29 Scandinavian Kitchen Ideas for a Functional Minimalist Space
These Scandinavian kitchen ideas have captured the hearts of homeowners and renters worldwide with their perfect blend of functionality and understated elegance. Born from the Nordic philosophy of lagom — just the right amount — these spaces prioritize clean lines, natural materials, and intelligent storage solutions that make daily cooking a joy rather than a chore.
What sets Scandinavian design apart is its unwavering commitment to practicality without sacrificing aesthetic appeal. Every element serves a purpose, from the streamlined cabinetry that maximizes every inch of space to the thoughtful lighting that transforms food preparation into a calming ritual. This approach creates kitchens that feel both spacious and intimate, modern yet timeless — and many ideas here work beautifully in rental apartments without permanent changes.
The signature palette of soft whites, warm woods, and muted grays reflects the Nordic landscape while providing a versatile canvas for personal expression. Whether you're refreshing a compact city apartment or designing a spacious family kitchen, these 29 Scandinavian kitchen ideas will guide you toward a space that embodies the Nordic ethos: beautiful simplicity that truly works.
Quick FAQ
What defines a Scandinavian kitchen?
Scandinavian kitchens blend minimalism with warmth, featuring clean lines, light color palettes, natural wood accents, and an emphasis on functionality. The design philosophy centers on hygge (coziness) and lagom (balance), creating spaces that are both practical for daily use and aesthetically pleasing.
How do I make my kitchen more functional?
Focus on the kitchen triangle (stove, sink, refrigerator), maximize vertical storage with floor-to-ceiling cabinetry, incorporate multi-functional islands, and ensure ample task lighting. Scandinavian design excels at hidden storage solutions that keep countertops clear while keeping essentials within easy reach.
What colors work best in Nordic kitchens?
The classic Scandinavian palette includes crisp whites, soft grays, warm beiges, and natural wood tones. These colors reflect natural light, making spaces feel larger and brighter. Accent colors like dusty blue, sage green, or muted terracotta can add personality while maintaining the serene atmosphere.
Are Scandinavian kitchens expensive to create?
Not necessarily. While high-end Scandinavian kitchens can be costly, the style's emphasis on simplicity actually makes it budget-friendly. Focus on quality basics: flat-panel cabinets in white or wood, simple hardware, open shelving instead of upper cabinets, and affordable materials like butcher block countertops. The key is thoughtful curation rather than expensive purchases.
As an Amazon Associate I earn from qualifying purchases.
Table of Contents
- 1. All-White Foundation with Open Shelving
- 2. Light Wood Cabinetry with Integrated Handles
- 3. Minimalist Hardware in Matte Finishes
- 4. Open Shelving Display for Ceramic Collections
- 5. Functional Island with Built-In Storage
- 6. Floating Shelves for Airy Storage
- 7. Under-Cabinet Lighting for Task Clarity
- 8. Butcher Block Countertops for Warmth
- 9. Hidden Appliances Behind Panel Doors
- 10. Pegboard Organization System
- 11. Large Format Tile Backsplash
- 12. Floor-to-Ceiling Pantry Storage
- 13. Breakfast Nook with Built-In Banquette
- 14. Pendant Lighting Over Work Zones
- 15. Magnetic Knife Strip and Utensil Bar
- 16. Two-Tone Cabinet Design
- 17. Window Seat with Storage Beneath
- 18. Minimalist Faucet in Brushed Metal
- 19. Glass Front Cabinet Sections
- 20. Roll-Out Pantry Drawers
- 21. Induction Cooktop for Clean Lines
- 22. Herb Garden Window Box
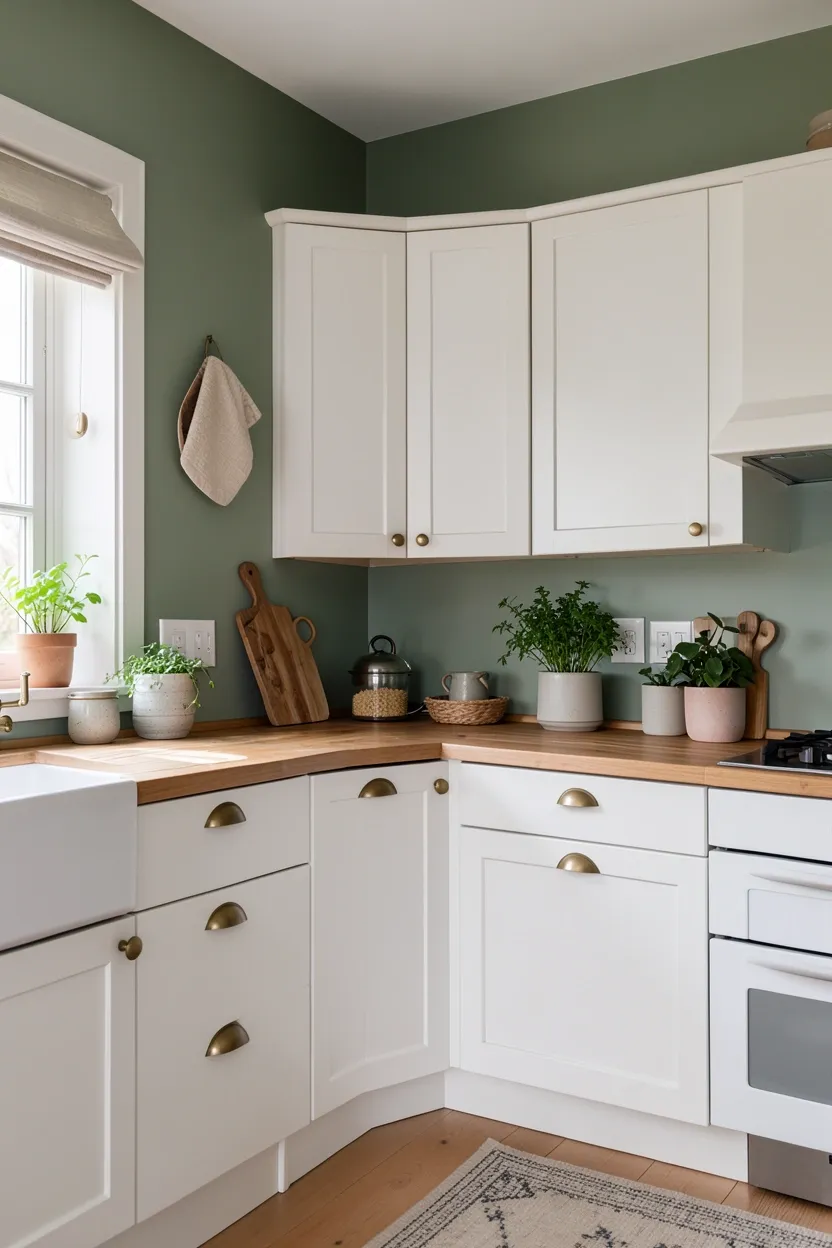
- 23. Corner Cabinet Solutions
- 24. Matte Black Accents for Contrast
- 25. Freestanding Kitchen Island
- 26. Wall-Mounted Pot Rack
- 27. Soft-Close Drawers Throughout
- 28. Integrated Dining Counter
- 29. Scandinavian-Inspired Color Pops
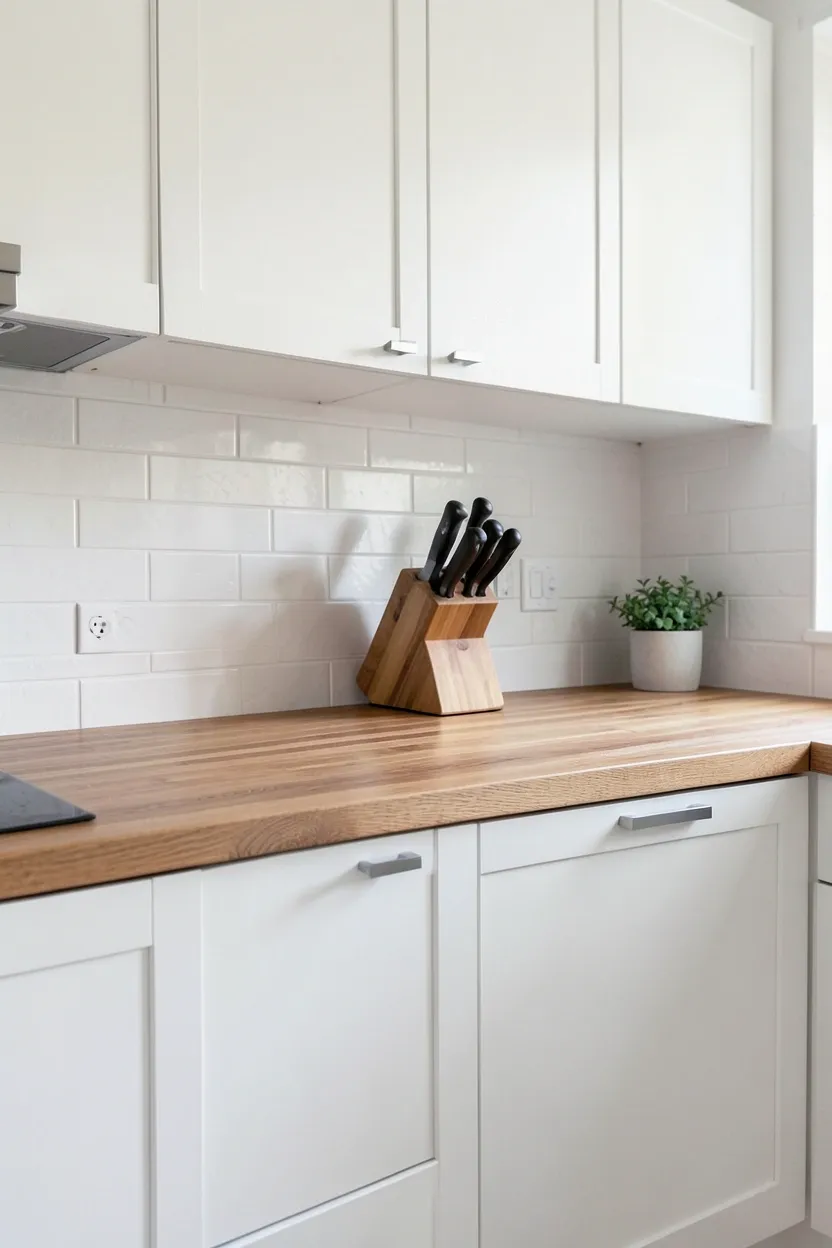
1. All-White Foundation with Open Shelving
An all-white kitchen forms the quintessential Scandinavian canvas, creating a bright, expansive feeling that maximizes natural light throughout the day. This approach eliminates visual clutter and provides a serene backdrop that lets your cookware and fresh ingredients become the stars of the space. The addition of open shelving introduces warmth and personality while maintaining the airy aesthetic that defines Nordic design.
The magic of this combination lies in the balance between concealed and displayed storage. Lower cabinets hide the inevitable kitchen chaos — cleaning supplies, bulky appliances, and everyday essentials — while open shelves showcase your favorite ceramic bowls, wooden cutting boards, and potted herbs. This visual rhythm keeps the kitchen feeling organized yet lived-in, practical yet beautiful.
When planning your shelving, consider asymmetrical arrangements that feel curated rather than rigid. Mix floating shelves of varying depths: deeper shelves (10-12 inches) for plates and serving pieces, narrower ledges (6-8 inches) for spice jars and small plants. The key is editing ruthlessly — display only what you use regularly and love aesthetically.
For more timeless white kitchen inspiration, explore our 17 Timeless White Kitchen Ideas that pair beautifully with Scandinavian aesthetics.
Design Do's: Use the same white shade for cabinets, walls, and ceiling to create seamless flow. Add warmth through natural wood shelving and copper or brass accents.
Common Mistake: Displaying too many items on open shelves creates visual clutter. Follow the rule of thirds: one-third open space, one-third functional items, one-third decorative touches.
Best for: Small kitchens that need to feel larger, homes with abundant natural light, and anyone who appreciates minimal visual noise.
What this gives you: A kitchen that feels twice as large while showcasing your personality through carefully curated displays.
2. Light Wood Cabinetry with Integrated Handles
Light wood cabinetry brings the organic warmth of Nordic forests directly into your kitchen, creating an immediate sense of calm and connection to nature. Oak, birch, and ash in their natural finishes showcase beautiful grain patterns while maintaining the pale, reflective quality essential to Scandinavian spaces. The integrated handle design — also known as J-pull or channel grips — eliminates visual interruptions, creating sleek, uninterrupted lines that define modern Scandinavian aesthetics.
Recommended
Items for this idea
This handle-free approach isn't merely about looks; it's profoundly practical. Without protruding hardware, cabinet faces are easier to clean, less likely to catch on clothing, and safer in tight spaces. The integrated grip runs along the top edge of lower cabinets and the bottom edge of uppers, providing intuitive access points that feel natural after just a few uses. Children and elderly family members especially appreciate the ease of opening.
Placement note: Position the channel grip 2-3 inches from the edge for optimal ergonomics. The groove should be deep enough for comfortable finger placement (approximately 0.75 inches) without compromising cabinet structural integrity.
The wood tone you choose significantly impacts the room's atmosphere. White oak offers a slightly warmer, more golden hue that pairs beautifully with brass accents. Birch provides a cooler, more contemporary feel that works well with chrome or black hardware elsewhere. Ash strikes a middle ground with prominent grain patterns that add subtle texture without overwhelming the minimalist palette.
- Wood selection: Choose quarter-sawn white oak for the most stable, warp-resistant cabinets with beautiful ray fleck patterns
- Finish matters: Opt for clear matte sealants rather than glossy varnishes that can look dated and highlight fingerprints
- Contrast strategy: Pair light wood bases with white upper cabinets to maintain brightness while grounding the space
- Maintenance hack: Wipe wood cabinets monthly with a mixture of warm water and mild dish soap, followed by immediate drying
What this gives you: Cabinets that age gracefully, developing a beautiful patina while maintaining their clean, modern silhouette for decades.
3. Minimalist Hardware in Matte Finishes
When simplicity reigns supreme, every detail matters — and minimalist hardware in matte finishes exemplifies the Scandinavian commitment to understated elegance. These small but significant elements bridge the gap between pure functionality and refined aesthetics, proving that even the most utilitarian components can contribute to a cohesive design vision. Matte black, brushed brass, and satin nickel finishes absorb rather than reflect light, creating subtle definition without visual noise.
The beauty of minimalist hardware lies in its ability to recede visually while performing admirably. Bar pulls in slim profiles (half-inch diameter or less) offer excellent grip for all hand sizes while maintaining the clean lines essential to Nordic design. Knobs with geometric precision — cylinders, spheres, or subtle cones — provide tactile satisfaction without ornamental excess. The matte finish conceals fingerprints and water spots far better than polished alternatives, a practical consideration in hardworking kitchens.
Why it works: Scandinavian design philosophy treats every element as part of a holistic system. When cabinets feature simple slab or shaker doors, ornate hardware would create jarring contrast. Minimalist pieces extend the visual language of clean planes and right angles, creating harmony between form and function. The matte finish specifically softens the industrial edge that metallic hardware can introduce, maintaining the warm, welcoming atmosphere central to hygge.
Budget & Time: Quality minimalist hardware ranges from $8-25 per piece. Plan for 2-3 hours of installation for a standard kitchen. This is an excellent DIY upgrade that transforms existing cabinets without renovation costs.
Pro Tip: Install hardware at consistent heights: 2.5-3 inches from the bottom edge of upper cabinets, 2.5-3 inches from the top edge of base cabinets. Use a template to ensure perfect alignment.
Design Fix: If your matte hardware shows wear over time, embrace it as part of the lived-in Scandinavian aesthetic, or easily replace individual pieces without disturbing the overall design.
What this gives you: Hardware that performs beautifully while remaining visually quiet, allowing cabinetry and spatial flow to take center stage.
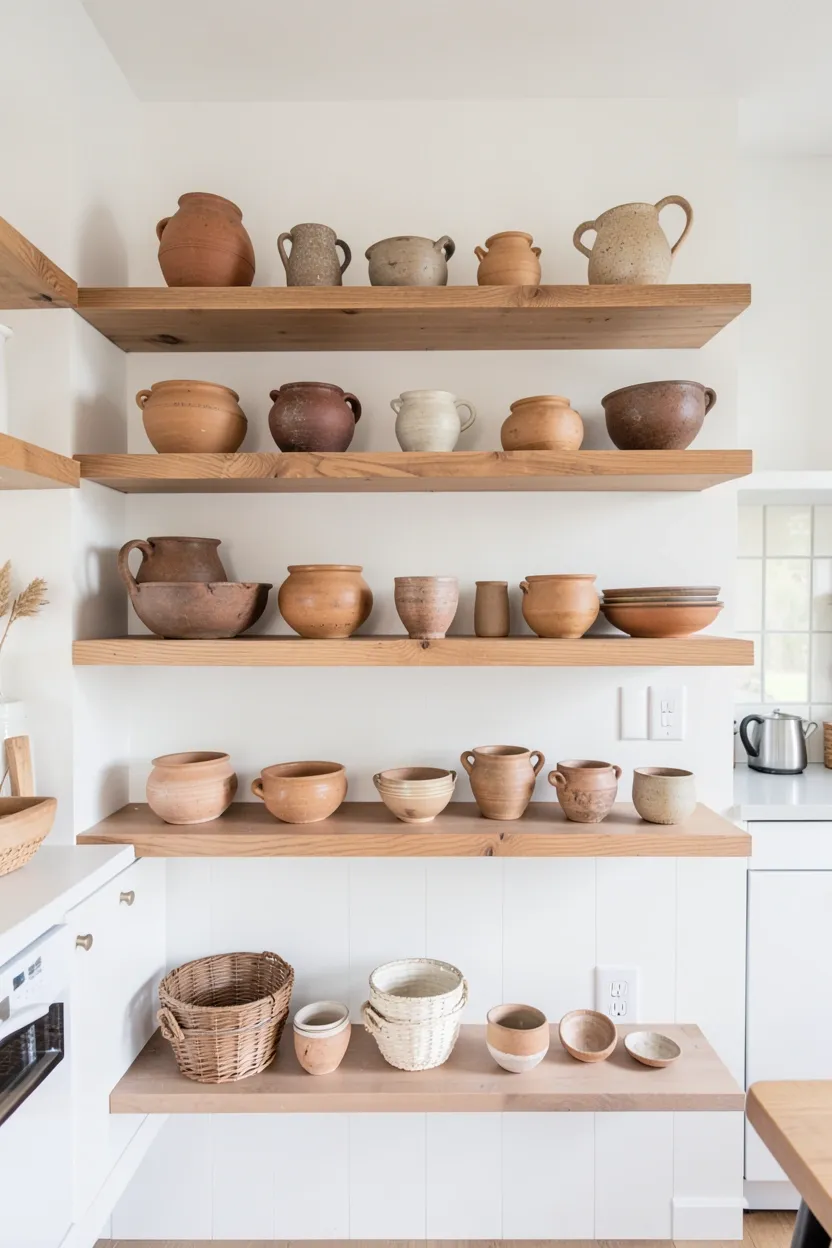
4. Open Shelving Display for Ceramic Collections
Transform everyday dishware into artful displays with strategically designed open shelving that celebrates the beauty of handmade ceramics, artisan pottery, and thoughtfully curated kitchen essentials. This approach embodies the Scandinavian principle of surrounding yourself with objects that are both useful and beautiful — functional items become decorative elements, eliminating the need for separate display pieces while keeping frequently used items within easy reach.
Recommended
Items for this idea
The key to successful open shelving lies in intentional curation rather than random accumulation. Scandinavian homes often feature collections of handmade ceramics in earthy tones — cream, terracotta, soft gray, and natural clay — that create visual cohesion even when pieces vary in shape and size. Wooden cutting boards in different grains lean against the backsplash, adding vertical interest and natural warmth. Glass jars containing grains, pasta, or colorful spices contribute both practical storage and pops of intentional color.
Common mistake: Many homeowners install open shelves then fill them haphazardly with mismatched items, creating visual chaos rather than curated beauty. The Scandinavian approach requires editing: choose a limited color palette (three to four complementary tones), vary heights and textures deliberately, and leave breathing room between groupings. Negative space is as important as the objects themselves.
For more display inspiration, see how Cottage Kitchens use open shelving to blend rustic charm with modern functionality.
- Shelf styling formula: Group items in odd numbers (3 or 5), vary heights within each grouping, and create visual triangles across the entire shelf arrangement
- Practical placement: Keep everyday dishes at eye level (48-60 inches from floor), special occasion pieces higher, and heavy items lower for safety
- Lighting enhancement: Install LED strip lighting under each shelf to illuminate displays and provide ambient evening glow
What this gives you: A kitchen that reflects your personal aesthetic while keeping essentials accessible, merging art gallery curation with practical daily function.
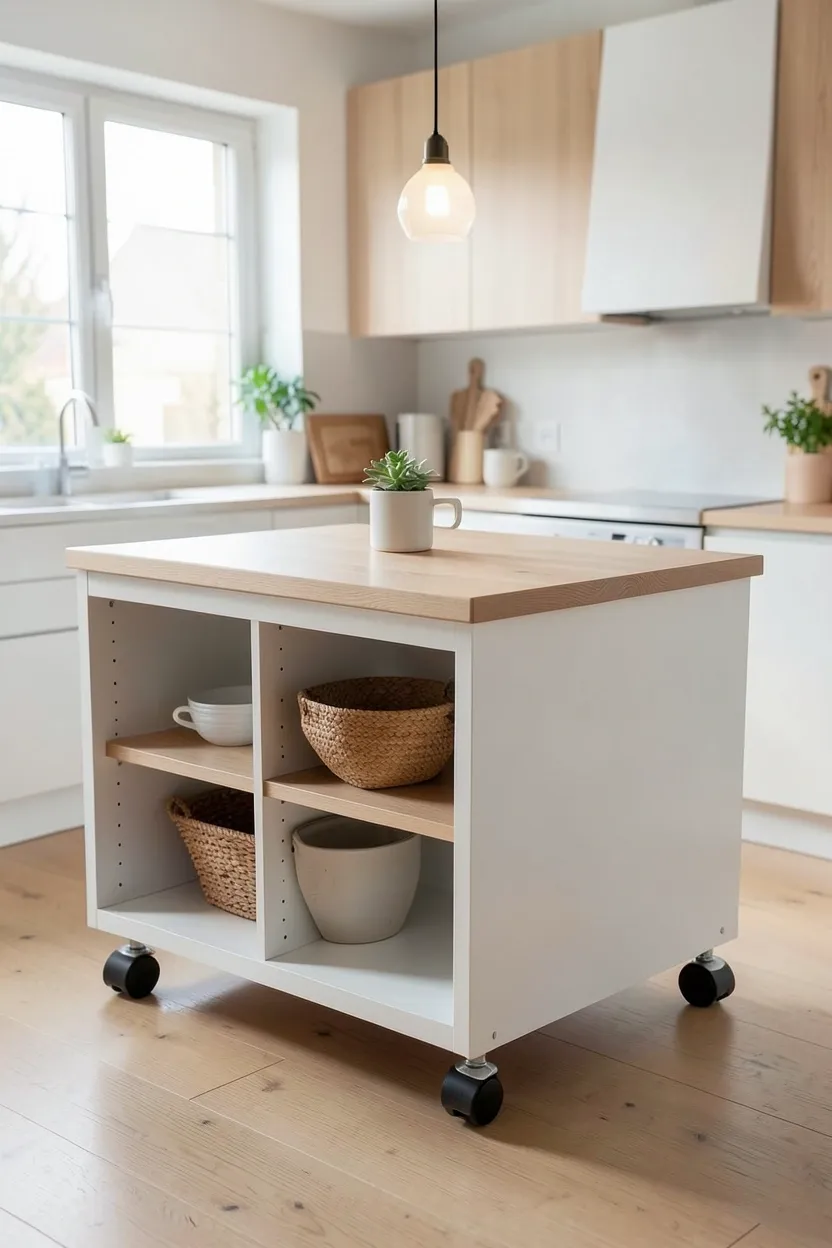
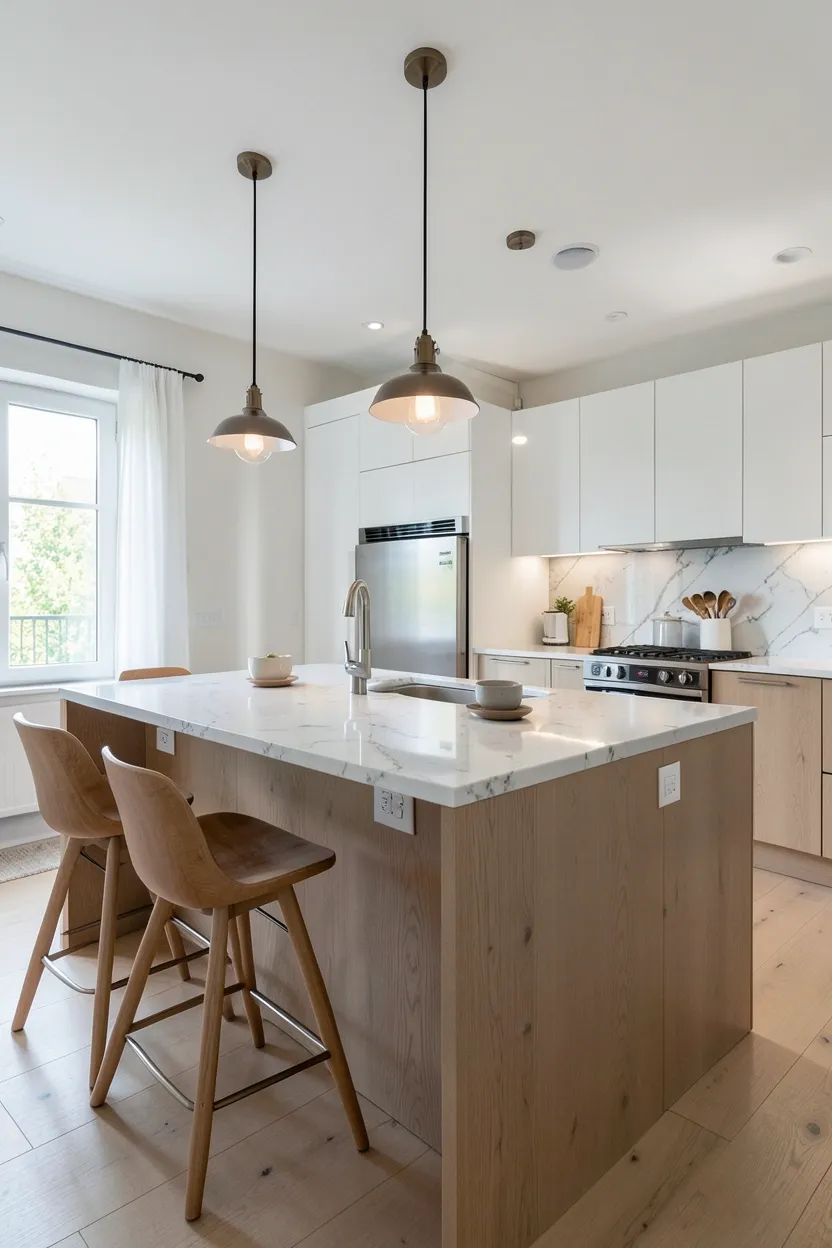
5. Functional Island with Built-In Storage
The kitchen island serves as the command center of Scandinavian culinary spaces, but in true Nordic fashion, it must earn its footprint through exceptional functionality. A well-designed island provides additional prep surface, casual dining space, and — most importantly — abundant storage that addresses the specific needs of your cooking routine. Every cubic inch matters, from deep drawers for pots and pans to specialized compartments for cutting boards and baking sheets.
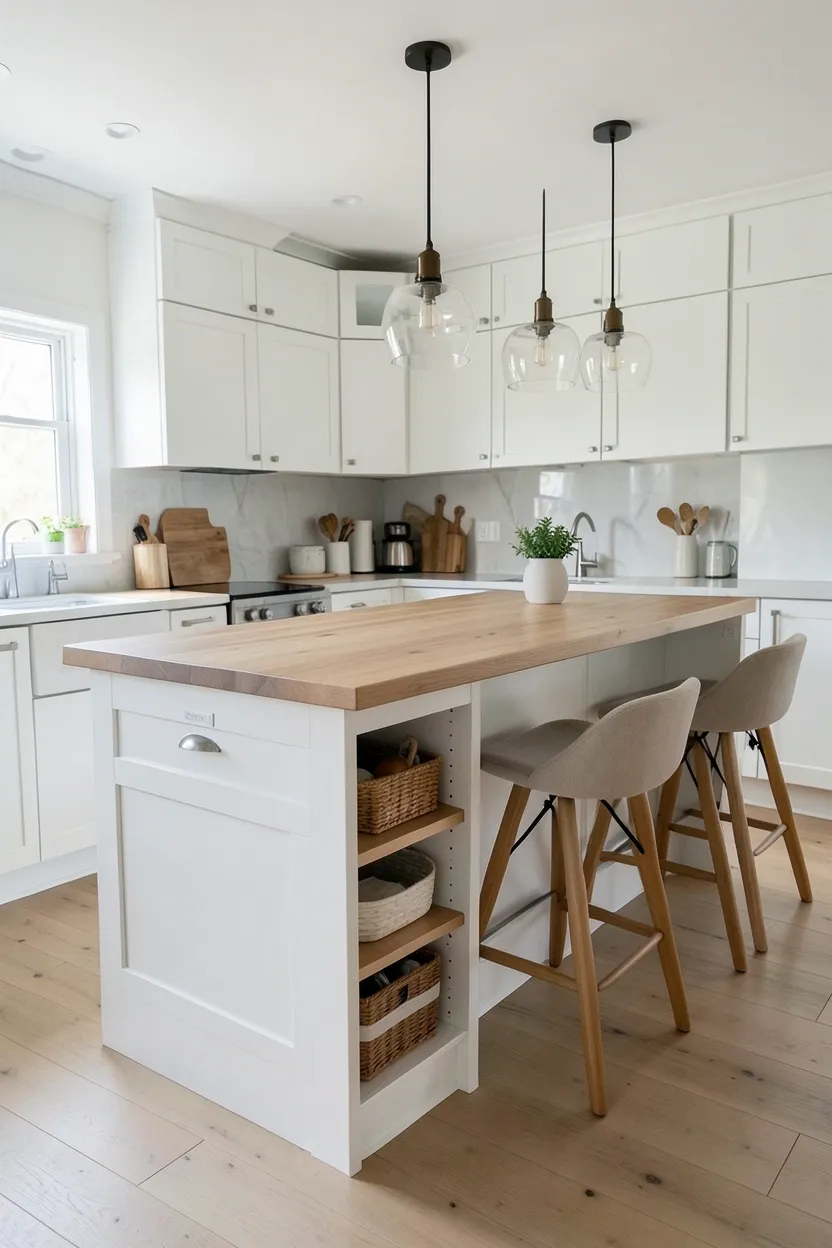
What distinguishes Scandinavian island design is the seamless integration of storage solutions that disappear behind clean facades. Deep drawers with dividers keep utensils organized and accessible without countertop clutter. Pull-out shelves transform awkward corner spaces into useful storage for small appliances. Vertical slots accommodate trays, platters, and sheet pans that otherwise consume precious cabinet space. The exterior maintains minimalist simplicity while the interior reveals thoughtful complexity.
The countertop material deserves careful consideration, as this surface handles everything from vegetable prep to homework sessions. Butcher block provides warmth and can be sanded and resealed when worn, embracing the Scandinavian appreciation for materials that age gracefully. Quartz offers durability and stain resistance with subtle patterning that complements Nordic palettes. Concrete, while heavier, provides industrial edge that contrasts beautifully with light wood cabinetry.
Avoid if: Your kitchen is less than 10 feet wide — an island requires 36-48 inches of clearance on all sides for comfortable movement and appliance door swing.
If you have a small kitchen: Consider a rolling island or peninsula that provides flexibility rather than a fixed installation.
If you entertain frequently: Include a wine fridge or beverage drawer in your island design for self-sufficient hosting.
If you bake often: Dedicate a lower drawer to stand mixer storage with an integrated electrical outlet for countertop-level appliance garages.
What this gives you: A multifunctional centerpiece that doubles your usable workspace while concealing the organized chaos of a well-equipped kitchen.
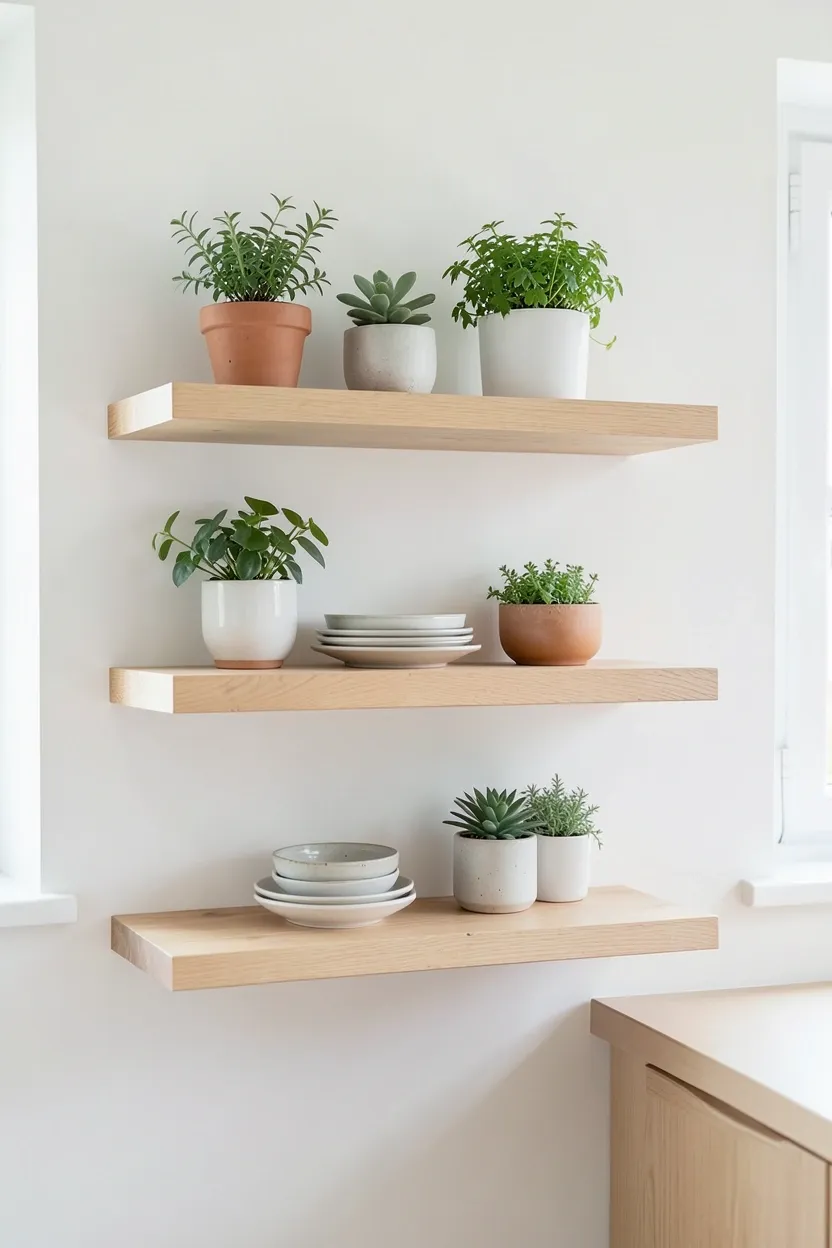
6. Floating Shelves for Airy Storage
Floating shelves epitomize the Scandinavian commitment to visual lightness, creating the illusion that your storage solutions defy gravity. These sleek ledges appear to hover against the wall, eliminating the visual weight of brackets and supports while providing practical storage for everyday essentials. In Nordic kitchens, where maximizing natural light is paramount, floating shelves allow light to flow uninterrupted across wall surfaces, enhancing the spacious, airy feeling that defines the style.
Recommended
Items for this idea
The installation method determines both appearance and capacity. True floating shelves use hidden brackets anchored directly into wall studs, creating the cleanest look but requiring precise placement. For heavier loads, consider floating shelf systems with minimal visible hardware that provides substantial support while maintaining the streamlined aesthetic. Wood thickness matters: 1.5-2 inches provides visual substance without appearing clunky, while thinner profiles (0.75-1 inch) suit smaller kitchens or more delicate displays.
Why it works: By removing visual barriers at eye level, floating shelves expand perceived space significantly. The continuous wall plane draws the eye upward, emphasizing ceiling height and room volume. This vertical expansion compensates for the horizontal space that wall cabinets consume, creating a more open, gallery-like atmosphere that transforms even modest kitchens into architectural statements.
- Weight capacity: Install into studs for loads up to 50 pounds per shelf; use toggle bolts for lighter displays between studs
- Styling strategy: Alternate between practical storage (everyday dishes) and decorative moments (plants, art, candles)
- Spacing formula: Leave 12-15 inches between shelves to accommodate plates, bowls, and medium-sized plants
- End grain detail: Choose shelves with visible end grain for organic warmth, or mitered corners for contemporary precision
What this gives you: Storage that maximizes vertical space while minimizing visual intrusion, creating an expansive, gallery-like kitchen atmosphere.
7. Under-Cabinet Lighting for Task Clarity
Proper illumination transforms kitchen work from a strain into a pleasure, and under-cabinet lighting provides the focused brightness essential for safe food preparation while contributing to the layered lighting scheme that Scandinavian design demands. These discreet fixtures nestle beneath upper cabinets, casting even, shadow-free light across countertops where you chop vegetables, read recipes, and plate finished dishes. The result is both practical enhancement and ambient beauty.
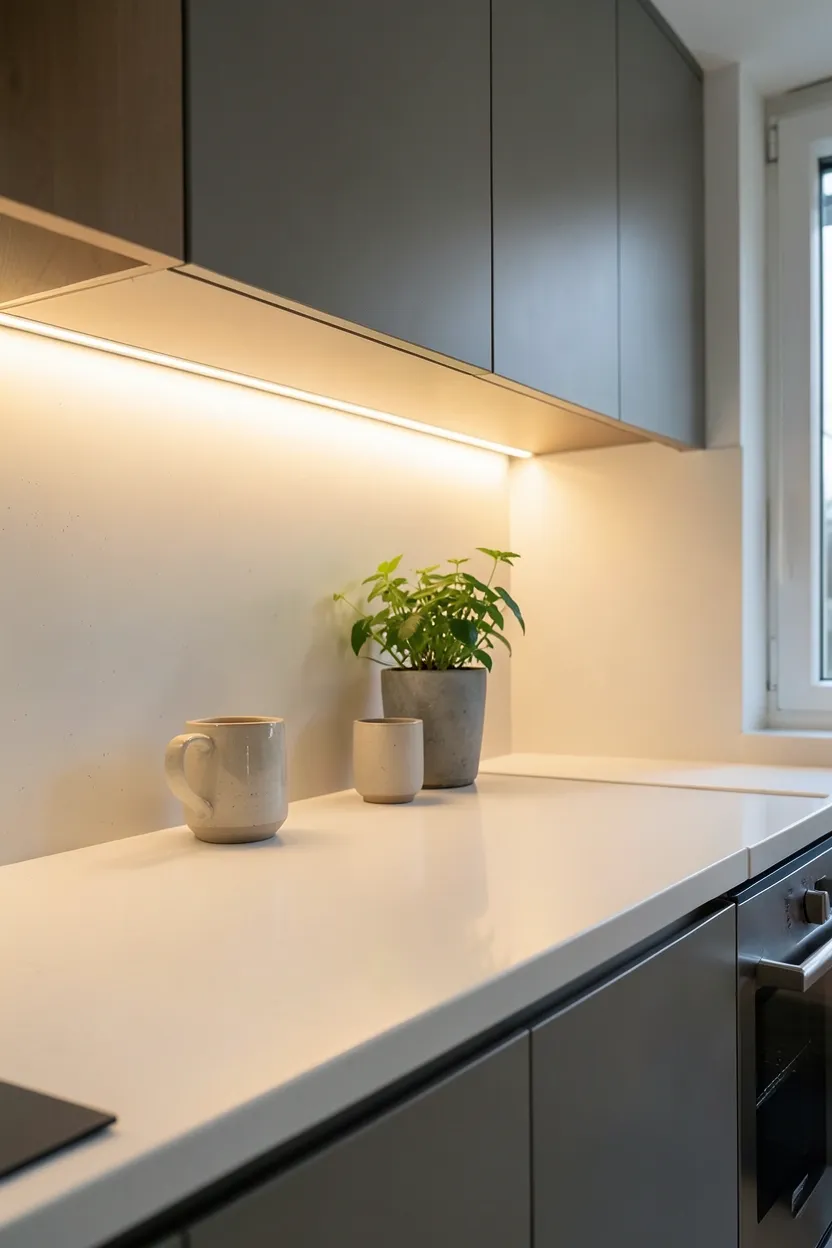
LED strip lighting has revolutionized under-cabinet illumination, offering slim profiles (as thin as 0.25 inches), minimal heat output, and remarkable energy efficiency. Warm white (2700-3000K) mimics natural daylight and complements the warm wood tones common in Scandinavian kitchens. Cooler temperatures (3500-4000K) provide crisp clarity for detailed tasks but can feel clinical if used exclusively. Dimmable systems allow transition from bright task lighting to subtle evening ambiance with a single adjustment.
Placement note: Position LED strips 2-3 inches from the front edge of upper cabinets to avoid glare while maximizing countertop coverage. For even illumination across deep counters (24+ inches), consider dual strips: one near the front edge and one near the back wall.
Common mistake: Many homeowners install under-cabinet lighting too far back, creating harsh shadows at the counter's front edge where most work occurs. Others choose overly bright fixtures that create uncomfortable glare when seated at adjacent dining areas. Test placement and brightness before permanent installation, using temporary battery-powered options to evaluate positioning.
Do: Install on a separate switch from overhead lighting to create layering options. Use motion sensors for automatic activation when hands are full.
Don't: Use exposed bulb fixtures that create hot spots and harsh shadows. Avoid color-changing RGB strips that clash with Scandinavian simplicity.
What this gives you: Perfect visibility for detailed tasks while creating a warm, welcoming glow that transforms evening kitchens into inviting spaces.
8. Butcher Block Countertops for Warmth
Butcher block countertops introduce the organic warmth of natural wood into Scandinavian kitchens, creating a tactile, inviting surface that softens the potential coolness of white cabinetry and stainless steel appliances. These substantial wood surfaces — typically 1.5-2 inches thick — bring literal and figurative warmth to the heart of your home, developing a rich patina over time that tells the story of countless meals prepared and shared. Unlike stone or synthetic materials, wood feels alive under your hands, responsive and forgiving.
Recommended
Items for this idea
The Scandinavian approach to butcher block emphasizes simplicity and functionality over ornate detailing. Edge grain construction (strips glued side-by-side) offers excellent durability for daily use at a moderate price point. End grain (wood pieces standing vertically) creates distinctive checkerboard patterns that are remarkably knife-friendly, though more expensive. Both options benefit from regular oiling with food-safe mineral oil or specialized butcher block conditioner to prevent drying and cracking.
Wood species selection impacts both appearance and performance. Hard maple provides the hardest, most durable surface with subtle, creamy grain. Oak offers more pronounced character and withstands heavy use beautifully. Walnut brings rich, chocolate tones that contrast strikingly with pale Scandinavian palettes. Birch presents an affordable, light-colored option that aligns perfectly with Nordic aesthetics, though it requires slightly more diligent maintenance.
Rental note: If you can't replace countertops, consider large butcher block cutting boards (24x36 inches or larger) placed strategically over existing surfaces to achieve the aesthetic without permanent changes.
- Daily care: Wipe spills immediately; never let water pool on the surface
- Monthly maintenance: Apply food-safe mineral oil liberally; let absorb overnight; wipe excess
- Annual refresh: Sand away stains or cuts with 220-grit sandpaper, then re-oil thoroughly
- Avoid: Placing hot pots directly on wood; use trivets to prevent scorch marks
What this gives you: A living surface that improves with age, bringing natural warmth and authentic character that manufactured materials cannot replicate.
9. Hidden Appliances Behind Panel Doors
The Scandinavian pursuit of visual calm extends to appliance integration, where refrigerators, dishwashers, and even microwaves disappear behind cabinetry panels that match surrounding doors. This approach eliminates the visual clutter of mismatched stainless steel, black glass, and white enamel, creating a seamless wall of uniform surfaces that soothes the eye and simplifies the spatial experience. The kitchen becomes a cohesive architectural element rather than a collection of individual machines.
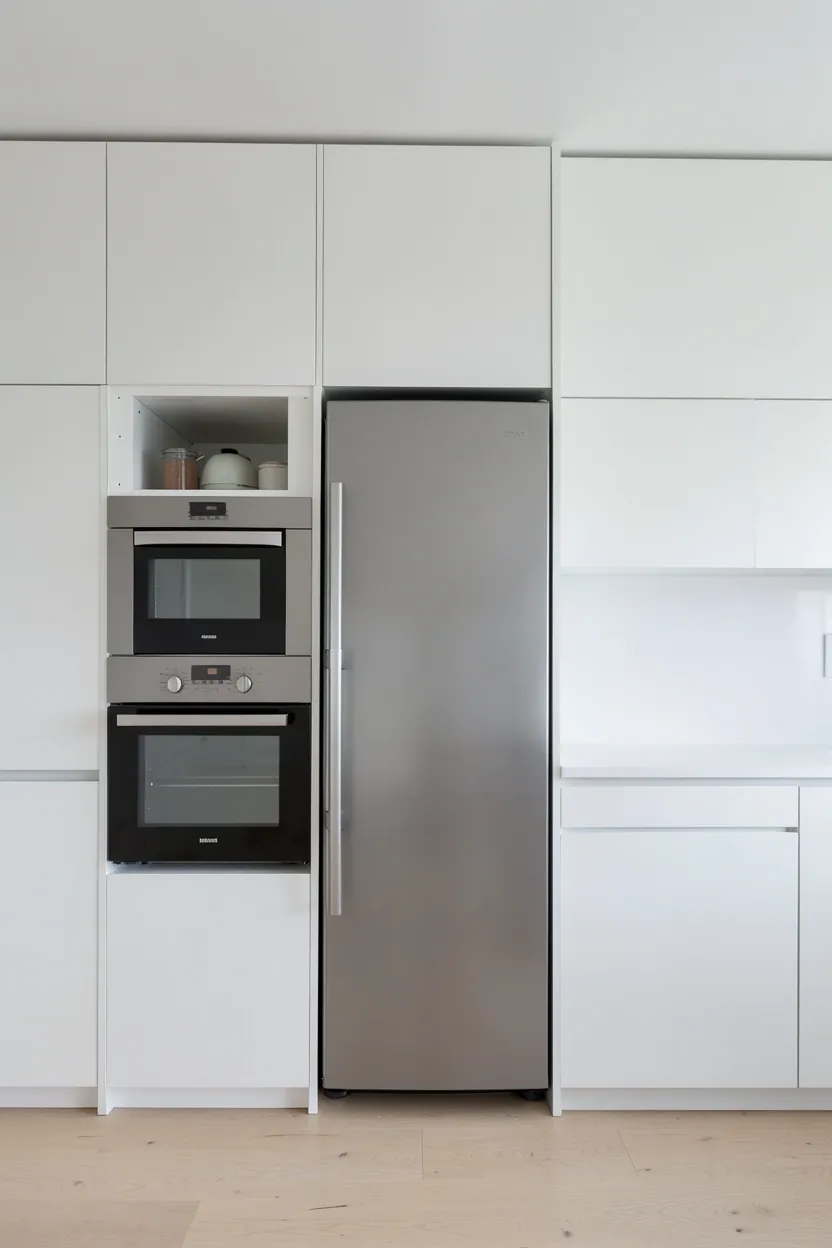
Panel-ready appliances are specifically designed for this integration, featuring flat fronts with attachment systems for custom cabinetry panels. Refrigerators with this capability accept 0.75-inch thick panels on doors and sides, transforming bulky appliances into elegant built-ins. Dishwashers slide behind drawer-like fronts that maintain countertop continuity. Some manufacturers even offer panel-ready ranges and ovens, though ventilation requirements make these less common.
The design impact extends beyond aesthetics to spatial perception. When appliances blend into walls, the kitchen feels larger and more intentional. The eye travels across uninterrupted planes rather than stopping at each appliance break. This visual continuity supports the Scandinavian emphasis on simplicity and order, creating environments that feel calm and controlled even during busy cooking sessions.
For kitchens where full integration isn't possible, consider Warm Minimalist Kitchen Ideas that blend appliances harmoniously without complete concealment.
Design Do: Use the same hardware on appliance panels as surrounding cabinetry to maintain consistent visual language.
Pro Tip: Ensure adequate ventilation gaps (as specified by manufacturers) to prevent overheating and maintain appliance efficiency.
Budget Alternative: If panel-ready appliances exceed your budget, choose appliances in a single finish (all stainless or all black) to minimize visual fragmentation.
What this gives you: A kitchen that feels intentionally designed as a unified space rather than assembled from disparate elements, maximizing both beauty and tranquility.
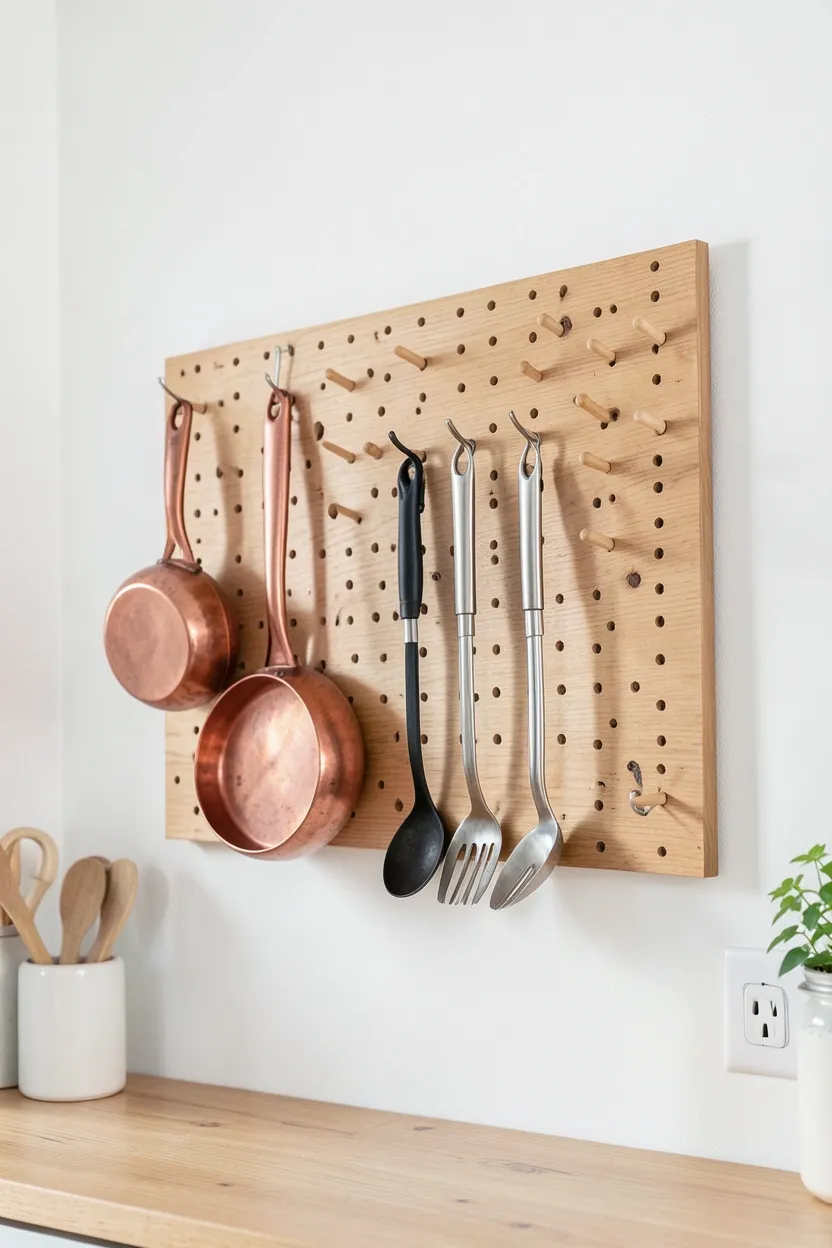
10. Pegboard Organization System
The humble pegboard undergoes a Scandinavian transformation when executed in natural wood with thoughtful spacing and intentional tool placement. This flexible organization system turns empty wall space into customizable storage for pots, pans, utensils, and even small plants, adapting as your needs evolve. Unlike fixed shelving or rigid cabinetry, pegboard offers infinite reconfigurability — move hooks, add baskets, or rearrange displays without tools or permanent changes.
Recommended
Items for this idea
Scandinavian pegboard installations favor natural birch or oak boards with simple wooden pegs rather than metal hooks, maintaining the warm, organic material palette central to Nordic design. The board itself becomes a textural element, adding visual interest to otherwise plain walls while serving practical purpose. White or pale gray painted pegboards offer a more contemporary interpretation that blends seamlessly with light kitchen palettes.
Why it works: Scandinavian design values adaptability and longevity over rigid perfection. Pegboard embodies these principles, allowing your storage to grow and change with your cooking habits. The visible organization also encourages tidiness — when everything has a designated spot, maintaining order becomes effortless. The system transforms utilitarian storage into an artistic display, proving that function and beauty need not be separate pursuits.
Budget & Time: A 4x4 foot custom pegboard costs $100-200 in materials and requires 3-4 hours to build and install. Pre-made systems range from $50-150 depending on size and material quality.
- Placement: Install at comfortable reaching height (center at 60-66 inches from floor) near prep and cooking zones
- Weight distribution: Use heavier hooks at bottom for pots, lighter arrangements above for utensils and tools
- Visual rhythm: Group similar items together; alternate between functional tools and decorative elements like dried herbs or small plants
- Spacing: Standard 1-inch hole spacing provides flexibility; 2-inch spacing offers stronger hold for heavy items
What this gives you: Infinitely adaptable storage that keeps essential tools visible and accessible while transforming blank walls into functional art installations.
11. Large Format Tile Backsplash
Large format tiles revolutionize kitchen backsplashes by eliminating the visual clutter of countless grout lines, creating instead expansive, serene surfaces that complement Scandinavian minimalism. These substantial tiles — typically 12x24 inches or larger — transform the wall behind your cooking area into a statement of calm sophistication, allowing the material's inherent beauty to take center stage. Fewer grout lines mean less visual interruption and easier cleaning, addressing both aesthetic and practical concerns simultaneously.
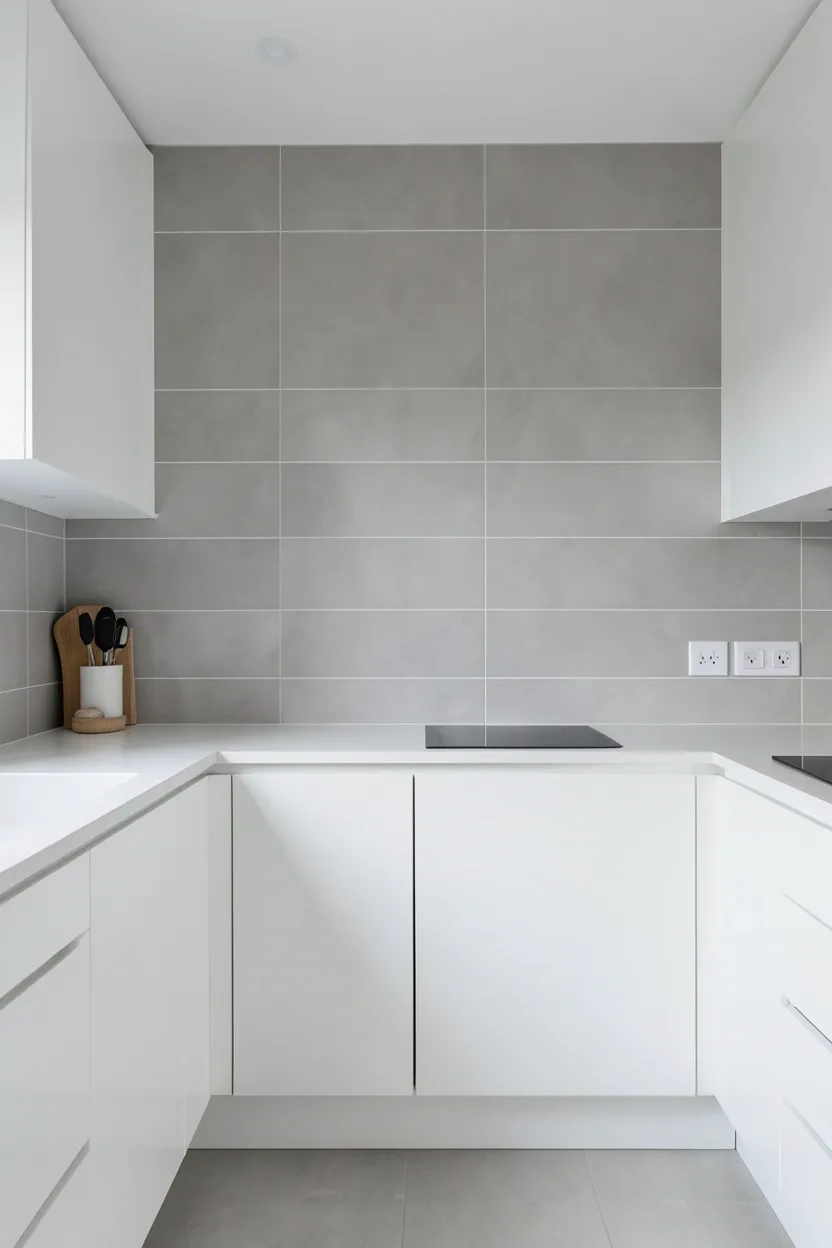
The Scandinavian palette favors tiles in soft whites, warm grays, and gentle beiges that harmonize with natural wood and white cabinetry. Matte finishes absorb light rather than reflecting it aggressively, maintaining the soft, diffused illumination essential to Nordic spaces. Textured tiles add subtle depth without overwhelming simplicity — think gentle waves, soft ripples, or barely-there linear patterns that catch light differently throughout the day.
Common mistake: Homeowners often select large format tiles without considering the importance of leveling. Uneven walls become glaringly obvious when large tiles can't flex to accommodate imperfections. Professional installation with proper substrate preparation is essential. Additionally, failing to use movement joints at appropriate intervals can lead to cracking as the house settles or temperature fluctuates.
- Grout selection: Choose grout colors that closely match the tile for seamless appearance; contrasting grout creates busy grid patterns that clash with Scandinavian simplicity
- Installation tip: Use a 1/16-inch grout line for the cleanest look; anything wider defeats the purpose of large format minimalism
- Sealing: Seal grout annually to prevent staining, especially behind cooking zones exposed to grease splatter
- Edge finishing: Use Schluter strips or bullnose tiles for clean edges rather than exposed cut tile sides
What this gives you: A backsplash that functions as minimalist art, providing easy-clean protection while contributing to visual serenity.
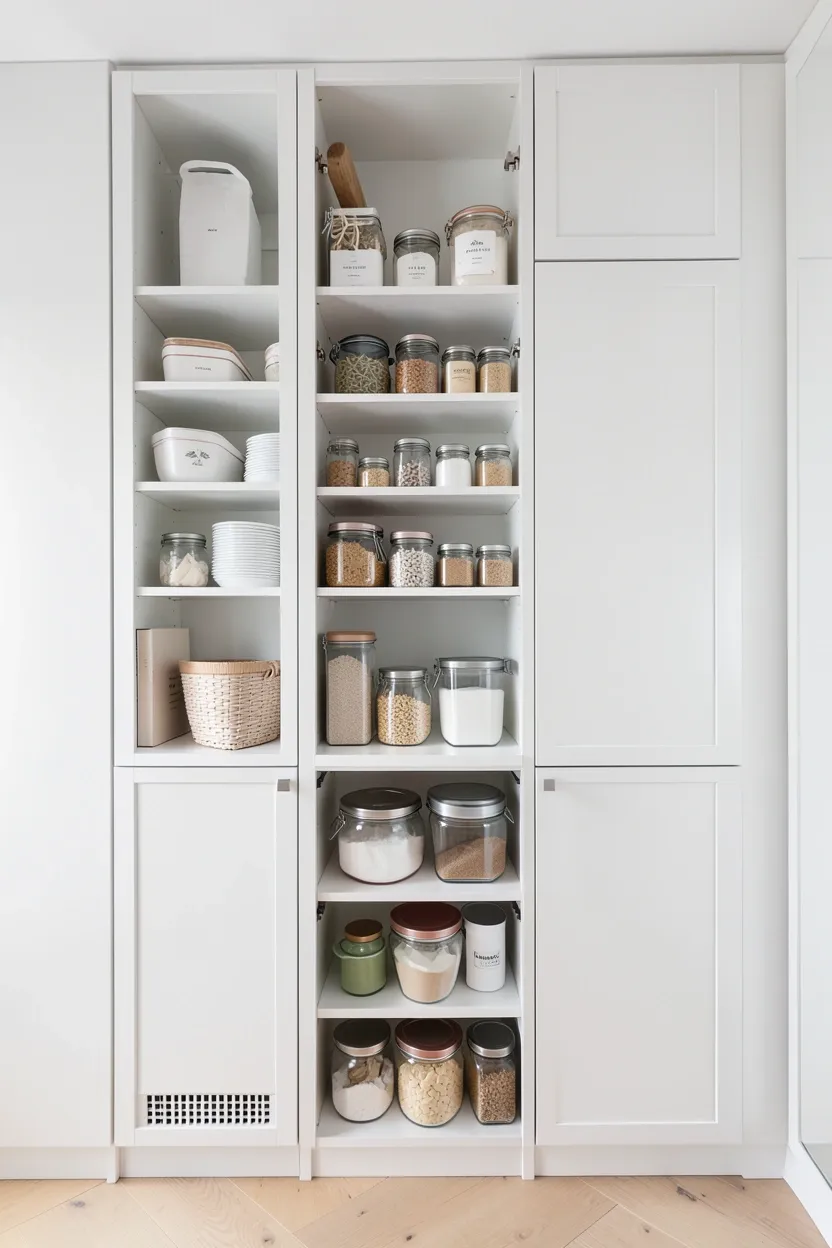
12. Floor-to-Ceiling Pantry Storage
A floor-to-ceiling pantry wall transforms a single kitchen section into a storage powerhouse that rivals walk-in pantries in capacity while maintaining the compact footprint essential to efficient design. This vertical solution maximizes every inch of available height, storing everything from bulk dry goods to small appliances in a beautifully organized display concealed behind sleek cabinet doors. When closed, the pantry wall presents as elegant built-in cabinetry; when open, it reveals the organizational logic that makes Scandinavian kitchens so functional.
Recommended
Items for this idea
Interior organization distinguishes exceptional pantries from basic storage. Adjustable shelving accommodates items of varying heights — tall cereal boxes, squat spice jars, oversized mixing bowls — evolving as your needs change. Pull-out drawers at counter height bring heavy items forward without lifting, while upper shelves store lightweight goods accessed via step stool. Door-mounted racks exploit previously wasted space for spices, oils, and small packages. The goal is visibility: everything should be seen and reachable without excavation.
The exterior treatment should match surrounding cabinetry exactly, including hardware, finish, and panel style. This integration maintains the kitchen's cohesive aesthetic while concealing the pantry's impressive capacity. Some designs incorporate appliance garages within the pantry wall, housing stand mixers, blenders, and coffee equipment with integrated electrical outlets for true countertop liberation.
Avoid if: Your ceiling height is less than 8 feet — floor-to-ceiling storage can feel overwhelming and impractical in low-ceiling spaces. Consider half-height solutions instead.
Pro organization tip: Use clear containers for dry goods to monitor inventory at a glance and maintain freshness. Label everything consistently for family harmony.
Lighting essential: Install LED strips vertically along both sides of the pantry interior to eliminate shadowy depths where items disappear from view.
Zone by frequency: Store daily-use items at eye and counter level; occasional-use items higher and lower; bulk storage in least accessible spots.
What this gives you: Pantry capacity that rivals dedicated rooms, organized for efficiency and concealed for visual tranquility.
13. Breakfast Nook with Built-In Banquette
A built-in banquette transforms awkward kitchen corners or unused wall space into intimate dining destinations that maximize seating while minimizing footprint. Unlike freestanding tables and chairs that require clearance on all sides, banquettes nestle against walls, reclaiming precious floor area for circulation. The Scandinavian approach emphasizes clean lines, comfortable cushioning, and integrated storage beneath seats — proving that even dining furniture should work as hard as the kitchen itself.

The design typically features an L-shaped or straight bench upholstered in durable, washable fabrics — think heavy linens, performance velvets, or leather in neutral tones that withstand daily use. The base often incorporates hinged lift-up seats or pull-out drawers revealing substantial storage for table linens, serving pieces, or seasonal items. This hidden capacity addresses the Scandinavian obsession with clutter concealment while keeping entertaining essentials close at hand.
Table selection completes the nook's functionality. Round tables encourage conversation and fit into tight spaces more gracefully than rectangular alternatives. Rectangular tables maximize seating along the banquette but require careful dimension planning. Leave 10-12 inches between bench back and table edge for comfortable entry, and ensure 12 inches of table overhang beyond the bench seat for leg clearance. The table height should align with standard dining dimensions (28-30 inches) with bench seats 17-19 inches high.
For small-space dining solutions, explore Modern Elegant Dining Room Ideas that blend seamlessly with Scandinavian kitchen aesthetics.
- Comfort calculation: Plan 24 inches of width per person for comfortable dining; 18 inches minimum for occasional use
- Back angle: Slight recline (5-10 degrees) dramatically improves comfort for extended seating
- Cushion depth: 18-20 inches provides adequate support without overwhelming the space
- Storage access: Choose gas-strut-assisted lift mechanisms for heavy bench lids that stay open hands-free
What this gives you: Intimate dining space that seats more people in less area while providing hidden storage for kitchen essentials.
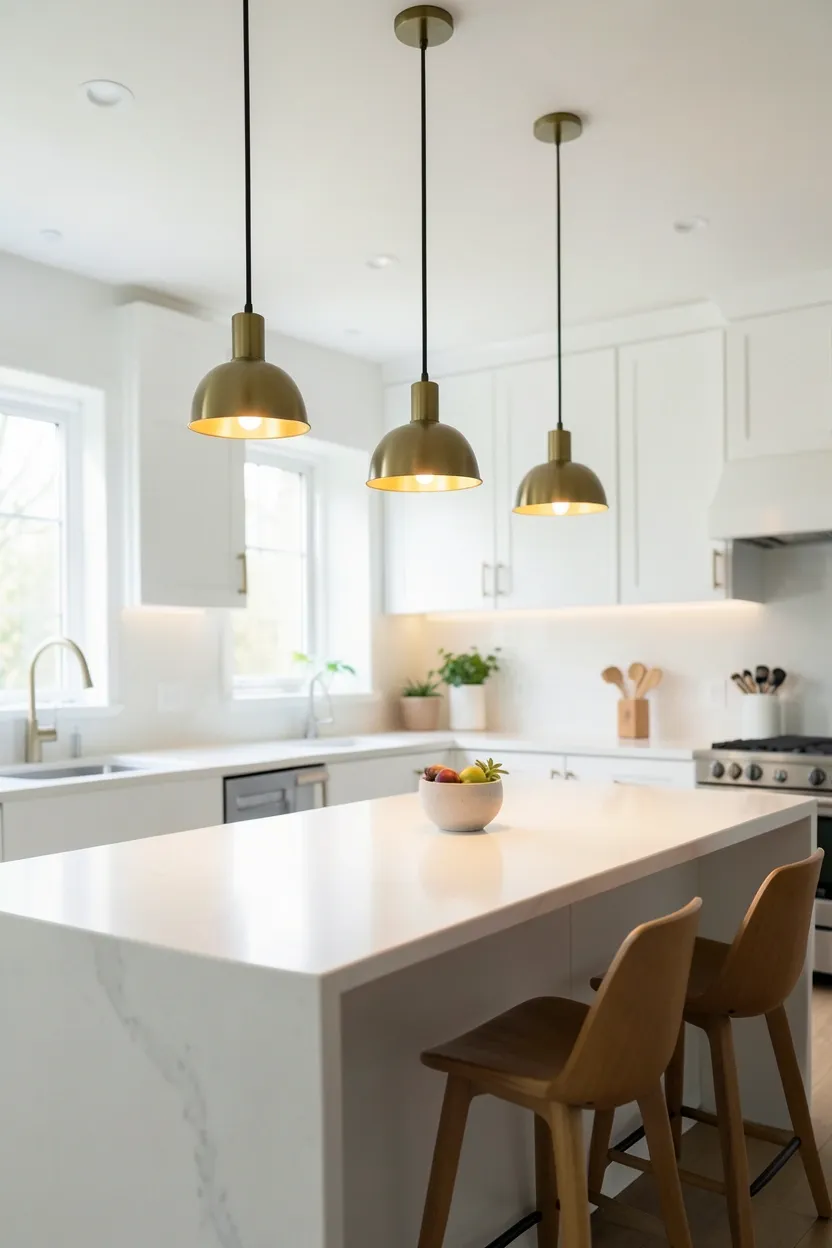
14. Pendant Lighting Over Work Zones
Pendant lighting serves as both functional task illumination and sculptural design element in Scandinavian kitchens, marking specific work zones while contributing to the layered lighting essential for comfortable spaces. These suspended fixtures draw the eye downward, defining islands, sinks, or dining areas as distinct destinations within the larger kitchen landscape. The Scandinavian approach favors simple geometric forms — spheres, cylinders, cones — in natural materials like brass, copper, or mouth-blown glass that add warmth without visual complexity.
Recommended
Items for this idea
Scale and proportion determine pendant success. Over an island or table, the bottom of the pendant should hang 30-36 inches above the surface — low enough for intimate ambiance and adequate task light, high enough to preserve sight lines across the space. The fixture diameter should relate to the surface below: approximately one-third the width of a dining table or island, or 10-12 inches in diameter for individual pendants spaced 24-30 inches apart in linear arrangements.
Why it works: Pendant lighting creates the "light pools" that make large kitchens feel intimate and human-scaled. By defining specific zones with focused illumination, you can dim or extinguish general overhead lighting while maintaining perfect visibility where needed. This layering allows the kitchen to transition from bright workspace to relaxed gathering place with simple adjustments. The fixtures themselves become jewelry for the room, adding personality without clutter.
Do: Install pendants on dimmer switches to adjust brightness for different activities and times of day.
Don't: Choose fixtures so large they dominate the space or so small they get lost visually. Test proportions with cardboard cutouts before purchasing.
Pro Tip: Use LED bulbs with high CRI (Color Rendering Index above 90) to ensure food looks appetizing and colors appear true.
What this gives you: Beautifully defined work zones with adjustable illumination that transforms kitchen atmosphere from task-focused to entertaining-ready.
15. Magnetic Knife Strip and Utensil Bar
Wall-mounted magnetic storage liberates drawer space while keeping essential tools visible and instantly accessible, embodying the Scandinavian principle that practical items can double as aesthetic elements when thoughtfully displayed. A magnetic knife strip transforms your blade collection into a linear art installation, while a coordinating utensil bar creates designated homes for frequently used tools. Both systems mount securely to walls or backsplash areas, reclaiming counter space and adding vertical interest to otherwise plain surfaces.
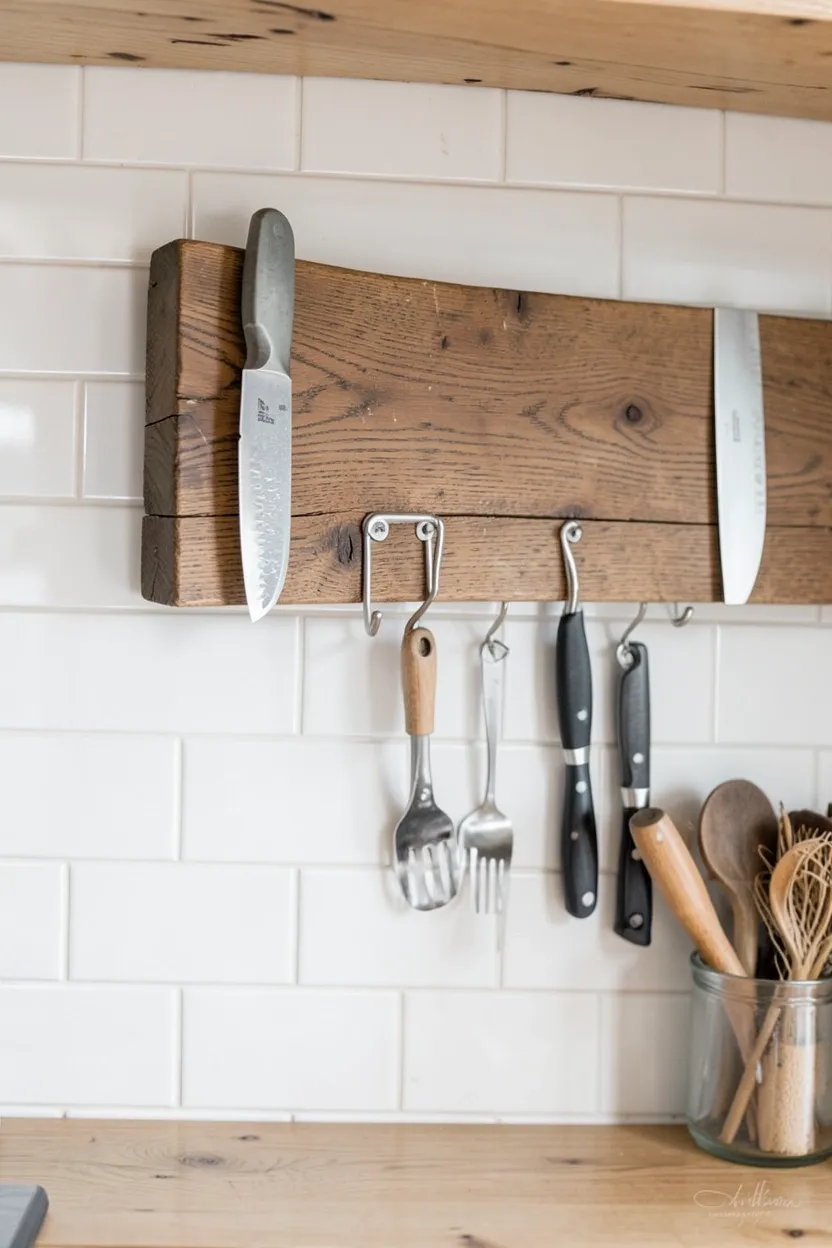
The Scandinavian interpretation favors natural materials — think oak, walnut, or beech wood strips with subtle magnetic inserts rather than industrial metal rails. These warmer interpretations integrate seamlessly with Nordic palettes while providing the same functional benefits. Wooden strips with routed grooves conceal the magnetic mechanism entirely, presenting only smooth timber surfaces that complement surrounding cabinetry and open shelving.
Safety considerations matter with exposed blade storage. Install knife strips at least 48 inches from the floor to keep sharp edges away from children, and ensure the magnetic strength adequately secures your heaviest knives. Position utensil bars within easy reach of primary cooking zones — typically 15-20 inches from the front edge of adjacent countertops. The goal is accessibility without obstruction; tools should be grab-and-go convenient but not in the way of active work surfaces.
Do: Install a continuous bar system that accommodates both knives and hanging utensils with S-hooks for maximum flexibility.
Don't: Mount magnetic strips near heat sources like stoves; temperature fluctuations can affect magnetic strength and damage knife handles.
Pro Tip: Alternate knife sizes along the strip for visual rhythm — place larger chef knives alongside smaller paring knives in an intentional pattern.
What this gives you: Freed drawer space and instant tool access while transforming practical storage into wall-mounted design elements.
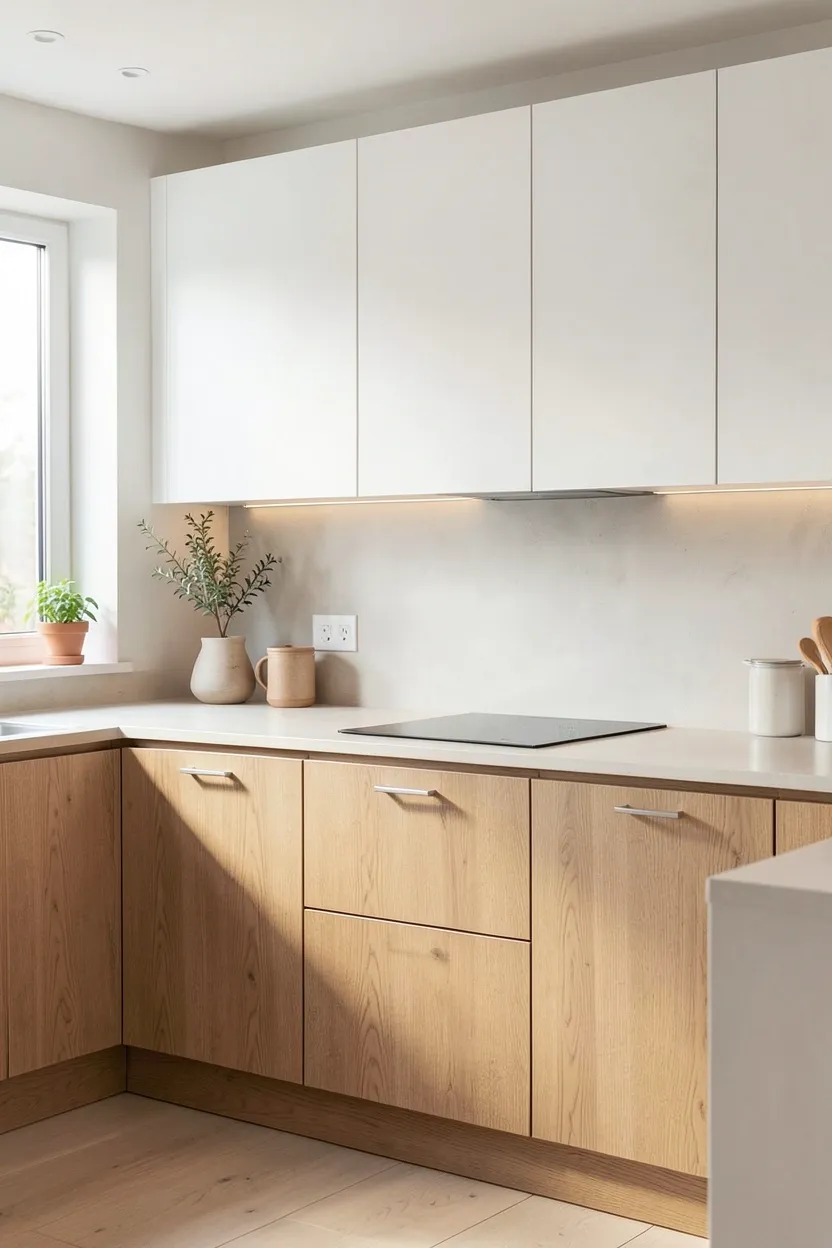
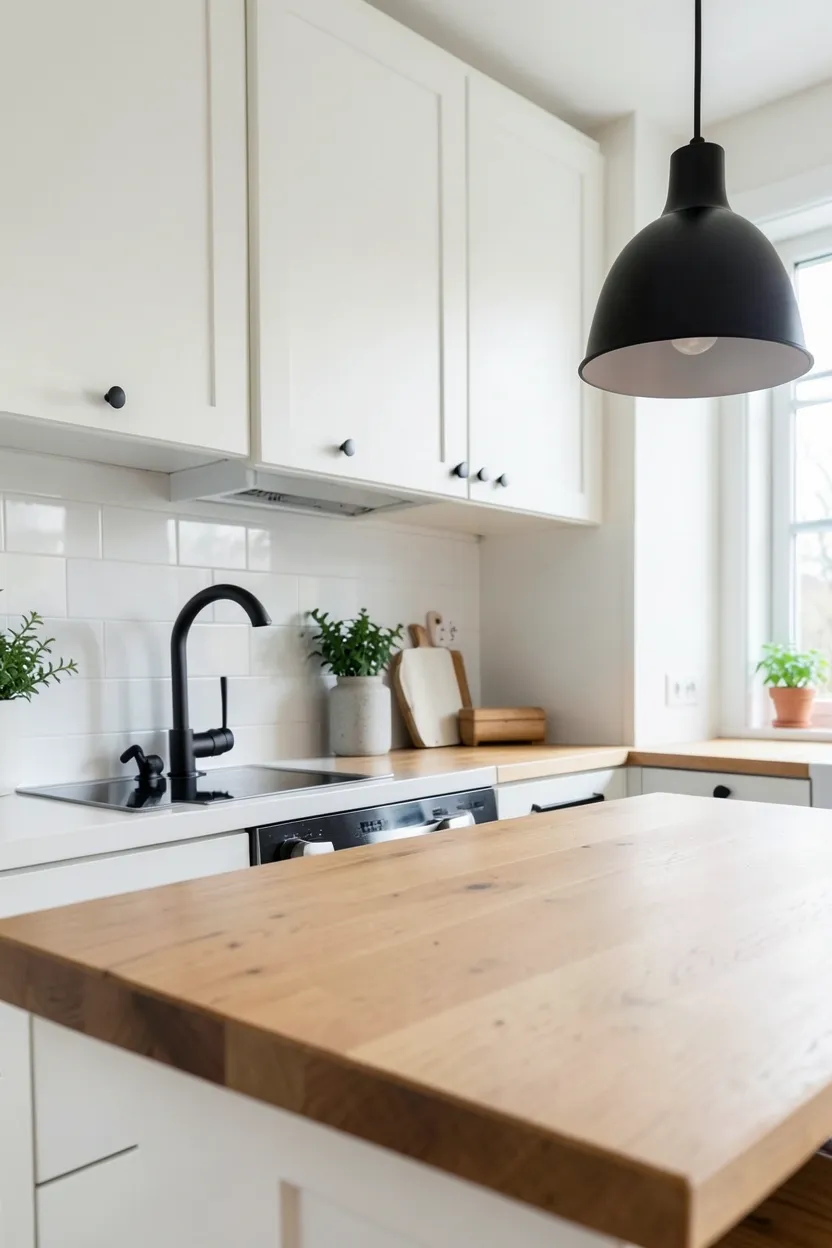
16. Two-Tone Cabinet Design
Two-tone cabinetry introduces sophisticated visual interest without abandoning the restrained palette essential to Scandinavian design. By contrasting white or pale gray upper cabinets with natural wood lowers, you create gentle definition that grounds the space while maintaining brightness above eye level. This approach honors Nordic practicality — lighter uppers recede visually and reflect light, while darker or wood-toned bases anchor the composition and conceal inevitable scuffs from daily use.
Recommended
Items for this idea
The key to successful two-tone design lies in proportion and material selection. The classic 60/40 split favors lighter tones (60%) with darker or wood elements (40%) maintaining airy dominance. Wood selections should remain pale — white oak, bleached walnut, or ash — rather than dramatic dark species that overwhelm Scandinavian subtlety. Paint colors should read as complex neutrals rather than stark contrasts; warm white paired with natural oak creates harmony, while pure white against cherry wood introduces jarring dissonance.
Why it works: This strategy acknowledges how we actually perceive kitchen spaces. Upper cabinets occupy peripheral vision and benefit from light tones that expand perceived space. Lower cabinets sit in our direct line of sight, welcoming the warmth and texture that natural wood provides. The division also offers practical flexibility — you might refresh painted uppers more frequently while allowing wood bases to develop character over decades.
Explore Elegant Modern Kitchen Ideas for additional two-tone inspiration that balances contemporary style with timeless appeal.
- Transition point: Align the color break with countertop height for natural visual logic
- Hardware consistency: Use identical hardware throughout to unify different cabinet finishes
- Island treatment: Repeat the lower cabinet wood tone on island bases for cohesive flow
- Avoid: High-contrast combinations (black and white) that feel more modern industrial than Scandinavian
What this gives you: Visual sophistication and practical durability without sacrificing the bright, airy feeling that defines Scandinavian spaces.
17. Window Seat with Storage Beneath
A window seat transforms underutilized kitchen wall space into a charming destination that combines seating, storage, and connection to outdoor views. In Scandinavian homes, where natural light is treasured and every square meter must earn its keep, these built-in benches exemplify multifunctional design. The seating provides casual dining or contemplative coffee moments, while hinged tops or pull-out drawers beneath reveal substantial storage for everything from cookbooks to seasonal serveware.
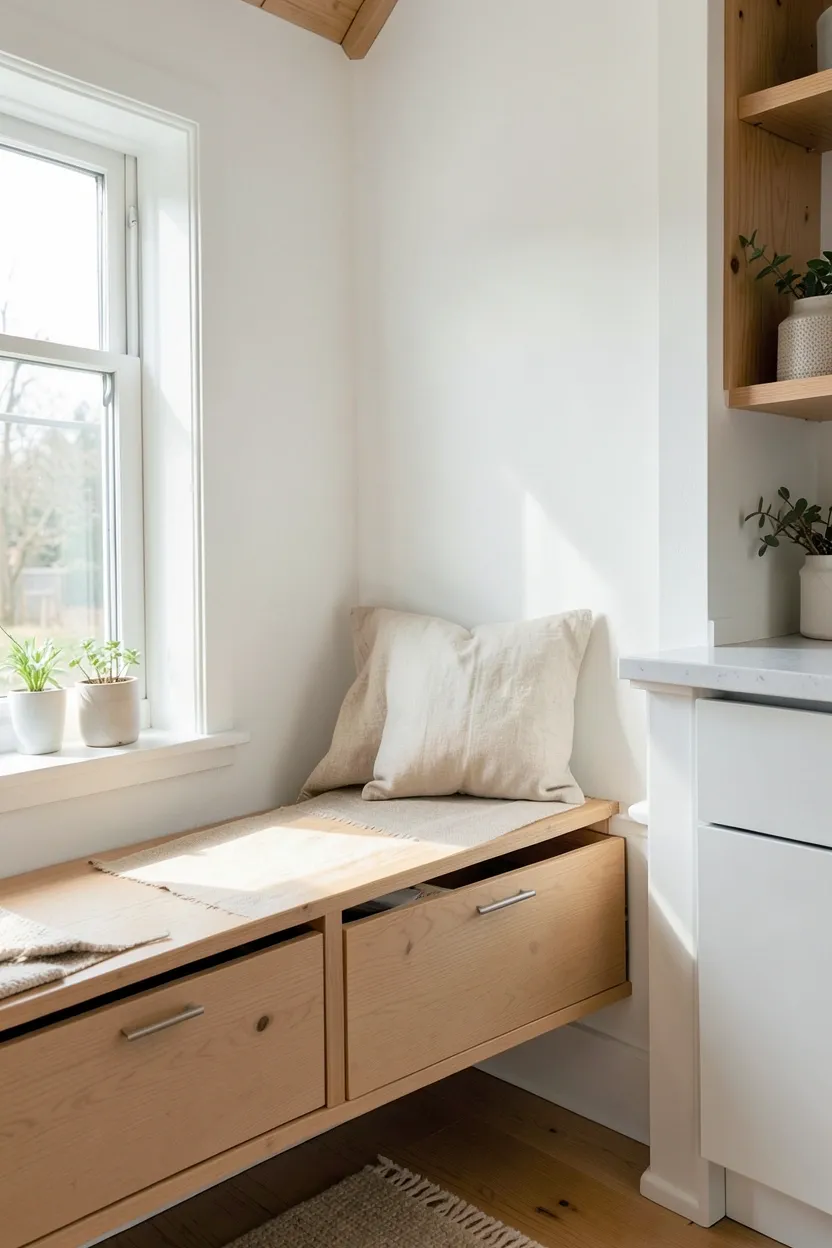
The design integrates seamlessly with surrounding cabinetry, often extending the kitchen's material palette into the seating area. Cushions upholstered in durable, washable fabrics — heavy linen, performance canvas, or leather — add comfort without compromising practicality. Simple rectangular or trapezoid shapes align with Scandinavian geometry, while integrated side panels transition smoothly into adjacent cabinets or walls.
Placement note: Ensure the window sill height accommodates comfortable seating (17-19 inches from floor to cushion top). Deeper sills (18+ inches) allow for lounging; narrower sills suit upright dining. Position 24-30 inches from adjacent countertops for comfortable circulation.
Common mistake: Building window seats without considering cushion thickness leads to uncomfortable perching on hard surfaces. Plan seat height at 16 inches from floor, then add 2-3 inch cushions for optimal comfort. Also avoid skimping on storage hardware — cheap hinges make accessing stored items frustrating, undermining the design's utility.
Best for: Kitchens with bay windows, wide garden windows, or walls beneath large windows that currently serve no purpose.
Do: Include electrical outlets in side panels for laptop or phone charging during morning coffee sessions.
Don't: Block radiator covers or heating vents with built-in seating; account for all mechanical elements in your design.
What this gives you: A sunlit retreat within your kitchen that provides seating, storage, and daily connection to outdoor views.
18. Minimalist Faucet in Brushed Metal
The kitchen faucet serves as both functional necessity and sculptural focal point, and Scandinavian design approaches this daily-use fixture with characteristic restraint. Minimalist faucets feature clean cylindrical or gently curved forms devoid of ornate detailing, industrial embellishments, or trendy flourishes. Brushed finishes — whether nickel, brass, or stainless steel — offer subtle texture that conceals water spots and fingerprints while harmonizing with the matte surfaces prevalent throughout Nordic kitchens.
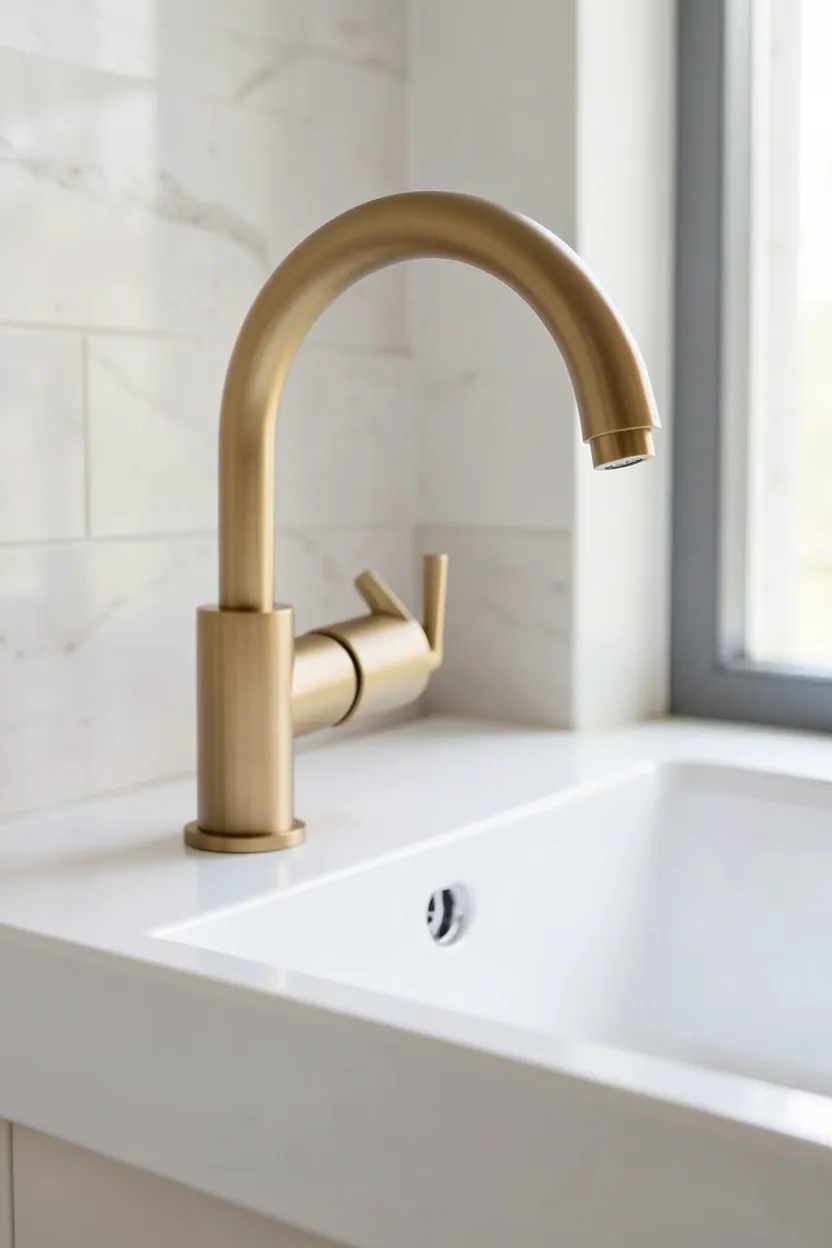
Recommended
Items for this idea
Single-handle designs dominate Scandinavian interpretations, offering temperature and flow control through intuitive lever movements that can be operated with wrists or elbows when hands are messy. High-arc gooseneck spouts provide clearance for filling pots and washing oversized items while maintaining the slim silhouette essential to minimalist aesthetics. Some advanced models incorporate pull-down spray heads that retract seamlessly into the main body, preserving clean lines when not in use.
The finish selection significantly impacts the kitchen's overall tone. Brushed brass introduces warm golden notes that complement oak cabinetry and cream backsplashes. Brushed nickel offers cooler, more contemporary sophistication that pairs beautifully with white and gray palettes. Matte black makes a modern statement while absorbing light rather than reflecting it aggressively. All resist the water spots and fingerprints that plague polished alternatives, maintaining their appearance with minimal maintenance.
Budget & Time: Quality minimalist faucets range from $200-600. Professional installation takes 1-2 hours; confident DIYers can complete the task in 2-3 hours with basic plumbing tools.
- Spout reach: Ensure 8-10 inch reach places water stream directly over drain center
- Height clearance: Verify cabinet doors above can open fully without faucet interference
- Finish matching: Coordinate with cabinet hardware for cohesive metal story throughout kitchen
- Water efficiency: Look for 1.5 GPM flow rates that conserve water without compromising performance
What this gives you: A sculptural focal point that performs beautifully while requiring minimal cleaning and maintenance.
19. Glass Front Cabinet Sections
Glass-front cabinets introduce transparency and depth to kitchen walls, creating visual breaks in solid cabinetry that prevent monotony while displaying curated collections. In Scandinavian design, these illuminated display cases showcase beautiful dishware, glassware, or pottery that might otherwise hide behind opaque doors. The glass creates a sense of expanded space, as the eye travels through the cabinet to the wall behind, effectively doubling perceived depth in those sections.
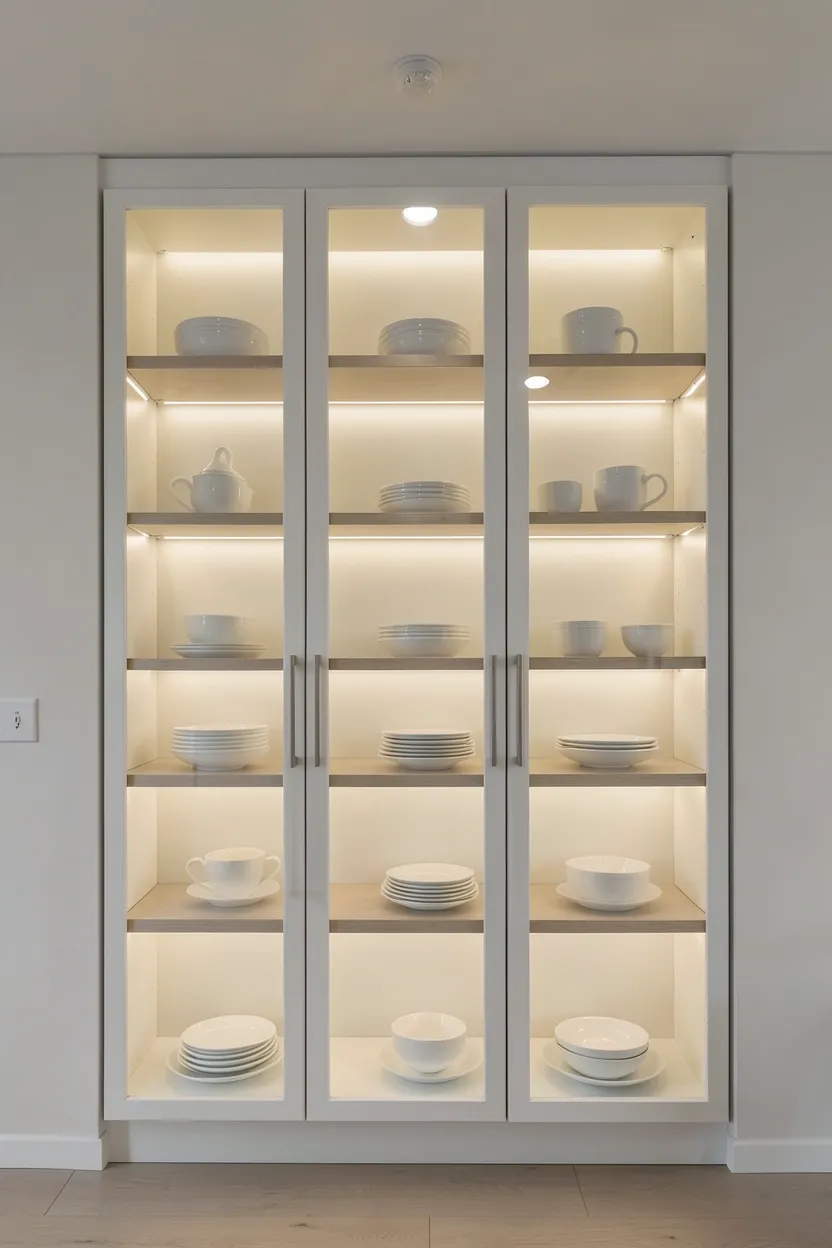
The Scandinavian approach favors simple, clear glass without decorative mullions, etched patterns, or colored tints that would introduce visual noise. Frameless or minimally framed doors maintain the clean lines essential to Nordic aesthetics. Interior lighting is crucial — LED strips mounted along cabinet tops or sides illuminate contents beautifully while contributing to the kitchen's overall lighting scheme. This glow transforms the cabinets into lanterns after dark, adding warmth and ambiance to evening hours.
Why it works: The human eye seeks variety and relief from unbroken surfaces. In a kitchen with extensive wall cabinetry, solid doors create heavy, monolithic blocks that can feel oppressive. Strategic placement of glass-front sections — typically upper cabinets flanking a range hood or at wall ends — introduces necessary visual rhythm. The requirement for curated, organized contents also encourages the decluttered minimalism central to Scandinavian living.
Avoid if: You lack time or inclination for constant organization. Glass cabinets expose all contents and require regular editing to maintain their aesthetic appeal.
Do: Edit ruthlessly — display only pieces you love that share a cohesive color palette or material story.
Don't: Mix everyday plastic containers, mismatched mugs, or cluttered items behind glass; reserve these cabinets for your most beautiful possessions.
Pro styling tip: Stack white plates and bowls in graduated sizes; alternate between vertical stacks and horizontal arrangements for visual interest.
What this gives you: Visual breathing room in cabinetry walls with illuminated displays that function as both storage and ambient lighting.
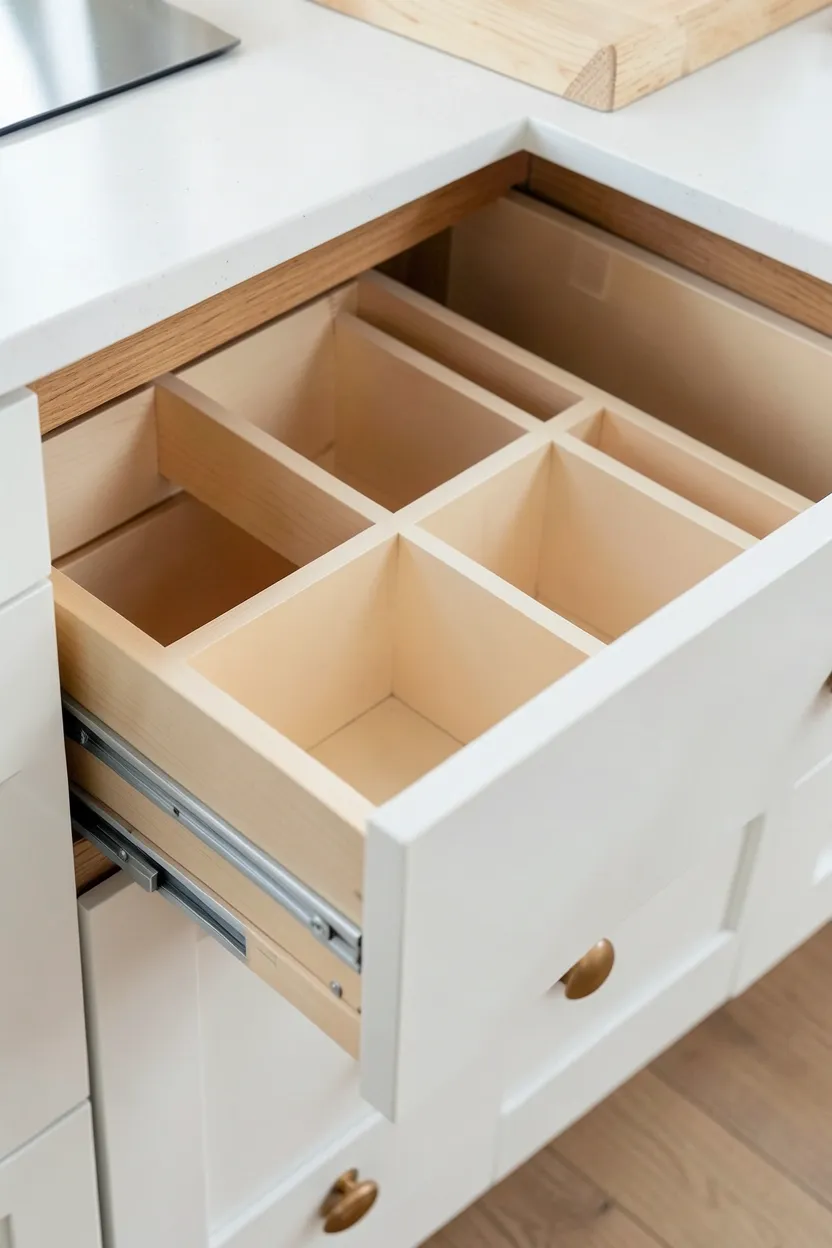
20. Roll-Out Pantry Drawers
Roll-out pantry drawers transform deep cabinet chaos into organized accessibility, bringing every item forward into full view rather than requiring excavation of dark, dusty depths. Unlike fixed shelves where back-row items disappear from memory and reach, these sliding platforms extend completely, revealing their entire contents at a glance. The Scandinavian embrace of this practical solution reflects the culture's reverence for thoughtful engineering that simplifies daily life.
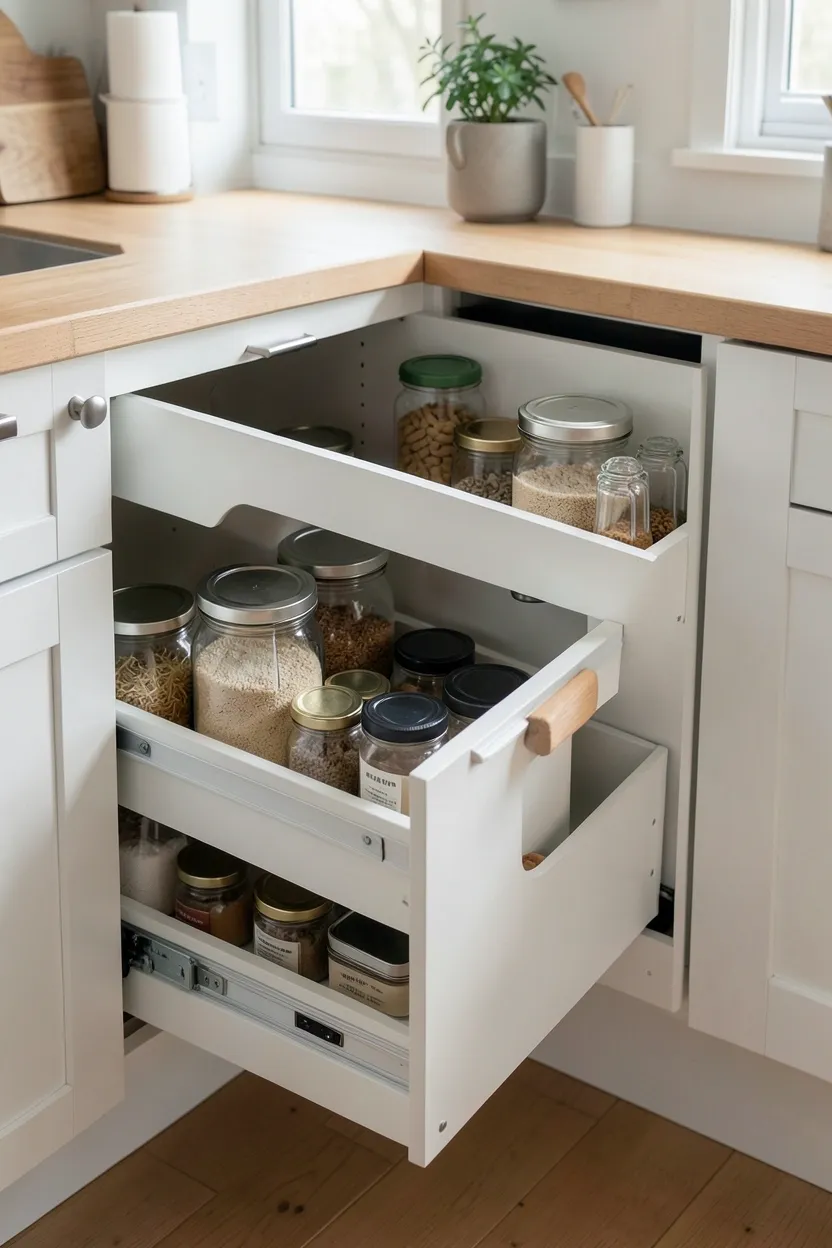
Recommended
Items for this idea
The mechanism is elegantly simple: heavy-duty drawer slides mounted to cabinet sides support platforms that glide smoothly on ball bearings, supporting 75-100 pounds even when fully extended. Upper drawers feature low sides (3-4 inches) for cans and jars; middle drawers offer medium height (6-8 inches) for cereal boxes and containers; lower drawers boast tall sides (10-12 inches) for bulky appliances and serving pieces. This graduated system accommodates diverse pantry needs while maintaining clean sight lines.
Common mistake: Homeowners often install roll-outs without considering weight distribution, leading to sagging or binding over time. Heavy items should occupy lower drawers where slides bear weight most effectively. Another error is choosing shallow drawers that waste vertical space — measure your tallest items and ensure adequate clearance. Finally, neglecting to install drawer stops allows accidental complete removal and potential damage.
For additional pantry organization ideas, see Minimalist Kitchen Design Ideas that maximize storage efficiency without sacrificing style.
- Full extension: Choose slides that extend 100% (not 75%) for complete rear access
- Soft-close: Upgrade to soft-close mechanisms that prevent slamming and extend hardware life
- Labeling: Apply clear labels to drawer fronts for instant content identification
- Maintenance: Vacuum slides annually and wipe with silicone lubricant if movement becomes sticky
What this gives you: Complete pantry visibility and accessibility that eliminates forgotten items and simplifies inventory management.
21. Induction Cooktop for Clean Lines
Induction cooktops represent the perfect marriage of advanced technology and minimalist aesthetics, offering precise temperature control through sleek glass surfaces that disappear into countertops when not in use. Unlike gas ranges with visible grates and burners or electric coils that protrude from the surface, induction creates an uninterrupted plane of black glass that aligns perfectly with Scandinavian visual principles. The magnetic heating technology only activates when cookware contacts the surface, providing safety and efficiency that appeals to practical Nordic sensibilities.
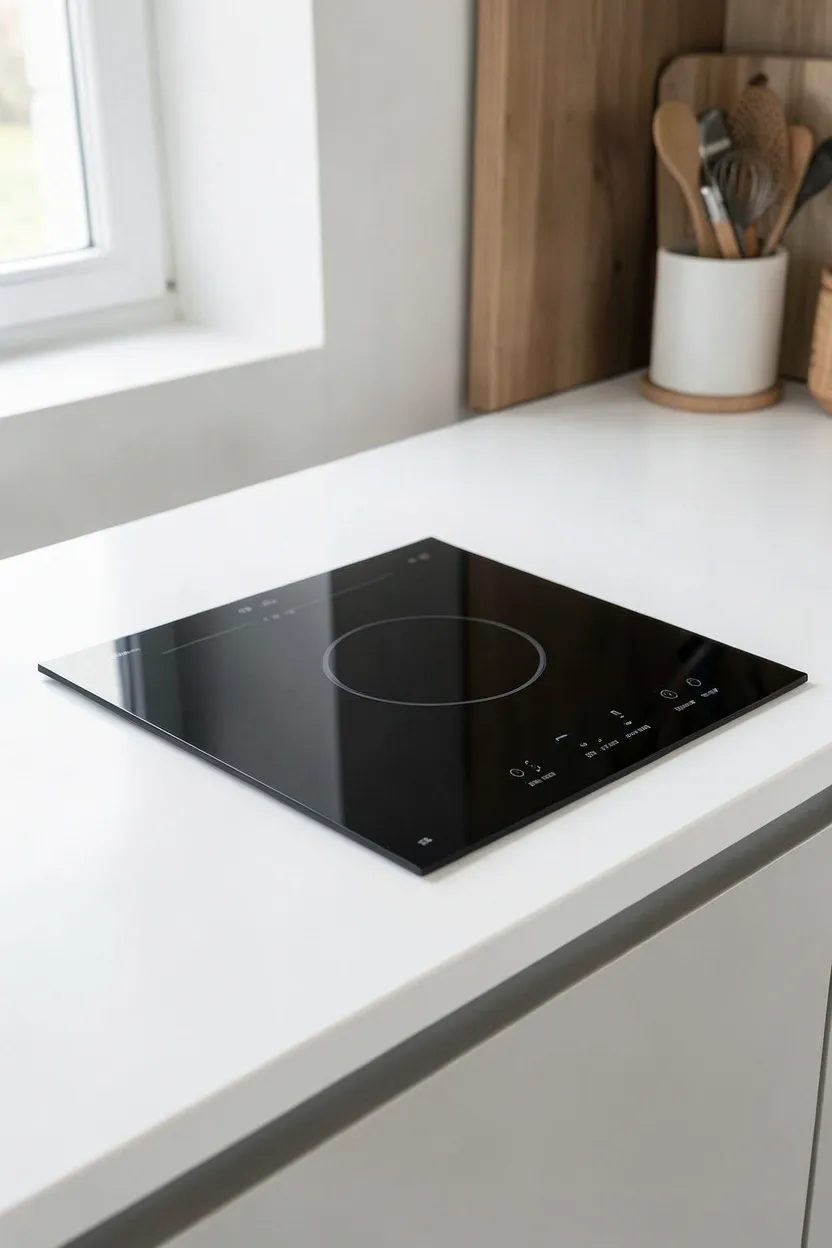
The safety advantages of induction cooking align perfectly with family-focused Scandinavian homes. The surface remains cool to the touch except where cookware makes contact, dramatically reducing burn risks for curious children. Spills don't bake onto hot coils or grates; a simple wipe cleans the smooth glass immediately. Energy efficiency exceeds both gas and traditional electric options since heat transfers directly to the pan rather than warming the surrounding air.
Do: Invest in quality cookware with magnetic bases — cast iron and stainless steel work beautifully; aluminum and copper require adapter plates.
Don't: Slide heavy pots across the glass surface; lift and place to prevent scratches.
What this gives you: A virtually invisible cooking surface that delivers professional temperature control with enhanced safety and minimal cleaning.
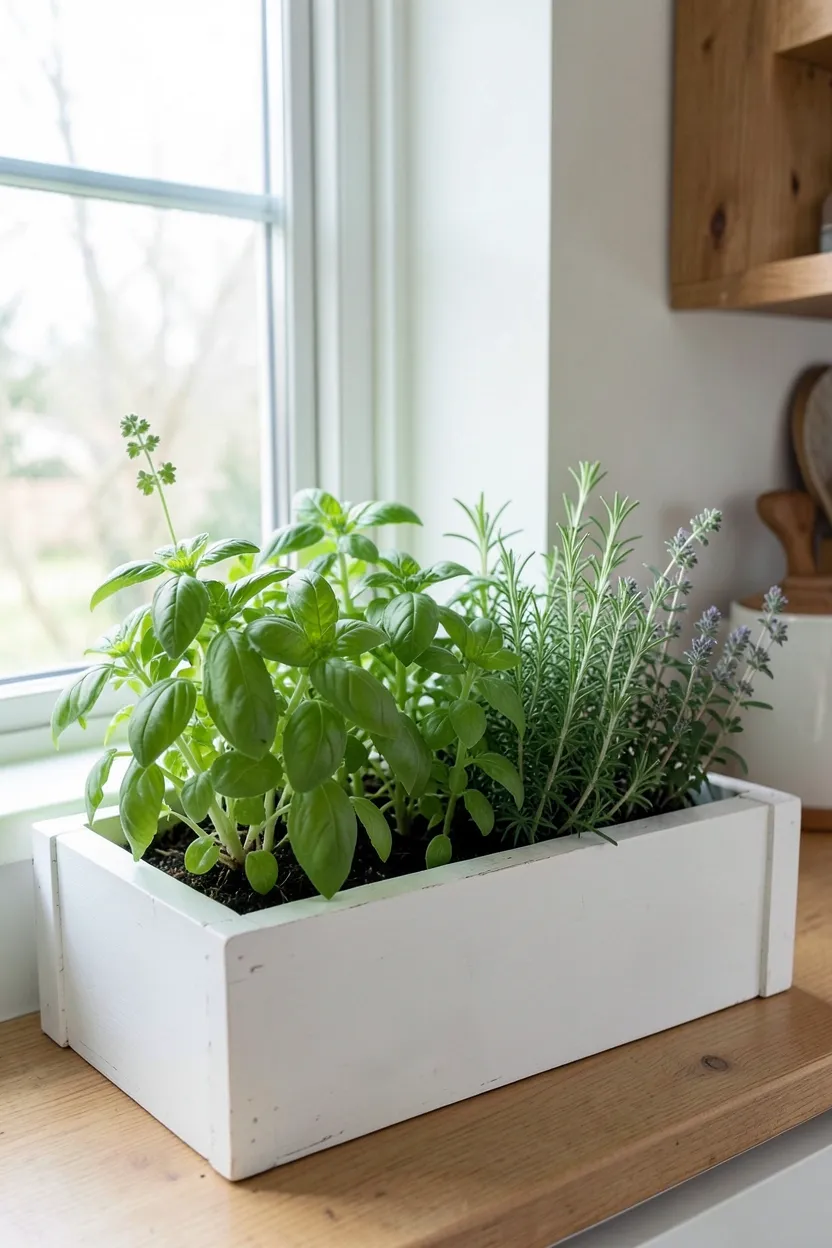
22. Herb Garden Window Box
A window-mounted herb garden brings living greenery into your kitchen while providing fresh flavor within arm's reach of your cooking zone. This simple addition transforms an ordinary window into a productive growing space, cultivating basil, rosemary, thyme, and parsley that thrive in the abundant natural light Scandinavian kitchens prioritize. The wooden box itself becomes a textural element, adding organic warmth against white walls and countertops.
Recommended
Items for this idea
The practical benefits extend beyond aesthetics to genuine culinary enhancement. Fresh herbs offer flavor intensity that dried alternatives cannot match, encouraging healthier cooking with less reliance on salt and fat. The garden also serves as a subtle reminder of seasonal rhythms — basil flourishes in summer heat, rosemary persists through winter chill, connecting your indoor space to natural cycles outside.
Best for: South or east-facing windows receiving 4+ hours of direct sunlight, cooks who use fresh herbs regularly, and anyone seeking to add living elements to their kitchen.
- Drainage essential: Ensure boxes have drainage holes and drip trays to protect window sills
- Soil selection: Use potting mix (not garden soil) formulated for container growing
- Harvest technique: Snip from the top to encourage bushy growth rather than leggy stems
- Winter survival: Choose cold-hardy herbs like rosemary and thyme for year-round growing
What this gives you: Fresh ingredients at your fingertips, living greenery that purifies air, and a daily connection to the natural world.
23. Corner Cabinet Solutions
Corner cabinets have long been the Bermuda Triangle of kitchen storage, swallowing items into inaccessible depths where they disappear from memory and use. Modern corner solutions transform these awkward angles into highly functional storage through ingenious mechanical systems that bring contents forward into full view. The Scandinavian approach demands that every square inch serves a purpose, making these specialized organizers essential for truly efficient kitchens.
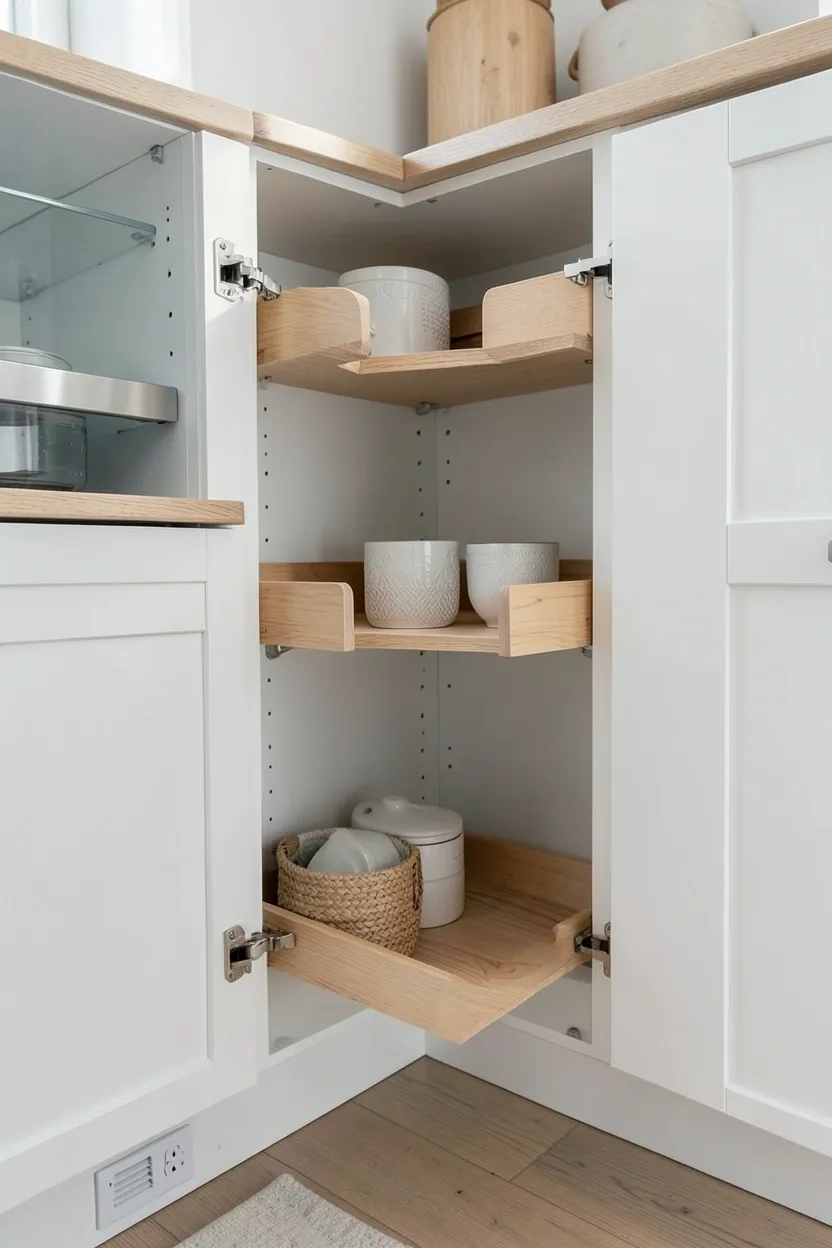
The most effective systems include Le Mans corner units with kidney-shaped shelves that swing out smoothly, bringing rear contents into full view. Magic corners feature trays that slide laterally then forward, creating complete accessibility. Both systems support substantial weight and operate with minimal effort, transforming previously frustrating spaces into favorite storage zones. The investment in quality hardware pays dividends in daily convenience and storage capacity.
- Measure twice: Corner solutions require precise cabinet dimensions — verify sizes before ordering
- Weight capacity: Quality systems support 25-35 pounds per shelf; avoid overloading
- Installation: Professional installation recommended; complex mechanisms require precise alignment
- Maintenance: Clean slides annually and lubricate with silicone spray for smooth operation
What this gives you: Reclaimed storage space that is fully accessible, eliminating the black hole where kitchen items traditionally disappear.
24. Matte Black Accents for Contrast
Strategic use of matte black introduces sophisticated contrast to predominantly light Scandinavian kitchens, creating visual anchor points that define faucets, pendant lights, and hardware without overwhelming the serene palette. Unlike glossy black surfaces that aggressively reflect light and attract fingerprints, matte finishes absorb illumination and conceal daily wear beautifully. This restrained use of darkness provides necessary depth while maintaining the airy openness essential to Nordic design.
Recommended
Items for this idea
Consider the specific elements where black makes the strongest statement. A matte black faucet becomes a sculptural focal point above a white farmhouse sink. Simple bar pulls in blackened bronze add weight to light wood cabinetry without competing with natural grain. A single pendant light in matte black metal draws the eye upward while complementing rather than matching other metal finishes. The restraint is crucial — too much black shifts from sophisticated accent to heavy dominance.
Budget & Time: Upgrading to matte black hardware costs $5-15 per piece and requires 1-2 hours for a standard kitchen. This is an affordable weekend transformation with significant visual impact.
Do: Mix matte black with one other metal finish (brass or nickel) for sophisticated contrast rather than matching everything.
Don't: Use matte black for every metal element — save it for statement pieces and use softer finishes elsewhere.
What this gives you: Visual depth and sophisticated contrast that prevents all-white kitchens from feeling sterile or flat.
25. Freestanding Kitchen Island
Unlike fixed islands that commit you to a single layout, freestanding units offer the flexibility that modern life demands. These mobile workstations on casters roll where needed — positioned against walls for compact daily use, centered for entertaining, or moved entirely when hosting large gatherings. The Scandinavian appreciation for adaptability makes these versatile pieces particularly appealing in multifunctional homes — and they are a perfect renter-friendly upgrade since they require no permanent installation.
Design options range from simple rolling carts with butcher block tops to substantial pieces with integrated storage, wine racks, or even breakfast bars. The key is selecting a unit that complements your kitchen's scale — too small appears insignificant, too large overwhelms the space. Locking casters provide stability during food preparation while enabling movement when flexibility is required. Some designs fold or expand, offering compact daily storage that transforms into generous workspace for entertaining.
Avoid if: Your kitchen has uneven flooring that would make rolling difficult or dangerous, or if you require permanent utility connections (plumbing, gas) that mobile units cannot accommodate.
- Size guidelines: Allow 36-48 inches clearance on all sides for comfortable movement
- Surface height: Match your existing countertops (36 inches standard) for seamless workflow
- Caster quality: Invest in heavy-duty locking casters that support 300+ pounds total
- Storage strategy: Use freestanding units for items needed in multiple kitchen zones
What this gives you: Adaptable workspace that evolves with your needs, providing flexibility that fixed installations cannot match.
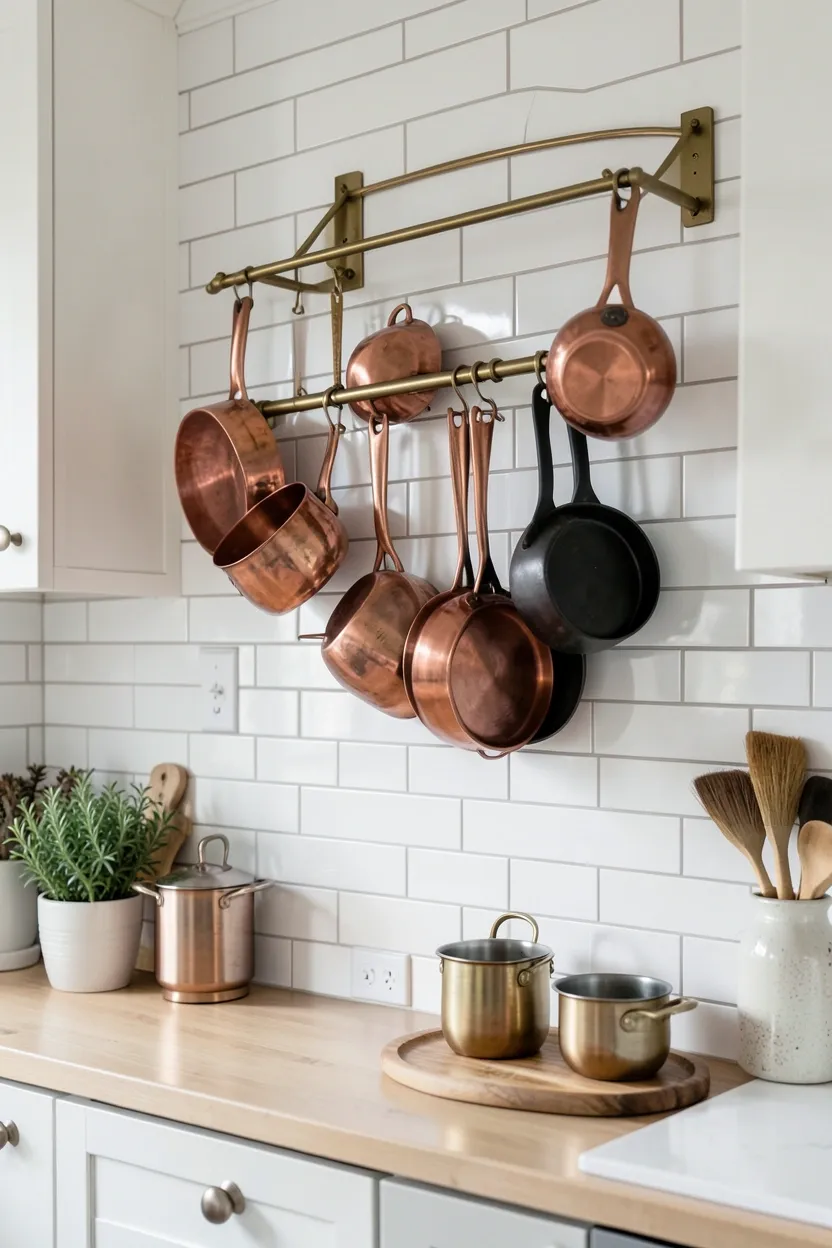
26. Wall-Mounted Pot Rack
A wall-mounted pot rack transforms your cookware collection from cabinet clutter into architectural display, freeing valuable storage space while keeping essential pans within arm's reach. In Scandinavian kitchens, where cabinet space is often at a premium and every element must justify its presence, these racks serve double duty as functional storage and decorative focal point. The linear arrangement of copper, cast iron, and stainless steel creates visual rhythm against simple white walls.
Recommended
Items for this idea
The practical advantages are immediate and lasting. Heavy cast iron skillets that strain cabinet shelves hang safely on sturdy hooks, their weight distributed across wall studs rather than pressed on particleboard. Daily-use pots and pans that once required bending and reaching now hang at eye level, streamlining cooking workflows. The open storage also encourages regular use and proper maintenance — visible cookware receives attention while forgotten cabinet items deteriorate.
Why it works: Scandinavian design celebrates honest materials and visible function. Copper and cast iron possess inherent beauty that deserves display rather than concealment. The rack itself, typically simple metal bars or wooden dowels, adds linear structure that complements minimalist architecture. This approach transforms utilitarian storage into curated presentation, aligning with the Nordic appreciation for everyday beauty.
- Mounting security: Install into wall studs or use heavy-duty toggle bolts rated for 50+ pounds
- Height placement: Center rack 18-24 inches above countertops for easy reach without head clearance issues
- Arrangement strategy: Hang larger, heavier items toward ends for visual balance; group by material for cohesive appearance
- Dust management: Use monthly if racks are open to ceiling dust; otherwise periodic cleaning suffices
What this gives you: Liberated cabinet space and instant cookware access while transforming practical tools into wall-mounted art.
27. Soft-Close Drawers Throughout
Soft-close drawer mechanisms represent one of those small luxuries that, once experienced, feel essential rather than optional. These hydraulic or pneumatic systems gently catch closing drawers in their final inches, guiding them to whisper-quiet closure regardless of how forcefully they're pushed. In Scandinavian homes, where tranquility and thoughtful design are paramount, the elimination of slamming drawers contributes significantly to household serenity, especially in open-concept spaces where kitchen sounds travel.
Beyond the audible benefit, soft-close systems protect cabinetry and contents from the jarring impact of hard closures. Fine china, glassware, and delicate pantry items remain secure rather than rattling against one another. Drawer fronts and cabinet boxes experience less stress over years of use, extending furniture lifespan. The mechanism also prevents pinched fingers — a genuine safety advantage for homes with children or elderly residents who may not react quickly enough to avoid injury.
The technology has become standard in quality cabinetry but can also retrofit into existing drawers with aftermarket slides. Installation requires removing old slides and mounting new mechanisms, a straightforward task for anyone comfortable with basic tools. The upgrade transforms daily kitchen interaction from noisy and abrupt to smooth and controlled, contributing to the unhurried, intentional pace that characterizes Scandinavian domestic life.
Do: Upgrade all kitchen drawers at once for consistent behavior; mixing soft-close with standard drawers creates frustrating inconsistency.
Pro Tip: Look for slides with full extension capability that brings drawer contents completely forward, not just soft-close functionality.
What this gives you: A quieter, more peaceful kitchen environment where every interaction feels considered and refined.
28. Integrated Dining Counter
An integrated dining counter blurs the boundary between kitchen workspace and eating area, creating a seamless transition that supports modern lifestyles where cooking and socializing often occur simultaneously. Unlike separate dining tables that occupy distinct zones, the integrated counter extends directly from kitchen cabinetry or islands, maintaining material and visual continuity while providing casual seating for two to four people. This configuration supports everything from quick breakfasts to homework sessions to wine and conversation while the host prepares meals.
Recommended
Items for this idea
The design typically extends countertop material 12-18 inches beyond cabinetry base to create knee space for seating. Counter height (36 inches) accommodates standard bar stools; raised sections at 42 inches suit taller stools and create more definition between work and dining zones. The extended surface also provides additional landing space during food preparation, a practical benefit that reveals itself constantly during cooking sessions.
Material selection impacts both durability and comfort. Quartz and solid surfaces offer stain resistance and easy cleaning but can feel cool against arms during extended seating. Butcher block extensions add warmth and can be sanded and refinished when worn, though they require more diligent maintenance. Some designs incorporate waterfall edges where material continues down the sides, creating sculptural statement pieces that define the kitchen's architectural character.
Best for: Small kitchens that cannot accommodate separate dining tables, households that prioritize casual eating over formal meals, and families who enjoy interacting during food preparation.
- Overhang depth: Plan 15-18 inches of clear knee space for comfortable seating
- Seating clearance: Allow 24 inches of width per person for comfortable dining
- Lighting consideration: Install pendant lights 30-36 inches above counter for task and ambient illumination
- Support structure: Ensure adequate corbels or internal support for cantilevered sections bearing human weight
What this gives you: Multifunctional space that seamlessly blends food preparation with casual dining and social connection.
29. Scandinavian-Inspired Color Pops
While Scandinavian kitchens traditionally embrace neutral palettes, strategic color pops introduce personality and warmth without abandoning the serene atmosphere that defines Nordic design. The key lies in selecting muted, nature-derived hues that feel grounded rather than jarring — think sage green, dusty blue, warm terracotta, or soft ochre. These tones complement the white, wood, and gray foundation while adding visual interest that evolves with seasons and moods.
The most effective approach introduces color through easily changeable elements rather than permanent fixtures. Painted accent walls can be repainted when tastes change; colorful ceramics rotate with the seasons; textiles — tea towels, seat cushions, window treatments — offer infinite variety at minimal cost. Even small appliances in curated colors contribute to the palette while remaining functional investments. This flexibility honors the Scandinavian appreciation for adaptability and evolution over rigid permanence.
Why it works: Restrained use of color within a predominantly neutral space creates focal points that draw the eye without overwhelming the senses. A single sage green wall behind open shelving transforms that zone into a garden-like retreat. Terracotta ceramics against white countertops evoke sun-warmed clay and Mediterranean warmth. These touches reference the natural world that Scandinavians deeply revere, bringing outdoor elements into domestic spaces in controlled, meaningful ways.
Avoid if: You prefer unchanging, timeless environments. Color pops require periodic refreshment and curation to maintain their impact.
Do: Limit yourself to one or two accent colors that share similar saturation levels for cohesive appearance.
Don't: Introduce bright, primary colors that clash with the muted, natural palette essential to Scandinavian aesthetics.
Seasonal strategy: Rotate accent colors throughout the year — sage greens for spring, warm terracottas for autumn, soft blues for winter.
What this gives you: Personal expression and seasonal flexibility within the calm, neutral foundation that defines Scandinavian design.
Creating a Scandinavian kitchen is ultimately about embracing the philosophy that beauty and function are not opposing forces but natural partners. Each of these 29 ideas offers a pathway to a more intentional, efficient, and visually serene cooking space — one that supports your daily routines while nourishing your sense of calm. Whether you implement one transformation or twenty-nine, the Scandinavian approach reminds us that the best kitchens don't just look beautiful; they work beautifully for the people who use them.
About the author
OBCD
CGI visualization and interior design content. We create detailed 3D renders and curate practical design ideas for every room in your home.