29 Budget-Friendly Teen Room Decor Projects (No Drilling)
Looking for budget-friendly teen room decor that actually works in a rental? These 29 DIY projects transform any bedroom into a personalized sanctuary without drilling holes, risking your security deposit, or spending a fortune.
From removable wallpaper accent walls to washi tape headboards, each idea gives teens creative control over their space using affordable materials and renter-safe techniques. We've focused on projects that use command strips, tension rods, and other no-damage methods so any teen in a rental apartment can pull these off.
Whether working with a small bedroom or a larger shared space, these budget-friendly ideas deliver maximum visual impact with minimal investment — and can be undone completely when it's time to move.
Quick FAQ
What's the easiest way to personalize a teen room on a budget?
DIY wall art, photo collages, and removable wallpaper are the simplest ways to add personality without permanent changes or high costs.
How can teens decorate a rental room without damaging walls?
Use command strips, removable decals, tension rods for curtains, and freestanding storage solutions that can be taken down without leaving marks.
What are the best budget-friendly lighting options for teen rooms?
LED strip lights, fairy lights, floor lamps, and DIY pendant lights made from baskets or mason jars offer affordable ways to transform room ambiance.
How do I organize a small teen room without spending much?
Use under-bed storage, over-the-door organizers, stackable crates, and vertical shelving to maximize space while keeping clutter under control.
As an Amazon Associate I earn from qualifying purchases.
Table of Contents
- 1. DIY Photo Collage Wall
- 2. Removable Wallpaper Accent Wall
- 3. String Light Canopy
- 4. Repurposed Crates Storage
- 5. Painted Furniture Makeover
- 6. Gallery Wall of Art Prints
- 7. Macramé Plant Hangers
- 8. DIY Pegboard Organization
- 9. Chalkboard Wall Section
- 10. Thrift Store Art Revamp
- 11. Custom Throw Pillows
- 12. Vinyl Record Wall Display
- 13. Mason Jar Organizers
- 14. Washi Tape Wall Designs
- 15. DIY Floating Shelves
- 16. Fabric Canopy Bed
- 17. Statement Mirror Frame
- 18. Cork Board Inspiration Wall
- 19. Book Page Wall Art
- 20. DIY Room Divider
- 21. Neon Sign Alternative
- 22. Painted Rug on Floor
- 23. Memory Box Display
- 24. DIY Canopy Reading Nook
- 25. Washi Tape Headboard
- 26. Upcycled Door Organizer
- 27. Fabric-covered Bulletin Board
- 28. Shadow Box Collections
- 29. DIY Bedside Caddy
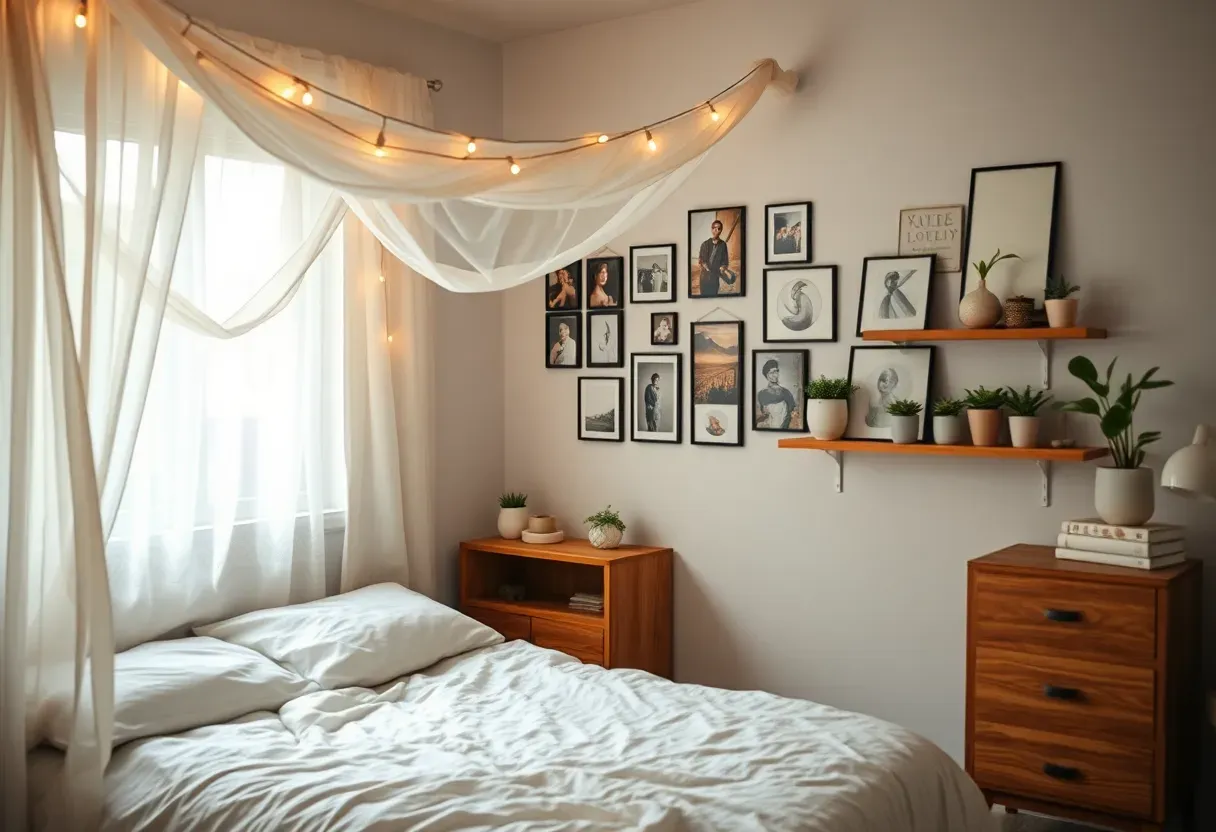
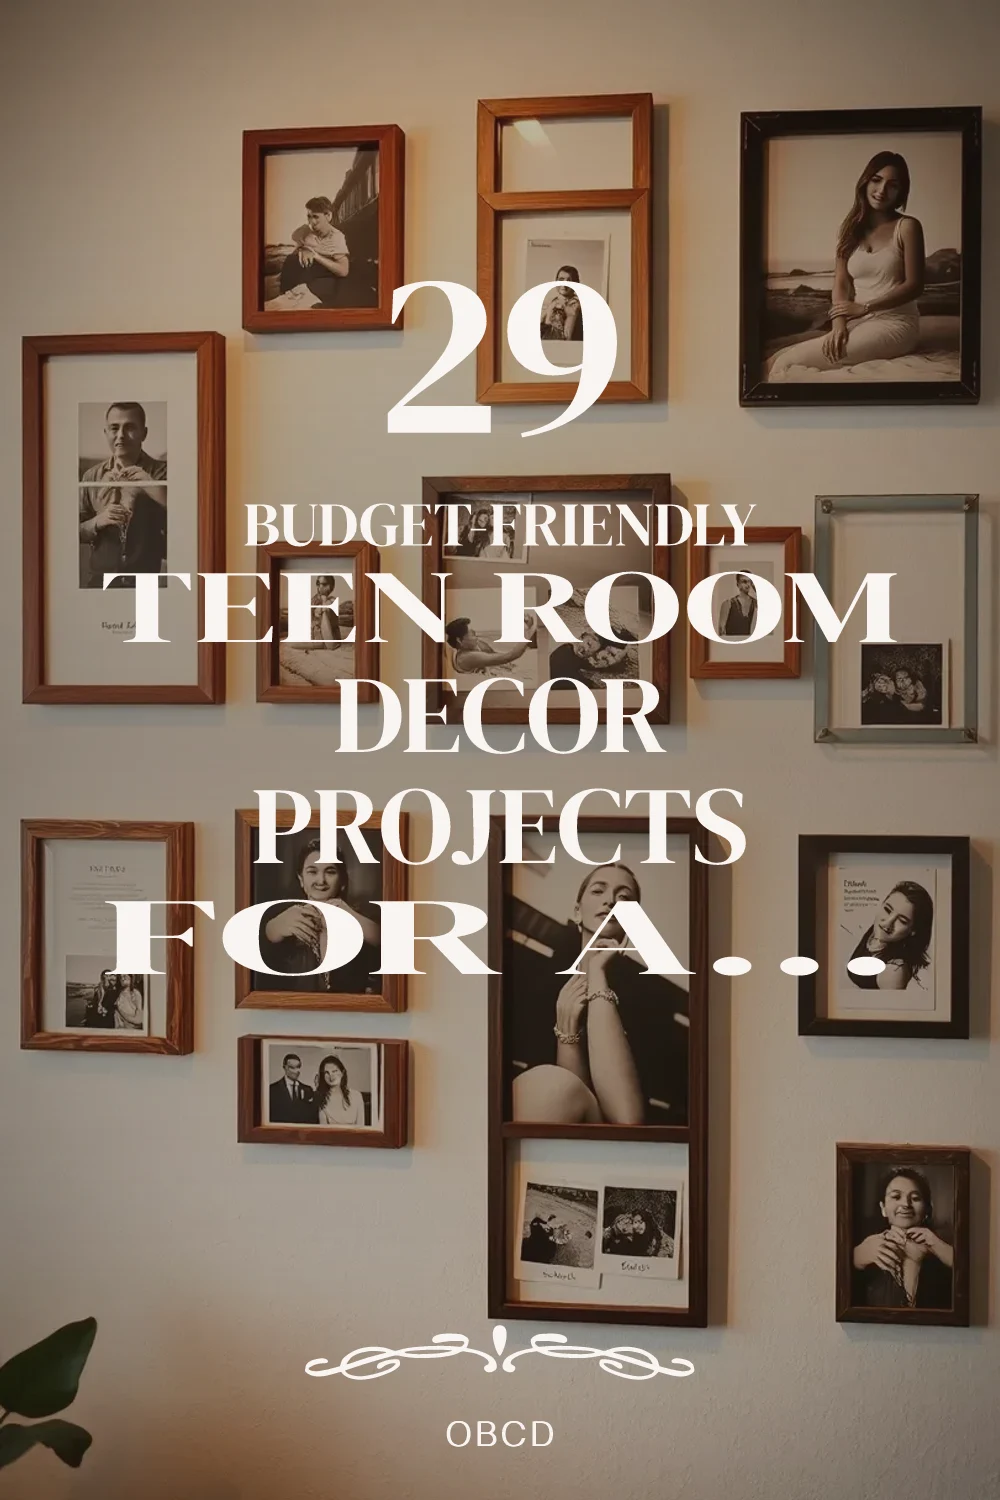
1. DIY Photo Collage Wall
A photo collage wall transforms blank space into a personal gallery showcasing favorite memories, friends, and experiences through carefully arranged prints in various sizes and frames.
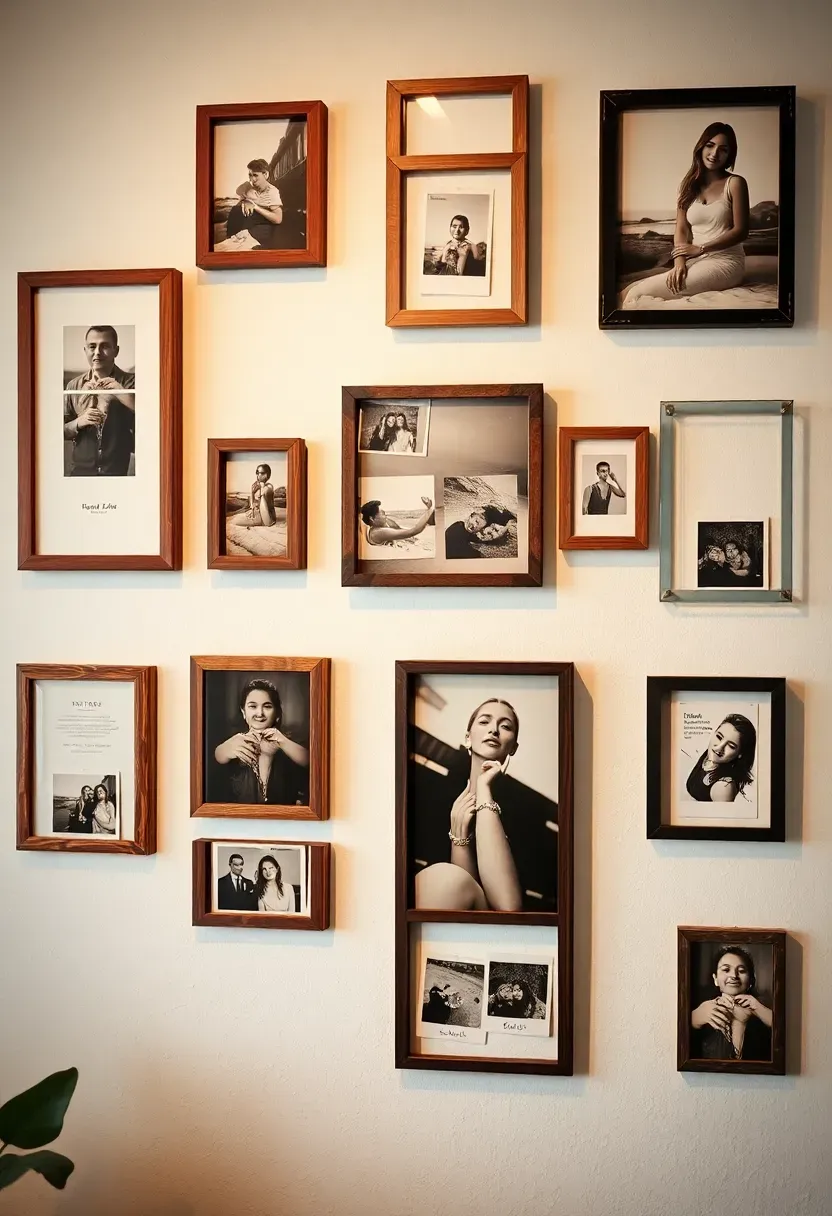
Start with printed photos in different sizes—4x6, 5x7, and Polaroid-style prints create visual interest when mixed together. Arrange them on the floor first to experiment with layouts before attaching anything to the wall. Use painter's tape to create temporary frames or borders, or lean framed photos against each other for a casual, layered look that's easy to change.
Add dimension by mixing in ticket stubs, concert wristbands, handwritten notes, and small mementos between photos. Use command strips or removable adhesive for damage-free hanging in rental spaces. Consider creating themed clusters—travel memories, concert experiences, or friend groups—to make the wall feel organized rather than chaotic.
Tips
- Do choose a unifying color scheme for frames or photos for a cohesive look
- Don't overcrowd the space—leave some breathing room between clusters
- Do include negative space as part of the design
What this gives you: A constantly evolving, deeply personal display that grows with your teen's interests and experiences.
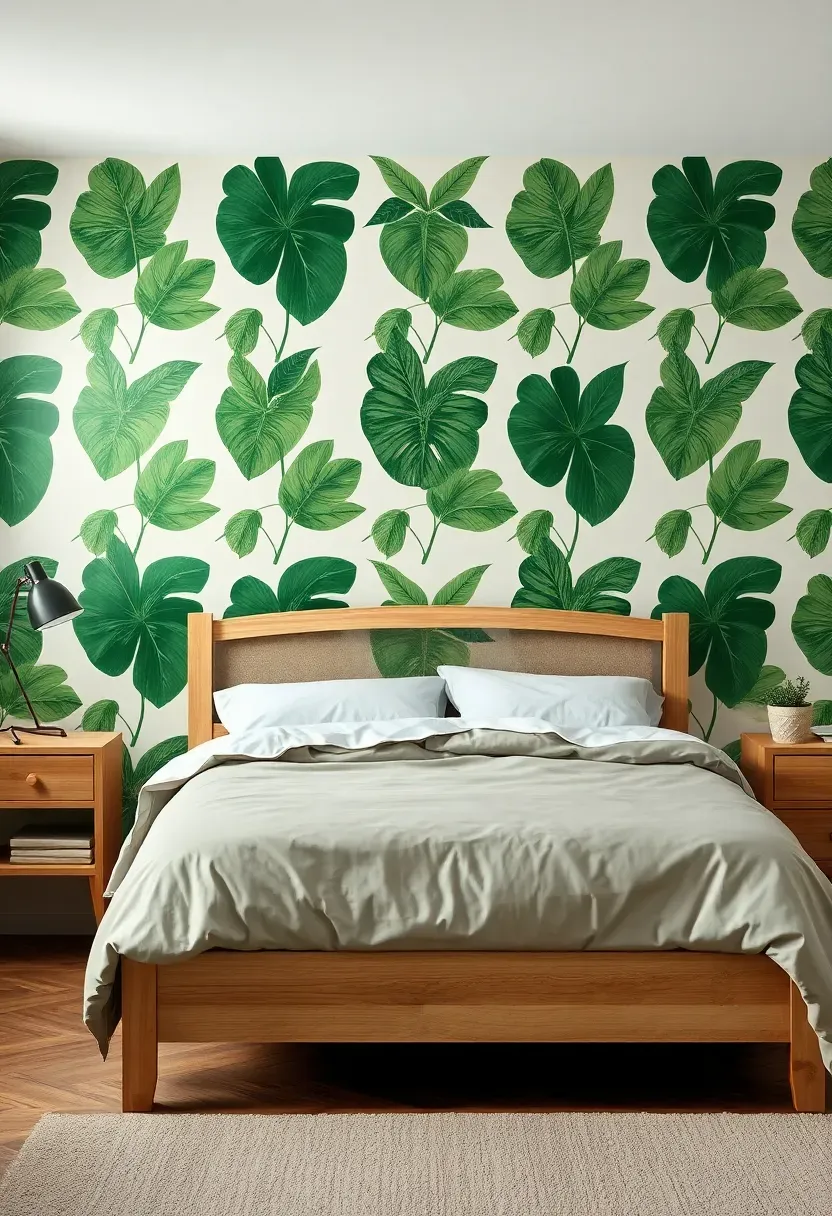
2. Removable Wallpaper Accent Wall
Removable wallpaper instantly transforms a teen room with bold patterns, geometric designs, or nature-inspired motifs without permanent commitment or damage to walls.
Recommended
Items for this idea
Choose a single wall behind the bed or desk as the focal point to create maximum impact while keeping costs low. Popular patterns for teen spaces include botanical prints, abstract geometric shapes, galaxy or space themes, and vintage-inspired florals. Measure carefully before ordering—most removable wallpapers come in standard rolls with specific repeat patterns that affect coverage calculations.
Placement note: Apply removable wallpaper to smooth, clean walls for best results and easiest removal. Test in a small corner first if unsure about wall texture.
Precutting panels before applying helps with pattern matching and reduces waste. Use a smoothing tool or credit card to eliminate air bubbles during installation. If pattern matching seems intimidating, choose non-directional designs or create a unique look by mixing complementary patterns rather than matching repeats perfectly.
Tips
- If you're nervous about large-scale patterns, start with a smaller section above the desk or behind shelves
- Then gradually expand once comfortable with the application process
- If the pattern feels overwhelming, balance it with solid-colored bedding and curtains
What this gives you: Dramatic visual impact and personality that can be completely changed in a few hours when tastes evolve.
3. String Light Canopy
A string light canopy creates dreamy ambient lighting and adds instant magic to a teen room, turning an ordinary ceiling into a cozy, starlit retreat perfect for relaxation and late-night study sessions.
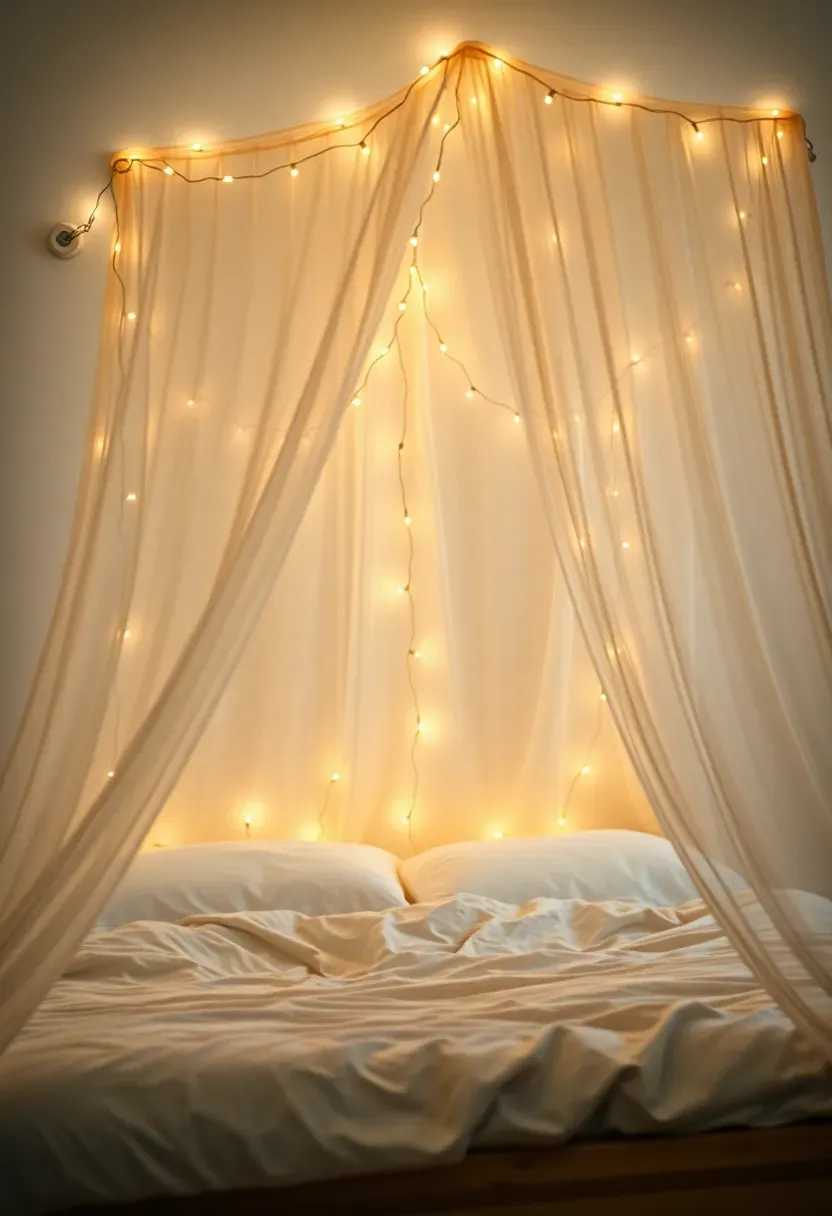
Warm white LED string lights work best for creating a warm, inviting glow without harsh brightness. Drape lights from the ceiling corners toward the center, creating a tent-like effect, or hang them in parallel lines across the ceiling for a more structured look. Use clear adhesive hooks or clips designed specifically for string lights to secure them without damaging ceilings or walls.
Why it works: Soft, ambient lighting reduces eye strain while studying or reading and creates a calming atmosphere that helps teens unwind after busy days.
Layer different types of lights—fairy lights for delicate sparkle, larger globe bulbs for focused task lighting, and rope lights for outlining windows or bed frames. Consider adding a dimmer switch to adjust brightness for different activities, from bright studying to soft relaxation. LED options last longer and stay cool to the touch, making them safer than traditional incandescent strings.
Tips
- Pro: LED string lights consume minimal electricity and can be left on for extended periods
- Con: Tangled strings require patience during installation and seasonal adjustments
- Fix: Store lights wrapped around cardboard or dedicated organizers to prevent tangling when not in use
What this gives you: Instant atmosphere and mood lighting that transforms the entire room with minimal effort and cost.
4. Repurposed Crates Storage
Wooden crates transformed into functional storage units combine rustic charm with practical organization, offering affordable solutions for books, clothes, accessories, and everyday items while adding character to the space.
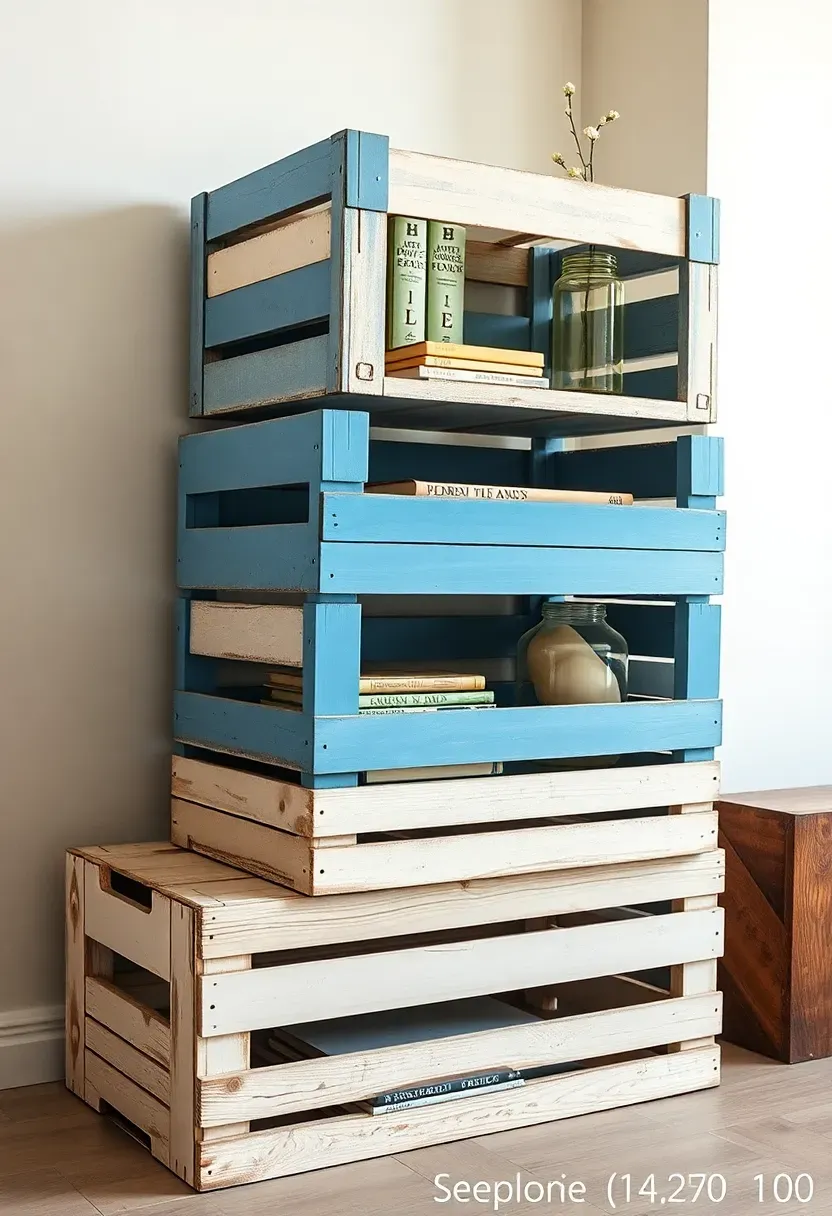
Recommended
Items for this idea
Source crates from craft stores, garden centers, flea markets, or even shipping pallets for the most budget-friendly options. Clean crates thoroughly and sand rough edges before adding paint, stain, or a clear protective finish. Stack them to create a modular storage tower, mount them on walls as floating shelves, or add casters to create mobile storage units that can move as needed.
Common mistake: Overloading stacked crates without securing them properly leads to instability and potential accidents.
Use L-brackets, screws, or heavy-duty adhesive to secure stacked configurations to walls for safety. Line crates with decorative fabric or contact paper to protect contents and add visual interest. Add handles or labels to make organization easier, especially when using crates for specific categories of items like craft supplies, reading materials, or seasonal clothing.
Tips
- Sand crates before painting to ensure smooth, even coverage that looks intentional and finished
- Test paint colors on crate undersides first to see how they look with the wood grain
- Use clear coat sealant for natural wood look, especially in humid areas
What this gives you: Customizable storage that grows with changing needs while adding unique, handcrafted character to the room.
5. Painted Furniture Makeover
Transforming existing furniture with fresh paint breathes new life into outdated pieces, allowing teens to customize their room's color palette without the expense of buying new furniture.
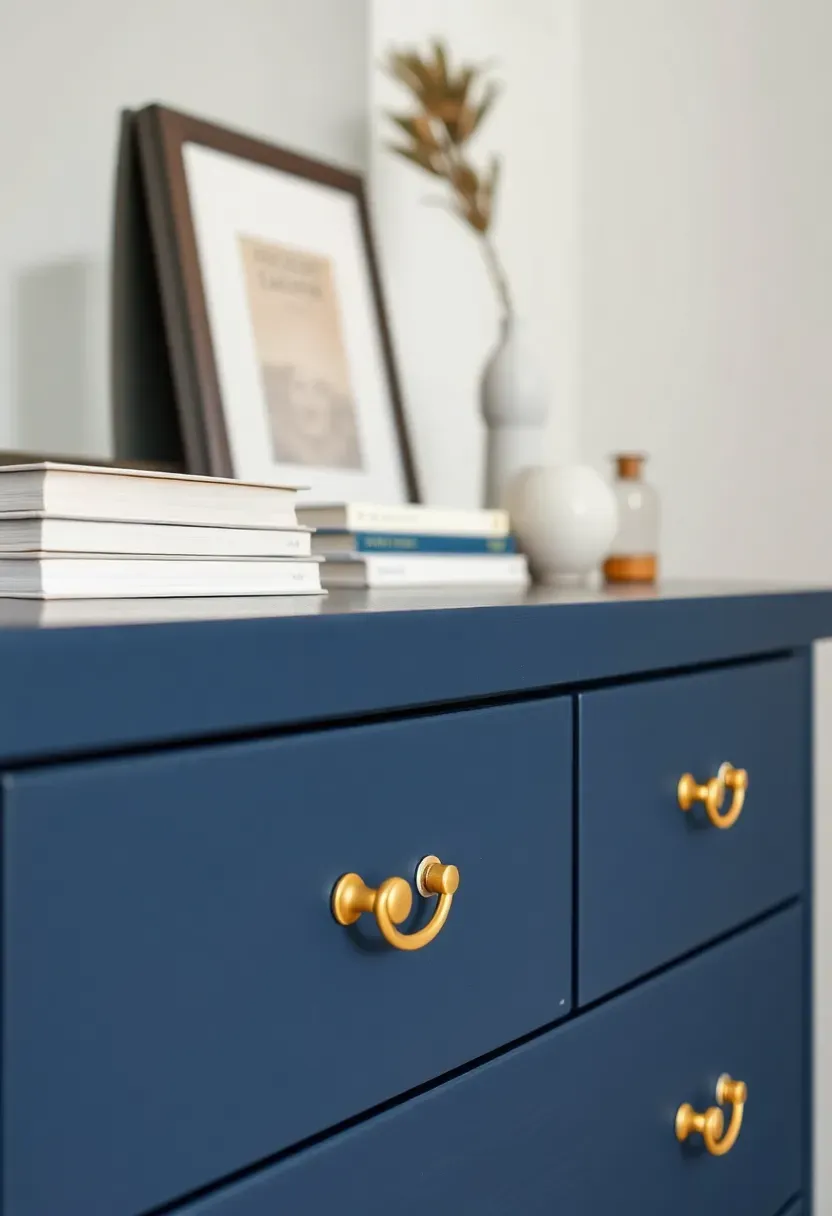
Start with clean, sanded surfaces to ensure proper paint adhesion and smooth results. Choose paint specifically designed for the material—wood, laminate, or metal—since standard wall paint may not adhere properly to furniture surfaces. Popular teen-friendly color combinations include bold contrasts like navy and gold, soft pastels with metallic accents, or two-tone effects that highlight furniture details and architectural features.
Add dimension through techniques like distressing edges for vintage appeal, ombré gradients for modern style, or geometric patterns using painter's tape for a graphic look. Replace hardware with updated knobs or pulls that complement the new finish. Consider painting drawer interiors with contrasting colors for a surprise element that adds personality when drawers are opened.
Tips
- Do apply multiple thin coats rather than one thick coat for smoother, more durable finish
- Don't skip the primer—it's essential for paint adhesion and true color representation
- Do allow adequate drying time between coats and before using the furniture
What this gives you: Customized furniture that perfectly matches the room's aesthetic at a fraction of the cost of buying new pieces.
6. Gallery Wall of Art Prints
A curated gallery wall transforms empty walls into a sophisticated display of artistic expression, allowing teens to showcase their favorite images, quotes, and visual inspirations in a cohesive, professional-looking arrangement.
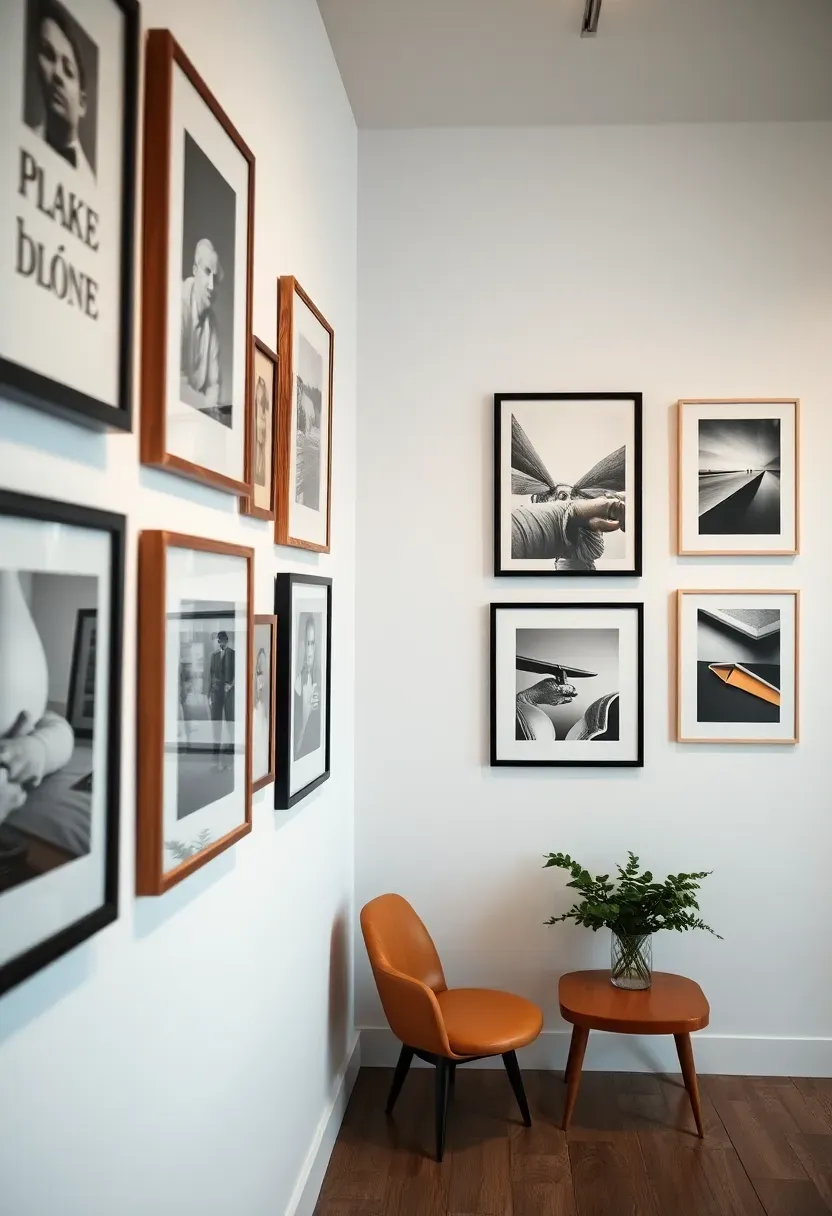
Recommended
Items for this idea
Placement note: Center the gallery wall at eye level, typically 57-60 inches from the floor, ensuring the center point of the arrangement falls within this range.
Mix different frame sizes, styles, and matting for an eclectic look, or keep frames uniform for a more modern, streamlined appearance. Start with the largest piece in the center and arrange smaller pieces around it, working outward until satisfied with the composition. Use paper templates cut to frame sizes to experiment with layouts before putting holes in walls—this allows easy adjustment and perfect spacing without damage.
Include a variety of content types: photography, typography prints, abstract art, travel posters, and personal artwork create visual interest and tell a story about interests and experiences. Consider adding small three-dimensional objects like mounted plates, small shelves with plants, or woven wall hangings to break up the flat arrangement and add texture.
Tips
- If mixing frame styles, choose one unifying element like color, matting, or subject matter to create cohesion
- Then gradually add pieces that share this element while introducing variety in size and shape
- If the wall feels too busy, remove a few pieces or increase spacing between elements
What this gives you: A dynamic, personalized art display that evolves with changing tastes and interests while elevating the room's overall aesthetic.
7. Macramé Plant Hangers
Handcrafted macramé plant hangers bring natural elements and bohemian style to teen rooms, adding life and greenery while maximizing floor space and creating interesting vertical visual interest.
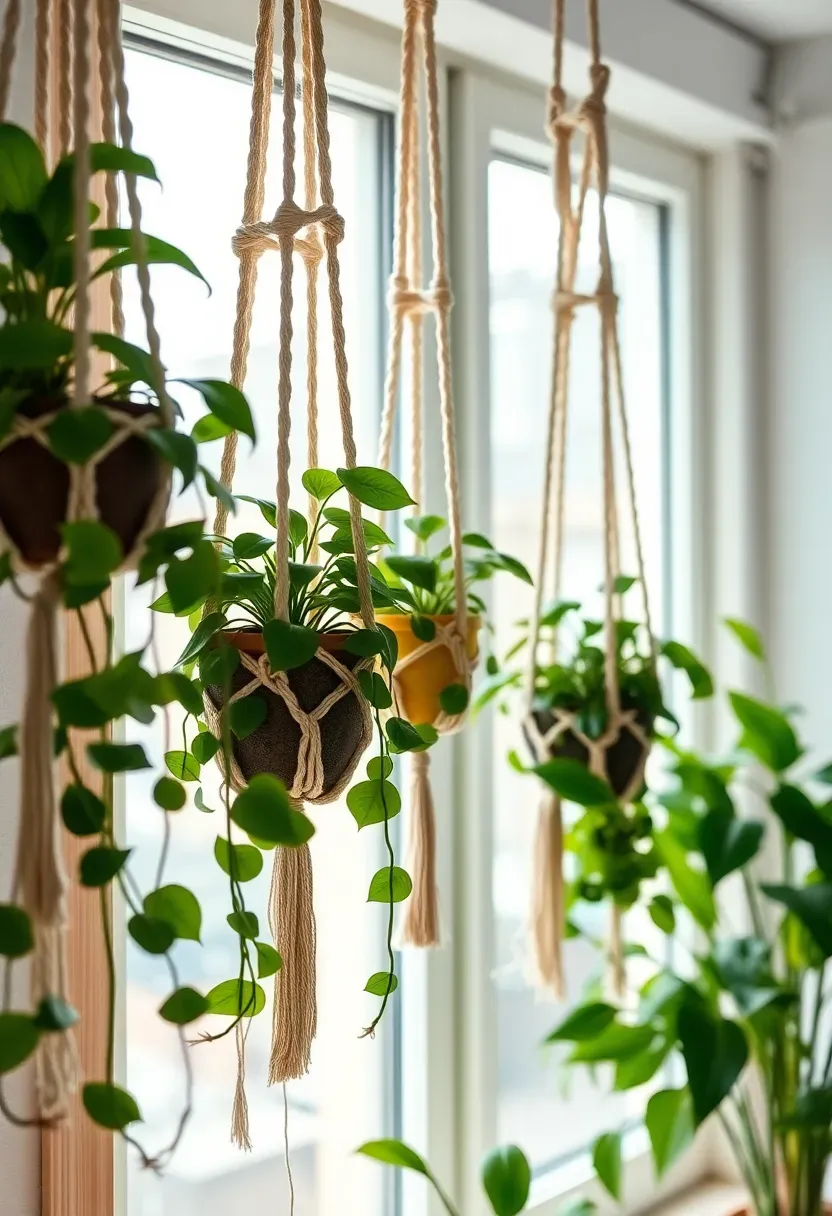
Begin with simple knot patterns if new to macramé—the square knot and lark's head knot form the foundation of most designs and are easy to master with practice. Cotton cord in 3-5mm thickness works best for most projects, offering both strength and flexibility while maintaining a clean, finished appearance. Choose lightweight plant varieties like pothos, spider plants, or trailing ivy that thrive in typical room conditions and don't require extensive care.
Why it works: Hanging plants purify air naturally, add organic texture that softens hard surfaces, and create living decor that changes and grows over time.
Hang multiple planters at varying heights near windows for maximum sunlight and visual impact. Group three to five hangers together for a cohesive display, or scatter them individually throughout the room to create green moments in different areas. Consider incorporating colored cords or adding beads, driftwood, or other natural elements to the knots for personalized touches that reflect individual style.
Tips
- Pro: Macramé projects are portable and can be moved between rooms or taken to college dorms
- Con: Plants require regular watering and attention to remain healthy and attractive
- Fix: Choose low-maintenance plant varieties and establish a simple watering schedule
Best for: Teens who love plants but lack floor space or want to add organic elements to their room decor.
What this gives you: Living, breathing decor that improves air quality while adding handcrafted texture and natural beauty to the space.
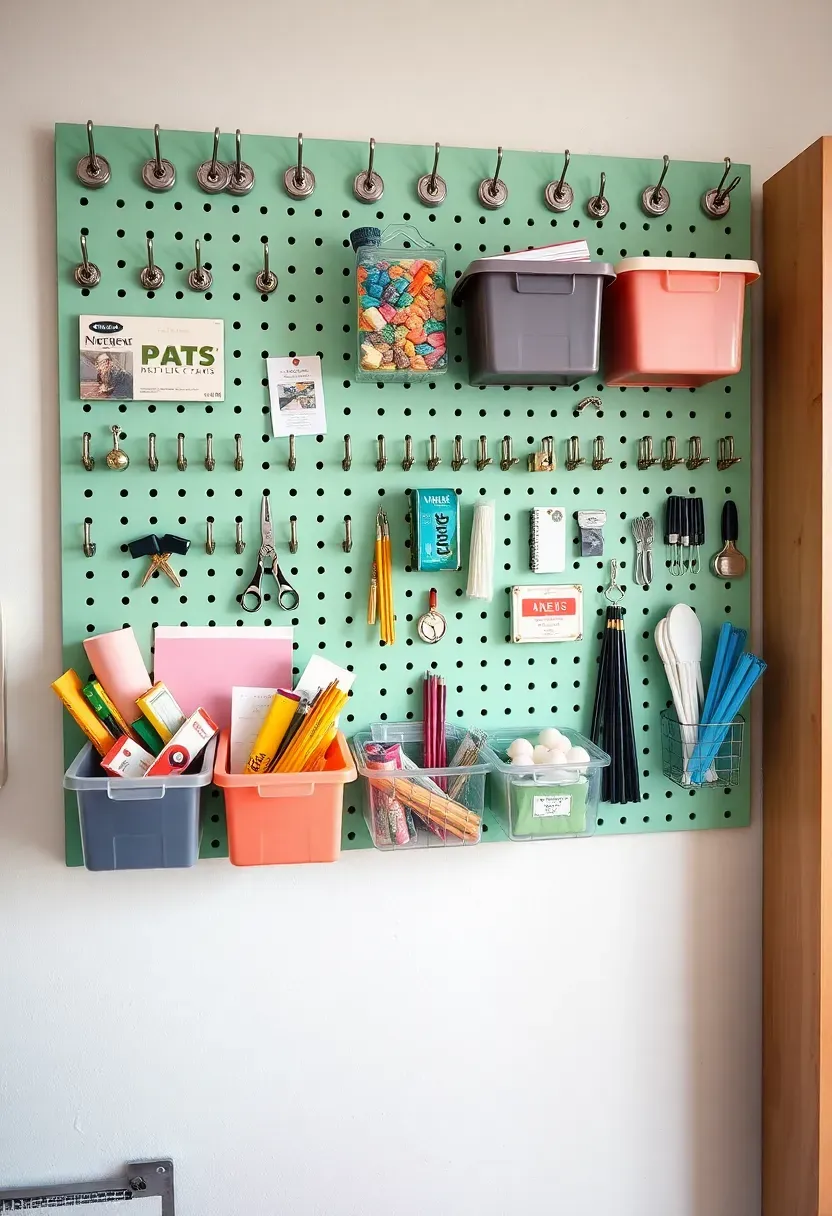
8. DIY Pegboard Organization
DIY pegboards transform blank walls into customizable organizational systems, keeping frequently used items visible, accessible, and stylishly displayed while reducing desktop clutter and maximizing vertical space.
Recommended
Items for this idea
Choose pegboard size based on available wall space and storage needs—small boards above desks work for supplies, while larger floor-to-ceiling installations can organize entire collections. Paint the pegboard to match or complement the room's color scheme, or leave natural wood for a more rustic look. Add a frame around the edges for a finished appearance that looks intentional rather than utilitarian.
Common mistake: Overloading pegboards with too many heavy items causes sagging and potential damage to walls and fixtures.
Use appropriate hooks, brackets, and organizers designed specifically for pegboard weight limits. Arrange items by category—art supplies, accessories, tools, or collections—to make finding things easier. Add small shelves, baskets, and bins to the pegboard for holding items that don't hang well, like small office supplies, jewelry, or craft materials. Incorporate clip-on lights to illuminate the display and add visual interest.
Tips
- Leave empty space for future additions rather than filling every available slot
- Use coordinating colors for bins and accessories to maintain a cohesive appearance
- Position frequently used items at eye level for easy access
What this gives you: Highly customizable storage that adapts to changing needs while keeping essentials organized and displayed attractively.
9. Chalkboard Wall Section
A chalkboard wall section serves as a versatile canvas for creative expression, organization, and artistic exploration, providing an ever-changing surface that combines functionality with playful self-expression.
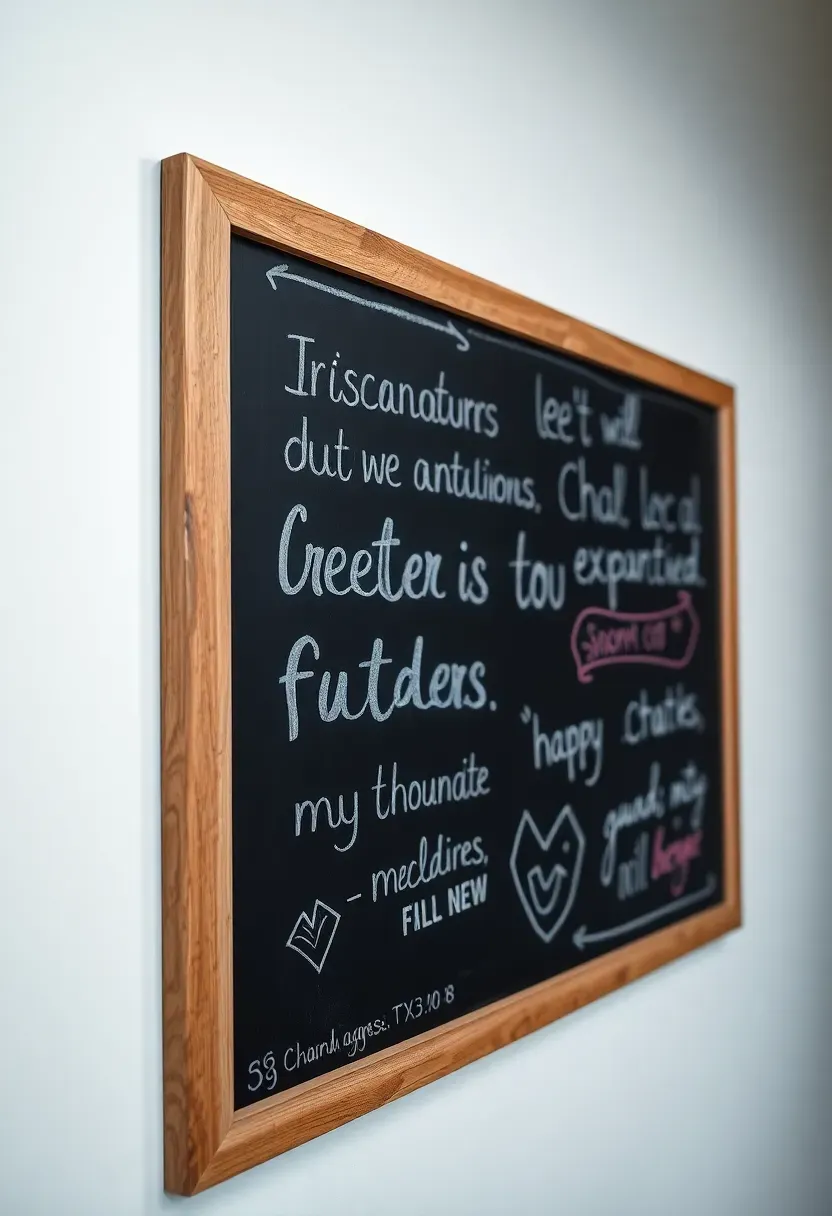
Apply chalkboard paint to a small defined section rather than an entire wall to maintain visual balance in the room. Frame the chalkboard area with trim, tape, or paint borders to create a defined, intentional-looking feature. Consider using colored chalkboard paint instead of traditional black for unexpected pops of color—deep blues, greens, or even bright primary colors can complement existing decor while adding personality.
Use the space for weekly schedules, inspirational quotes, artistic drawings, or collaborative artwork created with friends. Keep chalk and erasers in nearby decorative containers for easy access and neat appearance. Change the content regularly to keep the space feeling fresh and engaging—monthly themes, seasonal decorations, or rotating inspirational messages prevent the area from becoming stagnant.
Tips
- Do season the chalkboard surface properly before first use by rubbing entire area with chalk sideways and erasing
- Don't use permanent markers or chalk markers that don't erase cleanly on chalkboard paint
- Do keep soft cloths or specialized erasers nearby for clean changes between designs
Budget/time note: Chalkboard paint costs approximately $15-25 and applies in two coats, making this one of the most affordable room transformations.
What this gives you: A creative, functional surface that serves multiple purposes while allowing constant visual change without additional cost.
10. Thrift Store Art Revamp
Transforming thrift store artwork with modern updates turns dated pieces into unique, personalized decor that adds character and conversation-starting style to teen rooms while saving significant money compared to buying new art.

Recommended
Items for this idea
Scout thrift stores, garage sales, and flea markets for interesting frames or canvases—solid wood frames can be reused and repainted, while larger canvases offer ample space for creative transformations. Look beyond the current artwork to focus on frame quality, canvas size, and overall condition rather than subject matter or current aesthetic. Consider the scale and proportion of each piece in relation to where it will be displayed in the room.
Popular revamp techniques include painting over existing art with solid colors or abstract designs, adding metallic accents or geometric patterns using tape, collaging over the original surface, or completely recreating the artwork while keeping the original frame. Consider mixing media—add three-dimensional elements, fabric, or photographic prints to create mixed-media pieces that feel current and personally meaningful.
Tips
- Pro: Thrift store art typically costs $5-20, making this extremely budget-friendly compared to gallery prices
- Con: Some pieces may require significant prep work to remove old paint or repair damaged surfaces
- Fix: Sand surfaces thoroughly and use primer before new paint for smooth, professional results
What this gives you: One-of-a-kind art pieces that reflect personal style while building creativity and artistic skills through hands-up projects.
11. Custom Throw Pillows
Handmade custom throw pillows add softness, color, and personality to teen rooms while allowing complete creative control over fabric choices, sizes, and styles without the premium cost of designer home decor.
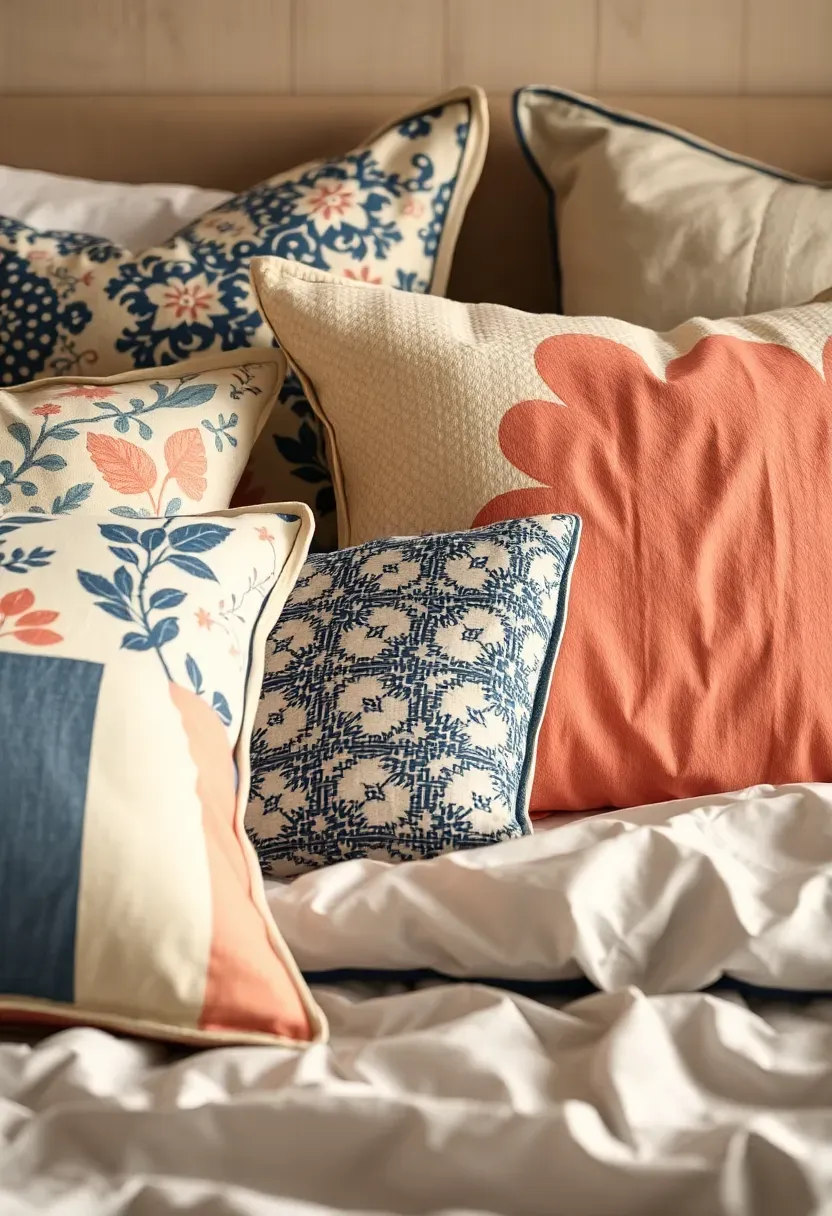
Start with pillow forms in various sizes—standard 16x16 or 18x18 inches work well, but mixing sizes creates visual interest. Choose fabrics that reflect personal style and coordinate with the room's color scheme—bold prints, subtle textures, or solid colors can all work depending on the desired aesthetic. Consider repurposing fabric from old clothing, curtains, or thrift store finds for eco-friendly and budget-conscious options.
Simple envelope-style pillow covers require only basic sewing skills and can be removed for washing, making them practical and long-lasting. Add embellishments like contrasting piping, buttons, trim, or iron-on transfers for additional personality. Create a cohesive look by choosing fabrics that share a common color, pattern scale, or theme, or intentionally mix styles for an eclectic, collected appearance.
Tips
- Do prewash fabrics before sewing to prevent shrinking after construction and maintain proper fit
- Don't skimp on seam allowances—seam finishes prevent fraying and increase longevity
- Do store seasonal pillow covers separately and swap them out for quick room refreshes
What this gives you: Budget-friendly, fully customized soft furnishings that can be updated or changed to match evolving tastes and styles.
12. Vinyl Record Wall Display
Displaying vinyl records as wall art celebrates musical taste while creating striking visual impact with album cover artwork, transforming a music collection into a gallery that reflects personal interests and artistic preferences.
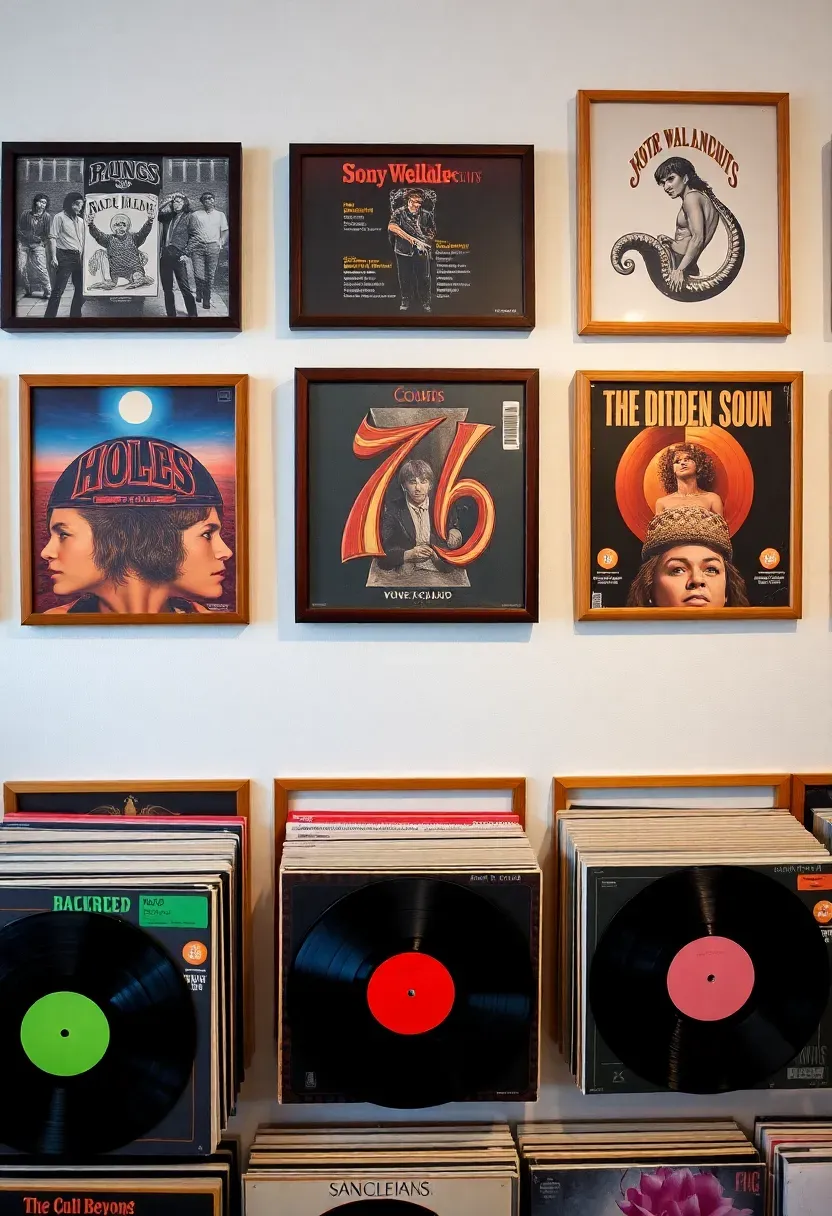
Recommended
Items for this idea
Placement note: Arrange records at a comfortable viewing height and leave adequate space between pieces for individual appreciation—typically 2-3 inches of spacing works well for most displays.
Use specialized vinyl record frames for a clean, museum-quality look, or create a more casual display with simple wooden ledges or brackets that allow easy removal for listening. Group records by artist, genre, color palette, or aesthetic style for organized arrangements that feel intentional rather than random. Consider mixing in actual vinyl discs alongside album covers for textural variety and authentic display of the music medium itself.
Include empty record sleeves as display pieces for interesting artwork without the actual record, or create themed collections—concert memorabilia, favorite artists, or visually striking cover designs. Add small spotlights or LED strips above the display to highlight favorite pieces and create a dramatic effect similar to a professional gallery or music store display.
Tips
- If displaying valuable or rare records, choose UV-protective glass frames to prevent fading
- Then position displays away from direct sunlight for additional protection
- If budget is tight, use simple ledges or DIY brackets instead of expensive frames
What this gives you: A visual representation of musical identity that serves as both decor and conversation starter while keeping favorites easily accessible.
13. Mason Jar Organizers
Mason jars repurposed as organizers combine vintage charm with practical functionality, creating attractive storage solutions for small items while adding visual interest and personality to shelves, desks, and walls.
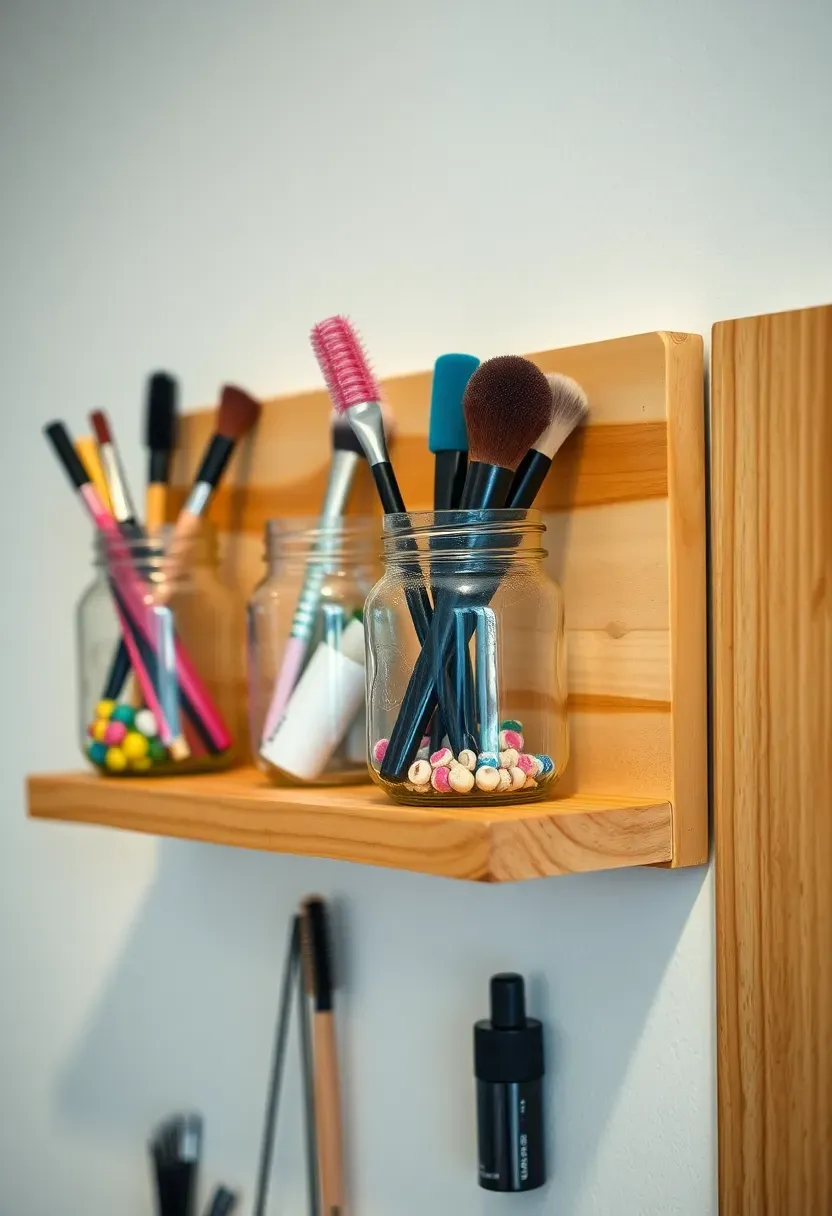
Standard wide-mouth mason jars work best for organizing and accessing contents easily, while smaller jelly jars suit delicate items like jewelry or small office supplies. Group jars by contents—makeup brushes, writing utensils, craft supplies, or small accessories—for organized, efficient storage. Paint the jar exteriors or lids in coordinating colors, or leave them clear for a simple, rustic appearance that highlights the contents.
Why it works: Jars are durable, washable, and reusable, making them environmentally friendly and cost-effective long-term storage solutions.
Mount multiple jars to boards or directly to walls using pipe clamps or specialized jar holders for wall-mounted storage that keeps surfaces clear. Add labels using chalkboard paint, stencils, or simple tags for easy identification of contents. Cluster jars on trays or shallow baskets for mobile organizers that can be moved between rooms as needed—perfect for homework supplies, beauty products, or craft materials.
Tips
- Pro: Jars are inexpensive and readily available at grocery stores, thrift shops, and online
- Con: Glass jars can break if dropped, requiring careful handling especially in high-traffic areas
- Fix: Use plastic mason jars for particularly fragile items or high-risk areas
Best for: Organizing small items like pens, makeup brushes, craft supplies, jewelry, and desk accessories while adding decorative charm.
What this gives you: Affordable, versatile storage that adds visual interest while keeping small items organized and accessible.
14. Washi Tape Wall Designs
Washi tape designs transform plain walls with colorful, removable patterns and graphics, offering a commitment-free way to add personality, geometric interest, and artistic flair to teen rooms without permanent changes or damage.
Recommended
Items for this idea
Choose washi tape in coordinating color palettes or mix patterns intentionally for eclectic designs that reflect personal style. Create simple geometric shapes like triangles, diamonds, or hexagons for modern looks, or form elaborate patterns like chevron, honeycomb, or Moroccan-inspired motifs for more intricate designs. Plan designs on paper first or use low-tack painter's tape to create temporary outlines before committing to washi tape placement.
Common mistake: Applying washi tape to textured walls causes uneven adhesion and creates gaps where the tape doesn't fully contact the surface.
Apply designs to smooth walls or surfaces for best results and easiest removal. Layer multiple widths and patterns of tape to create depth and visual interest—narrow accent tapes within broader patterns create sophisticated, professional-looking designs. Use washi tape to frame artwork, create temporary headboards, or add borders and accents around windows, doors, and furniture pieces for cohesive room-wide design elements.
Tips
- Start with simple designs and gradually build complexity as confidence and skill increase
- Keep extra tape on hand in case of mistakes or pattern revisions
- Smooth tape thoroughly after application to ensure clean, crisp edges
What this gives you: Completely removable, customizable wall art that can be changed frequently without damage or significant expense.
15. DIY Floating Shelves
Handmade floating shelves provide sleek, modern storage and display space while keeping floor surfaces clear, allowing teens to showcase books, collections, plants, and decor in a clean, minimalist aesthetic.
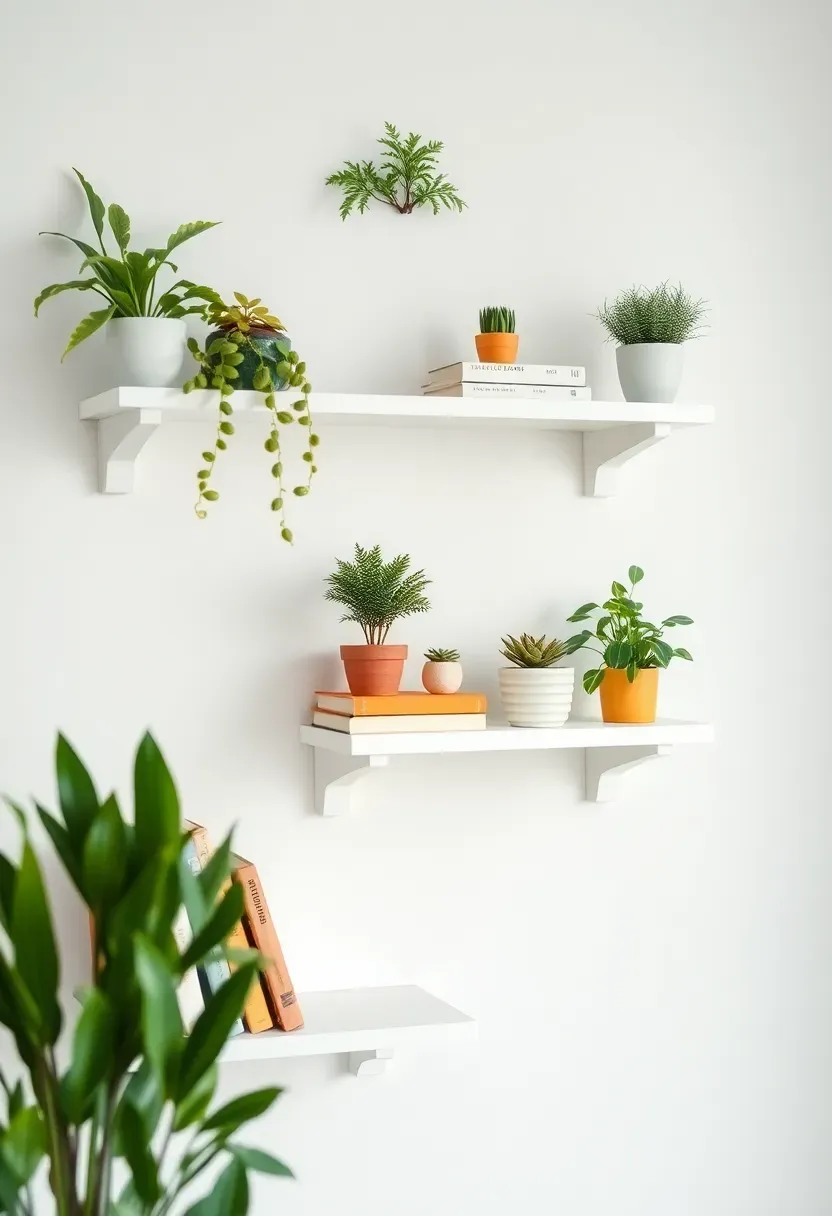
Choose materials based on skill level and desired appearance—solid wood offers traditional warmth, while plywood or MDF can be painted for a more contemporary look. Determine appropriate depth based on intended use—6-8 inches works well for books and decor, while narrower shelves suit smaller display items. Cut pieces precisely and sand thoroughly for professional-looking results that appear store-bought rather than homemade.
Install shelves at varying heights for visual interest, or create symmetrical groupings for a more structured, formal appearance. Consider grouping shelves in threes or fives for balanced arrangements that feel intentional. Use shelf brackets designed to be hidden or mount shelves directly to wall studs for the cleanest floating appearance. Add under-shelf lighting to highlight displayed items and create ambient room lighting.
Tips
- Do use proper mounting hardware rated for the shelf weight plus contents
- Don't overload shelves—distribute weight evenly and avoid placing heavy items near edges
- Do use a level during installation for perfectly horizontal shelves
Rental note: Use heavy-duty removable wall anchors for damage-free installation in rental properties, though weight capacity is lower than permanent mounting.
What this gives you: Custom storage and display space that maximizes wall area while maintaining clean, uncluttered floors.
16. Fabric Canopy Bed
A fabric canopy bed transforms an ordinary sleeping space into a cozy, dreamy retreat using lightweight fabric draped or hung above the bed, creating a dramatic focal point that adds romance and privacy to teen rooms.
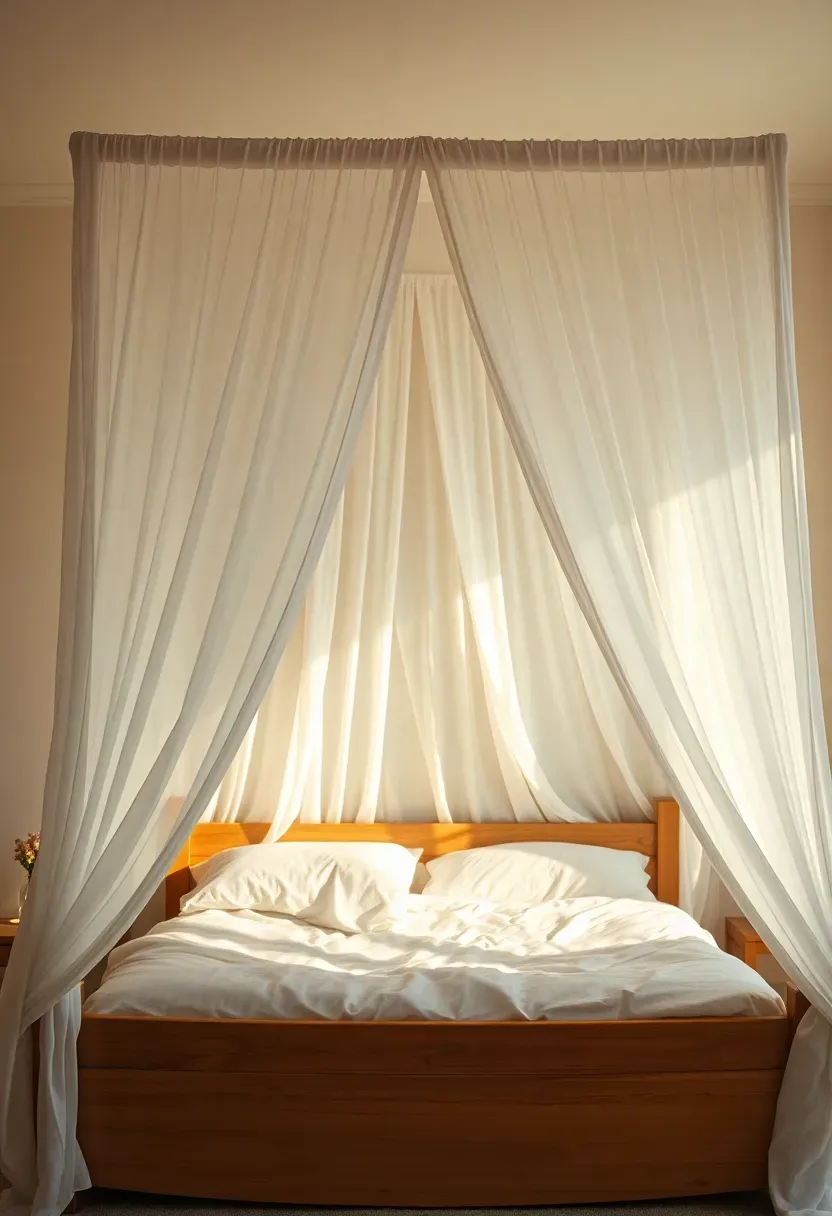
Recommended
Items for this idea
Choose lightweight, sheer fabrics like voile, chiffon, or lace for ethereal, romantic effects, or select heavier materials like velvet or brocade for more dramatic, dramatic statements. Install curtain rods, tension rods, or dowels above the bed for draping fabric, or create a simple canopy using hooks in the ceiling corners with fabric gathered and draped between them. Consider the bed's height and room proportions when designing the canopy to avoid overwhelming the space.
Placement note: Ensure canopy fabric doesn't interfere with ceiling fans, light fixtures, or ventilation to maintain safety and functionality.
Color choice significantly impacts the overall mood—white neutrals create airy, open feelings, while rich colors add drama and coziness. Layer multiple fabrics or add fairy lights within the canopy for enhanced visual interest and ambient lighting. For smaller rooms, consider a half-canopy or side-draped design rather than fully enclosing the bed to maintain a sense of openness while still achieving the desired aesthetic.
Tips
- If working with a limited budget, use simple sheer curtains hung from tension rods between bed posts or walls
- Then upgrade gradually by adding more elaborate draping or fabrics as budget allows
- If the room feels dark with added fabric, incorporate lighter colors and ensure adequate natural light
What this gives you: Instant transformation of the bed into a cozy, private sanctuary that dramatically enhances room atmosphere and comfort.
17. Statement Mirror Frame
A custom-framed statement mirror serves as both functional decor and artistic focal point, reflecting light to make rooms appear larger while adding personality and visual interest through creative frame treatments.
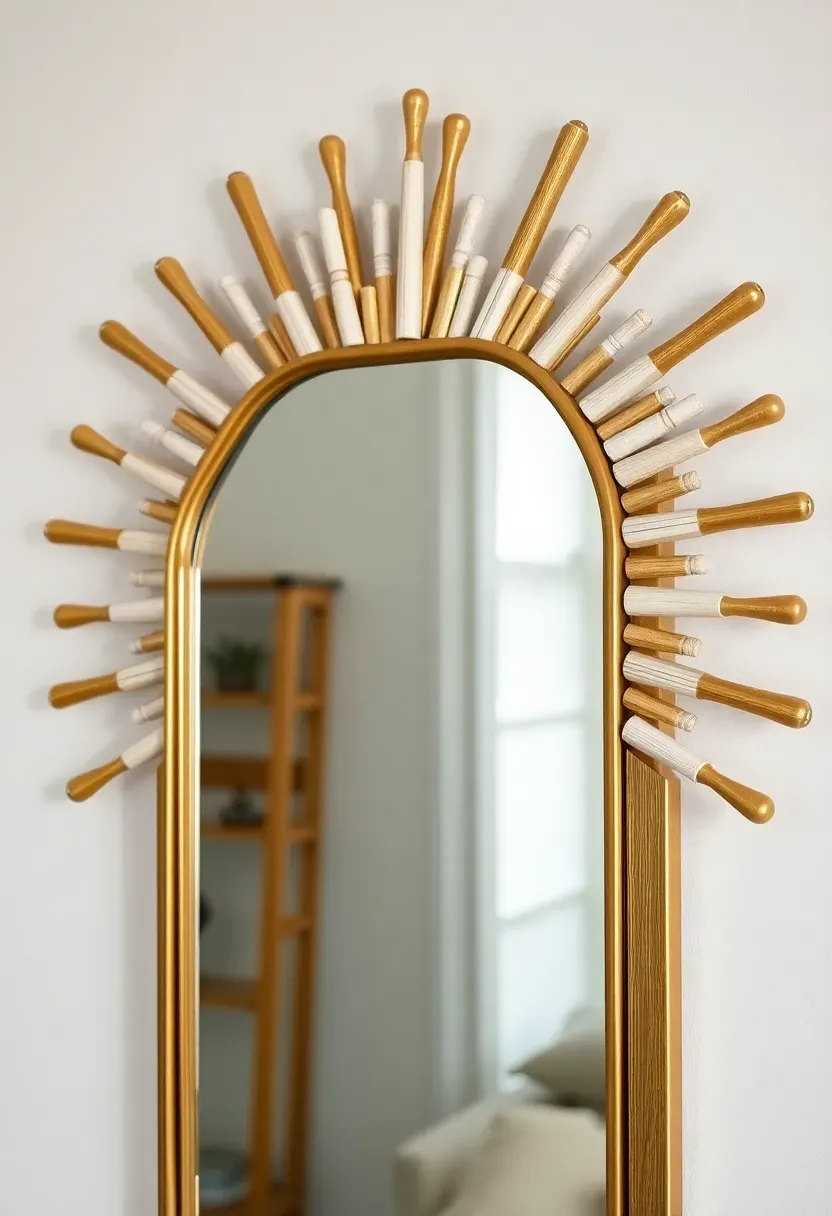
Start with an inexpensive mirror from discount stores or thrift shops—the quality of the glass matters less than the frame when the goal is a custom treatment. Measure carefully to determine frame dimensions and decide whether to completely replace the existing frame or build over it. Consider mirror placement when designing the frame—bathroom mirrors need moisture-resistant materials, while bedroom mirrors can incorporate more delicate or decorative elements.
Why it works: Mirrors visually expand small spaces, reflect natural light to brighten rooms, and serve as functional decor for daily routines.
Frame options include building simple wooden frames, adding mosaic tiles, creating sunburst designs using wooden dowels or metallic elements, or wrapping the perimeter in rope, ribbon, or fabric. Paint frames in bold accent colors or patterns to make them stand out, or match existing room decor for a more integrated appearance. Add dimensional elements like shells, gems, or other small objects for unique, personalized touches that reflect individual interests and style.
Tips
- Pro: Statement mirrors can dramatically impact room atmosphere while serving practical purposes
- Con: Large mirrors are heavy and require secure mounting for safety
- Fix: Use appropriate wall anchors rated for the mirror's weight and enlist help during installation
What this gives you: A functional art piece that enhances room brightness, creates the illusion of space, and serves as a striking visual focal point.
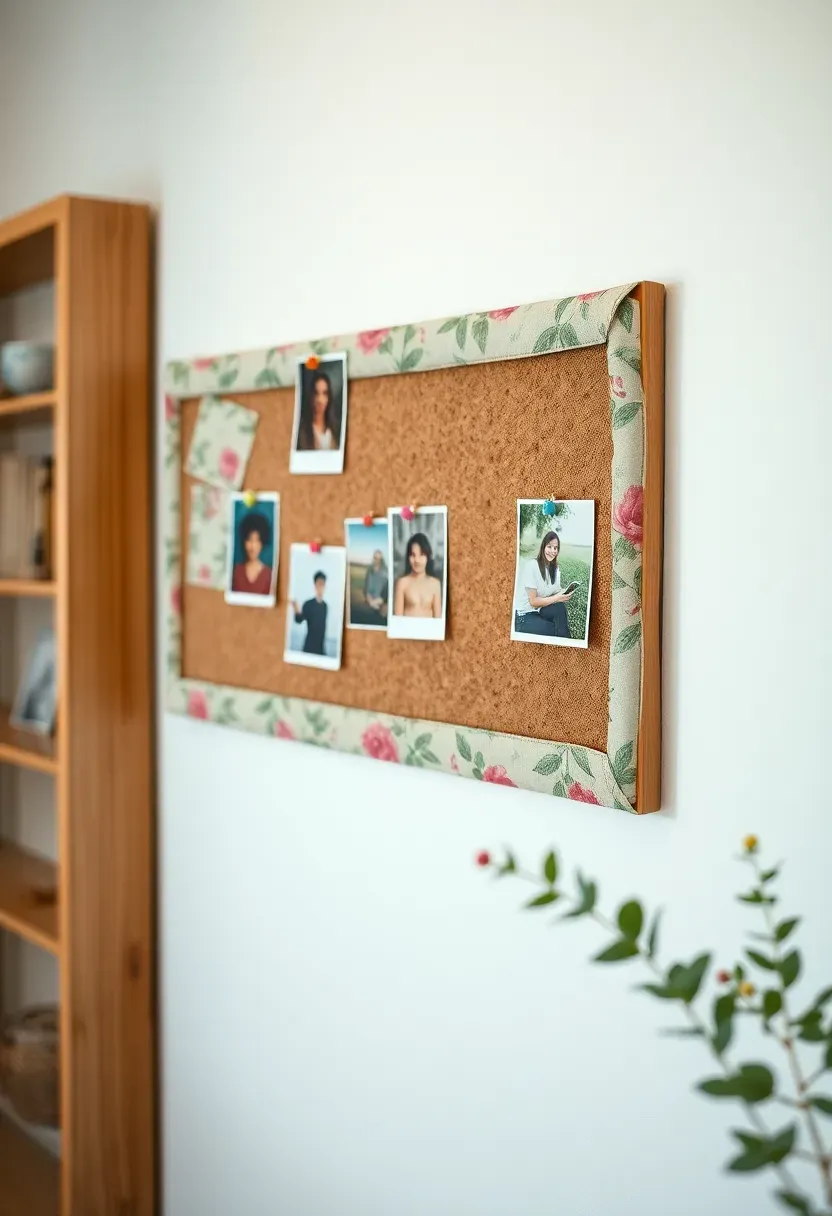
18. Cork Board Inspiration Wall
A cork board inspiration wall serves as a constantly evolving gallery for displaying favorite images, quotes, reminders, and creative ideas, providing a functional space that combines organization with personal expression.
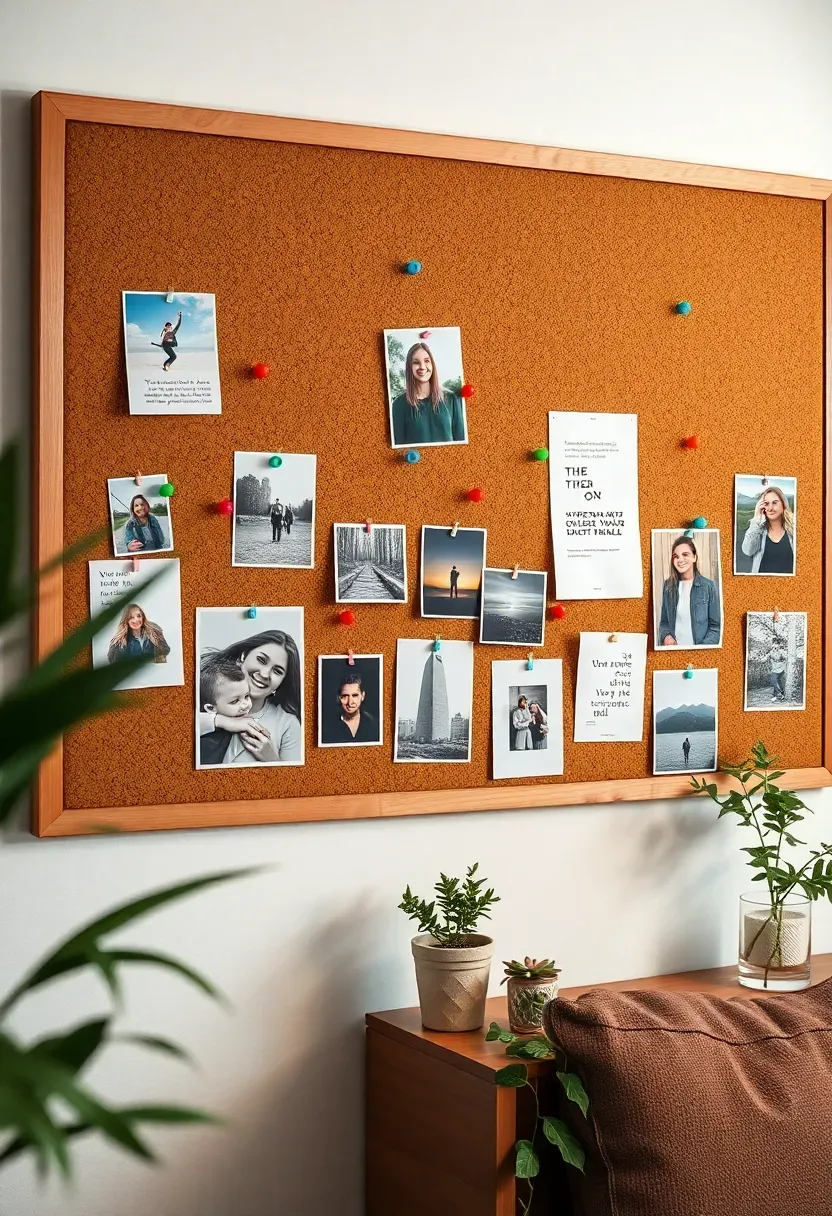
Recommended
Items for this idea
Choose between traditional rolled cork sheets, decorative cork tiles, or upcycle old picture frames with cork backing for custom-sized boards. Paint or frame cork boards to match room decor rather than leaving them plain brown for a more intentional, finished appearance. Consider creating a large statement wall using multiple cork boards arranged together, or use smaller boards in different areas for themed displays like fashion inspiration, school reminders, or travel goals.
Common mistake: Overcrowding cork boards with too many items makes them difficult to use and visually overwhelming rather than inspiring.
Rotate items regularly to keep the display fresh and relevant—archive older items in albums or boxes rather than discarding sentimental pieces completely. Use colorful push pins, tacks, or decorative clips to secure items and add additional visual interest. Create organizational zones within the board—assign sections for different categories or purposes to maintain functionality while allowing creative freedom.
Tips
- Leave negative space and establish visual hierarchy by keeping some areas clear while others are filled
- Use coordinating colors for pins and clips to create a cohesive appearance
- Consider adding small shelves or ledges above or below cork boards for additional display space
What this gives you: A functional, evolving display that combines organization, inspiration, and personal expression in one customizable space.
19. Book Page Wall Art
Book page wall art repurposes vintage or damaged books into decorative wall displays, creating literary-inspired decor that adds texture, nostalgia, and intellectual character to teen rooms while being incredibly budget-friendly.
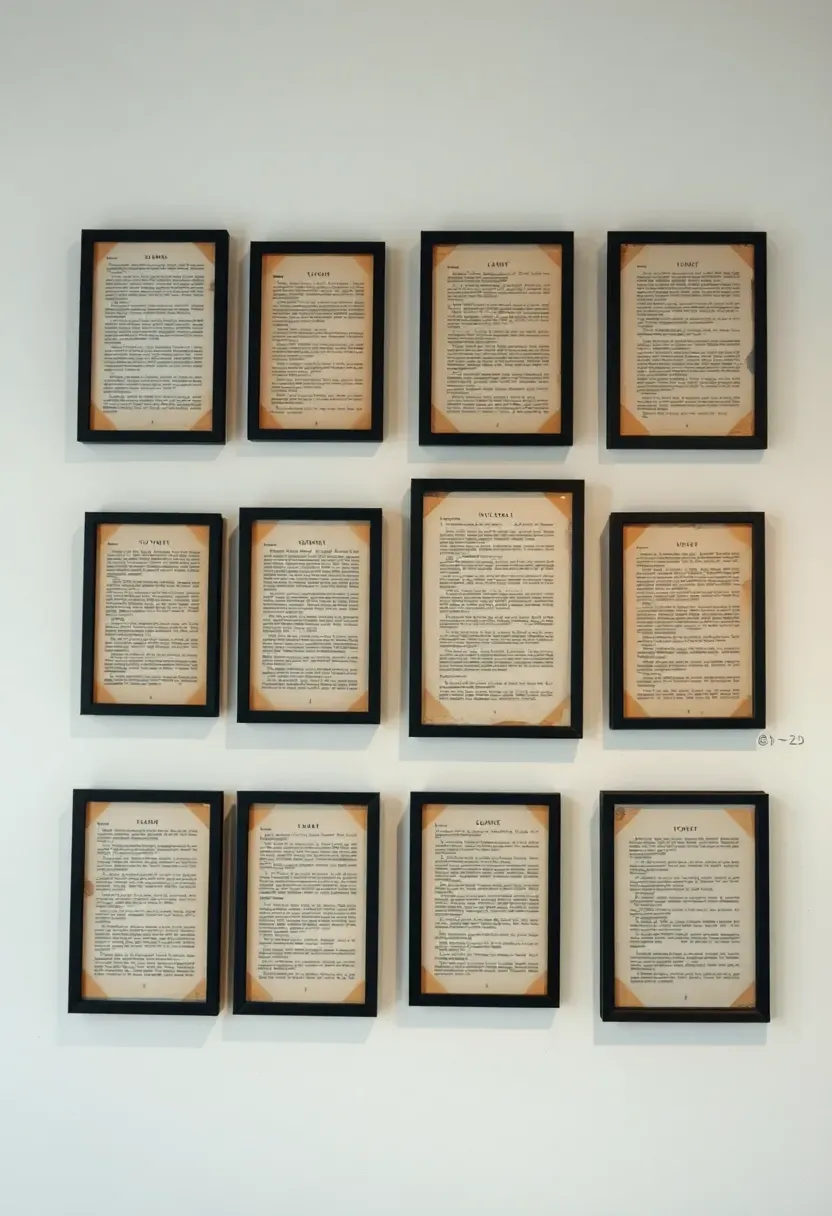
Source books from thrift stores, garage sales, or personal collections—choose books with interesting fonts, decorative elements, or personal meaning to make the artwork more meaningful. Individual pages can be framed simply in thrifted or inexpensive frames, or arrange multiple pages on a single backing for a larger statement piece. Consider creating shapes or patterns by cutting book pages into hearts, stars, or geometric forms before arranging them artistically.
Add visual interest by incorporating colored elements like watercolor washes, gold leaf accents, or small drawings directly onto book pages before framing. Group multiple framed pages together for a library-inspired gallery wall, or mix book page art with other types of prints and photographs for eclectic displays. For literary enthusiasts, choose passages or pages from favorite books, poems, or meaningful quotes to make the artwork deeply personal.
Tips
- Pro: Book pages are free or extremely inexpensive, making this one of the most budget-friendly art options
- Con: Thin paper can wrinkle or tear during handling and framing, requiring careful work
- Fix: Mount pages on sturdy backing before framing to prevent wrinkling and ensure smooth appearance
Best for: Book lovers and readers who want to incorporate their passion into room decor while maintaining an elegant, sophisticated aesthetic.
What this gives you: Literary-inspired, textured wall art that adds intellectual depth and personal meaning while remaining extremely budget-friendly.
20. DIY Room Divider
A DIY room divider creates distinct zones within shared spaces or adds architectural interest to larger rooms, providing privacy, storage, or visual separation while serving as a decorative element that enhances room functionality.
Recommended
Items for this idea
Design options range from simple curtain dividers suspended from tension rods to more elaborate structures using wooden panels, open shelving units, or repurposed doors. Consider the divider's purpose—privacy screening, storage, pure decoration, or creating a defined workspace area—when choosing materials and design. Lightweight materials like fabric, PVC pipes, or louvered doors work well for rental spaces, while more substantial construction suits permanent installations.
Placement note: Position dividers where they won't block natural light sources or create circulation problems within the room.
Open shelving dividers offer the dual benefit of separation and storage or display space—use them to divide a sleeping area from a workspace while showcasing books, plants, or collectibles. Fabric dividers add softness and can be easily changed to update room color schemes or patterns. For a more permanent solution, consider building a half-wall or creating a divider using lattice panels that allow some light penetration while defining separate zones.
Tips
- If using fabric dividers, choose heavyweight fabrics or add liners for better privacy and sound dampening
- Then consider layering multiple panels for enhanced separation while maintaining visual interest
- If building a structural divider, ensure it's properly secured and stable for safety
What this gives you: Defined zones within a single room that improve functionality while adding architectural interest and personal style.
21. Neon Sign Alternative
DIY neon sign alternatives capture the trendy, glowing aesthetic of neon lights while being safer, more affordable, and fully customizable, allowing teens to create personalized lighted decor that makes a statement.
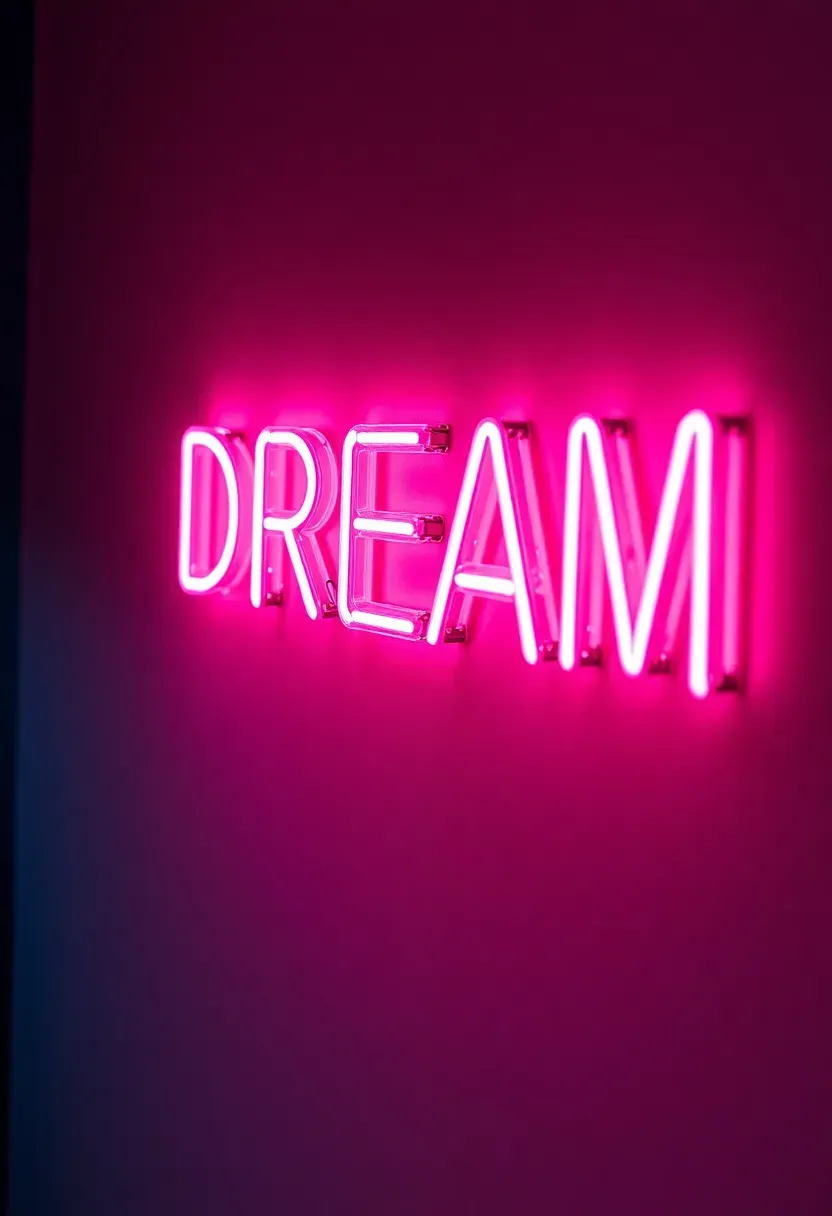
LED strip lights offer the closest approximation to neon's continuous glow without the fragile glass tubes or high-voltage concerns of real neon. Shape LED strips into letters, words, or simple designs using clear tubing or flexible channels that create smooth, rounded edges. Battery-operated options avoid the need for electrical outlets near the display, while plug-in versions provide consistent, reliable illumination for permanent installations.
Popular alternative methods include backlit acrylic shapes, electroluminescent wire, or lighted canvas art where fairy lights are sandwiched between fabric layers. Create custom words, phrases, or symbols that have personal meaning or reflect interests—names, inspirational quotes, favorite song lyrics, or icons associated with hobbies and passions. Use colored LED strips in bold, bright colors for authentic neon vibes, or choose softer warm whites for subtler, more sophisticated effects.
Tips
- Do plan designs carefully before installing—once LED strips are cut or shaped, modifications are difficult
- Don't overload electrical circuits when using multiple lighted elements in one room
- Do consider adding dimmers or remote controls for adjustable brightness and convenience
Budget/time note: LED neon alternatives cost $20-50 depending on complexity, compared to $200+ for custom real neon signs.
What this gives you: Trendy, personalized lighted decor that adds atmosphere and visual impact without the cost or safety concerns of real neon.
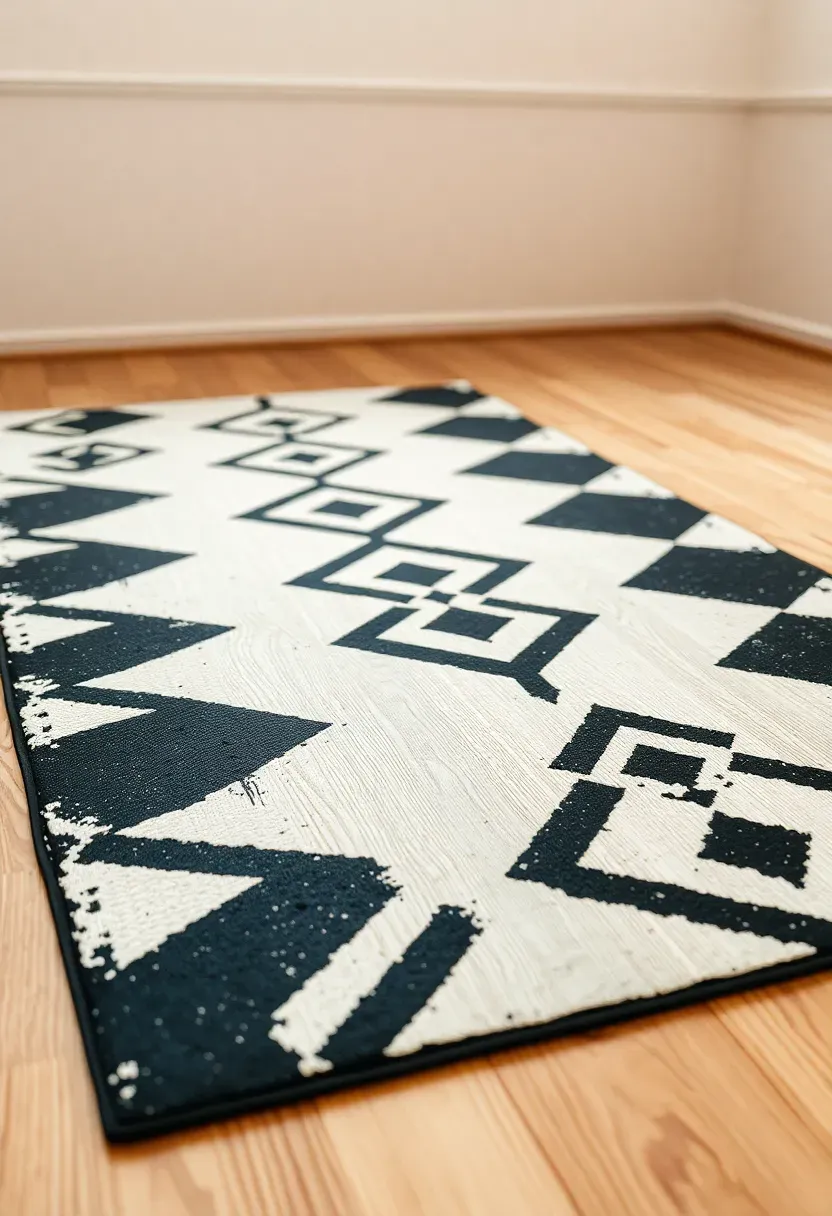
22. Painted Rug on Floor
A painted floor rug creates custom, perfectly-sized decor directly on hard flooring surfaces, offering a budget-friendly alternative to area rugs while allowing complete creative control over design, colors, and patterns.
Recommended
Items for this idea
Placement note: Choose areas with minimal foot traffic for painted floor designs to extend their lifespan and reduce wear from frequent use.
Clean floors thoroughly and apply primer before painting to ensure proper adhesion and long-lasting results. Use floor paint specifically designed for the flooring material—wood, concrete, or laminate surfaces require different products. Plan designs on paper first, considering scale and proportion in relation to the room size and furniture placement. Simple geometric patterns like stripes, diamonds, or Moroccan-inspired motifs work well for most spaces and are easier to execute than complex illustrations.
Apply several thin coats rather than one thick coat for even coverage and better durability. Use painter's tape for crisp edges in geometric designs, or freehand paint organic patterns for a more casual, artistic look. Finish with several coats of clear polyurethane sealer to protect the painted design from scratches, scuffs, and wear. Consider extending painted designs up walls for a cohesive, custom wallpaper effect that ties the entire room together.
Tips
- If unsure about committing to a permanent painted design, start with a small, reversible area as a test
- Then expand to larger areas once satisfied with the technique and visual result
- If the design looks too busy or overwhelming, repaint the entire floor in a solid color and start over
Rental note: Painted floors may be considered damage in rental properties—check lease terms before attempting this project.
What this gives you: Custom, perfectly-sized floor decor that reflects personal style while avoiding the cost and maintenance of traditional area rugs.
23. Memory Box Display
A memory box display transforms sentimental collections and small mementos into curated wall art, preserving precious memories while creating meaningful, personalized decor that tells the story of experiences, relationships, and personal growth.
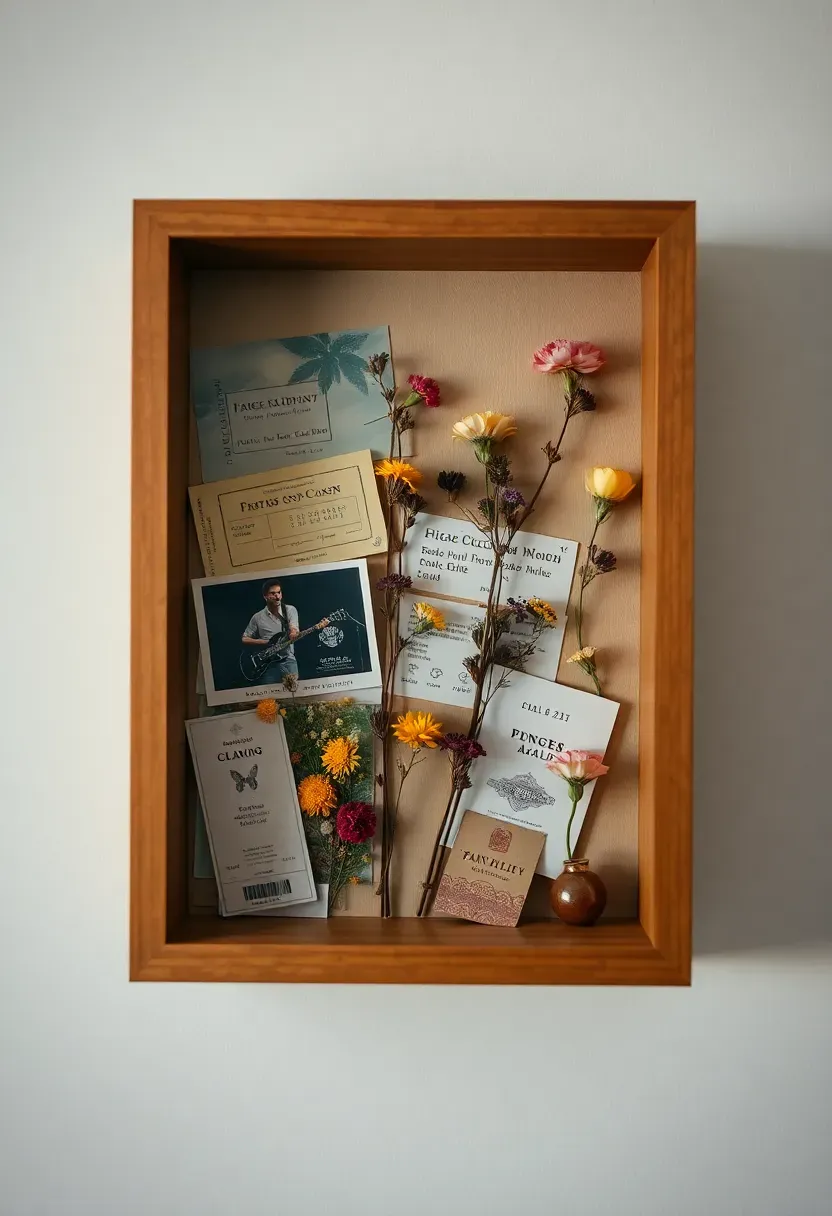
Choose shadow boxes or deep-framed display cases that accommodate various item thicknesses—from flat paper memorabilia to dimensional objects like shells, medals, or small collectibles. Group items by theme—concert memorabilia, travel souvenirs, sports achievements, or friendship tokens—or create chronological collections that document particular periods or experiences. Arrange items thoughtfully within the box, considering visual balance and the story being told rather than simply placing items randomly.
Why it works: Displayed memories remain visible and meaningful rather than being hidden away in drawers or boxes, allowing regular appreciation and reflection.
Add context and storytelling elements by including small labels, dates, or brief notes explaining the significance of displayed items. Mix different types of materials—photographs, ticket stubs, dried flowers, handwritten notes, and small objects—to create rich, textured displays that capture the full essence of memories. Consider creating multiple small displays for different life aspects rather than one overwhelming collection of everything meaningful.
Tips
- Pro: Memory displays preserve sentimental items while incorporating them into room decor as conversation pieces
- Con: Some items deteriorate when displayed long-term, especially in direct light
- Fix: Use UV-protective glass and rotate displayed items periodically to preserve fragile memorabilia
What this gives you: Tangible displays of personal history and meaningful experiences that make the space feel deeply personal and connected to identity.
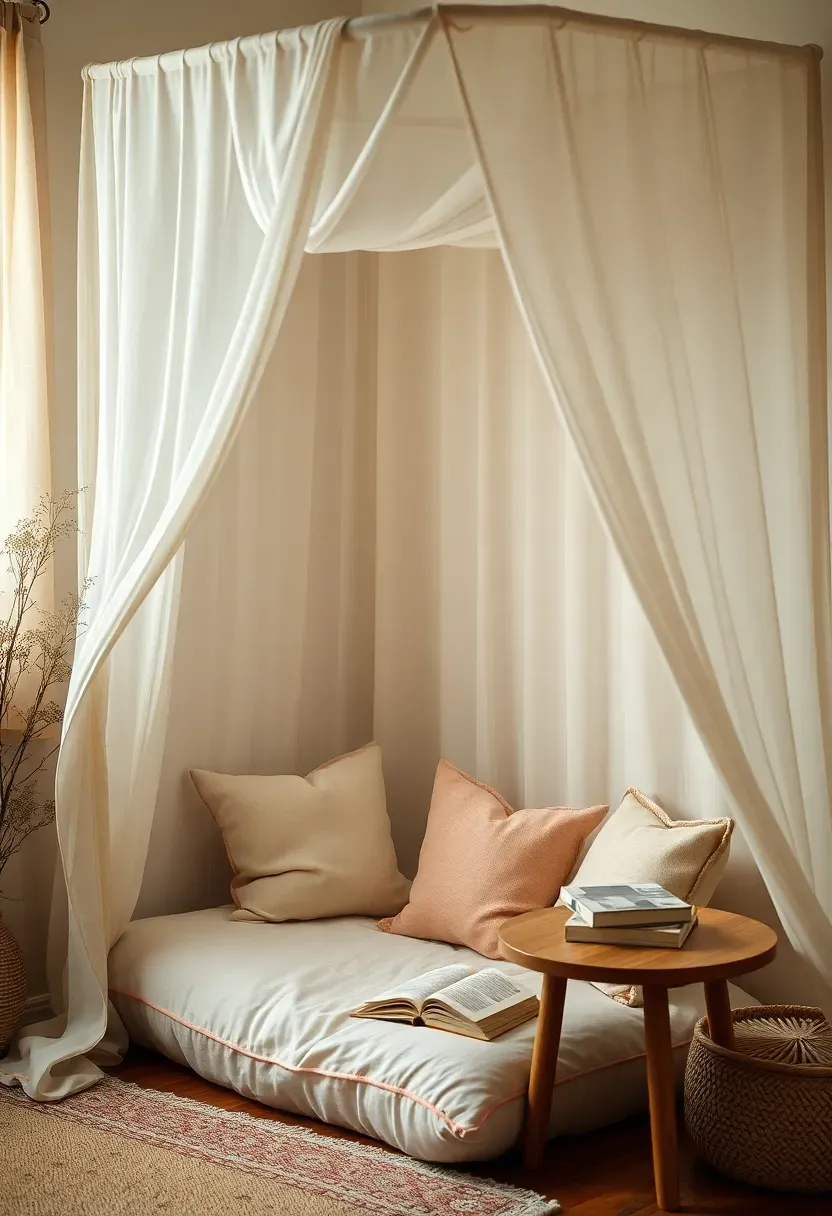
24. DIY Canopy Reading Nook
A DIY canopy reading nook transforms a corner or small space into a cozy, private retreat perfect for reading, studying, or simply relaxing, creating an escape within the room that feels special and personal.
Recommended
Items for this idea
Create a basic structure using tension rods suspended between walls, curtain rods mounted from the ceiling, or a simple frame built from wooden dowels or PVC pipe. Drape lightweight, flowing fabrics like sheers or soft cottons to create the canopy effect—choose colors and textures that complement the room's existing decor while adding softness and visual interest. Ensure the fabric is washable and durable enough for regular use, especially in high-traffic areas.
Common mistake: Making the canopy area too small or cramped prevents comfortable use and defeats the purpose of creating a relaxing retreat.
Provide comfortable seating using floor cushions, bean bags, a small armchair, or even piled blankets and pillows for lounging. Add a small side table or ledge for holding books, drinks, or electronic devices while in the nook. Incorporate lighting specifically for the area—reading lamps, string lights, or small floor lamps ensure adequate illumination for activities while adding ambiance. Personalize the space with favorite books, meaningful decor, or cozy touches that make it feel truly special.
Tips
- Position the nook near windows for natural light whenever possible
- Ensure adequate ventilation and airflow to prevent stuffiness during extended use
- Keep the area accessible but somewhat separated from the main room traffic for privacy
What this gives you: A dedicated, cozy retreat within the room that encourages reading, relaxation, and quiet time away from daily distractions.
25. Washi Tape Headboard
A washi tape headboard creates a decorative focal point above the bed without the expense or permanence of traditional headboards, offering endless creative possibilities for patterns, colors, and designs that can be changed whenever style evolves.
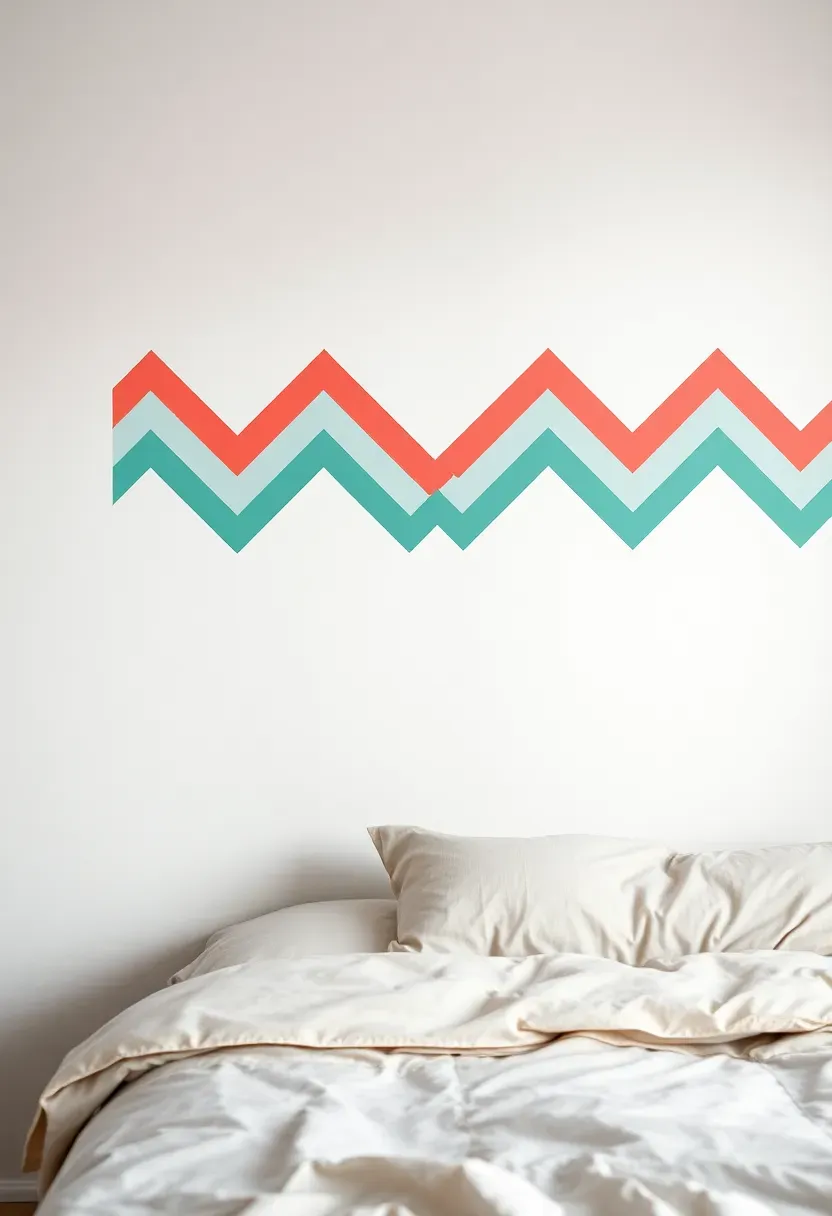
Determine headboard dimensions based on bed size and desired visual impact—typically, headboards extend slightly beyond the mattress width on both sides and reach a pleasing proportion of the wall height. Choose washi tape colors and patterns that either coordinate with existing room decor or intentionally contrast for bold statements. Create geometric patterns like chevron, stripes, herringbone, or interlocking triangles for modern, structured designs, or opt for more organic, freeform patterns for casual, artistic looks.
Start by marking the headboard area lightly in pencil or using low-tack masking tape as a guide for washi tape placement. Apply tape carefully, smoothing thoroughly to eliminate air bubbles and ensure clean edges. Consider layering different tape widths and patterns to create depth and visual interest—wide base tapes with narrow accent tapes create sophisticated, professional-looking designs. Add small details like dots, lines, or flourishes using fine-tip washi tapes for extra personalization.
Tips
- Do work from the center outward when applying tape for more consistent patterns
- Don't apply washi tape to textured walls where it won't adhere properly
- Do keep extra tape on hand for replacing damaged sections or fixing mistakes
Rental note: Washi tape removes cleanly from most smooth walls without damage, making this perfect for renters seeking temporary decor solutions.
What this gives you: A completely removable, customizable headboard that adds visual interest above the bed without significant expense or commitment.
26. Upcycled Door Organizer
An upcycled door organizer transforms unused vertical space into functional storage, keeping essentials accessible while utilizing an often-overlooked surface that maximizes room organization without consuming floor or desk space.

Recommended
Items for this idea
Placement note: Ensure door organizers don't interfere with door function or strike plates—test door swing before finalizing installation.
Repurpose old items like picture frames, spice racks, shoe organizers, or even fabric swatches as door-mounted organizers. Picture frames with added wire or twine create jewelry displays, while small baskets or containers mounted to backing boards hold office supplies, accessories, or small items. Consider the door's purpose when designing organizers—bedroom doors suit jewelry, accessories, or reading materials, while closet doors work well for shoes, accessories, or seasonal items.
Use over-the-door hooks for hanging larger items like bags, coats, or accessories. Magnetic surfaces created with magnetic paint or sheets allow for flexible, changeable displays of photos, notes, or lightweight items. For a more polished look, paint or repurpose materials to match room decor rather than leaving them in original, worn condition. Group similar items together for organized appearance and easier access—office supplies, beauty products, or accessories each deserve their own designated space.
Tips
- If renting, choose removable hooks and lightweight organizers that won't damage door surfaces
- Then upgrade to permanent installations in owned spaces for heavier items and greater durability
- If the door feels cluttered, reduce the number of items or create themed sections
What this gives you: Maximum storage efficiency using underutilized vertical space while keeping essentials organized and easily accessible.
27. Fabric-covered Bulletin Board
A fabric-covered bulletin board combines practical organization with decorative style, transforming standard cork or foam board into a visually appealing display space that coordinates perfectly with room decor while providing functional storage for notes, reminders, and inspiration.
Choose durable, medium-weight fabrics in patterns or colors that complement the room—solid colors provide versatile backdrops for displayed items, while subtle patterns add visual interest without overwhelming the board contents. Stretch fabric tightly over the board surface and secure it neatly on the back using staple guns or heavy-duty adhesive for smooth, professional results. Consider adding a contrasting border or frame using ribbon, decorative tape, or wood trim to define the board's edges and add finished appearance.
Why it works: Fabric-covered boards offer the same functionality as standard cork boards while providing customizable decor that looks intentional rather than purely utilitarian.
Incorporate ribbons or twine crisscrossed over the fabric for additional display options—slide photos, notes, or small items beneath the ribbons for secure display without pins. Create themed boards for specific purposes—one for school reminders, another for inspiration or goals, or mix multiple smaller boards for different categories. Use decorative push pins that coordinate with the fabric or room color scheme for cohesive, intentional appearance rather than standard office supplies.
Tips
- Pro: Fabric-covered boards look intentional and decorative rather than purely functional, enhancing room aesthetics
- Con: Some fabric surfaces don't hold push pins as securely as plain cork
- Fix: Place cork tiles or pinboards beneath the fabric in areas where pins will be frequently used
What this gives you: Stylish, coordinated display space that serves practical organizational needs while enhancing rather than detracting from room decor.
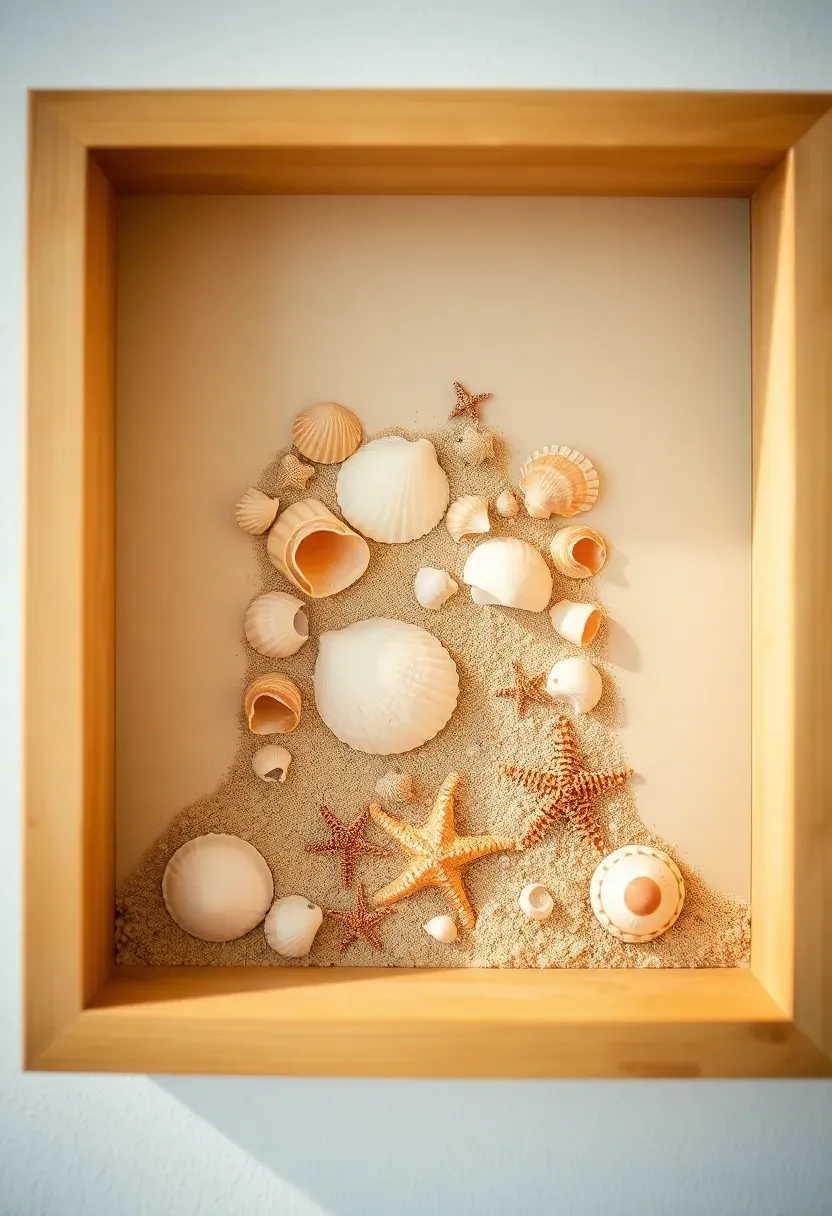
28. Shadow Box Collections
Shadow box collections display dimensional objects and small treasures in curated, gallery-like arrangements, preserving and showcasing meaningful items while adding sophisticated depth and visual interest to room decor.
Recommended
Items for this idea
Group objects by theme—seashells and coastal finds, travel souvenirs, sports memorabilia, or nature collections like pressed flowers or interesting rocks and minerals. Arrange items thoughtfully within the box, considering scale, color, and visual balance rather than simply placing objects randomly. Use contrasting or complementary backing materials—colored paper, fabric, or natural elements like sand or pebbles—to enhance displayed items and create depth within the box.
Common mistake: Overfilling shadow boxes makes them cluttered and difficult to appreciate individual items, diminishing their visual impact.
Incorporate small labels, tags, or handwritten notes explaining the significance of displayed items, transforming collections into storytelling displays. Create arrangements that tell stories or represent specific experiences, periods, or interests rather than random groupings of unrelated objects. Hang multiple shadow boxes together for impactful gallery walls, or scatter individual boxes throughout the room for smaller moments of visual interest. Mix box depths and sizes for dynamic, layered displays that create visual movement and prevent monotony.
Tips
- Leave negative space within boxes—some empty area helps individual items stand out and prevents visual overwhelm
- Use museum-quality or acid-free materials for valuable or fragile items to prevent long-term damage
- Consider seasonal rotations—swap displayed collections to keep displays fresh and engaging
What this gives you: Sophisticated displays of personal collections that preserve memories while adding three-dimensional visual interest to room decor.
29. DIY Bedside Caddy
A DIY bedside caddy keeps essential items organized and within arm's reach while sleeping or lounging in bed, maximizing small room efficiency without requiring nightstands or consuming valuable floor space.
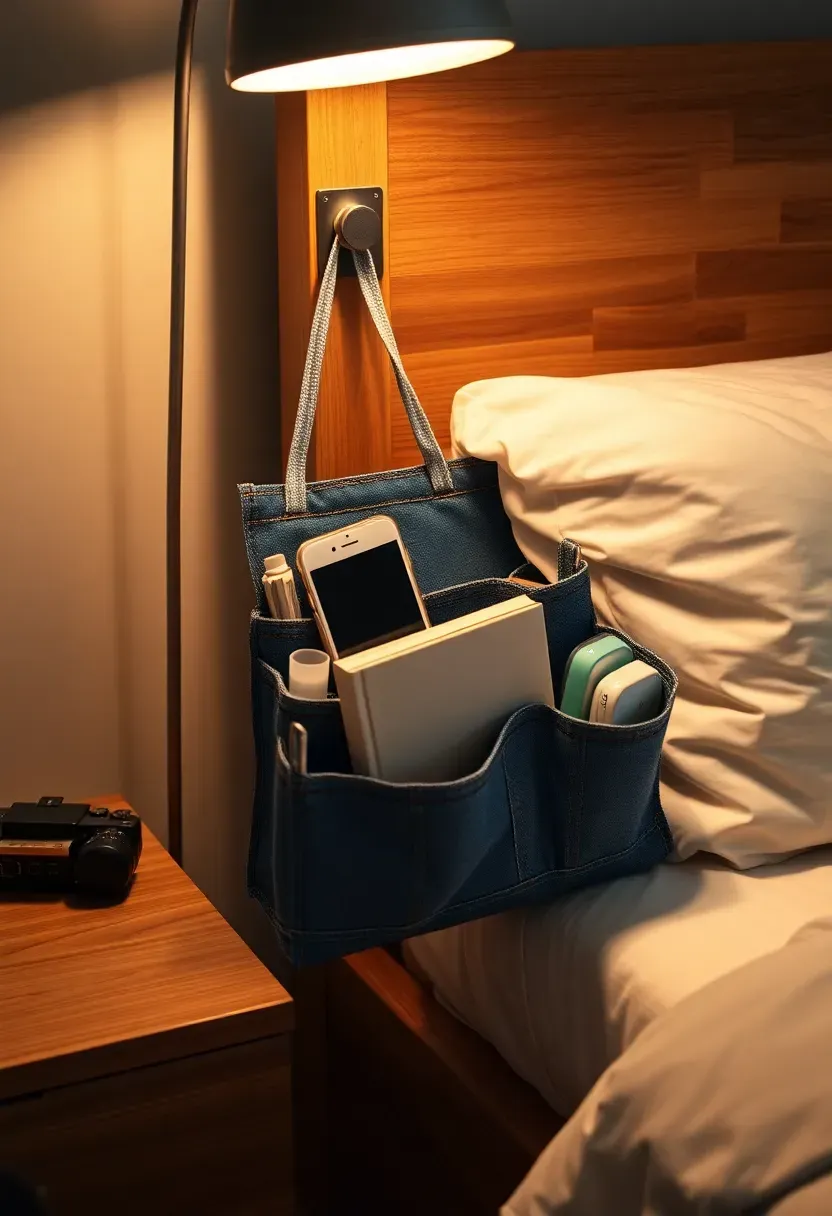
Create caddies from fabric, canvas, or repurposed materials like jeans pockets or sturdy tote bags. Sew multiple pockets in various sizes to accommodate different items—phones, tablets, books, glasses, remote controls, and water bottles all fit conveniently. Adjustable straps or ties allow attachment to bed frames, mattress edges, or headboards, ensuring the caddy stays securely in place during use. Choose durable, washable fabrics in colors or patterns that coordinate with bedding and room decor for cohesive appearance.
Placement note: Attach caddies at a height that allows easy access while lying down but doesn't interfere with sleeping position or cause discomfort.
Include features like reinforced stitching at stress points, loop handles for carrying, or zippered compartments for valuable items that need extra security. Create themed caddies for different purposes—reading materials, electronics, personal care items, or study supplies—or design multipurpose caddies that accommodate various needs. Consider making two caddies for beds with two sides, providing personalized storage for each person sharing the space.
Tips
- If sewing skills are limited, use iron-on hem tape or fabric glue for no-sew construction
- Then upgrade to stitched versions as skills improve for more durable, long-lasting results
- If the caddy slips or moves during use, add extra securing points or non-slip backing materials
What this gives you: Convenient bedside storage that keeps essentials organized and accessible without requiring nightstands or taking up floor space.
These budget-friendly teen room decor projects prove that creating a personalized sanctuary doesn't require expensive furniture or professional design services. By combining creativity, DIY techniques, and thoughtful use of materials, teens can transform their rooms into spaces that genuinely reflect who they are while staying within reasonable budgets. Start with projects that match existing skills and comfort levels, then gradually tackle more ambitious ideas as confidence grows. The most rewarding personal spaces evolve over time through experimentation, personal touches, and the meaningful incorporation of memories, interests, and dreams into everyday surroundings.
About the author
OBCD
CGI visualization and interior design content. We create detailed 3D renders and curate practical design ideas for every room in your home.