25 Green Bathroom Ideas: Sage, Olive & Emerald Decor
Green bathroom ideas bring nature's tranquility into your home, creating spaces that feel both grounding and refreshingly modern. Whether you're drawn to soft sage green bathroom walls, rich olive vanities, or dramatic emerald tile accents, green offers surprising versatility for bathroom designs of every size. These nature-inspired colors work beautifully with crisp white fixtures, warm wood accents, and brass hardware—and many can be achieved without touching a single wall in your rental.
The psychological benefits of green bathroom decor are well documented: exposure to green hues reduces stress and creates a sense of balance. A green bathroom doesn't have to feel like a forest cabin; when paired with contemporary fixtures and clean lines, it becomes a sophisticated, calm space that feels current rather than rustic. The key is choosing the right shade for your bathroom's natural light and selecting complementary materials that enhance—not compete with—your chosen green tone.
From compact apartment powder rooms to master bath retreats, green bathroom ideas scale to any space. Small bathrooms benefit from lighter sage tones that maximize natural light, while larger spaces can handle deeper olive and emerald shades that create drama. Many ideas here are renter-friendly: peel-and-stick tiles, removable wallpaper, and green accessories let you refresh your bathroom design without risking your security deposit. This collection of 25 green bathroom ideas covers the full spectrum—from subtle sage accents to bold emerald statements.
Quick FAQ
What green shade is best for small bathrooms?
Sage green and other light green tones work best for small bathrooms because they reflect more light and create an airy feel. Darker greens like emerald can make small spaces feel cramped unless balanced with abundant natural light and white fixtures.
How do I choose between sage, olive, and emerald green?
Consider your bathroom's natural light and desired mood. Sage green works well in low-light spaces and creates a calm, neutral feel. Olive green adds warmth and pairs beautifully with wood tones. Emerald green makes a bold statement and suits well-lit bathrooms with contemporary fixtures.
What colors complement green bathroom tiles?
White creates crisp contrast, brass or gold fixtures add warmth, and natural wood tones enhance green's organic feel. For sage bathrooms, soft blues and blush pink work as gentle accents. Emerald green pairs elegantly with charcoal grey and black for dramatic contrast.
Are green bathrooms timeless or trendy?
Green is inherently timeless because it's rooted in nature. Sage green, in particular, has remained popular for decades due to its versatility and calming effect. While specific shades may trend, green as a color family continues to be a sophisticated choice for bathroom design.
As an Amazon Associate I earn from qualifying purchases.
Table of Contents
- 1. Soft Sage Walls with White Subway Tiles
- 2. Olive Green Vanity with Brass Hardware
- 3. Emerald Green Accent Wall Behind Mirror
- 4. Monochromatic Sage Bathroom with Terrazzo Floors
- 5. Green Hexagon Tiles with White Grout
- 6. Two-Tone Green Bathroom with Wainscoting
- 7. Botanical Green Wallpaper with Gold Accents
- 8. Matte Forest Green Fixtures with Marble Countertops
- 9. Sage Green Floating Vanity with Wood Tones
- 10. Green Penny Round Tiles for Vintage Charm
- 11. Olive Green Shower Niche with Natural Stone
- 12. Emerald Green Bathtub as Statement Piece
- 13. Light Sage Bathroom with Brass Mirror Frame
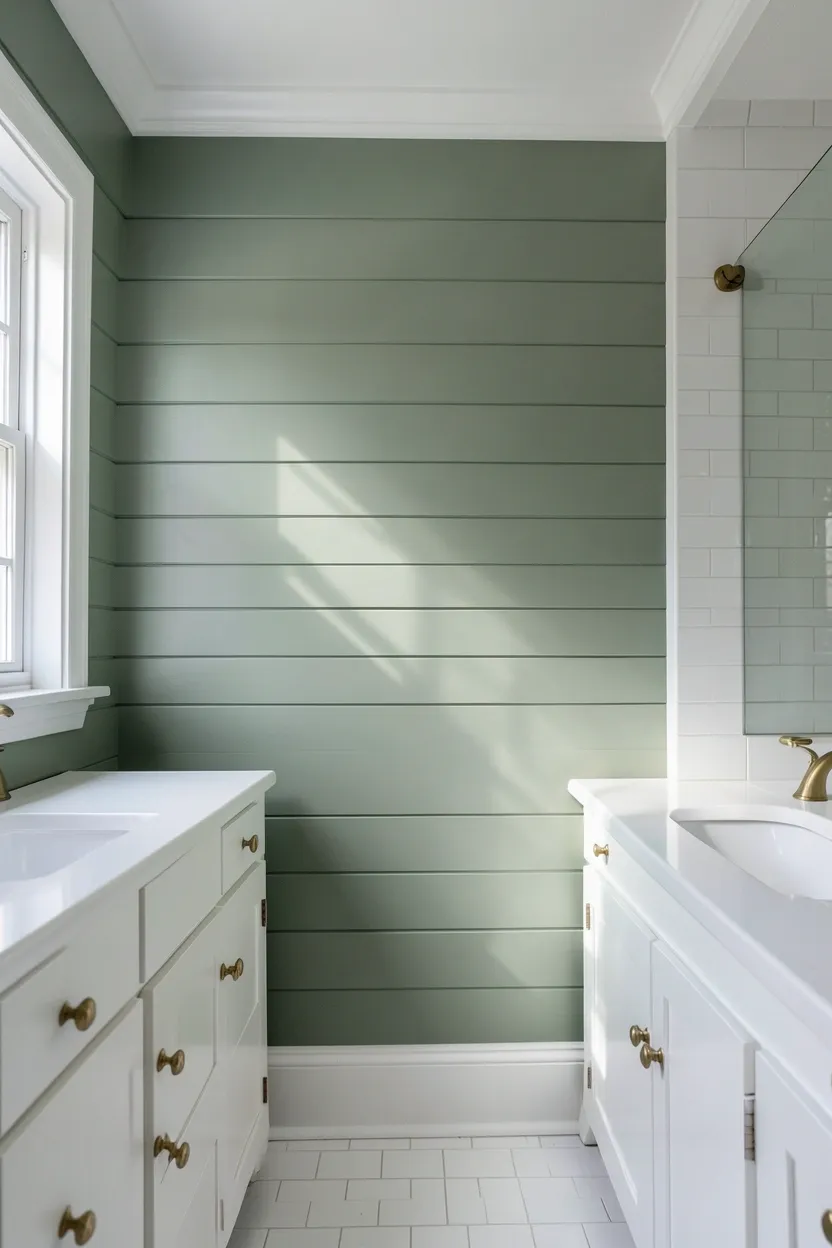
- 14. Green Shiplap Walls with White Trim
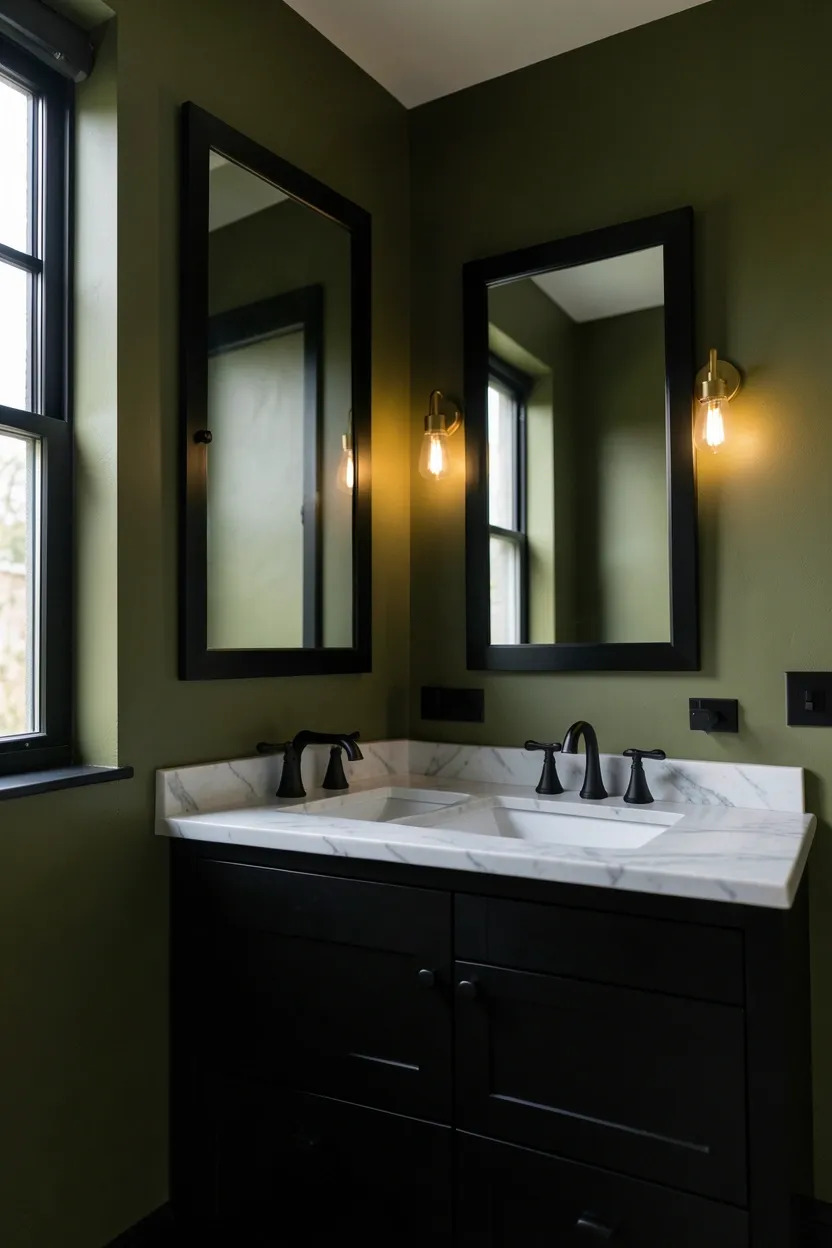
- 15. Moody Olive Bathroom with Black Fixtures
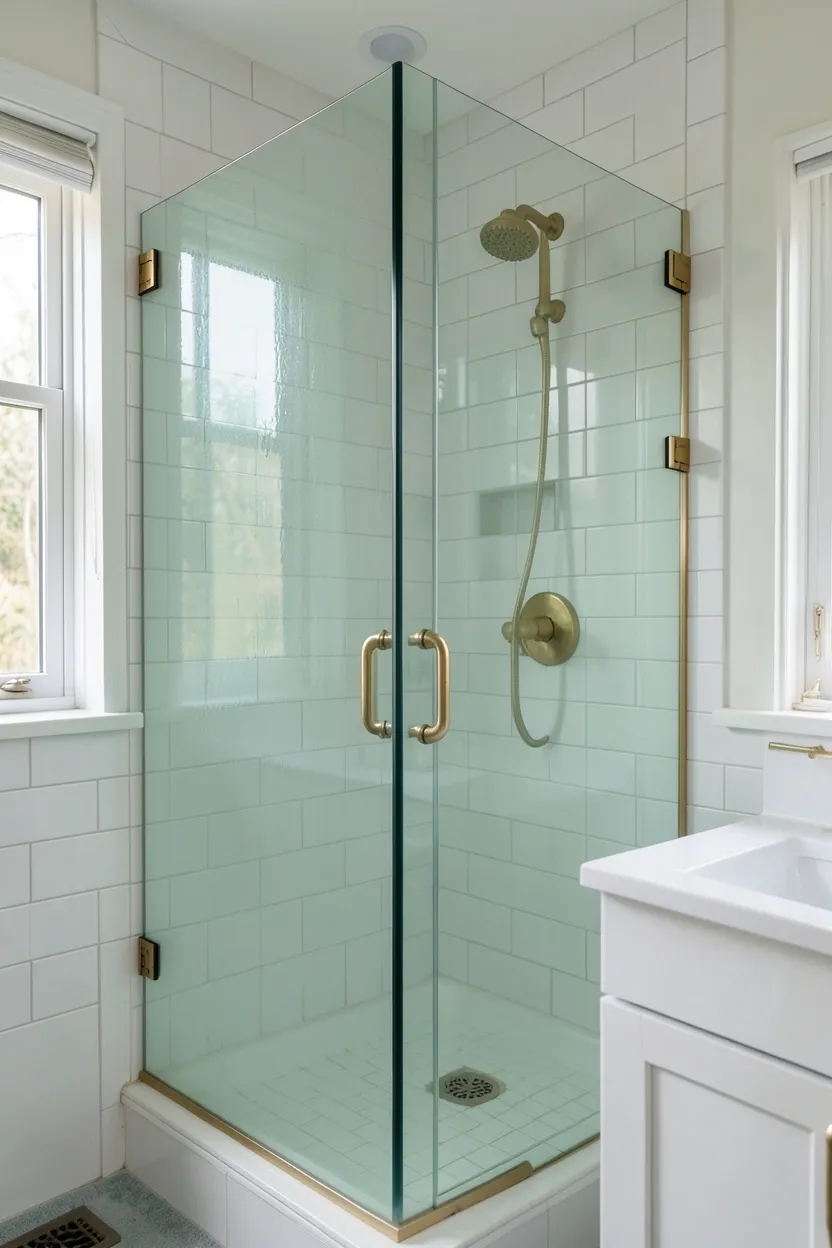
- 16. Sage Green Glass Shower Enclosure
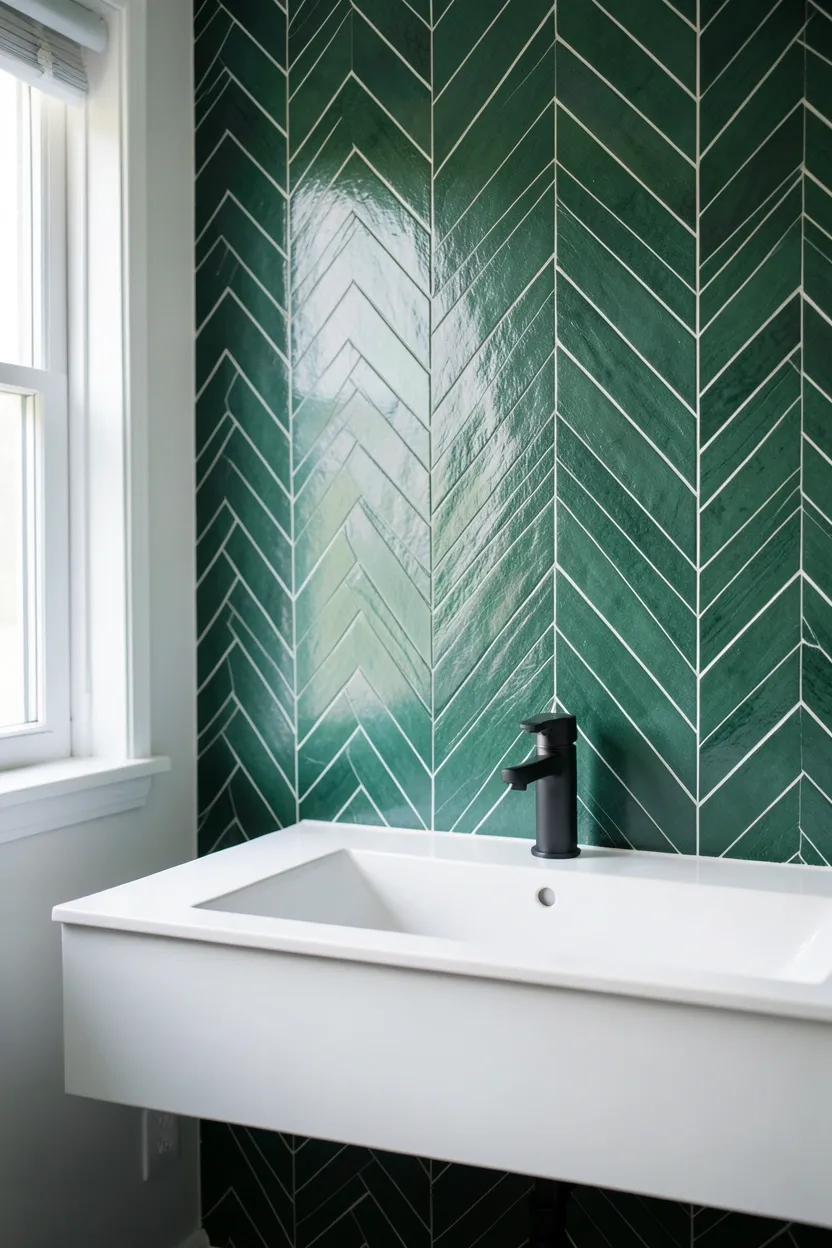
- 17. Green Chevron Tiles with Modern Vanity
- 18. Hunter Green Ceiling with White Walls
- 19. Mint Green Subway Tiles with Dark Grout
- 20. Olive Green Double Vanity with Stone Sink
- 21. Green Vertical Siding for Farmhouse Look
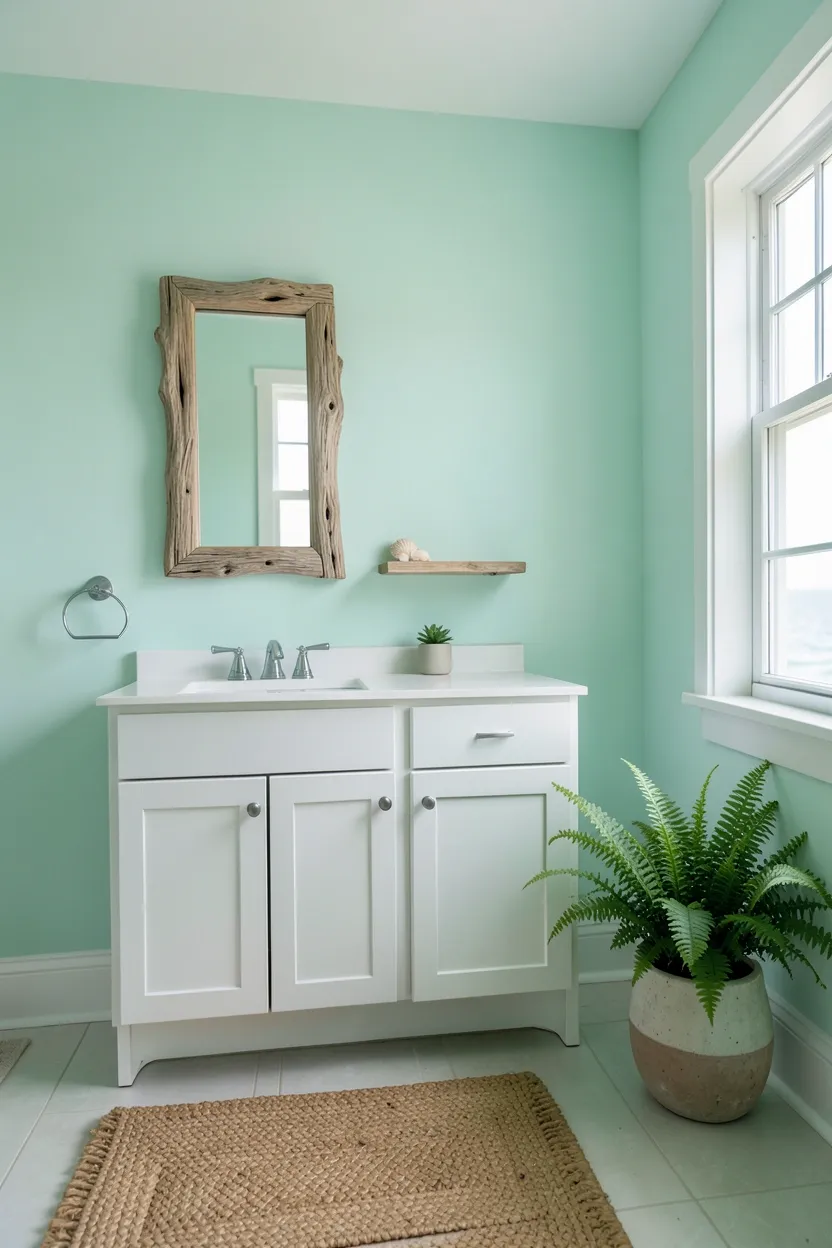
- 22. Seafoam Green Bathroom with Coastal Elements
- 23. Emerald Green Geometric Floor Tiles
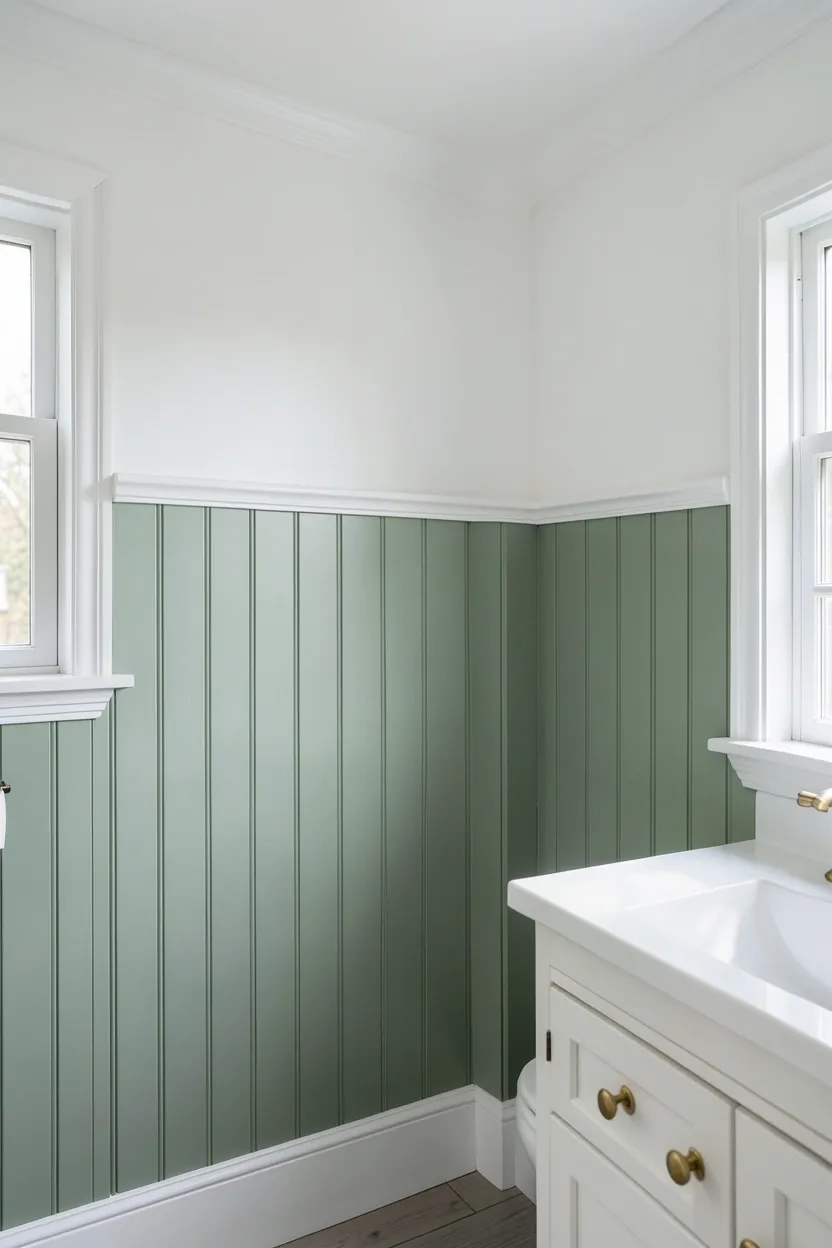
- 24. Sage Green Half Wall with Board and Batten
- 25. Natural Wood Vanity with Green Tiles
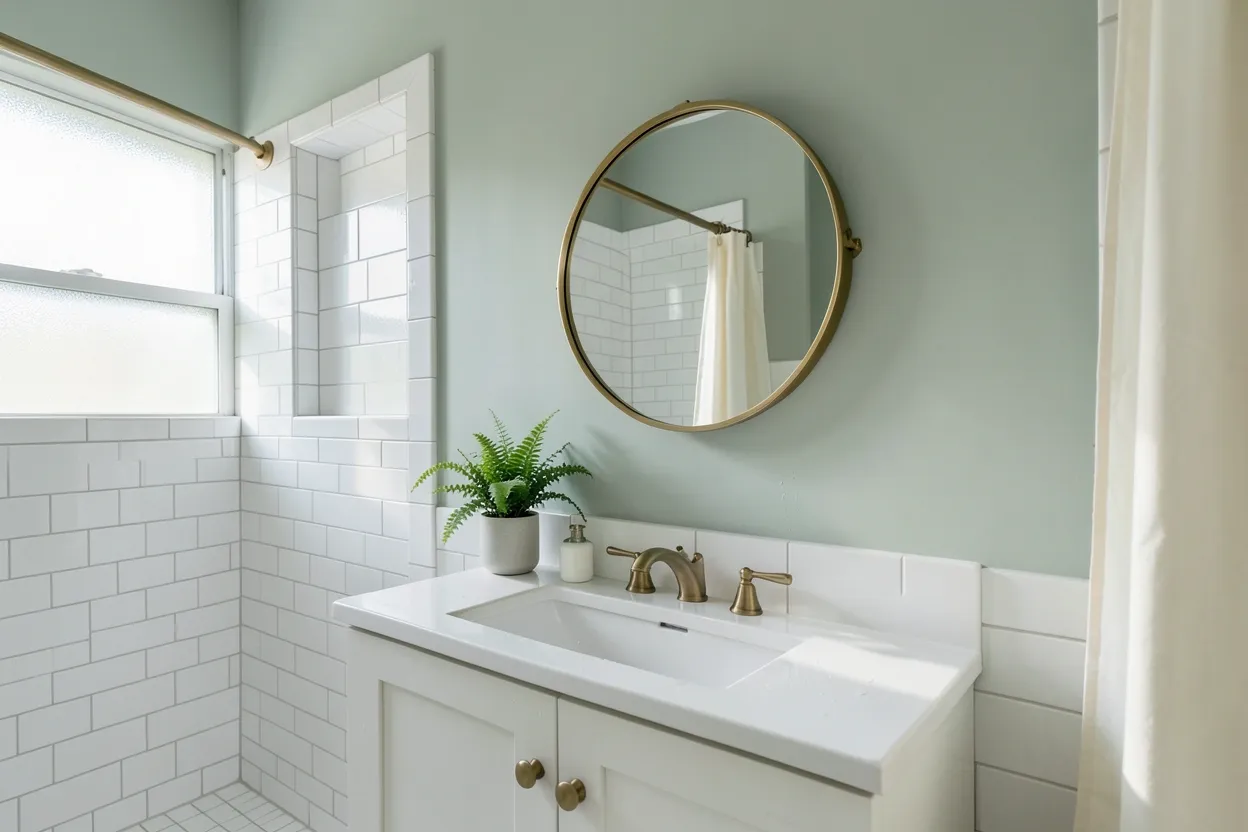
1. Soft Sage Walls with White Subway Tiles
Soft sage walls paired with classic white subway tiles create a timeless green bathroom design that feels both fresh and calming. This combination works particularly well in bathrooms with limited natural light, as the sage hue adds warmth without overwhelming the space while the white tiles reflect brightness throughout the room. The gentle green tone provides a sophisticated backdrop that allows white fixtures and brass hardware to shine.
The contrast between the matte sage walls and glossy white subway tiles creates visual interest through texture rather than color alone. Consider extending the white tiles to ceiling height to draw the eye upward and make the bathroom feel more spacious. Pair this combination with a white porcelain sink and brushed brass faucet for an elegant, spa-like atmosphere. A common mistake is using bright white fixtures that look clinical; instead opt for warm white or ivory tones that harmonize with the sage's gentle warmth. For more sage-specific inspiration, see our full guide to [sage green bathroom ideas](/posts/326_29-sage-green-bathroom-ideas/).
Do: Use warm white bulbs (2700K-3000K) to enhance sage's calming effect. Add live plants in simple ceramic pots to reinforce the natural aesthetic.
Don't: Choose bright, cool white grout—opt for bone or ivory for softer contrast. Avoid black fixtures that can create harsh contrast with gentle sage.
What this gives you: A timeless, serene bathroom that feels grounded in nature while remaining sophisticated enough for modern homes.
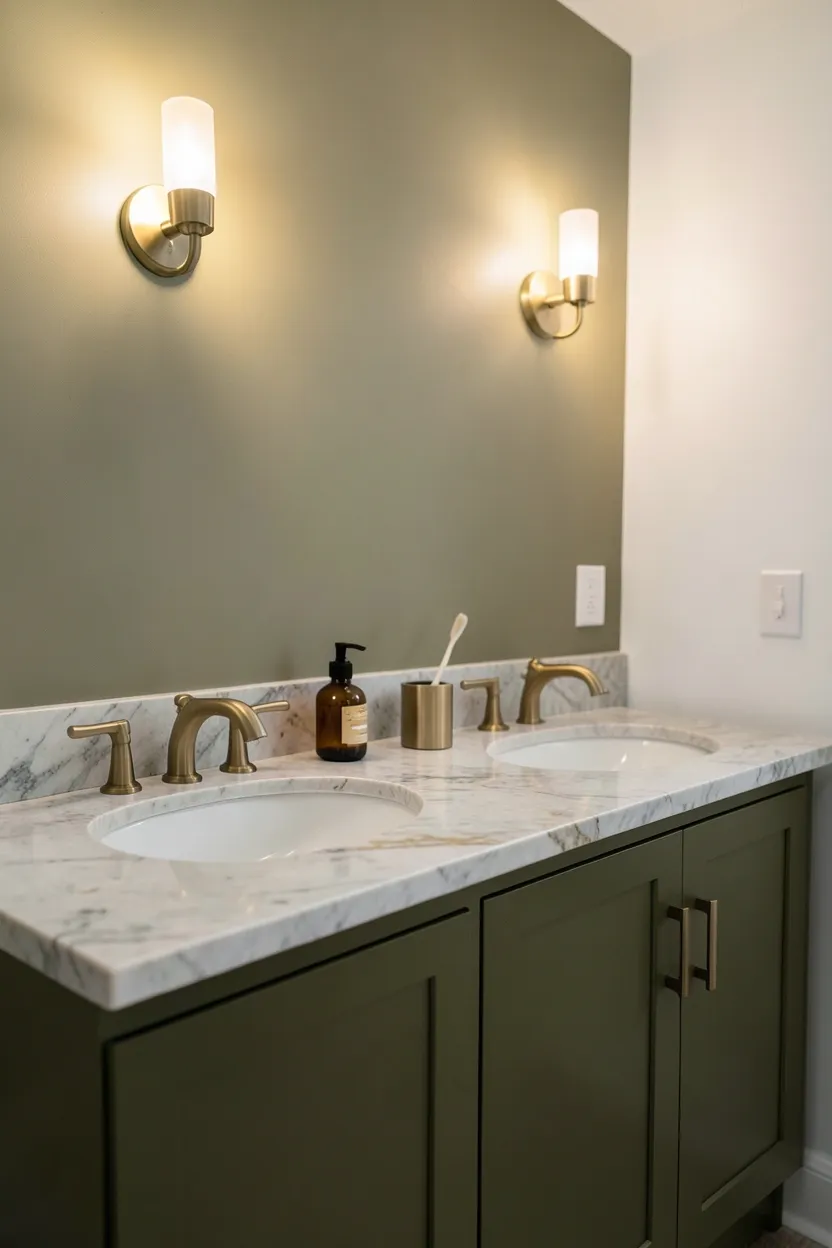
2. Olive Green Vanity with Brass Hardware
An olive green vanity cabinet brings rich, earthy warmth to the bathroom while brass hardware adds a touch of luxury and timeless elegance. This green bathroom idea works beautifully in both modern and traditional spaces, as the deep olive tone anchors the room and creates a sophisticated focal point that draws the eye. The combination of olive and brass creates a warm, inviting atmosphere that feels upscale yet approachable.
Recommended
Items for this idea
Olive green pairs exceptionally well with marble countertops, especially those with warm veining that complements the vanity's rich undertones. Consider a honed marble finish rather than polished for a more organic feel that harmonizes with the green. Brass hardware should be consistent—knobs, pulls, faucet, and even the towel bar in the same warm brass finish create cohesion. White or cream walls provide necessary contrast, preventing the space from feeling dark. Why it works: the warm yellow undertones in olive green naturally harmonize with brass's golden hues, creating an intentional color relationship that feels sophisticated rather than accidental.
Placement note: Position the vanity opposite a window if possible—natural light will enhance brass's warm glow and prevent the olive from feeling too dark. In bathrooms without windows, add warm wall sconces on either side of the mirror.
If you want a modern look, pair the olive vanity with a frameless mirror and sleek wall-mounted faucet in matte brass. Choose a marble countertop with subtle veining rather than dramatic patterns.
If you prefer traditional style, opt for a vanity with detailed molding or raised panel doors. Add a framed mirror with brass detailing and a vintage-style faucet with cross handles.
What this gives you: A statement vanity that anchors the bathroom with rich color while brass hardware adds warmth and sophistication without overwhelming the space.
3. Emerald Green Accent Wall Behind Mirror
A dramatic emerald green accent wall behind the mirror creates a stunning focal point that elevates any bathroom from ordinary to extraordinary. This bold green bathroom idea works particularly well in master bathrooms where you want to make a design statement without committing to an all-over color. The rich jewel tone adds depth and luxury, especially when paired with metallic fixtures and natural materials.
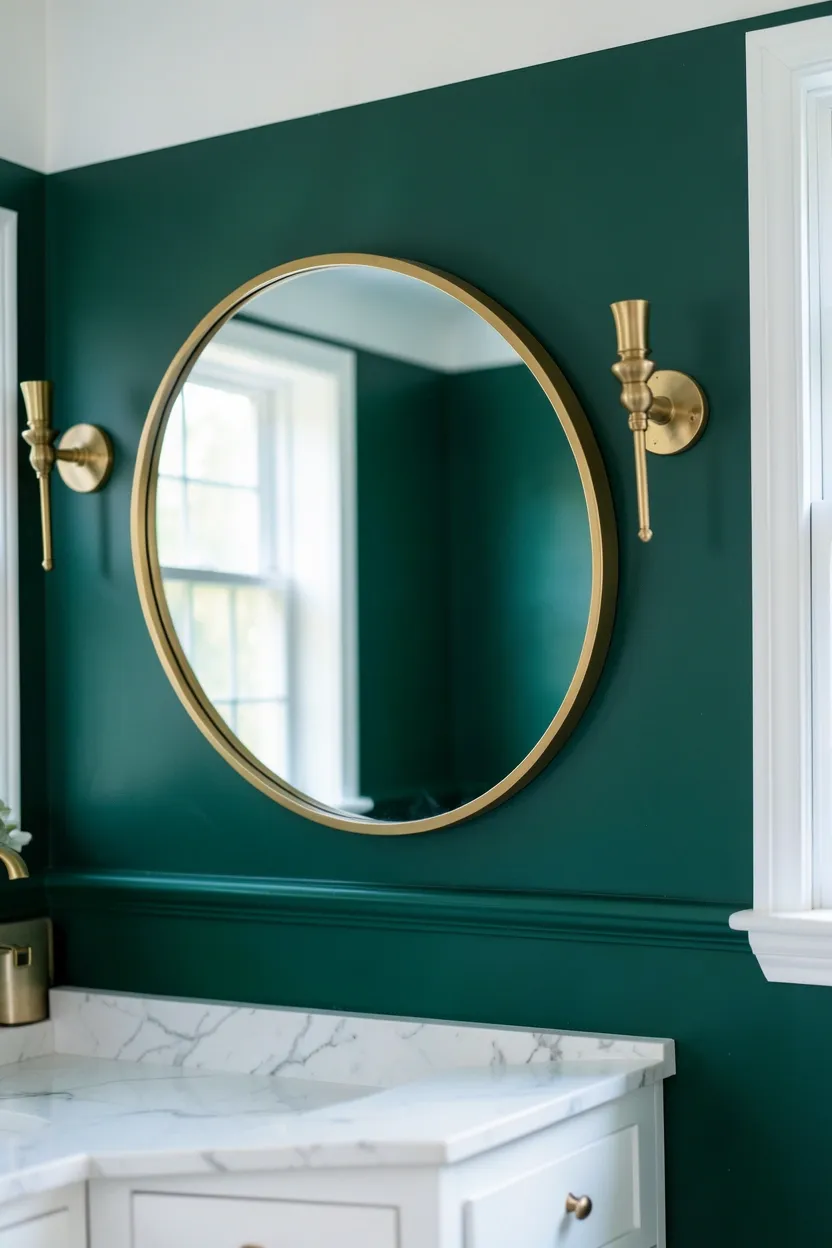
Emerald green has enough visual weight that the surrounding walls can remain neutral—think crisp white, soft cream, or even a pale greige that won't compete with the accent's intensity. A large, round mirror with either brass or chrome frame sits beautifully against emerald, creating the classic jewelry box effect that's particularly desirable in bathroom design. Lighting is crucial: sconces on either side of the mirror with warm white bulbs will make the emerald glow, while cool-toned lighting can flatten the color and make it appear muddy. Common mistake: using emerald green in a bathroom with very low natural light—the color can feel oppressive without sufficient brightness to lift it.
Pro tip: Extend the emerald paint to include the recessed medicine cabinet interior for a surprising pop of color when the cabinet is opened. Paint the ceiling the same neutral color as surrounding walls, not emerald, to maintain proper proportion.
Con: Emerald can feel overwhelming if overused—keep it to one wall maximum. Fix: If the emerald feels too intense, add a large white bath mat or light-colored shower curtain to balance the space.
Best for: Master bathrooms with good natural light, particularly those with large mirrors that can reflect the jewel tones and multiply the luxurious effect.
What this gives you: A high-impact design element that creates instant luxury and visual drama without requiring a full bathroom renovation.
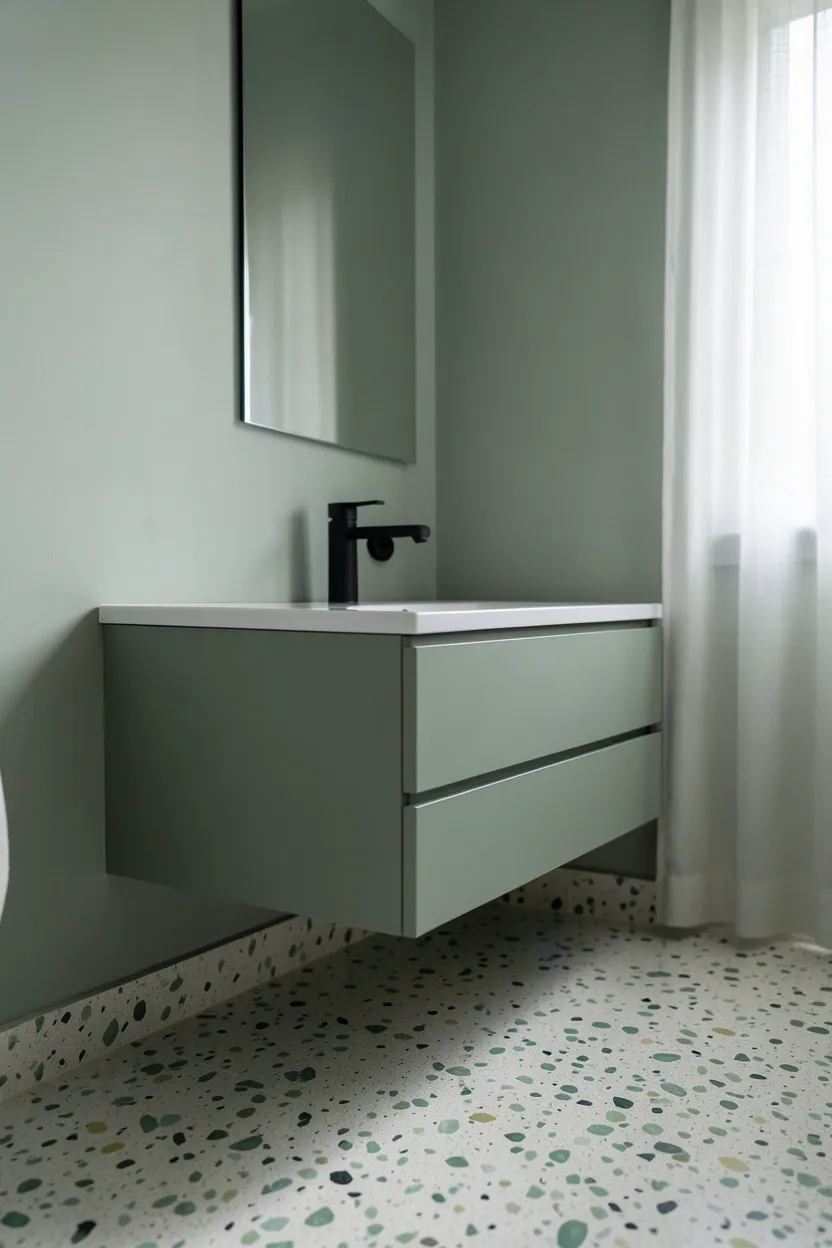
4. Monochromatic Sage Bathroom with Terrazzo Floors
A monochromatic sage bathroom featuring terrazzo floors creates a cohesive, serene environment that feels both modern and timeless. This green bathroom approach uses varying shades of sage—from walls to accessories—while terrazzo flooring adds visual interest through pattern and texture rather than contrasting color. The result is a space that feels harmonious and intentionally designed, with each element contributing to a unified color story.
Recommended
Items for this idea
Choose terrazzo with sage and soft green chips set in a light base color to maintain the monochromatic scheme. The floors provide subtle pattern and movement while the walls create a seamless, calm backdrop. White or light gray fixtures act as neutral anchors, preventing the space from feeling too monotonous. Consider a floating vanity in a slightly deeper sage than the walls to create subtle dimension without breaking the color harmony. Soft towels in complementary greens and maybe one contrasting element—like a brass mirror frame or black faucet—add necessary focal points. This approach works especially well in bathrooms where you want to minimize visual clutter and create a spa-like retreat.
Do/Don't: DO vary the texture of green elements—matte walls, glossy tiles, terrazzo floors—so monochromatic doesn't feel flat. DON'T match every shade of green exactly; subtle variations create depth.
If/Then: IF your bathroom lacks natural light, THEN choose terrazzo with lighter base colors and use warm white bulbs to prevent the space from feeling dim.
Budget/time consideration: Terrazzo floors can be expensive; a budget-friendly alternative is sage vinyl flooring with a terrazzo-inspired pattern. For walls, paint is much more affordable than tile and easier to change if you tire of the monochromatic look. For more wallet-friendly options, see our roundup of [green bathroom ideas on a budget](/posts/393_19-green-bathroom-ideas-on-a-budget/).
What this gives you: A sophisticated, calming bathroom where color harmony creates visual peace and a sense of intentional design.
5. Green Hexagon Tiles with White Grout
Green hexagon tiles with crisp white grout combine geometric pattern with nature-inspired color for a bathroom that feels both contemporary and organic. This tile design works beautifully as a feature wall behind the vanity or as a shower enclosure, where the hexagon shape adds visual movement while the green color provides warmth and character. The white grout creates definition that prevents the space from feeling overwhelming, especially important in smaller bathrooms.

Choose your green shade carefully: sage creates a softer, more spa-like feel while forest green adds drama and sophistication. Consider the size of hexagons—smaller tiles (1-2 inches) create more detailed patterns ideal for feature walls, while larger hexagons (3-4 inches) work well for shower floors or larger wall expanses. White or light gray walls provide necessary contrast, preventing the tiled area from feeling too dominant. White or cream fixtures complement the grout color while allowing the green tiles to take center stage. An alternative approach: use the green hexagons only as a border or decorative strip with larger neutral tiles in the main area for a more subtle take on the trend.
Hack 1: For a budget version, use green hexagon peel-and-stick tiles on a vanity backsplash. They're easy to install and perfect for rentals.
Hack 2: Create a focal point with green hexagons only in the shower niche or above the bathtub, using plain subway tiles elsewhere for cost savings.
Hack 3: Use green hexagon mosaic sheets—they're pre-arranged on mesh backing, making installation faster and ensuring consistent spacing.
What this gives you: A stylish, contemporary bathroom with pattern and color that feels fresh and intentional rather than trendy or overwhelming.
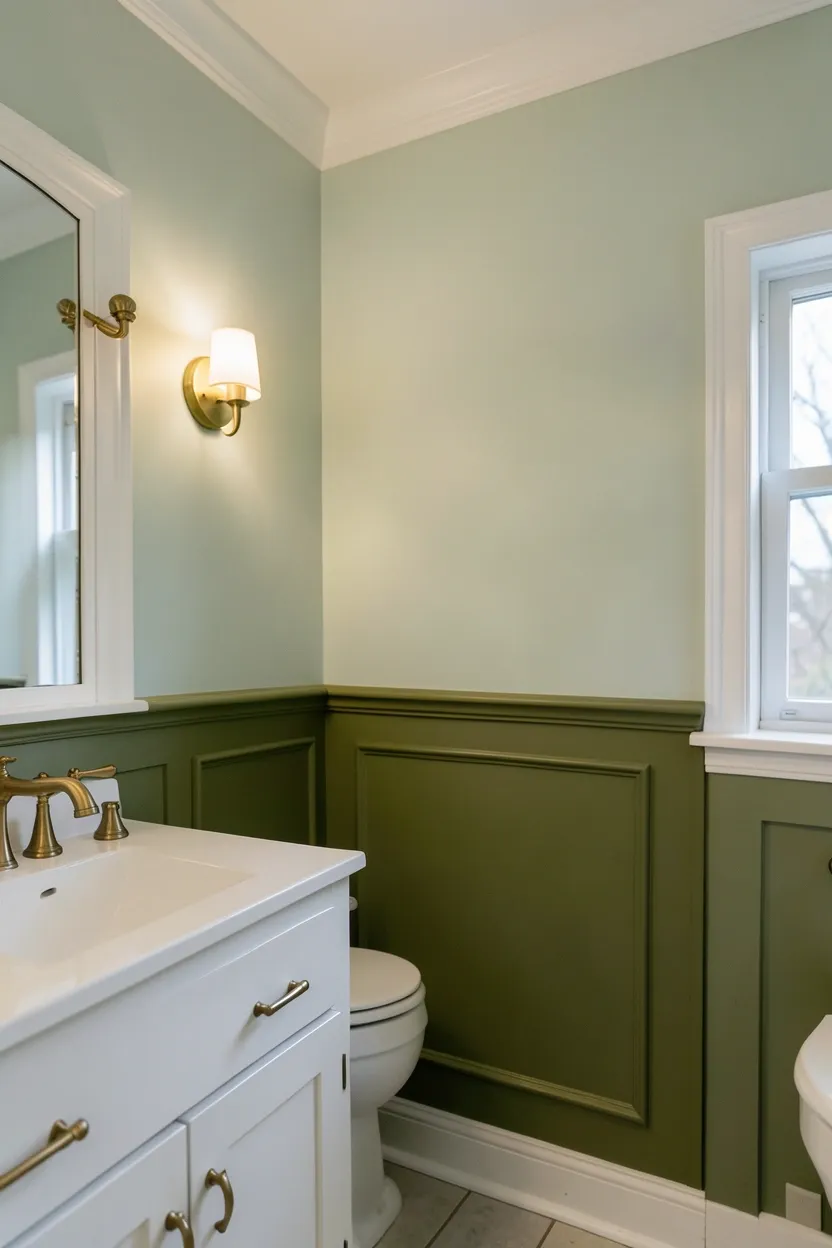
6. Two-Tone Green Bathroom with Wainscoting
A two-tone green bathroom featuring wainscoting combines architectural detail with sophisticated color blocking for a look that feels both traditional and fresh. This approach uses a deeper, richer green on the lower portion of walls—typically where wainscoting is installed—with a lighter green or cream above the chair rail. The result is a bathroom with elegant proportion, visual interest, and a refined color story that celebrates green's versatility.
Recommended
Items for this idea
Classic wainscoting details—raised panels, beadboard, or shaker style—in olive or hunter green create rich, warm lower walls that ground the space. Above the chair rail, choose a complementary light sage, cream, or soft white to keep the upper portion airy and bright. This color blocking technique adds architectural interest even in newer construction without inherent details. White trim and crown molding provide crisp definition between the two green tones. For fixtures, consider brass or gold hardware that picks up the warm undertones in the darker green wainscoting. A common mistake: making both green shades too similar, which can make the color blocking look accidental rather than intentional. Ensure sufficient contrast between upper and lower colors.
If you have high ceilings, extend the wainscoting to 36-48 inches for proper proportion. If your ceilings are standard height, 30-36 inches of wainscoting creates classic proportion.
If you have low ceilings, keep the upper wall color lighter than the wainscoting and avoid dark ceiling paint. Consider running wainscoting only partway up the wall, leaving more light-colored surface area above.
What this gives you: An elegant bathroom with architectural interest and sophisticated color blocking that feels timeless rather than trendy.
7. Botanical Green Wallpaper with Gold Accents
Botanical green wallpaper featuring botanical prints or tropical patterns brings nature indoors and creates a bathroom that feels like a serene garden retreat. When paired with gold accents—fixtures, mirror frames, or light fixtures—the wallpaper's organic beauty is elevated with metallic warmth that adds sophistication and luxury. This green bathroom idea works particularly well in powder rooms or smaller bathrooms where bold pattern can create dramatic impact.
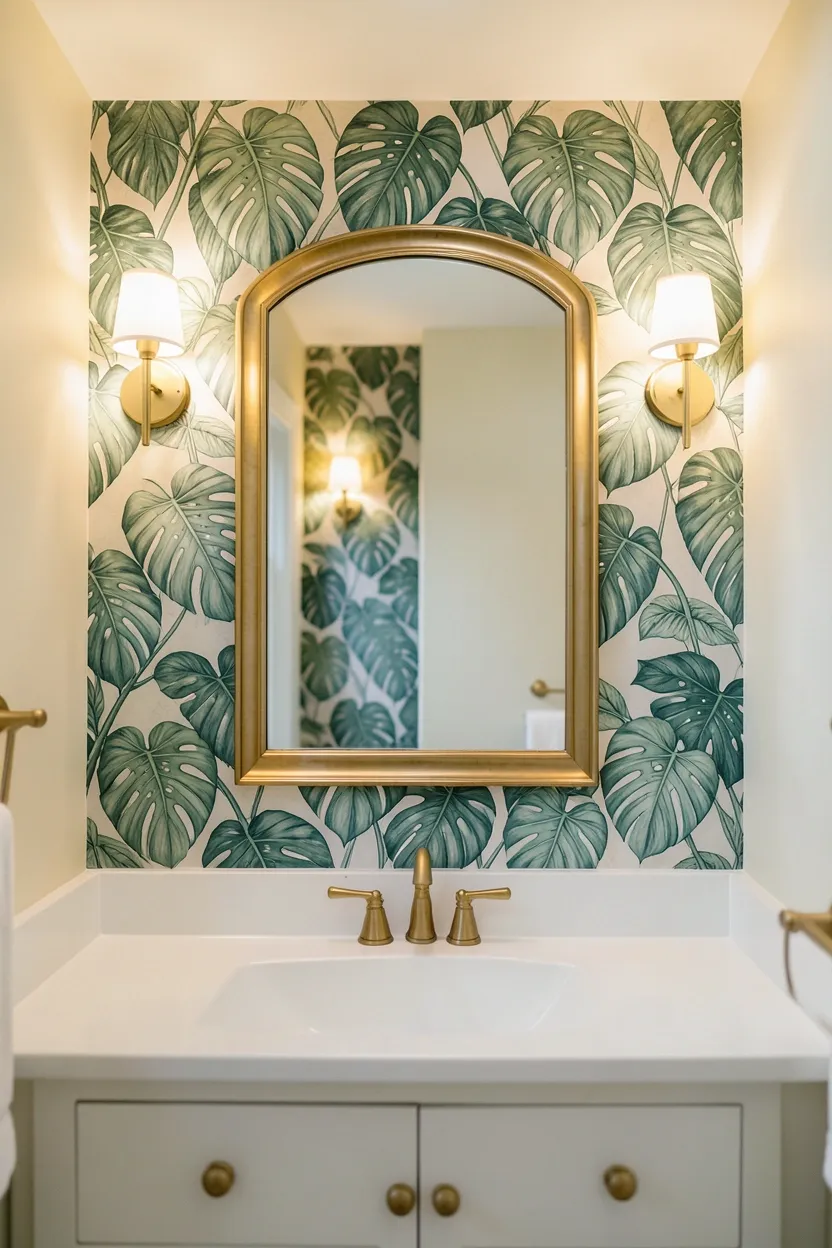
Choose botanical wallpaper that incorporates your preferred green shade—large monstera or palm leaves in emerald create drama, while delicate ferns or vines in sage offer subtlety. Consider the scale of the pattern relative to your bathroom size; large-scale prints work beautifully in powder rooms or behind vanities, while smaller, more intricate patterns suit shower enclosures or half-baths. Gold or brass fixtures should be the primary metallic accent—vanity hardware, mirror frames, towel bars, and even light fixtures in warm gold tones create cohesion. White or light cream walls beyond the wallpapered area prevent the space from feeling overwhelming. Why it works: the organic nature of botanical patterns naturally harmonizes with gold's warmth, while green provides the perfect backdrop for botanical illustrations, making them feel vivid and alive.
Pro: Botanical wallpaper creates instant visual interest and eliminates the need for additional artwork or wall decor. Con: Can feel busy if overused—keep it to one or two walls maximum. Fix: If the pattern feels overwhelming, paint the remaining walls a crisp white and keep fixtures simple and minimal.
Best for: Powder rooms, half-baths, and guest bathrooms where you can embrace bold pattern without committing to a full master bathroom renovation.
Budget/time consideration: High-quality wallpaper can be expensive; for a budget version, look for peel-and-stick botanical wallpaper or consider botanical wall decals. Focus the wallpaper on one accent wall rather than all walls for cost savings and easier installation.
What this gives you: A bathroom with garden-inspired charm and luxurious gold accents that feels both elegant and refreshingly natural.
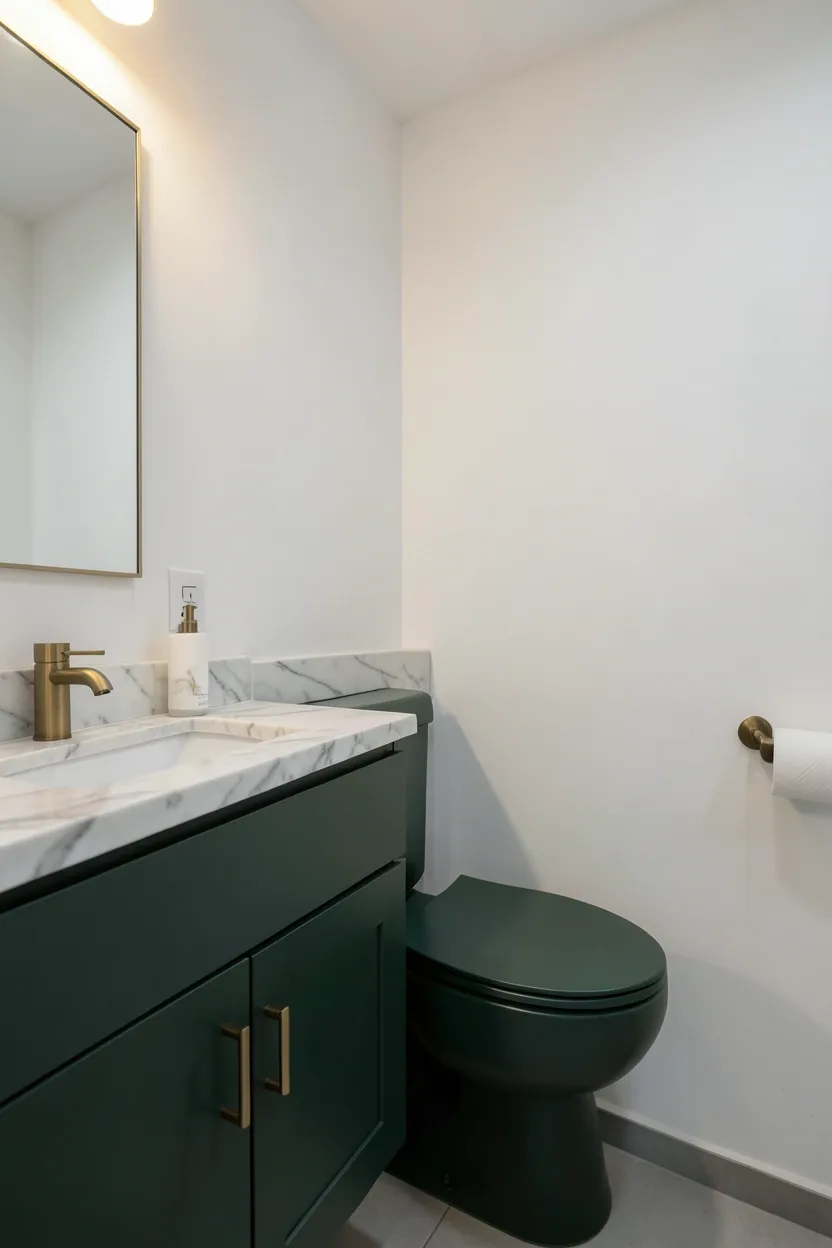
8. Matte Forest Green Fixtures with Marble Countertops
Matte forest green fixtures paired with marble countertops create a luxurious, contemporary bathroom that celebrates rich color while maintaining sophistication. Rather than painting walls or tiling surfaces, this green bathroom idea incorporates green through the bathroom's functional elements—the toilet, sink, and potentially bathtub—making the color choice feel intentional and modern. The marble countertops provide natural veining and organic pattern that complements the deep green without competing.
Recommended
Items for this idea
Choose matte over glossy finish for a more contemporary, sophisticated look that feels less retro. The matte finish absorbs light rather than reflecting it, which helps the forest green feel grounded and rich rather than flashy. Marble countertops with white or light gray base and subtle veining provide necessary contrast—avoid marble with heavy gold or yellow veining that might clash with the green's undertones. Keep walls and floors neutral—white, cream, or soft gray—to allow the green fixtures to take center stage. Brass or gold hardware creates warm contrast with the deep green while harmonizing with marble's natural elegance. Common mistake: using forest green fixtures in a very small bathroom without adequate light—the deep color can make the space feel cramped and dark. This approach works best in bathrooms with good natural light or plenty of artificial lighting.
Do/Don't: DO coordinate all green fixtures—the toilet, sink, and even bathtub if possible—in the same shade and finish for cohesion. DON'T mix matte and glossy finishes; choose one and stick with it throughout.
If/Then: IF you're concerned about the commitment of green fixtures, THEN start with just the sink or toilet in forest green and use white for other elements until you're confident in the bold choice.
What this gives you: A bold, contemporary bathroom where green fixtures make a statement while marble countertops add natural luxury and timeless appeal.
9. Sage Green Floating Vanity with Wood Tones
A sage green floating vanity with wood accents creates a bathroom that feels both modern and warmly organic. This green bathroom idea combines the calming nature of sage green with the natural warmth of wood, resulting in a space that feels balanced and grounded. The floating design adds a contemporary touch while creating visual lightness that makes the bathroom feel more spacious, especially beneficial in smaller bathrooms.
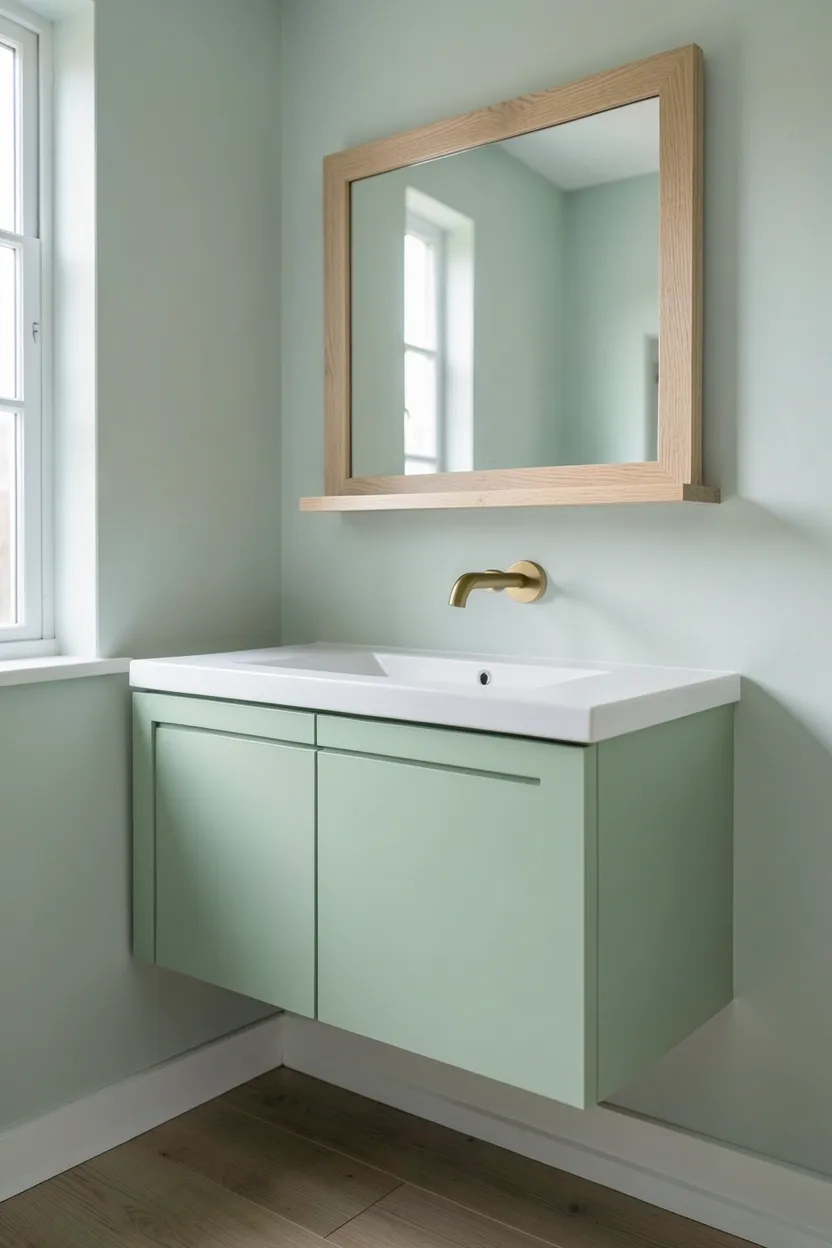
Choose wood tones that complement sage's subtle warmth—light oak, white oak, or even bamboo work beautifully, creating a natural color story rather than harsh contrast. Wood can appear in several places: the vanity cabinet itself in wood with sage green doors, wood shelving above the vanity, or even wood-framed mirrors that echo the vanity's natural elements. Floating vanities with wall-mounted faucets create clean lines and maintain the contemporary feel. White or light gray walls provide necessary contrast while allowing the sage and wood tones to take center stage. Natural or artificial plants in simple ceramic pots reinforce the organic theme. An alternative: if a full wood vanity feels too warm, incorporate wood through small elements like a wood-framed mirror, wood shelf, or even wood-framed artwork above the vanity.
Placement note: Position the floating vanity 18-20 inches above the floor to allow cleaning underneath while maintaining proper ergonomic height. In bathrooms with tile floors, ensure the vanity is mounted securely into wall studs, as floating cabinets bear weight without floor support.
Pro tip: Run the vanity's sage green color into the recessed medicine cabinet interior for a cohesive look. Choose hardware—knobs or pulls—in brushed brass or matte black that complements both sage and wood tones.
Common mistake: Using wood that's too red or too dark, which can create jarring contrast with gentle sage. Stick to light to medium natural wood tones for harmony.
What this gives you: A contemporary bathroom with floating vanity design that feels spacious, modern, and warmly organic through the harmonious combination of sage green and natural wood.
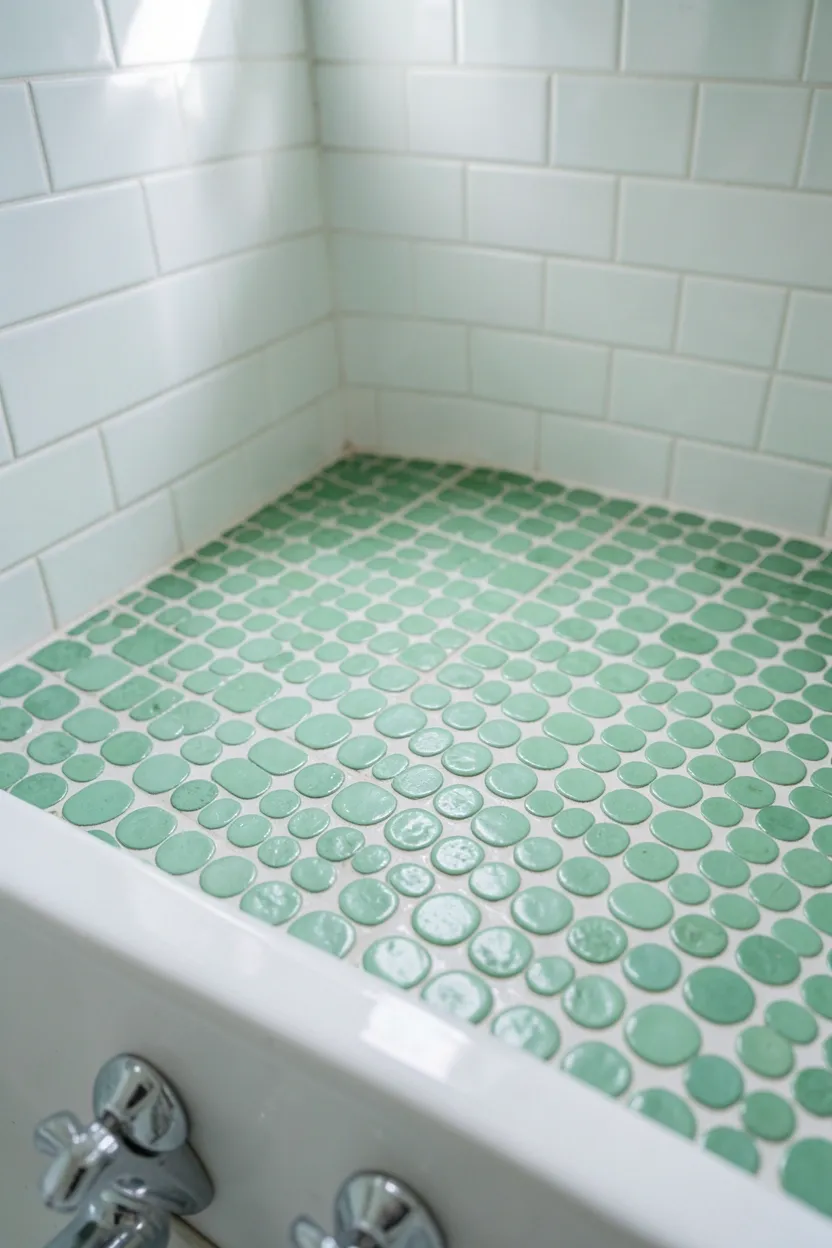
10. Green Penny Round Tiles for Vintage Charm
Green penny round tiles bring vintage charm and playful pattern to bathrooms while maintaining a sophisticated color story. These small circular tiles create interesting visual texture through their repetitive pattern, and when done in green shades—from mint to forest—they add color without overwhelming the space. Penny tiles work beautifully as bathroom floors, shower walls, or even as a decorative border or backsplash behind the vanity.
Recommended
Items for this idea
The small scale of penny tiles (typically 3/4 to 1 inch in diameter) creates plenty of grout lines, which means the grout color is crucial. White grout creates crisp contrast and makes the green tiles pop, while gray or sage-colored grout creates a more subtle, monochromatic effect. Consider using penny tiles in a green that complements your overall bathroom scheme—lighter mint green floors brighten small spaces, while deeper forest green shower walls create dramatic focal points. Penny tiles on bathroom floors are particularly charming and offer a non-slip texture due to the abundant grout lines. White subway tiles or plain field tiles on walls provide clean contrast, preventing the penny tiles from feeling too busy throughout the entire space. For fixtures, brass or gold hardware adds warmth while chrome or nickel creates a more contemporary, crisp look.
Hack 1: For a budget version, use green peel-and-stick penny tiles on a vanity backsplash. They're perfect for rentals or quick updates.
Hack 2: Use penny tiles only in a small area—like the shower niche or as a border around a mirror—for vintage charm without the expense of tiling entire surfaces.
Hack 3: Penny tile sheets on mesh backing make installation much faster than individual tiles. Look for sheets with your chosen green pre-arranged for consistent patterns.
What this gives you: A bathroom with vintage character and playful pattern through green penny tiles that feels charming rather than dated or overwhelming.
11. Olive Green Shower Niche with Natural Stone
An olive green shower niche surrounded by natural stone tile creates a sophisticated focal point within the shower enclosure. This green bathroom approach incorporates color in a small, intentional way—perfect for those who want green's warmth without committing to an all-over color scheme. The olive green niche stands out beautifully against neutral stone tiles, creating both visual interest and practical storage space within the shower.
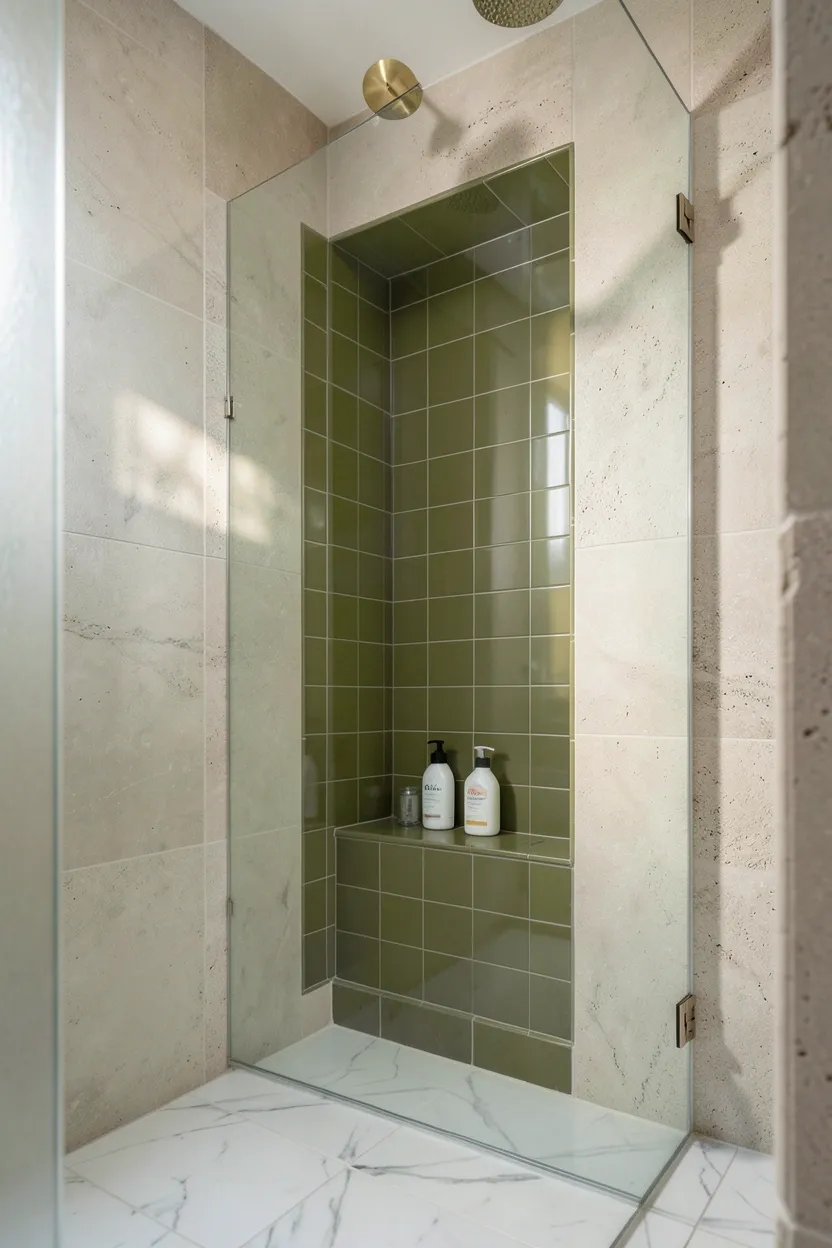
Build the niche during shower construction or renovation, tiling the interior with olive green subway tiles, hexagons, or small mosaics. The surrounding shower walls should remain neutral—natural stone, travertine, or even simple white subway tiles—to allow the olive green niche to shine. Consider the size and placement: a single niche placed at eye level creates a clean, modern look, while stacked niches or a larger shelf-style niche offers more storage and visual weight. The olive green tiles inside the niche can be glossy for contrast with matte stone walls, or matte for a more subtle, monochromatic effect. Coordinate shower fixtures—niche shelf edges, faucet handles—with either brass for warmth or chrome for crispness. Why it works: the olive green acts like jewelry within the shower, adding rich color and sophistication without overwhelming the space or requiring full commitment to colored walls.
Do/Don't: DO tile the entire niche interior in the same olive green for consistency. DON'T use patterned olive tiles that compete with natural stone's organic patterns—choose solid or subtly variegated olive tiles.
If/Then: IF you can't build a tiled niche, THEN use a floating glass shelf with olive green bottles or accessories against neutral tile walls for a similar effect.
What this gives you: A sophisticated shower with an olive green focal point that adds warmth and color while maintaining a clean, neutral overall aesthetic.
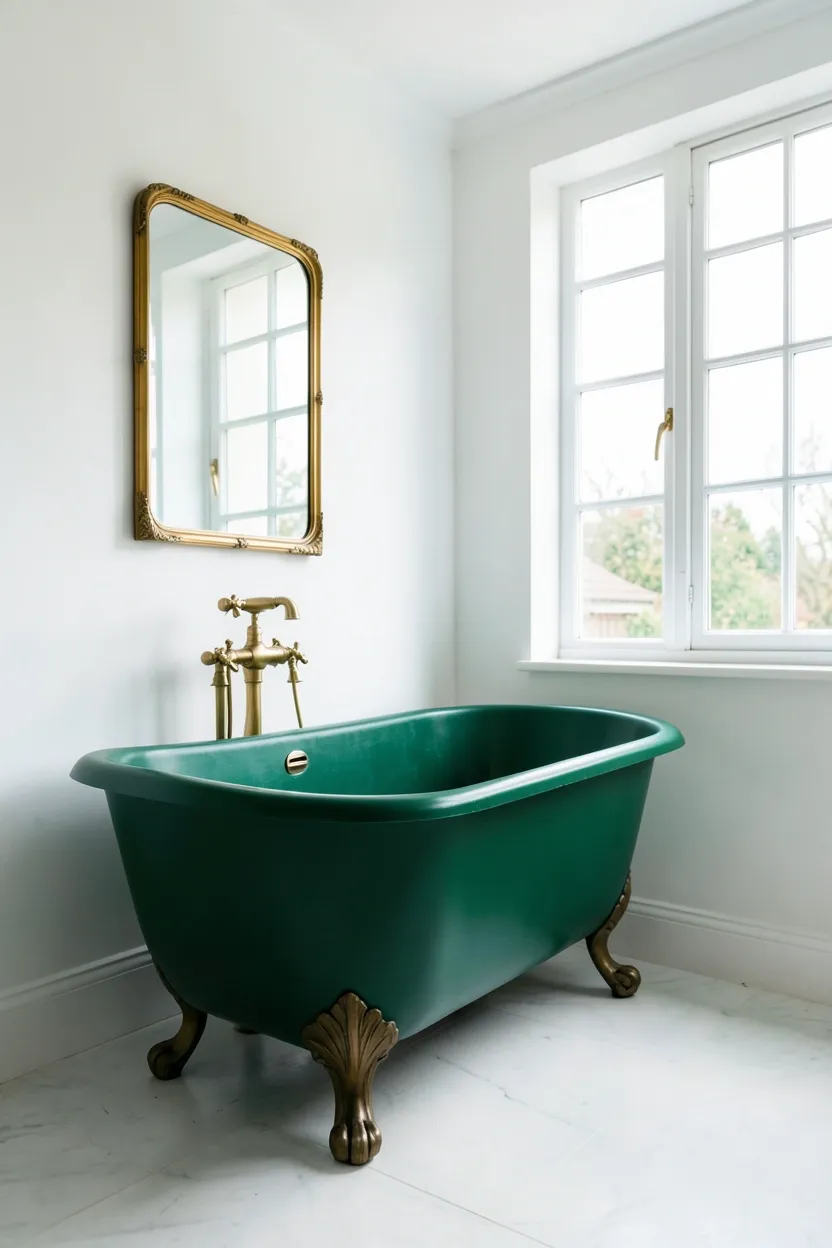
12. Emerald Green Bathtub as Statement Piece
An emerald green bathtub serves as a stunning statement piece that transforms an ordinary bathroom into a luxurious retreat. This bold green bathroom idea makes the bathtub the undeniable centerpiece of the room, creating dramatic visual impact through color alone. An emerald tub works particularly well in larger bathrooms where there's ample space to appreciate the statement piece without the space feeling cramped or overwhelmed by color.
Recommended
Items for this idea
Choose a freestanding tub in emerald green for maximum impact—the tub's sculptural form combined with rich color creates true statement-piece quality. Matte finish offers sophisticated, contemporary appeal while glossy finish feels more traditional and glamorous. Surround walls should remain neutral—white, cream, or soft gray—to allow the emerald tub to take center stage. Gold or brass fixtures add warmth and luxury, harmonizing beautifully with emerald's rich undertones. A large window or skylight nearby is ideal, as natural light enhances the jewel-tone quality of emerald green and prevents the bathroom from feeling dark. In bathrooms without abundant natural light, incorporate multiple light sources—wall sconces, chandelier, or even LED strip lighting under the tub—to ensure the emerald color glows rather than appears muddy. Common mistake: placing an emerald tub in a very small bathroom where it dominates and makes the space feel cramped. This approach requires sufficient square footage to feel intentional rather than overwhelming.
Pro: An emerald tub creates instant luxury and becomes the bathroom's undeniable focal point, eliminating the need for additional dramatic elements. Con: Very expensive and difficult to change if you tire of the bold color. Fix: If budget is a concern, consider a green freestanding tub in a lighter shade like sage or mint, or use a white tub and add green through tile or wallpaper instead.
Best for: Master bathrooms in larger homes, particularly those with high ceilings, good natural light, and a layout that allows the tub to take center stage.
What this gives you: A dramatic, luxurious bathroom with a stunning emerald green tub that serves as the room's unforgettable centerpiece.
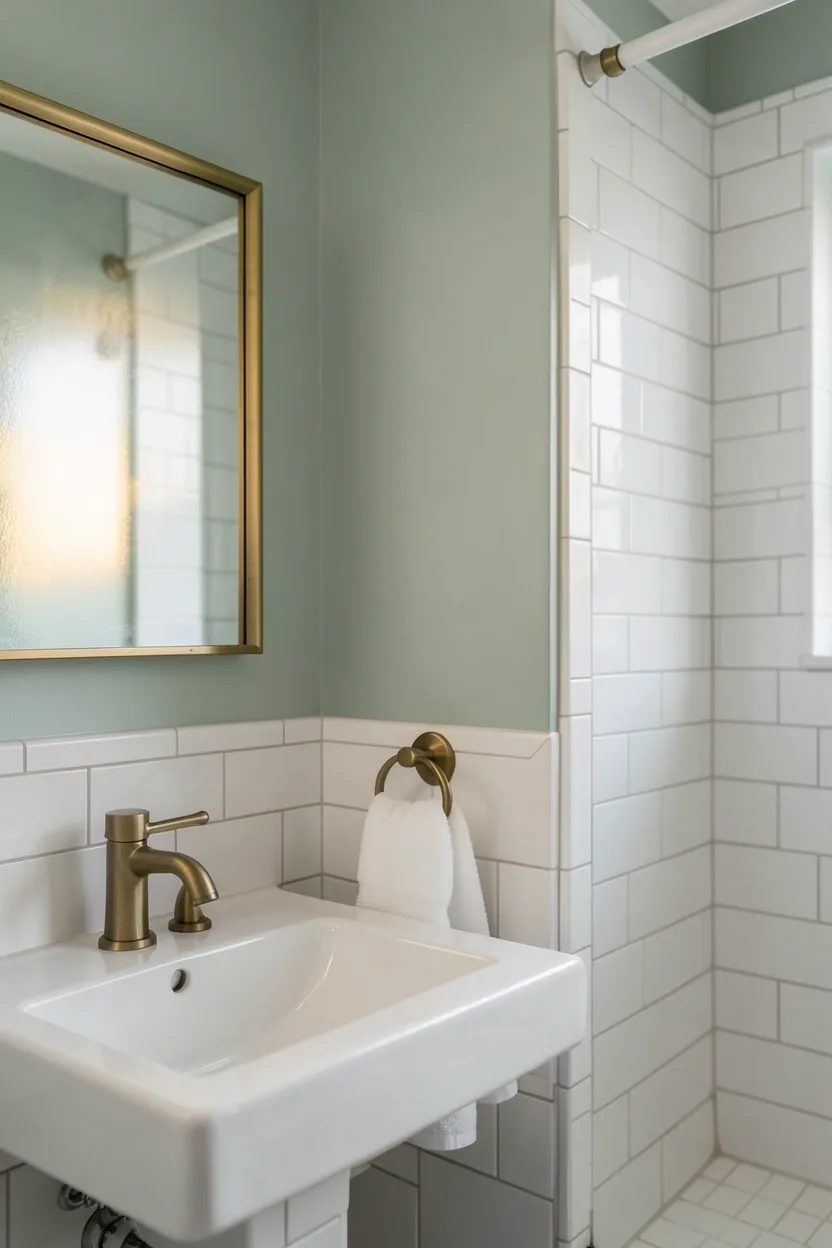
13. Light Sage Bathroom with Brass Mirror Frame
A light sage bathroom with a brass mirror frame creates a soft, elegant space that feels both calming and sophisticated. This green bathroom approach uses sage as the primary wall color, creating a gentle backdrop that allows brass accents to shine with warm metallic warmth. The combination of light sage and brass is particularly harmonious—sage's subtle yellow undertones naturally complement brass's golden hue, creating an intentional color relationship rather than accidental contrast.

Light sage walls work beautifully in bathrooms of any size, but are especially beneficial in smaller spaces where darker greens might feel overwhelming. The soft color reflects more light, making the bathroom feel larger and brighter. Choose a large mirror with an ornate brass frame or a minimalist brass-framed mirror depending on your aesthetic preference—both work equally well with sage walls. Extend the brass accent to other elements: vanity hardware, faucet, towel bars, and even light fixtures in consistent brass create cohesion. White or cream fixtures and countertops provide necessary contrast while keeping the overall palette soft and calming. Natural or artificial plants in simple ceramic pots reinforce the nature-inspired color story. An alternative: if a full brass mirror frame feels too ornate, consider a simple round mirror with a thin brass border or brass sconces flanking a plain mirror.
Placement note: Position the mirror to reflect natural light from windows, which will enhance brass's warm glow and make the sage walls feel luminous. If your bathroom lacks windows, ensure warm-toned artificial lighting (2700K-3000K bulbs) to maintain brass's golden appearance and prevent sage from looking gray or flat.
If you want a modern look, choose a simple rectangular mirror with a thin brass frame and pair it with a floating vanity and wall-mounted faucet. Keep other brass elements minimal and sleek.
If you prefer traditional style, opt for an oval or round mirror with an ornate brass frame, perhaps with decorative detailing or beveled glass. Add traditional brass faucet handles with cross handles or widespread design.
What this gives you: A serene bathroom with light sage walls and warm brass accents that feels sophisticated, calming, and harmoniously coordinated.
14. Green Shiplap Walls with White Trim
Green shiplap walls with crisp white trim create a bathroom with architectural character and cottage charm. This green bathroom idea incorporates texture through shiplap's horizontal boards, while the white trim provides crisp definition and contrast that prevents the green from feeling overwhelming. The combination is particularly effective in bathrooms where you want to add architectural interest without extensive renovation—shiplap can be installed over existing drywall for a quick transformation.
Recommended
Items for this idea
Choose your green shade carefully: sage creates a soft, spa-like feel, olive adds warmth and richness, while hunter green provides dramatic contrast with white trim. Paint the shiplap boards in your chosen green, then use bright white for all trim—baseboards, window casings, and especially the cap molding where shiplap meets walls or ceiling. The horizontal lines of shiplap create visual movement and can make bathrooms feel wider, especially beneficial in narrow powder rooms or small bathrooms. For ceilings, choose white to maintain brightness and proper proportion. White or cream fixtures and vanities harmonize with white trim while allowing the green shiplap to take center stage. Brass or gold hardware adds warmth that complements both green and white. A common mistake: using dark green shiplap in a bathroom with very low natural light—the horizontal boards can make a dim space feel cave-like. This approach works best in bathrooms with adequate lighting.
Pro tip: Run the shiplap only partway up the wall—36-48 inches—and paint the upper walls white. This creates wainscoting effect while saving material and time compared to full-wall installation.
Common mistake: Using shiplap with wider boards (4-6 inches) in a small bathroom, which can make the space feel busy and cramped. Stick to narrower boards (2.5-3.5 inches) for bathrooms.
What this gives you: A bathroom with character, texture, and cottage charm through green shiplap walls that feels architectural and intentionally designed.
15. Moody Olive Bathroom with Black Fixtures
A moody olive bathroom with black fixtures creates a sophisticated, modern space with dramatic contrast and rich warmth. This green bathroom approach embraces darker tones to create an intimate, cocoon-like atmosphere perfect for master bathrooms where you want to create a retreat-like feel. The combination of olive green and black feels both contemporary and timeless, especially when balanced with lighter elements to prevent the space from feeling oppressive.
Paint walls or install olive green tiles for the primary color, then commit to black throughout: vanity, faucet, shower fixtures, towel bars, and even mirror frame in matte black create cohesion and intentional contrast. However, balance is crucial—incorporate lighter elements to prevent the space from feeling dark and cramped. White or light gray flooring, white or cream countertops, and a large white or light-colored shower curtain (if applicable) provide necessary brightness. Consider a large mirror in a black frame to reflect light and make the space feel larger. Natural light is particularly valuable in moody bathrooms—larger windows or skylights help lift the olive green and prevent black fixtures from feeling harsh. In bathrooms without abundant natural light, incorporate warm-toned artificial lighting (2700K-3000K bulbs) in multiple sources: wall sconces, vanity lighting, and even LED strip lighting under floating vanities. Why it works: the warm undertones in olive green prevent black fixtures from feeling too cold or stark, creating a sophisticated balance rather than harsh contrast.
Pro/Con/Fix: Pro: Moody olive with black creates instant drama and sophistication. Con: Can make small bathrooms feel cramped and dark. Fix: Incorporate plenty of light—larger windows, multiple light sources, reflective surfaces like large mirrors—and keep at least one surface (floor or ceiling) light-colored.
Best for: Master bathrooms with good natural light, particularly those with higher ceilings or larger square footage where the moody atmosphere feels intentional rather than oppressive.
Budget/time consideration: Achieving this look through paint is more budget-friendly than through olive green fixtures or tiles. If budget is limited, paint walls olive and use black spray paint on existing hardware (knobs, pulls, faucet) for an affordable transformation.
What this gives you: A dramatic, moody bathroom with rich olive walls and black fixtures that feels sophisticated, modern, and retreat-like.
16. Sage Green Glass Shower Enclosure
A sage green glass shower enclosure adds color and contemporary style to the bathroom while maintaining transparency and visual openness. Rather than traditional clear or frosted glass, this approach uses tinted glass in a soft sage green shade that filters light and creates a calming, spa-like atmosphere within the shower. The green tint adds subtle color without blocking visibility, making it an ideal choice for those who want green's calming effect without darkening the space.
Recommended
Items for this idea
The sage green glass tint is achieved through specialized glass manufacturing—typically a laminate or coating applied to clear glass creates the color effect. Choose a tint that's subtle rather than saturated; you should still be able to see clearly through the glass while enjoying the soft green filter. The shower tiles inside can remain neutral—white, cream, or light gray subway tiles—or you could choose matching green tiles for a monochromatic effect. For fixtures outside the shower, consider brass or gold hardware that complements sage's warm undertones. A common mistake: using sage green glass in a bathroom with very little natural light—the tint can make the space feel dim and green-tinted lighting can be unflattering. This approach works best in bathrooms with good natural light or plenty of warm artificial lighting. The green glass also works beautifully as a room divider in large bathrooms, creating a separate shower area while maintaining visual connection.
If you want a spa feel, pair sage glass shower enclosure with matching sage green towels, natural stone floors, and warm wood tones in the vanity. Add live plants for an organic, nature-inspired retreat.
If you prefer modern style, keep shower tiles crisp white and choose matte black fixtures for contrast with the green glass. A floating vanity and minimalist lighting enhance the contemporary aesthetic.
What this gives you: A bathroom with a sage green shower enclosure that adds calming color and contemporary style while maintaining openness and visual connection.
17. Green Chevron Tiles with Modern Vanity
Green chevron tiles paired with a modern vanity create a bathroom that feels both dynamically patterned and sleekly contemporary. The chevron pattern—V-shaped tiles arranged in a continuous zigzag—adds visual movement and energy to the space, while a modern floating vanity keeps the overall look clean and sophisticated. This green bathroom idea works beautifully as a feature wall behind the vanity or as a shower enclosure where the pattern creates dramatic interest.
Choose your green shade based on desired effect: lighter greens like sage or mint create energy without overwhelming, while darker greens like forest or hunter add drama and sophistication. Consider the chevron scale—smaller tiles (1-2 inches) create more detailed patterns ideal for feature walls, while larger chevrons (3-4 inches) make bolder statements suitable for larger wall expanses or shower floors. The modern vanity should be simple and clean-lined—floating design, slab door fronts, wall-mounted faucet—to balance the busy chevron pattern. White or light gray vanity cabinets in sleek, minimalist styles work best, allowing the green tiles to take center stage. Brass or black hardware adds warmth or contrast without competing with the pattern. White walls beyond the tiled area provide necessary breathing room, preventing the chevron pattern from feeling overwhelming. Why it works: the dynamic chevron pattern provides visual interest that eliminates the need for additional wall decor, while the modern vanity ensures the overall aesthetic feels contemporary rather than retro.
Pro tip: Limit chevron tiles to one surface or area—either a feature wall, shower enclosure, or vanity backsplash. Using chevron throughout the entire bathroom can feel chaotic and overwhelming.
Common mistake: Installing chevron tiles with inconsistent alignment—use tile spacers and reference lines to ensure perfect V-shape alignment throughout the installation.
What this gives you: A bathroom with dynamic chevron pattern and modern vanity that feels contemporary, sophisticated, and visually interesting.
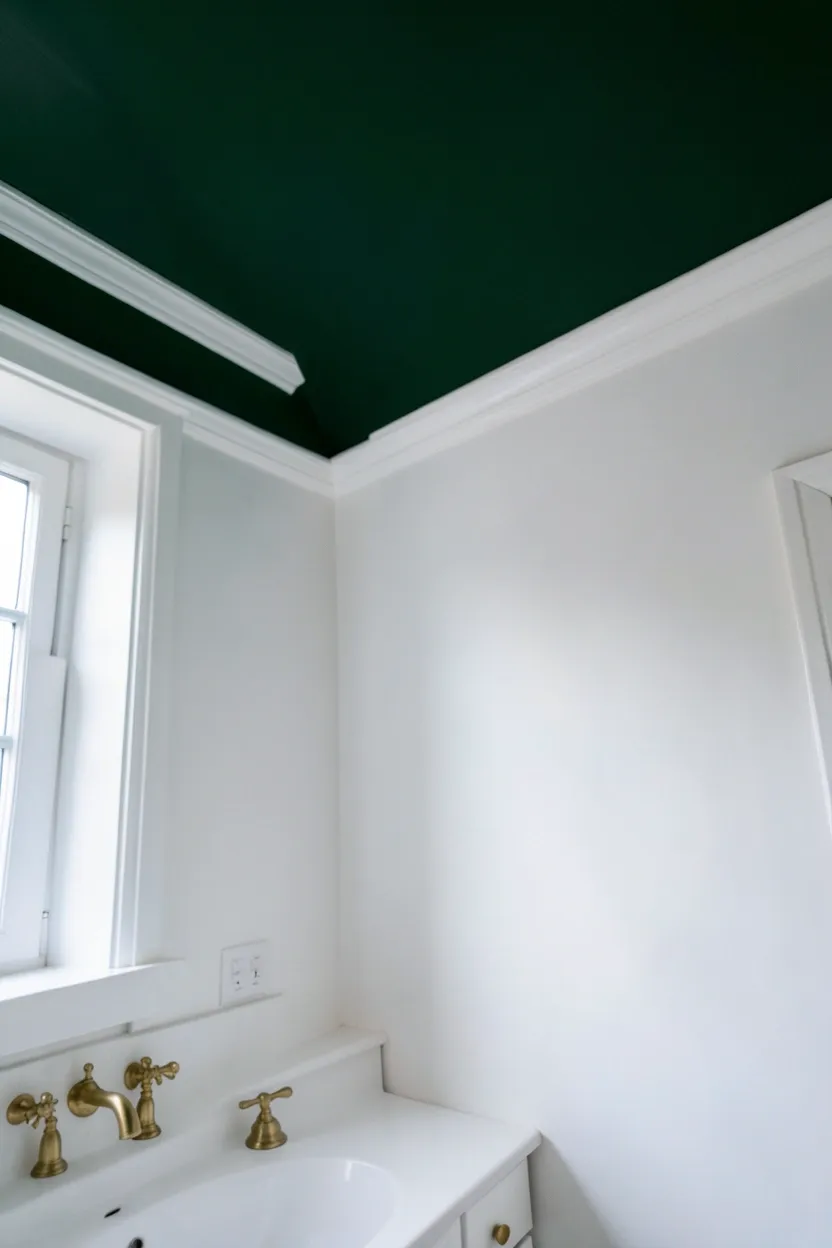
18. Hunter Green Ceiling with White Walls
A hunter green ceiling with white walls creates a bathroom that feels unexpectedly sophisticated and richly detailed. This unconventional green bathroom approach draws the eye upward and adds color in an unexpected location, making the ceiling a design element rather than an afterthought. The contrast between deep hunter green and crisp white walls creates a clean, tailored look that feels both traditional and modern depending on fixtures and accessories.
Recommended
Items for this idea
Hunter green—a deep, rich shade with warm undertones—adds warmth and sophistication without making the entire bathroom feel dark or cramped. The white walls reflect light throughout the space, balancing the dark ceiling and preventing the room from feeling oppressive. This approach works particularly well in bathrooms with higher ceilings (9+ feet), where the colored ceiling draws attention upward and emphasizes the room's verticality. For fixtures, choose brass or gold hardware that complements hunter green's warm undertones, or opt for black fixtures for dramatic contrast. White or light gray vanities maintain cohesion with white walls while allowing the green ceiling to be the statement piece. Natural light is valuable—larger windows help lift the dark ceiling and make the space feel balanced. In bathrooms without abundant natural light, incorporate multiple light sources: wall sconces, vanity lighting, and even a ceiling fixture that highlights the green paint. A common mistake: using hunter green ceiling in a bathroom with low ceilings—this can make the space feel oppressive and cramped rather than sophisticated.
Do/Don't: DO use a high-quality, washable paint on the ceiling—bathrooms have high humidity that can damage lower-quality paint. DON'T paint crown molding or trim the same color as the ceiling; keep them white for crisp definition.
If/Then: IF you're hesitant about a fully green ceiling, THEN try painting only the ceiling's recessed area or creating a green border around the ceiling's perimeter using painter's tape for a more subtle approach.
What this gives you: A bathroom with sophisticated color on the ceiling that feels unexpected, rich, and intentionally detailed.
19. Mint Green Subway Tiles with Dark Grout
Mint green subway tiles with dark grout create a fresh, vintage-inspired bathroom that feels both playful and sophisticated. The classic subway tile shape becomes contemporary and eye-catching through the mint green color, while dark grout adds definition and contrast that prevents the space from feeling too sweet or juvenile. This green bathroom approach works beautifully as a full wall treatment behind vanity, in shower enclosures, or even as wainscoting with white walls above.
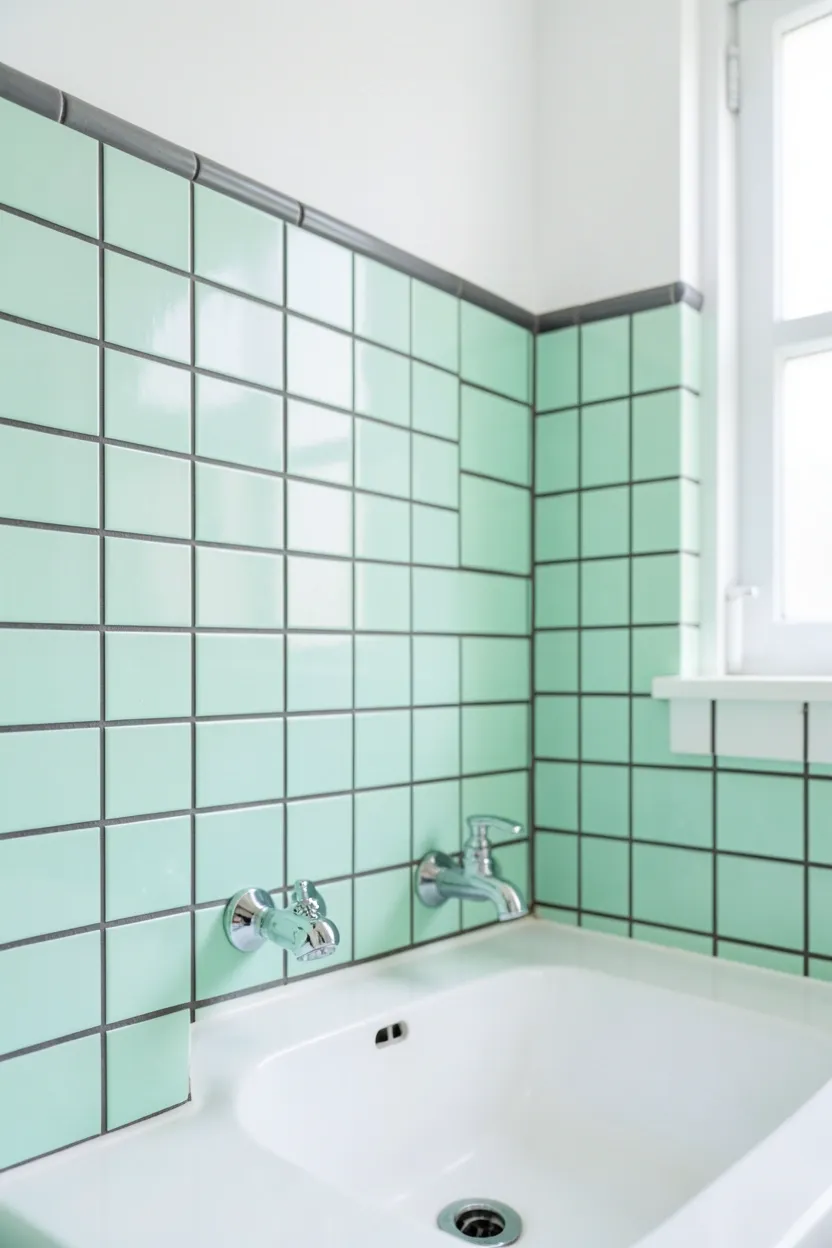
Mint green—a light, fresh shade with subtle blue undertones—brings brightness and energy to the bathroom while maintaining sophistication through classic subway tile form. Dark grout in charcoal or deep gray creates crisp lines and definition, making each tile stand out and creating a modern grid pattern that contrasts with mint's softness. Consider the tile layout: traditional offset (brick pattern) creates classic appeal, while herringbone or vertical stack patterns feel more contemporary. White or light gray walls beyond the tiled area provide necessary contrast, preventing the mint from feeling overwhelming throughout the entire space. For fixtures, brass or gold hardware adds warmth that complements mint's subtle coolness, while chrome or nickel creates a crisp, fresh look. White or cream vanities maintain neutrality and allow the mint tiles to shine. Natural or artificial plants reinforce the fresh, organic feel. A common mistake: using mint green tiles in a bathroom with very low natural light without adequate artificial lighting—mint can appear gray or dingy in dim conditions.
If you want a vintage look, pair mint subway tiles with a white pedestal sink, vintage-style brass fixtures with cross handles, and a framed mirror with decorative molding. Add a clawfoot tub if space allows.
If you prefer modern style, choose a floating vanity, wall-mounted faucet in matte black or brushed brass, and a large frameless mirror. Keep accessories minimal and let the mint tiles be the star.
What this gives you: A fresh, charming bathroom with mint green subway tiles that feels vintage-inspired yet contemporary through the contrast of dark grout.
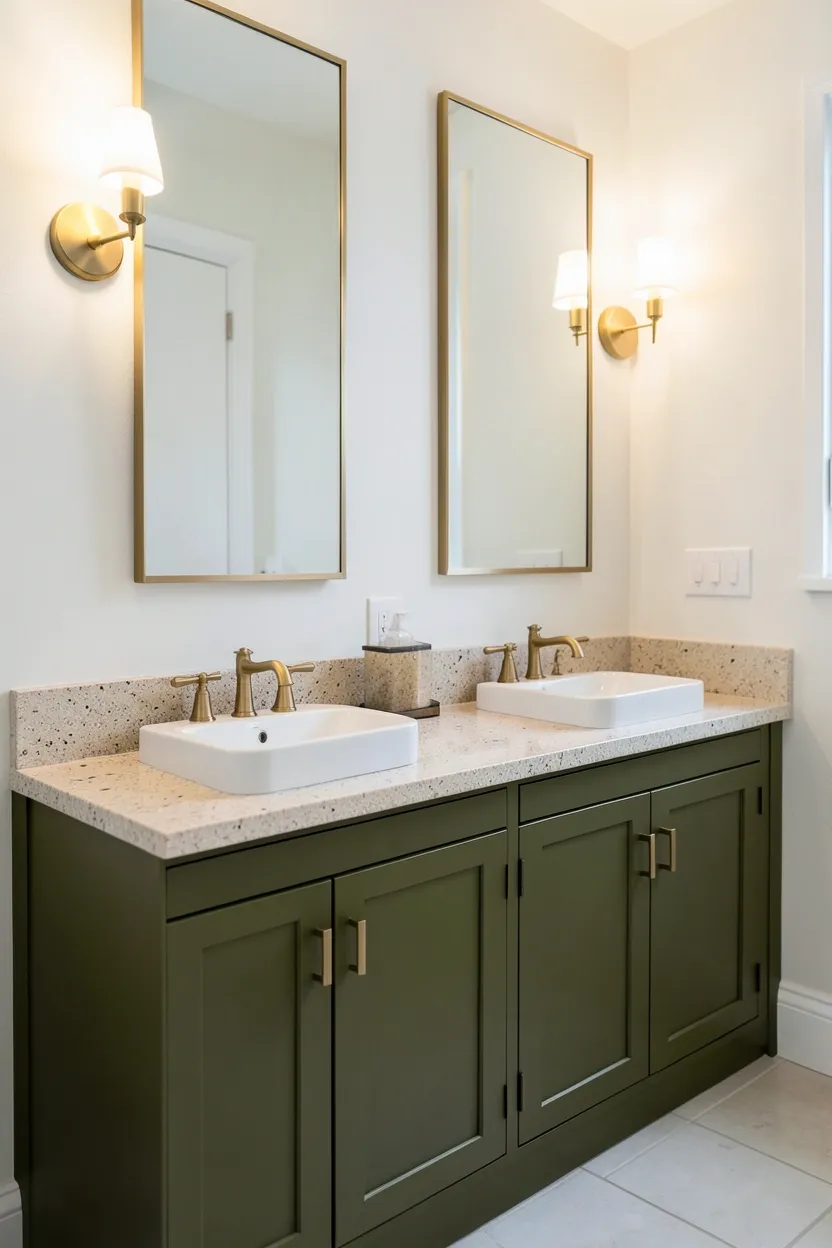
20. Olive Green Double Vanity with Stone Sink
An olive green double vanity with a stone sink creates a master bathroom centerpiece that feels both luxurious and warmly organic. This green bathroom idea combines rich color with natural materials, resulting in a vanity that anchors the space while providing abundant storage and functionality. The double vanity design is perfect for master bathrooms, offering his-and-her sinks while making a strong design statement through color and material choices.
Recommended
Items for this idea
Choose an olive green that feels rich and saturated rather than dull or muddy—look for warm undertones that will harmonize with stone's natural beauty. The vanity cabinet in olive green provides the primary color statement, while the stone sink—whether honed marble, travertine, or even soapstone—adds natural pattern and organic warmth. Consider a vessel sink or undermount style in stone; both work beautifully with olive cabinets and create different aesthetic vibes. For countertops, match the stone sink material for cohesion, or choose a complementary material like marble with subtle veining. Brass or gold hardware throughout—vanity knobs or pulls, faucet handles, towel bars—adds warmth that complements both olive and stone. White or light gray walls provide necessary contrast while allowing the vanity to take center stage. Natural light is particularly valuable as it enhances both the olive color and stone's natural veining. Why it works: the warm undertones in olive green naturally harmonize with stone's organic warmth, creating a cohesive color story rather than competing elements.
Placement note: Ensure adequate clearance between the two sinks—at least 30 inches center-to-center for comfortable simultaneous use. Consider adding lighting above each sink—wall sconces or pendant lights—to ensure both users have adequate task lighting.
Pro tip: Add a matching olive green medicine cabinet or wall-mounted cabinet above the vanity for additional storage that maintains color cohesion. The cabinet can be flush-mounted or recessed depending on your wall construction.
Common mistake: Choosing a stone that's too busy or heavily patterned, which competes with the olive vanity's strong color. Look for stone with subtle, organic patterns rather than dramatic veining.
What this gives you: A luxurious master bathroom centerpiece with an olive green double vanity and stone sink that feels sophisticated, warm, and organically beautiful.
21. Green Vertical Siding for Farmhouse Look
Green vertical siding creates a bathroom with farmhouse charm and architectural character. This green bathroom idea uses board-and-batten style vertical siding painted in a green shade—typically sage or olive—to create a cozy, rustic aesthetic that feels both traditional and fresh. The vertical lines add height and visual interest while the green color brings warmth and organic charm to the space.
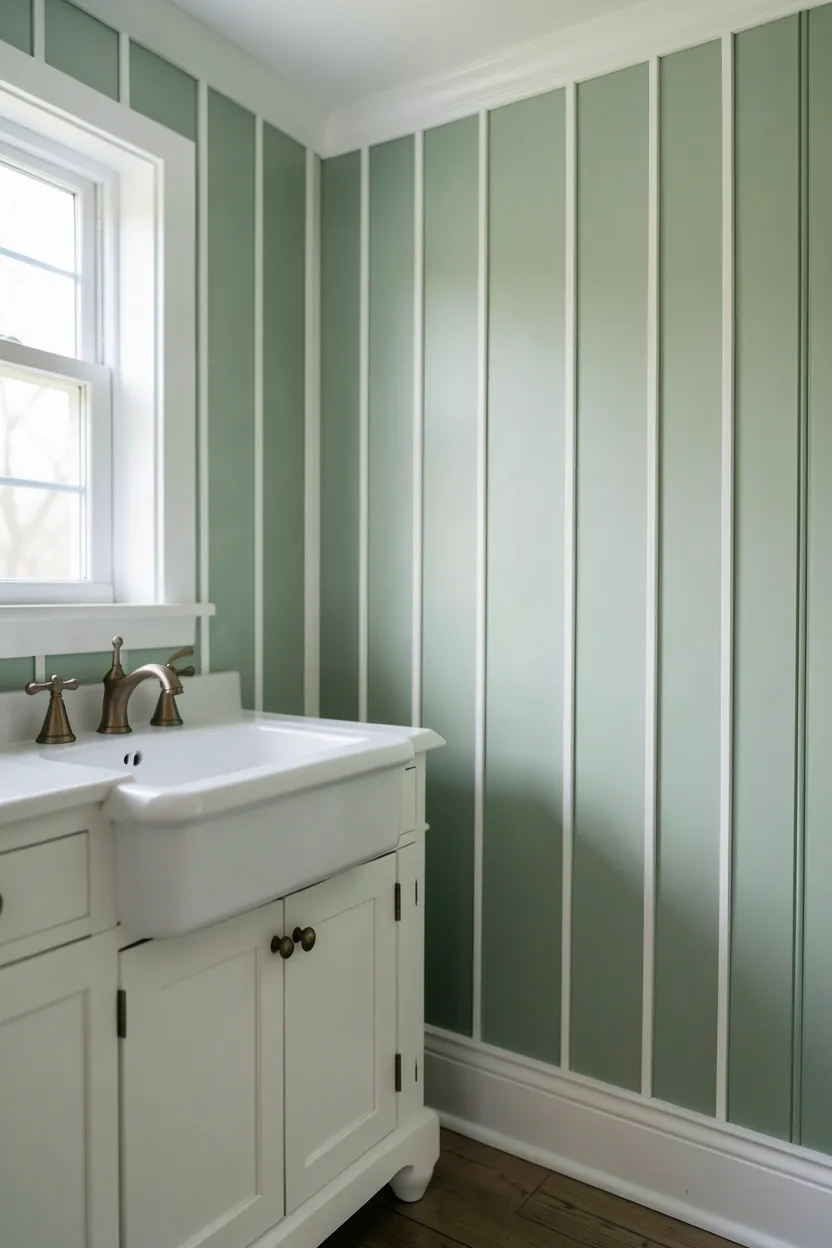
Install vertical siding with traditional board-and-batten details: wider boards (4-6 inches) with thinner battens (1-2 inches) covering the seams create classic farmhouse character. Paint the siding in sage green for a soft, spa-like feel or olive green for richer warmth. White crown molding, baseboards, and window casings provide crisp definition and contrast. The vertical lines draw the eye upward, making even lower ceilings feel taller—a valuable benefit in smaller bathrooms or powder rooms. For fixtures, choose hardware that complements the farmhouse aesthetic: brass or oil-rubbed bronze adds traditional warmth, while black hardware creates more contemporary farmhouse style. White or cream vanities and countertops maintain neutrality while allowing the green siding to shine. A porcelain or stone farmhouse sink completes the aesthetic with its signature deep basin and apron front. A common mistake: installing vertical siding with inconsistent spacing—use spacers and reference lines to ensure perfect alignment throughout the installation.
Hack 1: For a budget version, use peel-and-stick board-and-batten wall panels in white and paint only the battens green for a similar effect without the expense of installing real siding.
Hack 2: Use green paint to create the board-and-batten effect on existing drywall—paint wider rectangles in a lighter green, then paint narrow strips (the battens) in a deeper green for depth and dimension.
Hack 3: Install vertical siding only partway up the wall (36-48 inches) as wainscoting, then paint upper walls white for a farmhouse look that's more budget-friendly and faster to install.
What this gives you: A bathroom with farmhouse charm and architectural character through green vertical siding that feels cozy, traditional, and intentionally designed.
22. Seafoam Green Bathroom with Coastal Elements
A seafoam green bathroom with coastal elements creates a fresh, beach-inspired space that feels both calming and breezy. Seafoam—a soft, muted green with subtle blue undertones—naturally evokes ocean and coastal environments, making it perfect for bathrooms where you want to create a spa-like, retreat atmosphere. When paired with coastal elements like natural textures, shell accents, and breezy fabrics, seafoam green transforms the bathroom into a coastal sanctuary.
Recommended
Items for this idea
Paint walls or tile surfaces in seafoam green to establish the coastal color foundation. Seafoam works beautifully on all walls for an immersive effect, or as a feature wall behind the vanity for a more subtle approach. Incorporate coastal elements through materials and accessories: natural fiber rugs (jute, seagrass), wood-framed mirrors, shell or coral accents, and beach-inspired artwork. For fixtures, choose finishes that complement the coastal aesthetic—chrome or nickel feels fresh and crisp, while brass or oil-rubbed bronze adds warmth and vintage charm. White or light gray vanities and countertops maintain brightness and keep the space feeling breezy rather than heavy. Natural light is particularly valuable in coastal bathrooms; larger windows or skylights enhance seafoam's fresh quality and make the space feel airy. In bathrooms without abundant natural light, incorporate cool-toned artificial lighting (3000K-4000K bulbs) in multiple sources to maintain seafoam's fresh, coastal appearance. Why it works: seafoam's natural blue-green undertones inherently evoke ocean and sky, making it the perfect foundation for coastal design elements.
Pro tip: Add indoor plants like ferns, ivy, or even small palms in natural ceramic or woven baskets to reinforce the organic, coastal feel. Plants add life and fresh color that complements seafoam naturally.
Common mistake: Overloading the bathroom with literal coastal elements—too many shells, anchors, and sea creature motifs can make the space feel themed rather than sophisticated. Keep coastal elements subtle and material-based rather than overtly decorative.
What this gives you: A fresh, coastal bathroom with seafoam green that feels breezy, calming, and beach-inspired without feeling overly themed.
23. Emerald Green Geometric Floor Tiles
Emerald green geometric floor tiles create a bathroom with dramatic pattern and rich color that anchors the entire space. This green bathroom approach uses bold emerald tiles in geometric patterns—hexagons, diamonds, or even Moroccan-inspired designs—to create visual interest and energy through the floor alone. The emerald color adds depth and luxury while the geometric pattern adds contemporary sophistication, making the floor a design element rather than simply a functional surface.
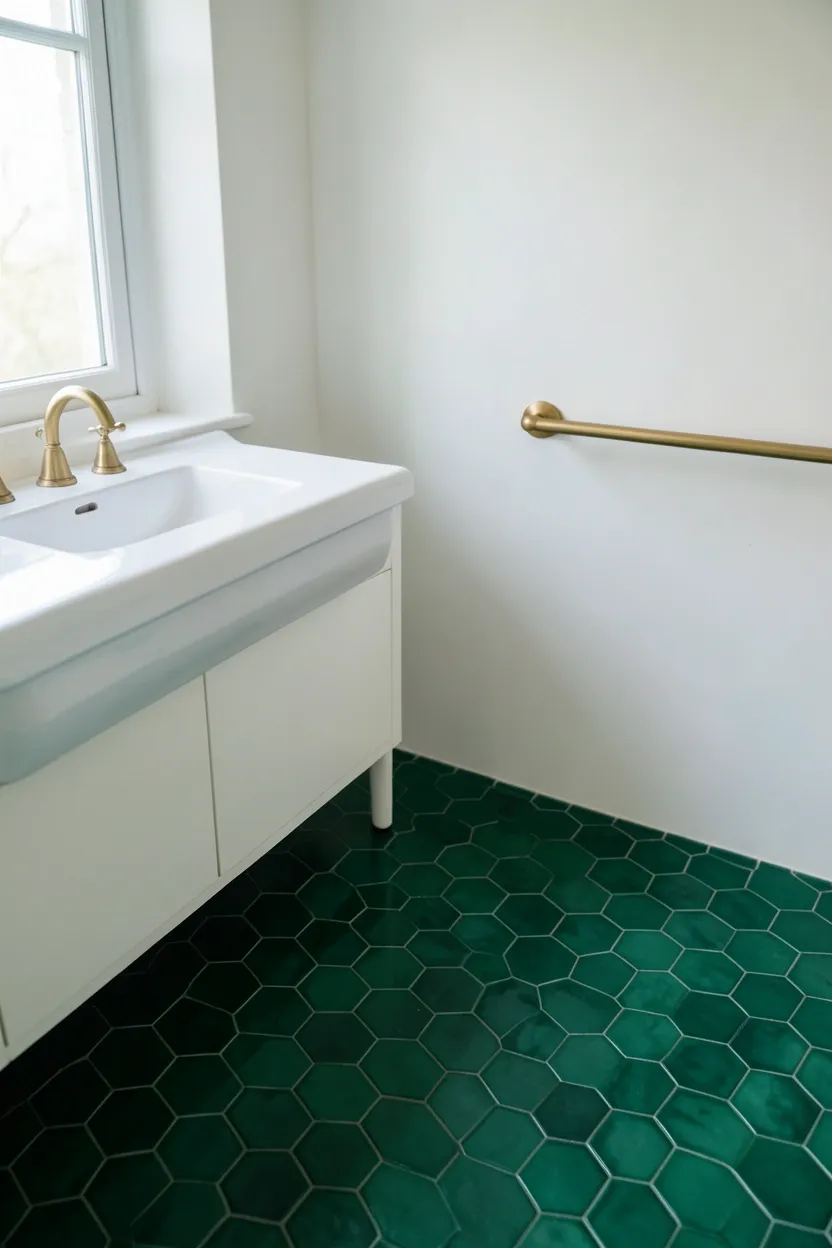
Emerald green—a deep, saturated jewel tone—provides rich color that feels luxurious rather than overwhelming when limited to the floor. The geometric pattern creates visual movement and interest, eliminating the need for additional wall decor or busy patterns elsewhere in the bathroom. Keep walls and fixtures neutral to allow the emerald floor to shine: white, cream, or soft gray walls maintain brightness and proper proportion. White or light gray vanities and countertops provide necessary contrast while keeping the overall palette balanced. For fixtures, consider brass or gold hardware that adds warmth and complements emerald's rich undertones, or opt for matte black for dramatic contrast. Natural light enhances emerald's jewel-tone quality—larger windows or skylights are ideal. In bathrooms without abundant natural light, incorporate warm-toned artificial lighting (2700K-3000K bulbs) in multiple sources to ensure the emerald glows rather than appears muddy. A common mistake: using emerald geometric tiles in a very small bathroom where the busy pattern and dark color can make the space feel cramped. This approach works best in bathrooms with sufficient square footage.
Pro tip: Extend the emerald geometric tiles slightly up the wall (4-6 inches) as a border or to create a wainscoting effect, which adds visual weight and makes the floor-to-wall transition feel intentional rather than abrupt.
Common mistake: Choosing a geometric pattern that's too busy or complex—stick to simple, repeatable patterns like hexagons or diamonds that won't overwhelm the space or clash with other bathroom elements.
What this gives you: A bathroom with dramatic emerald green geometric floors that feels luxurious, contemporary, and visually sophisticated.
24. Sage Green Half Wall with Board and Batten
A sage green half wall with board and batten detail creates a bathroom with architectural character and soft, calming color. This green bathroom approach uses wainscoting-style board and batten painted in sage green on the lower portion of walls, while the upper section remains white or cream. The result is a space with balanced proportion, visual interest, and a color story that feels both traditional and contemporary.
Recommended
Items for this idea
Install board and batten on the lower 36-48 inches of walls—vertical boards (4-6 inches wide) with thinner battens (1-2 inches) covering the seams create classic architectural detail. Paint the board and batten in sage green, a soft, muted shade with warm undertones that adds color without overwhelming. The upper walls remain white or cream, providing brightness and visual balance. A chair rail or cap molding where the board and batten meets the upper wall creates crisp definition. This technique adds architectural interest even in newer construction without inherent details. For fixtures, choose hardware that complements the soft sage aesthetic—brass or gold adds warmth, while nickel or chrome creates a fresh, crisp look. White or cream vanities maintain cohesion with upper walls while allowing the sage board and batten to take center stage. A common mistake: making the board and batten too tall or too short for the ceiling height—maintain proper proportion (typically 1/3 to 1/2 of wall height) to ensure the space feels balanced rather than awkward.
Do/Don't: DO use consistent spacing between all battens—measure and mark locations before installation to ensure perfect uniformity. DON'T paint the chair rail or cap molding the same green as the board and batten—keep them white for crisp definition and proper contrast.
If/Then: IF you want more drama, THEN extend the sage green board and batten higher up the wall (48+ inches) for a more saturated color statement. IF you prefer a subtler look, keep the board and batten lower (30-36 inches) for a gentle splash of green.
What this gives you: A bathroom with architectural character and soft sage green color through board and batten that feels balanced, intentional, and sophisticated.
25. Natural Wood Vanity with Green Tiles
A natural wood vanity paired with green tiles creates a bathroom that feels warmly organic and deeply connected to nature. This green bathroom approach celebrates natural materials—wood's warm grain and green's calming color—to create a space that feels spa-like and serene. The combination works beautifully regardless of green shade; light sage tiles with light oak feel fresh and beachy, while forest green tiles with walnut create a rich, sophisticated mood.

Choose wood tones that complement your chosen green shade: light woods like white oak, birch, or ash pair beautifully with sage and mint greens for fresh, airy bathrooms. Medium to dark woods like walnut, cherry, or mahogany create rich warmth that complements olive, hunter, and forest green tiles. The wood vanity can be a simple floating design with slab door fronts for contemporary appeal, or include decorative molding or raised panel doors for traditional warmth. Green tiles can appear as a feature wall behind the vanity, as shower enclosure, or even as the primary wall treatment throughout the bathroom. Consider the tile pattern: subway tiles feel timeless, hexagons add contemporary flair, while penny tiles create vintage charm. For fixtures, choose finishes that harmonize with both wood and green—brass or gold adds warmth, while nickel or chrome creates fresh contrast. White or light gray countertops maintain brightness while allowing the wood vanity and green tiles to shine. Natural light enhances both wood's grain and green's natural quality—larger windows are ideal. In bathrooms without abundant natural light, incorporate warm-toned artificial lighting (2700K-3000K bulbs) to maintain both wood's warmth and green's calming appearance.
Pro tip: Add live plants in natural ceramic or woven baskets to reinforce the organic theme. Plants like ferns, ivy, or pothos thrive in humid bathroom environments and add fresh life that complements both wood and green tiles naturally.
Common mistake: Choosing wood that's heavily stained or artificially colored, which can compete with green tiles and make the space feel cluttered. Stick to natural wood finishes with minimal or no stain for a cohesive, organic feel.
What this gives you: A bathroom with natural wood vanity and green tiles that feels warmly organic, spa-like, and connected to nature through material harmony.
These 25 green bathroom ideas demonstrate the remarkable versatility of nature's most calming color, from soft sage and mint to rich olive and dramatic emerald. If you're working with a rental apartment, explore our guide to [green apartment bathroom ideas](/posts/404_23-green-apartment-bathroom-ideas-for-a-calm-and-modern-bathroom/) for renter-specific solutions. Whether you prefer gentle spa-like serenity or bold, dramatic statements, there's a green shade and design approach that perfectly suits your aesthetic and functional needs. The key to successful green bathroom design lies in balance—choosing the right shade for your space's natural light, incorporating complementary materials like brass, wood, and stone, and maintaining sufficient brightness through white or neutral elements. Remember that green bathrooms don't have to feel like forest cabins; when paired with contemporary fixtures, clean lines, and modern materials, they become sophisticated spaces that feel current rather than rustic. Whether you're refreshing a powder room or designing a master bath retreat, green offers timeless appeal and proven psychological benefits that make your bathroom more than just functional—it becomes a sanctuary for relaxation and renewal.
About the author
OBCD
CGI visualization and interior design content. We create detailed 3D renders and curate practical design ideas for every room in your home.