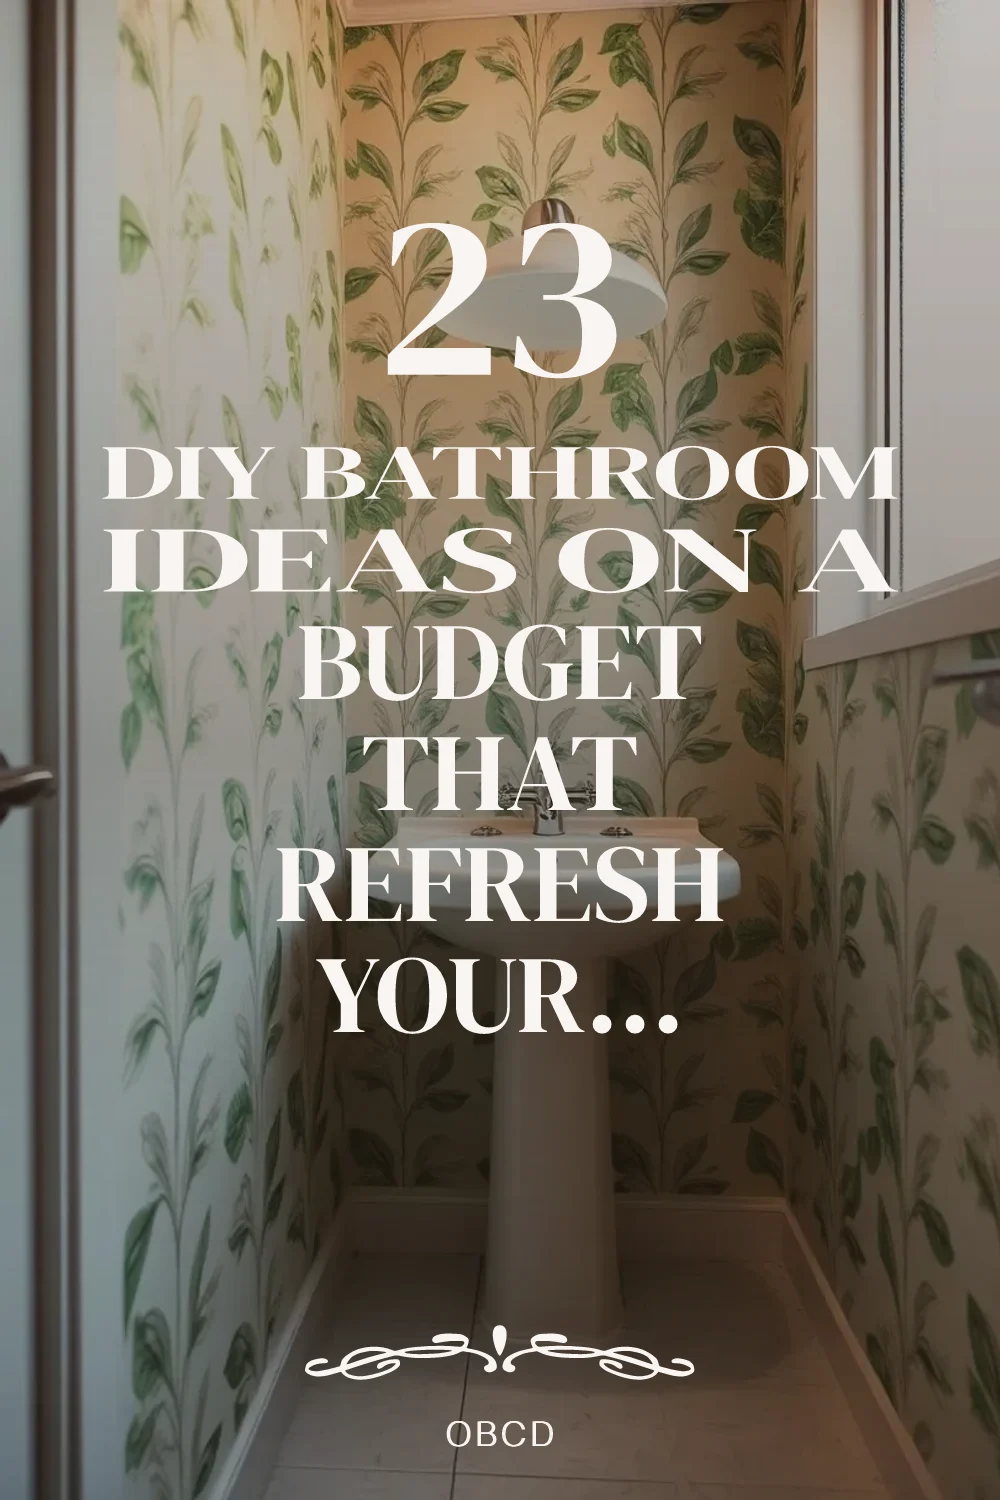
23 DIY Bathroom Ideas on a Budget for a Fresh Look
Transforming your bathroom doesn't require a massive renovation budget or a professional contractor. The best DIY bathroom ideas on a budget offer creative, affordable ways to refresh your space and make it feel intentional, functional, and uniquely yours. From simple cosmetic updates to functional improvements, these projects range from weekend-friendly quick fixes to more involved upgrades that dramatically change the space.
Whether you're working with a cramped powder room, an outdated master bath, or a rental property where major changes aren't permitted, these ideas provide solutions for every scenario. Many projects can be completed for under $100 and deliver the visual impact of renovations that cost far more. Several include no-drill or damage-free alternatives specifically designed for renters. The key is focusing on high-impact elements that transform perception—lighting, storage solutions, texture, and color.
This guide walks you through 23 achievable DIY bathroom upgrades on a budget, organized by complexity and impact. Choose projects that match your skill level, timeline, and budget, then tackle them one at a time for steady transformation. The cumulative effect of multiple smaller improvements often creates greater satisfaction than a single large renovation—plus you get the satisfaction of knowing you built your personalized bathroom oasis with your own hands.
Quick FAQ
How much do DIY bathroom renovations typically cost?
Most of the ideas in this guide cost between $20-200, with many projects falling under $50. Larger projects like vanity transformations or tile work can reach $200-500 depending on materials and scope. This represents significant savings compared to professional renovations, which typically cost thousands more for similar outcomes.
Which projects are best for renters who can't make permanent changes?
Peel-and-stick wallpaper, removable shelf mounting, new fixtures that can be swapped back, lighting changes, and shower curtain updates are all renter-friendly. Many ideas include rental alternatives that use command strips, adhesive hooks, or other damage-free mounting solutions.
How long do most of these projects take to complete?
Simple projects like updating hardware or art can be done in 1-2 hours. Medium projects like painting or shelving typically take 4-8 hours over a weekend. Larger projects like vanity transformations or tile work may require 8-12 hours spread across multiple days. All are designed as manageable weekend projects rather than week-long renovations.
What if I'm not confident with tools or DIY projects?
Start with the simpler cosmetic projects like updating lighting, adding art, or installing shelves that require minimal tools. As confidence grows, tackle progressively more involved projects. Many ideas offer beginner-friendly alternatives or can be modified to match your skill level. The goal is creating a bathroom you love, not proving your construction skills.
As an Amazon Associate I earn from qualifying purchases.
Table of Contents
- 1. Peel-and-Stick Wallpaper Accent Wall
- 2. Painted Tile Floor with Stencils
- 3. Floating Shelves Above the Toilet
- 4. DIY Mirror Frame with Molding
- 5. Painted Vanity Cabinet Refresh
- 6. Wainscoting or Shiplap Half-Wall
- 7. Replaced Lighting Fixtures
- 8. Shower Curtain Transformation
- 9. Tile Backsplash or Accent
- 10. Storage Ladder or Tower
- 11. Hardware and Faucet Update
- 12. Painted Ceiling or Accent Wall
- 13. Mason Jar Storage and Dispensers
- 14. Towel Warmer Rack
- 15. DIY Art or Gallery Wall
- 16. Plant Shelf or Hanging Planter
- 17. Rustic Barn Door
- 18. Open Shelving Over Toilet
- 19. Tile Niche or Recessed Shelf
- 20. Chalkboard Accent Wall
- 21. Rope or Wire Basket Storage
- 22. Vintage Sign or Typography
- 23. Repurposed Furniture Vanity
1. Peel-and-Stick Wallpaper Accent Wall
Peel-and-stick wallpaper transforms a plain bathroom wall into a stunning focal point without the hassle of traditional wallpaper installation. These DIY bathroom ideas on a budget work especially well in powder rooms or small bathrooms where a single accent wall makes maximum visual impact. The key is choosing moisture-resistant varieties and properly prepping the surface.
Clean the wall thoroughly with mild soap and water, then let it dry completely before applying. Measure twice and cut carefully, starting from a corner and working your way across while smoothing out air bubbles with a credit card or squeegee. This project typically takes 2-3 hours and costs $30-80 depending on the wallpaper quality and wall size. Unlike traditional wallpaper that requires paste and hours of drying time, peel-and-stick options let you reposition strips if they're not quite straight, though you'll want to work slowly to avoid tearing.
Common mistake: applying directly over textured walls or glossy paint without proper preparation leads to premature peeling.
Most peel-and-stick wallpapers last 3-5 years in bathrooms with good ventilation. If you're worried about moisture exposure, consider using a clear sealer spray over the finished product. For renters, this is one of the best DIY bathroom ideas because it's completely removable without damaging walls.
Do: Prime walls with a smooth coat if they're heavily textured
Don't: Apply near direct water sources like shower heads or bathtub rims
Fix: If bubbles appear, prick them gently with a pin and smooth again
What this gives you: instant room transformation with rental-friendly, removable materials
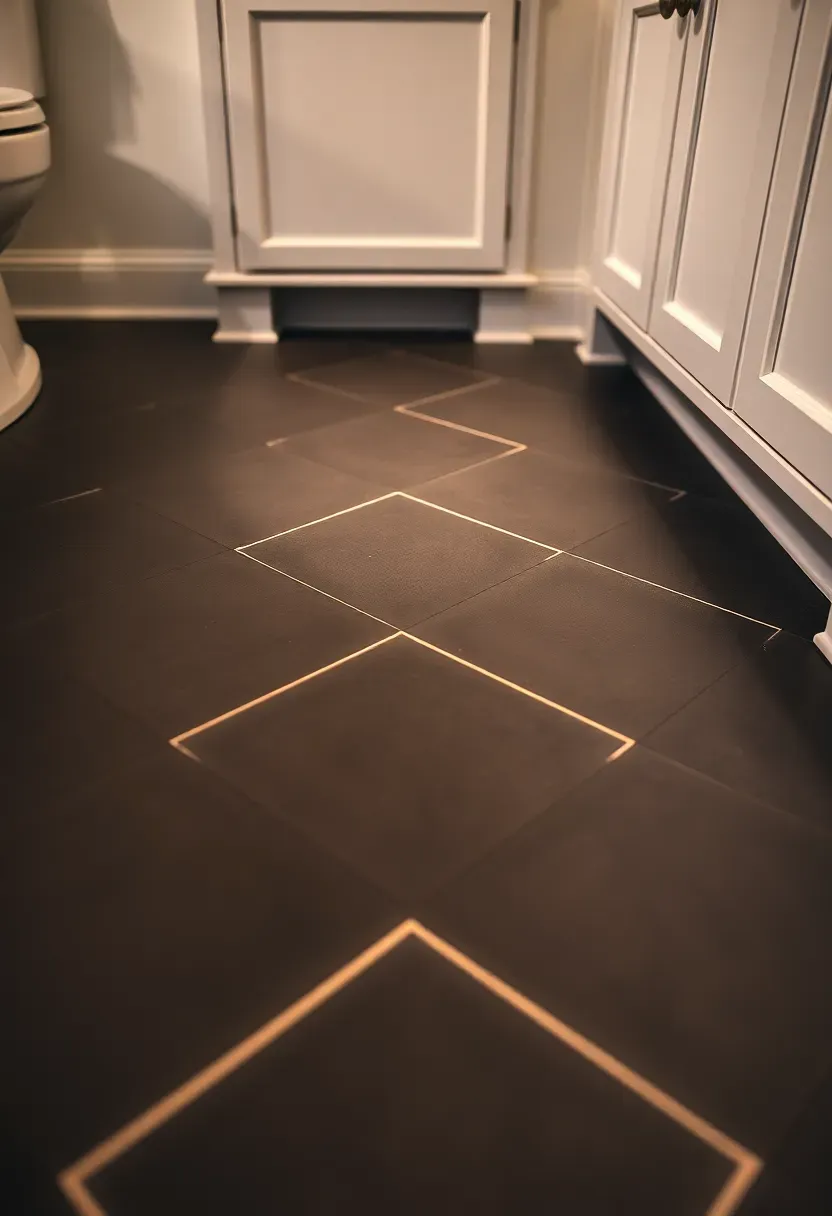
2. Painted Tile Floor with Stencils
Budget bathroom renovations often involve working with existing surfaces, and painted tile floors offer dramatic results for under $50. This DIY approach lets you create custom patterns using stencils and floor paint, transforming dated ceramic or linoleum floors into designer-looking surfaces. The key is choosing the right paint and sealing properly for durability in wet environments.
Recommended
Items for this idea
Start by thoroughly cleaning and degreasing the floor, then lightly sand to help paint adhere. Apply a primer specifically designed for tile surfaces, then choose your stencil pattern and get creative with colors. Porch and floor enamel paints work best because they're formulated to withstand foot traffic and moisture. Each coat should dry completely before applying the next, and you'll typically need 2-3 base coats plus pattern work. Common mistake: skipping the final sealer coat leads to paint chipping within months.
Placement note: this technique works best on bathroom floors with good ventilation and minimal direct water exposure.
Stenciling smaller bathroom floors takes about 4-6 hours over a weekend, while larger master baths might require 8-12 hours. For intricate patterns, consider using a stencil brush with a circular motion technique rather than a roller for cleaner lines. If your existing tile has deep grout lines, fill them slightly with grout caulk first to create a smoother surface. The finished look mimics expensive encaustic tiles at a fraction of the cost, making this one of the most impressive DIY bathroom ideas on a budget.
If: Your tiles have a high-gloss finish, sand more aggressively before priming
Then: Use an oil-based primer for better adhesion
What this gives you: custom flooring design that would cost thousands professionally installed
3. Floating Shelves Above the Toilet
Installing floating shelves above the toilet maximizes vertical space while adding storage and display opportunities to small bathrooms. These DIY bathroom ideas on a budget create a custom look that's much more affordable than built-in cabinetry, costing roughly $40-120 for materials depending on shelf length and finish. Proper mounting is critical because bathroom walls can be tricky, especially when dealing with tile or moisture.
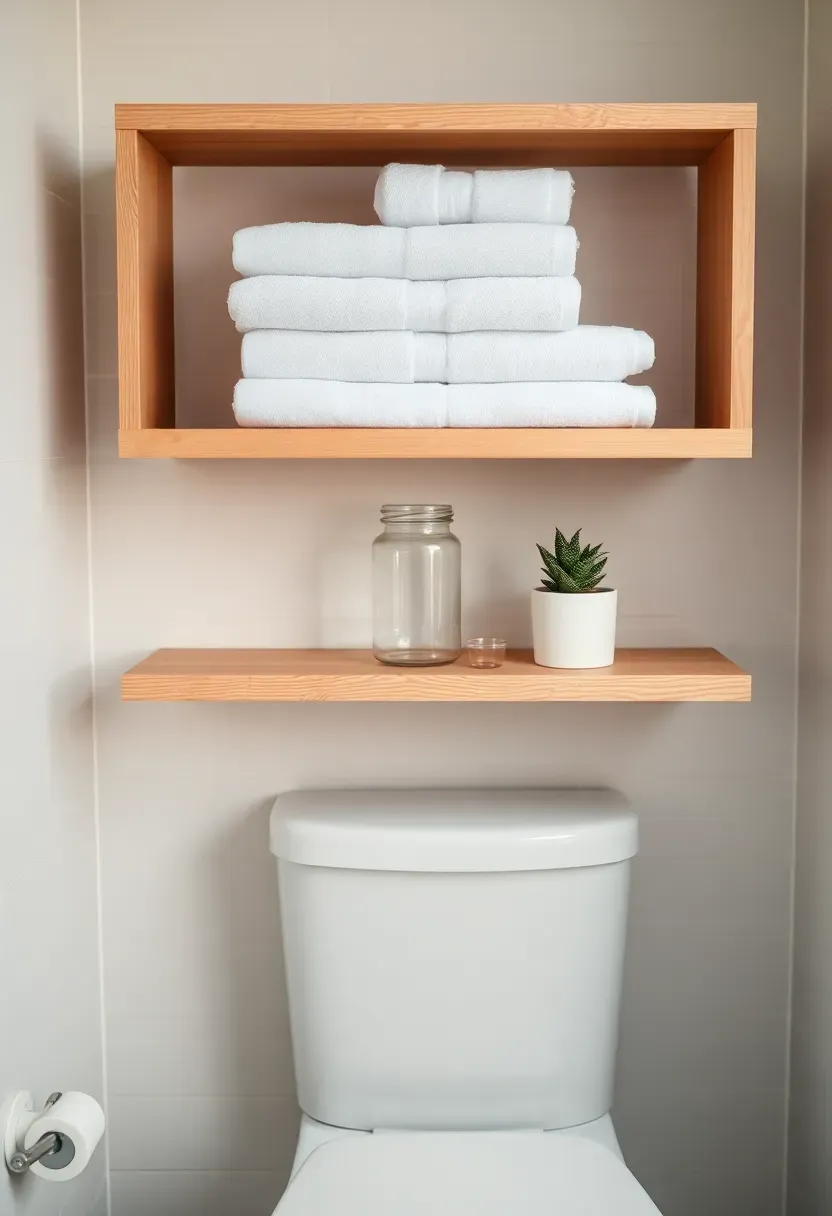
Use wall anchors rated for the combined weight of items you'll store, and position shelves 12-18 inches above the toilet tank to avoid interference. Natural wood shelves add warmth to minimalist bathrooms, while white painted shelves blend seamlessly into traditional spaces. For a cohesive look, match shelf finishes to other bathroom hardware or fixtures. If you're mounting into tile walls, use special tile anchors and drill slowly to avoid cracking.
Why it works: this utilizes otherwise wasted space while keeping daily essentials within easy reach.
Average installation takes 2-3 hours, including finding studs and drilling. Consider adding a decorative trim or molding to hide rough edges for a more finished appearance. Arrange shelves with practical items in back and pretty pieces in front—rolled towels, succulents, and apothecary jars create a spa-like atmosphere. If you're concerned about moisture, apply a waterproof sealant to wood shelves and avoid storing paper products that might get damp from shower steam.
Do: Use a level to ensure shelves are perfectly straight
Don't: Overload shelves with heavy ceramic items without proper anchors
Fix: If shelves feel unstable, add additional anchors or relocate to studs
Rental-friendly alternative: use command strips and lightweight floating shelves that don't require drilling
What this gives you: functional storage and display space without sacrificing floor area
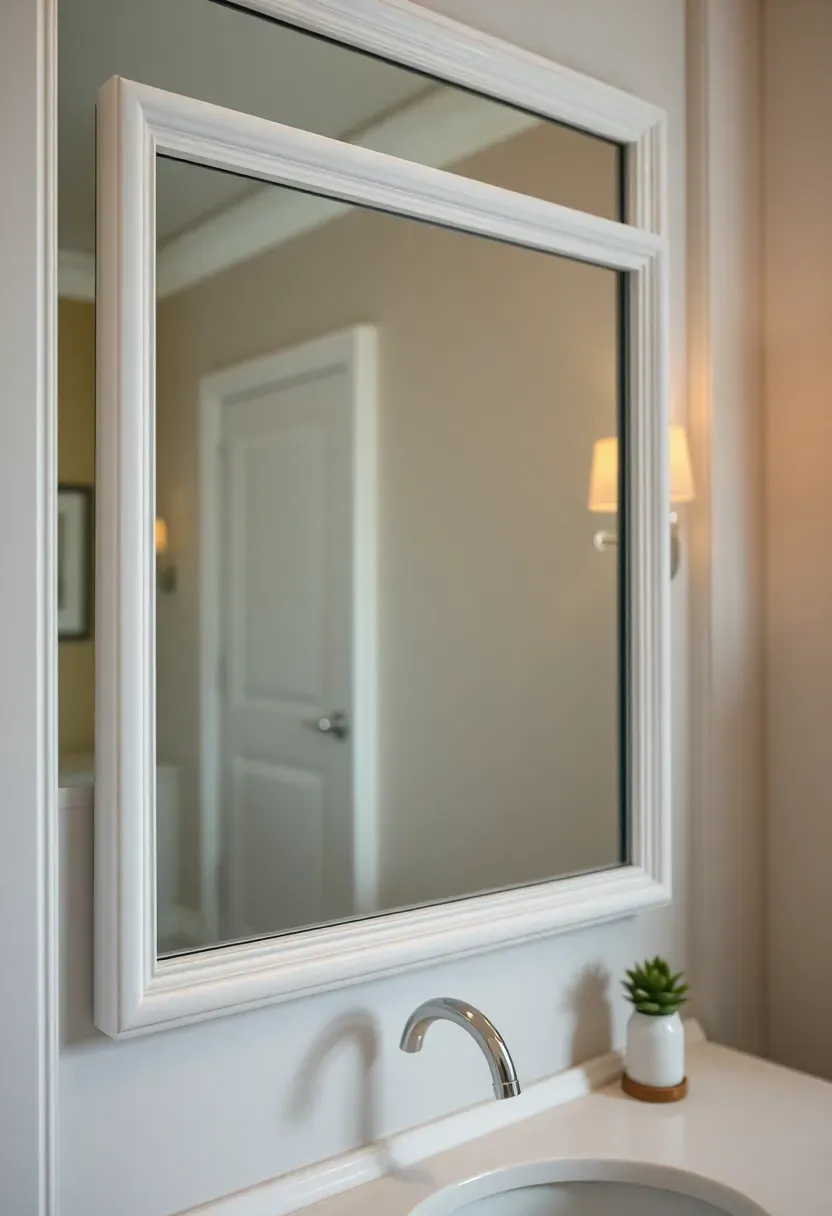
4. DIY Mirror Frame with Molding
Adding a frame to a plain builder-grade mirror instantly elevates the entire bathroom aesthetic and costs surprisingly little compared to replacing the mirror entirely. These DIY bathroom ideas on a budget transform basic plate glass mirrors into custom-looking fixtures that complement your style, whether that's farmhouse rustic, modern minimalist, or traditional elegance. The project requires basic woodworking tools and some patience with miter cuts.
Recommended
Items for this idea
Measure your mirror dimensions, then cut molding pieces 1-2 inches larger on each side to overlap the glass. Use construction adhesive rated for bathrooms to attach the molding directly to the mirror surface, and reinforce with finishing nails into the wall if possible. Miter the corners at 45-degree angles for professional-looking joints, then fill gaps with paintable caulk. Paint the frame to match your vanity or choose a contrasting color for dramatic effect.
Common mistake: using regular wood glue instead of construction adhesive leads to the frame detaching from the slick glass surface.
This project typically takes 3-5 hours over a weekend and costs $20-80 depending on molding choice and finish. For an ultra-modern look, consider using thin metal strips instead of traditional wood molding. If your mirror is heavy or you're uncomfortable working above your head, enlist a helper to hold pieces while you secure them. The transformation is remarkable—what looks like a simple builder-basic bathroom suddenly feels intentional and designed.
Do: Clean the mirror thoroughly with rubbing alcohol before applying adhesive
Don't: Skip sanding the back of molding pieces for better glue grip
Fix: If corners don't align perfectly, fill gaps with wood filler and sand smooth
What this gives you: custom mirror appearance without the expense of replacement or professional installation
5. Painted Vanity Cabinet Refresh
Painting bathroom cabinets creates an immediate transformation and ranks among the most cost-effective DIY bathroom ideas on a budget, typically costing $30-100 for materials. Whether your vanity is dated oak, boring builder white, or an unfortunate color choice, the right paint and technique can give it a custom look that lasts years. The key is proper preparation—skipping this step is the main reason painted cabinets chip and peel.
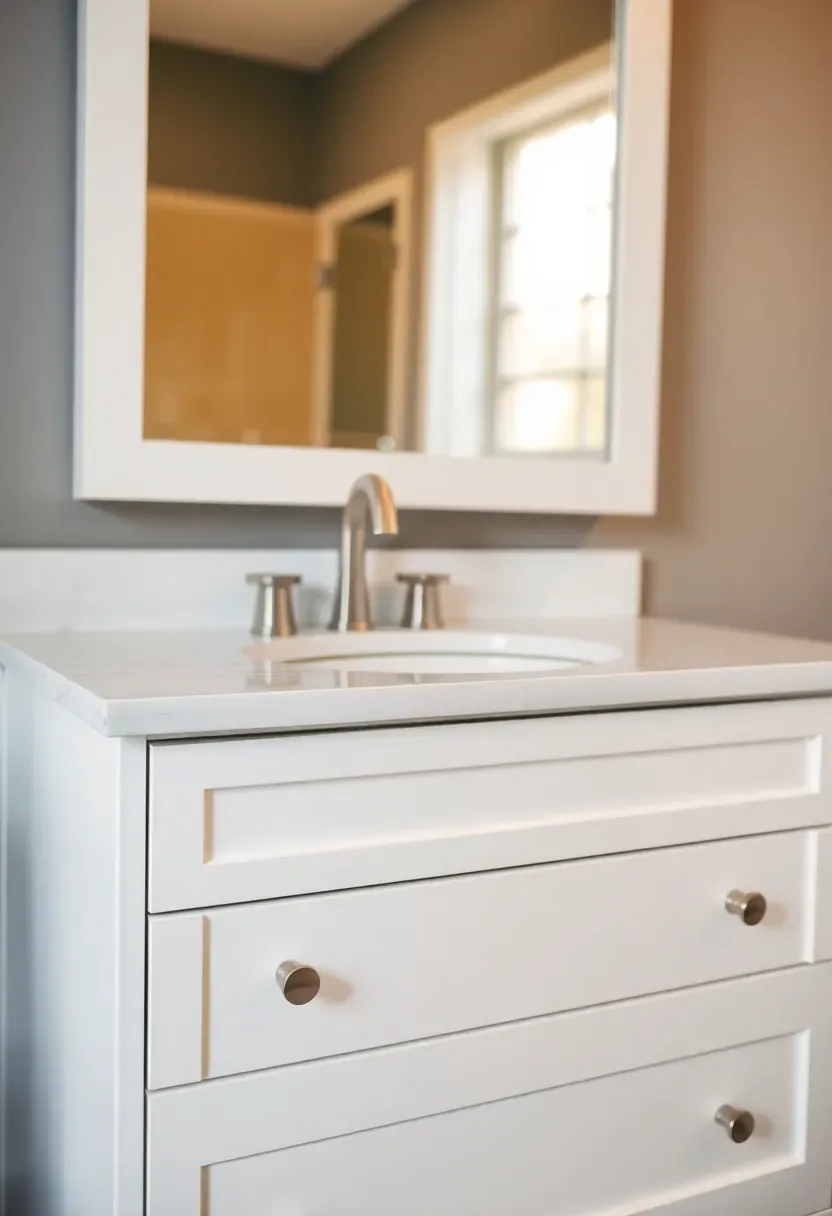
Remove all hardware and doors, then clean surfaces thoroughly with degreaser to remove years of built-up grime. Lightly sand glossy surfaces to create a mechanical bond for paint, then apply a bonding primer designed specifically for bathroom cabinets. Use high-quality cabinet enamel paint for the finish—this resists moisture, staining, and frequent cleaning. Two thin coats of paint beat one thick coat every time, allowing adequate drying time between applications.
For small baths: consider painting the vanity walls above the counter the same color to visually expand the space.
This project typically spans a weekend, with most time spent on preparation and drying. Consider updating hardware while you're at it—new pulls or knobs in a contrasting finish add instant polish. If you're feeling ambitious, paint the interior of the cabinet in a fun color or pattern for a surprise pop of character. The transformation from dated to designer is so dramatic that this single change often makes an entire bathroom feel newly renovated.
Pro: Cabinet enamel paint is extremely durable and easy to clean
Con: Requires significant drying time between coats
Fix: If you notice drips or brush marks, sand lightly between coats
Budget/time hack: spray paint cabinet doors outdoors for faster application and smoother finish
What this gives you: custom vanity appearance without replacing cabinets
6. Wainscoting or Shiplap Half-Wall
Adding wainscoting or shiplap to the lower half of bathroom walls creates architectural interest and protects walls from water damage while adding character. These DIY bathroom ideas on a budget range from traditional beadboard to modern shiplap, with costs typically $50-200 depending on material choice and wall coverage. The installation process is straightforward for basic patterns and dramatically elevates the room's appearance.

Recommended
Items for this idea
Measure your wall height and decide on the wainscoting height—standard is 32-36 inches from the floor. For shiplap, use a level to keep rows straight, and space gaps evenly or butt pieces tight together depending on the look you want. Add a chair rail or baseboard trim at the top for a finished edge. Paint the whole installation in a semi-gloss finish that's easy to wipe clean. In small bathrooms, painting wainscoting white with light walls above visually expands the space.
Common mistake: skipping adhesive and relying only on nails leads to boards pulling away from damp walls.
Installation typically takes 4-8 hours for a standard bathroom wall, depending on your experience level. Pre-made wainscoting panels speed up the process significantly compared to individual board installation. Consider moisture-resistant MDF or PVC materials in humid bathrooms to prevent warping over time. The timeless appeal of wainscoting means this investment continues to pay dividends for years, and it's one of those DIY bathroom ideas that looks professionally installed when done carefully.
Do: Use construction adhesive rated for bathrooms in addition to nails
Don't: Install directly over peeling paint or damaged drywall without repair
Fix: If gaps appear between boards, fill with paintable caulk and touch up paint
What this gives you: architectural detail that makes the bathroom feel custom and finished
7. Replaced Lighting Fixtures
Updating bathroom lighting fixtures dramatically changes the room's atmosphere and is one of the most impactful DIY bathroom ideas on a budget, costing $40-150 per fixture depending on style and quality. Swapping out dated builder-basic lights for modern or vintage-inspired fixtures transforms the entire aesthetic instantly. Many homeowners feel intimidated by electrical work, but fixture replacement is actually quite accessible with basic precautions.
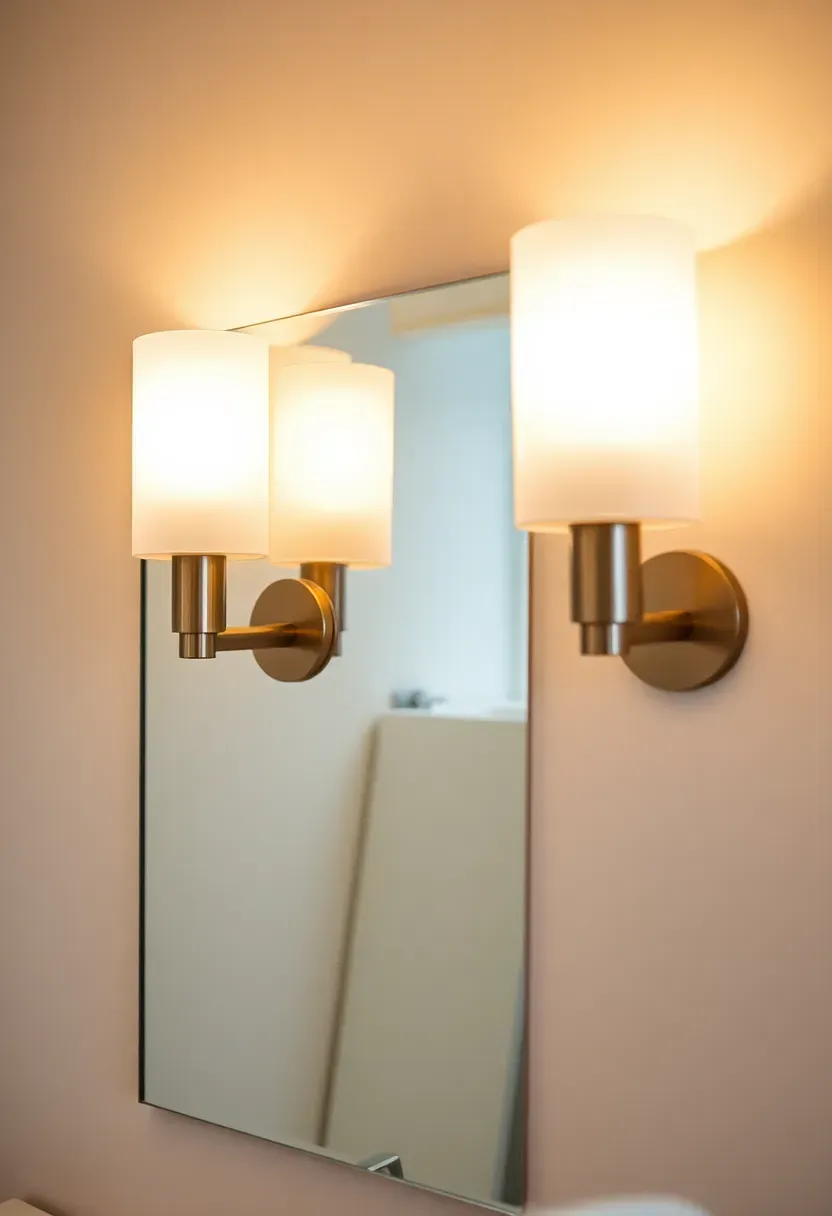
Always turn off power at the circuit breaker before beginning—this is non-negotiable for safety. Remove the old fixture carefully, noting how wires connect, then install the new fixture following manufacturer instructions. Consider LED fixtures for energy efficiency and cooler operation. For vanities, install fixtures at eye level on either side of the mirror for the most flattering lighting. If you're unsure about electrical work, don't hesitate to hire an electrician for the installation while you choose and purchase the fixtures yourself.
Why it works: lighting affects everything from how you apply makeup to how clean the bathroom feels.
This project typically takes 1-2 hours per fixture, including prep work. Mix styles thoughtfully—industrial Edison bulbs complement farmhouse vanities, while sleek modern fixtures work with minimalist designs. If you're working with a tight budget, consider simply painting existing fixtures with high-heat spray paint in a new finish like brushed nickel or matte black. The change in lighting quality and style creates an immediate perception of value and luxury in the space.
Do: Test wires with a voltage tester before touching anything
Don't: Attempt to work on live electrical circuits
Fix: If new fixtures flicker or buzz, check all connections and bulb compatibility
Rental-friendly alternative: swap in plug-in sconces or hardwired fixtures you can reinstall when you leave
What this gives you: improved functionality and style without major renovation
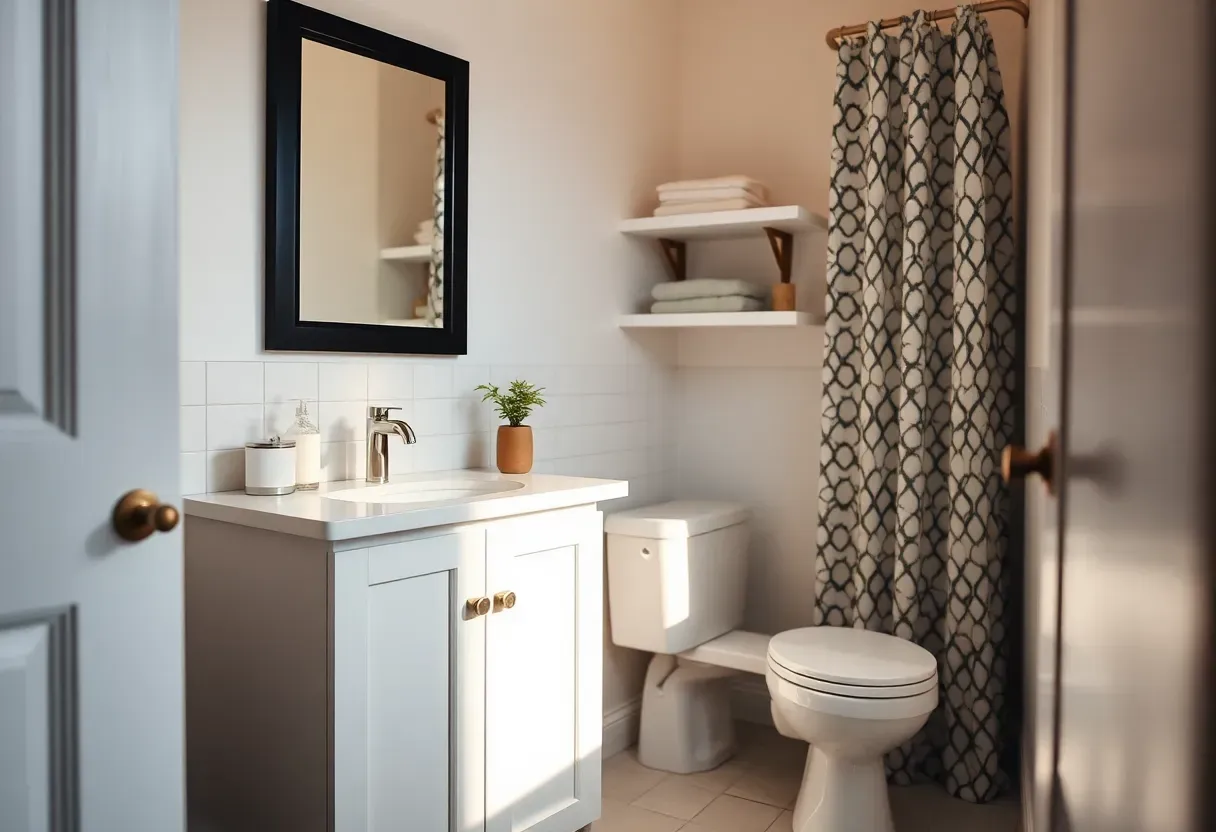
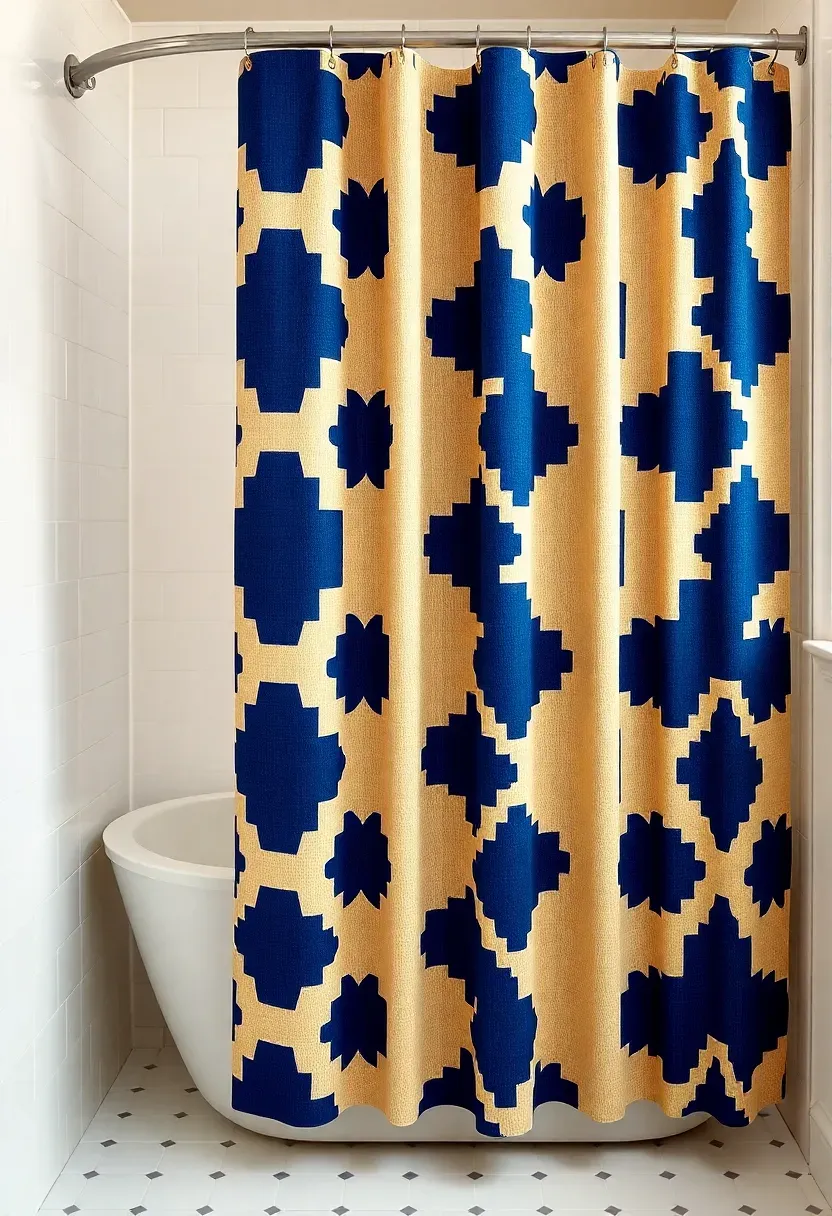
8. Shower Curtain Transformation
A statement shower curtain serves as the largest visual element in many bathrooms and offers an incredibly affordable way to refresh the space. These DIY bathroom ideas on a budget cost $20-80 but deliver maximum impact, effectively becoming the room's focal point and setting the entire design direction. Beyond simply buying a new curtain, consider customizing or upgrading how it's installed for a more polished look.
Recommended
Items for this idea
Choose a curtain with a weighted hem for better drape and fewer blowouts from shower steam. Install the rod a few inches higher than standard for added drama, and consider a curved rod that adds elbow room in tight showers. If you're crafty, customize a plain fabric curtain with painted stencils, trim, or embroidery. For bathrooms with windows, use a sheer curtain behind the main one to let light filter through while maintaining privacy.
Placement note: ensure the curtain rod is installed at least 3-4 inches above the shower head to prevent water from escaping.
This quick refresh takes 15-30 minutes and works as a perfect weekend project. Consider coordinating the curtain with other elements—towels, rugs, or accessories—for a cohesive look. If you're feeling ambitious, sew a custom curtain using water-resistant fabric for exactly the size and style you want. Even simply upgrading from a flimsy vinyl liner to a quality fabric liner makes a surprising difference in how the bathroom feels.
If: Your bathroom feels dark
Then: Choose a light-colored or translucent curtain to maximize brightness
What this gives you: instant room refresh with minimal investment and effort
9. Tile Backsplash or Accent
Installing a tile backsplash or accent strip behind the vanity creates a high-end focal point that costs surprisingly little for the visual impact. These DIY bathroom ideas on a budget range from $40-150 depending on tile choice and area size, with options ranging from classic subway tile to intricate mosaics. The backsplash protects walls from water damage while adding a designer touch that elevates the entire vanity area.
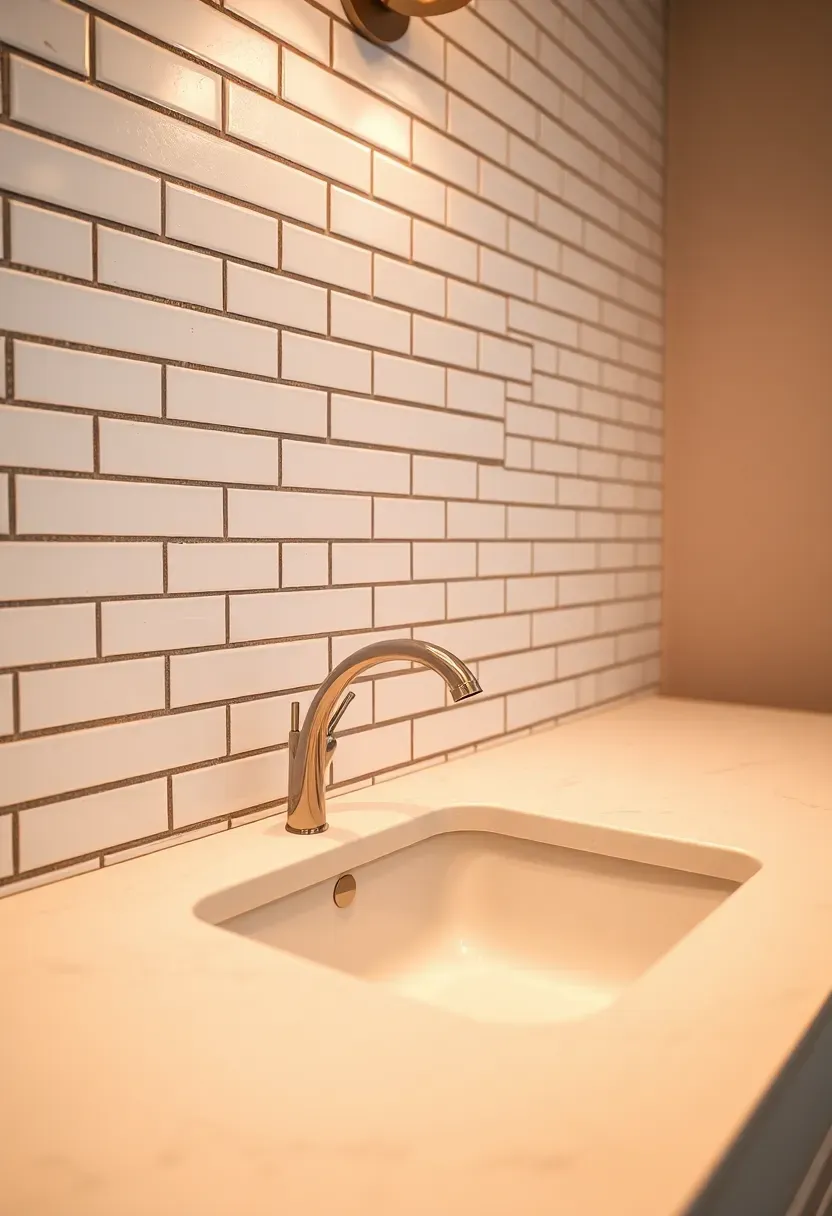
Plan your layout carefully, starting from the center and working outward to ensure symmetrical cuts at edges. Apply thin-set mortar with a notched trowel, press tiles firmly, and use spacers for consistent grout lines. For smaller bathrooms, consider a simple 4-6 inch tall band above the vanity rather than tiling all the way up to the mirror. This creates visual interest without overwhelming the space. If full tile installation seems intimidating, peel-and-stick tile sheets offer a beginner-friendly alternative with surprisingly convincing results.
Common mistake: applying grout too soon after tile installation leads to shifting and uneven grout lines.
This project typically takes 4-8 hours over a weekend, allowing ample drying time between steps. Consider adding a decorative tile border or mixing tile sizes for added interest. For a truly custom look, create a pattern using different tile colors or textures. The backsplash serves as a bridge between the vanity and the rest of the bathroom, so choose materials that complement both. Even a simple white subway tile with dark grout creates striking contrast and timeless appeal.
Do: Dry-lay tiles first to verify your pattern and cuts before applying mortar
Don't: Rush the drying process between mortar, grout, and sealer steps
Fix: If grout is too thin, apply a second coat after the first dries completely
What this gives you: designer detail that makes the vanity feel intentional and custom
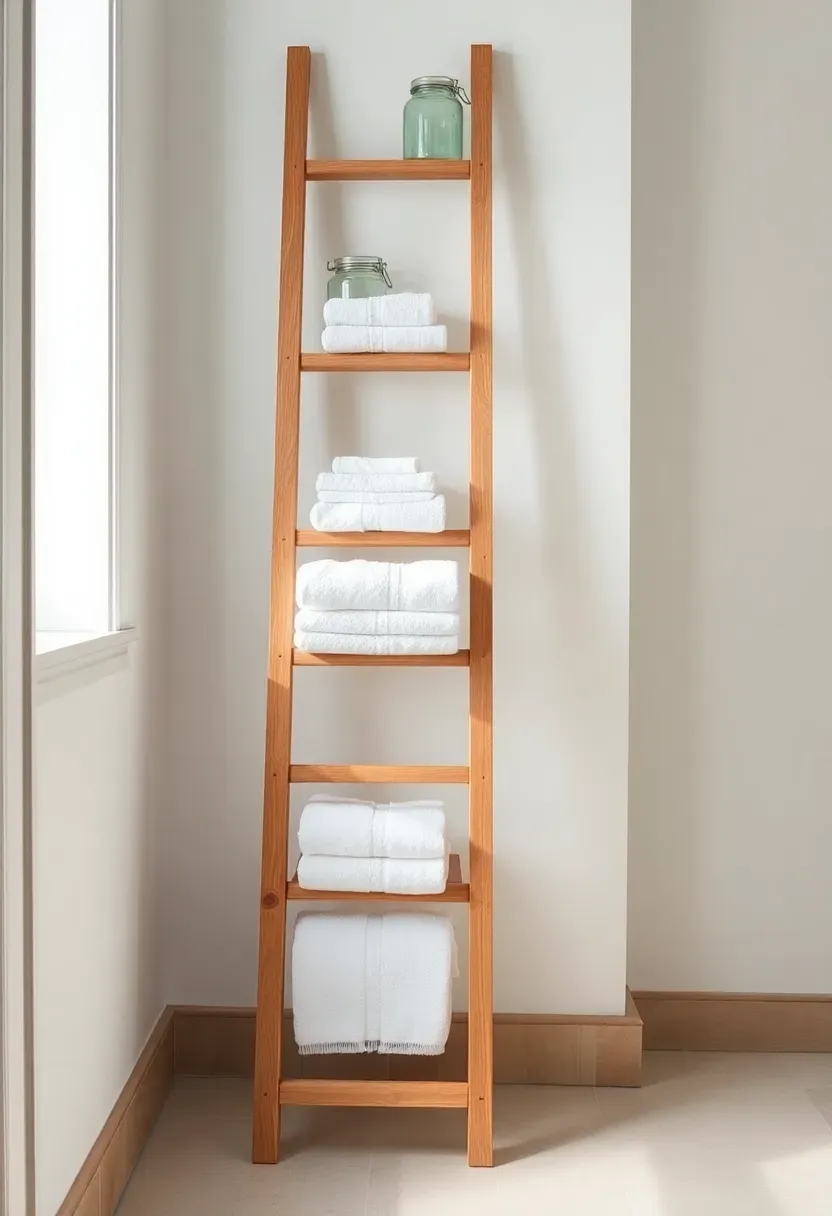
10. Storage Ladder or Tower
Adding a storage ladder or tower maximizes vertical space while providing storage for towels, toiletries, and decorative items. These DIY bathroom ideas on a budget range from purchased options ($50-150) to building your own ($30-80) and work exceptionally well in bathrooms with limited floor space. The vertical design draws the eye upward, making the room feel larger while keeping essentials organized and accessible.
Recommended
Items for this idea
Position the ladder or tower where it won't obstruct movement pathways—typically in a corner or beside the vanity. For a DIY version, use wooden boards and basic brackets to create open shelving that leans against the wall. Store heavier items like folded towels on lower shelves and lighter items like candles or decorative jars on upper shelves. If space is extremely tight, consider a narrow ladder-style shelf that takes up minimal floor footprint.
For narrow bathrooms: choose a ladder with a slim profile and store items perpendicular to the wall to maximize clearance.
This project or purchase typically takes 1-3 hours to set up. Consider the ladder's finish in relation to other bathroom elements—wood adds warmth to white bathrooms, while black metal creates industrial contrast. If you're building, add hooks on the sides for hanging robes or additional storage. The beauty of vertical storage is that it provides abundant functionality without sacrificing floor area, making it perfect for smaller bathrooms.
Do: Secure the ladder or tower to the wall if you have small children or pets
Don't: Overload upper shelves with heavy items that could make the unit unstable
Fix: If the ladder slides, add rubber pads to the feet or mount to the wall
Budget/time hack: upcycle an old wooden ladder with sanding and paint for instant character
What this gives you: abundant storage without sacrificing valuable floor space
11. Hardware and Faucet Update
Replacing outdated faucets, cabinet pulls, and towel bars creates an immediate bathroom refresh that feels far more expensive than the actual cost. These DIY bathroom ideas on a budget range from $80-300 depending on fixture quality and quantity, with options spanning every style from traditional to ultra-modern. Updated hardware serves as jewelry for the bathroom, elevating the entire aesthetic with minimal effort.
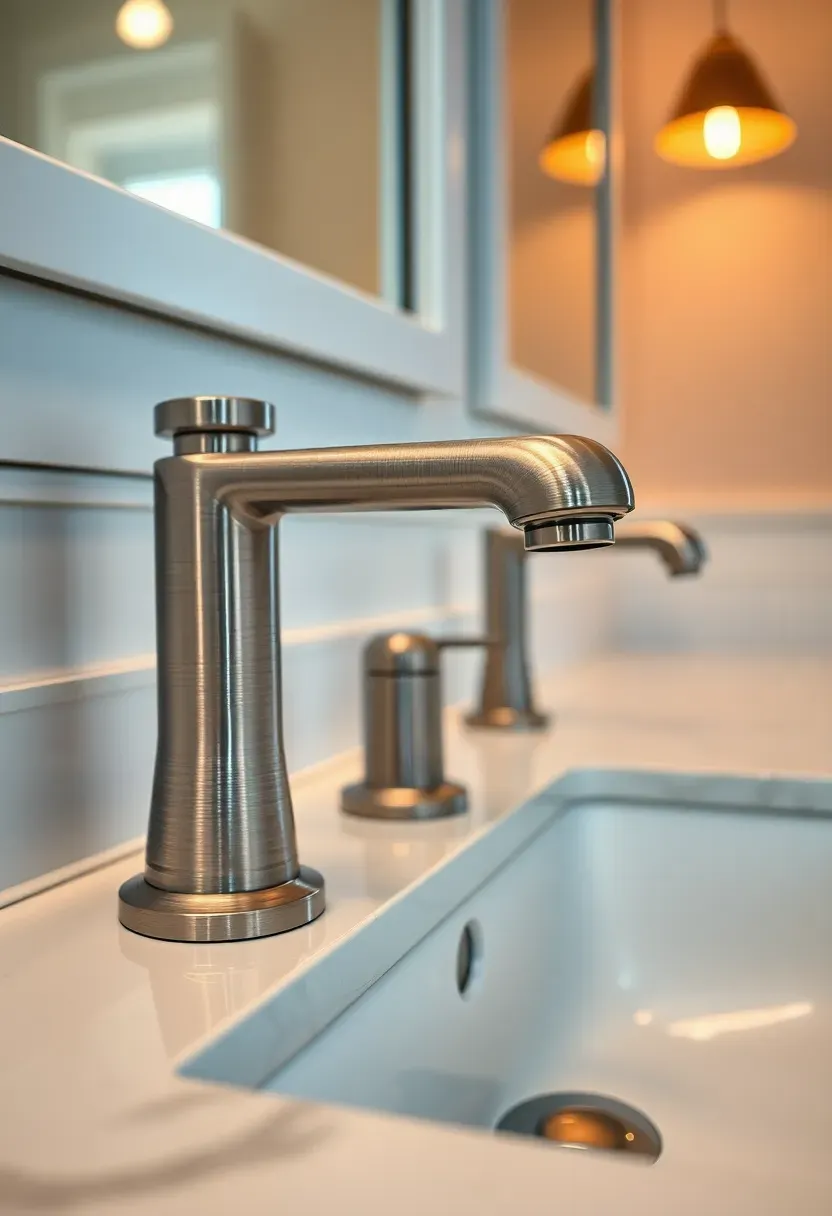
Measure your existing fixtures carefully before purchasing—faucets come in various spreads and configurations. For cabinets, use the same screw hole patterns if possible to avoid patching and drilling new holes. Choose finishes that complement each other—brushed nickel pairs well with chrome, while matte black creates dramatic contrast with brass. When replacing faucets, turn off water supply valves and open faucets to drain lines before beginning.
Why it works: fixtures are the elements you touch and interact with most, so updating them makes the biggest functional impact.
This project typically takes 2-4 hours, with the faucet replacement taking the most time. Consider mixing metals intentionally—brushed nickel pulls with a brass faucet creates an eclectic designer look. If you're on a tight budget, start with the most visible elements like vanity pulls and the faucet, then add towel bars and robe hooks later. The difference in perceived quality and attention to detail is remarkable.
Do: Apply plumber's tape to all threaded connections to prevent leaks
Don't: Over-tighten fittings, especially on ceramic or PVC materials
Fix: If a faucet drips after installation, check that supply lines are fully open and seats are clean
Rental-friendly alternative: simply swap cabinet pulls and reinstall original hardware when you leave
What this gives you: elevated style and improved functionality without major renovation
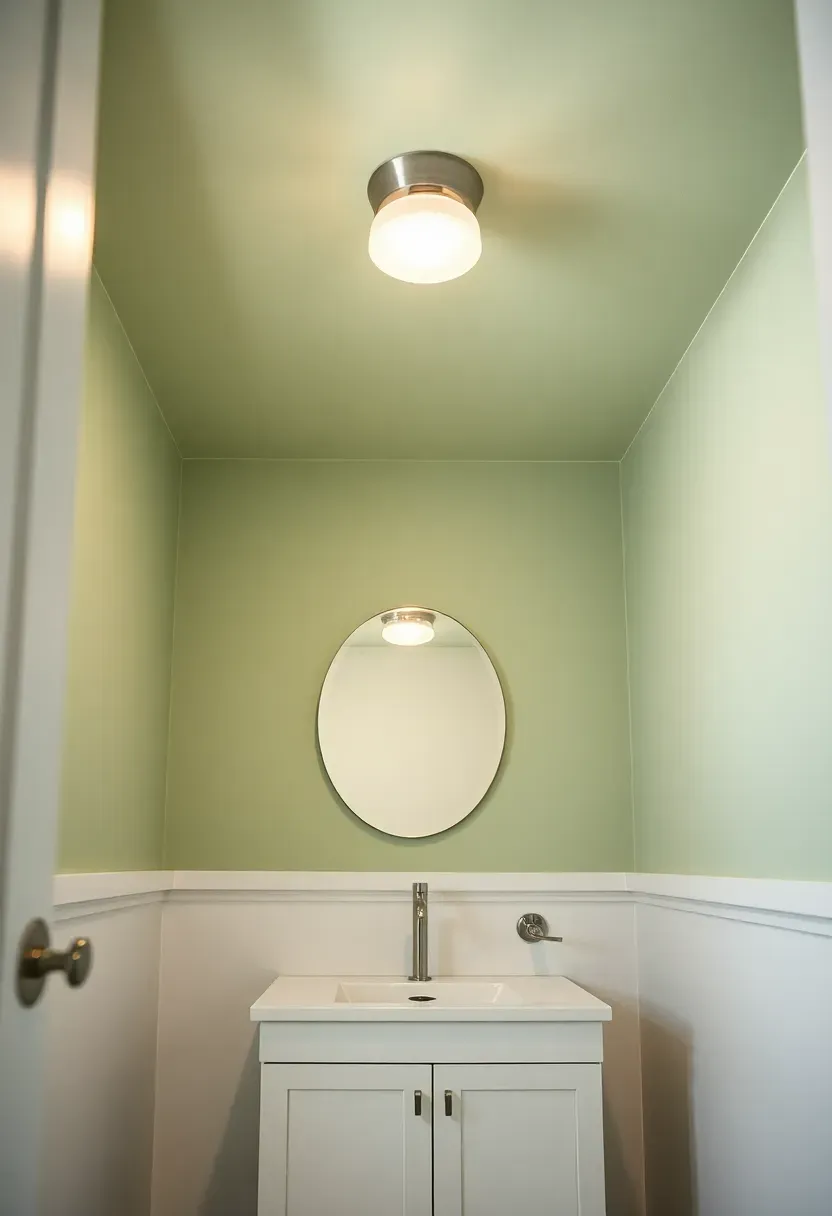
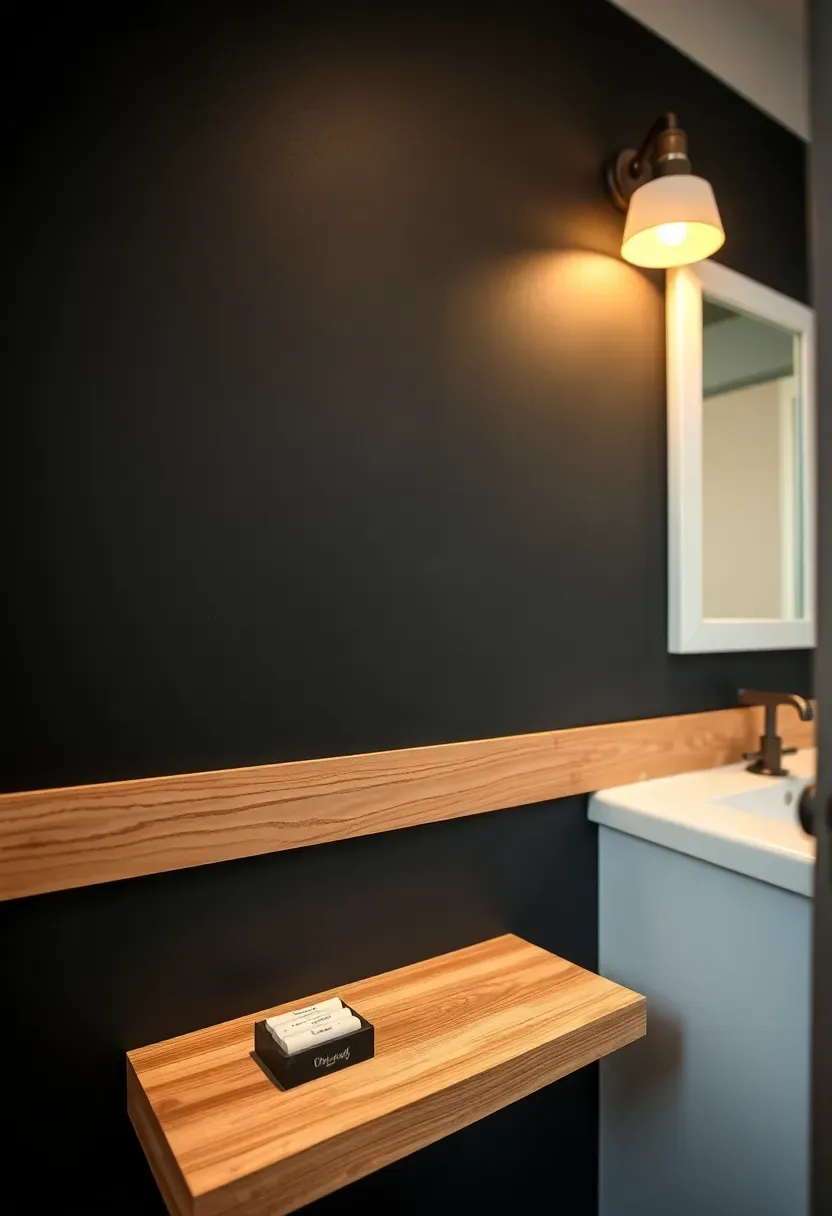
12. Painted Ceiling or Accent Wall
Painting the bathroom ceiling or creating an accent wall offers dramatic visual impact for a minimal investment of $30-80 in paint and supplies. These DIY bathroom ideas on a budget work especially well in bathrooms with tall ceilings or prominent walls that deserve attention. The contrast between painted and neutral surfaces creates instant character and makes the space feel intentionally designed.
Recommended
Items for this idea
For ceilings, choose a color that complements the wall color without overwhelming the space—soft blues, sage greens, or warm neutrals work beautifully in bathrooms. For accent walls, consider the wall behind the vanity or the wall facing the entry for maximum visibility. Use high-quality bathroom paint with mold resistance, especially important on ceilings where moisture collects. Tape carefully around fixtures and trim, and use an angled brush for cutting in near edges.
Common mistake: using regular wall paint instead of bathroom-specific paint leads to mold and peeling on ceilings.
This project typically takes 3-5 hours, including preparation and drying time between coats. If you're unsure about committing to a bold color, start with a darker shade of your existing wall color for sophisticated contrast. Consider adding a subtle pattern with stencils or painter's tape for added interest. The painted ceiling technique is particularly effective in bathrooms with interesting architectural features like crown molding or beams.
Do: Use paint with a semi-gloss finish for better moisture resistance and easier cleaning
Don't: Paint during humid conditions, as this slows drying and can affect the finish
Fix: If brush strokes show, sand lightly between coats and apply final coat with a roller
What this gives you: bold visual impact with minimal investment and effort
13. Mason Jar Storage and Dispensers
Creating storage solutions from Mason jars adds farmhouse charm while providing functional organization for bathroom essentials. These DIY bathroom ideas on a budget cost $15-40 and offer endless customization possibilities from soap dispensers to toothbrush holders. The jars' clear glass lets you see contents at a glance while adding visual texture and rustic appeal to the space.
For soap dispensers, drill a small hole in jar lids and insert pump tops from old dispensers or purchase conversion kits. For storage, organize items like cotton swabs, cotton balls, bath salts, and makeup brushes in different sized jars. Consider painting jar lids to match your bathroom color scheme, or leave them galvanized for authentic farmhouse style. Mount jars to walls with pipe clamps for vertical storage that saves counter space.
Placement note: group jars on trays or shelves rather than scattering them randomly for a curated look.
This project takes 1-2 hours and works as a perfect weekend activity. Consider using vintage or colored Mason jars for added character, or distress new jars with paint for an aged appearance. Label jars with chalk paint or decorative tags for easy identification. The beauty of Mason jar storage is that it's endlessly customizable—you can swap contents and arrangements seasonally for a fresh look without additional expense.
If: You have small children
Then: Consider locking lids or storing breakable jars on higher shelves
Rental-friendly alternative: use adhesive hooks and lightweight jars for damage-free wall mounting
What this gives you: charming organization that adds character and personality
14. Towel Warmer Rack
Installing a towel warmer rack transforms the bathroom experience with luxury hotel-level warmth and comfort. These DIY bathroom ideas on a budget range from $40-150 for electric models to $30-80 for freestanding versions, offering options for every bathroom configuration. Beyond the obvious comfort of warm towels, these racks also help towels dry faster between uses, reducing mustiness and laundry frequency.
Recommended
Items for this idea
Electric hardwired models require professional installation but offer permanent, silent operation. Plug-in versions are easy to install but require access to an outlet. Freestanding racks offer flexibility and portability but take up floor space. Position the rack within easy reach of the shower or tub for maximum convenience. Consider the rack's heat capacity—some models warm multiple towels while others handle single items.
Why it works: this upgrade turns routine bathroom visits into spa-like experiences without major renovation.
Installation varies from 30 minutes for freestanding units to 2-3 hours for hardwired models. Look for racks with timers or auto-shutoff features for energy efficiency. If budget allows, choose a model with multiple bars to warm several towels simultaneously. The tactile experience of wrapping yourself in a pre-warmed towel creates a daily luxury that quickly becomes indispensable, making this one of the most satisfying DIY bathroom upgrades.
Do: Measure your space carefully before purchasing to ensure the rack fits your wall
Don't: Overload racks beyond their stated weight capacity
Fix: If a rack isn't warming properly, check power connections and timer settings
What this gives you: daily luxury experience that elevates routine bathroom use
15. DIY Art or Gallery Wall
Adding art or creating a gallery wall infuses personality and transforms blank bathroom walls into curated, thoughtful spaces. These DIY bathroom ideas on a budget range from free using items you already own to $100-200 for purchased artwork and frames. The key is choosing moisture-resistant materials and arranging pieces thoughtfully to create visual interest without overwhelming the space.
For DIY art, create abstract paintings on canvas, frame botanical prints from old books, or arrange pressed flowers in floating frames. Consider bathroom themes like ocean waves, botanical elements, or geometric patterns for cohesive styling. Hang pieces at eye level, typically 57-60 inches from the floor, and space them evenly for a polished look. Use frames with moisture-resistant glass or acrylic to protect artwork from bathroom humidity.
Common mistake: hanging art too high or spacing pieces unevenly creates a disjointed, amateur appearance.
This project takes 2-4 hours depending on the size and complexity of your arrangement. For a gallery wall, start by laying pieces on the floor to experiment with arrangements before hanging. Consider mixing frame styles and sizes for eclectic appeal, or keep everything uniform for a minimalist look. The art should complement the bathroom's color scheme and style—ocean blues pair beautifully with beach-themed bathrooms, while botanical art suits natural spaces.
Do: Use level and measuring tape to ensure pieces hang straight and evenly spaced
Don't: Hang valuable or irreplaceable artwork in humid bathrooms
Fix: If pieces feel unbalanced, add or remove items until the arrangement feels right
What this gives you: personalized space that reflects your style and interests
16. Plant Shelf or Hanging Planter
Adding plants brings life and freshness to bathrooms while improving air quality and creating a spa-like atmosphere. These DIY bathroom ideas on a budget range from $10-50 for simple planters to $80-200 for custom shelving, with options suitable for every bathroom size and light condition. The greenery contrasts beautifully with typical bathroom materials like tile and chrome, softening the space visually.
Recommended
Items for this idea
Choose bathroom-friendly plants like pothos, spider plants, or ferns that thrive in humid environments. For shelves, install floating shelves near windows or above the vanity for maximum light exposure. Hanging planters work well in corners or from shower curtain rods, adding vertical interest. Consider grouping plants at different heights for visual interest, or create a dedicated plant corner with multiple varieties. If you lack natural light, choose low-light tolerant species or add grow lights.
Placement note: position plants where they won't interfere with movement paths or get knocked over during routine use.
This project takes 1-3 hours depending on complexity. If you're building shelves, incorporate drainage trays to protect surfaces from water damage. Consider using moisture-resistant materials like sealed wood or metal in humid bathrooms. The psychological benefit of plants in bathrooms is significant—creating a connection to nature transforms the space from purely functional to restorative and calming.
Do: Choose plants specifically suited to your bathroom's light and humidity levels
Don't: Place delicate plants where shower spray might damage them
Fix: If plants show yellowing leaves, adjust light or water frequency
Rental-friendly alternative: use suction cup shelves or over-the-door plant hangers
What this gives you: natural, living elements that create a spa-like atmosphere
17. Rustic Barn Door
Replacing a traditional bathroom door with a rustic barn door creates dramatic visual impact while solving space problems in tight bathroom layouts. These DIY bathroom ideas on a budget range from $80-250 for materials, with options to build your own or purchase pre-made doors. The sliding mechanism saves floor space while the door itself becomes a design feature rather than just a functional necessity.
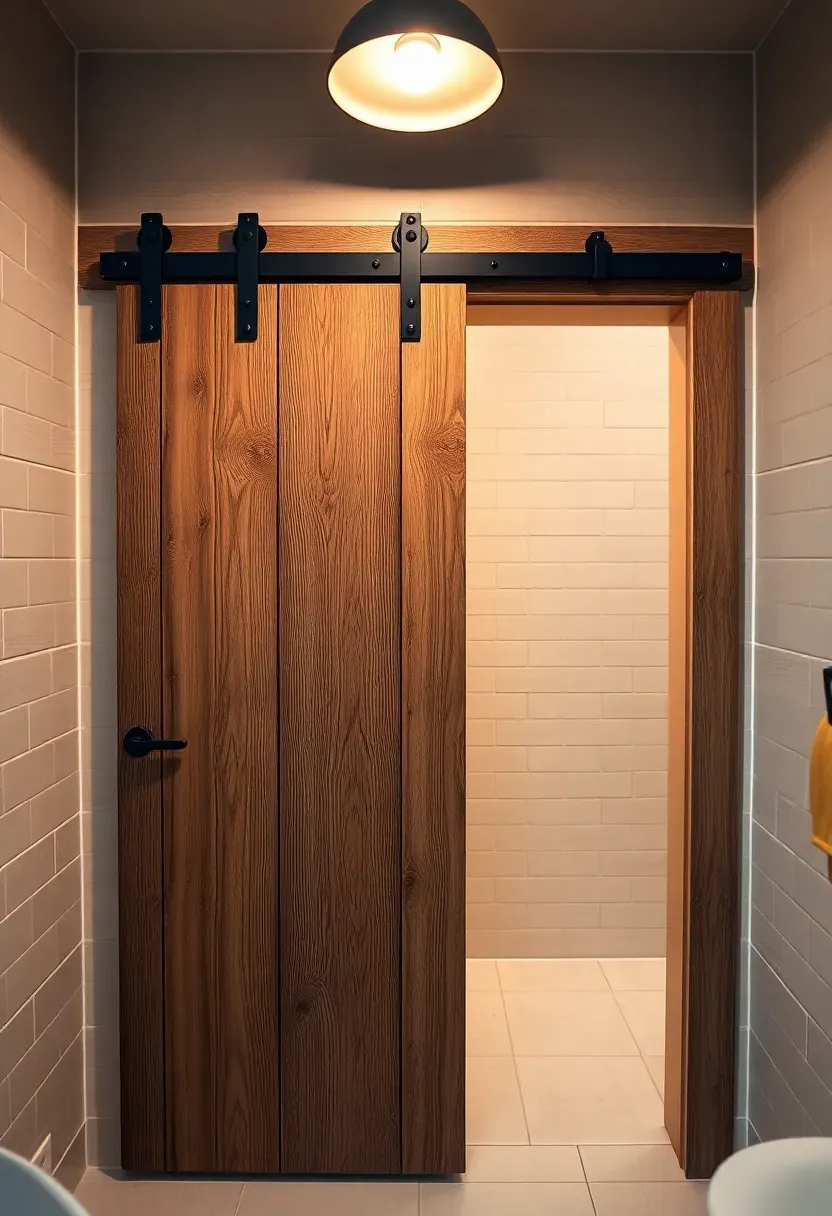
For DIY versions, start with reclaimed wood, pallets, or new boards you distress for age. The door width should be 2-4 inches wider than the opening to ensure complete coverage. Install a sturdy header board above the opening to support the rail system, ensuring it's anchored into studs. Choose hardware that complements your bathroom style—black iron creates industrial contrast, while oil-rubbed bronze suits traditional spaces.
Common mistake: installing rails that aren't level leads to doors that don't slide smoothly or completely cover openings.
This project typically takes 4-8 hours depending on whether you're building or assembling a pre-made door. Consider adding privacy features like tongue-and-groove construction or adding glass panels for modern barn door looks. If space is extremely tight, bypass double doors that slide past each other provide the same space-saving benefits with even smaller footprint. The transformation from standard door to barn door creates instant character and makes the bathroom entrance feel intentional and designed.
Do: Test the rail and hardware system before final installation
Don't: Skip header reinforcement—barn doors are heavy and require substantial support
Fix: If the door doesn't slide smoothly, check rail alignment and lubricate rollers
Rental-friendly alternative: install a curtain track with a decorative fabric panel instead of a solid door
What this gives you: dramatic style statement that also solves functional space problems
18. Open Shelving Over Toilet
Installing open shelving above the toilet utilizes otherwise wasted vertical space while providing storage and display opportunities. These DIY bathroom ideas on a budget cost $40-120 for materials and work exceptionally well in bathrooms where floor space is at a premium. The open design keeps essentials accessible while adding visual interest and architectural detail to the space.
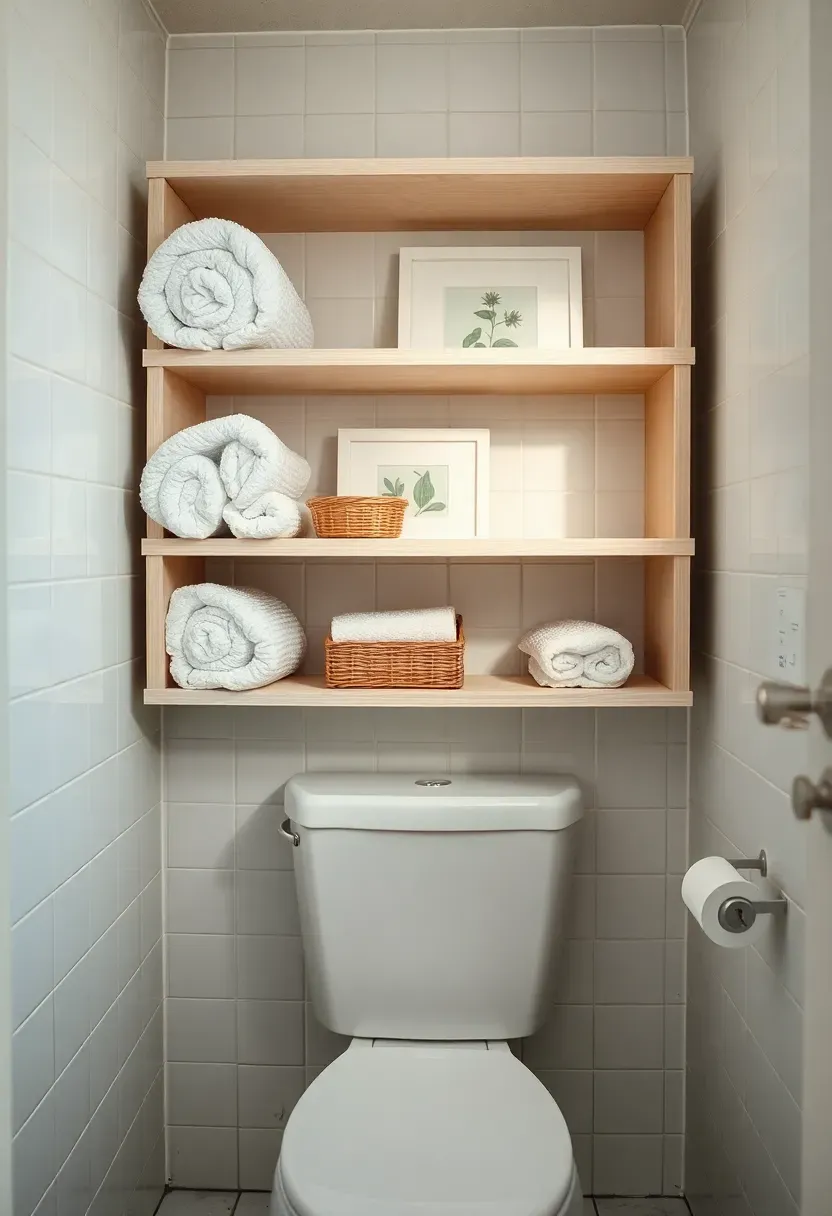
Recommended
Items for this idea
Position shelves 12-18 inches above the toilet tank to avoid interference, and space them 10-12 inches apart for easy access. Use floating shelf hardware for a clean, modern look, or decorative brackets for traditional styling. Consider wood shelves for warmth, or white-painted shelves that blend with walls. Store practical items on lower shelves and decorative pieces on upper shelves for visual balance. Add a back panel for a more finished appearance if the wall behind is rough.
For small bathrooms: keep shelves shallow and avoid overcrowding to maintain a sense of openness.
This project typically takes 2-3 hours for installation. Arrange items intentionally rather than randomly—group similar items, vary heights, and leave some negative space. Consider incorporating small plants or framed artwork into the display for added visual interest. If you're renting, use command strip shelves that don't require drilling. The transformation from blank wall to functional storage creates immediate improvement in bathroom utility.
Do: Anchor shelves securely to studs or use appropriate wall anchors for the weight
Don't: Overload shelves with heavy items that could fall during toilet use
Fix: If shelves feel unstable, add additional anchors or relocate to studs
What this gives you: functional storage without sacrificing valuable floor space
19. Tile Niche or Recessed Shelf
Adding a tile niche or recessed shelf in the shower wall provides built-in storage that looks custom and professional. These DIY bathroom ideas on a budget range from $50-200 depending on tile choice and niche size, with options from simple rectangular cutouts to elaborate tiled enclosures. The recessed design keeps shampoos and soaps accessible without protruding into shower space.
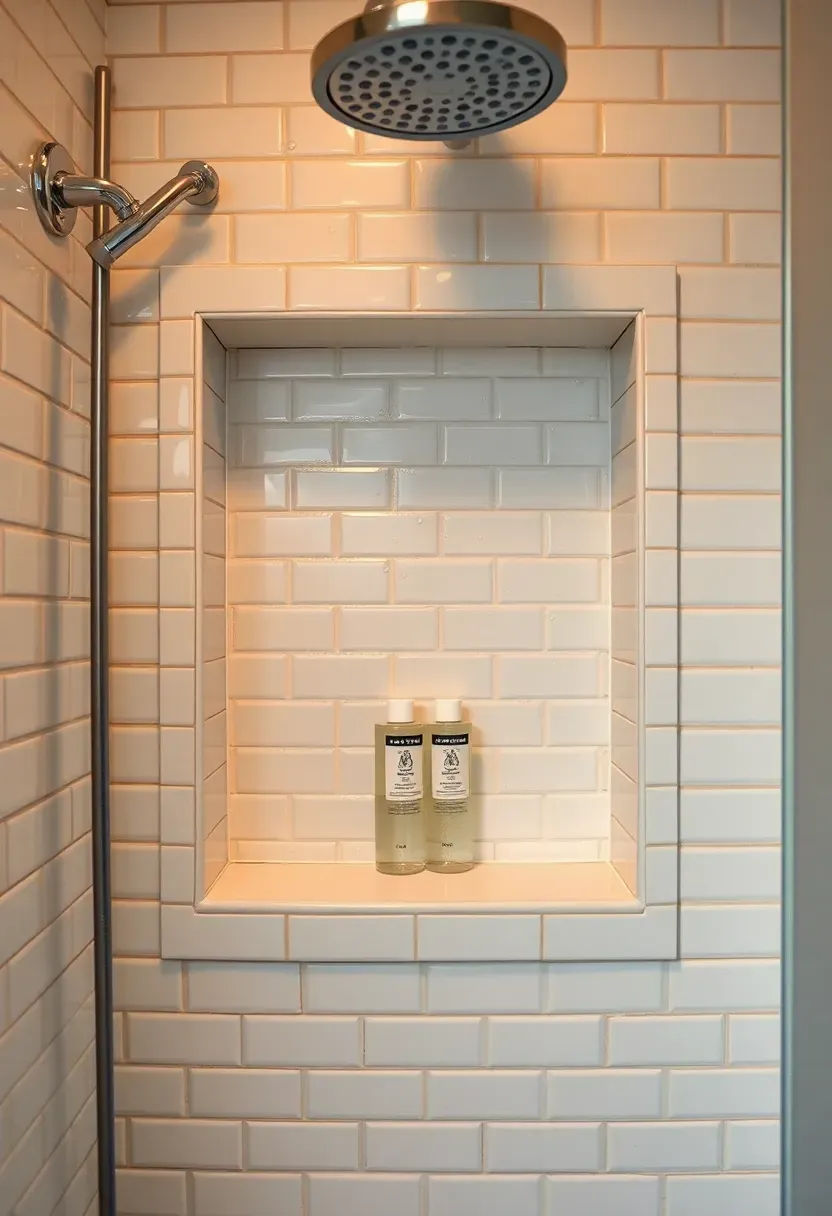
Mark the niche location carefully, typically 48-52 inches from the floor for convenient access. Cut an opening in the drywall, install framing support around the perimeter, then waterproof thoroughly before tiling. Match the niche tile to your shower tile for a seamless look, or create contrast with a different tile for visual interest. Add a waterproof membrane inside the niche before tiling to prevent water damage behind walls.
Common mistake: insufficient waterproofing leads to leaks and mold behind shower walls over time.
This project takes 6-10 hours over a weekend and requires basic tiling skills. Consider adding lighting inside the niche for added drama and visibility. For smaller bathrooms, a single shelf niche provides adequate storage, while larger master baths might accommodate double-height niches. The built-in storage keeps shower clutter organized while creating a high-end, custom appearance that significantly elevates the shower experience.
Do: Test-fit niche framing before cutting to ensure proper dimensions
Don't: Skip waterproofing steps—this is non-negotiable for wet areas
Fix: If niche walls feel unstable, add additional bracing before tiling
What this gives you: built-in storage that looks professionally installed and custom-designed
20. Chalkboard Accent Wall
Creating a chalkboard accent wall adds functional creativity and playful character to bathrooms while providing space for messages, quotes, or even shower thoughts. These DIY bathroom ideas on a budget cost $20-50 for chalkboard paint and supplies, making them incredibly accessible with major visual impact. The dark chalkboard surface creates striking contrast with typical light bathroom fixtures and tiles.
Recommended
Items for this idea
Choose a prominent wall for maximum impact—behind the vanity, beside the tub, or the wall facing the entry. Clean and prepare the surface thoroughly, then apply chalkboard paint in multiple thin coats for a smooth, durable finish. Season the chalkboard surface by rubbing the entire area with chalk and wiping it clean to prevent permanent ghosting of initial writings. Install a ledge at the bottom of the chalkboard area to hold chalk and erasers.
For family bathrooms: the chalkboard becomes a fun communication space for reminders, schedules, or inspirational quotes.
This project takes 2-3 hours plus drying time between coats. Consider framing the chalkboard area with molding or trim for a more finished, intentional appearance. If you're concerned about the dark surface making the bathroom feel smaller, limit the chalkboard to a specific area rather than an entire wall. The interactive nature of chalkboard walls makes bathrooms more engaging, especially for children who can express creativity in unexpected places.
Do: Use high-quality chalkboard paint specifically formulated for the surface material
Don't: Skip the seasoning step, or initial drawings will permanently ghost
Fix: If chalkboard surface feels gritty, sand lightly and apply an additional coat
Rental-friendly alternative: use removable chalkboard contact paper instead of paint
What this gives you: functional, interactive surface that adds creativity and personality
21. Rope or Wire Basket Storage
Incorporating rope or wire baskets adds texture and rustic charm while providing versatile storage solutions for bathrooms. These DIY bathroom ideas on a budget range from purchased options ($20-60) to DIY creations ($15-40) using materials like cotton rope, jute, or wire mesh. The natural textures contrast beautifully with smooth bathroom surfaces like tile and porcelain, creating visual interest.
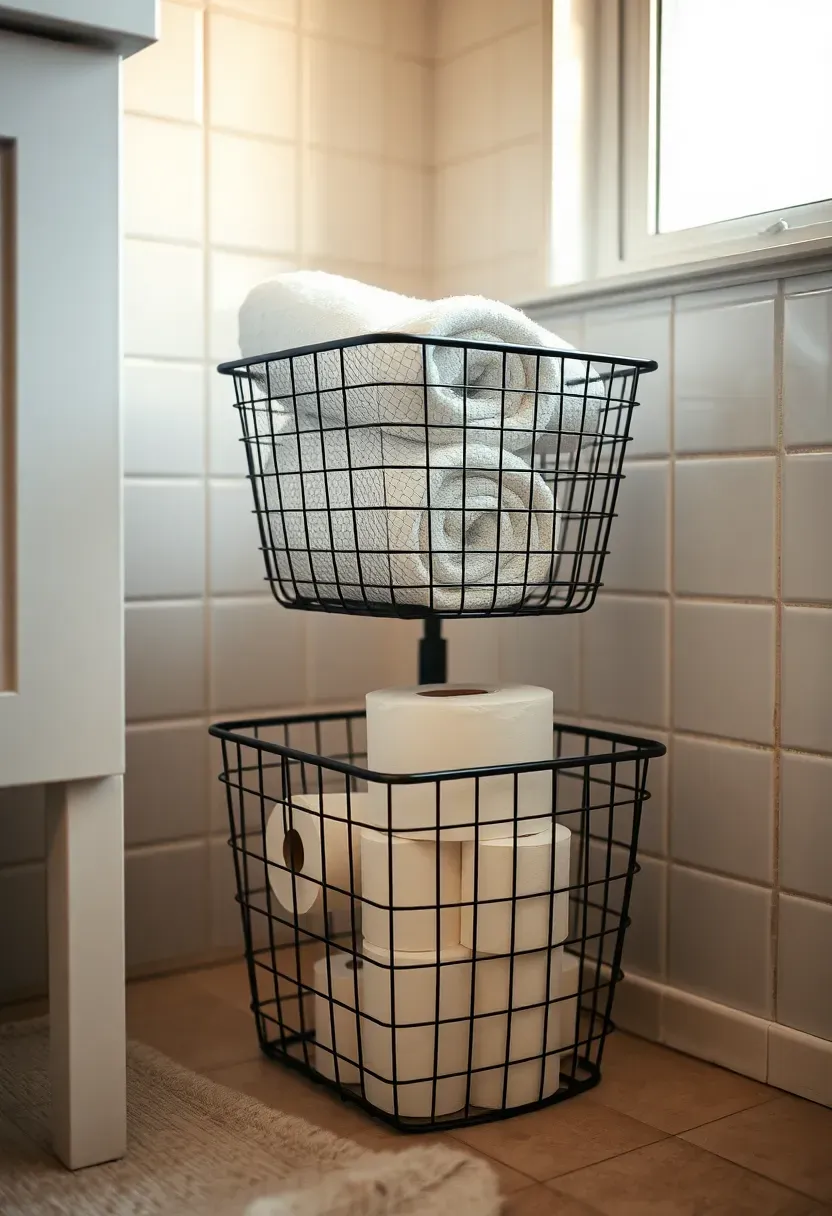
Use rope baskets for holding rolled towels, toilet paper, or extra blankets. Wire baskets work well for storing smaller items like hair accessories, makeup, or bath products. Hang larger baskets from walls or shower curtains for vertical storage, or place smaller baskets on shelves for organized storage. Consider lining baskets with fabric if storing items that might snag on rough textures. Group baskets by function or color for a curated, intentional appearance.
Placement note: position baskets where they're easily accessible but don't interfere with movement paths or fixture use.
This project or purchase takes 1-2 hours to set up. For DIY rope baskets, coil cotton or jute rope around a circular base, securing with hot glue or stitching as you go. Wire baskets can be assembled from purchased kits or created from wire mesh and basic bending tools. The natural, handcrafted quality of basket storage adds warmth and character to bathrooms, making them feel less sterile and more inviting.
Do: Choose baskets sized appropriately for their intended contents
Don't: Store heavy items in lightweight baskets that might stretch or break
Fix: If baskets feel unstable, add weight at the bottom or secure to shelves
What this gives you: textured, natural storage that adds warmth and character
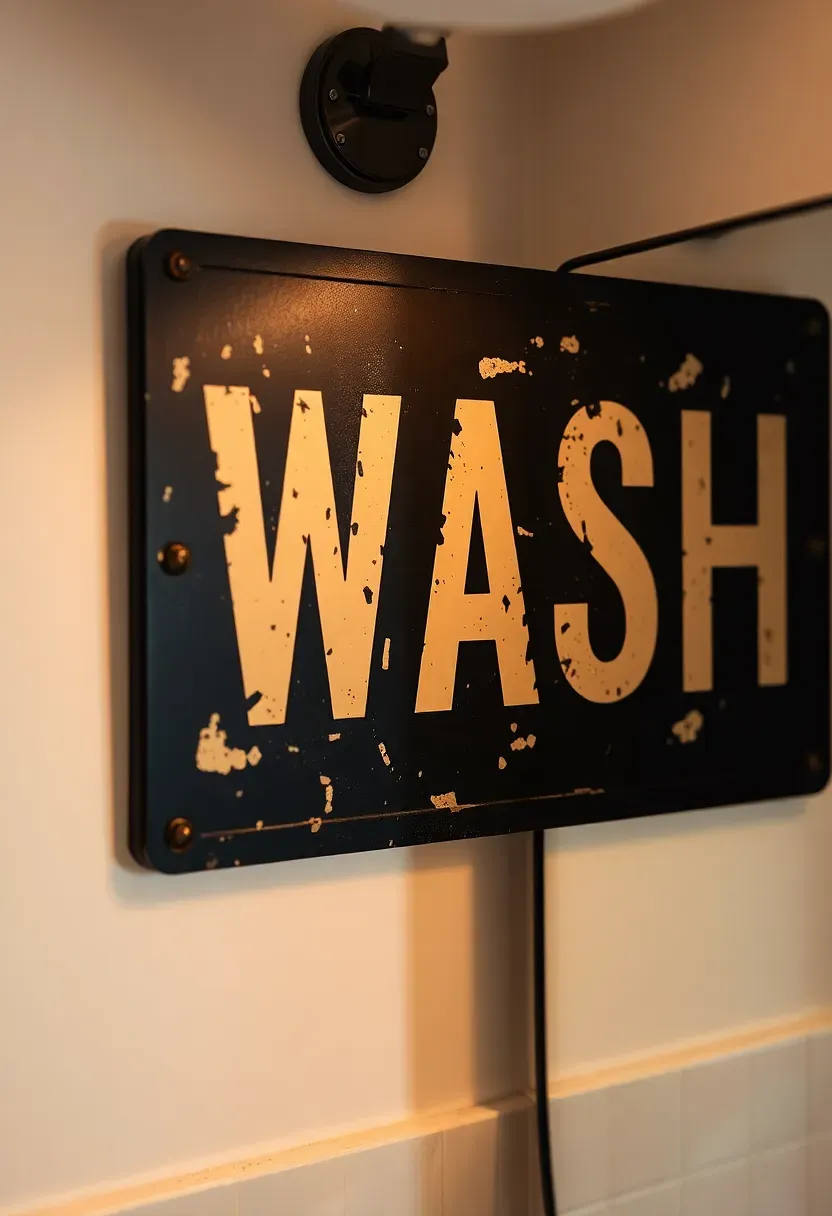
22. Vintage Sign or Typography
Adding vintage signs or typography elements creates focal points that inject personality and humor into bathroom spaces. These DIY bathroom ideas on a budget range from $10-50 for purchased signs to $5-20 for DIY versions using reclaimed wood, stencils, or transfer paper. The retro charm of vintage signs creates immediate character and serves as conversation starters for guests.
Recommended
Items for this idea
Choose signs with bathroom-appropriate messages like "Wash," "Relax," or humorous quotes. For DIY versions, start with reclaimed wood or new boards distressed for age, then use stencils, vinyl cutouts, or freehand painting for text. Consider grouping multiple smaller signs together for a curated gallery wall effect. Position signs where they're visible from the entry or where they serve functional purposes like above towels or near the mirror.
Why it works: typography adds visual interest and personality without requiring significant space or investment.
This project takes 1-3 hours depending on complexity and technique. For authentic vintage appearance, lightly sand edges, add faux rust or oxidation effects, or use aged typography fonts. Consider mixing sign styles—some with weathered wood backgrounds, others with metal frames—for eclectic appeal. The beauty of vintage signage is that it tells a story and gives the bathroom a sense of history beyond its actual age.
Do: Use high-quality outdoor-rated paint for durability in humid bathrooms
Don't: Overcrowd walls with too many signs that compete for attention
Fix: If signs feel disjointed, create visual cohesion through consistent colors or frames
Rental-friendly alternative: use removable wall decals or temporary wall signs
What this gives you: personality and conversation pieces that make the bathroom uniquely yours
23. Repurposed Furniture Vanity
Transforming a vintage dresser or cabinet into a bathroom vanity creates unique character and provides abundant storage that far exceeds standard vanity options. These DIY bathroom ideas on a budget range from free using furniture you already own to $100-300 for purchasing and modifying a piece. The repurposed furniture approach creates a custom, one-of-a-kind bathroom that tells a story and reflects personal style.

Choose a piece with the right dimensions—typically 18-20 inches deep and 30-36 inches tall for comfortable use. Cut an opening for the sink, reinforcing the area with additional framing to support weight. Apply a waterproof top like granite, quartz, or sealed butcher block to protect the furniture from water damage. Seal all surfaces with marine-grade polyurethane or bathroom-appropriate sealant. Adjust drawer interiors to accommodate plumbing, using false drawer fronts where necessary.
Common mistake: inadequate waterproofing leads to warping, swelling, and eventual failure of the furniture vanity.
This project typically takes 8-12 hours over a weekend and requires intermediate woodworking skills. Consider the piece's original character and features that can be highlighted—original knobs, drawer pulls, or unique architectural details. Paint or stain to match your bathroom's aesthetic, leaving some areas natural for contrast. The transformation from ordinary furniture to bathroom vanity creates a stunning focal point that makes the bathroom feel thoughtfully designed rather than assembled.
Do: Measure sink dimensions carefully before cutting the counter opening
Don't: Skip interior sealing—bathroom humidity penetrates every surface
Fix: If drawers stick after plumbing installation, adjust slides or use drawer glides
What this gives you: unique, character-filled vanity with exceptional storage and personality
The beauty of these DIY bathroom ideas on a budget is that they're endlessly customizable and scalable. Start with one or two projects that appeal to you most, then gradually incorporate additional improvements as budget and time allow. Focus on creating a bathroom that reflects your personal style while meeting your functional needs—there's no single right approach to bathroom design. Whether you transform a powder room in a single weekend or gradually upgrade a master bath over several months, the result will be a space that feels intentionally designed and refreshingly personal. Remember that the most successful renovations are those that make your daily routine more pleasant and your bathroom a space you genuinely enjoy using.
About the author
OBCD
CGI visualization and interior design content. We create detailed 3D renders and curate practical design ideas for every room in your home.