25 Above Kitchen Cabinet Decor Ideas for Renters
Above kitchen cabinet space is one of the most overlooked opportunities in any rental or owned home. That gap between the top of your upper cabinets and the ceiling collects dust, stores forgotten appliances, or simply sits empty — and it does not have to. The right above kitchen cabinet decor ideas transform that dead zone into a display that adds warmth, personality, and visual depth to the entire kitchen.
Best of all, nearly every approach here is renter-friendly: no drilling required, no permanent changes, and nothing that can't come down cleanly at move-out. From trailing greenery and woven baskets to sculptural ceramics and seasonal arrangements, these 25 ideas work across kitchens of every style and size — whether you're styling a small apartment kitchen or a full family home. Ready? Let's dive in.
Table of Contents
- Trailing Pothos or Ivy Vines
- Woven Rattan Baskets
- Vintage Pottery Collection
- Framed Botanical Prints
- Rustic Wooden Crates
- Sculptural Ceramic Vases
- Stacked Linen Books
- LED Strip Lighting Glow
- Antique Milk Jugs and Pitchers
- Greenery Garland
- Oversized Clock Display
- Farmhouse Lanterns
- Tiered Tray Styling
- Dried Flower Arrangements
- Minimalist Sculptural Objects
- Cottage-Style Teapot Collection
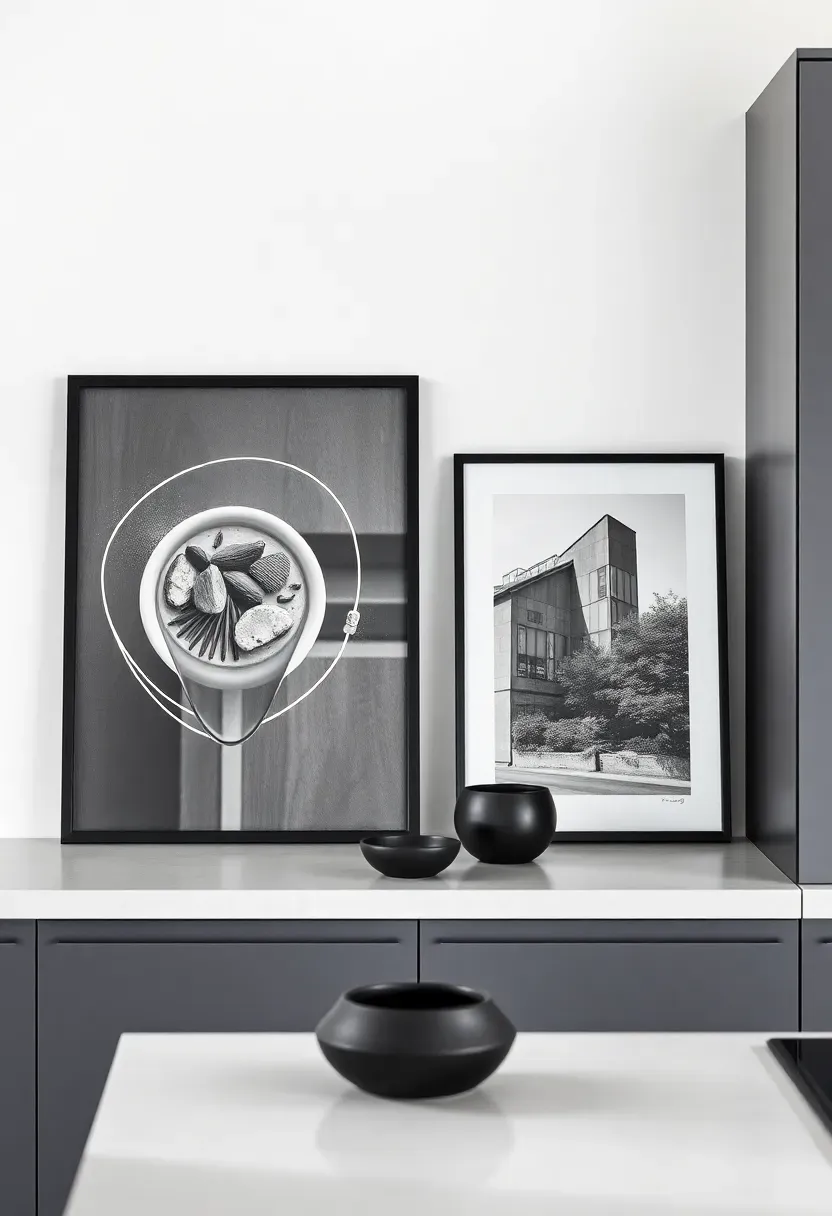
- Black and White Photography Prints
- Wicker and Seagrass Trays
- Hanging Macrame Panel
- Terracotta Pot Cluster
- Glass Apothecary Jars
- Vintage Bread Boxes and Tins
- Trailing Fake Greenery for Rentals
- Layered Cutting Boards and Paddles
- Seasonal Rotating Display
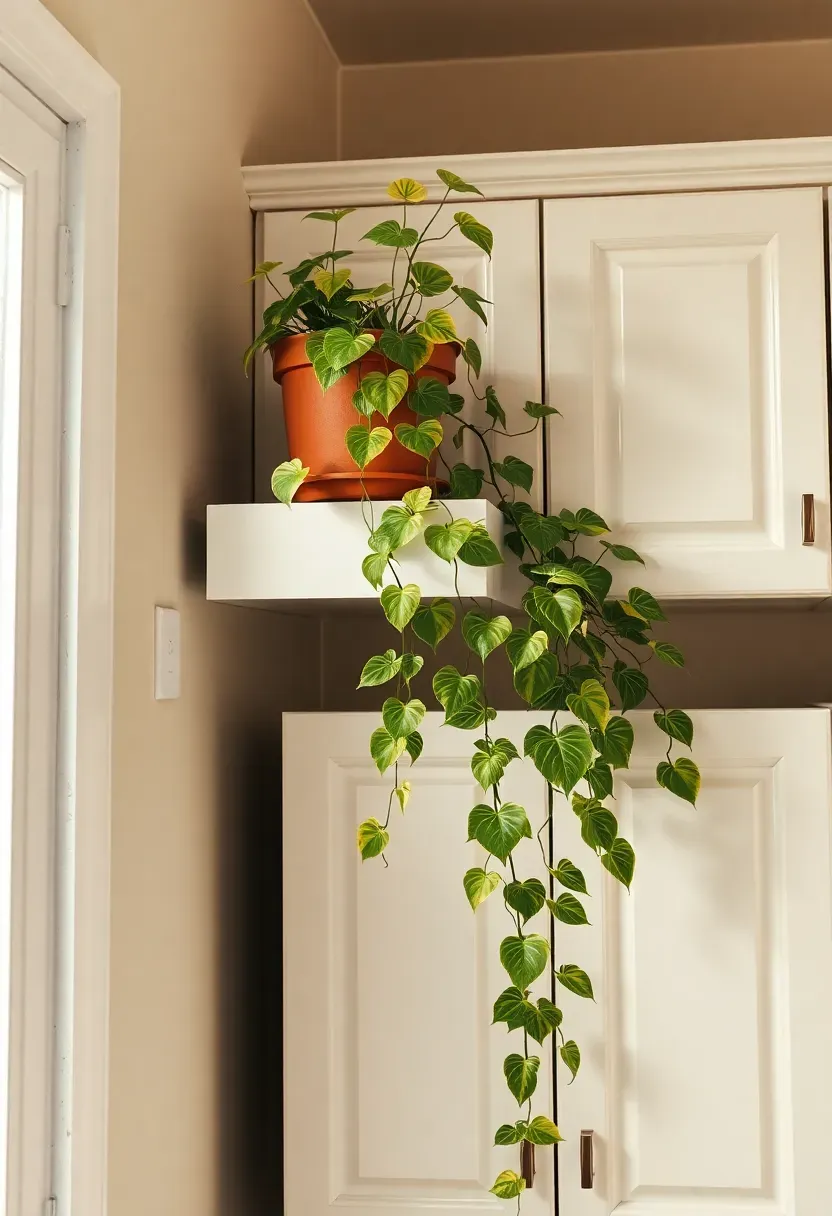
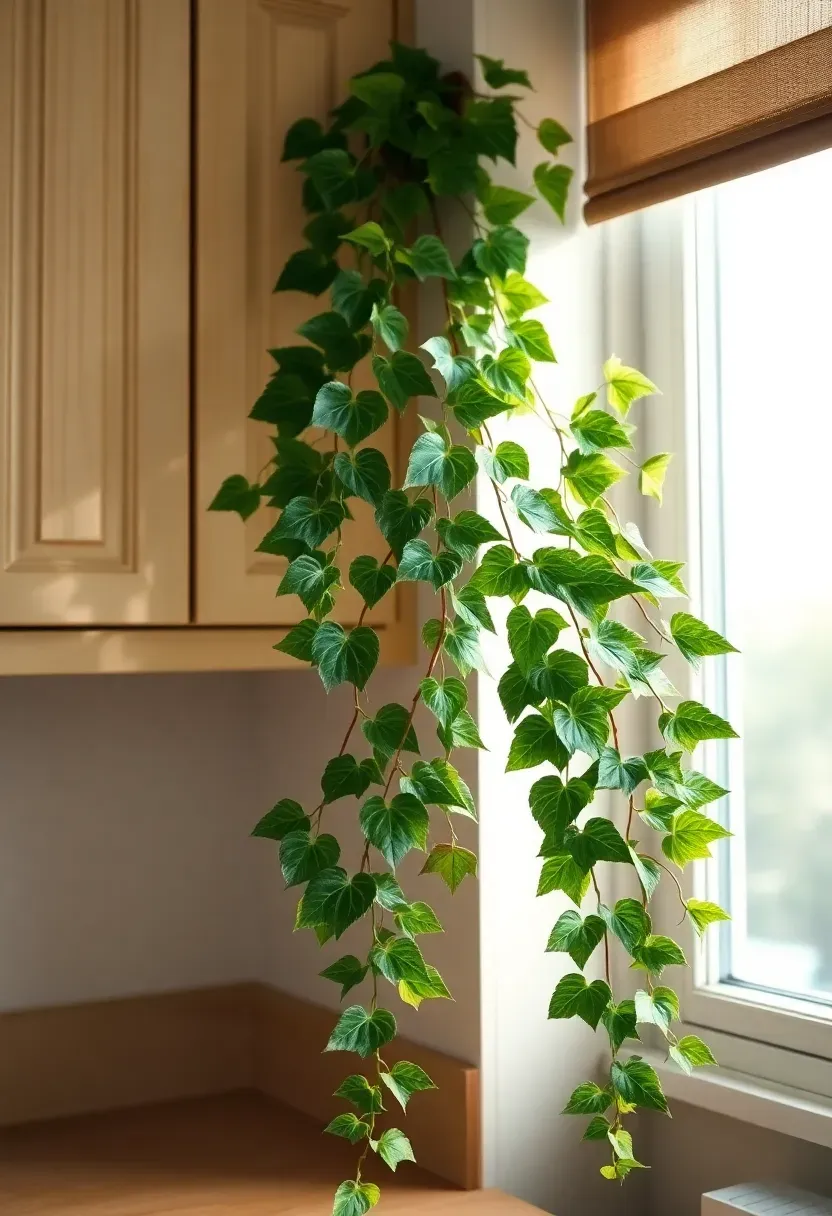
1. Trailing Pothos or Ivy Vines
Trailing pothos or ivy vines are the easiest way to bring life to above kitchen cabinet space without spending much at all. A single mature pothos in a terracotta pot can cascade two to three feet down the cabinet face within a season, softening hard lines and introducing organic movement that no artificial element can replicate. The golden or marble queen varieties add color variation even in lower-light kitchens, and the care demands are minimal enough that even a busy household can keep them thriving.
Placement Tips
- Position the pot at the corner of the cabinet run so the vine trails down one side rather than hanging awkwardly off the front.
- Avoid placing pothos directly above the stove where heat and steam can stress the leaves — two sections away works perfectly.
- Tuck a small Command hook at the cabinet edge to guide trailing stems in your preferred direction.
What to Watch For
Overwatering is the most common mistake: water once a week in summer, every ten to fourteen days in winter. Wipe leaves with a damp cloth monthly to remove cooking grease and keep them looking healthy.

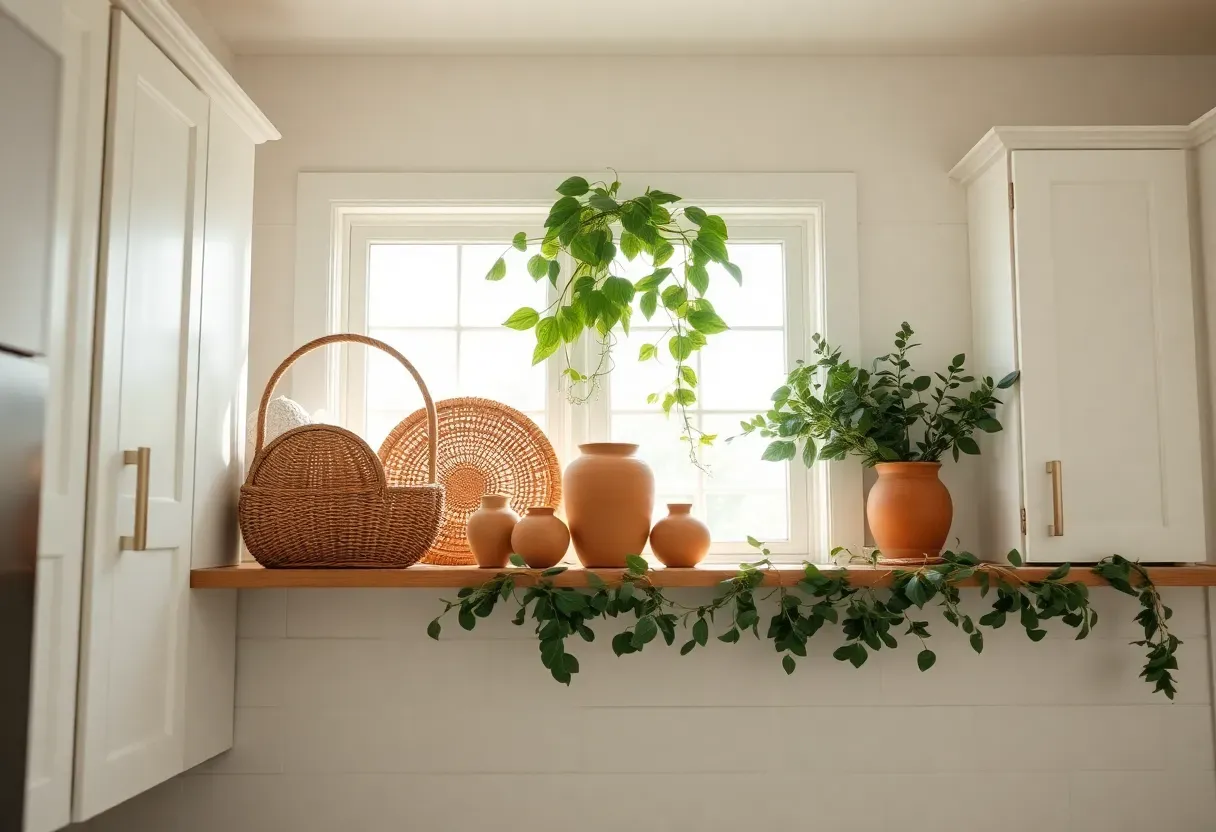
2. Woven Rattan Baskets
Why This Works
Woven rattan baskets bring warmth, texture, and practical storage to above cabinet space in a single move. Stack two or three baskets of varying widths — one upright, one lying flat — and the dead zone above your upper cabinets becomes a design moment with personality.
Styling It Right
The natural honey tones of rattan complement white, cream, wood-toned, and even dark navy cabinetry with equal ease. Use the baskets to actually store overflow: extra dish towels, holiday napkins, or rarely-used appliance accessories. A basket with a lid hides contents while still contributing to the display.
Anchor the tallest basket at one end of the display rather than in the center — this creates an asymmetric silhouette that feels naturally styled rather than symmetrically arranged.
Pros and Cons
Pros: Dual-purpose styling that is both decorative and genuinely useful; timeless natural texture; works across farmhouse, boho, coastal, and Scandinavian kitchens.
Cons: Avoid faux-wicker versions up close — the difference is noticeable, and real rattan ages far better than cheaper alternatives.
Recommended
Items for this idea
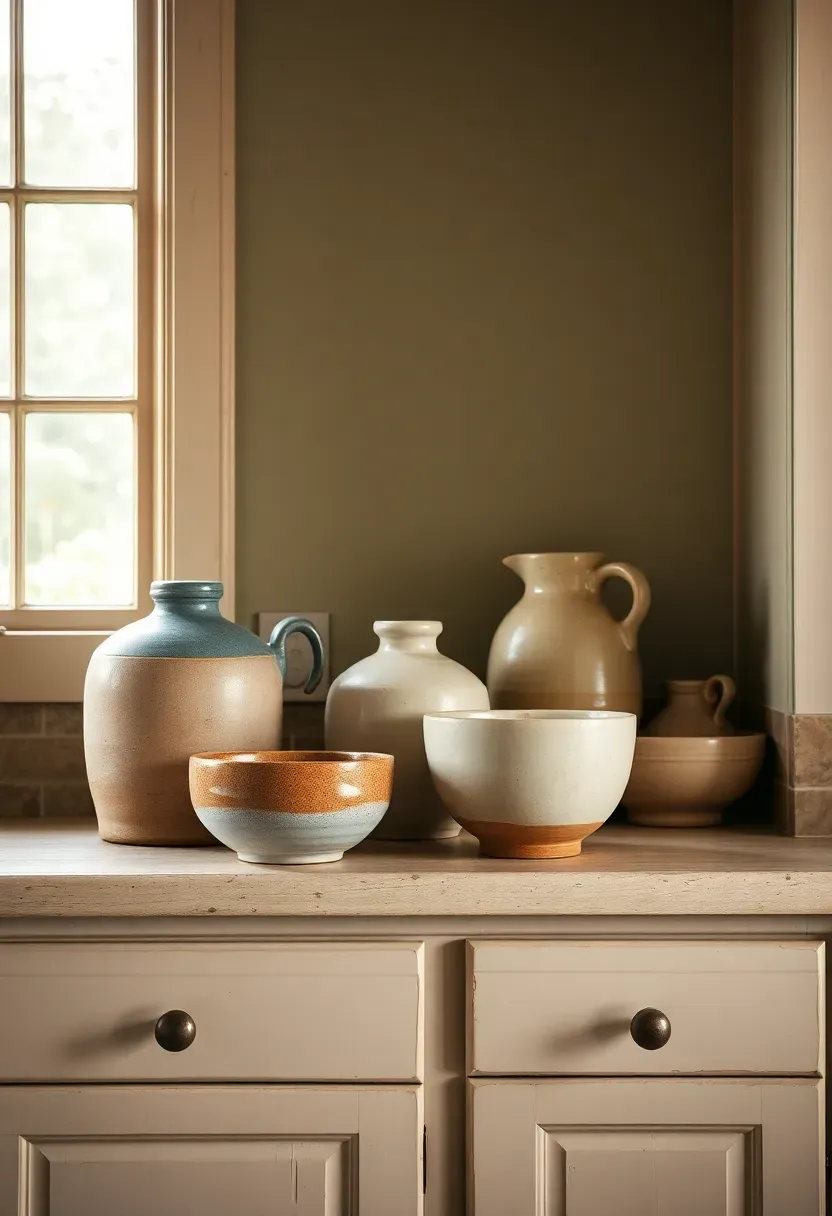
3. Vintage Pottery Collection
A curated collection of vintage pottery transforms the top of your kitchen cabinets into a gallery that has history and character money cannot simply buy new. Think mismatched crocks, stoneware jugs, hand-thrown bowls, and glazed pitchers in muted blues, greens, cream, and earth tones — items sourced from thrift stores and estate sales over time.
How to Arrange It
Arrange pieces in a loose triangle formation: one tall piece at the back, two medium pieces slightly forward, one or two small pieces at the front edge. This layering creates depth and prevents the flat, one-dimensional look that results from lining items up in a single row.
Practical Tips
- Match the pottery palette to your tile backsplash or countertop undertones so the display feels designed rather than random.
- If all pieces feel too disparate, unify them by choosing a single color family (all blues, or all earth tones).
- Include at least one dark or charcoal piece against white cabinets to anchor the display visually.
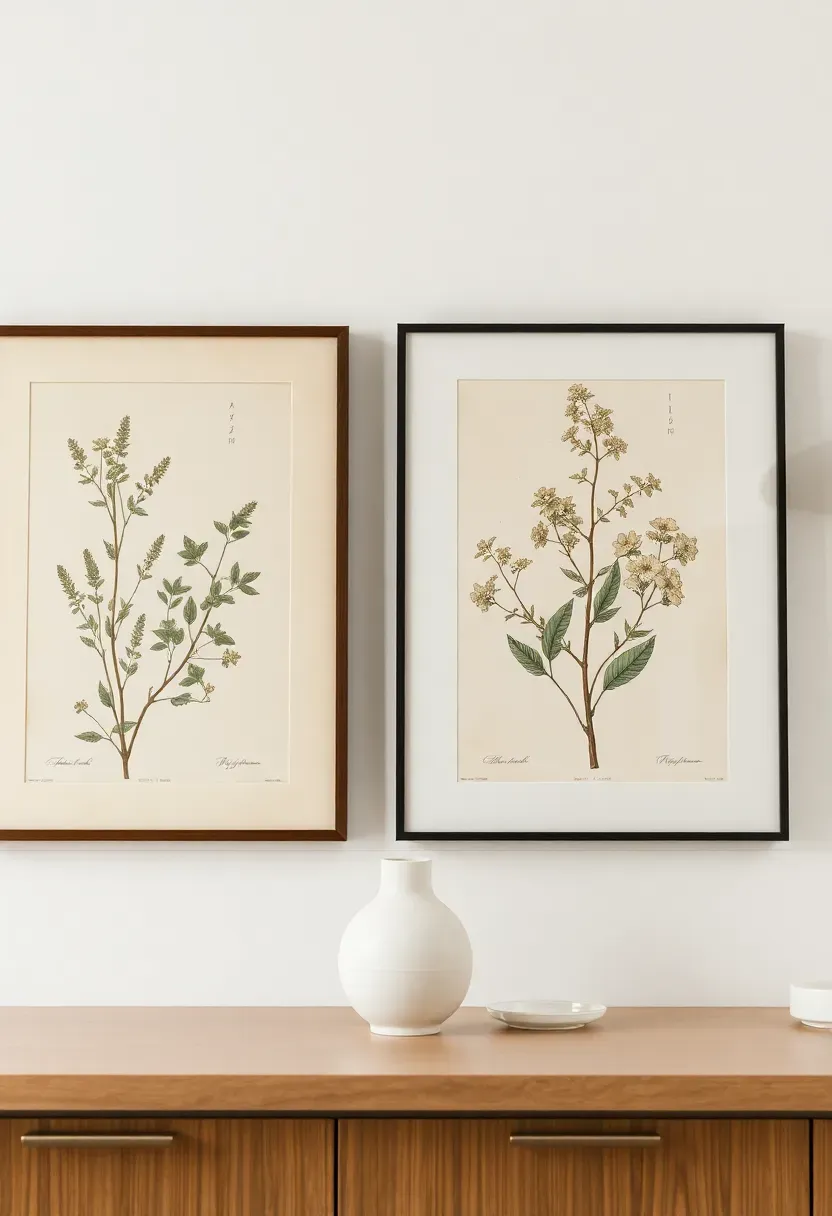
4. Framed Botanical Prints
The Core Idea
Framed botanical prints leaned against the wall above kitchen cabinets add art to a spot most people never think to decorate. Rather than drilling into the wall at a non-standard height, simply lean one or two frames of varying sizes with a small object in front to keep them stable and layered.
Making It Work
Black thin metal frames with aged botanical illustrations look elegant above white shaker cabinets. Natural wood frames with watercolor botanicals complement warm wood-tone kitchens perfectly. Use prints that are at least 8x10 inches — preferably 11x14 or larger — so they read clearly from the floor. Tiny frames get lost at cabinet height.
Practical Notes
- Source botanical prints as digital downloads and print at a local shop for a fraction of retail frame shop costs.
- Use a thin strip of museum putty on the base of each frame to prevent sliding during normal kitchen vibrations.
- Coordinate print tones with cabinet hardware: brass hardware pairs with warm sepia prints; brushed nickel with cool green botanical drawings.
- Rental note: Leaned frames require zero wall attachment — one of the most renter-friendly above-cabinet styling options available.
Recommended
Items for this idea
5. Rustic Wooden Crates
Rustic wooden crates — the kind used for wine, fruit, or farm produce — add instant farmhouse energy to cabinet tops without any assembly or artistic skill required. Stack one on its side and one flat, tuck greenery or bottles inside, and the whole arrangement looks curated within minutes.
Step 1: Source the Crates
Look for genuine vintage fruit crates at antique markets, or age new pine crates yourself with a diluted white vinegar and steel wool solution brushed on, then wiped away after ten minutes.
Step 2: Style the Contents
Tuck small potted herbs, a few wine bottles, or a rolled dish towel inside the open-face crate for purposeful styling that hints at kitchen function.
Step 3: Protect Against Humidity
The natural wood grain and weathered markings on vintage crates bring authentic texture that new decorative boxes rarely match — but they can warp slightly in high-humidity kitchens near the stove. Seal the interior with a quick coat of matte wax or beeswax to stabilize the wood and resist moisture.
6. Sculptural Ceramic Vases
Sculptural ceramic vases with bold forms — a squat round body, a tall bottle neck, an asymmetric hand-built shape — turn above-cabinet space into a low-key sculpture gallery that rewards a second look from across the room. Unlike purely decorative items that only work at eye level, strong ceramic forms hold their visual weight even when viewed from below at an angle.
Choose two or three pieces in a unified glaze color family, then introduce one contrasting accent piece to keep the group from feeling monotonous. Matte glazes in bone white, sage, charcoal, or terracotta are the most versatile: they read as sophisticated without competing with the cabinet color or backsplash tile.
Tips
- Group in odd numbers — three vases always look more dynamic than two or four.
- Vary heights by at least six inches between the tallest and shortest piece.
- Fill one with a single dried stem of pampas grass or eucalyptus to break the otherwise static arrangement.

Recommended
Items for this idea
7. Stacked Linen Books
The Concept
Stacking hardcover books — oversized cookbooks, food photography books, or linen-covered art books — above kitchen cabinets adds intellectual warmth and a home-library energy to an often ignored surface. The spines of beautiful books in neutral tones (white, tan, black, deep green) become a design element in themselves.
Styling the Stack
Stack three to five books horizontally, then place a small ceramic or object on top to anchor it visually and add height variation. Bookend groups of stacks with taller objects — a vase, a plant, a lantern — so the books feel part of a larger composed arrangement.
What to Choose
Choose books with neutral spines — multicolored spines create a visual jumble at a distance. Remove paper dust jackets from hardcovers to reveal the often cleaner and more photogenic linen or board covers beneath.
Avoid: Paperbacks or thin paperbacks that lose their presence at height; books with overly colorful or graphic covers that fight with the cabinet color.

8. LED Strip Lighting Glow
LED strip lighting installed along the top edge of kitchen cabinets — directed upward to wash the ceiling with a warm glow — transforms the entire atmosphere of a kitchen in the evening without any structural changes. This uplighting technique is borrowed from high-end restaurant design and is remarkably simple to DIY with peel-and-stick LED strips from a hardware store.
Installation Guide
Step 1: Run the strip along the back edge of the cabinet top, not the front, so the light source itself is hidden and you see only the glow.
Step 2: Choose warm white (2700K–3000K) — it is the universally flattering choice; avoid cool blue-white which reads as clinical.
Step 3: Connect to a smart plug for app or voice control of the ambiance. Set it on a timer for automatic evening mood lighting.
Why It Elevates Everything Else
The uplighting makes whatever you have displayed on the cabinets look dramatically better — plants glow, ceramics cast soft shadows, and the ceiling appears higher than it is. Budget and time: LED strips typically cost $20–$60 for a full kitchen run and can be installed in under an hour with no drilling required.
Recommended
Items for this idea
9. Antique Milk Jugs and Pitchers
Antique milk jugs, enamel pitchers, and galvanized metal canisters bring an authentic farmhouse nostalgia to above cabinet space that cannot be replicated with anything new. For the full farmhouse treatment from countertops to cabinets, see our roundup of rustic farmhouse kitchen ideas. Their patina — the slight rust on a seam, the cream enamel with a chip at the rim, the dented body of a well-used vessel — tells a story that new reproductions simply cannot.
Comparing: Enamelware vs. Galvanized Metal
Enamelware in white, cream, blue-and-white, or black-and-white patterns reads soft and cottage-like; it pairs beautifully with painted cabinets and floral or checked kitchen textiles.
Galvanized steel milk jugs and vintage dairy cans lean industrial and farmhouse; they work best alongside raw wood, exposed brick, or subway tile.
Choose enamelware if: your kitchen has a French country, cottage, or painted-cabinet aesthetic.
Choose galvanized if: your kitchen has more raw, industrial, or rustic farmhouse bones.
Recommendation
A grouping of three milk jugs in graduated sizes, slightly staggered in height and depth, is a classic display that always works. Tuck a few dried wheat stalks or cotton stems into the open mouth of the tallest jug to add organic softness.
10. Greenery Garland
A greenery garland draped along the top edge of kitchen cabinets is one of the most dramatic transformations possible for above cabinet space — it takes under thirty minutes and requires zero artistic skill. Whether you use a fresh eucalyptus garland for a two-week living display, dried preserved bay leaf for a longer-lasting natural version, or high-quality faux eucalyptus for permanent styling, the result is the same: a flowing green canopy that softens the hard horizontal line of the cabinet top.
Making It Look Natural
Drape the garland loosely rather than stretching it tight — a gentle swag with natural dips every foot or two mimics the way real ivy grows. Secure points where the garland meets the cabinet with small clear Command hooks or a discreet piece of floral wire. Let the ends trail slightly over the edge for a casual, abundant feel.
Seasonal Tips
- Add tiny white pumpkins in autumn, dried citrus slices in winter, or pastel ribbon in spring.
- Fresh eucalyptus releases a mild, pleasant scent as it dries — ideal for masking kitchen cooking odors naturally.
- Dried preserved garlands last six to twelve months before fading; faux versions last indefinitely but benefit from occasional dusting.
Recommended
Items for this idea
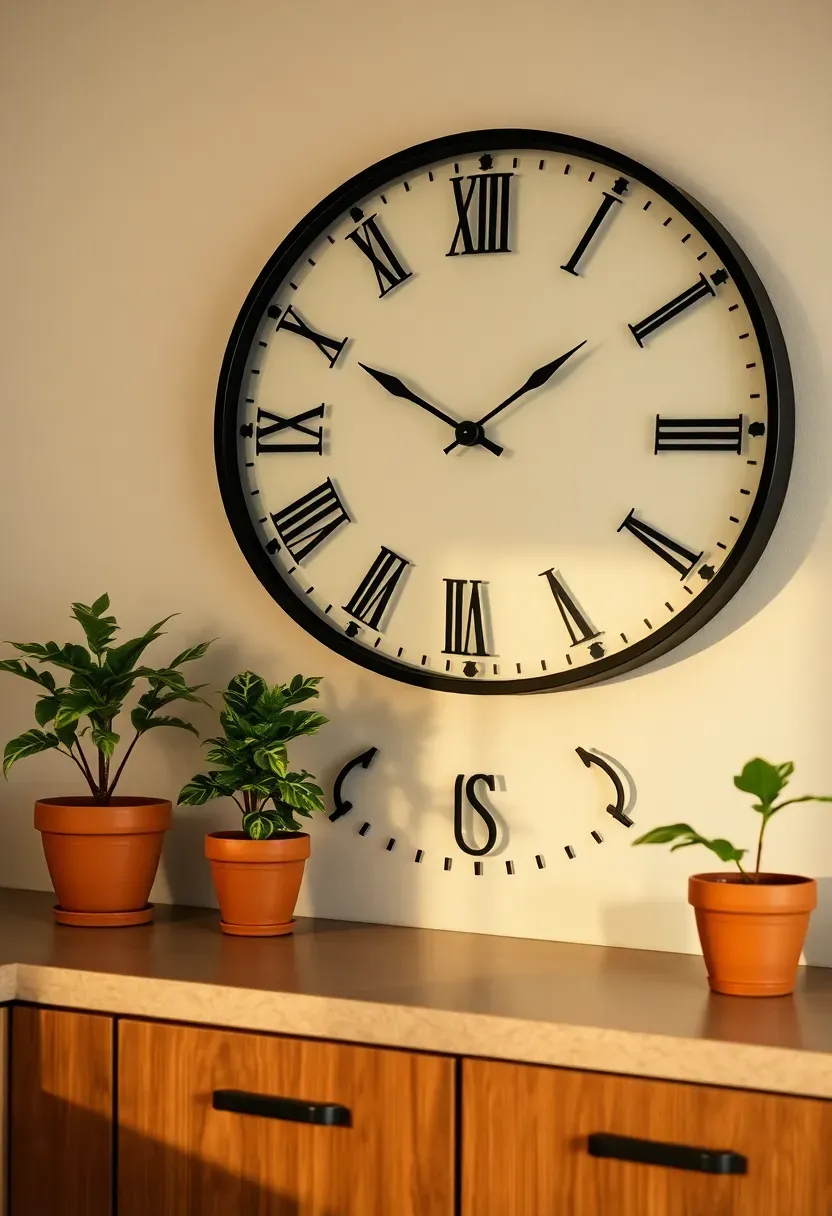
11. Oversized Clock Display
An oversized wall clock — 18 to 24 inches in diameter — mounted or leaned above kitchen cabinets instantly becomes a focal point that anchors the entire display and gives the eye a destination. Unlike smaller decor objects that compete for attention, a statement clock commands the space and lets everything grouped around it serve as supporting elements.
This approach is particularly effective above the refrigerator space, where the vertical height above the unit creates an ideal backdrop for a single large-scale object. Roman numeral faces in matte black or antique gold read best at a distance.
Styling Around the Clock
Flank the clock with two medium-height objects of equal visual weight — a pair of plants, matching vases, or stacked books — to create a balanced composition without a perfectly symmetrical arrangement.
- Choose a clock with a silent mechanism — no ticking — since kitchen cabinets amplify sound surprisingly effectively.
- An open-face clock (with visible gears or numbers only, no glass cover) catches light differently and adds more visual texture.
- Avoid mounting a heavy clock above cabinets if the wall above is just drywall without a stud — use a leaning arrangement with museum putty for stability.
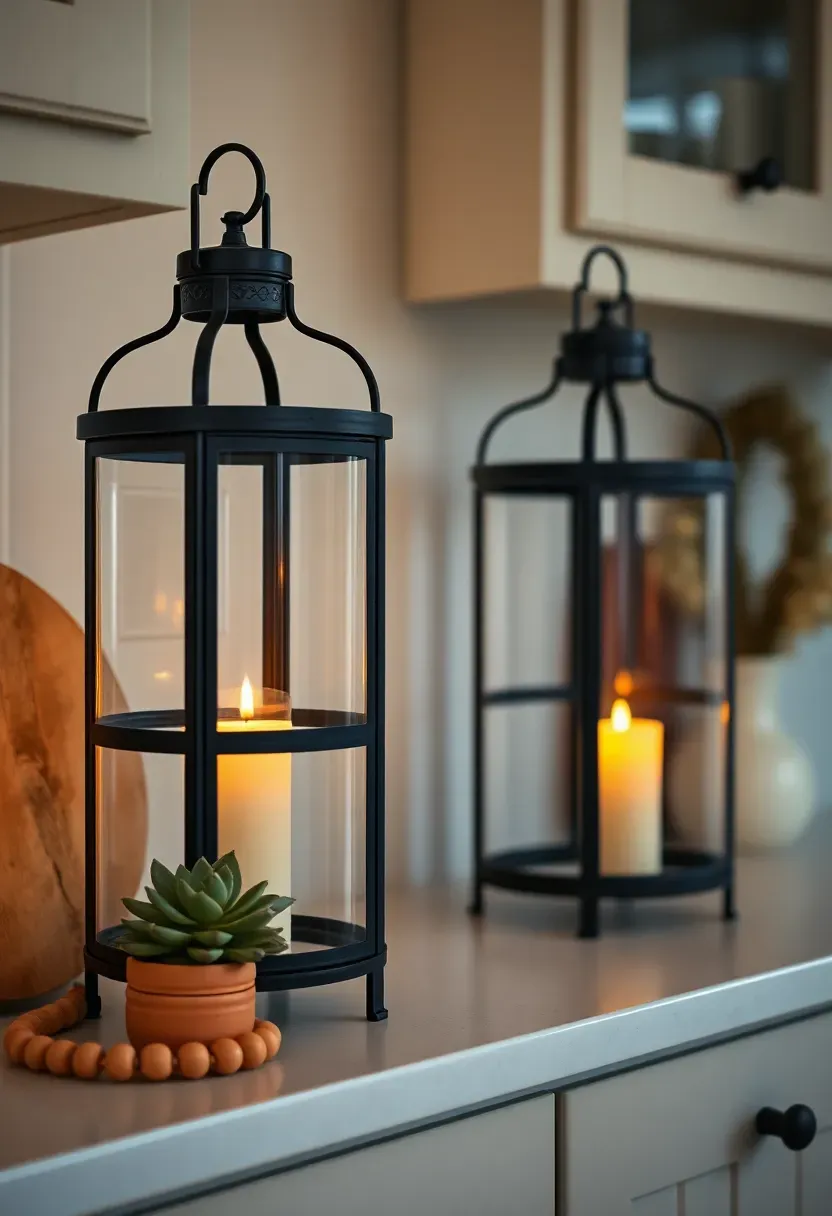
12. Farmhouse Lanterns
Farmhouse lanterns — the tall metal-and-glass kind typically used for outdoor or entryway displays — look unexpectedly elegant above kitchen cabinets, bringing a warm candlelit quality to an often overlooked zone. Place one or two large lanterns (fourteen inches tall minimum) filled with battery-operated pillar candles or fairy lights, and the cabinet tops become a glowing focal point for evening gatherings.
Building the Vignette
Nest the lanterns in a small arrangement: place one tall lantern at the back, a medium one slightly forward, and tuck a small potted succulent, a wooden bead string, or a short candle in front to build the vignette into something three-dimensional. The glass panels catch LED strip uplighting beautifully if you have both elements working together.
Practical Notes
- Use battery-operated candles with a built-in timer so the lanterns glow automatically each evening without any intervention.
- Fill the base of the lantern with a layer of coffee beans, river stones, or preserved moss to elevate the candle height and add texture visible through the glass.
- Never use real candles above cabinets near flammable items — battery-operated alternatives are equally beautiful and infinitely safer.

Recommended
Items for this idea
13. Tiered Tray Styling
Tiered trays — scaled up to eighteen inches tall or more — become automatic vignette platforms above kitchen cabinets. Each level holds a small grouping of coordinated objects that together create a layered, display-worthy arrangement. This approach is a favorite for people who love styled vignettes but find it difficult to arrange objects convincingly from scratch — the tray structure does the composition work for you.
Style each tray level with a different object type: the bottom level might hold a small plant and a candle; the middle level a mini sign or small framed print; the top level a tiny ceramic or figurine.
Tips
- Keep to two or three object types maximum per tray to avoid clutter — leave at least a third of each surface visible for breathing room.
- Metal tiered trays (black, white, or gold) coordinate with nearly every kitchen hardware finish.
- Rotate seasonal items in and out while the tray structure remains a permanent feature — label tray levels with tiny chalkboard tags for seasonal events.

14. Dried Flower Arrangements
Dried flower arrangements — bunches of pampas grass, wheat, lavender, lunaria, and statice — bring a soft, romantic, and surprisingly long-lasting display to above cabinet space without the upkeep of real plants. A single large bouquet of dried pampas grass in a tall stoneware vase can fill the above-cabinet zone of an entire corner with billowing texture that moves gently when air circulates.
Mix bloom types for the most interesting arrangements: dense round flowers like dried craspedia or dried roses alongside feathery pampas and long-stemmed grasses create a layered visual texture. Place the tallest bouquet at the corner of a cabinet run and let it spill slightly over the edge for a loose, abundant look.
Care and Longevity
- Spritz dried arrangements lightly with hairspray to reduce shedding from pampas grass feathers — it significantly extends their life.
- Store dried flowers away from direct sunlight to prevent color fading; a south-facing window will bleach them within weeks.
- Replace arrangements annually or when they begin to look dusty and flat rather than lush and dimensional.
- Budget: a large mixed dried bouquet costs $20–$50 at a craft store or market and requires no ongoing care beyond occasional light dusting.
Recommended
Items for this idea
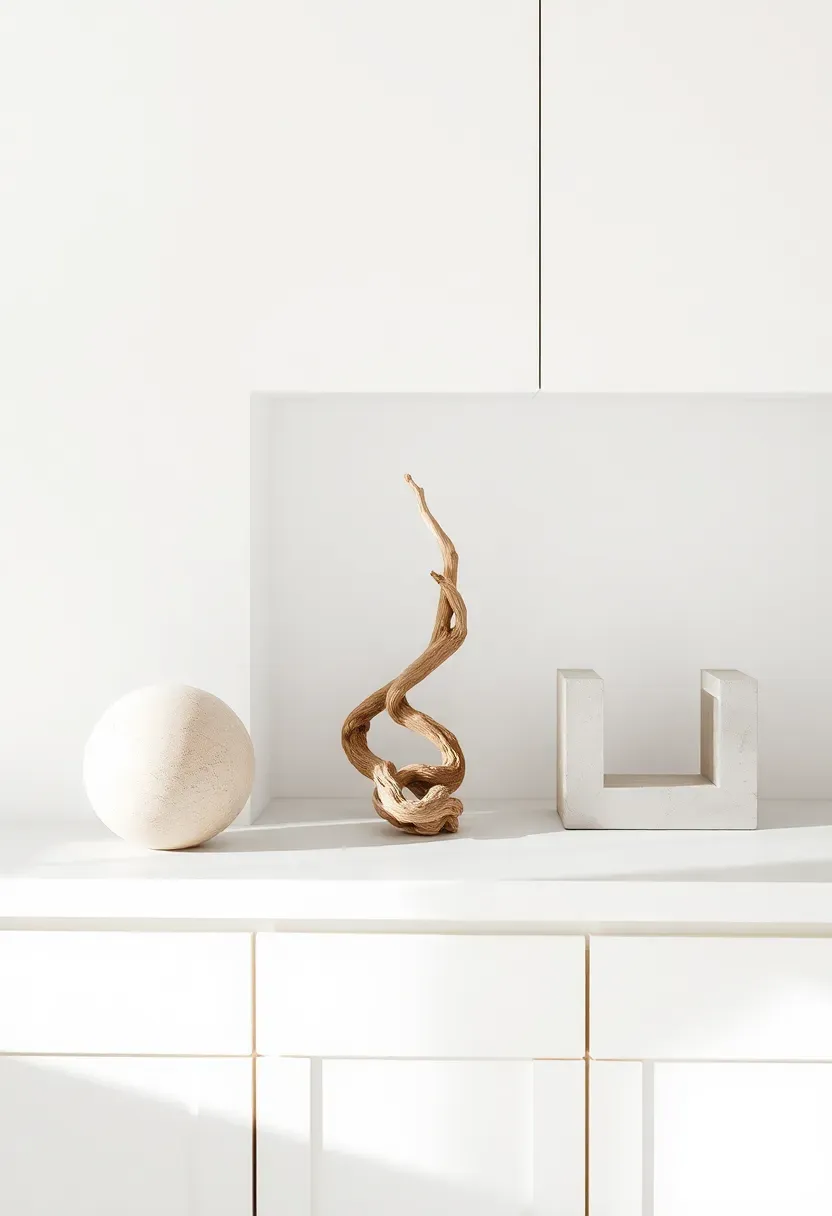
15. Minimalist Sculptural Objects
For kitchens that lean minimalist — clean-lined white or handleless cabinetry, flat-front drawers, quartz countertops — above cabinet decorating requires a different approach than maximalist styling. Rather than filling the space, the goal is to place two or three sculptural objects with strong forms and significant negative space between them.
Think: a single travertine sphere, a twisted driftwood piece, or a geometric concrete bookend. The three-object rule works perfectly here: choose one tall narrow piece, one low wide piece, and one round or organic form. Space them unevenly so the eye moves between them with natural pauses.
Material Choices
Materials like travertine, plaster, raw concrete, and brushed brass all carry strong sculptural presence. Choose objects in a monochromatic palette — all white, all black, or all natural stone tones — to maintain visual quiet.
Do: leave a minimum of twelve inches of empty space between each object — negative space is part of the design.
Don't: add more than three or four pieces total; each addition dilutes the sculptural impact of the others.
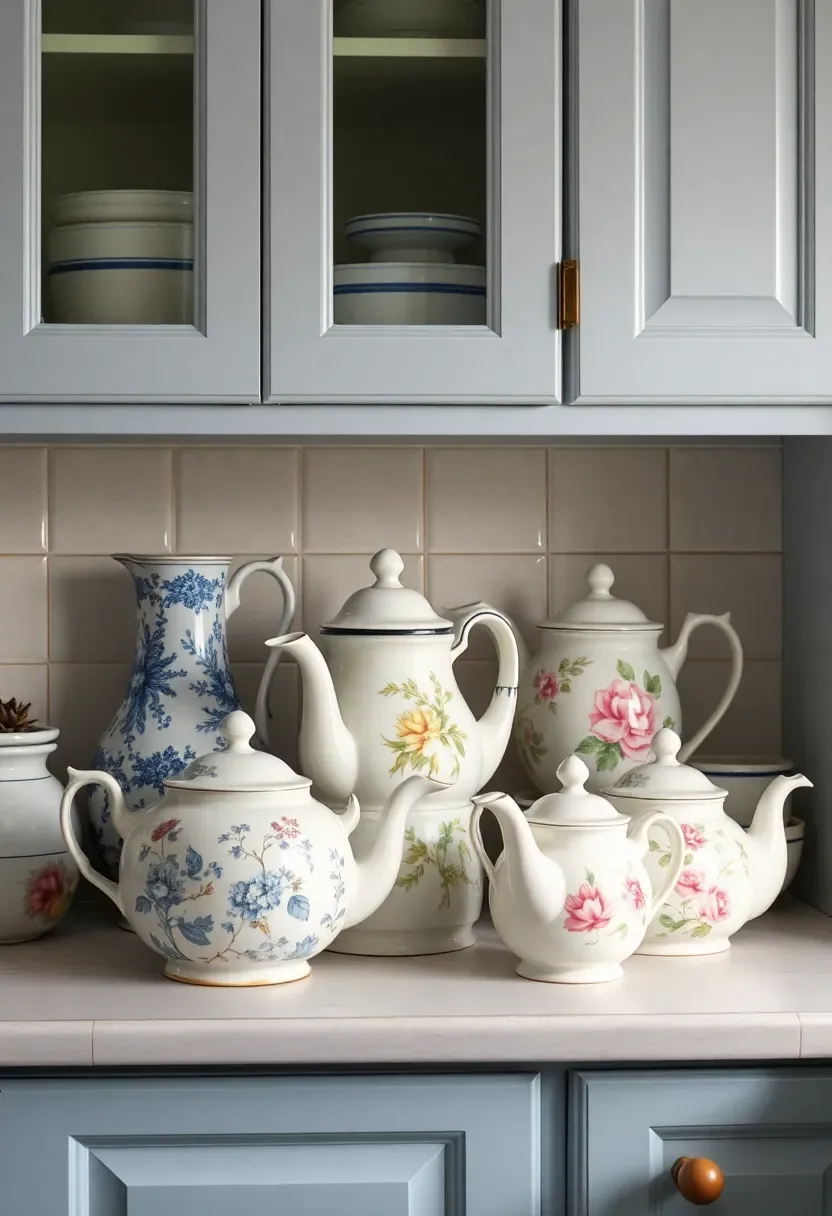
16. Cottage-Style Teapot Collection
A cottage-style teapot collection displayed above kitchen cabinets creates a charming, English-country atmosphere that feels both collected and personal. If you love this look throughout the whole room, our guide to cozy cottage kitchen ideas covers the full cabinet, countertop, and shelving picture. Mismatched floral teapots in various sizes — tall with a long spout, round and squat, one with a lidded dome — arranged in a casual cluster tell a story of slow mornings and afternoon teas.
Do not try to match teapots exactly — the collection should feel gathered rather than purchased as a set. Instead, find a common thread: all blue and white, or all white with gold accents, or all hand-painted florals in soft tones.
Building the Collection
- Estate sales and charity shops are the best source for genuine vintage teapots at $2–$15 each — far better than reproductions.
- Fill each teapot with a small dried flower or sprig of herbs visible inside the open lid for a lived-in cottage touch.
- Space the teapots at slightly different depths from the cabinet edge so some appear to recede and others come forward, creating a layered three-dimensional display.
- Limit the collection to five to seven teapots so the display reads as curated rather than overcrowded.
Recommended
Items for this idea
17. Black and White Photography Prints
Black and white photography prints leaned or mounted above kitchen cabinets bring a graphic, contemporary energy that coordinates with almost any cabinet color or material. Unlike colorful art, monochrome photography maintains visual calm while still delivering strong composition and mood.
Choosing the Right Prints
Food photography, architectural shots, landscape abstracts, and candid kitchen scenes all work beautifully. Choose prints that are at least 11x14 inches — smaller prints disappear at cabinet height. Frame in thin black metal or thin natural wood for a clean, contemporary look.
Installation Approach
Lean two prints of varying widths together, slightly overlapping, against the wall for a gallery-at-home feel without requiring precise hanging. Place a small ceramic or plant in front of the leaned frames to prevent sliding and add depth to the vignette.
- Source high-resolution prints from Unsplash or similar platforms, print at a local shop for $5–$15 per image.
- Use frames in the same finish as your cabinet hardware to create a visual connection between the display and the kitchen.
- Swap prints seasonally — the same frame stays; only the print changes, keeping the arrangement fresh year-round.
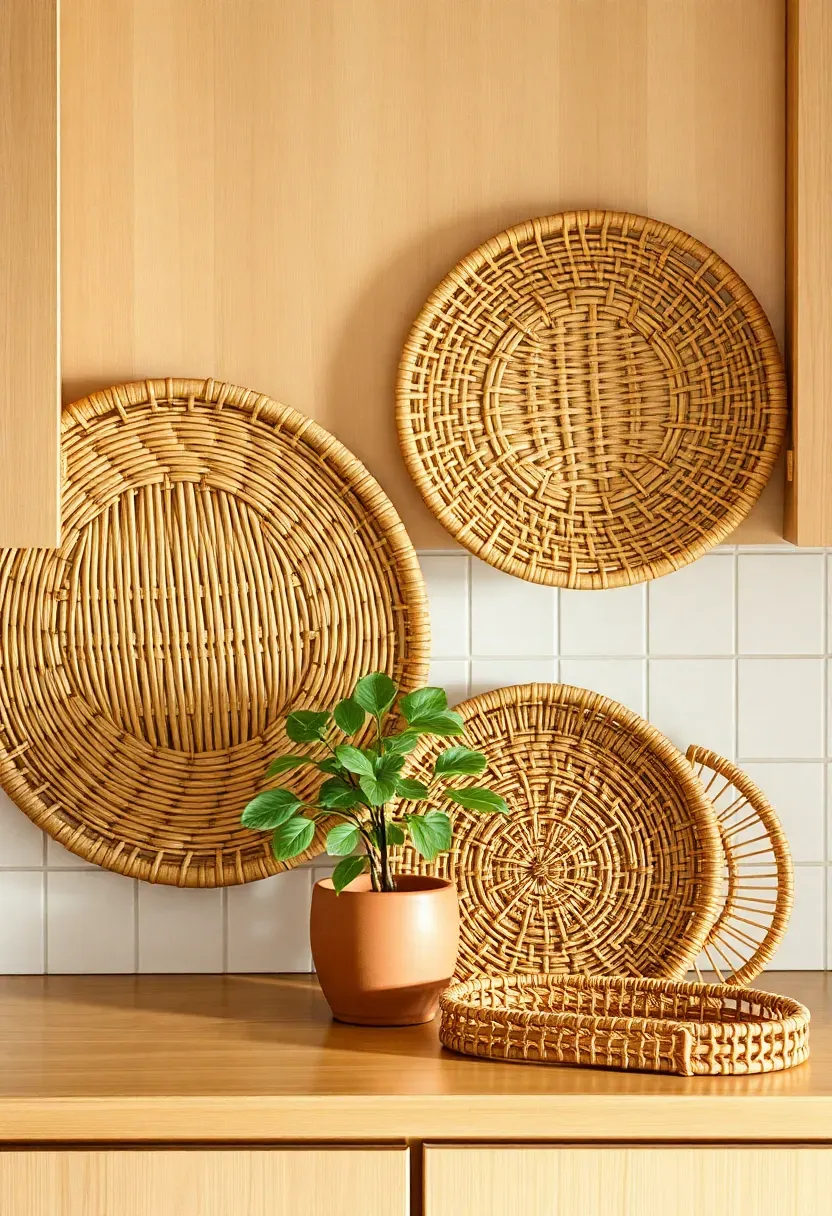
18. Wicker and Seagrass Trays
Wicker and seagrass trays — leaned upright above kitchen cabinets — function as natural wall art with genuine texture and dimension. Unlike framed prints or mirrors, woven trays bring a tactile, organic quality that photographs beautifully and coordinates with nearly every warm-toned kitchen.
Comparing: Round vs. Rectangular Trays
Round trays read as more decorative and organic — they soften the horizontal lines of cabinet rows and work best in bohemian and coastal kitchens.
Rectangular trays read as more structured and architectural — they suit Scandinavian and modern farmhouse kitchens where clean lines are valued.
Choose a mix: round trays next to oval or rectangular ones create more visual interest than a matched set.
Styling Notes
Lean two or three trays of different sizes and weave patterns against the wall, overlapping slightly. The varying weave densities — tight seagrass alongside open rattan — add richness of texture that elevates the arrangement. Mix tray colors from pale blonde to deep caramel for natural tonal depth rather than choosing all one color.
Recommended
Items for this idea
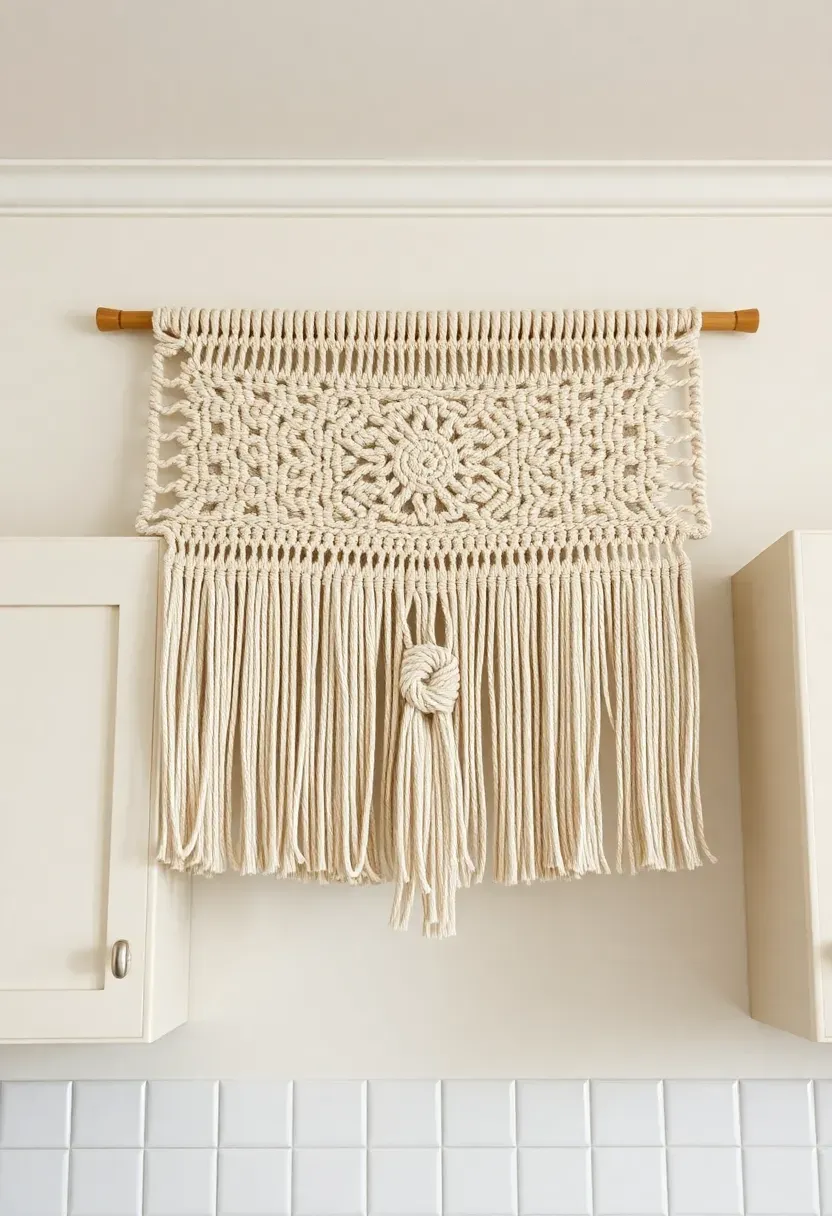
19. Hanging Macrame Panel
A hanging macrame panel mounted on the wall directly above kitchen cabinets introduces bohemian warmth, handmade texture, and soft vertical movement to the most linear zone in the kitchen. Where most above-cabinet decor sits horizontally across the cabinet top, a wall-hung macrame piece draws the eye upward, creating a textural bridge that makes the zone feel furnished rather than decorated.
This works best in kitchens with at least 14 inches of wall clearance between the cabinet top and ceiling so the piece can hang freely without cramping.
How to Install It
Choose a panel wide enough to span two to three cabinet doors, in natural cotton rope in undyed natural white, dusty sage, or warm cream depending on your cabinet color. Macrame panels with fringe at the bottom add the most movement and shadow play — especially dramatic under cabinet uplighting. Mount the dowel rod with two small Command hooks for a fully reversible installation.
- Natural undyed macrame pairs with virtually any cabinet color.
- Dust macrame by gently shaking it or using a hairdryer on cool setting — it collects cooking particles more readily than smooth surfaces.
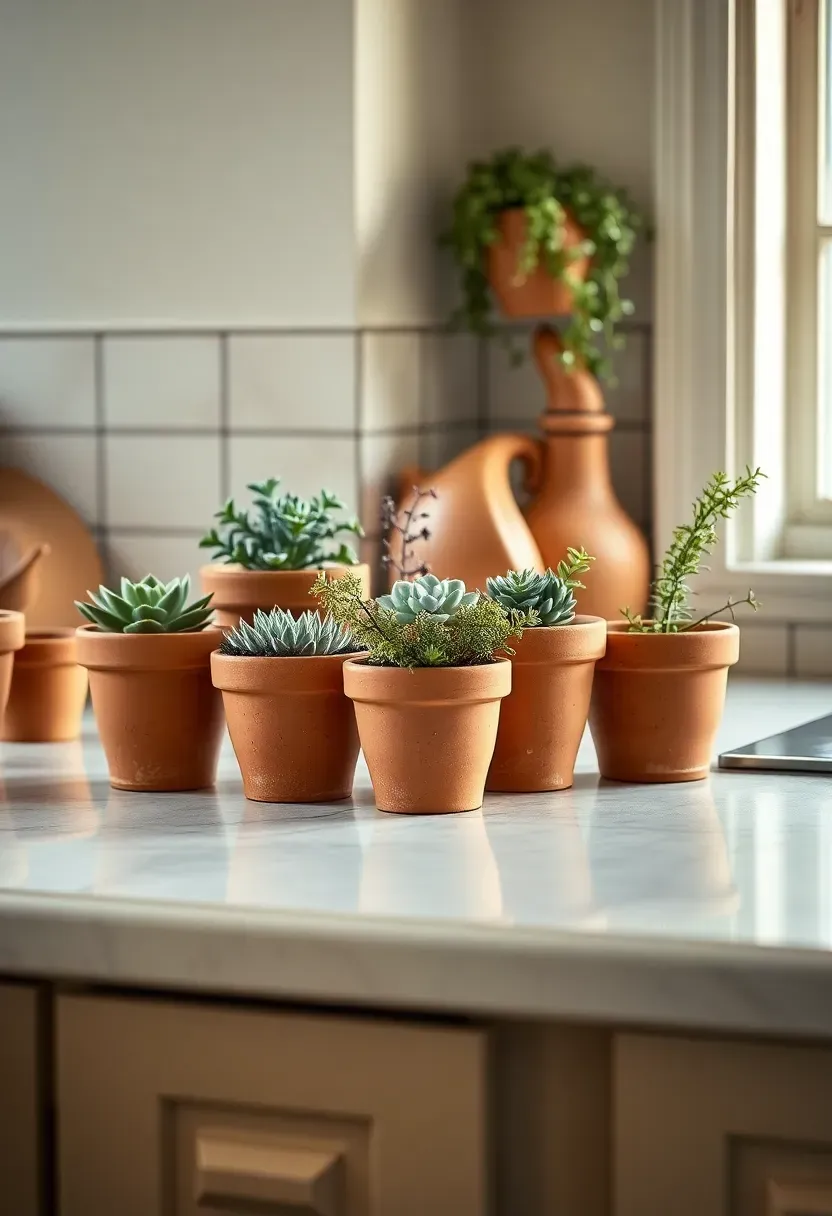
20. Terracotta Pot Cluster
A cluster of terracotta pots in graduated sizes — some planted with succulents, some with small trailing herbs, and one or two left empty as sculptural objects — creates a sun-baked Mediterranean warmth above kitchen cabinets that few other materials match. Terracotta's matte burnt-orange surface reads warm and grounded against white, cream, sage, or warm wood cabinetry.
Styling the Cluster
Use pots ranging from 3 inches to 8 inches in diameter. Stack one small pot inside a medium one to create height within the cluster — a design trick that adds dimension without taking up more surface area. Plant drought-tolerant succulents or air plants in the smaller pots to minimize watering demands in this hard-to-reach spot.
Finishing Touches
- Seal the inside of terracotta pots with a quick coat of wax or sealant to prevent water seeping through and staining the cabinet top.
- Age new pots naturally by soaking in water, rubbing the damp surface with a pinch of white flour, and leaving in the sun for a day.
- Mix glazed terracotta (in white or sage) alongside raw unglazed pots for textural variation within the cluster.
Recommended
Items for this idea
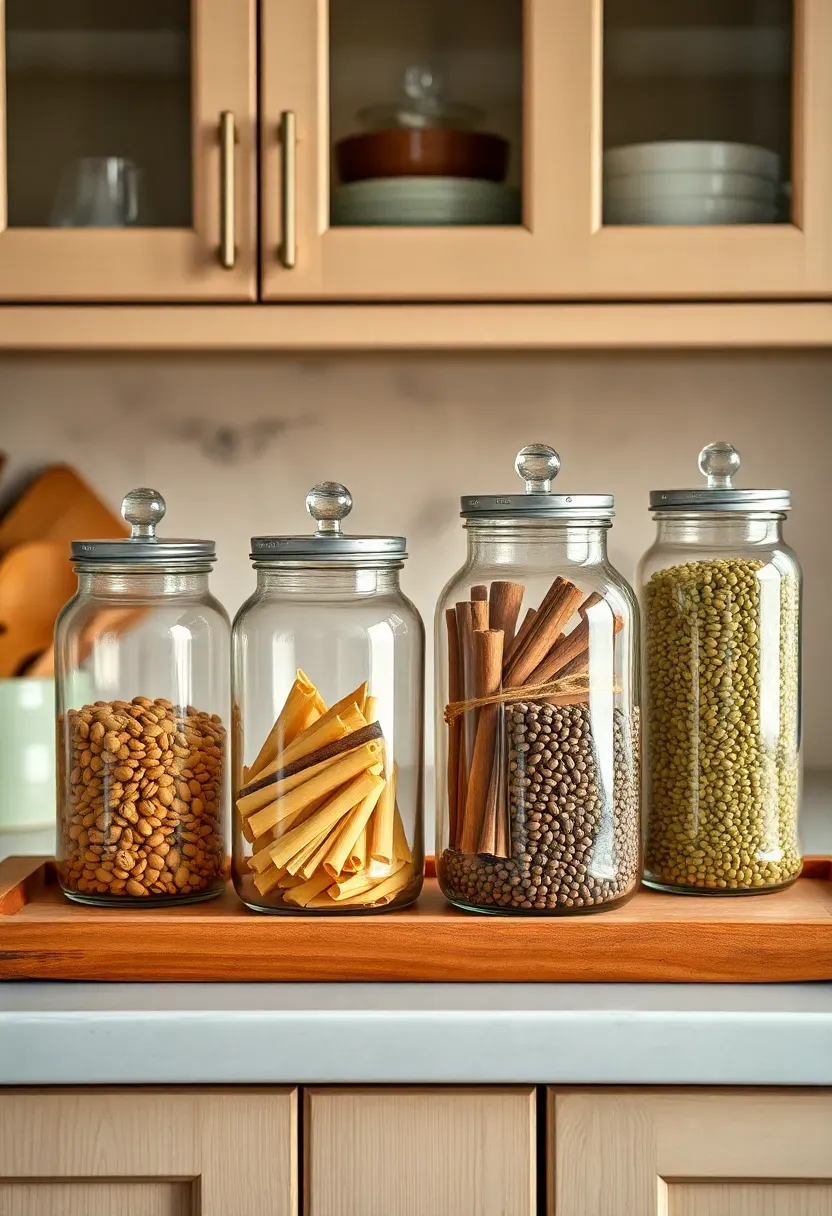
21. Glass Apothecary Jars
Glass apothecary jars — tall cylindrical vessels with glass lids, reminiscent of old pharmacy displays — bring a timeless, sophisticated clarity to above kitchen cabinet space. When filled with dried pasta, coffee beans, loose-leaf tea, corks, dried citrus slices, or decorative dried beans, they become both display and inventory in a single piece.
The transparent sides mean the contents become part of the display, so choose fills that are visually interesting: golden coffee beans, green-tinged dried lentils, bundled cinnamon sticks.
Arrangement
Apothecary jars work best in groupings of three to five in graduated heights — 6 inches, 10 inches, and 14 inches, for example. Set them on a small wooden tray to keep them organized as a unit and make moving them for cleaning significantly easier.
- The glass picks up and amplifies any LED uplighting, creating a warm glow through the filled contents that looks stunning in the evening.
- If the kitchen is above a stove, choose non-food fillers (corks, stones, dried botanicals) to avoid heat affecting consumable contents.
- If cabinets are dark wood or black, fill jars with light-colored contents — white beans, pale pasta — to create contrast visible from across the room.

22. Vintage Bread Boxes and Tins
Vintage bread boxes, biscuit tins, and advertising canisters from the early to mid-20th century are among the most charming and conversation-starting objects you can place above kitchen cabinets. Their faded typography, cracked enamel, and dented lids tell a story of everyday domestic life from another era, and their rectangular forms stack and cluster beautifully.
Building the Arrangement
Arrange the bread box as the tallest anchor piece and cluster smaller tins around and in front of it at varying heights. Mix open-face tins (showing their interior) with closed ones to vary the surface texture.
Key rule: Limit the palette to two or three coordinating colors across the entire arrangement — too many color families creates chaos at a distance.
Sourcing and Care
- A vintage bread box from a charity shop typically costs $5–$20; vintage advertising tins from estate sales range from $2–$30.
- Wipe vintage tins with a dry cloth only — moisture reactivates rust on old metal and accelerates deterioration of lithographed surfaces.
- Fill tins with small sachets of dried lavender or cedar to introduce a subtle, pleasant scent to the kitchen zone.
Recommended
Items for this idea
23. Trailing Fake Greenery for Rentals
High-quality faux trailing greenery designed specifically for display has improved dramatically in recent years. For renters, frequent travelers, or kitchens with no natural light near the cabinet zone, artificial trailing plants placed above upper cabinets deliver all the organic warmth of real greenery with zero maintenance, zero watering, and zero concern about dying plants.
Choosing Quality Faux Greenery
Look for faux greenery with individual leaf variation — slightly different shades of green, some yellowing at the edges, visible veining on each leaf — rather than uniformly identical leaves, which immediately reads as artificial. Vine lengths of four to six feet allow generous draping over the cabinet edge without additional pieces.
Making It Convincing
- Tuck the faux vine into a real terracotta pot filled with dry floral foam — the real pot grounds the fake plant and makes the combination far more convincing.
- Dust faux leaves monthly with a barely damp cloth — accumulated kitchen grease on leaves is the fastest way to make artificial greenery look fake.
- Mist the leaves lightly with water before photographing to restore a natural-looking sheen.
- Rental note: Faux plants require no soil, water, or drilling — perfect for renters who want beautiful spaces that come down cleanly at move-out.
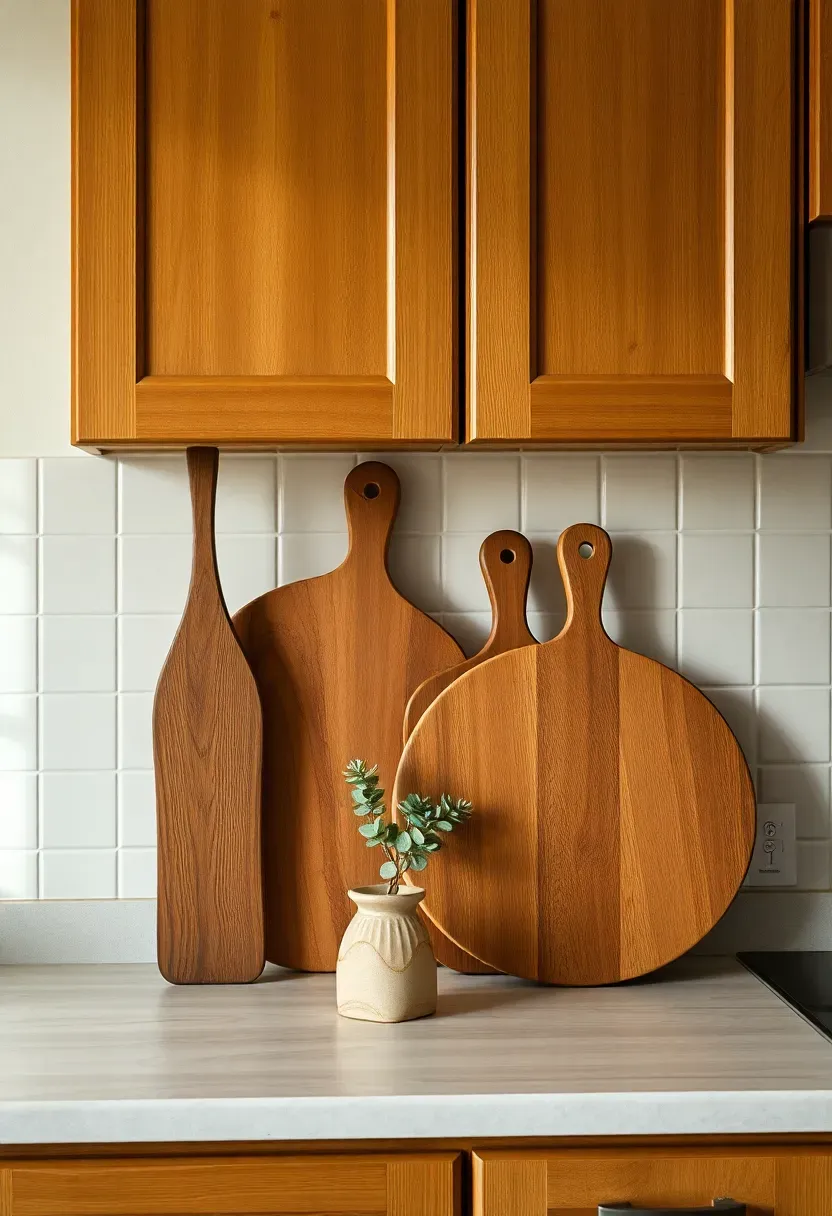
24. Layered Cutting Boards and Paddles
Wooden cutting boards, bread paddles, and cheese boards leaned and layered above kitchen cabinets create a warmly functional display that is unmistakably kitchen-themed without being kitschy. A mix of shapes — long rectangular bread paddle, round charcuterie board, oval serving plank — leaned casually against the wall at varying angles forms an organic arrangement that needs no artistic skill.
Above-cabinet ideas that use actual kitchen tools as display objects blur the line between decor and function in a way that feels authentic to the space. Walnut, maple, acacia, and reclaimed wood each bring their own grain character to the arrangement.
How to Layer Them
Layer boards from largest at the back to smallest at the front, slightly staggered so all handles are visible. Place a small ceramic or plant in front of the board arrangement to ground the cluster and prevent sliding. You can pull the boards down when actually needed in the kitchen and return them to the display — making this one of the most genuinely practical above-cabinet approaches.
- Oil wooden boards with food-safe mineral oil before displaying — it enhances the grain color and keeps them ready for actual use.
- Mix a board with a visible brand stamp or maker's mark alongside plainer boards for an artisanal quality.
- Hang one board vertically using a small Command hook if your cabinet-to-ceiling gap is narrow — a vertical board takes up less depth while still contributing visual height.
Recommended
Items for this idea
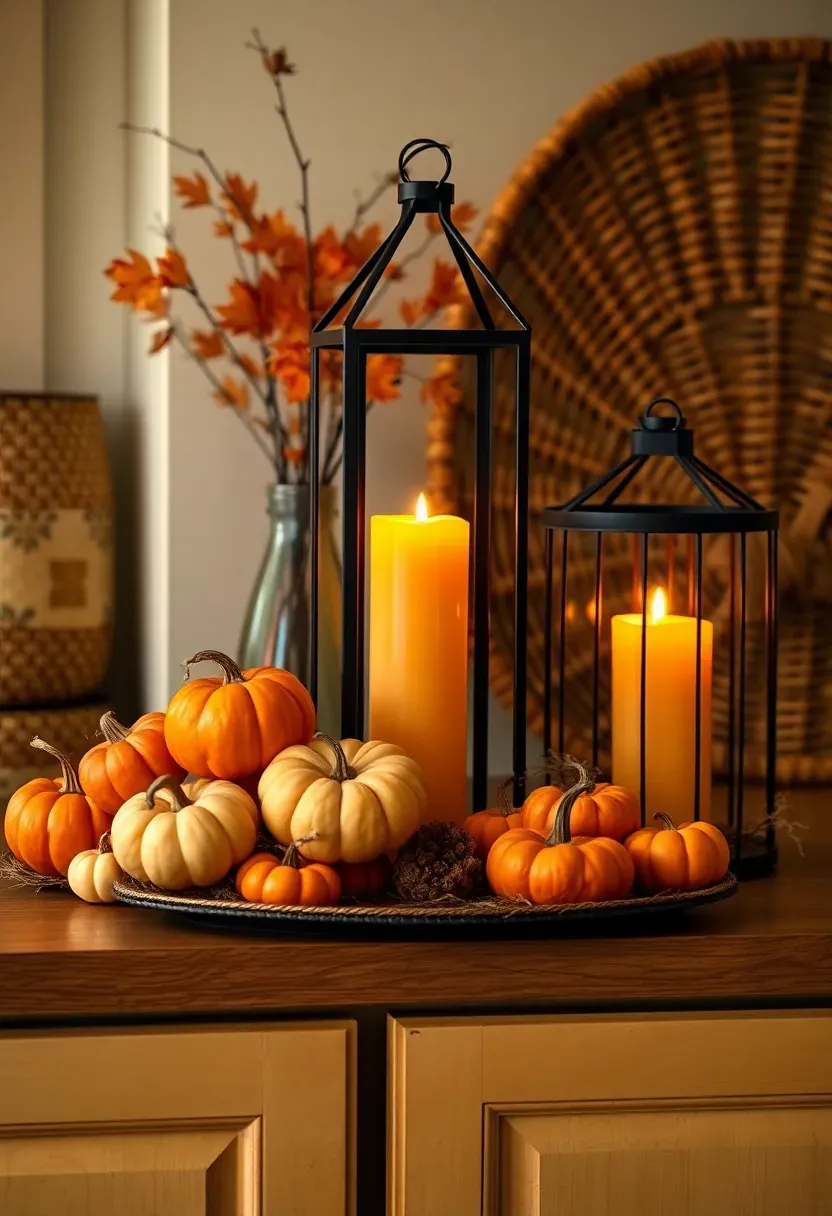
25. Seasonal Rotating Display
Building a seasonal rotating display above kitchen cabinets is not a single idea but a system — one that ensures your above-cabinet space stays current and interesting rather than becoming the static display that has not changed since you moved in.
Think autumn gourds, mini pumpkins, and copper lanterns for fall; evergreen sprigs, pinecones, and white pillar candles for winter; fresh tulips and pastel ceramics for spring; bright greenery and seagrass for summer.
Setting Up the System
The key to making seasonal rotation easy is building a neutral permanent base — a set of baskets and a plant or two that stay year-round — and then adding seasonal accents around and among them rather than replacing everything. Store off-season items in a single clearly-labeled bin so rotating takes twenty minutes rather than an afternoon project.
- Set a calendar reminder for the first weekend of each new season to rotate the display — making it a ritual ensures it actually happens.
- Shop end-of-season sales (post-Halloween, post-Christmas) for next year's seasonal accents at 50–70% off retail.
- Photograph your favorite seasonal arrangements so you have a reference for recreating them in future years without starting from scratch.
Quick FAQ
Is it still trendy to decorate above kitchen cabinets?
Yes — styling above cabinets has made a strong comeback as homeowners and renters embrace maximalist warmth and collected aesthetics. The trick is keeping it cohesive: choose a theme (rustic, modern, botanical) and stick to it throughout the display.
Should I use real or artificial plants above kitchen cabinets?
Both work beautifully depending on your situation. Real plants like pothos add genuine life and movement but require watering access. High-quality faux trailing vines are indistinguishable from a normal viewing distance and are perfect for rentals or low-light kitchens.
How do I prevent dust from building up on above-cabinet decor?
Choose smooth surfaces over intricate carvings when possible, and wipe items down during regular kitchen cleaning. Placing a shelf liner or runner on top of cabinets makes cleaning easier and protects the cabinet finish.
What height should above-cabinet decor be?
Aim for pieces that reach at least two-thirds of the way to the ceiling. Mixing tall and short items within the display creates visual rhythm; avoid a single row of same-height objects, which looks flat and uninspired.
Is it possible to style above kitchen cabinets on a tight budget?
Absolutely. Some of the best above-cabinet displays use items found at estate sales, charity shops, or even repurposed from elsewhere in the home. Dried flowers, vintage tins, wooden boards, and faux vines are all affordable starting points that look far more expensive than they cost.
Above kitchen cabinet decorating is one of the most rewarding styling opportunities in the home because the results are visible from across the room, require no renovation, and can evolve as your tastes and seasons change. Start with one corner, build a vignette you love, and let it inspire the next — the best above-cabinet displays grow over time rather than arriving all at once.
Pinterest cover for 25 Above Kitchen Cabinet Decor Ideas for Renters
About the author
OBCD
CGI visualization and interior design content. We create detailed 3D renders and curate practical design ideas for every room in your home.