21 Backyard Patio Designs That Turn Any Yard Into a Retreat

The right backyard patio design can turn even a modest yard into a genuine outdoor living room. These 21 patio design ideas cover everything from budget-friendly gravel layouts to dramatic cantilevered overlooks -- each one built around smart material choices, comfortable seating, and layouts that actually work for real life.
Whether you're planning a small backyard patio for morning coffee or a full outdoor kitchen for weekend entertaining, you'll find a design approach below that fits your space, your climate, and your budget.
Quick FAQ
Which backyard patio designs work best for small spaces?
Compact layouts with built-in seating and vertical elements maximize every square foot. Use folding furniture and multi-level surfaces to add flexibility without crowding.
How do I choose durable materials for my patio?
Prioritize natural stone, concrete pavers, and weather-resistant woods like teak or cedar. These materials develop beautiful patina while standing up to sun, rain, and temperature changes.
Why should I include shade in my patio design?
Shade extends usable hours throughout the day and protects furniture from fading. Pergolas, umbrellas, and shade sails add architectural interest while making the space comfortable.
What's the best way to light a backyard patio?
Layer string lights, lanterns, and low-voltage path lights for ambiance and safety. Solar options reduce wiring while warm LEDs create an inviting evening atmosphere.
Should I avoid mixing too many materials on my patio?
Yes, limit yourself to two or three complementary materials. If you want variety, combine textures like smooth concrete with rough stone rather than introducing competing colors.
How much patio space do I need for dining?
A dining area requires at least 10x10 feet for a four-person table with comfortable circulation. Add 2-3 feet around all sides for chairs and movement.
As an Amazon Associate I earn from qualifying purchases.
Table of Contents
- 1. Bluestone paver patio with built-in seating
- 2. Crushed gravel patio with fire pit focal point
- 3. Multi-level deck and stone patio combination
- 4. Modern concrete patio with geometric planters
- 5. Cedar pergola patio with string light canopy
- 6. Flagstone patio with mossy groundcover joints
- 7. Compact bistro patio for intimate dining
- 8. Turf-adjacent patio with seamless transition
- 9. Courtyard patio with water feature centerpiece
- 10. Shade sail patio for modern sun protection
- 11. Brick patio with classic herringbone pattern
- 12. Outdoor kitchen patio with bar seating
- 13. Zen-inspired gravel patio with bamboo screen
- 14. Cantilevered patio with scenic overlook
- 15. Paved patio perimeter with green lawn center
- 16. Covered patio with ceiling fan and curtains
- 17. River rock patio border with wood deck insert
- 18. Mediterranean tile patio with fountain accent
- 19. Minimalist concrete patio with fire table
- 20. Stone patio with embedded LED pathway
- 21. Curved patio that follows garden contours
1. Bluestone paver patio with built-in seating
This backyard patio design combines the cool blue-gray tones of bluestone with warm limestone accents for timeless appeal. The irregular paver shapes create organic movement while the limestone border defines the space crisply. Built-in L-shaped seating along two walls maximizes capacity without consuming floor space. Deep cushions in weather-resistant fabric add comfort and color contrast. Consider adding low planters at seat height for softening greenery that doesn't block views. This design works especially well when the patio connects directly to a kitchen or living room for indoor-outdoor flow.
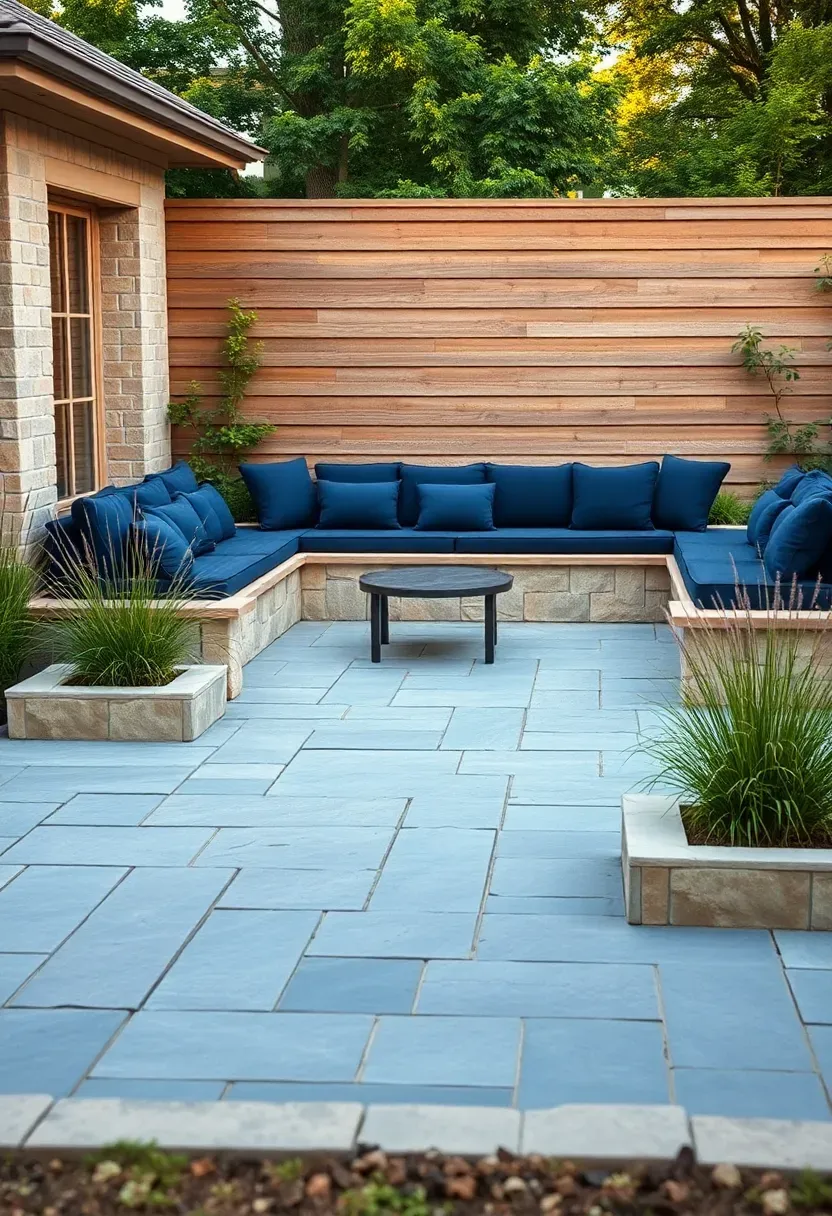
The natural cleft surface of bluestone provides excellent traction even when wet and hides minor wear beautifully. Install over a compacted crushed stone base with polymeric sand in joints to prevent weed growth and shifting. Plan for 1/4 inch drainage slope away from structures. The limestone border serves both aesthetic and practical purposes—containing the pavers while creating a clean visual frame that softens adjacent planting beds.
Tips
- Do: seal bluestone every 2-3 years to maintain color and prevent staining.
- Don't: use de-icing salts in winter—opt for sand or calcium magnesium acetate.
- If you live in a freeze-thaw climate, choose thermal bluestone for better frost resistance.
- Then add accent pillows in complementary terracotta or olive tones for seasonal updates.
Best for: medium to large backyards with room for defined zones.
What this gives you: a sophisticated foundation that elevates your entire outdoor space.
We picked a few things that go well with this idea: FDW Black Wicker Patio Conversation Set (★4.2), Flamaker Wicker Patio Chair Bistro Set (★4.4) and Aoxun Seven Piece Wicker Sectional Sofa (★4.4). As an Amazon Associate we earn from qualifying purchases.
2. Crushed gravel patio with fire pit focal point
One of the most approachable backyard patio designs uses crushed gravel as an affordable, permeable surface that drains naturally. The key is choosing 3/8 minus gravel with fines that compacts firmly underfoot. Center a fire pit surrounded by concentric rings of seating—mix built-in stone benches with movable Adirondack chairs for flexibility. The gravel surface accommodates any furniture arrangement and shifts easily as needs evolve. Avoid pea gravel which rolls underfoot; upgrade to decomposed granite or crushed stone for better stability.
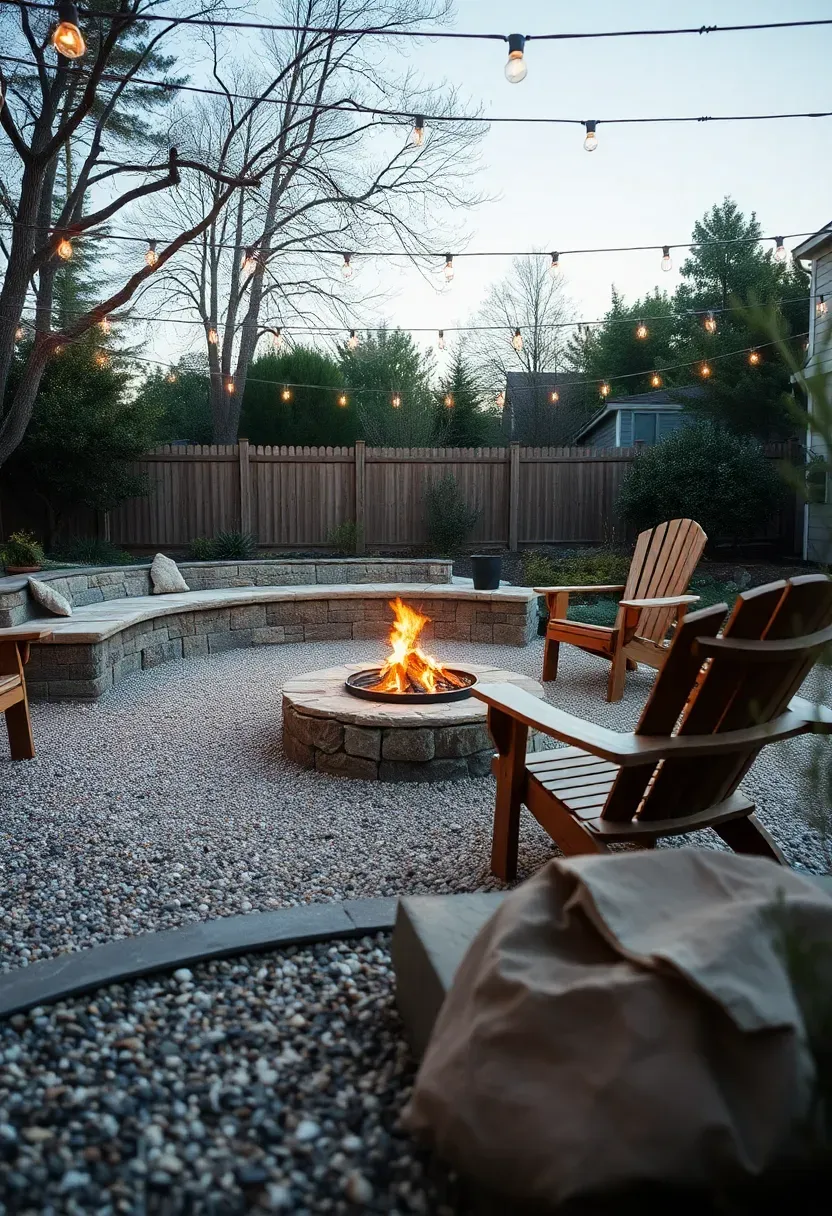
Placement note: Position the fire pit at least 10 feet from structures and overhanging trees, checking local codes for specific requirements.
Install edging to contain the gravel—metal, plastic, or stone all work depending on your aesthetic. A 4-inch depth over landscape fabric prevents most weeds while allowing drainage. Rake occasionally to refresh the surface and redistribute material. The fire pit becomes a natural gathering point that extends the patio's usefulness well into cool evenings -- for more flame-focused layouts, see our guide to [gorgeous fire pit backyard ideas](/posts/155_23-gorgeous-firepits-backyard-ideas-for-warm-gatherings/). Consider adding a wood storage nook nearby to minimize trips back and forth.
Tips
- Pro tip: Add a removable fire pit cover to convert the surface to a table when not in use.
- Con: Gravel can track into the house—add a transition mat or shallow stepping stones at entry points.
- Fix: Install a simple shoe brush station near the door for quick gravel removal before entering indoors.
What this gives you: an inviting, low-cost patio perfect for casual gatherings and evening relaxation.
We picked a few things that go well with this idea: Walsunny Rectangle Propane Fire Pit Table (★4.4), Ciays 42 Inch Propane Fire Pit (★4.5) and Ciays 28 Inch Compact Propane Fire Pit (★4.5). As an Amazon Associate we earn from qualifying purchases.
3. Multi-level deck and stone patio combination
This dynamic backyard patio design creates separate zones by elevating a dining deck 18 inches above a lower lounging patio. The change in elevation defines spaces without walls while adding visual interest to flat yards. Use the same material palette on both levels—Ipe decking on top with flagstone below—to maintain continuity. Wide timber steps with open risers preserve views and encourage circulation. The lower level feels intimate and sheltered while the raised deck captures better views and breezes.
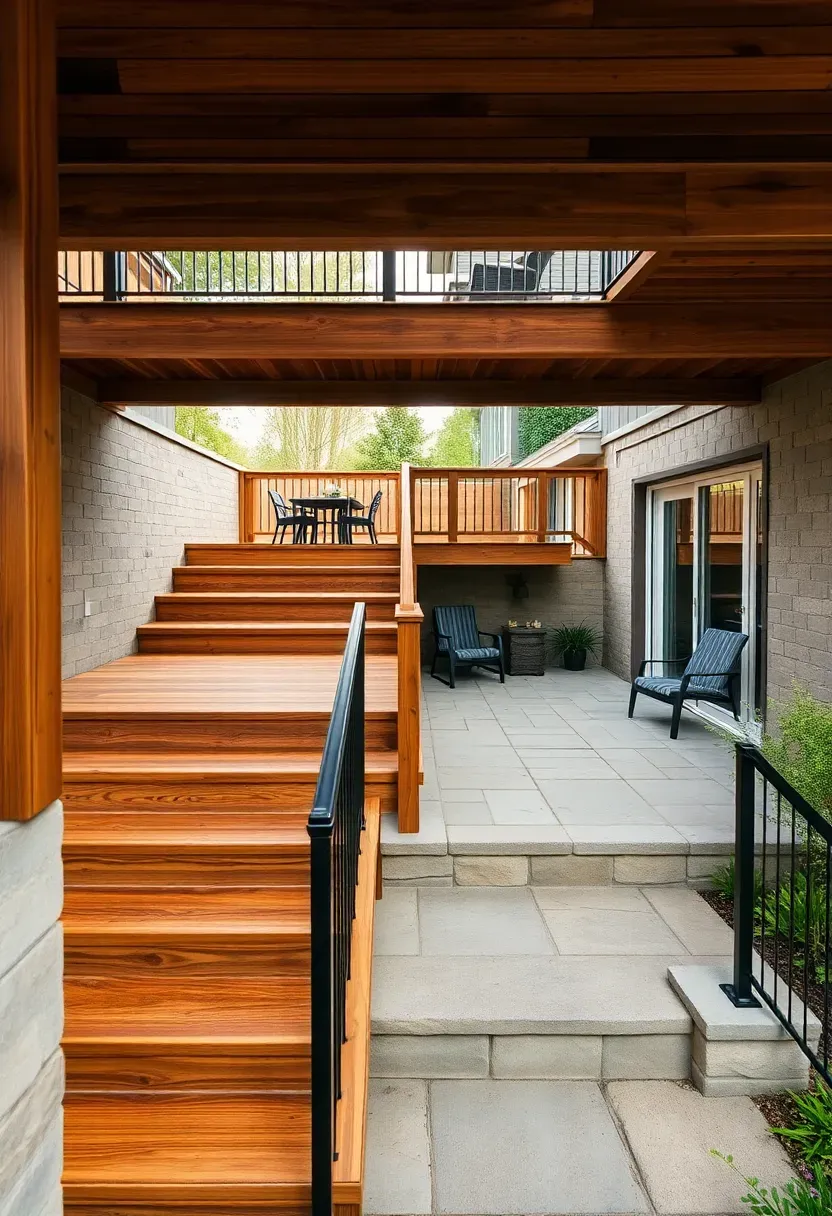
Placement note: Orient the steps to capture the best view and consider adding low riser lights for safe nighttime navigation.
Support the raised deck on concrete footings with pressure-treated joists, ensuring proper ventilation between wood and stone to prevent moisture damage. The 18-inch rise provides definition while remaining accessible without railings on all sides. Use planters at the changes in elevation to soften edges and add privacy. This design excels at separating active and relaxed zones—dining above, lounging below—while keeping everyone connected.
Tips
- Do: maintain a consistent 7-8 inch riser height across all steps for comfort and safety.
- Don't: create level changes narrower than 4 feet in any direction—this makes furniture arrangement difficult.
- Do: use the same lighting temperature on both levels to maintain cohesion after dark.
Budget/Time: higher cost due to structural requirements, typically 2-3 weeks for professional installation.
What this gives you: distinct living zones that feel connected yet serve different purposes.
We picked a few things that go well with this idea: Brightown 50FT Shatterproof Globe String Lights (★4.7), 100FT Dimmable ST38 Outdoor Patio Lights (★4.3) and Brightown 100FT Waterproof LED Patio Lights (★4.7). As an Amazon Associate we earn from qualifying purchases.
4. Modern concrete patio with geometric planters
A sleek backyard patio design featuring broom-finished concrete in warm gray creates a neutral canvas for architectural planters. Cast rectangular concrete planters in contrasting charcoal to frame the space and introduce sculptural greenery. The monochromatic palette feels sophisticated while letting plants take center stage. Large-format pavers (24x24 inches) minimize joints and create a seamless contemporary look. Integral color eliminates the need for staining while hiding wear and minor cracking over time.

Recommended
Items for this idea
Placement note: Position taller planters to block undesirable views or frame desirable ones—think strategically about sightlines from seating.
Score control joints in a deliberate grid pattern to guide cracking and add subtle detail. The concrete should be poured over a 4-inch gravel base with wire mesh reinforcement for durability. Planter drainage is critical—include weep holes and a layer of gravel beneath soil. This design thrives with drought-tolerant plants that echo the geometric forms: fountain grass, agave, and architectural succulents all enhance the modern aesthetic.
Tips
- If you want color variation, add a single accent piece like a cobalt bench or rusted steel fire bowl.
- Then layer in outdoor rugs to define seating zones without permanent construction.
- Avoid adding too many different shapes—stick to squares and rectangles for cohesion.
What this gives you: a clean, contemporary backdrop that highlights plants and stays stylish long-term.
5. Cedar pergola patio with string light canopy
This backyard patio design centers on a cedar pergola that defines the space while providing filtered shade and a framework for lighting. The open-grid roof offers dappled sunlight during the day and becomes a starry canopy at night when wrapped with string lights. Keep the pergola proportions generous—12x12 feet minimum for comfortable dining beneath. Clear cedar naturally resists decay and weathers to a beautiful silver-gray if left unstained. The posts anchor into concrete footings for stability while the beam-and-rafter construction creates visual rhythm overhead.
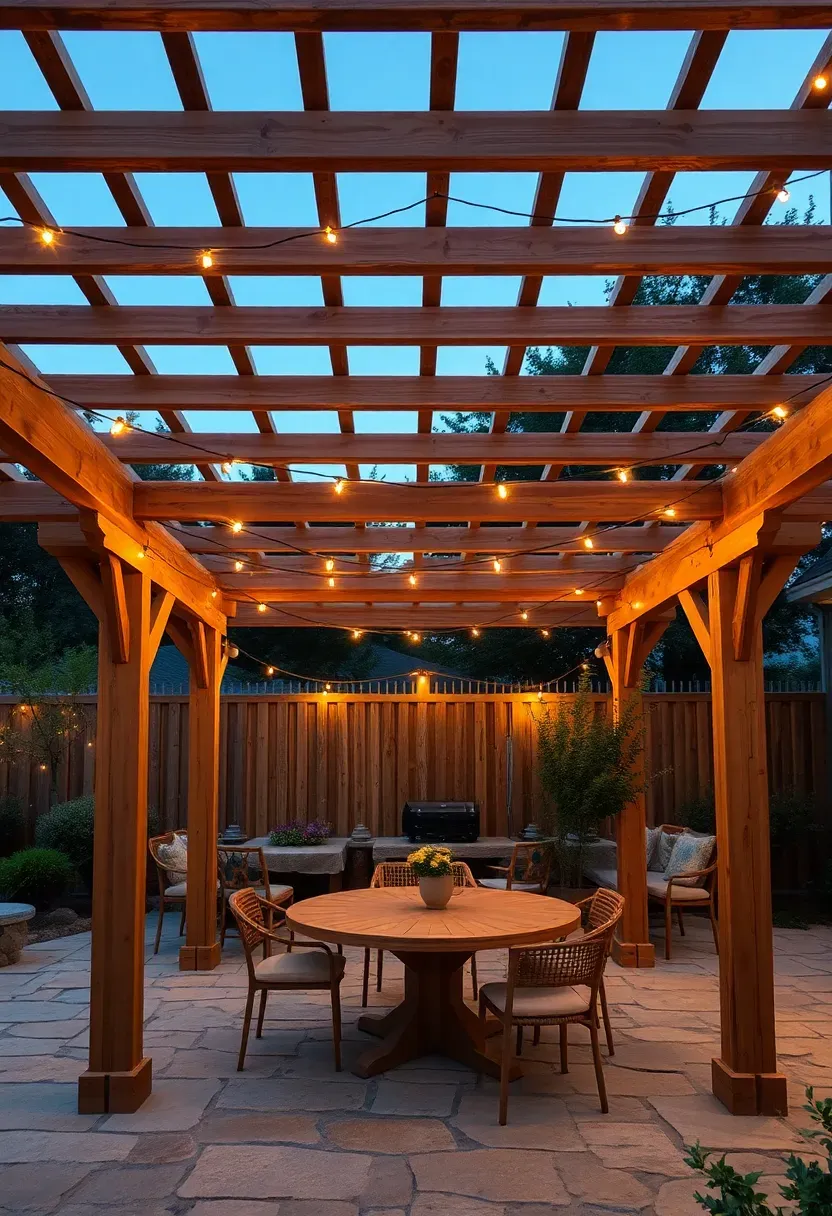
The rafter spacing determines both light filtration and string light density—12-16 inches on center creates good balance. Use commercial-grade string lights with warm 2700K bulbs and weather-rated sockets for year-round reliability. Consider adding removable shade cloth panels during peak summer months for additional sun protection. The pergola creates an outdoor room effect without fully enclosing the space, maintaining connection to the surrounding landscape.
Tips
- Do: route decorative chamfers on post edges for a custom furniture look.
- Don't: space rafters more than 24 inches apart—this makes string light installation difficult and shade insufficient.
- Do: install a dimmer switch to adjust ambiance from bright dining to soft conversation mode.
- Don't: attach string lights with staples—they damage the wire; use cup hooks or UV-rated zip ties instead.
Budget/Time: moderate cost depending on size, typically 1-2 weekends for DIY construction with basic carpentry skills.
What this gives you: an illuminated outdoor room that transforms dramatically from day to night.
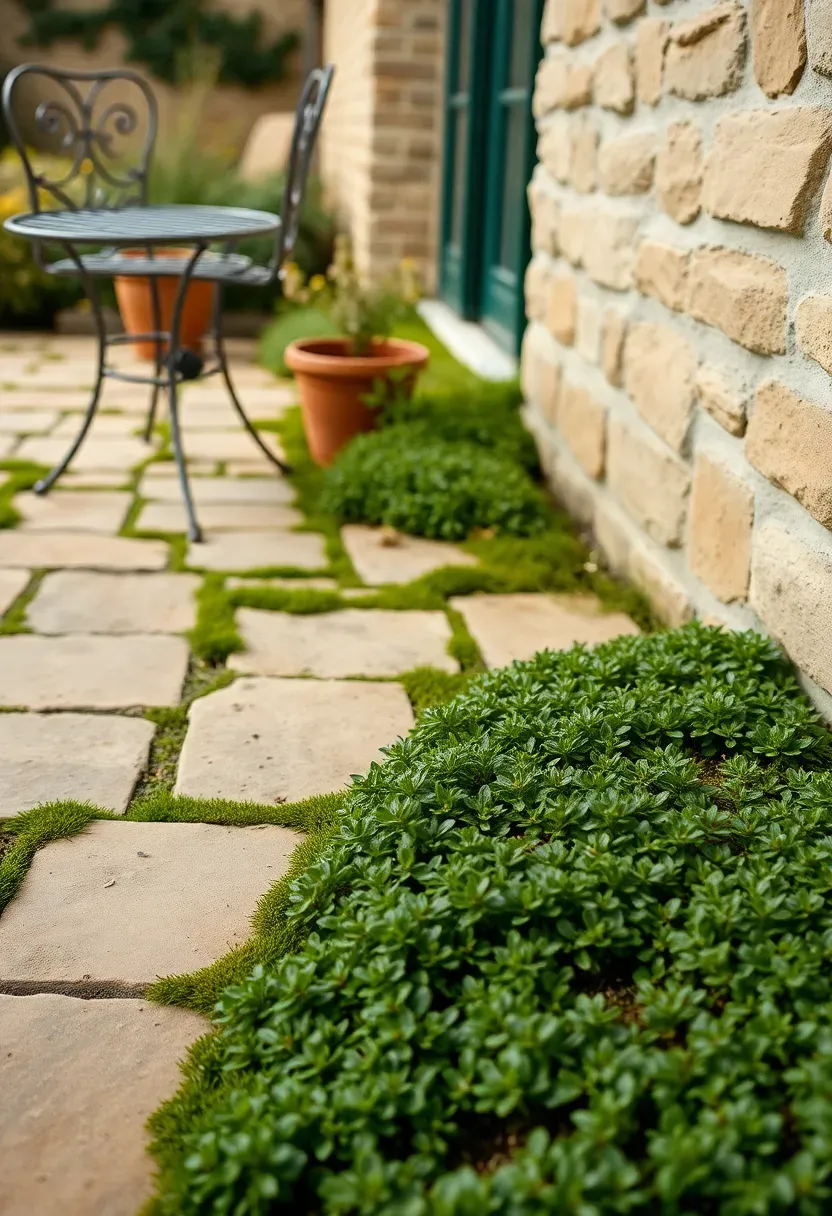
6. Flagstone patio with mossy groundcover joints
A romantic backyard patio design uses irregular flagstone with creeping groundcover planted between joints for a timeless, settled-in look. Choose flagstone in complementary colors—sandstone, bluestone, or quartzite—and lay them with varied gaps from 1-3 inches. Fill joints with drought-tolerant groundcover like creeping thyme, moss, or dwarf mondo grass. These living joints soften the hardscape and create visual texture that changes seasonally. The irregular stone shapes prevent the space from feeling rigid while the planting joints make the patio feel like it's been there for decades.
Recommended
Items for this idea
Install flagstone over a crushed stone base, positioning stones tightly then slightly separating them to create planting pockets. Fill joints with a mix of compost and sand before planting groundcover cuttings. Water frequently until established—typically 6-8 weeks—then reduce as plants fill in. This patio style excels in shaded areas where moss thrives, but sunny locations work with drought-tolerant creeping thyme varieties that release fragrance when stepped on.
Tips
- If you have heavy foot traffic, consider using dwarf mondo grass which holds up better than delicate thyme.
- Then add stepping stones across the patio to protect the most-traveled groundcover areas.
- Avoid using invasive groundcover like English Ivy which can damage stone and structures over time.
Best for: shaded locations and romantic cottage-style gardens.
What this gives you: a patio that looks like it's been part of your landscape for generations.
7. Compact bistro patio for intimate dining
Not every backyard patio design needs to accommodate large groups—a compact bistro patio creates an intimate dining nook in as little as 8x8 feet. The key is scaling everything appropriately: a 36-inch round table with two chairs fits perfectly without crowding. Use continuous paving to maximize the sense of space—large-format pavers or poured concrete reduce visual fragmentation. Surround the patio with lush planting to create privacy and the feeling of being in a secret garden. This design proves that even tiny corners can become magical outdoor rooms. If you're working with limited square footage, our collection of [stylish small patio ideas](/posts/220_25-stylish-small-patio-ideas-cozy-outdoor-vibes/) has even more compact layouts to explore.
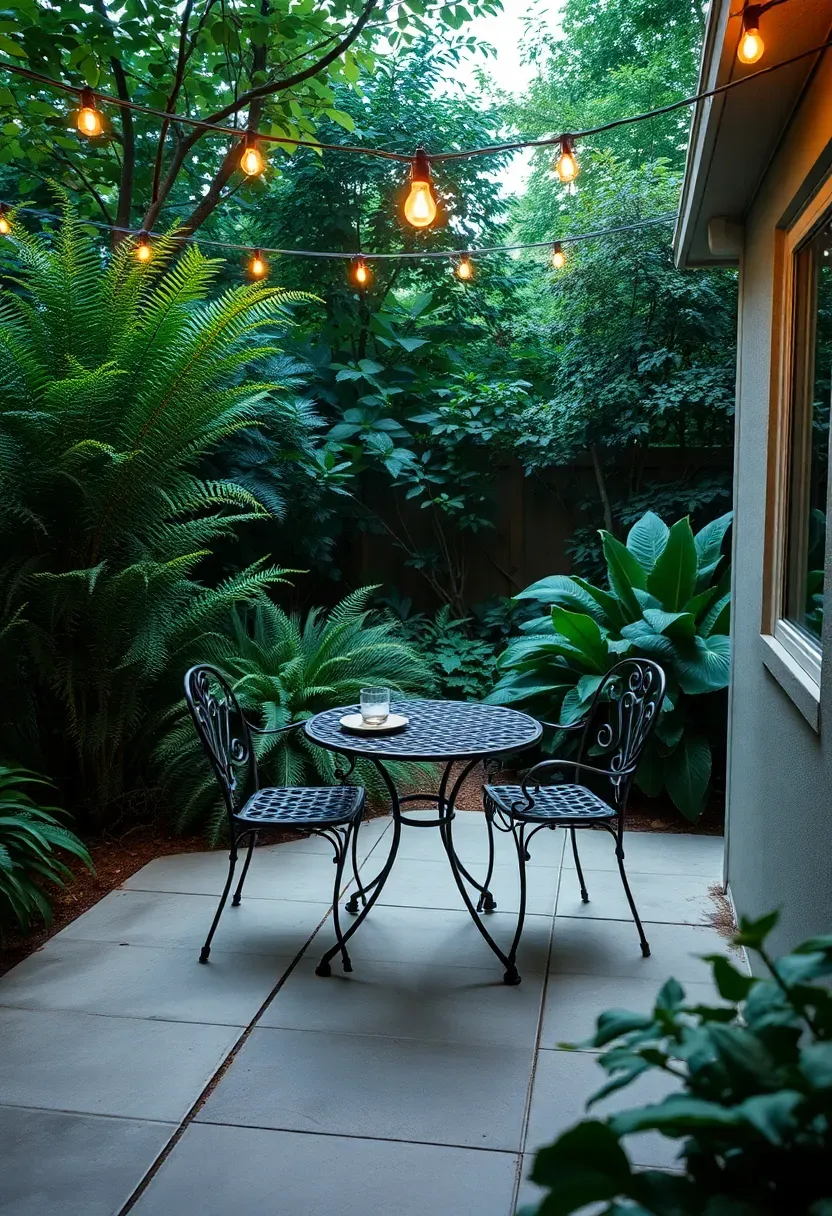
Position the patio to capture the best available light—morning sun for breakfast or evening light for dinner. Vertical space becomes crucial in small footprints—add a wall-mounted trellis or hanging plants to draw the eye upward without consuming floor space. The tight dimensions create coziness rather than claustrophobia when surrounded by softening plants. This patio style works beautifully as a secondary space off a master bedroom or tucked into an unused corner of the yard.
Tips
- Do: choose folding or stackable chairs to create occasional open floor space when needed.
- Don't: place the table in the exact center—offset it slightly to create more interesting circulation and views.
- Do: add a small side table (12-18 inches) for drinks or a potted herb garden.
Rental note: use loose pavers or portable deck tiles to create this patio without permanent construction.
What this gives you: a romantic private retreat for morning coffee or intimate dinners.
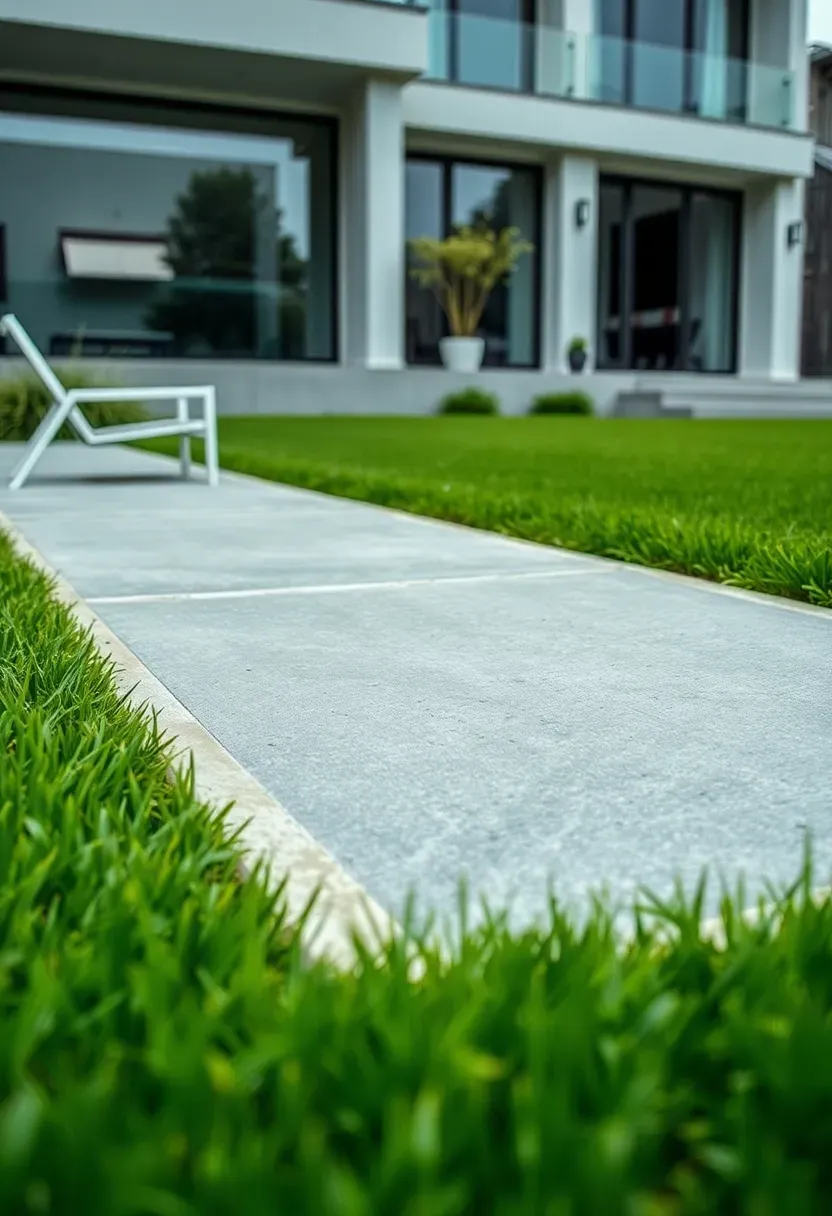
8. Turf-adjacent patio with seamless transition
This backyard patio design eliminates the traditional boundary between hardscape and lawn by setting pavers flush with the grass for a seamless transition. Use large-format pavers (24x24 inches or larger) with narrow 1/4 inch joints that nearly disappear when grass grows to the edges. The effect is a floating carpet of stone that maintains visual continuity across the entire yard. This approach works particularly well for contemporary homes and minimalist landscapes where clean lines dominate. Choose pavers in colors that complement your grass—warm gray with cool-season grasses, buff with warm-season varieties.
Recommended
Items for this idea
The key is meticulous installation—pavers must be set at exactly grass height to prevent tripping and mowing damage. Use a restraint edging hidden beneath the grass line to maintain the sharp edge. This design requires maintaining the grass to the same height across the entire surface for the illusion to work. The result is a unified outdoor space where hardscape and softscape feel like parts of the same continuous plane rather than separate zones.
Tips
- If maintaining grass to the patio edge seems difficult, consider using artificial turf for the transition zone.
- Then add mow-over edging with a flat top to protect both pavers and mower blades.
- Avoid this design if you have uneven grading—the flush installation requires a very level base.
Best for: contemporary homes and minimalist landscapes where clean lines are paramount.
What this gives you: visual continuity that makes your entire yard feel like one expansive room.
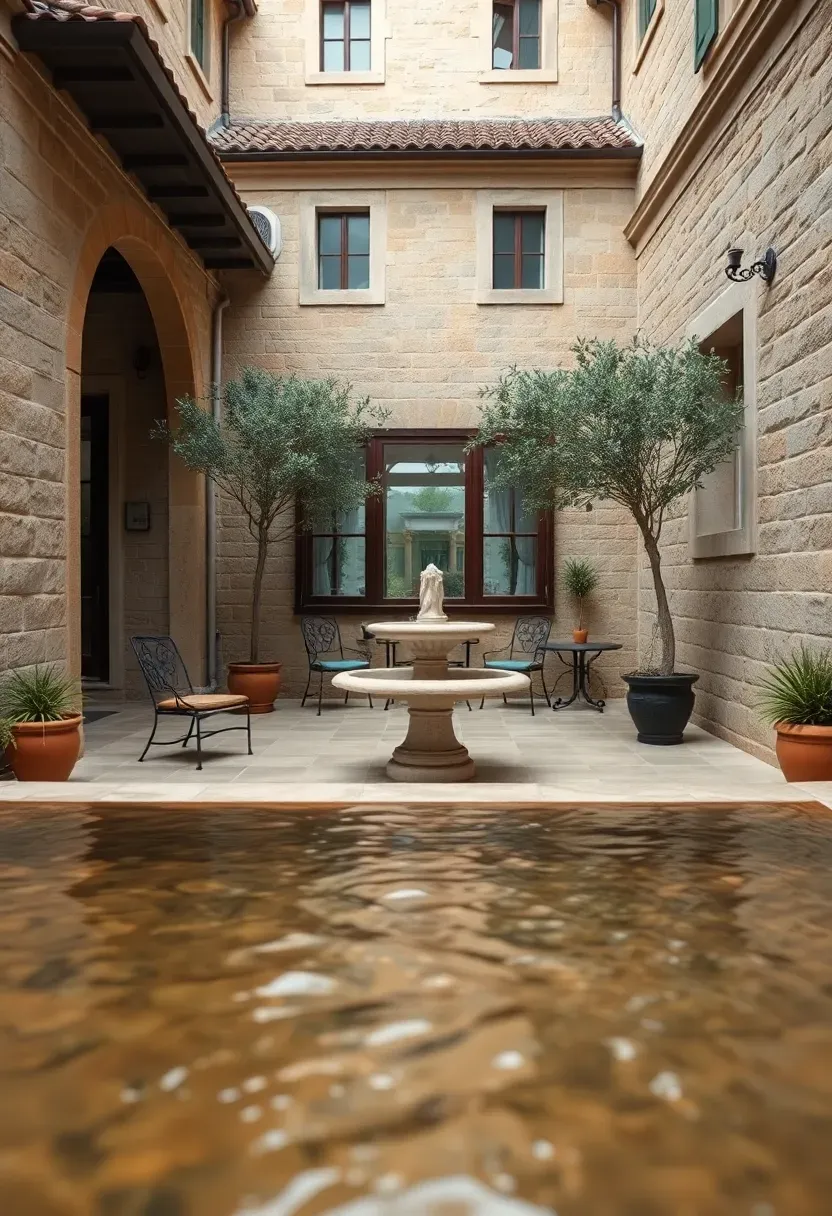
9. Courtyard patio with water feature centerpiece
A backyard patio design modeled after traditional courtyards creates sanctuary by enclosing the space on three sides with walls, fences, or planting. The centerpiece becomes a simple water feature—a bubbling urn, reflecting pool, or modest fountain—that provides soothing sound and draws the eye. Enclosure creates privacy and frames sky above, making even modest dimensions feel intimate. Use the same paving material continuously to blur boundaries between floor and walls. This design excels at creating outdoor rooms that feel completely separate from surrounding distractions.
Placement note: Site the water feature where you'll see and hear it from primary seating—consider how water sound carries and reflects off walls.
The enclosure doesn't need to be tall—4-5 feet is sufficient to create the courtyard feeling while maintaining views and breezes. Use climbing plants on walls to add softness and seasonal interest. The water feature should be sized appropriately to the space—too large feels overwhelming, too small feels insignificant. A recirculating pump keeps maintenance simple while providing constant gentle sound that masks street noise and creates tranquility.
Tips
- Do: include an electrical outlet near the water feature for pump and lighting.
- Don't: place the fountain where prevailing breezes will spray water onto seating.
- Do: add a float valve to maintain water level automatically during hot weather.
- Don't: locate the water feature directly under trees—falling debris creates maintenance issues.
What this gives you: a peaceful retreat where the outside world disappears and water sounds dominate.
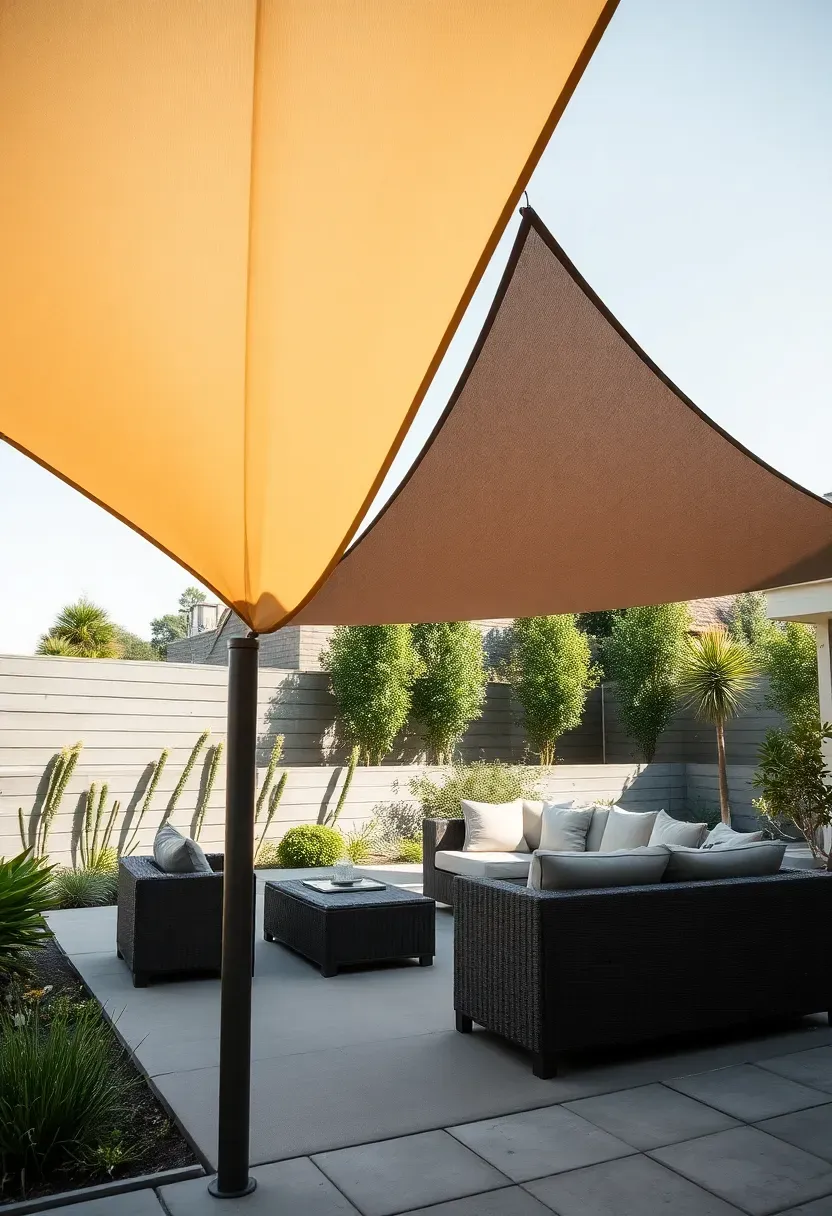
10. Shade sail patio for modern sun protection
This contemporary backyard patio design uses architectural shade sails to create dramatic shadows while providing effective sun protection. Triangular sails tensioned between steel posts create sculptural forms overhead that change throughout the day as light angles shift. Use multiple sails in complementary colors—neutral grays and tans for subtlety, or bold colors for architectural statement. The fabric allows some light transmission while blocking UV, keeping the space comfortable and bright. Unlike solid roofs, sails permit air circulation and maintain connection to the sky above.
Recommended
Items for this idea
Placement note: Orient sails to block peak sun angles for your latitude and season—generally southwest-facing in northern hemisphere.
Steel posts require concrete footings with proper anchoring for the tension loads. Sails install with turnbuckles for tensioning and should be taken down during extreme weather if not rated for high winds. The fabric typically lasts 5-10 years depending on UV exposure and can be replaced independently of the structural posts. This design works particularly well for contemporary homes where the sails echo architectural geometry.
Tips
- Do: slope sails slightly for drainage and to direct rain away from seating areas.
- Don't: attempt DIY installation without engineering input—tension loads are substantial.
- Do: choose UV-rated fabric specifically designed for shade sail applications.
- Don't: ignore local wind ratings—some areas require hurricane-rated installations.
Budget/Time: moderate to high cost depending on size and engineering, typically installed in 1-2 days by professionals.
What this gives you: sculptural shade that transforms sunlight into an architectural element.
11. Brick patio with classic herringbone pattern
A timeless backyard patio design featuring brick laid in a herringbone pattern creates immediate visual texture and traditional appeal. The diagonal orientation of bricks draws the eye through the space while creating interesting shadows across the surface. Use reclaimed bricks for instant patina or new bricks that will develop character over decades. A soldier course border—bricks laid perpendicular to the edge—contains the pattern crisply. The rich red tones of brick warm any space and complement both traditional and modern architecture when paired appropriately.
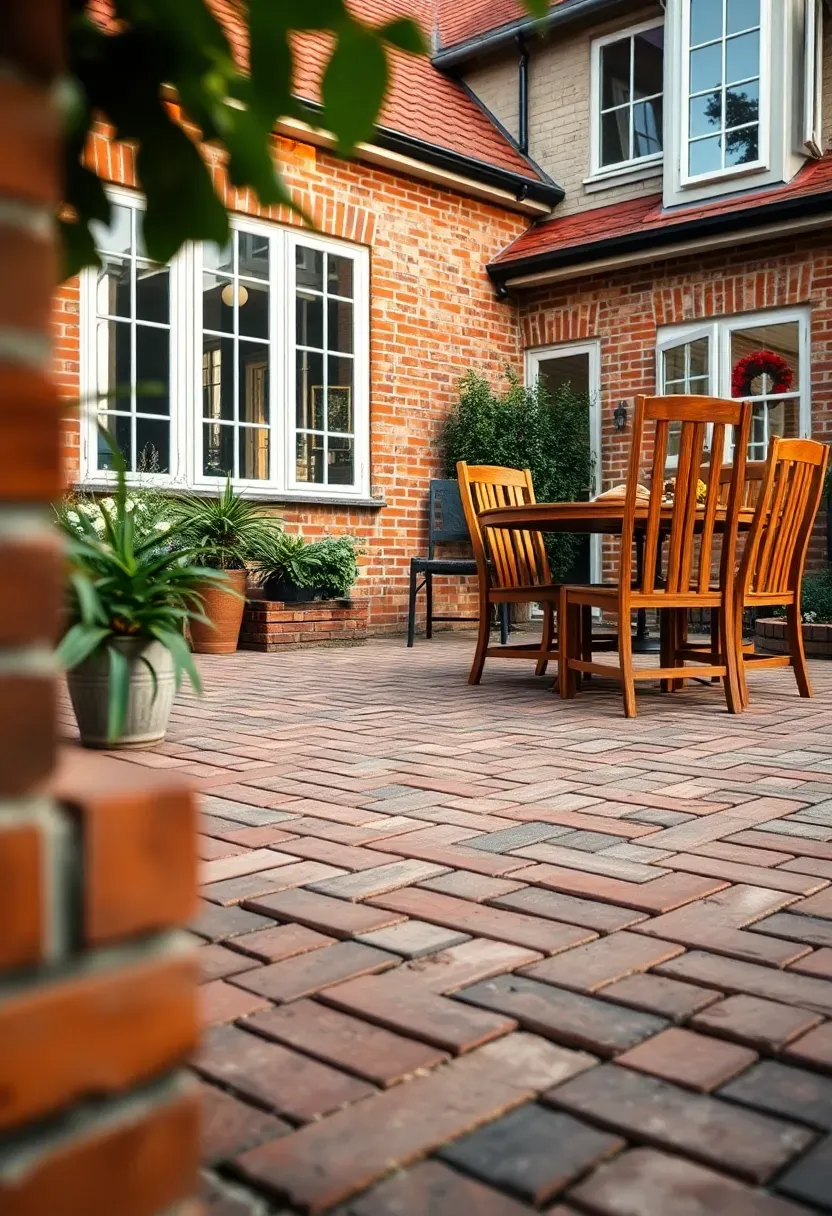
Install bricks over a crushed stone base with sand leveling bed, using plastic edging or concrete restraint to maintain pattern integrity. The herringbone pattern is forgiving on uneven surfaces but requires careful starting alignment for clean edges. Sand joints allow drainage and some flexibility—important for freeze-thaw climates. Seal periodically to reduce moss growth in shaded areas. This patio style feels immediately established and continues improving with age as bricks weather and moss naturally fills joints.
Tips
- Do: use polymeric sand in joints to lock bricks in place and reduce weed growth.
- Don't: use salvaged bricks from unknown sources for driveways—they may not be rated for freeze-thaw cycles.
- Do: choose bricks with consistent sizing for easier installation and tighter joints.
- Don't: forget to include expansion joints every 8-10 feet for larger patios.
What this gives you: classic character that only improves with time and weather.
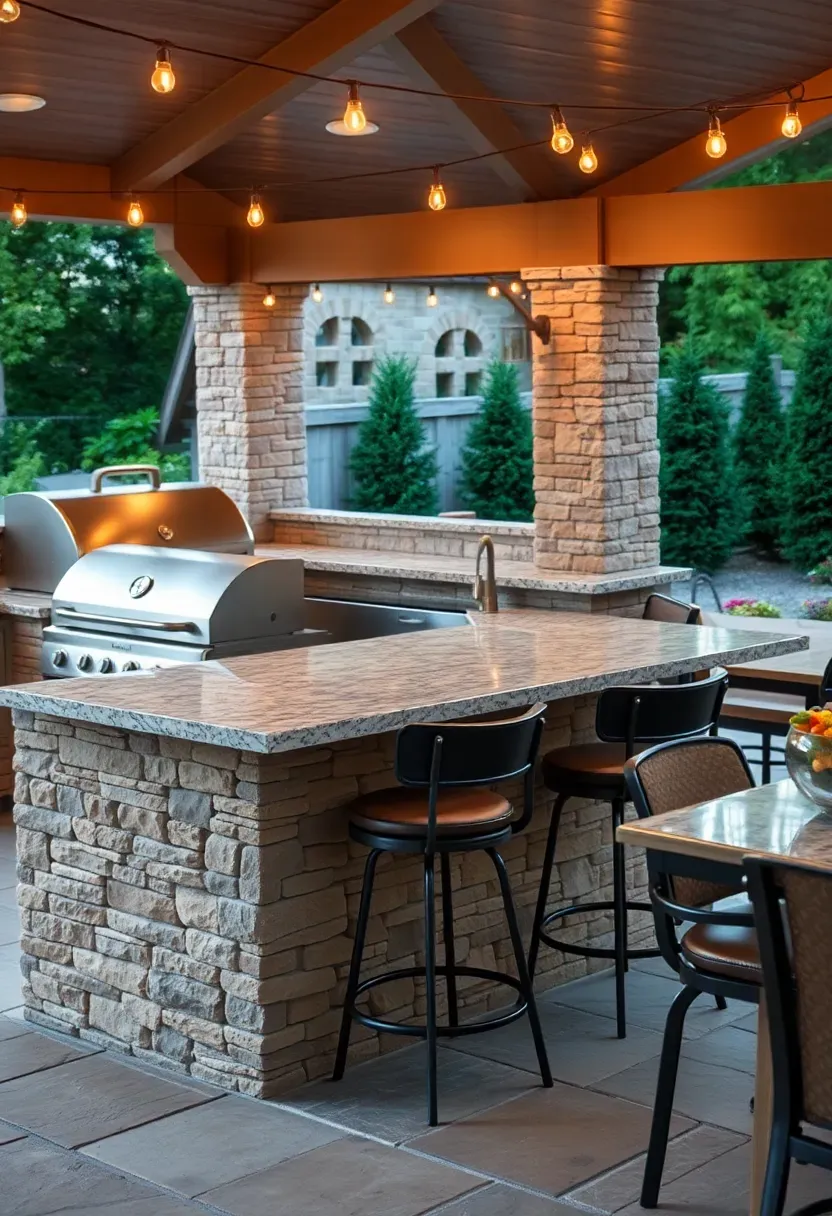
12. Outdoor kitchen patio with bar seating
This functional backyard patio design centers on a full outdoor kitchen with integrated bar seating that makes cooking a social activity. The L-shaped kitchen layout includes a grill, side burners, refrigerator, and prep sink—all arranged to facilitate conversation while cooking. A bar counter on the outer edge invites guests to sit and interact with the cook, blurring the line between kitchen and dining. Use durable countertops like granite or concrete that handle weather and food preparation equally well. The patio becomes an entertainment hub where food preparation and socializing happen simultaneously.
Recommended
Items for this idea
Placement note: Position the kitchen to minimize upwind cooking smoke reaching dining areas—consider prevailing breezes.
Plan utility runs carefully—gas, electric, water, and drain all need to reach the kitchen location. Include adequate task lighting for evening cooking and ambient lighting for dining. Storage is crucial—weather-tight cabinets keep utensils and supplies handy while protected from elements. A cover or shelter extends the kitchen's usable season significantly. The bar counter should be 42 inches high for comfortable seating—6 inches above standard prep counter height.
Tips
- Do: include a trash and recycling drawer to keep the space tidy during gatherings.
- Don't: underestimate the value of shade—cooking in full sun becomes unbearable quickly.
- Do: specify marine-grade or outdoor-rated appliances for durability.
- Don't: forget ventilation—consider a vent hood if the kitchen is under a solid roof.
Budget/Time: high cost due to utilities and appliances, typically 3-6 weeks for professional installation.
What this gives you: an entertainment hub where cooking and socializing happen as one seamless activity.
13. Zen-inspired gravel patio with bamboo screen
A serene backyard patio design drawing from Japanese aesthetics creates a meditative retreat through material simplicity and careful detailing. Decomposed granite or crushed gravel provides a neutral surface that rakes smoothly and drains naturally. A bamboo screen fences one or two sides for privacy while introducing natural texture. The palette stays restrained—grays, greens, and natural wood tones—allowing textures to take precedence over color. Minimal furnishings keep the focus on experiencing the space rather than occupying it. This patio excels at creating a quiet corner for contemplation away from visual stimulation.
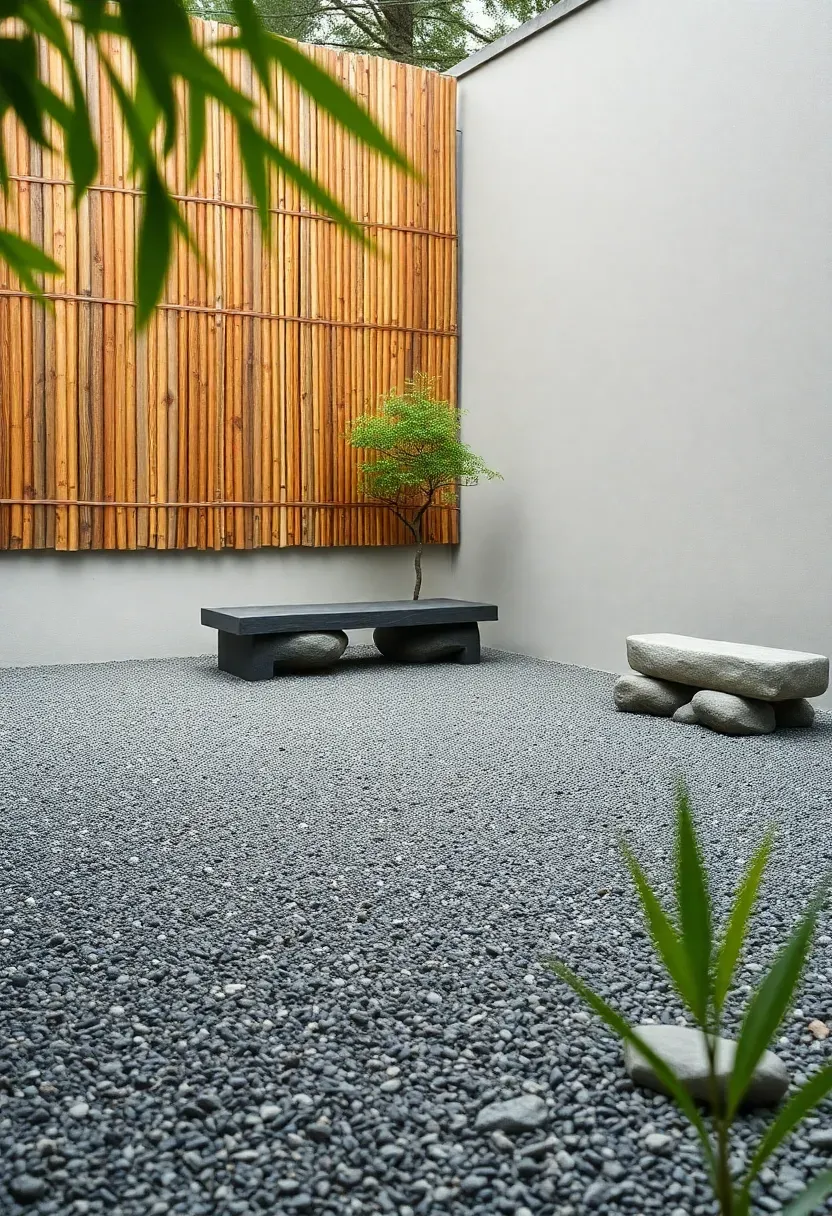
Install the gravel over a compacted base with landscape fabric to prevent mixing with soil beneath. The bamboo screen requires a frame and weather-resistant finish for longevity—expect to refinish every 2-3 years. A single carefully-placed element becomes the focal point—a lantern, stone basin, or specimen tree. The art lies in subtraction rather than addition—each element must earn its place through essential function or beauty.
Tips
- Do: include a simple stone lantern or water basin for subtle focal point.
- Don't: overplant—specimen trees and minimal groundcover are more effective than mass planting.
- Do: rake the gravel in patterns that emphasize movement or draw attention to focal points.
- Don't: introduce too many materials—gravel, bamboo, and stone provide sufficient variety.
Best for: creating a quiet meditation corner away from the main activity areas.
What this gives you: a calming retreat where material simplicity creates space for mental clarity.
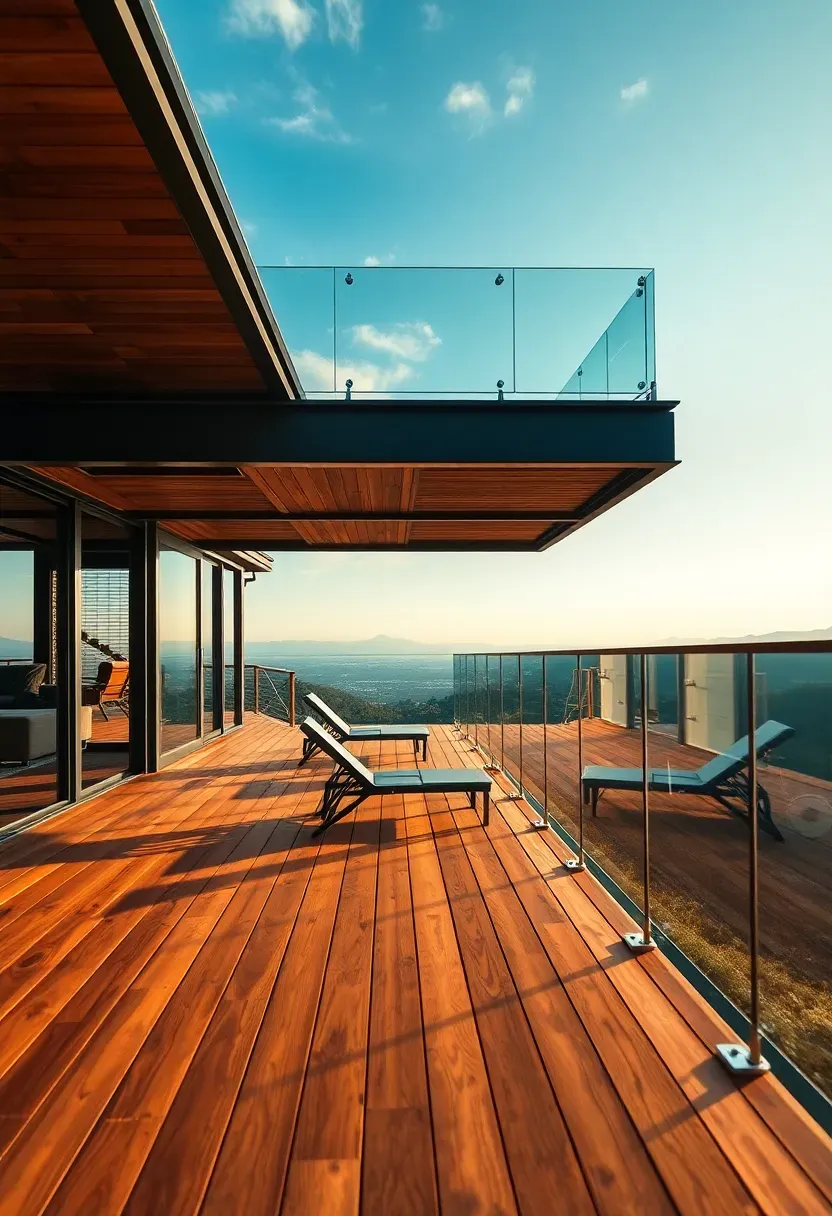
14. Cantilevered patio with scenic overlook
This dramatic backyard patio design extends over a slope or elevation change to capture views while creating architectural interest. The cantilevered structure requires professional engineering but rewards with a floating deck effect that maximizes dramatic views. Use the same materials on top and bottom surfaces to make the structure feel like one continuous plane. A glass cable railing system maintains views while meeting safety requirements. This design transforms an unusable slope into a primary gathering space with the best vantage point on the property.
Recommended
Items for this idea
Professional engineering is non-negotiable for cantilevered structures—soil conditions, loads, and connection details all require calculation. The steel or timber beam structure must be protected from moisture to prevent corrosion. Under-deck lighting can illuminate the slope beneath for dramatic nighttime effect. This design works particularly well on properties with elevation changes where maximizing views is a priority.
Tips
- Do: include adequate lighting on stairs and transitions for safe nighttime use.
- Don't: attempt without professional engineering and permits—this is not a DIY project.
- Do: consider how the space beneath the cantilever can be used or planted.
- Don't: ignore access requirements—every elevated surface needs a code-compliant stair or ramp.
Budget/Time: high cost due to structural requirements and engineering, typically 4-8 weeks for professional construction.
What this gives you: a dramatic viewing platform that turns an unused slope into your property's highlight.
15. Paved patio perimeter with green lawn center
This backyard patio design inverts the typical layout by creating a grassy center surrounded by paved edges—combining the softness of lawn with the functionality of hardscape. The paved perimeter provides a clean surface for furniture and circulation while the grass center offers barefoot comfort and visual relief. A 4-6 foot wide paved border gives sufficient space for chairs and circulation while maximizing the green area. The design works beautifully for irregular spaces where a solid paved surface would feel overwhelming or too permanent.
Placement note: Ensure the grass center receives adequate sunlight for healthy growth—avoid deep shade locations.
Steel or plastic edging separates the lawn from paving cleanly while allowing mowing right to the edge. Consider installing a mow-over strip at the transition to protect both lawn and mower. The grass center can be left open for play or planted with specimen trees for vertical interest. Irrigation is simpler than a fully paved surface—only the lawn center needs regular watering while the paved border stays dry. This design maintains green space even on smaller lots where a traditional lawn might feel too large.
Tips
- If maintaining real grass seems difficult, consider artificial turf for the center for year-round green.
- Then add a simple tree or specimen plant in the lawn center for scale and shade.
- Avoid making the paved border narrower than 3 feet—this prevents comfortable furniture placement.
What this gives you: the best of both worlds—durable outdoor living surfaces surrounded by soft green space.
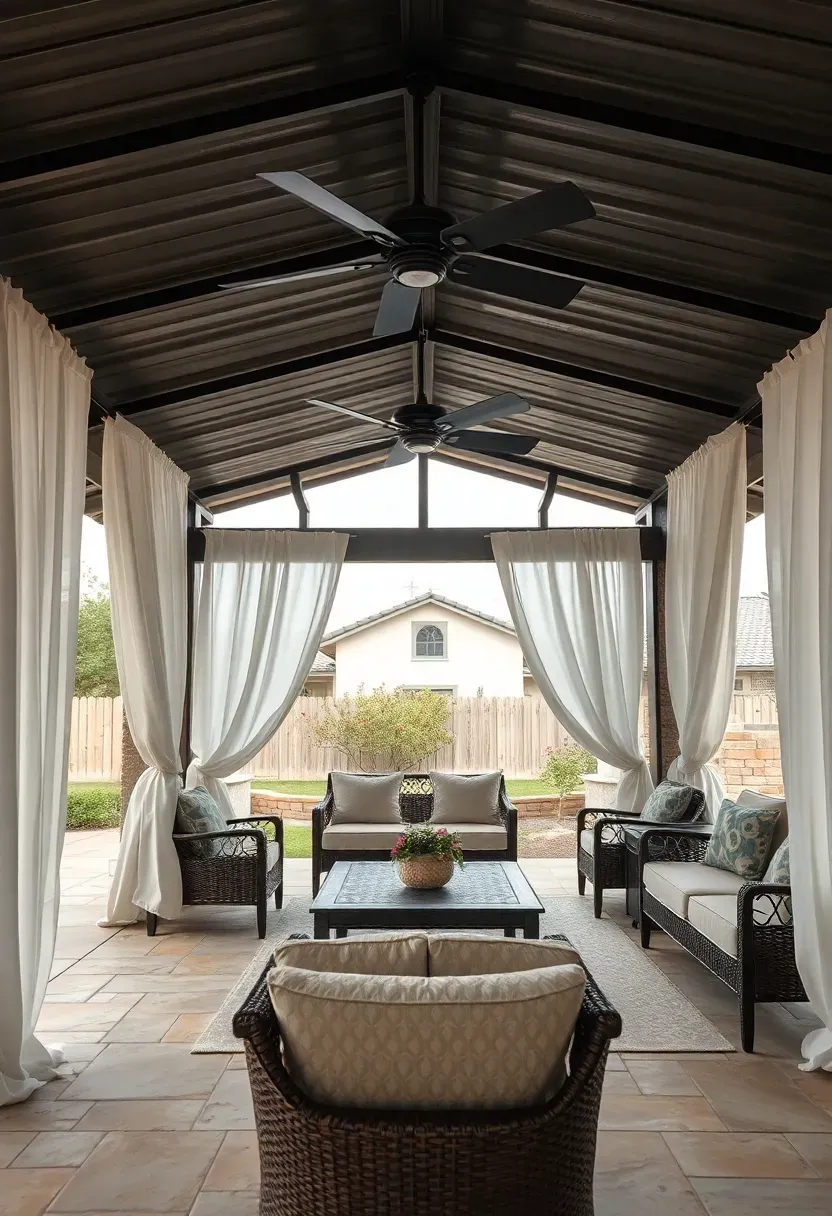
16. Covered patio with ceiling fan and curtains
A backyard patio design featuring a solid roof creates a true outdoor room that extends the home's living space in all weather. The solid roof provides complete shade and rain protection while ceiling fans keep air circulating on hot days. Weather-resistant curtains on two or three sides add privacy, block wind, and create an intimate enclosed feeling when desired. The ceiling height should be at least 9 feet for fan clearance and to prevent the space from feeling cramped. This design essentially creates a secondary living room that just happens to be outdoors.
Recommended
Items for this idea
The roof structure must be properly sized for snow loads and anchored to resist wind. Ceiling fans rated for outdoor use handle moisture and temperature fluctuations. Curtains should use marine-grade or outdoor fabric that won't mildew—sunbrella and similar brands offer excellent fade resistance. Track systems allow curtains to slide easily for flexible configuration. This covered patio essentially adds a fully usable room to your home without the cost of enclosed construction.
Tips
- Do: include electrical outlets for lamps, fans, and entertainment.
- Don't: use indoor ceiling fans—they're not rated for moisture and temperature extremes.
- Do: plan curtain tie-backs for when you want open views and breezes.
- Don't: forget drainage—a solid roof needs gutters and downspouts like any roof.
Budget/Time: moderate to high cost depending on roof size and materials, typically 2-4 weeks for construction.
What this gives you: a weather-protected outdoor room that's usable in rain, shine, and everything between.
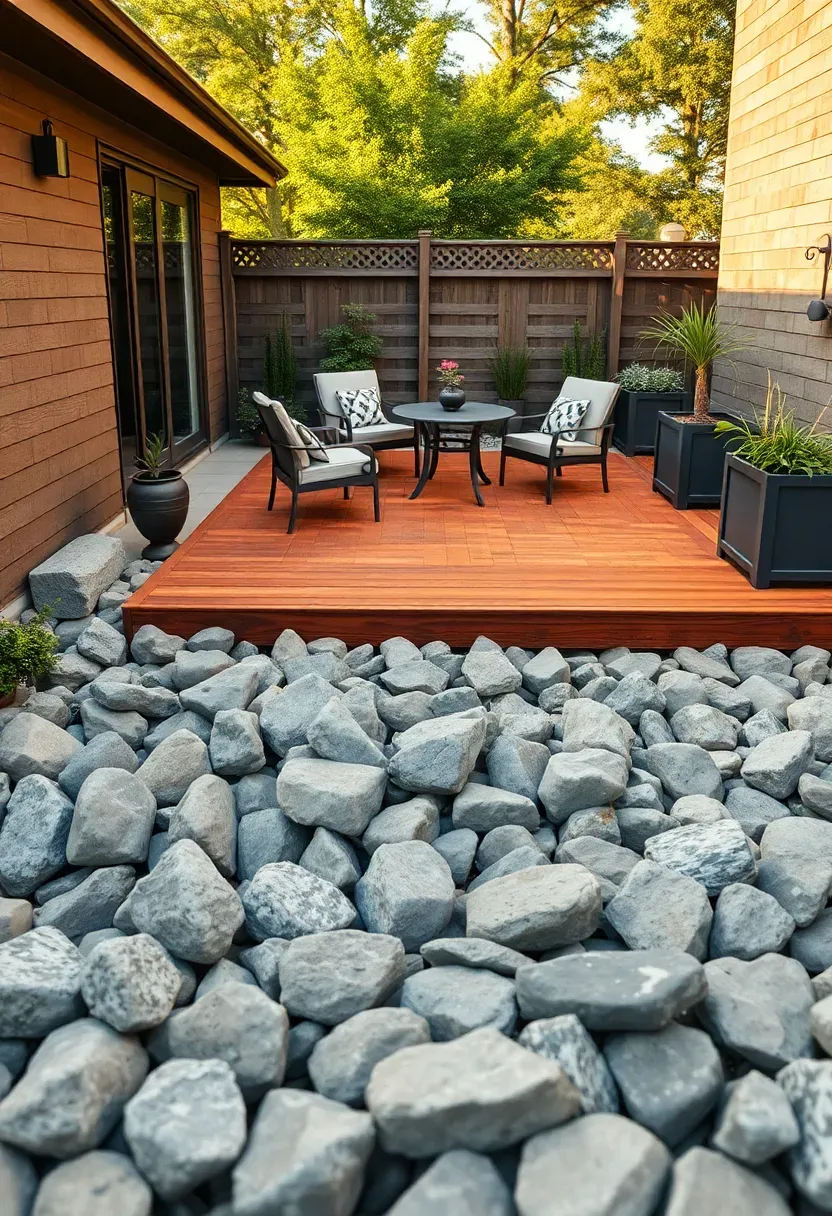
17. River rock patio border with wood deck insert
This textural backyard patio design combines contrasting materials—smooth river rocks and warm wood decking—to create visual interest and define zones. The river rock border (12-18 inches wide) contains a wood deck insert at seating height, creating a raised platform within the larger patio. The stone border provides a casual transition zone and drainage while the deck offers a warm, comfortable surface for furniture. This approach breaks up large expanses of single material while adding visual texture at ground level.
Placement note: Elevate the deck 12-18 inches above the rock border for comfortable seating without steps.
The river rock area should be 4-6 inches deep over landscape fabric to prevent weed growth while allowing drainage. Steel or plastic edging contains both materials cleanly. The deck structure uses standard joists and decking but is framed to sit on the stone border rather than traditional footings. This design works particularly well for creating defined seating zones within larger patio areas or where a change in elevation helps organize the space.
Tips
- Do: use uniform-sized river rocks (2-3 inches) for a more finished look.
- Don't: make the rock border narrower than 12 inches—it loses its visual presence.
- Do: consider outdoor rope lighting under the deck overhang for dramatic nighttime effect.
- Don't: forget drainage—the deck needs gaps or spaces to prevent water pooling on the rock surface.
What this gives you: textural variety that defines zones while maintaining open flow across the patio.
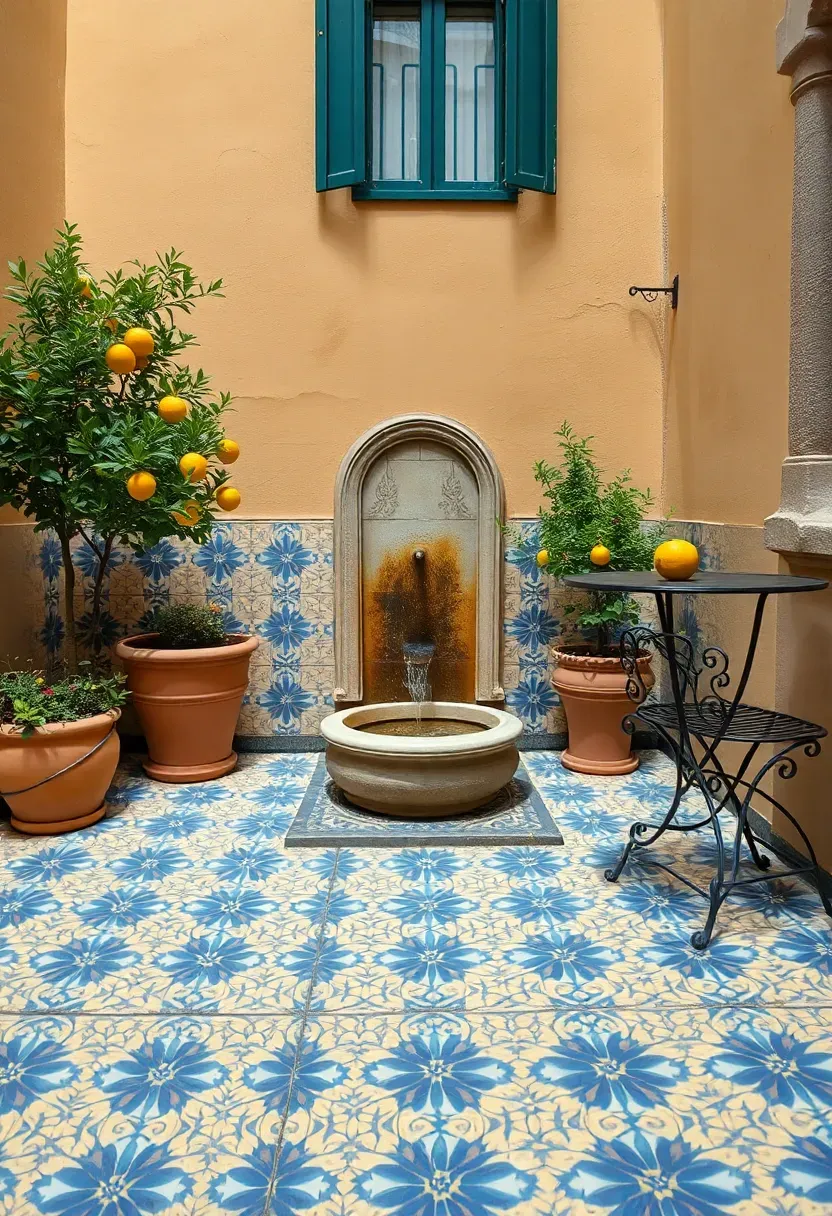
18. Mediterranean tile patio with fountain accent
This vibrant backyard patio design draws inspiration from Mediterranean courtyards with patterned cement tiles that bring color and pattern underfoot. The tiles feature traditional geometric patterns in blues, yellows, and terracottas that create visual richness even in small spaces. A simple wall fountain or freestanding water feature adds the soothing sound of water—a hallmark of Mediterranean outdoor living. Terracotta planters with citrus trees or olive complete the old-world aesthetic. This design proves that outdoor spaces can be as colorful and patterned as interiors.

Recommended
Items for this idea
Cement tiles require sealing immediately after installation and annually thereafter to protect from staining. Install over a mortar bed like ceramic tile for proper support and drainage. The fountain can be a simple wall-mounted design with a recirculating pump—minimal water use for maximum sound and visual benefit. This patio style thrives in hot climates where the tiles stay cool underfoot and the fountain provides evaporative cooling.
Tips
- Do: use a penetrating sealer rather than surface sealer to maintain tile texture.
- Don't: choose patterns that are too busy—let one or two colors dominate with accents.
- Do: include a few plain solid-color tiles as replacements in case of future damage.
- Don't: place the fountain where prevailing breezes will spray onto the tiles or seating.
Best for: hot climates where cool tiles and water sounds create refreshing outdoor comfort.
What this gives you: vibrant character underfoot that brings interior-style pattern to outdoor living.
19. Minimalist concrete patio with fire table
A refined backyard patio design featuring smooth-troweled concrete creates a neutral backdrop that lets architectural elements stand out. The concrete surface can be stained in soft grays or earth tones but maintains monolithic simplicity without joints or patterns. A modern fire table serves as both heat source and focal point—choose a rectangular or circular design in materials that complement the concrete (powder-coated steel, stone, or concrete itself). The fire table anchors the seating arrangement while extending the patio's usefulness well into cool seasons.
Smooth concrete requires expert installation—control joints must be strategically placed to manage cracking while maintaining the monolithic appearance. Consider integral color rather than surface stain for better wear resistance. The fire table should be proportioned to the space—typically 36-48 inches in diameter or length. Propane or natural gas fuel provides clean burning and easy ignition compared to wood. This design excels for contemporary homes where architectural restraint is valued.
Tips
- Do: include a gas line at the fire table location to avoid propane tank visibility.
- Don't: place furniture too close to the fire table—maintain 36 inches minimum clearance.
- Do: use the same concrete mix for any planters or built-ins for material consistency.
- Don't: skip the control joints—uncontrolled cracking will destroy the minimalist aesthetic.
What this gives you: a refined contemporary space where fire becomes a sculptural element.
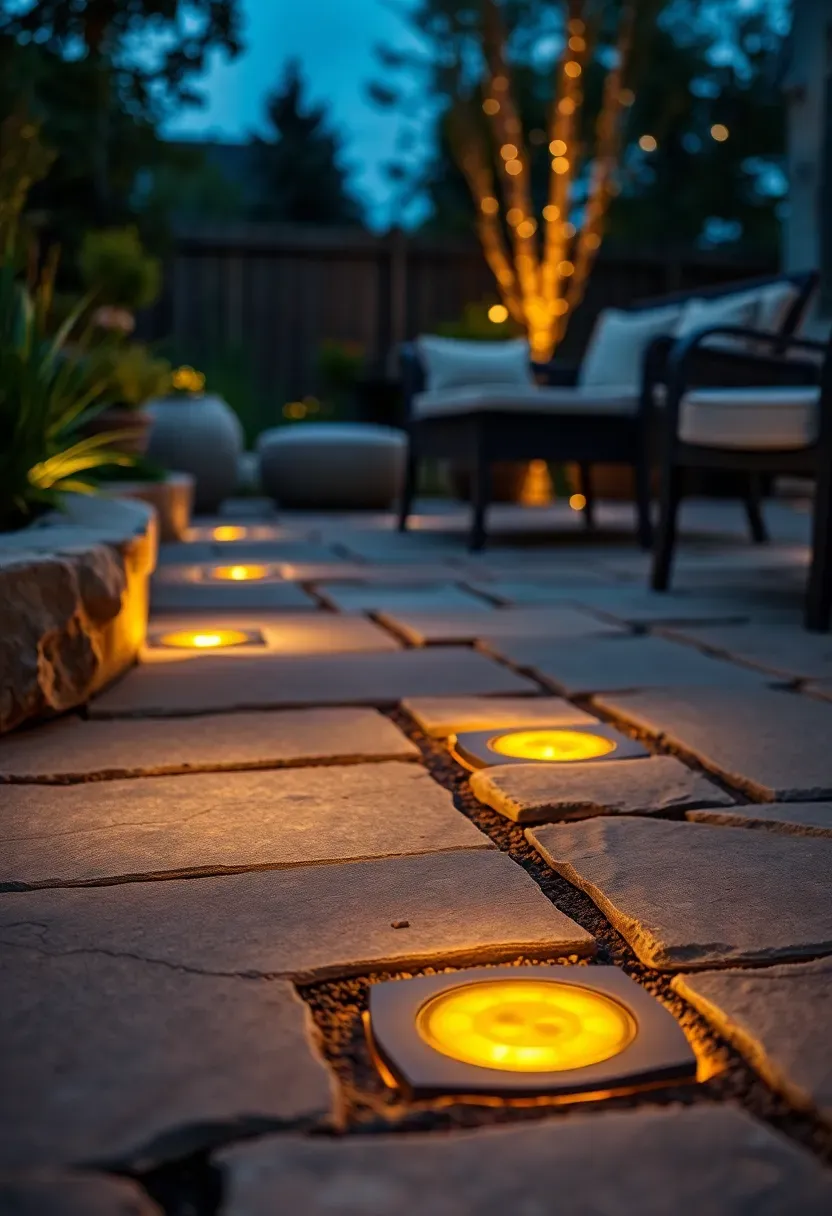
20. Stone patio with embedded LED pathway
This practical backyard patio design incorporates low-voltage LED lights directly into the paving for safe nighttime navigation without adding visual clutter during the day. The lights sit flush with the stone surface, barely visible until dusk when they create dramatic patterns across the patio. Use warm 2700K LEDs to maintain inviting ambiance—cool white feels clinical. Space lights 4-6 feet apart for safe circulation without excessive brightness. The result is a patio that transforms beautifully at night while maintaining clean lines during the day.
Recommended
Items for this idea
Install lights during patio construction—wiring runs beneath the paving in conduit for future maintenance. Use fixtures rated for wet locations and foot traffic. Consider a timer or photocell for automatic operation—the lights should come on at dusk and turn off at bedtime. The lighting design should highlight circulation paths primarily, with secondary accent lighting on features or plantings. This approach provides safety without the visual clutter of surface-mounted fixtures.
Tips
- Do: use a low-voltage transformer with photocell for automatic dusk-to-dawn operation.
- Don't: exceed 3000K color temperature—warmer light feels more inviting outdoors.
- Do: place extra lights at changes in elevation and steps for safety.
- Don't: aim lights toward seating areas—position them to illuminate paths without glare.
Best for: households that use the patio frequently in the evening and value safe navigation.
What this gives you: nighttime safety and ambiance without compromising the patio's daytime appearance.
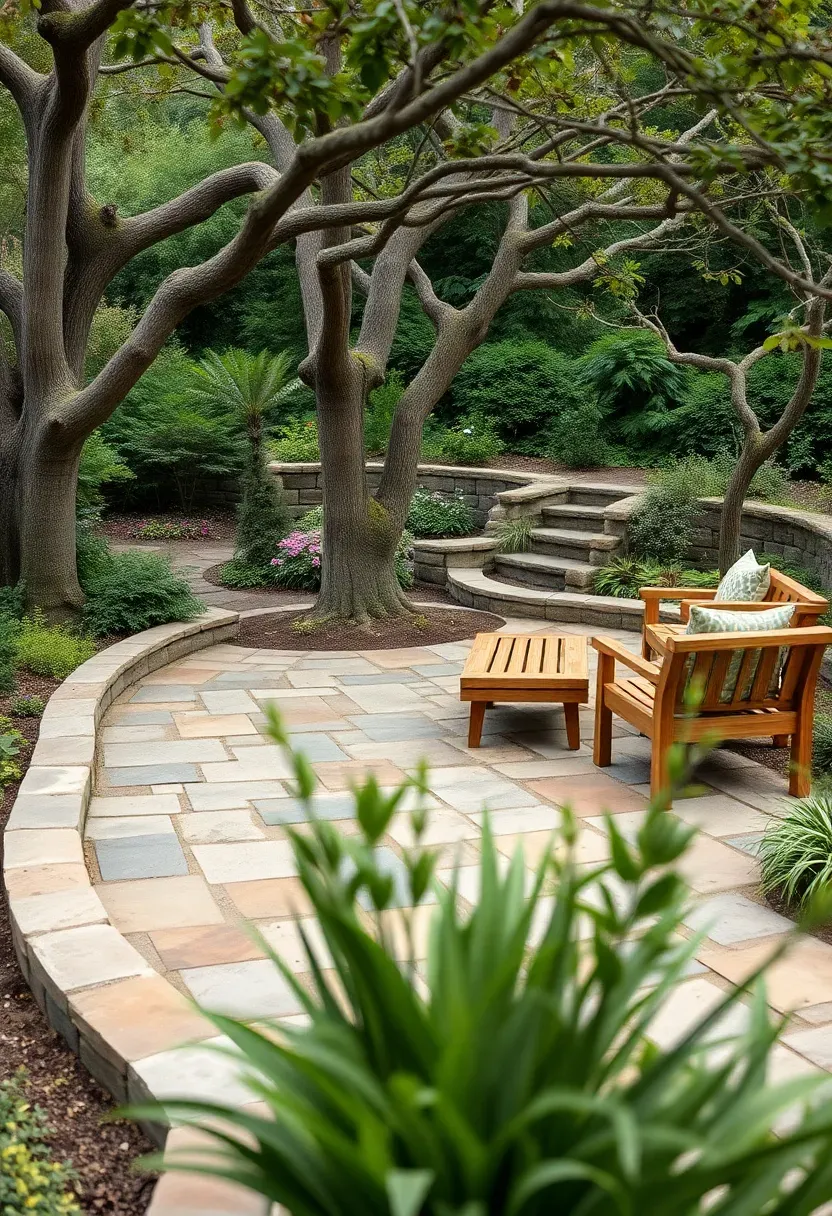
21. Curved patio that follows garden contours
This organic backyard patio design rejects rigid geometry in favor of curves that respond to existing landscape features. The patio edge follows property lines, specimen trees, or grade changes rather than imposing artificial shapes. Curved edges create more perimeter relative to area, increasing the interface between hardscape and planting for a lush, integrated feel. Use flexible paving materials like flagstone or small pavers that accommodate curves without excessive cutting. The result feels as if the patio emerged from the site rather than being imposed upon it.
Placement note: Let existing trees, slopes, and views guide the curve—don't force arbitrary curves into a flat site.
Use a garden hose or rope to lay out curves before beginning construction—adjust until the flow feels natural. Wide curves (minimum 5-foot radius) feel graceful while tight turns feel awkward. Planting pockets in the curve create opportunities for massing perennials or shrubs that soften the edge further. This design approach works particularly well on sloped or irregular sites where rectangular patios would require extensive grading.
Tips
- Do: maintain consistent curve radius rather than wiggling lines—confidence in the curve makes it successful.
- Don't: make curves too tight—generous arcs feel more natural and accommodate furniture better.
- Do: use the curved edge to frame views or create background for specimen plants.
- Don't: ignore furniture layout curves should still accommodate standard dining and seating arrangements.
What this gives you: a patio that feels like a natural extension of your landscape rather than an addition.
These backyard patio designs prove that thoughtful outdoor spaces blend practical layouts, durable materials, and comfortable gathering zones regardless of budget. From minimalist concrete courtyards to romantic flagstone retreats, there's a patio design idea for every climate, style, and yard size. If you're drawn to natural materials, you might also find inspiration in modern concrete applications that bring contemporary polish to outdoor spaces.
The best backyard patio design responds to how you actually live outdoors -- whether that's quiet morning coffee, lively dinner parties, or relaxed family time. Consider sun exposure, prevailing winds, and sightlines when planning, and don't be afraid to start small and expand over time. Even a simple gravel patio with a fire pit can transform an unused corner into the most-loved spot on your property.
About the author
OBCD
CGI visualization and interior design content. We create detailed 3D renders and curate practical design ideas for every room in your home.