25 Shabby Chic Decor Ideas on a Budget for Stylish Interiors
According to recent interior-design surveys, shabby chic remains one of the top searched decorating styles heading into 2026 -- and for good reason. The look thrives on imperfection, which means you do not need a designer budget to pull it off. A weekend at the flea market, a can of chalk paint, and a roll of linen fabric can reshape an entire room. The secret? Embrace wear and tear instead of hiding it. Every scuffed edge and faded cushion adds exactly the kind of character that polished modern decor cannot replicate.
Below you will find a detailed guide covering wall treatments, furniture hacks, textile layering, lighting tricks, and finishing accessories -- all priced for real budgets. We start with foundational pieces and build toward the small finishing touches that tie a shabby chic room together.
Table of Contents
- Chalk-Painted Accent Dresser
- Thrift Store Picture Frame Gallery
- Linen Drop-Cloth Curtains
- Mason Jar Flower Arrangements
- Distressed Wooden Ladder Shelf
- Vintage Doily Table Runner
- Repurposed Window Frame Mirror
- Pastel Painted Wicker Baskets
- Ruffled Pillow Covers from Old Bedsheets
- Whitewashed Pallet Headboard
- Faux Aged Terracotta Pots
- Burlap and Lace Table Centerpiece
- Decoupage Floral Side Table
- Chippy Paint Wooden Crate Storage
- Vintage Teacup Candle Holders
- Rope-Wrapped Pendant Light
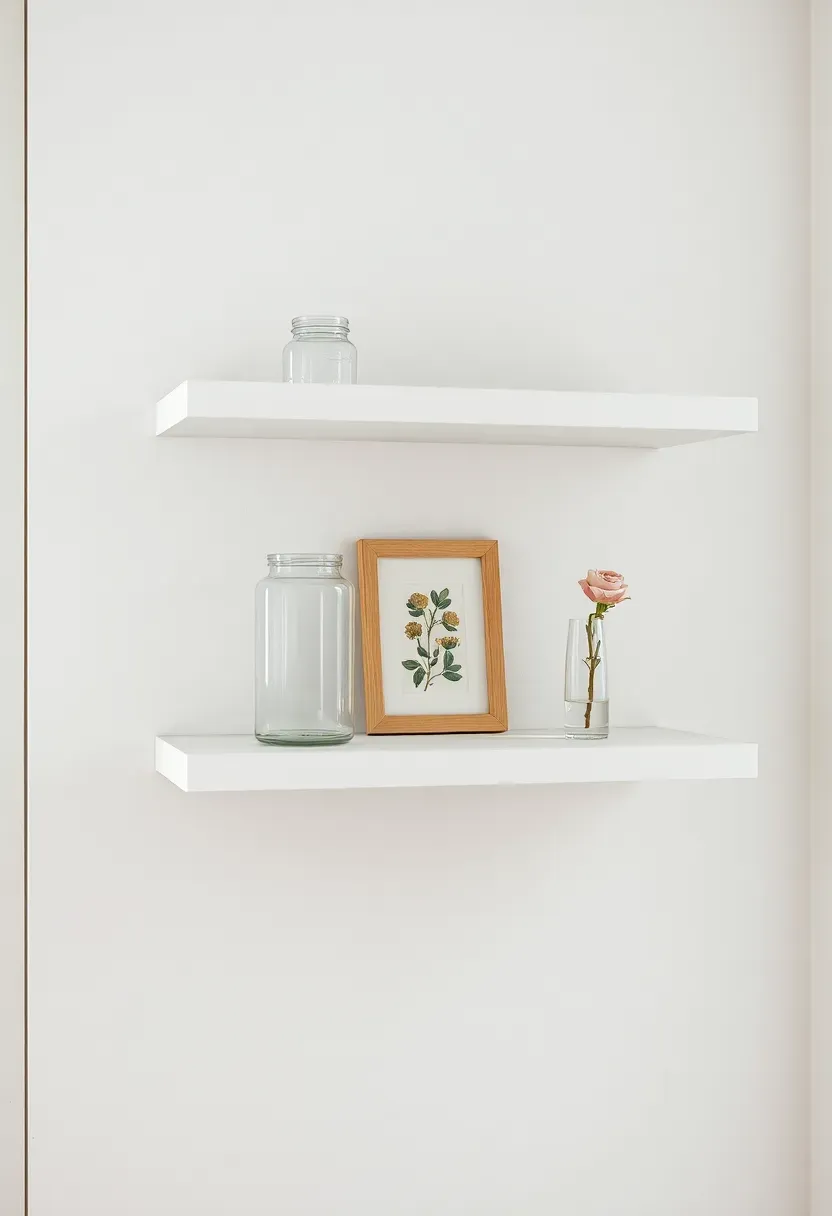
- Sanded-Edge Floating Shelves
- Fabric-Covered Bulletin Board
- Antiqued Brass Drawer Pulls
- Dried Lavender Door Wreath
- Upcycled Suitcase Nightstand
- Milk Paint Kitchen Chairs
- Embroidered Hoop Wall Art
- Crackle-Finish Photo Frames
- Layered Cream and Rose Textile Stack
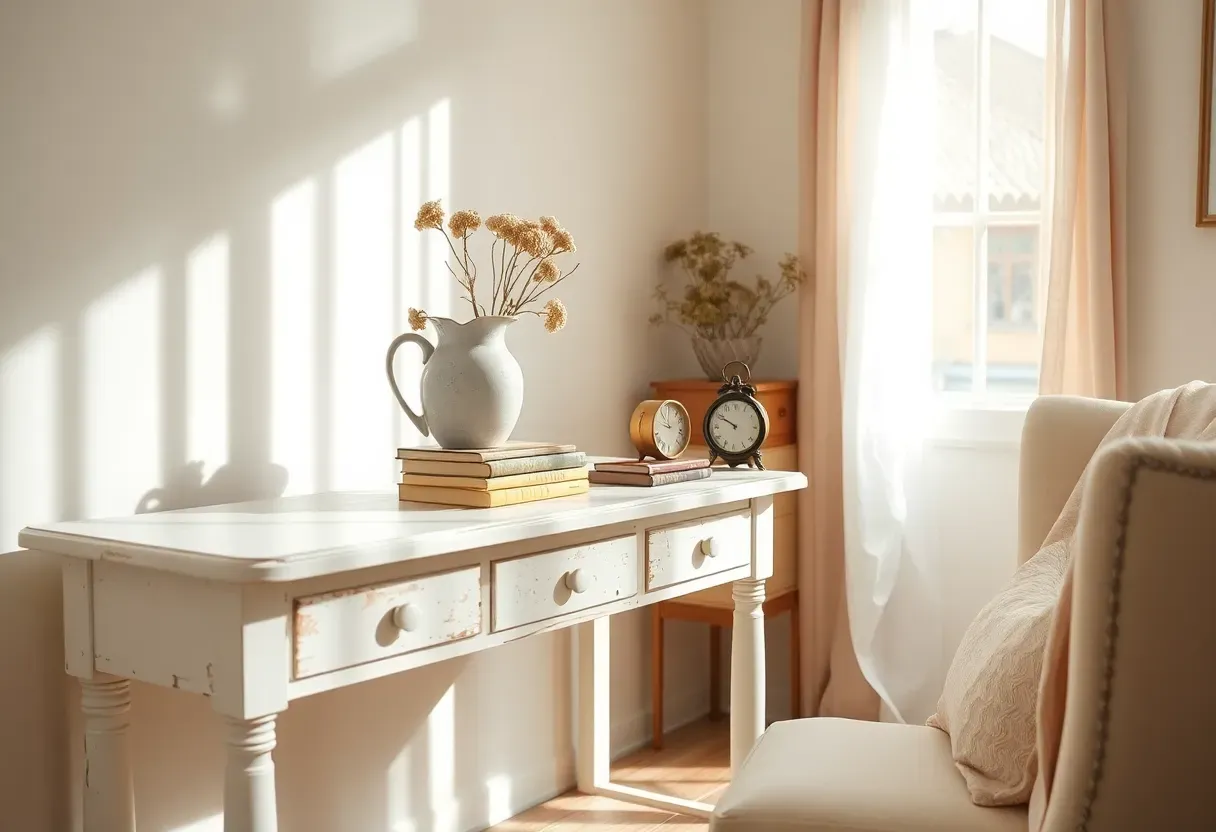
1. Chalk-Painted Accent Dresser
Why This Works on a Budget
An old dresser from a thrift store or yard sale costs a fraction of new furniture, yet chalk paint transforms it into a statement piece within hours. The matte finish hides surface flaws naturally, and you skip the tedious sanding step that regular paint demands. Choose a muted sage, powder blue, or antique white for the most authentic shabby chic feel. A single quart of chalk paint covers most standard dressers with paint to spare.
How to Get the Look
- Wipe down the dresser with a damp cloth and let it dry completely
- Apply two thin coats of chalk paint, letting each dry for about an hour
- Sand edges and corners lightly with 220-grit sandpaper to reveal the wood beneath
What to Watch Out For
- Skip polyurethane -- use clear wax instead for a soft, period-appropriate sheen
- Swap generic hardware for mismatched vintage knobs found at antique malls
We picked a few things that go well with this idea: Shabby Chic Chalk Furniture Paint (8.5 oz) (★4.3), Shabby Chic Metallic Chalk Paint Antique Gold (★4.3) and Shabby Chic Chalk Paint Chalky White (★4.3). As an Amazon Associate we earn from qualifying purchases.
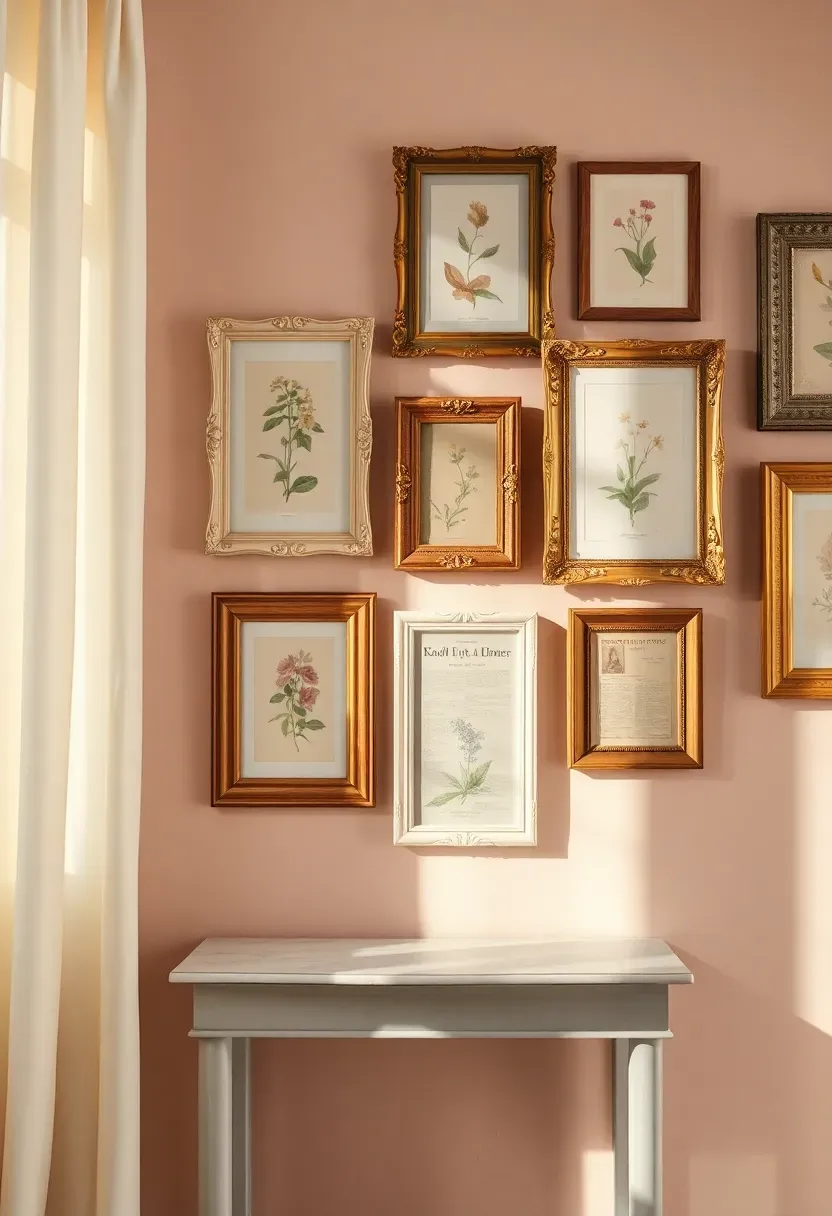
2. Thrift Store Picture Frame Gallery
Nothing captures the collected-over-decades spirit of shabby chic quite like a gallery wall assembled entirely from secondhand frames. Hunt for ornate plaster frames, simple wooden rectangles, and anything with chipped gilding or carved flourishes. Spray them all in a unified palette of cream, ivory, and pale gold, then fill each one with botanical prints, vintage postcards, or pages torn from old gardening books. The gallery tells a visual story that mass-produced wall art never could, and the total cost stays well under twenty dollars if you shop patiently.

We picked a few things that go well with this idea: Maxspace Classic Vintage Distressed Wall Clock (★4.6), XPXKJ Vintage Rotating Double-Sided Vanity Mirror (★4.0) and YOYI Vintage Rose Shabby Chic Tin Sign (★4.4). As an Amazon Associate we earn from qualifying purchases.
3. Linen Drop-Cloth Curtains
The Core Issue
Ready-made linen curtains carry hefty price tags, and custom panels from a decorator cost even more. Meanwhile, painters' canvas drop cloths hang at hardware stores for a few dollars per panel.
The Solution
Wash the drop cloth twice to soften the stiff canvas and shrink it to its final size. Hem the bottom edge with iron-on hem tape -- no sewing machine required. Clip the top edge to curtain rings and hang from a matte black rod. The result looks remarkably like expensive Belgian linen, with a relaxed drape that filters daylight beautifully. The natural oatmeal tone pairs well with every pastel in the shabby chic color wheel.
Pros and Cons
Pros: Costs roughly five dollars per panel; machine-washable; naturally textured Cons: Slightly stiffer than true linen until broken in after several washes
We picked a few things that go well with this idea: Pre-Washed Quilted Ruffle Throw Blanket (50x60) (★4.7), Simple&Opulence Cotton Woven Tassel Throw Blanket (★4.4) and Lush Decor Ella Ruffle Lace Throw Blanket (★4.4). As an Amazon Associate we earn from qualifying purchases.
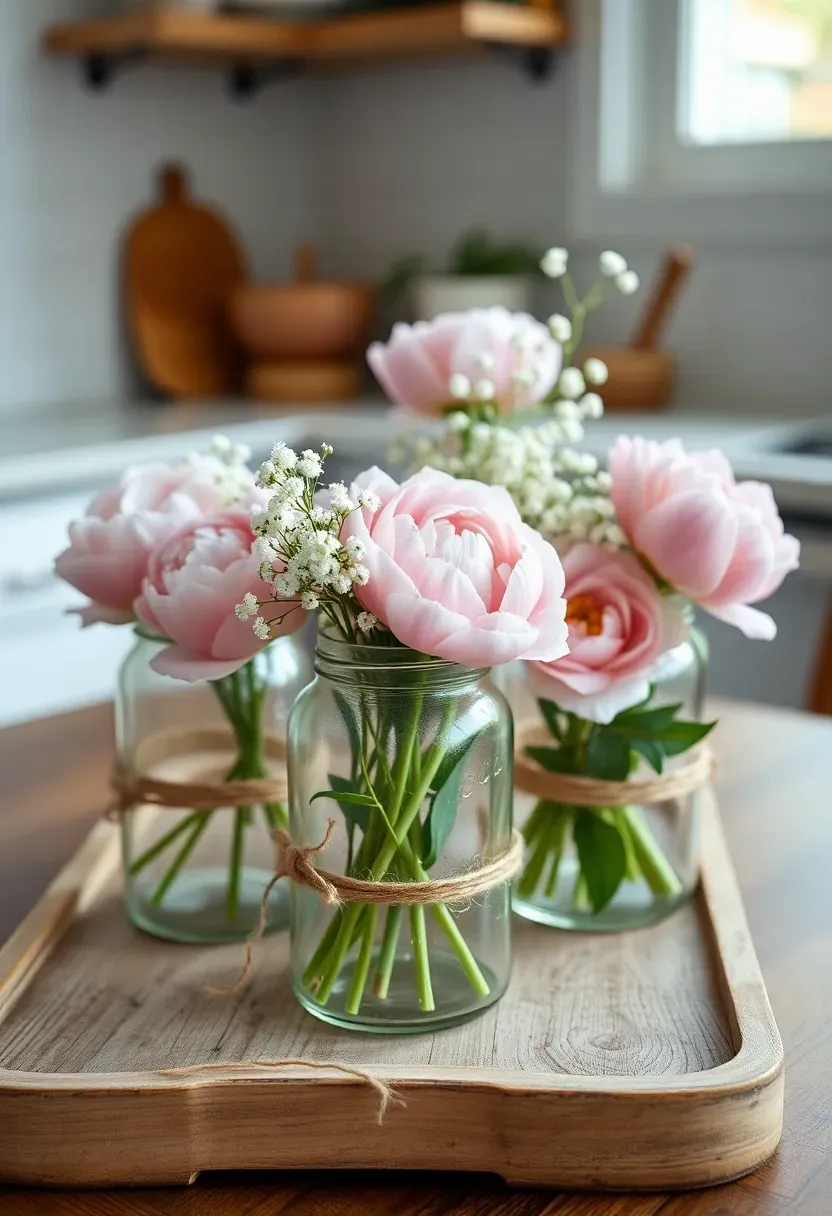
4. Mason Jar Flower Arrangements
Grab a handful of mason jars from the kitchen or pick them up at any dollar store. Wrap each one with a strip of burlap or twine for a rustic accent, or leave the glass bare for a cleaner look. Fill with seasonal blooms from the grocery store -- peonies, garden roses, and ranunculus all carry that romantic shabby chic energy. Group three to five jars on a distressed wooden tray for a centerpiece that looks intentional, costs almost nothing, and takes under ten minutes to assemble. Swap the flowers weekly to keep the display fresh.
Recommended
Items for this idea
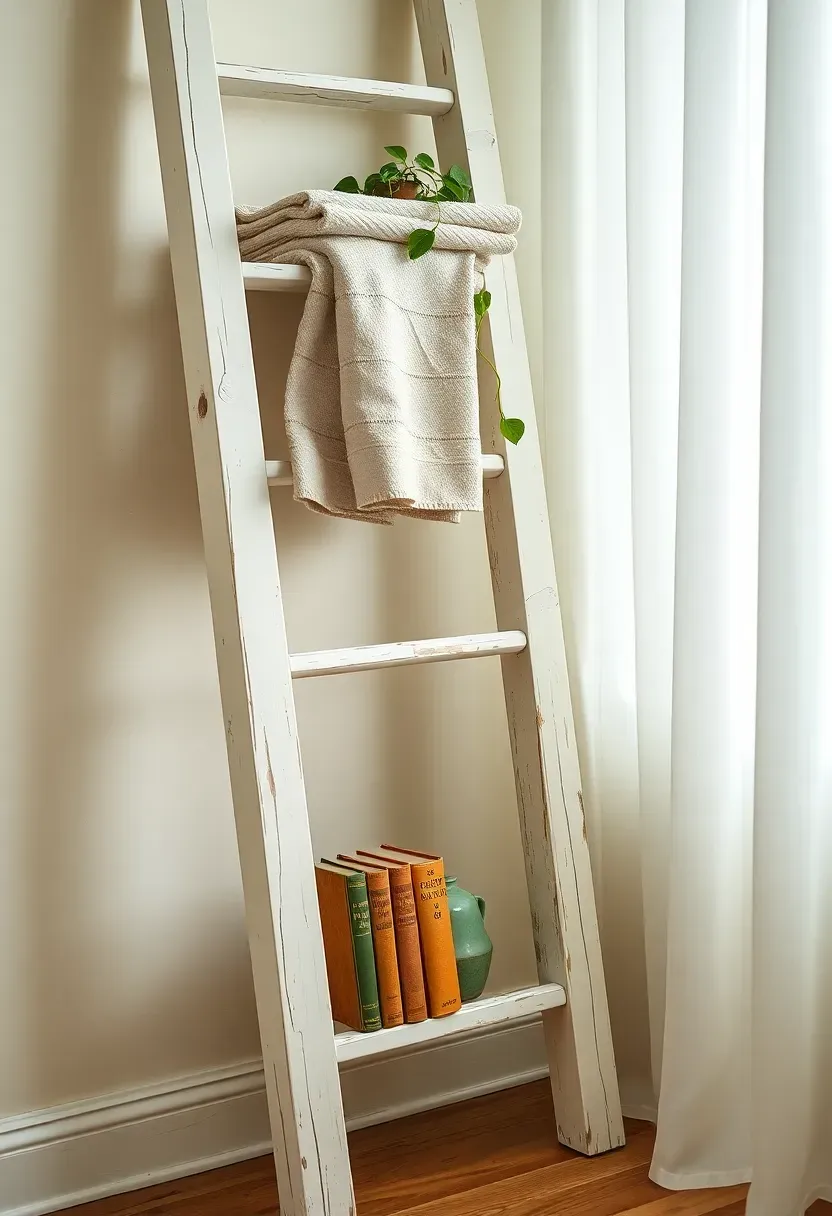
5. Distressed Wooden Ladder Shelf
Step 1: Find the Ladder
Check salvage yards, garage sales, or even your own garage for an old wooden ladder. A five-foot orchard ladder is the ideal height.
Step 2: Prep and Paint
Sand rough spots, then brush on white chalk paint. Let it dry and distress the edges with sandpaper so the raw wood peeks through.
Step 3: Style the Rungs
Drape folded linen towels over one rung, place a trailing pothos on another, and lean vintage hardcovers against the wall on the lowest rung.
What to Watch Out For
- Secure the top of the ladder to the wall with an L-bracket to prevent tipping
- Avoid overloading any single rung -- keep it airy and curated
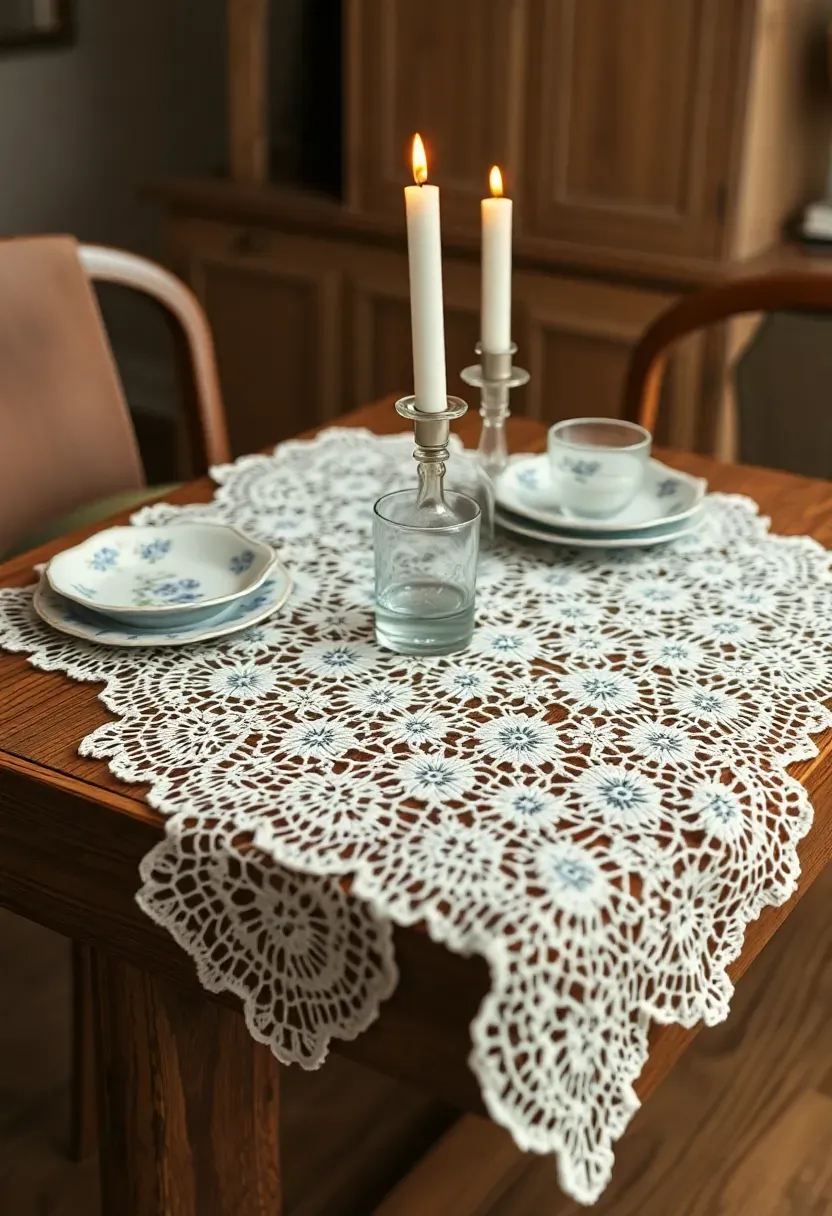
6. Vintage Doily Table Runner
Doilies show up at estate sales for pennies, and most people walk right past them. Collect six to eight doilies in varying sizes, then stitch or pin them together end to end to form a continuous runner. The openwork pattern casts delicate shadows under candlelight, and the handmade quality adds an heirloom texture that no store-bought runner replicates. Pair with mismatched china plates and simple glass votives for a dining setup that feels both elegant and completely affordable.
Recommended
Items for this idea
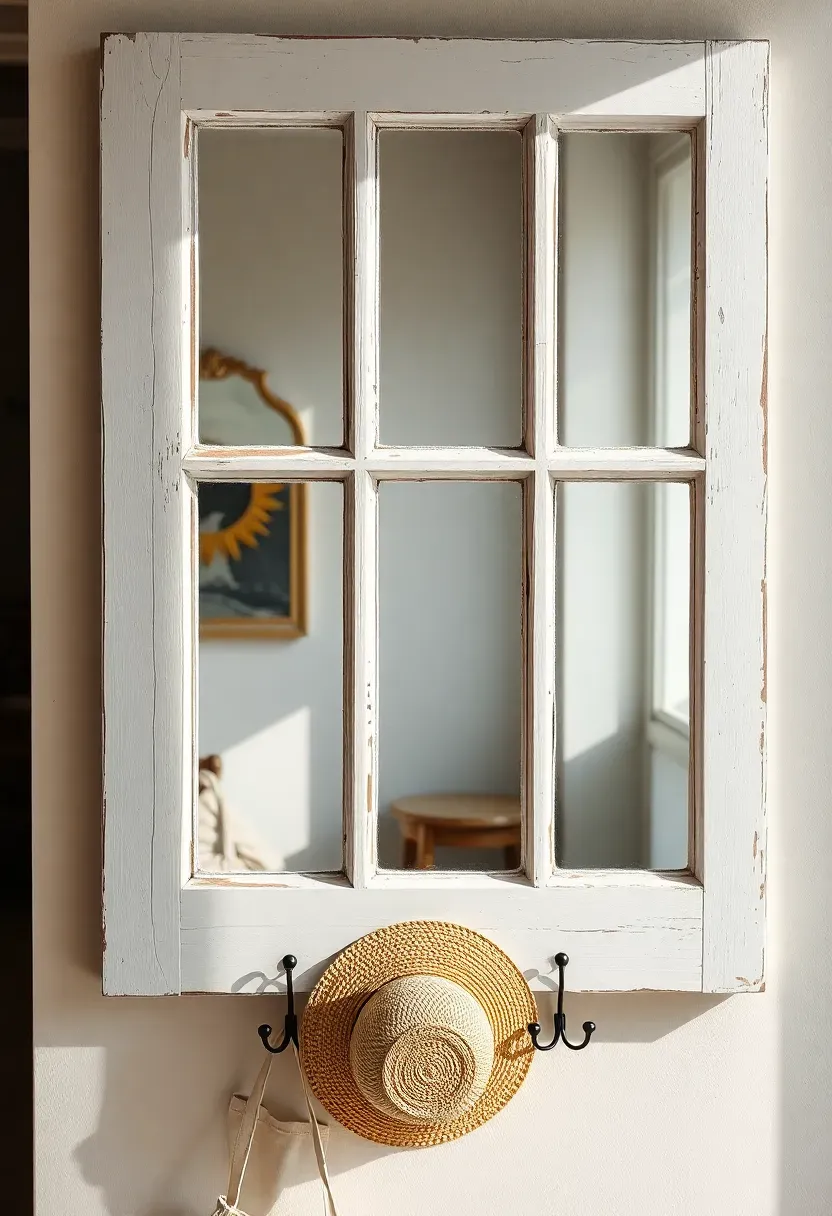
7. Repurposed Window Frame Mirror
Comparing: Buying New vs DIY Salvage
Introduction: A mirror framed in an old window sash gives instant architectural character. The question is whether to buy a reproduction or build your own.
Buying New
Reproduction window-frame mirrors retail for seventy to two hundred dollars. They arrive ready to hang but often look too perfect for authentic shabby chic.
DIY Salvage
An old six-pane window from a salvage yard costs five to fifteen dollars. Have mirror cut to fit each pane at a local glass shop for roughly thirty dollars total. Sand and paint the frame yourself.
What to Choose
Choose new if: you want zero hassle and a guaranteed clean finish. Choose DIY if: you prefer genuine patina and a sixty-percent price drop.
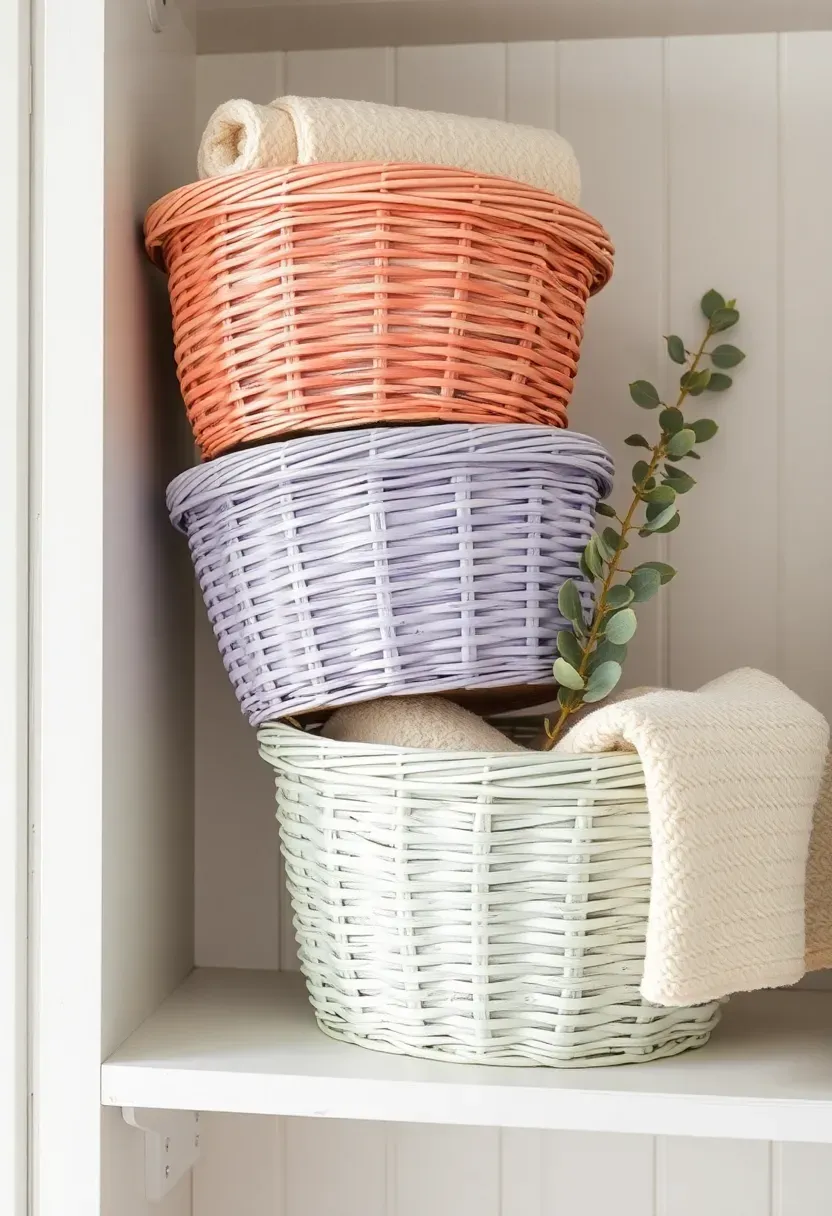
8. Pastel Painted Wicker Baskets
Wicker baskets from thrift stores usually cost a dollar or two. A quick coat of spray paint in blush, lavender, or pale mint reinvents them completely. Use them to organize throw blankets, magazines, bathroom towels, or craft supplies while adding a pop of soft color that aligns perfectly with the shabby chic palette. Stack them on open shelves or tuck them beneath console tables for storage that doubles as decor.
Recommended
Items for this idea
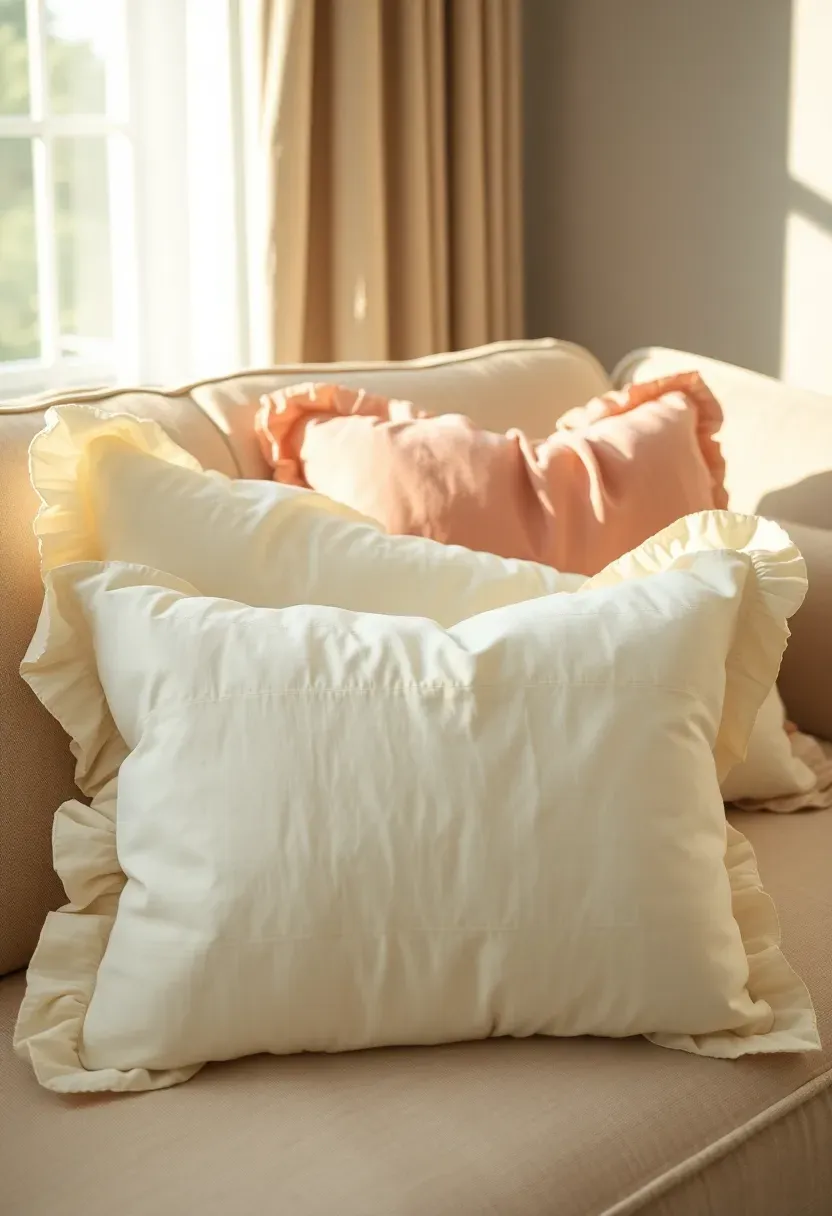
9. Ruffled Pillow Covers from Old Bedsheets
The Core Issue
Decorative shabby chic pillows in stores run twenty to forty dollars each. Buying four or five to fill a sofa adds up fast.
The Solution
Repurpose vintage cotton or percale bedsheets into pillow covers. Cut two squares to size, add a three-inch ruffle strip along the edges, and sew a simple envelope closure at the back. Floral patterns, ticking stripes, and solid pastels all work. The fabric is pre-softened from years of washing, which gives the pillows that lived-in drape you cannot fake with new material. Total cost per pillow: roughly two dollars if you already own a basic sewing machine.
Pros and Cons
Pros: Extremely affordable; infinitely customizable; washable at home Cons: Requires basic sewing skill; vintage sheets may have thin spots
10. Whitewashed Pallet Headboard
Shipping pallets turn up free behind warehouses and retail shops -- always ask before taking. Disassemble the pallet boards, sand them smooth, and apply a thin whitewash of diluted latex paint mixed fifty-fifty with water. Mount the boards horizontally behind the bed frame using French cleats. The rough grain texture and uneven white coating capture that perfectly imperfect shabby chic aesthetic. Add a strand of fairy lights across the top edge for a soft glow that replaces a traditional bedside lamp.
Recommended
Items for this idea
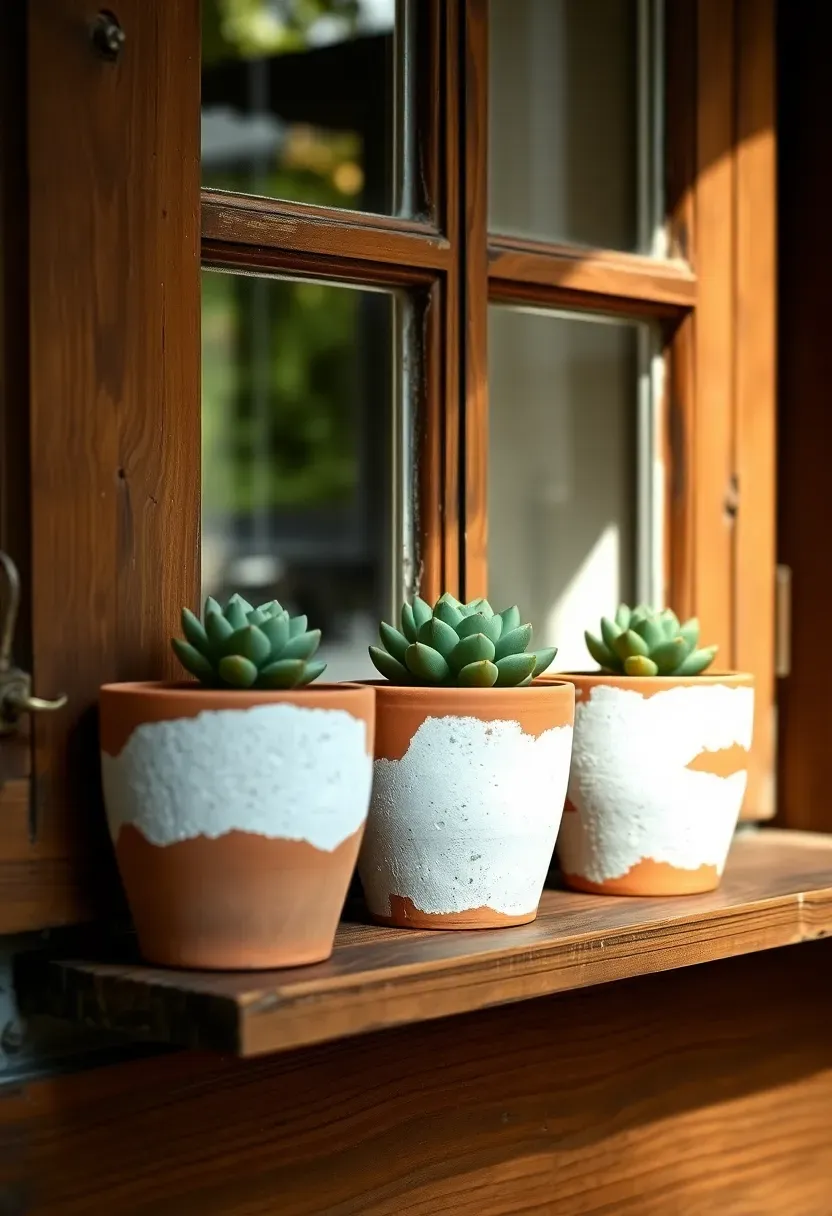
11. Faux Aged Terracotta Pots
Step 1: Gather Supplies
Pick up inexpensive terracotta pots from a garden center. You also need white acrylic paint, baking soda, and a stiff brush.
Step 2: Mix the Paste
Combine equal parts white acrylic paint and baking soda into a thick paste. The baking soda creates a gritty, chalky texture that mimics mineral deposits.
Step 3: Apply Unevenly
Dab the mixture onto the pots in random patches. Let some areas stay bare while building up heavier layers in others.
What to Watch Out For
- Work in thin layers -- you can always add more, but scraping off excess is tedious
- Group pots in odd numbers for the most visually balanced display
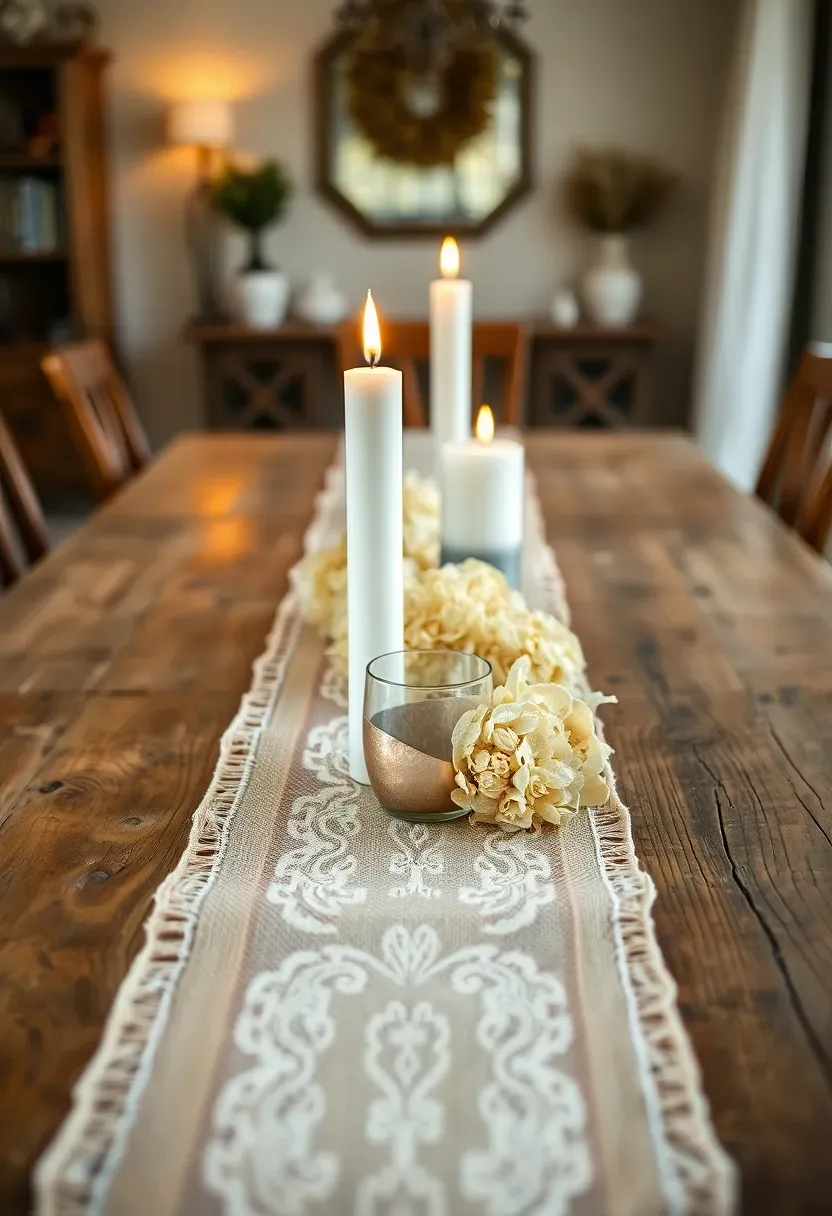
12. Burlap and Lace Table Centerpiece
This pairing captures the essential tension of shabby chic: rough against refined. Start with a strip of natural burlap running down the center of your table. Layer a narrower band of cream lace directly on top. Place white pillar candles, mercury glass votives, and a small cluster of dried hydrangeas along the length. The materials cost under ten dollars total, yet the arrangement looks pulled from a French countryside wedding. Switch the flowers seasonally -- dried lavender in summer, dried roses in autumn -- to keep the centerpiece feeling current.
Recommended
Items for this idea
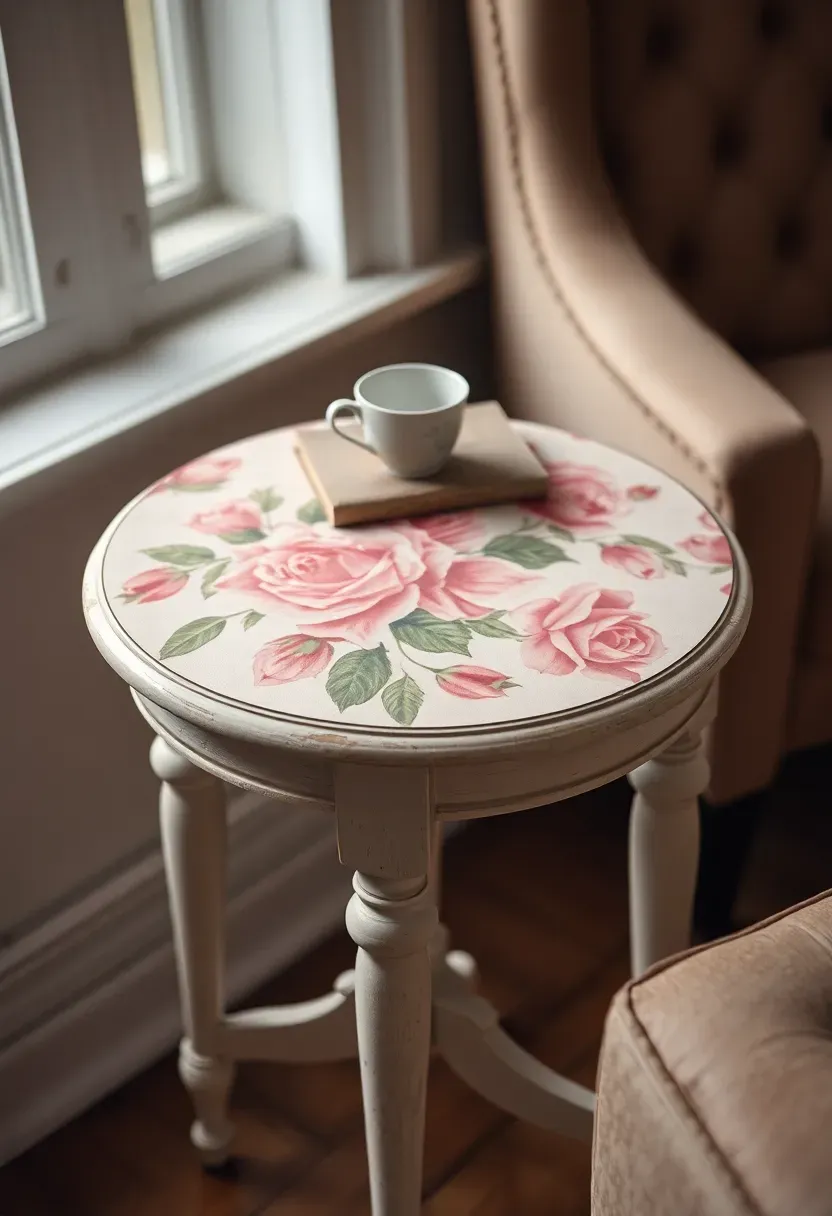
13. Decoupage Floral Side Table
Origins of the Technique
Decoupage dates back to 17th-century Venice, where craftsmen layered paper cutouts under heavy coats of lacquer to imitate expensive inlay work. The method traveled through France and England, picking up romantic motifs along the way.
Modern Interpretation
Today, a three-dollar side table from a thrift store becomes a focal accent with nothing more than floral wrapping paper and Mod Podge. Paint the legs in antique white, then adhere the paper to the tabletop with an even coat of decoupage medium. Seal with two to three protective layers. The vintage rose or peony prints common in gift wrap sections are tailor-made for shabby chic and cost far less than specialty decoupage papers.
How to Apply at Home
- Sand the table lightly before painting to help adhesive grip
- Trim paper edges precisely with a craft knife after the glue dries
- Use a brayer or credit card to smooth out air bubbles during application
- Top with a matte varnish to avoid unwanted shine
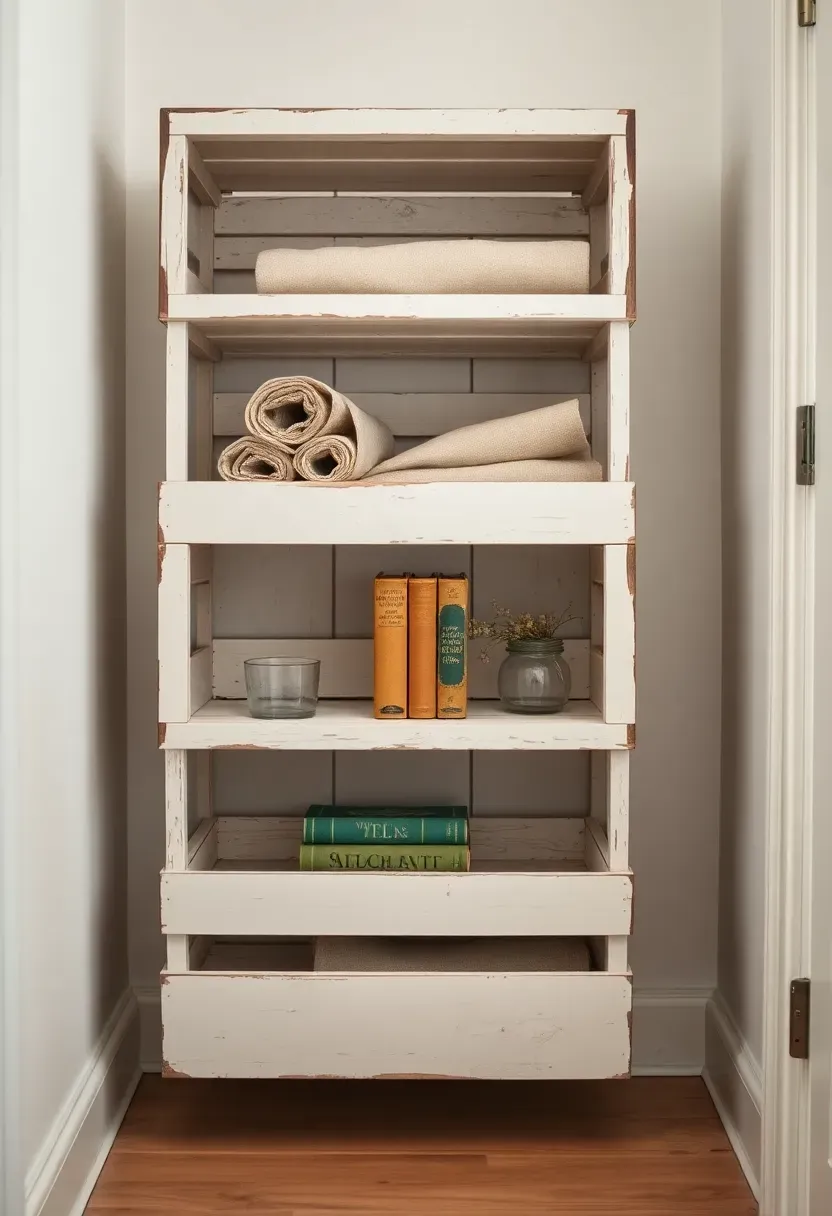
14. Chippy Paint Wooden Crate Storage
Wooden crates from craft stores or wine shops serve as instant open-face shelving when mounted on a wall or stacked on the floor. Paint each crate in off-white, let it dry fully, then attack the edges with coarse sandpaper until raw wood shows through. The deliberate wear suggests these crates lived in a French potting shed for decades. Fill them with rolled linen napkins, vintage paperbacks, small potted herbs, or glass jars of dried flowers. Total investment per crate hovers around four dollars -- less if you salvage them from a winery or grocery store.
Recommended
Items for this idea
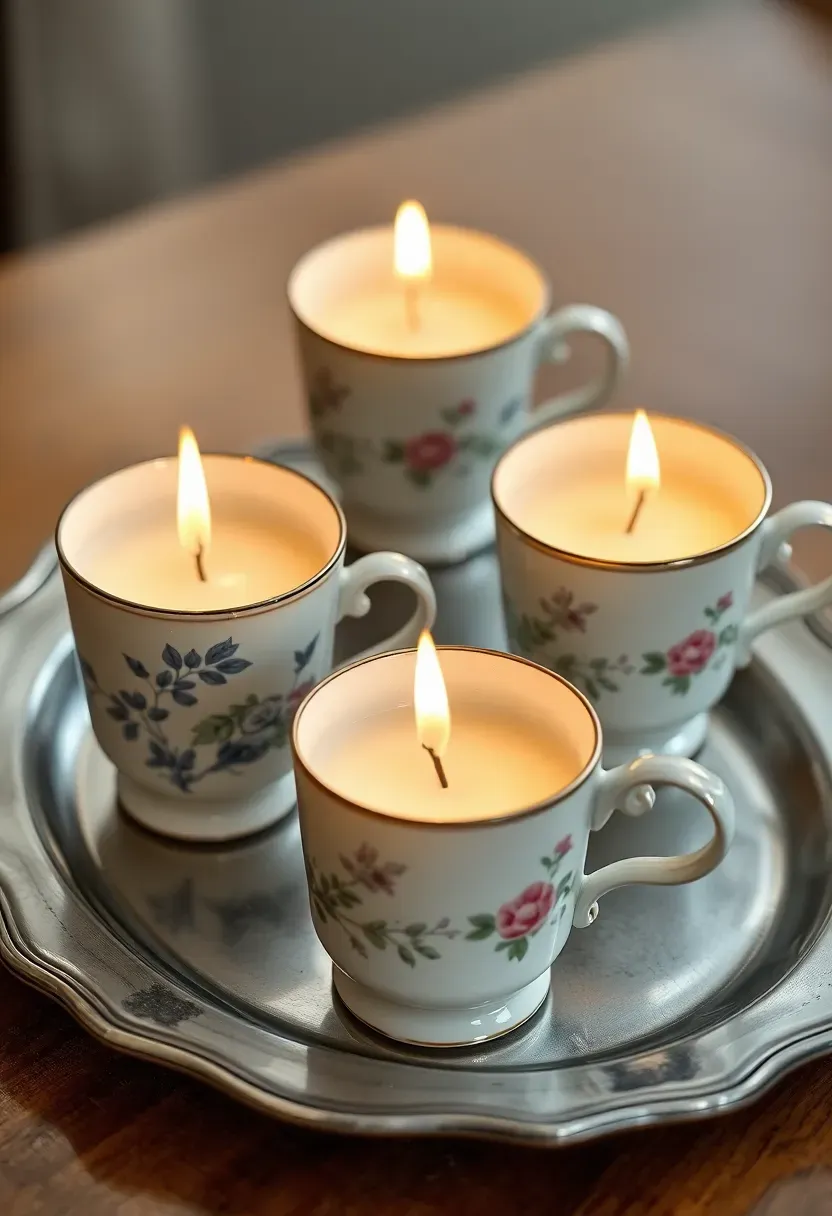
15. Vintage Teacup Candle Holders
Estate sales and thrift shops overflow with orphaned teacups -- the survivors of sets long since broken. Buy a handful for fifty cents to a dollar each. Melt soy wax flakes in a double boiler, add a few drops of lavender or vanilla essential oil, secure a cotton wick in the center of each cup, and pour. The finished candles burn for eight to twelve hours and make charming gifts as well as tabletop accents. Grouped on a small silver tray, they bring light and fragrance to any shabby chic vignette.
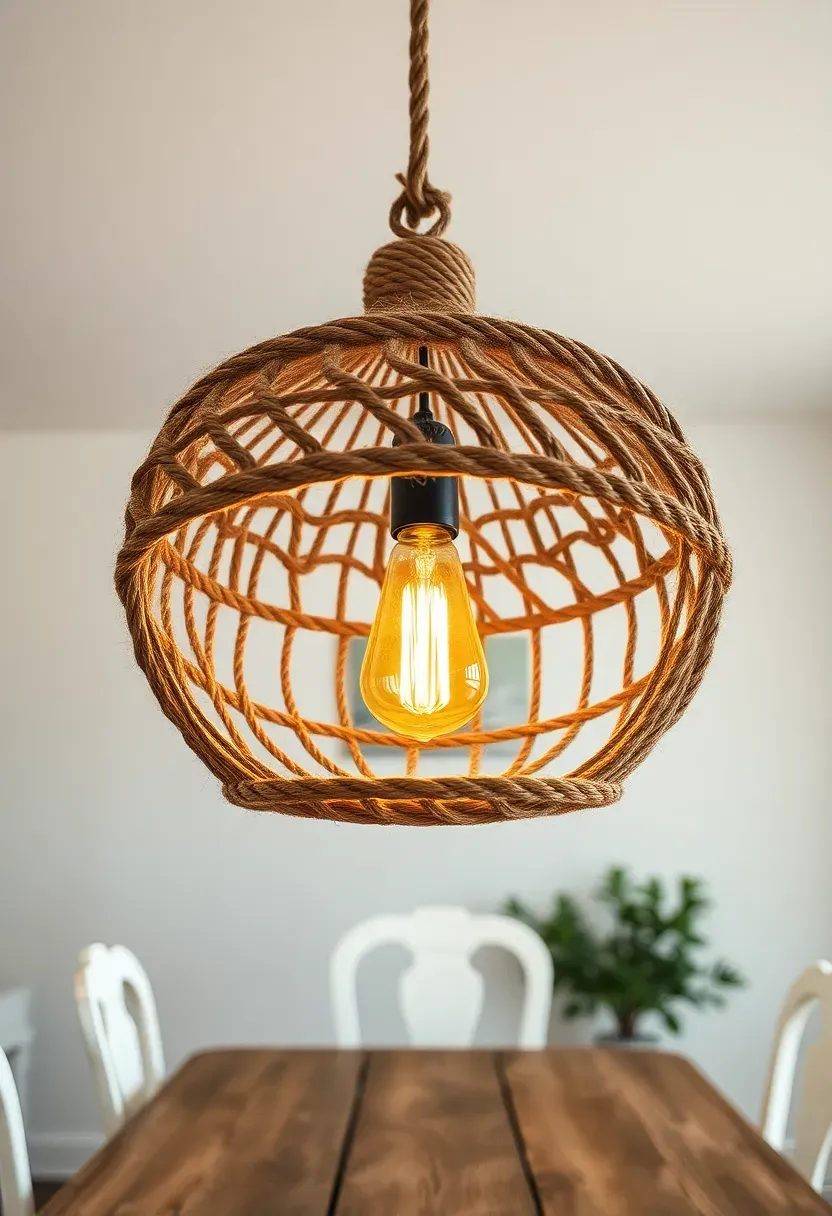
16. Rope-Wrapped Pendant Light
The Core Issue
Shabby chic lighting fixtures from specialty shops start at eighty dollars and climb quickly. Meanwhile, basic pendant light kits from hardware stores look too plain.
The Solution
Buy an inexpensive round pendant shade or even a wire basket frame. Wrap it tightly with natural jute rope, securing the start and finish with hot glue. The finished fixture filters light through the woven texture, casting warm, diffused patterns across the ceiling. Hang it above a dining table or in a reading corner for instant cottage ambiance. The total material cost sits between eight and fifteen dollars, depending on the size of the shade.
Pros and Cons
Pros: Dramatic visual impact for minimal investment; easy to customize the size Cons: Not suited for high-wattage bulbs -- stick to LED to prevent heat buildup
Recommended
Items for this idea
17. Sanded-Edge Floating Shelves
Standard pine floating shelves from any home improvement store cost under ten dollars each. Paint them white, then deliberately sand down the front edges and corners until the raw pine shows through. The result mimics shelves that have been in a cottage for generations, and the distressed edge catches light in a way that adds visual depth. Style each shelf with a mix of clear glass vessels, small framed prints, and a single dried rosebud for height variation. Keep negative space between objects -- shabby chic is about restraint, not clutter.
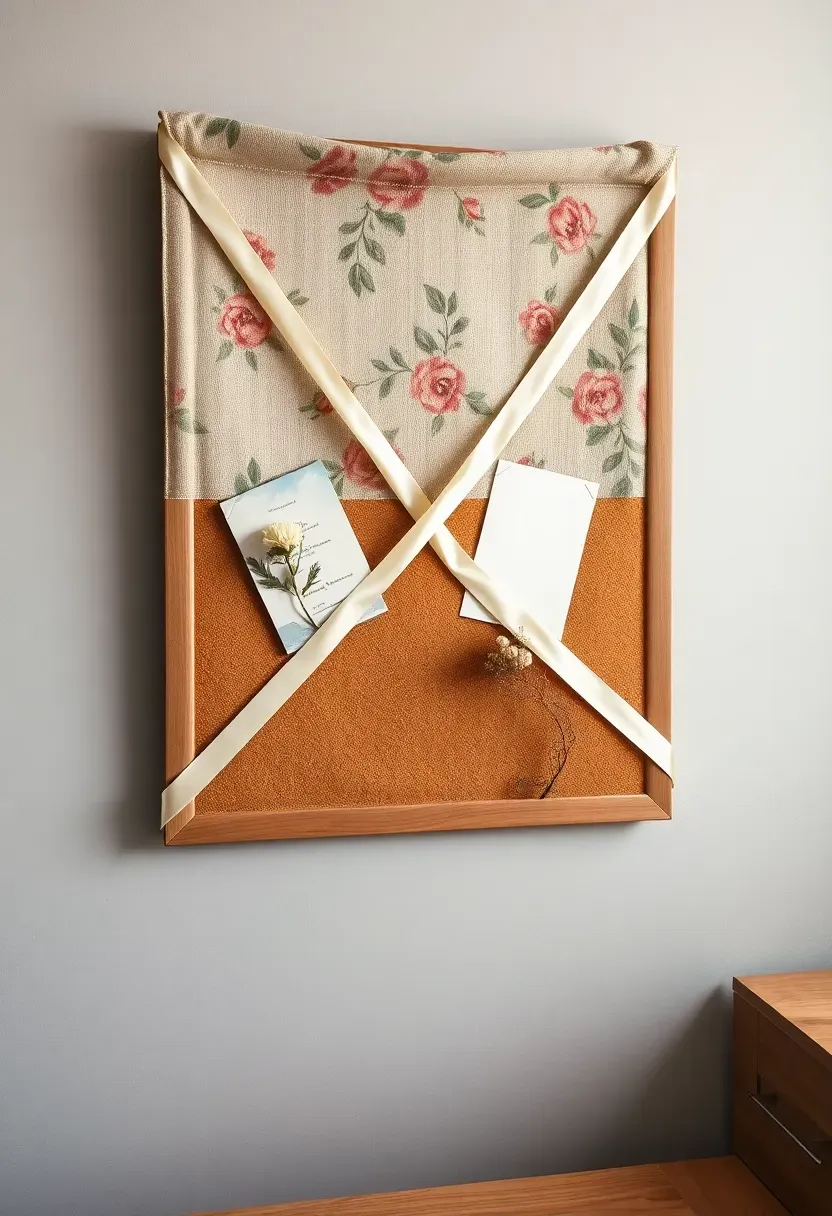
18. Fabric-Covered Bulletin Board
Step 1: Start with a Cork Board
A plain cork bulletin board from an office supply store is the base. Remove any existing frame if it feels too modern.
Step 2: Wrap in Vintage Fabric
Stretch a piece of floral or toile fabric tightly over the cork surface and staple it to the back. Trim excess fabric cleanly.
Step 3: Add Finishing Details
Crisscross thin satin ribbon diagonally across the face and pin at each intersection with pearl-topped pushpins. Tuck photos, postcards, and dried blooms under the ribbons.
What to Watch Out For
- Choose fabric with a small-scale print so it reads well at arm's length
- Avoid dark background colors -- pale grounds keep the board feeling light and airy
Recommended
Items for this idea
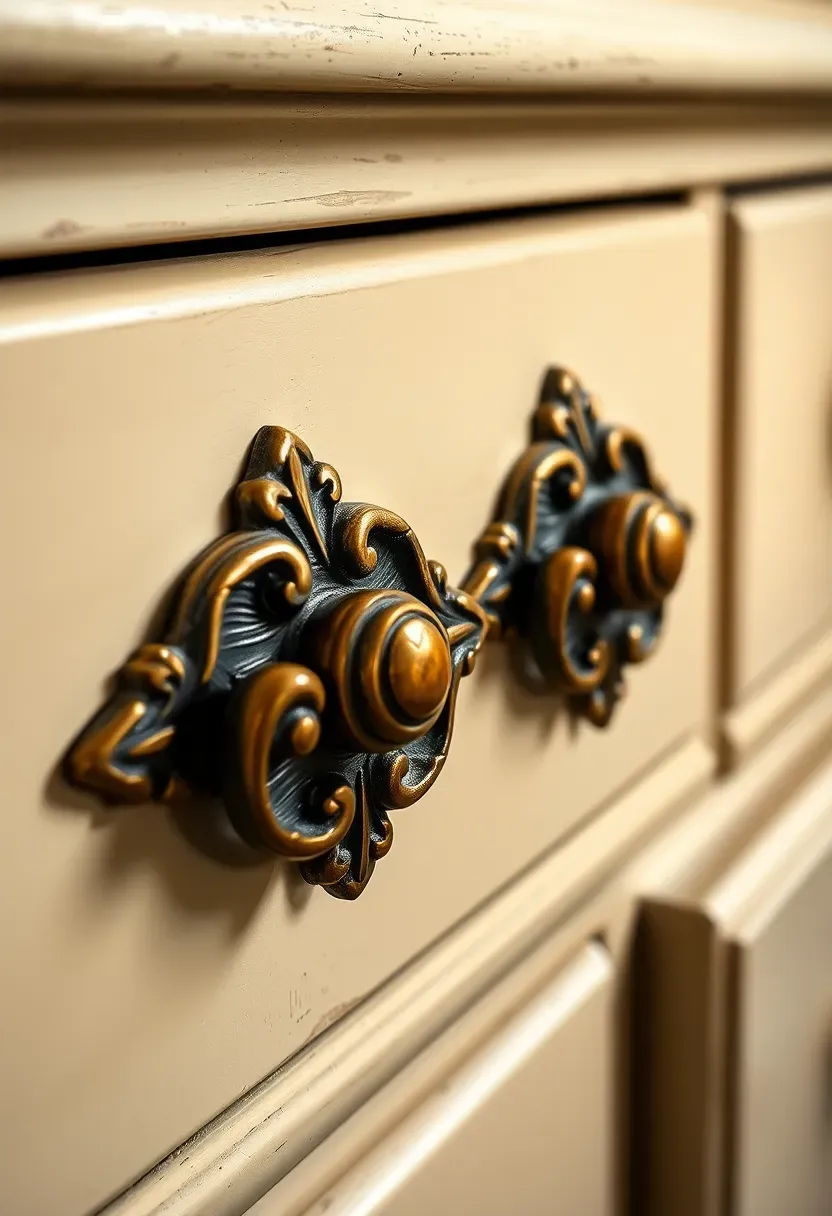
19. Antiqued Brass Drawer Pulls
Swapping hardware is the fastest furniture upgrade that exists, and it requires nothing more than a screwdriver. Ornate brass pulls with scroll or floral detailing sell in bulk online for one to three dollars each. If the brass looks too shiny and new, soak the pulls in a vinegar-and-salt solution overnight to accelerate tarnishing. The darkened patina blends seamlessly with chalk-painted surfaces and aged wood. This single change can make a forty-dollar thrift store dresser look like a genuine antique.
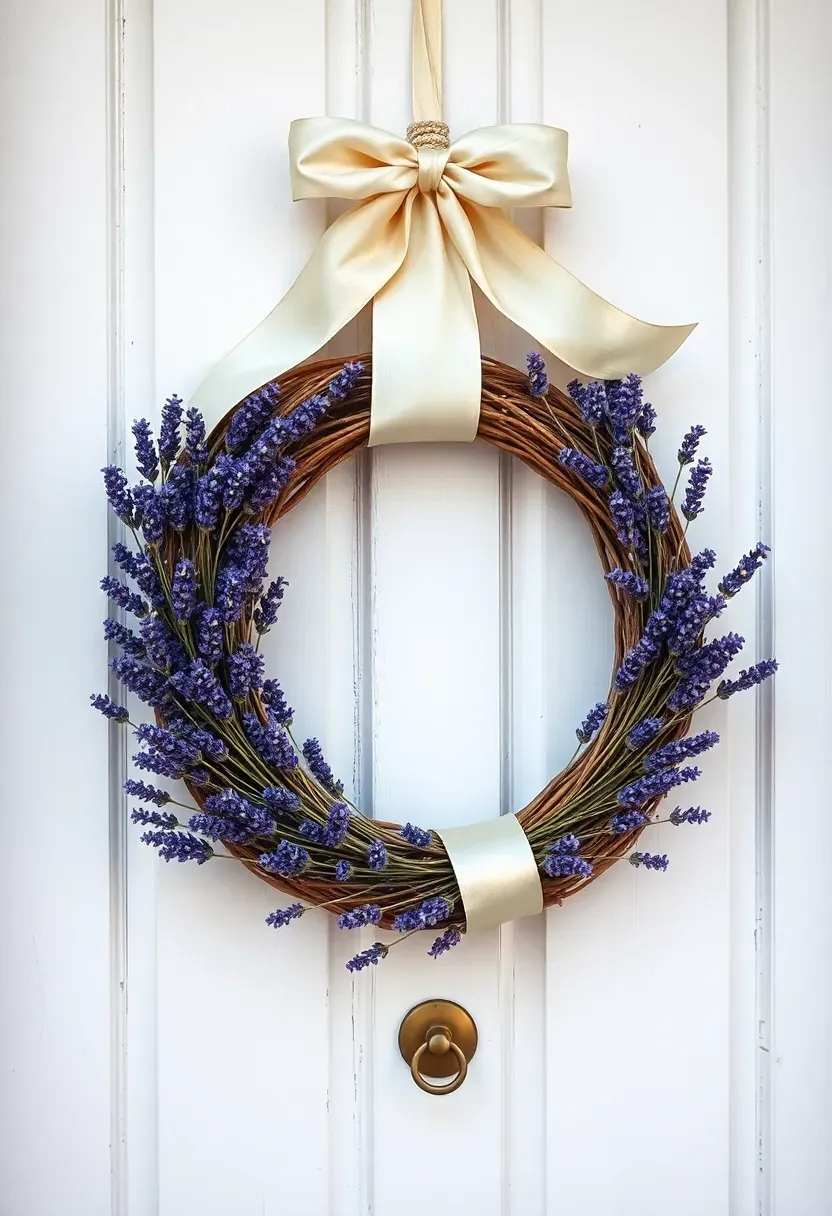
20. Dried Lavender Door Wreath
Origins of Lavender Wreaths
Lavender wreaths trace back to Provence, where bundles of dried lavender were hung at doorways both for fragrance and as a traditional welcome gesture. The custom spread through England during the Victorian era and became a staple of cottage decorating.
Modern Interpretation
Today, a dried lavender wreath signals shabby chic sensibility from the moment guests arrive. Bundle fresh lavender stems and wire them to a grapevine wreath form while still pliable. As the stems dry over a few days, they shrink and tighten naturally around the frame. Finish with a wide cream satin ribbon bow at the top. The wreath lasts six months to a year, releasing a gentle scent each time the door opens.
How to Apply at Home
- Harvest or buy fresh lavender when buds are just beginning to open for the best color retention
- Wire small bunches rather than individual stems for a fuller, faster build
- Hang on the inside of the door if your climate is very humid -- excess moisture fades the purple faster
- Replace the ribbon seasonally to refresh the look without rebuilding the wreath
Recommended
Items for this idea
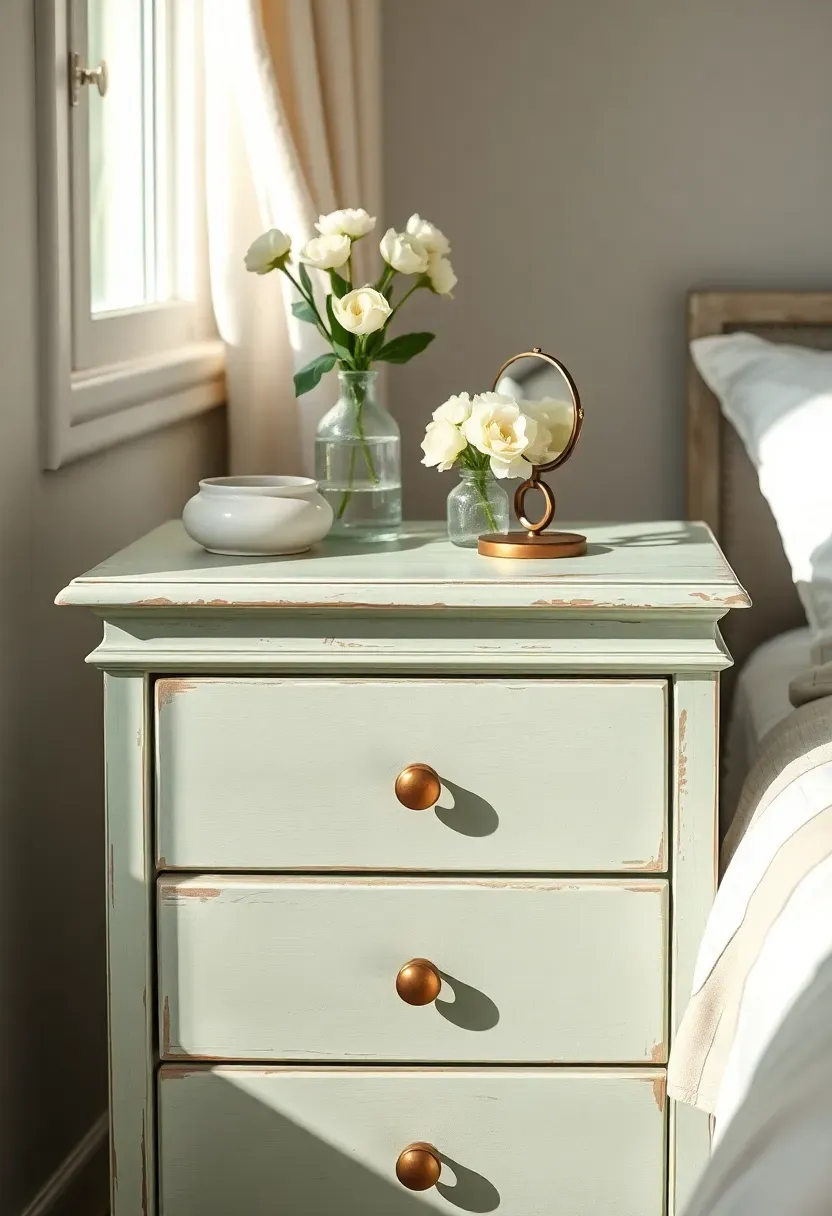
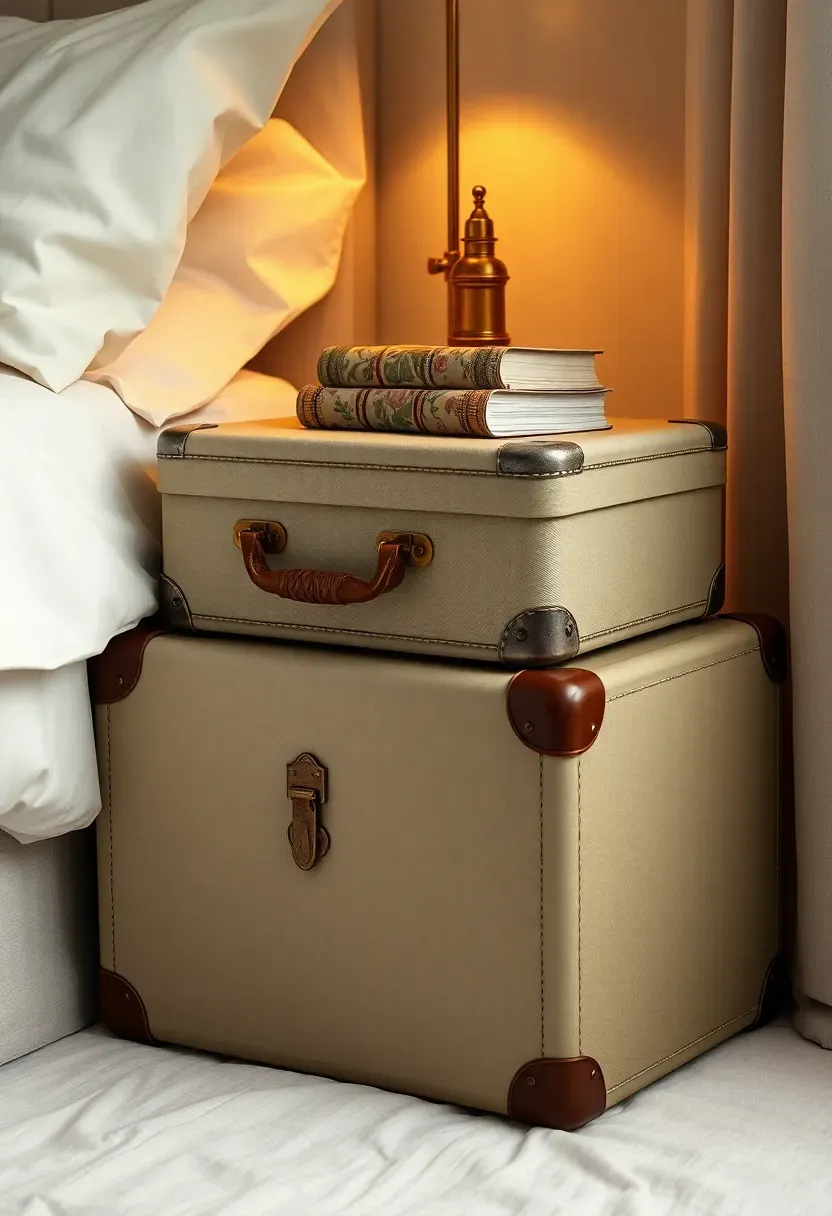
21. Upcycled Suitcase Nightstand
Vintage hardshell suitcases appear at flea markets and estate sales for five to fifteen dollars. Stack two suitcases of slightly different sizes on top of each other, or place a single case on a small wooden stool to achieve nightstand height. The flat lid surface holds a lamp, a book, and a water glass easily. Inside, the suitcase provides hidden storage for extra blankets or journals. Choose cases in muted pastels, faded florals, or worn leather tones to stay within the shabby chic color story.
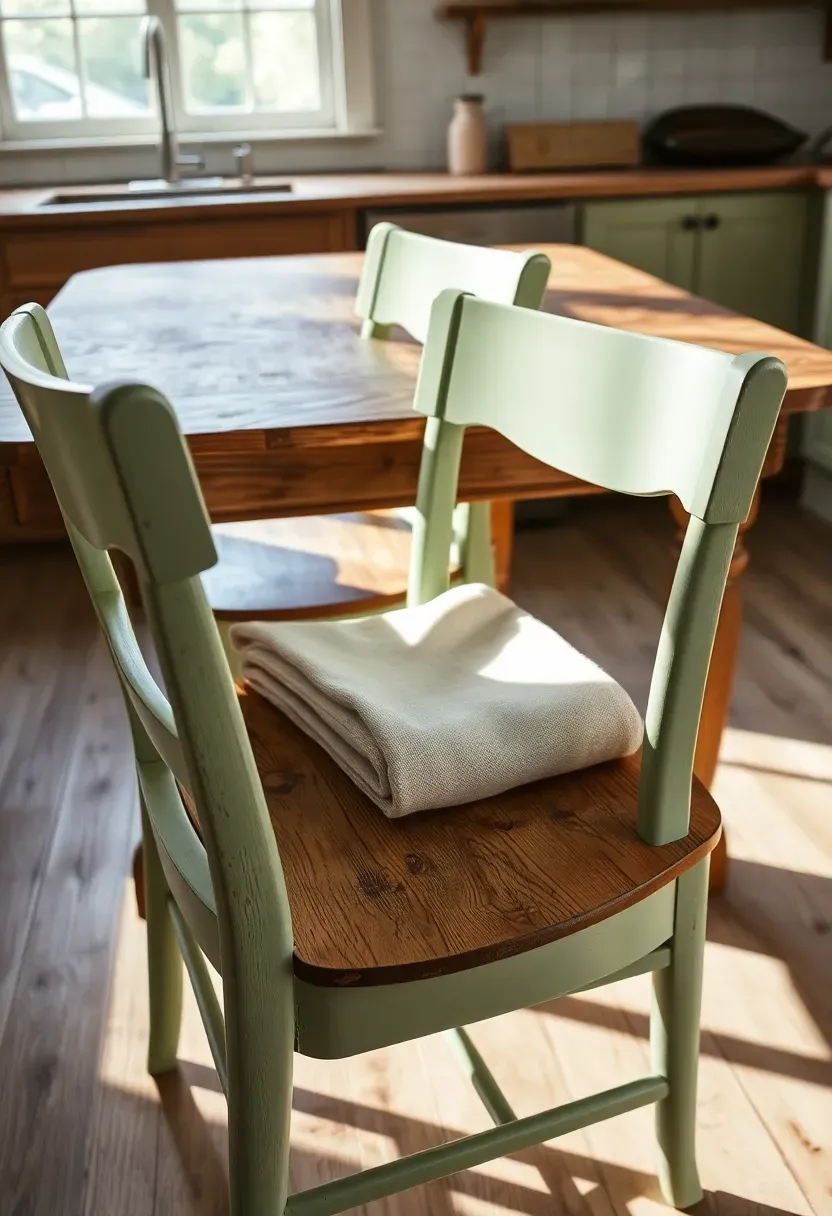
22. Milk Paint Kitchen Chairs
Comparing: Milk Paint vs Chalk Paint
Introduction: Both finishes dominate the shabby chic DIY world, but they behave differently on furniture. Knowing which to choose saves time and money.
Milk Paint
Milk paint is a powder mixed with water at home. It creates a thin, slightly translucent finish that lets wood grain show through. The paint naturally chips at edges without sanding, producing an authentically aged look on its own. Best for raw or previously stripped wood.
Chalk Paint
Chalk paint is ready-mixed and covers nearly any surface, including glossy finishes, without primer. It dries opaque and requires deliberate sanding to achieve distressing. Better for quick coverage on already-painted or laminate surfaces.
What to Choose
Choose milk paint if: you want maximum character with minimal effort on bare wood chairs. Choose chalk paint if: you need reliable coverage on chairs with an existing finish you cannot strip.
Recommended
Items for this idea
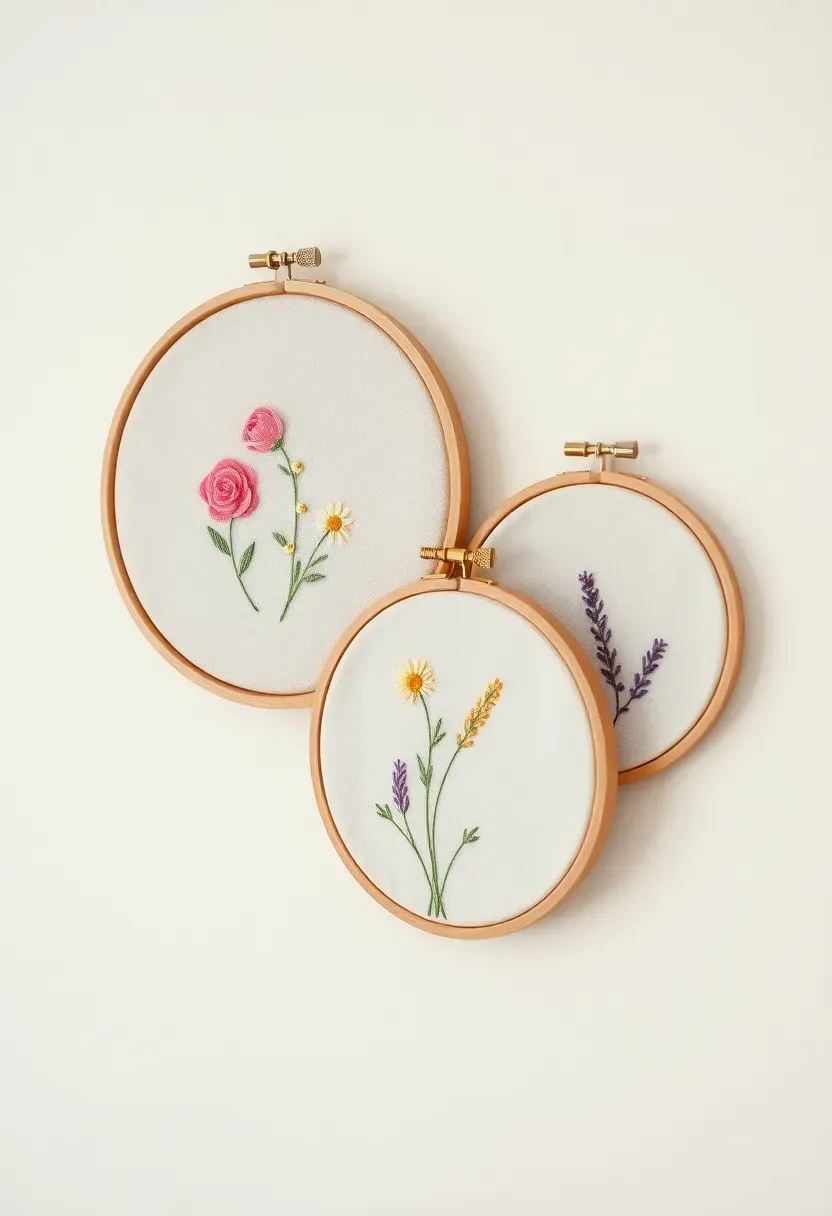
23. Embroidered Hoop Wall Art
Wooden embroidery hoops cost less than a dollar each at craft stores. Stretch vintage handkerchiefs, lace remnants, or hand-stitched fabric inside the hoops and trim the excess from the back. Hang in clusters of three or five at varied heights for a wall display that feels handmade and personal. If you enjoy needlework, stitch simple floral motifs directly onto plain muslin -- roses, daisies, and lavender sprigs are classic shabby chic choices. The hoops act as both frame and art, keeping the look informal and approachable.
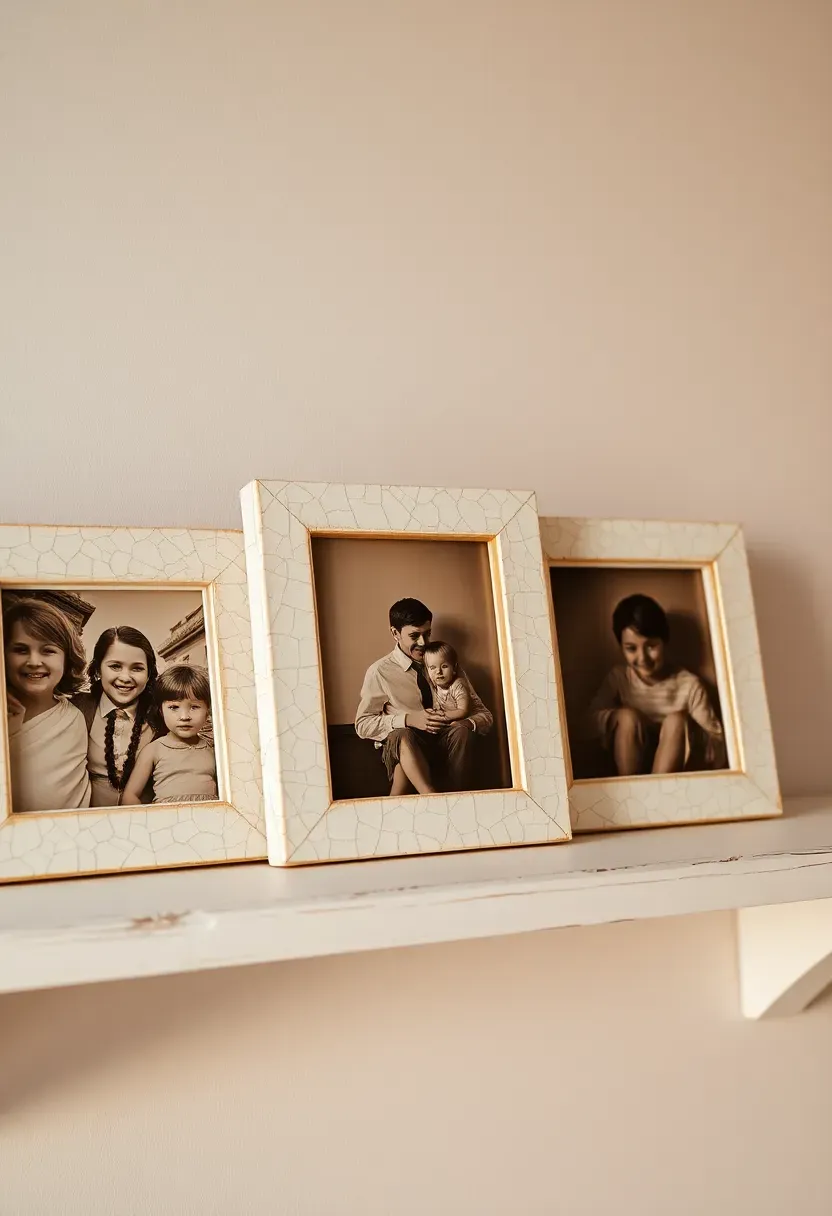
24. Crackle-Finish Photo Frames
Step 1: Prepare the Frame
Start with any flat wooden frame. Apply a base coat of gold or dark brown acrylic paint and let it dry completely.
Step 2: Apply Crackle Medium
Brush a generous layer of crackle medium over the base coat. The thicker the application, the larger the cracks will be.
Step 3: Add the Top Coat
Paint a single coat of ivory or cream over the crackle medium. As it dries, the surface splits open to reveal the darker base beneath, mimicking decades of natural aging in under an hour.
What to Watch Out For
- Brush the top coat in one direction only -- going back over wet paint disrupts the crackle pattern
- Use these frames for black-and-white or sepia photos to complete the vintage narrative
Recommended
Items for this idea
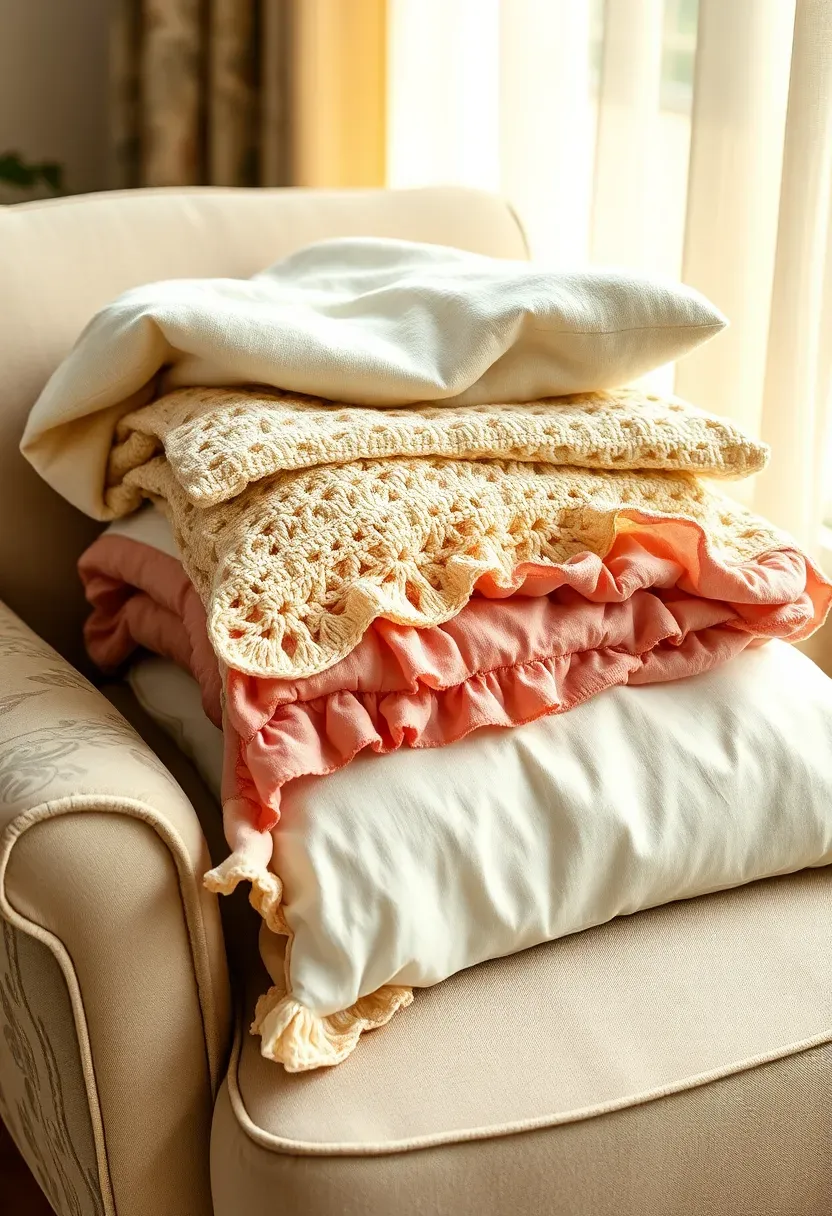
25. Layered Cream and Rose Textile Stack
Every shabby chic room needs one spot where textiles pile up with deliberate abundance. Fold a cream linen throw, a hand-crocheted blanket, and a ruffled pillow sham into a loose stack on an armchair, bench, or open shelf. Keep the palette restricted to ivory, cream, blush, and dusty rose so the layers harmonize rather than compete. Mix textures freely -- the combination of smooth linen, open crochet, and gathered ruffles creates visual richness that reads as luxurious even when every piece came from a secondhand shop. This final touch ties an entire room together, signaling that comfort and beauty live here in equal measure.
Quick FAQ
Is it possible to create shabby chic decor without any sewing? Absolutely. Iron-on hem tape, hot glue, and fabric adhesive handle most textile projects. Pillow covers with envelope closures need only straight cuts and folding. Many of the ideas above -- painted furniture, aged pots, rope-wrapped lights -- require no needlework at all.
Which thrift store items give the best shabby chic return on investment? Picture frames, teacups, wooden chairs, and linen tablecloths consistently offer the highest transformation potential for the lowest price. A two-dollar frame becomes a twenty-dollar-looking wall accent with a coat of paint and a botanical print.
Should you stick to one color or mix pastels across a room? Mixing works beautifully as long as you anchor the room with one dominant neutral -- usually white or cream. Then layer in two or three soft pastels like blush, sage, and powder blue. The neutral base prevents the pastels from feeling chaotic.
What separates shabby chic from regular vintage decorating? Shabby chic specifically celebrates wear: distressed paint, faded fabric, and deliberate imperfection. Standard vintage decorating may prize restored, polished antiques. In shabby chic, the flaws are the entire point.
Can renters do most of these projects without damaging walls? Yes. Command strips hold lightweight frames and shelves securely. Leaning mirrors and ladders against walls avoids drilling entirely. Fabric-covered boards and embroidery hoops weigh almost nothing and hang from a single small nail that leaves a tiny, easily patched hole.
Trends shift every season, but the core appeal of shabby chic stays stubbornly constant: beauty found in imperfection, elegance achieved without excess spending, and rooms that feel genuinely lived in rather than staged. Start with one project from this list -- a single chalk-painted dresser, a cluster of embroidery hoops, even just a mason jar of fresh flowers on a burlap runner -- and watch how quickly the aesthetic spreads through your home. The best interiors are built one thoughtful, affordable detail at a time.
Pinterest cover for 25 Shabby Chic Decor Ideas on a Budget for Stylish Interiors
About the author
OBCD
CGI visualization and interior design content. We create detailed 3D renders and curate practical design ideas for every room in your home.