19 Small Kitchen Trends for 2026
For centuries, kitchens have served as the heart of the home, yet the smallest ones often demand the most creative thinking. In 2026, designers are finally treating compact kitchens not as a limitation but as a canvas for innovation — prioritizing multi-functional surfaces, warmer material palettes, and storage solutions that hide in plain sight. The shift away from cold minimalism toward textured warmth means even a galley layout can feel genuinely luxurious without a full renovation.
Below — a detailed guide covering 19 trending approaches for small kitchens this year, from material choices and color palettes to layout strategies and hardware upgrades that deliver outsized impact in tight spaces.
Table of Contents
- Fluted Cabinet Fronts for Visual Depth
- Warm Brass and Brushed Gold Hardware
- Sage Green as the New Neutral
- Micro Pantry Behind a Pocket Door
- Full-Height Backsplash in Porcelain Slab
- Integrated Appliance Panels
- Floating Open Shelves in Natural Wood
- Warm LED Under-Cabinet Lighting
- Slim-Profile Waterfall Island
- Zellige Tile Backsplash
- Thin-Frame Black Metal Windows
- Pull-Out Worktop Extensions
- Curved and Arched Cabinet Details
- Mixed Countertop Materials
- Statement Range Hood as Focal Point
- Vertical Herb Garden Wall
- Two-Tone Cabinet Color Blocking
- Concealed Charging Station Drawer
- Terrazzo Revival on Floors and Counters
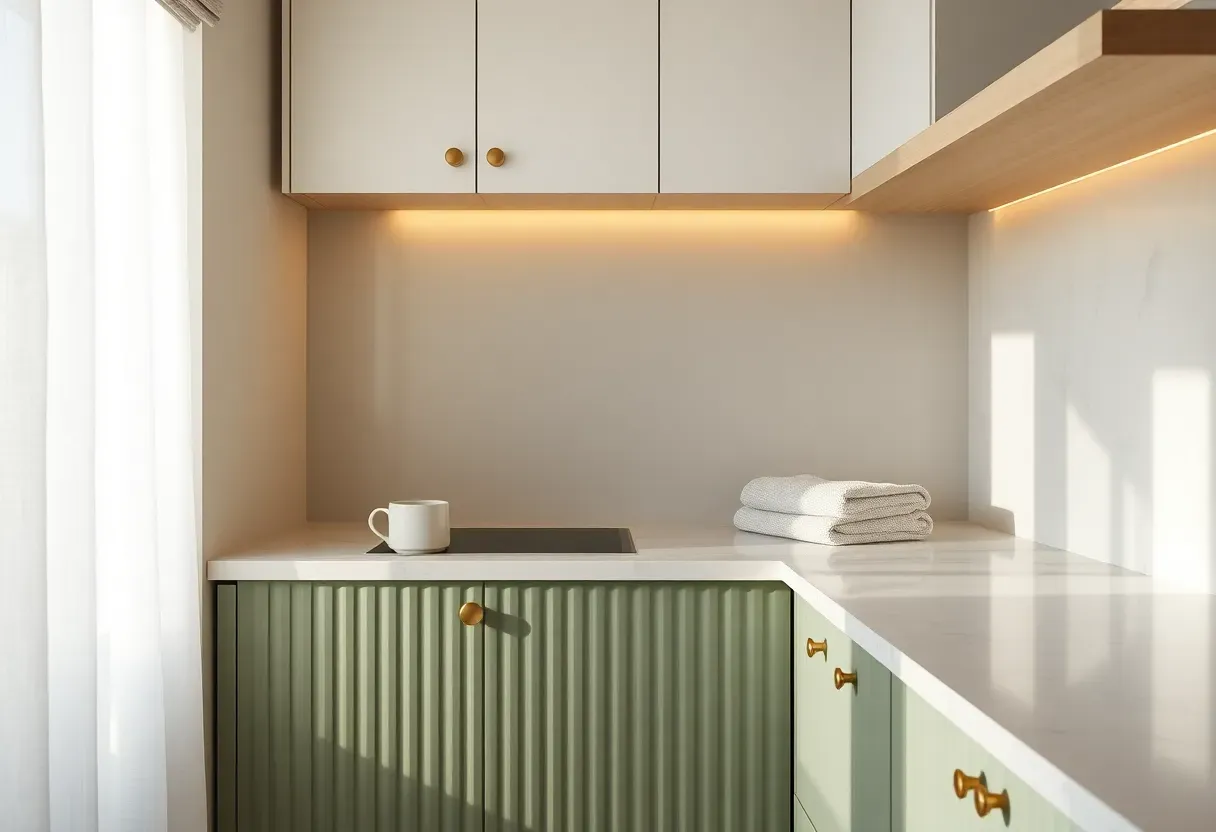
1. Fluted Cabinet Fronts for Visual Depth
Flat-panel cabinets dominated compact kitchens for years because they felt clean and simple. The problem is they can also read as flat and lifeless, especially in a galley layout where you face a solid wall of doors. Fluted fronts — vertical grooves routed into wood or MDF panels — solve this by catching light at multiple angles throughout the day. The shadow play creates an impression of depth and texture that makes a small kitchen feel more architectural without adding a single centimeter of bulk.
Tips / Practical Recommendations
- Choose a flute width between fifteen and twenty-five millimeters for a refined look; wider grooves can feel rustic
- Pair with simple bar pulls rather than knobs so the vertical lines remain uninterrupted
- Stick to matte or satin finishes — high-gloss amplifies fingerprints in the grooves
We picked a few things that go well with this idea: Goldenwarm Brushed Gold Cabinet Pulls (25-Pack) (★4.7), Goldenwarm 5-Inch Gold Cabinet Handles (25-Pack) (★4.7) and Homdiy Brushed Brass Cabinet Pulls (6-Pack) (★4.6). As an Amazon Associate we earn from qualifying purchases.
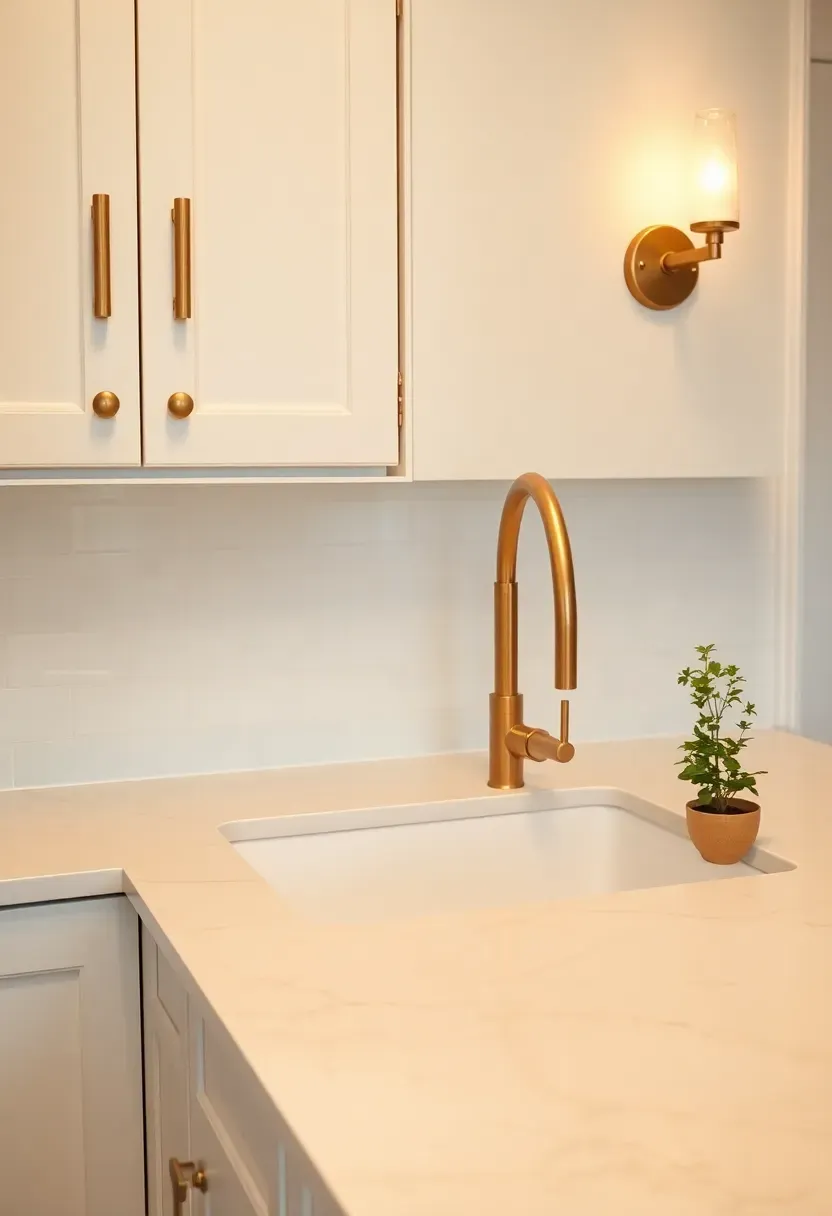
2. Warm Brass and Brushed Gold Hardware
Why Chrome Feels Dated in Small Kitchens
Chrome reflects cold light and visually competes with every other surface. In a small kitchen where surfaces are close together, that harshness amplifies. Brass and brushed gold absorb and warm the light instead, creating a cohesive glow that softens the space.
The Solution
Swap out handles, faucets, and cabinet knobs for unlacquered brass or brushed gold. Over time, unlacquered brass develops a living patina that adds character — something polished chrome never offers. The warm metal ties together disparate materials like white quartz, natural wood shelving, and matte painted cabinets into a single, intentional palette.
Pros and Cons
Pros: Timeless warmth, pairs with virtually any cabinet color, patina adds personality over time. Cons: Unlacquered brass requires occasional polishing if you prefer a bright finish; brushed gold is lower maintenance.
We picked a few things that go well with this idea: WOBANE Under Cabinet LED Kit (6-Pack, 2700K) (★4.5), DAYBETTER Under Cabinet LED Lights (6-Pack) (★4.4) and LAFULIT Under Cabinet LED Strip Kit (8-Pack) (★4.5). As an Amazon Associate we earn from qualifying purchases.
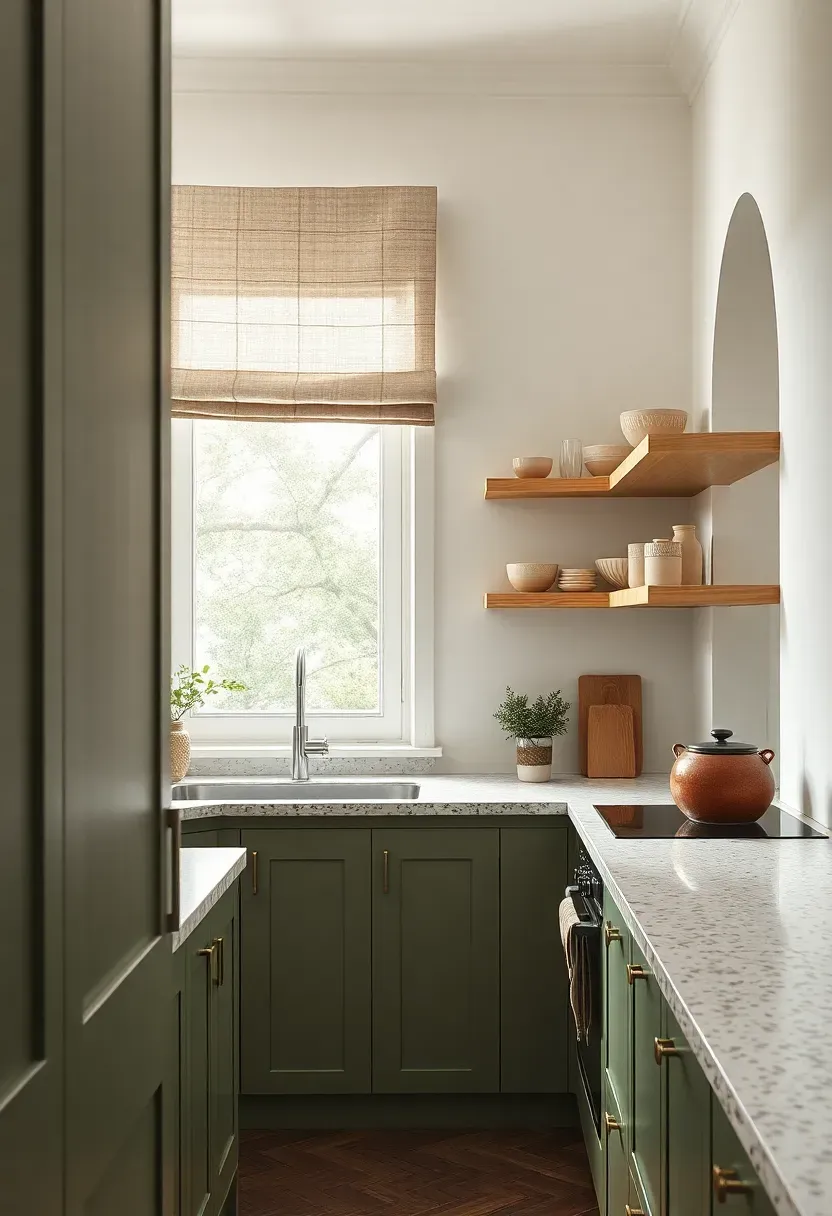
3. Sage Green as the New Neutral
Sage green has overtaken navy and charcoal as the go-to accent color for compact kitchens in 2026. It works because it sits at the intersection of warm and cool — never stark, never muddy. In a small kitchen, sage cabinets paired with white walls and natural wood accents produce a space that feels fresh without the sterility of an all-white scheme. The color also reads well under both natural daylight and warm artificial lighting, which matters in kitchens that often switch between the two throughout the day.
How to Apply at Home
- Use sage on lower cabinets only and keep uppers white or open shelving for a lighter visual weight
- Complement with matte black or brass hardware — both create crisp contrast against the muted green
- Test paint samples in both morning and evening light before committing, since sage shifts tone dramatically
- Pair with warm wood tones like white oak or walnut rather than gray-toned woods
We picked a few things that go well with this idea: QueenFun White Oak Floating Shelf (60-Inch) (★4.6), TRWISWDC White Oak Wall Shelf (24-Inch) (★4.5) and Solid White Oak Floating Shelf (12-Inch) (★4.4). As an Amazon Associate we earn from qualifying purchases.
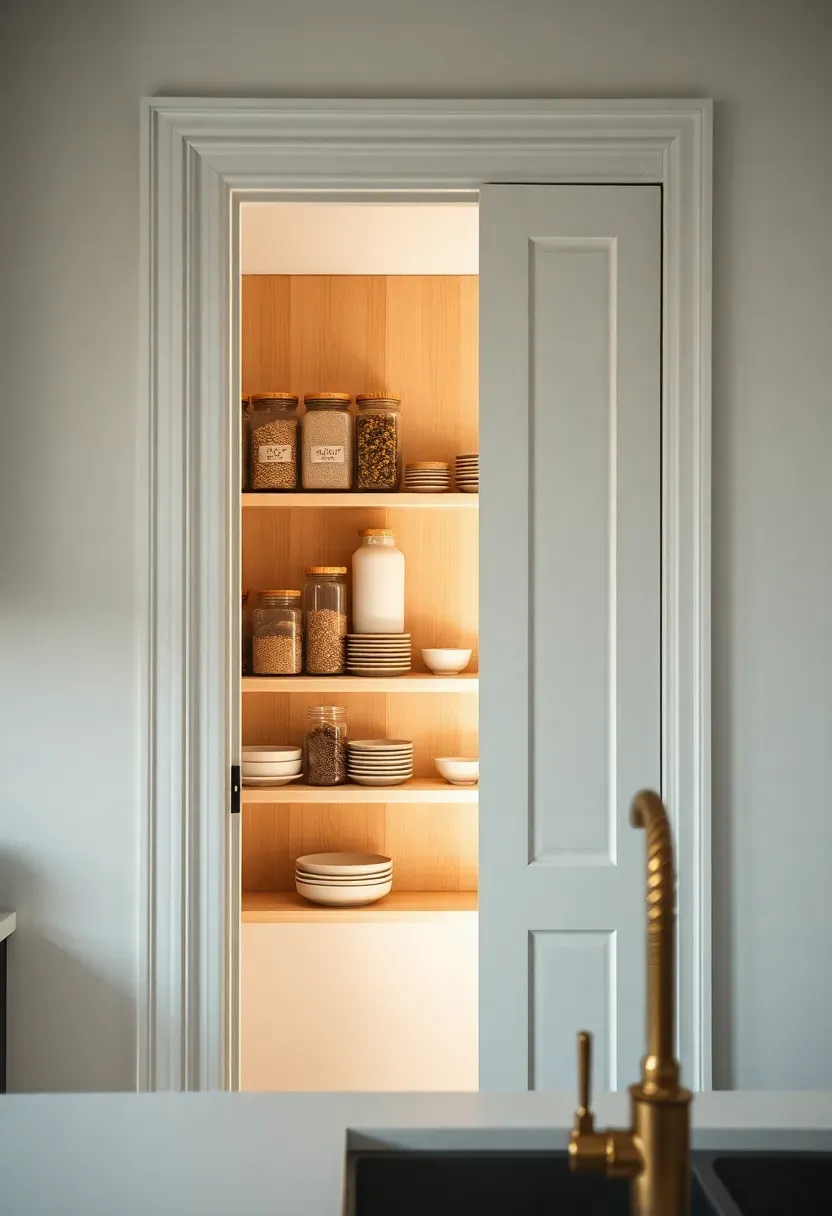
4. Micro Pantry Behind a Pocket Door
The Core Issue
Small kitchens suffer from visible clutter more than any other room. Open shelves overflow, countertops collect appliances, and the visual noise makes the entire space feel cramped regardless of actual square footage.
The Solution
A micro pantry — essentially a shallow closet between twelve and eighteen inches deep — tucked behind a pocket or barn door hides dry goods, small appliances, and cooking supplies in one concealed zone. When the door slides shut, the kitchen presents a clean, streamlined face. Even a sliver of unused wall next to the refrigerator or a dead corner can be converted into a micro pantry with custom shelving. The pocket door mechanism saves the swing clearance a hinged door requires, which is critical in tight floor plans.
Pros and Cons
Pros: Eliminates counter clutter, customizable shelf heights, keeps everything within arm's reach. Cons: Requires wall depth for the pocket door track; professional installation is recommended for smooth operation.
Recommended
Items for this idea
5. Full-Height Backsplash in Porcelain Slab
Taking the backsplash from countertop height all the way to the ceiling eliminates the visual break where tile grout usually creates a horizontal line. In a compact kitchen, this trick makes the wall read as one continuous surface, which heightens the perception of space. Porcelain slabs — large format panels that mimic marble, concrete, or natural stone — achieve this with minimal grout lines and far less maintenance than genuine stone.
Step 1: Choose the Right Pattern
Select a porcelain slab with subtle veining rather than bold, dramatic patterns. In a small kitchen, oversized veining can overwhelm the space. Soft Calacatta or warm Statuario patterns work beautifully.
Step 2: Plan the Layout
Have the fabricator do a dry layout to book-match the veining across panels. This creates a mirror-image effect that looks intentional and high-end.
Step 3: Install with Thin-Set Adhesive
Porcelain slabs require professional handling due to their size and weight. The result is a seamless surface with grout lines so thin they nearly disappear.
What to Watch Out For
- Porcelain slabs are heavy — ensure the wall structure can support the weight
- Budget for professional installation; DIY risks cracking during handling
6. Integrated Appliance Panels
Visible appliance fronts — especially stainless steel in a small kitchen — break up the cabinetry line and create visual fragmentation. The 2026 trend toward integrated panels means the refrigerator, dishwasher, and even microwave receive custom cabinet-matching fronts so they disappear into the wall. The result is a kitchen that reads as furniture rather than a collection of separate machines, and the uniform surface line makes the room feel substantially larger than it is.
Tips / Practical Recommendations
- Panel-ready appliances cost roughly fifteen to twenty percent more than standard models, so budget accordingly
- Ensure ventilation gaps are maintained behind panels to prevent overheating
- Magnetic push-to-open latches keep the seamless look by eliminating visible handles
Recommended
Items for this idea
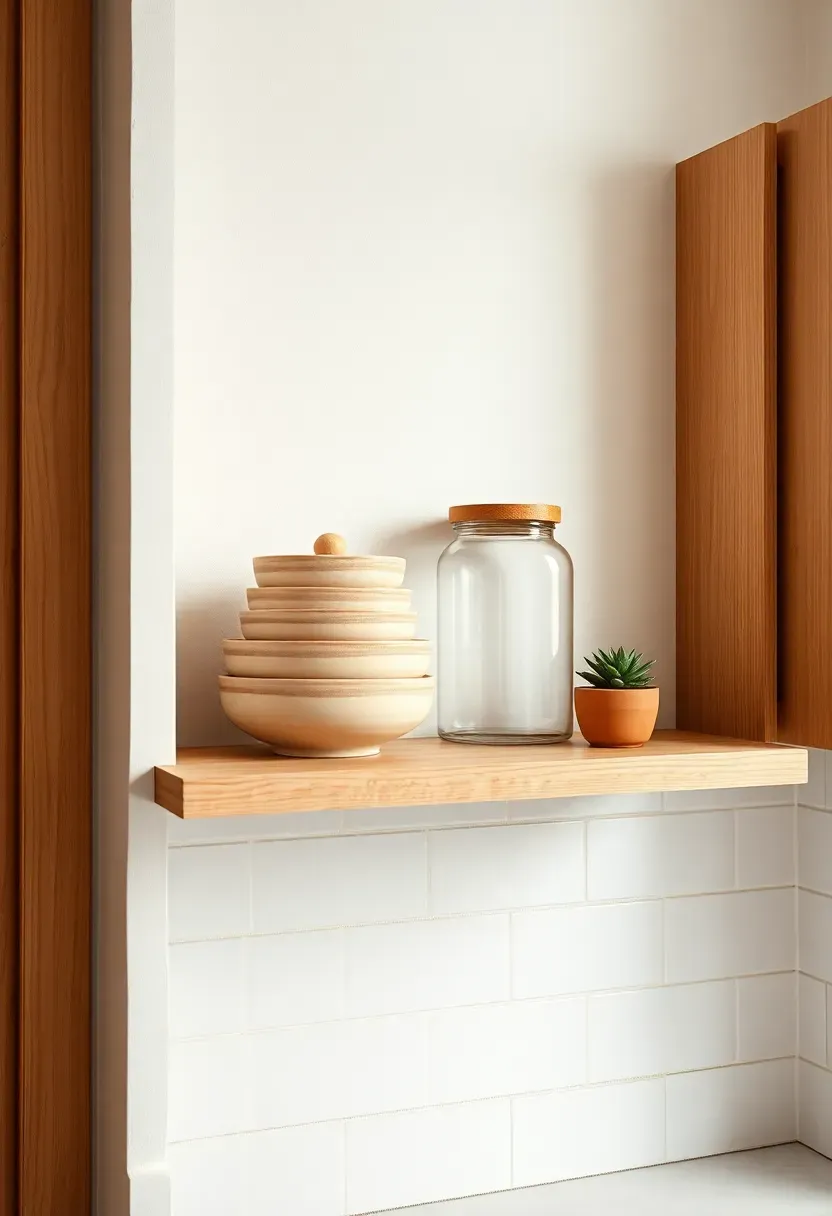
7. Floating Open Shelves in Natural Wood
Comparing: Open Shelves vs Upper Cabinets
Open shelves and upper cabinets each serve the same purpose — storage at eye level — but they feel fundamentally different in a compact kitchen.
Open Shelves
Remove the visual weight of cabinet boxes and doors. They let the wall color show through, create breathing room, and display everyday items as decor. White oak or walnut shelves bring warmth that painted cabinetry cannot replicate.
Upper Cabinets
Hide clutter completely, protect contents from grease and dust, and offer more total storage volume per linear meter.
What to Choose
Choose open shelves if: your kitchen has good ventilation, you enjoy curating visible displays, and you cook without heavy frying that generates airborne grease. Choose upper cabinets if: maximizing hidden storage is the priority and you prefer a streamlined, doors-closed appearance.
Recommendation
In most small kitchens, a hybrid approach works best — open shelves flanking the window or above the sink, closed cabinets everywhere else.
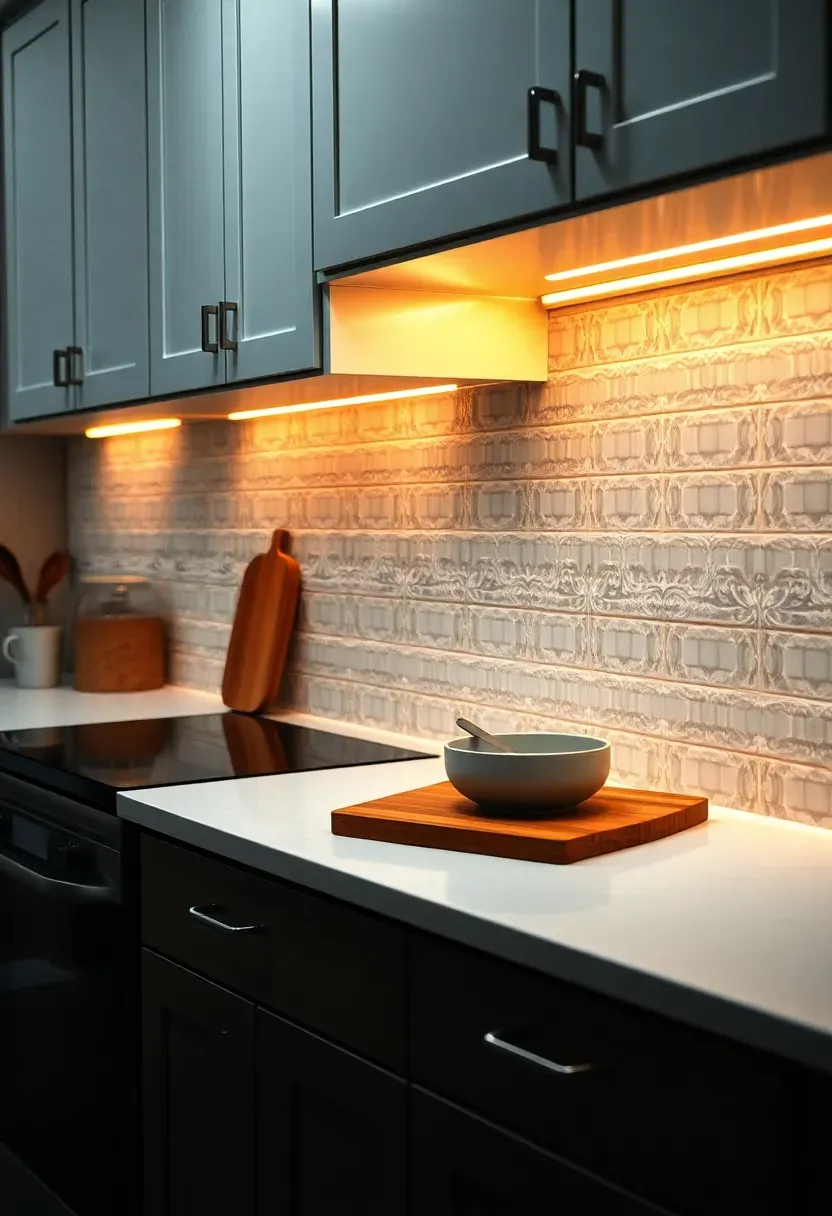
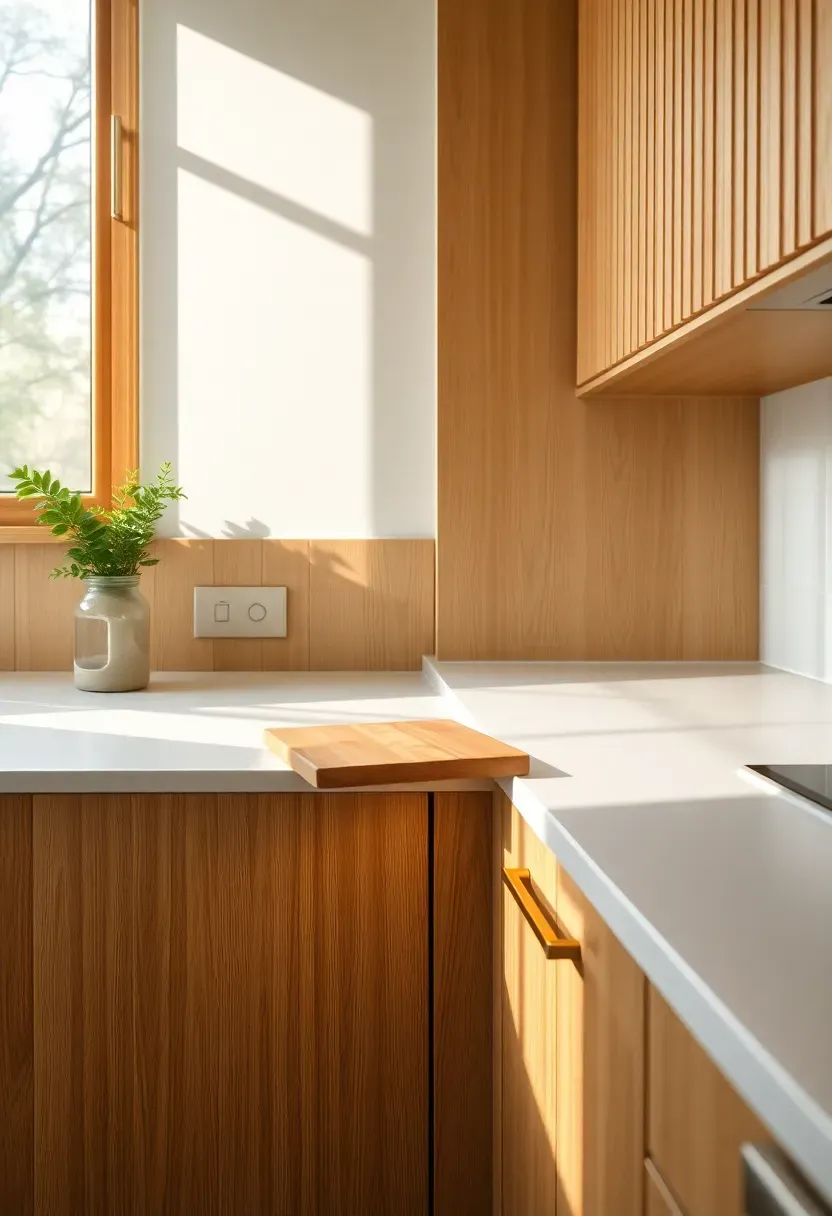
8. Warm LED Under-Cabinet Lighting
Under-cabinet LED strips in warm white (2700K to 3000K) transform a small kitchen more effectively than almost any other single upgrade. They eliminate the shadows that overhead lighting casts onto the countertop, making food prep easier and safer. Beyond function, the warm glow creates ambiance that makes the kitchen feel inviting during evening hours — a quality that compact kitchens desperately need since overhead fixtures alone tend to flatten the space.
Tips / Practical Recommendations
- Install continuous LED tape rather than individual puck lights for even, shadow-free illumination
- Place the strip toward the front edge of the cabinet underside, not against the wall, so light falls on the work surface
- Use a dimmer switch to shift from bright task lighting during cooking to soft ambient glow while entertaining
Recommended
Items for this idea
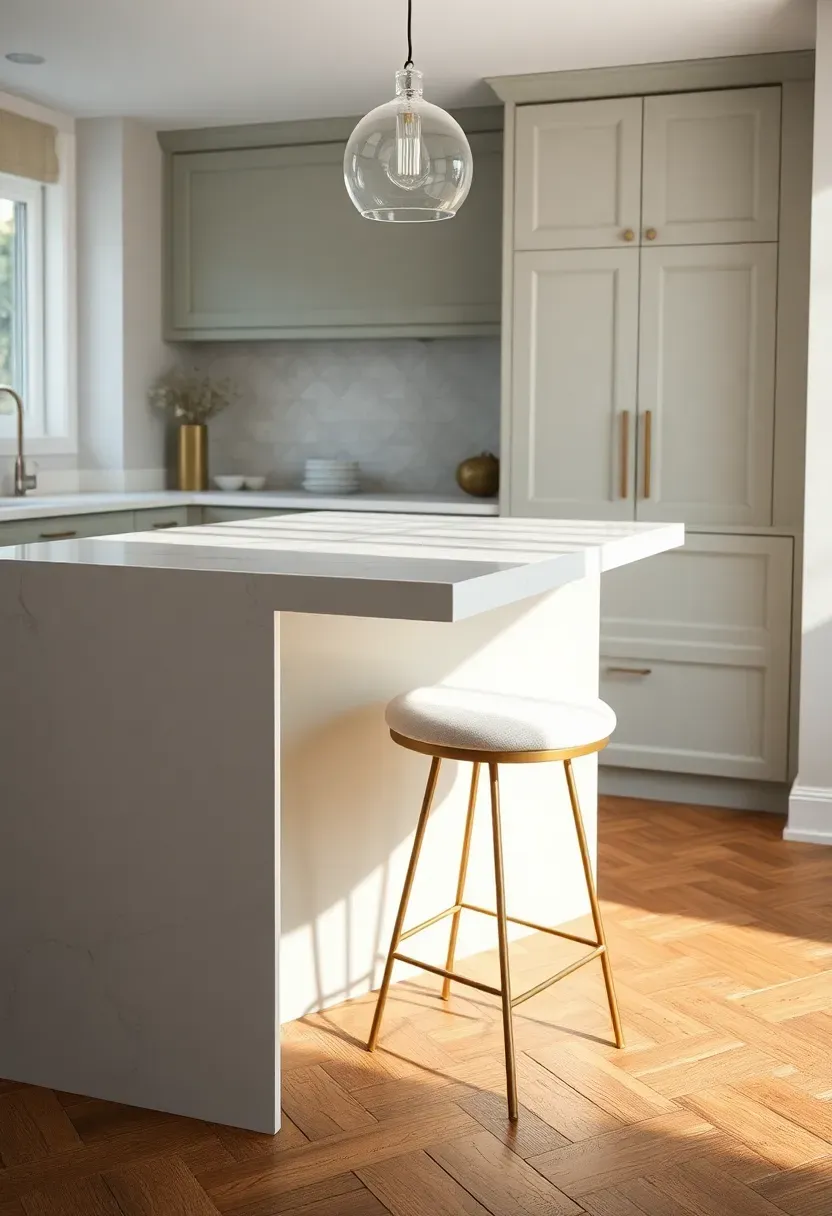
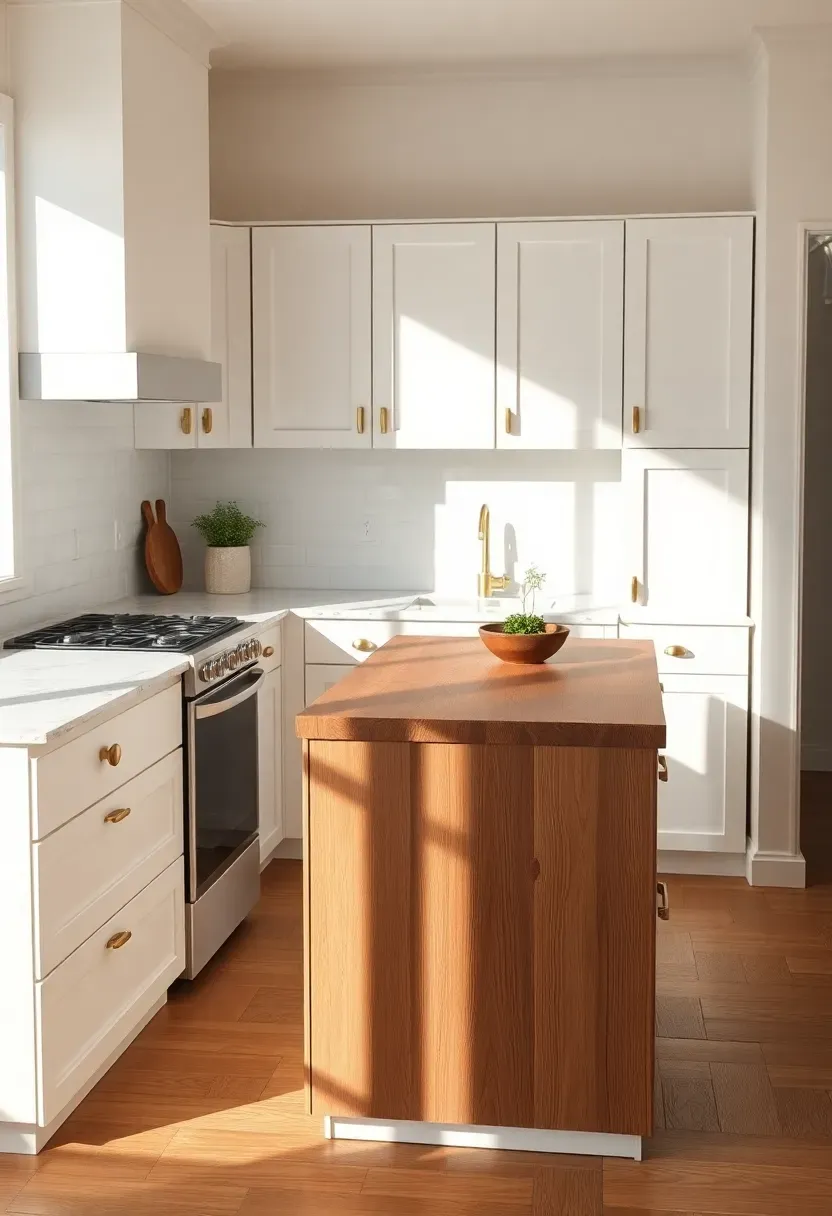
9. Slim-Profile Waterfall Island
A full-size island overwhelms most small kitchens, but a slim-profile version — typically forty-five to sixty centimeters deep instead of the standard ninety — delivers prep surface, casual seating, and storage without blocking traffic flow. The waterfall edge, where the countertop material wraps down one or both sides to the floor, adds a sculptural quality that makes the piece look intentional rather than squeezed in. White quartz, thin porcelain, or engineered stone all work for the waterfall treatment.
Step 1: Measure the Clearance
Ensure at least ninety centimeters of passage on all open sides. Less than that creates a bottleneck that defeats the purpose.
Step 2: Choose the Right Depth
Forty-five centimeters accommodates a cutting board and two place settings side by side. Sixty centimeters allows for a small undermount sink if plumbing permits.
Step 3: Add Hidden Storage
Install two or three slim drawers on the working side for utensils, linens, or spice jars. This converts dead island volume into active storage.
What to Watch Out For
- Waterfall edges require precision cutting and professional installation to align veining patterns
- Overhang for seating should extend at least twenty-five centimeters for comfortable knee clearance
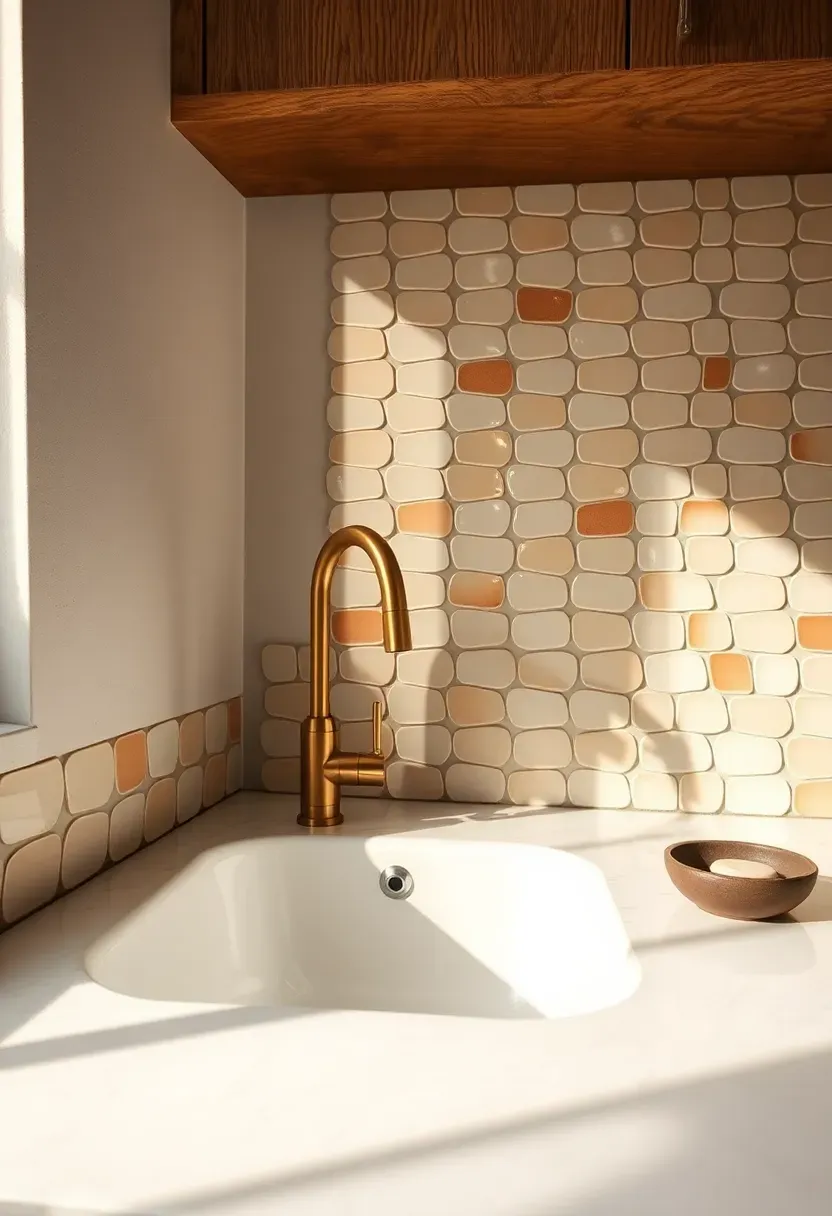
10. Zellige Tile Backsplash
Zellige tiles — hand-cut Moroccan clay tiles with undulating surfaces and slight color variation — inject artisan character into a small kitchen that subway tile or porcelain slab simply cannot match. Each tile catches light differently, creating a shimmering, alive surface that shifts throughout the day. In a compact kitchen, this subtle movement prevents walls from feeling static and adds visual richness without pattern overload. The 2026 palette favors warm whites, soft terracotta, and pale olive for zellige in kitchen settings.
Tips / Practical Recommendations
- Expect a ten to fifteen percent waste rate during installation because of the tiles' handmade irregularity
- Use a slightly wider grout line (three to four millimeters) to accommodate size variations between tiles
- Seal the tiles before grouting — zellige is porous and absorbs grout pigment permanently if unsealed
Recommended
Items for this idea
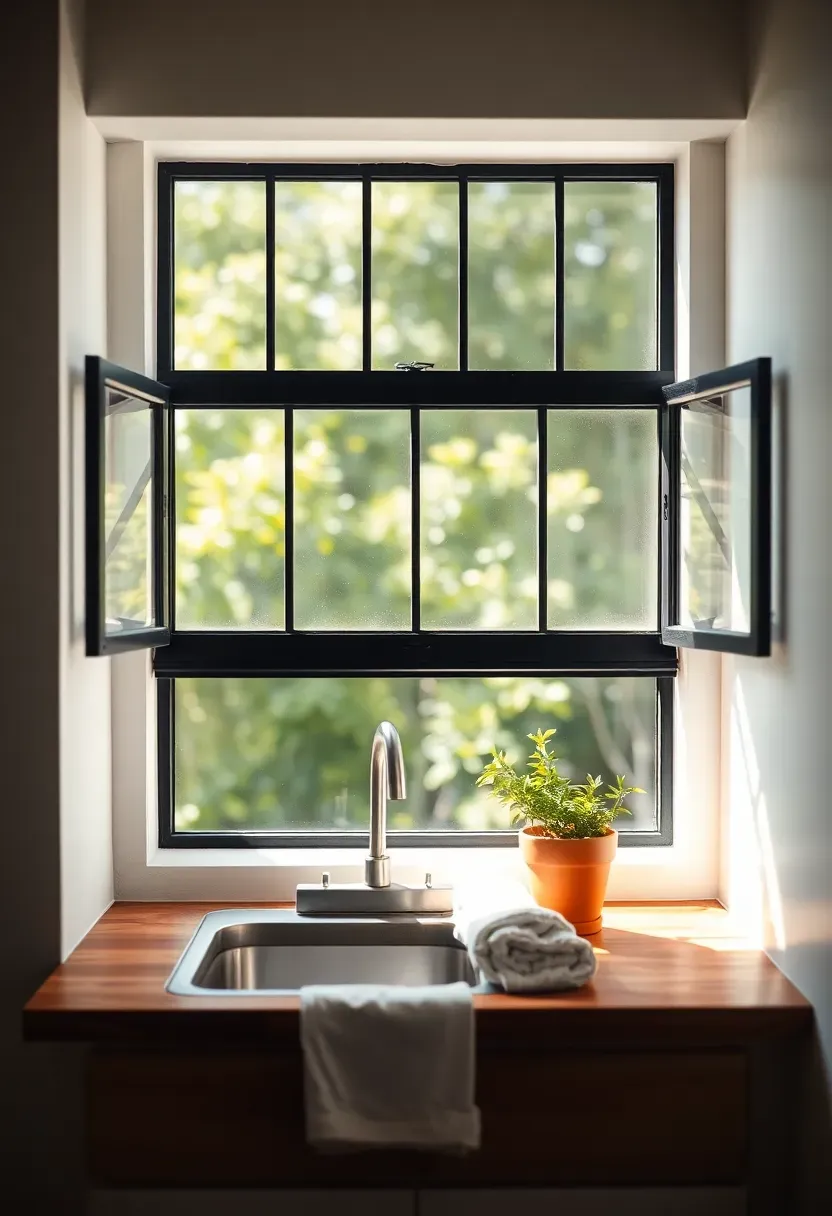
11. Thin-Frame Black Metal Windows
Origins / History
Steel-frame windows trace back to industrial loft conversions of the early twentieth century, where factory buildings were repurposed into residential spaces. The slim mullions maximized glass area while maintaining structural integrity — a practical necessity that became an aesthetic signature.
Modern Interpretation
In 2026, thin-frame black metal windows have migrated from loft conversions into compact kitchens of all styles. The narrow profiles allow substantially more natural light than standard vinyl or wood frames, and the black finish creates a graphic contrast against white or neutral walls that anchors the room. For small kitchens where the window above the sink is often the primary light source, upgrading to a thin-frame metal window can increase perceived brightness by twenty to thirty percent simply by reducing the frame width.
How to Apply at Home
- Replace a single kitchen window rather than renovating all windows — the impact is immediate and budget-friendly
- Choose thermally broken aluminum frames for energy efficiency comparable to vinyl
- Add a simple plant shelf across the lower third of the window for herbs or small succulents
- Pair with a matte black faucet and cabinet handles to create a cohesive hardware language
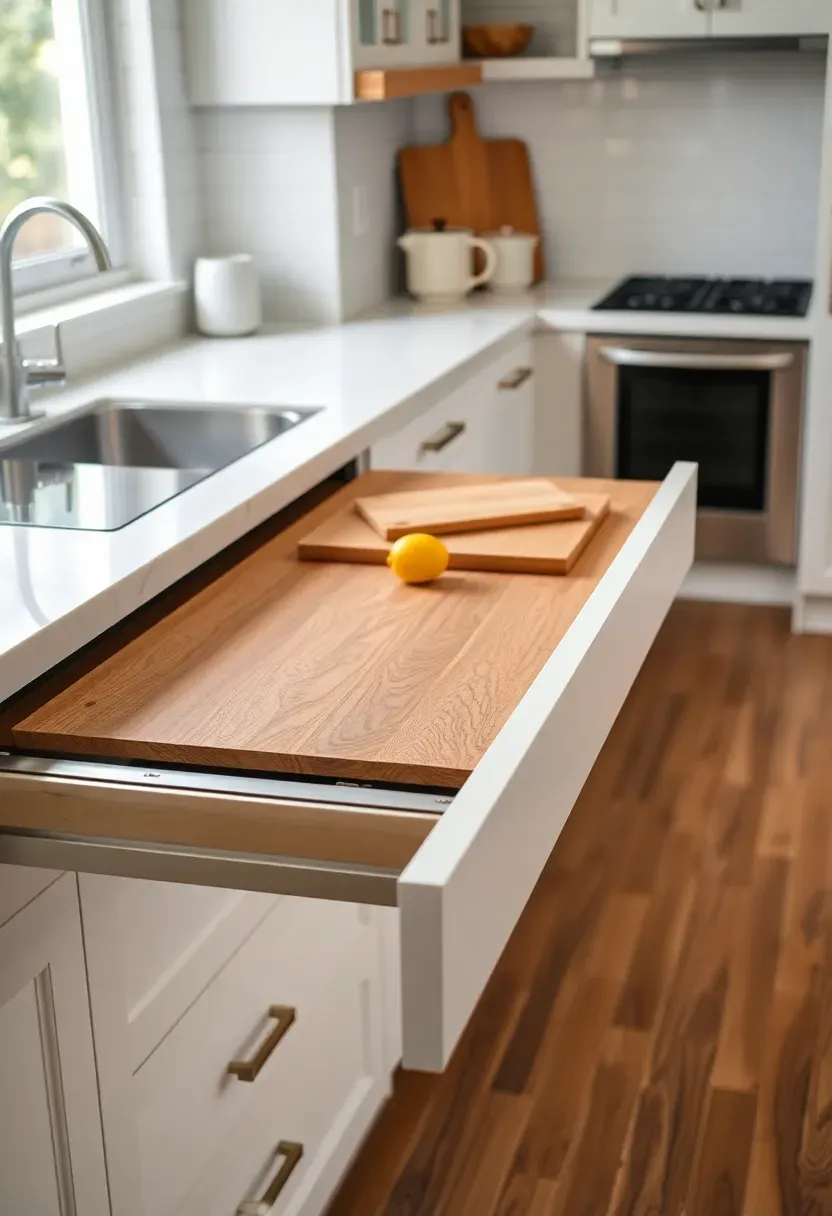
12. Pull-Out Worktop Extensions
Counter space is the single most valuable commodity in a small kitchen, and pull-out worktop extensions deliver it on demand without permanently occupying floor area. Mounted on heavy-duty drawer slides beneath the existing countertop, these extensions slide out when you need extra prep surface and tuck away flush when cooking is done. Butcher block is the most popular material because it doubles as a cutting surface, though matching the existing countertop material creates a seamless look.
Tips / Practical Recommendations
- Install the extension at the same height as your primary countertop for an uninterrupted work surface
- Use full-extension ball-bearing slides rated for at least thirty kilograms
- Position the pull-out adjacent to the stove or sink for maximum prep efficiency
Recommended
Items for this idea
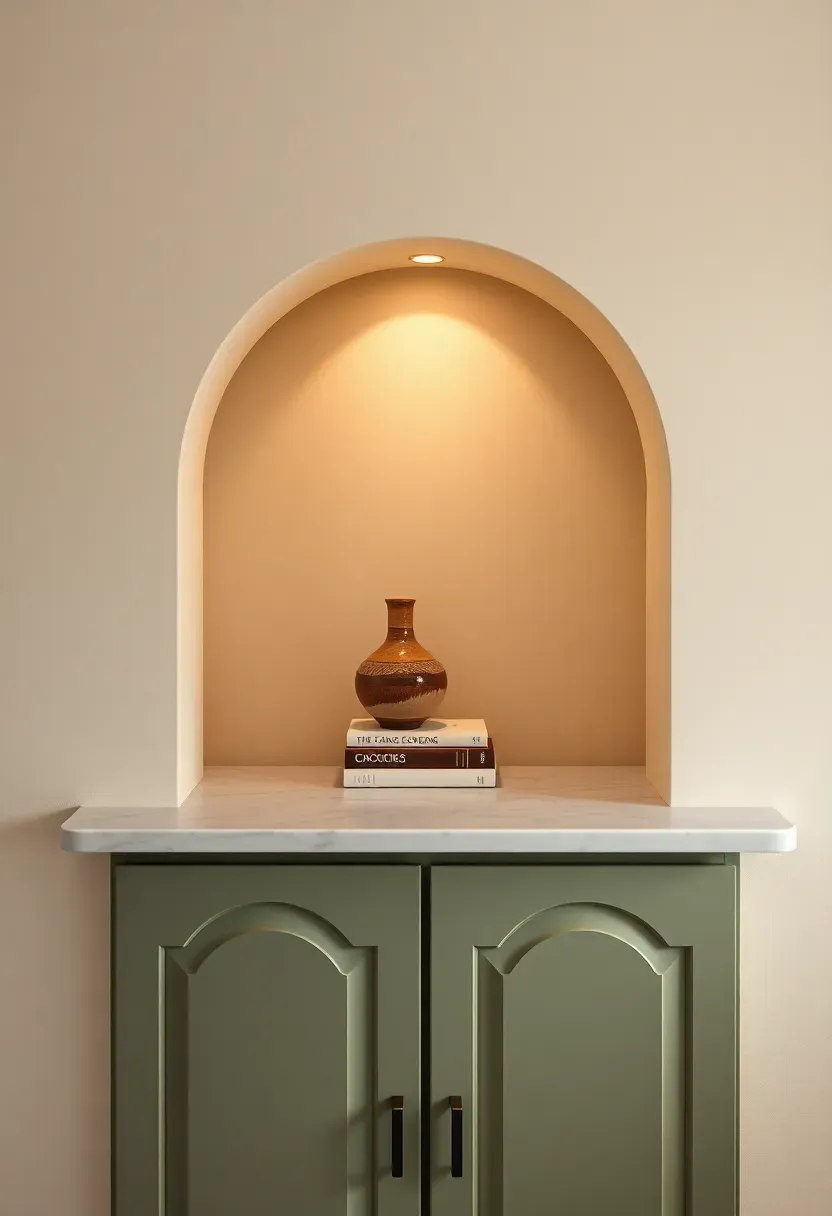
13. Curved and Arched Cabinet Details
Straight lines and sharp corners dominate most kitchen designs by default. Introducing curves — an arched display niche, rounded cabinet door edges, or a curved island end — softens the visual energy and creates focal points that draw the eye. In a small kitchen, curves also improve traffic flow by eliminating sharp corners that catch hips and elbows. The 2026 trend leans toward plaster-finished arched niches as display zones and gently radiused cabinet corners rather than full Art Deco curves.
Step 1: Identify One Zone for the Curve
Pick a single area — an upper cabinet niche, the end panel of a run of base cabinets, or a range hood surround. One deliberate curve is elegant; curves everywhere feels chaotic.
Step 2: Choose the Finish
Plaster or Venetian plaster applied over a wooden arch frame gives a soft, European feel. Painted MDF is more budget-friendly and equally effective.
Step 3: Light the Curve
Install a small LED spotlight inside an arched niche to highlight displayed objects and add a warm glow layer to the kitchen.
What to Watch Out For
- Custom curved cabinetry costs more than standard rectilinear pieces — focus the investment on one statement area
- Ensure the curve radius feels proportional to the kitchen scale; overly large arches can dwarf a compact room
14. Mixed Countertop Materials
Comparing: Single Material vs Mixed Countertops
Using one countertop material throughout a kitchen creates uniformity. Mixing two materials creates zones, visual interest, and practical advantages.
Single Material
Clean, consistent, visually quiet. Works well when the kitchen is very small and you want surfaces to recede. Quartz, porcelain, and solid surface are the most popular single-material choices.
Mixed Materials
Defines work zones — for example, butcher block on the island for prep and quartz on the perimeter for heat resistance near the stove. The material contrast adds visual layers that make a small kitchen feel designed rather than default.
What to Choose
Choose single material if: you prefer visual simplicity and have very limited counter area where mixing would look fragmented. Choose mixed materials if: you have at least two distinct counter zones (island and perimeter, or an L-shape with a natural break point).
Recommendation
Butcher block plus white quartz is the most versatile combination for 2026 — warm meets cool, and both materials are widely available at mid-range price points.
Recommended
Items for this idea
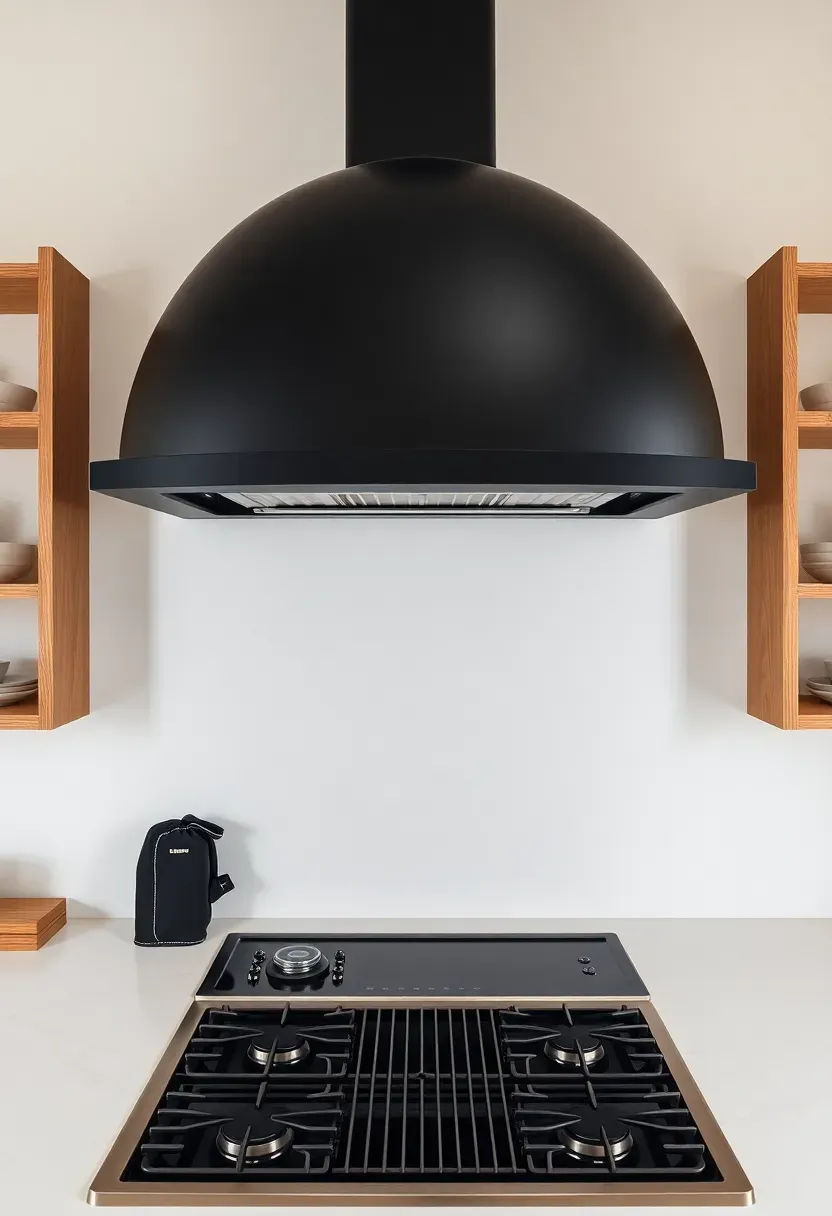
15. Statement Range Hood as Focal Point
In a small kitchen, every surface competes for attention because everything is close together. Rather than fighting this, the 2026 approach designates the range hood as the single focal point and keeps everything else restrained. A sculptural dome, a fluted plaster surround, or a matte black canopy hood draws the eye upward and gives the kitchen a center of gravity. The vertical emphasis created by a statement hood also makes ceilings feel taller — a welcome illusion in compact spaces.
Tips / Practical Recommendations
- Size the hood to extend at least five centimeters beyond the cooktop on each side for effective smoke capture
- Ducted hoods outperform recirculating models; invest in proper ductwork if at all possible
- Keep the wall behind and beside the hood visually simple — plain paint or minimal tile — so the hood reads clearly
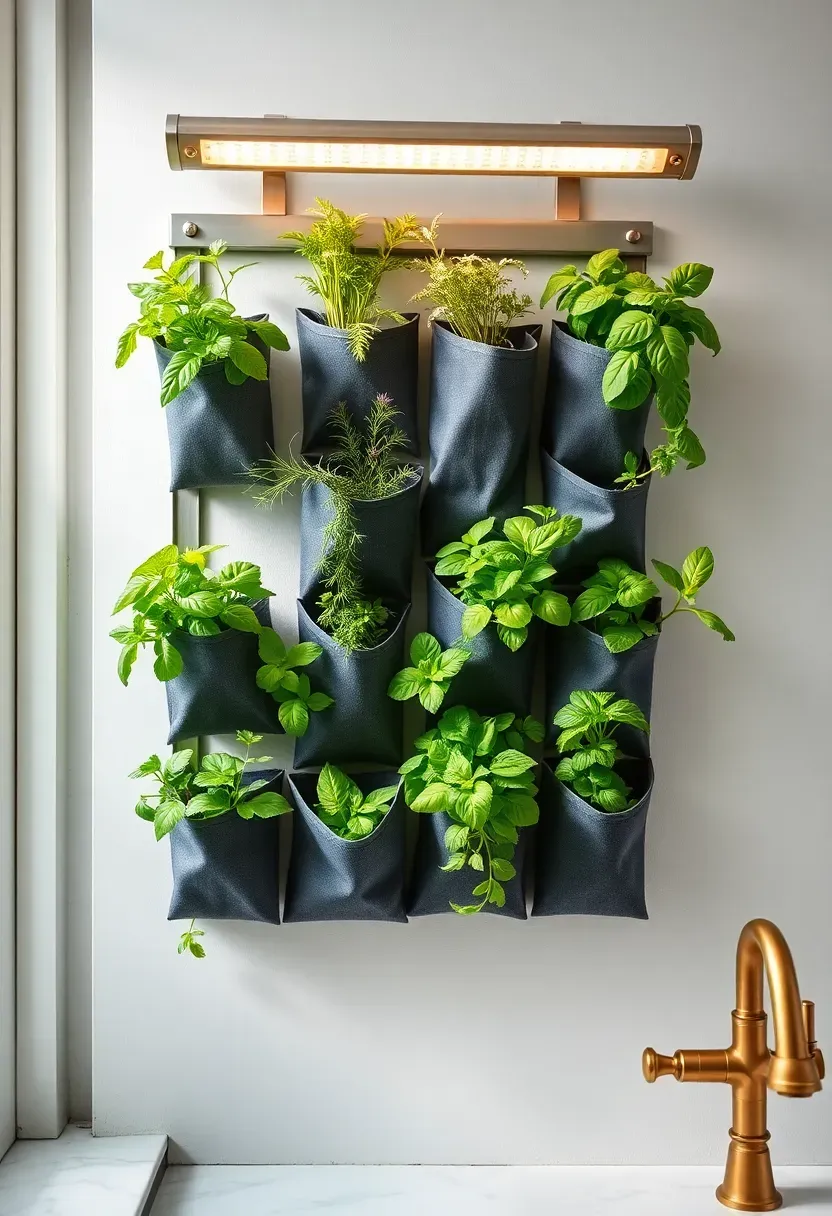
16. Vertical Herb Garden Wall
A vertical herb garden turns a bare wall section into a living, functional feature that provides fresh ingredients within arm's reach of the cutting board. In a small kitchen where windowsill space is already occupied, wall-mounted modular planter systems — fabric pockets, magnetic pots, or rail-mounted ceramic planters — keep herbs accessible without sacrificing counter or shelf real estate. The green wall also introduces organic texture and color that no amount of painted cabinetry can replicate.
Step 1: Choose the Right Wall
Select a wall that receives at least four hours of natural light daily, or supplement with a slim grow light bar mounted above the planters.
Step 2: Pick Hardy Kitchen Herbs
Start with rosemary, thyme, basil, and mint — these tolerate the warmth and humidity fluctuations of a working kitchen better than delicate herbs like cilantro or dill.
Step 3: Set Up a Watering Routine
Check soil moisture every two to three days. Most modular planter systems include drip trays, but mounting over a countertop rather than flooring provides a safety net against drips.
What to Watch Out For
- Ensure planters are securely anchored — a fully watered modular system is heavier than it looks
- Rotate herbs every three months as kitchen-grown herbs have shorter productive lifespans than outdoor plants
Recommended
Items for this idea
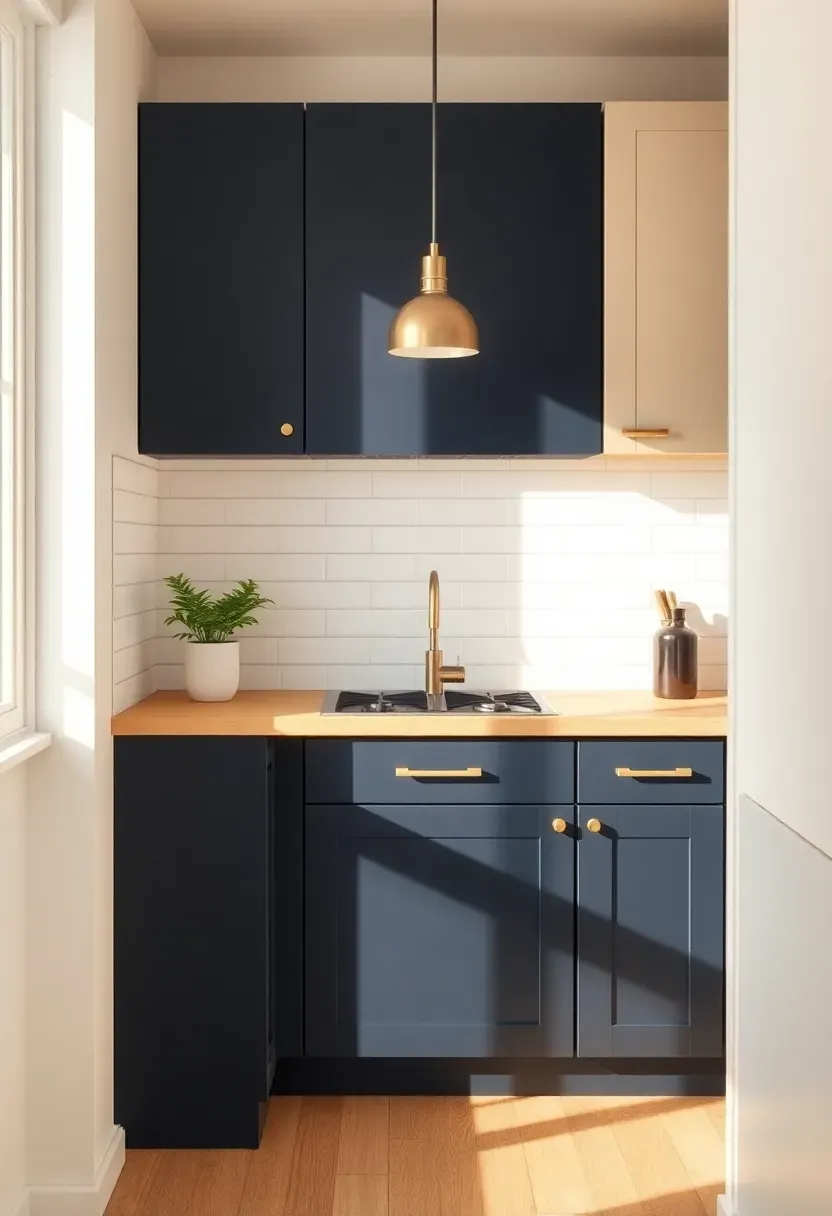
17. Two-Tone Cabinet Color Blocking
Painting all cabinets a single color is safe but predictable. Two-tone color blocking — dark lowers and light uppers, or a contrasting island against neutral perimeter cabinets — introduces dimension and can manipulate how the kitchen's proportions are perceived. Dark lower cabinets ground the space and hide scuffs, while light uppers open the room upward. The 2026 favorites are navy paired with cream, forest green with warm white, and charcoal with pale oak.
The Core Issue
Monochromatic small kitchens can feel either too stark (all white) or too enclosed (all dark). Neither extreme serves a compact footprint well.
The Solution
Splitting the palette between upper and lower zones creates a visual horizon line that breaks the monotony and gives each half of the kitchen its own identity. The contrast makes the room feel layered and considered. Pair the two tones with a single hardware finish — brass or matte black — to unify the scheme.
Pros and Cons
Pros: Adds visual interest without busy patterns, manipulates perceived height, hides daily wear on lower cabinets. Cons: Requires careful color testing to ensure the two tones complement rather than clash; repainting one section later means matching the other precisely.
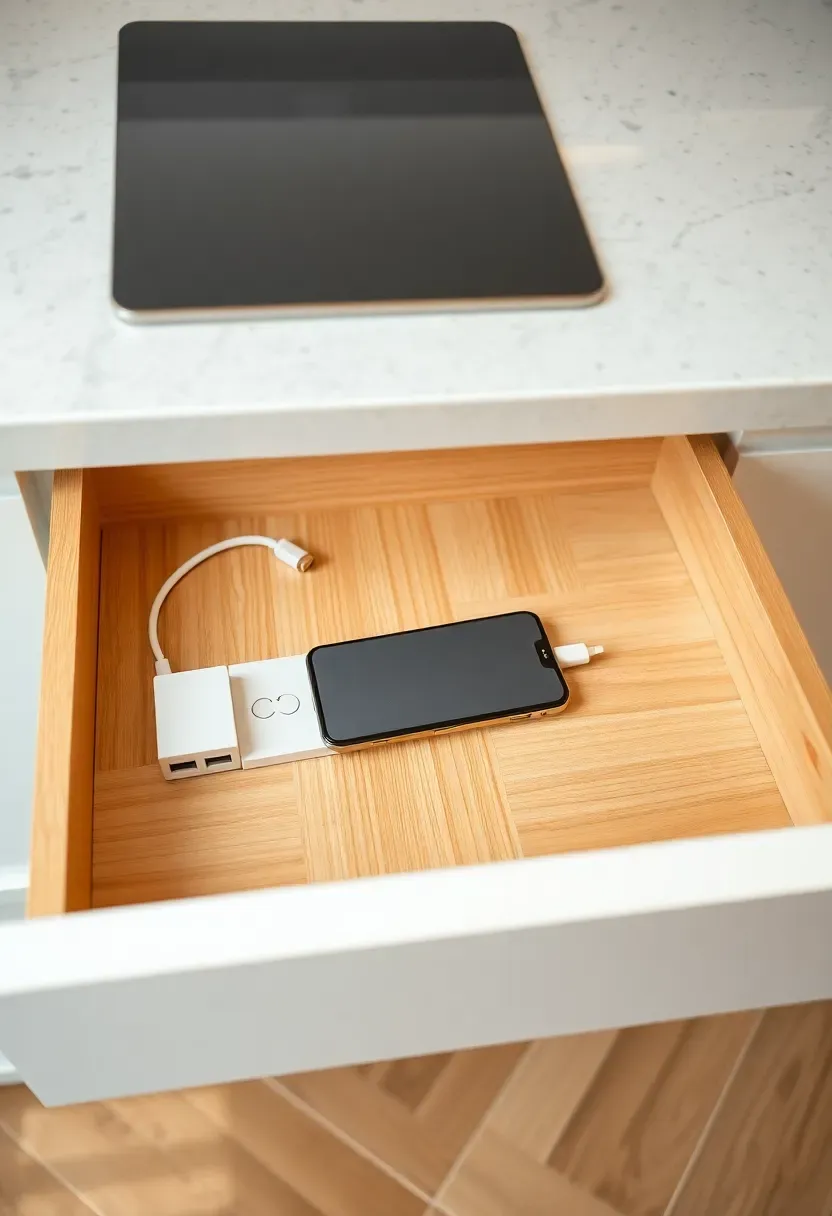
18. Concealed Charging Station Drawer
Phones, tablets, and smart home devices end up on kitchen counters by default, adding clutter and competing with prep space. A concealed charging station built into a shallow drawer near the kitchen entry point solves this entirely. The drawer contains a power strip with USB-A and USB-C ports, a wireless charging pad recessed into the drawer bottom, and cable management channels that keep cords invisible. When the drawer closes, every device charges out of sight and every centimeter of counter stays clear.
Tips / Practical Recommendations
- Install the charging drawer at the end of a cabinet run near the kitchen entrance — this is where people naturally set down devices
- Use a ventilated drawer bottom to prevent heat buildup from multiple devices charging simultaneously
- Include a slim cord pass-through at the drawer back so the power strip connects to an outlet behind the cabinet
Recommended
Items for this idea
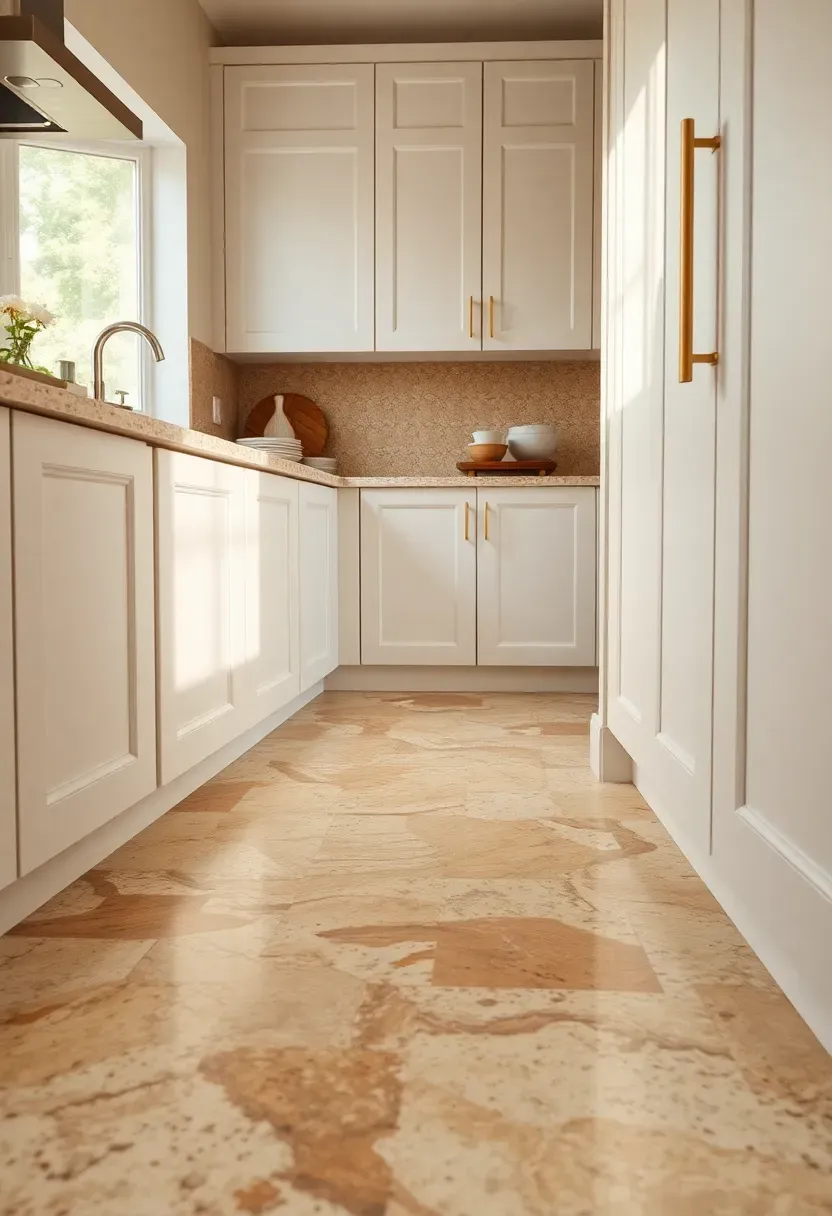
19. Terrazzo Revival on Floors and Counters
Origins / History
Terrazzo originated in fifteenth-century Venice when workers embedded marble chips into clay flooring as a way to reuse construction waste. The material evolved into a polished luxury finish over centuries, fell out of fashion in the 1980s, and has returned with force in the mid-2020s with updated chip sizes, resin binders, and warmer color palettes.
Modern Interpretation
The 2026 version of terrazzo moves away from the stark white-and-primary-color chips of previous decades toward warmer, earthier palettes — cream, terracotta, sage, and soft gray chips in a warm beige or off-white base. In a small kitchen, terrazzo works beautifully as either a floor material or a countertop accent because the chip pattern provides visual interest at close range without the repetitive geometry of tile grout lines. Precast terrazzo tiles offer the look at a fraction of the cost and installation complexity of poured-in-place terrazzo.
How to Apply at Home
- Start with terrazzo floor tiles if the budget allows only one application — floors define the kitchen's base tone
- Use terrazzo as a countertop edge detail or a section of the island top for a subtle nod rather than a full commitment
- Pair warm-toned terrazzo with white or sage cabinetry and brass hardware for a contemporary Mediterranean feel
- Seal terrazzo countertops every twelve to eighteen months to maintain stain resistance
Quick FAQ
Is it possible to follow 2026 kitchen trends in a rental apartment? Absolutely. Many trending elements — brass hardware, LED strip lighting, removable backsplash panels, and pull-out worktop extensions — are renter-friendly upgrades that install without permanent modifications. Focus on swappable details that travel with you when the lease ends.
Should you invest more in countertops or cabinetry for a small kitchen remodel? Cabinetry typically delivers more visual impact per dollar because it covers more surface area and defines the kitchen's overall character. If the budget forces a choice, prioritize quality cabinet doors and hardware, then use a mid-range countertop material like engineered quartz.
What is the biggest mistake people make when designing a small kitchen? Choosing materials and finishes that fragment the space visually. Too many competing colors, patterns, and textures make a compact room feel chaotic. The most effective small kitchens use a restrained palette — two or three materials, one accent color, one hardware finish — and let negative space do the work.
Which countertop material handles heat and stains best in a busy kitchen? Porcelain slab and engineered quartz both resist heat and staining better than natural marble or butcher block. Porcelain is the more durable of the two but costs more. Quartz offers the widest range of color and pattern options at a moderate price point.
Do open shelves collect grease in a kitchen without strong ventilation? They can. If your kitchen lacks a ducted range hood, open shelves near the stove will accumulate a fine grease film over time. Position open shelves away from the cooktop — above the sink or on an opposite wall — and keep a ducted hood running during cooking to minimize airborne grease.
A kitchen does not need to be large to feel current. Start with one or two of these trends — perhaps swapping hardware to brass and adding under-cabinet LEDs — and notice how quickly the entire room shifts. The most compelling small kitchens in 2026 are not the ones that chase every trend simultaneously, but the ones that commit fully to a few intentional choices and let those choices define the space.
Pinterest cover for 19 Small Kitchen Trends for 2026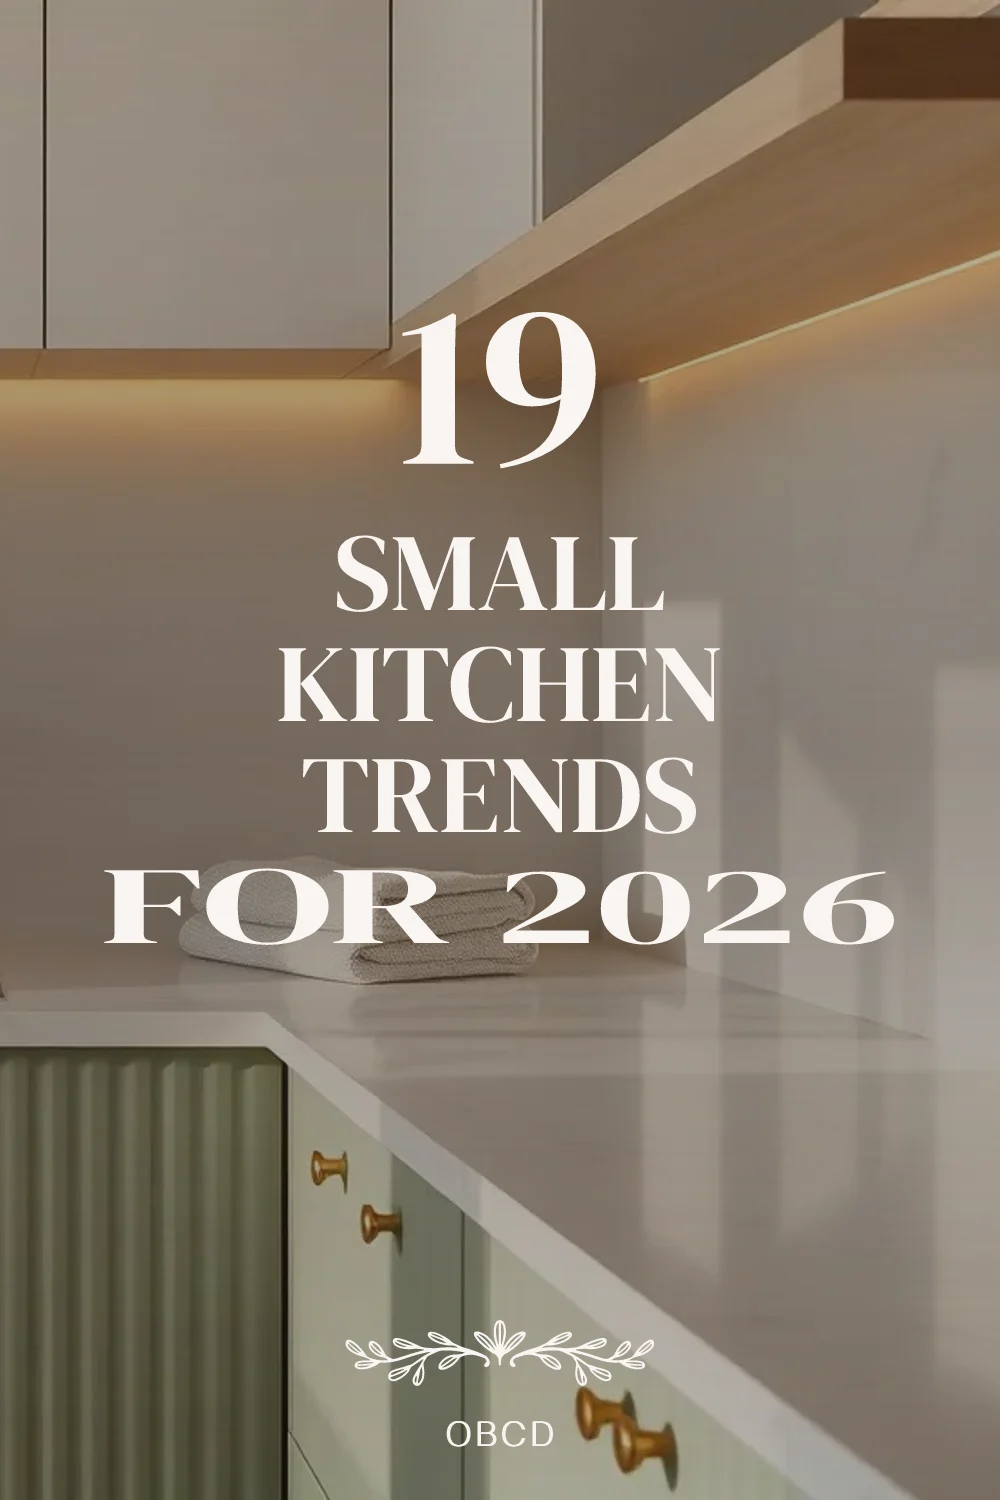
About the author
OBCD
CGI visualization and interior design content. We create detailed 3D renders and curate practical design ideas for every room in your home.