27 Wall Decor Ideas That Transform Bare Walls Into Focal Points
We have all stared at an empty wall and felt absolutely stuck. The furniture is placed, the rug is down, the curtains hang nicely, yet that one blank surface keeps pulling your eye for all the wrong reasons. The truth is that walls make up the largest visual real estate in any room, and leaving them bare is like wearing a tailored suit with no shoes. Whether you lean toward bold oversized art, subtle textured finishes, or a curated mix of objects, the right wall treatment can shift an entire room from unfinished to unforgettable.
In this article I have gathered 27 distinct approaches to wall decor, ranging from classic gallery arrangements to unexpected materials most people overlook. Let us dive in.
Table of Contents
- Oversized Canvas Statement
- Classic Gallery Wall Grid
- Floating Shelf Display
- Woven Textile Hangings
- Plate Wall Arrangement
- Limewash Accent Wall
- Vertical Garden Panel
- Vintage Mirror Cluster
- Architectural Wall Molding
- Black-and-White Photo Wall
- Rattan and Wicker Baskets
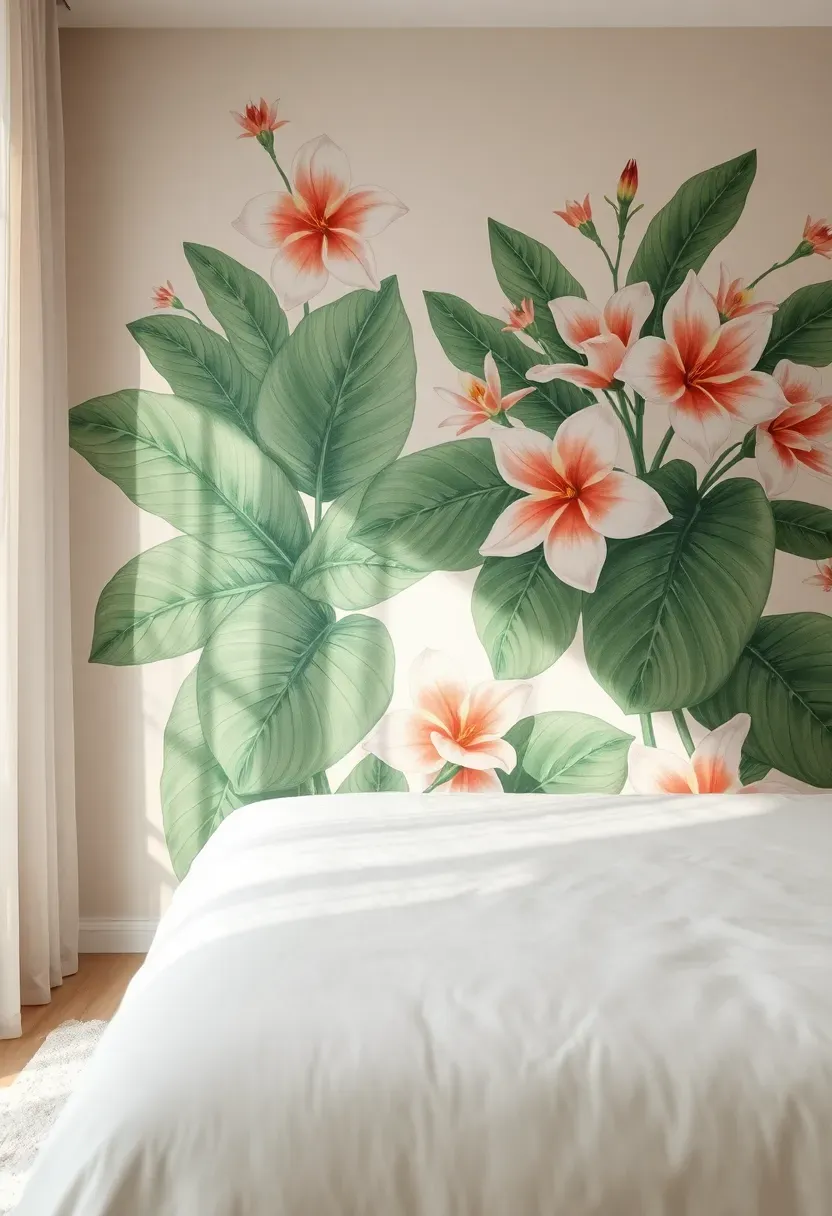
- Wallpaper Feature Panel
- Sculptural Metal Wall Art
- Neon Sign Accent
- Wood Slat Accent Wall
- Tapestry or Kilim Rug Display
- Asymmetric Salon-Style Hang
- Wall-Mounted Planter Collection
- Reclaimed Wood Accent
- Shadow Box and Object Display
- Pegboard Utility Wall
- Ceramic and Pottery Wall Mounts
- Stenciled or Hand-Painted Mural
- Fabric-Wrapped Panels
- Leaning Art and Layered Frames
- Minimalist Line Art Series
- Mixed-Media Eclectic Wall
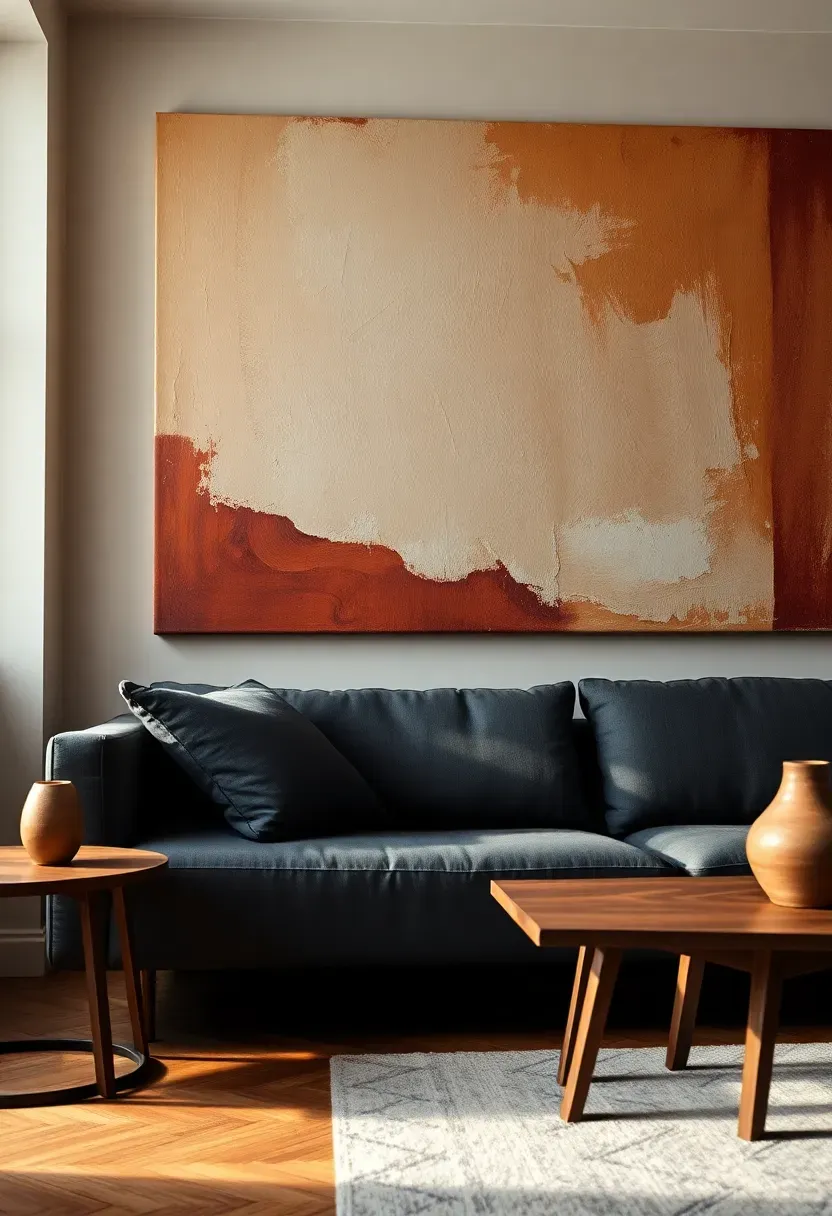
1. Oversized Canvas Statement
Sometimes a single massive piece says more than twenty smaller ones ever could. An oversized canvas — anything taller than four feet — anchors a wall instantly and gives the eye a clear resting point. Abstract works in muted earth tones integrate with most palettes without competing against furniture. Oil-heavy textures add a tactile dimension that flat prints simply cannot match, making the wall feel alive even in a restrained, minimalist room.
Tips for Choosing the Right Piece
- Scale to at least two-thirds the width of the furniture below it so the art feels intentional rather than lost
- Hang the center point at 57 inches from the floor, the standard gallery height
- Avoid matching colors exactly to your sofa — slight contrast keeps things dynamic
We picked a few things that go well with this idea: Gallery Perfect 7-Pack Black Frame Set (★4.5), Vittanly 15-Pack Gallery Wall Frame Set (★4.6) and SONGMICS 7-Pack Collage Photo Frames Black (★4.6). As an Amazon Associate we earn from qualifying purchases.
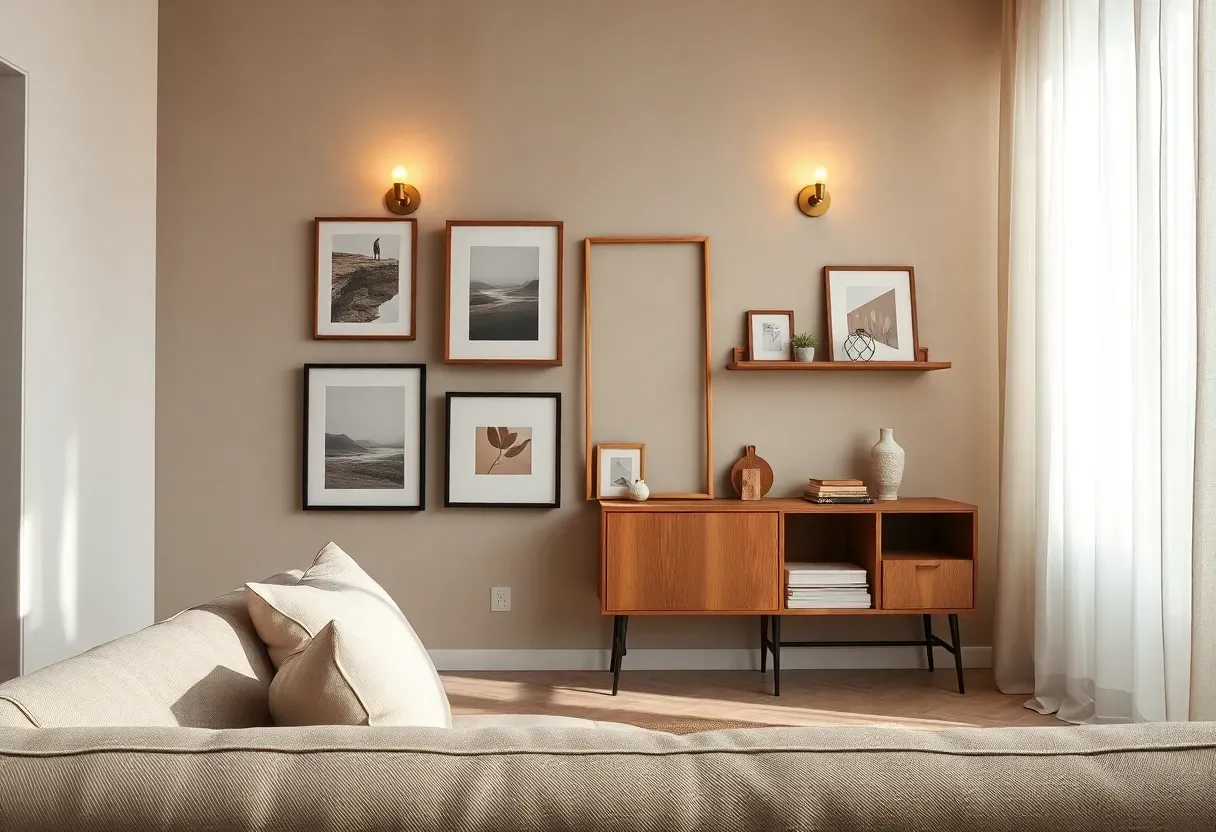
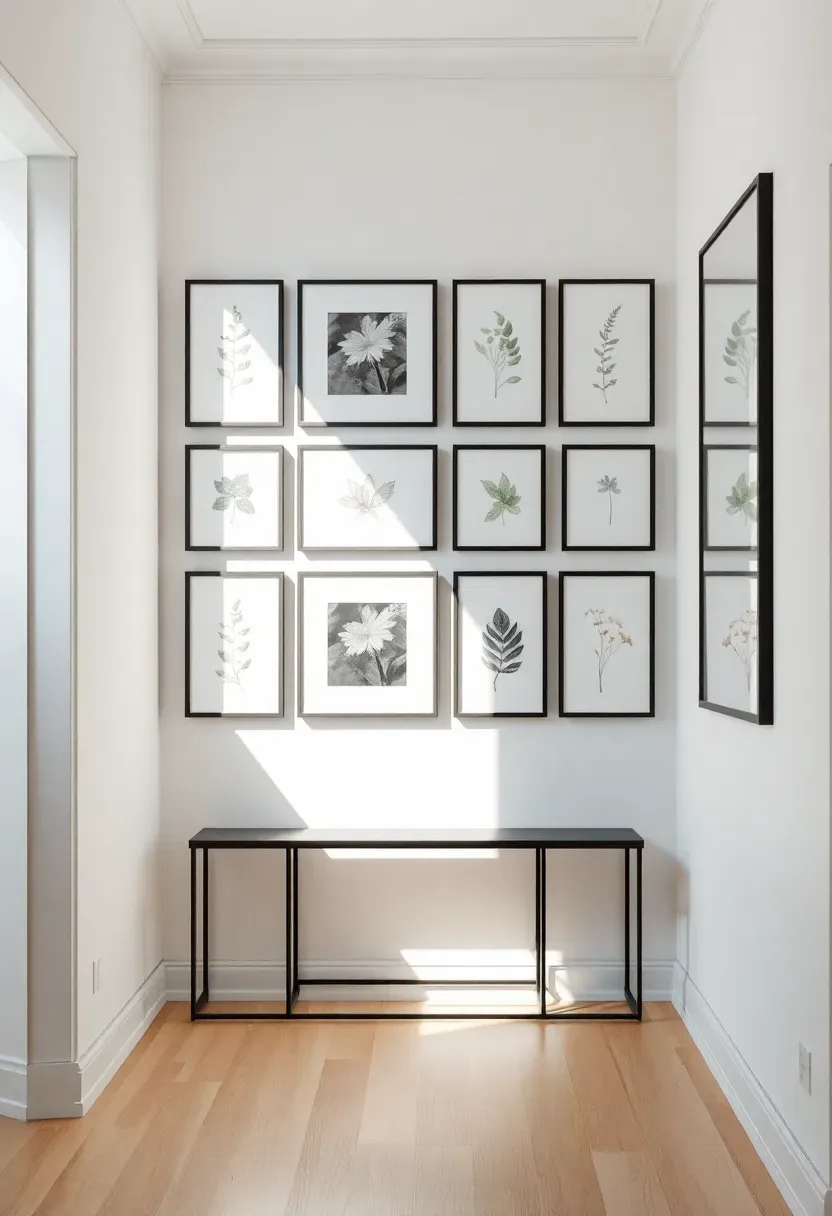
2. Classic Gallery Wall Grid
Why Grids Work So Well
Random arrangements can feel chaotic if you lack an eye for balance. A strict grid eliminates guesswork: equal spacing, identical frames, clean lines.
The Solution
Choose six to twelve frames in the same finish — black, natural oak, or brass — and fill them with a cohesive theme: botanical illustrations, travel photography, or family portraits in black and white. The uniformity of the frames creates order while the varied content inside each one provides visual interest. Hang them with two inches of space between each frame for a museum-quality look that anyone can achieve in an afternoon.
Pros and Cons
Pros: easy to plan, scales from small hallways to large living room walls, swappable prints keep it fresh Cons: requires precise measuring or it looks sloppy, identical frames can feel corporate if the content lacks personality
We picked a few things that go well with this idea: Guzhiou Large Boho Macrame Wall Hanging (★4.8), Boho Handmade Macrame Wall Tapestry (43x32) (★4.8) and KHOYIME Large Leaf Feather Macrame Wall Art (★4.4). As an Amazon Associate we earn from qualifying purchases.
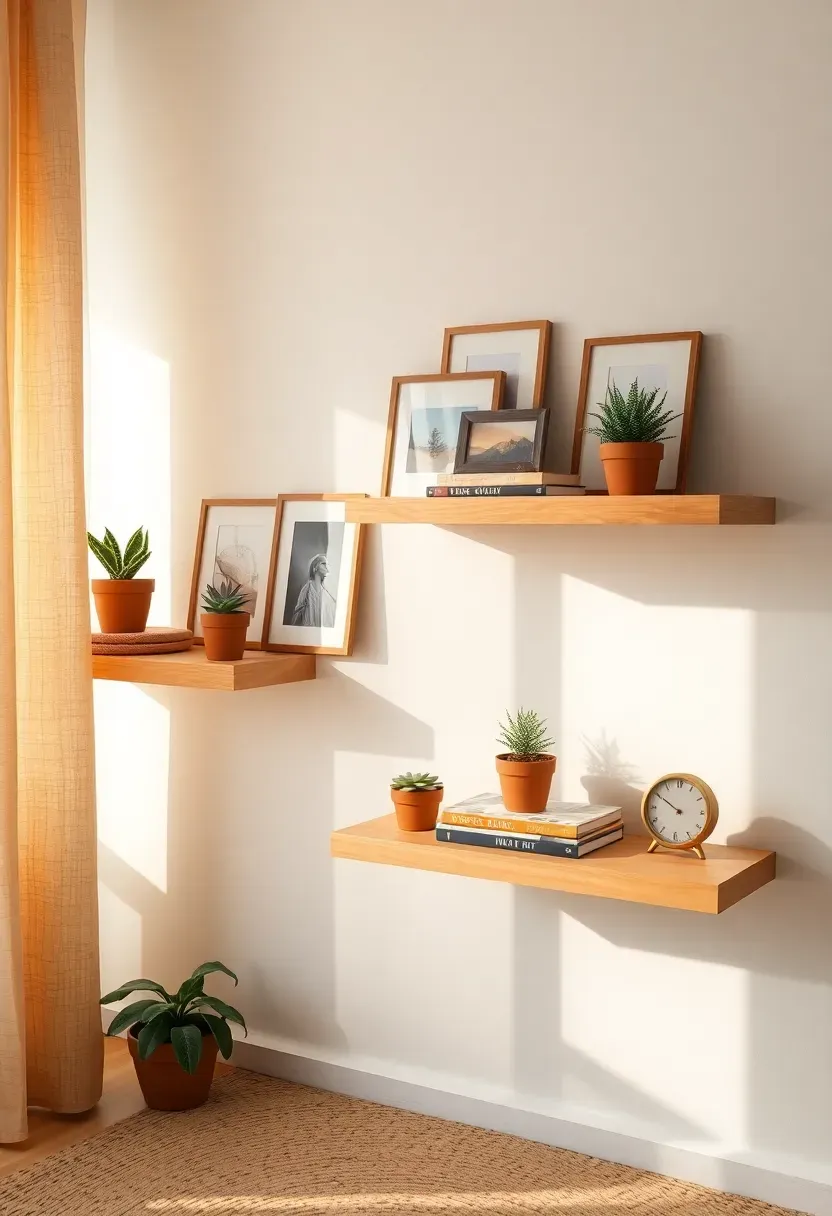
3. Floating Shelf Display
Floating shelves give you the freedom to style and restyle without putting new holes in the wall every season. Install two or three shelves at staggered heights and layer them with a rotating cast of objects: small framed prints propped rather than hung, trailing pothos plants, stacked books with meaningful spines facing out, and a single sculptural object like a ceramic vase or brass figure. The beauty of this approach is its impermanence — swap items as your taste evolves, and the wall always feels current.
Getting the Layering Right
- Place the tallest item at one end and let heights cascade down toward the other
- Overlap a small frame in front of a larger one for depth
- Leave at least a third of the shelf surface empty so the arrangement can breathe
We picked a few things that go well with this idea: WOPITUES Wood Floating Shelves Set (6-Pack) (★4.5), Upsimples Wall Mounted Wood Shelves (6-Pack) (★4.6) and QEEIG Rustic Floating Shelves (3-Pack, 16in) (★4.7). As an Amazon Associate we earn from qualifying purchases.
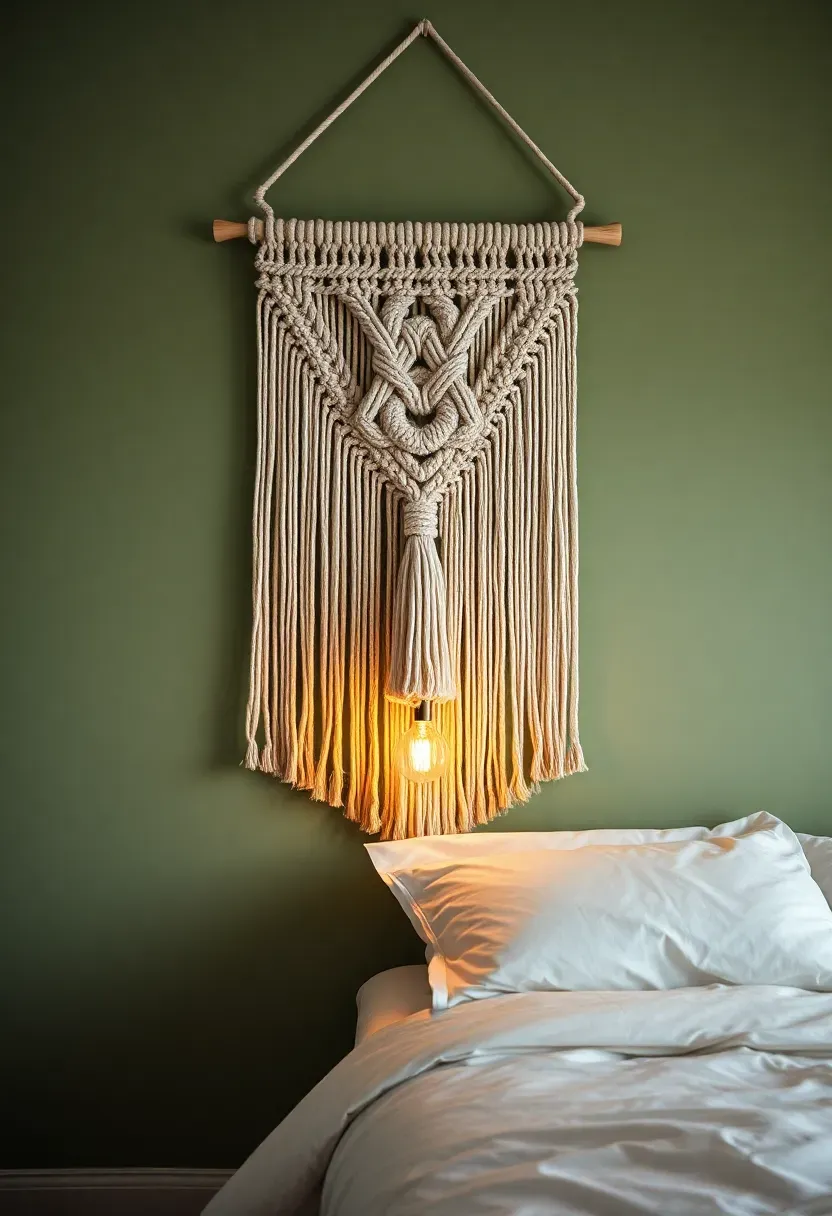
4. Woven Textile Hangings
Origins and Appeal
Textile wall hangings trace back thousands of years, from Andean weavings to Scandinavian ryijy tapestries. Their appeal is rooted in something primal: soft textures on a hard surface create an immediate sense of warmth.
Modern Interpretation
Today's woven hangings range from minimalist macrame in natural cotton to bold geometric kilims in dyed wool. They absorb sound in rooms with hard flooring, add a craft-forward character that mass-produced art cannot replicate, and introduce organic texture that softens spaces dominated by hard edges and flat surfaces. A single large weaving above a bed or sofa transforms the wall into something you want to touch.
How to Apply at Home
- Mount on a simple dowel rod with two discreet hooks for an effortless look
- Choose fibers that echo other textiles in the room — linen, cotton, or jute
- Scale up: a hanging that is too small for the wall looks like an afterthought
- Pair with a single shelf or minimal decor to avoid visual clutter

Recommended
Items for this idea
5. Plate Wall Arrangement
Hanging plates on a wall might sound dated, but the execution determines everything. When done with intention — mixing patterns, sizes, and origins — a plate wall becomes a conversation piece that bridges old-world charm with contemporary curation. Flea market finds, inherited china, and hand-painted ceramics from travels tell a layered story that no print-on-demand poster can match.
Start by laying your plates on the floor in the desired arrangement. Photograph it from above to lock in the layout. Then transfer to the wall using spring-loaded plate hangers or adhesive disc mounts. Aim for an organic, slightly asymmetric shape — an oval or diamond cluster reads more modern than a rigid grid.
Practical Pointers
- Mix three to five different plate sizes for visual rhythm
- Keep a unifying element: a shared color, era, or motif ties the collection together
- Adhesive disc hangers are invisible from the front and safer for heirloom pieces
6. Limewash Accent Wall
The Core Issue
Flat painted walls can feel lifeless. Even a carefully chosen color looks one-dimensional under overhead lighting, and accent walls in solid paint sometimes feel like a half-measure.
The Solution
Limewash paint builds depth through translucent layers of natural mineral pigment. Each brushstroke shows through the next, creating a cloud-like variation in tone that shifts with the light throughout the day. Morning sun reveals soft warm undertones while evening lamplight deepens the shadows. The result is a wall that feels ancient, tactile, and alive. Unlike standard paint, limewash has a matte, chalky finish with genuine texture you can feel under your fingertips — and it costs roughly the same as premium paint once you factor in that a single coat is usually enough.
Pros and Cons
Pros: unique depth impossible with flat paint, easy to touch up, natural mineral ingredients with zero VOC Cons: requires a porous surface like plaster or unsealed drywall, not suitable for bathrooms with high humidity
Recommended
Items for this idea
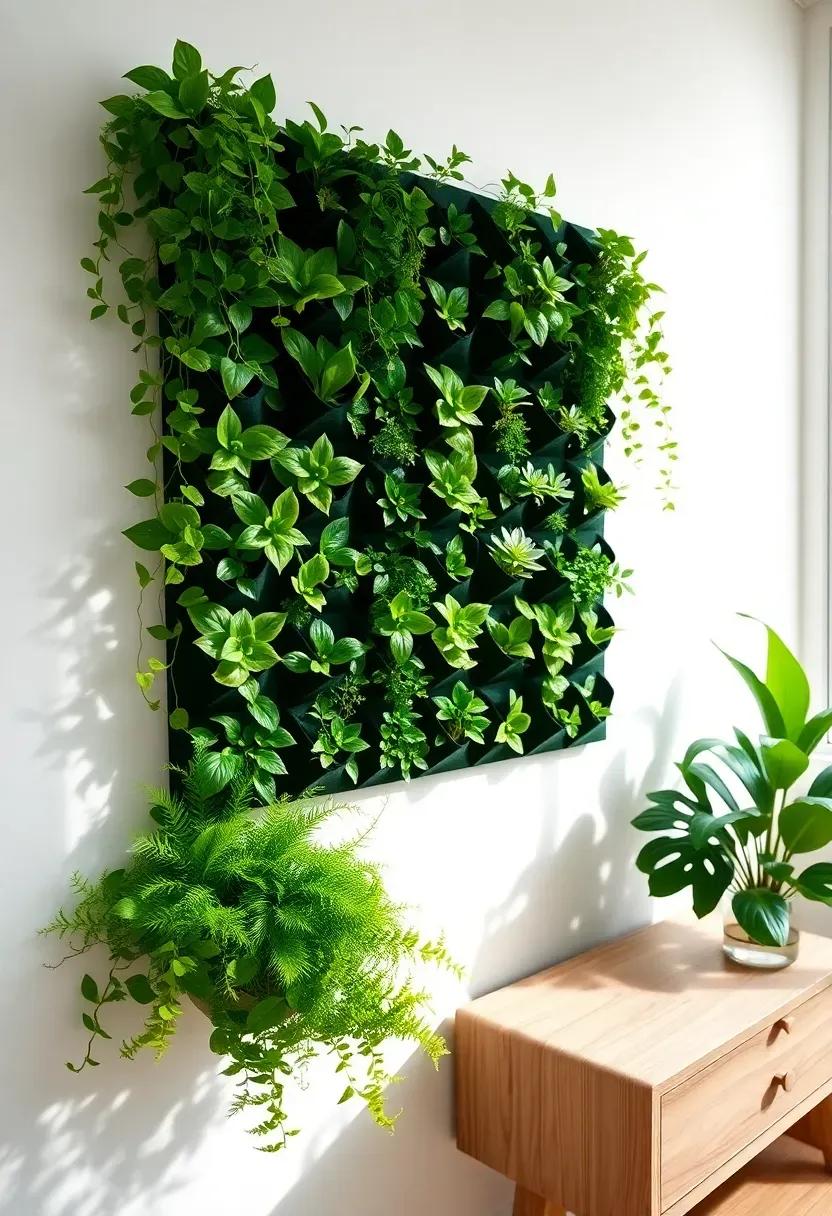
7. Vertical Garden Panel
Imagine walking past a wall that breathes. Vertical garden panels bring living greenery indoors as genuine wall decor rather than potted afterthoughts on a shelf. Modular pocket planters or felt-based panel systems mount directly to the wall and hold a curated mix of low-light plants: pothos, ferns, philodendrons, and air plants.
Step 1: Choose Your System
Select a modular panel system with built-in irrigation or go minimal with individual wall-mounted planters. Self-watering systems reduce maintenance to a weekly reservoir refill.
Step 2: Select Plants
Choose species that thrive in your room's light conditions. North-facing walls need shade-tolerant varieties. South-facing walls can handle more demanding tropicals.
Step 3: Install and Maintain
Mount with heavy-duty anchors since the panel gains significant weight when watered. Mist leaves weekly and rotate plants that lean toward the light source.
What to Watch Out For
- Humidity buildup behind the panel can damage drywall — use a waterproof backing
- Start small with a two-by-three-foot section before committing to a full wall
- Artificial alternatives exist in high-quality preserved moss panels that need zero care
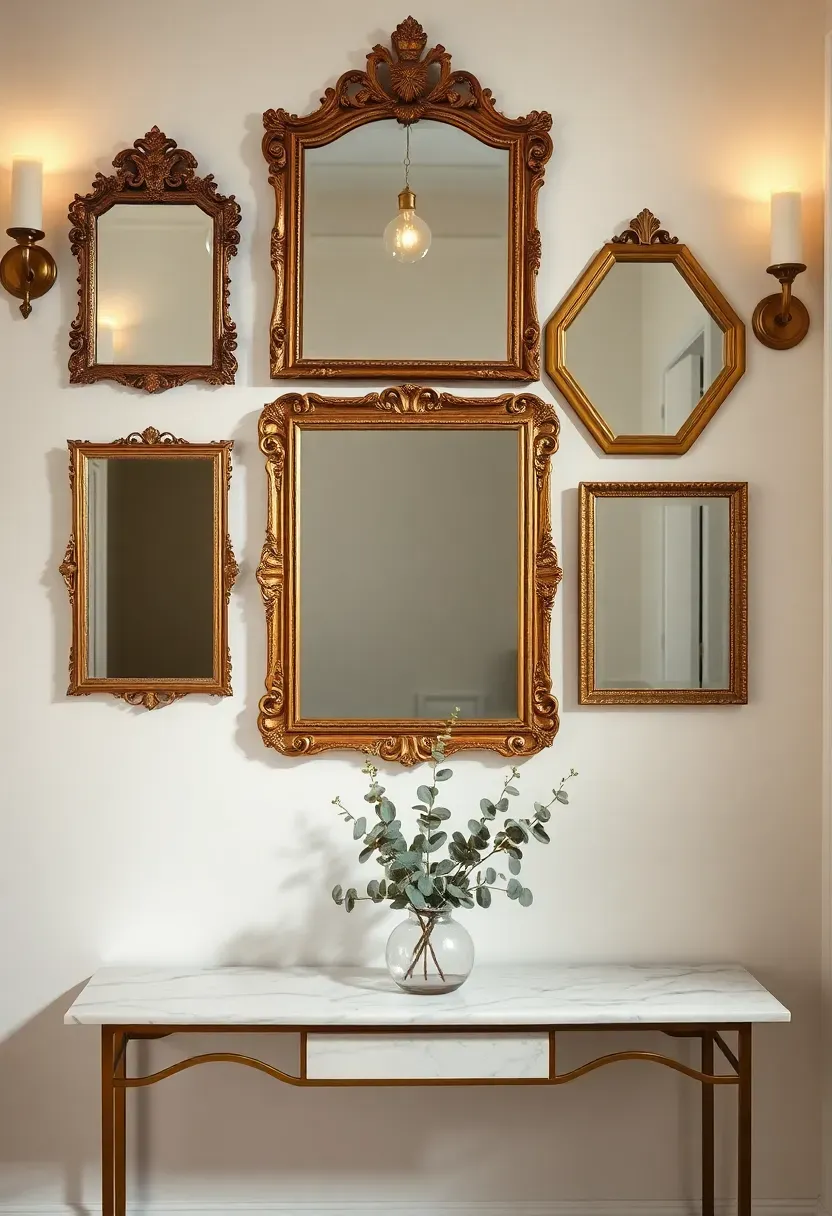
8. Vintage Mirror Cluster
Mirrors do double duty on any wall: they reflect light to brighten the space and they function as decorative objects in their own right. A cluster of mismatched vintage mirrors — collected from thrift stores, estate sales, and flea markets — creates an effect that is part gallery wall, part optical illusion. The key is variety in frame style and shape while maintaining a shared metallic tone. Gold, brass, or antiqued silver keeps the collection cohesive even when the frames span different eras and profiles.
Tips for Arranging Mirrors
- Hang the largest mirror slightly off-center as the anchor, then build outward
- Position the cluster where it will reflect something worth seeing — a window, a chandelier, or a bookshelf
- Odd numbers of mirrors tend to create more dynamic compositions than even numbers
Recommended
Items for this idea
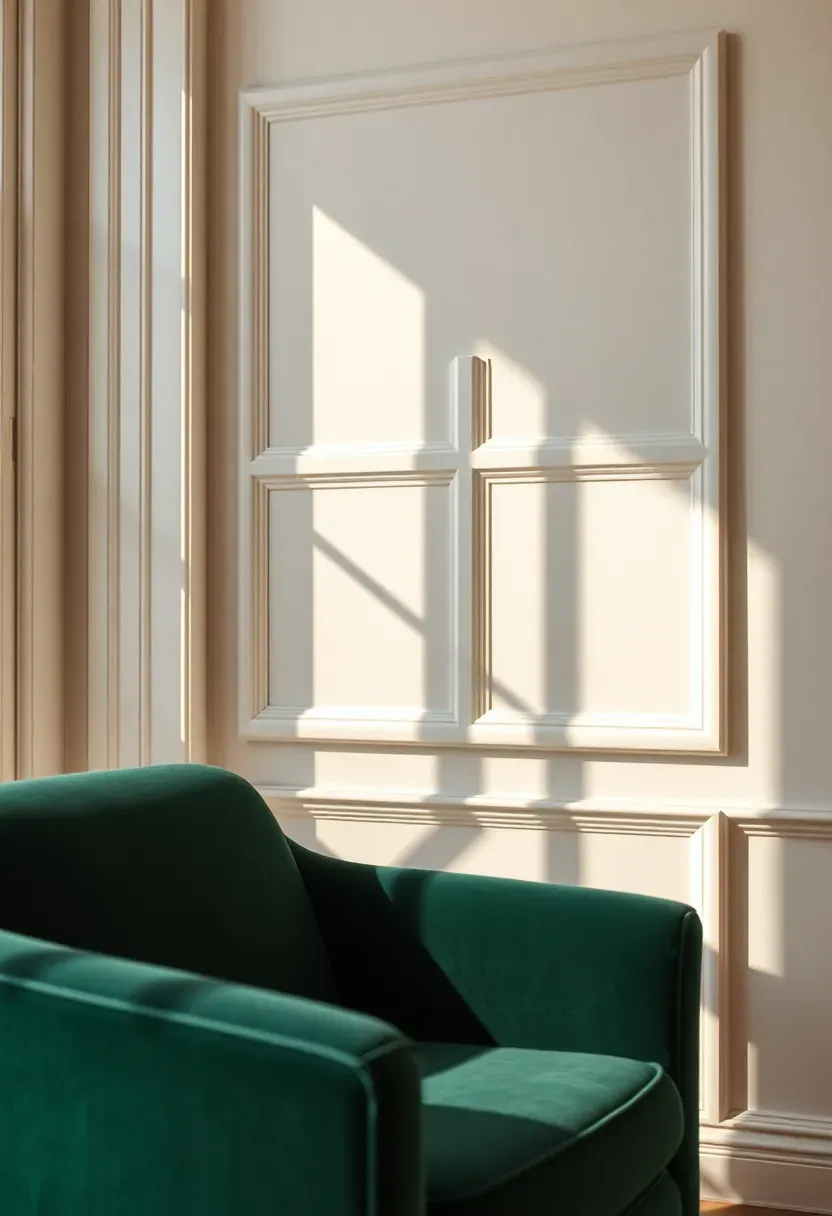
9. Architectural Wall Molding
A Centuries-Old Trick That Still Delivers
Panel molding was originally used in European architecture to protect plaster walls from furniture damage. Today it serves a purely aesthetic purpose, and it is one of the most cost-effective ways to add architectural character to a flat, featureless wall.
Modern Interpretation
Simple rectangular molding profiles applied in a grid or wainscot pattern transform builder-grade walls into something that looks custom. Paint the molding the same color as the wall for a subtle, tone-on-tone effect, or go bold with a contrasting shade inside the panels. The raised profile catches light differently throughout the day, creating shadow lines that give flat walls a three-dimensional quality.
How to Apply at Home
- Use lightweight MDF molding strips and construction adhesive for easy DIY installation
- Measure and mark your grid with painter's tape before committing to cuts
- Prime and paint molding before mounting, then touch up nail holes after installation
- A single accent wall is usually enough — molding on every surface can feel overwhelming

10. Black-and-White Photo Wall
Color photography can clash with room palettes, but black-and-white images sit comfortably in any environment. A dedicated monochrome photo wall — whether family portraits, travel shots, or fine art prints — brings narrative to a room without introducing competing hues. The tonal consistency lets the content and composition of each image take center stage.
Print on matte fine art paper for a museum feel or opt for glossy behind glass for crisp contrast. Frame everything in thin black metal for the sharpest presentation, or use unframed clips on a wire for a more casual, studio-like vibe.
Making It Personal
- Mix candid shots with composed images for an authentic feel
- Include at least one large anchor print among smaller supporting frames
- Update the wall seasonally with new prints to keep it from feeling static
Recommended
Items for this idea
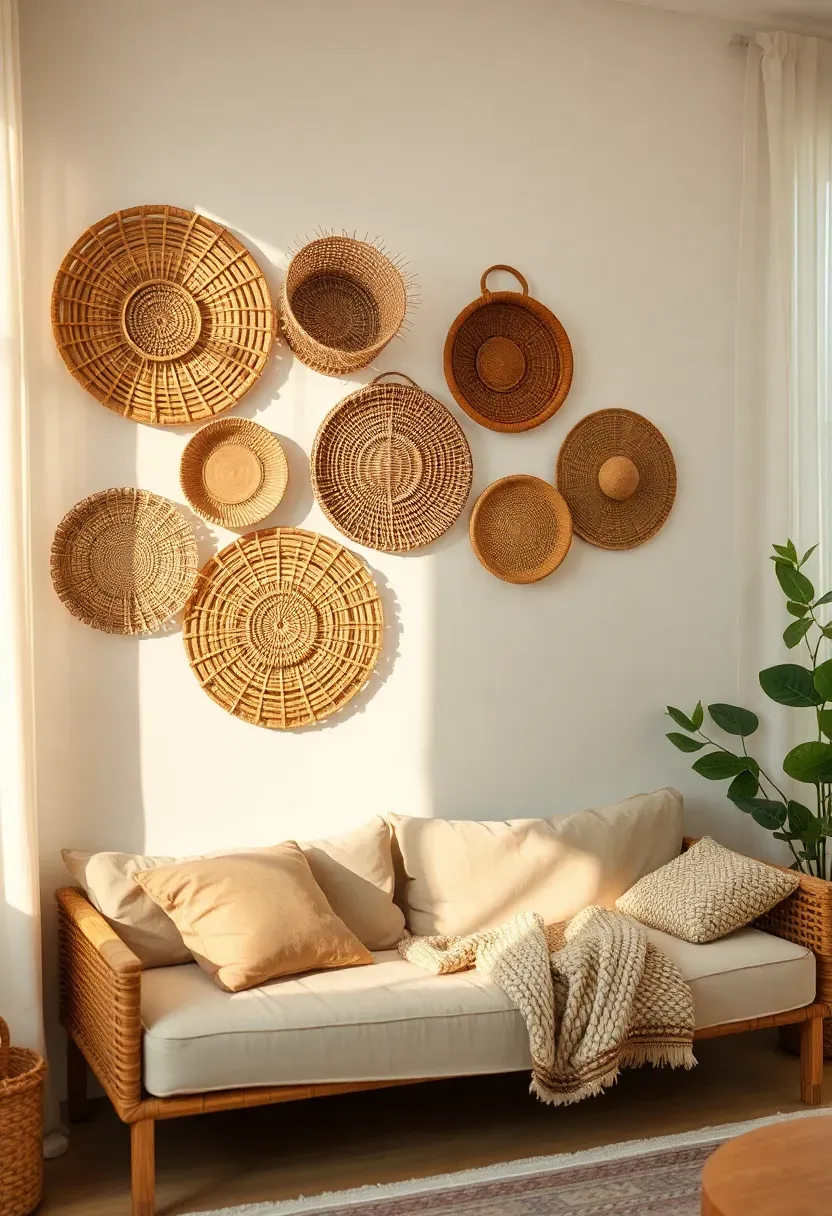
11. Rattan and Wicker Baskets
Baskets on walls might sound unconventional, but this approach delivers warmth, texture, and dimension that flat art cannot. Handwoven rattan, seagrass, and wicker baskets in different diameters create a layered, organic composition that works especially well in boho, coastal, or farmhouse-inspired spaces. Each basket's weave pattern and natural color variation adds subtle detail that rewards a closer look.
Step 1: Collect Varied Sizes
Gather five to nine baskets ranging from six inches to twenty inches in diameter. Thrift stores, import shops, and artisan markets offer the best variety.
Step 2: Plan the Layout
Arrange on the floor first. Aim for a loose, organic cluster rather than a rigid pattern. Overlap edges slightly for depth.
Step 3: Mount Securely
Use small nails or adhesive hooks depending on weight. Angle some baskets slightly to create shadow and dimension.
What to Watch Out For
- Avoid perfectly matching baskets — the beauty is in the imperfection
- Keep the color range within two or three tones for cohesion
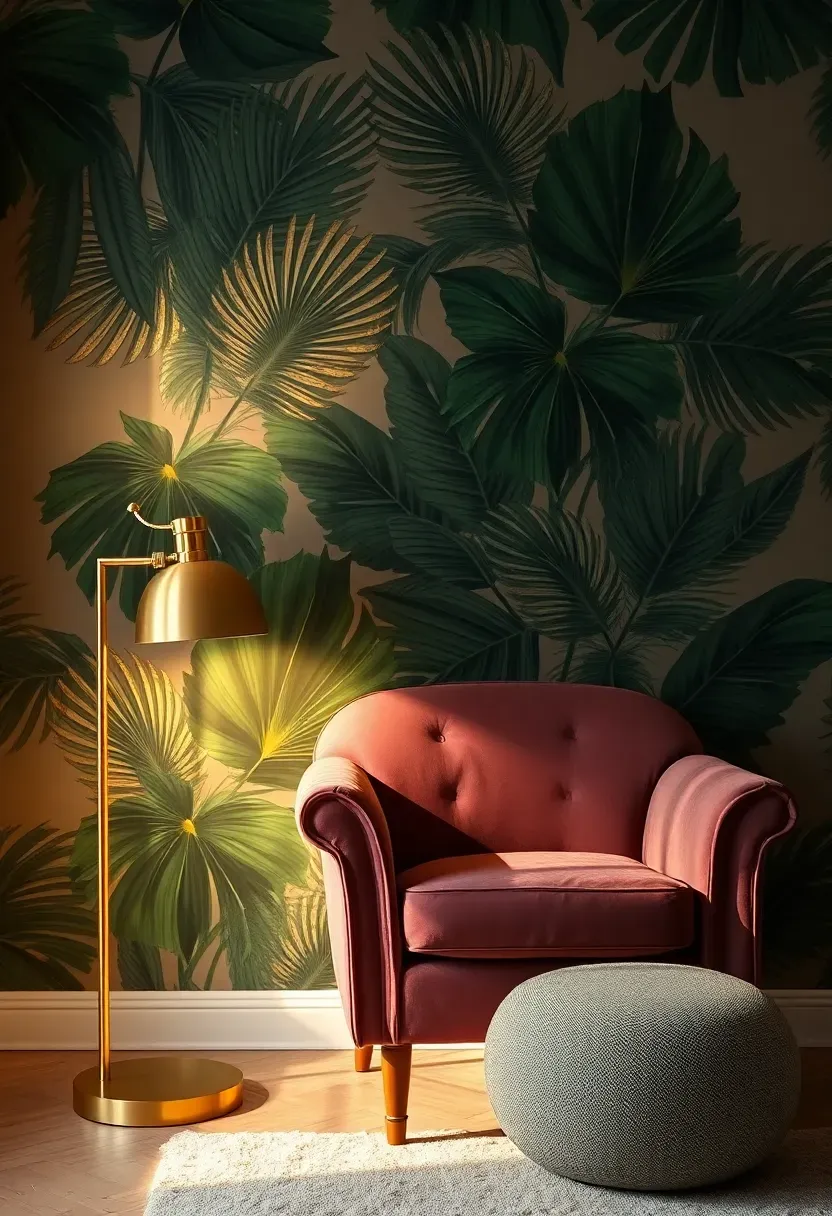
12. Wallpaper Feature Panel
Full-room wallpaper can overwhelm, but a single feature panel — one wall or even a framed section of wall — strikes the perfect balance between impact and restraint. Modern peel-and-stick options make this commitment-free, especially appealing for renters. Bold botanical prints, geometric patterns, or subtle linen textures each create entirely different moods from the same technique.
The trick is choosing a pattern scale that matches the wall size. Small patterns on large walls disappear; oversized motifs on small walls feel claustrophobic. For a wall ten feet wide or more, large-scale florals or tropicals make a confident statement. For smaller alcoves or bathroom walls, delicate geometrics or tonal stripes work better.
Practical Pointers
- Peel-and-stick wallpaper removes cleanly from smooth surfaces, ideal for rentals
- Frame a wallpaper section with thin molding for a built-in, intentional look
- Coordinate one accent color from the pattern with cushions or a throw for cohesion
Recommended
Items for this idea
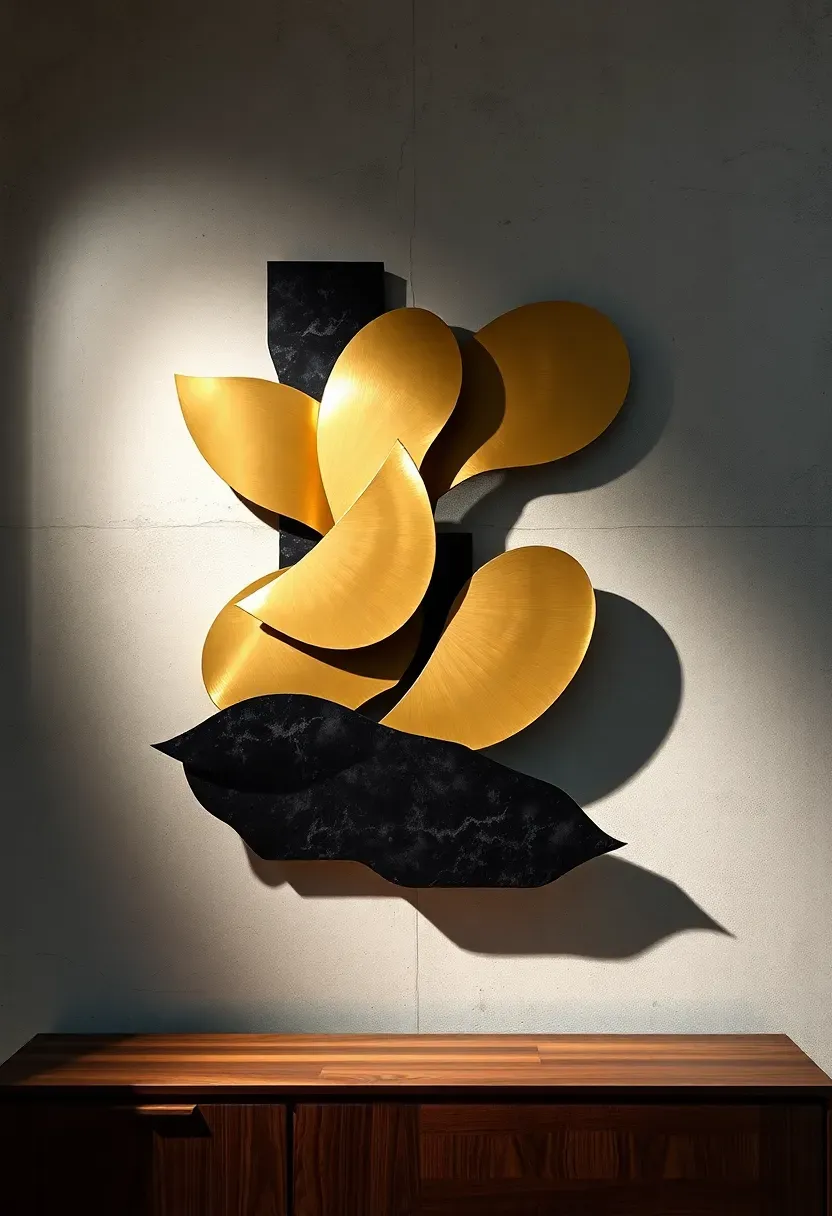
13. Sculptural Metal Wall Art
Comparing: Flat Art vs Three-Dimensional Metal Pieces
When walls feel flat despite having art on them, the issue is usually dimension. Flat prints exist in two dimensions. Sculptural metal pieces push outward, casting real shadows that shift as the light changes.
Flat Art
Traditional flat art stays flush against the wall. It relies entirely on the image for visual interest and adds no physical depth.
Sculptural Metal
Metal wall sculptures — whether abstract brass forms, blackened steel geometric pieces, or hammered copper panels — project inches from the surface. They interact with light, creating moving shadows that give the wall a living quality flat art simply cannot replicate.
What to Choose
Choose flat art if: you want to swap pieces frequently, budget is tight, or the wall already has strong architectural features Choose sculptural metal if: you want permanent presence, the wall lacks dimension, or you value how light plays across surfaces throughout the day
Recommendation
For walls that anchor a room — above a fireplace, behind a dining table, or at the end of a long hallway — sculptural metal delivers impact that justifies the investment.
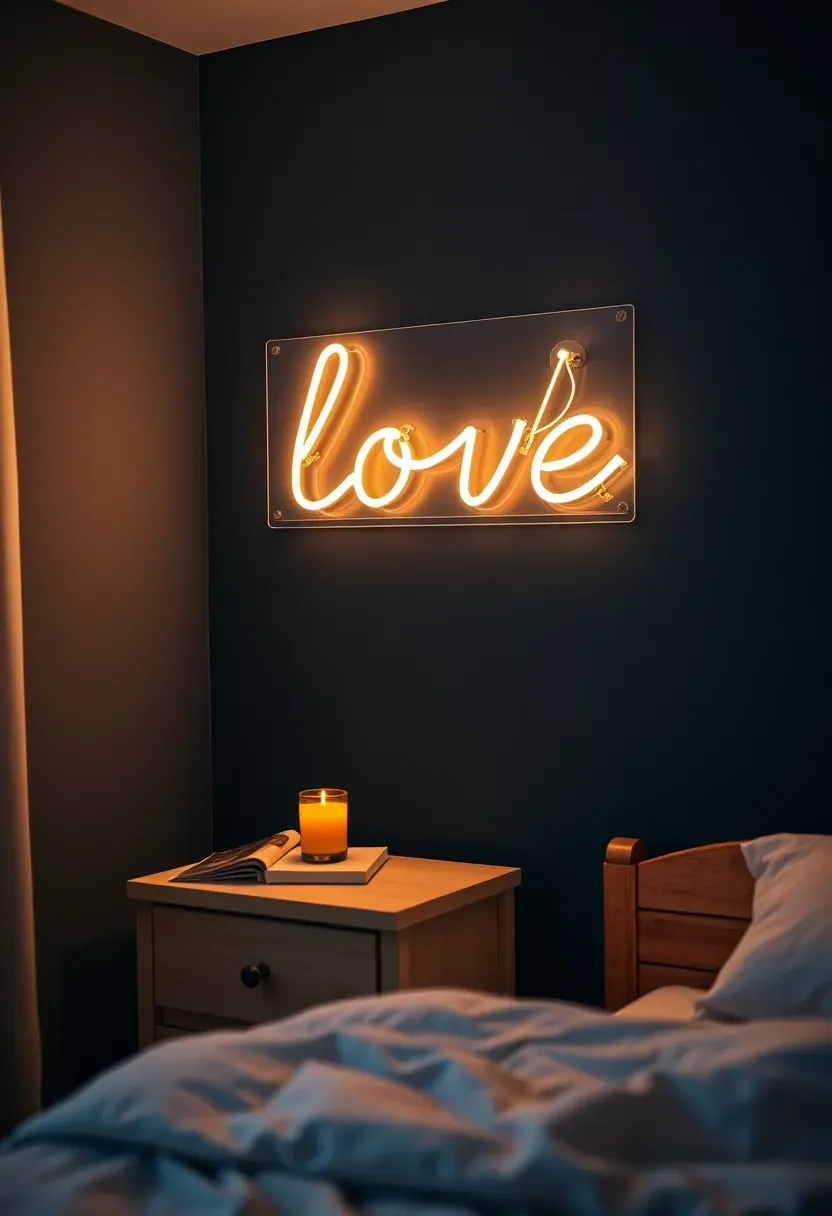
14. Neon Sign Accent
Neon signs have migrated from storefronts into living spaces, and the shift from glass tube to LED flex neon makes them safer, cooler to the touch, and dimmable. A single word or short phrase in warm white or a soft pastel hue adds a playful glow to bedrooms, home bars, and reading nooks. The light quality is softer than you might expect — closer to candlelight than a commercial sign.
Custom LED neon signs run from forty to two hundred dollars depending on size and complexity. Pair a warm white sign with a dark painted wall for maximum contrast and a moody, intimate atmosphere that works especially well in the evening.
Practical Pointers
- Warm white and soft peach tones feel residential; avoid cold white or primary colors unless the room calls for it
- Dimmable drivers let you adjust intensity from bright accent to soft ambient glow
- Mount with standoff pins so the sign floats slightly off the wall, enhancing the halo effect
Recommended
Items for this idea
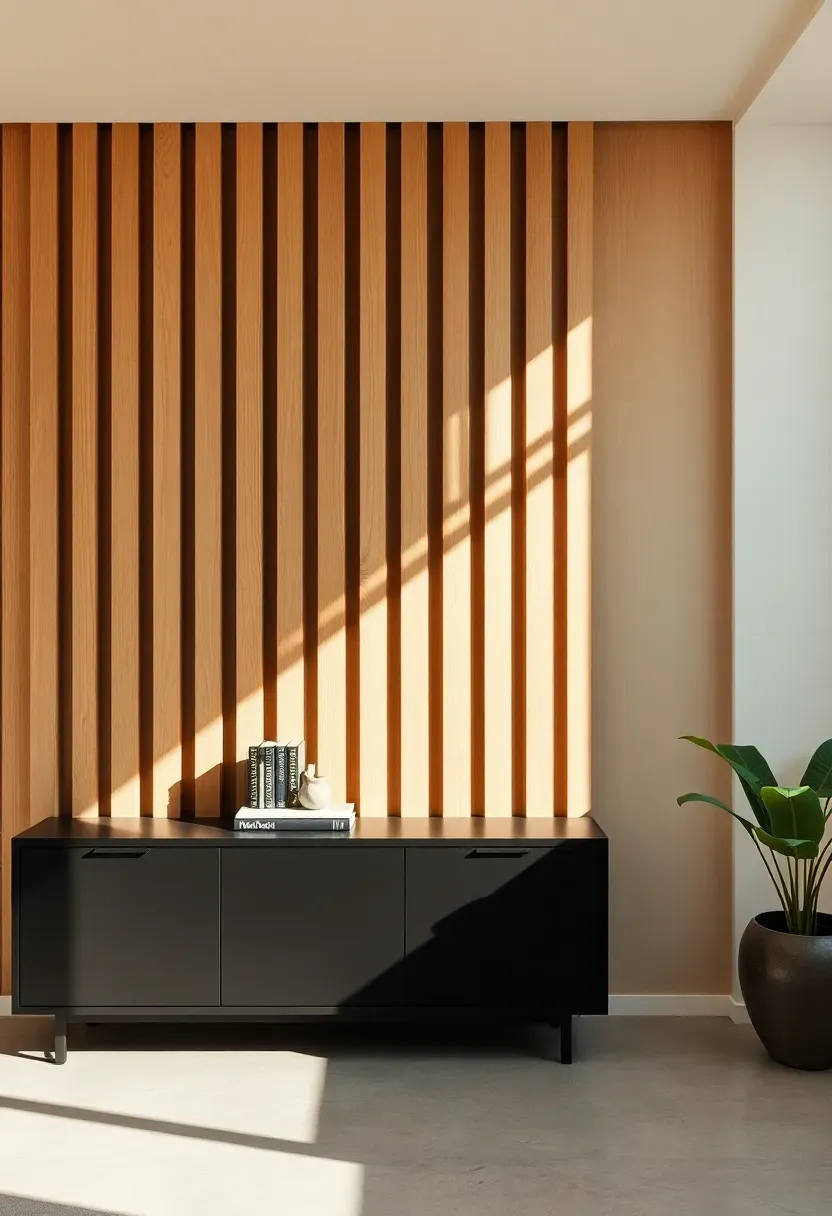
15. Wood Slat Accent Wall
Vertical wood slats have become one of the defining wall treatments of the mid-2020s, and the trend shows no sign of fading. The appeal is straightforward: slats add rhythm, warmth, and dimensional texture to any flat wall. Light passes between the slats at an angle, producing shadow lines that shift throughout the day and give the wall a kinetic quality even though nothing actually moves.
Pre-made slat panels in oak, walnut, or painted MDF simplify installation to a weekend project. Mount them behind a TV console, a bed headboard, or along an entryway wall to introduce architectural interest without a full renovation.
Tips for Choosing Slat Style
- Natural oak or ash slats suit Scandinavian and Japandi interiors
- Dark walnut or espresso-stained slats add drama and work well with moody palettes
- White or painted slats keep the texture while blending with lighter room schemes

16. Tapestry or Kilim Rug Display
Why Hang a Rug on the Wall
It sounds counterintuitive, but textile art was displayed on walls long before it covered floors. A handwoven kilim or vintage tapestry adds color, pattern, and acoustic dampening in one move — and it protects the textile from foot traffic and furniture wear that would shorten its life on the ground.
The Approach
Choose a rug with a flat weave and bold geometric pattern. Kilims from Turkey, Morocco, and Iran offer some of the richest color palettes available in any textile tradition. Hang it from a simple wooden dowel threaded through a fabric sleeve sewn to the back, or clip it to a decorative wall-mounted rod. The weight of the rug keeps it taut without framing.
Pros and Cons
Pros: massive visual impact, irreplaceable handmade character, doubles as sound absorption for hard-surfaced rooms Cons: large kilims are heavy and need secure anchoring, colors may fade in direct sunlight over time
Recommended
Items for this idea
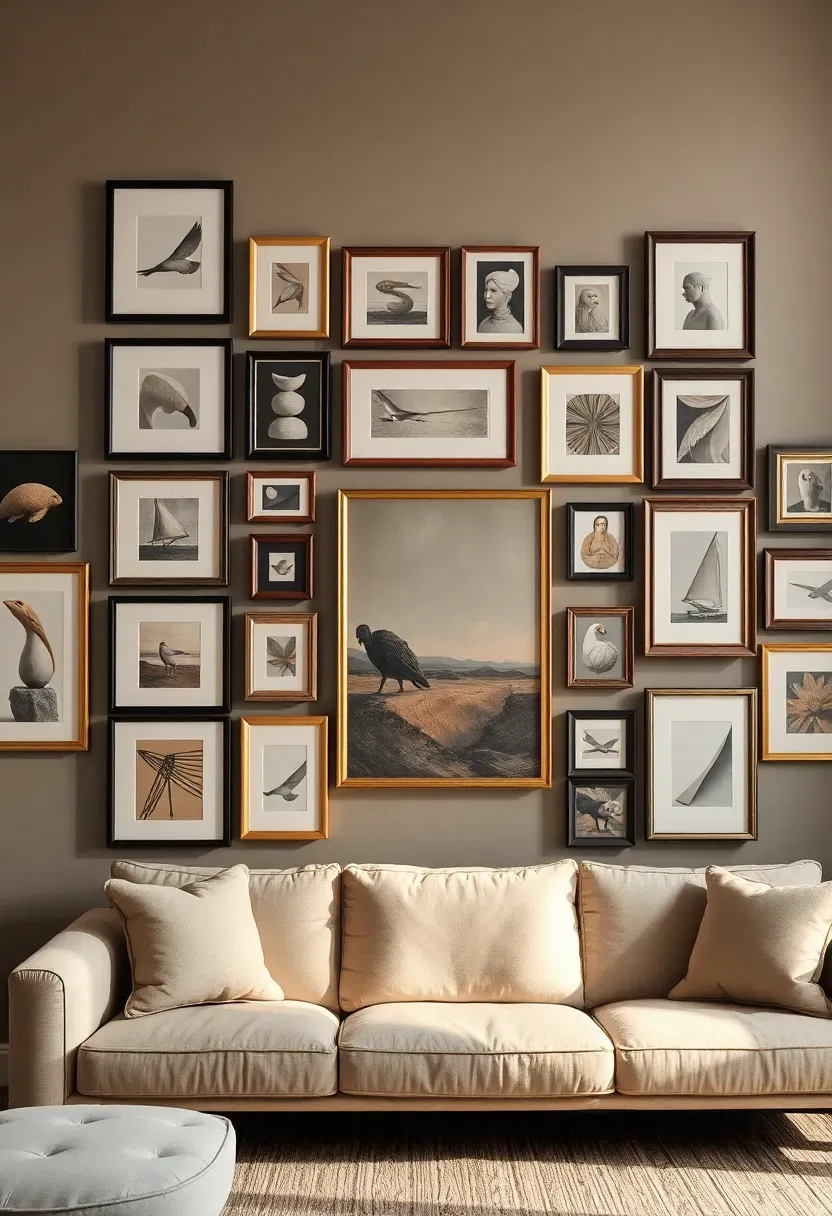
17. Asymmetric Salon-Style Hang
While grid gallery walls reward precision, the salon-style hang celebrates controlled chaos. Frames of different sizes, orientations, and styles spread across the wall in an organic arrangement that feels curated over time rather than purchased in a set. This approach suits maximalists, art collectors, and anyone whose taste refuses to fit inside identical frames.
The method dates to the 18th-century Paris Salon exhibitions, where paintings covered walls from baseboard to ceiling. You do not need to go that far — a concentrated cluster from hip height to about a foot above eye level creates plenty of impact without overwhelming the room.
Getting the Balance Right
- Start with the largest piece slightly off-center, then fill outward
- Maintain consistent spacing of one-and-a-half to two inches between all frames
- Mix horizontal and vertical orientations but keep the outer edges roughly aligned to an invisible boundary shape
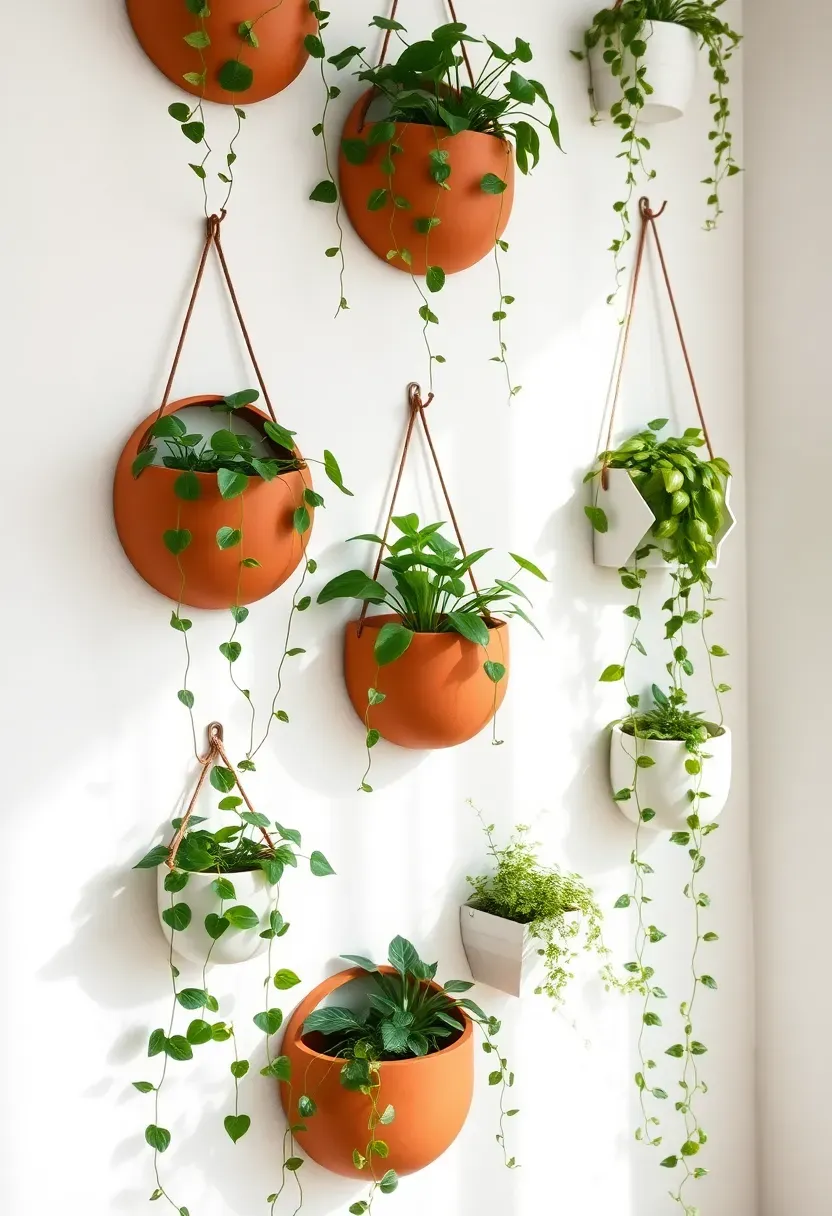
18. Wall-Mounted Planter Collection
Plants belong on walls just as much as they belong on shelves. A curated collection of wall-mounted planters turns a blank surface into a living installation that changes week by week as the plants grow, trail, and fill in. Ceramic half-moon planters, geometric metal frames with glass inserts, and woven pocket planters each offer a different aesthetic — earthy, modern, or bohemian.
Arrange planters at varying heights in a loose vertical column or a scattered constellation. Choose trailing species like string of pearls, pothos, and English ivy for planters mounted higher on the wall, and upright compact plants like small ferns or succulents for lower positions.
Practical Pointers
- Use planters with drainage trays or line them with plastic to protect the wall
- Group plants with similar light and water needs to simplify care
- Three to five planters create a meaningful display without overcommitting
Recommended
Items for this idea
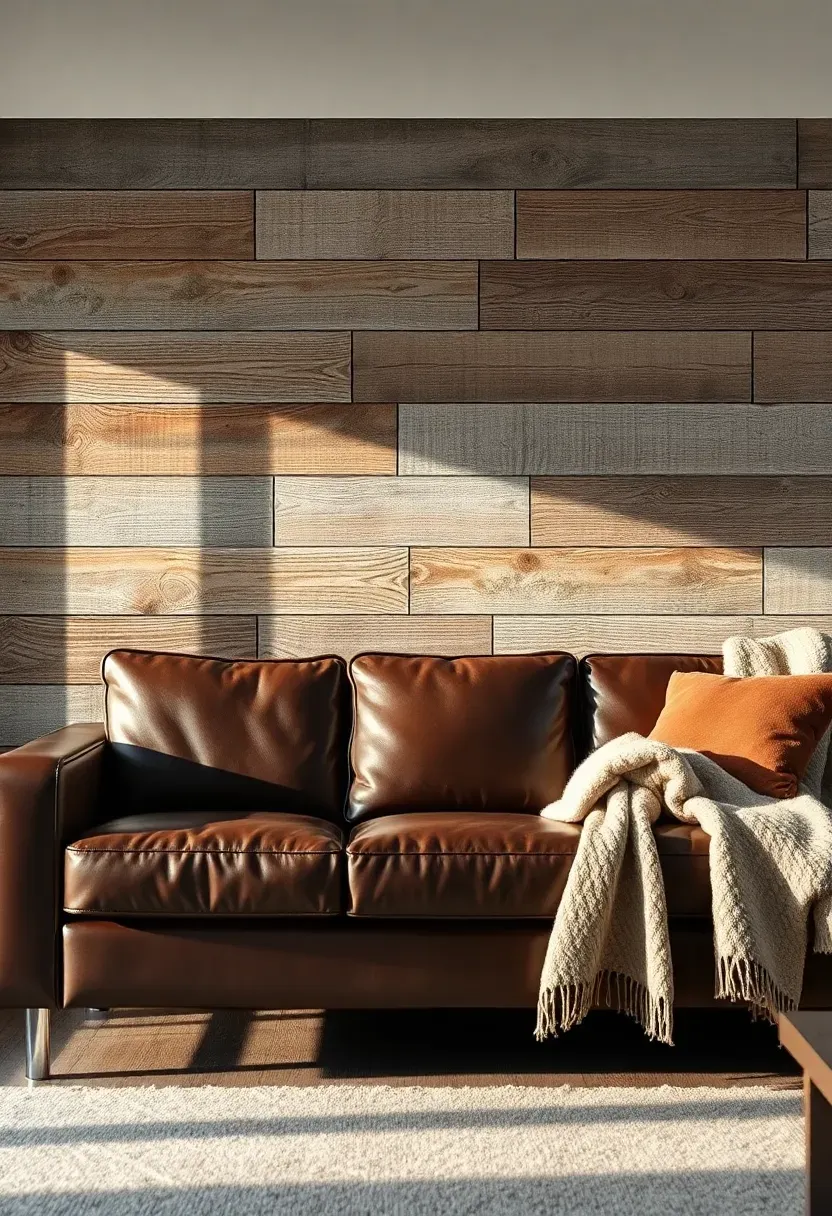
19. Reclaimed Wood Accent
Origins and Character
Reclaimed wood carries a history that no freshly milled board can replicate. Nail holes, saw marks, weathering patterns, and faded paint remnants give each plank a story. Barn wood, old fencing, and salvaged pallet stock all bring different textures and tones.
Modern Interpretation
Today's reclaimed wood walls blend rustic authenticity with clean modern interiors. The contrast between weathered planks and a sleek leather sofa or contemporary light fixture creates tension that feels intentional and layered. Horizontal installation reads more contemporary, while vertical or herringbone patterns lean more traditional. Many companies now sell pre-sorted reclaimed wood panels that peel and stick to the wall, making installation accessible even for renters.
How to Apply at Home
- Mix plank widths and tones within a close range for natural variation
- Seal the wood with a matte clear coat to prevent dust and splinters
- Limit to one wall — reclaimed wood on every surface reads more cabin than curated
- Pair with modern furniture to prevent the space from feeling too rustic
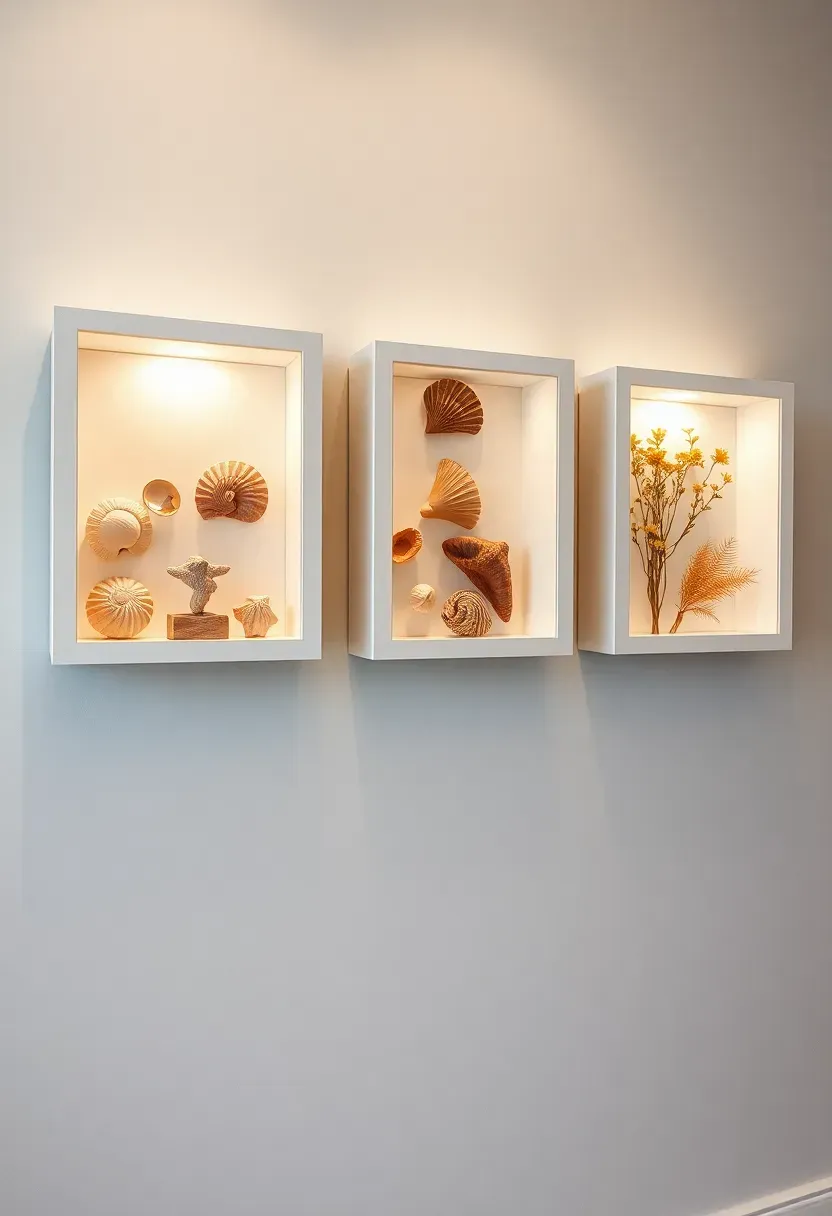
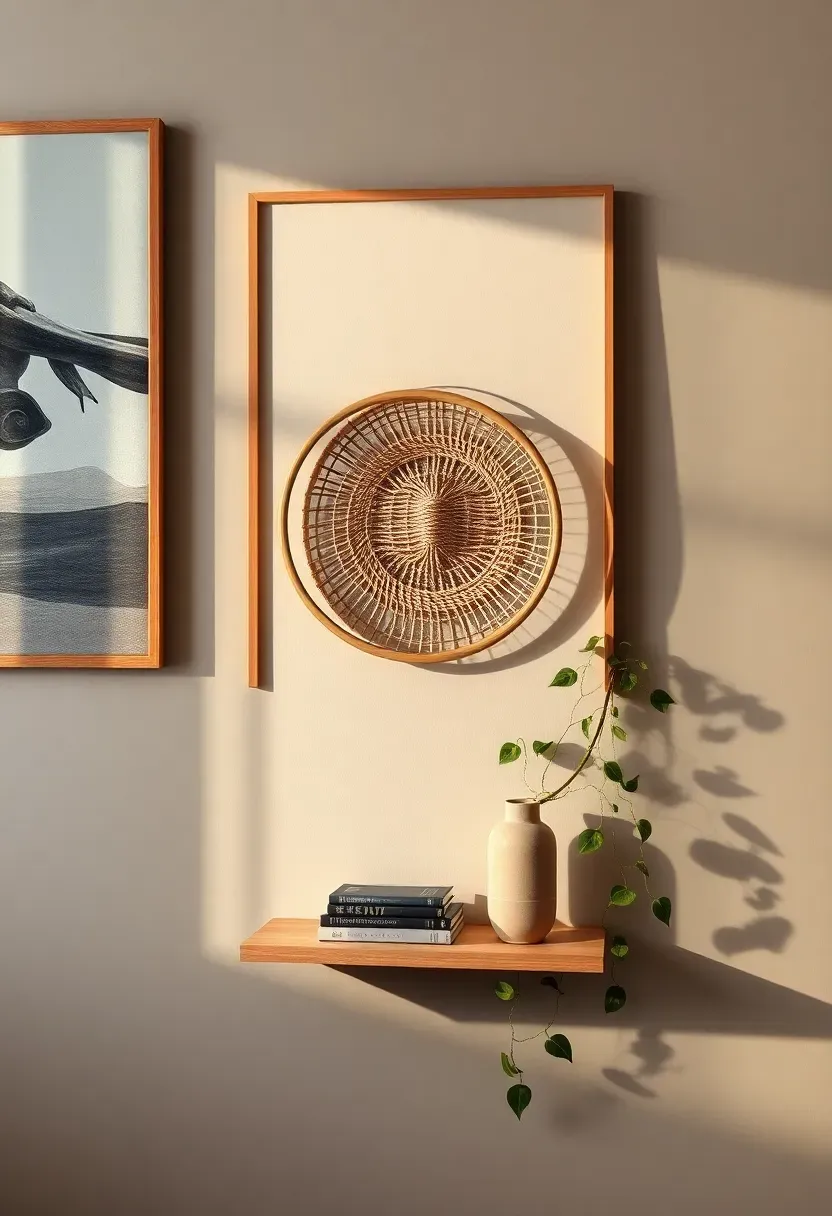
20. Shadow Box and Object Display
Shadow boxes turn small collected objects into wall-worthy art. Seashells from beach trips, vintage keys, antique buttons, miniature figurines, dried botanicals — anything too small to display on its own gains presence and context when framed within a shadow box's defined space. The depth of the frame creates real shadow, and the glass front protects delicate items from dust.
Group three to five shadow boxes in a loose arrangement, mixing square and rectangular formats. Alternatively, use a single large box with compartments to create a cabinet-of-curiosities effect that invites viewers to step closer and examine each object.
Tips for Impactful Shadow Boxes
- A neutral background — white linen, black velvet, or natural burlap — lets the objects stand out
- Add a small LED strip inside the box for a gallery-lit presentation
- Rotate contents seasonally: dried flowers in autumn, shells in summer, ornaments in winter
Recommended
Items for this idea
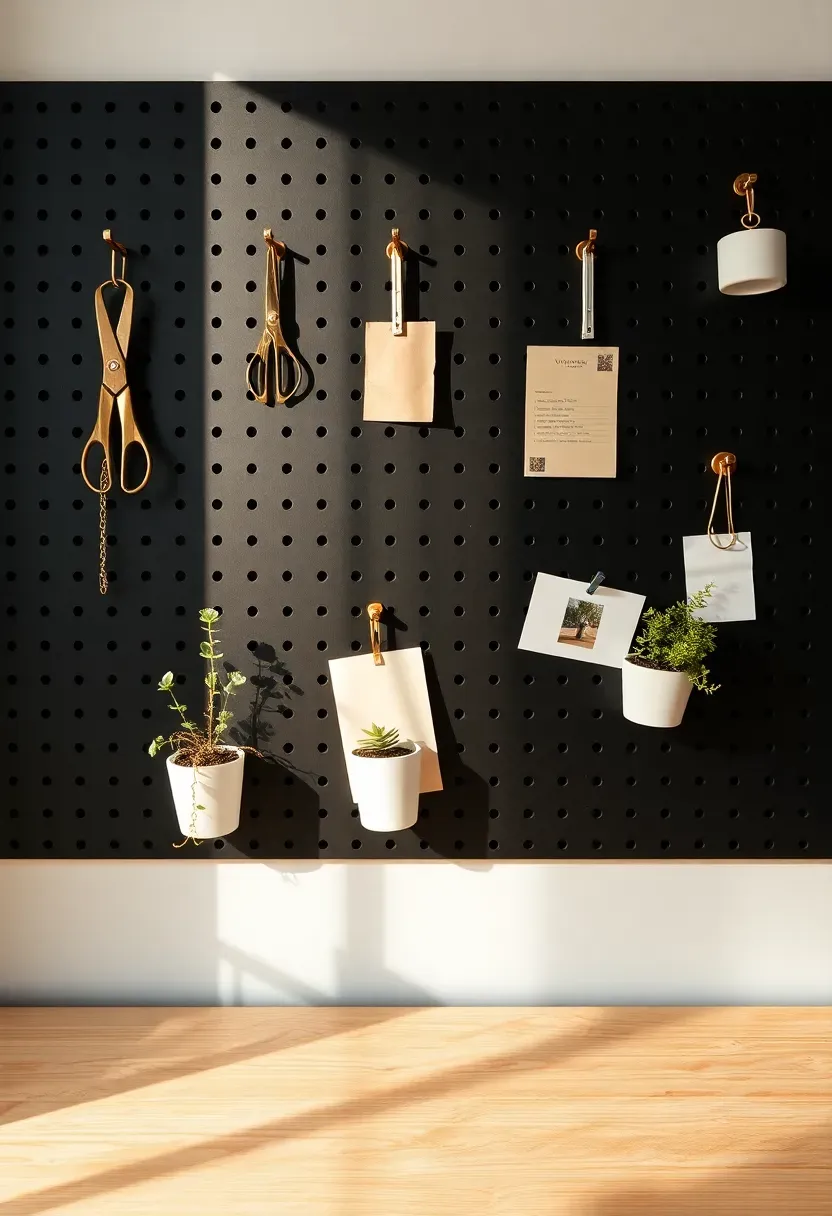
21. Pegboard Utility Wall
Pegboard has moved far beyond the garage. Painted in matte black, forest green, or warm white, a pegboard wall becomes a functional display system for home offices, kitchens, craft rooms, and entryways. The grid of holes accepts hooks, shelves, bins, and clips in any configuration, making it the most flexible wall storage and display system available.
Step 1: Choose and Finish the Board
Select medium-density fiberboard pegboard for a smoother look than traditional hardboard. Prime and paint it before mounting.
Step 2: Mount with Standoffs
Install the pegboard with spacers behind it so hooks and pegs can insert fully. Half-inch standoffs work for most accessories.
Step 3: Arrange and Adjust
Start with essentials — tools, supplies, or frequently used items — and fill in with decorative touches like small frames, trailing plants in wall cups, and inspirational cards.
What to Watch Out For
- Use toggle bolts or locate studs for heavy loads
- Leave some holes empty — a fully loaded pegboard looks cluttered rather than curated
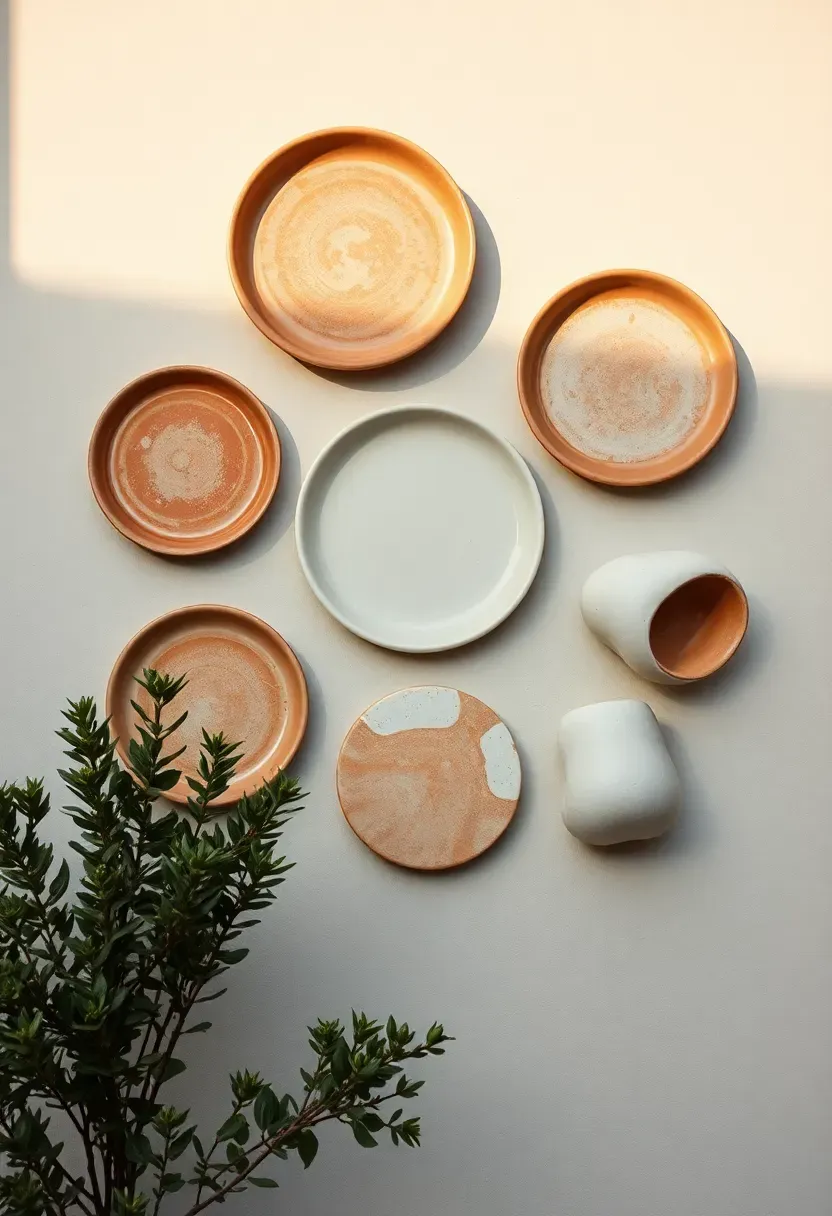
22. Ceramic and Pottery Wall Mounts
Handmade ceramics bring an organic, artisanal quality to walls that manufactured decor cannot match. Small ceramic plates, irregular-shaped tiles, and sculptural pottery pieces mount directly to the wall using adhesive or wire hangers, creating a three-dimensional collage of form and glaze. Each piece is unique — slight imperfections in shape and color variation in the glaze ensure no two installations look the same.
Cluster pieces in warm neutrals for a tonal, meditative effect, or mix bold glazes in cobalt, terracotta, and sage for a more vibrant display. The tactile surface quality of unglazed or matte-finished pottery adds a grounding earthiness that complements natural materials throughout the room.
Practical Pointers
- Group pieces by finish type — all matte or all glossy — for a more cohesive cluster
- Vary shapes: mix round, oval, and organic forms for visual interest
- Use museum putty on the back of lighter pieces for secure, damage-free mounting
Recommended
Items for this idea
23. Stenciled or Hand-Painted Mural
Why Murals Beat Wallpaper for Unique Spaces
Wallpaper gives you pattern. A mural gives you a one-of-a-kind scene that exists nowhere else. Hand-painted murals transform a wall into immersive art, and they do not need to be elaborate — even a simple botanical silhouette or an abstract wash of color makes a powerful statement.
The Approach
You do not need to be an artist. Overhead projectors and stencil kits make it possible to transfer complex designs onto any wall. Botanical themes, mountain landscapes, and abstract organic shapes are the most popular motifs right now. Use flat or matte interior paint for a seamless finish that integrates with the wall surface rather than sitting on top of it like a decal.
Pros and Cons
Pros: completely unique, scalable to any wall size, can be painted over when you want a change Cons: time-intensive, requires patience and a steady hand even with stencils, mistakes are harder to correct than swapping a frame

24. Fabric-Wrapped Panels
Fabric-wrapped acoustic panels started in recording studios and high-end hotels, but they have found a natural home in bedrooms and living rooms seeking both luxury and sound control. A row of panels in velvet, linen, or bouclé transforms a wall into a soft, tactile surface that absorbs echo and adds a sense of plush comfort that paint and wallpaper cannot deliver.
Build simple wooden frames, stretch fabric tightly over batting, and mount them edge to edge for a continuous upholstered look, or space them apart for a paneled effect. This is one of the few wall treatments that genuinely improves room acoustics while looking deliberately high-end.
Tips for Choosing Fabric
- Velvet in deep jewel tones creates a dramatic headboard wall
- Neutral linen or cotton suits living rooms where warmth matters more than drama
- Performance fabrics resist stains and fading, worth the extra cost for high-traffic walls
Recommended
Items for this idea
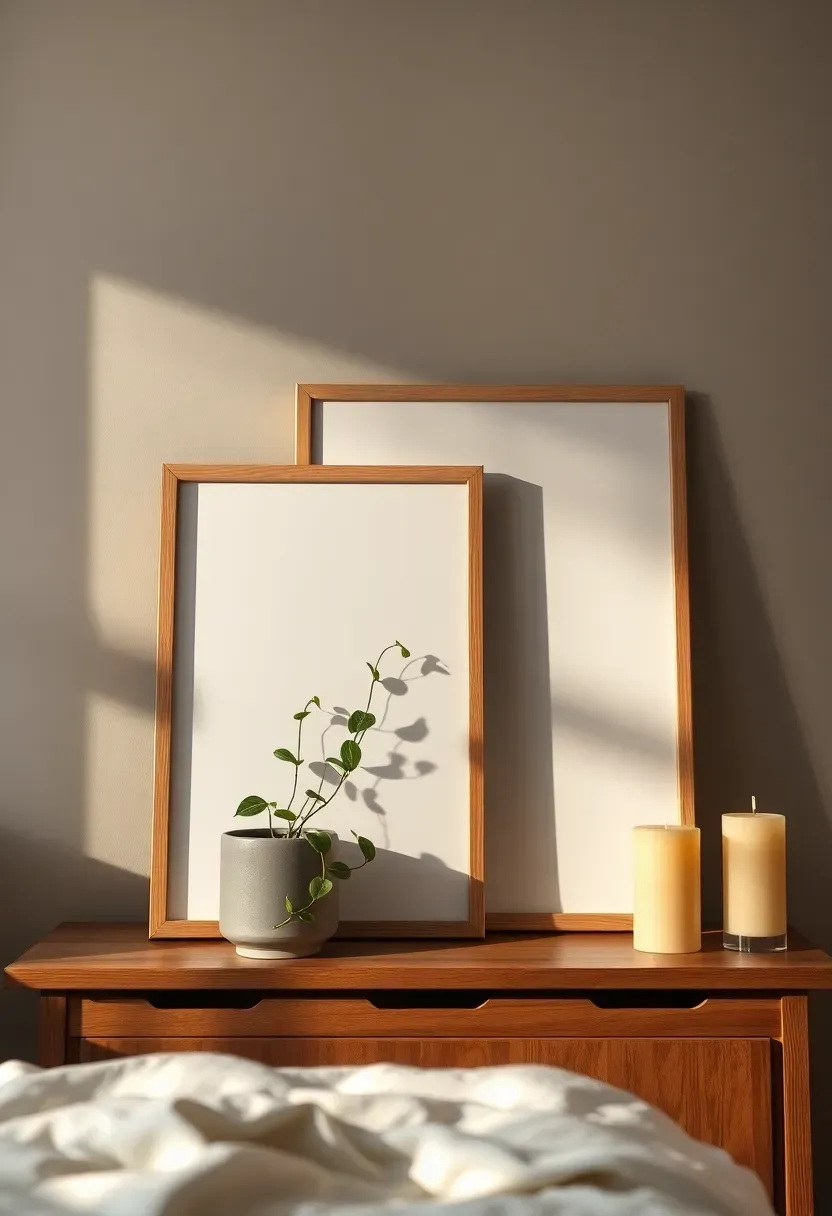
25. Leaning Art and Layered Frames
Not every piece of art needs a nail. Leaning frames against the wall — on a mantle, a shelf, or directly on the floor — creates a relaxed, studio-like atmosphere that feels less permanent and more personal than traditional hanging. Layer multiple sizes so smaller frames overlap larger ones, creating depth and a sense of casual curation.
This approach works especially well for people who rotate art frequently, renters who avoid drilling into walls, or anyone who appreciates the gallery-in-progress aesthetic. Place the largest frame at the back, lean medium frames in front at slight angles, and tuck the smallest pieces into the foreground. Add a small plant or candle to ground the arrangement.
Practical Pointers
- Secure floor-leaning frames with museum putty at the base so they do not slide
- Keep the lean angle gentle — about ten to fifteen degrees from vertical
- Mix framed and unframed pieces for textural variety

26. Minimalist Line Art Series
When the room already has plenty going on — bold furniture, patterned textiles, a strong color palette — the walls need something quieter. A series of minimalist line art prints provides visual interest without volume. Continuous line drawings of faces, figures, botanicals, or abstract forms in black ink on white paper deliver sophistication with radical simplicity.
Hang three to five pieces in a horizontal row with uniform spacing for a gallery strip effect, or stack them vertically in a narrow hallway. The thin lines and generous white space create breathing room that balances busier elements elsewhere in the room.
Tips for Displaying Line Art
- Thin natural wood or slim black metal frames complement the minimalist aesthetic
- Use oversized mats to give small drawings more visual weight on the wall
- Commission custom line art for a truly personal touch — many illustrators work from photographs
Recommended
Items for this idea
27. Mixed-Media Eclectic Wall
Why choose one approach when you can combine several? The mixed-media wall is the most personal option on this list — a curated collision of framed art, mirrors, woven textiles, small shelves, three-dimensional objects, and trailing plants all sharing the same stretch of wall. It is maximalism done thoughtfully, where every piece earns its place through meaning, beauty, or function.
The secret to making it work rather than look cluttered: maintain a shared color thread. If everything connects through warm neutrals, brass tones, and natural materials, the variety feels intentional. Without that thread, it quickly becomes a yard sale. Build the wall over time, adding pieces as you find them, and it develops the layered authenticity that styled-in-a-day approaches always lack.
Getting Started
- Begin with two or three anchor pieces — one large frame, one mirror, one shelf — and build around them
- Step back after every addition to check the overall balance and density
- Edit ruthlessly: removing one item sometimes improves the whole arrangement
Quick FAQ
Is it possible to decorate walls without making holes? Absolutely. Command strips, adhesive hooks, museum putty, and peel-and-stick solutions let you hang everything from lightweight frames to floating shelves without drilling. Leaning art, washi tape galleries, and magnetic paint are additional hole-free options. Renters and commitment-wary homeowners have more options than ever.
Which wall decor style works best for small rooms? Mirrors expand visual space, so a mirror cluster or a single oversized mirror is ideal for compact rooms. Minimalist line art and floating shelves also work well because they add interest without visual weight. Avoid overly dark or heavy treatments that can make small walls feel like they are closing in.
Should you match wall decor to your furniture style? Not necessarily. Some of the most compelling rooms pair contrasting styles — a rustic reclaimed wood wall behind a sleek modern sofa, or minimalist line art in a maximalist bohemian bedroom. The key is finding a connecting element like color, material, or scale that bridges the contrast.
What is the biggest mistake people make with wall decor? Going too small. A tiny frame on a large wall looks lost and highlights the emptiness rather than filling it. Scale your art and arrangements to at least fifty to seventy percent of the available wall width for a proportional, deliberate look.
How often should you update wall decor? There is no rule, but refreshing one or two elements each season keeps a room feeling alive. Swap prints in existing frames, rotate shadow box contents, or update shelf displays. You do not need to overhaul the entire wall — small changes prevent visual fatigue.
A wall is more than a structural boundary — it is the largest canvas in every room, and it sets the tone for everything in front of it. You do not need to fill every surface or spend a fortune. Start with one idea from this list that resonates, execute it well, and let the wall speak for itself. The best wall decor is the kind that makes you pause on the way to the kitchen and think: I actually love this room.
Pinterest cover for 27 Wall Decor Ideas That Transform Bare Walls Into Focal Points
About the author
OBCD
CGI visualization and interior design content. We create detailed 3D renders and curate practical design ideas for every room in your home.