27 Accent Wall Ideas for Bedroom That Elevate Any Space
For centuries, bedrooms have served as private sanctuaries where the walls set the emotional tone of the entire room. A well-chosen accent wall does more than decorate -- it reshapes how a bedroom feels the moment you walk in. Whether you gravitate toward raw organic textures, moody saturated hues, or clean architectural details, one deliberate wall can anchor the space and give every other element a reason to exist. The trick is choosing a treatment that matches your lifestyle, your lighting, and your willingness to commit. Some ideas here take an afternoon, others require a weekend, and a few demand professional hands -- but every single one delivers a room that feels unmistakably yours.
In this article I've gathered 27 distinct accent wall approaches organized by material, color, and technique. We'll start with paint-based ideas and move through wood, stone, fabric, and mixed-media treatments.
Table of Contents
- Charcoal Suede Paint
- Shiplap Herringbone Pattern
- Venetian Plaster in Dusty Rose
- Raw Cork Panel Wall
- Monochrome Stripe Mural
- Stacked Ledgestone Veneer
- Japanese Shou Sugi Ban Wood
- Zellige Tile Headboard Wall
- Hand-Painted Abstract Mural
- Cane Webbing Panel Grid
- Poured Resin Art Wall
- Fluted Wood Column Wall
- Grasscloth Wallpaper
- Micro-Cement Rough Finish
- Reclaimed Pallet Mosaic
- Fabric-Wrapped Sound Panel
- Arabesque Plaster Relief
- Terrazzo-Effect Paint
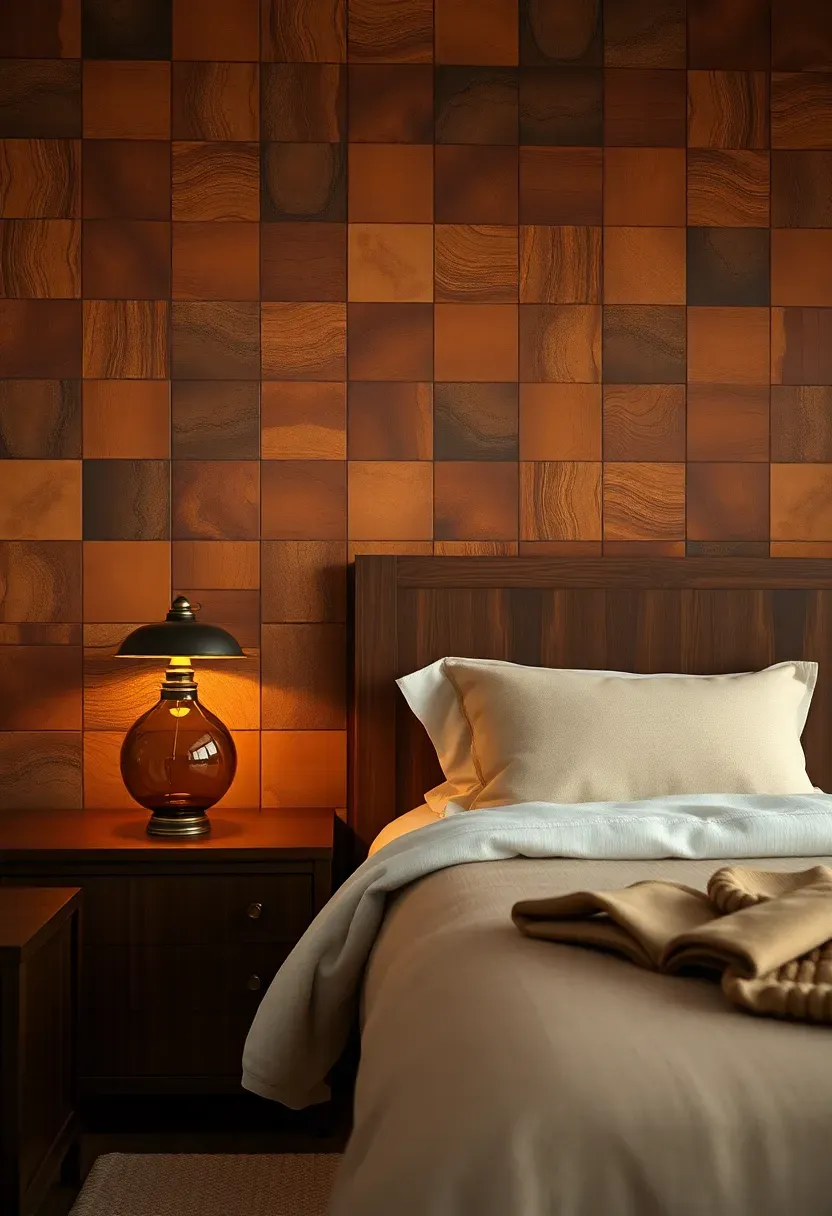
- Leather Tile Patchwork
- Living Moss Wall
- Mirrored Panel Accent
- Woven Macrame Tapestry Wall
- Slatted Divider Accent
- Painted Arch Nook
- Stamped Tin Ceiling Tiles on Wall
- Paper Bag Textured Finish
- Mixed Media Gallery Ledge

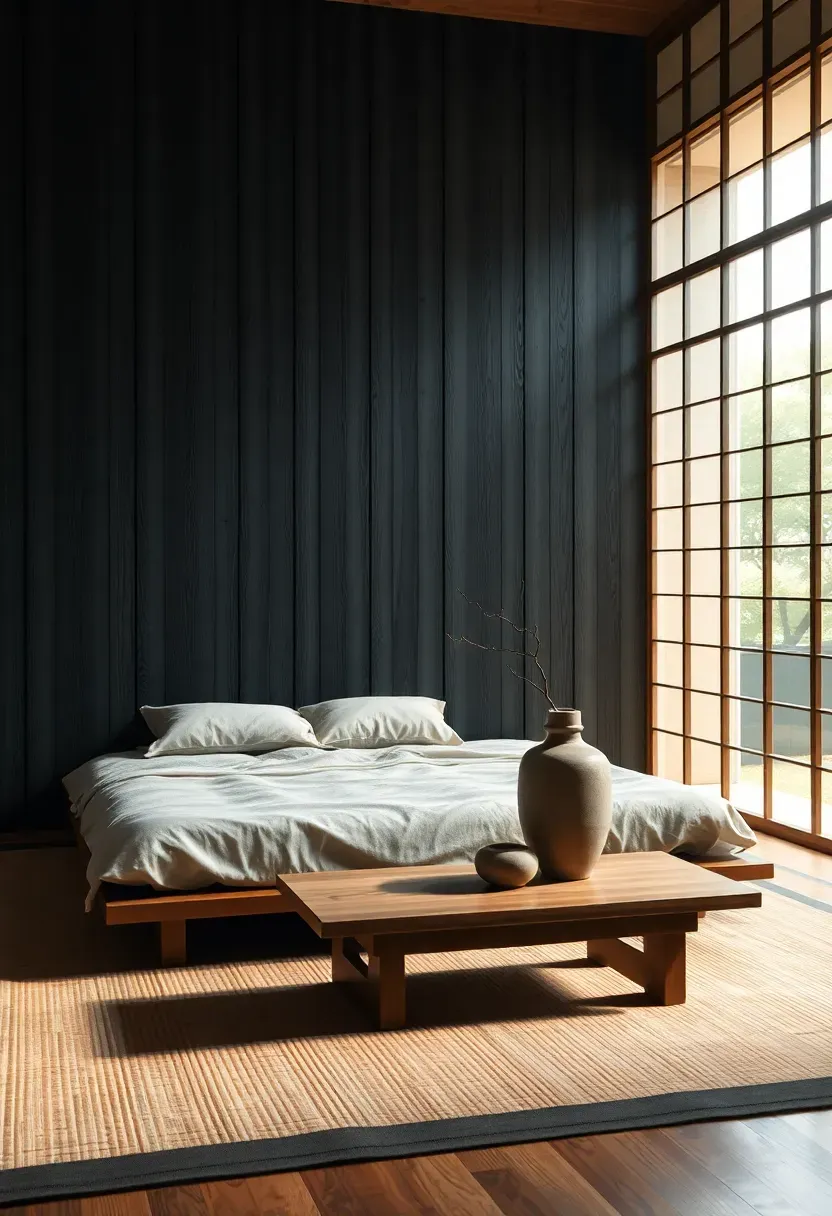
1. Charcoal Suede Paint
Suede-finish paint creates a velvety depth that standard matte cannot replicate. Applied in crosshatch strokes, this charcoal treatment absorbs light in a way that makes the wall recede slightly, giving the bed a cocoon-like backdrop that feels intimate without being oppressive.
Tips for Getting It Right
- Apply two coats using a specialized suede roller, alternating stroke direction between coats
- Keep surrounding walls in warm ivory to prevent the room from reading too dark
- Add brushed-nickel or matte-black sconces at headboard height for controlled warmth
We picked a few things that go well with this idea: Peel and Stick PVC Slat Wall Panel (236") (★4.2), Peel and Stick PVC Slat Wall Panel (118") (★4.2) and WADILE Acoustic Wood Slat Panels (8-Pack) (★4.0). As an Amazon Associate we earn from qualifying purchases.
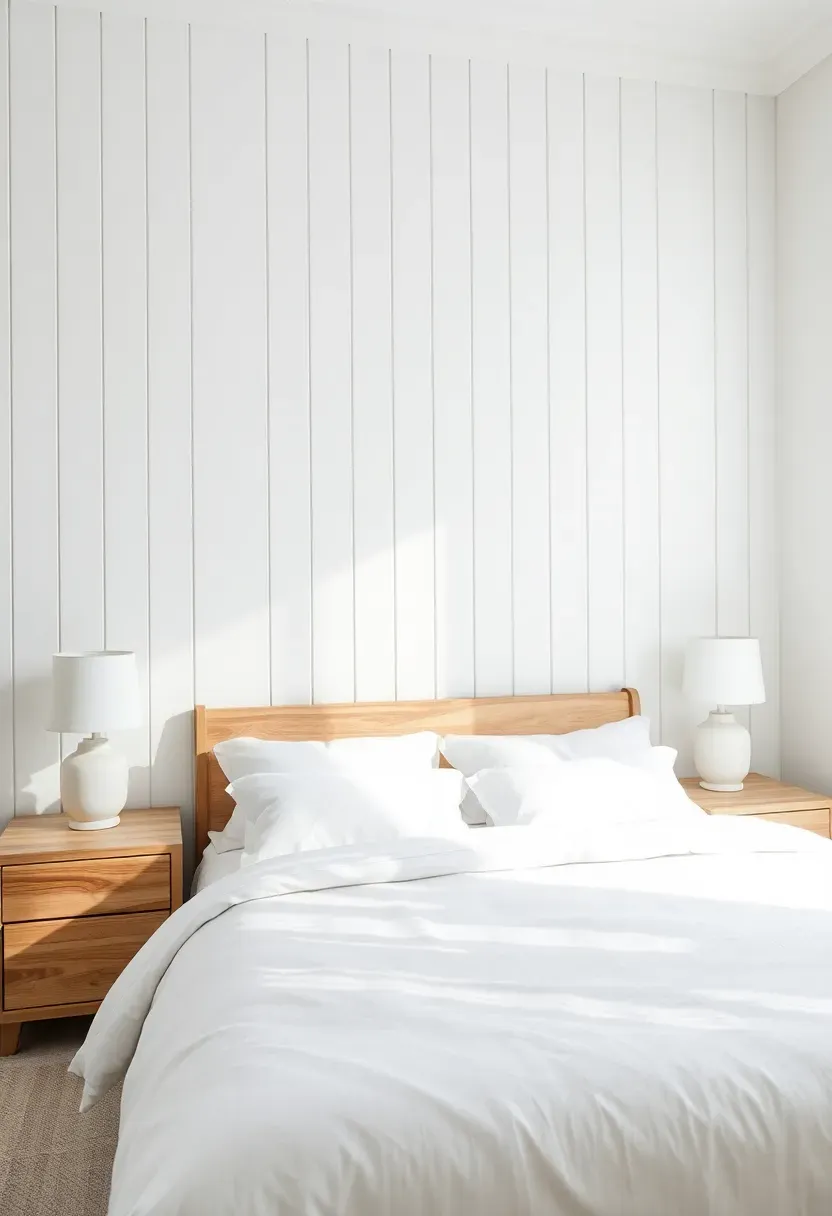
2. Shiplap Herringbone Pattern
Traditional shiplap gets a geometric upgrade when boards are cut at 45-degree angles and arranged in a V-pattern. This elevates the typical farmhouse look into something that works just as well in a modern loft or a coastal retreat.
Step 1: Prep and Measure
Calculate the center point of your wall and snap a vertical chalk line. All boards radiate outward from this center, ensuring symmetry on both sides.
Step 2: Cut and Nail
Use a miter saw set to 45 degrees. Start at the bottom center and work outward and upward. Secure each board with a brad nailer and construction adhesive for durability.
Step 3: Prime and Finish
A single coat of bright white semi-gloss highlights the pattern's shadows. For a warmer look, use a light wash stain that lets the wood grain peek through.
What to Watch Out For
- Gaps widen if boards are not perfectly dry before installation -- let lumber acclimate for 48 hours
- Use a laser level, not a bubble level, to keep the center line true on tall walls
- Pre-paint boards before mounting to avoid tedious brushwork in tight joints
We picked a few things that go well with this idea: Black Silk Embossed Peel and Stick Wallpaper (★4.2), Flarnadox Gold Khaki Wood Stripe Wallpaper (★3.9) and Laatse Vintage Black Floral Peel and Stick Wallpaper (★4.7). As an Amazon Associate we earn from qualifying purchases.
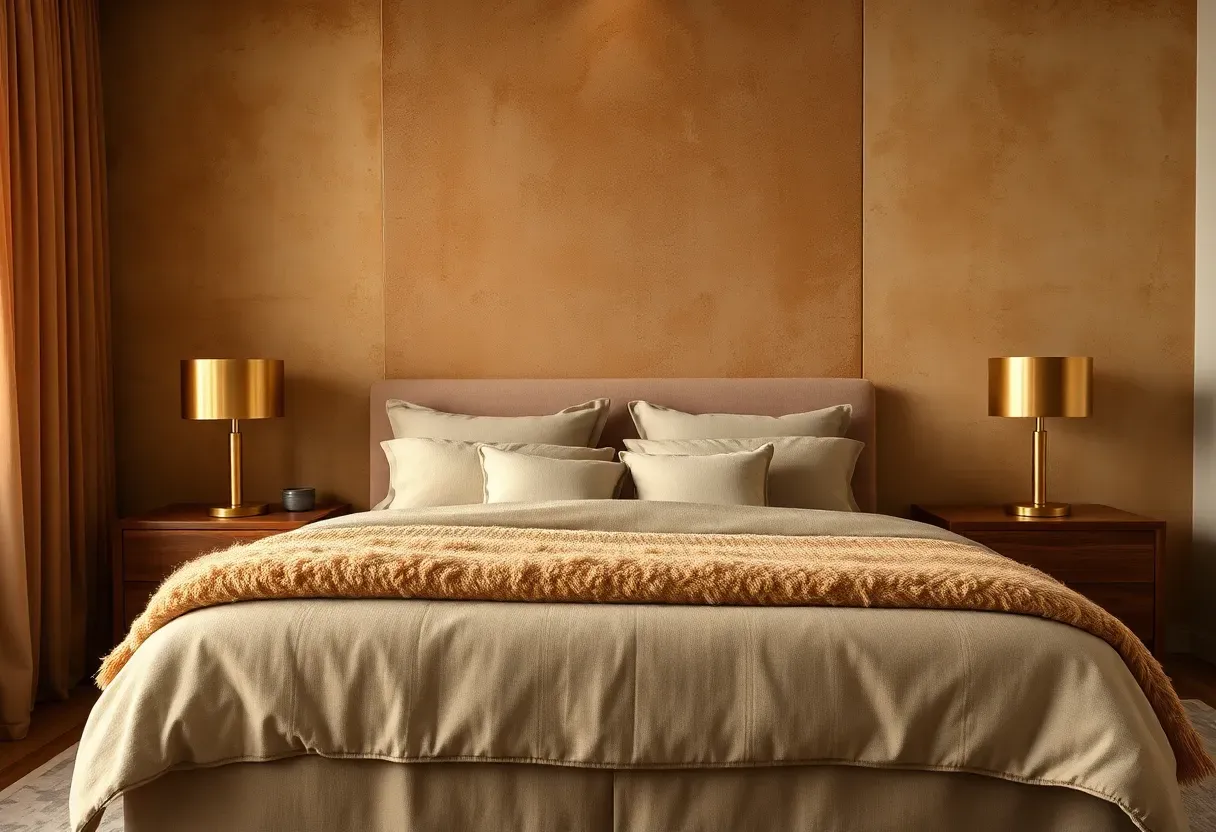
3. Venetian Plaster in Dusty Rose
The Core Issue
Most pink-toned bedrooms lean childish because the color is applied flat and paired with overly sweet decor. The result feels unintentional rather than sophisticated.
The Solution
Venetian plaster solves this by layering dusty rose in translucent coats that shift between blush and terracotta depending on the light angle. The natural variation in the plaster creates a depth that reads as mature and elegant. Pair it with dark walnut furniture, muted brass hardware, and raw linen textiles to ground the warmth and push the look firmly into adult territory.
Pros and Cons
Pros: Extraordinary texture that photographs beautifully, hides minor wall imperfections, ages gracefully over decades
Cons: Requires skilled application (not a beginner project), material cost runs higher than standard paint, repair patches can be visible if not blended carefully

We picked a few things that go well with this idea: Art3d Diamond Textured 3D Wall Panels (33-Pack) (★4.6), Art3d Waterproof 3D Accent Wall Panels (33-Pack) (★4.9) and STICKGOO Wave 3D Wall Panels (12-Pack) (★4.4). As an Amazon Associate we earn from qualifying purchases.
4. Raw Cork Panel Wall
Cork delivers three benefits at once: acoustic dampening, thermal insulation, and a warm honeyed texture that no other material replicates. Large cork tiles (600x300mm or bigger) create a modern grid pattern that looks intentional rather than like a bulletin board.
Origins and History
Cork has been used in Portuguese architecture since the Roman era, prized for its resilience and sustainability. The bark regenerates every nine years without harming the tree, making it one of the most eco-conscious wall materials available today.
Modern Interpretation
Contemporary cork panels come in shades from pale sand to deep espresso. Sealed with a matte clear coat, they resist moisture and dust while maintaining their natural softness. Interior designers now use them in master bedrooms as a sound-absorbing alternative to fabric headboards, especially in apartment buildings where noise transfer between rooms is a persistent issue.
How to Apply at Home
- Purchase panels with tongue-and-groove edges for clean seams
- Adhere directly to drywall with contact cement -- no nails needed
- Leave a 5mm expansion gap at floor and ceiling edges
- Seal once with water-based polyurethane if you want easier cleaning

Recommended
Items for this idea
5. Monochrome Stripe Mural
Horizontal stripes in alternating widths trick the eye into reading the room as wider than it is. Using only black and white keeps the impact graphic without adding color complexity, making it easy to change bedding and accessories seasonally.
Tips for Getting It Right
- Vary stripe widths between 10cm and 30cm to avoid a wallpaper-like uniformity
- Use low-tack painter's tape and burnish edges with a putty knife to prevent bleed
- Paint the thinnest stripes first -- they require the most precision and steady hands
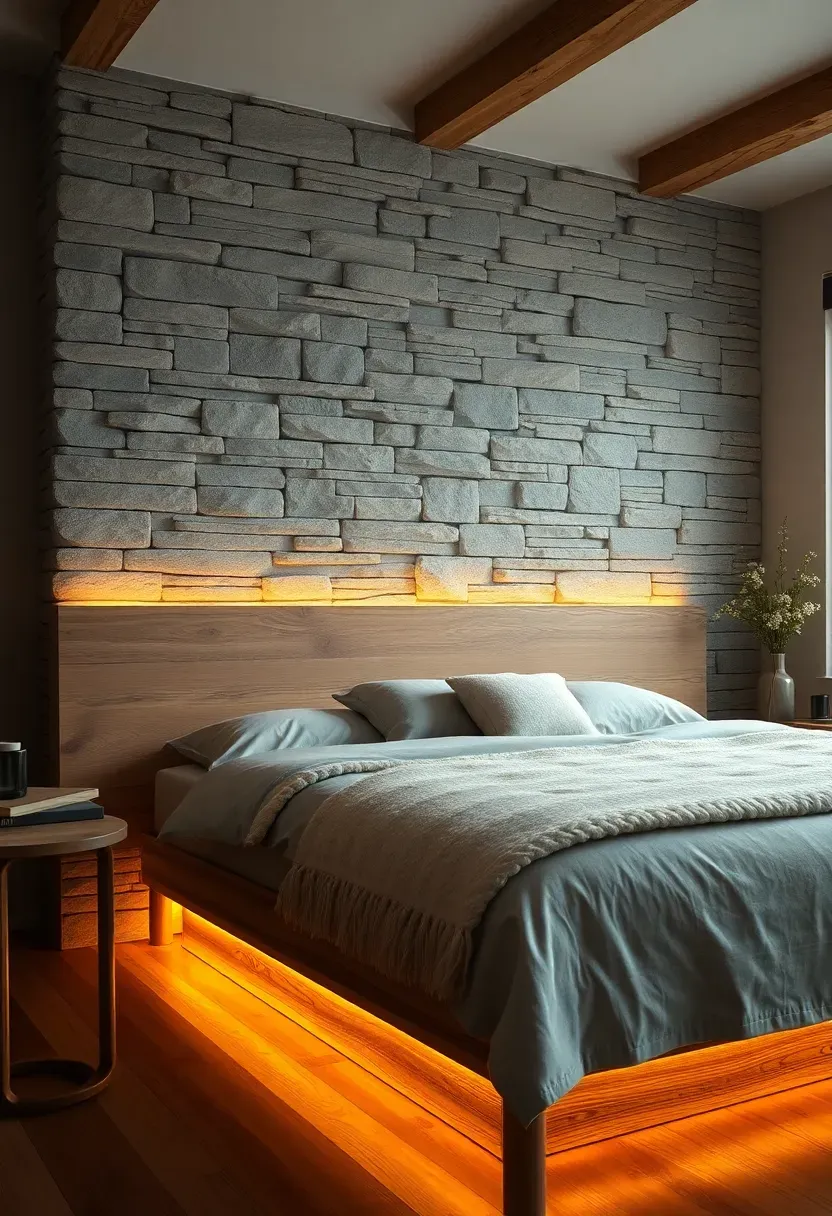
6. Stacked Ledgestone Veneer
Thin-cut stone veneer panels bring the gravitas of a mountain lodge into the bedroom without the structural weight of real stacked stone. Each panel interlocks, covering the wall in an afternoon and creating dramatic shadow lines that change throughout the day.
Why It Works
Stone registers as permanent and grounding -- qualities that make a bedroom feel safe and anchored. The irregular surface catches side lighting in ways that painted walls cannot, adding a three-dimensional quality visible from across the room.
Practical Recommendations
- Install LED strip lighting along the base of the wall to emphasize the stone texture after dark
- Choose grey or sandstone tones for versatility with both warm and cool bedding palettes
- Seal porous stone with a penetrating sealer to prevent dust accumulation in the crevices
Recommended
Items for this idea
7. Japanese Shou Sugi Ban Wood
This ancient Japanese technique involves charring the surface of cedar or cypress planks with fire, then brushing away the soft char to reveal a textured, blackened grain. The result is a wall that looks like it has centuries of history while being naturally resistant to insects, rot, and moisture.
Step 1: Select and Char
Choose untreated cedar planks. Using a propane torch, char each board until the surface is uniformly black and alligator-textured. Work outdoors with proper ventilation.
Step 2: Brush and Seal
Wire-brush the charred surface to remove loose carbon and reveal the grain pattern beneath. Apply a natural oil finish like tung oil to deepen the color and protect the wood.
Step 3: Mount to the Wall
Secure planks horizontally or vertically to furring strips with hidden brad nails. Leave 2mm gaps between boards for a deliberate, architectural look.
What to Watch Out For
- Charring produces significant smoke -- this is strictly an outdoor preparation step
- Wear a respirator during the brushing phase to avoid carbon dust inhalation
- Test oil finish on a scrap piece first -- some oils change the tone from matte black to warm brown
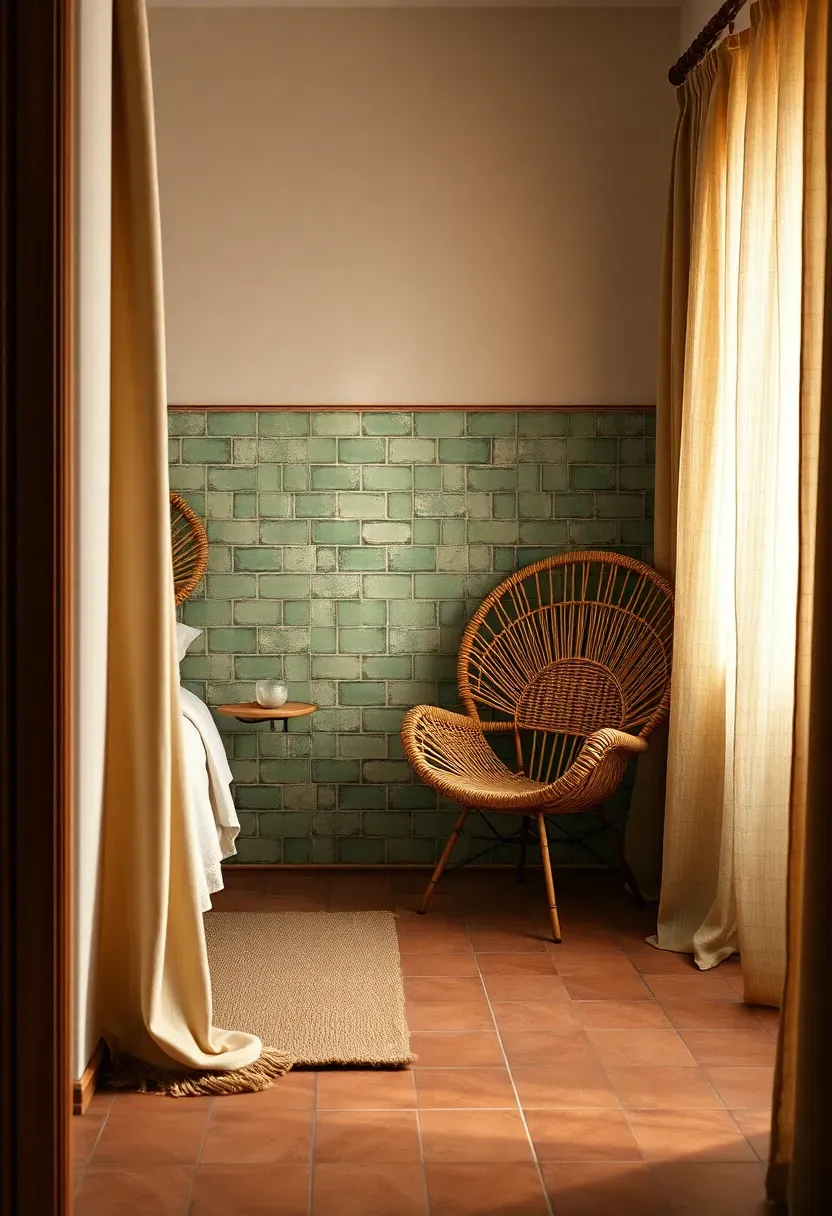
8. Zellige Tile Headboard Wall
Handmade Moroccan zellige tiles bring imperfect beauty to a bedroom wall. Each tile is slightly different in color, glaze depth, and surface texture, creating a mosaic effect that looks artisanal and layered even in a single color.
Comparing: Traditional Zellige vs Modern Machine-Made
Traditional zellige: Hand-cut, irregular edges, rich glaze variation, higher cost per square foot, requires skilled installation
Machine-made alternative: Uniform sizing, consistent color, budget-friendly, easier to install, less character
What to Choose
Choose traditional if: You want a one-of-a-kind wall with genuine handcraft character and your budget allows
Choose machine-made if: You love the zellige look but need easier installation and consistent results
Recommendation
For a bedroom accent wall, traditional zellige in a soft sage or ocean blue delivers the most impact. Limit the tiled area to the headboard zone (floor to about 120cm above the mattress) to control cost and keep the look focused.
Recommended
Items for this idea
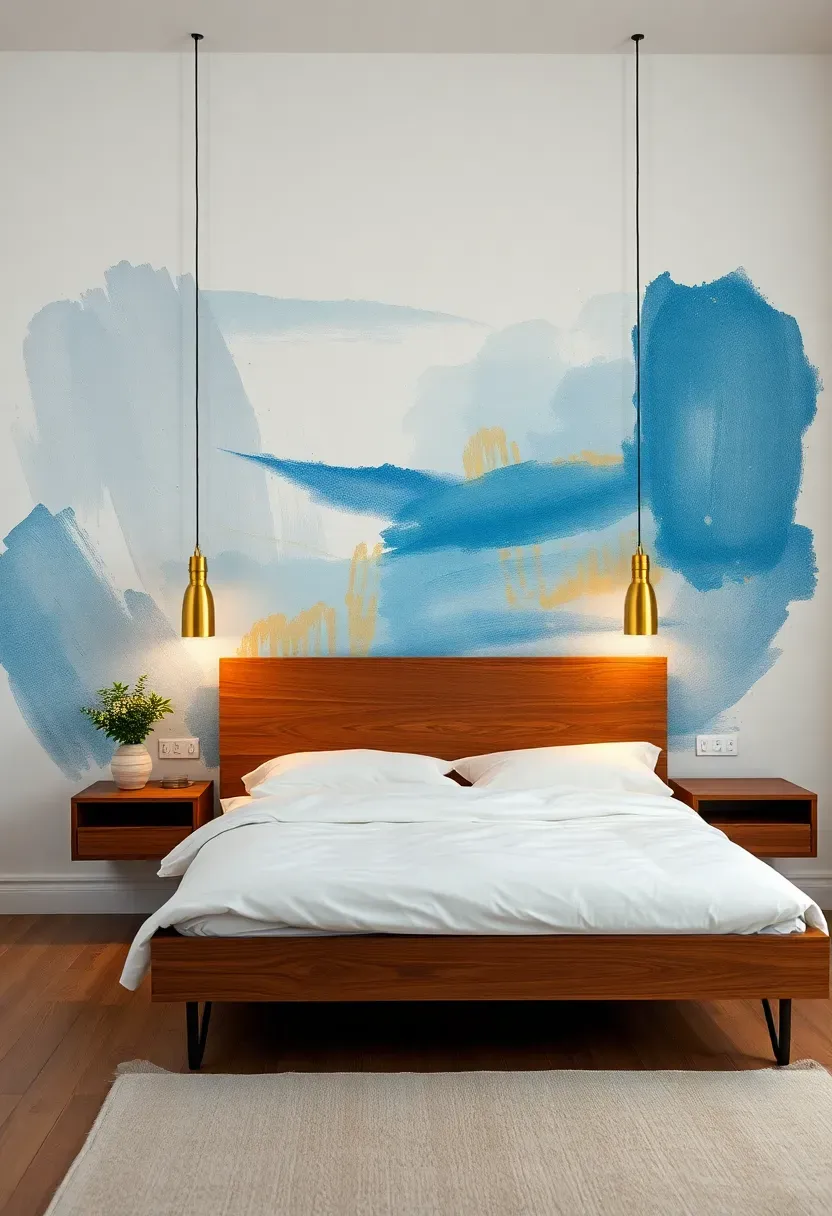
9. Hand-Painted Abstract Mural
A commissioned mural turns a bedroom wall into a genuine piece of art. Abstract compositions in soft, flowing shapes avoid the kitsch factor of realistic murals and give the room a gallery atmosphere that evolves as your eye moves across it.
The Core Issue
Mass-produced wall art and prints lack the scale and uniqueness needed to anchor a bedroom. They sit on the wall rather than becoming part of it.
The Solution
Working with a local muralist, choose a palette that pulls from your existing bedding and rug tones. Abstract forms in watercolor-style washes create movement and softness appropriate for a sleeping space. The mural wraps from wall edge to wall edge, eliminating the need for any additional wall decor and making the room feel cohesive and purposeful.
Pros and Cons
Pros: Completely unique to your home, can be designed around existing furniture, becomes a conversation piece
Cons: Requires hiring a professional artist, permanent without repainting, timeline depends on artist availability
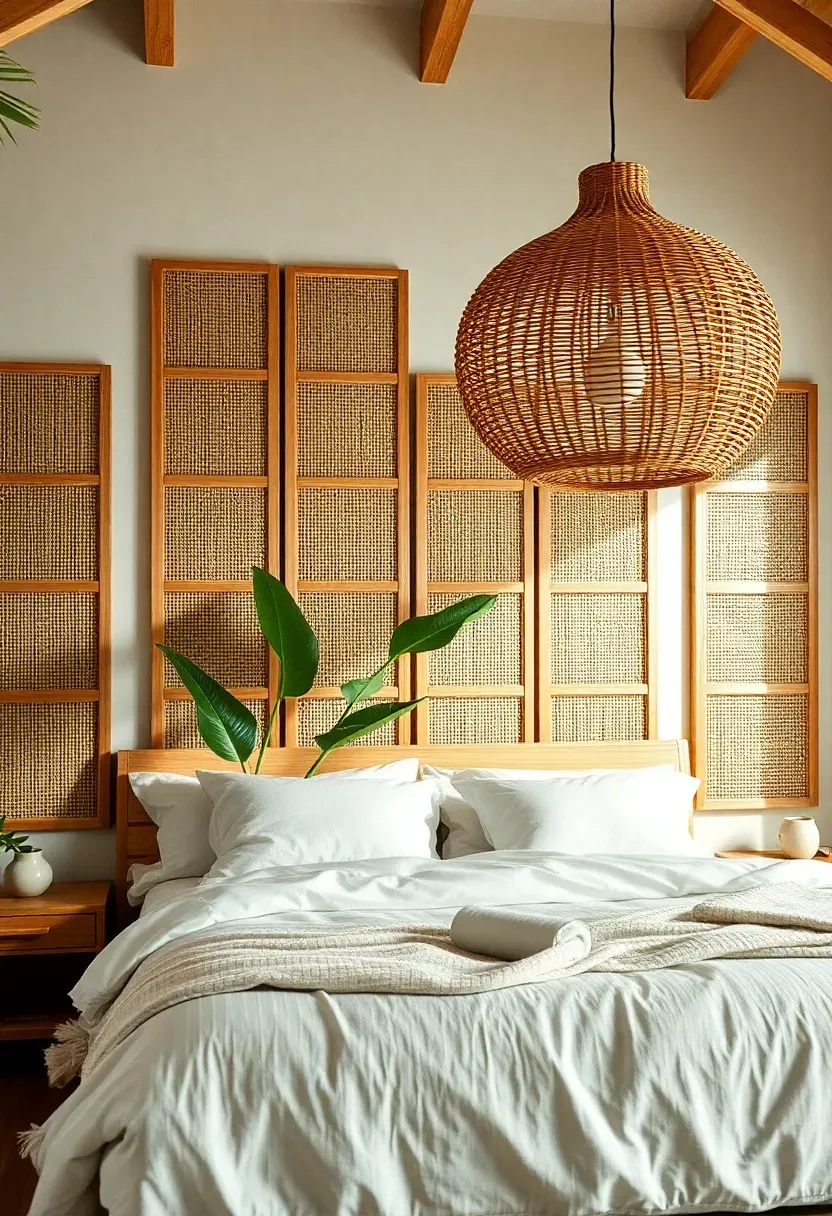
10. Cane Webbing Panel Grid
Cane webbing stretched over rectangular wood frames and mounted in a grid creates a headboard wall that is airy, textured, and full of warmth. The woven pattern filters light beautifully and introduces a craft-forward element that suits bohemian, tropical, and mid-century spaces equally.
Tips for Getting It Right
- Build frames from 25x50mm pine or oak, mitered at the corners for a clean look
- Soak cane webbing in warm water for 30 minutes before stretching -- it tightens as it dries
- Mount frames with French cleats for easy removal and repositioning
- Space frames 20-30mm apart to create shadow lines between each panel
Recommended
Items for this idea
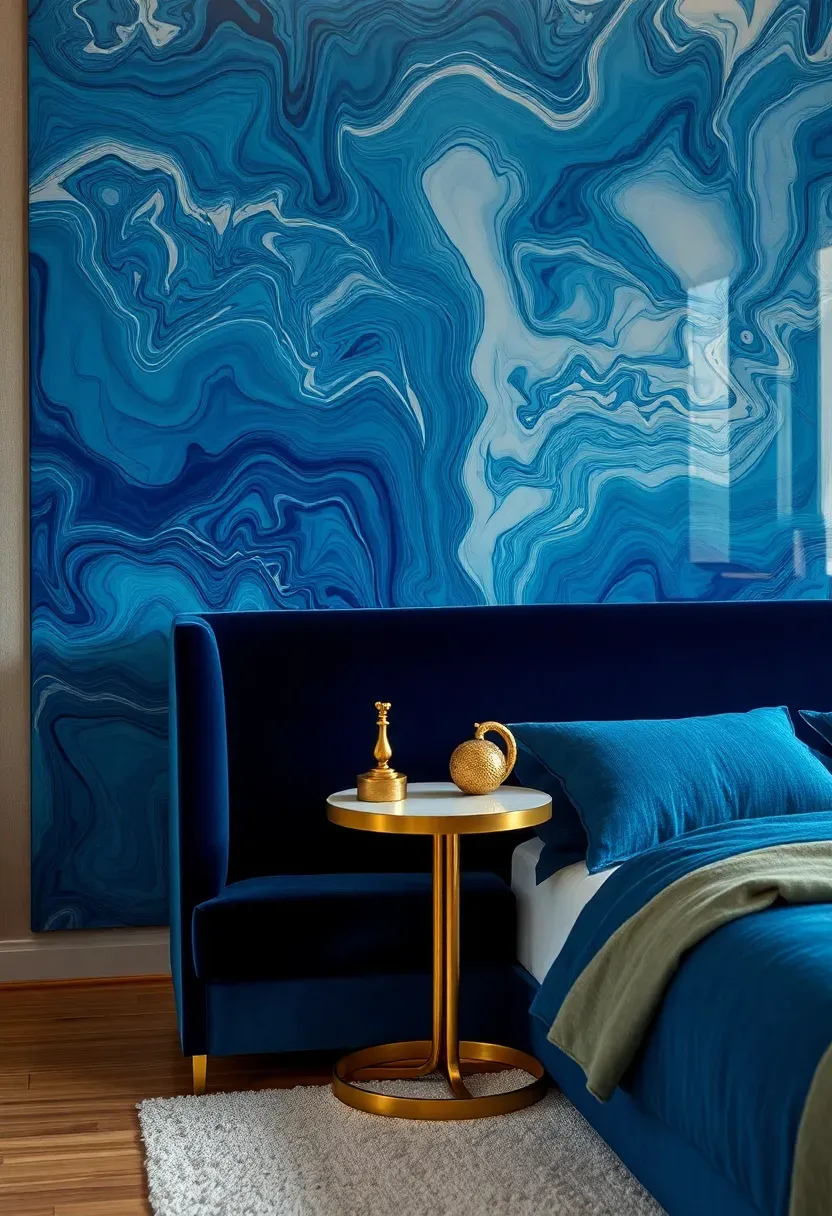
11. Poured Resin Art Wall
Epoxy resin poured directly onto a prepared wall panel creates a high-gloss, fluid art surface with depth that resembles ocean waves or geological formations. This technique delivers a statement wall that is both tactile and luminous, catching light in a way that paint or wallpaper cannot match.
Why It Works
The glossy, undulating surface creates a sense of movement in a room that is otherwise still. Blues and whites evoke water; earth tones and gold suggest agate or marble. The sealed surface is waterproof, scratch-resistant, and easy to wipe clean.
Practical Recommendations
- Work with a resin artist or practice extensively on sample boards before tackling a full wall
- Temperature and humidity must be controlled during curing -- plan for 24-48 hours undisturbed
- Mount resin panels to the wall rather than pouring in place for easier future removal
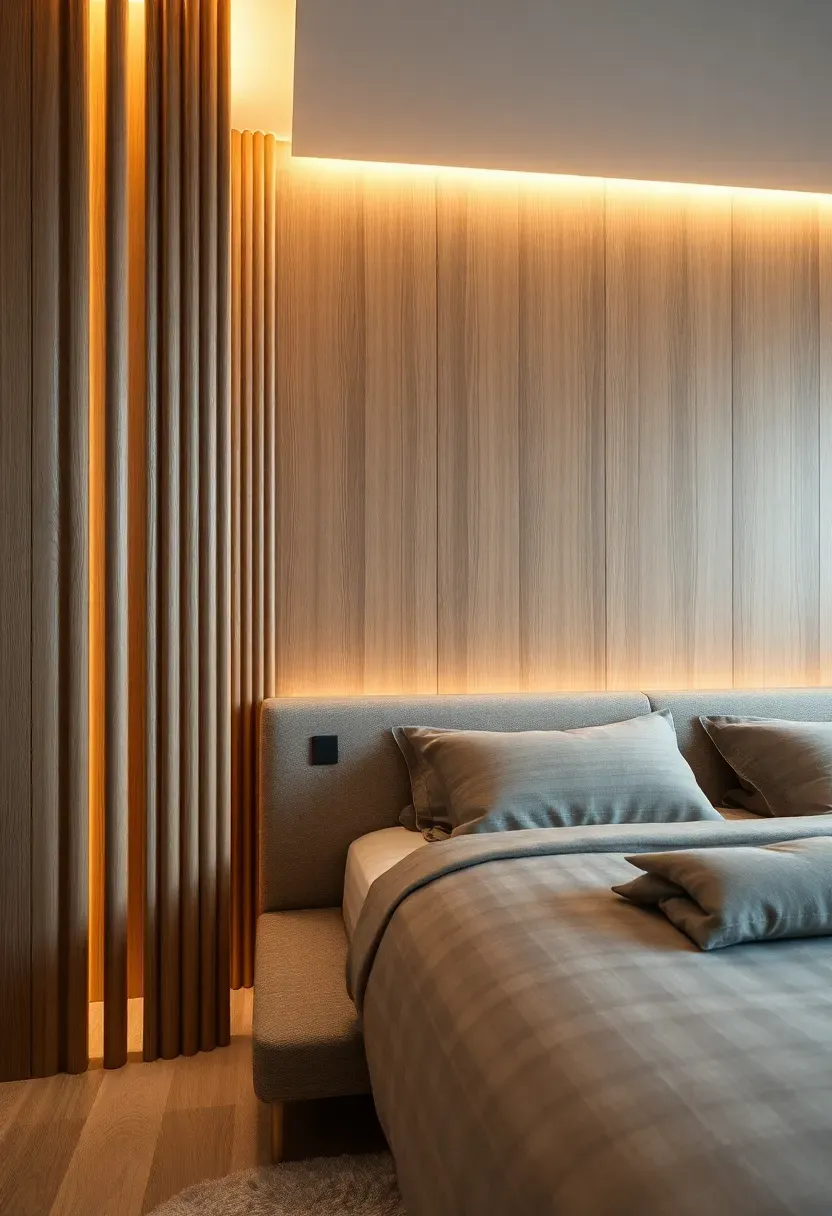
12. Fluted Wood Column Wall
Full-height fluted columns in natural oak or walnut create a rhythm of light and shadow that gives the bedroom a quiet architectural authority. Unlike flat wood paneling, the rounded profiles catch ambient light differently throughout the day.
Origins and History
Fluted columns trace their lineage to ancient Greek and Roman architecture, where they adorned temples and public buildings. In contemporary interiors, designers have reimagined this motif at a smaller, residential scale, using the repetitive vertical lines to elongate walls and add formality without heaviness.
Modern Interpretation
Today, CNC-routed MDF panels with fluted profiles offer the look at a fraction of the cost and weight of solid wood columns. Available primed for painting or veneered in natural wood, these panels install flat against the wall and transform a standard bedroom into something that resembles a boutique hotel suite. Pair with a floating headboard and recessed lighting above for maximum drama.
How to Apply at Home
- Purchase panels in 2400mm lengths to cover floor to ceiling in one piece
- Paint the wall behind in a contrasting dark tone so shadows between flutes pop
- Crown molding at the top creates a finished, built-in look
- Use a brad nailer and adhesive combo for secure, gap-free installation
Recommended
Items for this idea
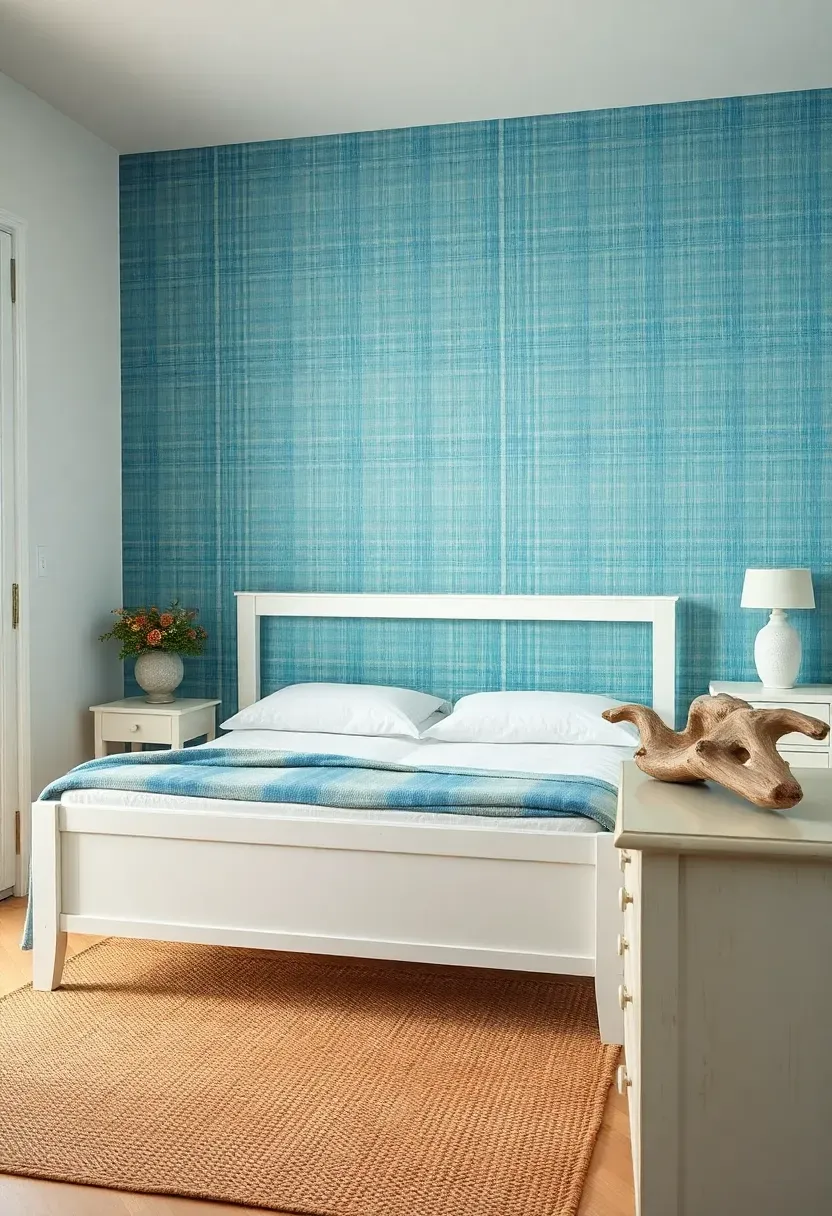
13. Grasscloth Wallpaper
Grasscloth wallpaper is woven from natural fibers like jute, seagrass, or sisal, laminated onto a paper backing. The organic weave creates horizontal texture lines that add depth and warmth impossible to achieve with printed wallpaper.
Tips for Getting It Right
- Hang panels in the same direction -- reversing them creates visible shading differences at seams
- Use a clear wallpaper adhesive applied to the wall, not the paper, to prevent staining
- Avoid areas near windows where direct sun hits for extended periods, as natural fibers can fade
- Choose a color with blue or green undertones for bedrooms -- these promote calm and sleep
14. Micro-Cement Rough Finish
Micro-cement applied with intentionally rough trowel marks creates a raw, industrial texture that balances beautifully against soft bedroom textiles. The finish reads as urban and edgy while remaining surprisingly warm when paired with the right materials.
Step 1: Prepare the Surface
Clean the wall thoroughly and apply a bonding primer. Micro-cement adheres best to properly primed drywall or concrete block.
Step 2: Apply Base Coat
Spread the first layer thinly with a stainless steel trowel, working in irregular arcs. This coat builds the texture foundation and does not need to be smooth.
Step 3: Add Finish Coat and Seal
Apply a thinner second coat, leaving some trowel marks visible for character. After 24 hours of curing, seal with a matte polyurethane to protect against moisture and scuffing.
What to Watch Out For
- Practice trowel technique on cardboard first -- pressure and angle determine the entire texture
- Work in sections no larger than one square meter to prevent edges from drying before you blend them
- Grey tones pair best with warm wood and cream textiles; avoid matching with more grey
Recommended
Items for this idea
15. Reclaimed Pallet Mosaic
Salvaged pallet wood cut into varied lengths and arranged in a randomized mosaic pattern creates a feature wall with genuine character and zero material cost for resourceful DIYers. The mixed patina of aged wood tells a visual story that new lumber cannot replicate.
Why It Works
Each piece of reclaimed wood carries unique weathering, nail holes, and color variation. When assembled together, these imperfections become the design itself -- a wall that looks curated rather than constructed.
Practical Recommendations
- Sand all pieces lightly to remove splinters but preserve the aged surface character
- Heat-treat pallet wood in an oven at 70C for 30 minutes to eliminate any pests
- Apply a clear matte sealer to prevent wood dust from settling on bedding
- Mix horizontal, vertical, and diagonal pieces for maximum visual interest
16. Fabric-Wrapped Sound Panel
Upholstered acoustic panels serve double duty: they dampen sound for better sleep and create a luxurious, padded headboard wall. Wrapped in velvet, linen, or bouclé, these panels introduce softness and color while solving noise problems common in apartments and townhouses.
Comparing: DIY Panels vs Commercial Products
DIY approach: Custom size and fabric choice, lower cost per panel, requires basic woodworking, takes a full weekend
Commercial acoustic panels: Professional finish, fire-rated options, faster installation, higher per-panel cost, limited fabric choices
What to Choose
Choose DIY if: You want full control over fabric, size, and arrangement and enjoy hands-on projects
Choose commercial if: Fire rating matters, you need a guaranteed acoustic performance spec, or time is limited
Recommendation
A grid of six to nine panels in a single fabric tone creates the cleanest look. Mount them edge-to-edge behind the bed from mattress height to approximately 30cm below the ceiling.
Recommended
Items for this idea
17. Arabesque Plaster Relief
Dimensional plaster patterns inspired by Islamic geometric art create a wall that is alive with shadow and light. The raised arabesque motifs catch even subtle ambient lighting and shift in appearance from morning to evening, turning the wall into a kinetic element.
Tips for Getting It Right
- Purchase prefabricated plaster panels with the pattern already cast -- hand-carving an entire wall is impractical for most homeowners
- Paint the finished wall in a single matte white or cream to let shadows do the decorating
- Install picture lights or directional wall washers aimed at sharp angles to maximize the relief effect
- Limit the treatment to one wall only -- the visual complexity needs surrounding simplicity to breathe
18. Terrazzo-Effect Paint
Terrazzo-style walls bring the beloved Italian flooring pattern off the ground and onto a vertical surface. Using a base coat, a sponge, and several accent colors, you can create a speckled composition that feels cheerful, artistic, and surprisingly easy to execute.
The Core Issue
Solid-color accent walls can feel one-dimensional, especially in bedrooms with neutral furniture. They add color but not texture or visual complexity.
The Solution
Start with a pale base coat -- cream, soft pink, or light grey. Using torn pieces of natural sponge, dab on irregular spots of two to three coordinating colors. The randomness mimics real terrazzo chips. Finish with a few deliberate larger spots and tiny flecks using a stiff brush flicked from a distance. The wall gains depth and personality without the permanence of wallpaper or the cost of actual terrazzo.
Pros and Cons
Pros: Extremely budget-friendly, customizable to any color palette, easy to paint over if tastes change
Cons: Requires patience and willingness to experiment, results vary with technique, can read juvenile if colors are too bright
Recommended
Items for this idea
19. Leather Tile Patchwork
Leather wall tiles in a patchwork of tones -- from cognac to chocolate to tan -- create an accent wall that ages beautifully and introduces a tactile warmth no other material can match. The subtle variations between tiles give the wall a collected, layered feeling similar to a well-worn satchel or vintage club chair.
Tips for Getting It Right
- Use genuine or high-quality bonded leather tiles with self-adhesive backing for easier installation
- Alternate between three to four complementary shades rather than random mixing for a cohesive pattern
- Apply to the wall behind the bed only, extending from floor to ceiling for maximum impact
- Condition the leather annually with a light oil to maintain suppleness and prevent cracking
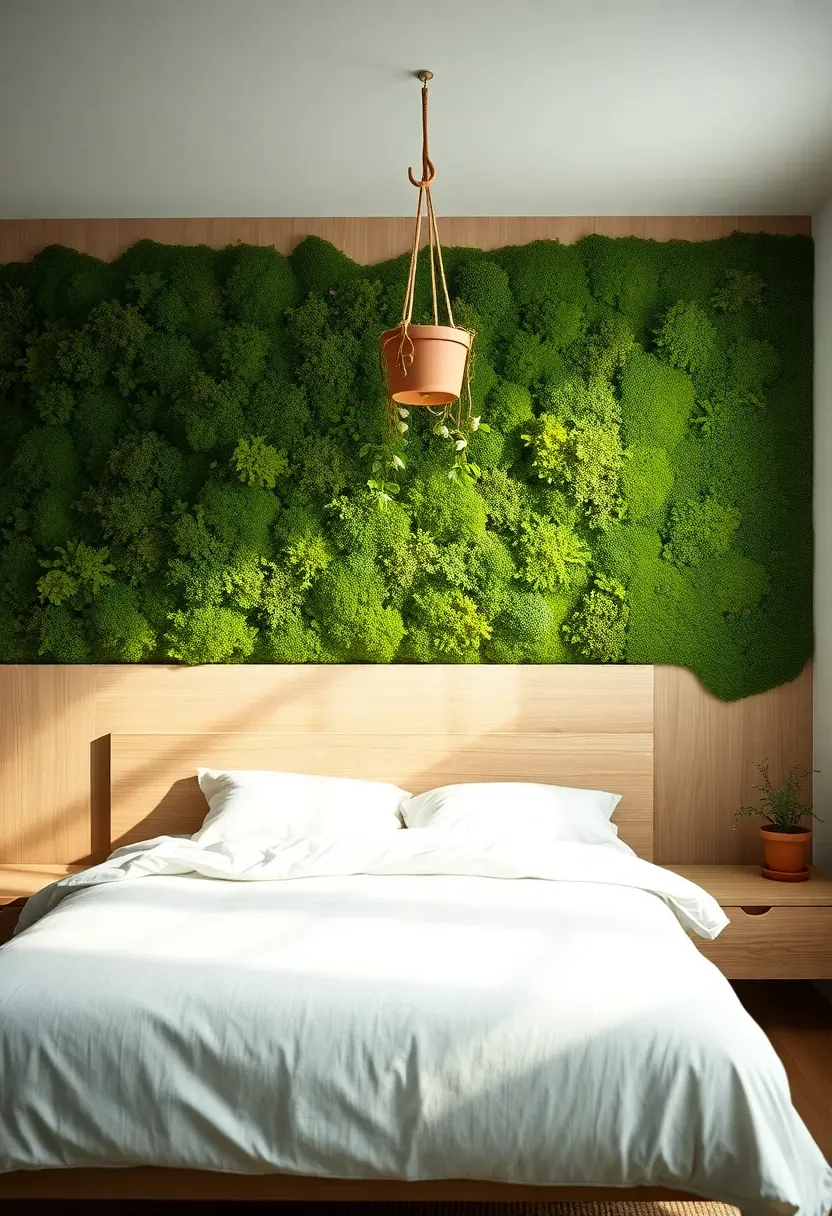
20. Living Moss Wall
Preserved moss panels bring genuine green into the bedroom without any maintenance, watering, or sunlight requirements. The wall reads as a vertical garden, creating an immersive biophilic experience that makes the room feel like a forest clearing.
Step 1: Choose Your Moss Type
Reindeer moss provides a fluffy, cloud-like texture. Sheet moss offers a flat, carpet-like surface. Mixing both creates topographic depth and visual interest.
Step 2: Prepare the Panels
Mount preserved moss onto plywood backing panels using non-toxic adhesive. Work in sections that can be carried through doorways and lifted into position.
Step 3: Install and Enjoy
Secure panels to the wall with French cleats or heavy-duty adhesive strips. Preserved moss requires zero watering and maintains its color for years. Avoid placing in direct sunlight or near heating vents, as these accelerate drying.
What to Watch Out For
- Preserved moss is treated with glycerin and food-safe dyes -- it is not alive and will not grow
- Humidity below 40% can cause edges to curl -- consider a small humidifier in dry climates
- Do not spray with water -- this damages the preserving treatment
Recommended
Items for this idea
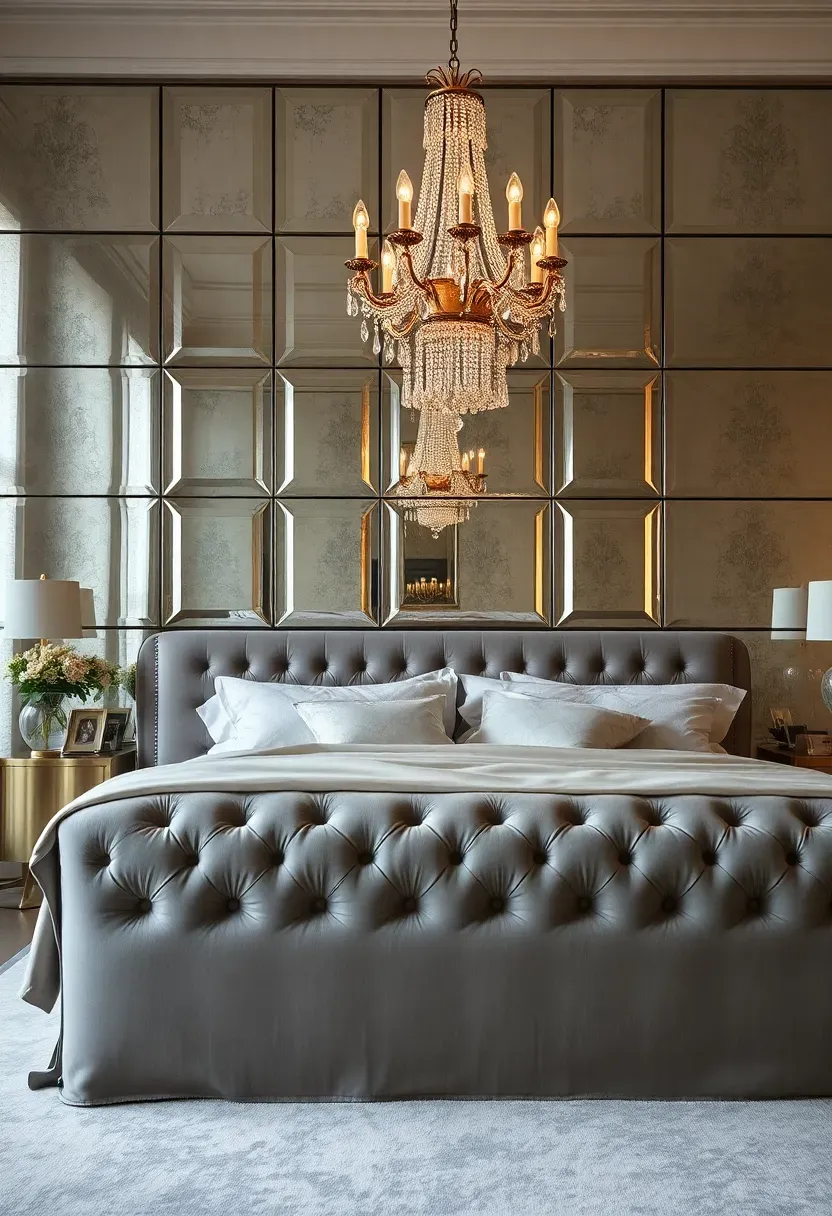
21. Mirrored Panel Accent
Antiqued or smoked mirror panels arranged behind the bed reflect light and visually double the room's depth. This technique works especially well in compact bedrooms where spatial illusion matters, turning a tight space into something that feels open and luminous.
Why It Works
Mirrors exploit natural and artificial light, bouncing it across the room and eliminating dark corners. Antiqued mirror -- with its mottled, imperfect silvering -- adds glamour without the harshness of clear mirror, softening reflections into something atmospheric.
Practical Recommendations
- Use mirror panels with beveled or framed edges to create visible grid lines and architectural rhythm
- Position opposite a window for maximum light reflection during daytime
- Choose smoked bronze mirror for warm-toned rooms or grey antiqued mirror for cool palettes
- Secure panels with industrial-strength mirror adhesive and mechanical clips at the bottom edge for safety
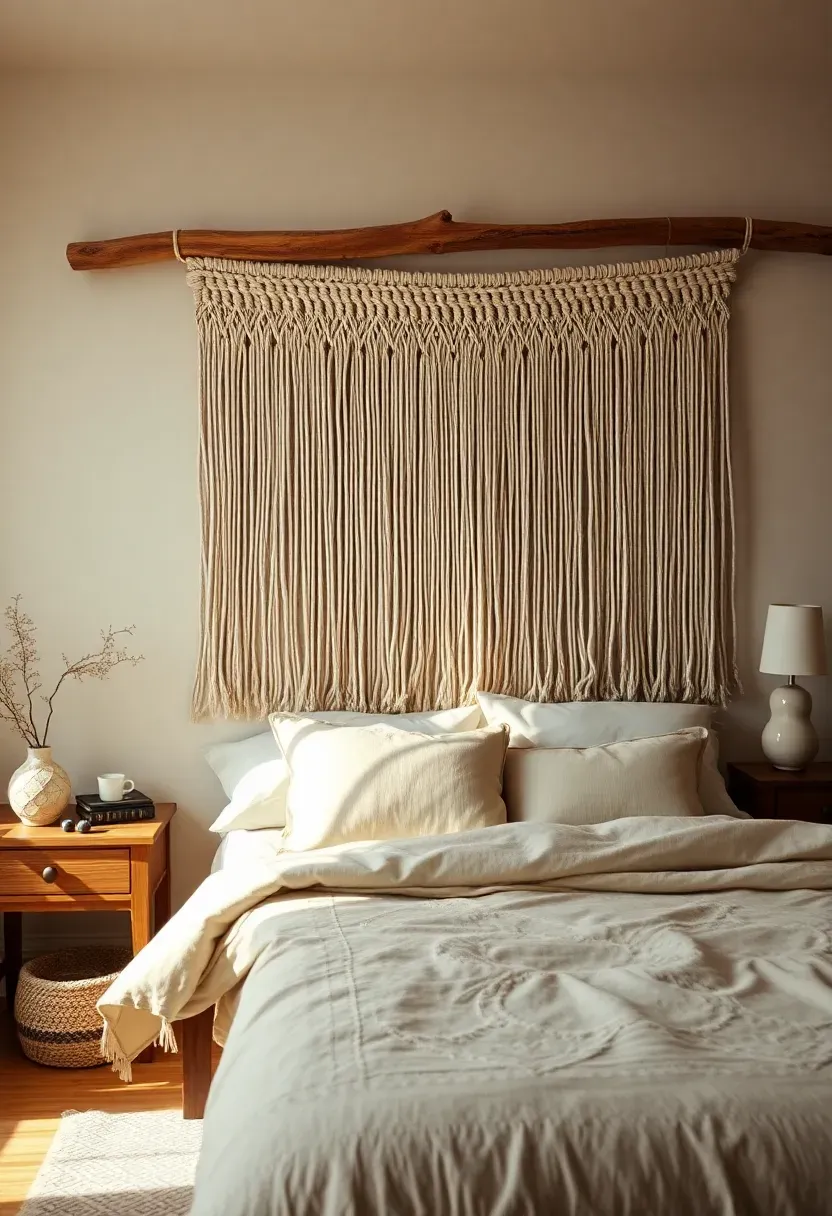
22. Woven Macrame Tapestry Wall
An oversized macrame wall hanging transforms the accent wall into a textile art installation. The knotted cotton or jute creates shadows and dimension that shift throughout the day, bringing craft and warmth into even the most minimal bedroom.
Origins and History
Macrame originated with 13th-century Arab weavers and spread through Europe via sailors who used decorative knotting during long voyages. The craft experienced revivals in the 1970s and again in the 2020s, now adapted for large-scale wall art that bridges bohemian and contemporary aesthetics.
Modern Interpretation
Contemporary macrame artists work at architectural scale, creating pieces that span entire walls. Natural cotton cord in cream or sand tones keeps the look neutral and versatile. Geometric patterns and layered fringes add complexity while maintaining the handcrafted quality that mass-produced decor lacks. Mounting on a thick wooden dowel or driftwood branch anchors the piece visually and adds a natural frame.
How to Apply at Home
- Commission a local fiber artist or purchase a large-scale piece online
- Ensure the wall can support the weight -- large pieces can exceed 10kg
- Mount the hanging rod with heavy-duty wall anchors rated for at least twice the piece's weight
- Pair with simple bedding to let the texture speak without competition
Recommended
Items for this idea
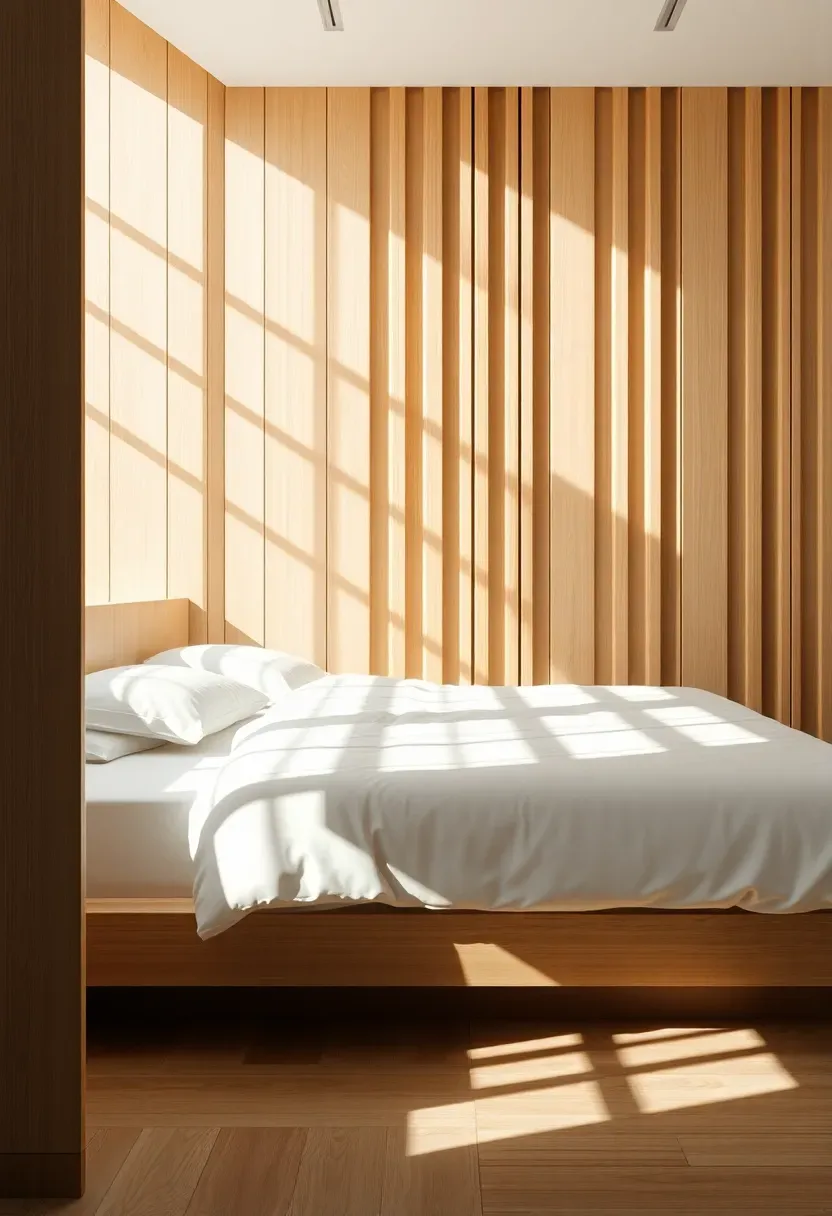
23. Slatted Divider Accent
Horizontal wood slats mounted with deliberate gaps create a semi-transparent accent wall that can separate a sleeping zone from a reading nook or dressing area. Light filters between the slats, maintaining openness while defining distinct zones within one room.
Tips for Getting It Right
- Use slats of uniform width (40-50mm) with consistent gaps (15-20mm) for a clean, rhythmic effect
- Mount to a simple wooden frame that stands slightly off the main wall for shadow depth
- Natural maple or birch keeps the look light and modern; dark walnut adds warmth and drama
- Consider running one or two slats longer than the rest for an asymmetric, contemporary edge
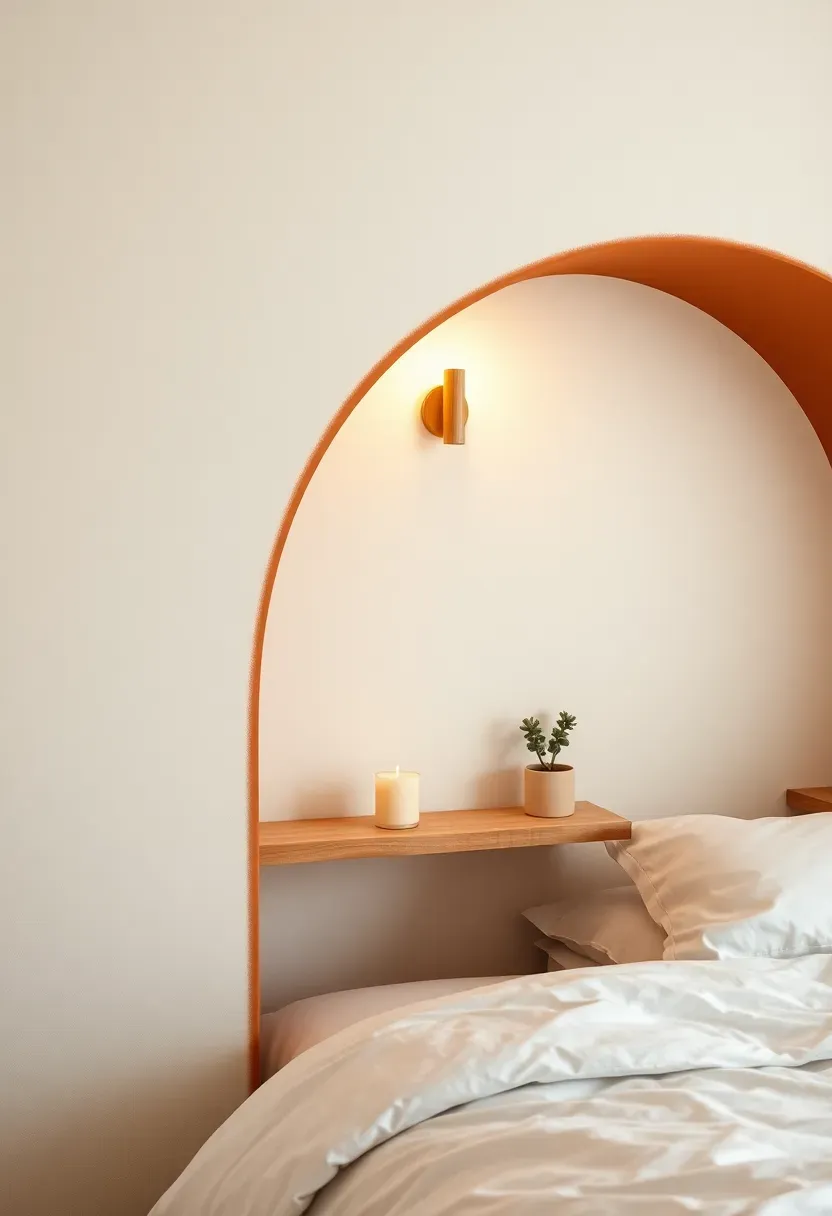
24. Painted Arch Nook
A painted arch on a flat wall creates the illusion of an architectural alcove framing the bed. Using tape and a steady hand, you can produce a curve that makes a standard bedroom feel like a Mediterranean retreat -- no construction required.
The Core Issue
Rectangular rooms with flat walls and square corners can feel boxy and uninspired. Adding real architectural detail requires demolition, framing, and plastering.
The Solution
Paint a tall arch shape directly onto the wall in a contrasting color. Extend it from roughly 30cm above the floor on each side, curving up and over the headboard area. The arch fools the eye into perceiving depth and structure. Mount floating shelves within the "arch" for functional niches that reinforce the illusion. Terracotta, dusty blue, or sage green work best against white or cream surrounding walls.
Pros and Cons
Pros: Costs less than a can of paint and a roll of tape, instantly architectural, easily repainted
Cons: Freehand curves require practice (use a pencil tied to a string as a compass), sharp tape lines demand patience
Recommended
Items for this idea
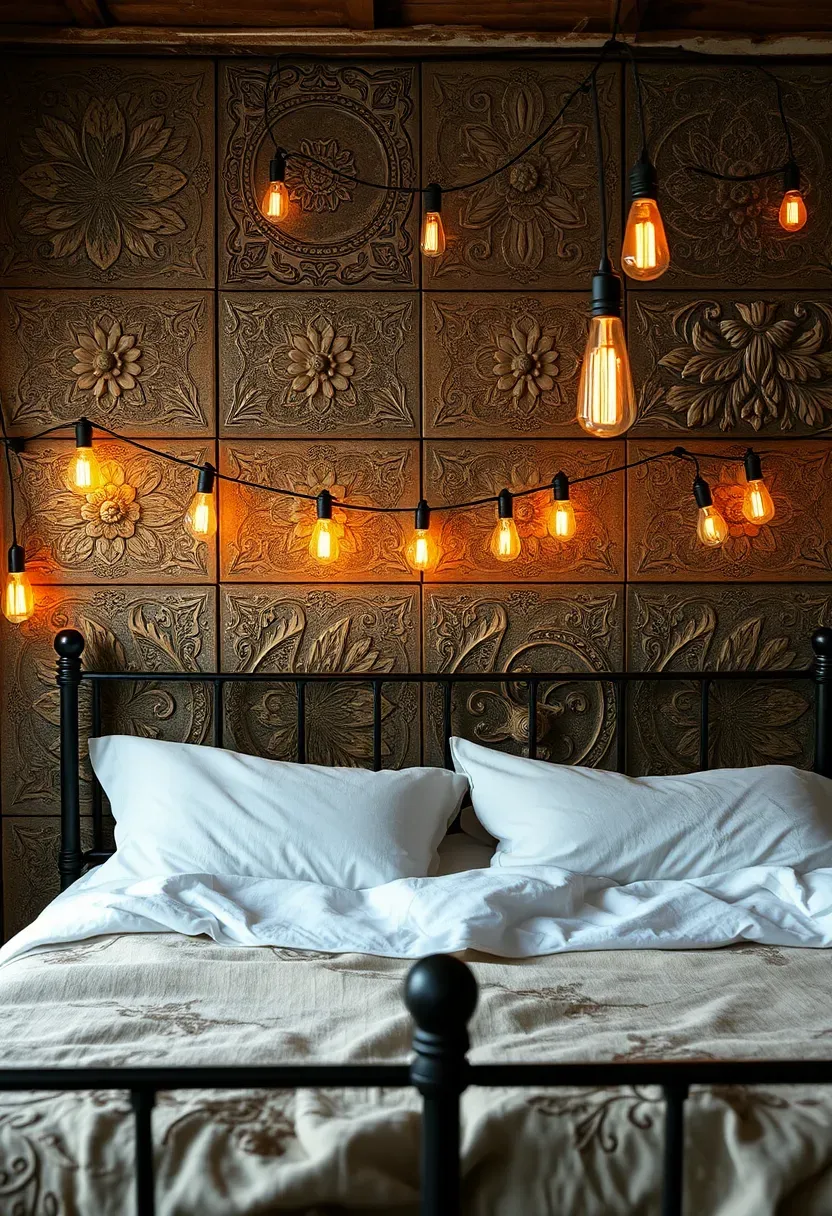
25. Stamped Tin Ceiling Tiles on Wall
Repurposing vintage or reproduction stamped tin panels as a wall treatment brings instant character with deep relief patterns that cast beautiful shadows. Originally designed for Victorian-era ceilings, these pressed-metal tiles look striking when mounted vertically behind a bed.
Why It Works
The intricate embossed patterns create visual complexity that no paint treatment or wallpaper can match. The metallic surface reflects ambient light softly, adding shimmer without the mirror effect. Over time, tin develops a natural patina that only enhances its appeal.
Practical Recommendations
- Source reproduction panels from architectural salvage companies for consistent sizing
- Leave the natural tin finish for an industrial look, or spray-paint in matte black, cream, or copper
- Mount with construction adhesive and small screws at panel corners, covering screw heads with decorative caps
- Combine two or three different patterns for an eclectic patchwork effect

26. Paper Bag Textured Finish
Crumpled brown paper bags adhered to the wall with diluted white glue create a surprisingly convincing faux leather texture at a fraction of the cost. When stained and sealed, the wrinkled paper develops a rich, warm surface that resembles aged hide.
Step 1: Prepare Materials
Tear brown paper bags into irregular pieces roughly the size of your hand. Crumple each piece tightly, then partially smooth it out -- the wrinkles become the texture.
Step 2: Adhere to the Wall
Mix equal parts white PVA glue and water. Brush the mixture onto the wall section by section, pressing paper pieces into the wet adhesive with overlapping edges. Smooth gently with a damp sponge.
Step 3: Stain and Seal
Once completely dry (24-48 hours), apply a wood stain in walnut or mahogany with a rag, wiping in random directions. Finish with two coats of matte polyurethane for durability and a leather-like sheen.
What to Watch Out For
- Work from top to bottom to prevent drips from marring finished sections below
- Overlap paper edges by at least 20mm to avoid visible gaps when the paper dries and shrinks slightly
- Test stain color on a sample piece first -- absorption varies based on paper thickness
Recommended
Items for this idea
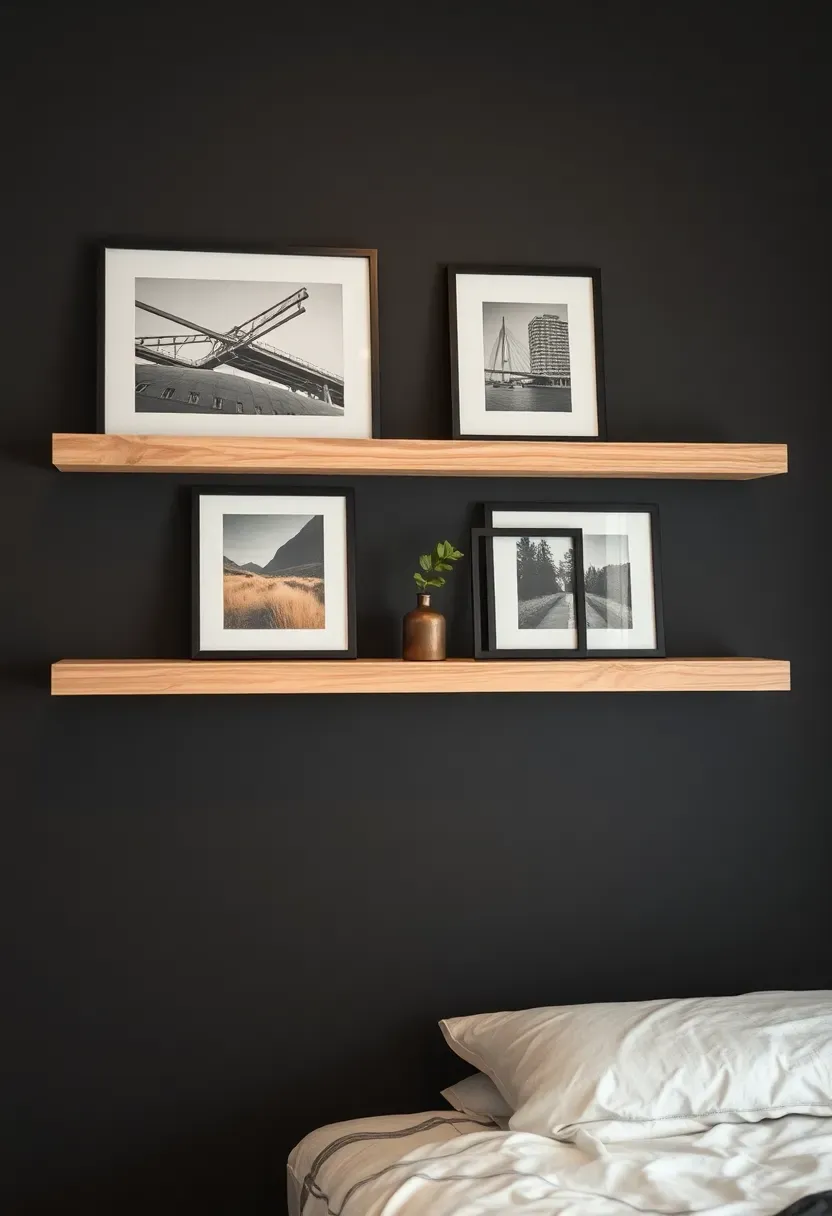
27. Mixed Media Gallery Ledge
Narrow floating picture ledges mounted in staggered rows transform an accent wall into a rotating gallery that you can update endlessly. Unlike a fixed gallery wall, ledges let you swap prints, photographs, and small objects without new nail holes every time your taste shifts.
Comparing: Picture Ledges vs Traditional Gallery Wall
Picture ledges: Infinitely reconfigurable, no commitment to a fixed layout, easy to swap art seasonally, supports 3D objects
Traditional gallery wall: Permanent arrangement, requires precise spacing, creates a more formal grid, limited to flat-framed pieces
What to Choose
Choose ledges if: You like changing your decor frequently, collect art impulsively, or want to display small sculptures and plants alongside framed pieces
Choose a traditional gallery if: You prefer a curated, fixed composition and want a more formal, museum-like effect
Recommendation
Install three to four ledges at varying heights against a dark-painted accent wall -- charcoal, deep navy, or forest green. The dark background makes artwork pop and gives the entire arrangement a gallery-like gravity. Overlap frame edges slightly on each ledge for a layered, collected look.
Quick FAQ
Should you paint all four walls or just one as an accent? A single accent wall delivers the most impact precisely because it contrasts with the other three. Painting all walls the same bold color flattens the room and eliminates the focal point that draws the eye. Keep surrounding walls neutral to let the accent breathe.
Is it possible to create an accent wall in a rental bedroom? Absolutely. Removable wallpaper, fabric panels mounted on French cleats, gallery ledges, large macrame hangings, and cork tiles with removable adhesive all work without damaging walls. Preserved moss panels and cane webbing frames can also be removed cleanly when you move out.
Which wall in the bedroom should be the accent? The wall behind the headboard is the strongest choice because it frames the largest furniture piece and is the first thing you see when entering. If your bed is not against a wall, choose the wall directly opposite the bedroom door for maximum visual impact upon entry.
What accent wall materials work best for small bedrooms? Light-reflective options like mirrored panels, light-toned grasscloth, or a painted arch expand the sense of space. Avoid heavy dark stone or deep saturated paint in rooms under 12 square meters -- these can make a small bedroom feel claustrophobic rather than cozy.
Does an accent wall increase home resale value? A well-executed accent wall in a neutral or on-trend palette can boost perceived value during showings by making the room feel finished and designed. However, very personal or polarizing treatments like bold murals or unusual materials may narrow buyer appeal. When in doubt, choose natural wood, stone, or a sophisticated paint color that reads as intentional rather than eccentric.
Trends come and go, but the principle behind an accent wall is timeless: one deliberate design choice can anchor an entire room. Whether you pick up a paintbrush this weekend or commission a moss wall next month, the goal is the same -- a bedroom that feels intentional, personal, and completely alive. Start with the idea that excites you most and let the rest of the room follow its lead.
Pinterest cover for 27 Accent Wall Ideas for Bedroom That Elevate Any Space
About the author
OBCD
CGI visualization and interior design content. We create detailed 3D renders and curate practical design ideas for every room in your home.