23 AI Garage Workshop Layout Ideas
A garage that doubles as a serious workshop demands more than a folding table and a few hooks on the wall. The layout determines whether you spend half your project time hunting for a drill bit or whether every tool sits within arm's reach. Good workshop design balances workflow zones — cutting, assembly, finishing, storage — so materials move through the space without backtracking. These AI-generated concepts push beyond the standard pegboard setup into territory that feels professional, practical, and genuinely inspiring.
Below you will find 23 distinct layout ideas covering everything from compact single-car garages to spacious two-bay setups. We begin with efficient wall systems and progress toward full shop floor plans.
Table of Contents
- Floor-to-Ceiling French Cleat Wall
- Central Workbench Island with Casters
- L-Shaped Bench Configuration
- Overhead Ceiling Storage Rack
- Compact Miter Station with Wings
- Pegboard Command Center
- Fold-Down Workbench for Tight Spaces
- Dedicated Finishing and Spray Booth
- Two-Zone Layout: Wood and Metal
- Mobile Tool Cabinet Lineup
- Wall-Mounted Lumber Rack System
- Assembly Table with Built-In Clamp Storage
- Corner Dust Collection Hub
- Garage Workshop with Epoxy Floor
- Vertical Panel Saw Station
- Open Rafter Storage with Pulleys
- Modular Shelving and Bin Wall
- Automotive Bay Meets Woodshop
- Small Garage Power Tool Alcove
- Natural Light Workshop with Skylights
- Industrial Pipe Shelving Workshop
- Multi-Level Mezzanine Workshop
- Smart Connected Workshop
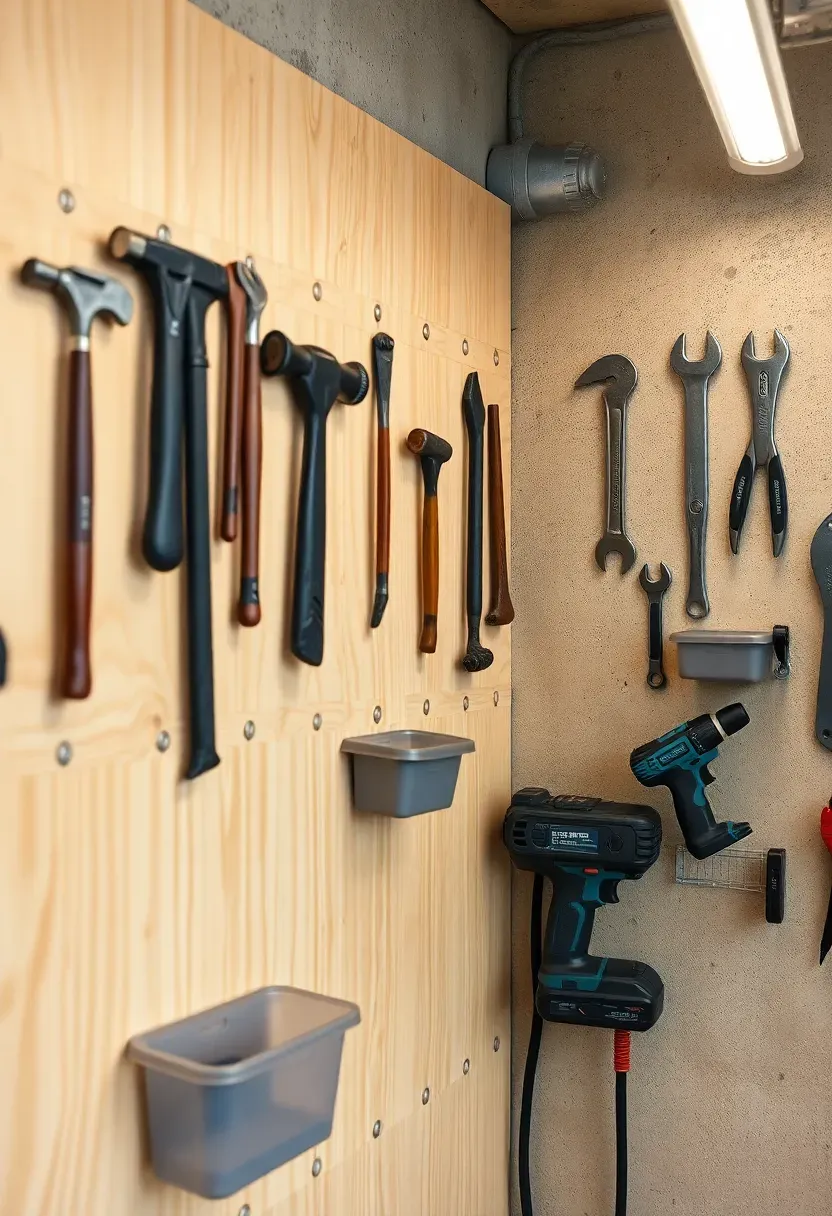
1. Floor-to-Ceiling French Cleat Wall
Most workshop storage solutions force you to commit to a fixed layout. French cleats solve that problem entirely. Every shelf, hook, and holder slides into any position along the wall, so your storage evolves alongside your tool collection without drilling new holes.
Why French Cleats Outperform Pegboard
Pegboard flexes under heavy loads and limits hanger placement to its hole grid. A plywood-based French cleat wall carries power tools, battery stations, and even small cabinets without sagging. The angled cuts interlock firmly enough for items weighing up to 20 kilograms per cleat.
Getting Started
- Rip 3/4-inch plywood into strips with a 45-degree bevel on the table saw
- Space horizontal cleats every 75 millimeters for maximum flexibility
- Paint the wall behind a light color so dark tools stand out visually
We picked a few things that go well with this idea: Goplus 5-Drawer Rolling Tool Chest (★3.8), Torin 5-Drawer Rolling Tool Chest (★4.1) and Heavy Duty 3-Tier Rolling Tool Cart (★4.1). As an Amazon Associate we earn from qualifying purchases.
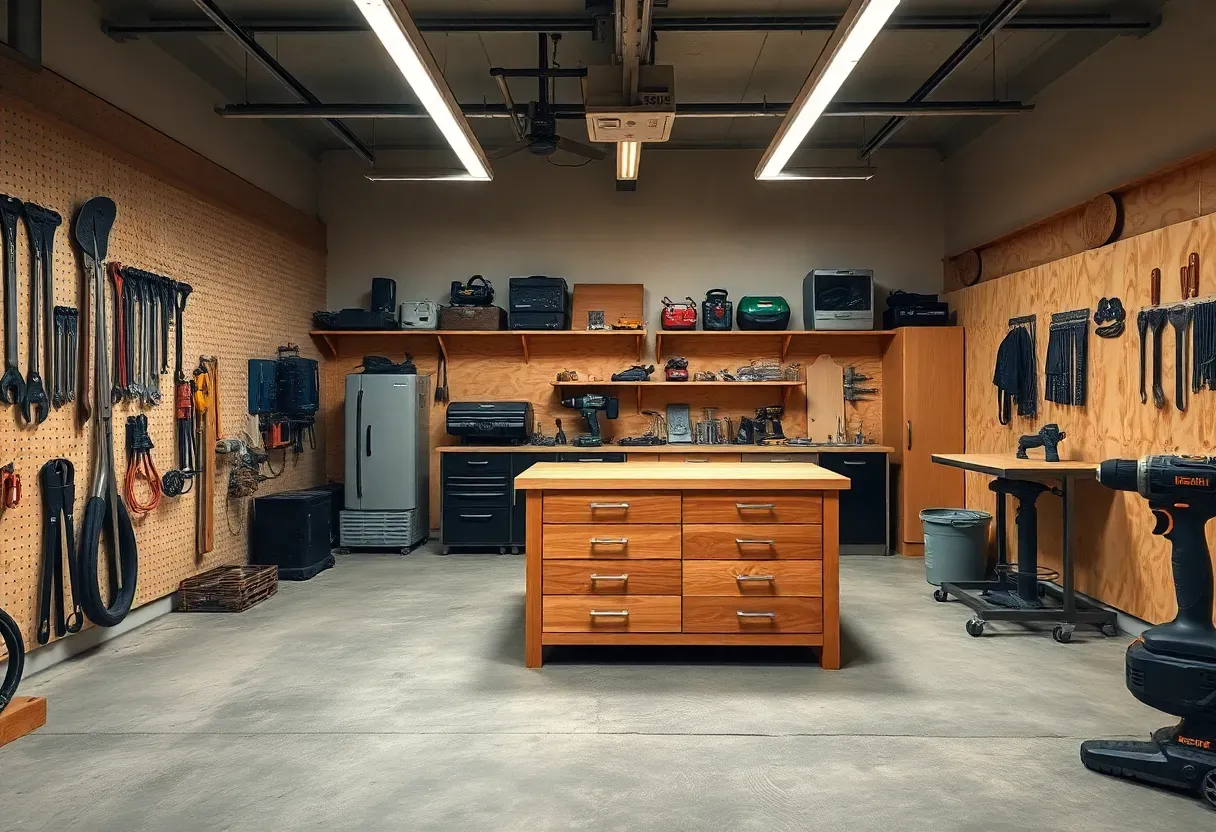
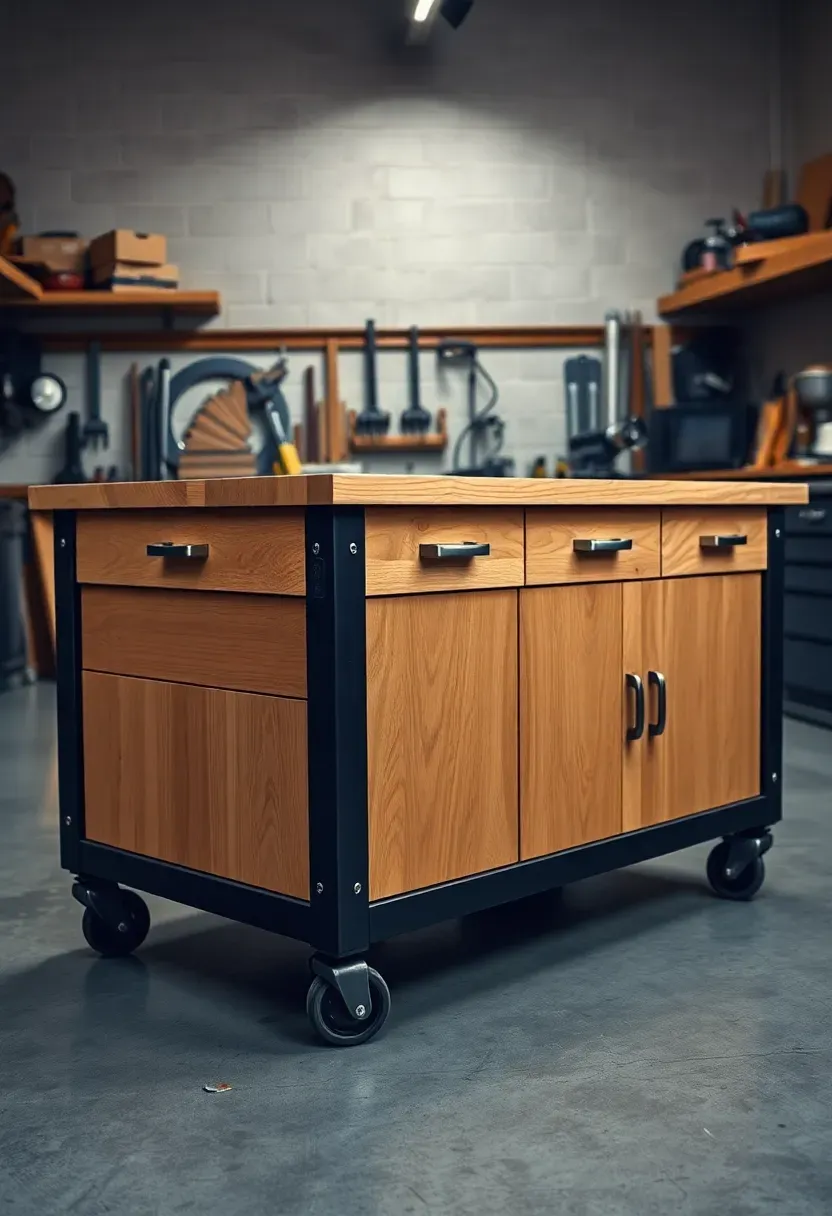
2. Central Workbench Island with Casters
Positioning your primary workbench in the center of the garage rather than against a wall changes everything about how you work. You gain 360-degree access for clamping, sanding, and assembly — tasks that constantly require repositioning the workpiece.
The Core Issue
Wall-mounted benches limit you to working from one side. Large panels, doors, and furniture frames become awkward because you cannot walk around the piece.
The Solution
A heavy bench on locking casters solves both problems. Lock the wheels for stability during precision work. Unlock them to roll the bench aside when you need floor space for a car or larger project. Build drawers on both long sides so storage is accessible from every angle.
Pros and Cons
Pros: Full access from all sides, easily repositioned, doubles as an outfeed table for the table saw Cons: Requires a garage wide enough to maintain clear aisles on all four sides, casters add cost
We picked a few things that go well with this idea: Metal Pegboard Panels with Hooks (4-Pack) (★4.4), Wall Control 4ft Metal Pegboard Kit (★4.7) and Ultrawall Pegboard Organizer with Bins (59pcs) (★4.4). As an Amazon Associate we earn from qualifying purchases.
3. L-Shaped Bench Configuration
An L-shaped bench turns a corner into the most productive square footage in the shop. One wing handles power tool operations while the other serves as a clean assembly and layout surface.
Step 1: Measure Your Corner
Leave at least 600 millimeters of clearance between the bench edge and any opposite wall or obstacle for comfortable movement.
Step 2: Assign Each Wing a Role
Dedicate the shorter wing to a bench grinder, drill press, or scroll saw. Reserve the longer wing for hand work and glue-ups.
Step 3: Connect with a Curved Corner Section
A rounded or angled corner piece prevents awkward dead zones and gives you a natural pivot point when transferring work between the two wings.
What to Watch Out For
- Keep electrical outlets on both wings to avoid stretching cords across your path
- Install task lighting independently over each wing for shadow-free work
- Bolt the junction point firmly to both walls for rigidity
We picked a few things that go well with this idea: Linkable LED Shop Lights (2-Pack, 100W) (★4.6), Barrina T5 LED Shop Lights (6-Pack, 2ft) (★4.6) and Deformable LED Garage Lights (2-Pack, 200W) (★4.6). As an Amazon Associate we earn from qualifying purchases.
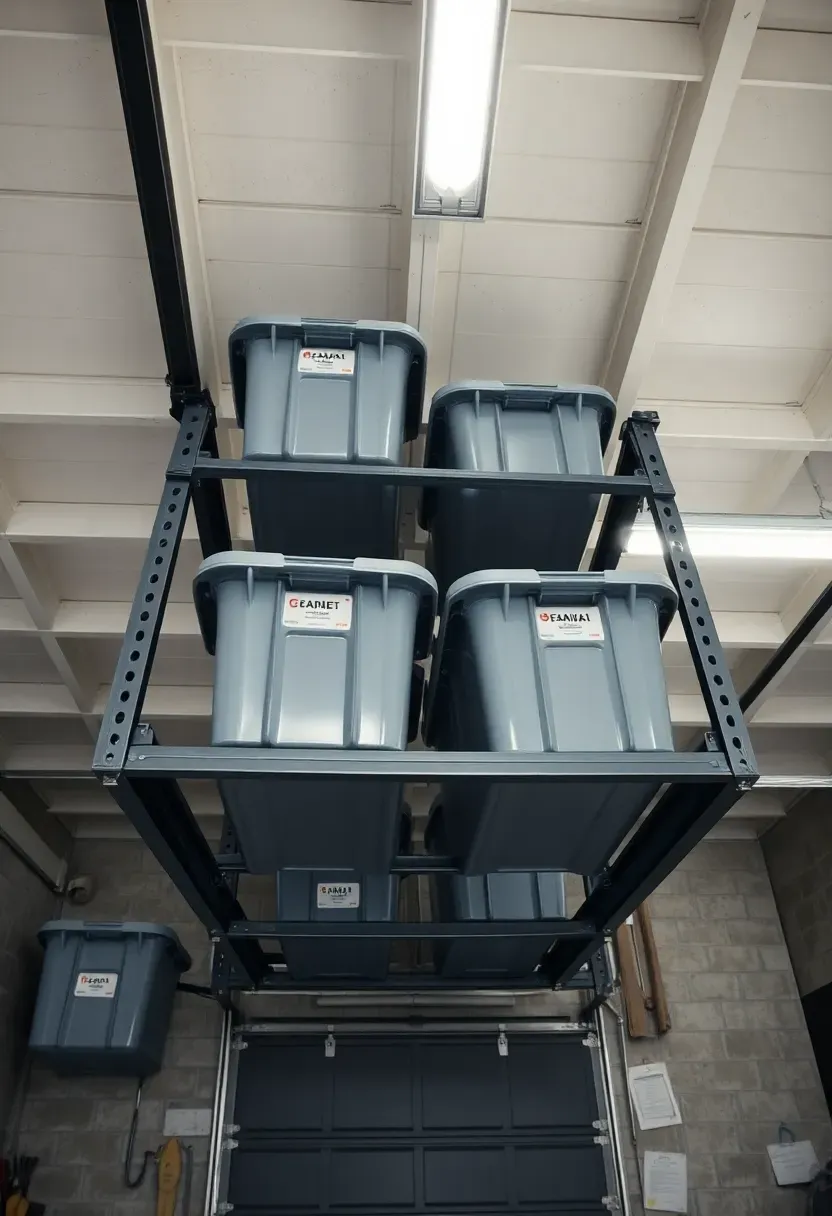
4. Overhead Ceiling Storage Rack
The ceiling is the most wasted real estate in a typical garage. A properly installed overhead rack reclaims that dead space for seasonal items, bulk materials, and anything you reach for less than once a week.
Steel ceiling-mounted platforms bolt directly into joists and can handle 250 kilograms per unit. Position them over areas where you do not need full headroom — above parked vehicles or along the back wall. Label bins from below with large-print tags so you never have to climb a ladder just to identify contents.
Tips for Safe Installation
- Always anchor into structural joists, never drywall alone
- Use a stud finder with deep-scan mode to locate joist centers accurately
- Keep the lowest edge of the platform above the garage door track height
Recommended
Items for this idea
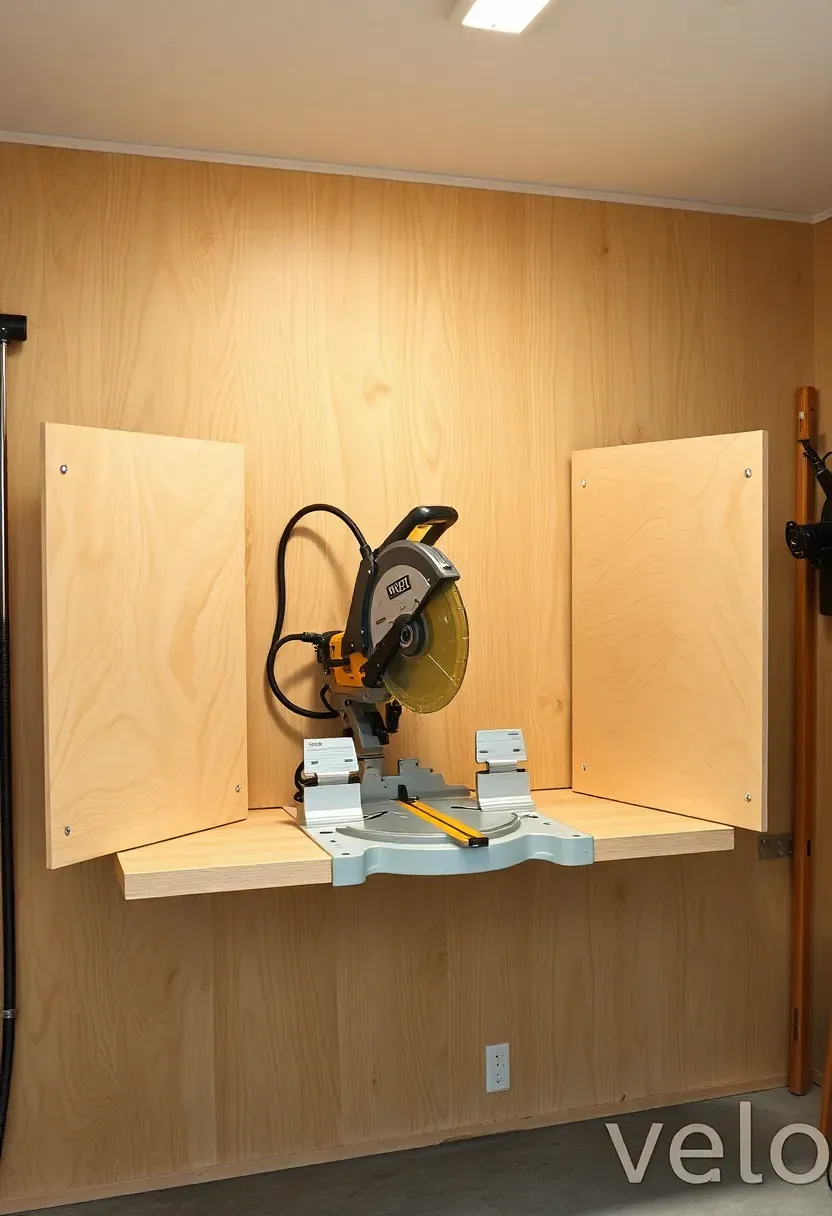
5. Compact Miter Station with Wings
A miter saw without proper support wings is a frustration machine. Long boards droop off the edge, measurements shift, and cuts lose accuracy. Building a dedicated station with fold-down wings transforms the saw into a precision crosscutting center.
How It Works
The saw sits in a recessed pocket so the bed is flush with the wing surfaces. Fold-down extensions on each side provide up to 2.4 meters of total support length. When the wings fold up against the wall, the station occupies barely 700 millimeters of wall space.
Materials and Build Notes
- Use 19-millimeter plywood for the wings and MDF for the fence
- Install a T-track along each wing for a repeatable stop block
- Route a dust port behind the saw to connect directly to your shop vacuum
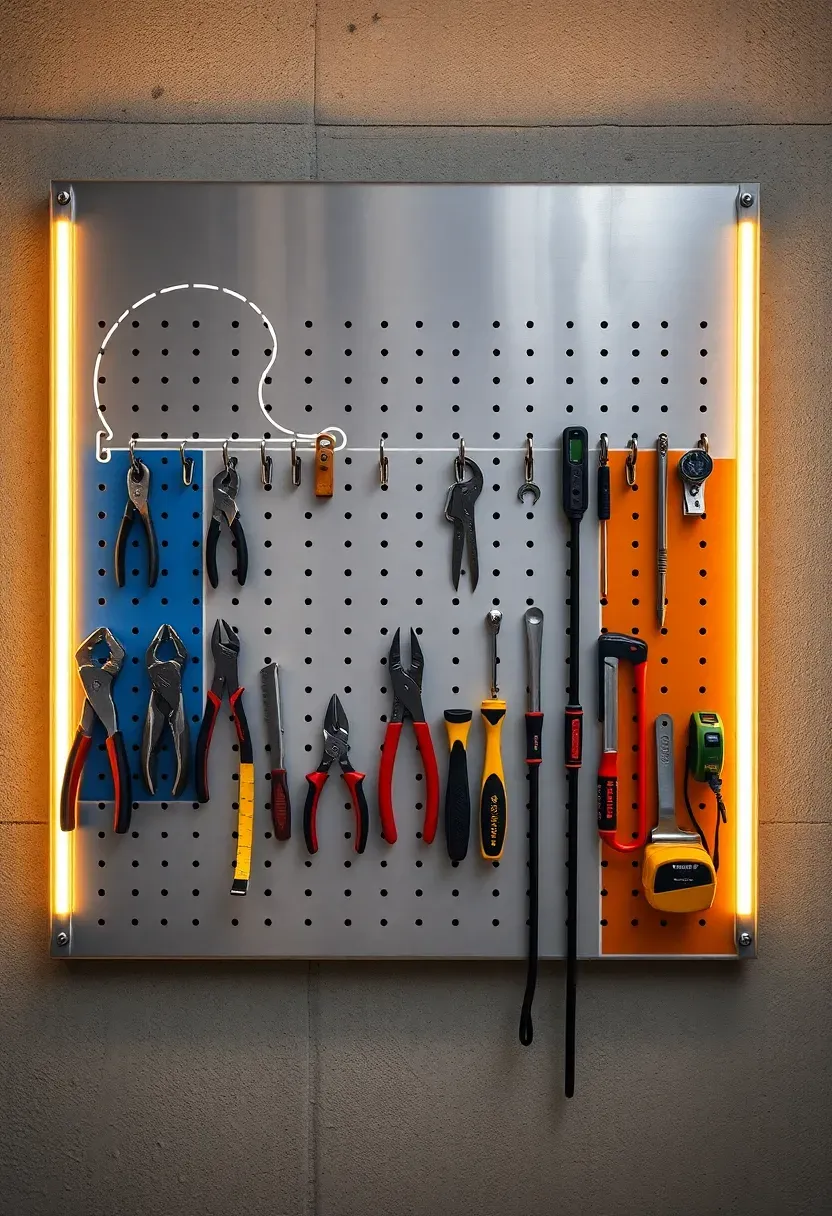
6. Pegboard Command Center
Pegboard may be a classic, but the modern approach goes well beyond the random-hook chaos of past decades. Treating your pegboard as a visual command center — with traced tool outlines, zone labels, and color-coded sections — makes returning tools to their spot almost automatic.
Origins
Pegboard gained popularity in workshops during the 1960s as an affordable, lightweight alternative to solid wood tool racks. Its grid pattern offered flexibility that solid shelving could not match.
Modern Interpretation
Today's pegboard setups pair metal boards with custom 3D-printed holders, LED strip lighting along the edges, and magnetic tool strips for quick access. Some makers even use chalkboard-painted pegboard so they can sketch project notes directly on the storage wall. The result looks intentional and polished rather than cluttered.
How to Apply in Your Garage
- Group tools by task: measuring, cutting, fastening, finishing
- Use heavier-gauge metal pegboard for power tools and steel-bodied clamps
- Install one LED strip at the top and one at the bottom of the board for even illumination
- Add a narrow shelf along the bottom for small parts bins
Recommended
Items for this idea
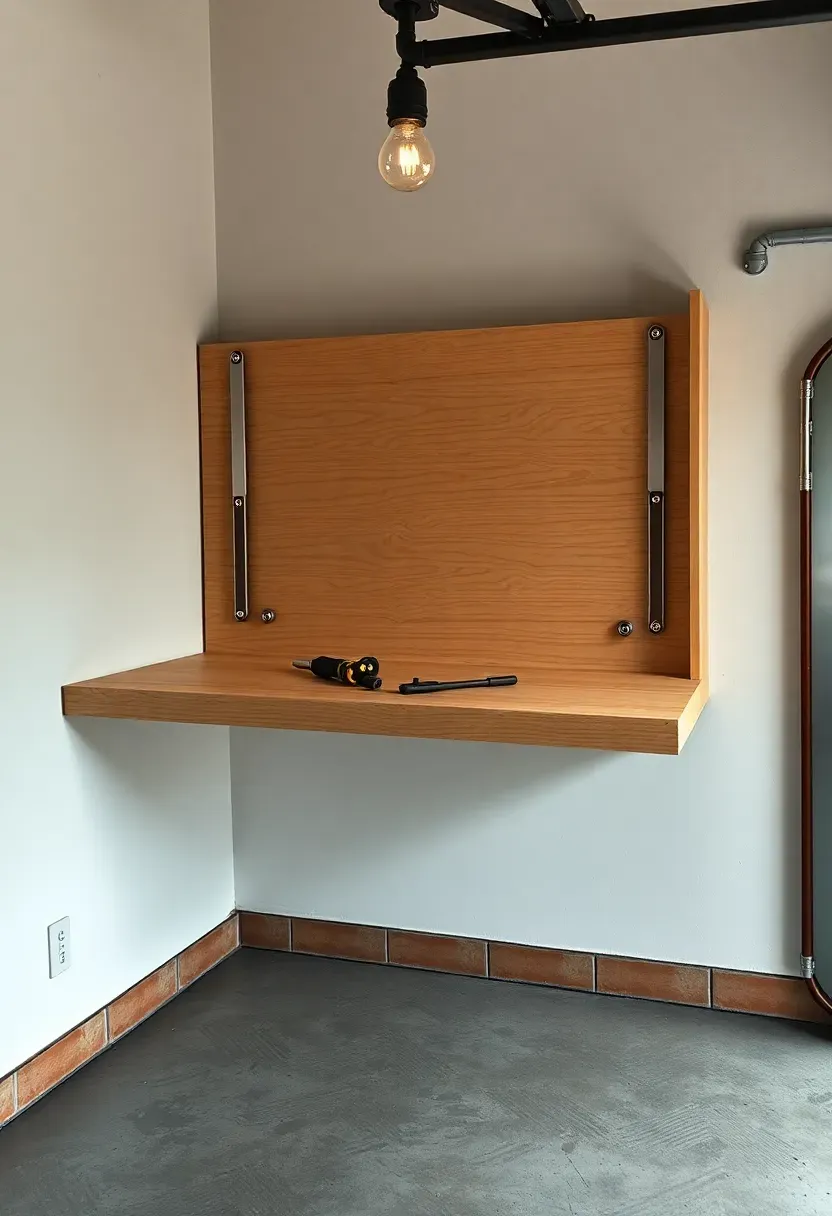
7. Fold-Down Workbench for Tight Spaces
Not every maker has a dedicated two-car garage. If your workshop shares space with a vehicle, a fold-down bench delivers a solid work surface when you need it and disappears when you don't.
Why It Matters
A permanent bench in a one-car garage often blocks the car entirely. Folding the bench up against the wall recovers that floor space in under ten seconds.
Building the Bench
Mount a sturdy piano hinge along the wall at bench height — typically 850 to 900 millimeters. Use 25-millimeter Baltic birch plywood for the top. Support the open bench with folding leg brackets or heavy-duty gas struts rated for the weight.
Pros and Cons
Pros: Zero floor footprint when stored, inexpensive to build, surprisingly rigid with proper bracing Cons: Limited bench depth compared to freestanding options, wall must be structurally sound

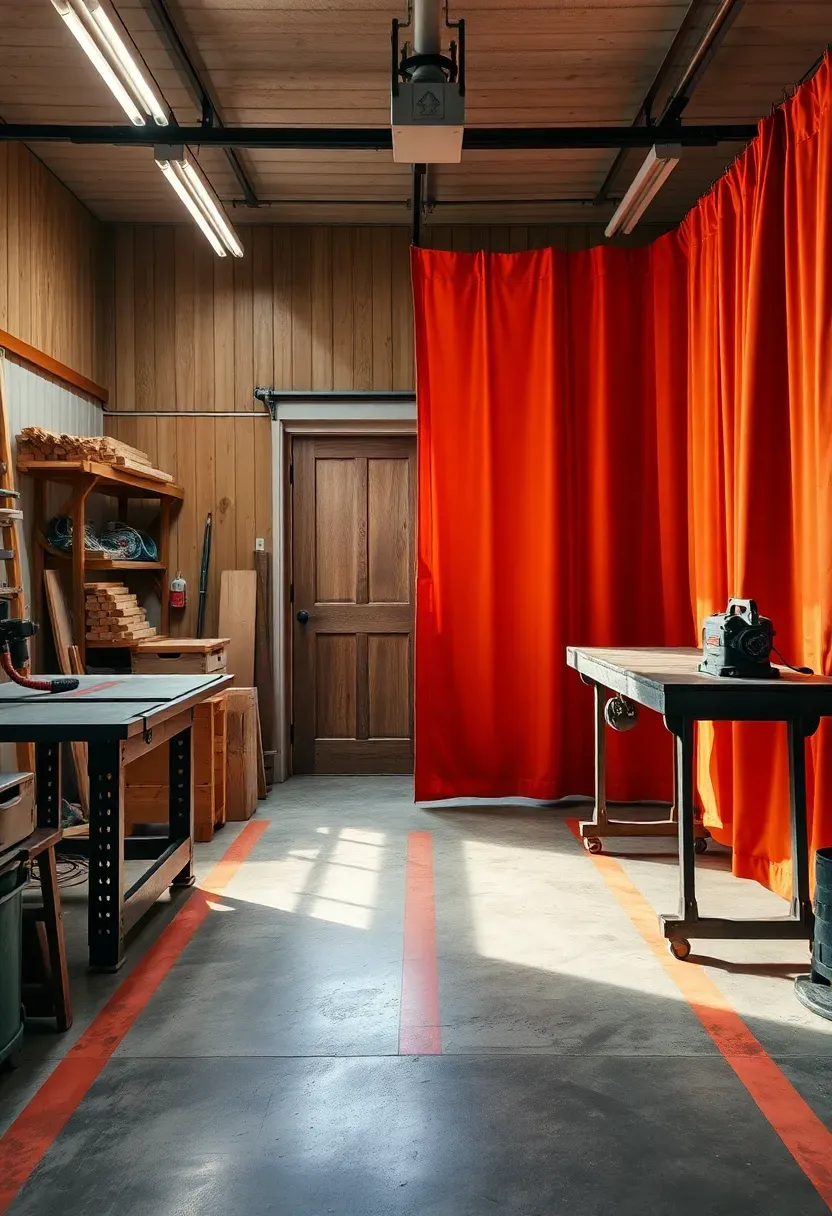
8. Dedicated Finishing and Spray Booth
Spraying lacquer or paint in an open garage coats everything in overspray and introduces health risks from airborne particles. A contained finishing booth — even a modest one built from PVC pipe and plastic sheeting — protects both your lungs and your other projects.
Position the booth near the garage door for natural ventilation flow. Install an explosion-proof exhaust fan at the back wall of the enclosure to draw fumes outward. Hang LED panel lights outside the plastic curtain so overspray cannot reach them. The curtain remains transparent enough for excellent visibility, and cleanup takes minutes instead of hours.
Tips for a Safe Spray Area
- Use only HVLP guns rated for water-based and solvent-based finishes
- Replace plastic sheeting after every large project to maintain visibility
- Keep a fire extinguisher within three meters of the booth at all times
Recommended
Items for this idea
9. Two-Zone Layout: Wood and Metal
Working with both wood and metal in the same garage creates a cross-contamination problem. Metal filings embedded in a softwood surface ruin finishes, and sawdust near a welding station is a fire hazard. Splitting the garage into two distinct zones with a physical boundary solves both issues.
Zone A: Woodworking Side
Assign the side closer to the garage door for woodworking. Sawdust ventilation benefits from the large opening, and lumber delivery is easier with direct exterior access.
Zone B: Metalworking Side
Place the welding table, angle grinder station, and metal bandsaw against the interior wall where a fire-resistant surface can be mounted behind the work area.
What to Choose
Choose a hard barrier (drywall partition) if: you weld frequently and need spark containment Choose a soft barrier (heavy welding curtain) if: you want flexible space and only do occasional metalwork
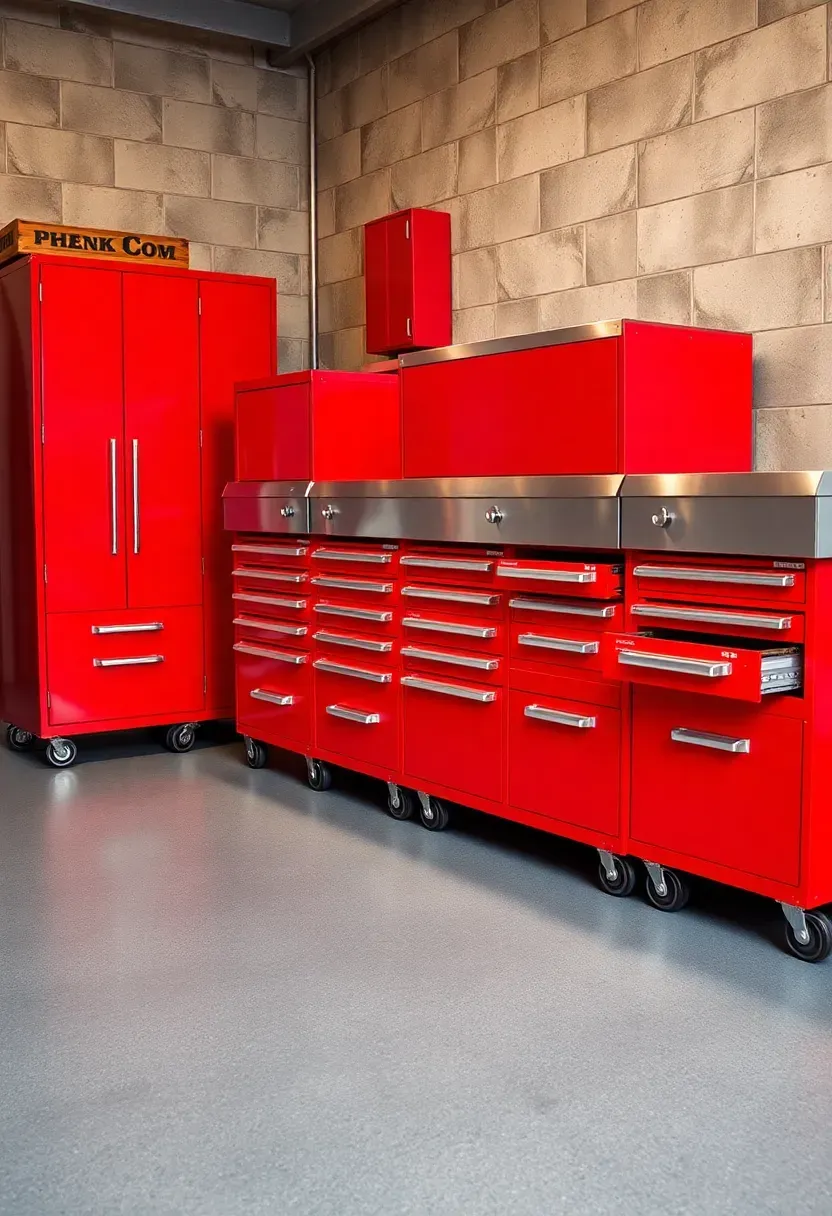
10. Mobile Tool Cabinet Lineup
A fleet of matching rolling cabinets creates a flexible, professional-grade storage system that adapts to any project. Line them along one wall under a continuous countertop for a sleek, unified look. When a project demands a specific cabinet at the workbench, unlock and roll it over.
Step 1: Select Cabinet Size
Standard 26-inch cabinets fit compact garages. Step up to 46-inch models if you have the room and own a deep tool collection.
Step 2: Add a Continuous Top
Bridge the cabinets with a single sheet of stainless steel or butcher block. This creates a long bench surface that remains usable even when one cabinet rolls away.
Step 3: Anchor the Row
Use a French cleat strip along the wall behind the cabinets. Each cabinet hooks onto the cleat when parked, preventing accidental rolling during heavy-vibration tasks.
Recommended
Items for this idea
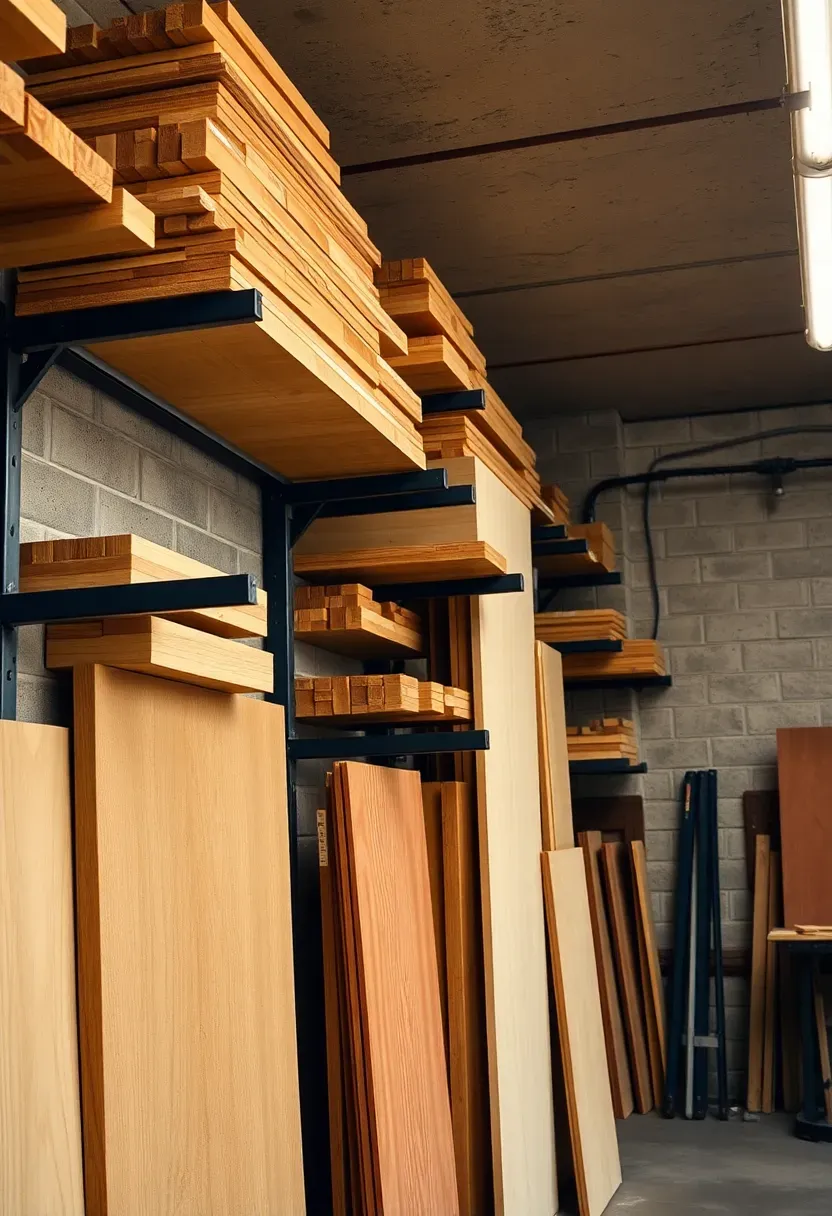
11. Wall-Mounted Lumber Rack System
Lumber stored on the floor gets damaged, warps from moisture, and devours working space. A wall-mounted rack lifts your stock off the ground and organizes it by species, thickness, or project allocation.
Cantilever-style steel arms bolted into wall studs at 400-millimeter vertical intervals create adjustable tiers. Keep plywood sheets vertical in a dedicated slot at one end. Store short cutoffs in a separate bin so they do not get buried behind full-length boards. Label each tier clearly — you will thank yourself halfway through a build when you need a specific piece.
Tips for Lumber Storage
- Leave a 25-millimeter gap between boards for airflow and to prevent moisture trapping
- Place the heaviest stock on the lowest tier for safety and easy handling
- Reserve one tier exclusively for project-specific material to avoid accidental use
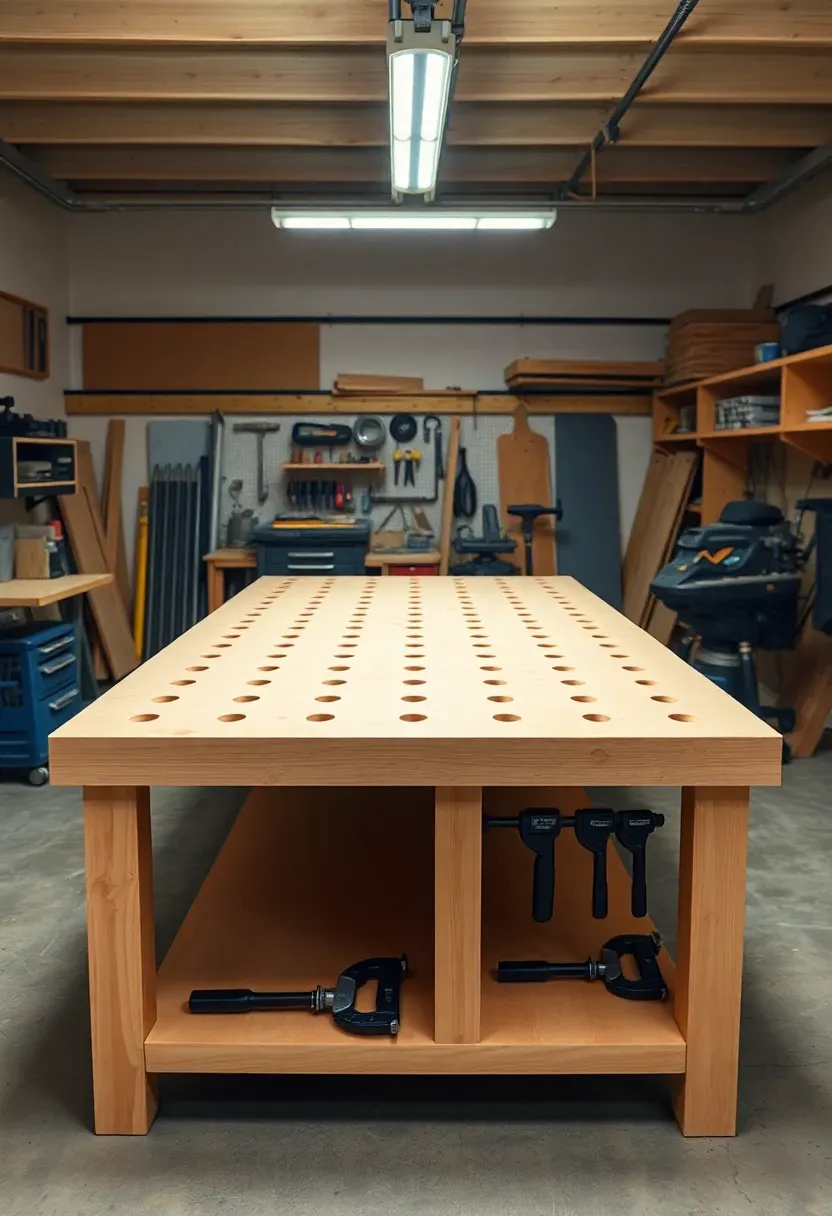
12. Assembly Table with Built-In Clamp Storage
Clamps migrating around the shop is a universal annoyance. Building storage directly into the assembly table keeps them within reach without occupying wall space or separate racks.
The Core Issue
During glue-ups, you need fast access to multiple clamp sizes. Hunting through a pile in the corner while glue dries is stressful and leads to weaker joints.
The Solution
Add a lower shelf with slotted dividers sized for bar clamps, pipe clamps, and F-clamps. Drill dog holes across the tabletop on a 100-millimeter grid. Use bench dogs and holdfasts for workholding, and store them in a drawer beneath the surface. The table becomes a self-contained glue-up and assembly station.
Pros and Cons
Pros: Clamps always organized and accessible, dog holes add versatile workholding, clean tabletop between projects Cons: Table is heavier and harder to move, requires more upfront build time
Recommended
Items for this idea
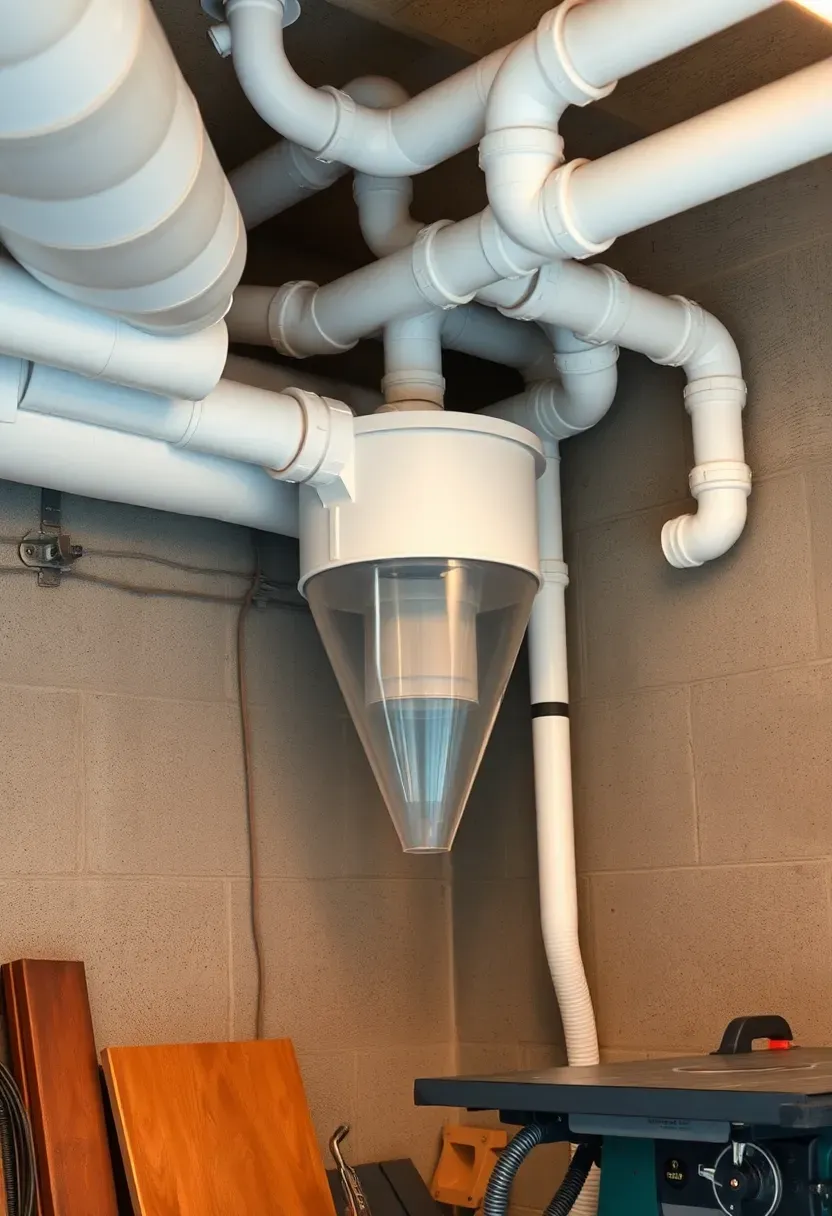
13. Corner Dust Collection Hub
Dust collection is the least glamorous part of a workshop but arguably the most important for health and fire safety. Placing the collector in a corner keeps it out of the main workflow while allowing short duct runs to every major tool.
A two-stage cyclone separator paired with a 1.5 to 2 horsepower blower handles most home workshop needs. Run 100-millimeter PVC trunk lines along the ceiling with blast gates at each drop point. Seal all joints with silicone and ground the PVC to prevent static buildup. The corner placement also dampens motor noise since two walls partially enclose the unit.
Tips for Efficient Dust Collection
- Size the trunk line for your most demanding tool — usually the planer or jointer
- Use flexible hose only for the final 300-millimeter drop to each machine
- Empty the collection drum when it reaches two-thirds full to maintain suction
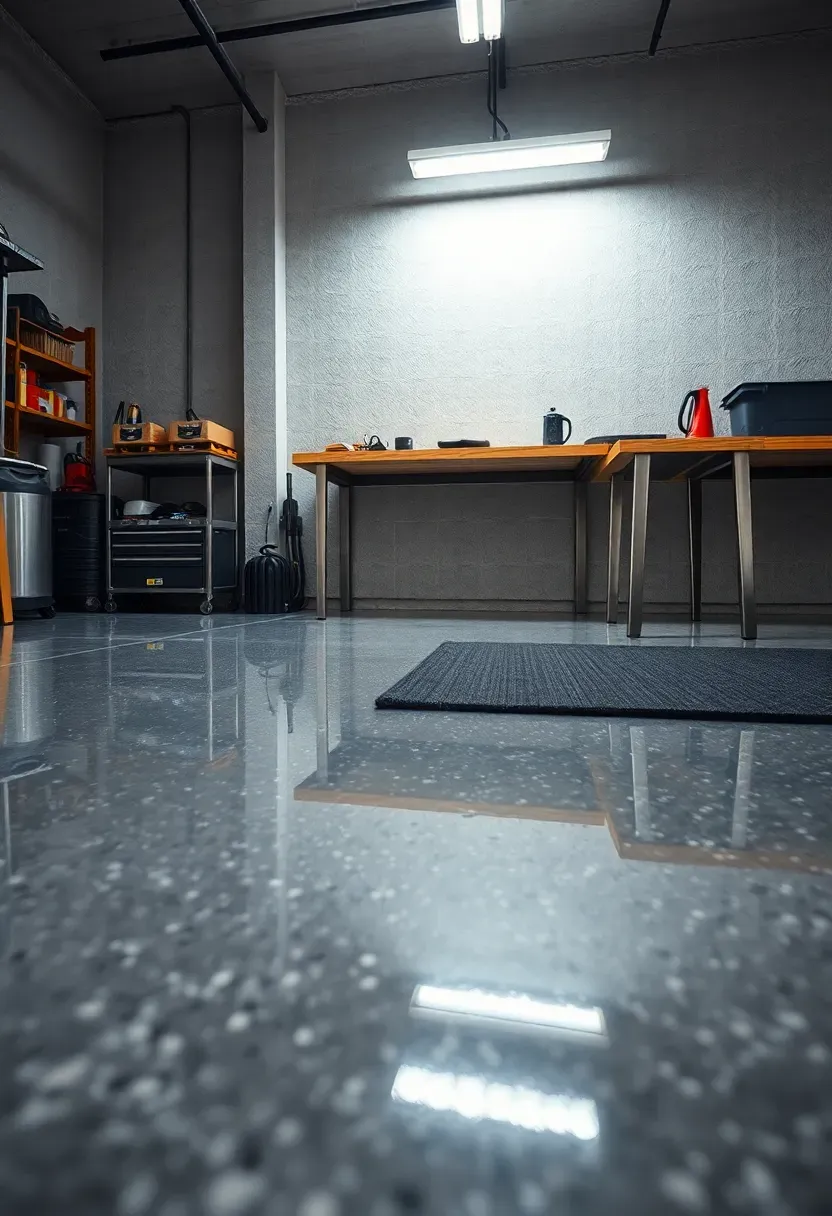
14. Garage Workshop with Epoxy Floor
An epoxy-coated floor transforms a dusty, oil-stained slab into a surface that is easy to clean, resistant to chemical spills, and genuinely pleasant to stand on for long hours. The reflective finish also bounces overhead light back up, improving overall shop brightness without adding fixtures.
Step 1: Surface Preparation
Grind or acid-etch the existing concrete to open the pores. This step determines adhesion quality more than any other factor.
Step 2: Apply the Base Coat
Roll a two-part epoxy primer in thin, even coats. Allow 24 hours of cure time before the next layer.
Step 3: Add Color and Flake
Broadcast vinyl flakes into the wet topcoat for texture and visual depth. The flakes also hide minor imperfections and future scratches.
What to Watch Out For
- Temperature and humidity during application affect cure time dramatically
- Avoid parking hot tires on fresh epoxy for at least 72 hours
- Anti-slip additive in the topcoat prevents dangerous slides on a smooth finish
Recommended
Items for this idea
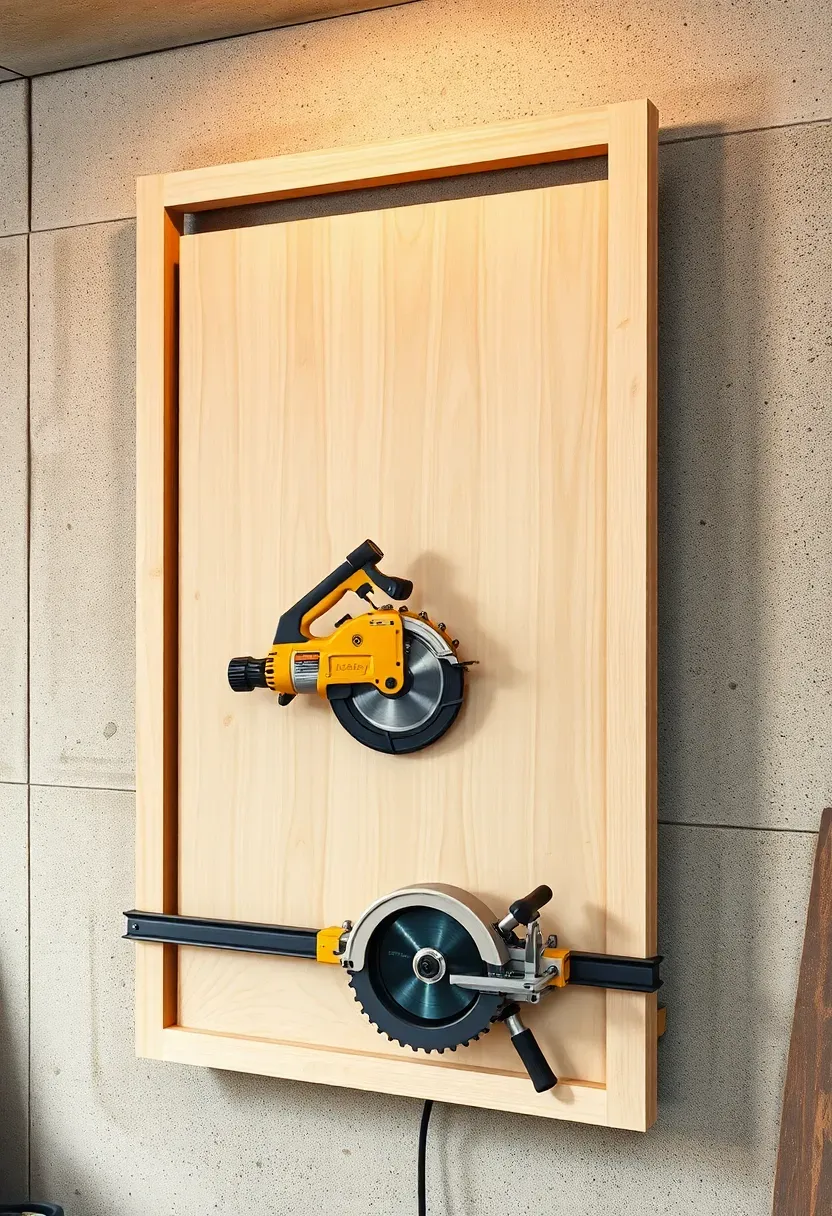
15. Vertical Panel Saw Station
Breaking down full sheets of plywood is the single most awkward task in a home workshop. A vertical panel saw turns that struggle into a one-person operation by holding the sheet upright against the wall while a carriage-mounted circular saw makes the cut.
The saw station occupies roughly 1.5 meters of wall width and almost zero floor space. Build the frame from 2x4 lumber and install roller bearings for the carriage. A pair of horizontal and vertical tracks allows both rip cuts and crosscuts. When not in use, the frame doubles as a sheet goods storage rack.
Tips for Accurate Panel Cuts
- Square the tracks carefully during installation using a framing square and shims
- Clamp a sacrificial backer board behind the cut line to prevent tearout
- Mark cut lines with painter's tape for visibility on dark-faced plywood
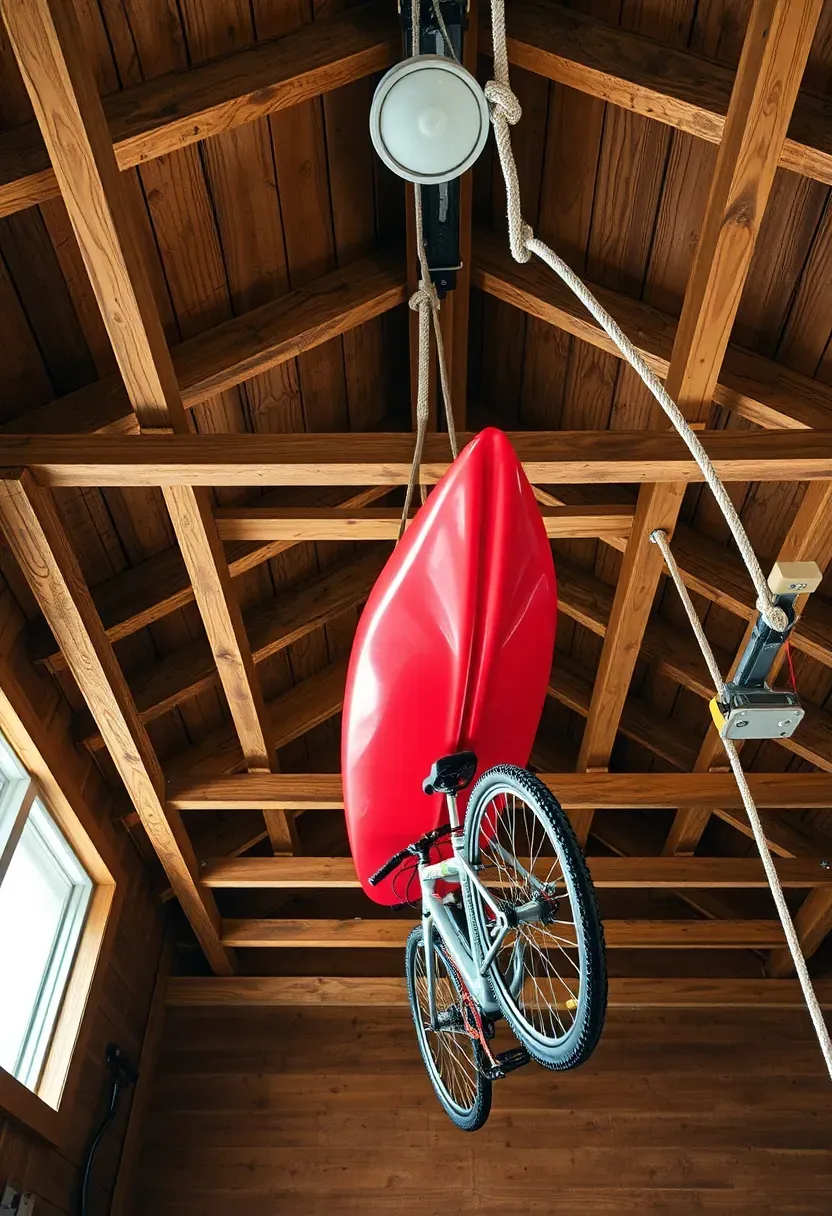
16. Open Rafter Storage with Pulleys
Exposed ceiling joists or open rafters are an invitation to reclaim vertical space. Rope-and-pulley hoists allow a single person to lift bicycles, kayaks, ladders, and lumber into the rafters and lower them again without climbing.
Why Pulleys Beat Static Hooks
Static hooks require you to lift heavy objects overhead manually — awkward and potentially dangerous for items over 15 kilograms. A 4:1 mechanical advantage pulley system reduces the effort by 75 percent and locks in place with a cleat tied to the wall.
Installation Essentials
- Bolt the pulley mounting plates directly into joist centers using 10-millimeter lag bolts
- Use braided nylon rope rated for at least double the expected load
- Add rubber cradles or fabric slings to protect items from rope abrasion
- Install the wall cleat within arm's reach of where you stand when operating the hoist
Recommended
Items for this idea
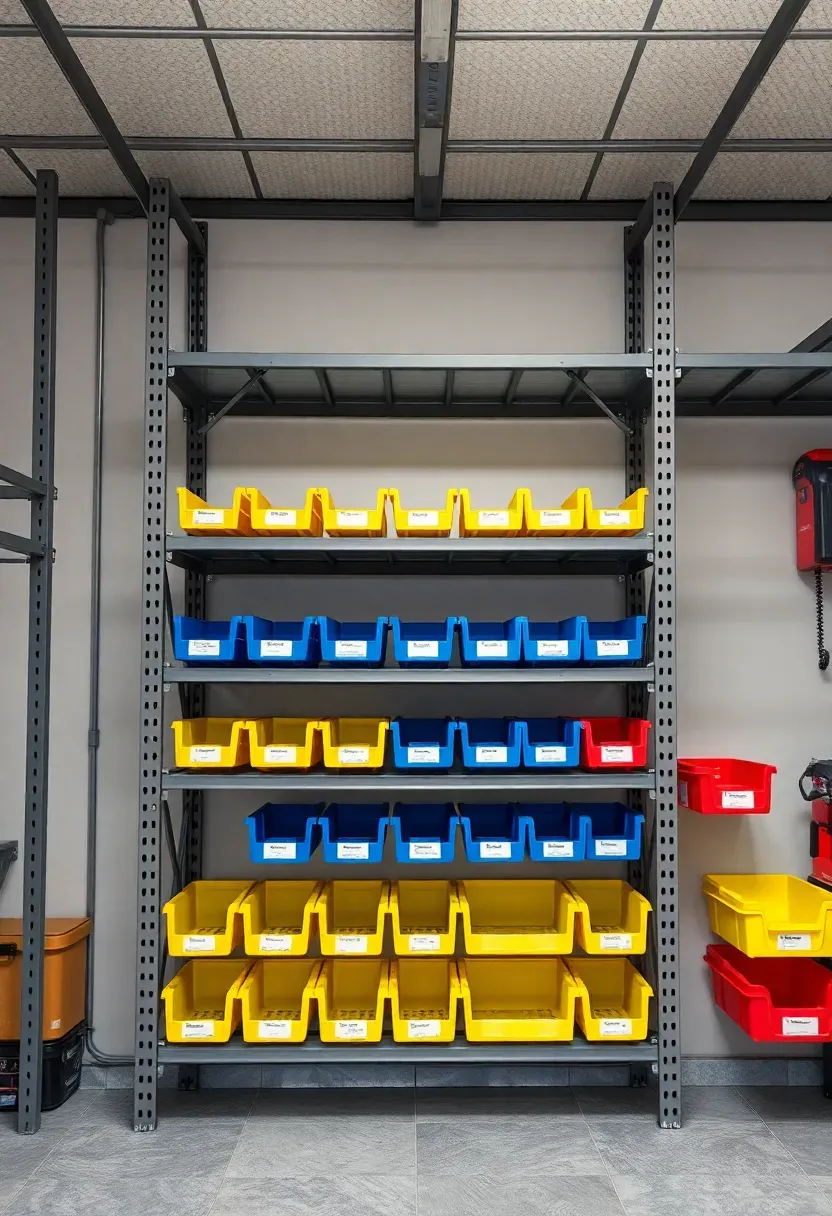
17. Modular Shelving and Bin Wall
Screws, nails, sandpaper, hardware — small consumables multiply in a workshop faster than you can organize them. A modular bin wall with adjustable shelves and clear-fronted drawers tames the chaos and makes restocking obvious at a glance.
Steel track shelving with slotted uprights lets you reconfigure shelf heights in under a minute. Attach stackable bins to a rail system beneath the shelves for fastener storage. Color-code bins by category: yellow for woodworking hardware, blue for electrical, red for plumbing fittings. When a bin runs low, the color tells you what supply category needs restocking before you even read the label.
Tips for Bin Organization
- Use bins no larger than necessary — oversized bins encourage mixed contents
- Face labels outward and add a photo of the contents on each bin
- Reserve the eye-level shelf for the items you reach for most often
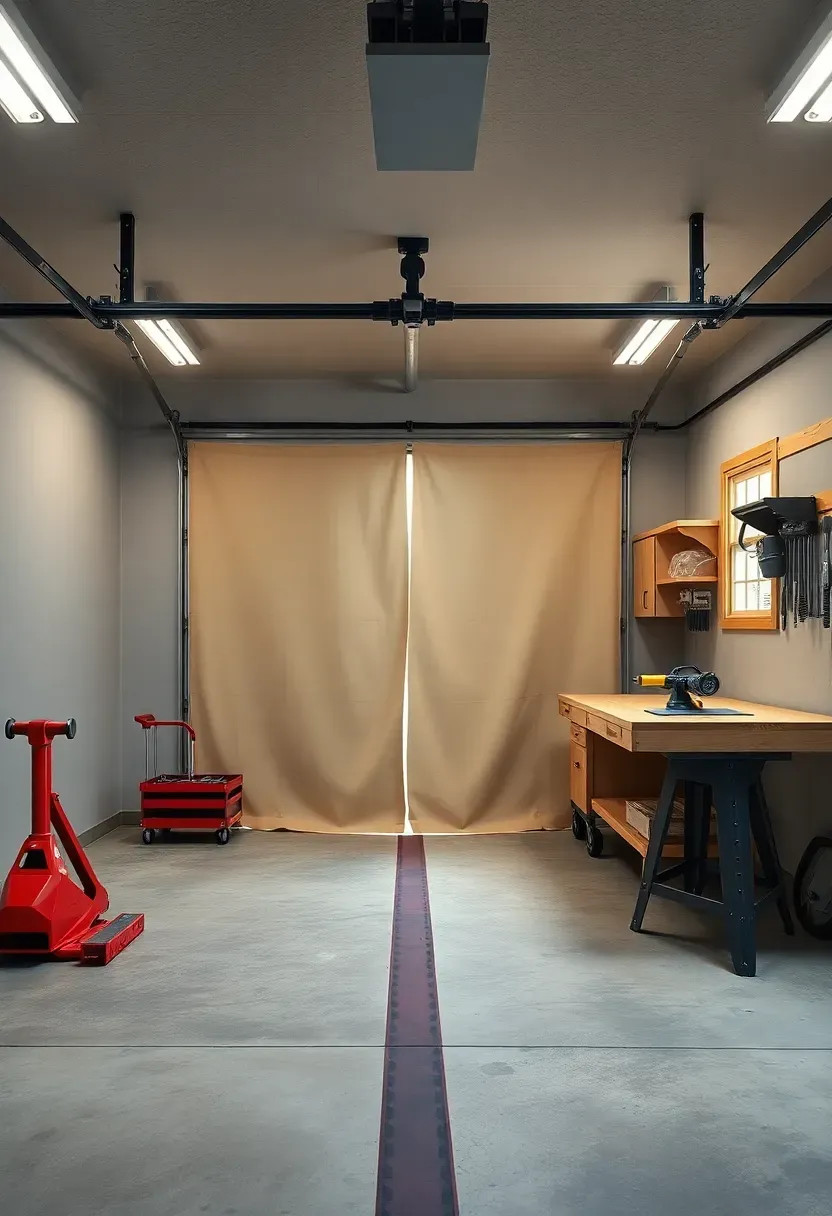
18. Automotive Bay Meets Woodshop
Sharing a garage between car maintenance and a workshop is one of the most common compromises homeowners face. The key is treating the dividing line seriously rather than letting one activity's footprint creep into the other's territory.
The Automotive Side
Keep a clear lane at least 3 meters wide for vehicle access. Store automotive fluids, jack stands, and creepers on a dedicated rolling cart that tucks against the side wall when not in use.
The Workshop Side
Build your workbench and tool storage along the far wall, perpendicular to the car bay. This arrangement lets you work on projects even when a vehicle is parked inside.
Recommendation
Install a retractable curtain between the zones. It blocks sawdust from settling on a car during active woodworking and rolls out of the way in seconds when you need full garage width.
Recommended
Items for this idea
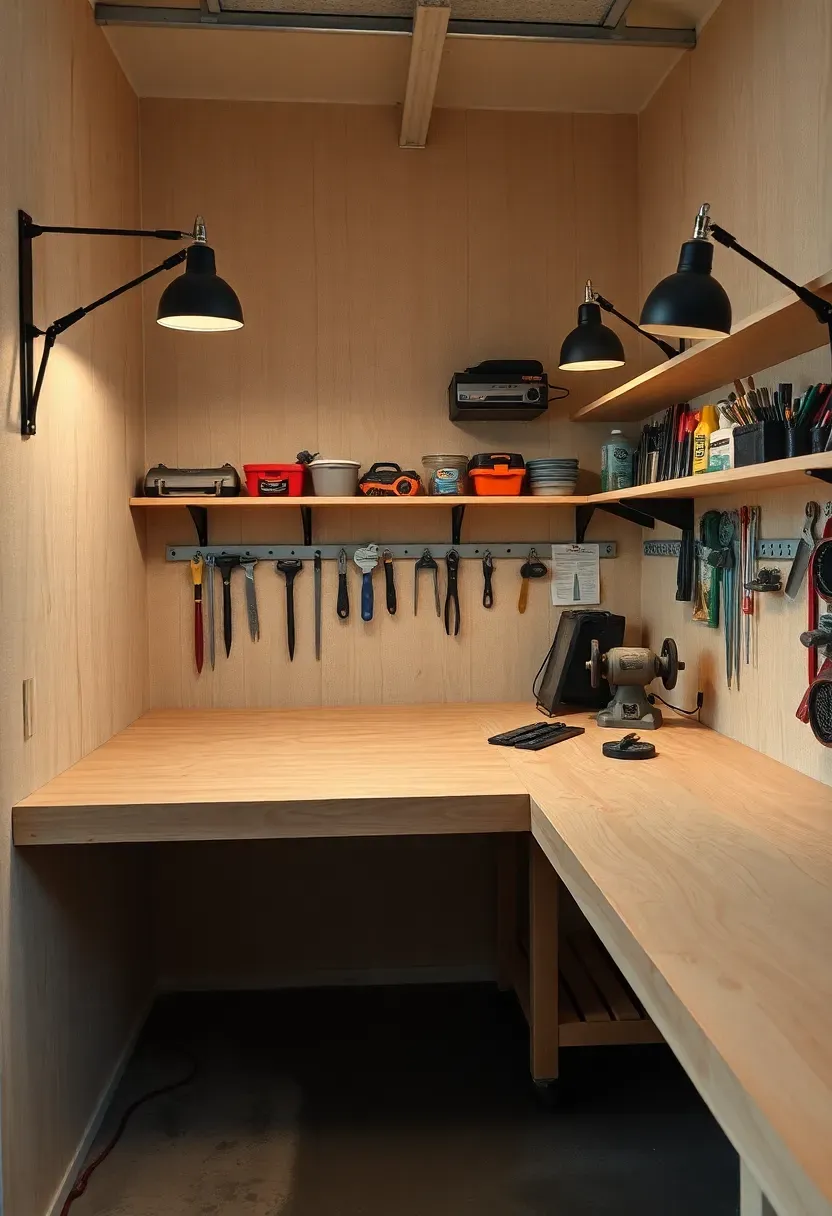
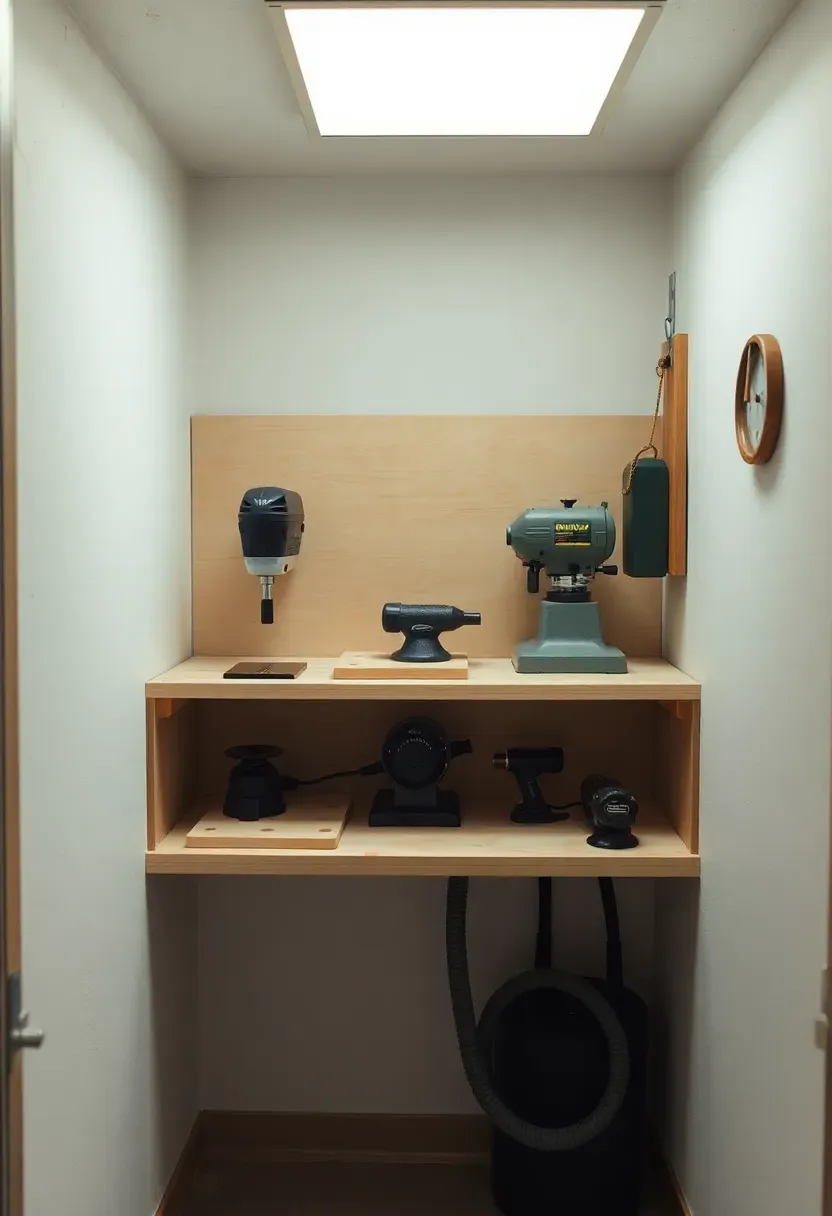
19. Small Garage Power Tool Alcove
Not every workshop needs a sprawling floor plan. A dedicated alcove measuring just 1.2 by 2 meters can house a benchtop drill press, a belt sander, and a compact bandsaw — the three benchtop machines that handle 80 percent of hobby projects.
Build a reinforced shelf at bench height across the back wall of the alcove. Mount each tool on a removable plywood plate so you can swap machines in and out depending on the project. Add a shared dust port below the shelf with quick-disconnect fittings for each tool. A single overhead LED panel lights the alcove brightly without casting shadows from the machines themselves.
Tips for Small Space Workshops
- Prioritize tools based on your most common projects, not aspirational purchases
- Store infrequently used tools on upper shelves and rotate them down when needed
- Use every vertical surface: the alcove sides accept French cleats for hand tool storage

20. Natural Light Workshop with Skylights
Artificial lighting reveals color and grain differently than natural light. A workshop flooded with daylight through skylights allows you to judge stain colors, finish sheen, and wood figure accurately — something even the best LEDs struggle to replicate.
Origins
Traditional craftspeople worked near large windows or in open-air sheds precisely because natural light was the only reliable standard. The woodworking tradition of north-facing windows to avoid direct sun glare dates back centuries.
Modern Interpretation
Tubular skylights and fixed roof windows bring that same quality light into an enclosed garage without compromising roof structure. Position them over the primary workbench and the finishing area. Supplement with color-corrected LED panels for evening work, keeping the color temperature at 5000K to approximate daylight closely.
How to Apply in Your Garage
- Install two 350-millimeter tubular skylights if a full roof window is not possible
- Paint walls and ceiling white to maximize light reflection and distribution
- Avoid placing skylights directly above the table saw — glare on the blade guard reduces visibility
- Add roller blinds to control intensity during summer months
Recommended
Items for this idea
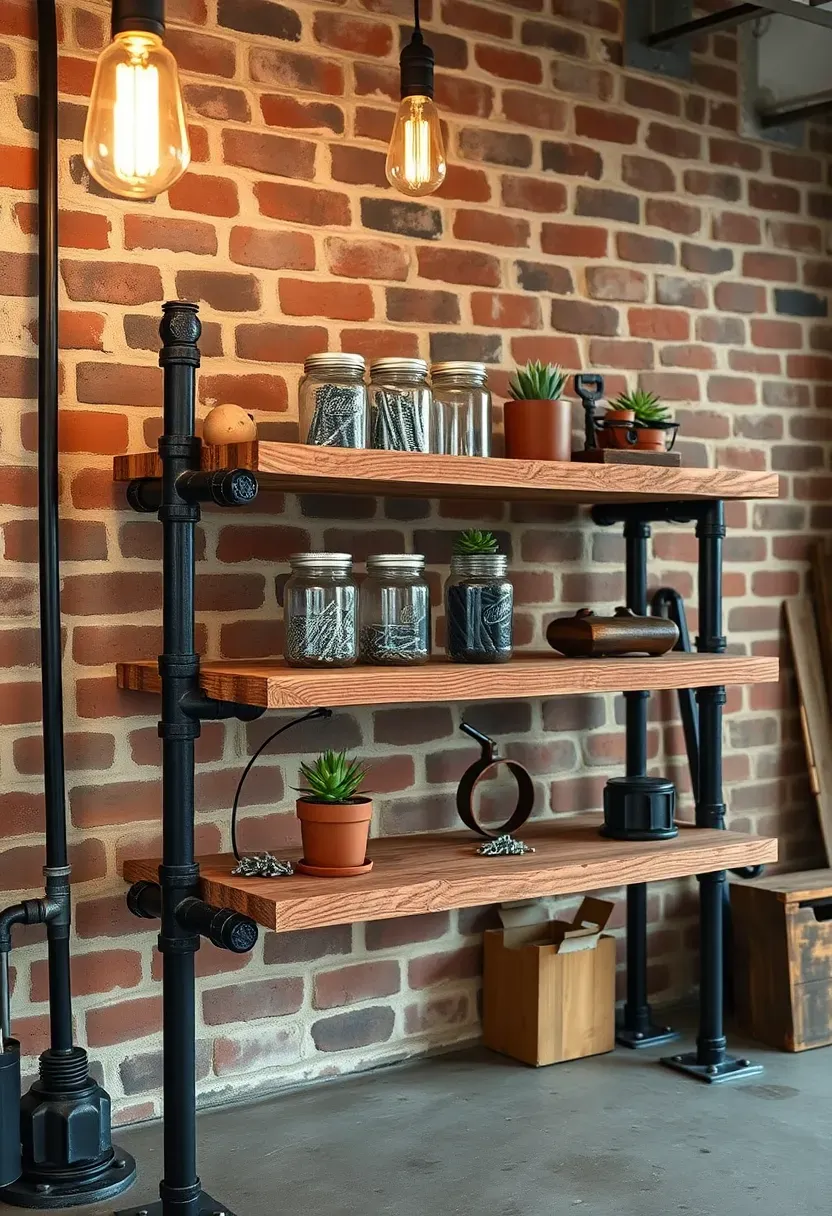
21. Industrial Pipe Shelving Workshop
Black iron pipe and reclaimed wood boards create shelving that is both structural and aesthetic. Unlike particleboard shelving units that sag under load, pipe-and-flange construction handles the weight of power tools, heavy vises, and stacked lumber without flexing.
Why It Works
Each shelf rests on threaded pipe supported by floor flanges at the base and wall flanges at the back. The threaded connections allow precise leveling and height adjustment. The industrial look also ages well in a workshop environment where scratches and patina add character rather than detract from it.
Building Your Pipe Shelving
- Use 3/4-inch black iron pipe for shelves under 1.2 meters wide; step up to 1-inch pipe for longer spans
- Sand and seal reclaimed boards with a clear polyurethane to prevent splinters
- Anchor wall flanges into studs with 75-millimeter lag screws for solid support
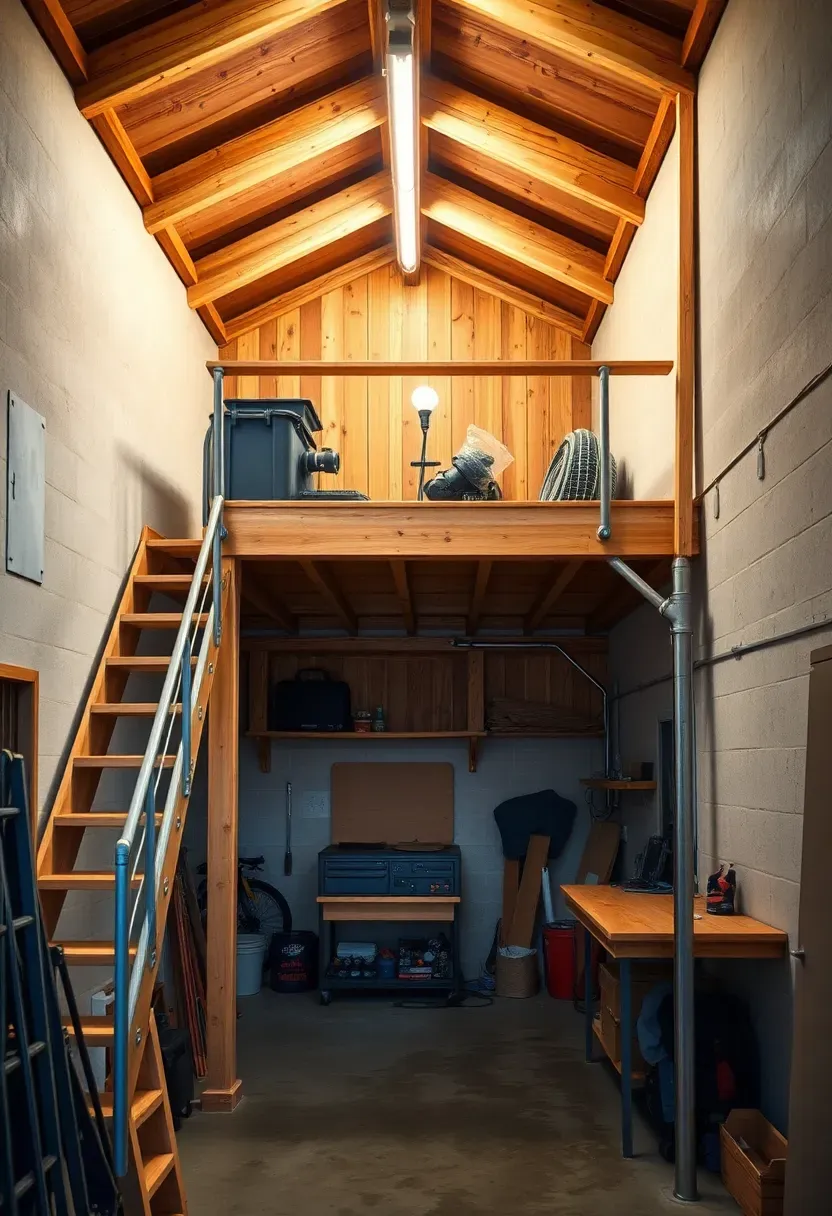
22. Multi-Level Mezzanine Workshop
High garage ceilings — common in structures with 3.5-meter or taller clearance — present an opportunity to build a partial second floor. A steel or timber mezzanine above the back third of the garage creates additional storage or even a small planning desk area without reducing the main workshop footprint.
Step 1: Check Local Building Codes
Mezzanines above a certain square footage may require a permit and must meet load-bearing, railing height, and egress requirements. Consult your municipality before starting.
Step 2: Design the Structure
Use steel I-beam supports for spans over 3 meters or engineered lumber for shorter spans. Keep the underside of the mezzanine at least 2 meters above the main floor for comfortable headroom beneath.
Step 3: Plan Access
A narrow staircase along the side wall occupies less floor space than a full-width stairway. Alternating-tread stairs provide a compact solution for tight garages.
What to Watch Out For
- Reinforce the garage slab at the support column footings if needed
- Add guardrails at least 1050 millimeters high on all open edges
- Wire the mezzanine with its own electrical circuit for lighting and tool charging
Recommended
Items for this idea
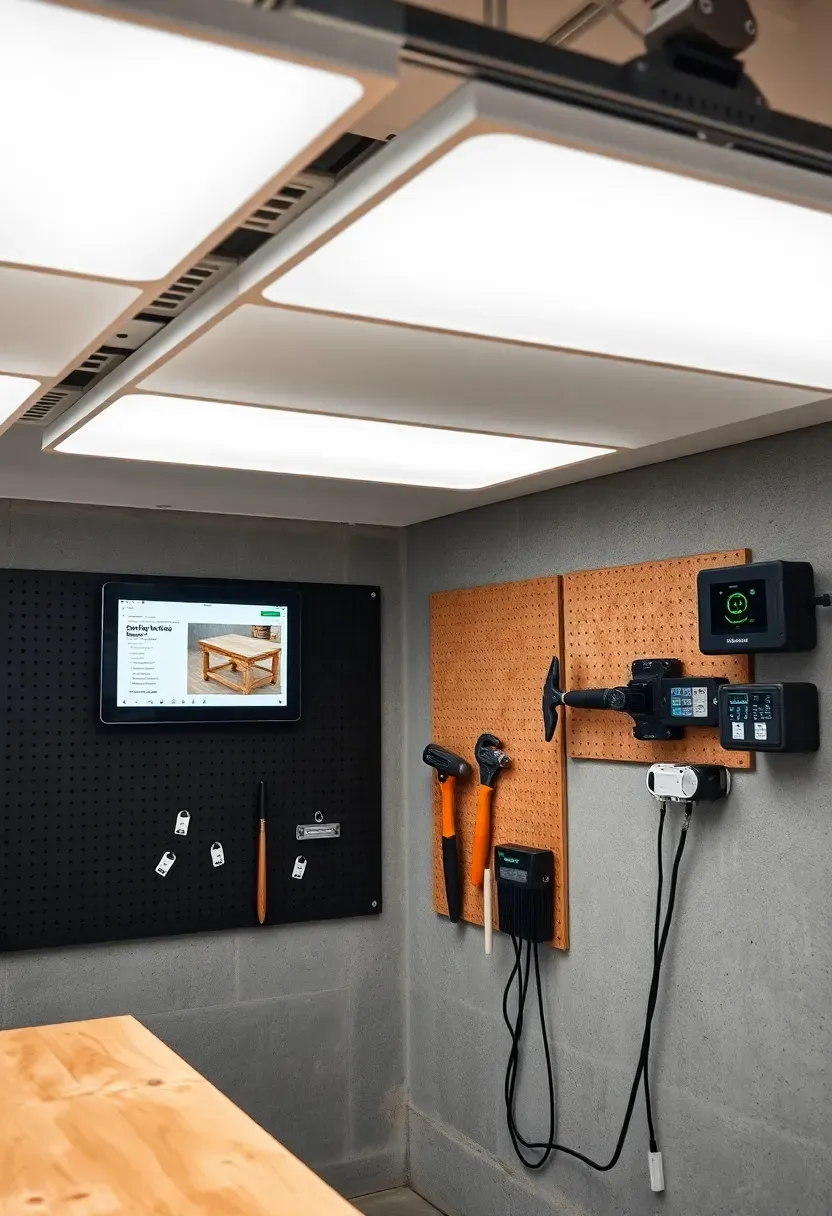
23. Smart Connected Workshop
Technology is reaching the garage in practical ways that go beyond novelty. A connected workshop uses smart LED panels that adjust brightness and color temperature by time of day, a wall-mounted tablet displaying project plans and cut lists, and wireless environmental sensors that monitor dust levels and humidity.
The Core Issue
Workshops often suffer from poor lighting at certain hours, forgotten dust collector filters, and humidity spikes that warp stored lumber — problems that are hard to notice until the damage is done.
The Solution
Smart sensors paired with a simple home automation hub send alerts to your phone when dust levels exceed safe thresholds or when humidity climbs above 55 percent. Programmable LED strips let you set task-specific scenes: bright cool light for precision cuts, warm ambient light for hand tool work. A tablet mounted at eye level near the bench replaces printed plans and lets you zoom into details mid-build.
Pros and Cons
Pros: Proactive alerts prevent health risks and material damage, lighting adapts to the task, paperless project management Cons: Initial setup requires some technical comfort, sensors need periodic battery replacement
Quick FAQ
Is a two-car garage large enough for a full workshop? Absolutely. A standard two-car garage offers roughly 36 square meters — enough for a central workbench, wall-mounted tool storage, a miter station, and a table saw with adequate infeed and outfeed space. The key is planning traffic lanes before placing any equipment.
Should I insulate my garage workshop? If you work year-round, insulation pays for itself quickly in comfort and energy savings. Insulated walls also reduce noise transmission to the rest of the house, which matters if you run loud power tools in the evening.
What flooring works best in a workshop setting? Epoxy-coated concrete is the most popular choice for durability and easy cleanup. Anti-fatigue mats placed at standing stations reduce leg strain during long sessions. Interlocking rubber tiles offer a middle ground between cost and comfort.
Which layout mistake do beginners make most often? Placing the table saw against a wall. A table saw needs clear space behind it — at least the length of the longest board you will rip — plus infeed space in front. Center it in the shop or position it so the outfeed path is unobstructed.
Can I add dust collection to an existing garage workshop? Yes. Retrofit systems using 100-millimeter PVC pipe along the ceiling with flexible drops to each tool are straightforward to install. Start with a single-stage collector and upgrade to a two-stage cyclone separator as your shop grows.
A well-planned garage workshop does not require a massive budget or a commercial building. Start with the zone that frustrates you most — storage, dust collection, or workholding — and improve it deliberately. Each upgrade compounds the last, and within a few weekends you will have a space that makes every project easier and more enjoyable to complete.
Pinterest cover for 23 AI Garage Workshop Layout Ideas
About the author
OBCD
CGI visualization and interior design content. We create detailed 3D renders and curate practical design ideas for every room in your home.