25 AI Raised Garden Design Ideas
There is something quietly satisfying about a raised garden bed that sits exactly at the right height, holds its soil perfectly, and looks intentional even in early spring before anything has sprouted. The challenge has always been getting from "I want raised beds" to an actual design that fits your specific yard — accounting for sun exposure, walkway widths, drainage, and the number of beds you can realistically tend. AI garden planning tools remove that planning bottleneck entirely. Describe your space, your goals, and your aesthetic, and the software generates scaled, buildable layouts that most gardeners would never arrive at through guessing alone. The 25 ideas below came directly from AI-generated concepts, each adapted to solve a different yard scenario or design preference.
Ready? Let us go through them one by one.
Table of Contents
- Classic Cedar Rectangle Pair
- L-Shaped Corner Bed
- Tiered Cascading Levels
- Accessible Hip-Height Bed
- U-Shaped Harvesting Station
- Galvanized Steel Trough Beds
- Keyhole Design for Compact Yards
- Raised Spiral Herb Tower
- Four-Square Kitchen Garden
- Mixed-Height Modular Grid
- Stone-Edged Raised Border
- Integrated Bench and Bed Combo
- Greenhouse-Frame Raised Bed
- Sloped Terrain Stepped Beds
- Narrow Vertical Wall Planter
- Corrugated Iron Farmhouse Beds
- Circular Conversation Garden
- Children's Low-Reach Mini Beds
- Formal Parterre-Style Layout
- Wicking Bed for Dry Climates
- Raised Pond-and-Planter Combo
- Fire-Treated Sleeper Timber Beds
- Compact Balcony Raised Planter Box
- Stacked Concrete Block Beds
- Full Backyard Raised Garden System

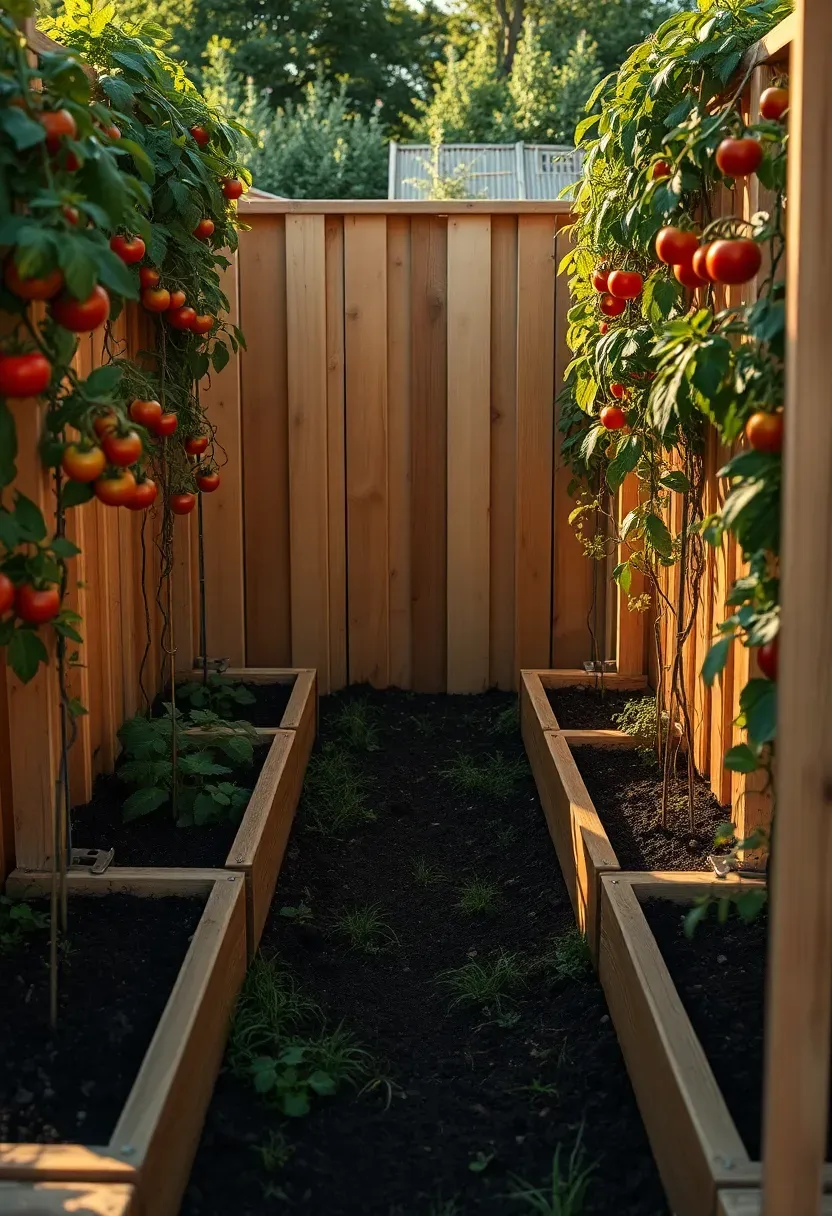
1. Classic Cedar Rectangle Pair
Two matching cedar beds placed side by side with a 90 cm walking path between them is the most buildable, most replicated raised garden layout for good reason. Cedar naturally resists rot without chemical treatment, and the symmetrical arrangement makes watering, trellising, and seasonal planting rotation intuitive from the start.
Why It Works
The paired format creates a planting area large enough for a meaningful vegetable harvest while keeping every square centimeter reachable from the outside edges. No stepping into the bed, no compacted soil.
Tips for This Layout
- Keep each bed no wider than 120 cm so you can reach the center from either side
- Set bed length to a multiple of your row spacing (typically 30 or 45 cm)
- Add a 5 cm wood cap on top edges — it doubles as a sitting rail and protects the end grain
We picked a few things that go well with this idea: BlueWish Elevated Cedar Raised Garden Bed (★5.0), Infinite Cedar Select Raised Garden Bed (2x8 ft) (★5.0) and Infinite Cedar Premium Raised Bed (3x6 ft) (★4.3). As an Amazon Associate we earn from qualifying purchases.
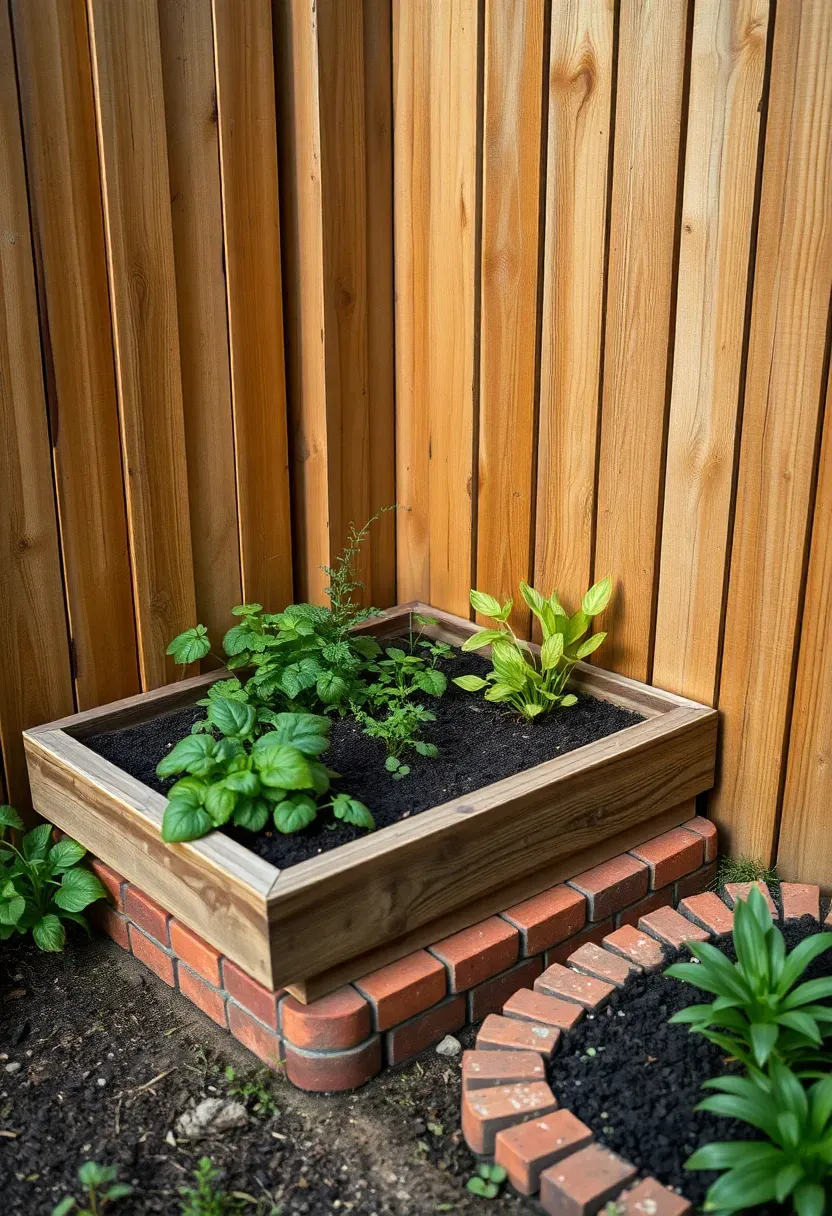
2. L-Shaped Corner Bed
The Core Issue
Backyard corners are the most underused real estate in any garden. Straight rectangular beds leave them empty, and that dead corner gradually fills with weeds or neglected clutter.
The Solution
An L-shaped raised bed wraps the corner and uses every centimeter of that otherwise awkward zone. The two arms of the L can serve different planting purposes — one arm for tall trellised crops like beans or cucumbers, the shorter arm for low herbs or strawberries that benefit from the reflected warmth of a fence or wall behind them.
Pros and Cons
Pros: maximizes corner real estate; creates a natural enclosure; the interior angle makes a sheltered microclimate for warm-season plants
Cons: the inside corner is slightly harder to reach — keep that segment under 60 cm deep; requires more precise carpentry cuts at the join
We picked a few things that go well with this idea: Land Guard Oval Galvanized Raised Bed Kit (★4.5), Land Guard 8x4 ft Galvanized Raised Bed (★4.2) and Land Guard Galvanized Steel Raised Beds (2-Pack) (★4.5). As an Amazon Associate we earn from qualifying purchases.
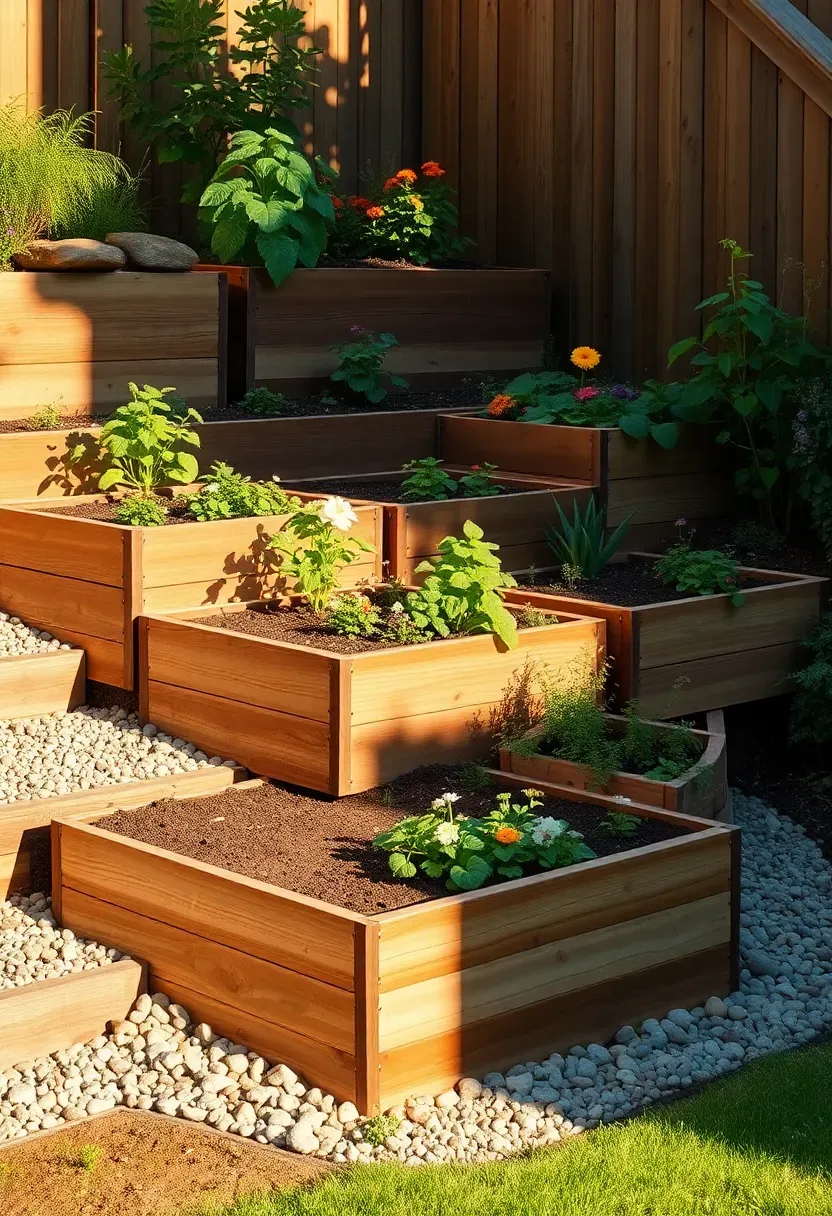
3. Tiered Cascading Levels
A three-tier cascade looks intentional and architectural, turning a sloped section of yard into a feature rather than a drainage problem. Each level steps down by about 30 cm, creating natural terracing that holds soil, controls runoff, and gives shorter plants on upper tiers full sun exposure without being shaded by taller ones below.
Step 1: Assess Your Slope
Measure the grade across your intended planting zone. A 10-15% slope is ideal — steep enough for visual drama, gentle enough that each tier needs only one course of timber or stone.
Step 2: Set the Back Wall First
Build from the top down. The highest retaining wall carries the most soil load, so use thicker stock lumber or double-stacked stone there.
Step 3: Plant for Height Progression
Put the tallest crops — tomatoes, corn, sunflowers — on the lowest tier where they have the most vertical clearance. Herbs, lettuce, and compact flowers fill the upper levels.
What to Watch Out For
- Irrigation lines must account for gravity; drip systems work better than overhead on slopes
- Leave at least 60 cm between tier faces for comfortable kneeling access
- Secure each tier wall to the one behind it with corner stakes to prevent lateral drift
We picked a few things that go well with this idea: Home Cult Foldable Self-Watering Raised Garden Bed (★4.3), Lineware Galvanized Self-Watering Raised Planter (48x24 in) (★4.5) and Keter Splendor Self-Watering Raised Garden Bed (★4.2). As an Amazon Associate we earn from qualifying purchases.
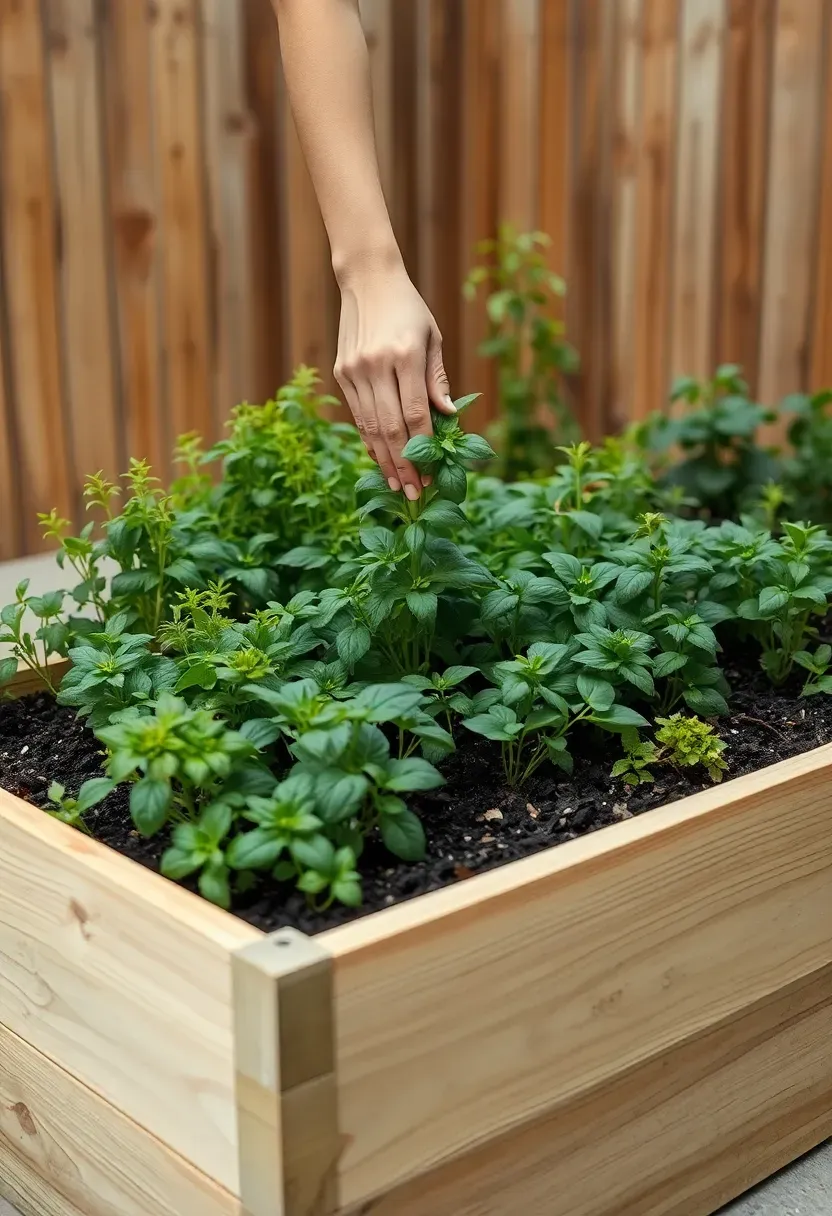
4. Accessible Hip-Height Bed
For gardeners with mobility limitations — or anyone who wants to garden without kneeling — an 80–90 cm tall raised bed changes the entire experience. Standing to harvest, prune, and plant is dramatically less fatiguing, and the depth of the bed (typically 45–60 cm of soil) supports root vegetables and herbs just as effectively as ground-level growing.
Key Dimensions
Build the walls at exactly your hip height so you can rest your forearm on the edge while working. Width stays at 90–110 cm maximum, and length can extend as far as your available space allows.
Tips for Accessibility
- Add a 15 cm overhang cap so a seated gardener can slide their knees underneath
- Use lightweight composite lumber — the taller walls are heavier to build but easier to garden
- Install drip irrigation at the base layer; watering from above becomes awkward at this height
Recommended
Items for this idea
5. U-Shaped Harvesting Station
How It Works
Three beds arranged in a U create a workspace at the center — an area you stand in surrounded by plants on three sides. The ergonomics are exceptional: you never need to stretch or reposition, everything is within arm's reach, and the enclosed feel naturally organizes your planting into distinct zones by bed.
What to Plant Where
Back bed (the long wall): Tall climbers — tomatoes, pole beans, cucumbers on a trellis attached to the rear edge.
Side beds (the two arms): Medium-height plants — peppers, eggplants, chard — that do not block the sightline into the space.
Pathways: Fill the center standing area with decomposed granite or stepping stones so it drains cleanly after rain.
Recommendation
Keep the U opening at least 120 cm wide so you can comfortably enter pushing a wheelbarrow during soil-loading season.
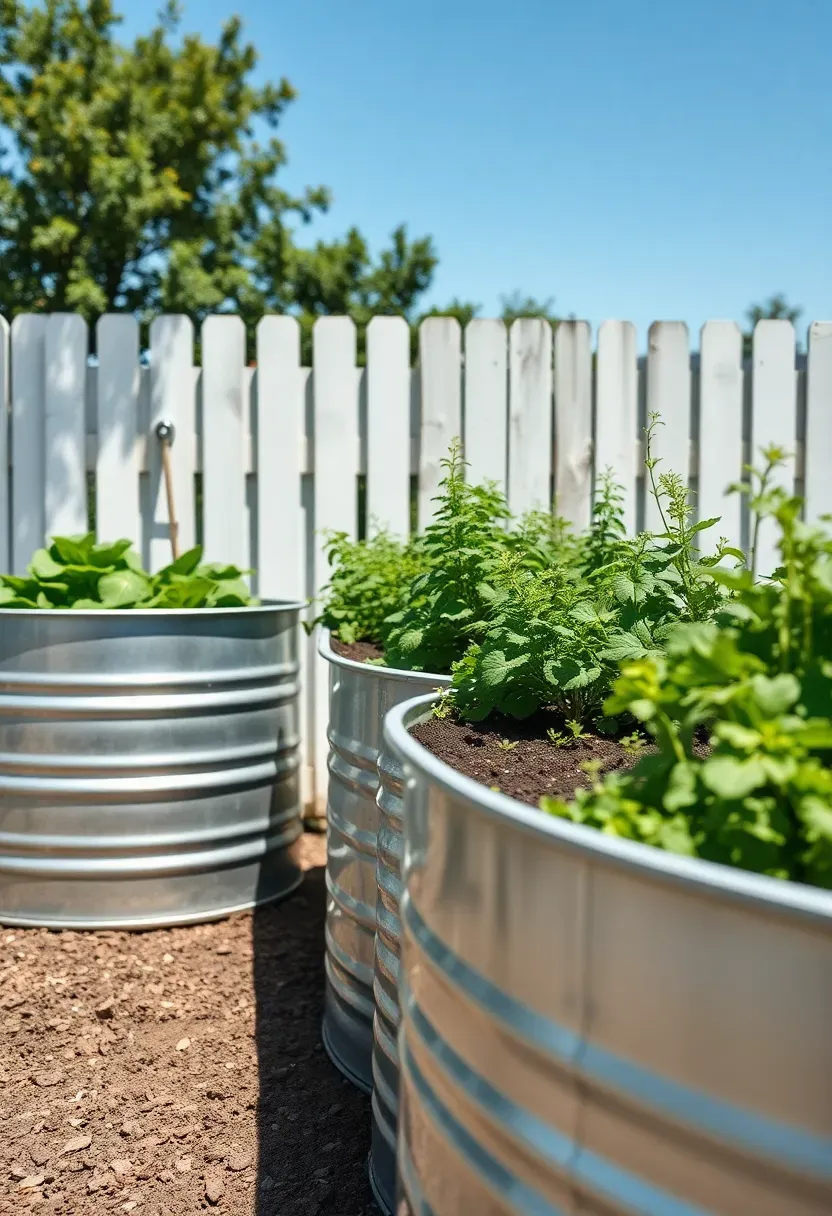
6. Galvanized Steel Trough Beds
Galvanized stock tanks repurposed as raised beds deliver a clean industrial look that sits naturally in modern farmhouse and contemporary garden styles. The material lasts decades without rotting, comes in standardized sizes, and heats the soil faster than wood in spring — giving cool-season crops a meaningful head start.
Style Variations
Polished look: Line them in a single row along a fence at equal spacing.
Mixed heights: Alternate standard 45 cm tanks with taller 60 cm units for a rhythmic visual pattern.
Patina finish: Leave them unsealed so they develop a soft rust-bloom surface over two or three seasons — the orange-brown tones complement grey gravel beautifully.
What to Watch Out For
Drill at least 12 drainage holes in the base before filling. Zinc leaching is minimal at typical soil pH but can be an issue in highly acidic conditions — a liner of landscape fabric adds an extra buffer.
Recommended
Items for this idea
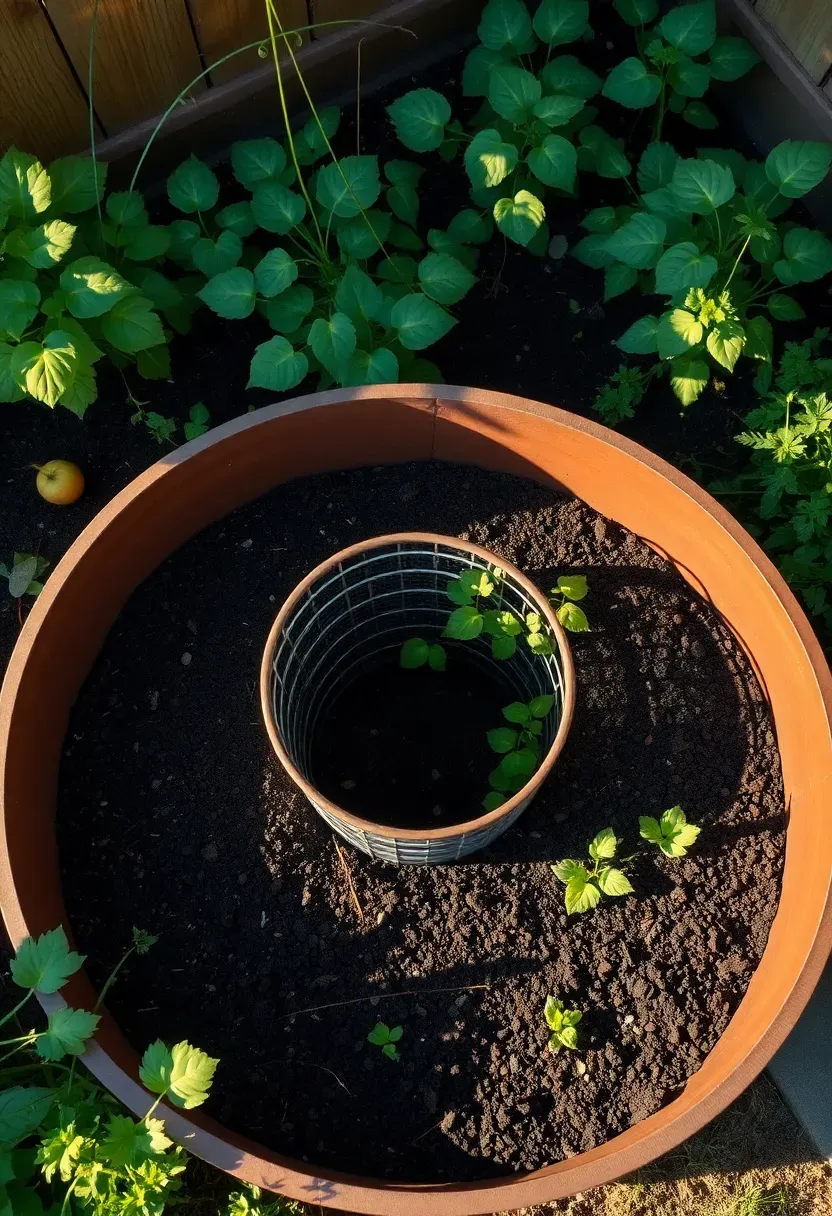
7. Keyhole Design for Compact Yards
The keyhole bed is a circle with a narrow notch cut into one edge, allowing the gardener to step into the center and reach all planting zones from a single position. Originally developed for food security gardens in water-scarce climates, the design is remarkably efficient: you cultivate roughly three times the planting area of a standard rectangle in the same footprint.
Practical Details
- Overall diameter: 180–220 cm
- Notch width: 45–50 cm (just wide enough to stand in)
- Compost basket at center: a wire cylinder that feeds nutrients directly to the root zone
Tips for This Layout
- Use flexible edging material (cor-ten steel strip, bent timber) to form the curve cleanly
- Plant the tallest crops on the far arc from the notch entry so they never block access
- This design works particularly well on compacted or rocky sites where breaking ground for a standard layout would be difficult
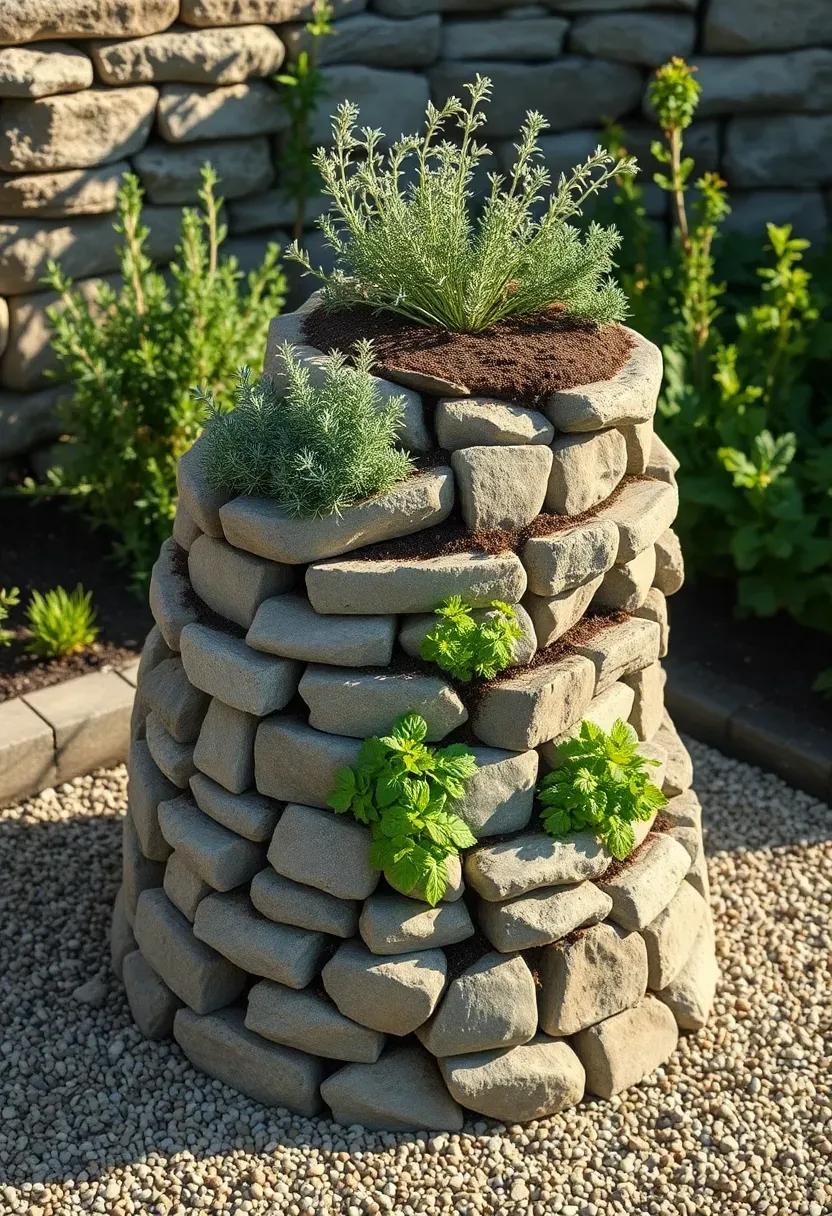
8. Raised Spiral Herb Tower
A spiral herb garden is built as a three-dimensional coil — lower and wider at the base, narrowing upward to a peak about 100 cm tall. The graduated height creates multiple microclimates in a single 150 cm footprint: the sunny, dry summit suits Mediterranean herbs like rosemary and thyme, while the shaded, moister base supports mint, parsley, and chives.
Origins
The design appeared in permaculture literature in the 1970s as a method to maximize biodiversity in minimal space. Today it functions equally well as a sculptural garden focal point.
How to Apply at Home
- Build the coil from dry-stack stone, reclaimed brick, or stacked timber rounds — all work, and each gives a different aesthetic character
- Fill each level with a slightly different growing medium: leaner, sandier soil at the top; richer, moisture-retentive mix at the base
- Water from the top only — gravity distributes moisture downward, feeding every level in turn
Recommended
Items for this idea
9. Four-Square Kitchen Garden
Comparing: Ancient Form vs. Modern Raised Bed
The four-square (or potager) layout divides a garden into four equal quadrants separated by intersecting pathways, with a focal point at the center. It is one of the oldest garden layouts in the world — seen in monastic herb gardens, French château potagers, and Victorian kitchen gardens alike.
Traditional Four-Square
Planted directly in prepared ground, relying on deep soil cultivation and seasonal crop rotation between quadrants. Elegant but labor-intensive to maintain.
Modern Raised-Bed Four-Square
Each quadrant becomes an individual raised bed with contained, optimized growing medium. The pathways between beds can be gravel, pavers, or compacted decomposed granite — no digging required. Crop rotation happens naturally by bed.
What to Choose
Choose traditional if: you have existing deep loam soil, want a heritage aesthetic, and can commit to annual cultivation
Choose raised if: your soil is poor or compacted, you want lower-maintenance upkeep, or drainage is a recurring issue
Recommendation
For most home gardens, the raised version delivers the same visual formality with significantly less ongoing labor.
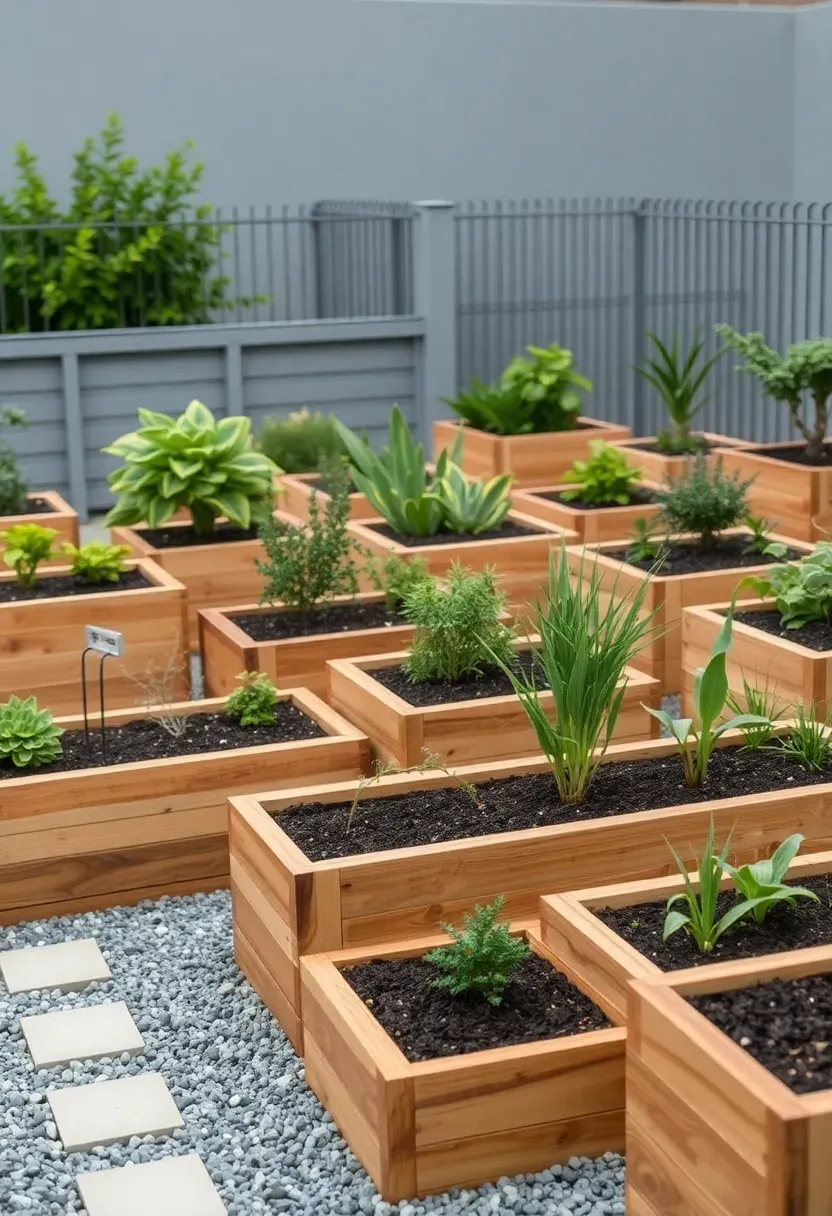
10. Mixed-Height Modular Grid
Start with a plan and evolve it. A modular grid uses standardized bed units — say, 60 cm × 120 cm — at varying heights: some at 30 cm for sprawling squash, some at 60 cm for root vegetables, a few at 90 cm for herbs and salad greens. The consistent footprint size makes rearranging the grid possible as your gardening priorities change year to year.
Why It Works
Modular thinking means you never have to commit to a permanent layout. Add a unit this spring, move two units next fall, stack an extra course of timber when you want more depth. The system grows with you rather than locking you into decisions made before you knew how you actually garden.
Tips for This Layout
- Use the same lumber dimensions throughout so pieces are interchangeable
- Settle on two or three heights maximum — more creates visual chaos rather than interest
- Mark each unit's orientation and sun exposure so seasonal replanning is quick
Recommended
Items for this idea
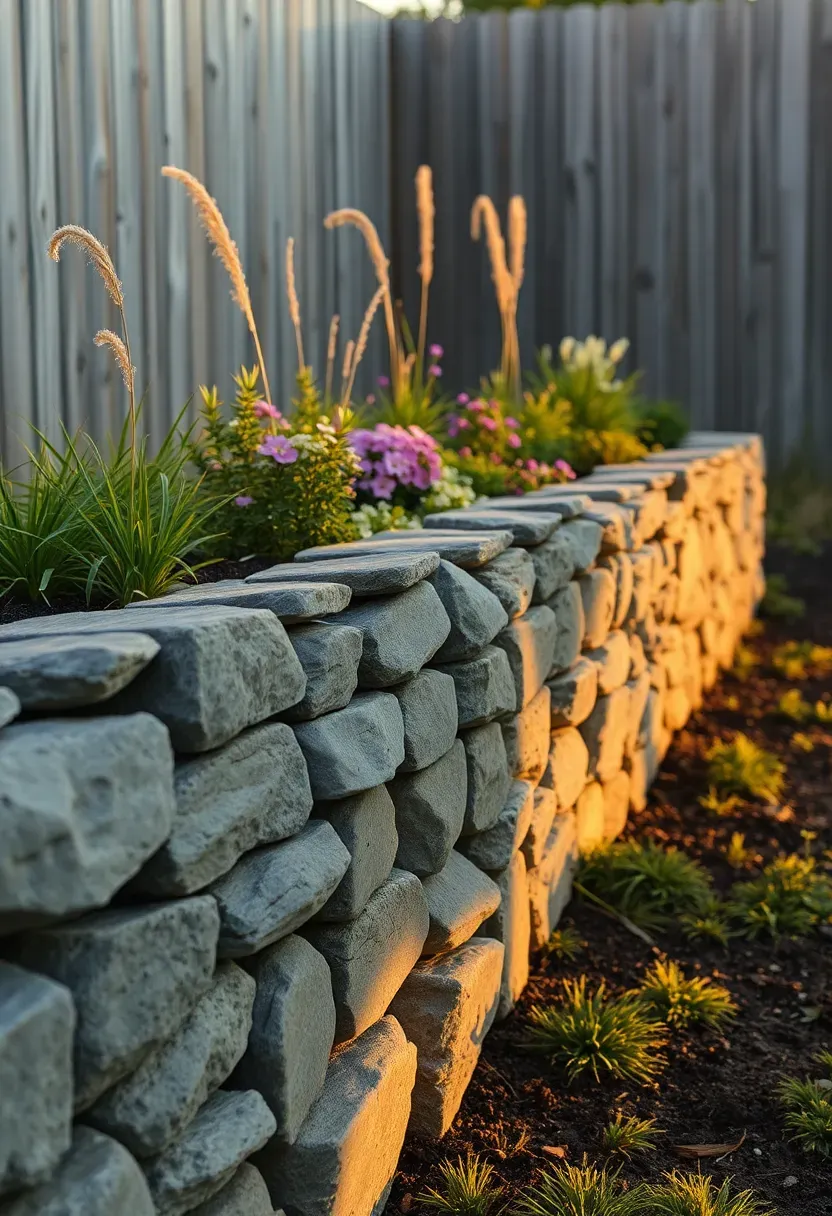
11. Stone-Edged Raised Border
Not every raised bed needs a timber frame. A dry-stack stone border — built from fieldstone, limestone, or salvaged granite — creates a raised planting zone that reads more like a landscape feature than a vegetable plot. The stone mass absorbs heat during the day and radiates it back through cool evenings, extending the growing season on both ends.
Materials Comparison
Dry-stack fieldstone: Most natural look, requires no mortar, settles slightly over time but remains structurally sound; best for informal cottage or wildflower plantings
Cut limestone blocks: Cleaner lines, easier to stack level, suits more formal planting arrangements; moderately higher cost
Salvaged granite curbing: Extremely durable, gray tones pair well with both modern and traditional aesthetics; requires mechanical assistance to position larger pieces
12. Integrated Bench and Bed Combo
A raised bed with a bench built into one long edge solves two garden problems simultaneously: where to sit while tending plants, and where to rest transplants, tools, and harvested produce during work sessions. The bench cap sits at 45–50 cm — comfortable sitting height — while the bed behind it rises another 30–45 cm to create a planting zone at eye level when seated.
Practical Benefits
- The bench becomes a natural staging area for potted seedlings before transplanting
- Painted or stained wood unifies the bench-bed visual into a single cohesive piece
- Works especially well along a fence line where the bed back wall can also serve as a vertical trellis support
What to Watch Out For
Design the seat so it overhangs the bed wall by at least 5 cm — enough to hook your fingers under it for leverage when standing up. Bench drainage matters too: angle the seat cap 2–3 degrees outward so rainwater runs away from the bed.
Recommended
Items for this idea
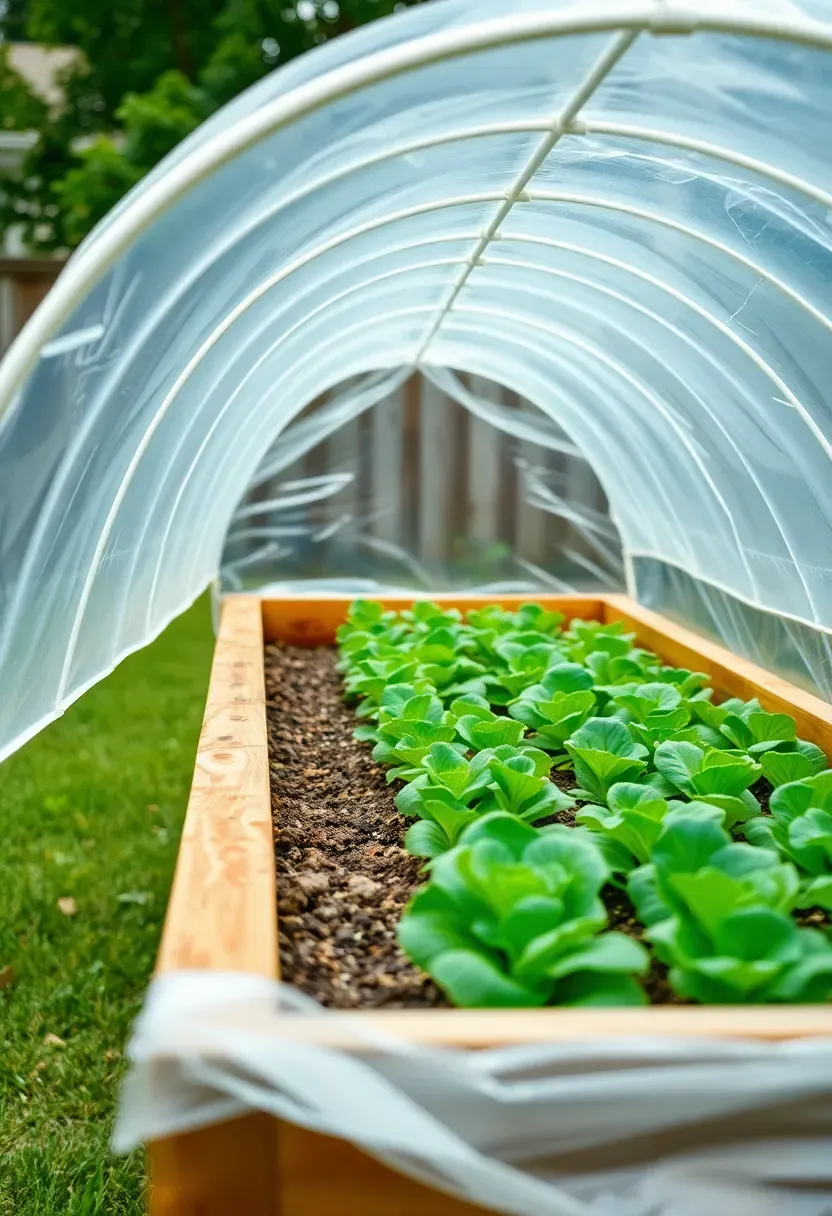
13. Greenhouse-Frame Raised Bed
Adding a simple hoop or arch frame over a standard raised bed transforms it into a season-extending micro-greenhouse. PVC pipe, bent conduit, or purpose-made aluminium hoops span the width of the bed and support clear plastic sheeting or floating row cover. The result: soil temperature increases by 4–8°C, and you can grow lettuces, spinach, and overwintering brassicas weeks earlier and later than an open bed allows.
Step 1: Install the Hoop Anchors
Screw short lengths of rebar or dedicated hoop holders to the inside face of the timber walls, evenly spaced every 60–90 cm along the length of the bed.
Step 2: Bend and Insert the Hoops
Slide each hoop into the paired anchors on both sides. The arch height should clear your tallest intended crop by at least 15 cm.
Step 3: Choose Your Cover
- Clear poly film: maximum heat retention, requires daily venting in mild weather
- Spun row cover: allows rain and some light through, less heat retention, better for frost protection without overheating
What to Watch Out For
Secure the cover edges firmly — wind will destroy a loosely anchored frame in one storm. Use sandbags, clips, or a timber batten along the base edge.
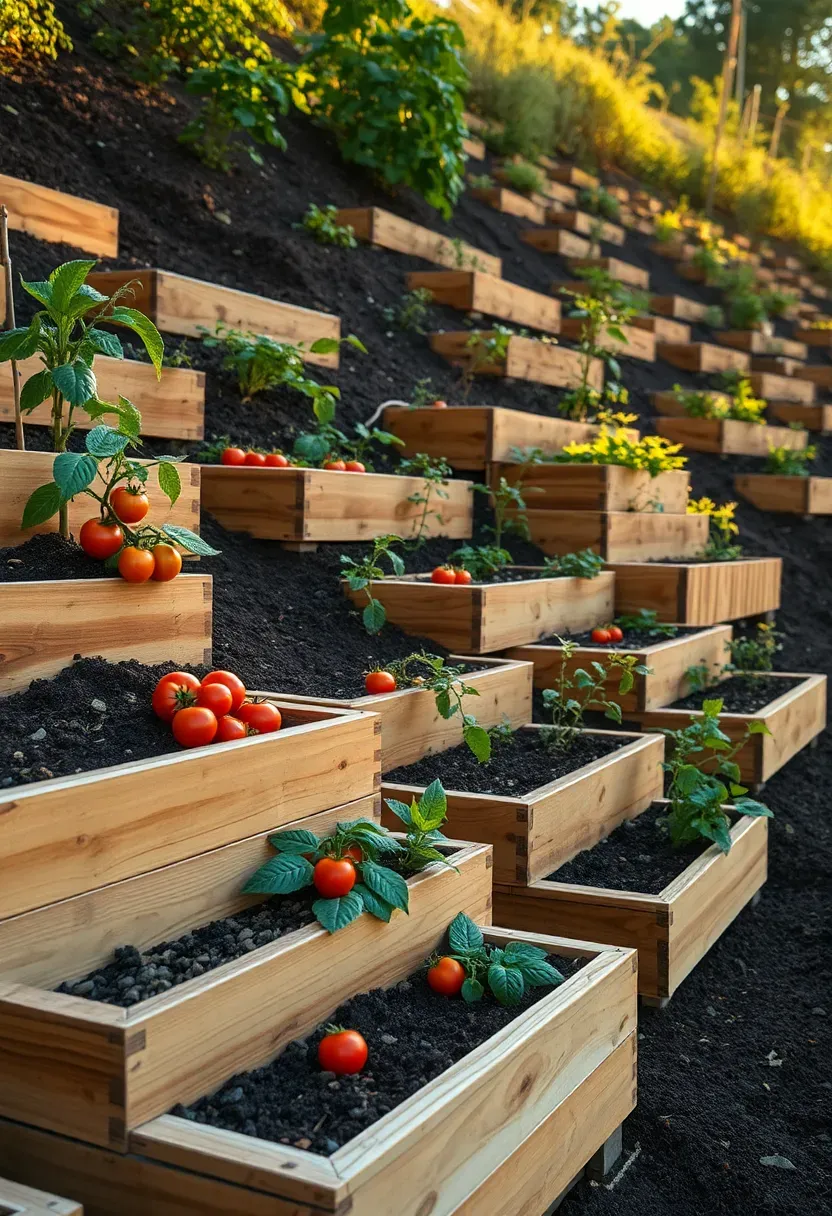
14. Sloped Terrain Stepped Beds
Slopes steeper than 15% are genuinely difficult to garden conventionally — water runs off before it penetrates, and soil erodes downhill over seasons. Stepped raised beds solve this by creating flat planting terraces cut into the grade, each one retained by a wall on its downslope face. The walls can be timber, concrete block, or dry-stacked stone depending on the aesthetic and permanence you want.
Planning the Steps
Each step should be wide enough to hold at least one bed — minimum 90 cm, ideally 120–150 cm — so the usable planting area justifies the construction effort. Steeper slopes need more, shorter steps; gentler slopes allow fewer, wider ones.
Practical Tips
- Run a level line across the slope before digging to establish your reference grade for each terrace
- Leave a 30 cm unpaved strip at the base of each retaining wall to absorb overflow during heavy rain
- Plant slope-facing walls with low groundcover to prevent erosion on the exposed wall surface
Recommended
Items for this idea
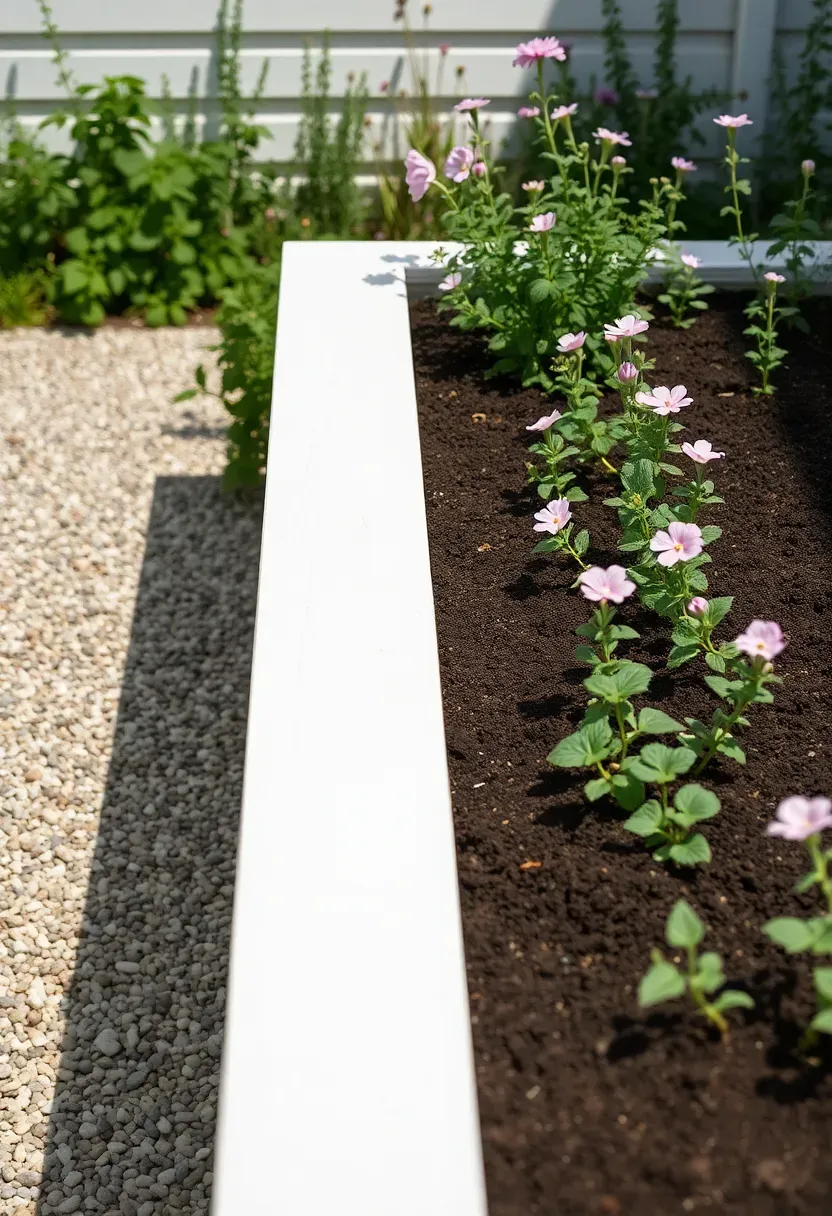
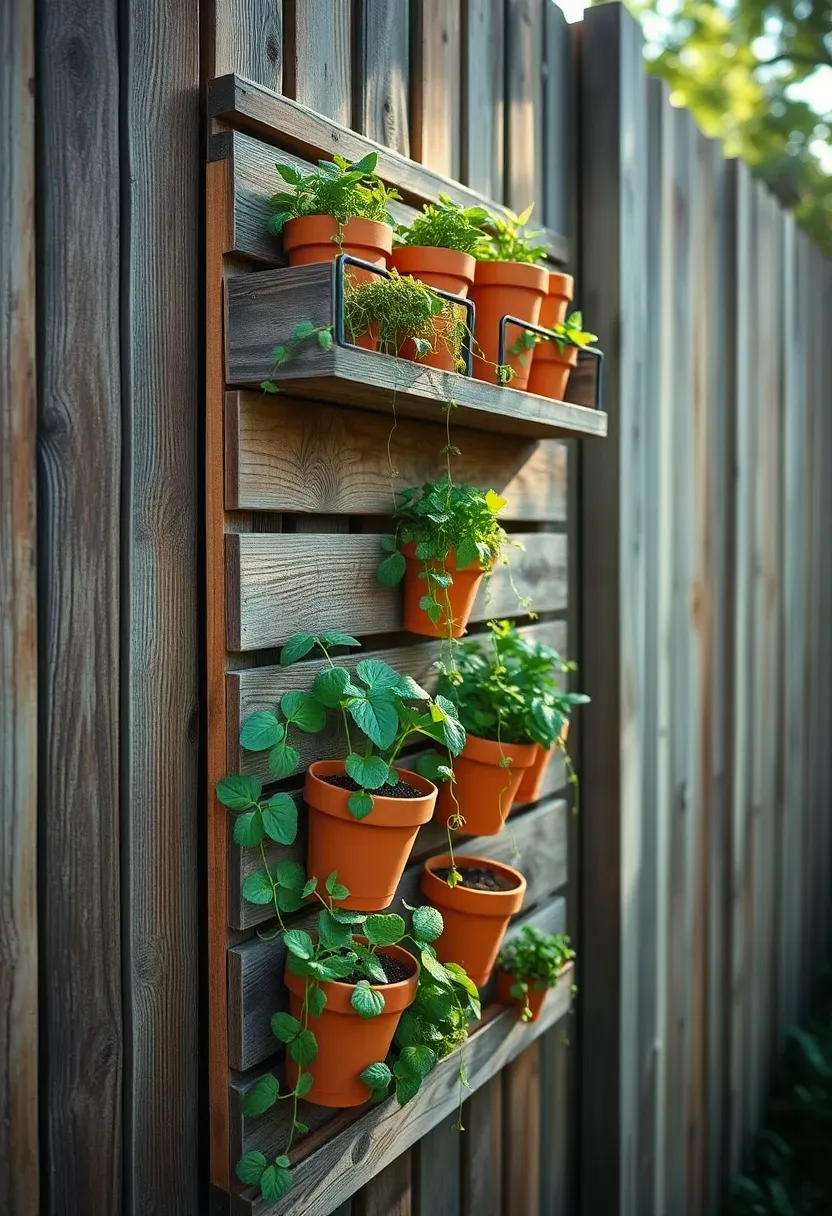
15. Narrow Vertical Wall Planter
When floor space is genuinely scarce — a side yard, a narrow courtyard, an urban plot — vertical raised planting turns the fence or wall into the growing surface. Stacked pocket planters, ladder-style shelving with inset troughs, or a continuous wall-mounted trough at shoulder height all qualify. The key is ensuring each tier gets adequate sunlight and that irrigation reaches every level without excessive manual intervention.
Style Variations
- Reclaimed pallet wood: instant texture, works in rustic and industrial settings, requires sealing for durability
- Black powder-coated steel: clean lines, suits contemporary spaces, lightweight and rust-resistant
- White painted wood shelving: cottage and Scandi aesthetics, pairs beautifully with terracotta pots
What to Watch Out For
Weight is critical on vertical installations — wet soil is heavy. Use wall anchors rated for the full loaded weight, not just the structure alone. A 1.5 m long trough filled with moist soil can weigh 30 kg or more.

16. Corrugated Iron Farmhouse Beds
Corrugated galvanised iron — the material of old sheds and rural water tanks — makes an unexpectedly beautiful raised bed wall. The ribbed texture catches light differently through the day, the zinc finish weathers to a soft silver-grey, and the material evokes a distinctly rural, utilitarian aesthetic that contrasts handsomely with lush green planting.
Building Approach
Use iron sheets cut to height (typically 40–60 cm) and secured to a timber post frame at each corner and at 90 cm intervals along the length. The posts carry the structural load; the iron provides the wall face and aesthetic character.
Planting Pairings
Corrugated iron suits bold, textural planting: rainbow chard, tall kale, bronze fennel, sunflowers. The rough-industrial background amplifies the organic quality of the plants rather than competing with it.
Recommended
Items for this idea
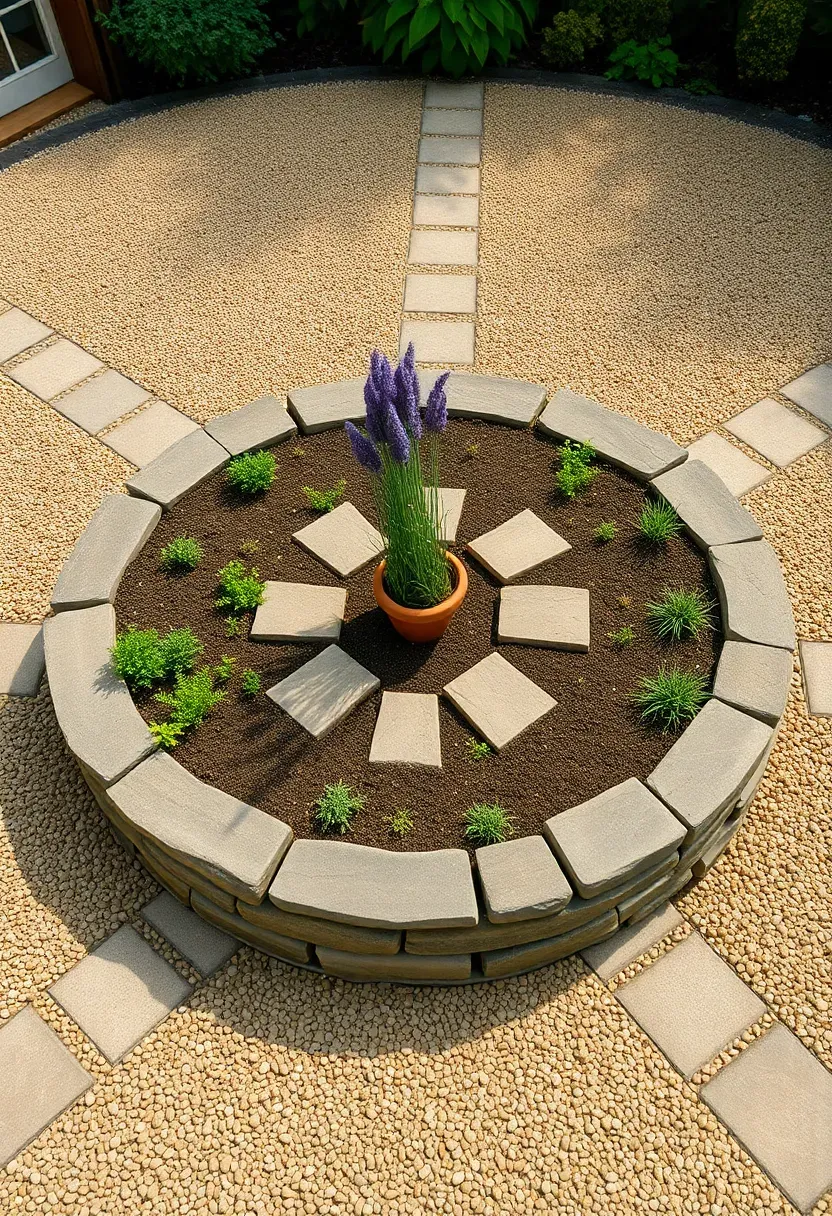
17. Circular Conversation Garden
A round raised bed positioned at the center of a garden space creates a focal point that draws movement and attention naturally. Unlike rectangular beds that orient along a single axis, a circle invites approach from any direction and encourages people to walk around it — which is exactly the behavior you want in a gathering garden where the plants themselves are part of the experience.
Design Details
Keep the diameter under 200 cm so the center remains reachable from the perimeter. Edge the circle with a material that contrasts clearly with the surrounding path surface — white limestone against dark gravel, or weathered timber against pale decomposed granite.
How to Apply at Home
- Position the circle at the intersection of two garden paths to maximize visual impact
- Plant a single statement species at the center (a small ornamental tree, a topiary, a large architectural herb like lovage) surrounded by lower companions
- Light it from below with a single ground-level uplighter for evening drama
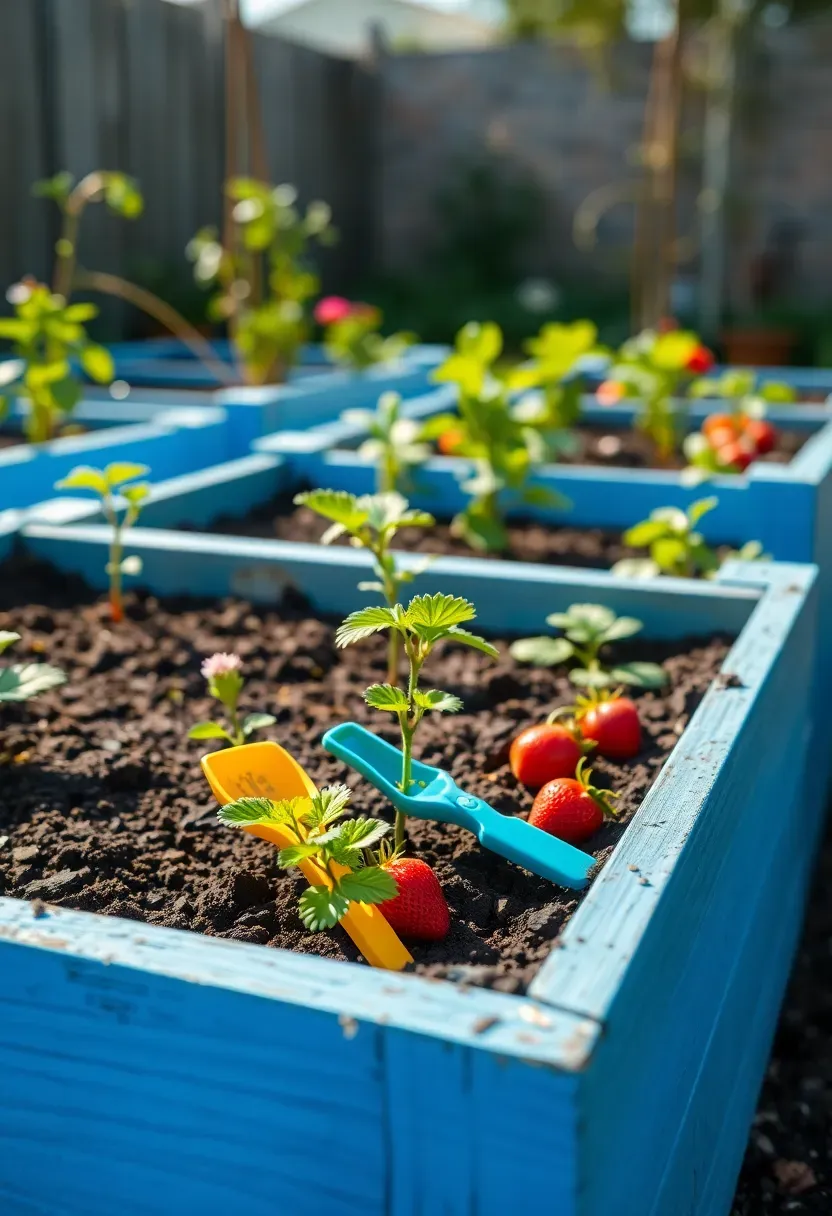
18. Children's Low-Reach Mini Beds
A raised bed sized and positioned for a young gardener — 25–30 cm tall, no wider than 80 cm — gives children meaningful ownership of a growing space without the frustration of unreachable centers or soil that is too hard to dig. Painted in a bright color or shaped as a simple rectangle just for them, these beds produce remarkable engagement: children who grow tomatoes eat tomatoes.
What Works Well for Kids
- Strawberries and cherry tomatoes — visible, quick-growing rewards
- Sunflowers planted at the far edge where they will not shade the bed
- Radishes — fastest crop from seed to harvest, within two weeks in good conditions
Setup Tips
- Use non-toxic exterior paint or raw untreated lumber (avoid pressure-treated timber for children's beds)
- Place the bed where it gets reliable afternoon sun without requiring a long hose run
- Let the child help fill the bed — the physical process of adding soil creates investment in what gets planted
Recommended
Items for this idea
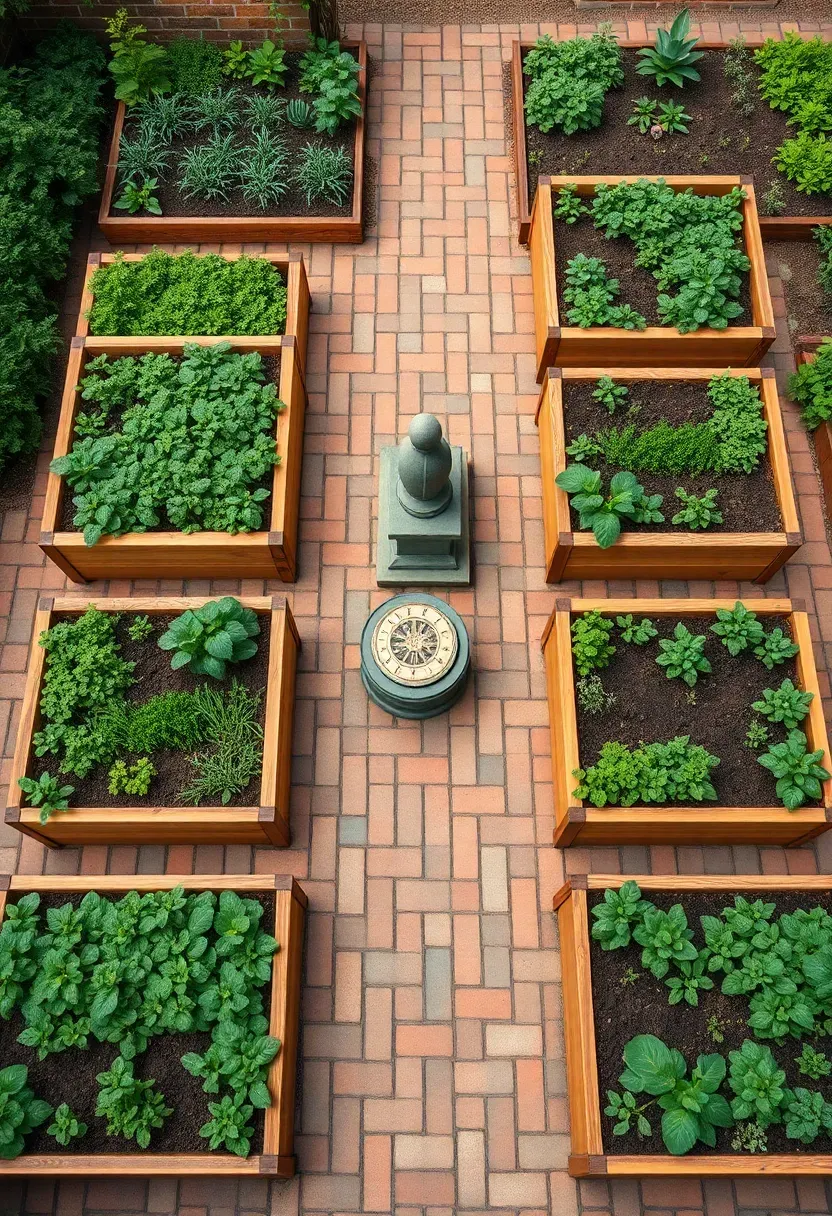
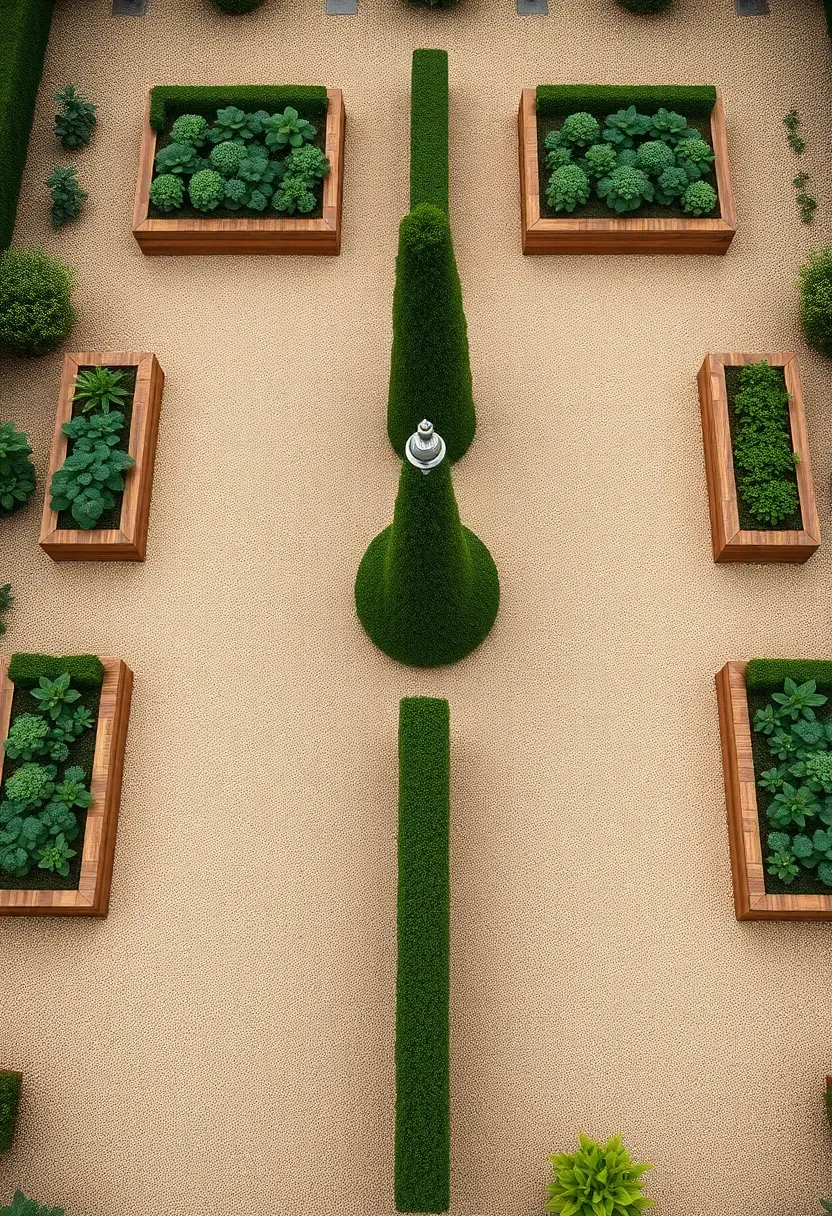
19. Formal Parterre-Style Layout
The parterre takes the discipline of formal garden design and applies it to productive planting. Symmetrical beds, mirrored across one or two axes, separated by clipped edging hedges or immaculate gravel paths, create a garden that looks as impressive in winter (when the structure alone carries the composition) as it does in summer when plants fill each compartment.
Historical Context
Parterre gardens originated in sixteenth-century French and Italian Renaissance formal estates. The term describes an ornamental arrangement of flower beds in a level area. Applied to raised vegetable beds, it brings the same visual discipline with the practical benefits of contained, optimized soil.
Modern Adaptation
You do not need a château. A 6 × 6 m area with four mirrored cedar beds, a central topiary, and a gravel surround achieves the essential quality of the style. Use formal planting (consistent species per bed, clipped edges on herbs, symmetrical staking) to reinforce the aesthetic.
How to Apply at Home
- Commit to symmetry — one misaligned bed breaks the visual logic of the entire layout
- Use the same material for all beds, all path surfaces, and all edging to unify the composition
- Boxwood or dwarf lavender as path edging reinforces the formal character without requiring elaborate maintenance
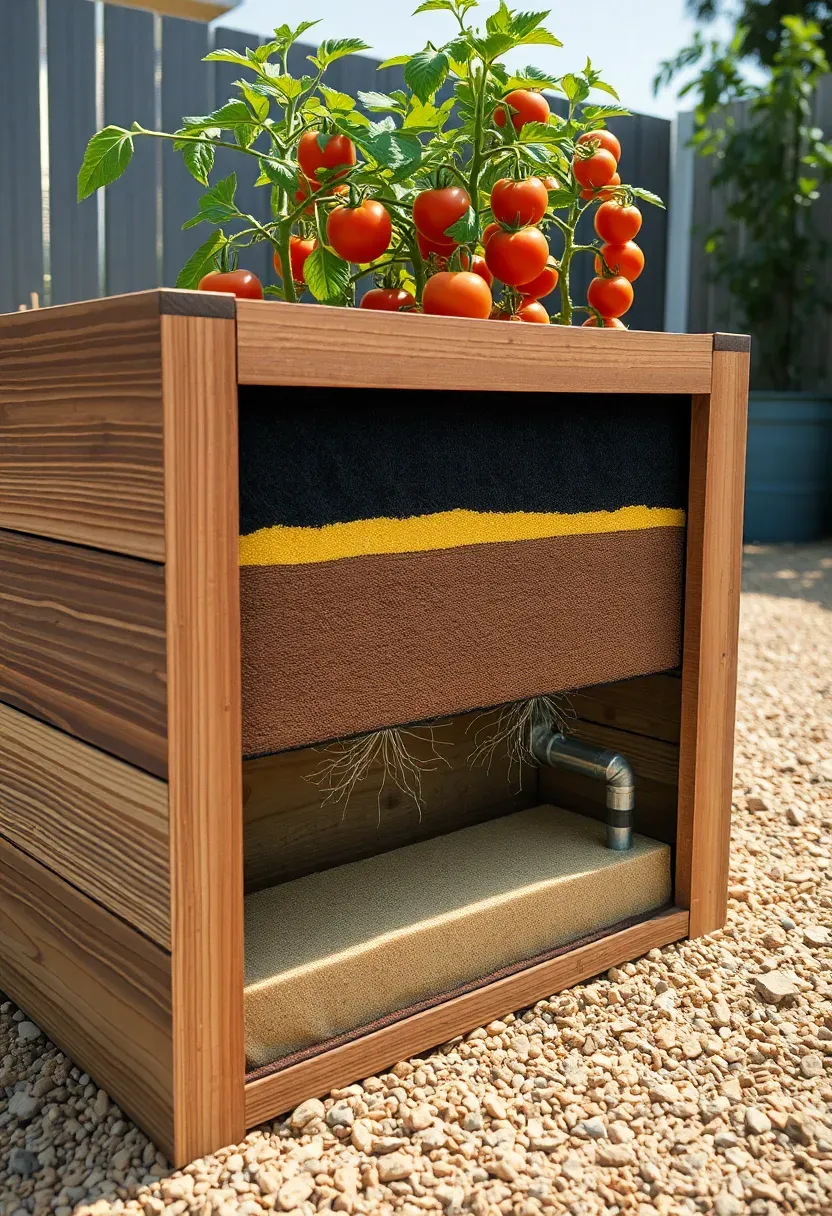
20. Wicking Bed for Dry Climates
Why Water Waste and Evaporation Are Real Problems
In hot, dry climates, conventional raised beds lose 40–60% of applied water to surface evaporation before it ever reaches plant roots. Hand-watering twice daily becomes a maintenance burden that defeats the simplicity a raised bed is supposed to offer.
The Solution
A wicking bed incorporates a sealed water reservoir at the base — typically 15–20 cm deep — separated from the growing medium by a wicking layer of sand or fine gravel. Plants draw water upward through capillary action at exactly the rate they need it, day and night, without any irrigation schedule. A fill pipe and an overflow hole are the only external components required.
Pros and Cons
Pros: reduces water use by 50–70% compared to conventional beds; eliminates the cycle of wet and dry stress; works exceptionally well for tomatoes, peppers, and eggplants that prefer consistent moisture
Cons: requires a liner (food-grade plastic) and a slightly more complex build; the reservoir must be topped up regularly during peak summer heat; not suitable for plants that prefer dry conditions between waterings (lavender, rosemary, Mediterranean herbs)
Recommended
Items for this idea
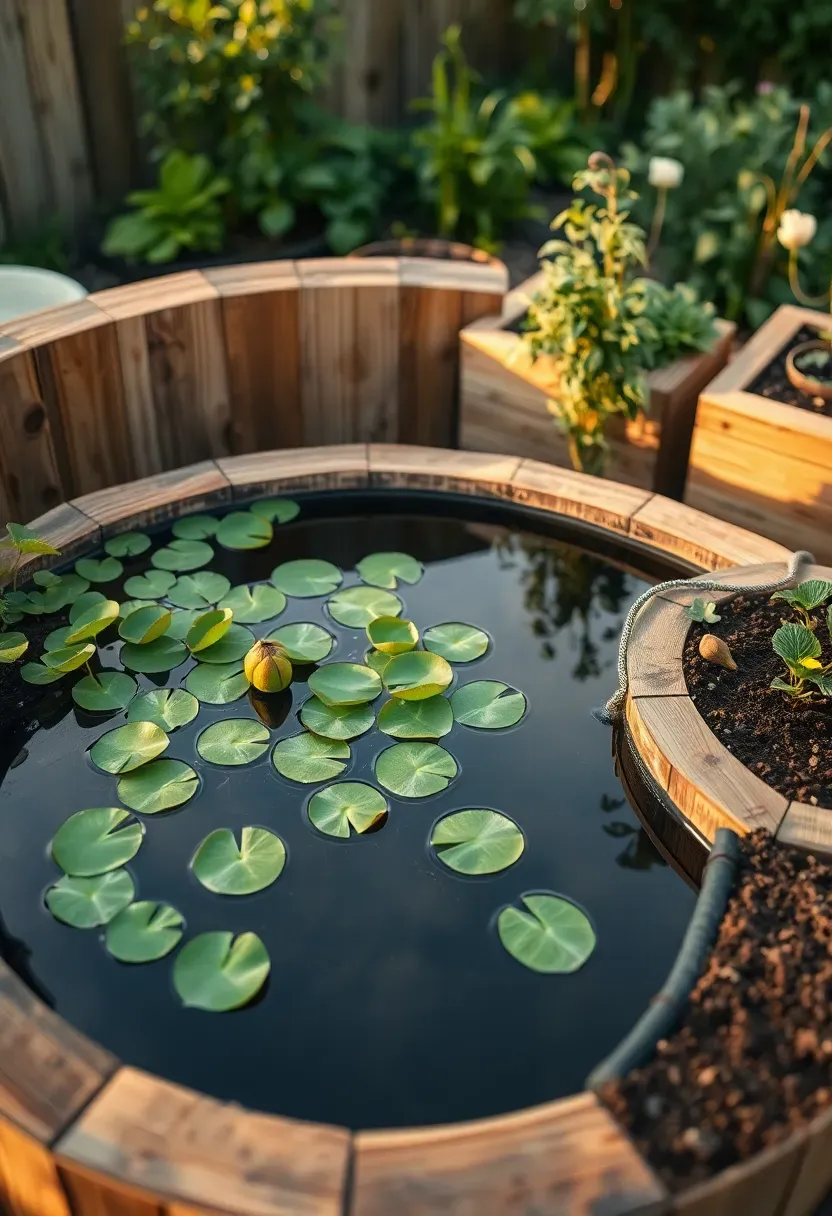
21. Raised Pond-and-Planter Combo
Water and garden beds share the same visual logic of contained, defined growing zones — so combining them is a natural creative step. A small raised pond (120–150 cm diameter, 45 cm deep) flanked by matching raised beds creates an integrated water garden feature that also provides a reliable moisture reservoir for adjacent planters via a simple hand pump or gravity tube.
Design Approach
Build the pond wall and the adjacent planter walls from the same material at the same height. The continuous surface line makes the two elements read as one deliberate composition rather than a pond and some beds that happen to be near each other.
Planting the Water Element
- Pond surface: water lilies for coverage, water hyacinth for filtration, marginal rushes for vertical interest at the edges
- Adjacent beds: moisture-loving plants that appreciate the humidity — hostas, astilbe, cardinal flower — contrast with the structural aquatic forms
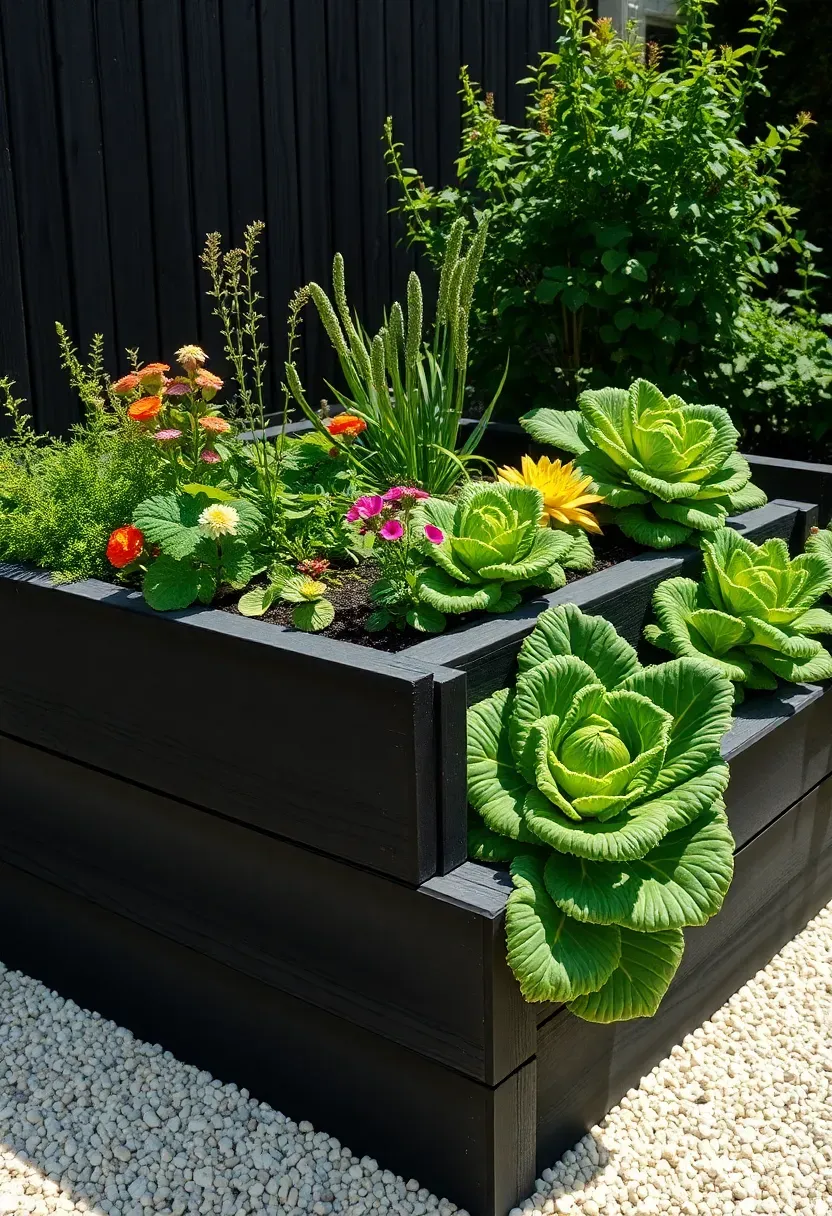
22. Fire-Treated Sleeper Timber Beds
Reclaimed railway sleepers or purpose-made sleeper-style timber bring extraordinary visual weight to a raised bed — the dark, textural surface and substantial mass read as permanently rooted in the landscape from the moment they are installed. Fire treatment (or charring, the Japanese shou sugi ban technique) enhances this quality while improving rot resistance without chemical treatment.
What Makes This Material Special
The dense grain of hardwood sleepers holds its form for decades. Charring the surface seals the wood's pores, prevents moisture penetration, and creates a matte black finish that makes plant colors — particularly bright flowers and vivid foliage — pop visually against the dark background.
How to Apply at Home
- Use charred sleepers for statement beds in prominent positions — a front garden, a courtyard, a formal kitchen garden
- Pair with pale gravel or white-painted walls to maximize the contrast effect
- Seal the charred surface with raw linseed oil annually to maintain the finish without altering the colour
Recommended
Items for this idea
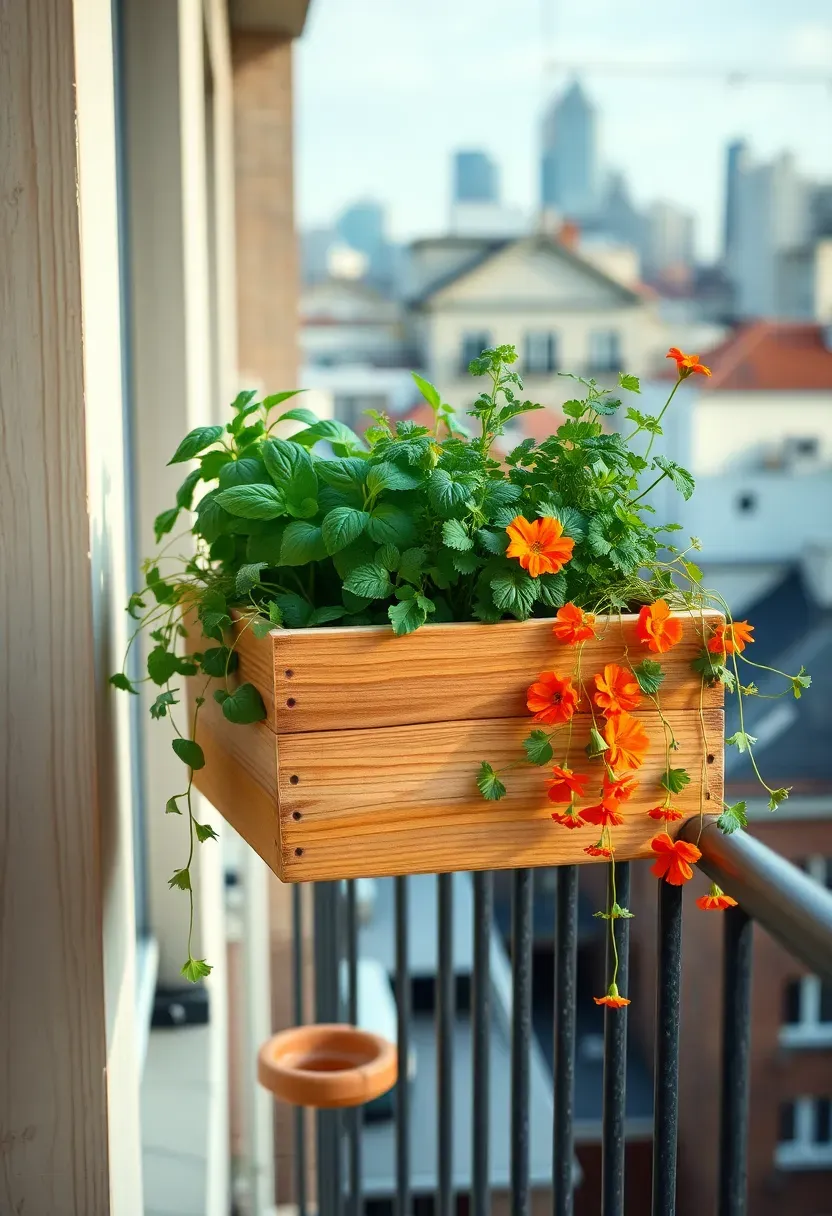
23. Compact Balcony Raised Planter Box
Balconies are not excluded from raised bed gardening — they simply require a scaled-down, weight-conscious approach. Railing-mounted planter boxes (long and narrow, typically 60–80 cm long × 20 cm wide × 25 cm deep), freestanding box planters at one corner, or a tiered balcony shelf with inset troughs all create meaningful growing space on even the most compact urban outdoor area.
Weight Management
This is the critical constraint on any balcony planting project. Standard potting mix weighs approximately 500 g per liter when wet. A 60-liter planter box fully saturated weighs 30 kg — significant on a typical balcony rated for 150–200 kg/m². Use lightweight perlite-heavy mixes or purpose-formulated balcony growing media that weigh half as much.
Best Crops for Balcony Boxes
- Herbs: basil, parsley, chives, thyme — dense, aromatic, useful
- Cherry tomatoes in a self-watering deep box (minimum 30 cm soil depth)
- Lettuce and salad greens — shallow-rooted, fast-cycling, high daily yield relative to space used
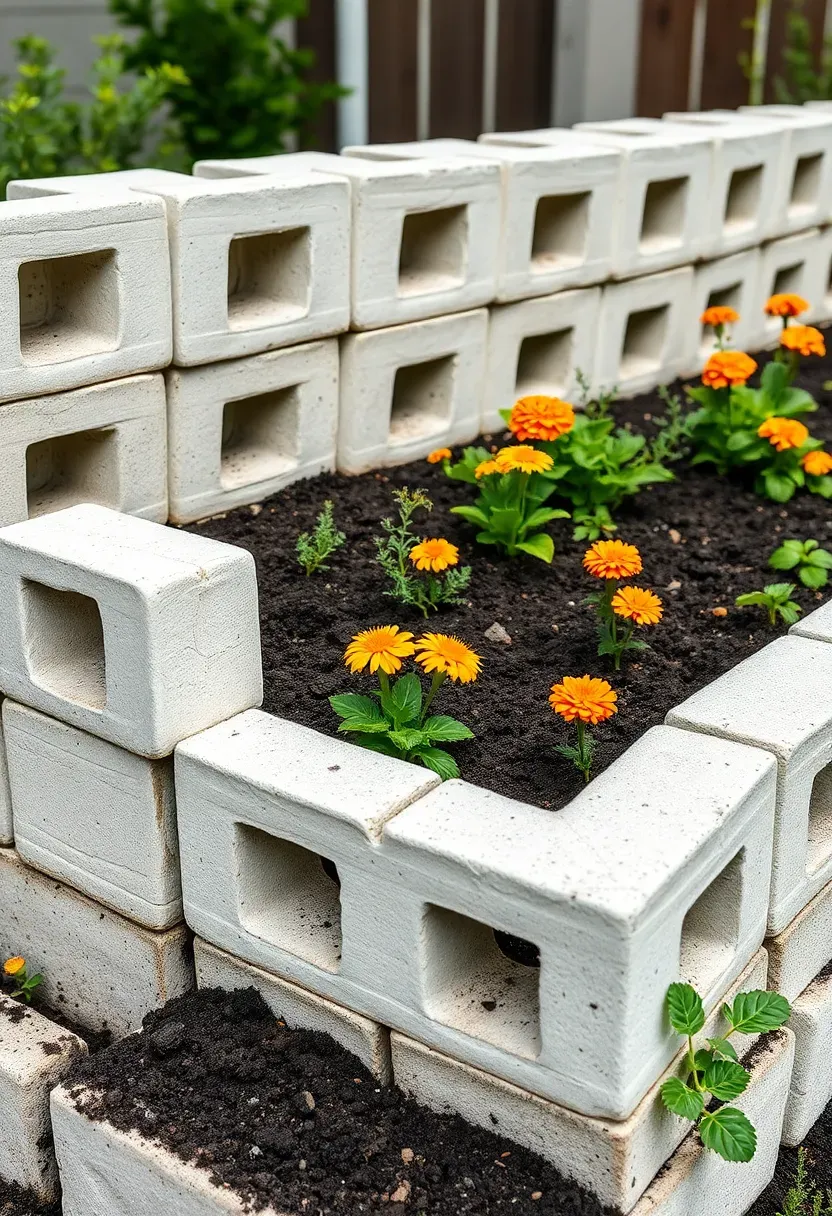
24. Stacked Concrete Block Beds
Standard concrete masonry units — the kind used in construction — make surprisingly attractive raised beds when used intentionally. Stack them two or three courses high, leave the holes in each block exposed (they become planting pockets for herbs or strawberries), and either leave the surface raw for an industrial aesthetic or paint them white or terracotta to soften the look.
Why This Material Works
Concrete blocks are dense and durable. They never rot, never warp, and never require structural maintenance. The thermal mass absorbs heat during the day and releases it at night — beneficial for warm-season crops in climates with cool evenings.
Practical Build Notes
- No mortar required for beds under three courses high; blocks lock in place under their own weight
- Fill block holes with excess growing medium mixed with perlite — shallow-rooted herbs like thyme and oregano thrive in the confined volume
- A poured concrete cap or smooth timber cap on top finishes the look and provides a comfortable working surface
Recommended
Items for this idea
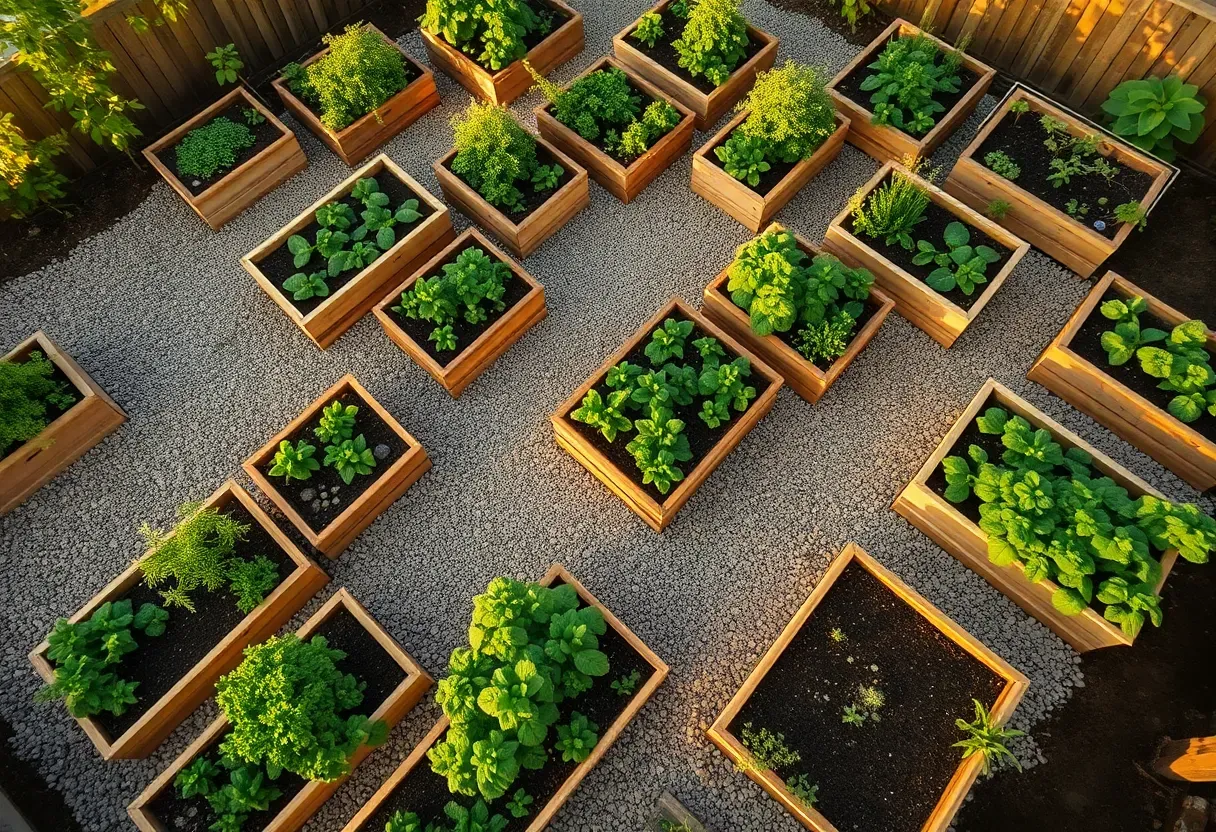
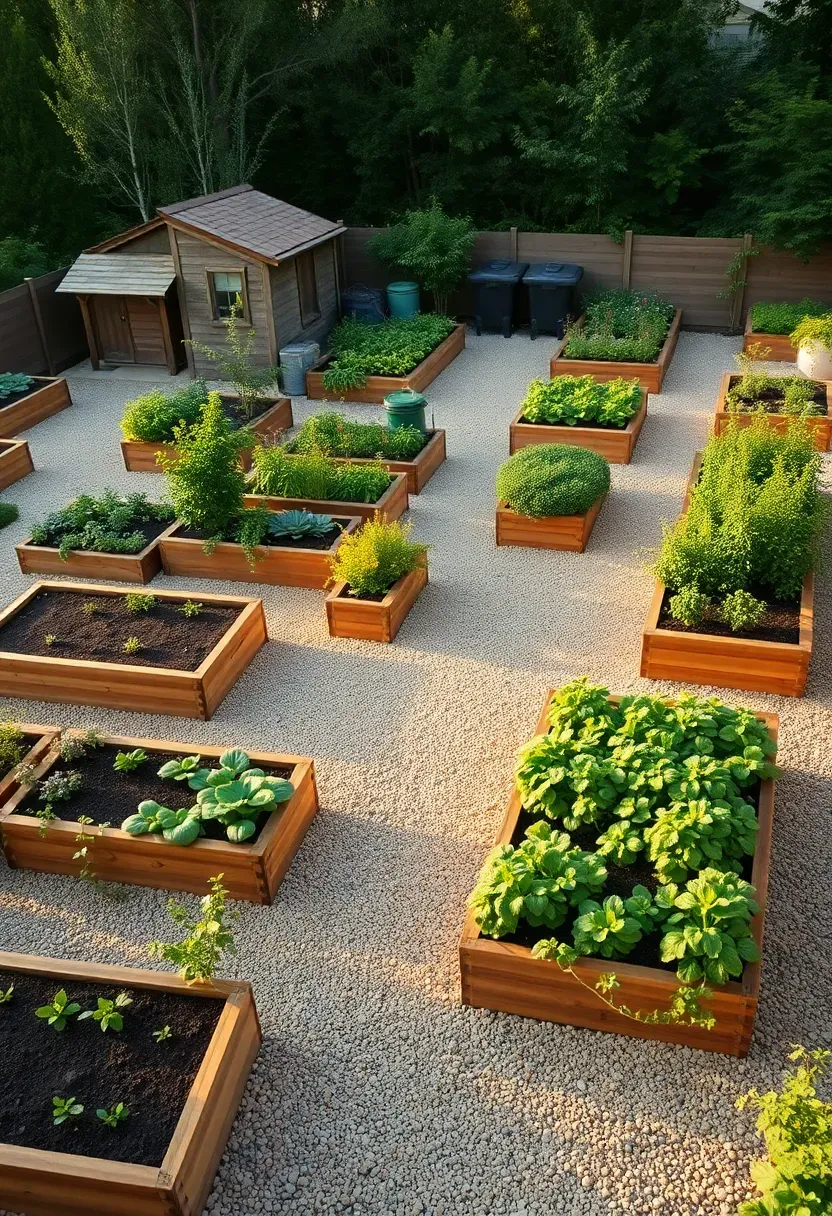
25. Full Backyard Raised Garden System
The most ambitious version of raised bed gardening is treating the entire backyard as a single integrated design project. Multiple beds, coordinated heights, a unified path material, a dedicated potting station, composting area, and tool storage — all designed together rather than added incrementally.
Planning the System
Zone 1 — Vegetables: Highest-sunlight area, beds at 45–60 cm height, drip irrigation on a timer, at least 8–10 m² of growing area.
Zone 2 — Herbs: Adjacent to the kitchen or back door for easy harvest access, hip-height beds for convenience, dense planting to maximize production per square meter.
Zone 3 — Infrastructure: Compost bins, tool storage, potting table, seed starting area — all connected by the same path system as the growing zones so they feel integrated rather than utilitarian afterthoughts.
What Holds a System Together
Material consistency is everything at this scale. Choose one path surface, one bed material, one edging style, and apply it throughout. A backyard where every element shares the same material language reads as intentional design, not accumulation.
Quick FAQ
Is pressure-treated lumber safe for vegetable raised beds? Modern ACQ (alkaline copper quaternary) treated lumber is considered safe by most regulatory agencies for vegetable beds, but many gardeners prefer untreated cedar or redwood, which offer natural rot resistance without any chemical question. For children's beds or beds growing root vegetables that contact the wood directly, untreated timber is the straightforward choice.
Should raised beds have a bottom, or sit directly on the ground? Most raised beds benefit from sitting directly on the soil — it allows earthworms and beneficial microorganisms to move freely between your growing medium and the ground below, and drainage is naturally excellent. Add a layer of hardware cloth or galvanized mesh at the base if burrowing rodents are a significant local problem.
How deep does a raised bed need to be for vegetables vs. herbs? Leafy greens and herbs need only 15–20 cm of growing depth. Root vegetables — carrots, parsnips, beets — want 30–45 cm. Tomatoes, squash, and other fruiting plants prefer 45–60 cm for optimal root development. When in doubt, build at 45 cm; it works for almost everything.
Which material lasts longest without maintenance? Galvanized steel, concrete block, and natural stone all outlast timber significantly — 20–30 years or more with essentially no maintenance beyond occasional cleaning. Cedar and redwood are the longest-lasting wood options at 10–20 years. Composite lumber sits between the two.
Can raised beds work in partial shade? Yes, with adjusted planting choices. Leafy greens, herbs like mint and parsley, and cool-season crops like peas tolerate 4–6 hours of direct sun. Fruiting crops — tomatoes, peppers, squash — need 8 or more hours, so shade sites should stick to foliage-focused planting.
Raised garden beds reward every level of commitment — from a single cedar box beside a back door to a fully orchestrated backyard growing system. Start with whichever idea from this list solves your most pressing problem: poor soil, limited reach, a difficult slope, or simply the need for something that looks as good as it grows. Build it well the first time, and it will still be producing for you a decade from now.
Pinterest cover for 25 AI Raised Garden Design Ideas
About the author
OBCD
CGI visualization and interior design content. We create detailed 3D renders and curate practical design ideas for every room in your home.