25 Attic Bathroom Ideas That Make the Most of Every Angle
For centuries, attic spaces were written off as awkward afterthoughts — too low here, too slanted there, nothing a reasonable person could do with them. Then architects and homeowners started paying closer attention. Those dramatic angles that once seemed like obstacles turned out to be assets. A skylight punched through a slope fills a bathroom with light that no window on a flat wall ever could. A knee wall that forces you to crouch becomes the perfect niche for a vanity. The roofline itself becomes architecture.
In this collection I have gathered 25 attic bathroom ideas that treat the sloped ceiling not as a problem to apologize for but as the defining feature to design around. We start with the most common angles and work toward the more daring approaches.
Table of Contents
- Pedestal Sink Under the Slope
- Built-In Shower in the Eave
- Clawfoot Tub Under a Skylight
- Floating Vanity Into the Knee Wall
- Dormer Window Vanity Nook
- Exposed Timber Beam Ceiling
- Dark Navy Walls with Oval Tub
- Knee Wall Storage Niche
- Sage Green Hex Tile Floor
- Double Skylight Shower Spa
- Marble Platform Tub at the Gable
- Industrial Brick and Copper Loft
- Mint Green Vintage Vanity
- Dual Vanities Along the Knee Walls
- Japandi Concrete Soaking Tub
- Angled Mirror Cabinet in the Dormer
- Shiplap Farmhouse with Galvanized Rack
- Zellige Tile Mediterranean Shower
- Kids' Attic Bathroom with Cloud Mural
- Boho Rattan and Macrame Bathroom
- All-Black Attic Drama
- Hollywood Regency Dormer Vanity
- Scandinavian Sauna Bench Bathroom
- Full-Glass Gable End Wall
- Hammered Copper Tub with Limewash Walls

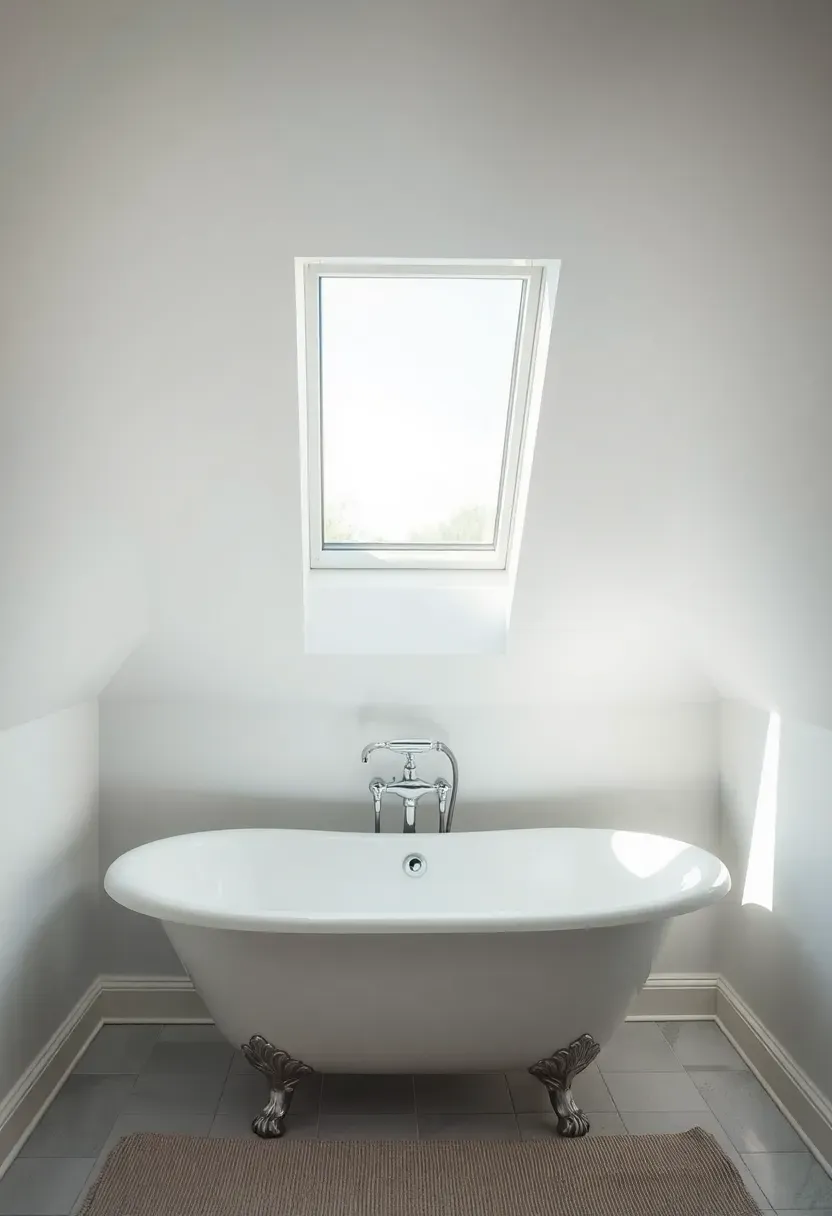
1. Pedestal Sink Under the Slope
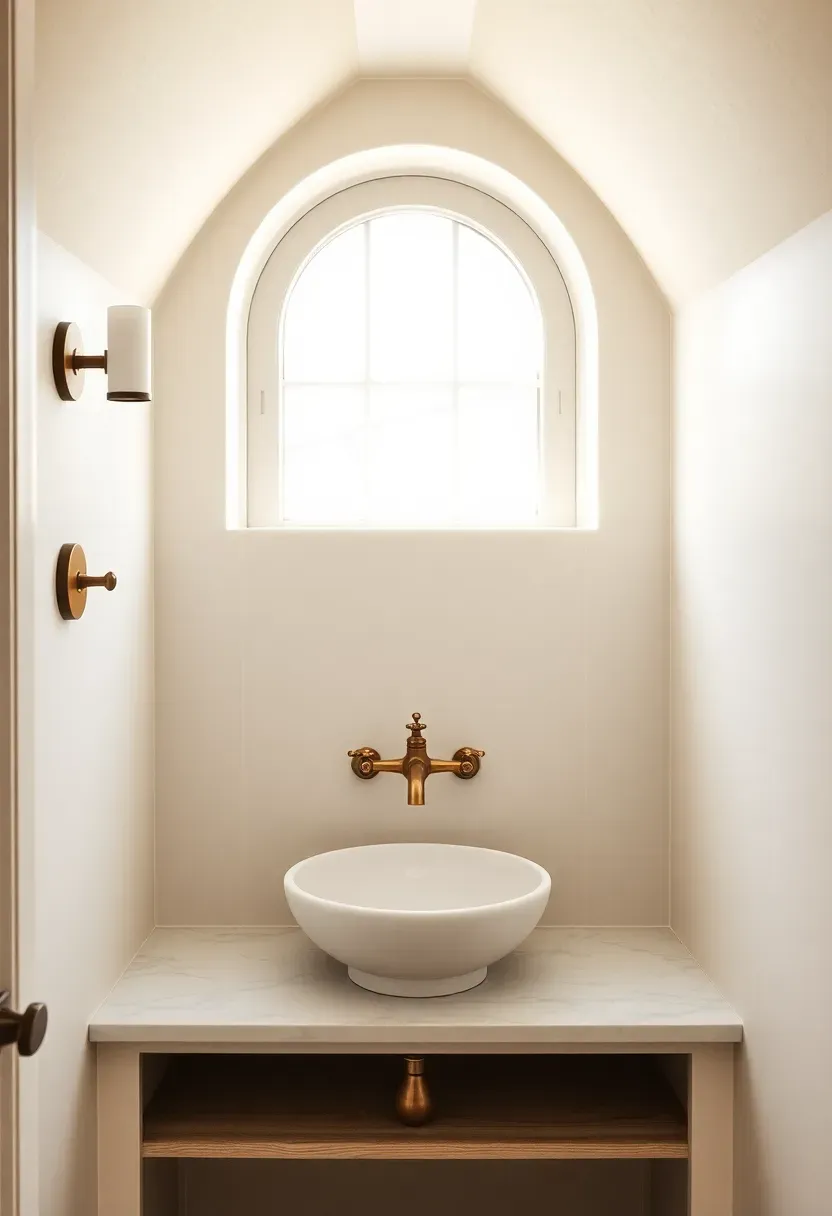
One of the smartest moves in attic bathroom design is accepting the slope rather than fighting it. A pedestal sink is the ideal fixture for the lowest point of the room — it has no overhead cabinet to conflict with the descending ceiling, requires minimal clearance, and keeps the composition light and open. A round mirror mounted on the flat gable wall reflects the dormer window opposite, doubling the natural light. White beadboard wainscoting wraps the lower walls, grounding the sloped zone with familiar cottage texture.
Tips for This Configuration
- Place the pedestal sink where the ceiling height is at least 6 feet for comfortable use
- Choose a mirror no taller than the available flat wall section — avoid mirrors that hit the slope
- Beadboard panels cut cleanly at the angle where the slope begins, creating a natural visual division
We picked a few things that go well with this idea: WOODBRIDGE 59in Acrylic Freestanding Soaking Tub (★4.8), WOODBRIDGE 67in Freestanding Soaking Tub Matte Black (★4.6) and Acrylic Freestanding Soaking Tub with Seat (49in) (★5.0). As an Amazon Associate we earn from qualifying purchases.
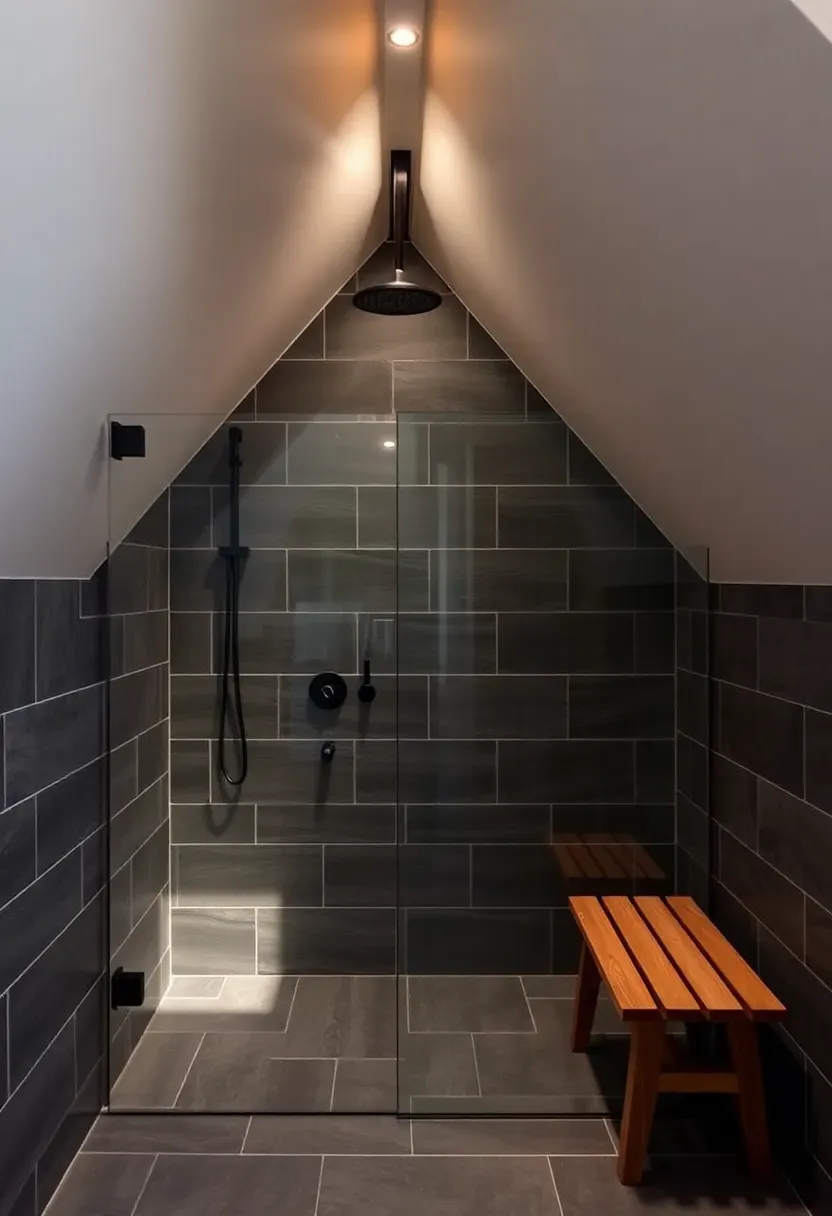
2. Built-In Shower in the Eave
The Core Issue
Standard shower enclosures assume vertical walls on all sides. In an attic, one or more walls slope inward at unpredictable angles, making a prefabricated shower unit nearly impossible to install cleanly.
The Solution
Build the shower directly into the eave. Frame the sloped ceiling as a structural wall of the shower, line it with large-format matte tile, and install a frameless glass panel that follows the roofline angle for the fourth side. A rainfall head at the peak delivers water from the highest point, and a teak bench against the low knee wall gives you a natural place to sit that the low clearance actually encourages. The result feels custom-designed rather than compromised.
Pros and Cons
Pros: maximizes the unusable eave zone, creates a genuinely unique shower experience, the slope acts as natural steam containment Cons: requires custom tilework and glass cutting, professional installation is non-negotiable, cleaning tile on a sloped ceiling surface demands extra effort
We picked a few things that go well with this idea: FOLKSMATE Dimmable LED Vanity Light Bar (16in) (★4.5), Joossnwell LED Black Vanity Light Bar (16in) (★4.5) and Aipsun Rectangular LED Black Wall Sconce (24in) (★4.6). As an Amazon Associate we earn from qualifying purchases.
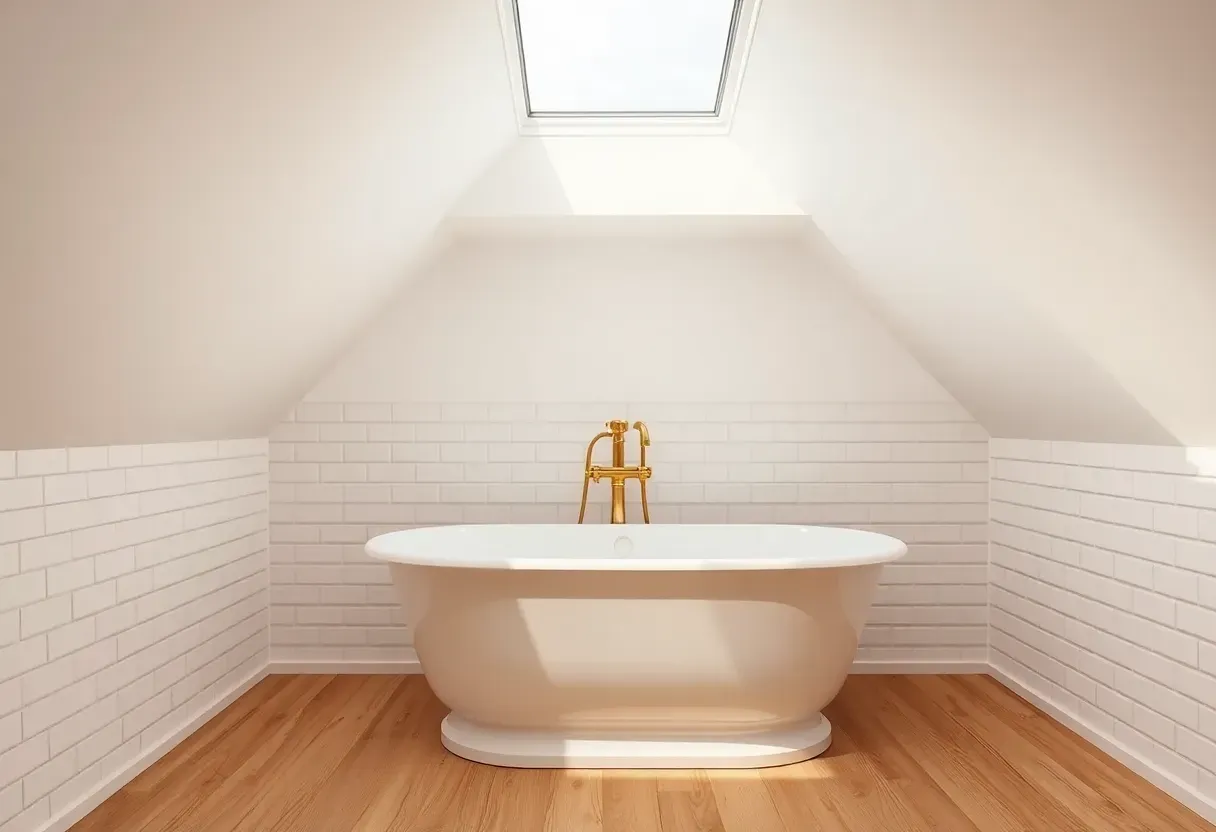
3. Clawfoot Tub Under a Skylight
There is a hierarchy to attic bathroom planning: figure out where the skylight goes before you decide where anything else goes. When you place the clawfoot tub directly below a roof window, the skylight becomes the tub's private light source — morning sun angles in at a slant in summer, blue winter sky frames a bath at dusk. The pairing transforms a practical bathroom fixture into something that feels like a room designed for contemplation.
Step 1: Position the Skylight First
Work with a roofer before any bathroom planning begins. The skylight's position determines where the tub sits, not the other way around. Aim for a unit roughly 24 to 36 inches above tub water level when the ceiling peaks.
Step 2: Choose the Right Tub
A double-ended clawfoot lets you position yourself to face the skylight regardless of which end you enter from. Matte white composite is lighter than cast iron for structural load considerations in attic floors.
Step 3: Keep Everything Else White
Chrome fixtures, white walls, white ceiling. The skylight and tub are the only characters in this composition. Competing colors dilute the impact.
We picked a few things that go well with this idea: Luxdecor Real Wood White Shiplap Planks (12.5sqft) (★3.8), Luxdecor White Peel and Stick Shiplap Boards (★3.9) and Faux Wood Shiplap Peel Stick Wall Panels (10-Pack) (★3.9). As an Amazon Associate we earn from qualifying purchases.
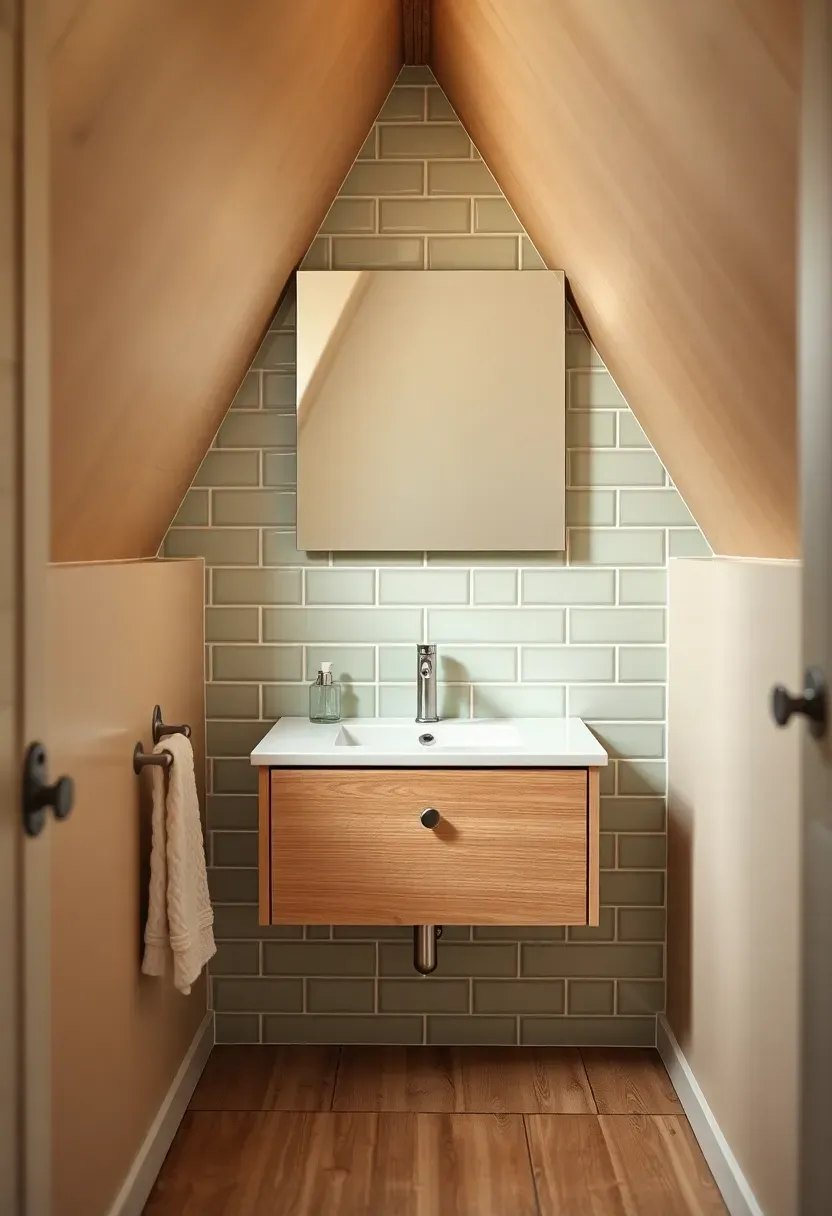
4. Floating Vanity Into the Knee Wall
Knee walls — those short vertical sections where the roofline meets the attic floor — are among the most misunderstood elements in attic renovation. Most people treat them as dead zones. Smart bathroom designers treat them as built-in cabinet locations.
A floating vanity tucked into the knee wall section sits exactly where standing headroom is insufficient for anything else. The mirror extends up along the slope, using every inch of the angled plane. Sage green painted cabinet doors give the composition a soft botanical quality that prevents the cramped zone from reading as a problem. Brushed nickel pulls add precision without weight.
What to Watch Out For
- The vanity depth is constrained by the knee wall's position — measure carefully before ordering custom cabinetry
- Ensure adequate plumbing access behind the knee wall panel; install a removable section for future maintenance
- The mirror following the slope requires custom cutting — budget accordingly
Recommended
Items for this idea
5. Dormer Window Vanity Nook
Origins of the Dormer as Interior Feature
Dormer windows were originally added to attic spaces for ventilation and light, creating small vertical wall sections within an otherwise sloped ceiling plane. For centuries those walls were wasted or plastered over. Modern attic bathroom design has finally recognized the dormer recess as premium real estate.
Modern Interpretation
A marble-topped shelf mounted under the dormer window serves as both vanity surface and windowsill extension. A ceramic vessel sink sits on the marble, an antique brass faucet rises above it, and a sheer linen curtain filters the incoming light without eliminating it. The dormer's own walls flank the setup, creating a natural sense of enclosure — a room within a room. Slim sconce lights on either side of the window provide evening illumination without overhead glare.
How to Apply at Home
- Measure the dormer's usable width; most dormers accommodate a 24-to-36-inch vanity surface
- Use a waterproof marble or quartz slab that overhangs the window ledge slightly for a finished look
- A linen roman shade pulls up fully during daylight to flood the vanity with natural light
6. Exposed Timber Beam Ceiling
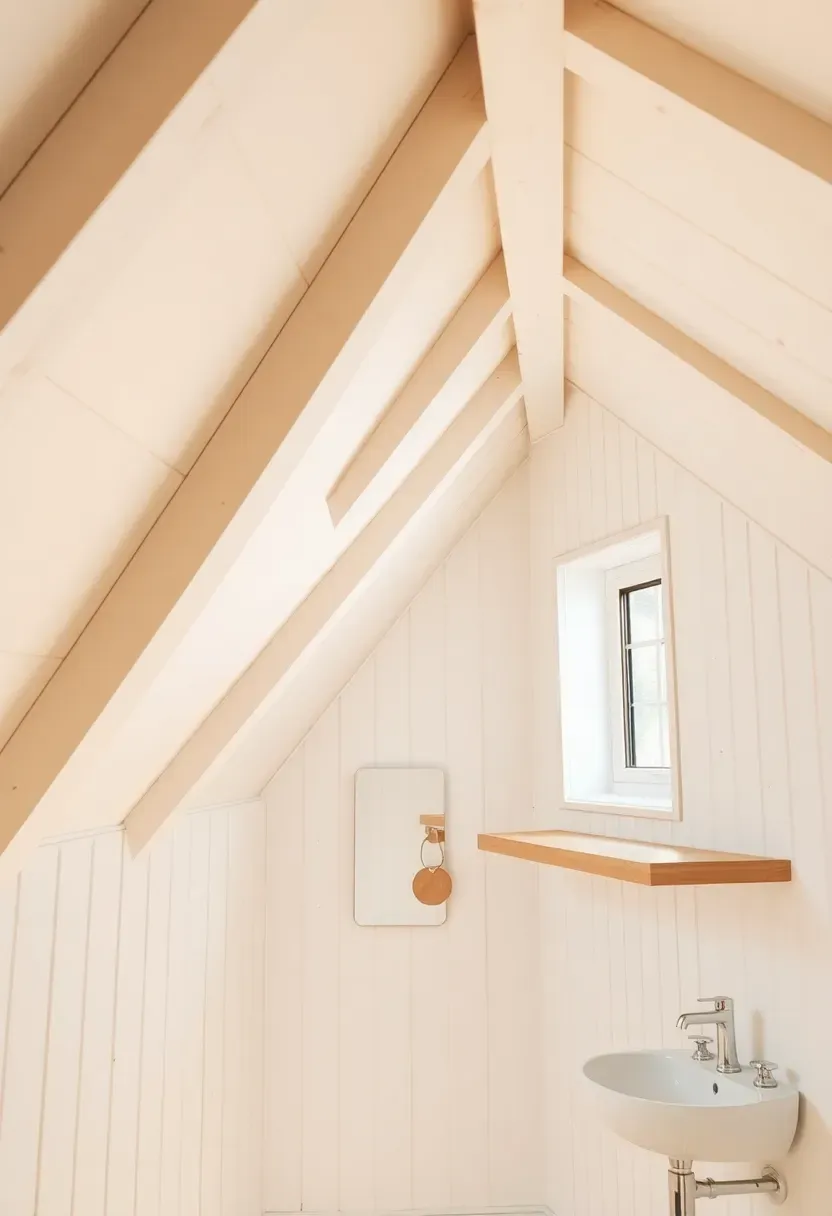
When the original attic structure includes timber rafters, the most expensive mistake is concealing them behind drywall. Paint them white and let them define the ceiling plane. The rhythm of beams at regular intervals — typically 16 or 24 inches apart — creates a coffered effect without any added materials. Tongue-and-groove pine panels painted the same white fill the spaces between beams, maintaining visual continuity while adding texture.
Keep everything at standing height simple: a floating oak shelf at mirror level, a wall-mounted ceramic sink. The ceiling does all the work.
Should You Leave Beams Raw or Painted?
Raw timber beams introduce warm brown tones that can feel heavy in a small bathroom. White-painted beams preserve the structural drama while keeping the room light and airy — the preferred choice for most attic bathroom applications. Reserve raw timber beams for spaces with substantial natural light and a deliberate rustic aesthetic.
Recommended
Items for this idea
7. Dark Navy Walls with Oval Tub
Comparing: Dark Walls vs. Light Walls in Attic Bathrooms
The conventional wisdom says small rooms need light colors. In an attic bathroom, that rule deserves scrutiny.
The Light Wall Approach
White or pale gray walls reflect the limited natural light available, make sloped ceilings recede visually, and create a clean, airy quality. This works well when natural light is generous or when you want to maximize the perceived size of the space.
The Dark Wall Approach
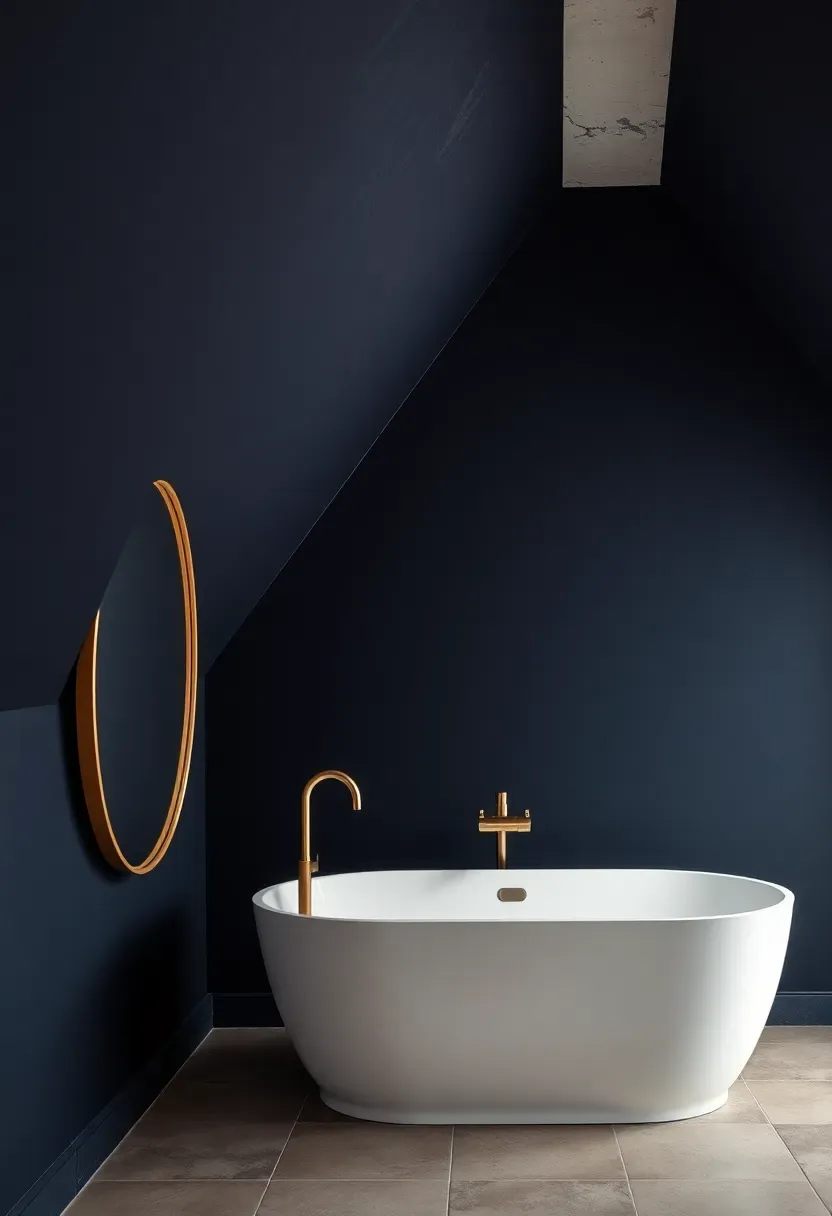
Deep navy or charcoal walls painted in textured limewash or plaster transform the sloped ceiling from an architectural oddity into an intimate envelope. The darkness makes the ceiling feel lower on purpose — cozy, deliberate, hotel-like. A single white oval tub becomes a luminous focal point against the navy backdrop. One brushed gold tub filler and an arched mirror with a thin gold frame are all the embellishment needed.
What to Choose
Choose light walls if: your attic bathroom has limited natural light or minimal windows Choose dark walls if: you have a skylight or large window that floods the space with daylight, and you want drama
Recommendation
In attic bathrooms with a skylight positioned above the tub, dark navy walls are transformative. The skylight compensates for the darkness of the walls, and the contrast between deep walls and bright overhead light creates a genuinely theatrical bathing experience.
8. Knee Wall Storage Niche
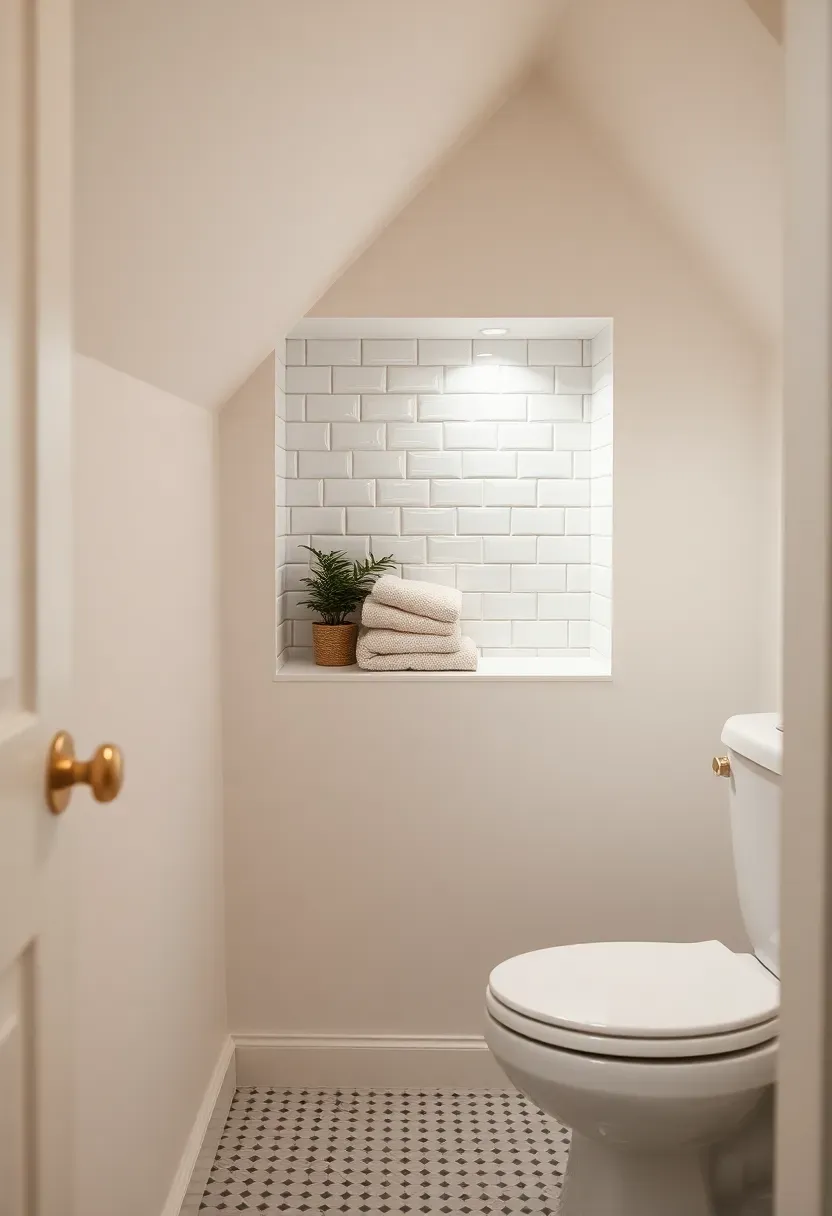
Knee walls do not just accept furniture — they accept recesses. A niche carved directly into the knee wall framing, lined with glossy white subway tile, creates storage that consumes zero floor space. Rolled cotton towels stacked in a column, a small trailing plant, a candle. The niche turns the knee wall from a structural necessity into a designed moment. At 12 inches deep and 24 inches wide, it holds a meaningful amount of bathroom essentials without protruding into the room at all.
Step 1: Locate the Studs
Standard knee walls are framed at 16-inch intervals. A niche between two studs gives you a maximum 14.5 inches of clear width — enough for three rolled towels side by side.
Step 2: Frame the Opening
Add a horizontal header above and a sill below the niche opening. Use blocking to create a solid back and sides before tiling.
Step 3: Waterproof and Tile
Apply a waterproof membrane inside the niche cavity, then tile with the same material as the surrounding shower or bathroom wall for a seamless look. Epoxy grout prevents mold in enclosed spaces.
Recommended
Items for this idea
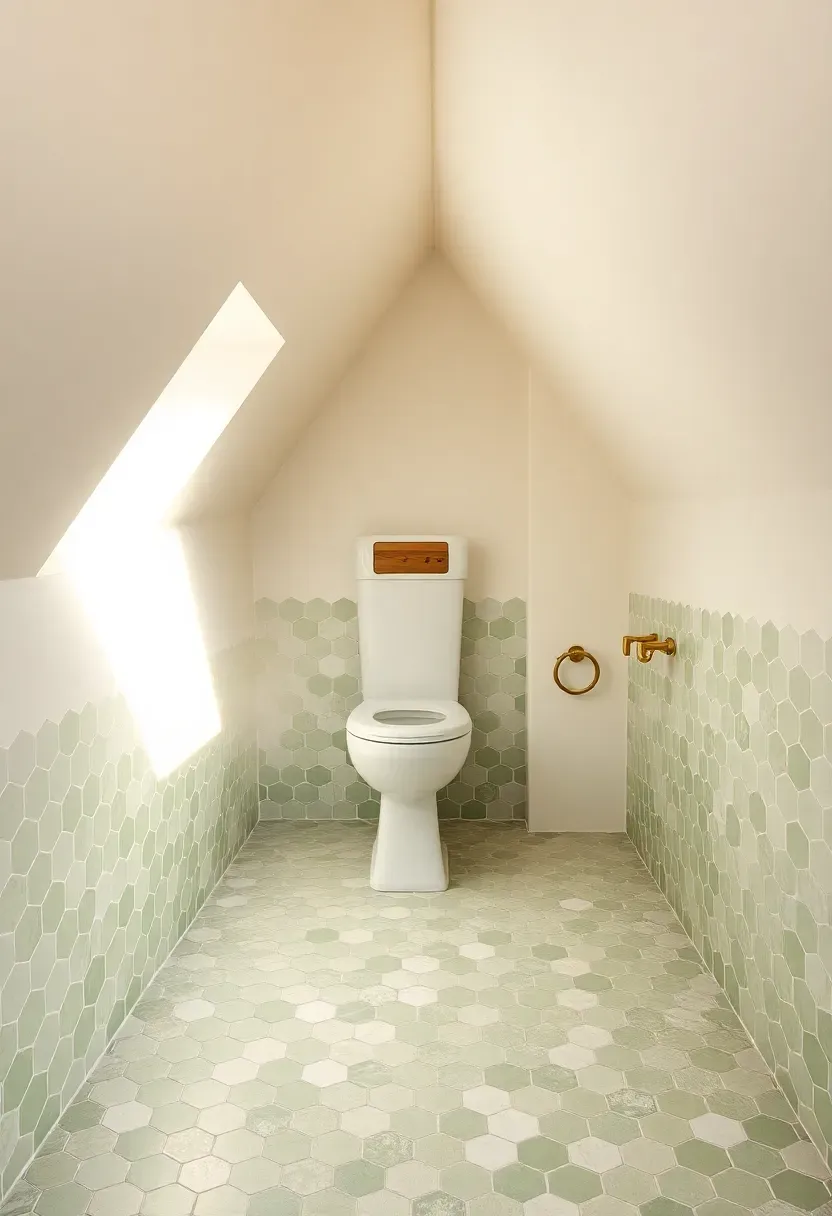
9. Sage Green Hex Tile Floor
A patterned floor anchors a bathroom that might otherwise feel geometrically unstable. In an attic, where walls and ceilings arrive at unexpected angles, a consistent floor pattern creates the visual order that allows everything above to be irregular. Sage green hexagonal tiles fading from darker green near the walls to almost white at the center produce a gradient that draws the eye downward — and inward, making the floor feel like the room's organizing principle.
The wall-hung toilet mounted on the flat gable wall keeps plumbing on the only properly vertical surface. A brushed brass towel ring catches warm afternoon light and adds a single warm-metal note against the cool sage and white composition.
Tips for Hex Tile in Attic Bathrooms
- Order 10% extra for the angled cuts required where tile meets sloped walls
- Choose a grout in the mid-tone between your two hex colors — not too dark, not too white
- Seal grout at installation and annually; hex tile patterns have more grout line per square foot than large-format alternatives
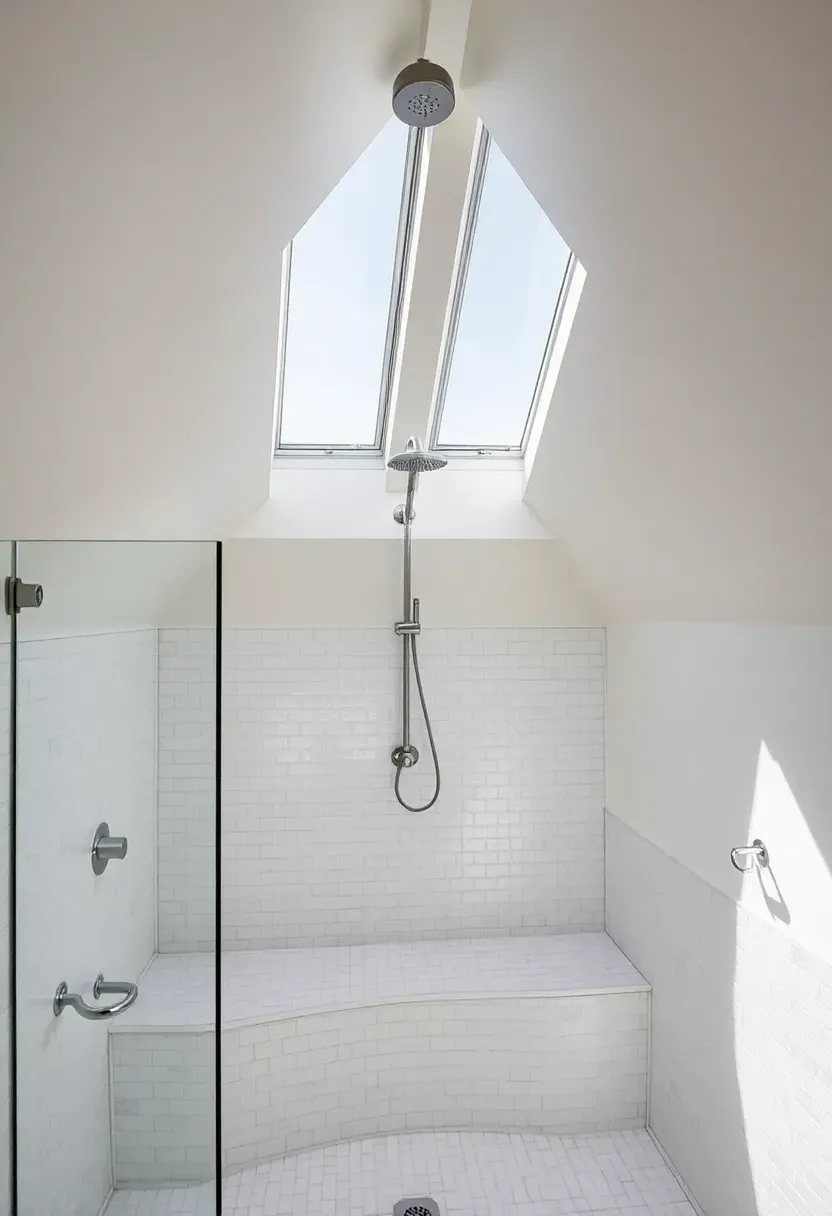
10. Double Skylight Shower Spa
Two skylights positioned along the shower's sloped ceiling change the experience of bathing at a fundamental level. The rainfall shower head at the ceiling peak delivers water from above while natural light falls through the glass panels on either side, creating a sensation not far from standing in warm rain under an open sky. White porcelain mosaic tile on every surface — floor, bench, and ceiling sections between the skylights — acts as a light amplifier, bouncing daylight in every direction.
What to Watch Out For
- Two skylights require structural assessment; consult a structural engineer before cutting
- Use tempered, laminated skylight glazing rated for shower steam and temperature fluctuation
- Install mechanical exhaust fans regardless of natural ventilation — skylights open in summer but attic bathrooms need year-round moisture control
- A built-in mosaic bench at the low end of the slope gives the room a reason to inhabit the cramped eave zone, turning it from a problem into a feature
Recommended
Items for this idea
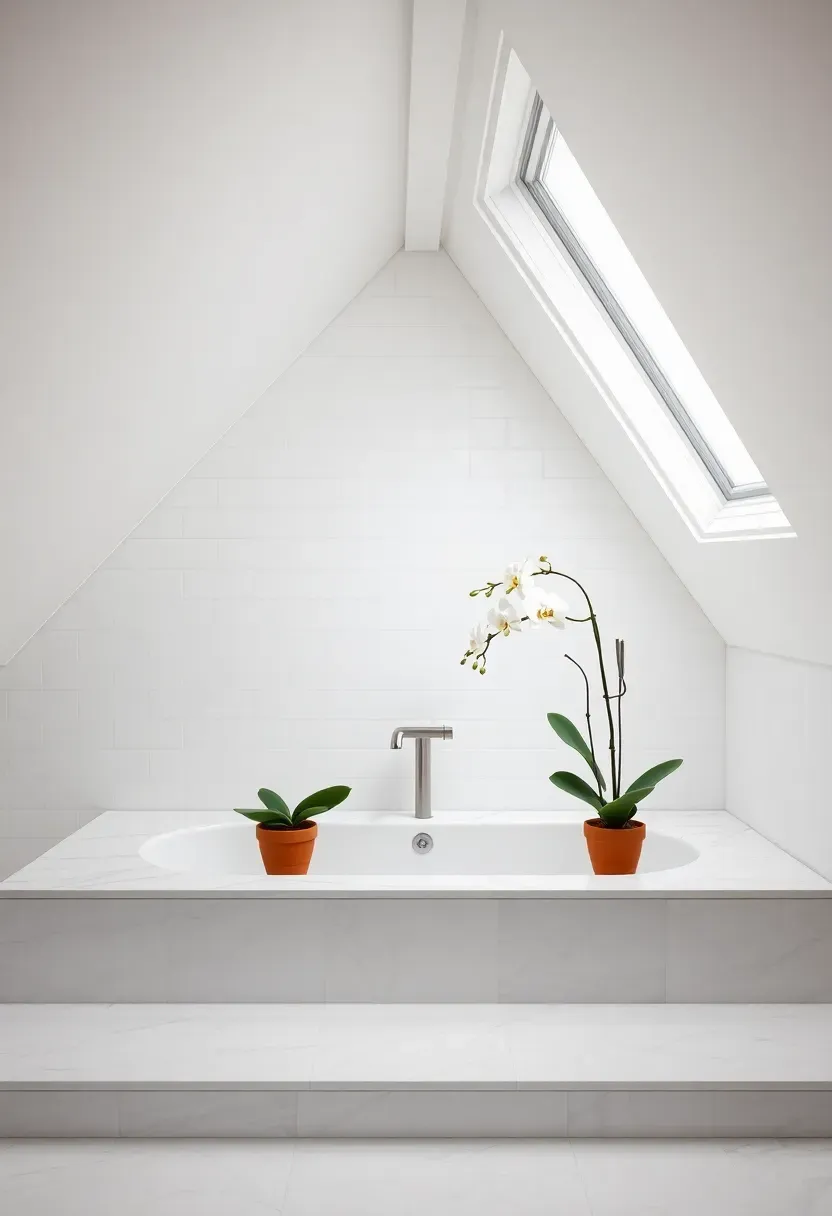
11. Marble Platform Tub at the Gable
The gable end of an attic — the triangular wall where the two roof slopes meet — is the room's most distinctive feature and often its least used wall. This idea places the bathing experience there deliberately. A built-in platform tub surrounded by Carrara marble tile occupies the floor space directly under the gable's triangular window, the window's geometric shape echoing the marble tile joints below it.
The marble platform solves two problems at once: it elevates the tub to the correct height without a freestanding pedestal base, and it creates a ledge for candles, a white orchid, bath salts. Every bathing session frames the window's view — rooftops, sky, treetops — as the backdrop.
Tips for the Marble Platform
- Use large-format marble tiles (12x24 or 18x36) on the platform face to minimize grout lines
- Match the grout color to the marble's dominant vein color for a seamless look
- Install a linear drain at the platform base if you want the tub positioned for easy exit without a mat
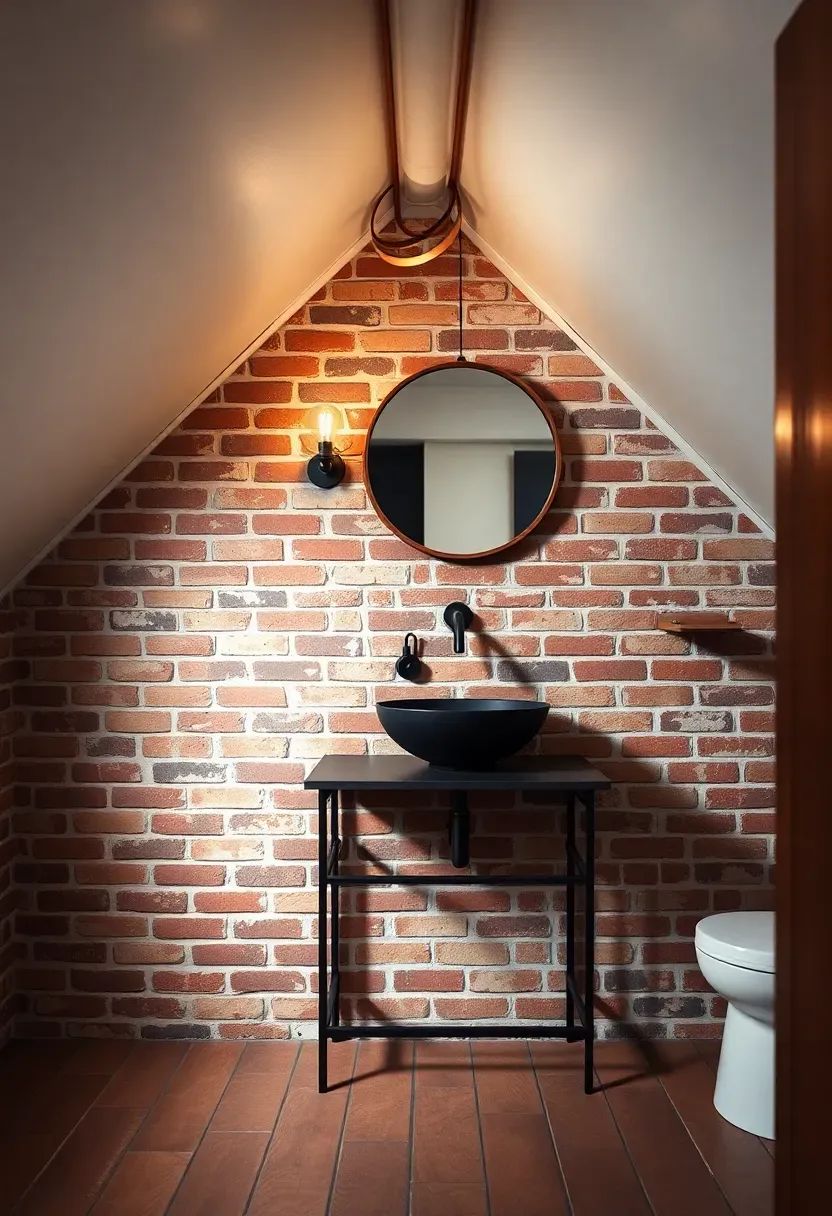
12. Industrial Brick and Copper Loft
Some attic bathrooms inherit a chimney breast — a brick column rising through the floor from the fireplace below. Most renovators route around it. This idea makes it the room's main character. Raw red brick, left unsealed or treated with a clear masonry sealer to protect against moisture, becomes the accent wall in a bathroom that leans entirely into its industrial attic character. A vintage copper round mirror, a black iron console sink, and an Edison bulb sconce on the brick compose a vignette that reads as historically layered rather than constructed.
Step 1: Assess the Chimney
Verify the chimney is structurally sound and not actively used. A decommissioned chimney can be left raw. An active one needs a liner and proper sealing before being incorporated into a wet room.
Step 2: Waterproof the Brick
Apply a clear masonry sealer to all brick surfaces within the splash zone of the sink. Let it cure for 48 hours before exposure to water.
Step 3: Source Authentic Pieces
The copper mirror and iron console must be genuine or convincing reproductions. Industrial pieces that look like they belong in the building's history create a more compelling result than obvious reproductions from mass-market retailers.

Recommended
Items for this idea
13. Mint Green Vintage Vanity
Not every attic bathroom needs to confront its unusual geometry with drama. Sometimes the right move is charm. Mint green paint applied directly to the sloped walls and ceiling as a single continuous color coat softens the angular geometry by unifying it. A vintage-style vanity with turned legs painted white, an oval mirror in a chrome frame, and a glass apothecary jar make the space feel like a 1930s upstairs bathroom that has been lovingly maintained rather than renovated.
White painted wood plank floors complete the vintage atmosphere without any additional investment. The mint green stays on the walls and ceiling only — below the floor level, everything is white, keeping the palette crisp rather than saturated.
Tips for Vintage Attic Bathrooms
- Use a mint with warm undertones (slight yellow or gray shift) rather than pure cool mint, which can feel clinical
- Turned-leg vanities work well in attic bathrooms because the open base reads as lighter than a skirted cabinet, preventing the low-ceilinged space from feeling heavier
- Chrome fixtures, not brass or black — chrome is authentic to the vintage period this look references
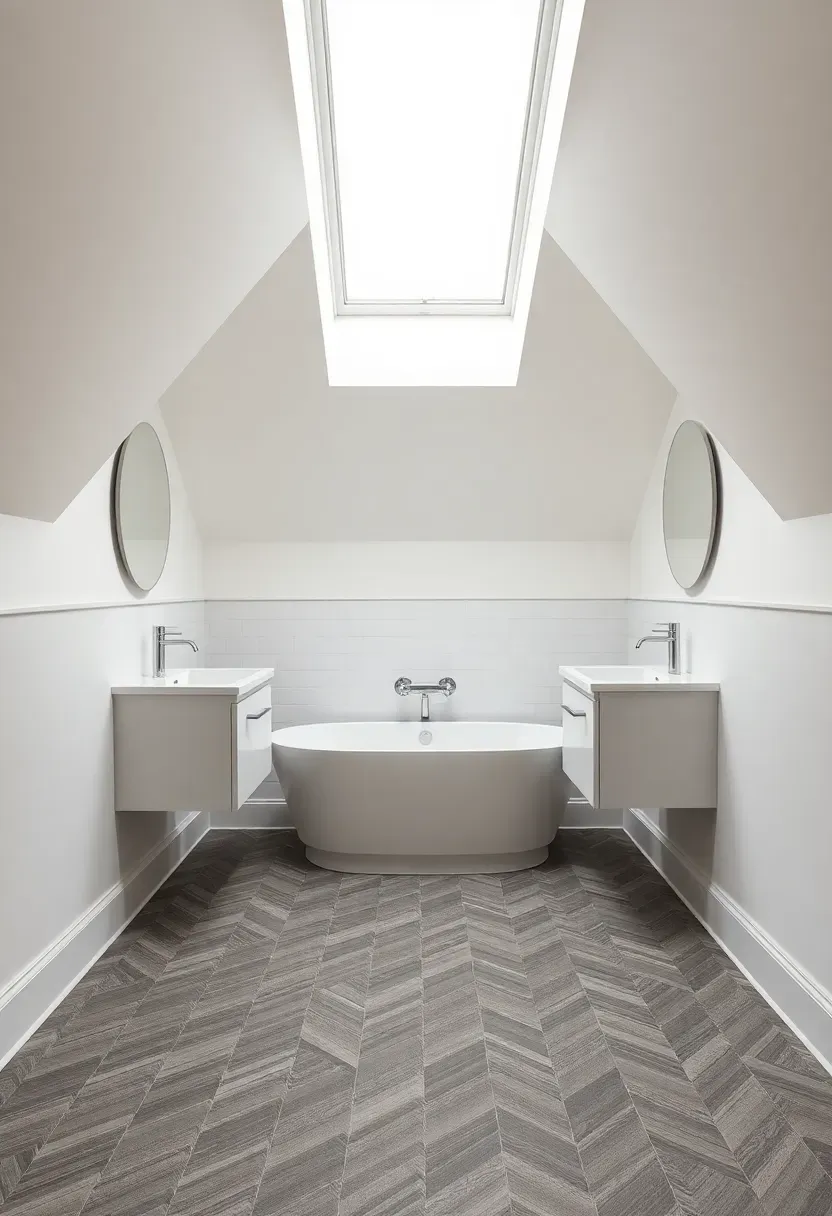
14. Dual Vanities Along the Knee Walls
The Core Issue
Attic bathrooms are rarely large enough for the typical side-by-side double vanity configuration. But families sharing an upper-floor bathroom genuinely need two sinks and adequate counter space.
The Solution
Install two compact wall-mounted vanities on opposite knee walls, facing each other across the room's central aisle. Each person gets their own grooming zone without competing for mirror space — simply rotate slightly toward your respective wall. A skylight above the centrally positioned bathtub floods the shared aisle with light. Gray herringbone tile flooring runs continuously between both vanity zones, tying the divided space together visually.
Pros and Cons
Pros: fully functional for two users simultaneously, uses the knee wall zones that are otherwise hard to furnish, symmetric layout looks intentional Cons: users face each other rather than a shared central mirror, requires careful plumbing planning on both sides of the room
Recommended
Items for this idea
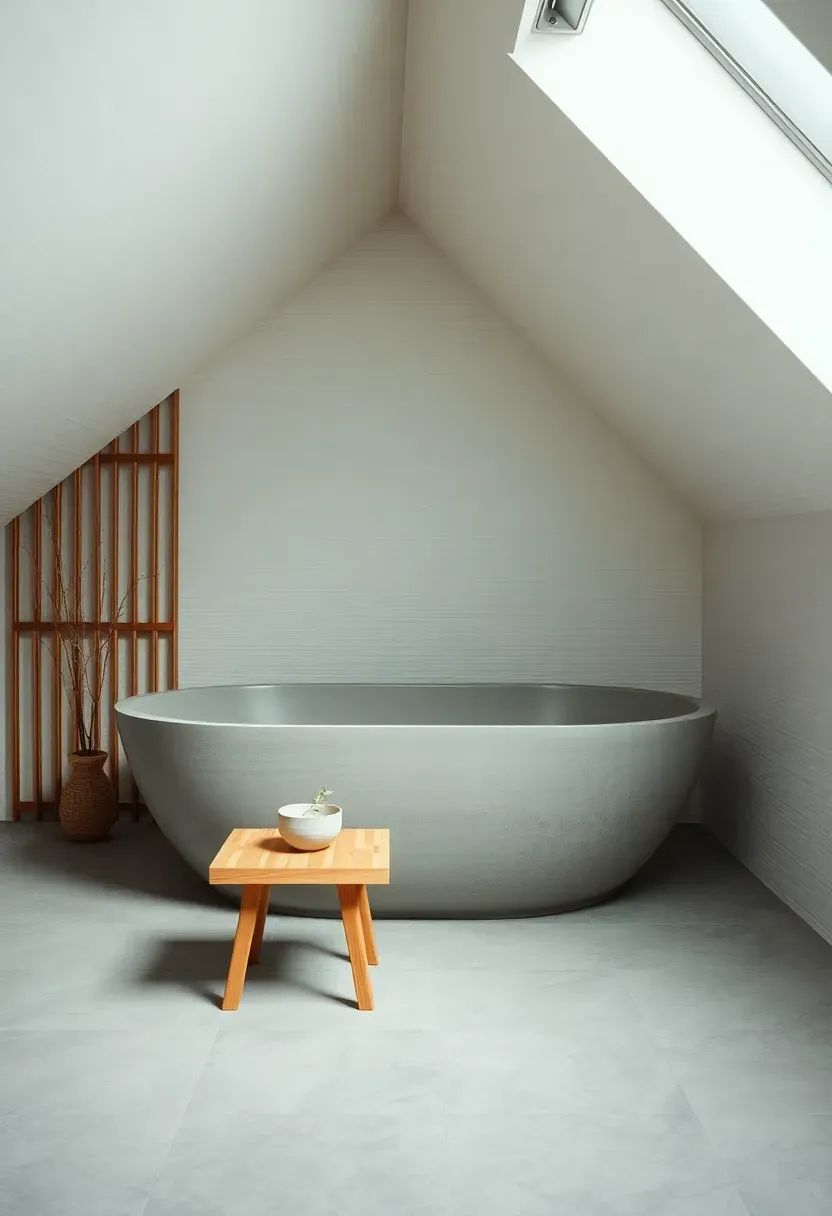
15. Japandi Concrete Soaking Tub
Japanese and Scandinavian design philosophies share an appreciation for restraint, natural materials, and rooms that feel intentionally incomplete. The Japandi attic bathroom takes those principles and allows the sloped ceiling to express itself fully — not disguised by color or pattern, but traced faithfully by washi-textured white panels that follow every angle of the roofline. A polished concrete soaking tub sits near the center with the authoritative minimalism of a piece of outdoor sculpture brought inside. A low bamboo stool holds a ceramic cup with eucalyptus. That is the entire decorating scheme.
How to Apply at Home
- Source washi-textured wall panels from Japanese import suppliers or Scandinavian-influenced tile manufacturers
- A concrete soaking tub requires structural floor reinforcement — consult an engineer before ordering
- The bamboo stool should be low (under 18 inches) to maintain the floor-level relationship that Japanese bathing culture favors
- Use underfloor heating with the matte gray porcelain floor; cold floors undermine the meditative atmosphere entirely
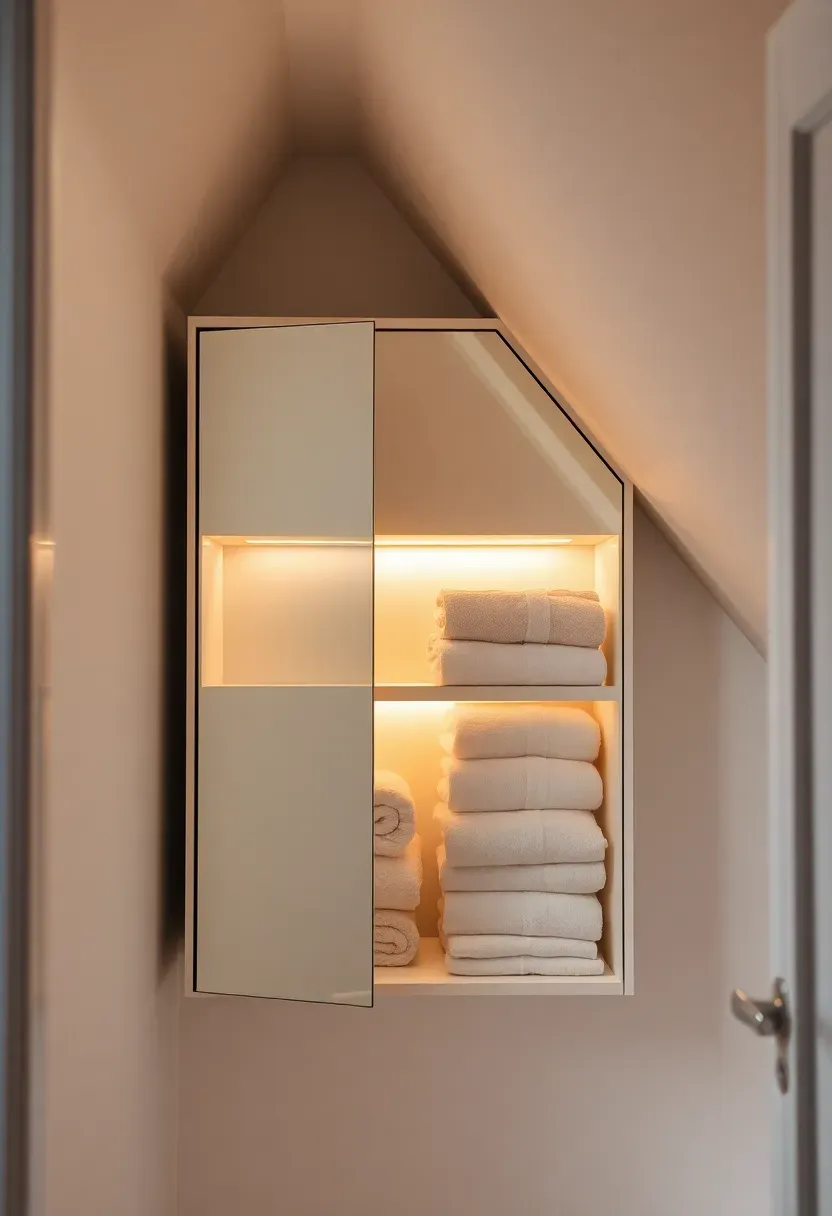
16. Angled Mirror Cabinet in the Dormer
Every dormer recess is a custom cabinet waiting to happen. The key insight is that the cabinet does not need to be rectangular — it should follow the angle of the dormer's top exactly, using every centimeter of the recess depth. A mirror front on the angled door reads as a continuation of the wall surface when closed, making the storage invisible. Open the door and an LED strip inside illuminates white shelves holding folded linens, skin care, and the small accessories that otherwise create bathroom clutter. The storage is entirely hidden, the mirror serves the vanity function, and the dormer recess — once a geometric puzzle — becomes the bathroom's most purposeful element.
Tips for the Angled Cabinet
- Commission a local joiner rather than ordering from a catalog — the precise angled top cut is not something most flat-pack suppliers accommodate
- Use a piano hinge along the full door height for stability on the angled door
- Interior LED strips should be warm white (2700K) to flatter skin tone at the mirror
Recommended
Items for this idea
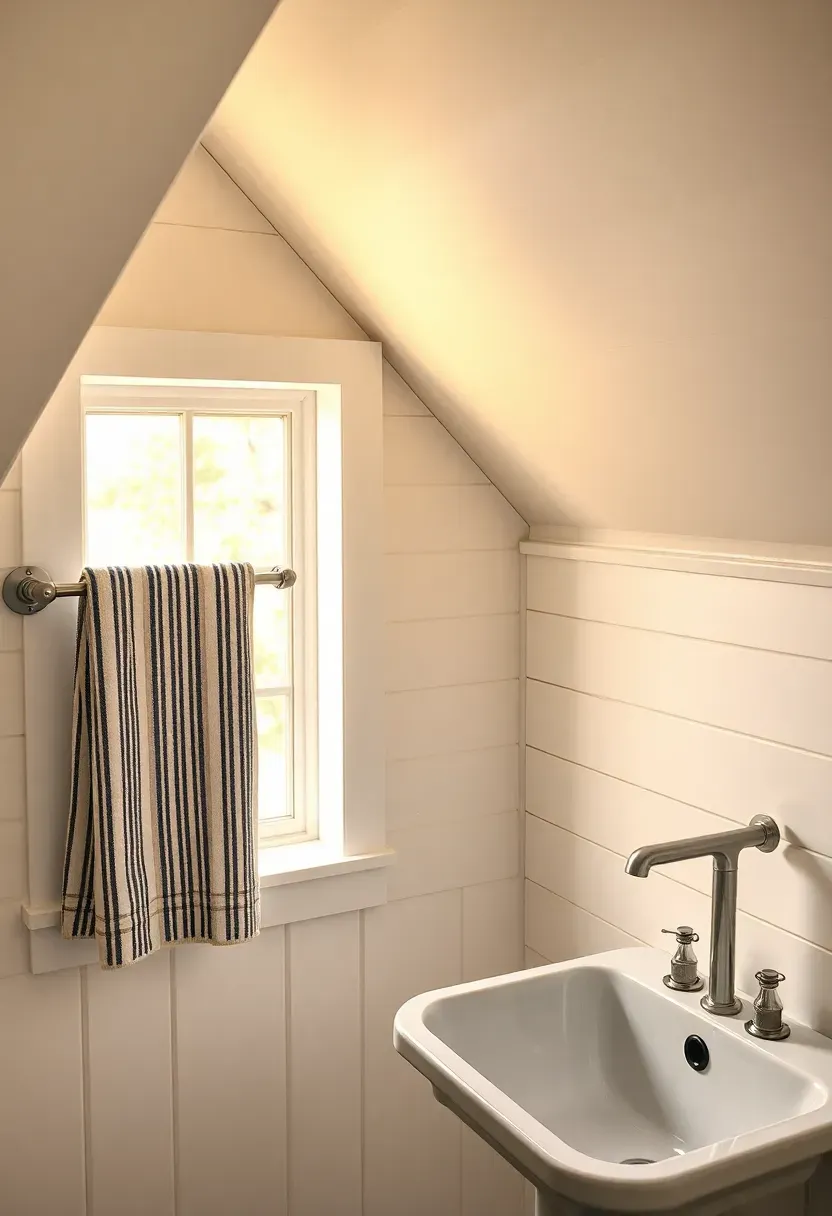
17. Shiplap Farmhouse with Galvanized Rack
White shiplap and sloped ceilings were made for each other. The horizontal lines of shiplap boards run consistently across the angled ceiling plane, emphasizing the slope without apology. In a farmhouse-style attic bathroom, the shiplap extends from the floor up across the knee wall and over the sloped ceiling as a single continuous surface — no material transitions, no interruptions. A galvanized metal towel rack mounted on the sloped wall section holds striped cotton towels. A cast iron farmhouse sink on the flat end wall anchors the plumbing in the only truly vertical zone. A mason jar of lavender on the windowsill is the single decorating gesture.
Should You DIY the Shiplap?
Shiplap installation on sloped ceilings is one of the more approachable DIY attic bathroom projects. The boards simply need to be ripped to consistent width, then nailed horizontally with a consistent reveal gap using a spacer block. Angled cuts at the roofline junction are the only technically demanding moment. The painted finish conceals any minor imprecision in the cuts.
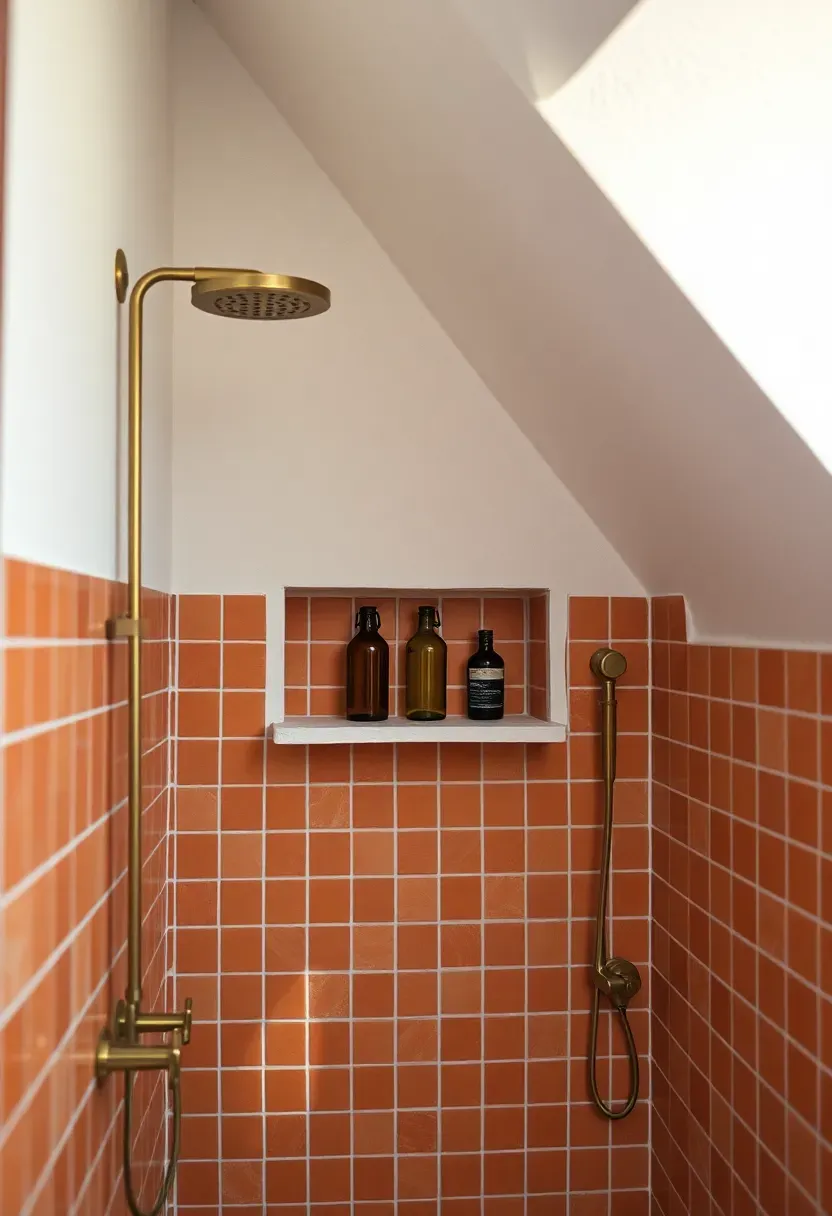
18. Zellige Tile Mediterranean Shower
Origins of Zellige in Interior Design
Zellige is a Moroccan ceramic tilework tradition dating to the tenth century, distinguished by hand-cut irregular tiles with a naturally uneven glaze surface that reflects light differently at every angle. Each tile is slightly different in thickness, shade, and texture — a quality that modern machine-made tile cannot replicate.
Modern Interpretation
In an attic bathroom shower, terracotta Zellige tiles covering the sloped wall under the roofline create a surface that seems to shimmer as the angle of daylight shifts through the day. The irregular glaze picks up amber tones in morning light and deeper terracotta hues in the afternoon. A white lime plaster ceiling above maintains the handcrafted Mediterranean feeling without adding visual competition. A built-in plaster shelf holds amber glass bottles. Brushed brass fittings connect the two warm material tones.
How to Apply at Home
- Source authentic Moroccan Zellige from specialist importers; counterfeit machine-made versions lack the handmade light variation
- Allow 20% extra tile for irregular cuts and breakage — Zellige is hand-cut and losses are higher than with standard tile
- Set with white thinset to enhance the terracotta color rather than a gray adhesive that may show through the glaze
Recommended
Items for this idea
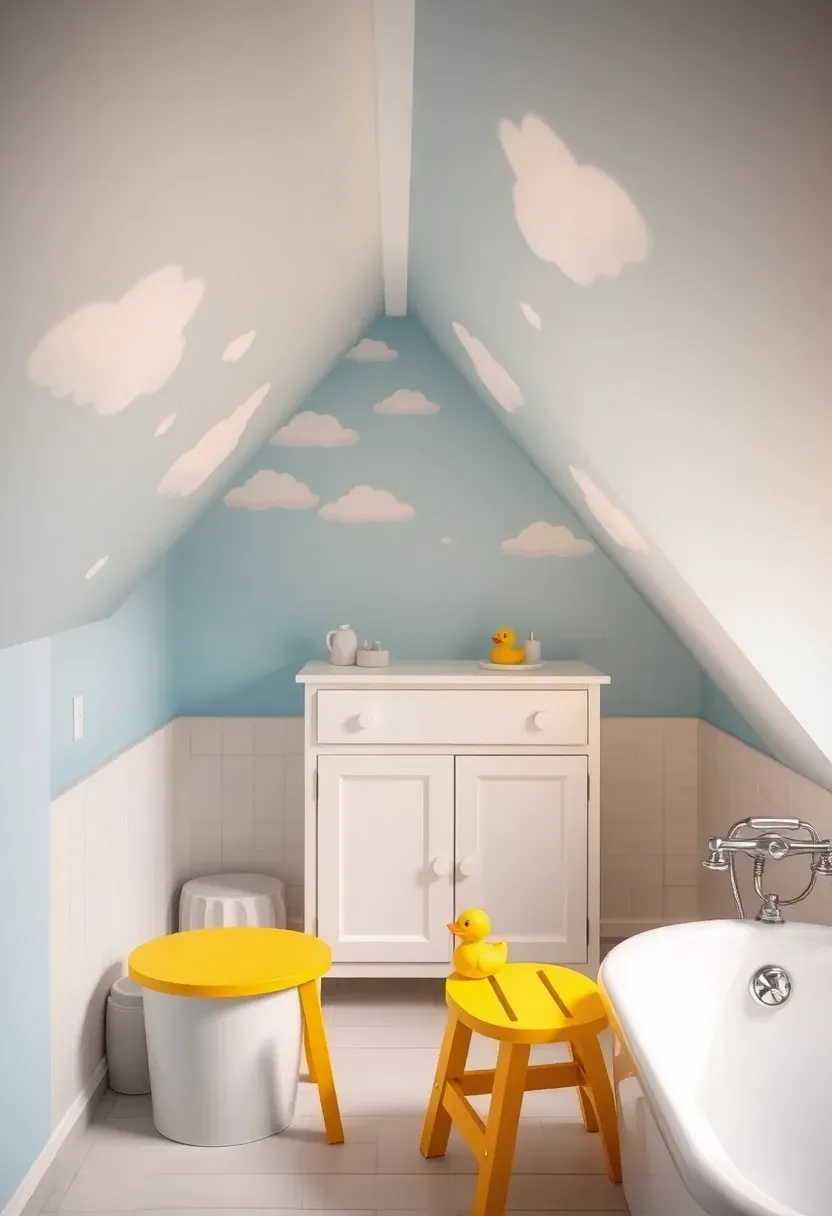
19. Kids' Attic Bathroom with Cloud Mural
Children are the ideal audience for an attic bathroom because they are not yet bothered by low clearance. A sloped ceiling that feels oppressive to an adult feels like a secret hideout to a seven-year-old. Lean into that instinct. A hand-painted cloud mural on the sloped ceiling — white clouds drifting across pale sky blue — turns the architectural oddity into a feature children will request bathtime to see. The rest of the bathroom stays simple: a compact white vanity with star-shaped knobs, a yellow step stool, a rubber duck on the tub ledge.
Step 1: Prime and Base Coat
Apply a matte pale blue paint to the entire sloped ceiling. Two coats of a low-VOC formula are non-negotiable in a space where children will spend time.
Step 2: Paint the Clouds
Use a dry-brush technique with pure white paint on a 2-inch chip brush, working in irregular rounded sweeps. Real clouds are asymmetric and layered — avoid drawing oval shapes. Work from the peak down the slope, letting clouds drift toward the low side.
Step 3: Seal for Durability
Apply a clear matte topcoat to protect the mural from steam and occasional splashing. Reapply every two to three years.
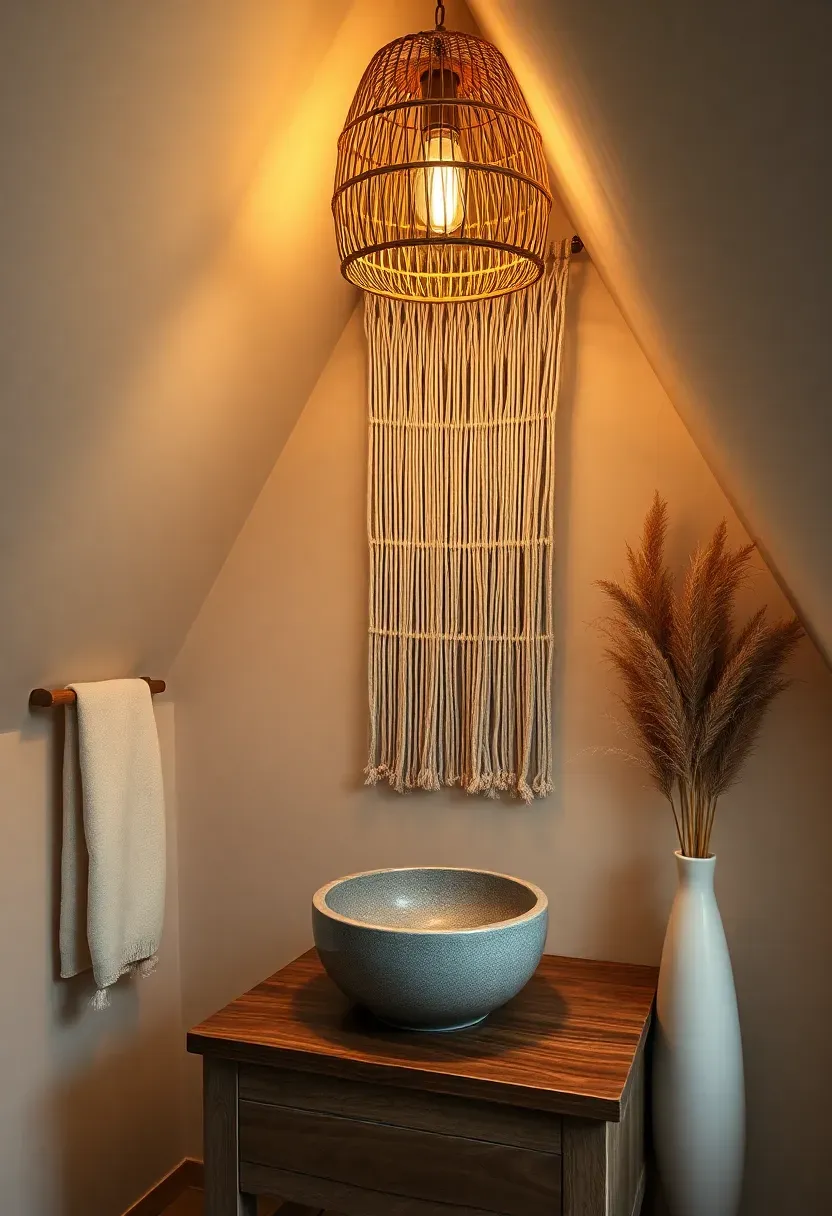
20. Boho Rattan and Macrame Bathroom
Bohemian design thrives on layered organic textures, and an attic bathroom's sloped surfaces give those textures unusual places to land. A macrame wall hanging draped over the slope — not hung from a hook on a flat wall but actually following the angled surface — creates a textile moment that no other room configuration could produce. A rattan pendant at the ceiling peak provides warm ambient light. A round stone resin basin on a walnut slab counter anchors the vanity zone with weight and material richness. Dried pampas grass in a tall vase fills the low corner beside the knee wall, using the space that chairs cannot.
Tips for Boho Attic Bathrooms
- Macrame in bathrooms needs a location away from direct steam; position it on the sloped section above the tub or sink rather than inside the shower enclosure
- Tightly woven rattan pendant shades handle bathroom humidity better than loose-weave versions that can sag or mold
- Stone resin basins are significantly lighter than natural stone — an important consideration for attic floor load limits
Recommended
Items for this idea
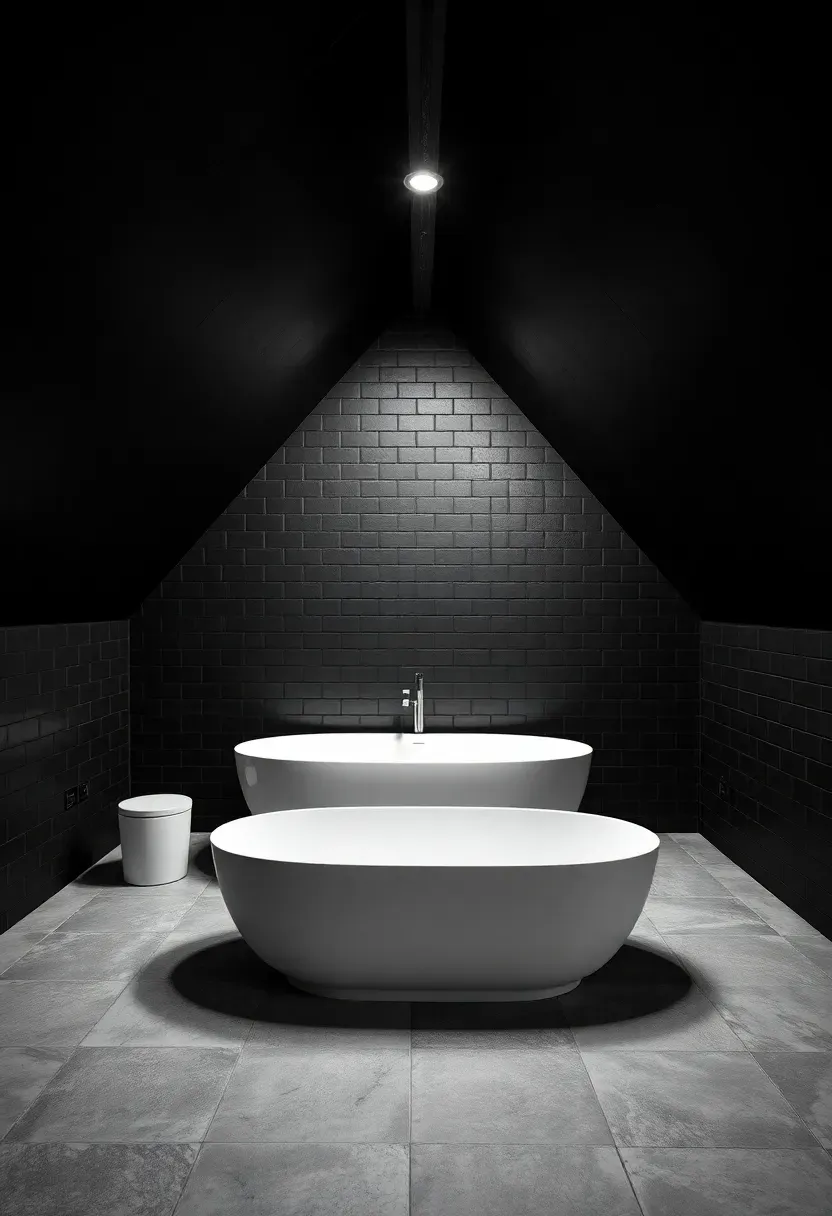
21. All-Black Attic Drama
This is the committed version of the dark attic bathroom — not navy, not charcoal, but a genuine matte black tile covering both walls and the sloped ceiling as a continuous surface. The attic roofline stops being visible as an architectural quirk and becomes an enveloping dark form that seems to absorb the room's boundaries. A white oval freestanding tub placed under the ceiling peak becomes the sole source of visual brightness in the composition, reading almost like a light source itself. A recessed LED strip at the peak creates a halo that separates ceiling from wall without breaking the monochromatic palette.
Is All-Black Practical in a Bathroom?
Matte black tile shows water spots and soap residue more readily than lighter surfaces, requiring more frequent wiping. However, it hides certain types of grime — mold and dark soap residue — better than white grout. The trade-off is real: you swap one maintenance concern for another. Budget for a good squeegee and a streak-free cleaning spray, and this finish is entirely livable.
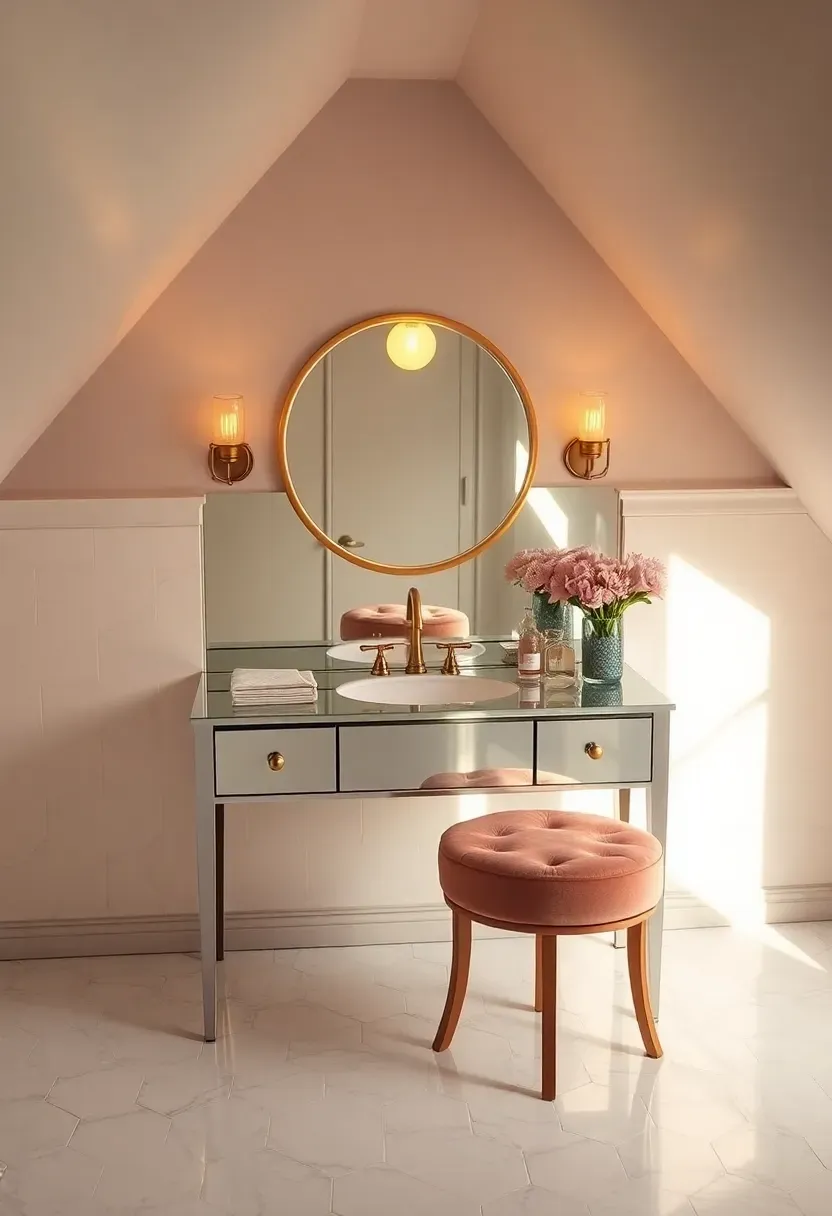
22. Hollywood Regency Dormer Vanity
The Core Issue
Attic bathrooms trend heavily toward rustic, minimalist, or industrial aesthetics because designers assume the sloped geometry demands a humble response. There is no actual reason for this.
The Solution
A mirrored vanity surface built into a flat dormer recess, bordered by a Hollywood-style bulb mirror surround, placed above a blush velvet stool — this is maximalism meeting attic architecture head-on. The warm bulb light at the vanity mirror compensates entirely for any lack of natural light in a north-facing dormer. The Carrara marble hex floor reflects the mirror's warm glow upward. The juxtaposition of glamorous Hollywood details against the cottage dormer architecture is precisely the tension that makes the room memorable.
Pros and Cons
Pros: creates the most dramatic makeup and grooming station possible, the warm bulb light is genuinely flattering, the blush velvet elevates the room to a style category rarely seen in attic bathrooms Cons: higher maintenance than simpler finishes, the aesthetic is committed and not easily reversed
Recommended
Items for this idea
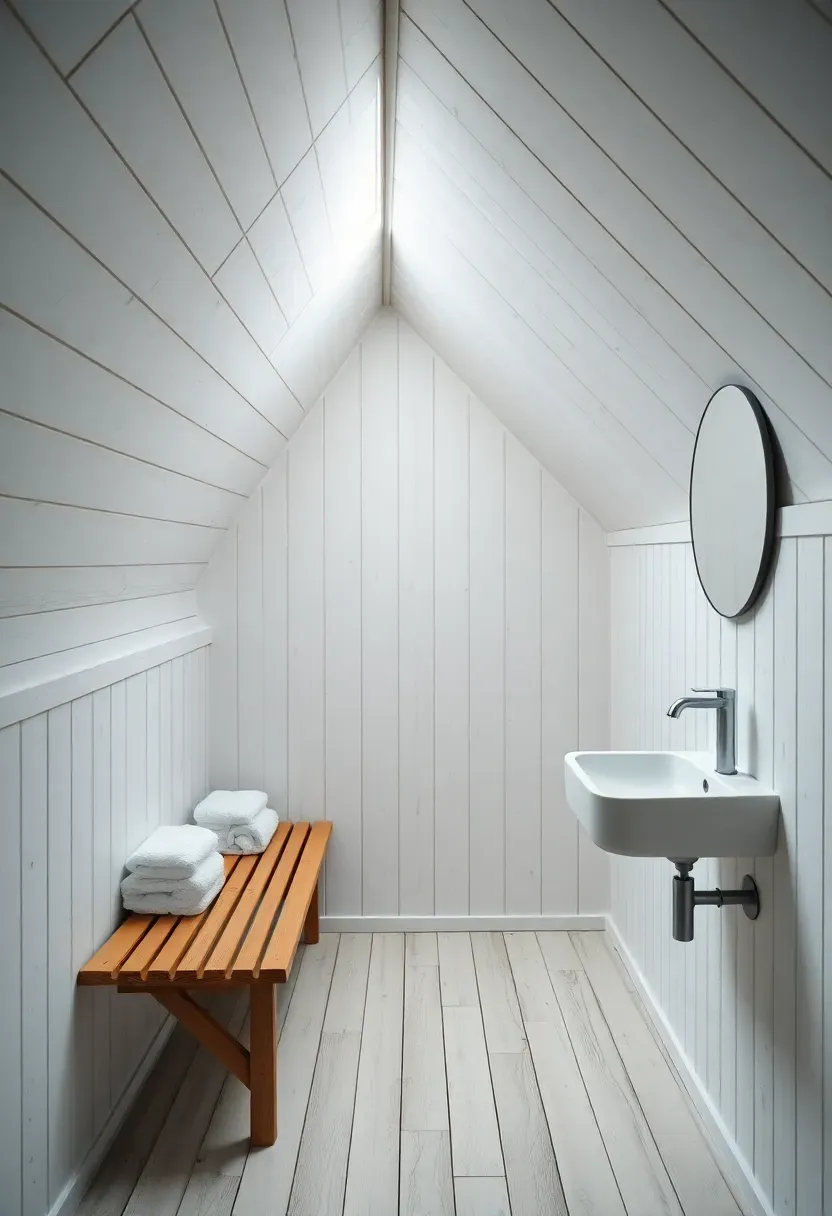
23. Scandinavian Sauna Bench Bathroom
The overlap between a bathroom and a sauna has always been deliberate in Nordic culture — both spaces exist for the same purpose: cleansing, warming, slowing down. An attic bathroom with white-washed tongue-and-groove pine walls that follow the slope looks unmistakably like a sauna anteroom. Complete the reference by building a low pine bench along the knee wall, exactly where the ceiling is too low to stand but perfectly comfortable to sit. Rolled white towels stacked on the bench. A simple wall-hung ceramic sink at the gable end. Nothing more is needed.
Origins of the Nordic Bath Space
Scandinavian sauna culture dates back at least two thousand years, with the sauna serving as the primary bathing space long before indoor plumbing. The bench, the low ceiling section, the narrow wooden space — these are features that Nordic design has always treated with respect rather than as constraints to overcome.
How to Apply at Home
- White-washed pine is the key material choice; avoid darker wood stains that make the sloped ceiling feel oppressive
- The built-in bench should be at least 18 inches deep and 18 inches high for comfortable sitting
- Use underfloor heating beneath the matte gray porcelain floor; it completes the sauna-adjacent atmosphere during winter months
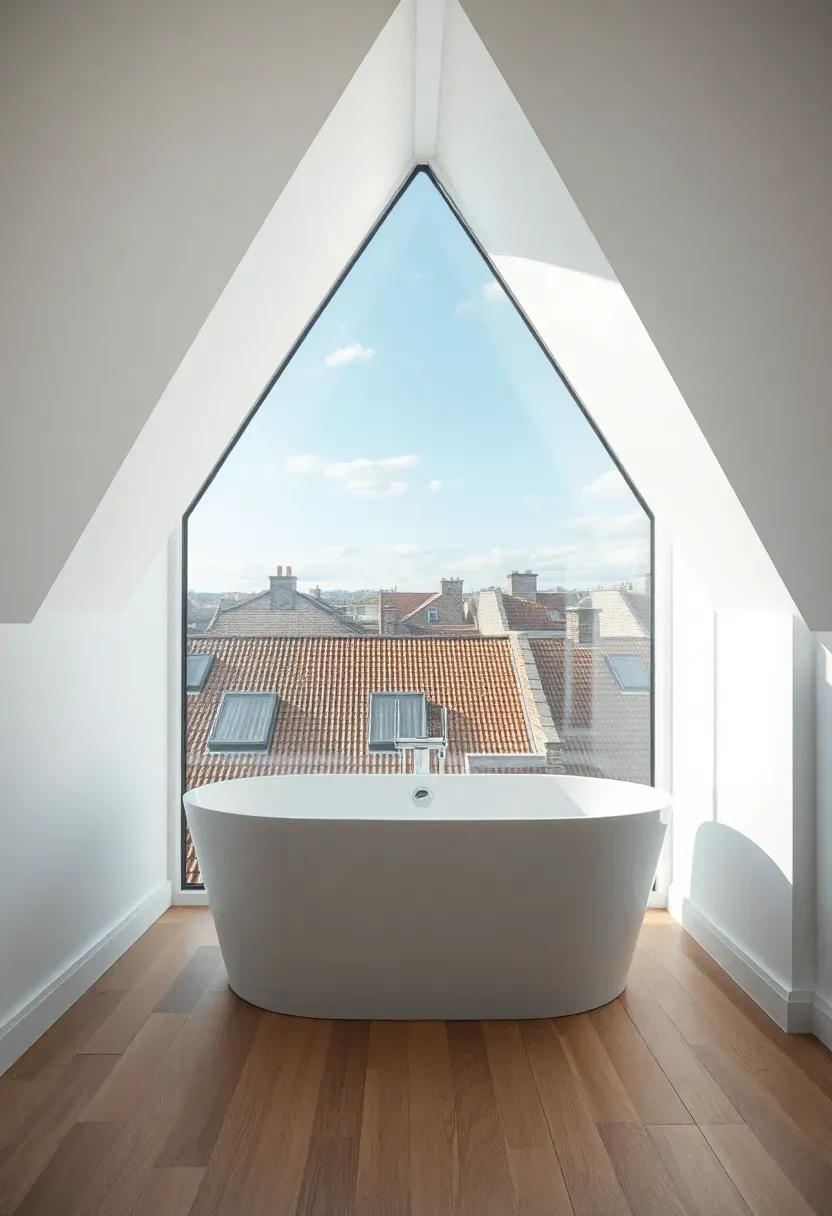
24. Full-Glass Gable End Wall
When the gable end of the attic faces a compelling view — a garden, rooftops, a hillside — replacing the entire triangular wall with glazing is among the most transformative decisions available in attic bathroom design. The structural triangle of the roofline becomes a giant picture frame. A white soaking tub positioned directly in front of the glass allows the person bathing to face the view with total openness. Pale oak floors and simple white walls keep every other surface neutral so nothing competes with the view.
What to Watch Out For
- Full gable glazing requires structural engineering; the triangle takes some of the roof's lateral load
- Use triple-glazed panels for thermal performance — attic spaces lose heat quickly without adequate insulation at the glass
- Privacy must be addressed: neighboring rooftops at the same height may look directly into the bathroom; acid-etched or switchable smart glass handles this without sacrificing daylight
- Orient the gable toward east for morning bathing light or west for evening warmth
Recommended
Items for this idea
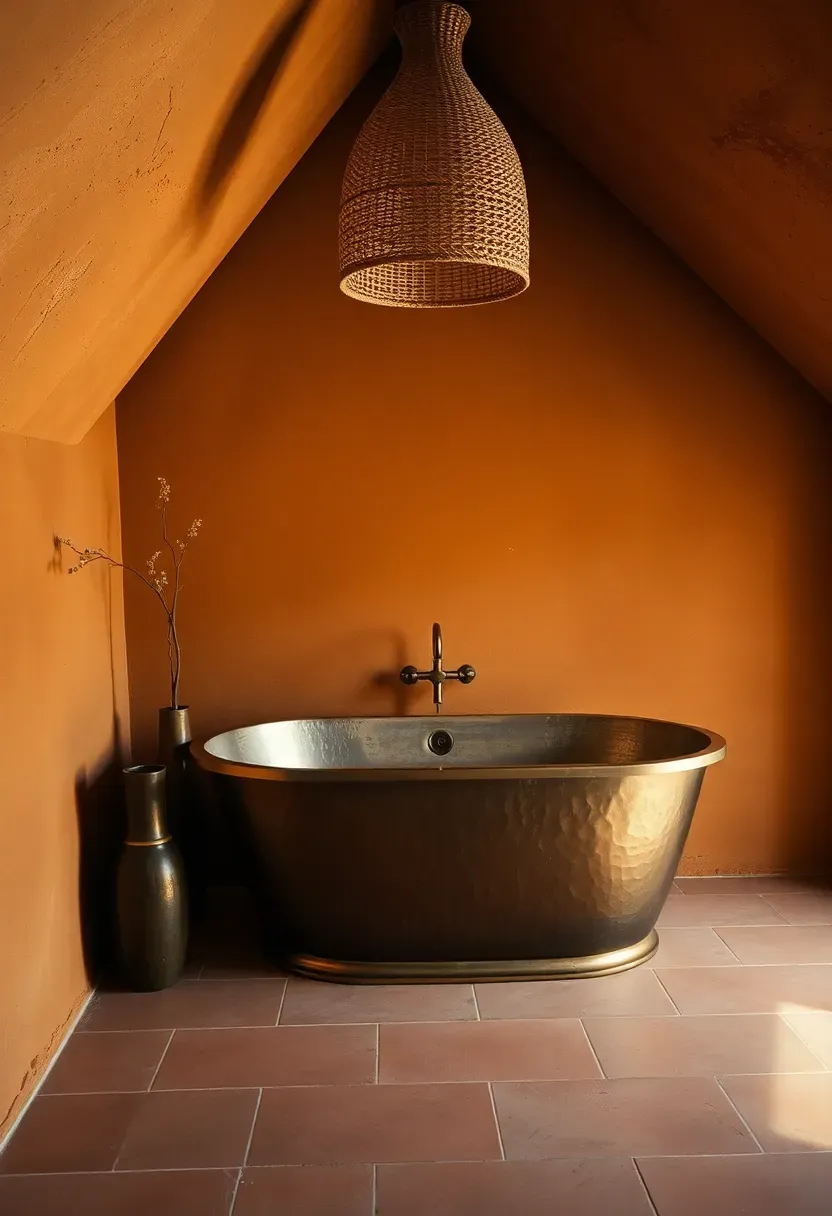
25. Hammered Copper Tub with Limewash Walls
Origins of Hammered Copper in Bathrooms
Copper bathtubs have roots in Moroccan, Turkish, and Indian bath cultures where the metal was prized for its natural antimicrobial properties and its capacity to retain water heat longer than cast iron. In contemporary interior design, hammered copper represents the ultimate artisan bathroom centerpiece — no two tubs are identical, each one carrying the marks of the craftsman's hammer in its surface.
Modern Interpretation
Set against warm ochre limewash plaster walls that trace every contour of the attic roofline, a hammered copper freestanding tub becomes a sculptural element that earns the room's entire design philosophy. The limewash's characteristic translucency — each layer slightly different in opacity — mirrors the uneven surface of the hammered copper. Matte terracotta floor tiles continue the warm earth palette underfoot. A dried olive branch in a tall vase and a rattan pendant overhead complete the artisan earthy luxury narrative without adding complexity.
How to Apply at Home
- Source hammered copper tubs from Moroccan artisan cooperatives or specialist Indian importers; European reproductions tend to be thinner gauge and less durable
- Limewash plaster requires a professional plasterer for a convincing result; brush-on limewash paint products are available as a more accessible alternative
- Copper develops a natural patina over time — embrace it or apply a clear metal lacquer to preserve the original hammered finish
- The rattan pendant should hang at the ceiling peak where clearance is maximum; avoid positioning it on the sloped section where it creates a tripping hazard when drying hair
Quick FAQ
Is an attic bathroom worth the renovation cost? In most cases, yes. Converting an attic into usable bathroom space adds measurable resale value to a home — often more per square foot than any other renovation category. The investment is higher than a standard bathroom remodel due to structural requirements, plumbing runs to the top floor, and custom carpentry for the sloped geometry. But the return, both in daily use and property value, typically justifies the expense.
Does a sloped ceiling make an attic bathroom feel cramped? Only if you fight the slope. Bathrooms that try to install standard-height fixtures under insufficient clearance feel cramped because of the mismatch. Bathrooms designed around the slope — fixtures at the correct height for the available clearance, mirrors that follow the angle, storage in niches rather than tall cabinets — feel intimately proportioned rather than cramped. The difference is entirely in the planning.
Which fixtures work best under a sloped ceiling? Wall-hung toilets, wall-mounted sinks, and floating vanities all work well because they sit at controlled heights without extending above. Freestanding tubs positioned at the ceiling peak avoid clearance issues. Standard pedestal sinks require only 6 feet of clearance, making them ideal for the lower zones. Walk-in showers built into the eave itself eliminate the clearance problem entirely.
Should you tile the sloped ceiling in a shower? You should waterproof whatever sloped ceiling surface exists within the shower enclosure, whether you tile it or not. Tiling is the most durable and visually cohesive solution. Use large-format tiles to minimize grout lines on the angled surface, and plan tile layout from the peak down to minimize awkward cuts at the low edge.
What kind of lighting works best in an attic bathroom? Layered lighting performs best. Recessed LED downlights at the ceiling peak provide general illumination. Wall sconces at mirror height provide flattering task light for grooming. An LED strip along the ceiling peak junction or under the vanity provides ambient fill without glare. Skylights and dormer windows handle all natural light duties — position artificial fixtures to supplement those specific zones during evening hours.
An attic bathroom is never a compromise — it is a negotiation with gravity, geometry, and roofline logic that, when handled well, produces rooms with more character than any standard rectangular space could manage. The slope is the signature. The skylight is the luxury. The knee wall niche is the ingenuity. Start with whichever of these 25 ideas matches your existing attic geometry most closely, and let the architecture tell you where the fixtures go. The ceiling already knows.
Pinterest cover for 25 Attic Bathroom Ideas That Make the Most of Every Angle
About the author
OBCD
CGI visualization and interior design content. We create detailed 3D renders and curate practical design ideas for every room in your home.