23 Backsplash Kitchen Ideas Worth Stealing
My neighbor ripped out a brand-new herringbone backsplash six months after installing it. Not because anything was wrong with the tile — the execution was fine — but because it clashed with the countertop she picked later. That is the backsplash problem in a nutshell. You are choosing a surface that has to get along with cabinets, countertops, hardware, lighting, and whatever appliance finish happens to be popular when you renovate. And unlike paint, swapping it out costs real money and real weekends.
These 23 backsplash kitchen ideas cover materials you might not have considered alongside familiar ones used in less obvious ways. Each section flags the price range, best cabinet pairings, and the maintenance reality.
Table of Contents
- Stacked Zellige in Sage Green
- Concrete Look Porcelain Tile
- Terrazzo Slab Backsplash
- Chevron Marble Mosaic
- Hand-Painted Spanish Ceramic
- Fluted Porcelain Tile
- Brushed Stainless Steel Panel
- Honed Black Granite Slab
- Basketweave Marble Mosaic
- Terracotta Tile with Matte Seal
- Penny Round Tile in Mixed Neutrals
- Star and Cross Cement Tile
- Thin Brick Veneer in Whitewash
- Arabesque Lantern Tile
- Shou Sugi Ban Wood Panel
- Mirrored Antique Glass Tile
- Color-Blocked Ceramic Tile
- Crackle Glaze Subway in Cream
- Geometric Hex Tile in Charcoal
- Venetian Plaster Backsplash
- Tumbled Slate Mosaic
- Floral Relief Ceramic Tile
- Polished Onyx Slab
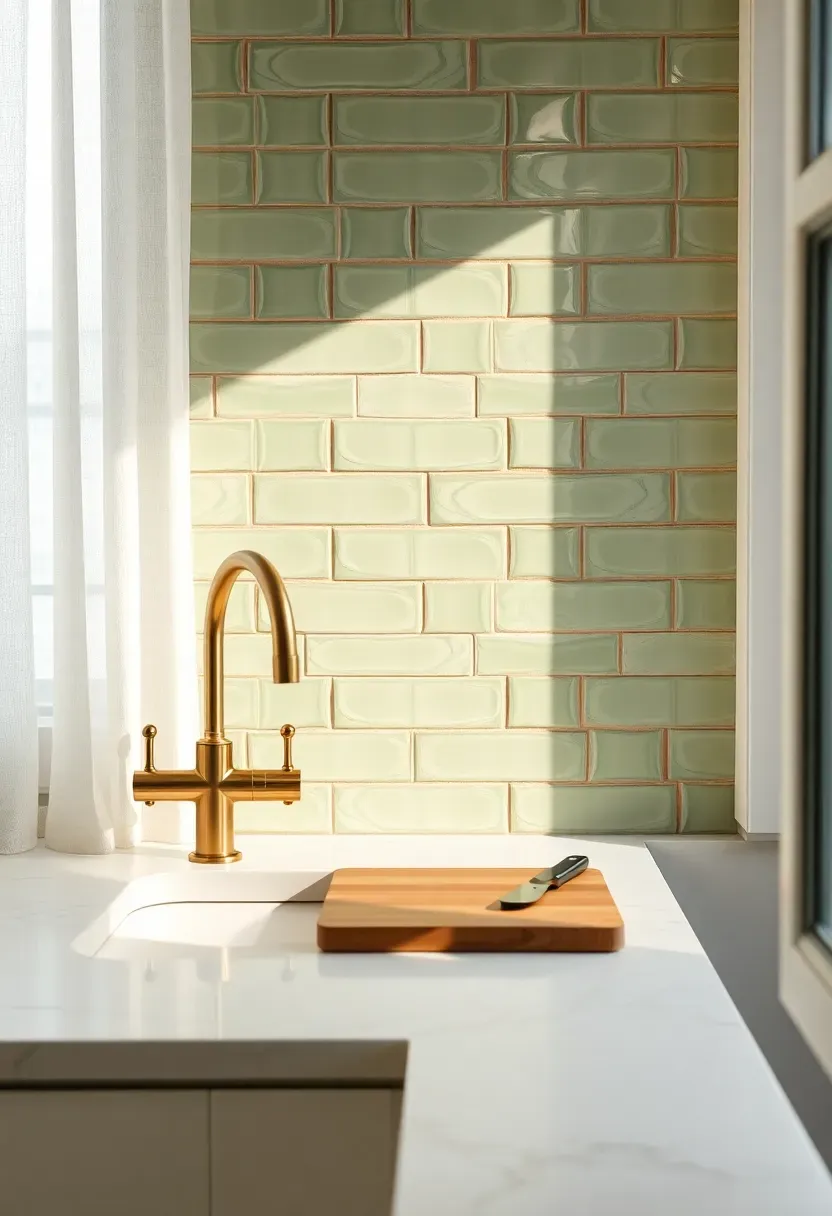
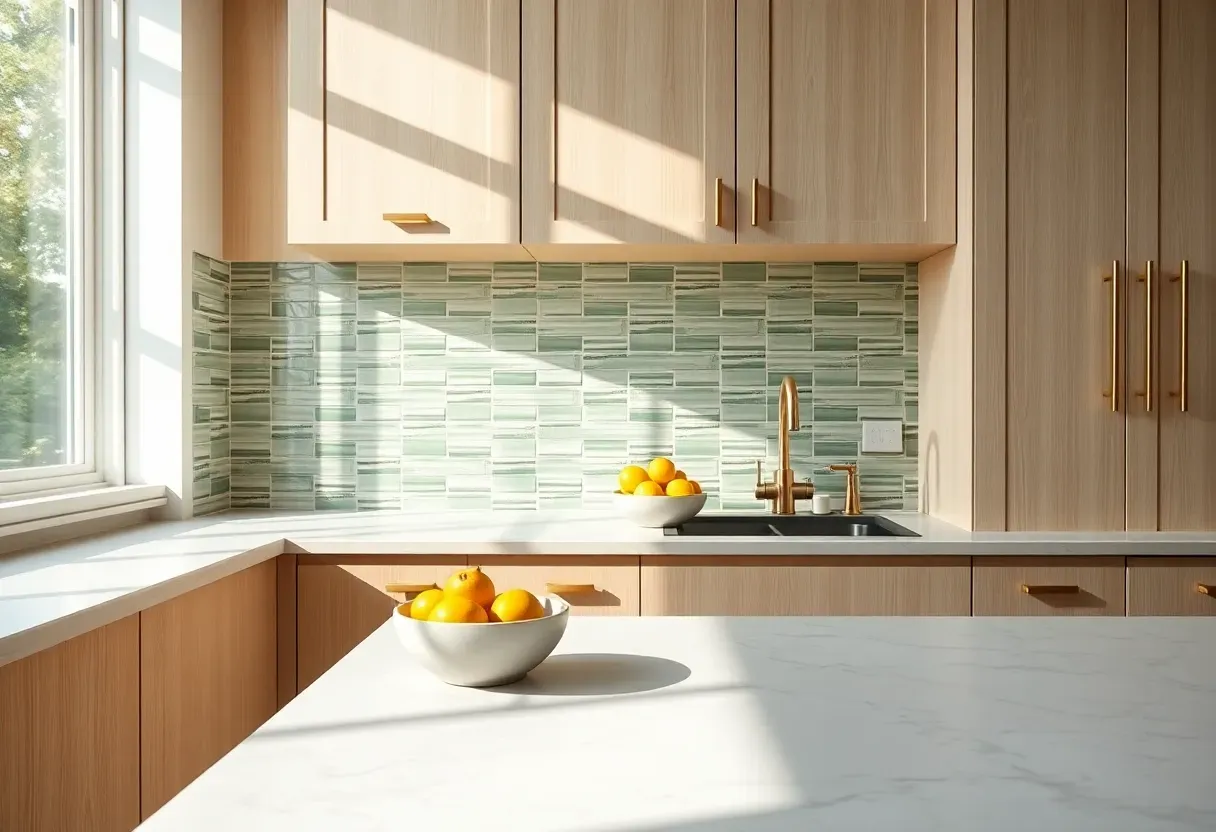
1. Stacked Zellige in Sage Green
Zellige is Moroccan handmade tile fired at low temperatures, which produces irregular surfaces that catch light differently across every piece. Sage green zellige installed in a vertical stack bond brings texture and color simultaneously without overwhelming the kitchen. Each tile has slight undulations and glaze pooling that factory-made ceramic cannot replicate. The color works well alongside white oak, walnut, or painted cream cabinets. Expect to pay $15-30 per square foot for genuine Moroccan zellige — domestic imitations run cheaper but lose the handmade variation. Grouting is straightforward since the irregular edges hide minor inconsistencies.
Tips
- Order 15% overage since handmade tiles vary more in size and some will not fit tight spaces
- Unsanded grout in a matching sage or warm gray keeps attention on the tile, not the grid
- Install a few sample tiles first to confirm the green reads correctly under your kitchen lighting
We picked a few things that go well with this idea: STICKGOO Peel and Stick Backsplash (10 Sheets) (★4.4), STICKGOO Peel and Stick White Subway Tile (★4.2) and STICKGOO Peel and Stick Sandstone Tile (10 Sheets) (★4.4). As an Amazon Associate we earn from qualifying purchases.
2. Concrete Look Porcelain Tile
Why Concrete Texture Works Behind the Stove
The Core Issue
Real poured concrete backsplashes crack, stain, and require frequent resealing. The material looks good in photos but creates maintenance headaches in an actual cooking environment where grease and acids are constant.
The Solution
Large-format porcelain tile (24x48 or 12x24) printed with concrete texture gives you the raw industrial look without any of the upkeep. The surface is nonporous, does not need sealing, and cleans with soap and water. Gray tones range from warm taupe to cool charcoal. Minimal grout joints — especially with rectified edges and 1/16-inch spacers — make the backsplash read as a continuous concrete wall. Costs $5-12 per square foot.
Pros and Cons
Pros: Zero maintenance, frost-proof if used near exterior doors, available in matte and textured finishes Cons: Lacks the depth and tonal variation of real concrete, large tiles require a perfectly flat wall, thin grout lines demand precise installation
We picked a few things that go well with this idea: Art3d Smoothing Tool Kit for Backsplash (★4.6), WRAPXPERT Wallpaper Smoothing Tool Kit (★4.6) and NAACOO Professional Flooring Installation Kit (★4.5). As an Amazon Associate we earn from qualifying purchases.
3. Terrazzo Slab Backsplash
Terrazzo came back about five years ago, mostly in floors and countertops, but as a backsplash slab it hits differently. The speckled surface — marble, glass, or stone chips suspended in a cement or resin binder — provides visual interest without any strong directional pattern. Unlike veined marble that demands careful slab orientation, terrazzo reads the same in every direction, which simplifies fabrication. White-based terrazzo with pale pink and gray chips pairs naturally with brass hardware and warm wood cabinets. A polished finish reflects light and brightens the cooking area. Precast terrazzo slabs run $30-60 per square foot installed, while terrazzo-look porcelain tiles cost a fraction at $6-14.
Tips
- Cement-based terrazzo requires sealing; resin-based does not — clarify which you are buying
- Larger chip sizes (1/2 inch and up) create a bolder pattern visible from across the room
- Match the terrazzo base color to your grout or countertop for a cohesive look
We picked a few things that go well with this idea: Miracle Sealants 511 Penetrating Stone Sealer (★4.5), Weiman Granite Stone Sealer Spray (24 oz) (★4.5) and Granite Gold Water-Based Stone Sealer Spray (★4.5). As an Amazon Associate we earn from qualifying purchases.
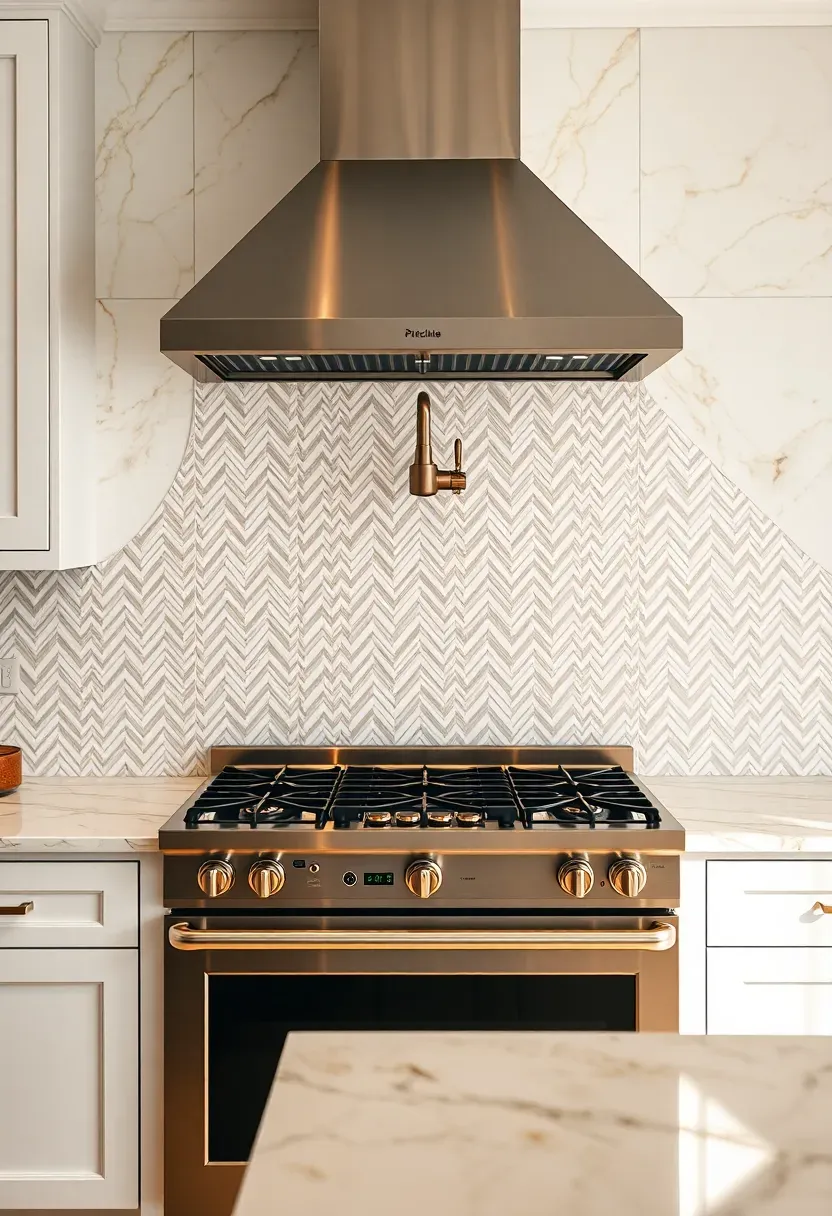
4. Chevron Marble Mosaic
How to Install Chevron Without a Professional
Chevron marble looks complex, but pre-mounted mesh-backed sheets make it accessible to confident DIYers.
Step 1: Prepare the Wall
Skim-coat any uneven drywall with thinset and let it cure overnight. Chevron patterns expose every bump because the angled lines create a strong visual rhythm — any wobble in the wall telegraphs through the tile.
Step 2: Find Your Center Line
Chevron must be centered on the focal wall, typically behind the range. Snap a vertical chalk line at the midpoint and dry-lay two sheets on each side before committing with adhesive.
Step 3: Cut the Edges
The zigzag pattern leaves angled gaps at the top, bottom, and sides. Mark each cut individually — do not assume both edges are identical, because walls are rarely perfectly square.
What to Watch Out For
- Marble chevron uses more grout than subway tile — budget extra grout and sealer
- Polished marble near the range shows grease splatter more than honed; pick honed for behind the cooktop
Recommended
Items for this idea
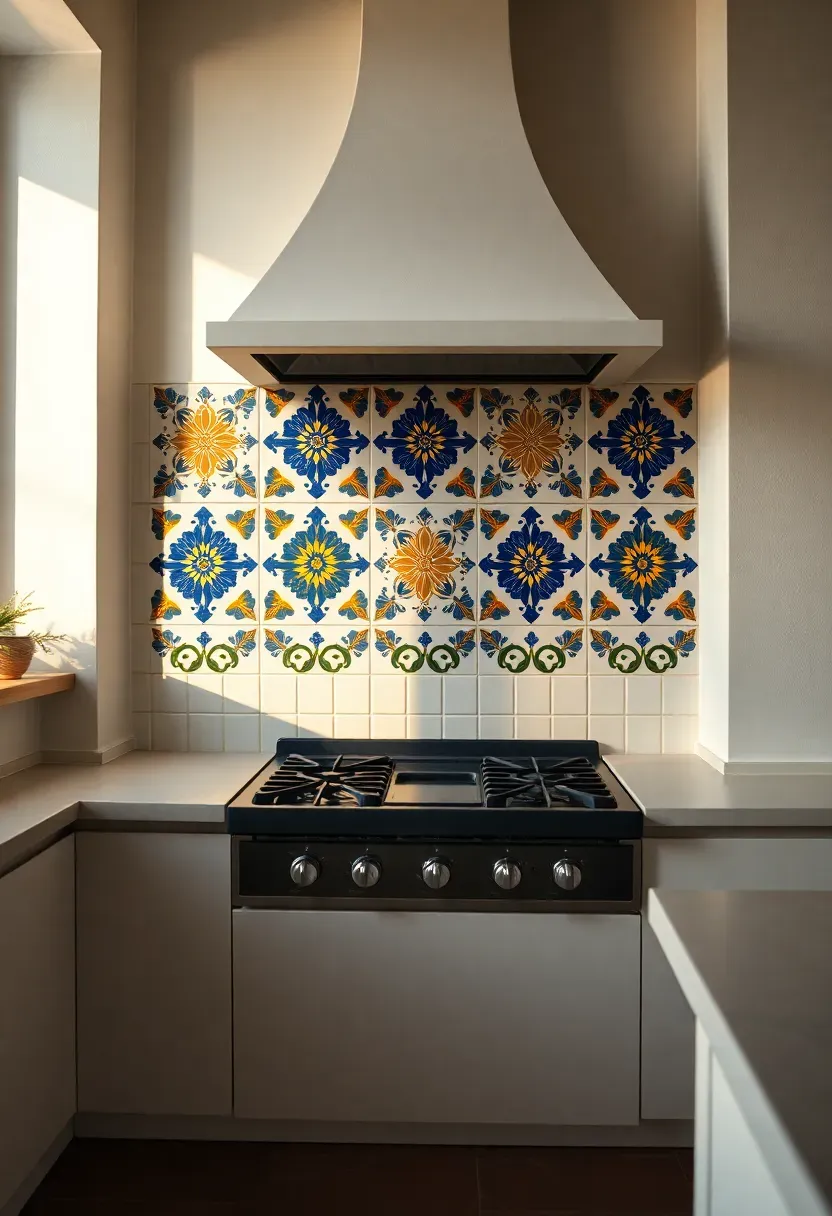
5. Hand-Painted Spanish Ceramic
Hand-painted tile from Seville or Valencia carries a specific visual weight that mass-produced ceramic cannot match. Each tile is individually decorated before firing, which means slight color shifts and brush marks appear across the installation — these irregularities are the entire point. Traditional patterns include geometric stars, floral medallions, and Moorish arabesques in cobalt blue, terracotta, and saffron yellow. A concentrated panel of painted tiles behind the cooktop, framed by solid white tile elsewhere, creates a focal point without overwhelming the kitchen. Authentic hand-painted Spanish tile costs $18-40 per square foot, but a focused accent area of 8-10 square feet keeps the budget reasonable.
Tips
- Seal hand-painted tile with a penetrating sealer before grouting to protect the decoration
- Use these as an accent behind the range rather than full-wall coverage, which can look busy
- Pair with simple shaker cabinets and minimal hardware so the tile gets the attention
6. Fluted Porcelain Tile
Flat Tile vs. Fluted: When Texture Beats Pattern
Flat Tile
Smooth surfaces rely on color, pattern, or grout contrast for visual interest. They photograph predictably and are easy to clean, but they can feel one-dimensional in person, especially in large backsplash areas.
Fluted Tile
Vertical ribs molded into the tile surface create shadows that shift as light moves across the room throughout the day. The effect is architectural — like a column or a reeded cabinet front translated to the wall. White fluted porcelain in a 3x12 or 4x12 format adds depth without color, making it versatile with any cabinet style.
Choose Fluted If...
Your kitchen has good natural or task lighting that can activate the shadows, you prefer texture over pattern, and you want a backsplash that changes appearance subtly from morning to evening.
Recommended
Items for this idea
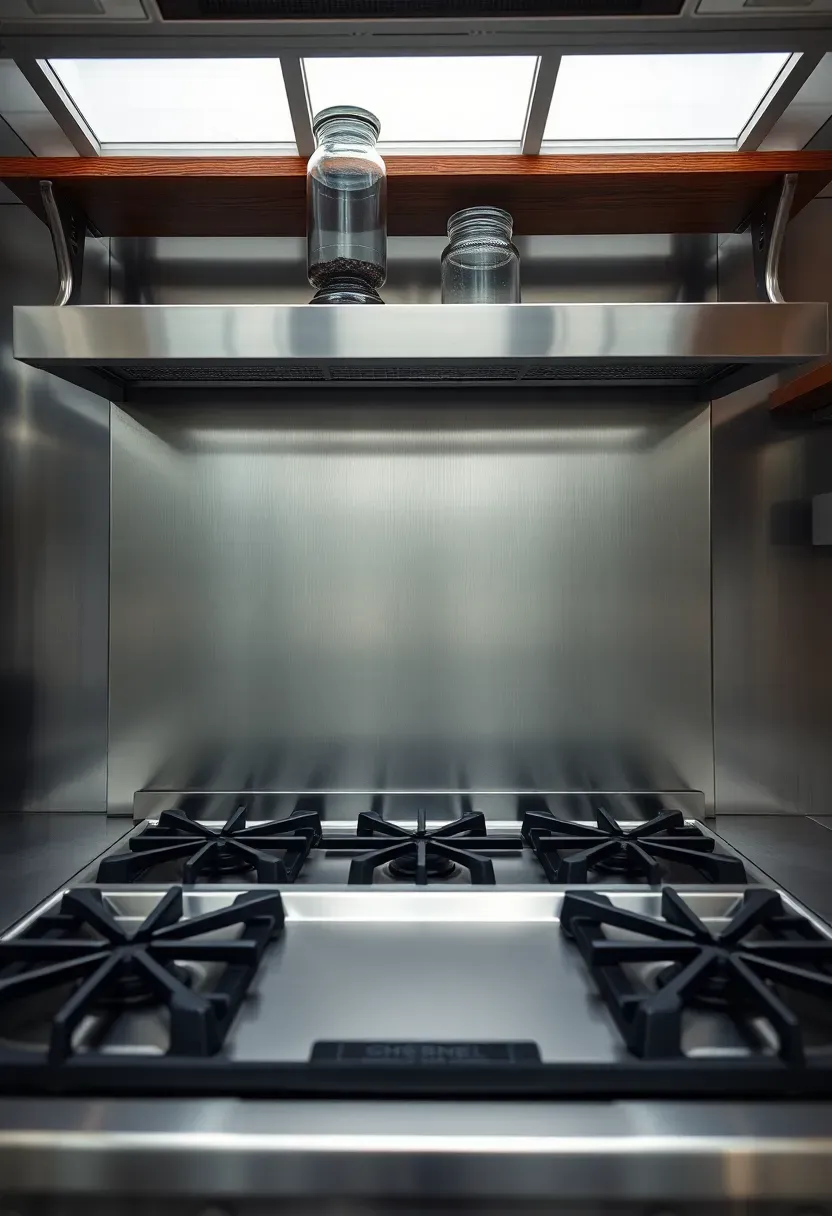
7. Brushed Stainless Steel Panel
Restaurant kitchens use stainless steel behind every cooking surface for a reason — it handles heat, grease, and moisture without flinching. A single brushed stainless panel from counter to hood vent eliminates grout lines entirely, which means no grout to stain, crack, or discolor over time. The brushed finish hides fingerprints and water spots better than polished mirror stainless. In a home kitchen, pairing stainless behind the range with tile or another material on adjacent walls keeps the look from feeling too commercial. Sheet stainless runs $10-25 per square foot depending on gauge and finish. Most sheet metal shops can cut to your exact dimensions.
Tips
- Specify 18-gauge or thicker to prevent oil-canning (wavy dents) on large panels
- Apply with construction adhesive on clean drywall — no special substrate needed
- Leave a 1/8-inch gap at the countertop and caulk with silicone to allow for thermal expansion
8. Honed Black Granite Slab
The Understated Drama of Black Stone
The Core Issue
Black backsplashes get a bad reputation for making kitchens feel small and dark. Most of that reputation comes from glossy black glass or polished stone that creates harsh reflections and shows every water spot.
The Solution
Honed black granite absorbs light softly instead of bouncing it back. The matte surface reads as a deep charcoal wall rather than a mirror, and the subtle mineral flecks in the stone add just enough visual activity to prevent it from looking flat. Absolute Black, Nero Assoluto, or Zimbabwe Black granite are the most uniform options. A full slab from countertop to hood creates a dramatic backdrop, especially with contrasting light cabinets. Price sits at $35-70 per square foot fabricated and installed.
Pros and Cons
Pros: Nearly indestructible, heat-resistant, honed finish hides water marks and fingerprints well Cons: Heavy — requires secure wall mounting, limited pattern variation, seams are visible on long runs
Recommended
Items for this idea
9. Basketweave Marble Mosaic
Basketweave is one of the oldest mosaic patterns in Western architecture — alternating pairs of rectangular tiles with a small square dot at each intersection. The pattern creates a woven textile effect that feels refined without being fussy. Carrara white rectangles with Bardiglio gray dots is the most common color combination, and it has persisted because the contrast is just enough to make the weave readable without shouting. Each mesh-backed sheet covers roughly one square foot and installs like any other mosaic. The tight grout joints mean more sealing effort, but the pattern itself is forgiving of slight spacing inconsistencies because the weave disguises them.
Tips
- Seal marble mosaic with an impregnating sealer before grouting — unsealed marble absorbs grout pigment permanently
- Light gray grout makes the weave pattern pop; white grout creates a more subtle, tone-on-tone effect
- This pattern works best on the main backsplash wall, not wrapped around corners where the weave alignment breaks
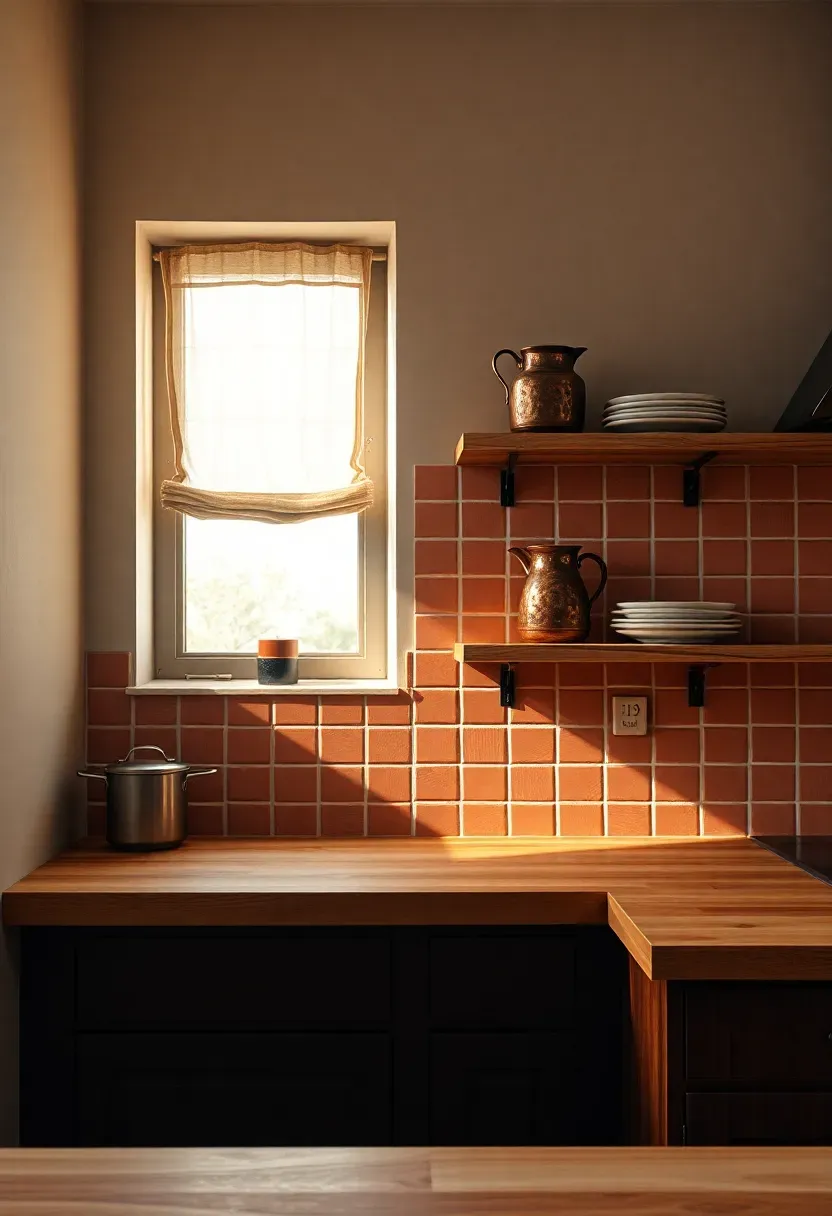
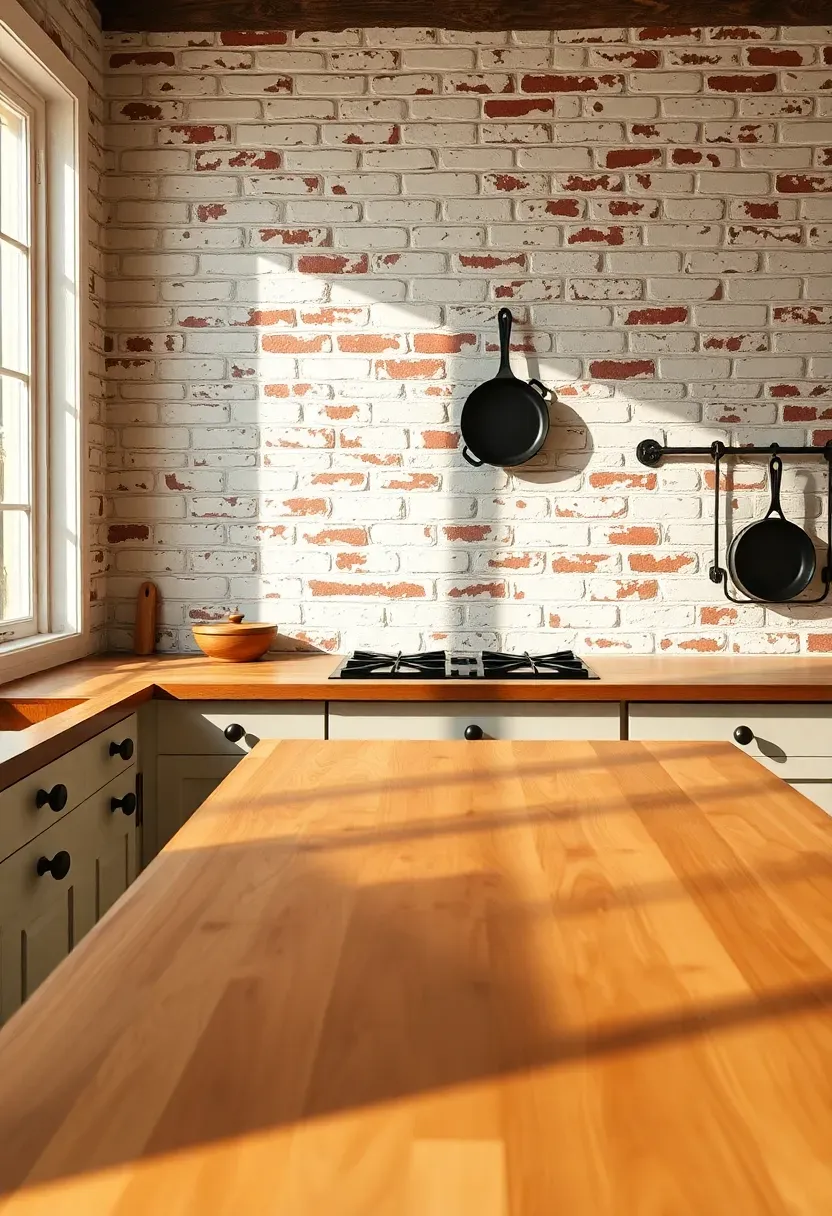
10. Terracotta Tile with Matte Seal
From Floors to Walls: Making Terracotta Work Vertically
Terracotta is enjoying a serious revival, mostly in floors, but it translates surprisingly well to backsplash duty.
Step 1: Choose Between Handmade and Machine-Cut
Handmade terracotta (Saltillo-style) has uneven surfaces and color variation from tile to tile. Machine-cut terracotta is more uniform. Both work, but the handmade version brings more character and a stronger Mediterranean or farmhouse association.
Step 2: Seal Properly
Raw terracotta is extremely porous. Apply two coats of a matte-finish penetrating sealer before installation and another coat after grouting. This prevents oil stains near the cooktop while preserving the natural earthy look.
Step 3: Pick Your Format
Square 4x4 or 6x6 tiles in a simple grid give the most authentic look. Running bond layout with 3x6 tiles feels slightly more modern.
What to Watch Out For
- Terracotta is softer than ceramic — a dropped pan can chip the tile
- Color darkens significantly with sealant, so test a sample before committing to a batch
Recommended
Items for this idea
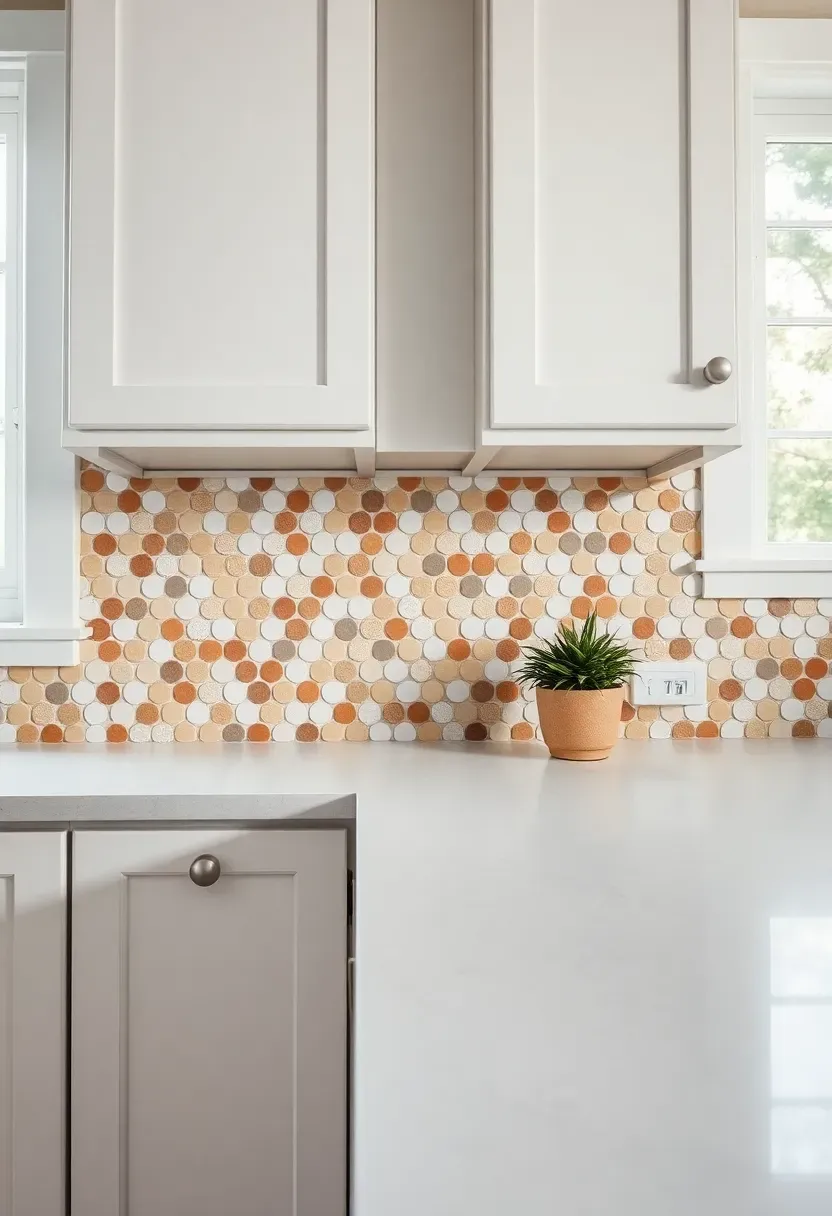
11. Penny Round Tile in Mixed Neutrals
Penny rounds — small circular tiles usually 3/4-inch in diameter — create a distinctly textured surface that reads differently from any rectangular format. In mixed neutral tones (cream, warm gray, tan, and white), the effect is subtle and almost sandy, like a pebbled beach seen from a few feet away. The small scale makes this tile forgiving of curved walls and niches since each piece adjusts independently on the mesh backing. Porcelain penny rounds cost $8-15 per square foot, and the mosaic sheets cut easily with scissors between the tiles. The grout lines are the dominant visual element here, so grout color selection matters more than with larger tiles.
Tips
- Use unsanded grout — the tight joints between penny rounds are too narrow for sanded grout
- A warm mid-tone grout blends the mixed colors together; white grout isolates each circle
- Install with a flat trowel and press sheets firmly so every tile sits at the same depth
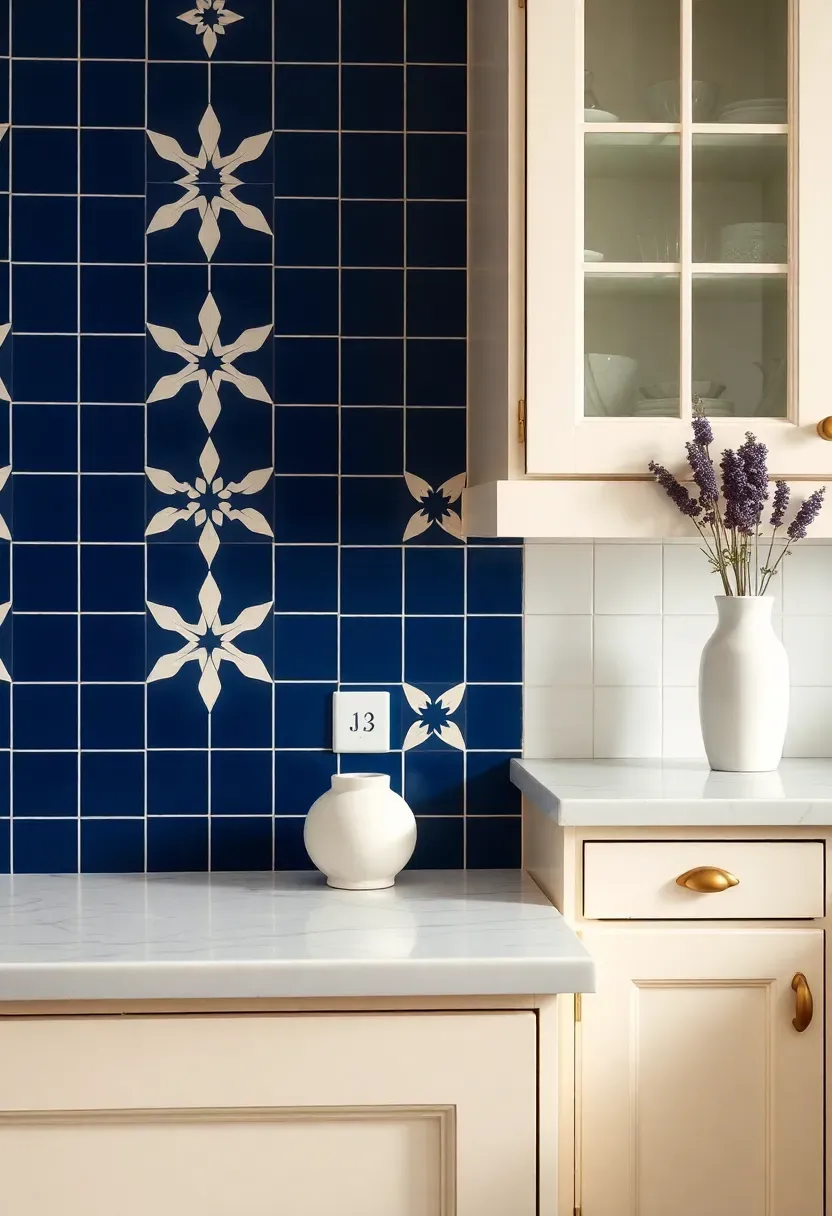
12. Star and Cross Cement Tile
The star-and-cross pattern is a centuries-old Islamic geometric design that has crossed into European and American kitchens through Moroccan and Spanish tile traditions. Each tile is an eight-pointed star interlocking with a small cross-shaped piece, producing a complex-looking field from just two simple shapes. In navy and white, the pattern reads crisp and nautical. In terracotta and cream, it feels Mediterranean. Unlike printed ceramic that imitates the pattern on a flat surface, genuine cement tile creates a slight relief where the two shapes meet, adding shadow depth. Cement tile costs $10-28 per square foot and needs sealing before and after installation.
Tips
- Dry-lay the entire backsplash area before adhering — the star-and-cross alignment must be consistent
- These tiles are thicker than standard ceramic, so check your cabinet clearances and outlet box depth
- Use an enhancing sealer to deepen the colors or a matte sealer for a more washed-out, vintage look
Recommended
Items for this idea
13. Thin Brick Veneer in Whitewash
Real brick backsplashes have a weight and installation problem — full bricks are heavy and thick enough to interfere with cabinet mounting. Thin brick veneer solves both issues. These are sliced real brick faces, typically 1/2-inch thick, that adhere directly to drywall with modified thinset. A whitewash finish (lime wash or diluted white paint brushed over red brick) softens the industrial edge and gives the backsplash a French country or Scandinavian farmhouse quality. The wash lets the original brick color show through unevenly, which adds age and character. Material cost runs $6-14 per square foot for the veneer, plus the wash is a DIY-friendly finishing step.
Tips
- Apply whitewash in stages — one thin coat for a hint of white, two or three for heavier coverage
- Seal the finished wash with a matte polyurethane to make the surface wipeable near the stove
- Pair with butcher block, soapstone, or honed granite countertops that share the rustic character
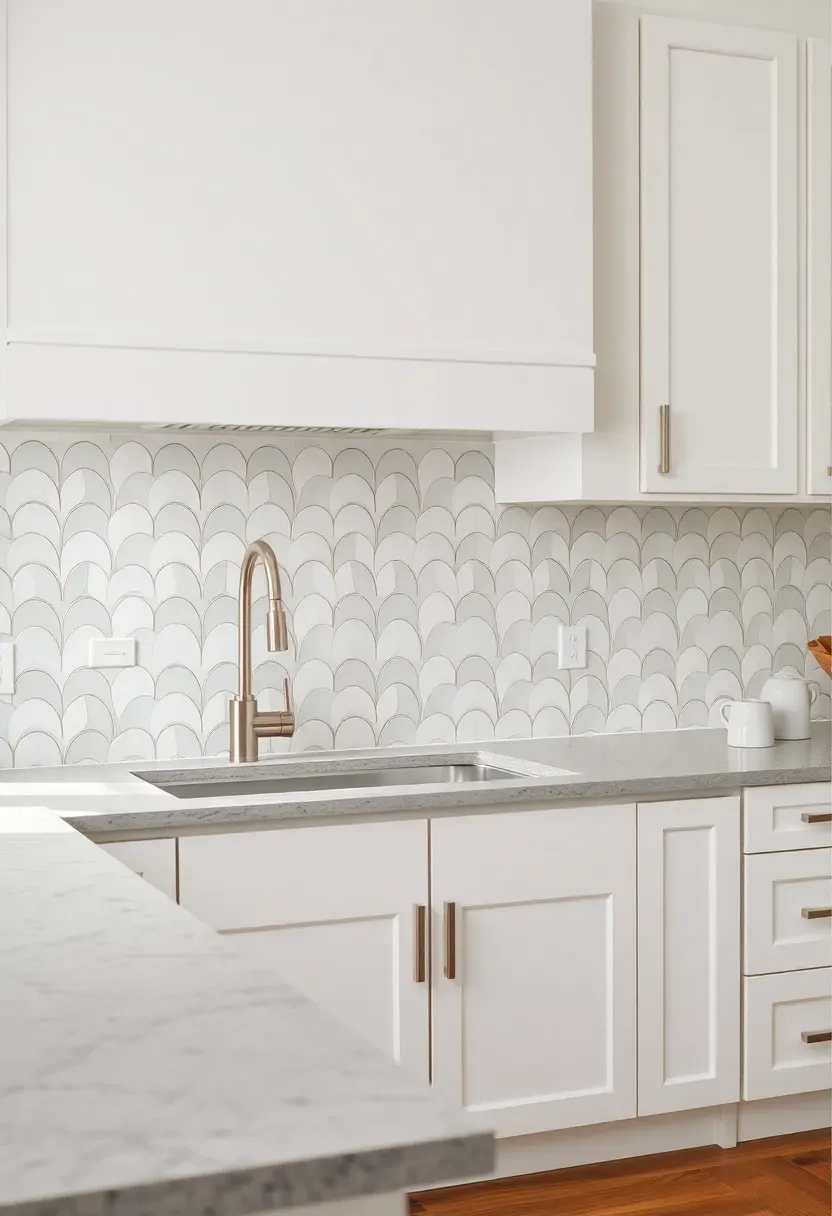
14. Arabesque Lantern Tile
Why This Shape Keeps Showing Up on Pinterest
The Core Issue
Standard rectangular tile layouts can feel predictable. Herringbone and chevron add movement but still use rectangular pieces. Some kitchens need a shape that is inherently decorative without relying on color or pattern.
The Solution
Arabesque tile — also called lantern tile or provencal tile — has a sinuous, teardrop-like shape borrowed from Moorish architecture. The interlocking curves create a flowing, organic pattern across the wall. In white or cream with contrasting grout, the shape alone provides all the visual interest needed. The tile works best in smaller kitchens or as a feature panel where its distinctive silhouette is easy to appreciate up close. Porcelain arabesque tile costs $10-20 per square foot.
Pros and Cons
Pros: Instantly recognizable, photographs well for Pinterest, available in dozens of colors and finishes Cons: The curved perimeter means more grout per square foot, cutting around outlets is tricky, pattern can look busy on large walls
Recommended
Items for this idea
15. Shou Sugi Ban Wood Panel
Shou sugi ban is a Japanese wood preservation technique where lumber is charred with an open flame, then cooled and sealed. The result is a deep black surface with an alligator-skin texture that is naturally resistant to rot, insects, and moisture. As a backsplash panel behind a dry zone — coffee bar, open shelving, or a bar area — charred wood adds a moody, textural quality that no tile can replicate. Cedar and cypress are the traditional species for this treatment. The charred surface needs a clear oil or wax finish to prevent soot transfer. Keep the panel at least 18 inches from any open flame or heating element.
Tips
- Purchase pre-charred panels from a supplier rather than DIY torching near cabinetry
- Wipe with a tack cloth after installation to remove loose carbon before applying the sealant
- Pair with light-colored countertops and walls to prevent the backsplash from absorbing all the light
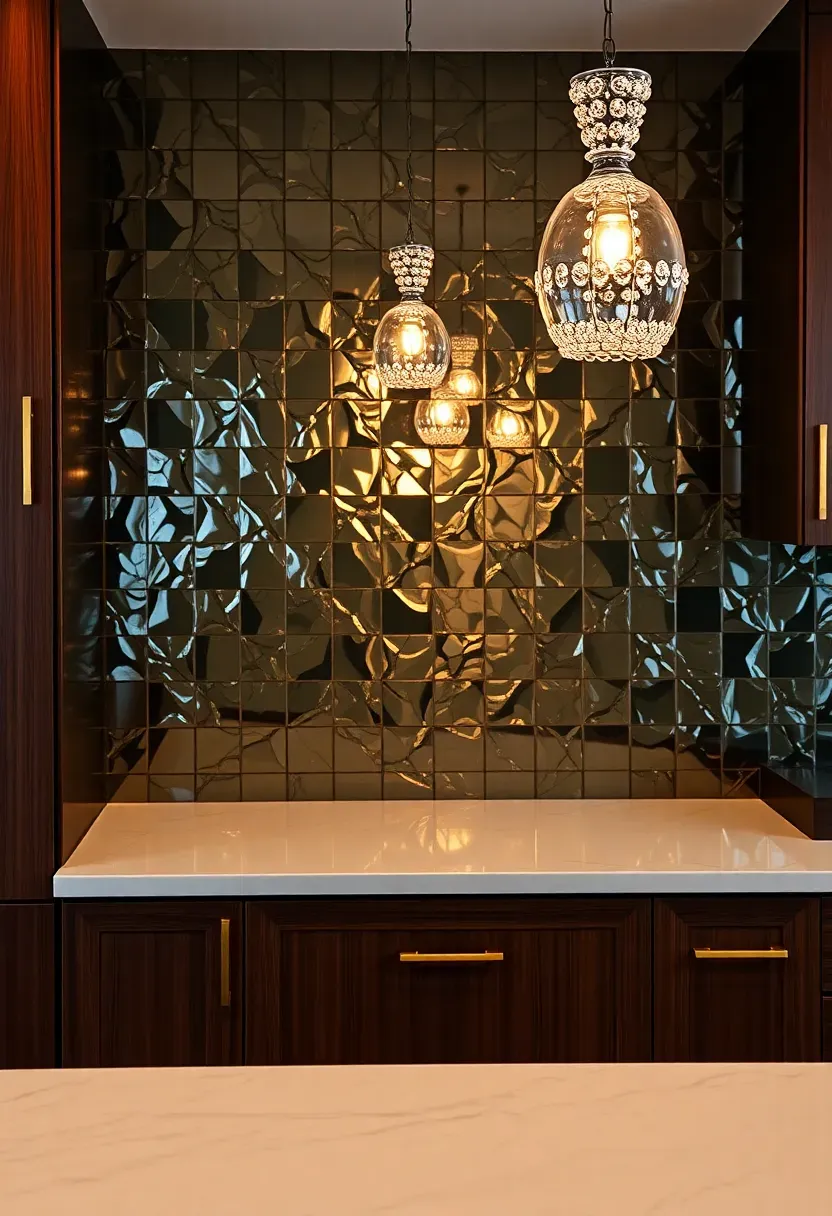
16. Mirrored Antique Glass Tile
Mirrored tile sounds like a 1980s relic, but the antique-finish version is something else entirely. These tiles have an intentionally distressed silvering on the back that creates a smoky, mercury-glass effect — reflective enough to bounce light around the kitchen but too mottled to show your reflection clearly. The effect feels moody and slightly glamorous, like a Parisian bistro. Small-format squares (2x2 or 3x3) on mesh backing install like standard mosaic. Larger 3x6 or 4x8 subway-format mirrored tiles make a bolder statement. Cost ranges from $15-35 per square foot. The patina pattern varies tile to tile, which means no two installations look identical.
Tips
- Use a glass-specific thinset and avoid over-troweling, which can squeeze adhesive to the front
- Handle carefully during installation — mirror tile chips more easily than ceramic
- Clean with glass cleaner rather than abrasive products that scratch the reflective surface
Recommended
Items for this idea
17. Color-Blocked Ceramic Tile
Two Colors, One Backsplash, Zero Boredom
Instead of a single tile covering the entire backsplash, color blocking divides the surface into two or three distinct zones using different colored tiles in the same format.
Step 1: Choose Your Colors
Pick two shades from the same temperature family — dusty pink with terracotta, sage green with forest green, or sky blue with navy. Avoid mixing warm and cool tones, which can look disjointed.
Step 2: Decide the Division Point
A horizontal split at counter height (with the darker color below and lighter above) is the most balanced approach. Vertical splits work behind a range where the hood creates a natural frame for the transition.
Step 3: Handle the Transition
Either butt the two colors directly against each other for a clean line, or use a single row of contrasting tile (white, brass, or black) as a border strip at the meeting point.
What to Watch Out For
- Ensure both colors are from the same manufacturer and product line so thickness and texture match
- The division line must be perfectly level — any wobble is immediately obvious with two contrasting fields
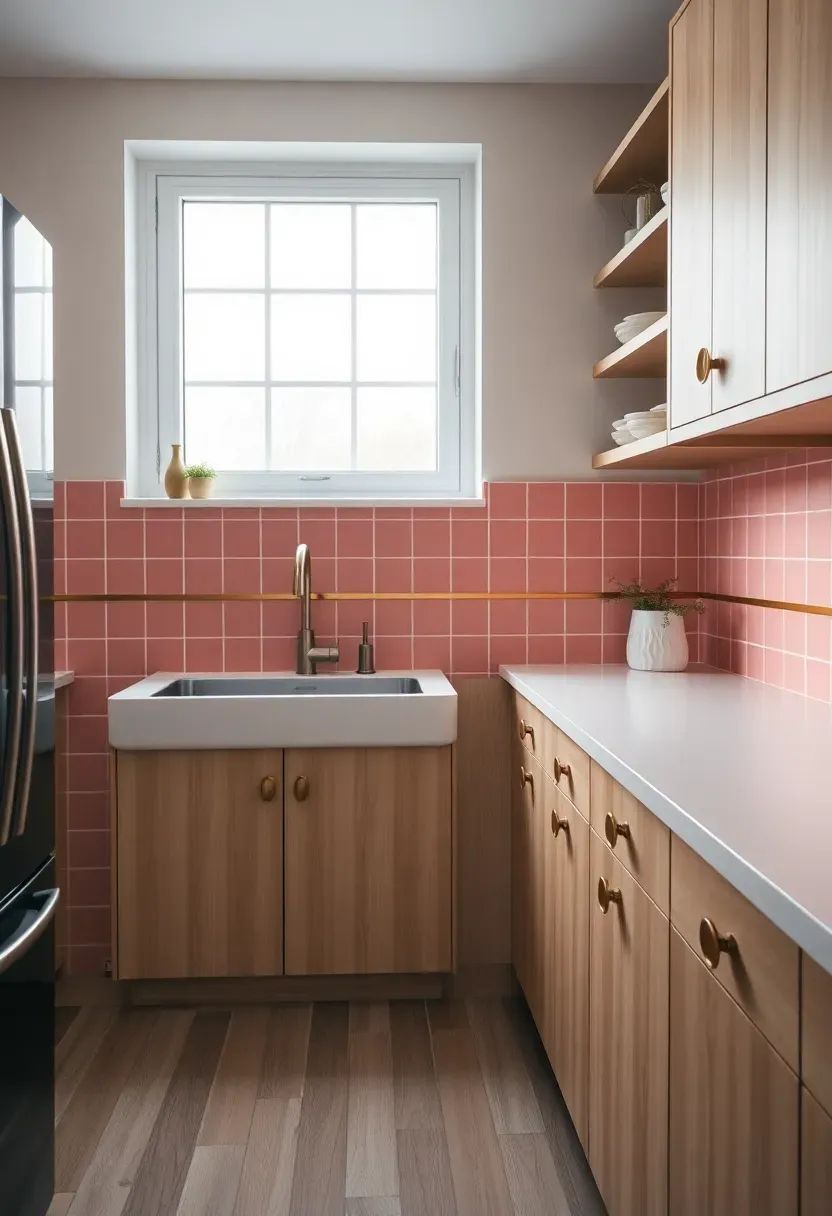
18. Crackle Glaze Subway in Cream
Crackle glaze is a centuries-old ceramic technique where a controlled network of fine cracks forms in the glaze during cooling. The crazing pattern gives each tile a weathered, antique appearance that softens the uniformity of a subway layout. In cream, the crackle lines read as a warm gray web across the surface — visible up close but dissolving into a warm overall texture from across the room. The 3x6 subway format in crackle glaze bridges traditional and contemporary, working equally well in a farmhouse kitchen or a modern one with clean lines. These tiles cost $7-18 per square foot. The crackle lines can absorb pigment over time, which darkens them gradually and adds to the aged look.
Tips
- Seal the surface before grouting if you want to slow down the crackle-line darkening
- Warm-toned grout (cream or buff) creates a subtle effect; dark grout makes the crackle pop dramatically
- The handmade versions with uneven edges create more shadow play than machine-made crackle tile
Recommended
Items for this idea
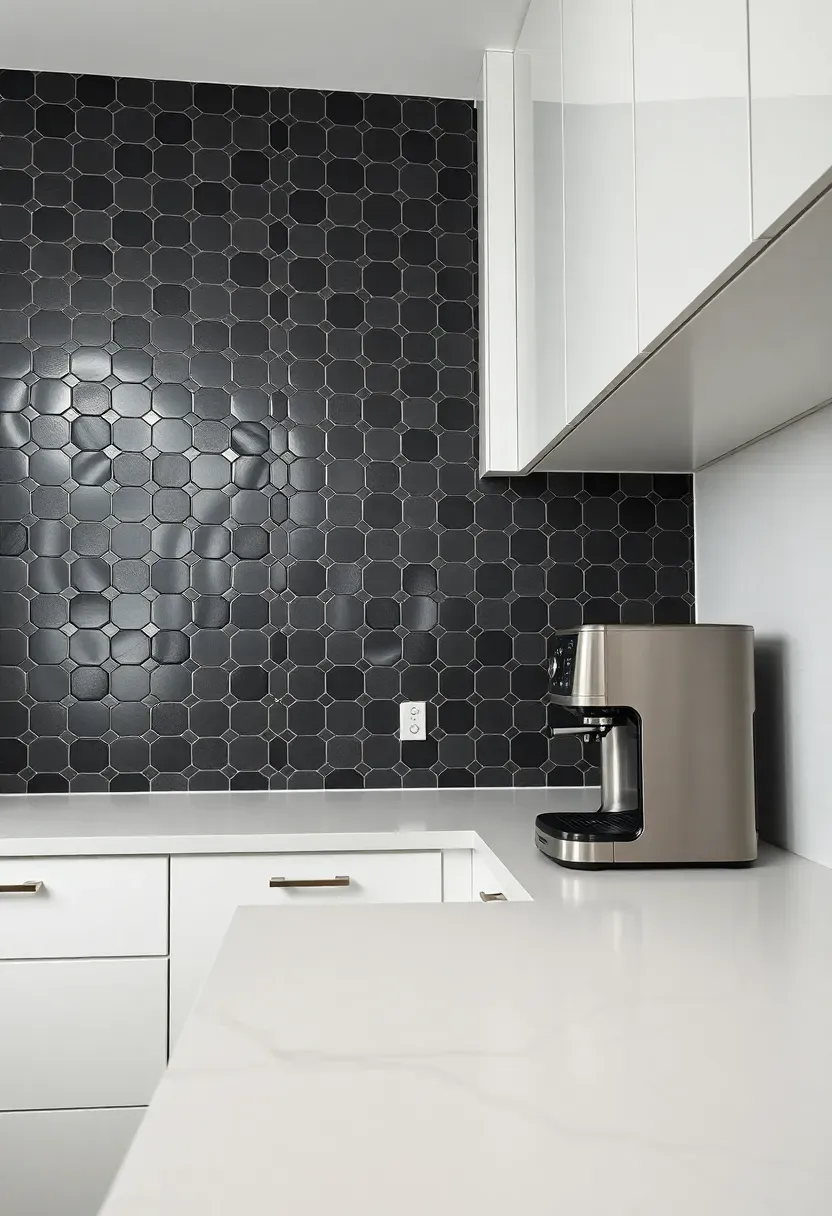
19. Geometric Hex Tile in Charcoal
Hexagonal tile dates back to early 20th-century bathrooms, but sized up to 4-inch or 6-inch formats and finished in matte charcoal, it belongs squarely in a modern kitchen. The six-sided shape tessellates without grout-line interruptions at the edges, creating a honeycomb grid that feels both geometric and organic. Charcoal hex tile behind white or light gray cabinets provides the same grounding effect as a black backsplash but with more visual texture from the hexagonal joints. The matte finish absorbs light and hides cooking splatter between cleanings. Porcelain hex tiles in this size range cost $6-15 per square foot.
Tips
- Cut hexagons along the top and bottom edges require a wet saw with a diamond blade — the six angles make freehand cutting unreliable
- Use matching dark grout to emphasize the honeycomb pattern, or light grout to outline each hex individually
- Large hex tile reads modern; small hex (1-inch) reads vintage — pick your size based on the kitchen era
20. Venetian Plaster Backsplash
Venetian plaster applied behind the sink or along a dry-zone wall creates a seamless, sculptural surface with depth and movement that tile cannot match. The material consists of slaked lime and marble dust, applied in multiple thin layers and burnished to a soft sheen. Each layer adds translucency, so the finished surface appears to glow from within — especially in warm gray, cream, or blush tones. A wax topcoat makes the surface water-resistant enough for backsplash duty away from direct splashing. This is not a behind-the-stove solution — grease and high heat degrade the finish. Venetian plaster costs $12-25 per square foot for professional application.
Tips
- Combine plaster on flanking walls with tile directly behind the range for a practical hybrid approach
- Reapply wax every 12-18 months to maintain moisture resistance
- DIY application is possible with premixed products but requires practice to achieve even layering
Recommended
Items for this idea
21. Tumbled Slate Mosaic
Slate mosaic brings a geological texture to the kitchen wall — layered, fissile, and colored in earth tones that range from rust and copper to dark gray and olive green. Tumbling rounds the tile edges and creates a slightly rougher surface than calibrated stone, which adds a handcrafted, mountain-lodge quality. The natural cleft surface of slate catches light at multiple angles across the mosaic, producing a depth that smooth tiles lack. Mesh-backed sheets in 1x1 or 2x2 formats cover walls quickly. Slate mosaic costs $5-12 per square foot, making it one of the more affordable natural stone options.
Tips
- Apply an enhancing sealer to bring out the color variation, or a matte sealer to keep the tones subdued
- Slate flakes at cut edges — use a wet saw with a continuous-rim blade for clean cuts
- Mix slate mosaic with a solid stone or wood accent to break up the busy texture over large areas
22. Floral Relief Ceramic Tile
When Flat Tile Feels Too Plain
The Core Issue
Pattern and color are the usual tools for making a backsplash interesting, but sometimes you want visual richness without adding more color to an already busy kitchen.
The Solution
Relief tile — ceramic with raised botanical motifs pressed into the surface — creates interest through shadow alone. White-on-white floral relief tiles show their pattern only when light rakes across the surface at an angle, which means the backsplash subtly changes throughout the day. Morning sunlight reveals leaf veins and petal edges that disappear under flat overhead lighting at night. Common formats include 6x6 decorative tiles interspersed within a field of flat tile, or full-coverage 4x8 panels. Prices range from $12-30 per square foot for handmade relief tiles.
Pros and Cons
Pros: Adds dimension without color, timeless botanical motifs, works in traditional and modern settings Cons: Raised surfaces trap grease near the stove, harder to wipe flat than smooth tile, grout application around relief edges is fiddly
Recommended
Items for this idea
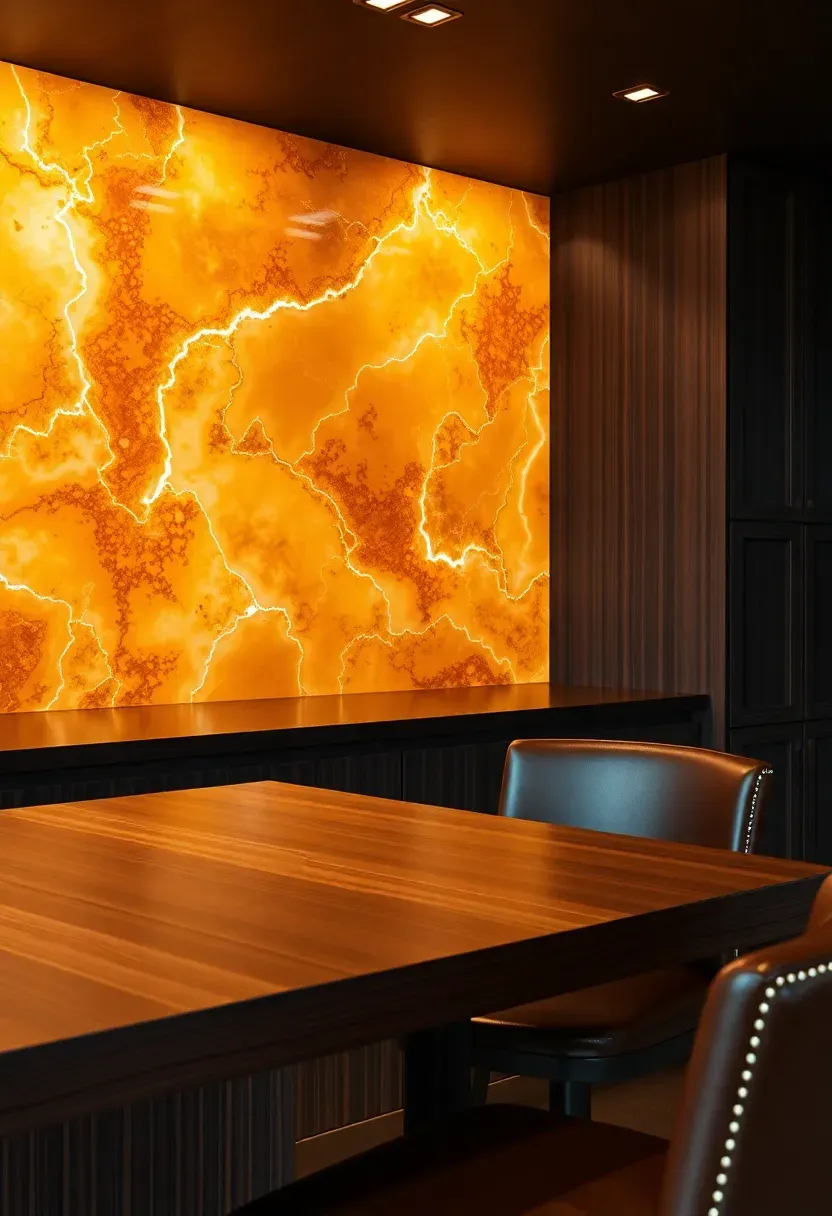
23. Polished Onyx Slab
Onyx is the showpiece stone — translucent enough to backlight, with veining patterns that look like frozen honey or flowing amber. A polished onyx slab backsplash makes the most dramatic statement on this entire list. Because onyx is translucent, installing LED strip lighting behind a thin slab creates a glowing wall effect that no other material can achieve. Honey onyx (warm amber and gold) and green onyx (jade and forest tones) are the most popular varieties. The material is softer than granite or quartzite and scratches more easily, so it works best in areas away from heavy-use zones. Fabricated onyx slab backsplashes cost $80-200 per square foot — this is a luxury finish by any measure.
Tips
- Use a fiber-mesh backing on the slab to prevent cracking during transport and installation
- LED backlighting requires a gap between the slab and the wall; discuss with your fabricator early
- Seal with a high-quality stone sealer annually to protect against etching from acidic kitchen splatter
Quick FAQ
Does backsplash tile need to match the countertop? Not at all. Matching creates a safe, coordinated look, but contrast often produces a more interesting kitchen. The goal is for the two materials to share an undertone — warm with warm, cool with cool — while differing in texture, pattern, or color intensity.
Which backsplash kitchen ideas work for renters? Peel-and-stick vinyl tiles, removable wallpaper with a clear acrylic panel overlay, and magnetic stainless steel sheets all remove cleanly. For something more convincing, thin tile with removable adhesive strips exists but is harder to find and limited in color selection.
How far should a backsplash extend past the stove? At minimum, the backsplash should cover 4-6 inches beyond each side of the range. Ideally, it runs the full length of the countertop for visual continuity. Stopping a backsplash in the middle of a wall always looks like a budget compromise.
Can I combine two backsplash materials in one kitchen? Yes, and it works well when you use a statement material behind the range (stone slab, patterned tile) and a simpler material on flanking walls (solid subway, painted plaster). The transition should happen at a natural break point like a cabinet edge, not in the middle of an open wall.
Is grouting a backsplash something I can do myself? Grouting is the most accessible part of a tile backsplash project. If the tile is already installed, grouting takes a few hours, a rubber float, a sponge, and patience. The harder DIY step is cutting tile cleanly around outlets and corners.
Your backsplash occupies maybe 25-35 square feet in a typical kitchen, which makes it one of the smallest surfaces with the highest visual impact per square foot. That ratio means it is worth spending the time — and often the money — to get something you actually like rather than defaulting to the safest option. Order samples. Hold them next to your cabinet doors at 3pm and again at 8pm under the pendants. Live with them taped to the wall for a week. The backsplash you rush into is the one you notice every morning for the wrong reasons.
Pinterest cover for 23 Backsplash Kitchen Ideas Worth Stealing
About the author
OBCD
CGI visualization and interior design content. We create detailed 3D renders and curate practical design ideas for every room in your home.