25 Basement Family Room Ideas for Every Budget
Most basements sit half-empty for years, collecting holiday decorations and forgotten exercise equipment. That is a lot of square footage going to waste. The reality is that a below-grade family room can be one of the most comfortable spaces in your house — naturally cooler in summer, insulated from street noise, and far enough from bedrooms that movie night does not wake anyone up. The challenge comes down to moisture control, lighting, and ceiling height. Get those three right, and you have a room the whole family actually uses. These 25 ideas cover everything from quick weekend projects to full renovations, organized by the problems they solve.
Here is a mix of layout strategies, material choices, and budget-friendly finishes for basement family rooms at every price point.
Table of Contents
- Warm-Toned LVP Flooring
- Recessed Ceiling Lighting Grid
- L-Shaped Sectional Pit
- Basement Bar Nook
- Shiplap Accent Wall
- Carpet Tile Modular Floor
- Daylight Simulation Light Panels
- Built-In Storage Bench
- Drop Ceiling vs. Exposed Joists
- Kid-Friendly Play Zone Corner
- Projector Media Wall
- Heated Floor Mat System
- Board and Batten Wainscoting
- Basement Gym Combo Room
- Egress Window Seating Nook
- Faux Coffered Ceiling Panels
- Vinyl Plank Wall Treatment
- Oversized Area Rug Layering
- Corner Reading Alcove
- Staircase Wall Gallery
- Basement Ceiling Paint Trick
- Open Shelving Room Divider
- Soundproofing for Movie Night
- Basement Guest Suite Layout
- Budget Refresh Under Five Hundred
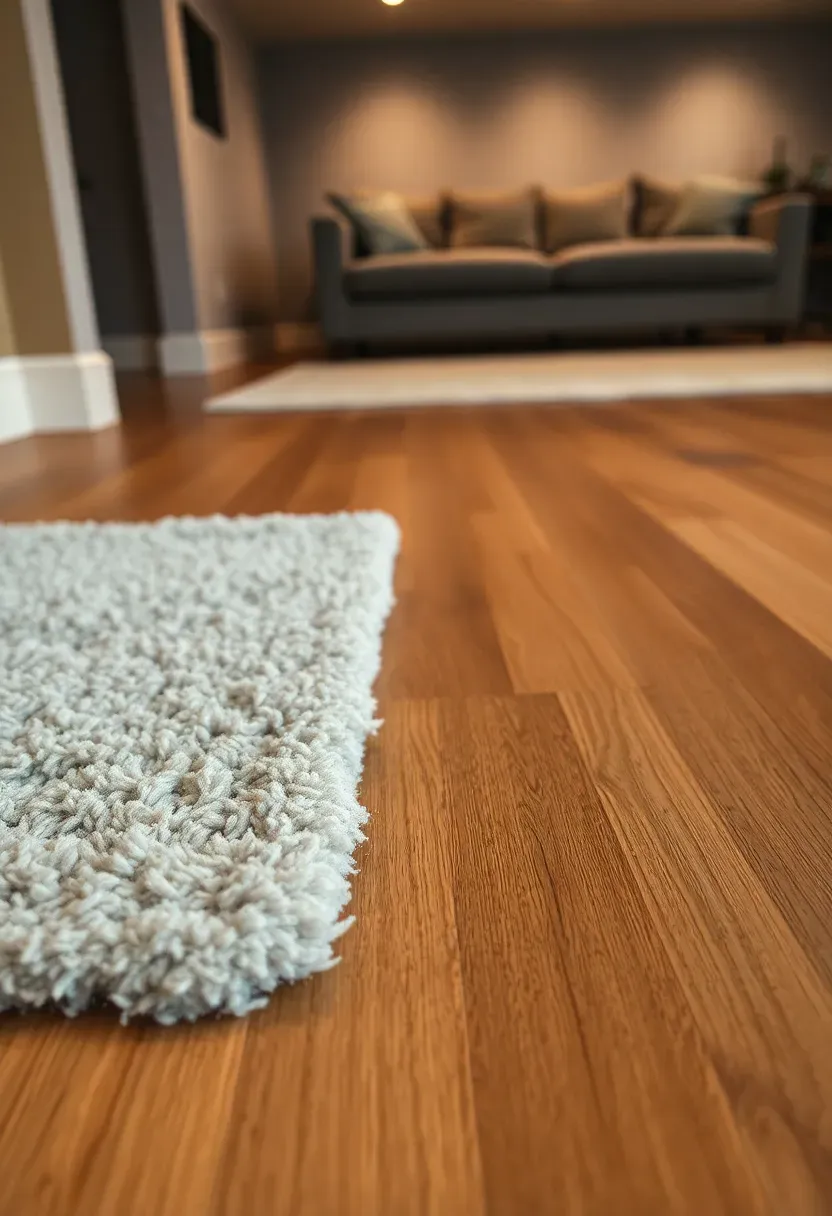
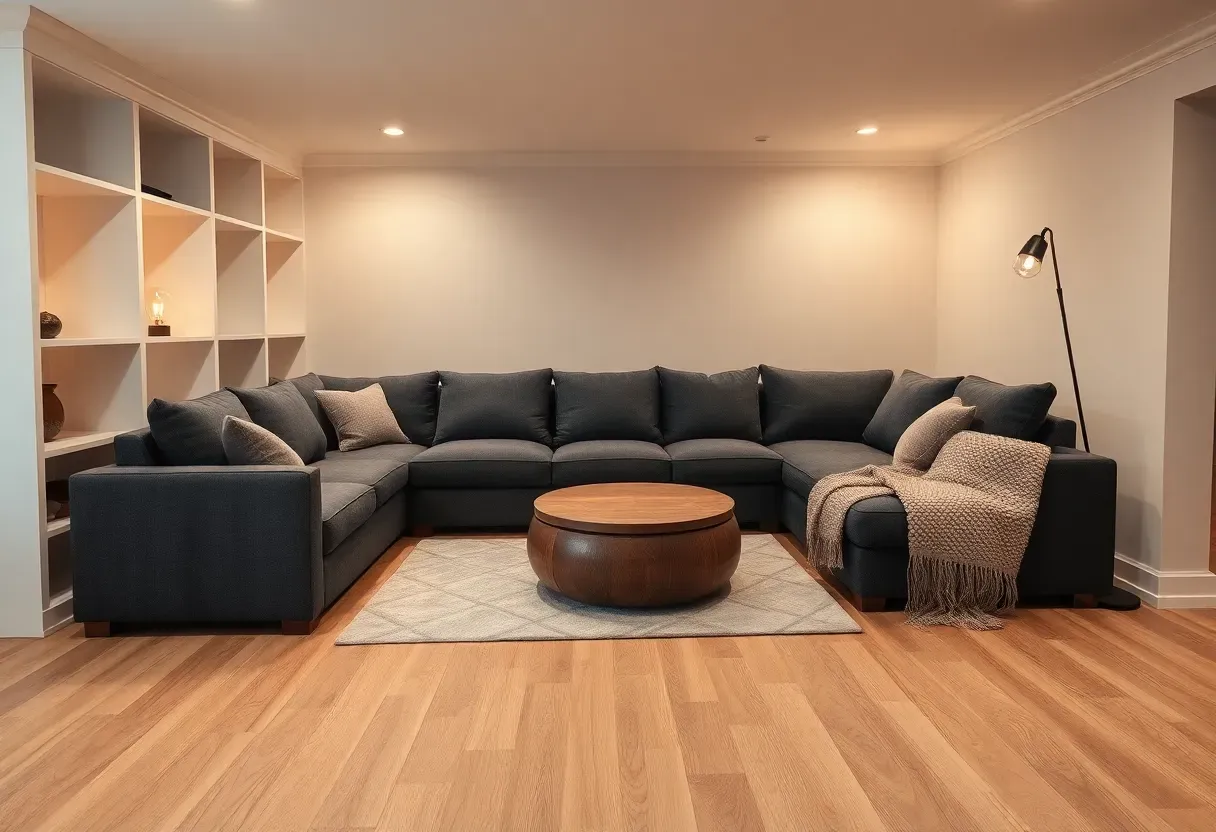
1. Warm-Toned LVP Flooring
Luxury vinyl plank is the default basement flooring for good reason. It handles moisture better than hardwood, feels warmer underfoot than tile, and installs as a floating floor over uneven concrete without adhesive. Pick planks in a warm oak or hickory tone to fight the cave-like feeling basements tend to have. A thickness of at least 5mm with an attached cork underlayment adds both comfort and a slight thermal break between you and cold concrete. Cost runs about three to five dollars per square foot installed.
Tips
- Run planks lengthwise toward the main light source to make the room feel longer
- Leave a quarter-inch expansion gap along every wall — basements shift seasonally
- Test moisture levels with a calcium chloride kit before installation; readings above three pounds mean you need a vapor barrier first

We picked a few things that go well with this idea: Dowiean 104" Modular Sectional Sleeper Sofa (★4.4), HOMRELEXA 106" L-Shape Corduroy Sectional Sofa (★4.3) and Novilla 141" U-Shape Modular Cloud Sofa (★4.2). As an Amazon Associate we earn from qualifying purchases.
2. Recessed Ceiling Lighting Grid
The Core Issue
Basements rarely have natural light. A single overhead fixture creates harsh shadows and leaves corners dark, which makes the space feel smaller and uninviting.
The Solution
Install a grid of 4-inch recessed LED wafer lights spaced about five feet apart. Wafer lights sit nearly flush with the ceiling, preserving headroom — critical when your basement ceiling is already under eight feet. Wire them to a dimmer so you can shift from full brightness during homework time to a low amber glow for movie night. A 500-square-foot basement typically needs twelve to sixteen fixtures. Budget around fifteen to twenty dollars per light plus electrician labor.
Pros and Cons
Pros: Even illumination everywhere; no hanging fixtures stealing headroom; dimmable for flexibility
Cons: Requires cutting into ceiling material; running new wiring can get expensive if your electrical panel is far from the basement
We picked a few things that go well with this idea: Amico 4" LED Wafer Lights (12-Pack) (★4.7), Ensenior 4" Dimmable Wafer Lights (12-Pack) (★4.7) and Ensenior 4" Dimmable Wafer Lights (24-Pack) (★4.7). As an Amazon Associate we earn from qualifying purchases.
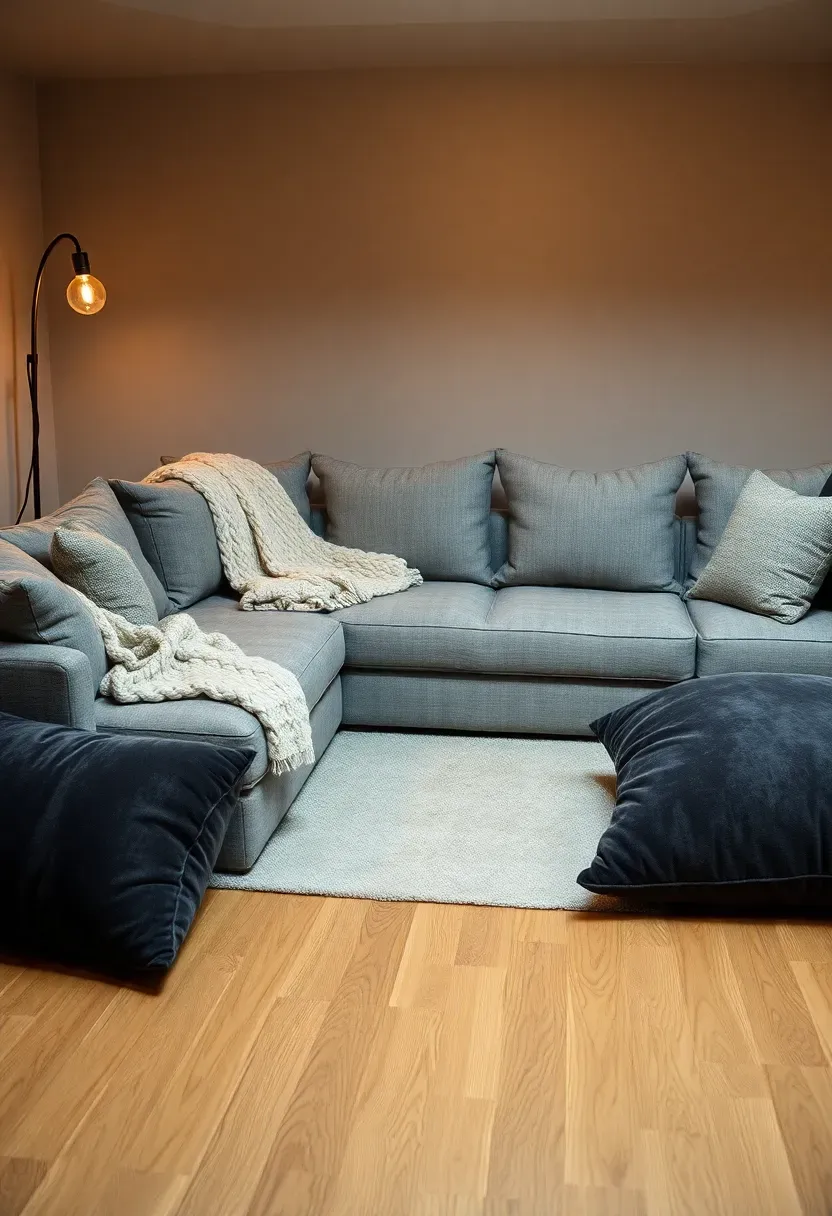
3. L-Shaped Sectional Pit
A deep-seat sectional arranged in an L or U shape turns the center of your basement into a communal gathering spot. The key word is "pit" — you want low, deep seating that people sink into, not a stiff formal sofa pushed against a wall. Position the sectional facing your screen wall with a large ottoman in the center that doubles as a footrest, coffee table, or extra seat. Choose performance fabric (Crypton or Revolution) rated for 50,000-plus double rubs so it survives kids, pets, and spilled juice without staining permanently.
Tips
- Measure your stairwell before ordering — many sectionals will not fit around a tight basement turn
- Modular designs let you reconfigure when you rearrange the room
- Add a washable slipcover if you have young children; it is cheaper than reupholstering in three years
We picked a few things that go well with this idea: Washable Abstract 9x12 Area Rug (Beige) (★4.5), UERMEI Washable 9x12 Area Rug (Brown Grey) (★4.5) and Soalmost Washable Vintage 9x12 Area Rug (★4.4). As an Amazon Associate we earn from qualifying purchases.
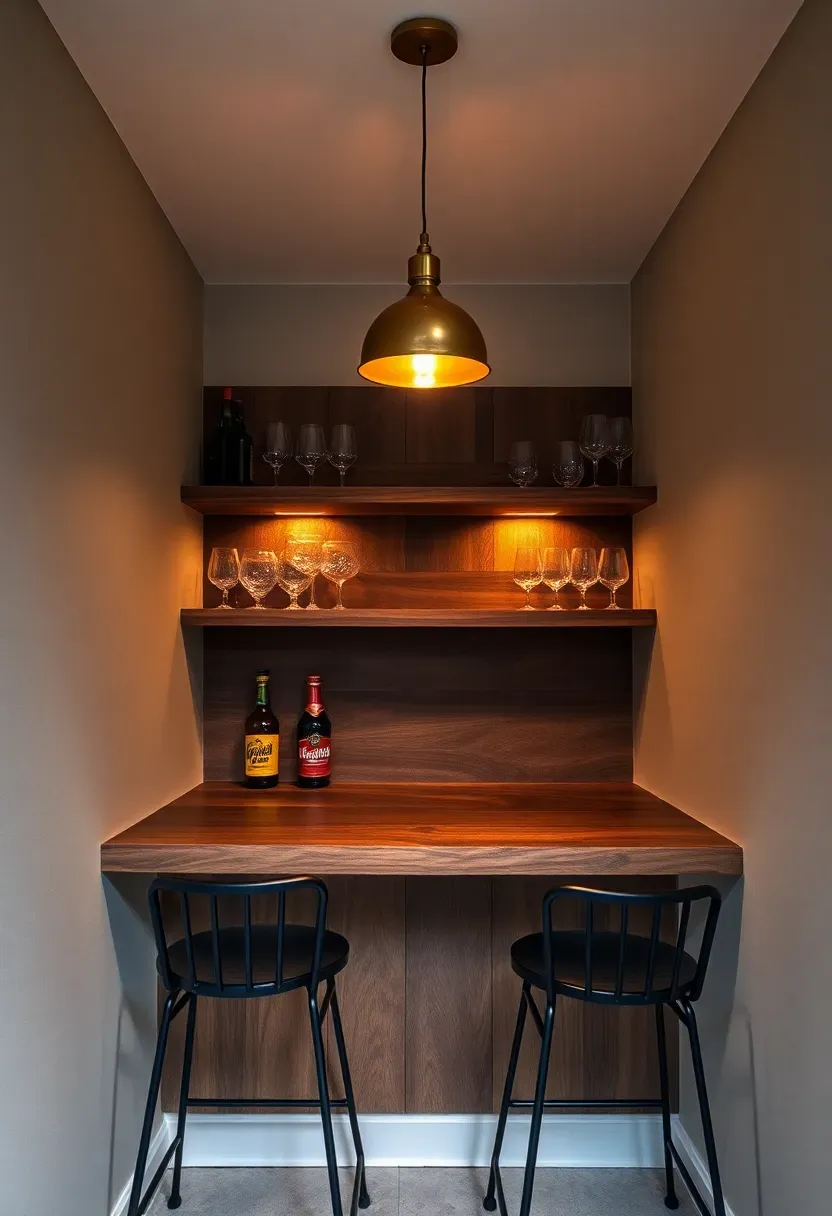
4. Basement Bar Nook
How to Build It
You do not need a full wet bar to get the effect. A four-foot base cabinet topped with butcher block or quartz, mounted between two walls or at the end of the room, gives you a functional drink station without major plumbing.
Step 1: Frame and Cabinet
Anchor a stock 36-inch-high base cabinet to the wall studs. If you want a sink, position the cabinet near existing drain lines to minimize plumbing costs. Otherwise, skip the sink entirely and use an insulated ice bucket.
Step 2: Countertop and Backsplash
Cut butcher block to size, sand, and seal with food-safe polyurethane. Peel-and-stick tile behind the counter adds visual interest for under fifty dollars.
Step 3: Shelving and Lighting
Mount two floating shelves above for glassware and bottles. Hang a single pendant light centered over the counter.
Watch Out
- Check local code: some jurisdictions require a dedicated 20-amp circuit for a basement bar area
- Without a sink, plan for carrying glasses upstairs; a small dishpan hidden in the cabinet helps

Recommended
Items for this idea
5. Shiplap Accent Wall
Shiplap behind the TV or along one focal wall adds texture and visual warmth without overwhelming the room. In a basement, it also hides imperfect drywall or concrete block. Use primed MDF shiplap boards rather than real wood — MDF resists moisture better and costs about half as much. Install with a nail gun over furring strips, leaving a nickel-width gap between boards for the shadow line. Paint it white for a bright, modern look, or go with a warm greige to keep things grounded. A single 12-by-8-foot wall costs around two hundred to three hundred dollars in materials.
Tips
- Seal the back of each board with primer before installation to prevent moisture wicking
- Run boards horizontally to widen a narrow room, vertically to add height
- Pre-paint all boards before nailing — touching up after installation is tedious
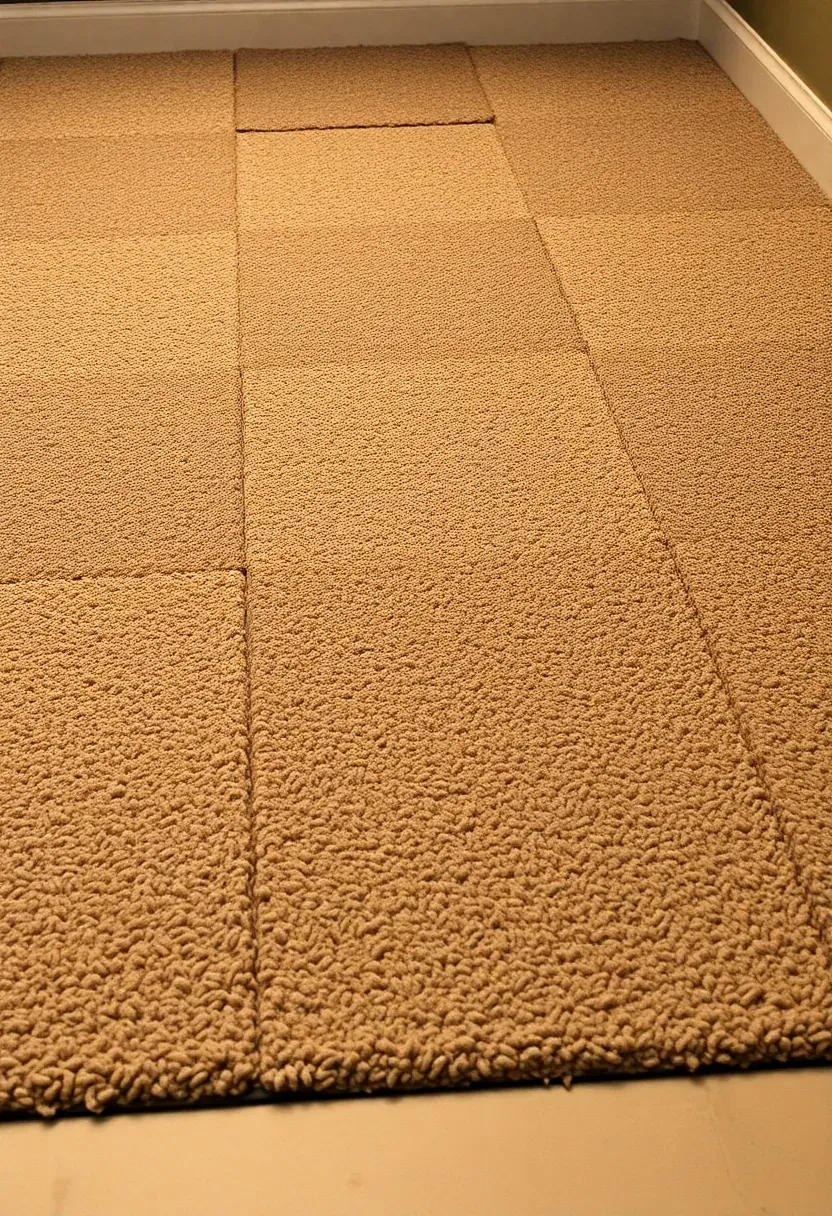
6. Carpet Tile Modular Floor
Carpet Tile vs. Wall-to-Wall Carpet
Both add warmth and comfort, but carpet tiles win in basements for one reason: replaceability. When a pipe leaks or a kid spills grape juice, you pull up the stained tiles and swap in fresh ones. Wall-to-wall carpet traps moisture underneath and becomes a mold risk in below-grade spaces.
Choose Carpet Tiles If
- Your basement has any history of dampness or minor flooding
- You have kids or pets that create frequent messes
- You want to mix colors or patterns for a custom look
Choose Wall-to-Wall If
- Your basement is fully waterproofed with a sump pump and dehumidifier
- You prefer a seamless, unified feel
- Budget matters less than aesthetics
Recommendation
For most basement family rooms, go with carpet tiles. FLOR and Interface both sell residential lines with built-in moisture barriers. Expect to pay four to eight dollars per square foot.

Recommended
Items for this idea
7. Daylight Simulation Light Panels
Windowless basements feel oppressive after an hour or two. Daylight simulation panels — flat LED fixtures that mimic the color temperature and intensity of natural light — trick your brain into thinking there is a window overhead. Mount them in the ceiling like a skylight, framed with trim to reinforce the illusion. The better models shift color temperature throughout the day, from cool blue-white in the morning to warm amber by evening. A 2x4-foot panel runs between eighty and two hundred dollars depending on quality. Two or three panels in a large basement make a noticeable psychological difference.
Tips
- Look for panels rated 5000K to 6500K for a convincing midday daylight effect
- Pair with a smart timer so they follow a natural sunrise-to-sunset schedule
- Frosted diffuser panels look more like actual skylights than bare flat LEDs
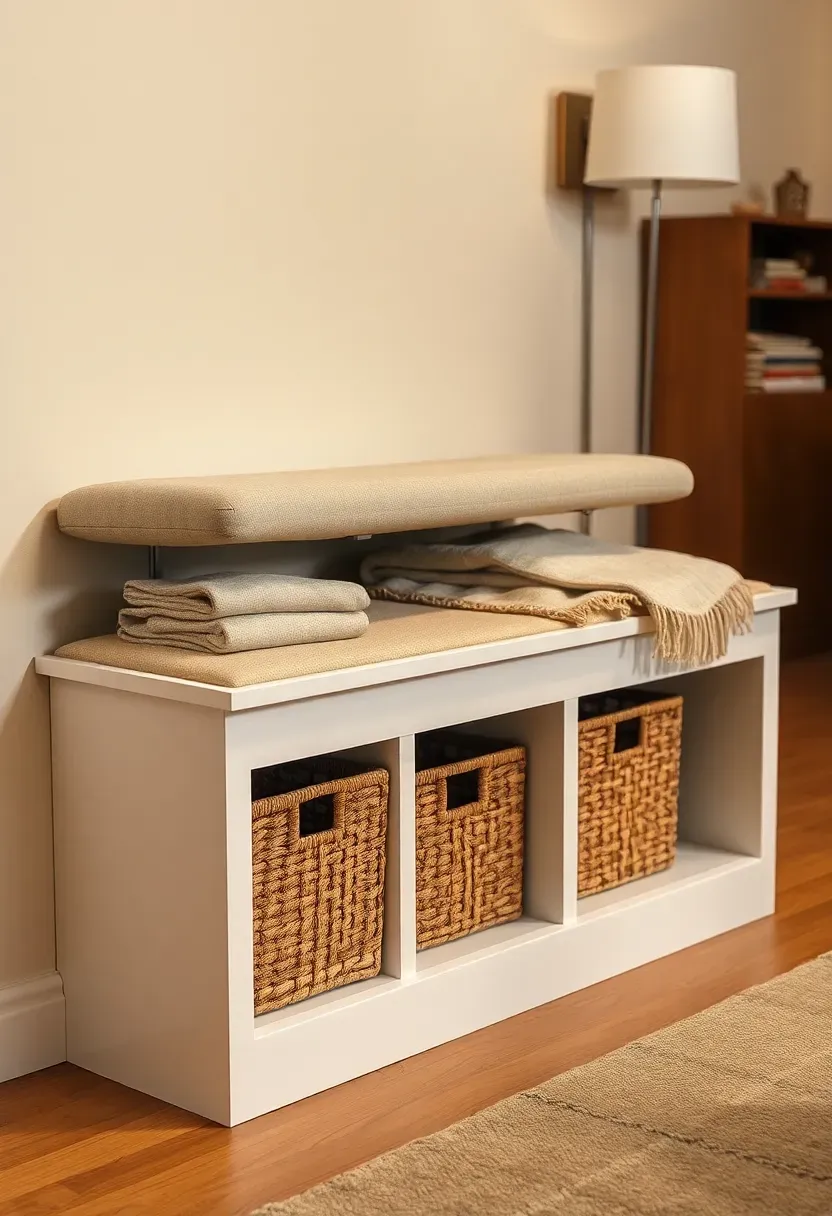
8. Built-In Storage Bench
How to Build One
A built-in bench along a wall serves three purposes at once: seating, storage, and visual architecture. In a basement family room, it is the perfect spot to hide board games, blankets, and toys.
Step 1: Build the Box
Frame a simple plywood box to your wall length, 18 inches deep and 18 inches high. Anchor it to wall studs.
Step 2: Add Dividers and Baskets
Install vertical dividers every 24 inches to create cubbies. Slide in woven baskets or fabric bins for organized storage.
Step 3: Top It Off
Cut a plywood top, wrap it in 3-inch foam and upholstery fabric, and attach with hinges for lift-up access — or leave it as a flat surface with removable cushions.
Watch Out
- Leave a half-inch gap between the bench back and the wall for air circulation in damp basements
- Use exterior-grade plywood for the bottom panel if your floor ever gets damp
Recommended
Items for this idea
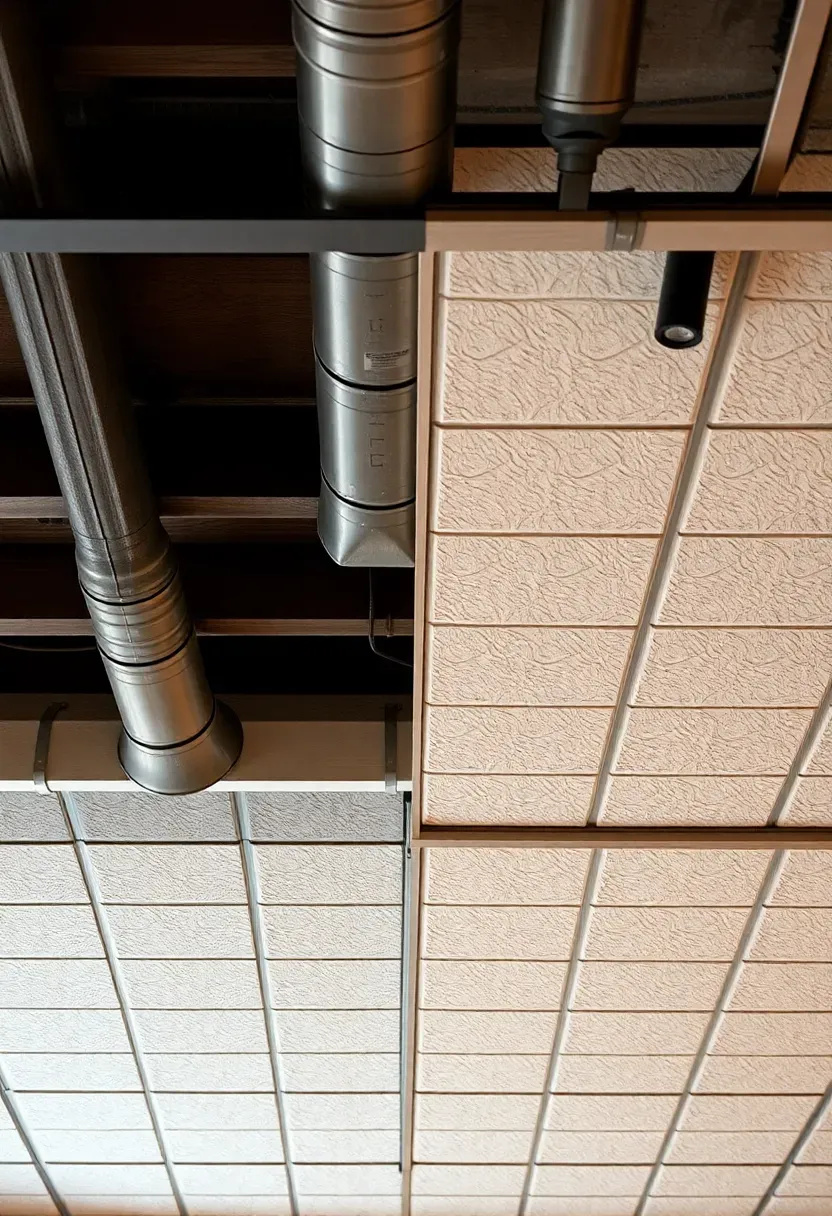
9. Drop Ceiling vs. Exposed Joists
Drop Ceiling
Acoustic drop ceilings hide ductwork, pipes, and wiring while giving easy access for repairs. They also dampen sound transmission to the floor above. The trade-off is height — a standard drop ceiling eats four to six inches of headroom.
Exposed Joists
Painting everything above — joists, ductwork, wires — a single dark color (matte black or dark charcoal) creates an industrial loft feel and preserves every inch of headroom. It looks intentional rather than unfinished.
Choose If
- Drop ceiling if you need regular access to plumbing/HVAC above, or if sound isolation matters
- Exposed joists if your ceiling is already under 8 feet and you cannot afford to lose inches, or if you prefer the industrial aesthetic
Recommendation
For basement family rooms under 8 feet, paint the ceiling. Above 8 feet, drop ceiling panels give a more polished look. Budget: painted exposed runs about $1-2 per square foot; drop ceiling runs $3-5 installed.
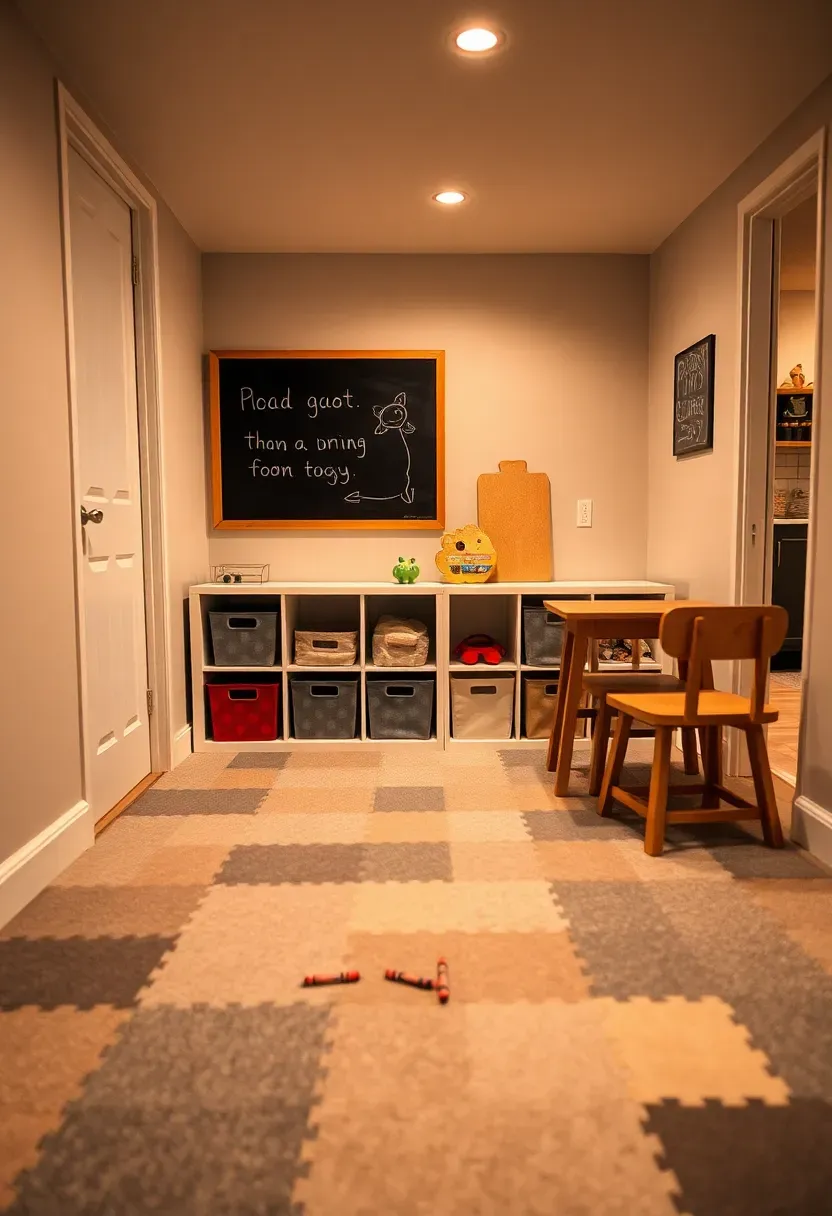
10. Kid-Friendly Play Zone Corner
Dedicate one corner of your basement family room to kids without letting toys take over the entire space. The trick is boundaries — physical and visual ones that separate play from the rest of the room.
How to Set It Up
Lay interlocking foam mats in a defined rectangle. Back the zone with a low bookshelf or cube storage unit that acts as both a room divider and toy organizer. Mount a small chalkboard or whiteboard on the adjacent wall. Keep a labeled bin system: one for blocks, one for cars, one for art supplies. The foam mats make cleanup obvious — if it is on the mat, it is in the play zone. If it is off the mat, it gets put away.
Practical Tips
- Choose foam mats in neutral colors (gray, cream) so they blend with the room when toys are stored
- Rotate toys monthly — store extras in labeled bins on a high shelf
- Add a small table and chairs for coloring and crafts; kid-sized furniture keeps messes contained
Recommended
Items for this idea
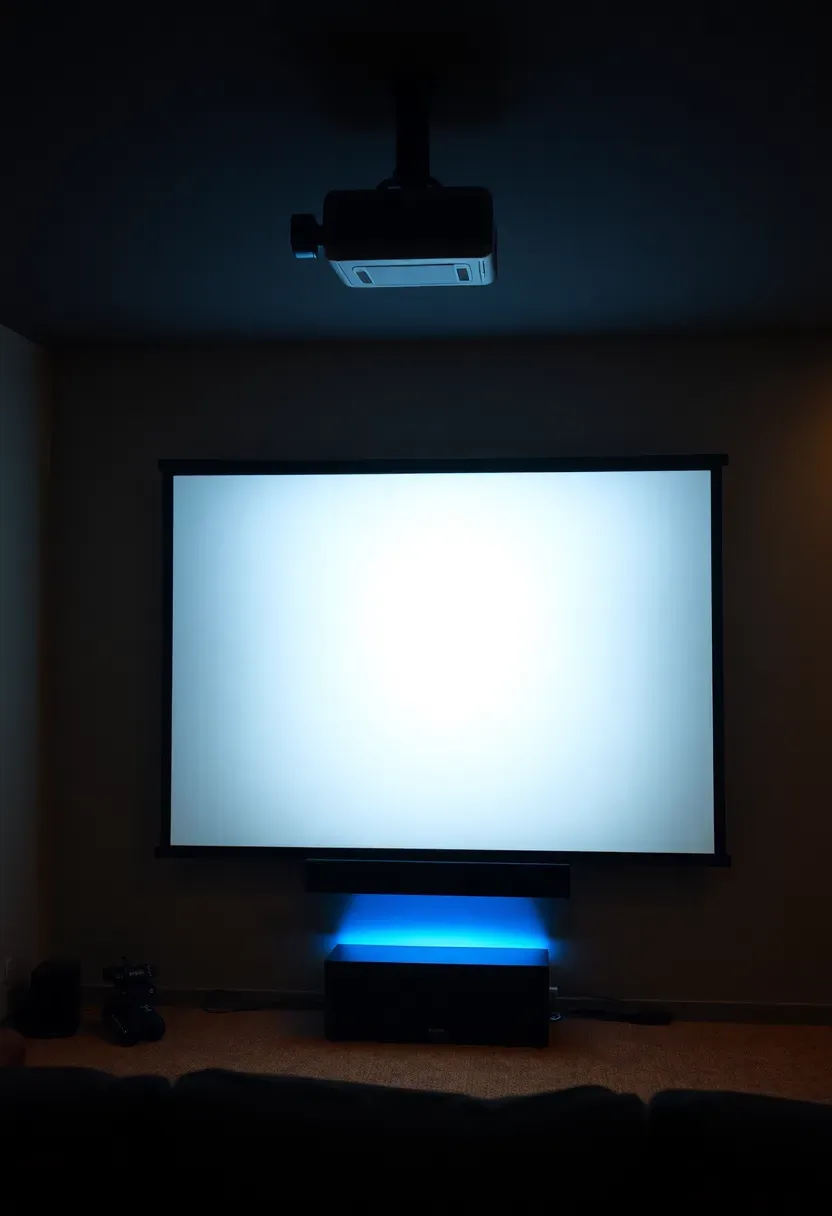
11. Projector Media Wall
Why Not a TV?
Basements are dark by nature, which is exactly what projectors need. A 100-inch projected image on a basement wall costs less than a 75-inch TV and creates a genuine theater experience. The lack of ambient light means you do not need an expensive high-lumen projector — even mid-range models produce vivid images in a fully dark basement.
How to Set It Up
Paint one wall with screen paint (Silver Ticket or Screen Paint by Digital Image) for about sixty dollars, or mount a pull-down screen. Position the projector on a ceiling mount eight to twelve feet from the wall. Run HDMI and power cables through the ceiling or along painted conduit. Add a 2.1 soundbar below the image for audio.
Pros and Cons
Pros: Massive image size for under a thousand dollars total; immersive movie and gaming experience; easy to hide the projector when not in use
Cons: Requires a dark room — any light leaks wash out the image; bulb replacement every few years adds cost; lower resolution than premium TVs at close viewing distances
12. Heated Floor Mat System
Basement concrete stays cold year-round, even in finished spaces. A heated floor mat installed under LVP, tile, or carpet tiles solves this without the expense of a full radiant floor system. Electric mat systems from brands like nVent NUHEAT or SunTouch roll out directly on the concrete, get covered by thin-set or self-leveling compound, and connect to a wall thermostat. You heat only the family room zone rather than the entire basement. Operating cost for a 200-square-foot zone runs about thirty to fifty cents per day. Material and installation for that same zone: roughly $800 to $1,200.
Tips
- Pair with a programmable thermostat so the floor warms up 30 minutes before you typically use the room
- Heated mats work best under tile and LVP; thick carpet insulates too much and blocks heat transfer
- Always install a dedicated GFCI circuit for safety in below-grade applications
Recommended
Items for this idea
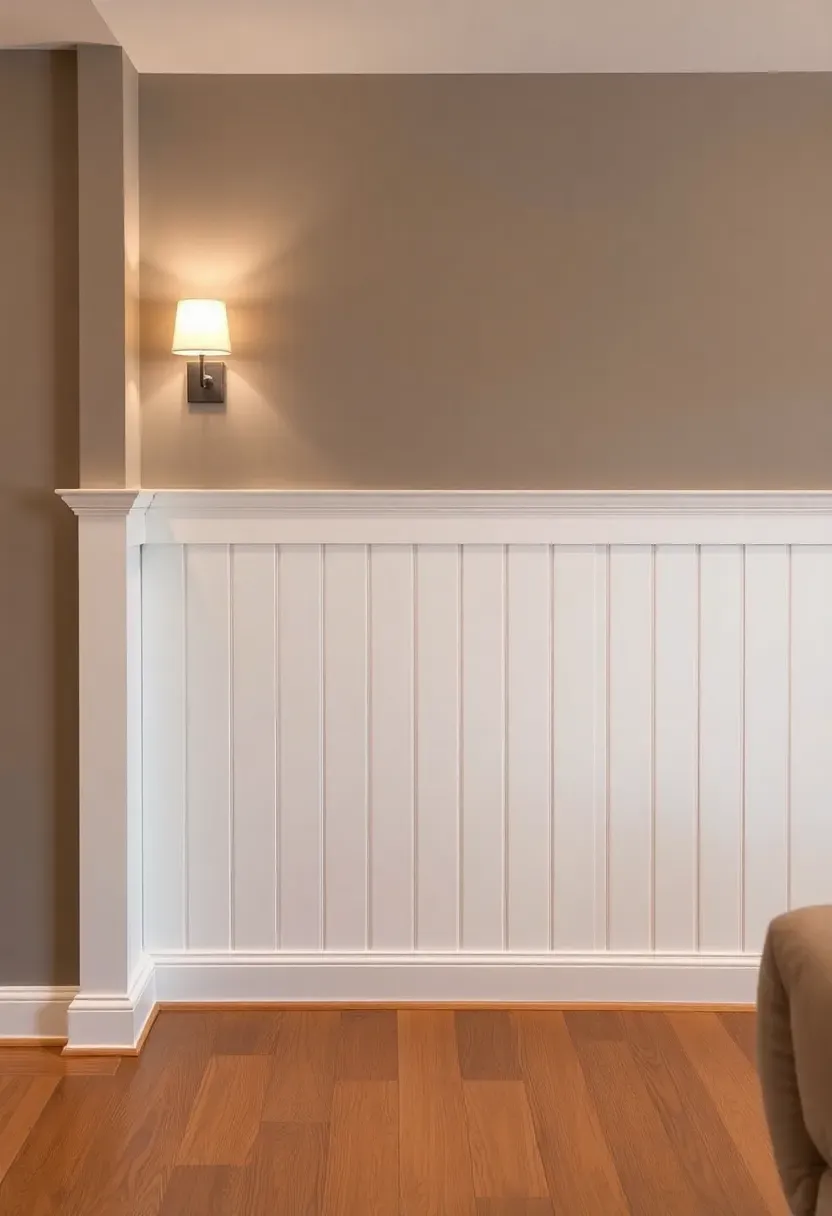
13. Board and Batten Wainscoting
Board and batten on the lower third of your basement walls does two things at once: it adds architectural character to flat drywall, and it protects wall surfaces from scuffs, kicked soccer balls, and furniture bumps. Install battens (1x2 MDF strips) every 16 inches over a flat MDF base panel, caulk all seams, and paint everything in a semi-gloss white or soft cream. The semi-gloss finish wipes clean, which matters in a room where kids run around. Keep the upper wall in a warm gray, sage, or navy to create contrast. Material cost for a 40-linear-foot wall: about $150 to $200.
Tips
- Use a level and spacer jig for consistent batten spacing — eyeballing leads to visible unevenness
- Caulk every seam before painting; basement humidity will eventually expose gaps
- Semi-gloss or satin finish only — flat paint shows every scuff mark
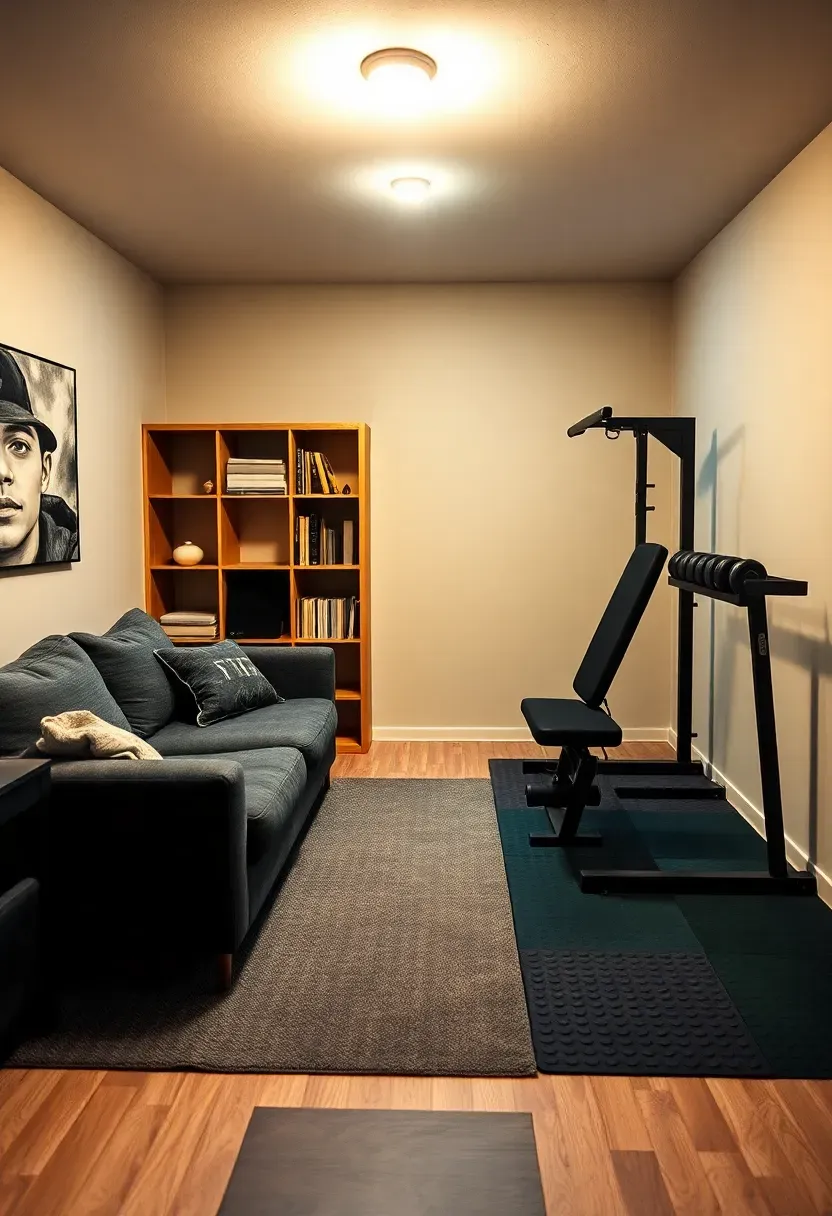
14. Basement Gym Combo Room
The Problem
You want a home gym but you also need a family room. Dedicating the entire basement to one or the other feels wasteful.
The Solution
Split the room with a visual divider — an open bookshelf, a half-wall, or even a large area rug that defines the boundary. Place gym equipment (a folding bench, adjustable dumbbells, a wall-mounted pull-up bar, a yoga mat) on the concrete or rubber-matted side. Keep the family room side carpeted or LVP-covered with comfortable seating. The key is choosing compact, foldable equipment that stacks against the wall when not in use. A folding power rack, collapsible bench, and adjustable dumbbell set take up a 6x6-foot footprint when deployed and almost nothing when stored.
Pros and Cons
Pros: No gym membership; equipment is steps away; family room stays usable
Cons: Sound from dropping weights carries; sweaty equipment next to a couch requires discipline about cleanup; rubber mat smell takes weeks to off-gas
Recommended
Items for this idea
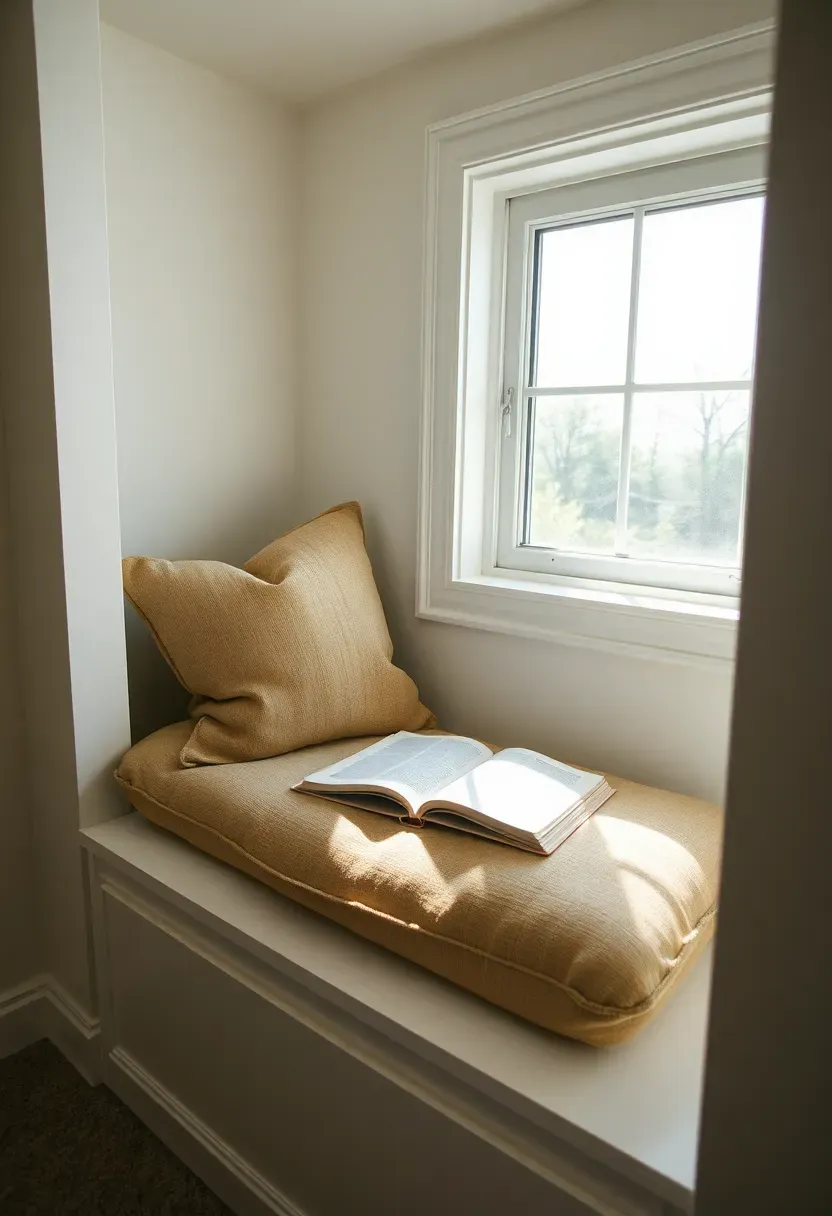
15. Egress Window Seating Nook
If your basement has an egress window — and by code, it should if there is a bedroom down there — that window well is prime real estate. Build a bench seat into the window nook with a hinged top for storage. Add a thick cushion, a couple of throw pillows, and a wall-mounted reading light. This becomes the one spot in the basement that gets genuine natural light, making it a magnet for reading, morning coffee, or just escaping the screen for a few minutes. Frame the window with simple trim and paint it white to maximize light reflection into the room.
Tips
- Keep the window well clean and consider a clear bubble cover to let light in while keeping debris out
- Size the bench seat to match the window width exactly for a built-in look
- Use moisture-resistant foam for the cushion insert — Dryfast foam drains and dries if it ever gets damp
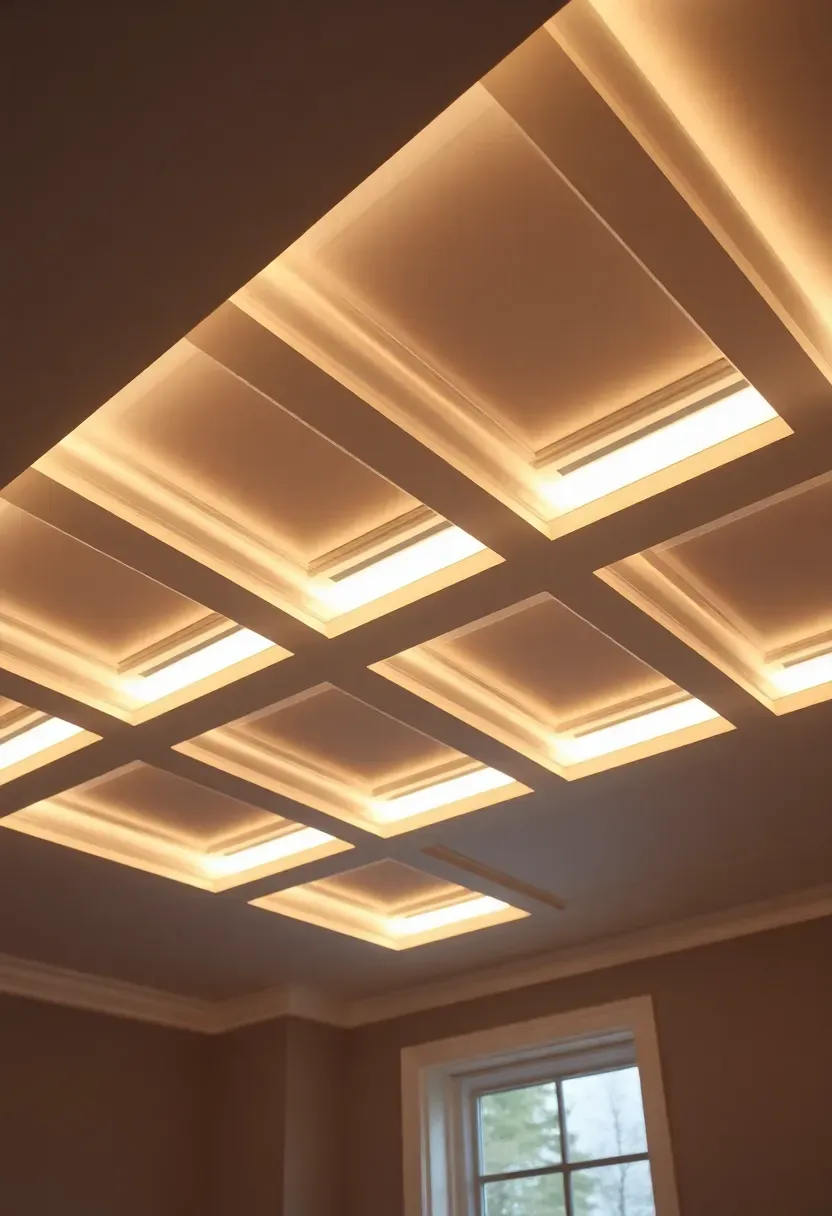
16. Faux Coffered Ceiling Panels
Real coffered ceilings require deep ceiling cavities you do not have in a basement. Faux coffered panels — lightweight PVC or foam grid systems — give you the same visual depth while only dropping the ceiling by one to two inches. Companies like Tilton Coffered Ceilings sell interlocking panels that glue directly to existing drywall or drop ceiling grids. Paint them the same color as the walls for a seamless look, or go white to brighten the space. The grid pattern draws the eye upward and makes low ceilings feel more intentional rather than just short.
Tips
- White or very light colors on coffered panels make ceilings feel higher
- Avoid deep coffers in rooms under 8 feet — shallow profiles (1-2 inches) work better
- Install LED strip lights inside the coffers for indirect uplighting that adds perceived height
Recommended
Items for this idea
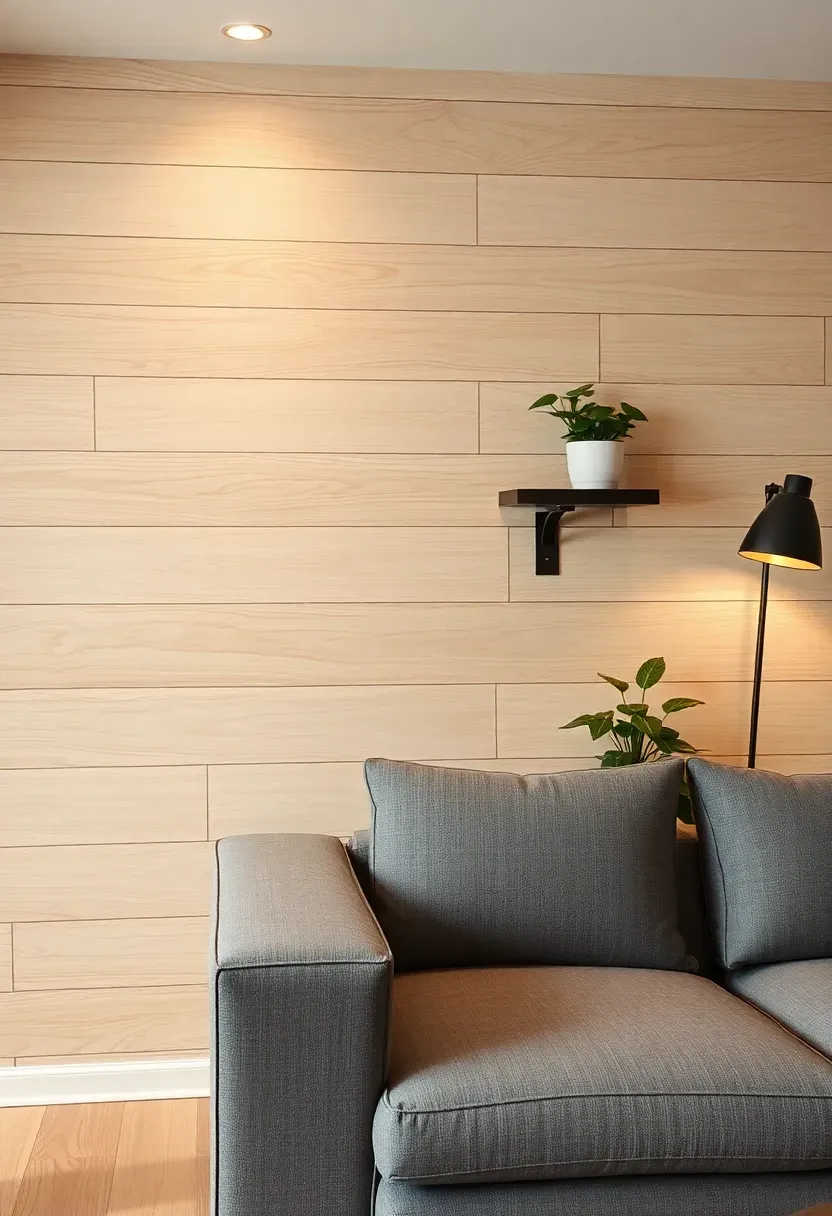
17. Vinyl Plank Wall Treatment
Leftover LVP from your floor installation makes a surprisingly effective accent wall material. It is moisture-resistant, easy to clean, and adds the look of reclaimed wood at a fraction of the cost. Install planks horizontally with construction adhesive directly over drywall or concrete block. Stagger end joints for a natural plank look. Light wood tones (whitewashed oak, blonde maple) work best for basement walls because they bounce light around the room. A single accent wall behind the sofa or TV takes about thirty planks and costs under a hundred dollars if you are using leftovers.
Tips
- Use construction adhesive rated for vinyl — standard wood glue will not hold
- Start from the bottom and work up, letting adhesive tack for five minutes per row
- End caps or thin trim strips at corners give a finished look
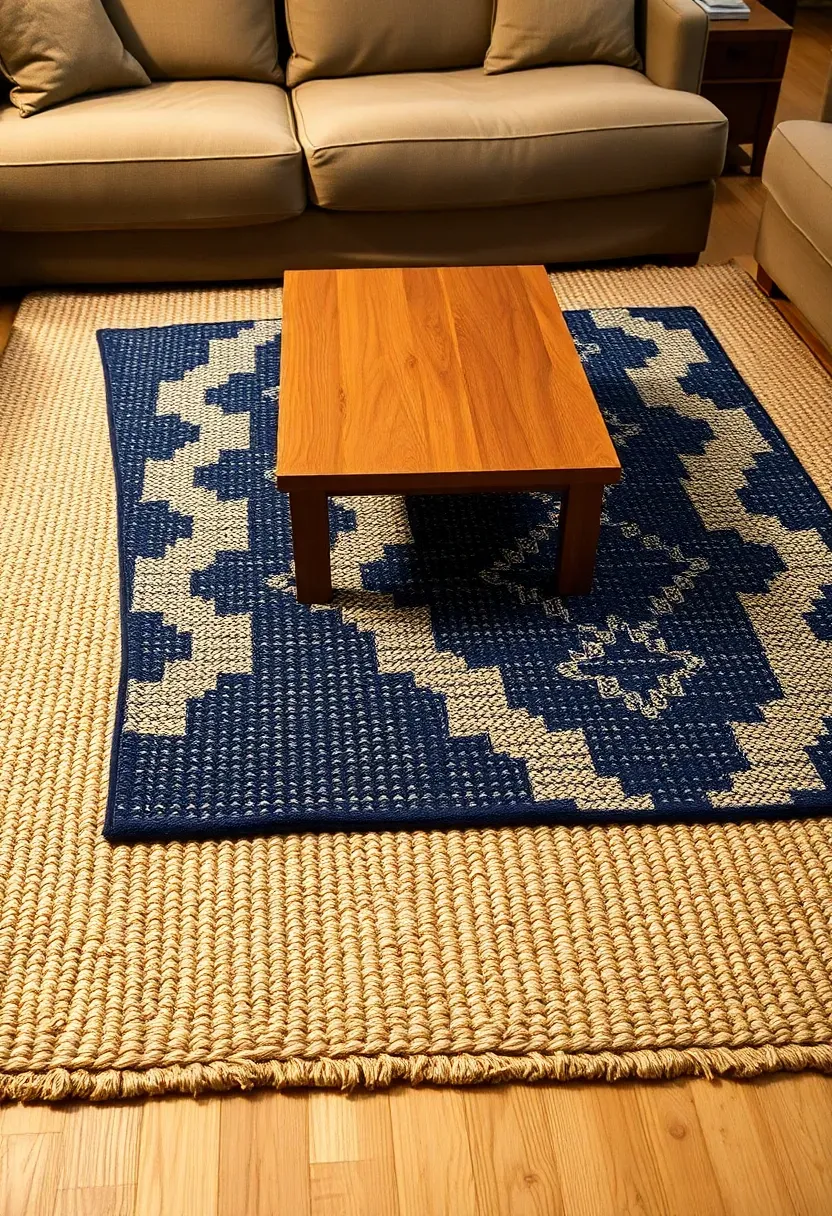
18. Oversized Area Rug Layering
Why Layer Rugs?
A single area rug on a basement floor can look like it is floating in the middle of concrete. Layering two rugs — a large neutral base rug with a smaller patterned rug on top — anchors furniture groupings and adds visual warmth without wall-to-wall carpet. The base rug defines the room zone; the accent rug adds personality.
How to Do It
Start with a natural fiber base rug (jute or sisal, 9x12 or larger) that covers most of the seating area. Place a smaller patterned or textured rug (5x7 or 6x9) on top, centered under the coffee table. The base rug should extend at least 12 inches beyond the top rug on all sides.
Pros and Cons
Pros: Adds insulation from cold concrete; creates visual interest; easy to swap the top rug seasonally
Cons: Natural fiber rugs can absorb basement moisture — use a rug pad with moisture barrier; layered rugs can bunch and shift without proper padding
Recommended
Items for this idea
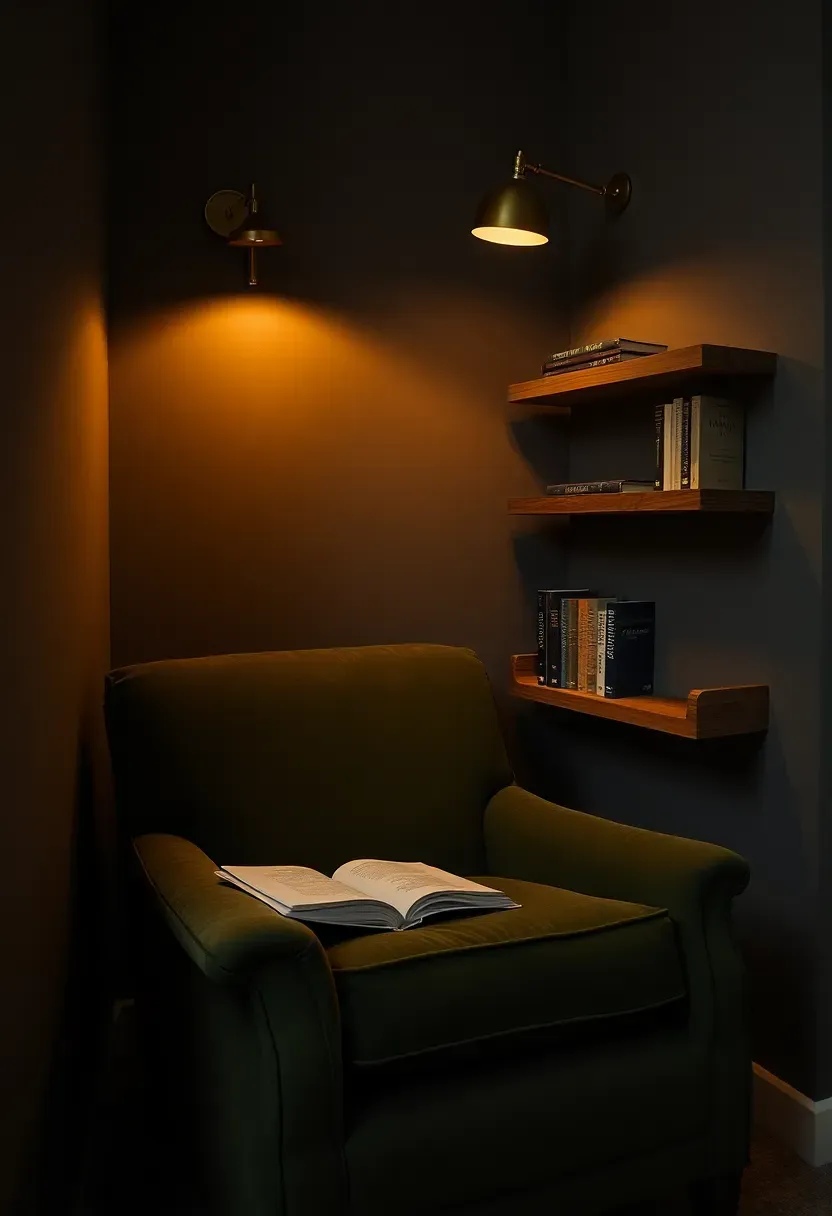
19. Corner Reading Alcove
Basements often have awkward corners where walls jog around ductwork or support columns. Instead of ignoring these spots, build them into reading alcoves. A deep armchair, a wall-mounted swing-arm light, and two floating shelves turn a dead corner into the most used seat in the room. Paint the alcove walls a shade or two darker than the rest of the room to create a cocoon effect. Add a small side table for drinks and you have a nook that pulls people away from screens without any effort.
Tips
- Position the chair so the reading light falls over the left shoulder for right-handed readers (reverse for lefties)
- Choose a chair with high arms and a deep seat — you want to curl up, not sit upright
- Keep shelf books to a single row deep so the alcove does not feel cluttered

20. Staircase Wall Gallery
The wall along your basement stairs is the first thing people see when heading down. A gallery wall here sets the tone for the entire space before anyone reaches the bottom step. Use uniform frames (all black, all white, or all natural wood) in mixed sizes to keep things cohesive without feeling rigid. Arrange frames along an imaginary center line that follows the staircase angle. Mix family photos with simple prints or typography for variety. Spacing of two to three inches between frames keeps the grouping tight enough to read as one composition.
Tips
- Use paper templates taped to the wall before hammering any nails
- Command strips work on most basement stairwell walls and avoid drilling into block or poured concrete
- Stick to a maximum of two mat colors across all frames for visual unity
Recommended
Items for this idea
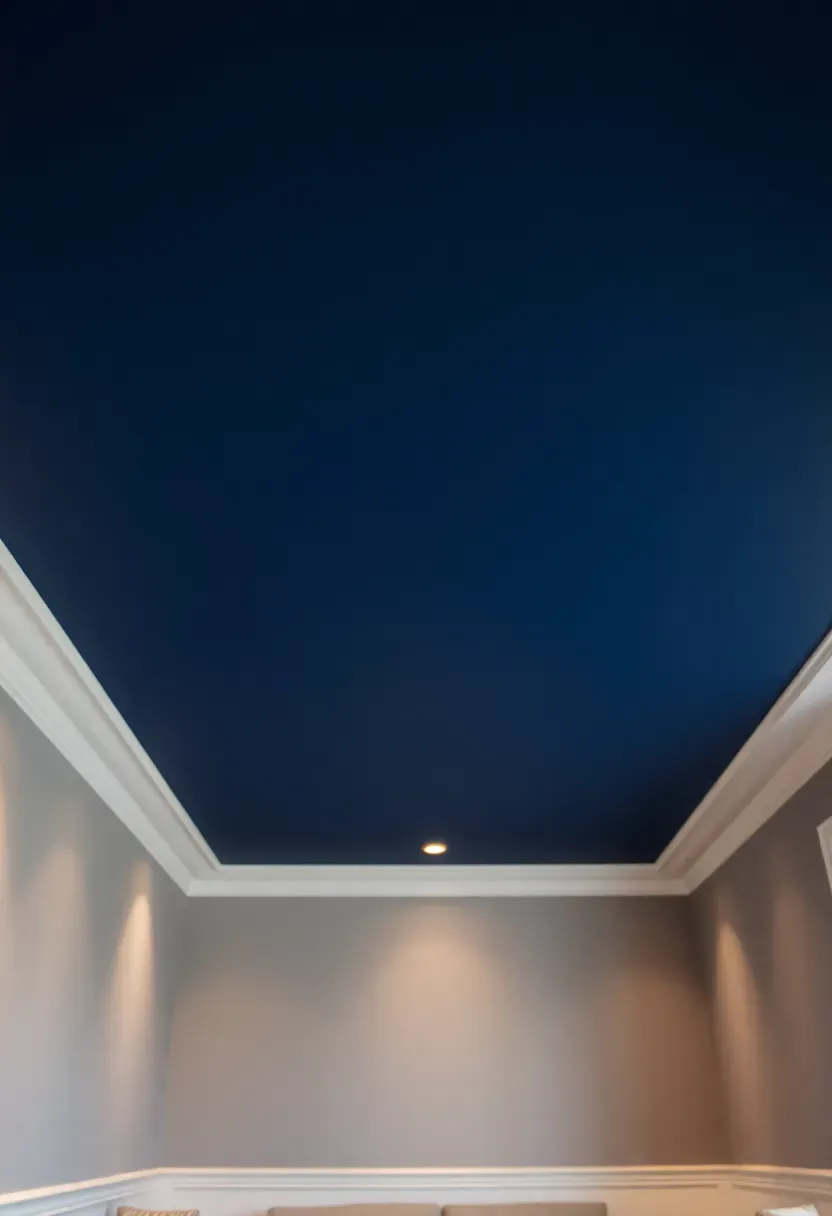
21. Basement Ceiling Paint Trick
The Core Issue
Low ceilings make basements feel cramped. Standard advice says paint them white, but in rooms under 8 feet, a white ceiling just highlights how close it is to your head.
The Solution
Paint the ceiling and the top 8 to 12 inches of the wall the same color — a rich, saturated tone like dark navy, deep charcoal, or forest green. This blurs the boundary between wall and ceiling, making it harder for your eye to pinpoint exactly where the ceiling starts. The room feels taller because the transition disappears. Keep the lower walls lighter for contrast. It sounds counterintuitive, but dark ceilings in low rooms genuinely work better than white ones. One gallon of quality paint covers about 350 square feet of ceiling, so this is a sub-fifty-dollar project.
Pros and Cons
Pros: Cheapest ceiling treatment available; makes low ceilings feel less oppressive; dramatic visual impact
Cons: Requires good artificial lighting to compensate for the darker overhead; can feel heavy if the rest of the room is also dark; tough to roll paint above your head without drips
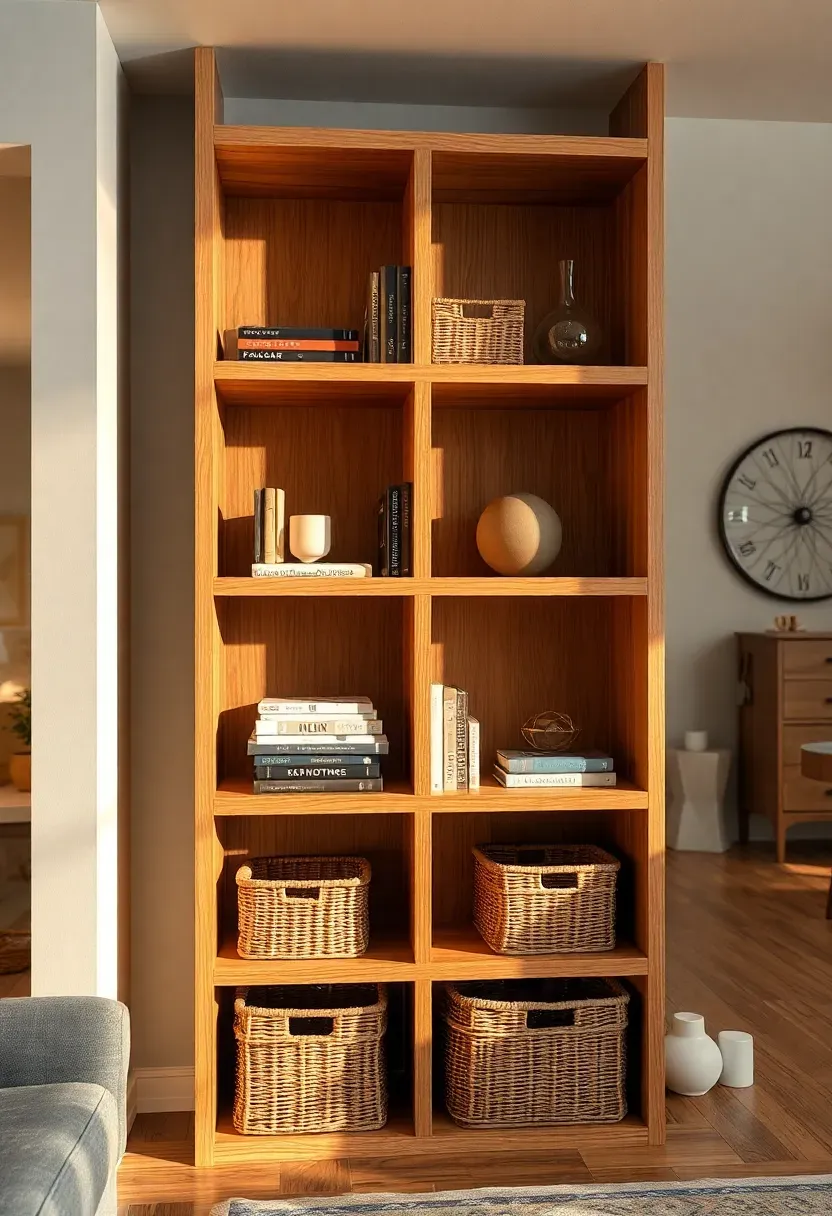
22. Open Shelving Room Divider
Large basements benefit from zones, but solid walls eat square footage and block light flow. An open shelving unit — tall, backless, and accessible from both sides — divides the room while keeping it visually connected. Place it between the TV area and a play zone, office nook, or bar area. Stock shelves with a mix of books, baskets, and a few decorative objects, keeping at least 30 percent of shelf space empty so you can see through to the other side. IKEA Kallax units are the budget standard; custom-built versions with thicker shelves and a wood finish look more permanent.
Tips
- Anchor tall units to the wall or ceiling — freestanding bookcases in a room with running kids are a tipping hazard
- Use the bottom shelf for heavy items (books, storage bins) to lower the center of gravity
- Back-to-back styling works well: display side faces the living area, storage side faces the utility zone

Recommended
Items for this idea
23. Soundproofing for Movie Night
How to Reduce Sound Bleed
Basement family rooms share a ceiling with the main living floor. Movie explosions, game audio, and kid noise travel straight up through the joists. You do not need a professional studio build to cut transmission noticeably.
Step 1: Insulate Between Joists
Fill joist bays with mineral wool batts (Rockwool Safe'n'Sound). This alone reduces sound transfer by roughly 50 percent compared to empty joist cavities.
Step 2: Add Mass to the Ceiling
Attach a layer of 5/8-inch Type X drywall to the joists using resilient channel — metal strips that decouple the drywall from the structure, breaking the vibration path.
Step 3: Seal Every Gap
Sound leaks through small openings. Caulk around electrical boxes, pipe penetrations, and the ceiling perimeter with acoustic sealant.
Watch Out
- Resilient channel must be installed correctly (screw only into the channel, never into the joist through the channel) or it becomes useless
- This is a two-person job minimum — hanging drywall overhead alone is dangerous

24. Basement Guest Suite Layout
The Problem
Guests need privacy but you cannot wall off half the basement permanently. The family room needs to function normally 350 days a year.
The Solution
Install a ceiling-mounted curtain track around a sofa bed or Murphy bed zone. When guests arrive, pull the curtains to create an enclosed sleeping area. When they leave, push the curtains back and the room returns to normal. Add a small nightstand, a wall-mounted reading light, and a basket with fresh towels and toiletries. If the basement has a bathroom, position the guest zone closest to it. A ceiling curtain track system costs forty to eighty dollars and installs in under an hour.
Pros and Cons
Pros: Guest room on demand without losing family room square footage; curtains add visual softness to the basement; far cheaper than building a wall with a door
Cons: Zero sound isolation — guests hear everything happening in the room; curtains collect dust and need periodic washing; sofa beds are notoriously uncomfortable compared to real mattresses
Recommended
Items for this idea
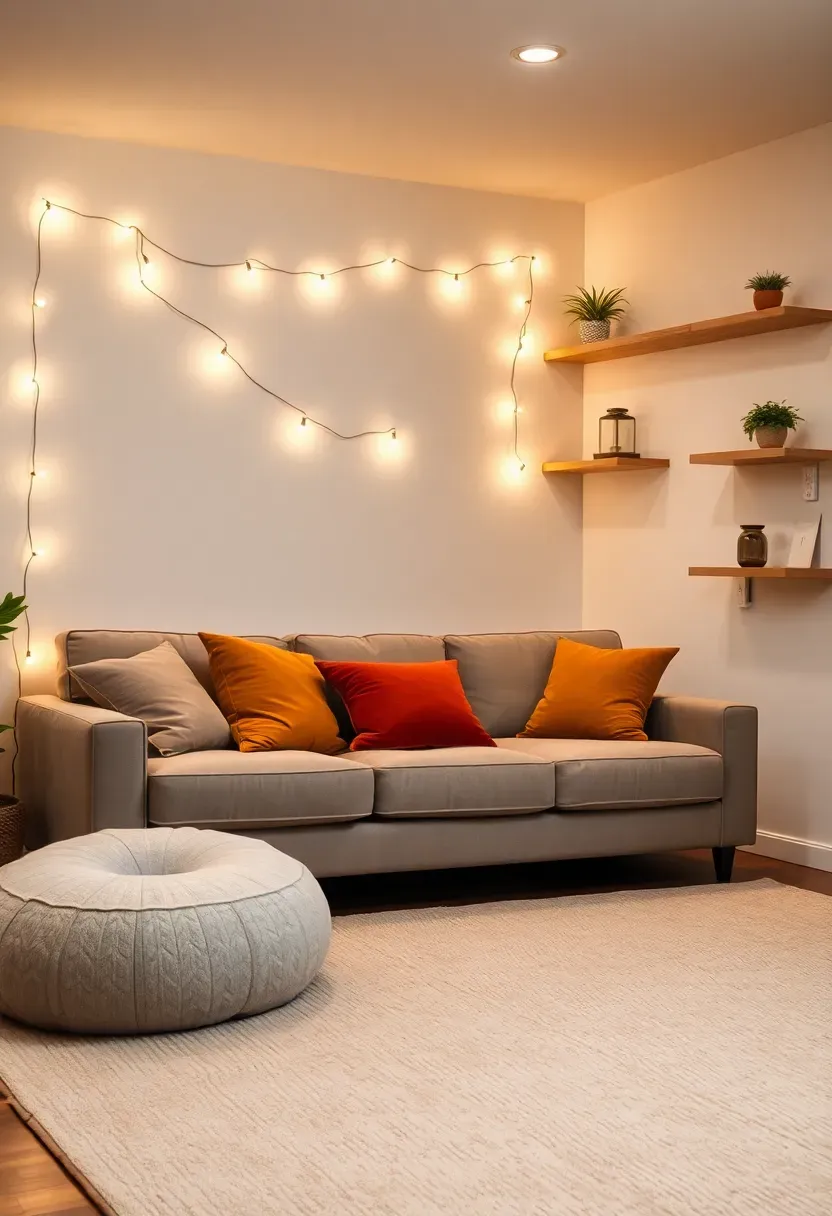
25. Budget Refresh Under Five Hundred
You do not need a full renovation to make your basement family room feel different. Five hundred dollars, spent carefully, goes a long way.
The Breakdown
| Item | Estimated Cost |
|---|---|
| Two gallons of paint (walls + ceiling trick) | $80 |
| New throw pillows and blankets | $60 |
| String lights or LED strip lighting | $25 |
| Large area rug (8x10) | $120 |
| Floating shelves (set of 3) | $45 |
| Curtains for windows or room division | $50 |
| Storage baskets (set of 4) | $40 |
| Wall art or framed prints | $60 |
| Total | $480 |
Where to Start
Paint first — it changes the entire feel of the room for the lowest cost. Then add the rug and lighting. Everything else layers on top. Do it over two weekends and the space will feel like a different room without touching the floor, ceiling, or layout.
Quick FAQ
Does a finished basement add value to your home? In most markets, a finished basement returns 50 to 70 percent of the renovation cost at resale. More importantly, it adds usable square footage that appraisers factor into their calculations. A well-finished basement family room can add $20,000 to $50,000 in perceived value depending on your area.
What is the best way to handle basement moisture before finishing? Start with a dehumidifier and monitor relative humidity for at least one full season. Address any active water intrusion — cracks, window well drainage, grading issues — before covering walls. Interior drainage systems and sump pumps handle hydrostatic pressure. Seal concrete floors with an epoxy or penetrating sealer before installing any flooring.
Can I finish a basement family room myself? Framing, insulation, drywall, painting, and flooring are all DIY-friendly with basic tools and YouTube guidance. Electrical work and plumbing typically require permits and licensed contractors. Expect a full DIY basement finish to take three to six months of weekend work for a 500-square-foot space.
How do I keep a basement family room from feeling dark? Layer your lighting: recessed ceiling lights for general illumination, table and floor lamps for warmth, and LED strip lights for accent. Use light-colored paint on walls. Add mirrors to bounce light. Daylight simulation panels fill the gap where windows would normally be. Avoid dark flooring — it absorbs light instead of reflecting it.
What temperature should I keep a basement family room? Aim for 68 to 72 degrees Fahrenheit when the room is in use. A separate HVAC zone or a ductless mini-split gives you independent temperature control without heating or cooling the entire basement. Ceiling fans help circulate air and prevent the stale feeling basements develop.
A basement family room does not need to look or feel like an afterthought. The ideas here work whether you are starting from bare concrete or refreshing a space that was finished a decade ago. Pick two or three that solve your biggest pain points — cold floors, bad lighting, no storage — and start there. You can always add more later. The best family rooms grow over time anyway, shaped by how your family actually uses them rather than by a single weekend of decisions.
Pinterest cover for 25 Basement Family Room Ideas for Every Budget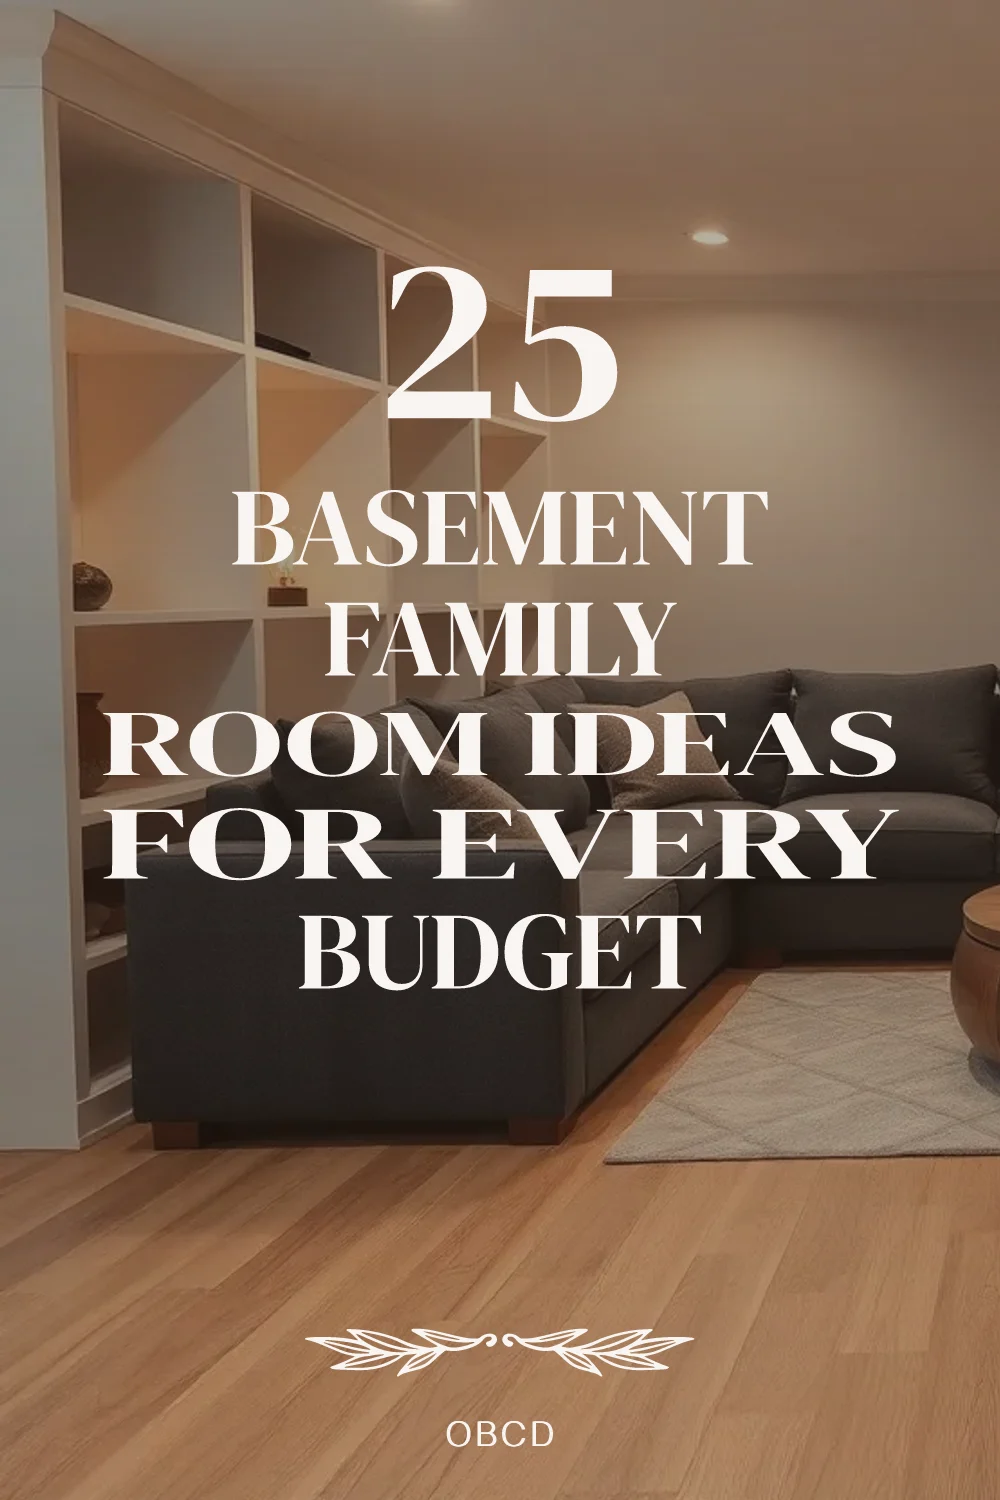
About the author
OBCD
CGI visualization and interior design content. We create detailed 3D renders and curate practical design ideas for every room in your home.