21 Basement Playroom Ideas Kids Actually Use
My kids used to play in the living room. Legos embedded in couch cushions, crayon marks on the coffee table, stuffed animals colonizing every chair. Moving their play space to the basement changed everything — but only after a few false starts. The first version was basically a concrete box with a rug thrown in. Nobody wanted to be down there. The second attempt, after I actually addressed lighting, flooring, and storage, became the most popular room in the house. What I learned is that a basement playroom needs to solve specific problems: it has to feel warm despite being underground, withstand daily destruction, and keep toys organized enough that cleanup takes minutes, not hours.
Below are 21 ideas covering layout zones, flooring options, storage systems, and creative features that hold up to real kid use.
Table of Contents
- Interlocking Foam Floor Tiles
- Wall-Mounted Toy Cubby System
- Indoor Climbing Wall
- Art Station with Washable Surfaces
- Reading Nook Under the Stairs
- Projector Play Wall
- Rubber Flooring Gym Zone
- Magnetic Chalkboard Accent Wall
- IKEA Kallax Play Kitchen Setup
- Sensory Corner for Toddlers
- Ceiling-Hung Swing or Hammock
- Train Table and LEGO Station
- Indoor Slide Built Into a Platform
- Dress-Up Corner with Mirror and Hooks
- Ball Pit Zone
- Music and Instrument Corner
- Homework Nook Within the Playroom
- Puppet Theater Built-In
- Glow-in-the-Dark Ceiling Stars
- Indoor Sandbox with Kinetic Sand
- Toy Rotation Storage System
1. Interlocking Foam Floor Tiles
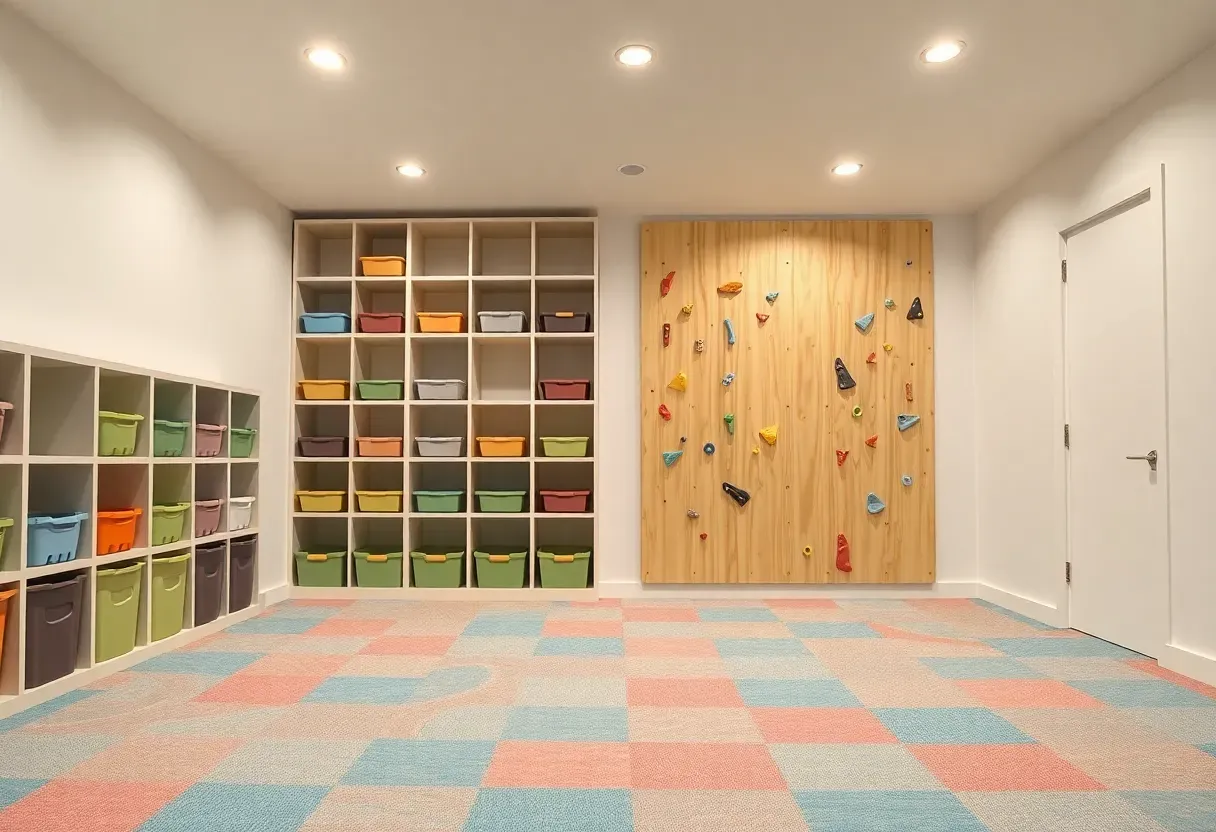
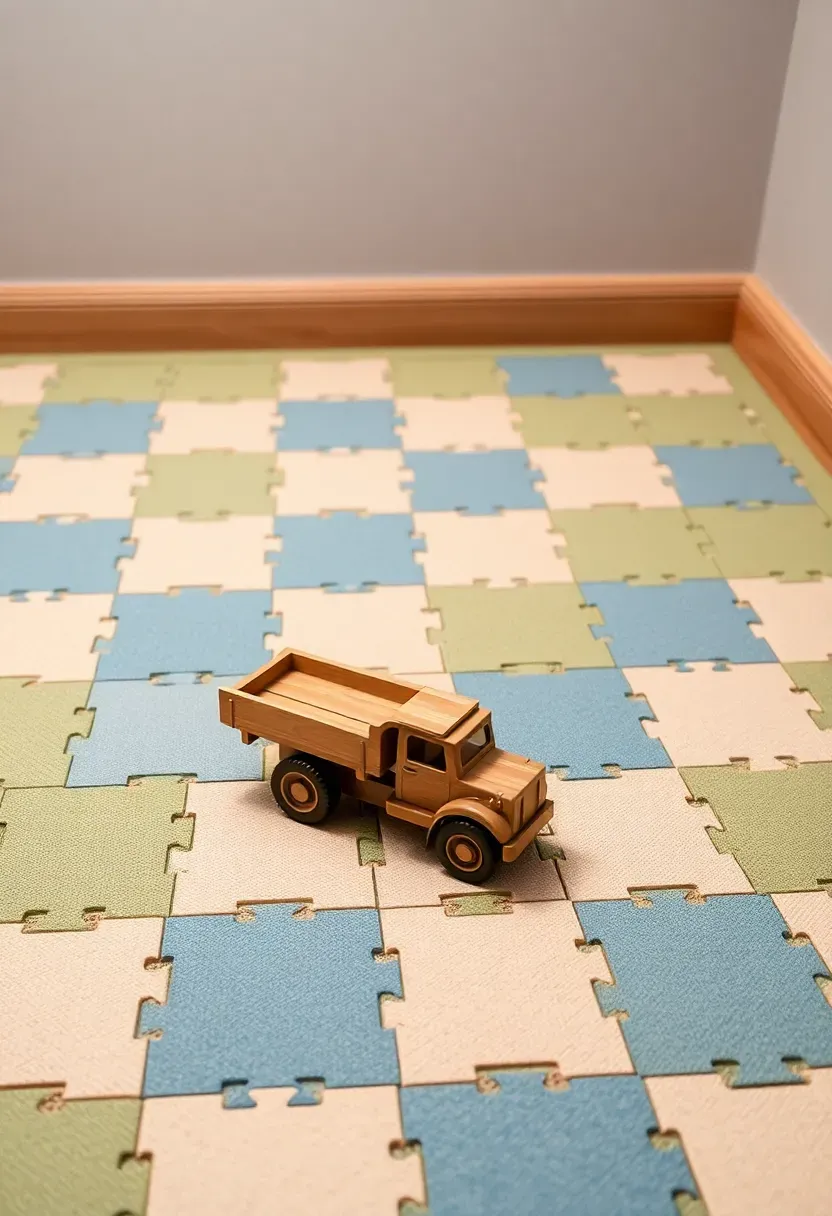
Concrete basement floors are cold and unforgiving when a toddler takes a spill. Interlocking EVA foam tiles solve both problems at once. They provide a cushioned surface that absorbs impact, insulate against cold concrete, and come in enough colors to create patterns or zone different play areas. Installation takes about twenty minutes for a standard room — no adhesive, no tools. When a tile gets stained or torn, you swap out that single piece instead of replacing an entire floor. Budget around one to two dollars per square foot, making this the cheapest flooring option that actually works well in a playroom.
Tips
- Choose tiles at least 5/8-inch thick for real cushioning on concrete
- Pick solid colors over puzzle-piece alphabet tiles — they look better as kids grow older
- Vacuum between tile seams monthly; crumbs and sand collect in the joints
We picked a few things that go well with this idea: ProSource Foam Puzzle Play Mat (36 Tiles) (★4.6), ProsourceFit Wood Grain EVA Foam Tiles (24 Sq Ft) (★4.4) and Stalwart Interlocking Foam Play Mat (8-Piece) (★4.4). As an Amazon Associate we earn from qualifying purchases.
2. Wall-Mounted Toy Cubby System
The Core Issue
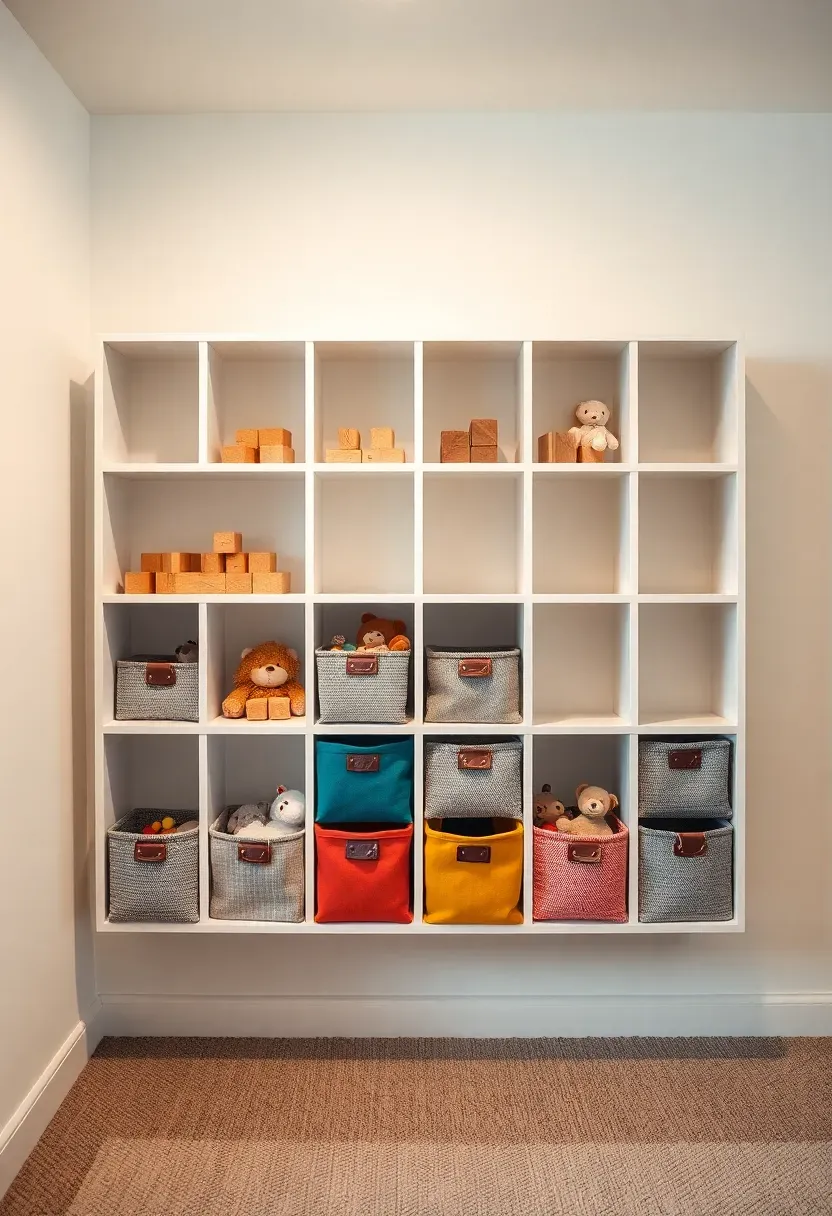
Toy bins on the floor eat up play space and end up dumped out constantly. Kids cannot see what is inside, so they empty everything searching for one item.
The Solution
Wall-mounted cubby grids at kid height keep toys visible and accessible while freeing floor space. Use open-front bins in each cubby, color-coded by toy type. Label each bin with a picture for pre-readers. Mount the unit to wall studs — drywall anchors alone will not hold the weight once bins are loaded. The IKEA Kallax turned on its side and secured to the wall is the most popular budget option, running about seventy dollars for a 4x2 unit.
Pros and Cons
- Pro: Floor stays clear for active play
- Pro: Kids learn sorting and cleanup habits naturally
- Con: Heavy items in upper cubbies can be a tipping hazard if not wall-mounted properly
We picked a few things that go well with this idea: TOPNEW 32 Rock Climbing Holds with Hardware (★4.6), KINSPORY 20pc Kids Climbing Holds Set (★4.7) and 32-Piece Kids Rock Climbing Wall Kit (★4.9). As an Amazon Associate we earn from qualifying purchases.
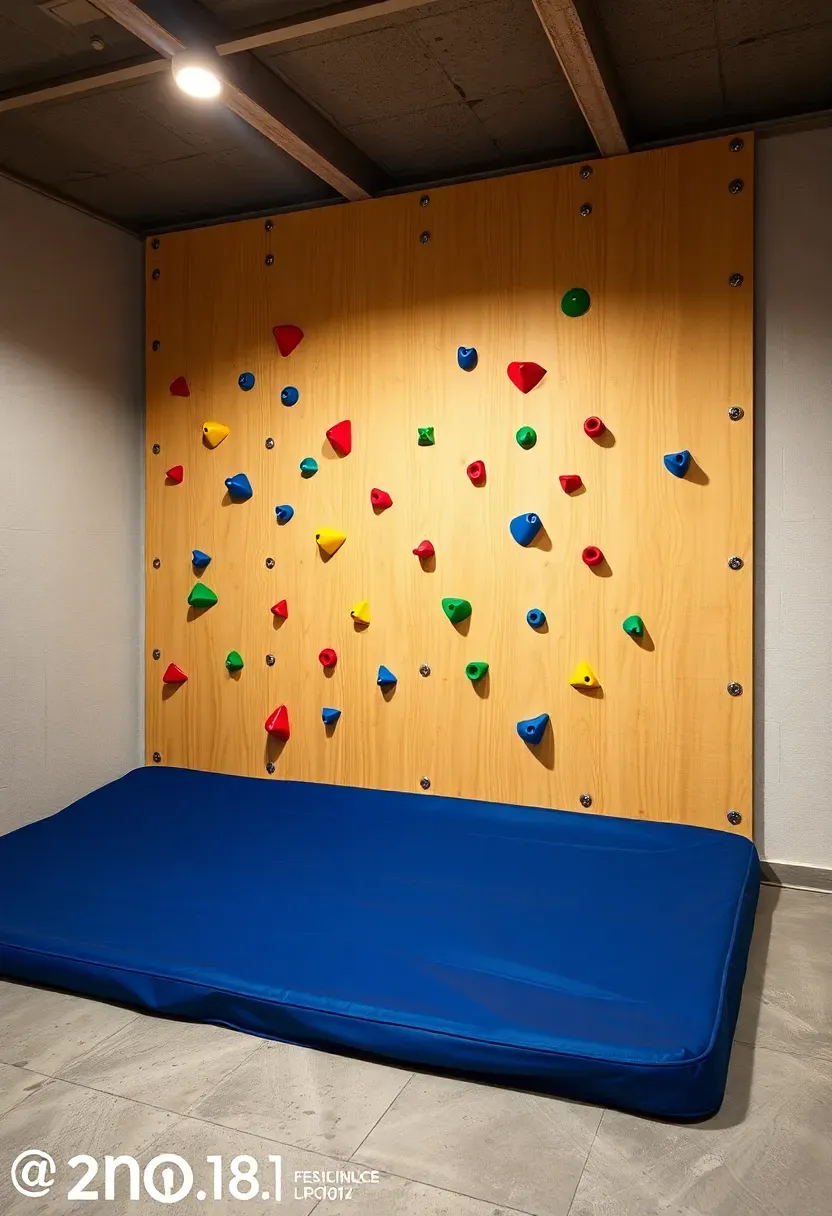
3. Indoor Climbing Wall
Kids climb furniture anyway. Giving them a dedicated wall channel that energy into something safe and physical. A 4-by-8-foot sheet of 3/4-inch plywood mounted to studs with T-nut climbing holds costs about 150 dollars in materials. Space holds 8 to 12 inches apart for younger kids, closer together for older ones. The critical piece is the landing zone: a 4-inch-thick gymnastics crash mat extending at least 3 feet from the wall base. Cap the climbing height at about 6 feet for residential use — high enough to be exciting, low enough that falls stay manageable.
Tips
- Sand and seal the plywood edges to prevent splinters
- Use bolt-on holds rather than screw-on; they are easier to rearrange as skills progress
- Add a horizontal traverse route (sideways climbing) if vertical height makes you nervous
We picked a few things that go well with this idea: Humble Crew Toy Organizer with 16 Bins (★4.6), SpaceAid Toy Organizer with Shelves (12 Bins) (★4.6) and Humble Crew Toy Organizer (16 Bins, Colorful) (★4.6). As an Amazon Associate we earn from qualifying purchases.
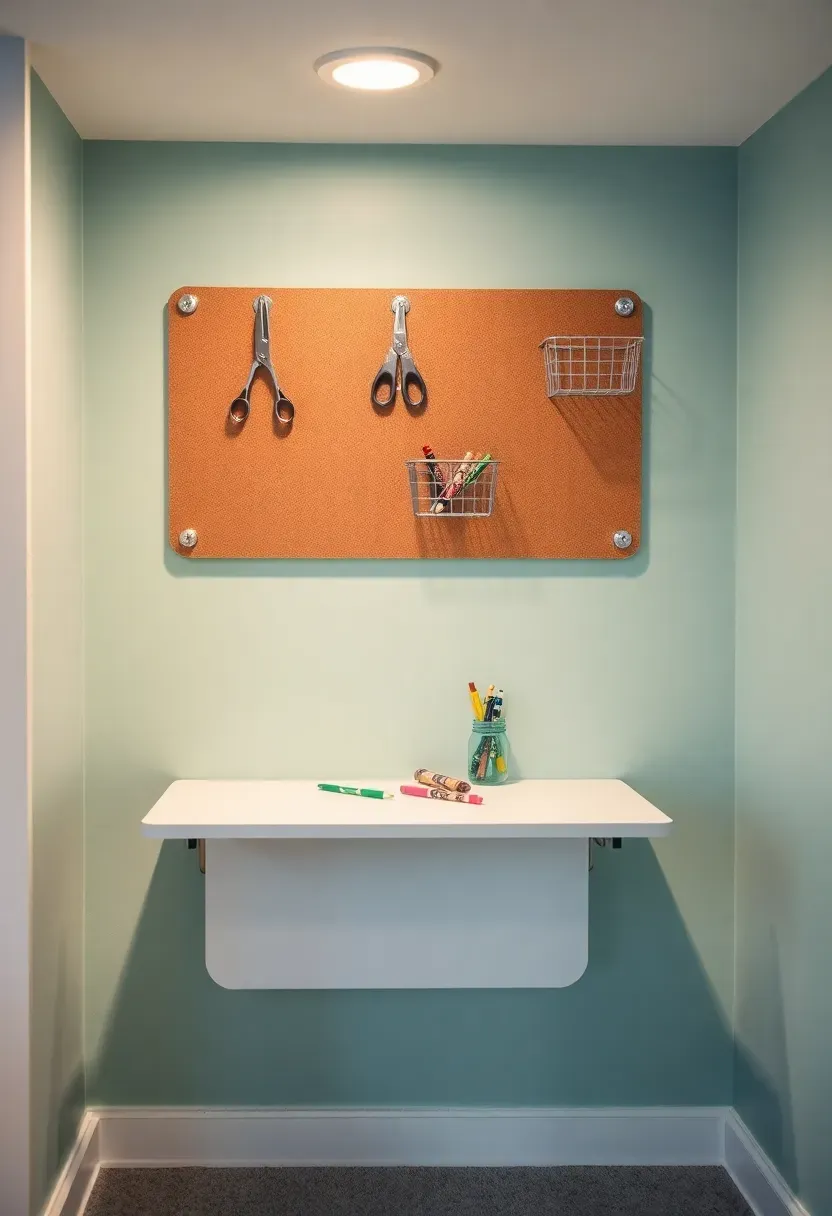
4. Art Station with Washable Surfaces
How to Set Up a Mess-Proof Art Zone
Containing art supplies to one area keeps the rest of the playroom usable. Here is how to build one that survives daily use.
Step 1: Prep the Wall
Paint a 4-by-6-foot section with semi-gloss or high-gloss latex paint in a light color. Crayon, marker, and most paint wipe off semi-gloss with a damp Magic Eraser. Skip matte finishes entirely.
Step 2: Install the Work Surface
Mount a wall-hinged drop-leaf table at kid height. When art time is over, the table folds flat against the wall and the floor is clear again.
Step 3: Organize Supplies Vertically
Hang a pegboard above the table with hooks for scissors, tape rolls, and small wire baskets for markers and crayons. Everything visible, everything off the table.
Watch Out
- Keep paint and glue on a separate tray with raised edges to contain spills
- Smock hooks next to the station save clothing and reduce laundry arguments
Recommended
Items for this idea
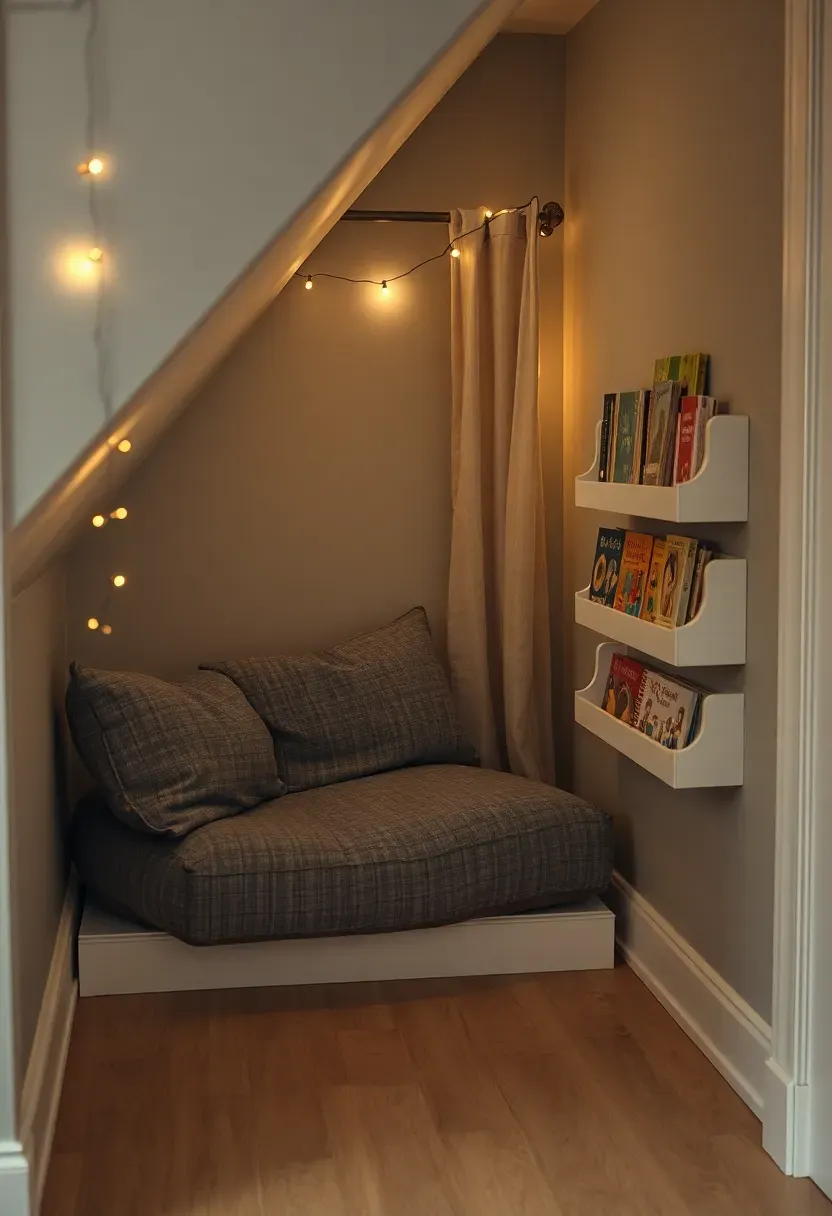
5. Reading Nook Under the Stairs
That triangular void under your basement stairs is wasted space in most homes. Line it with a piece of plywood on the floor, add a thick foam cushion cut to fit the shape, and hang a curtain rod across the opening. Battery-operated LED string lights along the ceiling of the alcove make it feel like a secret hideout. Mount a few forward-facing book ledges on the side walls — rain gutter shelves from the hardware store work perfectly and cost about four dollars per three-foot section. The enclosed feeling is exactly what draws kids in; this becomes the go-to reading spot because it feels private and special without any expensive renovation.
Tips
- Use a removable cushion cover in a washable fabric; juice spills are inevitable
- A small USB-rechargeable book light is better than overhead lighting for cozy atmosphere
- Keep the curtain lightweight so kids can open and close it independently
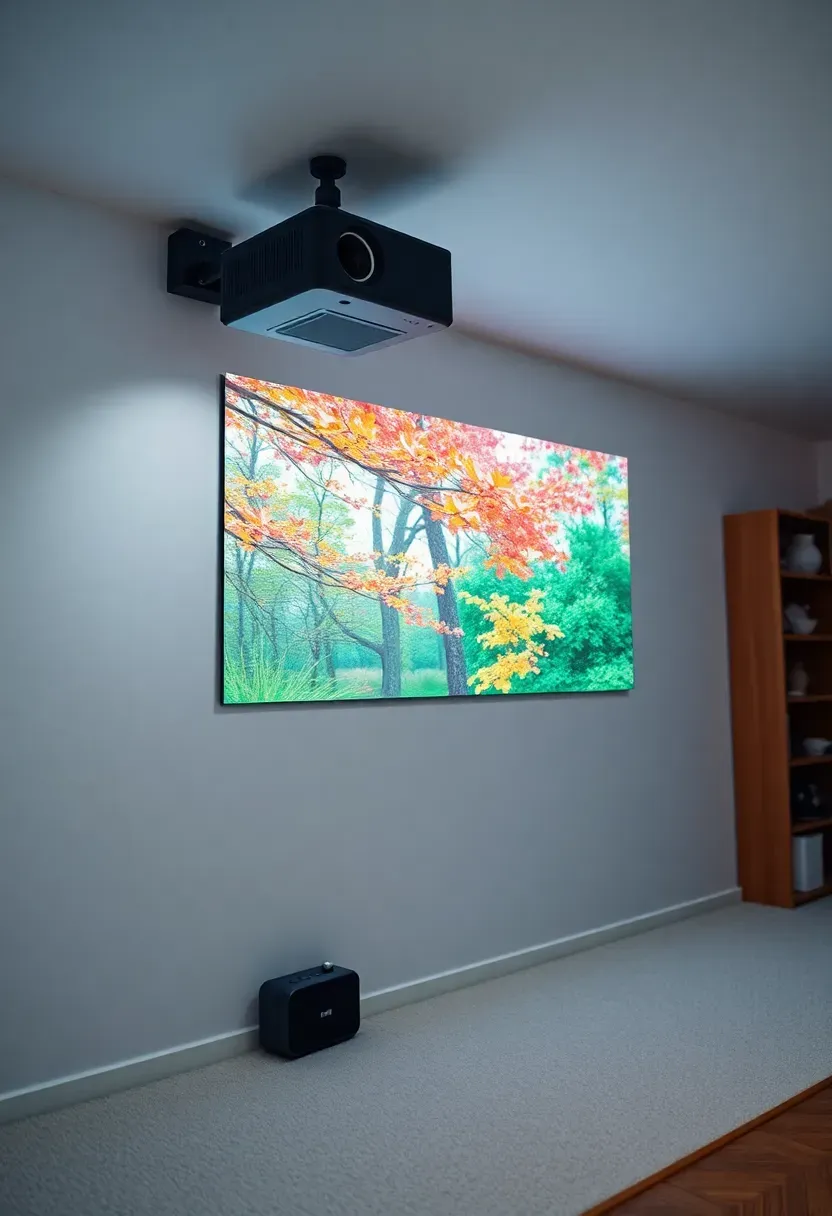
6. Projector Play Wall
A blank white wall and a 100-dollar mini projector replace a television while opening up much bigger possibilities. Project dance-along videos, interactive drawing apps, or nature documentaries at a scale that holds attention far better than a tablet screen. Paint one wall with flat white projector paint for a brighter image, or just leave existing white walls as-is — the difference is marginal in a dark basement. Mount the projector on a ceiling bracket to keep it out of reach. The low ambient light in basements actually works in your favor here, producing a sharper image than you would get upstairs.
Tips
- A short-throw projector works better in small rooms; it produces a large image from just a few feet away
- Add a Bluetooth speaker for better audio since built-in projector speakers are weak
- Set up a timer that auto-shuts off to manage screen time without arguments
Recommended
Items for this idea
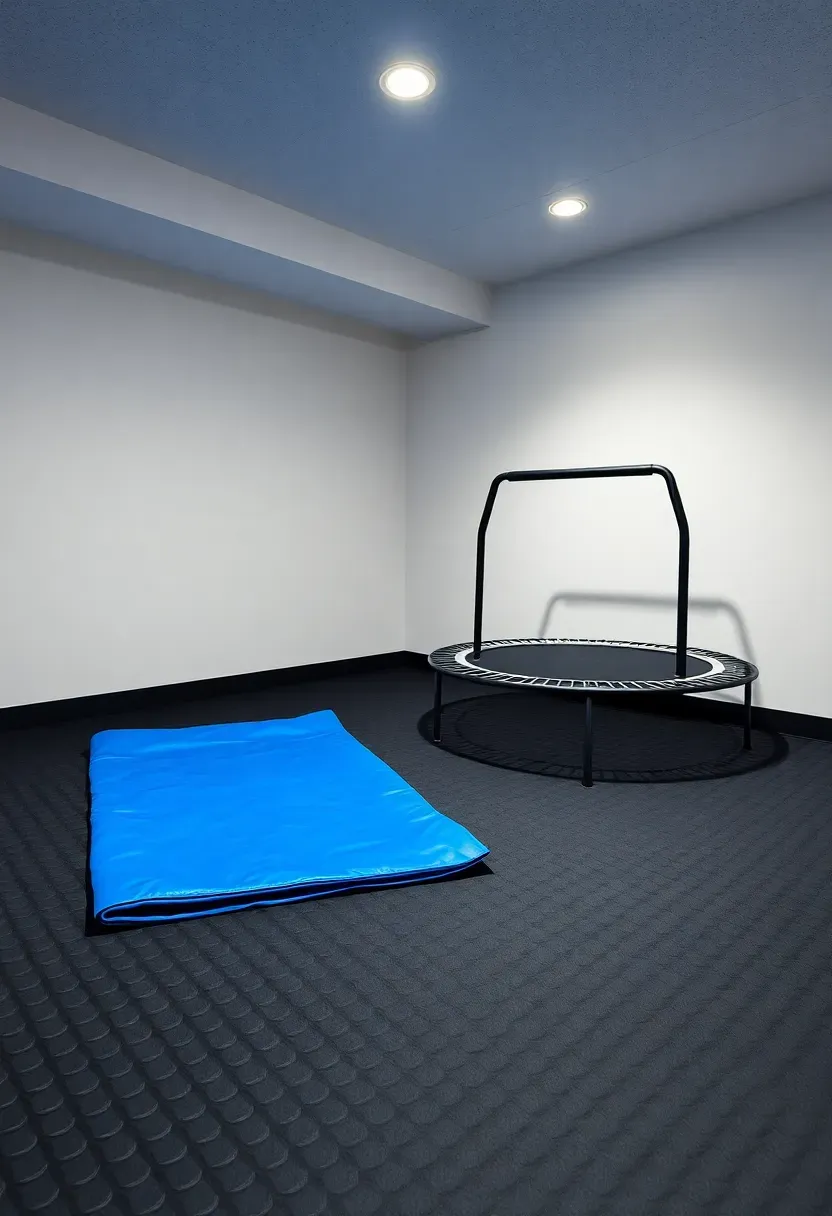
7. Rubber Flooring Gym Zone
Designate one corner for physical play with interlocking rubber gym tiles — the same material used in commercial fitness centers. These are denser and more durable than foam tiles, better suited for activities like tumbling, mini trampolines, or wrestling. Rubber tiles dampen noise transmitted through the floor, which matters if bedrooms sit directly above. Standard 2-by-2-foot tiles in 3/8-inch thickness run about three to four dollars per square foot. The rubber smell fades after a week or two of off-gassing in a ventilated space.
Pros and Cons
- Pro: Nearly indestructible surface that handles wheeled toys, jumping, and dragging
- Pro: Easy to mop clean with mild soap and water
- Con: Heavier and harder to install than foam; budget extra time for cutting edge pieces
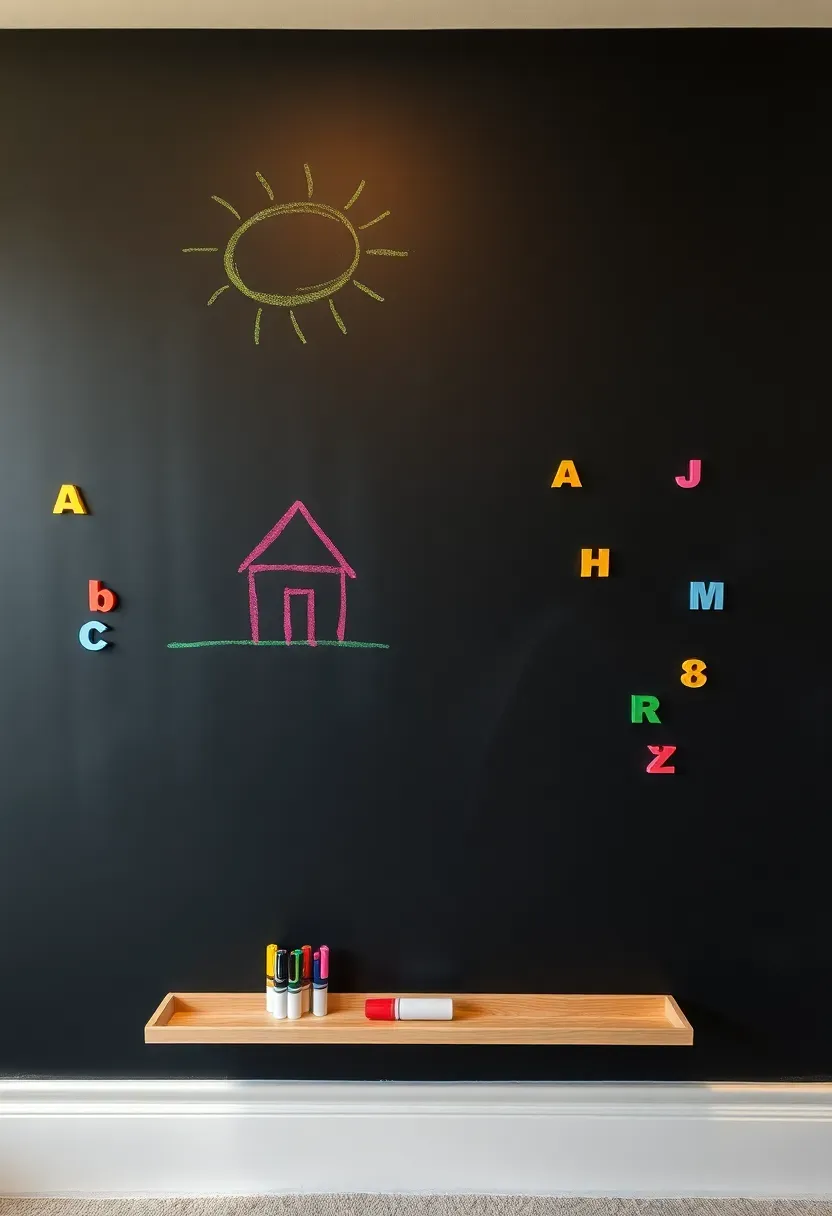
8. Magnetic Chalkboard Accent Wall
Two coats of magnetic primer followed by two coats of chalkboard paint give you a wall that holds magnets and accepts chalk. Kids get a massive drawing surface that wipes clean, plus the option to stick up magnetic letters, photos, or small metal toys. The magnetic primer is the expensive part — about forty dollars per quart, which covers roughly 50 square feet. Apply it thick in multiple coats for stronger magnet hold. Pair with dust-free chalk markers instead of regular chalk if you want to avoid the dust cloud that settles on nearby toys and furniture.
Tips
- Test magnet strength before declaring the project done; if magnets slide, add another primer coat
- Frame the chalkboard area with simple wood trim for a finished look
- Keep a small tray mounted at the base to catch chalk dust and hold markers
Recommended
Items for this idea
9. IKEA Kallax Play Kitchen Setup
IKEA Hack vs. Pre-Made Play Kitchen
Both options work, but they serve different budgets and age ranges. Here is how they compare.
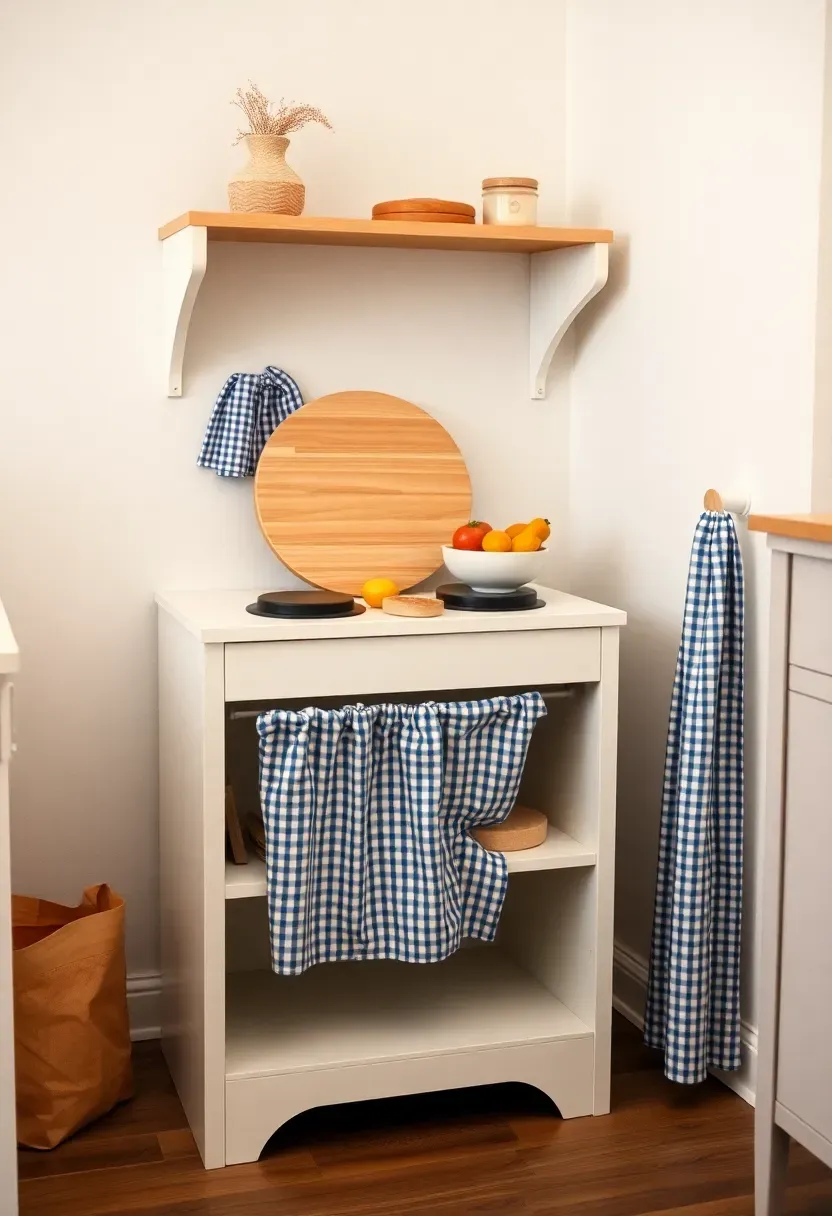
IKEA Kallax Hack
A 2x2 Kallax unit ($40) with a round wood cutting board on top, stick-on burner decals, and a fabric curtain below becomes a surprisingly convincing play kitchen. Total cost stays under eighty dollars. It grows with the child — remove the kitchen accessories later and you have a regular shelf.
Pre-Made Play Kitchen
Purpose-built wooden play kitchens from KidKraft or Melissa and Doug run 120 to 250 dollars. They look more realistic but have a fixed lifespan. Most kids outgrow them by age six or seven, and they are difficult to repurpose.
Choose If...
- Pick the hack if your child is under four or you want flexibility
- Pick pre-made if realism matters to your kid and budget allows it
10. Sensory Corner for Toddlers
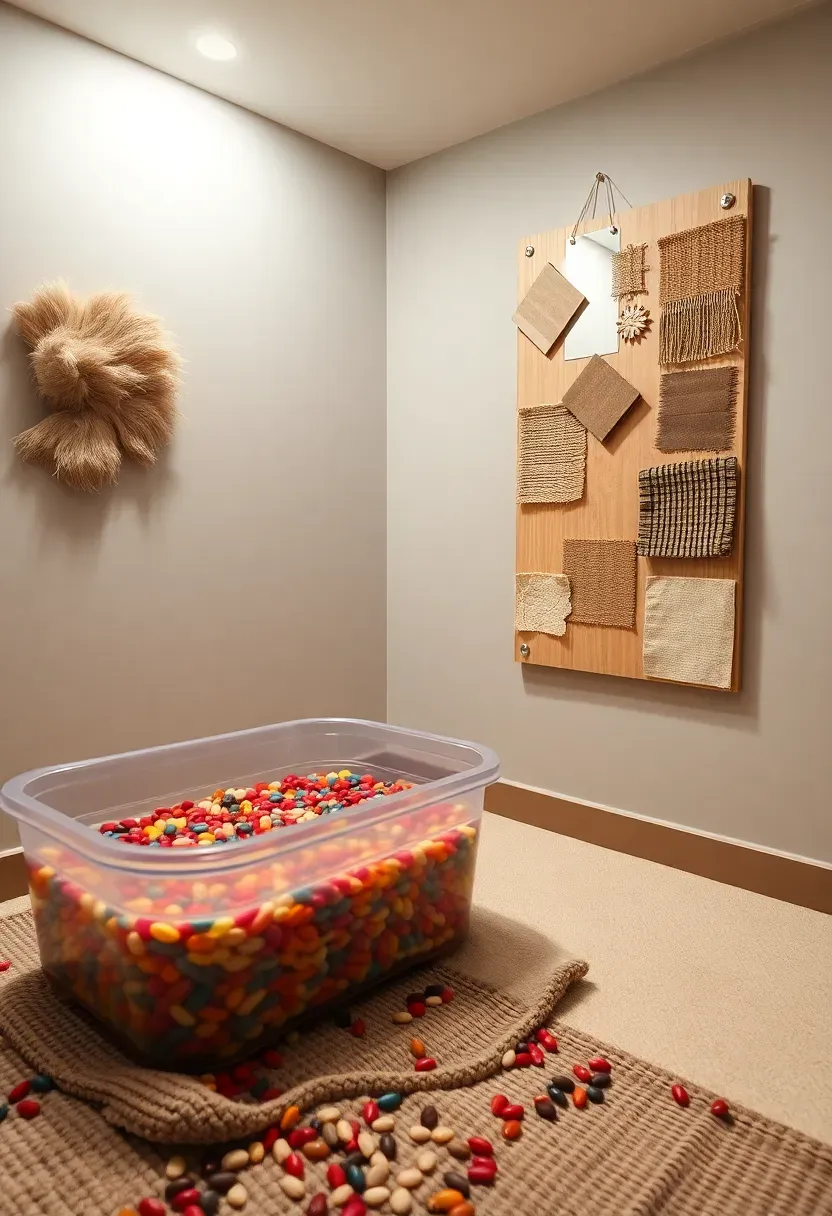
Toddlers process the world through touch, and a dedicated sensory corner keeps them engaged while older siblings play elsewhere. Start with a textured play mat — something with raised bumps or ridges rather than flat foam. Add a small water table (use dry rice or dried beans for a mess-free alternative), a fabric panel wall with different textures to touch, and a mirror at toddler height. Keep this zone gated off or in a visible corner so you can supervise without hovering. Budget about sixty to ninety dollars for a basic setup using a mix of purchased and DIY elements.
Tips
- Rotate sensory materials weekly to maintain interest — swap rice for kinetic sand, beans for water beads
- Mount textures to a plywood board screwed to the wall: faux fur, burlap, smooth tiles, corrugated cardboard
- Avoid items smaller than a toilet paper tube for children under three
Recommended
Items for this idea
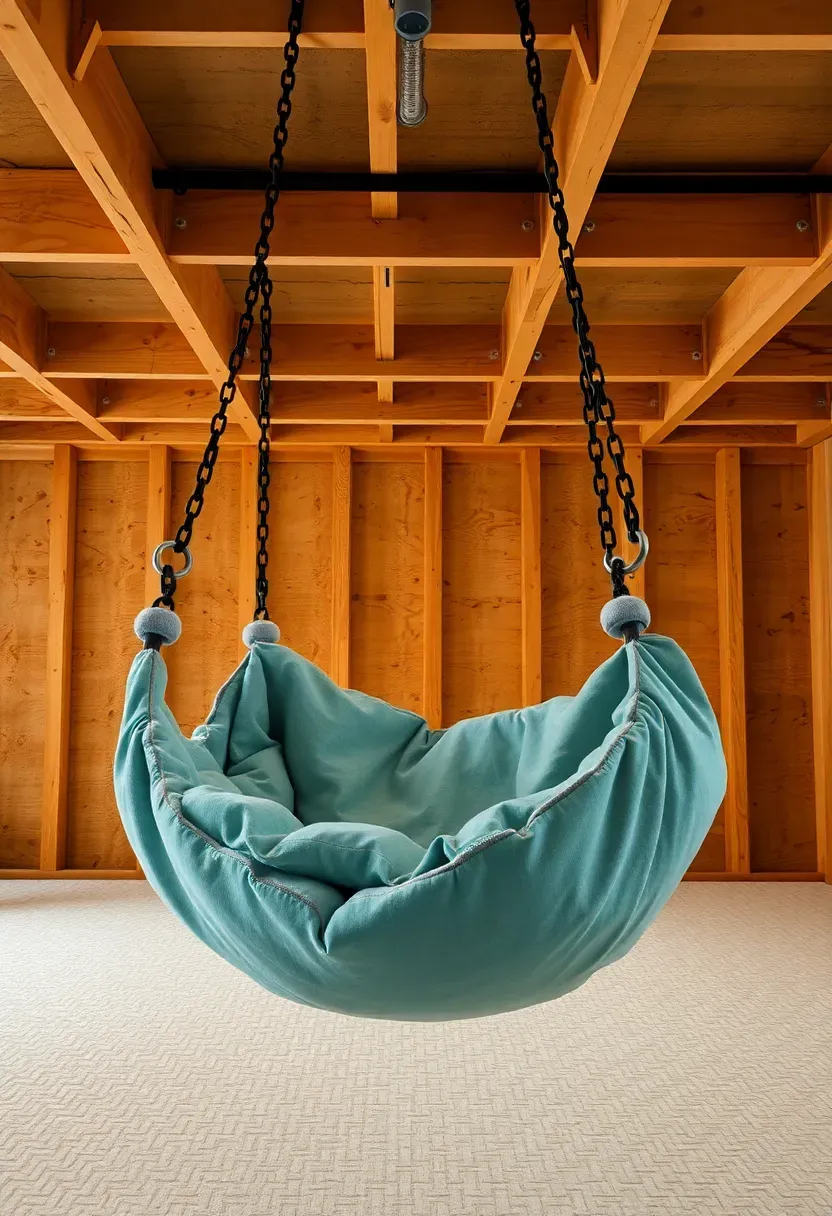
11. Ceiling-Hung Swing or Hammock
Basement ceiling joists are typically exposed or accessible behind drywall, making them ideal anchor points for a swing or hammock chair. Use heavy-duty eye bolts rated for at least 300 pounds, drilled directly into a joist — never into drywall alone. A fabric pod swing works for younger kids who want to spin and curl up. A platform swing accommodates two children sitting side by side. Leave at least three feet of clearance in all directions from walls and furniture. The rhythmic motion is genuinely calming for kids who need a sensory break during play.
Tips
- Wrap chain links in pool noodle sections to prevent pinched fingers
- Test the anchor by hanging your own weight on it before letting kids use it
- Add a carabiner quick-release so you can take down the swing when adults need the space
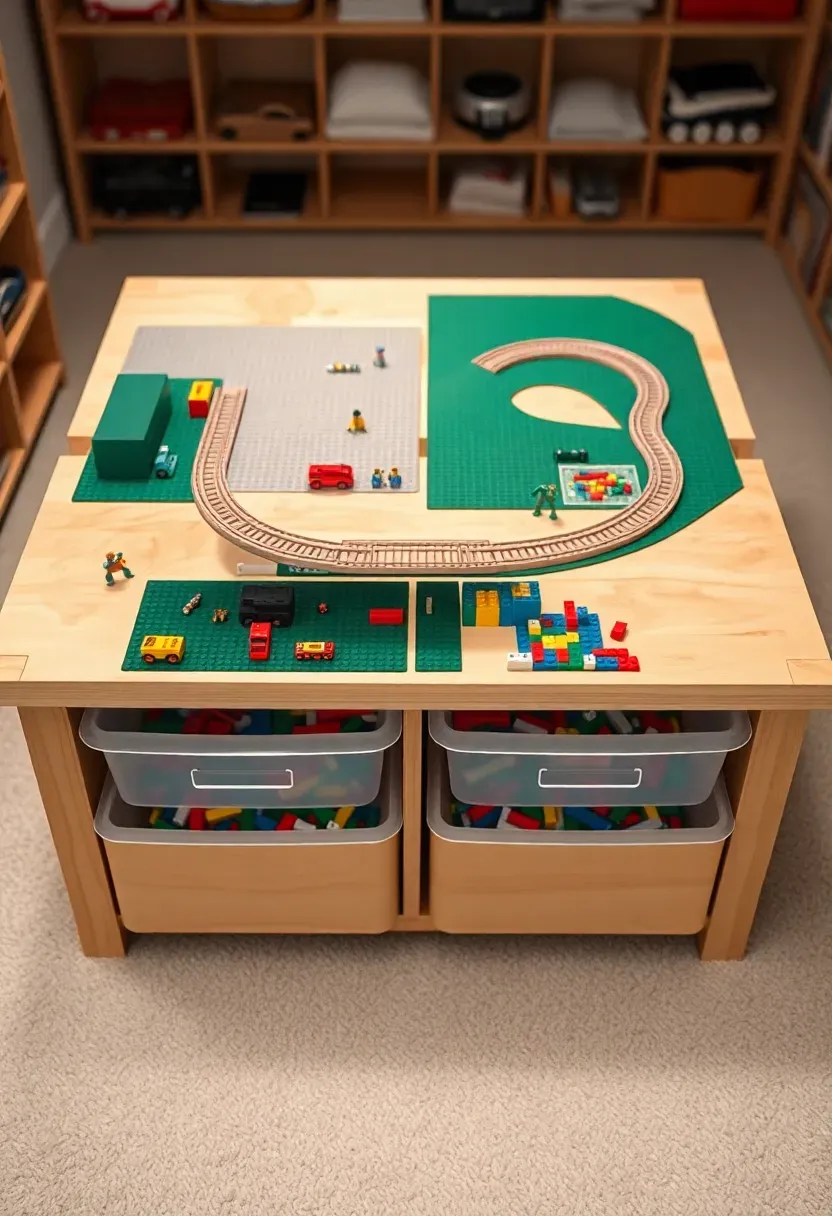
12. Train Table and LEGO Station
How to Build a Combined Build-and-Play Surface
A single table that handles both train tracks and LEGO saves space and gets more daily use than either station alone.
Step 1: Choose the Right Table
A 4-by-2-foot table at about 20 inches tall works for kids ages three through eight. IKEA LACK coffee tables are cheap and the right height, or build one from 2x4 lumber and plywood.
Step 2: Split the Surface
Glue LEGO baseplates to one half. Leave the other half as a smooth wood surface for train tracks, puzzles, or drawing.
Step 3: Add Storage Below
Attach shallow bins or pull-out trays under the table for bricks sorted by color or size. Labels help kids find pieces without dumping entire collections.
Watch Out
- Secure baseplates with construction adhesive, not hot glue — hot glue peels off within weeks
- If using a LACK table, reinforce the legs with L-brackets; they wobble under aggressive building
Recommended
Items for this idea
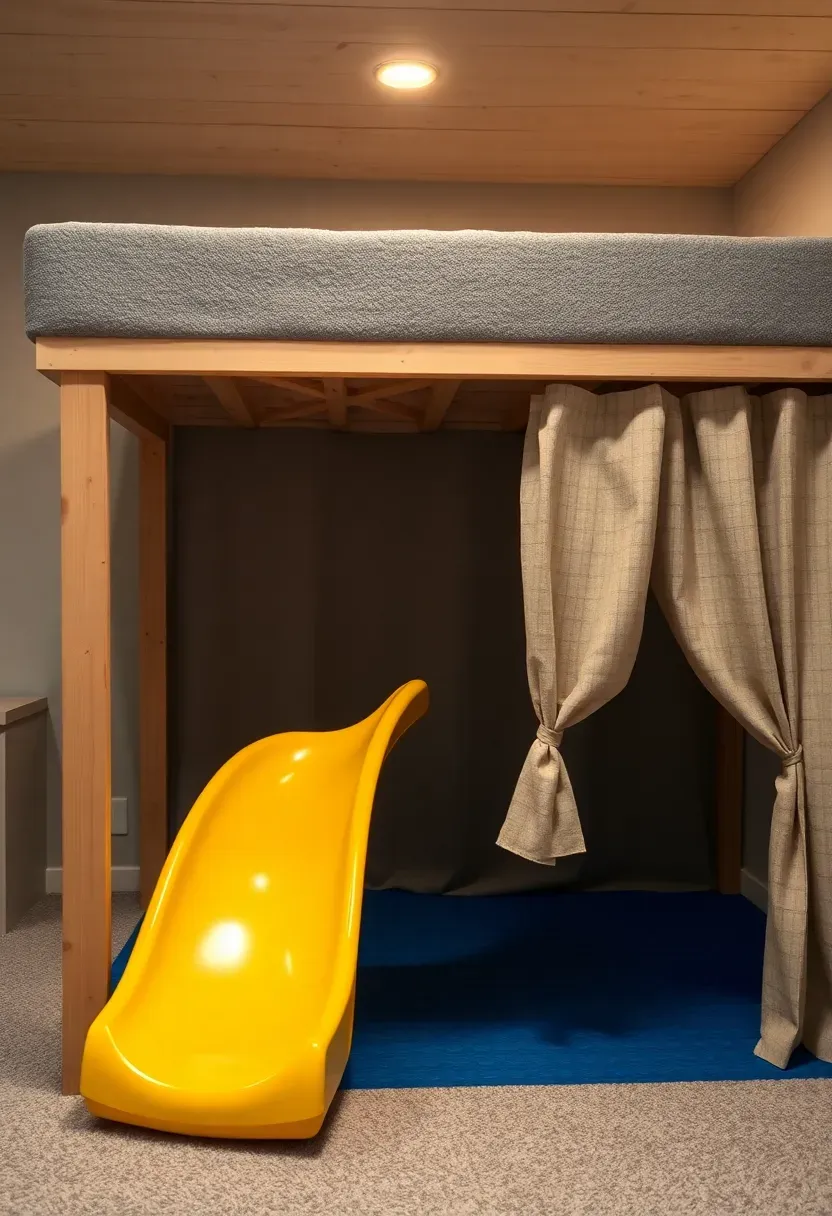
13. Indoor Slide Built Into a Platform
Building a raised platform in one corner of the basement — essentially a 3-foot-high stage — and attaching a plastic slide to it creates an indoor playground anchor. The platform top doubles as a play surface or reading loft. Frame it from 2x6 lumber, sheathe the top in 3/4-inch plywood, and carpet the surface for grip. Bolt the slide flange directly to the platform edge. The space underneath becomes a fort, puppet theater, or additional toy storage depending on how you enclose it. Total material cost runs about 200 to 300 dollars for a 6-by-4-foot platform.
Tips
- Add a railing on any side taller than 24 inches
- Slide exit should land on foam or rubber flooring, not bare concrete
- Keep platform height under 4 feet for residential ceiling clearance
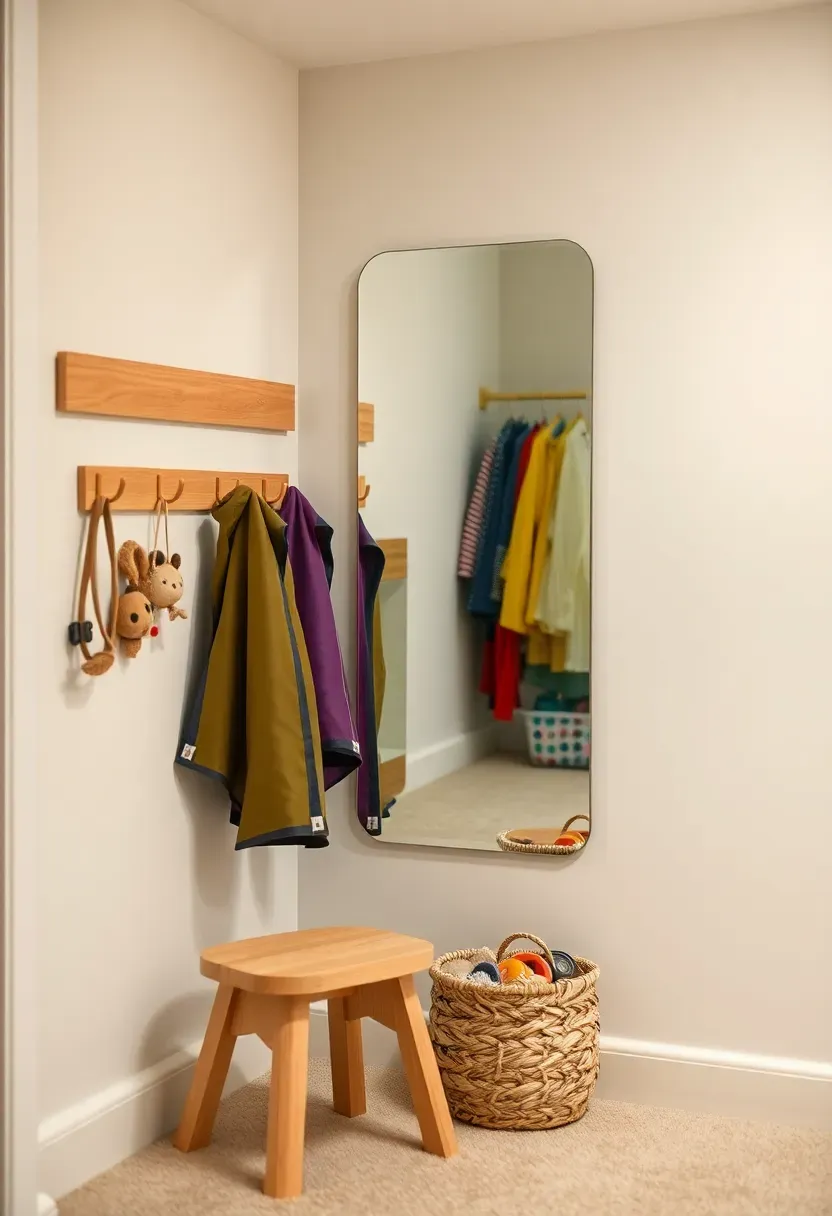
14. Dress-Up Corner with Mirror and Hooks
Imaginative play needs props, and a dress-up corner keeps costumes accessible and organized instead of scattered across the floor. Mount a shatter-proof acrylic mirror at kid height — about two feet off the ground for preschoolers. Install a row of low coat hooks on either side for capes, tutus, hats, and costume pieces. A small bench or stool in front of the mirror lets kids sit while pulling on boots or shoes. Below the hooks, a shallow basket catches accessories like wands, crowns, and belts. The entire setup fits into a 3-foot-wide wall section.
Tips
- Use acrylic mirrors only — glass is a safety hazard in a play space
- Label hooks with pictures of costume categories to encourage cleanup
- Rotate costumes seasonally to keep the corner feeling fresh
Recommended
Items for this idea
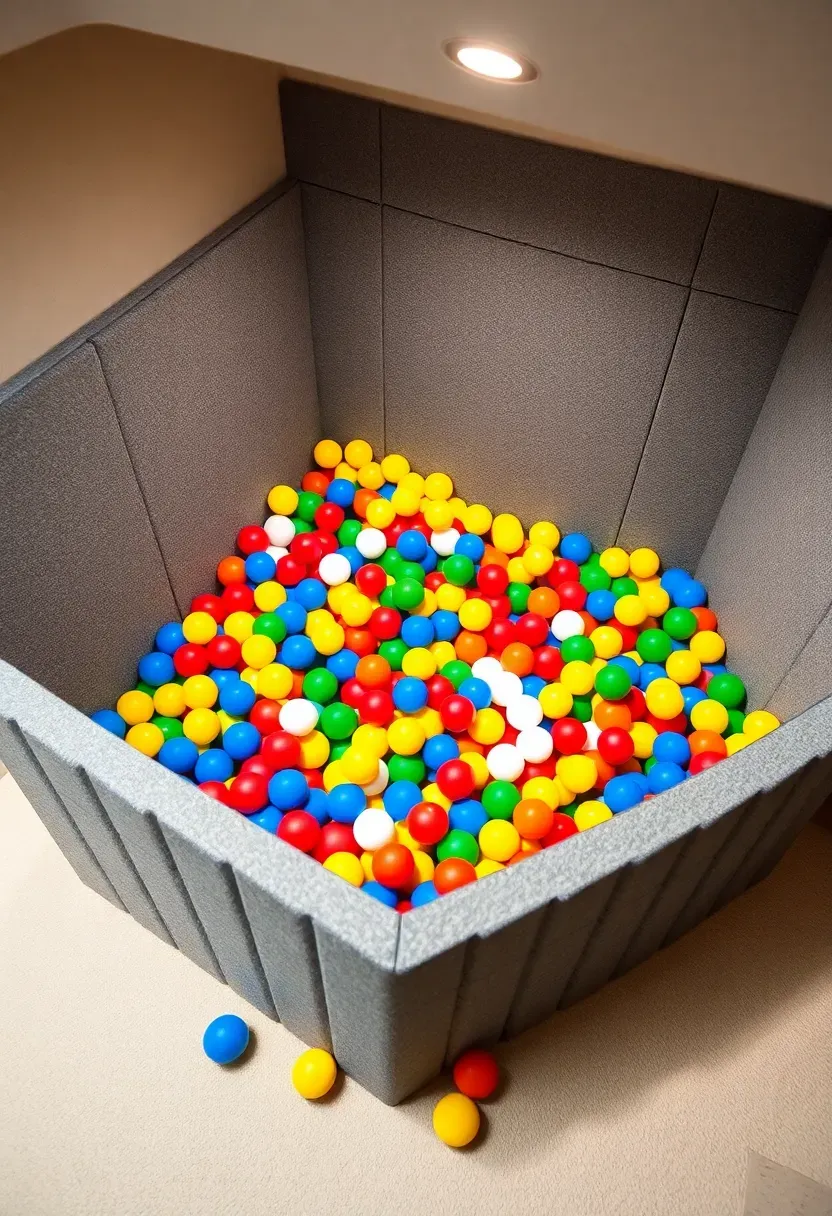
15. Ball Pit Zone
A basement ball pit sounds indulgent until you see how many hours of play it generates per dollar spent. Build a border using interlocking foam panels stood on edge, forming a 4-by-4-foot pen. An inflatable kiddie pool also works as the container — cheaper and easier to deflate for storage. Fill with 500 to 800 crush-proof plastic balls, which runs about 30 to 50 dollars for a bulk pack. The low ceiling height of a basement actually helps here by keeping thrown balls from reaching orbit. Machine-washable ball pit balls exist now if hygiene is a concern; toss them in a mesh laundry bag once a month.
Pros and Cons
- Pro: Entertains toddlers through early elementary with zero supervision needed beyond line-of-sight
- Pro: Surprisingly physical — wading through balls builds core strength
- Con: Balls escape the pit constantly; expect to find them in every room of the house
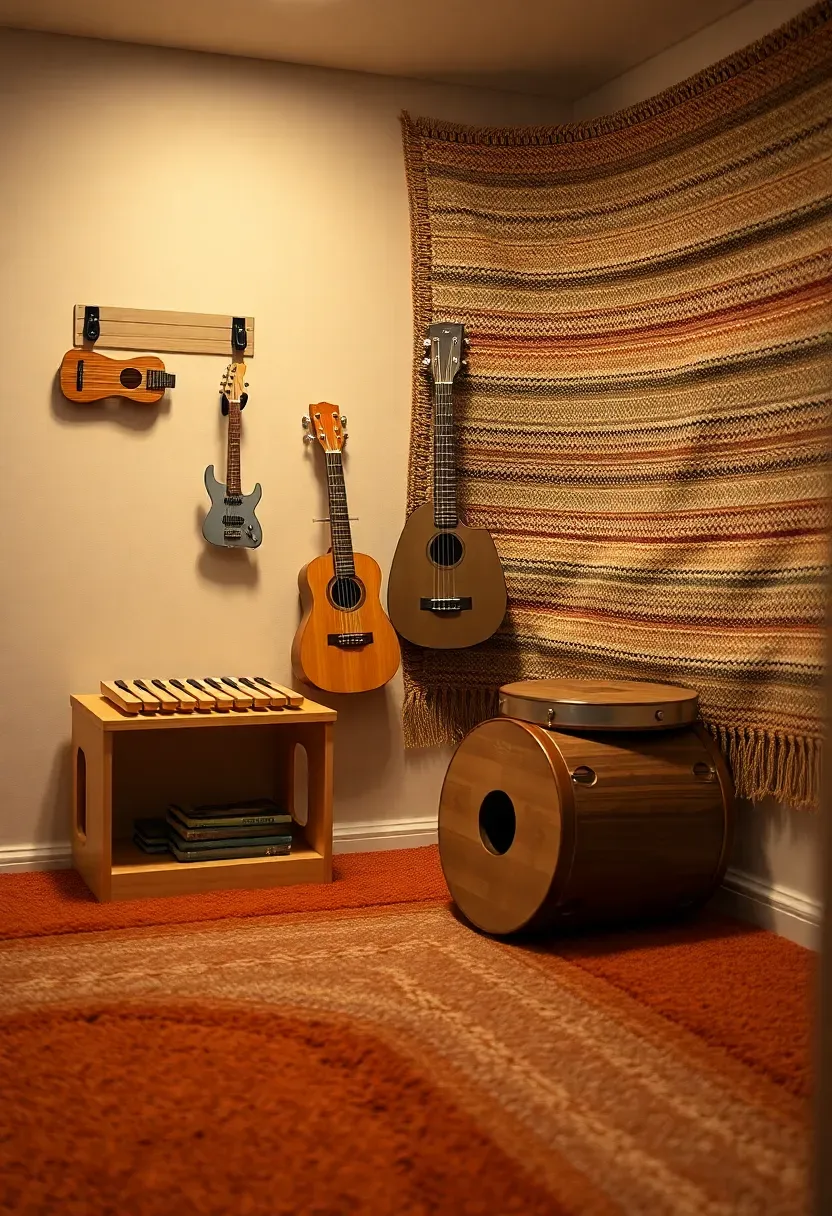
16. Music and Instrument Corner
Put the noisiest play zone in the basement where it belongs. Sound travels upward through floor joists less than it travels laterally through walls, so a basement music corner bothers the rest of the house less than you might expect. Hang instruments on wall hooks — a ukulele, a tambourine, a small xylophone — so kids can grab and replace them independently. A carpet remnant on the floor and a tapestry or heavy curtain on the wall behind the instruments dampens sound further. Skip electronic keyboards with tinny speakers; acoustic instruments at small scale sound better and do not need batteries.
Tips
- Egg crate foam panels behind the instrument wall absorb mid-range frequencies cheaply
- A cajon drum doubles as a seat when not being played
- Group instruments by volume: quiet ones accessible anytime, loud ones for designated music time
Recommended
Items for this idea
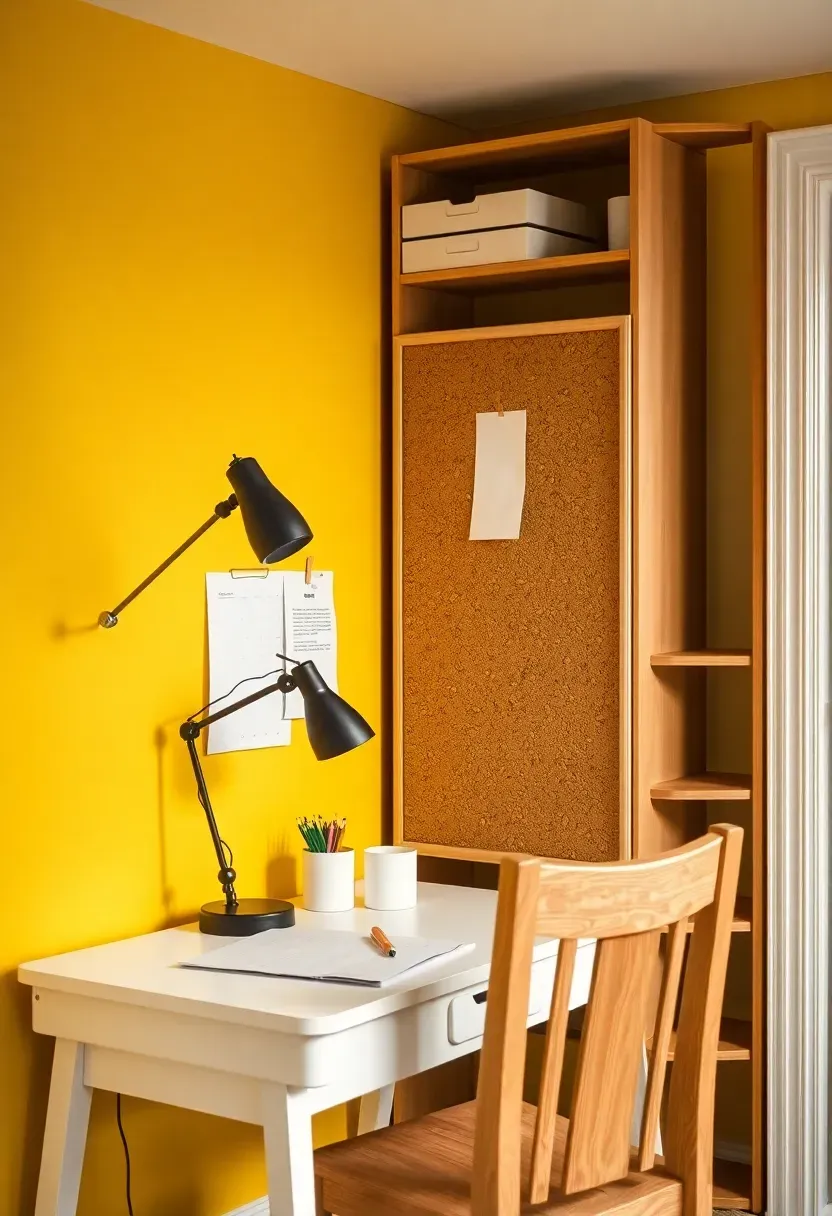
17. Homework Nook Within the Playroom
Why It Works Here
Separating homework space from bedroom removes the temptation to lie on the bed instead of working. Putting it in the playroom — but physically distinct from play zones — gives older kids a reason to be downstairs while younger siblings play.
How to Set It Up
Face the desk toward a wall, away from the play area. A small desk lamp with warm-white light, a corkboard for pinning assignments, and a pencil cup are all you need. Keep the desk surface clear of toys by enforcing a simple rule: the desk zone is for school supplies only. A partition — even a tall bookshelf turned sideways — creates enough visual separation to help kids focus.
Pros and Cons
- Pro: Keeps homework materials out of bedrooms and off kitchen counters
- Pro: Older kids feel included in basement time without being expected to play
- Con: Noise from nearby play zones can distract; consider noise-dampening headphones as a backup
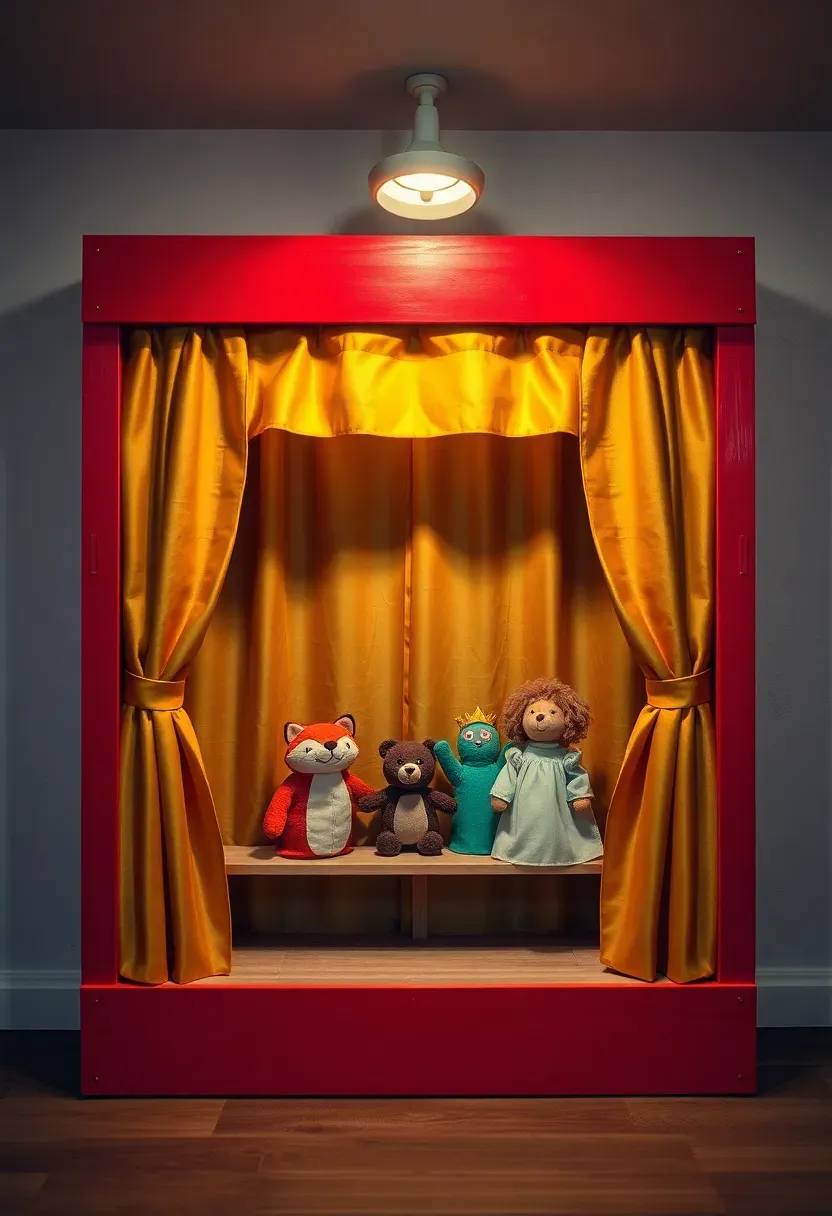
18. Puppet Theater Built-In
A puppet theater fits neatly into the space under a lofted platform or between two bookcases. The simplest version is a spring-loaded curtain rod mounted in a doorway or opening, with a fabric panel that has a rectangular cutout at kid arm height. More permanent versions use a plywood frame screwed to the wall with a hinged counter that folds up as the stage. Add a fabric curtain that draws open and closed for dramatic effect. Puppets hang on hooks inside the theater when not in use. Building this takes about two hours and costs under forty dollars in materials.
Tips
- Make the stage opening wide enough for two kids to perform side by side
- Attach a small battery-operated tap light inside for stage lighting
- Store puppets in a hanging shoe organizer nearby — each pocket holds one puppet visibly

Recommended
Items for this idea
19. Glow-in-the-Dark Ceiling Stars
This costs about twelve dollars and takes thirty minutes. Adhesive glow stars and planet stickers on the basement ceiling create an instant nighttime sky effect when you dim the lights. For extra effort, print a constellation map and place stars in accurate patterns — Orion, the Big Dipper, Cassiopeia — turning it into a low-key educational feature. The glow effect charges from regular room lighting and lasts about twenty minutes in full darkness, which is plenty for a bedtime wind-down routine or a quiet play transition. Phosphorescent paint pens let you add the Milky Way band across the ceiling if you want to go further.
Tips
- Stick stars to the ceiling with the lights on, then check placement in the dark before committing
- Combine with a small planetarium projector for special movie-night-style events
- Use removable adhesive dots instead of the included sticky pads — they peel off cleaner later
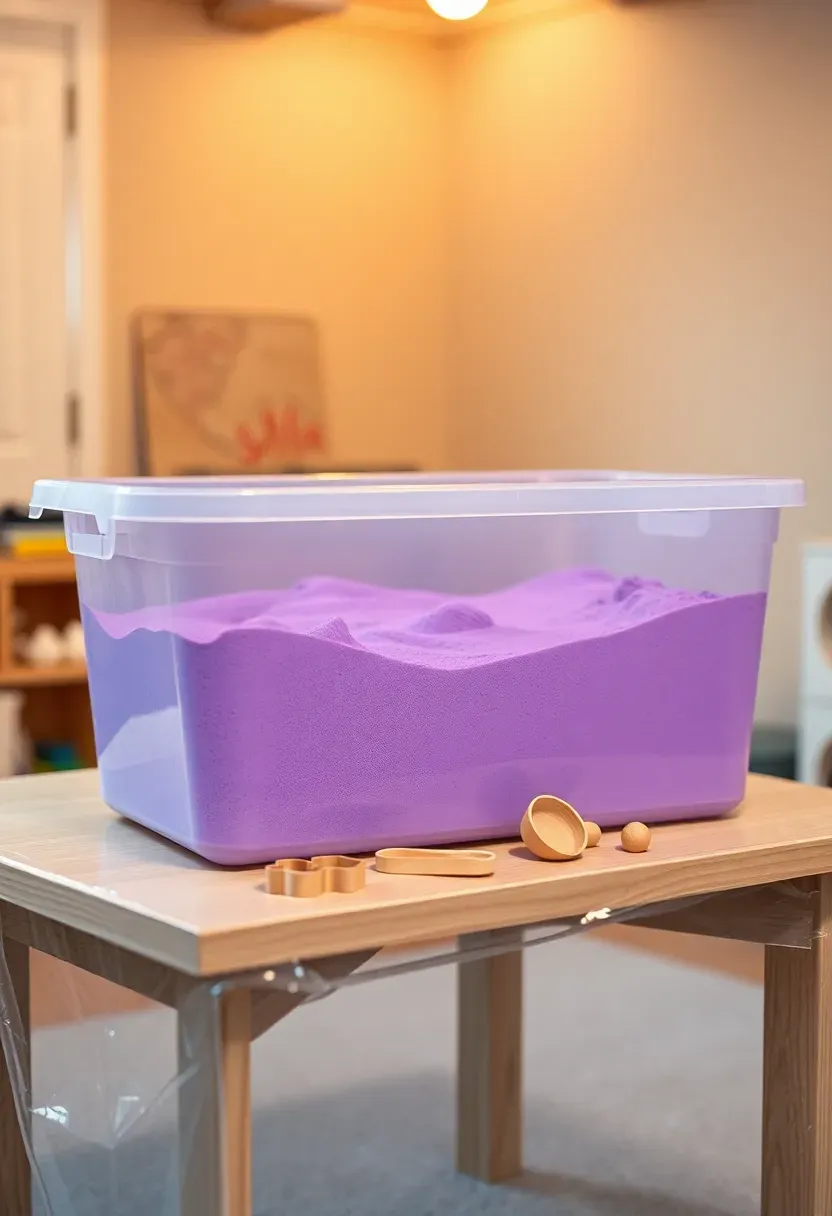
20. Indoor Sandbox with Kinetic Sand
Regular sand indoors is a disaster. Kinetic sand sticks to itself instead of spreading everywhere, making it viable for basement use. A large under-bed storage bin (about 30 by 16 inches) with 5 pounds of kinetic sand creates a contained sand play station. Place the bin on a table or the floor with a plastic tablecloth underneath for easy cleanup. Add molds, cookie cutters, and small scoops. The sand never dries out, does not need water, and lasts for months of daily use before needing replacement. Total setup cost runs about twenty-five to thirty-five dollars.
Tips
- Keep kinetic sand away from carpeted areas; it is easy to clean off hard surfaces but embeds in carpet fibers
- Store the bin with a lid when not in use to prevent the sand from collecting dust and pet hair
- Avoid mixing colors — blended kinetic sand turns gray permanently within a few sessions
Recommended
Items for this idea
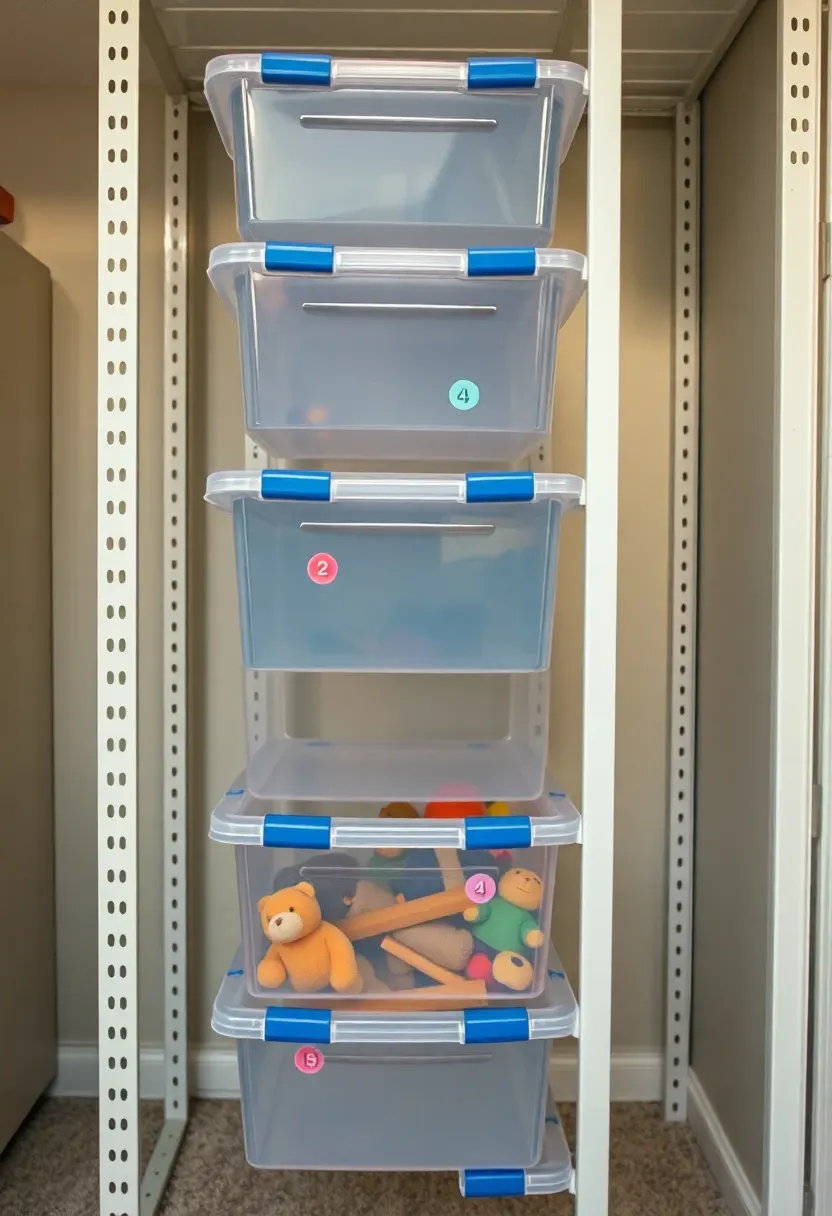
21. Toy Rotation Storage System
Fewer toys out at once means better play and faster cleanup. A toy rotation system works like this: divide all toys into three or four groups. One group stays in the playroom. The rest go into labeled bins on a high shelf or in a closet. Every two weeks, swap groups. Kids rediscover toys they forgot about, play more creatively with a curated selection, and the room stays manageable. Use clear bins so you can see contents without opening them. Label each bin with a number or color — not contents, since the contents change each rotation. This system costs nothing if you already have bins, and it dramatically reduces playroom chaos.
Tips
- Rotate on the same day each time so it becomes routine rather than a negotiation
- Let kids pick one item to keep out permanently as their "always toy"
- Donate or sell anything that does not get touched across two full rotation cycles
Quick FAQ
How much does it cost to finish a basement playroom? Budget around 5 to 15 dollars per square foot for a basic playroom conversion, which includes flooring, paint, and lighting. A 200-square-foot room runs 1,000 to 3,000 dollars for a functional space. Fancy features like climbing walls or built-in platforms add to the total but are not necessary to start.
Is basement air quality safe for kids? Test for radon before converting any basement to a play space — test kits cost about fifteen dollars at hardware stores. Run a dehumidifier to keep humidity below 50 percent, which prevents mold growth. An air purifier with a HEPA filter handles dust and allergens. Address these three things and basement air quality matches the rest of the house.
What is the best flooring for a basement playroom? Interlocking foam tiles win for toddler spaces because they cushion falls and insulate against cold. Luxury vinyl plank works better for mixed-age rooms since it handles wheeled toys and heavier foot traffic. Avoid carpet in basements unless you have solved all moisture issues first — damp carpet grows mold fast.
At what age do kids stop using a playroom? Most dedicated playrooms see heavy use from ages two through nine. After that, interests shift toward screens, homework, and hangouts. Design with modularity in mind so you can convert zones as kids age — a climbing wall becomes a workout wall, a puppet theater becomes a media corner, and toy storage becomes book and game shelving.
Do basement playrooms need windows? Building codes in most areas require an egress window if the basement is a habitable space. Even without that requirement, natural light makes a huge difference in how willing kids are to play downstairs. If windows are not possible, invest heavily in full-spectrum LED lighting that mimics daylight.
A basement playroom does not need to be perfect on day one. Start with safe flooring and good lighting — those two things alone make the space usable. Add zones gradually based on what your kids actually do: watch where they naturally play and build infrastructure around those activities. The best playrooms I have seen were not designed all at once but grew over a year or two as the family figured out what worked. Pick three ideas from this list, start there, and expand as needed.
Pinterest cover for 21 Basement Playroom Ideas Kids Actually Use
About the author
OBCD
CGI visualization and interior design content. We create detailed 3D renders and curate practical design ideas for every room in your home.