27 Basement Bar Designs for Every Style
My neighbor spent three weekends building a basement bar out of reclaimed fence boards and a slab of butcher block he found at a salvage yard. Total cost was around $400. Meanwhile, a friend across town hired a contractor for a full wet bar build with plumbing, undercounter refrigeration, and quartzite counters — easily $15,000. Both spaces get used constantly. The difference is not quality; it is scope. Before you pick materials or browse cabinet options, figure out what your bar actually needs to do. A cocktail mixing station for two has very different requirements than a twelve-seat pub setup for game nights.
Here are 27 basement bar designs organized by style, layout type, and price range.
Table of Contents
- Classic Pub-Style Bar
- Sleek Modern Wet Bar
- Rustic Reclaimed Wood Bar
- L-Shaped Corner Bar
- Industrial Steel and Concrete
- Mid-Century Cocktail Lounge
- Sports Bar with TV Wall
- Wine Bar with Built-In Rack
- Tiki Bar with Bamboo Accents
- Farmhouse Barn Door Bar
- Under-Stairs Bar Nook
- Dry Bar Cart Station
- Speakeasy Dark Moody Bar
- Coastal Beach House Bar
- Open Shelving Minimalist Bar
- Stone and Timber Lodge Bar
- Compact Galley Bar
- Craft Beer Tap Wall
- Art Deco Glam Bar
- Built-In Bookcase Bar
- Outdoor-Indoor Walkout Bar
- Whiskey Lounge Bar
- Neon-Lit Game Room Bar
- Scandinavian Light Wood Bar
- Budget IKEA Hack Bar
- Barrel-Top Pub Bar
- Full Commercial-Style Bar
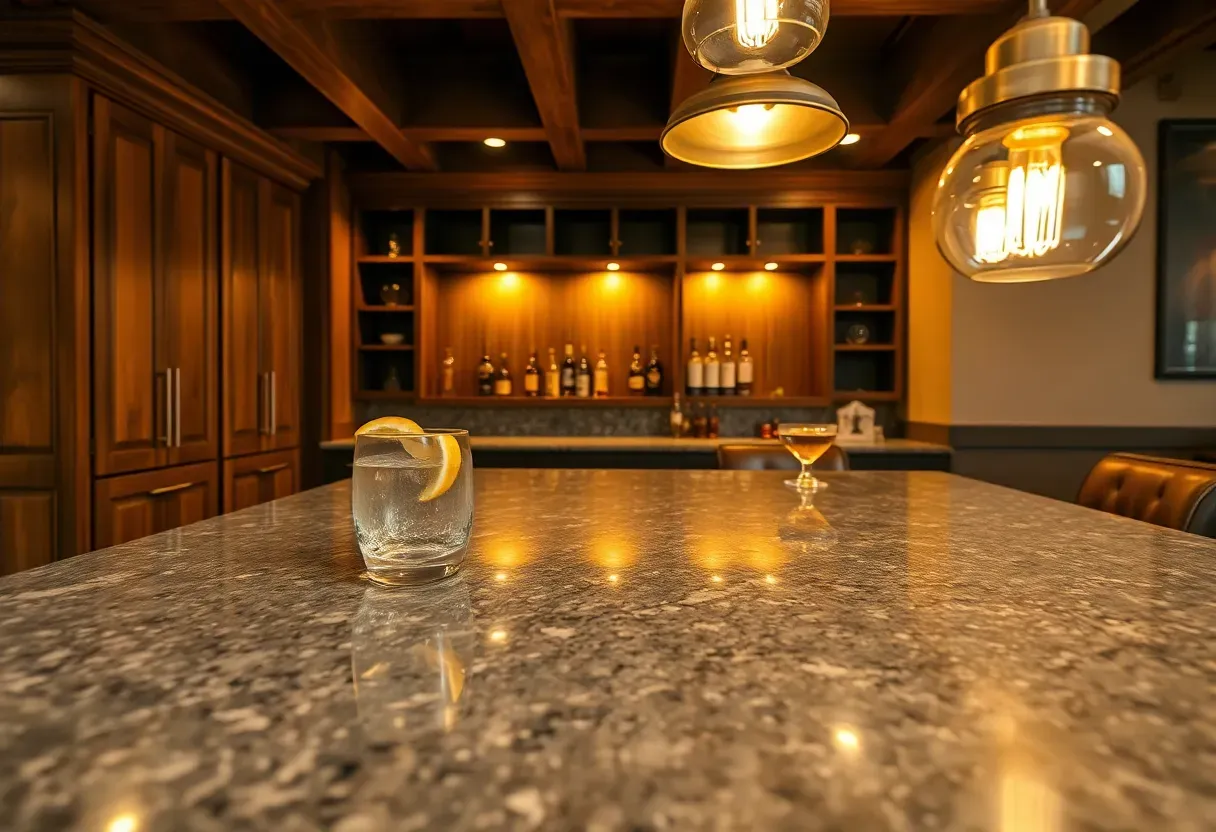
1. Classic Pub-Style Bar
A traditional pub bar works well in basements because the naturally low ceilings and limited windows mimic the enclosed, cozy atmosphere of an actual pub. Dark stained wood paneling on the bar front, a brass foot rail along the bottom, and a few pendant lights with amber bulbs set the mood. The counter depth should be at least 16 inches so you can serve drinks comfortably, and bar-height seating (42 inches) keeps proportions right. A simple beer tap system or a row of spirit bottles on a mirrored back shelf completes the look.
Getting the Pub Feel Right
- Install wainscoting or beadboard on the bar front panel for texture
- Use warm-toned LED bulbs (2700K) to avoid harsh fluorescent basement lighting
- Add a chalkboard menu panel for a playful, authentic touch
We picked a few things that go well with this idea: KITESSENSU Cocktail Shaker Bartender Kit with Stand (★4.7), 18-Piece Stainless Steel Bartender Kit with Stand (★4.6) and Professional Cocktail Shaker Bar Accessories Set (★4.7). As an Amazon Associate we earn from qualifying purchases.
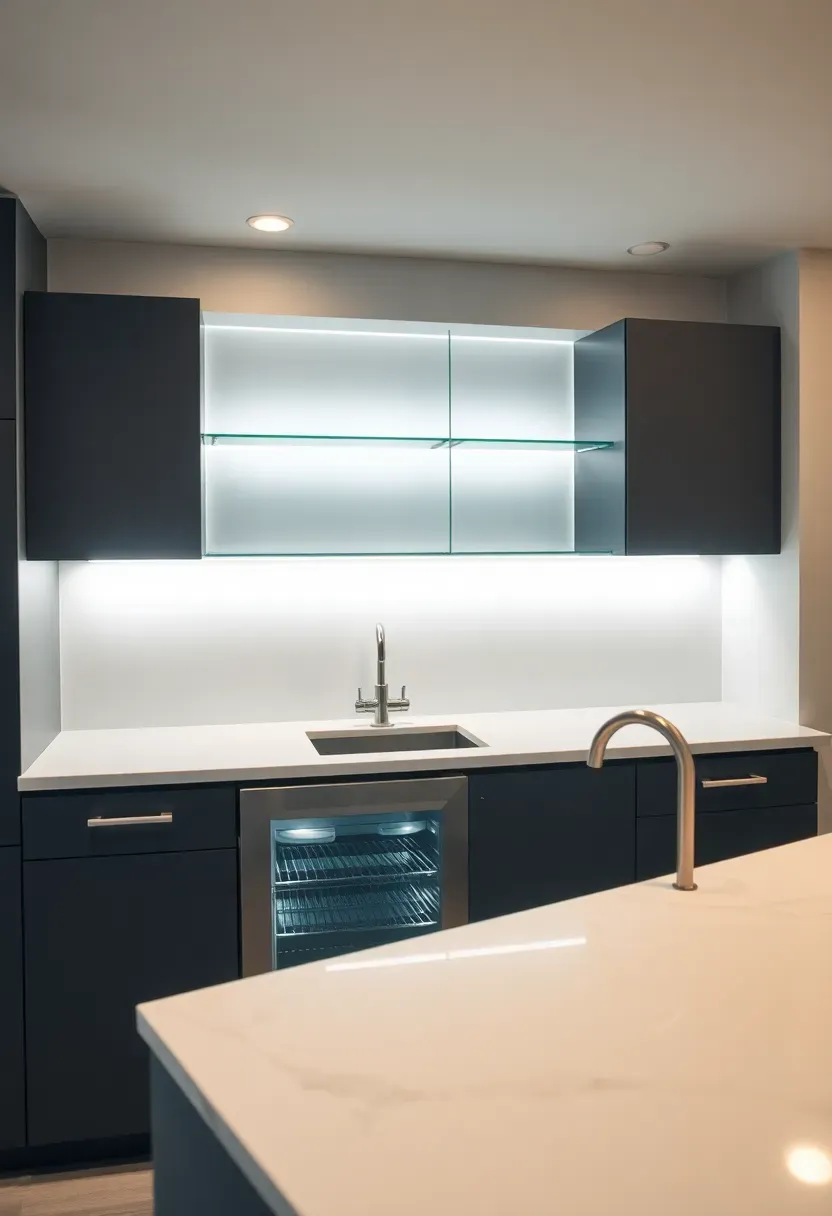
2. Sleek Modern Wet Bar
Why Go Wet?
Running water to a basement bar changes everything about how you use the space. You can rinse shakers, wash glasses, and fill ice buckets without trekking upstairs. The plumbing cost is the main barrier — typically $800 to $2,500 depending on how far the bar sits from an existing drain line.
The Build
Choose flat-panel cabinetry in matte white or dark charcoal, a quartz or solid surface countertop, and LED strip lighting under the upper cabinets. A single-basin bar sink (roughly 15 by 15 inches) is all you need. Pair it with an undercounter beverage fridge and a narrow dishwasher drawer if budget allows.
Pros and Cons
- Pro: Full functionality without leaving the basement
- Pro: Higher resale value — finished basement wet bars are a strong selling point
- Con: Plumbing adds $1,000+ to project cost and may require permits
We picked a few things that go well with this idea: INNOCCY Industrial Cage Pendant Lights (2-Pack) (★4.6), Farmhouse Dome Pendant Lights (3-Pack) (★4.7) and Retisee Industrial Dome Pendant Lights (12-Pack) (★4.6). As an Amazon Associate we earn from qualifying purchases.
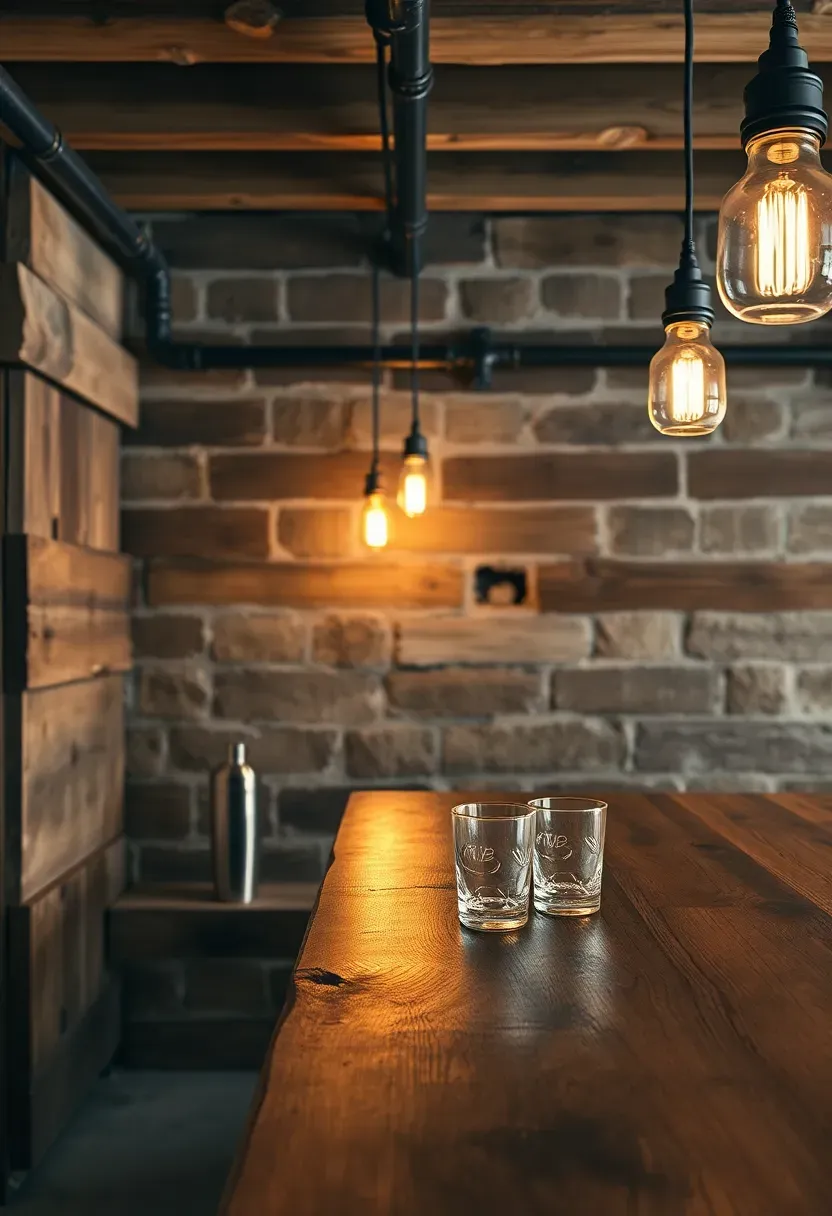
3. Rustic Reclaimed Wood Bar
Salvage lumber from old barns, pallets, or fence boards gives a basement bar character that new materials cannot replicate. The imperfections — nail holes, weathered grain patterns, slight warping — are the whole point. Sand the surface smooth enough to set a glass down without it wobbling, then seal with a food-safe polyurethane or bar-top epoxy. For the frame, black iron pipe fittings from a hardware store are inexpensive and match the rugged aesthetic perfectly. Total material cost for a six-foot bar can land under $300 if you source the wood free or cheap.
Build Tips
- Check reclaimed wood for lead paint before bringing it inside — a $10 test kit handles this
- Apply three coats of sealant on the bar top surface; one coat is not enough for drink spills
- Mount a simple shelf behind the bar using the same pipe fittings for a cohesive look
We picked a few things that go well with this idea: GDLF Large Bar Cabinet with Fridge Space (★4.7), BROTTAR Bar Cabinet with Fridge and LED Lights (★4.2) and Rustic Freestanding Wine Rack Bar Cabinet (★4.6). As an Amazon Associate we earn from qualifying purchases.
4. L-Shaped Corner Bar
The Space Advantage
An L-shaped layout fits naturally into basement corners, which are often dead zones anyway. The two wings of the L give you separate work areas: one side for drink prep and one for serving. Most L-bars run 6 to 8 feet on each wing, which provides seating for four to six people along the outside edge.
Planning the Layout
Place the sink and prep area on the shorter wing, away from where guests sit. The longer wing becomes your serving counter with stools. Store glasses, bottles, and tools in base cabinets underneath. The corner junction is prime real estate for a display shelf or a mounted TV.
Choose This If
- Your basement has an unused corner that is at least 6 by 6 feet
- You want seating for more than three people without a massive straight bar
- You need separate zones for working and socializing
Recommended
Items for this idea
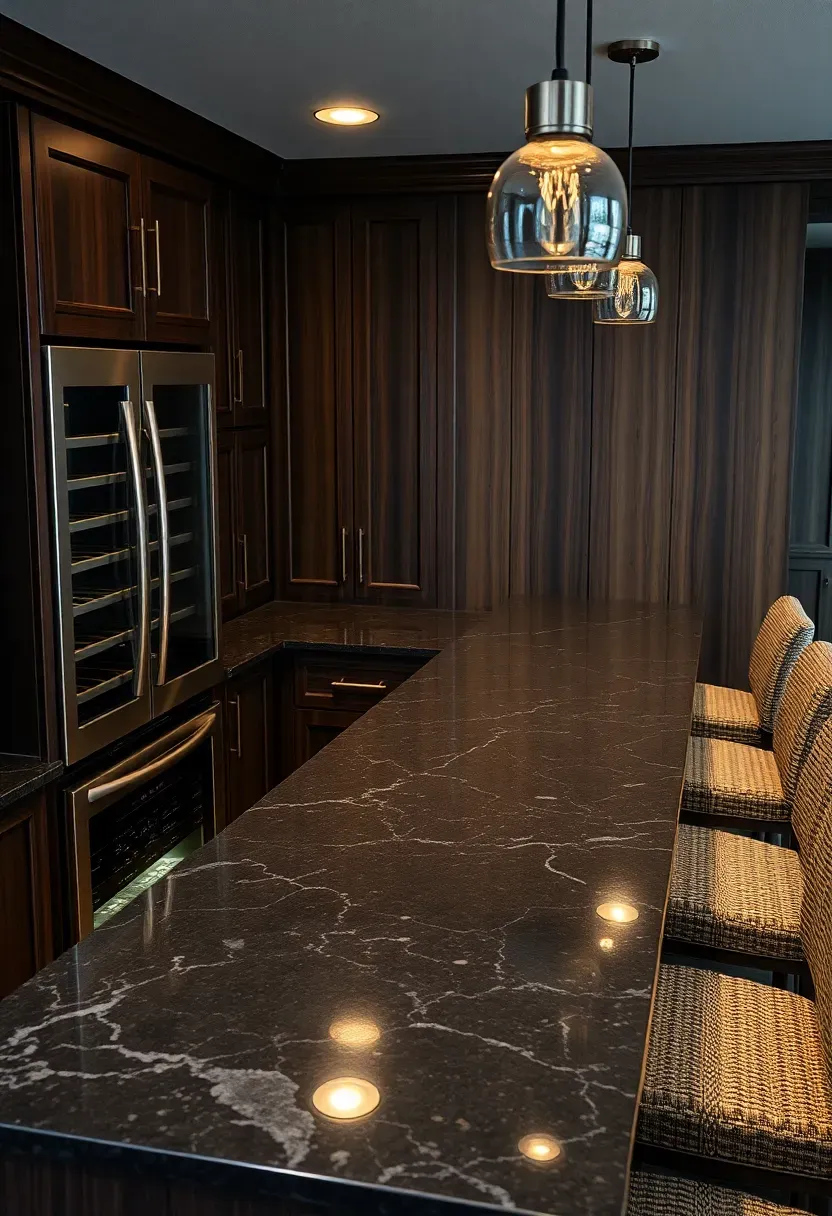
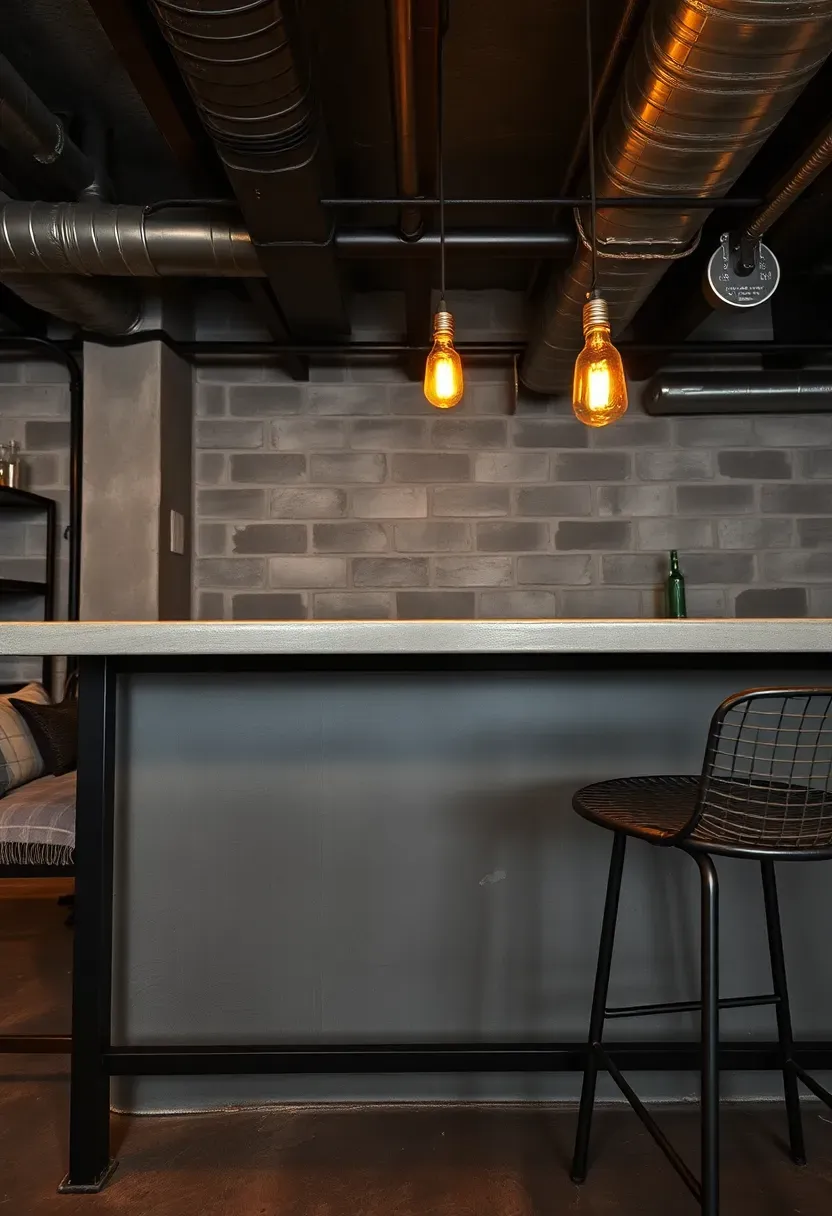
5. Industrial Steel and Concrete
Basements already have exposed pipes, ductwork, and concrete floors — so lean into it. Instead of covering everything with drywall, paint the ceiling joists matte black, leave the concrete floor sealed and polished, and build a bar using welded steel frames with a poured concrete countertop. The concrete top weighs a lot (about 25 pounds per square foot at 1.5 inches thick), so the frame needs to be sturdy. Angle iron or square steel tube welded into a rectangle works well. Pair with metal mesh stools and a few Edison bulb fixtures for a look that belongs in a Brooklyn loft.
Key Details
- Seal concrete countertops with a penetrating sealer, not just a topical one — spills will stain otherwise
- Use rubber bar mats on the concrete top to prevent glass breakage
- Hang open steel shelving behind the bar for bottles instead of closed cabinets
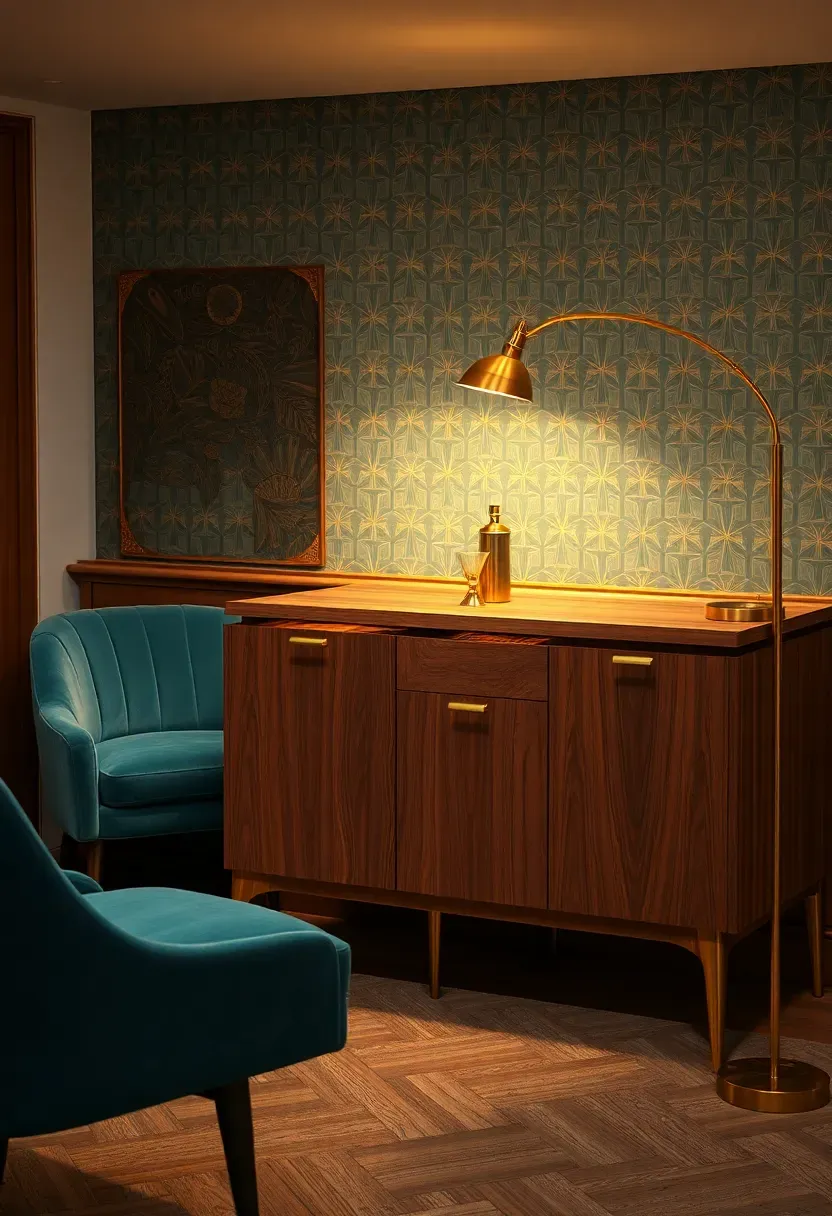
6. Mid-Century Cocktail Lounge
Think Mad Men, but in your basement. A mid-century cocktail lounge relies on a few specific ingredients: walnut or teak wood tones, brass hardware, low-profile furniture, and a restrained color palette of teal, mustard, or olive against warm neutrals. The bar itself can be a walnut-veneered cabinet with tapered legs, or a built-in with flat-panel doors and a laminate counter in a period-appropriate color. Add a couple of low armchairs or a curved sofa nearby. Keep a cocktail recipe book and proper glassware on display — the rituals of mixing are part of the aesthetic.
Styling Notes
- Source vintage barware from estate sales — it costs less than new reproductions
- Use a geometric or atomic-pattern wallpaper on one accent wall behind the bar
- Avoid overhead cans; use table lamps and a pendant or two for warm, low lighting
Recommended
Items for this idea
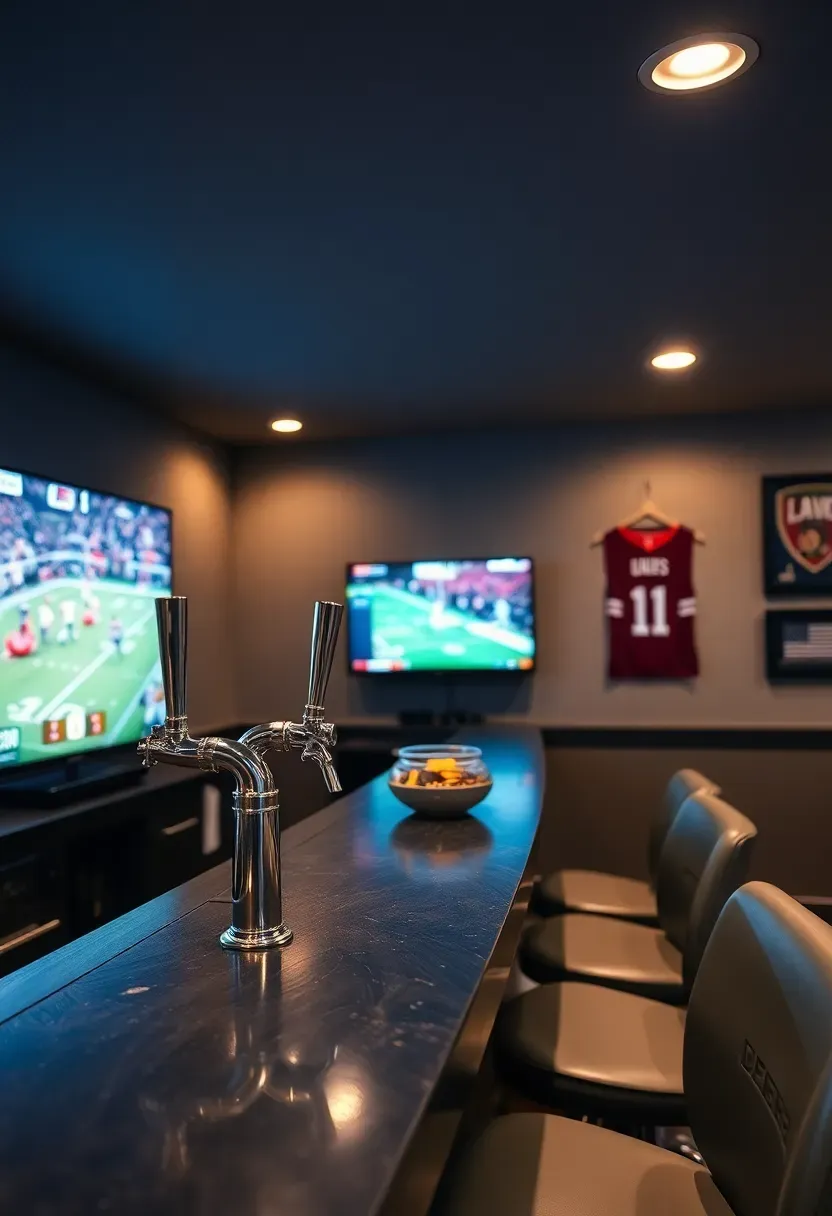
7. Sports Bar with TV Wall
The Problem
You want to watch the game downstairs with friends, but the drinks and snacks are all upstairs in the kitchen. Everyone keeps going up and down the stairs, missing plays and making a mess.
The Solution
Put the bar directly across from a wall-mounted TV (65 inches minimum for a basement viewing distance of 8 to 12 feet). Install two or three beer taps if you are serious about it, or keep a beverage fridge stocked below the counter. The bar counter faces the screen so the person mixing drinks does not miss the action either. Mount a shelf or two for team memorabilia, add some dimmable lighting, and run a sound bar under the TV.
Pros and Cons
- Pro: Everyone stays in one room — no more staircase traffic during the fourth quarter
- Pro: Dedicated space keeps sports clutter out of the main living areas
- Con: Wiring multiple screens and a sound system gets expensive fast
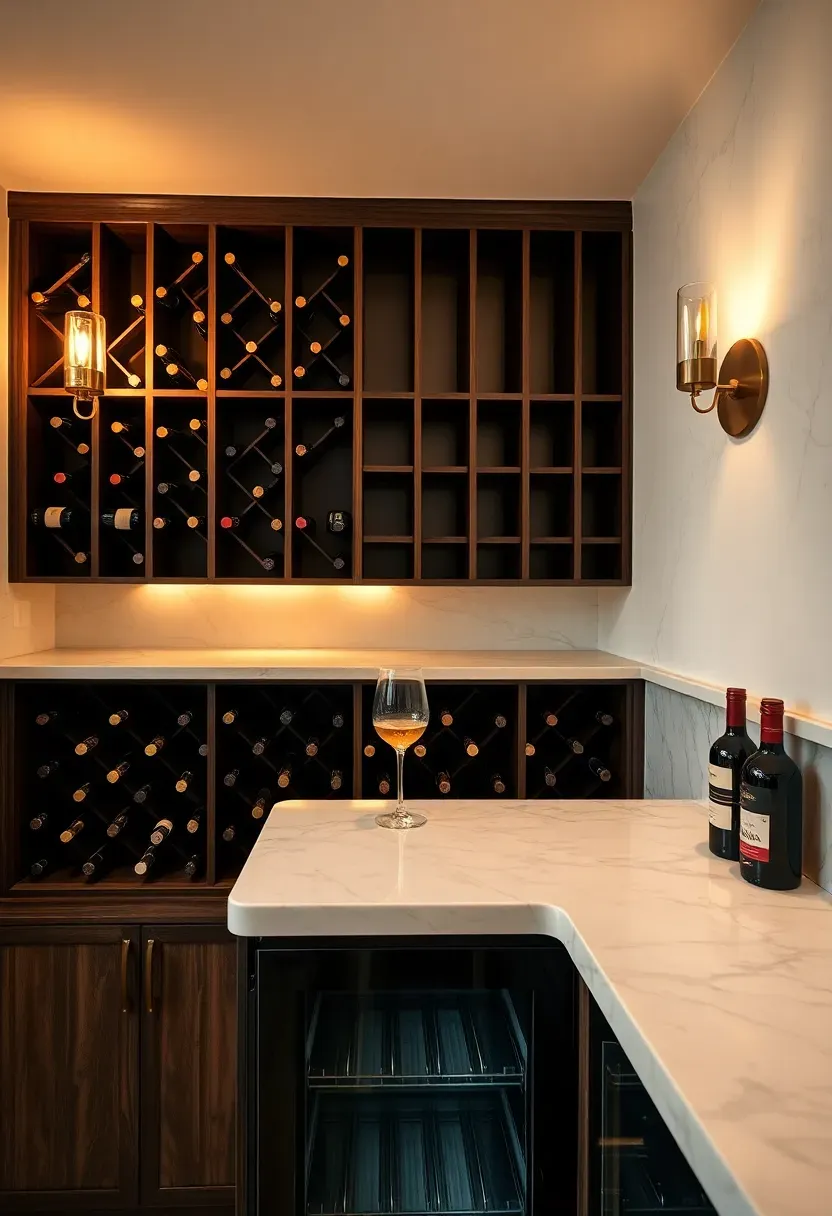
8. Wine Bar with Built-In Rack
A wine-focused basement bar needs temperature awareness more than anything else. Basements naturally stay cooler than upper floors, which is an advantage, but you still want consistency. A built-in wine rack along the back wall — either diamond-bin style for bulk storage or individual bottle slots for display — paired with a dual-zone wine cooler handles both serving temperature and long-term storage. Keep the counter clear for decanting and tasting. Marble or soapstone works well here because it stays cool to the touch and looks refined. Skip the beer taps; this bar is about a different pace.
Tips
- Maintain 55 to 58 degrees Fahrenheit for mixed red and white storage
- Use under-cabinet LED strips in warm white — harsh light affects how you perceive wine color
- Display wine reference books or regional maps as wall decor
Recommended
Items for this idea
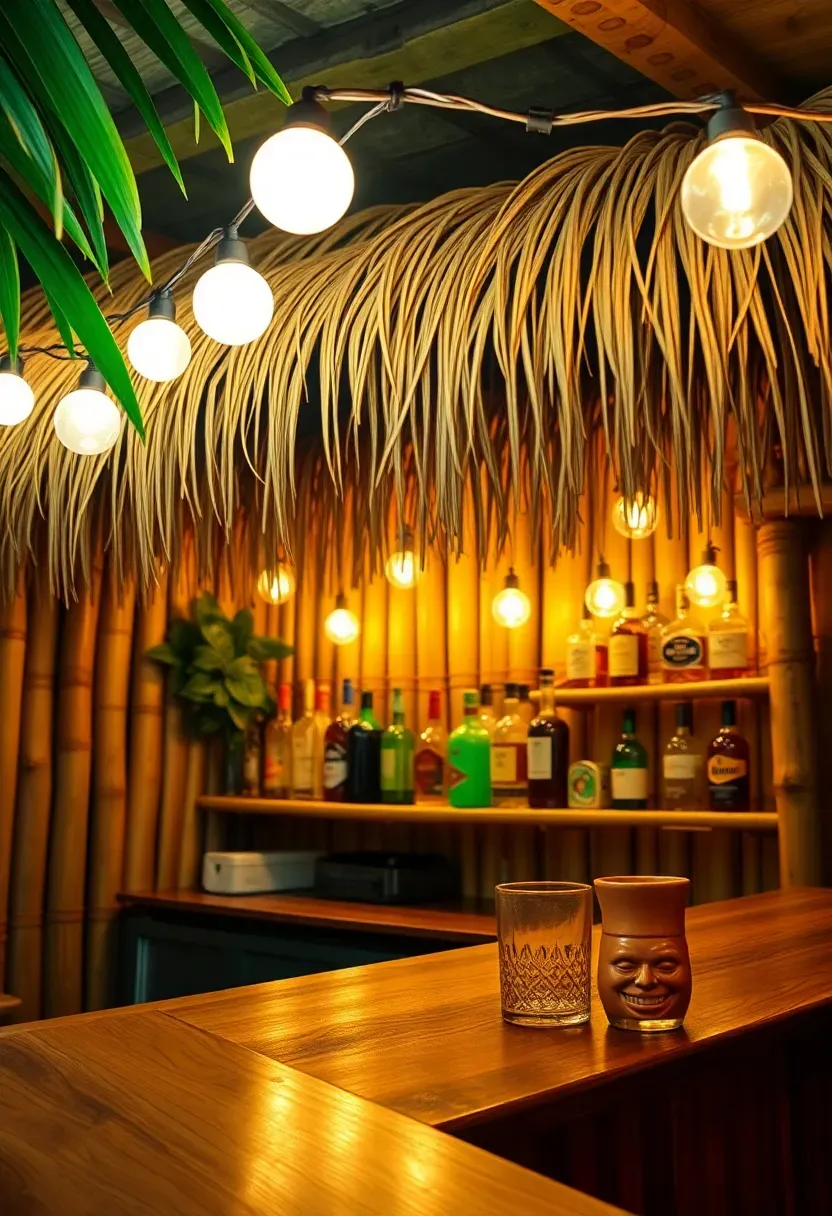
9. Tiki Bar with Bamboo Accents
A tiki bar sounds gimmicky until you actually build one. Then it becomes the only place anyone wants to hang out. The key materials are bamboo (for the bar facing and back wall), thatch or palm leaf panels (for a small overhang above the bar), and rope details. Bamboo fencing panels from a garden supply store cost $20 to $40 per roll and wrap around a basic plywood bar frame easily. Stock it with rum, tropical mixers, and a blender. Use ceramic tiki mugs instead of regular glasses. The commitment to the theme is what makes it work — half measures look awkward.
Tips
- Staple bamboo fencing over plywood for the bar front — fast and cheap
- Add a small water feature or tabletop fountain for ambient sound
- String warm-white globe lights across the ceiling to mimic outdoor patio lighting
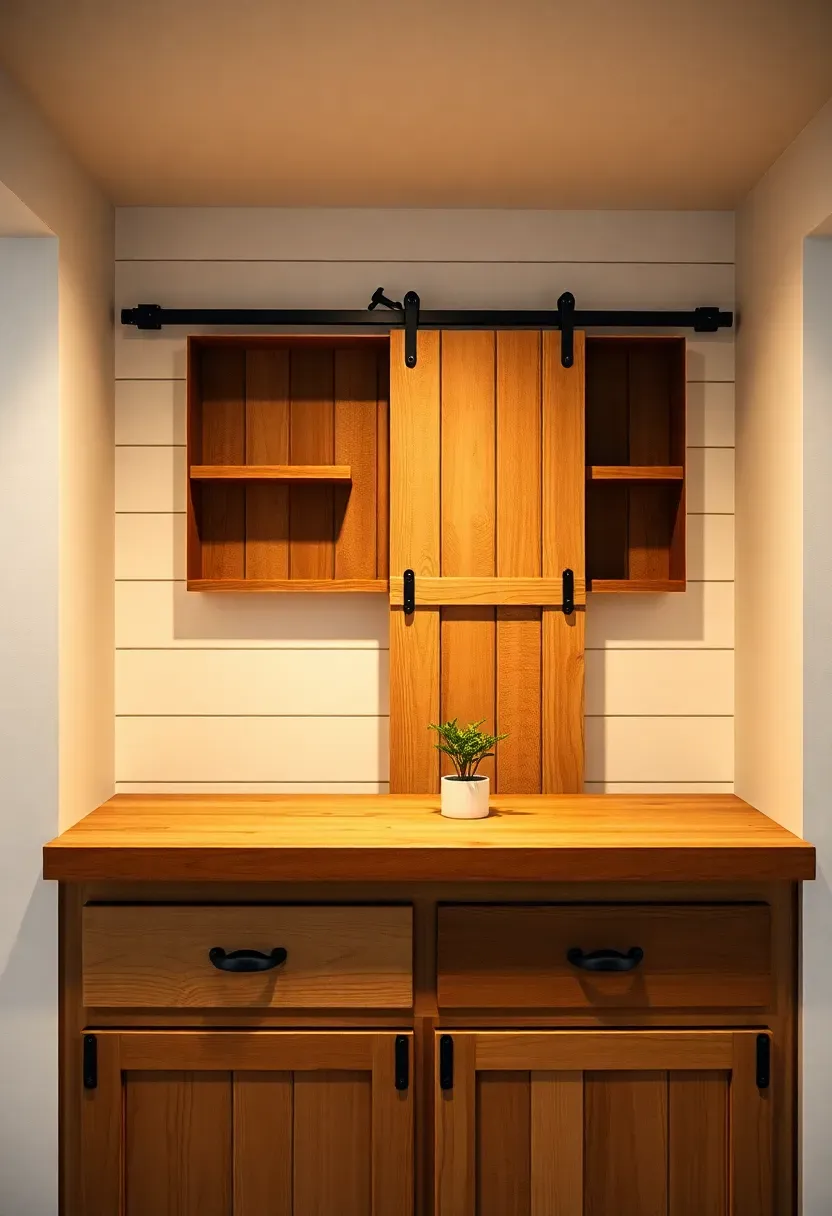
10. Farmhouse Barn Door Bar
How to Build It
Start with a standard bar frame (plywood or 2x4 construction) and clad the front with shiplap boards painted white or left in natural pine. The signature move is a sliding barn door mounted on a flat-track rail that covers the bottle shelves and glassware storage when the bar is not in use. This hides the clutter and gives the space a clean look during the day.
Step 1: Build or buy a barn door sized to cover your back bar shelving (standard is 36 by 84 inches).
Step 2: Install a flat-track barn door rail rated for the door weight — most kits run $40 to $80.
Step 3: Add wrought iron cup pulls and strap hinges as hardware accents, even if decorative only.
Watch Out
- Barn doors need 6 to 8 inches of clearance on either side of the opening for the slide track
- Cheap kits use plastic rollers that wear out fast — spend extra on steel wheels
Recommended
Items for this idea
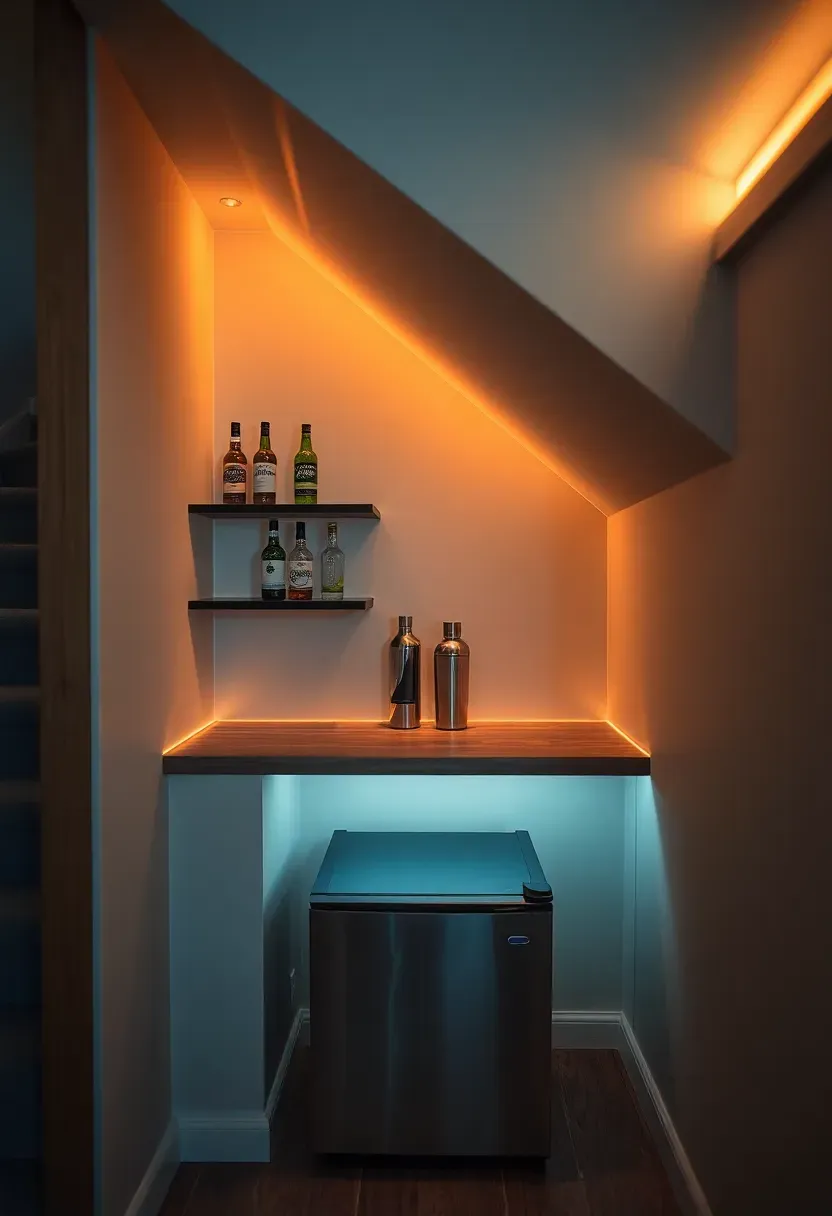
11. Under-Stairs Bar Nook
The triangular space beneath a basement staircase is often wasted on storage boxes or left empty. A narrow bar fits perfectly here. The tallest point (where the first step begins from above) gives you enough clearance for a standing-height counter and a row of bottles on a shelf. As the ceiling slopes down, tuck shorter items — a mini fridge, glass storage, napkins. You do not need more than 24 to 30 inches of counter width. This design works best as a self-serve station during parties rather than a sit-down bar, because seating is impractical under the slope.
Tips
- Measure headroom at every point along the slope — anything under 36 inches is storage only
- Use peel-and-stick LED strips along the sloped ceiling to highlight the nook
- Mount a fold-down shelf for extra prep space when mixing drinks
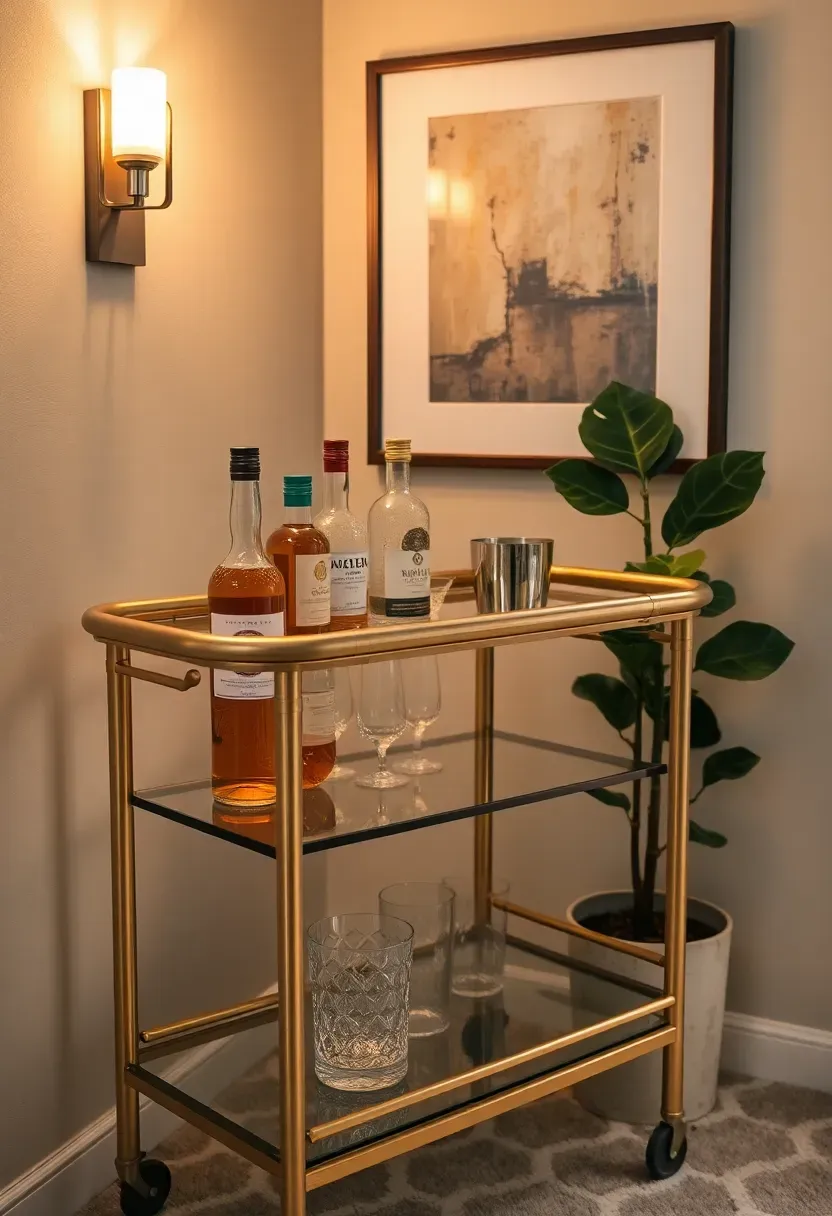
12. Dry Bar Cart Station
Cart vs. Built-In
Not everyone wants a permanent bar installation. A bar cart costs $50 to $300, requires zero construction, and can be relocated whenever you rearrange the basement. The tradeoff: limited storage and no sink. For someone who mixes an occasional cocktail and does not need draft beer or a dishwasher, this is plenty.
Setting It Up
Pick a cart with two or three tiers. Top tier holds your four or five most-used spirits plus a mixing glass and jigger. Middle tier stores mixers, bitters, and a small ice bucket. Bottom tier handles backup bottles and barware you use less often. Position the cart against a wall with a piece of art or a mirror above it to create a focal point.
Choose This If
- You rent and cannot modify the space
- Your bar needs are modest — a few drinks on weekends
- You want flexibility to move the setup between rooms
Recommended
Items for this idea
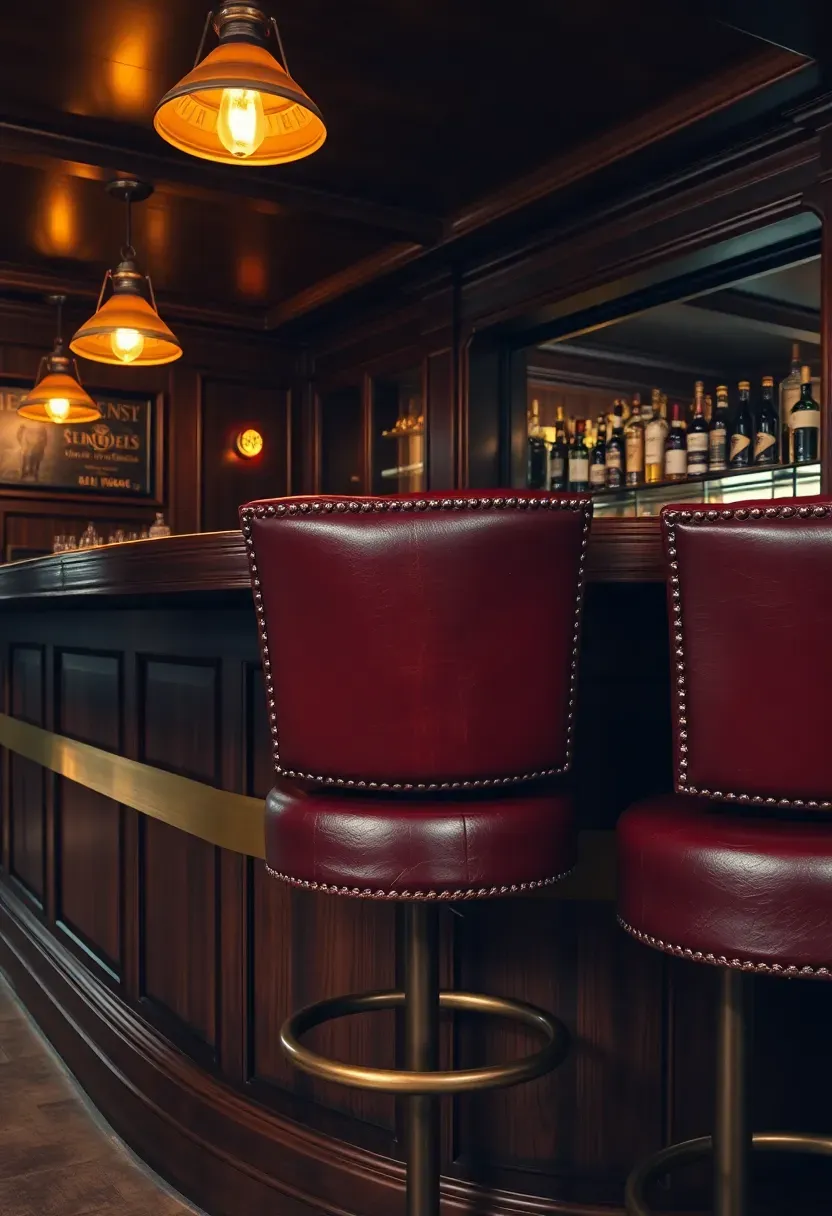
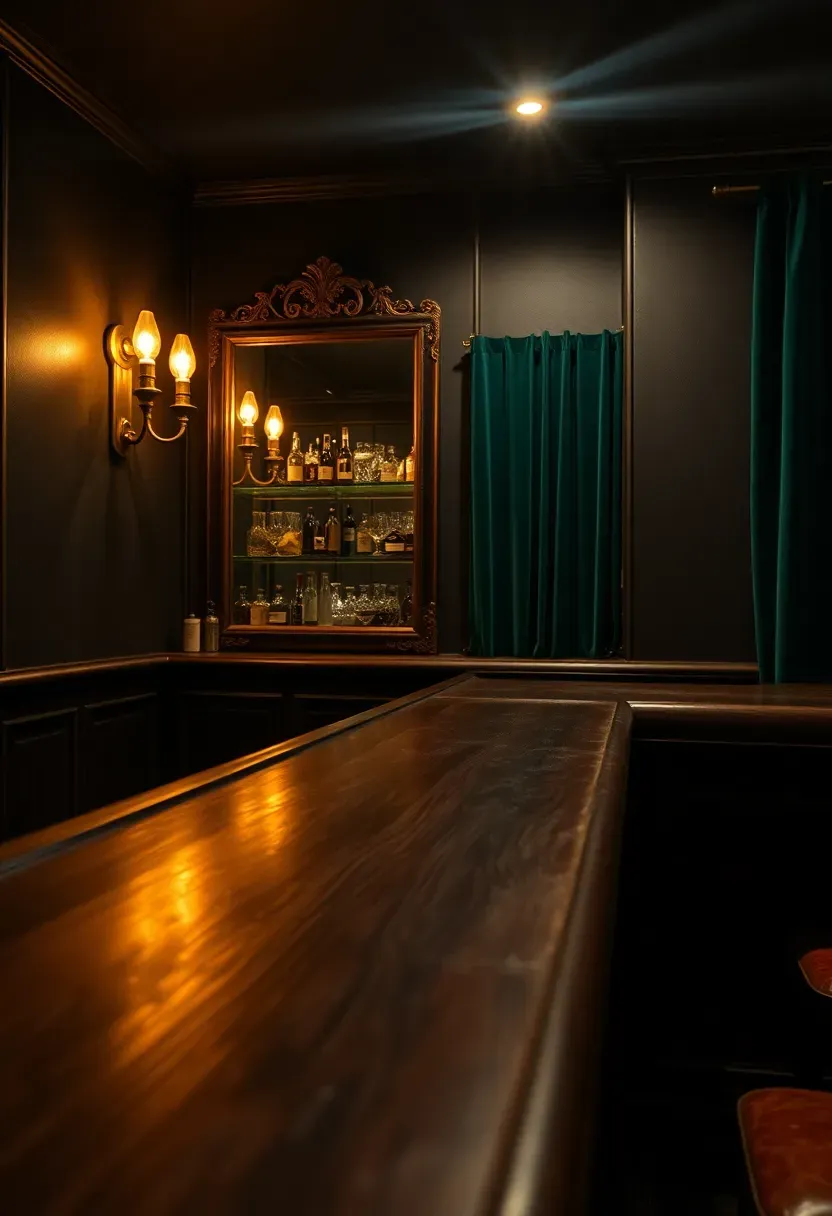
13. Speakeasy Dark Moody Bar
Paint the walls a deep charcoal or navy, install sconces with dim amber light, and add heavy velvet curtains at the entrance. A speakeasy bar thrives on atmosphere — low light, rich textures, and a sense of being somewhere secret. The bar itself should have a thick, dark wood or black marble top. Keep glassware on open shelves against a mirrored back wall so the bottles and glasses reflect the low light. A record player in the corner is not mandatory but fits the vibe perfectly. Serve old fashioneds and manhattans. No blender drinks in this room.
Styling Notes
- Hang vintage prohibition-era prints or black-and-white photographs on the walls
- Use heavy, thick-based rocks glasses — they feel more deliberate than thin glassware
- A leather-topped bar rail adds authenticity and comfort for leaning
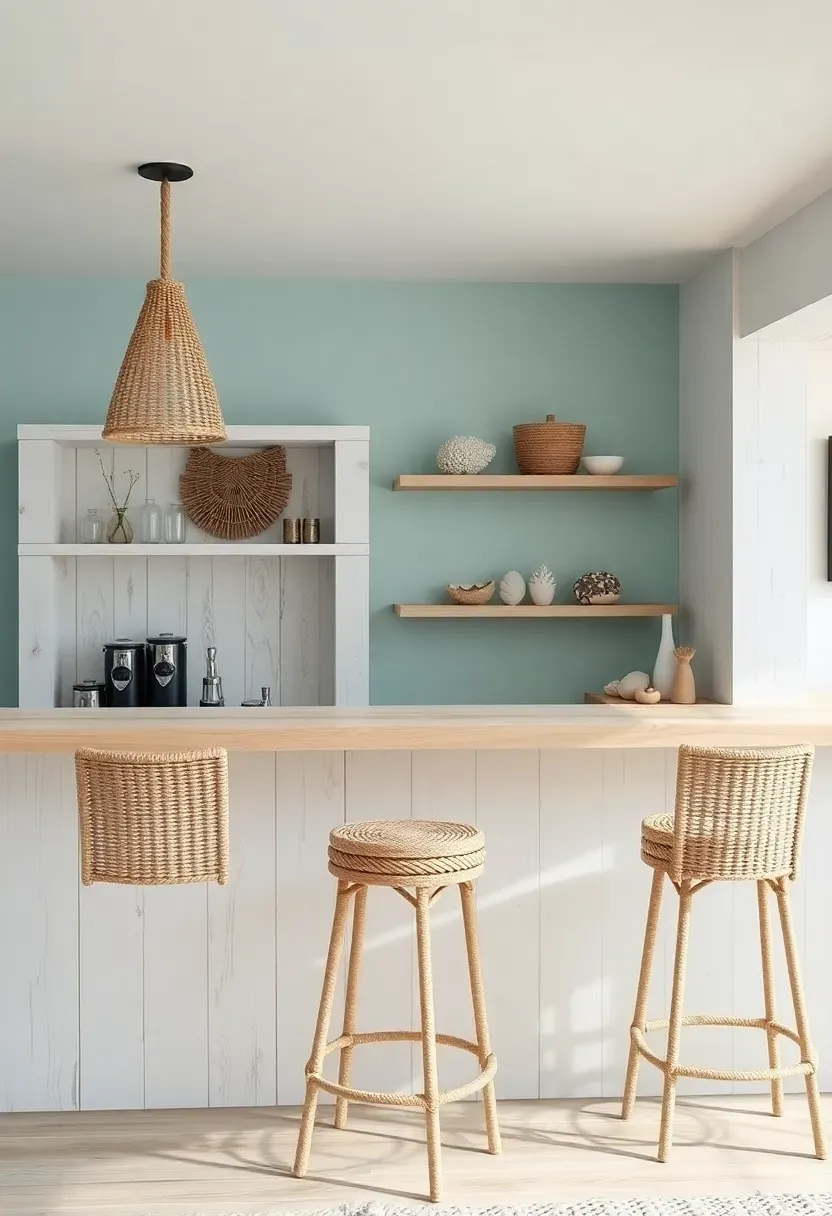
14. Coastal Beach House Bar
Origins
Beach bars started as open-air shacks near the water — corrugated tin roofs, sand floors, and coolers full of ice. The basement version borrows that laid-back energy without the sand in your shoes.
Modern Take
Use whitewashed or bleached wood for the bar front, light blue or seafoam green accents on the walls, and rope-wrapped details on hardware and light fixtures. A live-edge countertop in a pale wood like ash or poplar reinforces the natural, driftwood feel. Stock the bar with light spirits — white rum, tequila, vodka — plus citrus and tropical mixers.
Apply at Home
- Install beadboard paneling painted white or pale blue on the bar front
- Use jute or sisal bar stools instead of leather or metal
- Display collected shells, sea glass, or a surfboard as wall decor
Recommended
Items for this idea
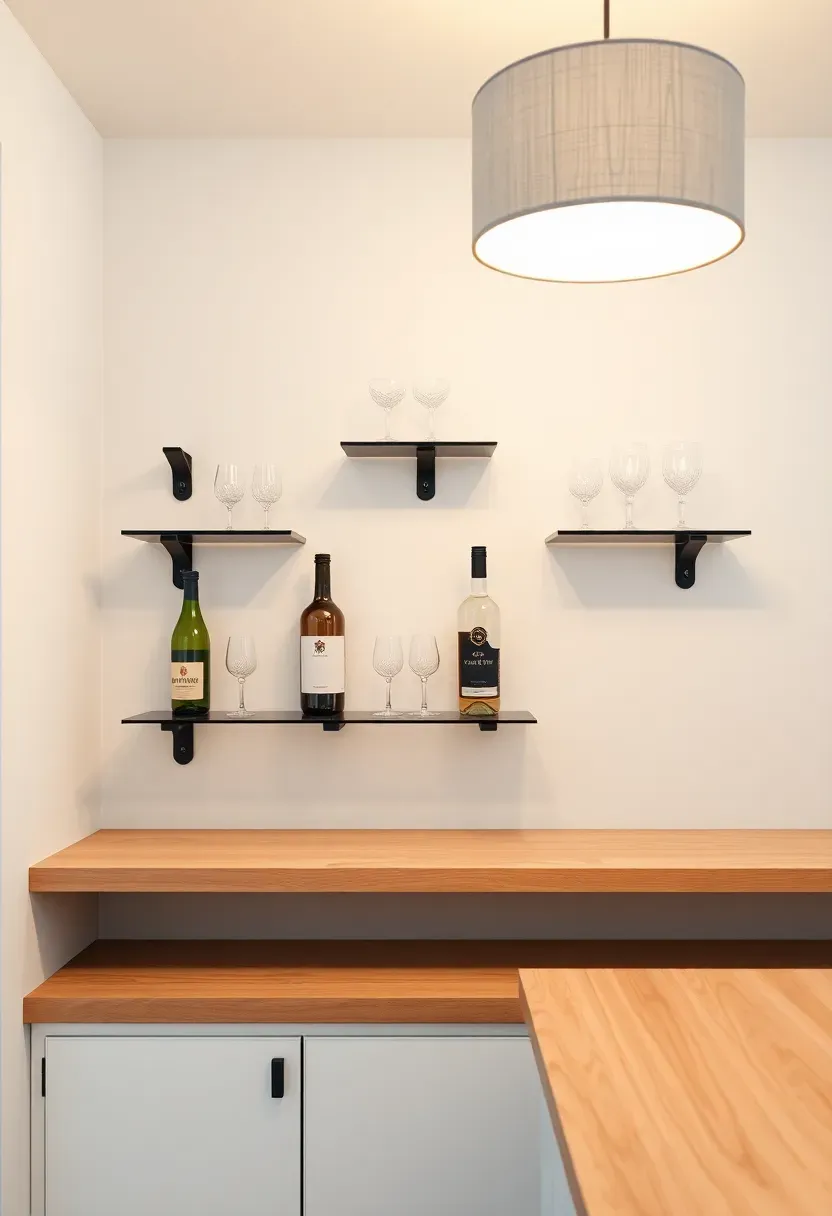
15. Open Shelving Minimalist Bar
Strip away everything you do not need. No ornate moldings, no themed decor, no excess. A minimalist bar has a clean wood or white laminate counter, two or three floating shelves on the wall behind it, and only the bottles and tools you actually use. The discipline is in editing: keep six to eight spirits, a few mixing tools, and matching glassware. Everything on display should earn its spot. This approach works especially well in basements with low ceilings because the visual simplicity prevents the space from feeling cluttered or cramped.
Tips
- Use matching shelf brackets (matte black or brass) for visual consistency
- Limit the color palette to two or three tones across the entire bar area
- Hide backup bottles and supplies in a closed cabinet below the counter
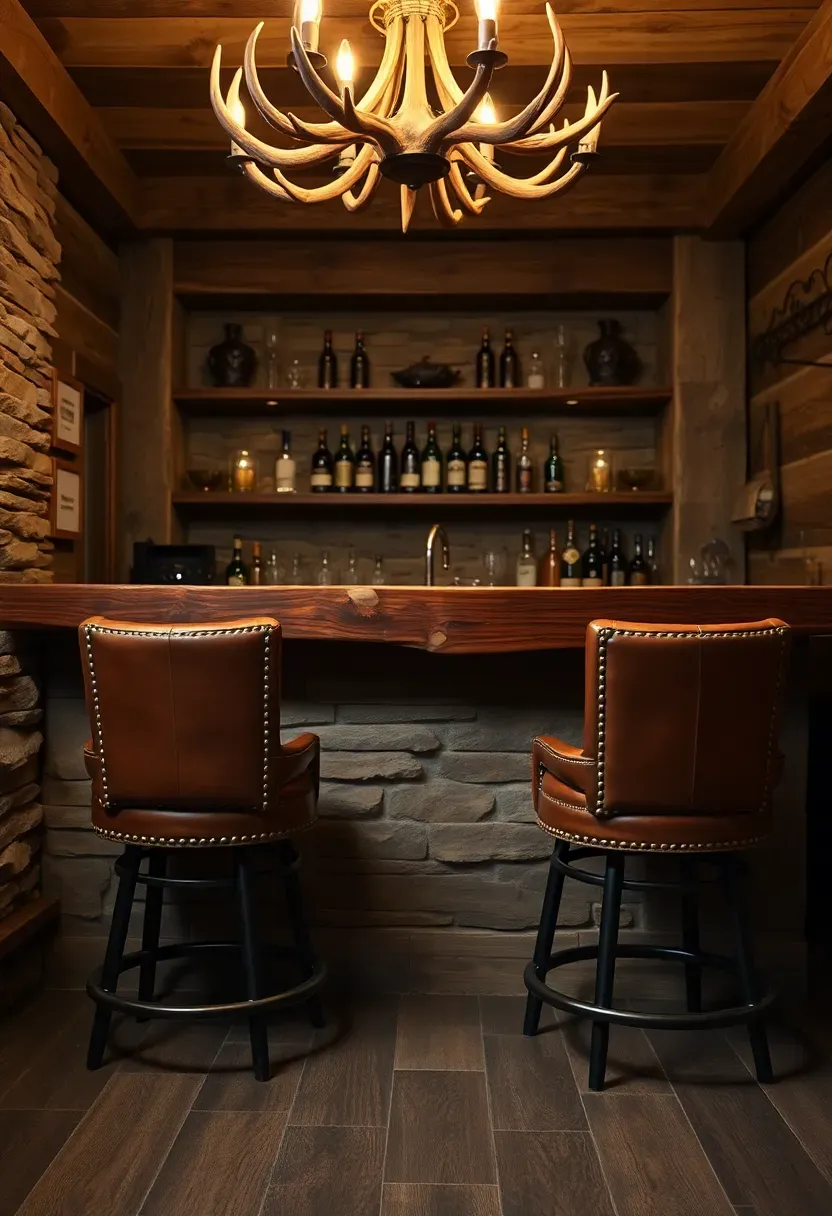
16. Stone and Timber Lodge Bar
The Problem
Your basement feels like a cold concrete box. It has no character, no warmth, and nobody wants to spend time down there.
The Solution
Cover the bar front with stacked stone veneer panels (much lighter and cheaper than real stone, at $8 to $15 per square foot). Top it with a heavy timber slab — reclaimed barn beam sections work well for this. The stone and wood combination instantly adds visual weight and warmth. Mount an antler chandelier or a wrought-iron fixture overhead. Use leather-upholstered stools with nailhead trim. The lodge aesthetic turns a forgettable basement into a room with genuine presence.
Pros and Cons
- Pro: Stone veneer is a dramatic visual upgrade for relatively low cost
- Pro: Natural materials age well and do not look dated after a few years
- Con: Timber slab countertops need regular sealing to handle moisture
Recommended
Items for this idea
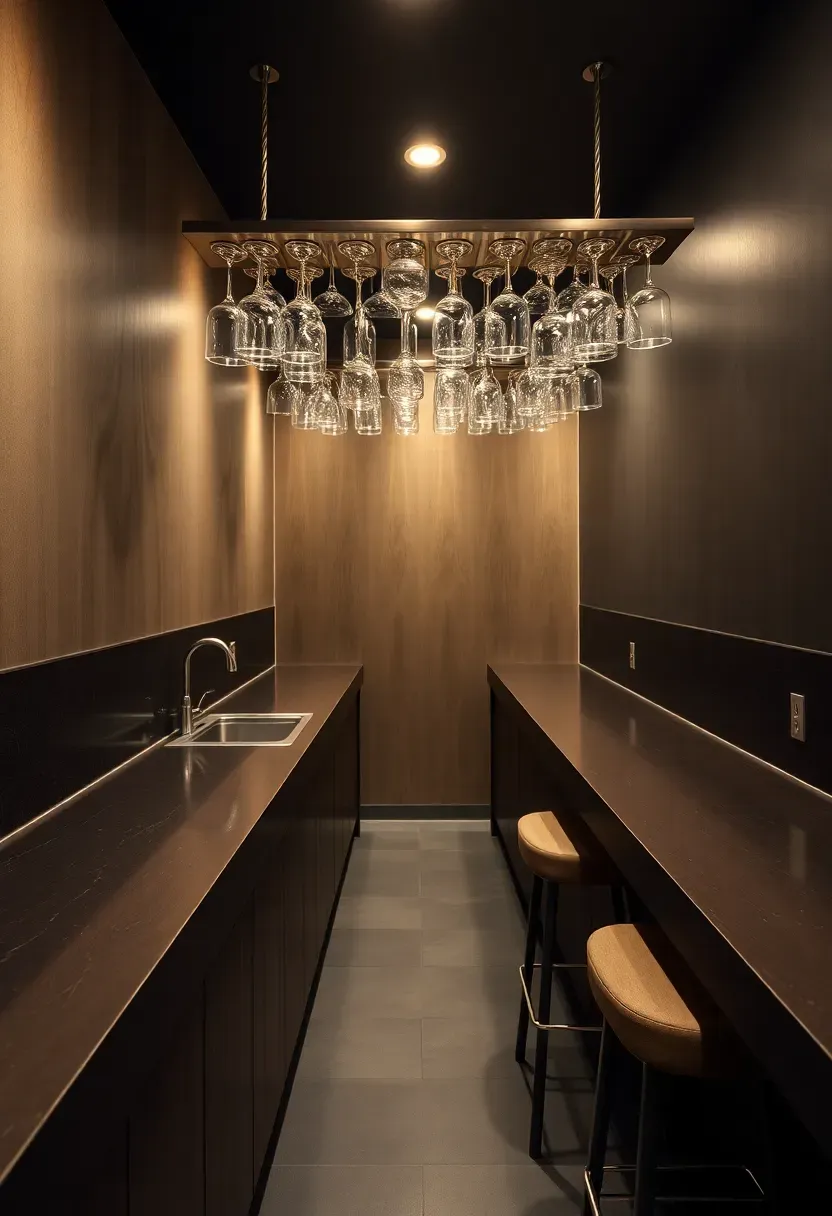
17. Compact Galley Bar
When floor space is limited, a galley layout puts everything within arm's reach. Two parallel counters — one for serving, one for prep — with 36 to 42 inches of walkway between them. The prep side holds the sink, fridge, and storage. The serving side faces the room with stools. This layout borrows from commercial kitchen efficiency and works in basements where a full-size bar would eat too much floor area. A six-foot galley bar can hold a surprising amount of function in a tight footprint.
Tips
- Hang a stemware rack from the ceiling between the counters to save cabinet space
- Use a pull-out trash bin in the prep counter to keep waste hidden
- Install a narrow countertop (12 to 14 inches) on the prep side — you do not need full depth
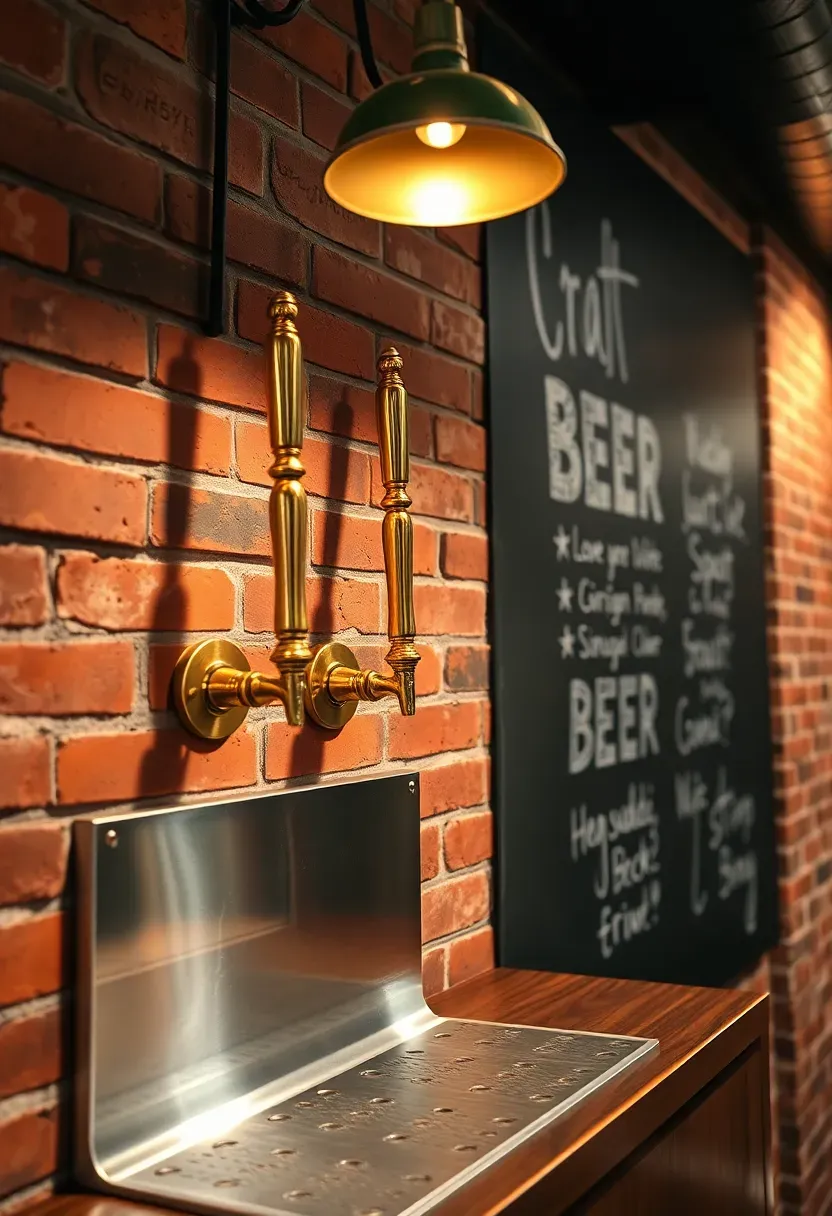
18. Craft Beer Tap Wall
How to Build a Tap Wall
A dedicated tap wall is the centerpiece for any beer-focused basement bar. Instead of mounting taps on the bar counter, run the beer lines through the wall from a kegerator or glycol system behind it.
Step 1: Build or frame a section of wall (4 to 6 feet wide) with space behind for the kegerator and beer lines. Insulated lines keep the beer cold from keg to tap.
Step 2: Mount a stainless steel drip tray below the taps to catch overflow. Size it to span the full width of your tap handles.
Step 3: Finish the wall face with chalkboard paint (for rotating beer names), reclaimed wood, or exposed brick veneer. Mount four to eight tap handles depending on your kegerator capacity.
Watch Out
- Glycol-cooled systems run $1,500+ but keep beer at serving temperature over long line runs
- Direct-draw systems (kegerator right behind the wall) are cheaper but limit placement options
Recommended
Items for this idea
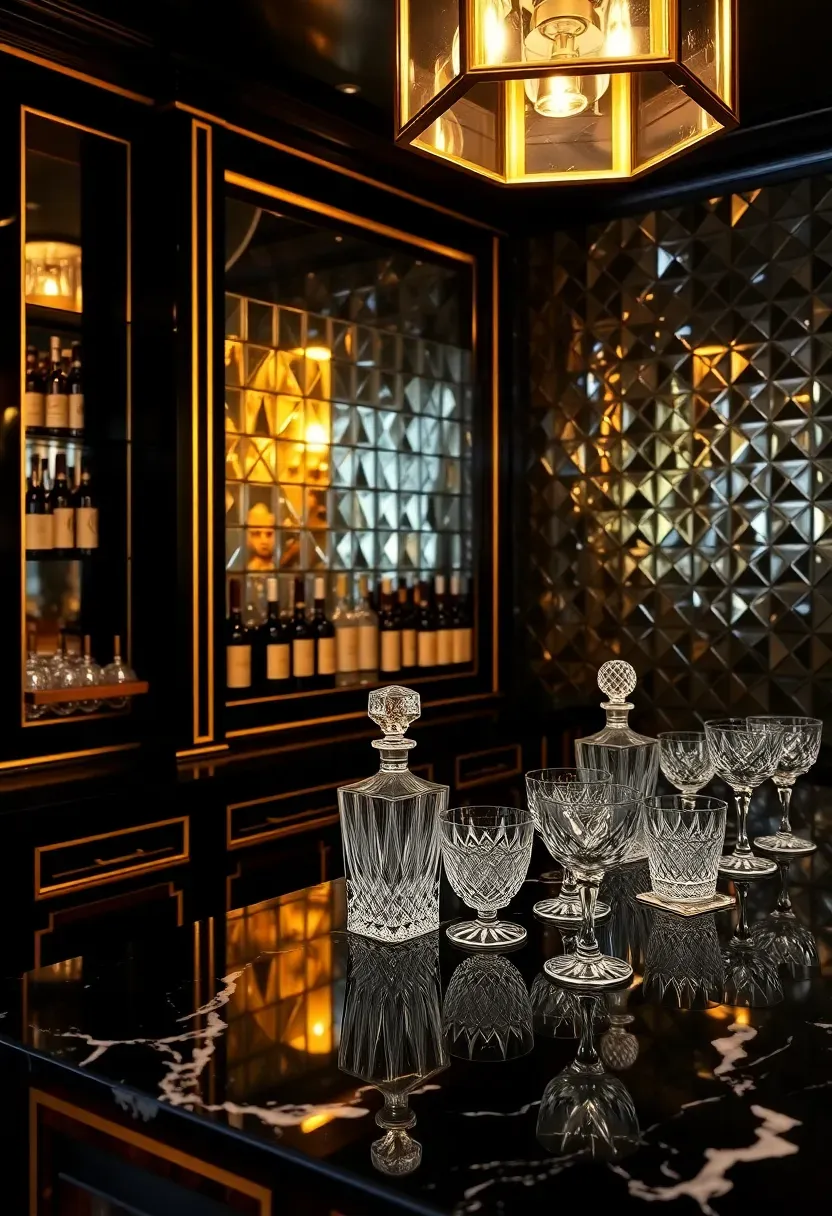
19. Art Deco Glam Bar
Art deco design peaked in the 1920s and 1930s — the same era as prohibition, which makes it a fitting reference for a home bar. The style is built on geometric patterns, metallic finishes (gold, brass, chrome), mirrored surfaces, and rich materials like lacquer and marble. For a basement bar, start with a dark lacquered bar front with gold trim lines. Mount a large mirror panel or mirrored tiles on the back wall. Use geometric-patterned floor tile (black and white hexagons are classic). Display crystal decanters and cut-glass tumblers. The goal is polished, deliberate glamour — not rustic, not casual.
Styling Notes
- Geometric pendant lights (hexagonal or fan-shaped) are more period-accurate than drum shades
- Use velvet or leather upholstery on bar stools in emerald green, deep blue, or black
- A marble or onyx countertop sells the look but is not mandatory — black laminate with a polished edge works too
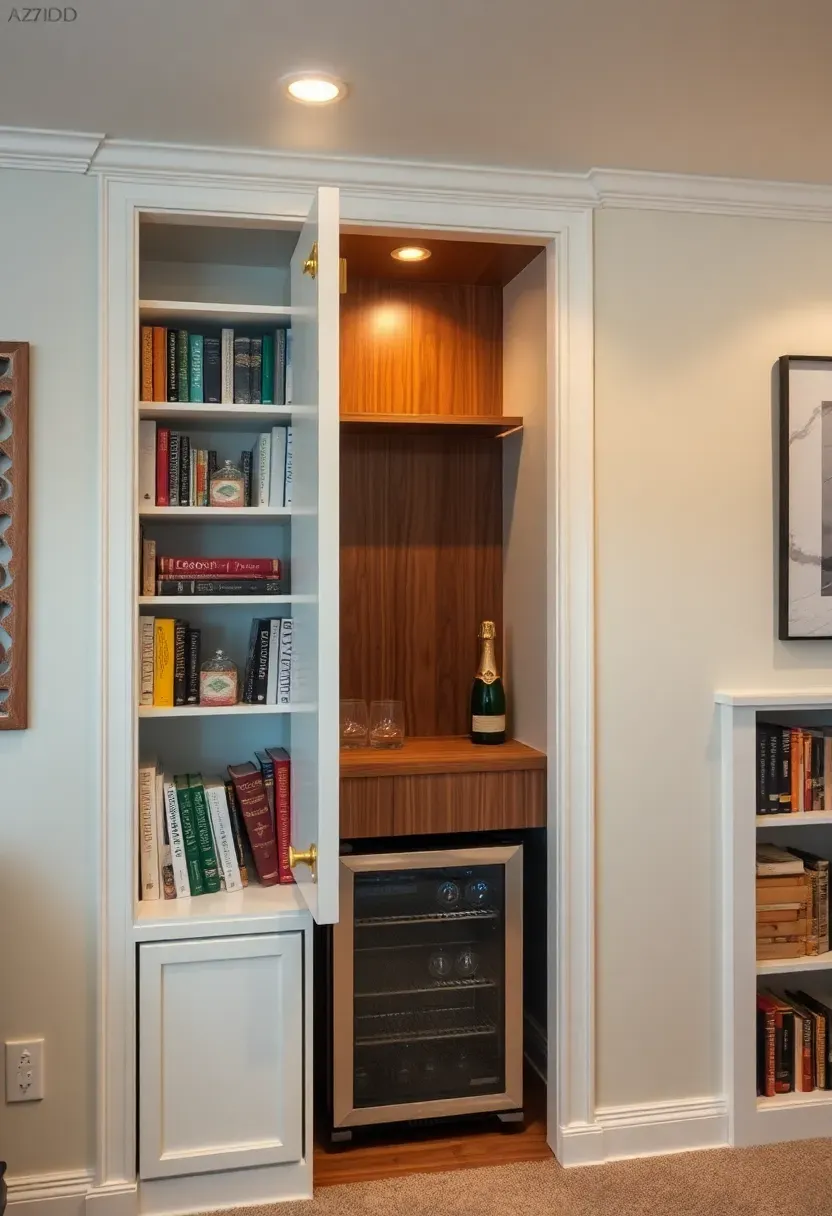
20. Built-In Bookcase Bar
Why Hide It?
Sometimes you want a bar that disappears when company is not over. A bookcase bar conceals the bottles, glasses, and tools behind what looks like an ordinary built-in shelf unit. Pull open a section — either a hinged bookcase door or a sliding panel — and the bar reveals itself.
Building the Concealment
The simplest version: build a standard bookcase with one section that swings open on concealed hinges. Behind it, install a narrow counter (12 to 16 inches deep), a mini fridge, and wall-mounted bottle shelves. The front of the bookcase still holds real books and decorative objects. The hinge mechanism needs to handle the weight — SOSS invisible hinges rated for the door weight work well.
Choose This If
- You share the basement with kids and want alcohol stored out of sight
- You prefer a clean, library-like aesthetic most of the time
- You enjoy the novelty of a hidden feature
Recommended
Items for this idea
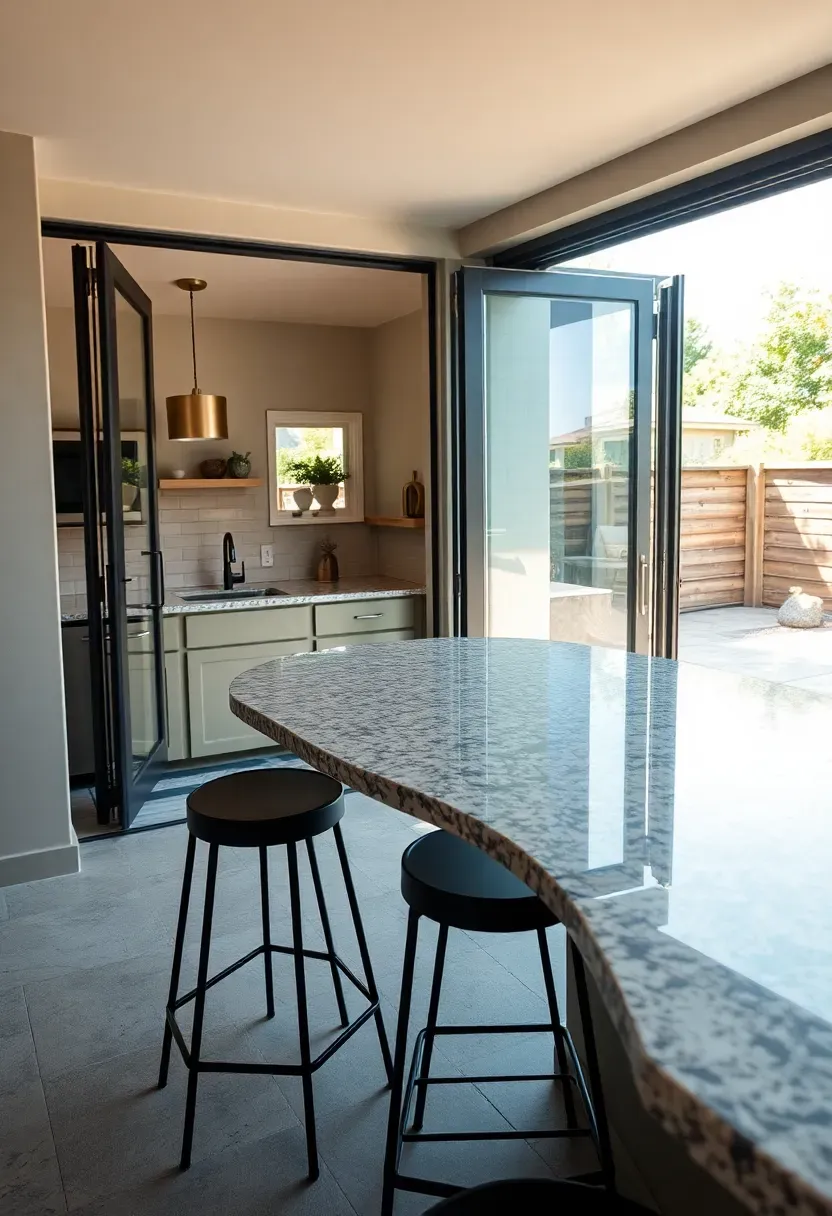
21. Outdoor-Indoor Walkout Bar
If your basement has a walkout to a patio or yard, position the bar near that door. With folding or sliding glass panels, the bar can serve both the indoor basement space and the outdoor area simultaneously. Use a durable countertop material that handles temperature swings — granite, concrete, or porcelain slab. The indoor side gets standard bar amenities (fridge, sink, storage) while the outdoor side acts as a pass-through serving window or counter extension. This layout is particularly effective for summer entertaining because guests move freely between inside and outside.
Tips
- Extend the countertop through the door opening so it functions as a continuous surface
- Use weather-resistant stools on the outdoor side — powder-coated metal or teak
- Install a ceiling fan near the door transition to manage airflow in summer

22. Whiskey Lounge Bar
A whiskey lounge is less about the bar counter and more about the seating and atmosphere. The bar itself can be modest — a small cabinet with a decanter, a few bottles of bourbon, rye, and scotch, and proper Glencairn or rocks glasses. The real investment goes into two or three deep leather club chairs, a low table between them, and warm directional lighting (a reading lamp on the table, sconces on the wall). If the basement has adequate ventilation or an exterior vent, some people add a cigar element. The room should feel quiet and unhurried — no TV, no loud music, just conversation.
Tips
- Keep the whiskey selection curated: five to eight bottles you actually drink, not fifty for show
- Use wool or sisal rugs to absorb sound and warm the concrete floor
- A small humidor on the shelf adds character even if you do not smoke
Recommended
Items for this idea
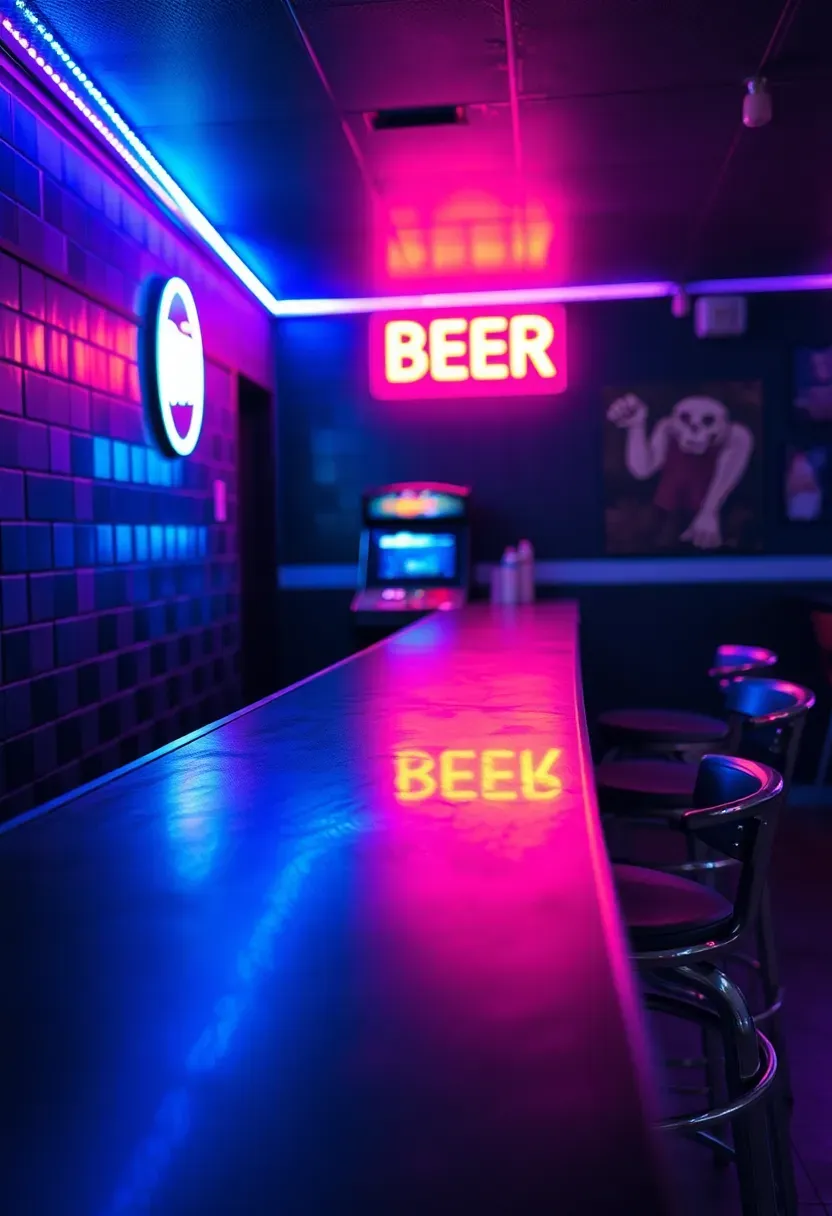
23. Neon-Lit Game Room Bar
The Concept
Combine the bar with a game area — pool table, dartboard, arcade cabinets, or a pinball machine. The bar anchors one wall while games fill the rest of the room. Neon signs and LED strip lighting in saturated colors (purple, blue, red) give it an arcade or retro bowling alley feel.
Making It Work
Keep the bar simple so the games are the focus. A straight counter with a few stools, a fridge underneath, and some open shelving for bottles is enough. Run LED strips along the bar underside, under shelves, and around the ceiling perimeter. Mount one or two neon signs (custom or vintage) on the wall behind the bar. The lighting does most of the decorating work in this setup.
Choose This If
- Your basement doubles as an entertainment space with games
- You want a casual, fun atmosphere rather than a refined lounge
- You have kids or teens who will use the game area (keep the bar lockable)
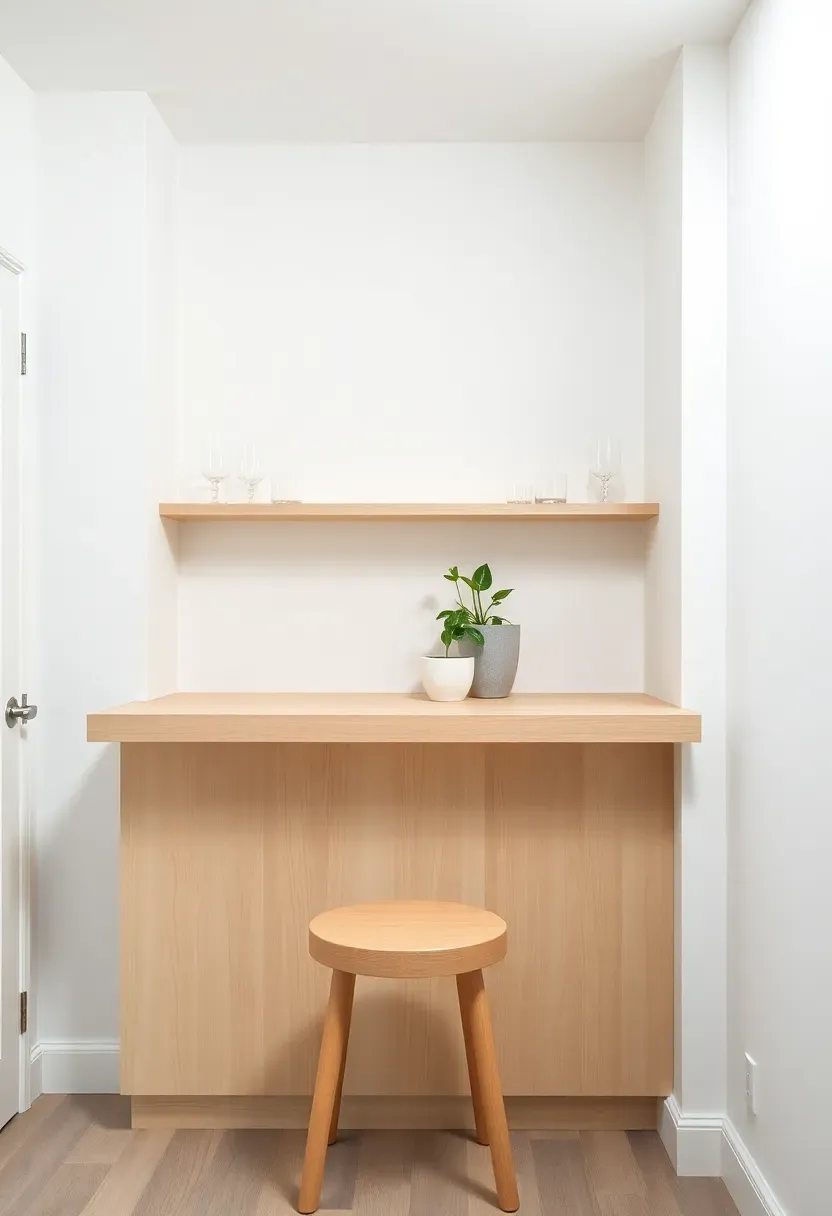
24. Scandinavian Light Wood Bar
Most basement bars go dark. This one goes the opposite direction. Light birch or maple plywood for the bar front, white walls, a pale countertop (birch butcher block or white laminate), and simple, unadorned glassware on open shelves. The Scandinavian approach relies on natural light tones to counteract the typical basement darkness. Add a few green plants — pothos or snake plants that tolerate low light — and keep surfaces clear. The restraint is the design. No neon, no memorabilia walls, no themed decor. Just clean materials and good proportions.
Tips
- Use matte finishes throughout — high gloss does not fit this aesthetic
- Choose stools with wooden legs and a simple cushion in gray or white linen
- A single pendant light with a natural linen or paper shade works better than multiple fixtures
Recommended
Items for this idea
25. Budget IKEA Hack Bar
How to Build It for Under $200
IKEA KALLAX shelving units (the cube storage ones) make a surprisingly effective bar base. Two units placed side by side with a plywood or butcher block countertop on top give you a 58-inch-wide bar with built-in storage cubes underneath.
Step 1: Assemble two KALLAX 2x2 units and place them next to each other. Secure them together with bolts through the side panels.
Step 2: Cut a plywood or butcher block top to overhang the front by 10 to 12 inches for knee clearance when seated.
Step 3: Insert KALLAX door inserts or fabric bins in the cubes to organize bottles, glasses, and bar tools. Add a mini fridge next to the unit.
Watch Out
- KALLAX is not designed to hold heavy stone countertops — stick with wood or laminate
- Secure the unit to the wall to prevent tipping, especially with a heavy overhang
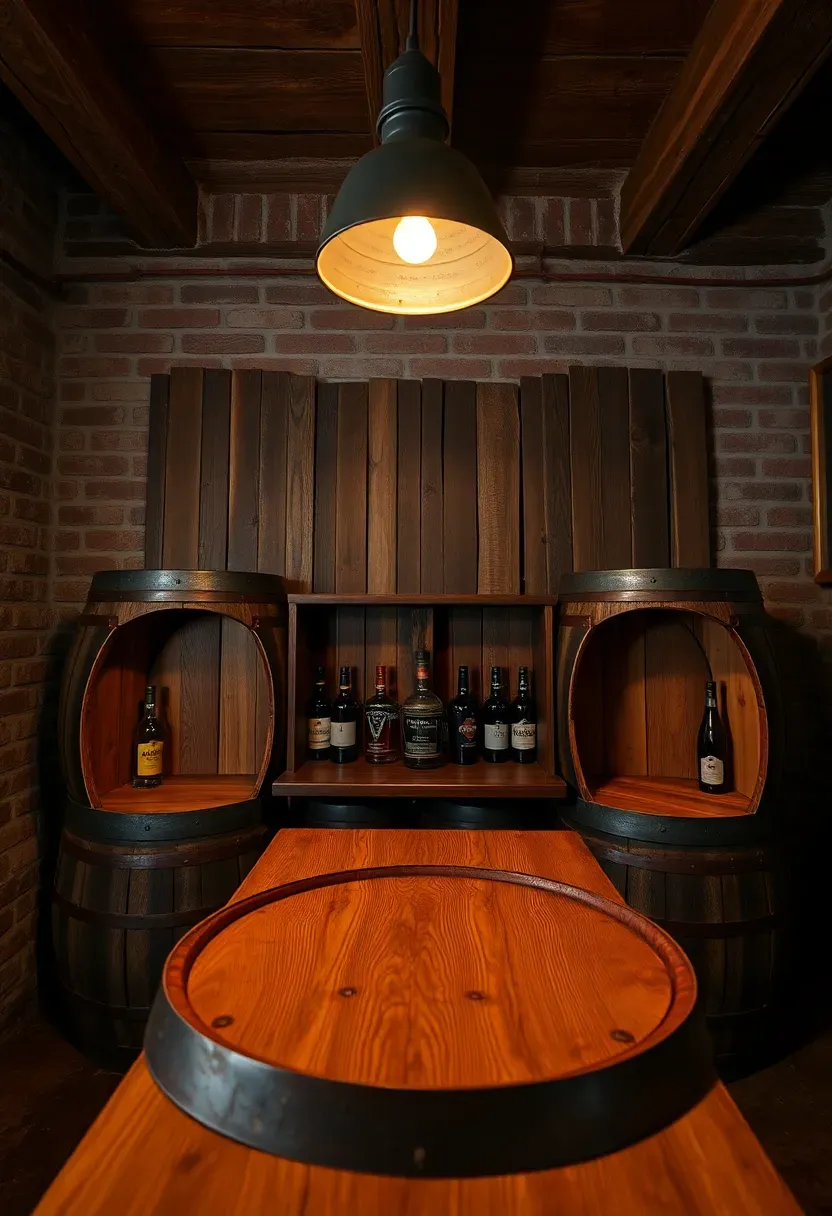
26. Barrel-Top Pub Bar
Used whiskey or wine barrels cost $50 to $150 each from distilleries, wineries, or online sellers. Stand three or four barrels upright, lay a thick wood plank (2 inches minimum) across the tops, and you have a bar. The barrels act as both the base structure and storage — the open interiors hold bottles, ice buckets, or glassware. For a more polished version, cut the barrels in half lengthwise and mount them against a wall as the bar front, then build a standard counter behind them. The curved stave lines and iron hoops give immediate visual interest without any additional decoration needed.
Tips
- Sand the barrel tops flat before placing the countertop — they are often uneven
- Seal barrel interiors with polyurethane if using them for storage; raw wood attracts insects
- A single barrel with a round top also works as a standalone cocktail table
Recommended
Items for this idea
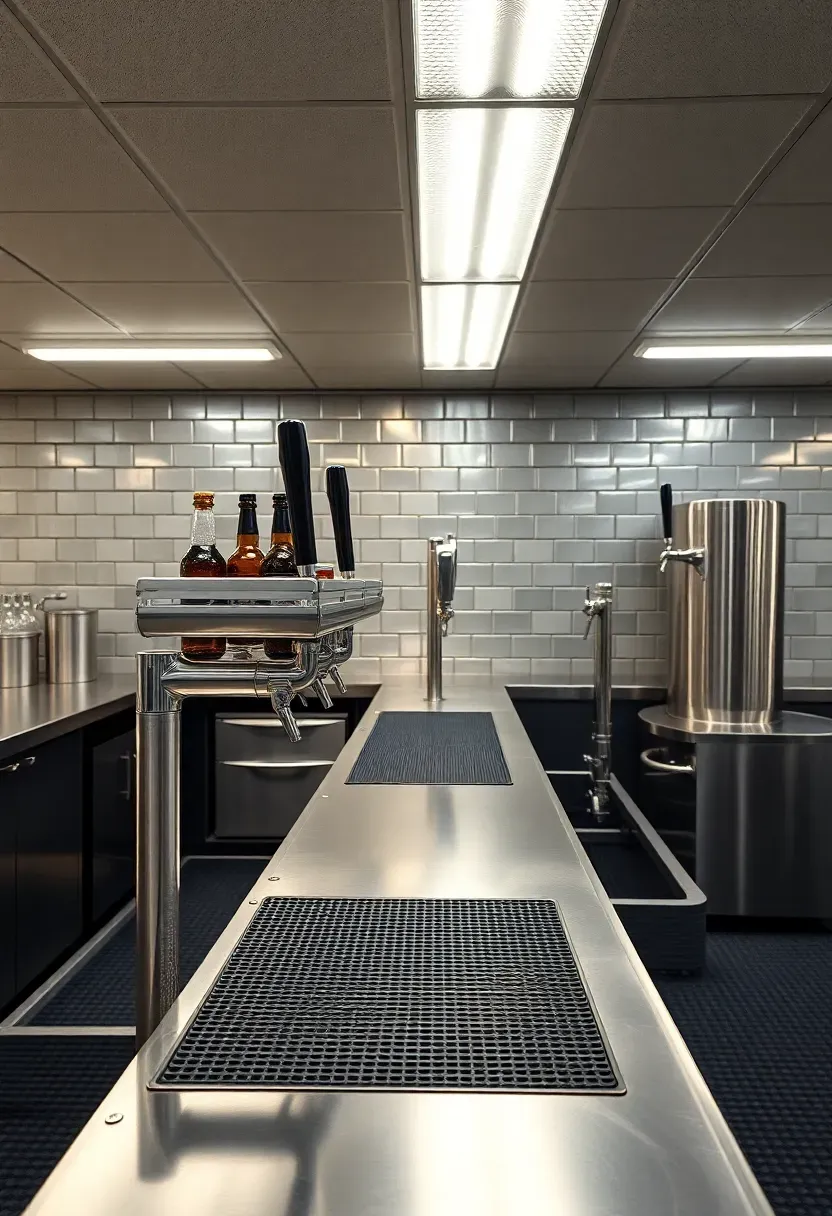
27. Full Commercial-Style Bar
This is the build for someone who takes bartending seriously or entertains large groups regularly. A commercial-style bar uses restaurant-grade equipment: a three-compartment sink, a speed rail for frequently used bottles, a jockey box or multi-tap draft system, commercial ice bin, and rubber floor mats behind the bar. The counter is stainless steel, granite, or a poured epoxy surface rated for heavy use. The cost runs $5,000 to $20,000+ depending on equipment choices, but the durability and efficiency are unmatched. If you are pouring drinks for 15 or more people regularly, the investment pays off in workflow alone.
Key Details
- Check local building codes — some jurisdictions require specific plumbing for commercial sinks
- Rubber anti-fatigue mats behind the bar make a real difference during long evenings
- A commercial ice maker (producing 50+ pounds per day) means you never run out during parties
Quick FAQ
Do I need a permit to build a basement bar? It depends on your municipality and the scope of work. A dry bar (no plumbing) typically needs no permit. Adding a sink or running gas lines for a stove usually requires a plumbing or mechanical permit. Electrical work beyond plugging into existing outlets may need an electrical permit. Call your local building department — the answer takes five minutes and can save you from fines during a future home sale inspection.
Which countertop material holds up best for a basement bar? Granite and quartz handle spills, condensation, and heavy use without staining or scratching easily. Butcher block looks great but needs regular oiling and is vulnerable to water rings if left unsealed. Concrete is durable but porous — it requires proper sealing. Laminate is the budget champion and modern versions look surprisingly convincing.
How much does a basic basement bar cost to build? A simple dry bar with a plywood frame, laminate or butcher block counter, and open shelving runs $200 to $800 in materials. Add a mini fridge for $150 to $400. A wet bar with plumbing, cabinetry, and a stone countertop ranges from $3,000 to $15,000. Beer tap systems add $500 to $3,000 depending on the number of taps and cooling method.
Can I build a basement bar without finishing the whole basement? Yes. Many effective bars occupy one corner or wall of an otherwise unfinished basement. Frame and drywall just the bar area, seal the concrete floor in that zone with epoxy or interlocking floor tiles, and leave the rest of the basement as-is. This approach costs a fraction of a full basement finish and still gives you a functional, attractive bar space.
Is a dry bar or wet bar better for resale value? A wet bar adds more resale value because buyers see it as a complete, functional feature. Real estate agents in markets where finished basements are common report that a wet bar can add $3,000 to $10,000 to perceived home value. A dry bar adds less but still signals that the basement is a usable living space rather than storage.
A basement bar does not have to be complicated or expensive to be worth building. Start with how you actually drink and entertain — that tells you whether you need a full wet bar with taps or just a cart and a good playlist. Pick one of these 27 designs as your starting point, adapt it to your space and budget, and build it in stages if you need to. The best bar is the one that gets used, not the one that looks most impressive in a photo.
Pinterest cover for 27 Basement Bar Designs for Every Style
About the author
OBCD
CGI visualization and interior design content. We create detailed 3D renders and curate practical design ideas for every room in your home.