25 Basement Organization Ideas
Basements collect things. Holiday decorations go down the stairs in January and stay there until next December — if they make it back at all. Outgrown toys, old paint cans, luggage, seasonal sports gear, and that bread maker from 2014 pile up until the whole space feels like a lost cause. But basements also offer something most homes are short on: square footage with no rent attached. The difference between a chaotic dumping ground and a functional storage zone usually comes down to systems, not space. Shelves, labels, zones, and a few hours of sorting can reclaim hundreds of usable square feet.
Here are 25 approaches that work, from simple shelf setups to full basement overhauls.
Table of Contents
- Freestanding Metal Shelving
- Clear Labeled Bins
- Pegboard Tool Wall
- Ceiling-Mounted Overhead Racks
- Zone-Based Floor Plan
- Rolling Utility Carts
- Wine Storage Rack System
- Sports Gear Wall Rack
- Holiday Decoration Station
- Workbench with Drawer Storage
- Slatwall Panel System
- Under-Stair Pull-Out Drawers
- Dehumidifier and Climate Station
- Color-Coded Bin System
- Vertical Bike Hooks
- Laundry Sorting Center
- Open Pipe Shelving
- Stackable Crate Storage
- Kids' Toy Rotation Corner
- Basement Pantry Shelves
- Tool Chest and Cabinet Row
- Hanging Overhead Pulley System
- File and Document Archive
- Shoe and Boot Station
- Command Center Bulletin Board
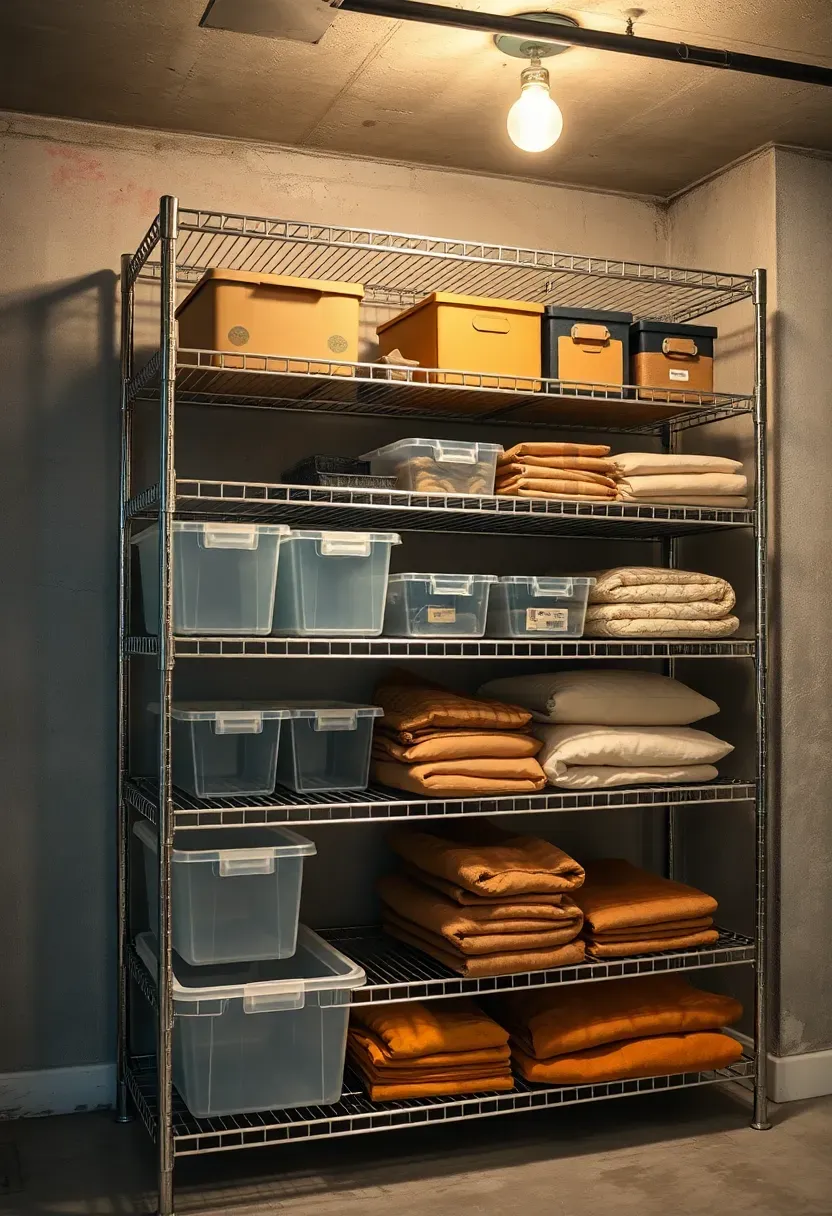
1. Freestanding Metal Shelving
Steel wire shelving is the backbone of most organized basements for a reason — it holds weight, allows air circulation around stored items, and assembles without tools in under twenty minutes. A standard five-tier unit from brands like Seville Classics or Amazon Basics carries 350 pounds per shelf and costs between $50 and $90. Line them against a wall with six inches of clearance behind for airflow. Group shelves by category: one unit for holiday, one for tools, one for household overflow.
Tips
- Bolt units to the wall with L-brackets if you live in an earthquake-prone area or have kids who climb
- Place heavier items on lower shelves to prevent tipping
- Use shelf liners on wire shelves to keep small items from falling through the gaps
We picked a few things that go well with this idea: Heavy Duty 5000LBS Garage Shelving Unit (★4.2), Adjustable Metal Garage Storage Shelves (3500LBS) (★3.9) and AOAORGG 5-Tier Tool-Free Metal Shelf Unit (★4.3). As an Amazon Associate we earn from qualifying purchases.
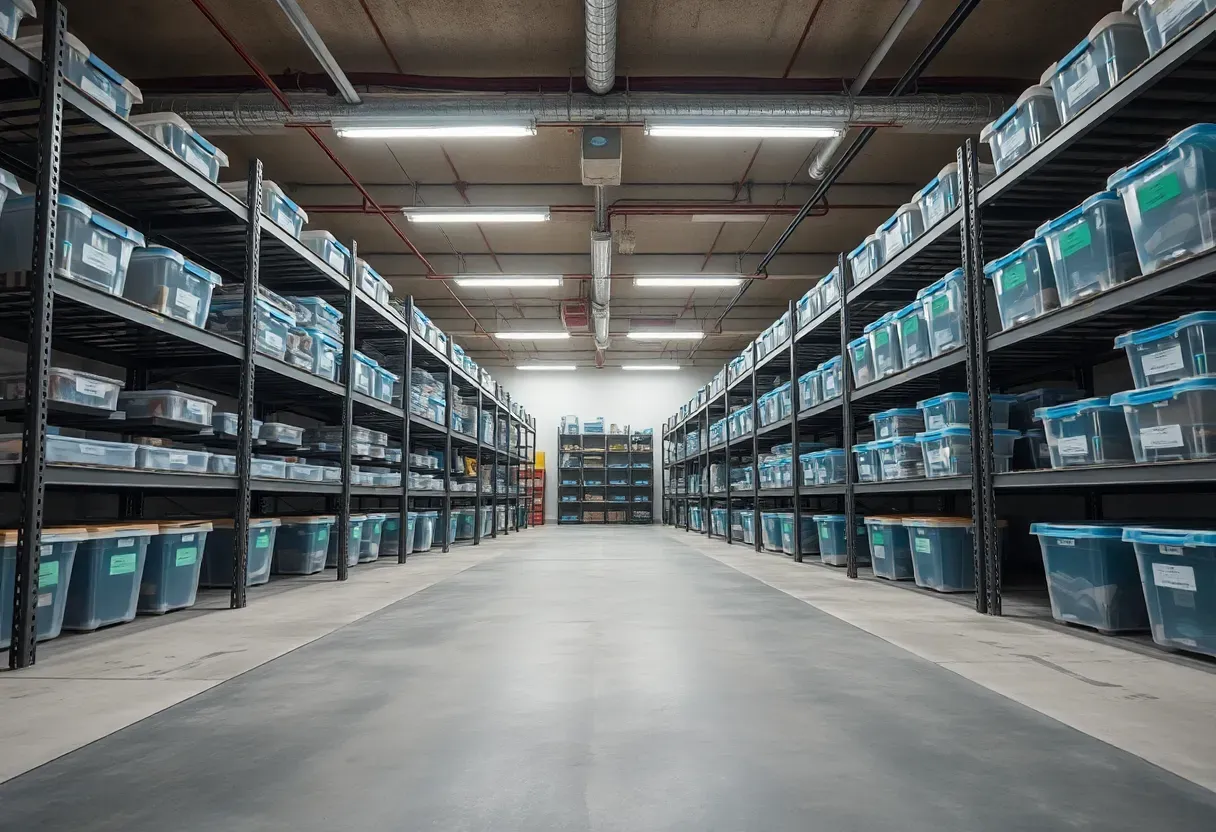
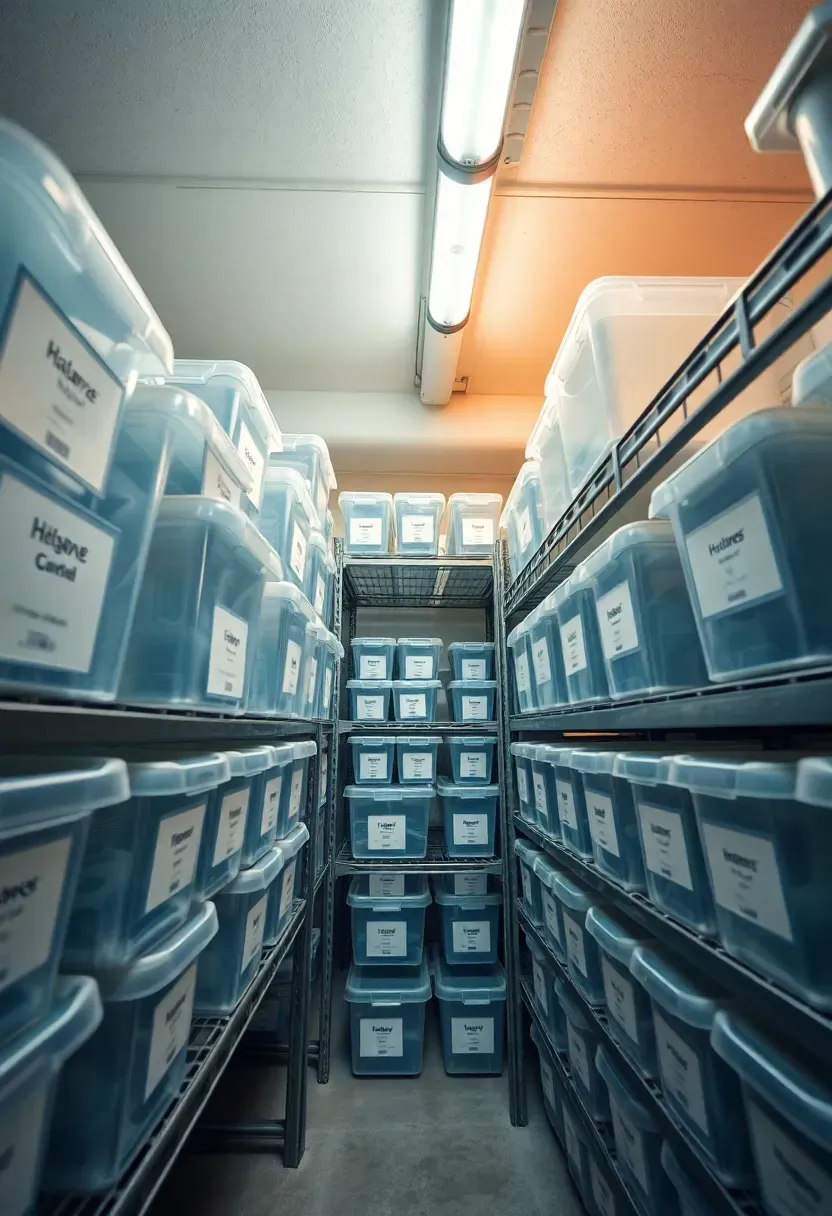
2. Clear Labeled Bins
The problem with cardboard boxes
Cardboard absorbs moisture, collapses under stacking pressure, and hides its contents. After six months in a basement, you end up opening every box just to find one thing. Clear polypropylene bins fix all three issues. They resist humidity, stack without crushing, and let you see what is inside without lifting a lid.
The system that works
Buy bins in only two or three sizes so they stack uniformly. Label every bin on two sides and the top using a label maker or adhesive shipping labels. A 66-quart Sterilite bin fits standard metal shelving and holds a full season of clothing or a complete set of holiday decorations. Budget about $8-12 per bin. The upfront cost pays back fast in time saved searching.
Choose if
- You need to find things quickly without unpacking everything
- Moisture is a concern in your basement
- You want a system that scales easily as you add more items

We picked a few things that go well with this idea: Heavy Duty Clear Storage Bags (8-Pack) (★4.8), Vtopmart Clear Stackable Storage Bins (6-Pack) (★4.6) and Sterilite 70-Quart Latching Storage Bins (4-Pack) (★4.5). As an Amazon Associate we earn from qualifying purchases.
3. Pegboard Tool Wall
Pegboard has been standard in workshops since the 1950s, and the concept is almost impossible to improve on. A 4x8-foot sheet of 1/4-inch tempered hardboard pegboard costs about $15 at any home center. Mount it with 3/4-inch furring strips behind it so hooks can seat properly. Outline each tool with a marker so you always know what goes where — and more importantly, you can see at a glance what is missing. Metal hooks hold more weight than plastic ones and cost only slightly more. A full wall setup with hooks runs under $60 total.
Tips
- Use locking hooks (the kind with a small tab at the bottom) to prevent them from falling out when you remove a tool
- Paint the pegboard a light color so tools stand out visually
- Group tools by task: one section for electrical, one for plumbing, one for general carpentry
We picked a few things that go well with this idea: INCLY Pegboard Hooks Organizer Kit (120-Piece) (★4.6), INCLY Pegboard Accessories Kit (278-Piece) (★4.6) and Metal Pegboard Panels with Hooks (4-Pack) (★4.4). As an Amazon Associate we earn from qualifying purchases.
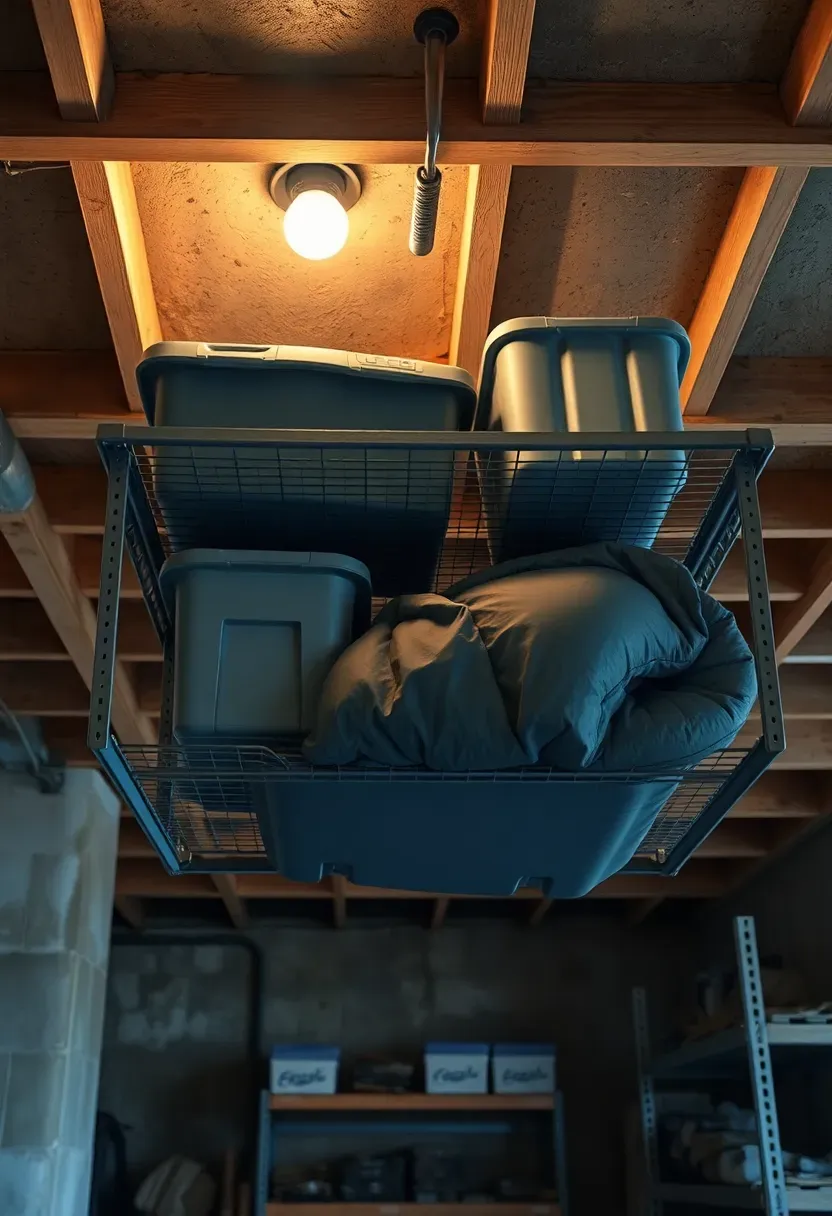
4. Ceiling-Mounted Overhead Racks
How to use dead space above your head
Most basements have eight feet of ceiling height, and the top two feet go completely unused. Overhead ceiling racks bolt directly into joists and create a platform for items you access once or twice a year — holiday decorations, camping gear, suitcases, off-season clothing. A 4x8-foot overhead rack from SafeRacks or Fleximounts holds 500-600 pounds and installs with a drill and a couple of hours.
Steps to install
Step 1: Find your joists. Use a stud finder across the ceiling. Mark every joist location with painter's tape. Racks need at least two joists for support.
Step 2: Mount the brackets. Drill lag bolts through the ceiling brackets directly into joist centers. Do not use drywall anchors — they cannot handle the weight.
Step 3: Adjust the height. Most racks have adjustable drop lengths from 22 to 40 inches. Set the platform high enough to walk under but low enough to reach with a step stool.
Watch out
- Check your ceiling height before buying — if your basement has 7-foot ceilings, a rack may leave too little headroom
- Never exceed the weight rating, even if the rack looks sturdy enough
Recommended
Items for this idea
5. Zone-Based Floor Plan
Treating a basement as one big room is the fastest path to chaos. Instead, divide the space into zones the same way a warehouse does. Use painter's tape on the floor (or colored duct tape for something more permanent) to outline distinct areas: a storage zone along the far wall, a laundry zone near the plumbing, a workshop zone under the best lighting, a kids' play zone on the warmest part of the floor. Each zone gets its own shelving, its own bins, and its own rules for what belongs there.
Tips
- Draw the zone layout on paper first and measure twice before taping
- Keep a three-foot walkway between zones so you can move bins and carts freely
- Put the most-used zone closest to the stairs
6. Rolling Utility Carts
Why fixed storage is not always enough
Sometimes you need supplies at the workbench, sometimes by the laundry, sometimes by the stairs. A rolling cart goes wherever the task is. Three-tier metal carts (the kind IKEA popularized with the RASKOG) work for lightweight supplies — cleaning products, craft materials, small tools. For heavier loads, go with an industrial steel cart from Uline or Husky that handles 400+ pounds across three shelves.
Practical uses
- Cleaning supply cart: All-purpose cleaner, rags, mop, bucket on one cart that rolls to any zone
- Project cart: Load it with the tools and materials for a specific weekend project, then park it when done
- Seasonal rotation cart: Swap contents seasonally — pool supplies in summer, snow gear in winter
Best approach
Buy carts with locking casters so they stay put when parked. Rubber wheels roll quieter on concrete than hard plastic ones.
Recommended
Items for this idea
7. Wine Storage Rack System
Basements naturally stay between 55 and 65 degrees year-round in most climates, which makes them the best room in the house for storing wine without a dedicated cooler. A simple wooden rack along one wall holds 30-100 bottles depending on size. Horizontal storage keeps corks wet, which prevents them from drying out and letting air in. Avoid spots near the furnace, water heater, or dryer vent — heat fluctuations damage wine faster than a slightly wrong temperature. Pine racks start around $40; redwood or mahogany options run $150-300 but resist moisture better.
Tips
- Keep a thermometer on the rack and check it seasonally
- Store reds and whites in the same area — the ideal range for both overlaps more than most people think
- Add a small hygrometer to monitor humidity; aim for 60-70% relative humidity
8. Sports Gear Wall Rack
The mess sports equipment creates
Balls roll, bats lean and fall, helmets take up shelf space they do not deserve, and gloves end up in a tangled pile. Sports gear is awkward to store because nothing is the same shape. Wall-mounted sport racks solve this with purpose-built hooks and cradles.
What works
A ball claw mount holds individual balls flat against the wall. J-hooks support bats, rackets, and hockey sticks vertically. Mesh bags hung from heavy-duty hooks handle smaller items like shin guards, goggles, and gloves. Mount everything between 24 and 60 inches off the ground so kids can put their own gear away. A full garage-sport-rack system from Wall Control or Proslat costs $80-150 and handles a family's worth of gear.
Choose if
- Multiple family members play different sports
- You are tired of tripping over equipment near the stairs
- You want gear dry and aired out rather than stuffed in bags
Recommended
Items for this idea
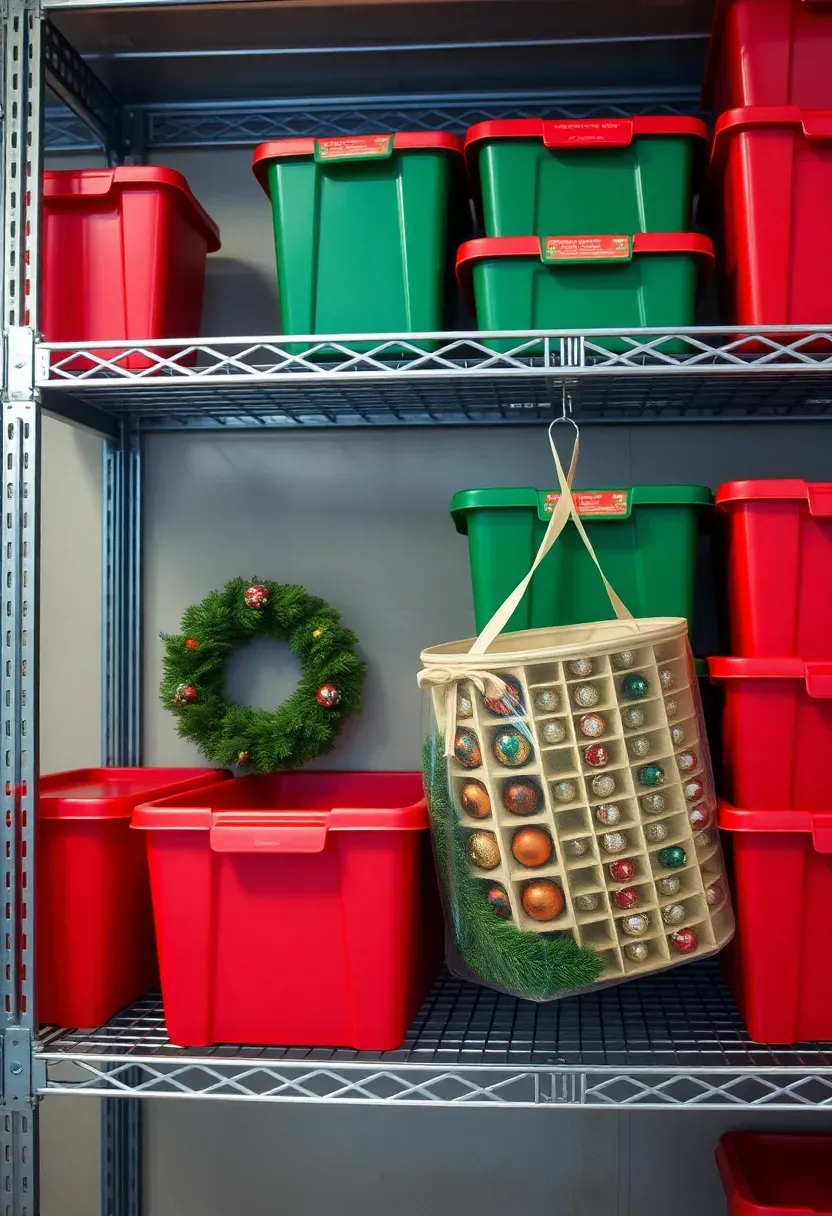
9. Holiday Decoration Station
Holiday decorations are the single biggest category of stuff most basements hold, and they sit untouched for 11 months of the year. Give them a dedicated section — one shelving unit or one wall area — with bins organized by holiday. Red-lidded bins for Christmas, orange for Halloween, pastel for Easter. Use ornament storage boxes with cardboard dividers (about $10 each) instead of wrapping ornaments in newspaper that you have to unwrap and re-wrap annually. Store artificial trees in upright tree bags rather than the original box, which always falls apart by year three.
Tips
- Put the next upcoming holiday at the front of the shelf so you are not digging past Christmas in September to reach Halloween
- Store lights by wrapping each strand around a piece of cardboard to prevent tangling
- Label each bin with a contents list taped to the outside
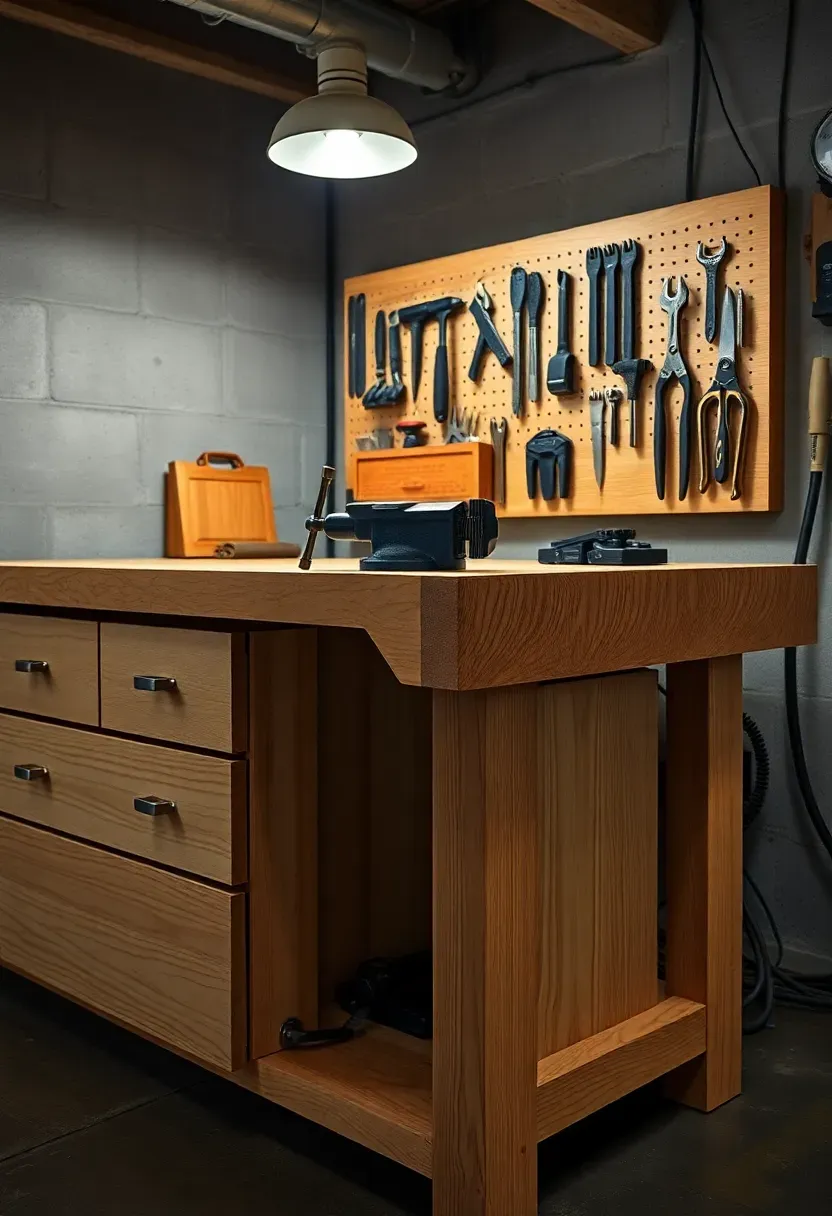
10. Workbench with Drawer Storage
A workbench without storage underneath is just a table. The difference matters. Build or buy a bench with at least four drawers and a lower shelf. Drawers keep screws, nails, sandpaper, tape, and small parts organized and dust-free — things that get lost instantly on open shelves. A 60-inch Husky workbench with a solid wood top and steel frame runs about $250-350 at Home Depot. If you are building your own, use 2x4 framing with a 3/4-inch plywood or MDF top, and add drawer slides from the hardware store for about $8 per pair.
Tips
- Mount a power strip along the back edge so you always have outlets within reach
- Attach a pegboard backsplash above the bench for the tools you use most often
- Keep the bench surface clear — if it becomes a dumping ground, it stops being useful
Recommended
Items for this idea
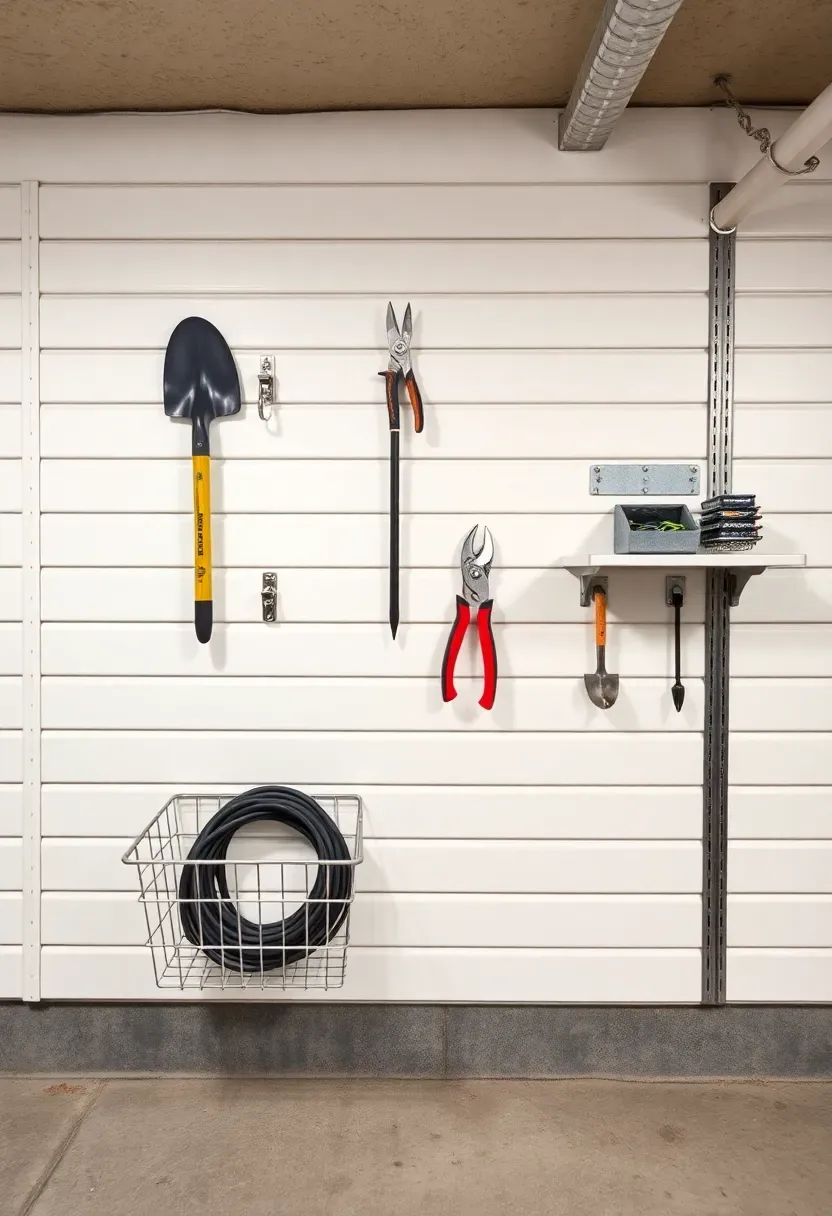
11. Slatwall Panel System
Pegboard's more refined cousin
Slatwall uses horizontal grooves instead of holes, and the accessories clip in rather than hanging from hooks. This makes them sturdier and harder to knock loose. A 4x8-foot PVC slatwall panel costs $40-80 and mounts directly to studs. The real advantage is the accessory ecosystem — bins, shelves, hooks, and brackets all slide into the grooves and lock with a downward push. Rearranging takes seconds without any tools.
When slatwall beats pegboard
- You need to hold heavier items (slatwall hooks handle more weight per point)
- You want a cleaner, more finished look
- You rearrange your layout frequently and want tool-free adjustments
When pegboard is better
- Budget is tight (pegboard costs about one-third the price)
- You prefer a more workshop-traditional look
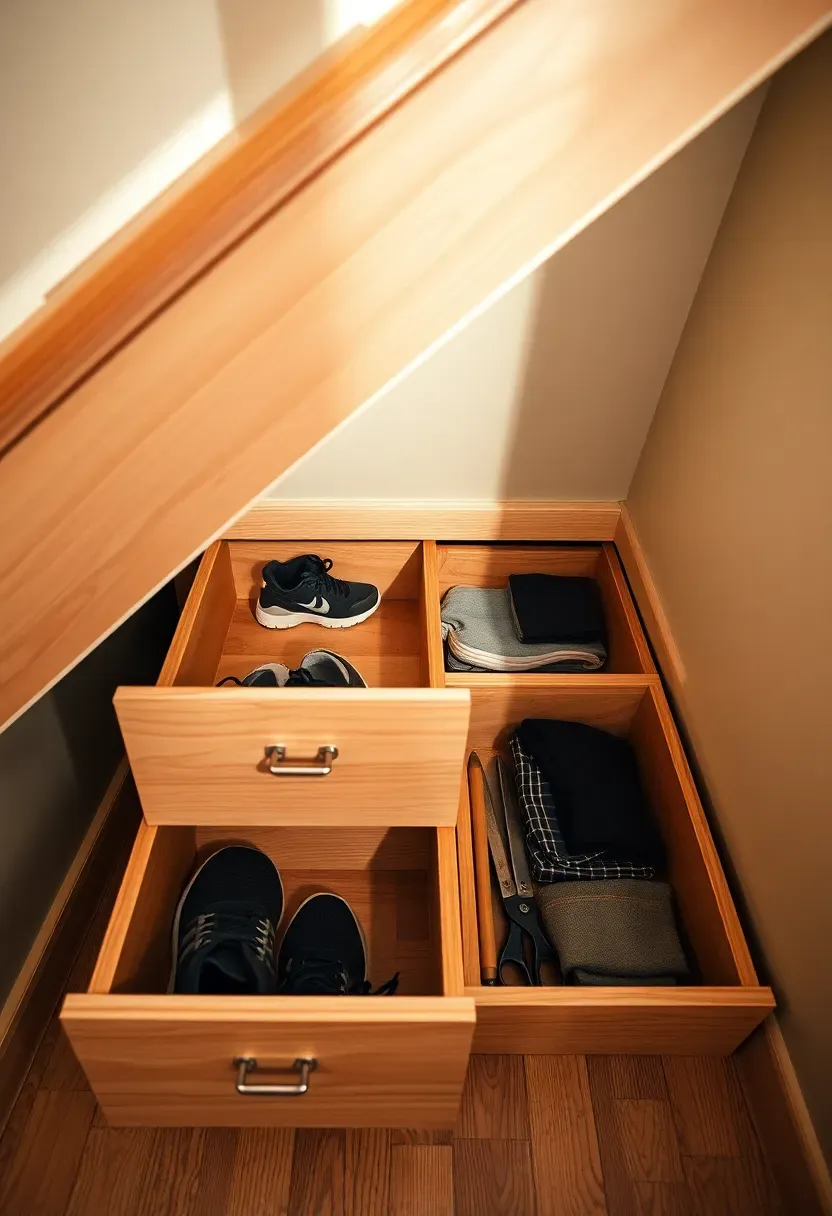
12. Under-Stair Pull-Out Drawers
The triangular space beneath basement stairs wastes an extraordinary amount of volume when left open. Custom pull-out drawers built into that space reclaim every cubic inch. Each drawer matches the stair tread depth (usually 10-11 inches) and pulls straight out on full-extension slides. The tallest drawers go at the bottom of the staircase where headroom is greatest; shallow ones fit near the top. A carpenter charges $800-1,500 for a custom set of five or six drawers. DIY with plywood and drawer slides brings that down to $150-250 in materials.
Tips
- Use soft-close drawer slides so drawers do not slam
- Add felt or rubber bumpers inside to protect stored items
- Label the face of each drawer so family members know where things belong
Recommended
Items for this idea
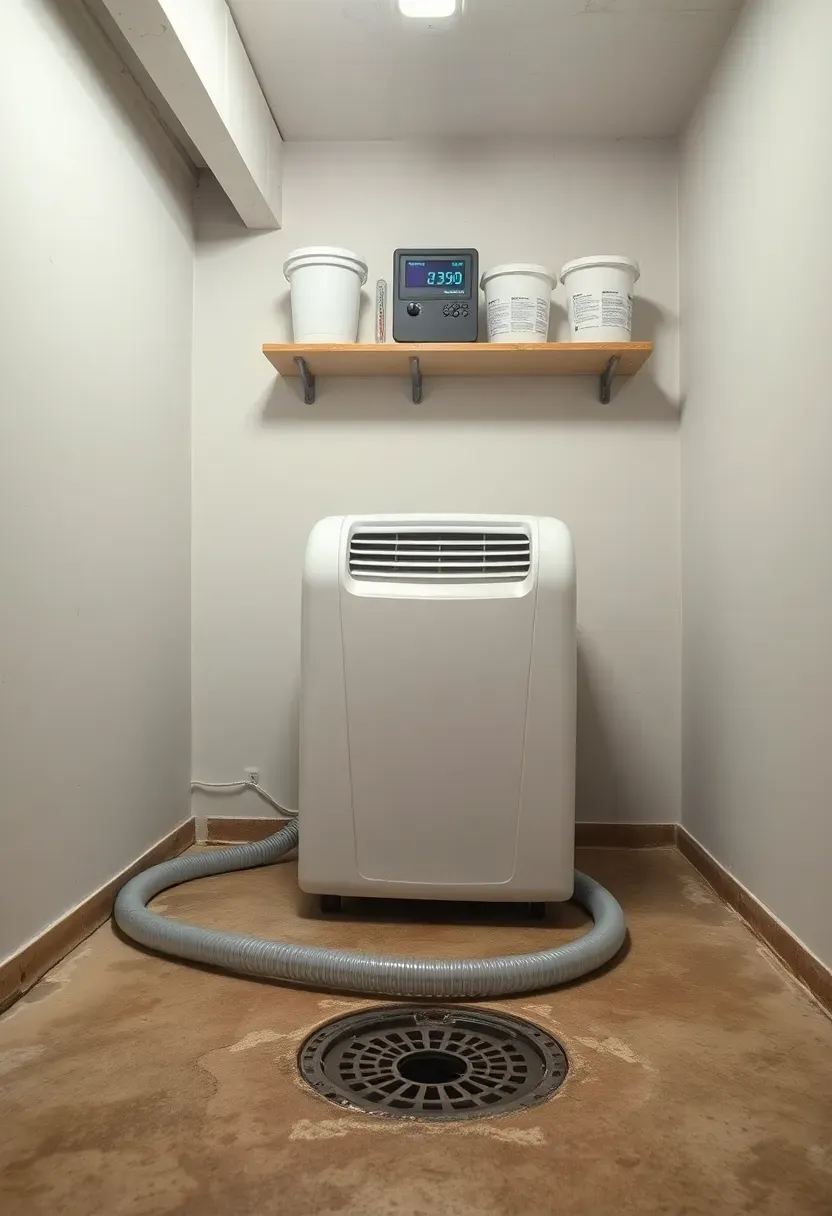
13. Dehumidifier and Climate Station
Why this matters before anything else
No amount of shelving helps if your stored items grow mold. Basements below grade often run 60-80% relative humidity, and anything above 60% puts paper, fabric, wood, and leather at risk. A dehumidifier rated for your square footage is the single most important "organization" purchase for a basement — it protects everything else you store down there.
Steps to set up
Step 1: Measure humidity. Buy a $10 hygrometer and leave it in the basement for a week. Record the high reading.
Step 2: Size the dehumidifier. For basements under 1,000 square feet with humidity above 60%, a 50-pint unit handles the job. Larger or wetter basements need a 70-pint model.
Step 3: Set up drainage. Run a garden hose from the dehumidifier's drain port to a floor drain or sump pit so you never have to empty the tank manually.
Watch out
- A dehumidifier adds $20-40 per month to your electric bill depending on runtime and unit size
- Clean the filter every two weeks or airflow drops and efficiency tanks
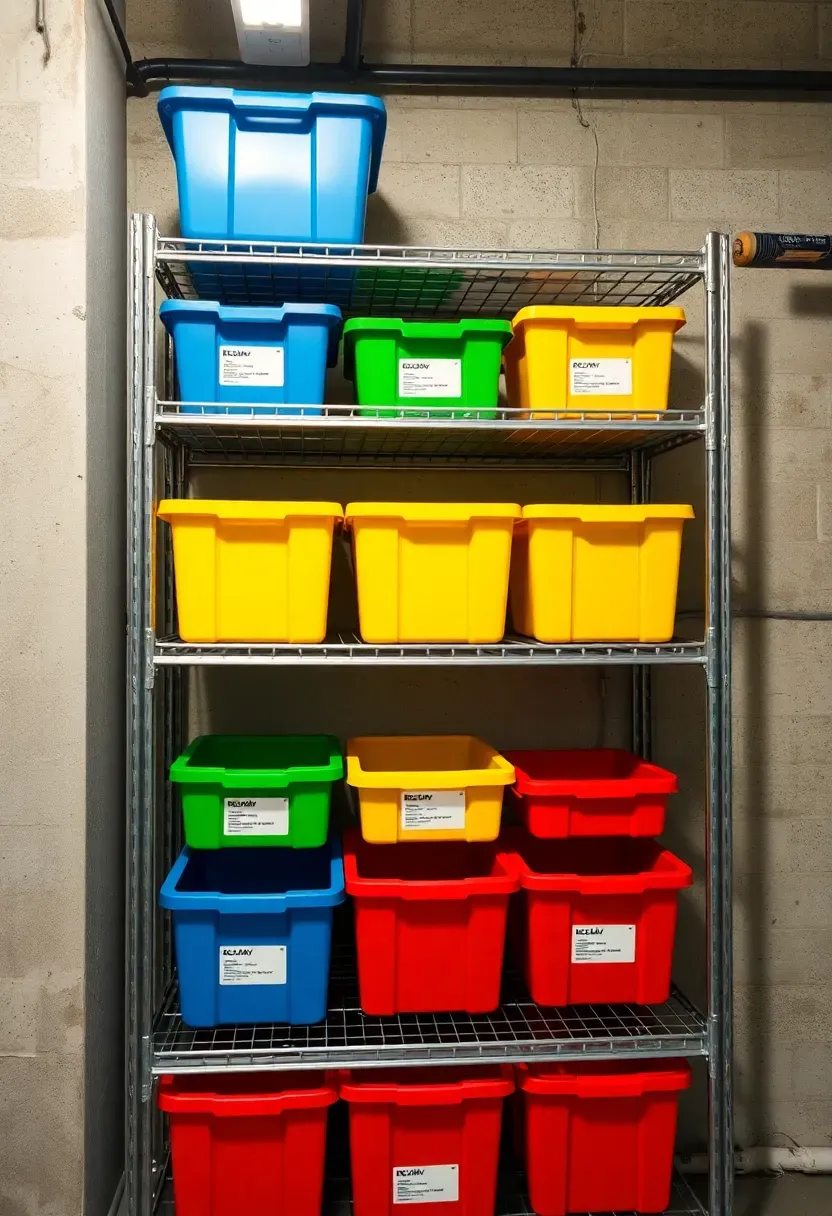
14. Color-Coded Bin System
Take labeled bins one step further by assigning a color to each storage category. Blue bins for tools and hardware. Green for seasonal outdoor gear. Red for holiday decorations. Yellow for kids' items. The visual shorthand means you (and anyone helping) can spot the right category from across the room without reading a label. Buy solid-color bins from Sterilite or Iris, or add colored duct tape bands to clear bins if you want the see-through advantage too.
Tips
- Post a color legend near the stairs or on the wall above the shelves
- Limit yourself to five or six colors — more than that and the system loses its speed advantage
- Use the same color system in other storage areas (garage, attic) for household-wide consistency
Recommended
Items for this idea
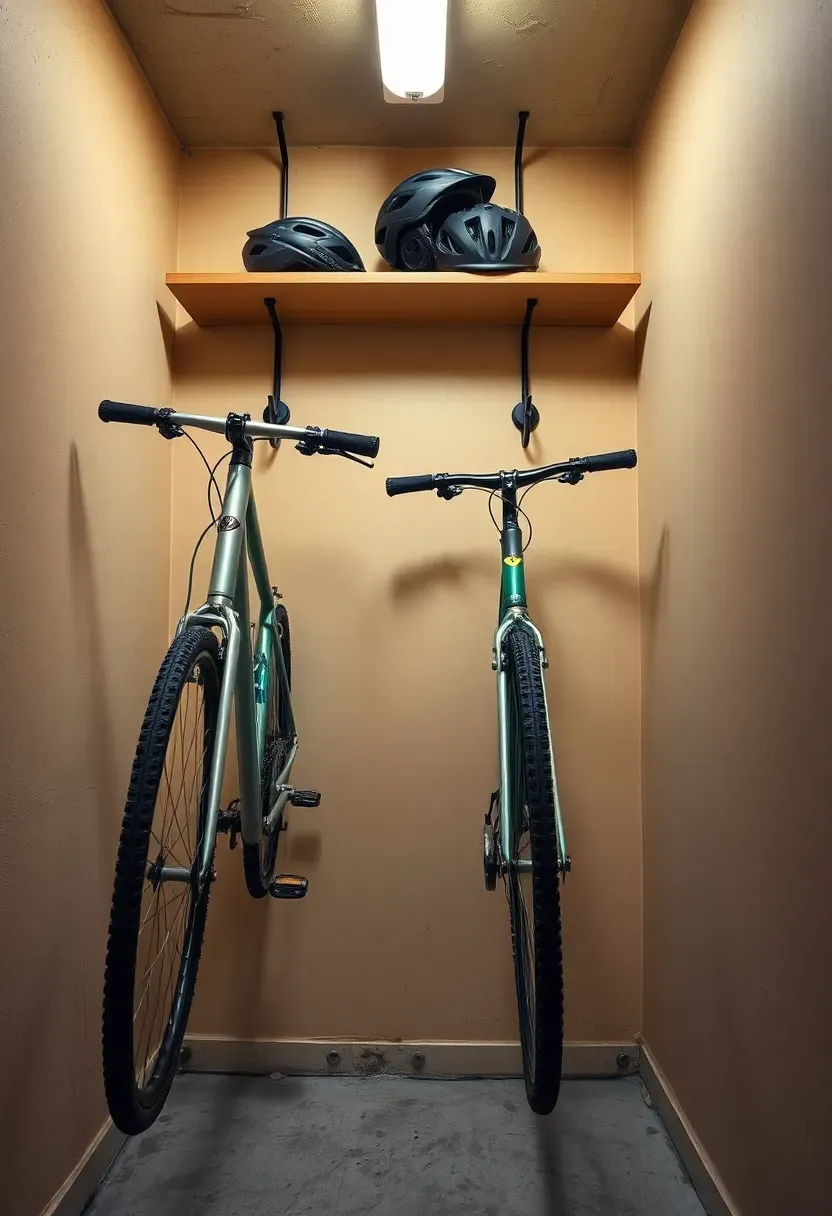
15. Vertical Bike Hooks
Floor space vs. wall space
A bicycle takes up about six feet of floor space when leaned against a wall. Hang it vertically from a wall hook, and it occupies roughly two feet of wall and zero floor. For a family with two or three bikes, that difference reclaims 12-18 square feet of usable basement area. Heavy-duty rubber-coated bike hooks screw directly into a wall stud and cost $8-15 each. Hang the front wheel from the hook so the bike hangs straight down.
Steps to install
Step 1: Find a stud using a stud finder. Mark it at a height of about 6 feet (adjust based on bike size).
Step 2: Drill a pilot hole and screw the hook in by hand until tight.
Step 3: Lift the bike and hook the front wheel rim over the hook. Check that it hangs without touching the wall or nearby items.
Watch out
- Rubber-coated hooks prevent rim scratches; bare metal hooks will damage the finish over time
- Check weight ratings — most hooks handle 50 pounds, but e-bikes can weigh 60-70 pounds
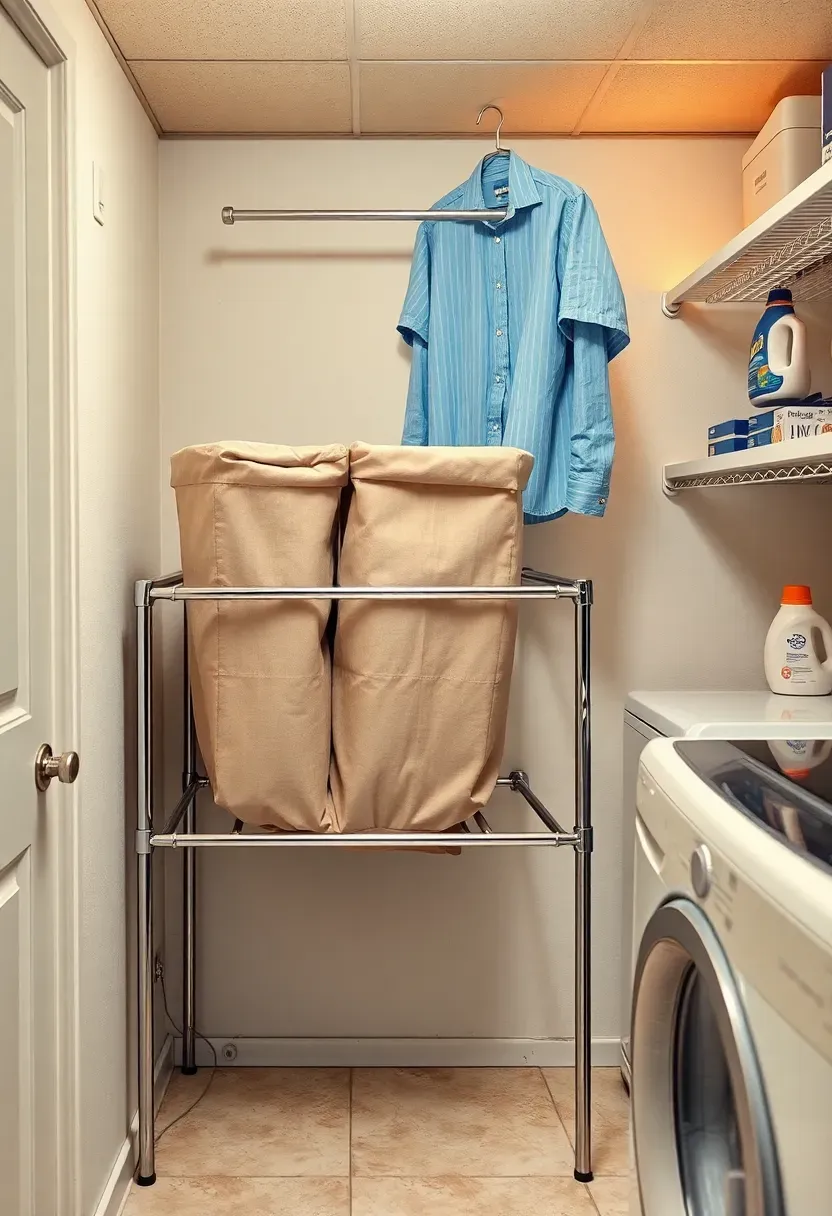
16. Laundry Sorting Center
If your washer and dryer live in the basement, build a sorting station around them. A three-bin hamper sorts darks, lights, and delicates before wash day. A folding table (or a countertop mounted to the wall) gives you a surface for folding right out of the dryer. A wall-mounted shelf above holds detergent, stain remover, and dryer sheets. A tension rod or wall-mounted rod provides hanging space for items that should not go in the dryer. The total setup runs $50-120 depending on whether you buy or build the table.
Tips
- Mount the folding table on a piano hinge so it folds flat against the wall when not in use
- Add a small trash can nearby for lint, dryer sheets, and pocket finds
- Install a retractable clothesline across the ceiling for air-drying delicates
Recommended
Items for this idea
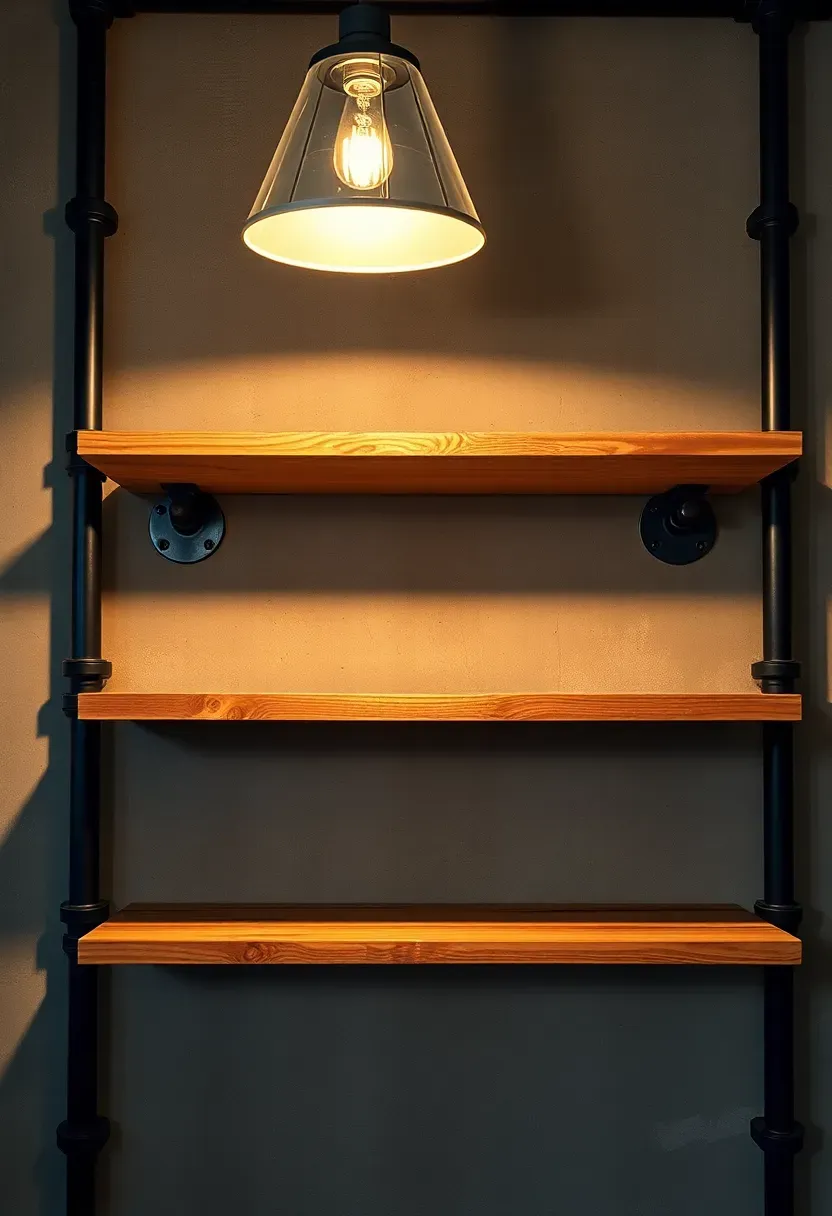
17. Open Pipe Shelving
Black iron pipe and wood plank shelving looks more intentional than wire racks and holds serious weight. A 1-inch diameter pipe supports over 100 pounds per bracket. Build a system using floor flanges, pipe nipples, elbows, and tees from the plumbing aisle — the hardware runs about $15-20 per bracket. Top them with 2x10 or 2x12 lumber sanded smooth and sealed with polyurethane. The industrial aesthetic works especially well in basements with exposed mechanical systems since the pipe shelving matches the visual language of the space rather than fighting it.
Tips
- Spray paint all pipe fittings flat black before assembly for a uniform look
- Space brackets no more than 36 inches apart for heavy loads
- Seal the wood with at least two coats of poly to protect against basement humidity
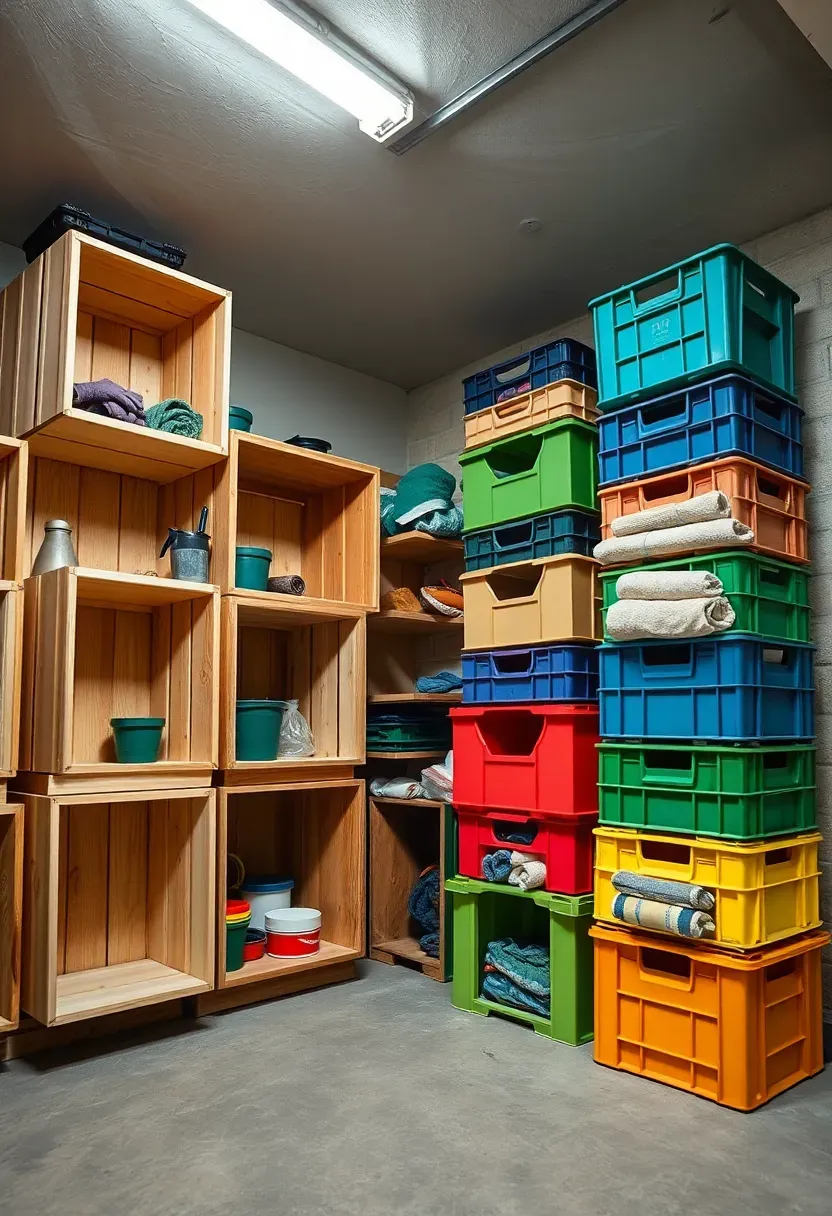
18. Stackable Crate Storage
An alternative to bins when budgets are tight
Wooden crates from craft stores and plastic milk crates from hardware stores both stack, and they both cost between $5 and $12 each. Unlike sealed bins, crates provide airflow around contents — useful for items that need ventilation, like sports pads, gardening gloves, or camping gear that might still hold moisture. Stack them two or three high and zip-tie them together for stability. Turn them on their sides against a wall for an open-shelf effect.
Pros and cons
- Pro: Extremely cheap and endlessly reconfigurable
- Pro: Airflow keeps contents from getting musty
- Con: Dust gets in — not ideal for clothing or paper goods
- Con: Stackability has limits; three high is the practical maximum before things feel unstable
Recommended
Items for this idea
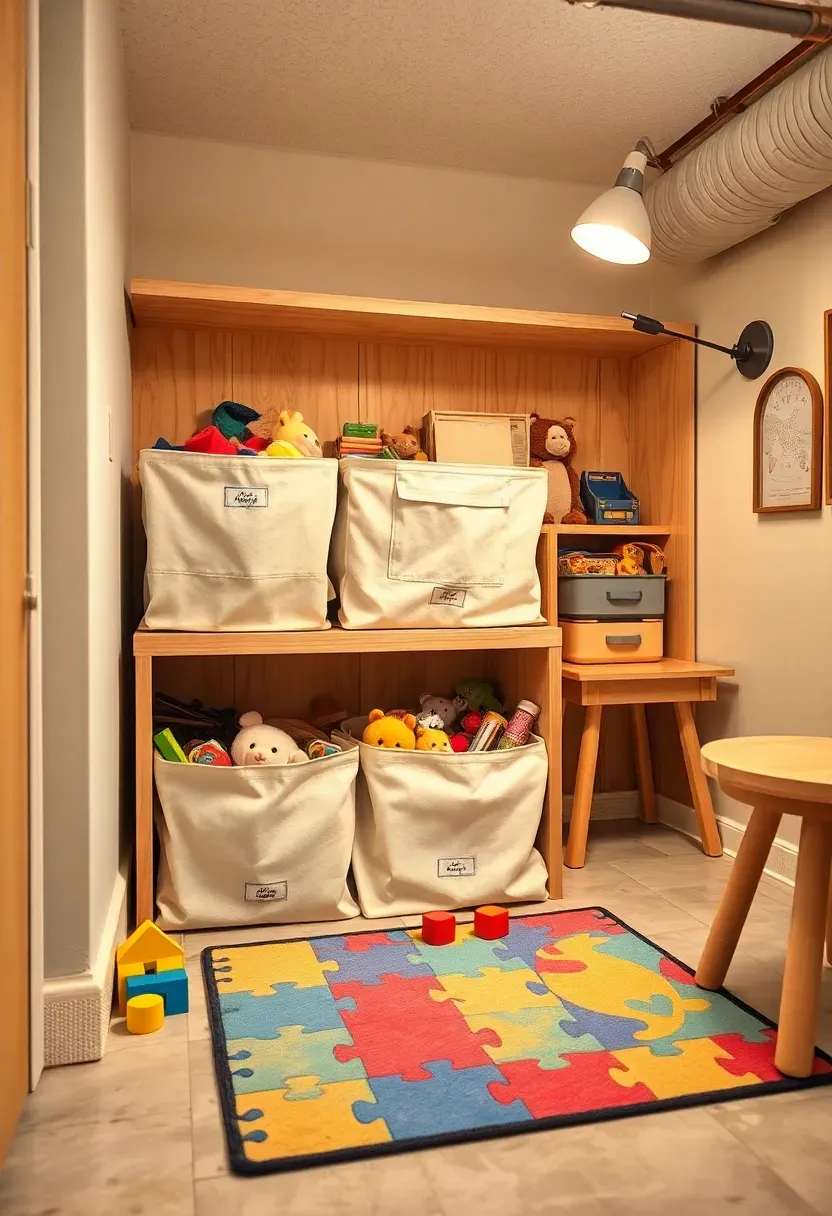
19. Kids' Toy Rotation Corner
If you have young children, you already know that toys multiply. Rather than letting them take over the entire basement, dedicate one corner with low open-front bins on a shelf at kid height. Sort toys into groups — blocks in one bin, action figures in another, art supplies in a third. The key is rotation: keep four or five bins accessible and store the rest on a higher shelf or in a closet. Every two weeks, swap in different bins. Kids play more with toys that feel "new" again, and you keep the active toy count manageable.
Tips
- Use picture labels on bins for kids who cannot read yet
- Keep the bin count to six or fewer in the active play area
- Put a large washable rug or foam mat under the play zone so the concrete floor is comfortable for sitting

20. Basement Pantry Shelves
When the kitchen runs out of room
Most kitchens lack space for bulk purchases, extra canned goods, and backup supplies. A basement pantry shelf solves the overflow. Use heavy-duty metal shelving (not wire — you want flat shelves for cans) and organize by category: canned goods on one shelf, dry goods in sealed containers on another, paper products on the bottom. Place newer items behind older ones to rotate stock naturally.
Steps to set up
Step 1: Choose a shelving unit with solid shelves or add plywood liners to wire shelves so cans sit flat.
Step 2: Group items by type and label each shelf edge with a category name.
Step 3: Store everything at least four inches off the concrete floor to protect against minor flooding.
Watch out
- Never store food directly on the basement floor — moisture and pests are both risks
- Check expiration dates every three months and move near-expiry items upstairs

Recommended
Items for this idea
21. Tool Chest and Cabinet Row
For homeowners with serious tool collections, a row of matching steel cabinets along one wall creates a workshop-grade storage wall. A Craftsman or Husky rolling tool chest ($200-500) anchors the center, with tall steel cabinets ($150-300 each) flanking it. Lockable doors keep sharp and dangerous tools away from children. Drawer liners prevent tools from sliding when drawers open. Label each drawer with its contents — "drill bits," "electrical," "plumbing fittings" — or you will spend ten minutes searching for a specific socket size every time.
Tips
- Bolt tall cabinets to the wall to prevent them from tipping
- Use magnetic strips inside cabinet doors for small metal tools like screwdrivers and pliers
- Put your most-used tools in the top drawers of the chest so you do not bend down constantly
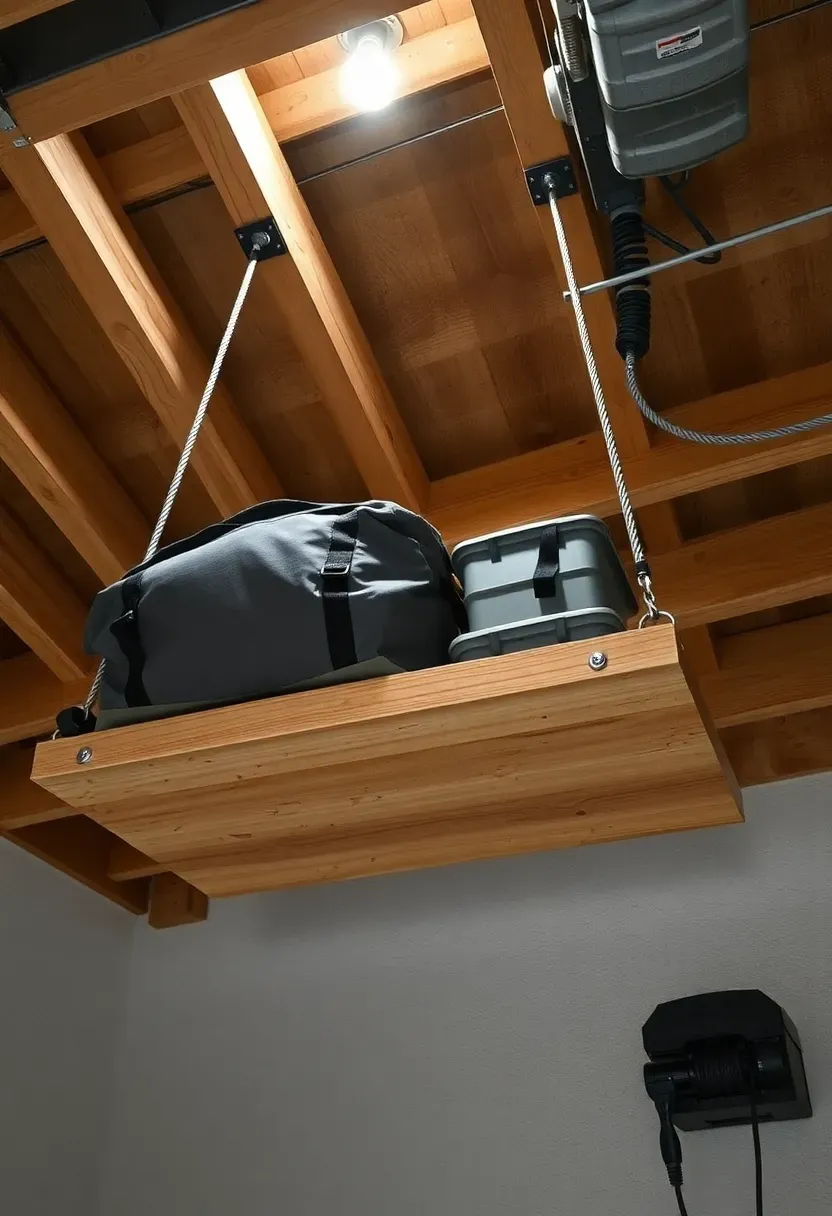
22. Hanging Overhead Pulley System
Beyond static ceiling racks
A pulley system does everything a fixed overhead rack does, but you can lower the platform to load and unload it without climbing a ladder. This matters if you store heavy bins or bulky items like kayaks, roof cargo boxes, or large seasonal decorations. A 4x4-foot pulley platform from Racor or Garage Gator lifts up to 200 pounds and mounts to ceiling joists with lag bolts. A hand-crank rope runs along the wall. Lower the platform, load it, crank it up. That simple.
Pros and cons
- Pro: No ladder needed — much safer for regular access
- Pro: Adjustable height means you can optimize headroom
- Con: Costs $100-200 more than a fixed rack
- Con: Moving parts mean more maintenance (check ropes and pulleys annually)
Recommended
Items for this idea
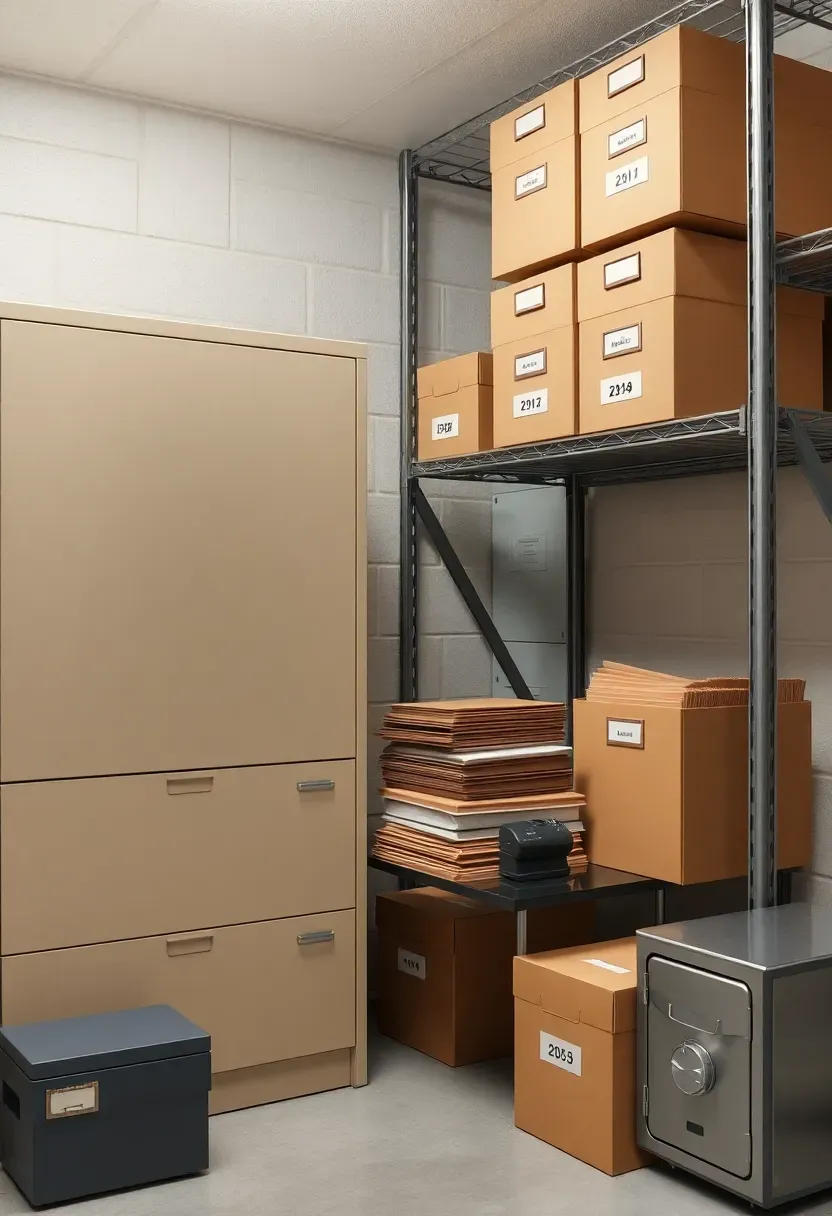
23. File and Document Archive
Tax records, warranties, manuals, insurance documents, birth certificates, property deeds — paperwork piles up over decades. A dedicated filing station in the basement keeps it accessible but out of daily living space. Use a locking two-drawer metal file cabinet for important documents and banker's boxes on shelves for older records. Store everything in hanging file folders with labeled tabs. The critical detail: use a waterproof fire safe ($30-80) for irreplaceable documents. A basement flood will destroy a file cabinet, but a fire safe rated for both water and fire keeps contents intact.
Tips
- Scan important documents digitally as a backup and store on cloud
- Shred documents you no longer need rather than letting them accumulate
- Label banker's boxes by year range so you can purge old records easily
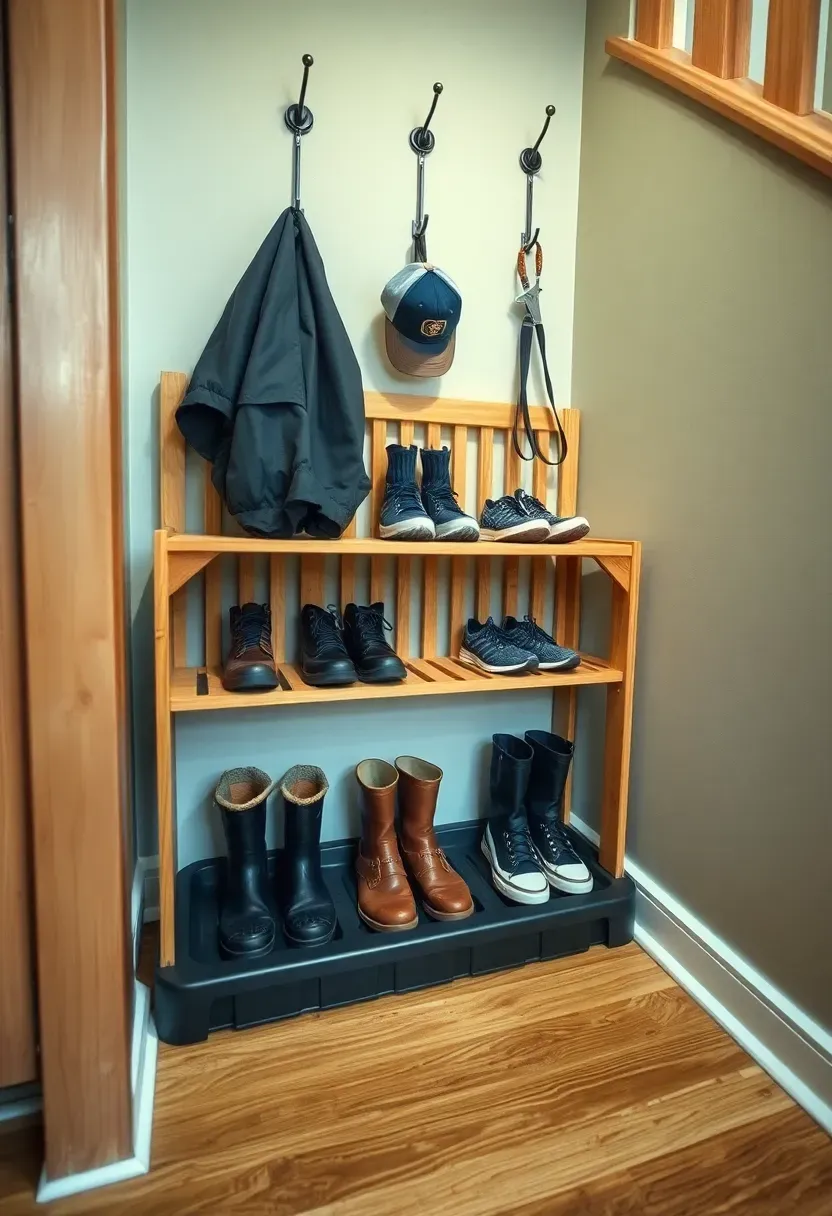
24. Shoe and Boot Station
Where dirty footwear belongs
Muddy boots, wet snow shoes, and garden clogs do not belong upstairs. A shoe station near the basement entry point — at the bottom of the stairs or by an exterior door — catches dirty footwear before it tracks through the house. Use a slatted wooden rack so air circulates and shoes dry. Place a boot tray underneath to catch drips. Mount coat hooks above for jackets and hats that are too dirty or wet for the main closet.
What you need
- A slatted shoe rack (wooden or metal, $20-40)
- A rubber boot tray ($10-15)
- Three to four heavy-duty wall hooks ($5-8 each)
- A small rug or mat for wiping feet
Recommended
Items for this idea
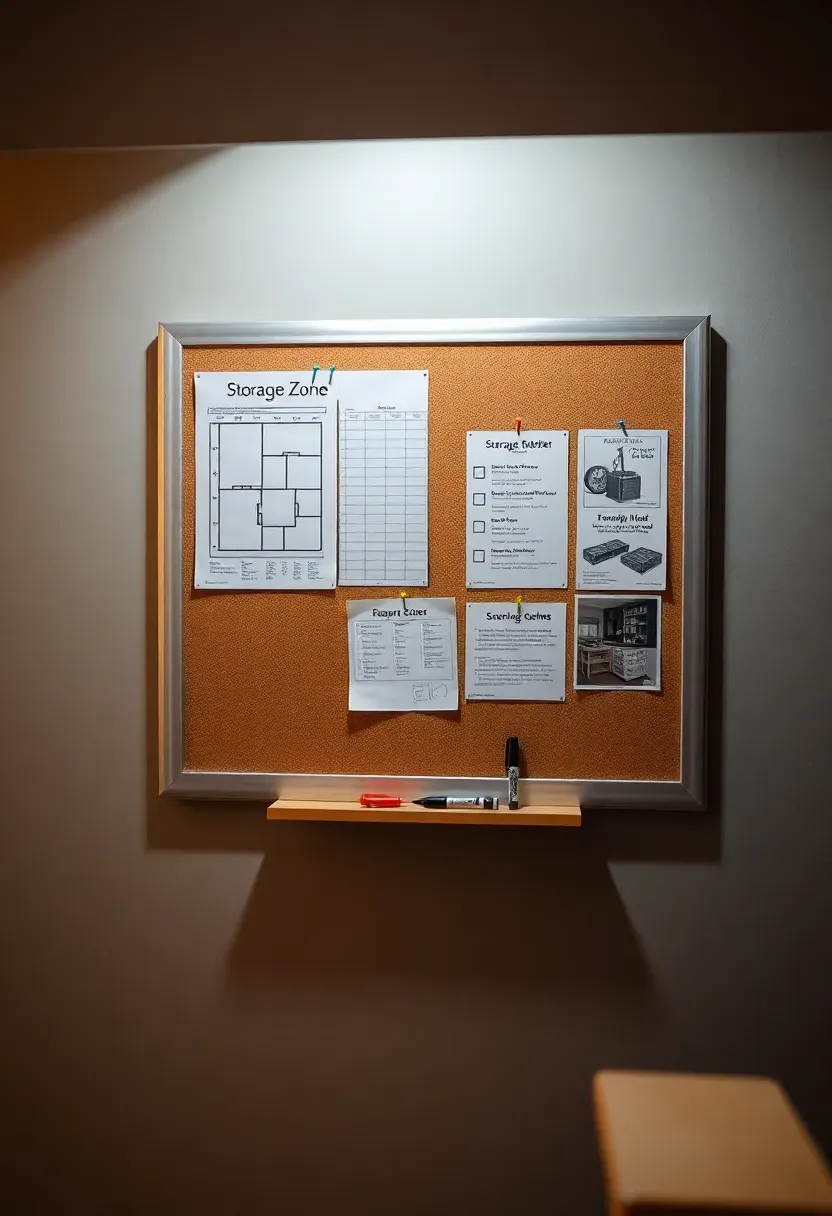
25. Command Center Bulletin Board
Hang a large cork or magnetic board near the top of the basement stairs and turn it into the household's central reference point for what is stored below. Pin a storage zone map showing where each category lives. Tape up a household inventory list so you know how many holiday light strands you own before buying more. Post a seasonal maintenance checklist — when to change the furnace filter, when to test the sump pump, when to rotate stored food. The board costs $15-25. The time it saves over a year of not searching blindly through boxes is worth far more.
Tips
- Update the inventory list every time you add or remove something significant from storage
- Include a "needs repair" section where family members can note broken items waiting to be fixed
- Photograph the board and save it on your phone for reference while shopping
Quick FAQ
Do I need to seal my basement floor before organizing? Not necessarily, but it helps. A concrete sealer ($30-50 for a 5-gallon bucket) prevents moisture from wicking up through the slab and damaging the bottom of bins or boxes stored on the floor. If your basement stays dry year-round, you can skip it. If you ever see damp patches after rain, seal before you invest in storage.
How much does a full basement organization project cost? A basic setup with four shelving units, 20 bins, and labels runs $300-500. A more complete project with overhead racks, a workbench, slatwall, and zone flooring tape ranges from $800-1,500. Hiring a professional organizer adds $50-100 per hour on top of materials.
Should I store clothing in the basement? Only in sealed, airtight bins with moisture-absorbing packets inside. Basements tend toward higher humidity, and fabric absorbs moisture readily. Vacuum-sealed bags inside bins offer double protection. Never store clothing in cardboard or open containers in a basement.
What items should never be stored in a basement? Anything flammable (gasoline, propane, paint thinner) should stay in a detached garage or shed. Medications degrade faster in humid environments. Electronics with batteries can corrode. And anything irreplaceable — original photographs, heirloom documents — should live in a fire-safe box if stored below grade.
Which organization system works best for a small basement? Vertical storage wins in tight spaces. Wall-mounted slatwall panels, vertical bike hooks, and ceiling-mounted racks keep the floor clear. Combine that with a single row of shelving and labeled bins, and you can organize a 200-square-foot basement effectively without feeling cramped.
A finished organization project does not require expensive materials or professional help. Start with the zone that bothers you most — usually holiday decorations or tools — and build the system outward. One shelving unit, one set of bins, and a label maker can shift the momentum of the entire basement. The rest follows naturally once you see how much easier it is to find things, put them away, and actually use the space for something beyond long-term storage.
Pinterest cover for 25 Basement Organization Ideas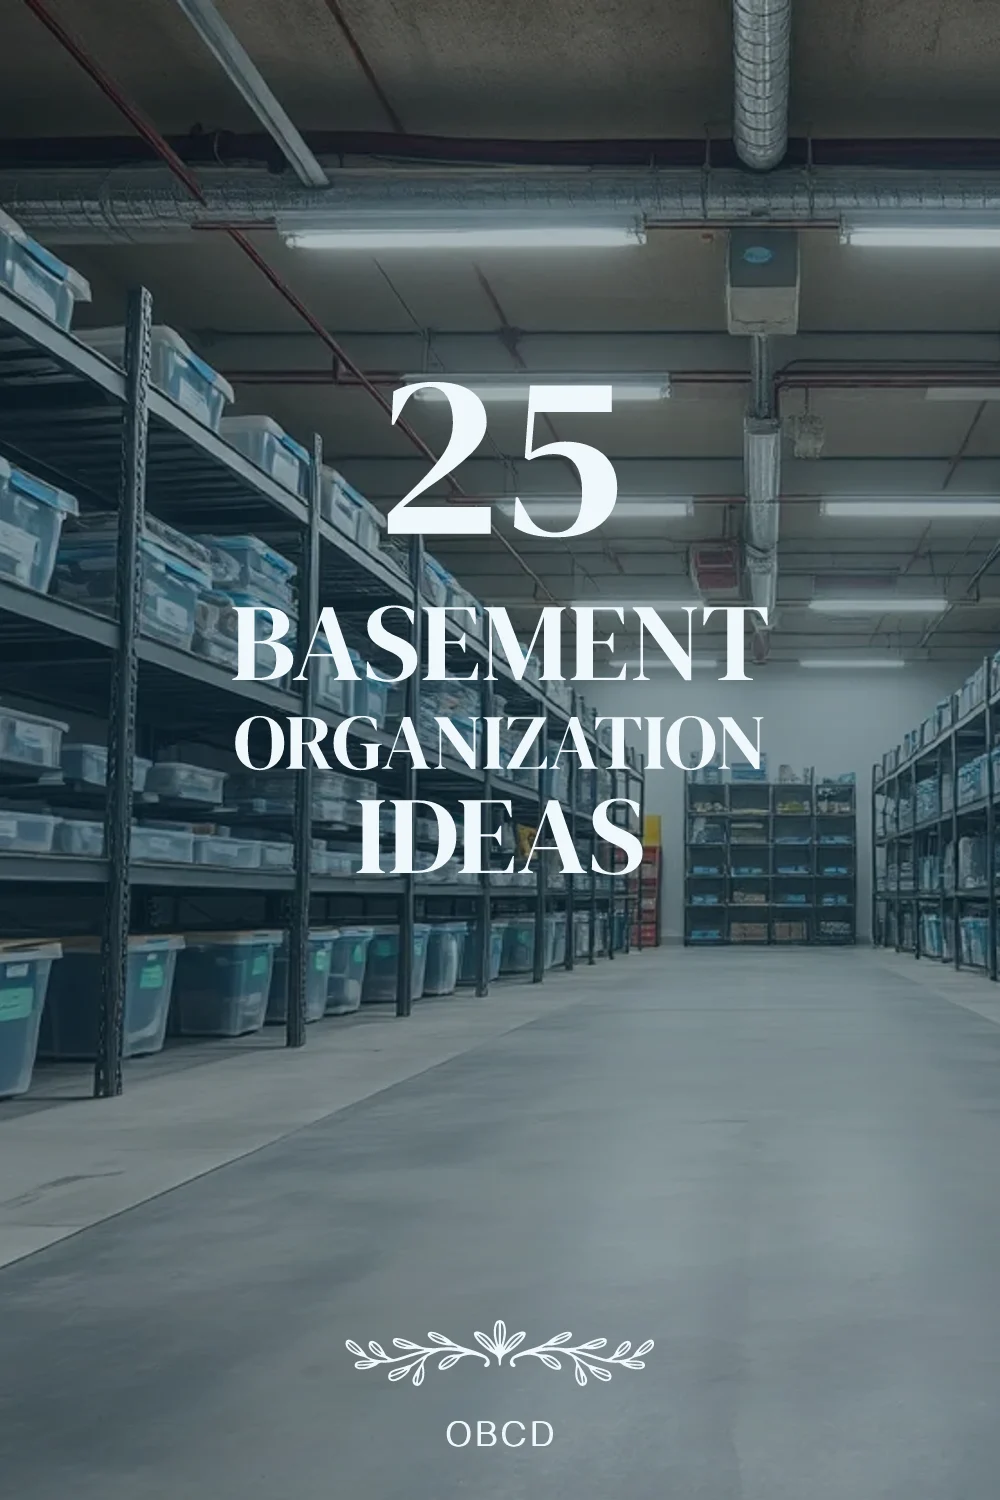
About the author
OBCD
CGI visualization and interior design content. We create detailed 3D renders and curate practical design ideas for every room in your home.