17 Basement Layout Ideas
When I started sketching out my own basement renovation last year, the biggest challenge was not picking finishes or paint colors. It was figuring out where everything should go. A basement is usually one big rectangle with a few columns, a staircase landing somewhere awkward, and mechanical equipment claiming a corner. The layout you choose determines whether the space feels like a real extension of your home or just a decorated storage area. Getting the zones right from the start saves money too, because moving plumbing or electrical after drywall goes up is expensive and frustrating.
Below are 17 basement layout ideas organized from full-floor plans down to specific room arrangements and zoning strategies.
Table of Contents
- Open Concept Rectangle
- L-Shaped Layout Around the Staircase
- Multi-Zone Plan with Area Rugs
- Home Theater at the Far End
- Guest Suite with Ensuite Bath
- Kitchenette Along the Plumbing Wall
- Bathroom Tucked Under the Stairs
- Built-In Storage Spine
- Dual-Purpose Gym and Rec Room
- Kids Zone with Adult Lounge
- Bar and Entertainment Hub
- Home Office Alcove
- Laundry and Mudroom Combo
- Daylight Basement Split-Level
- Workshop and Craft Corner
- Rental Suite with Separate Entry
- Flexible Partition Layout
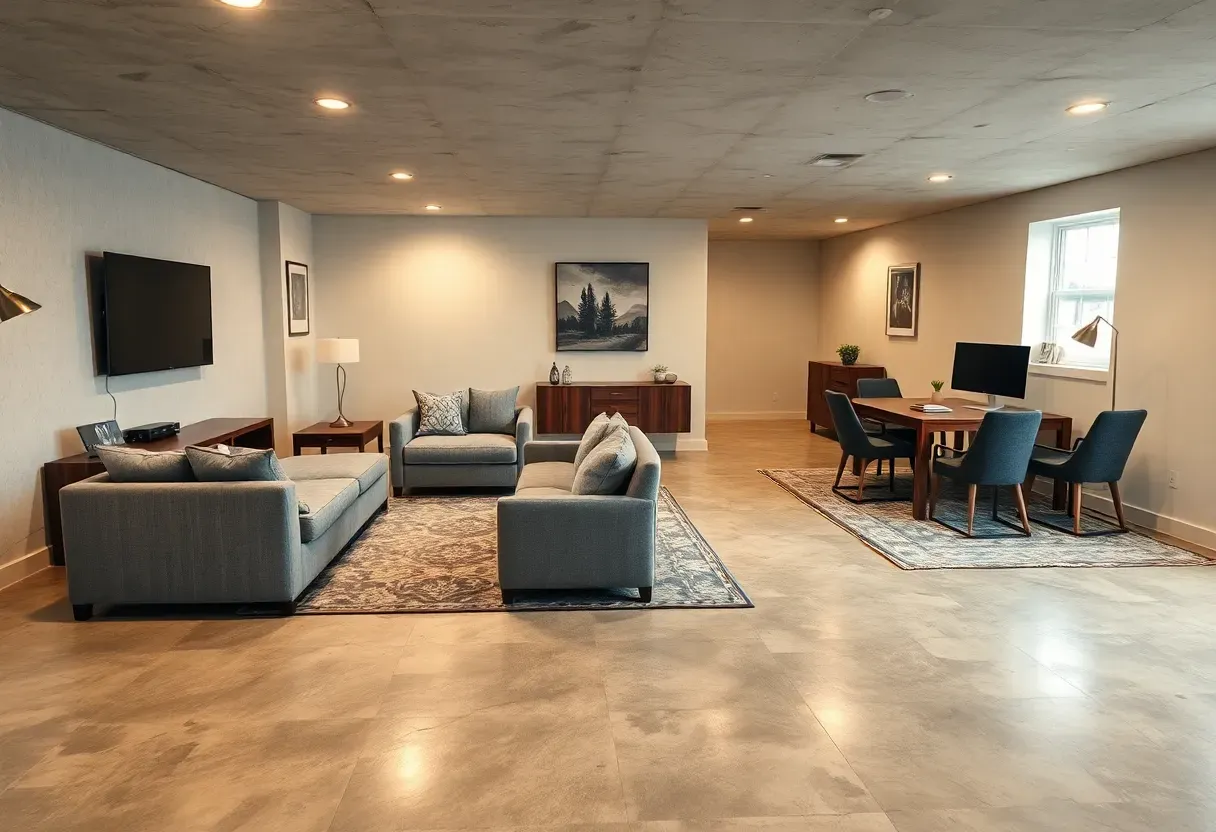
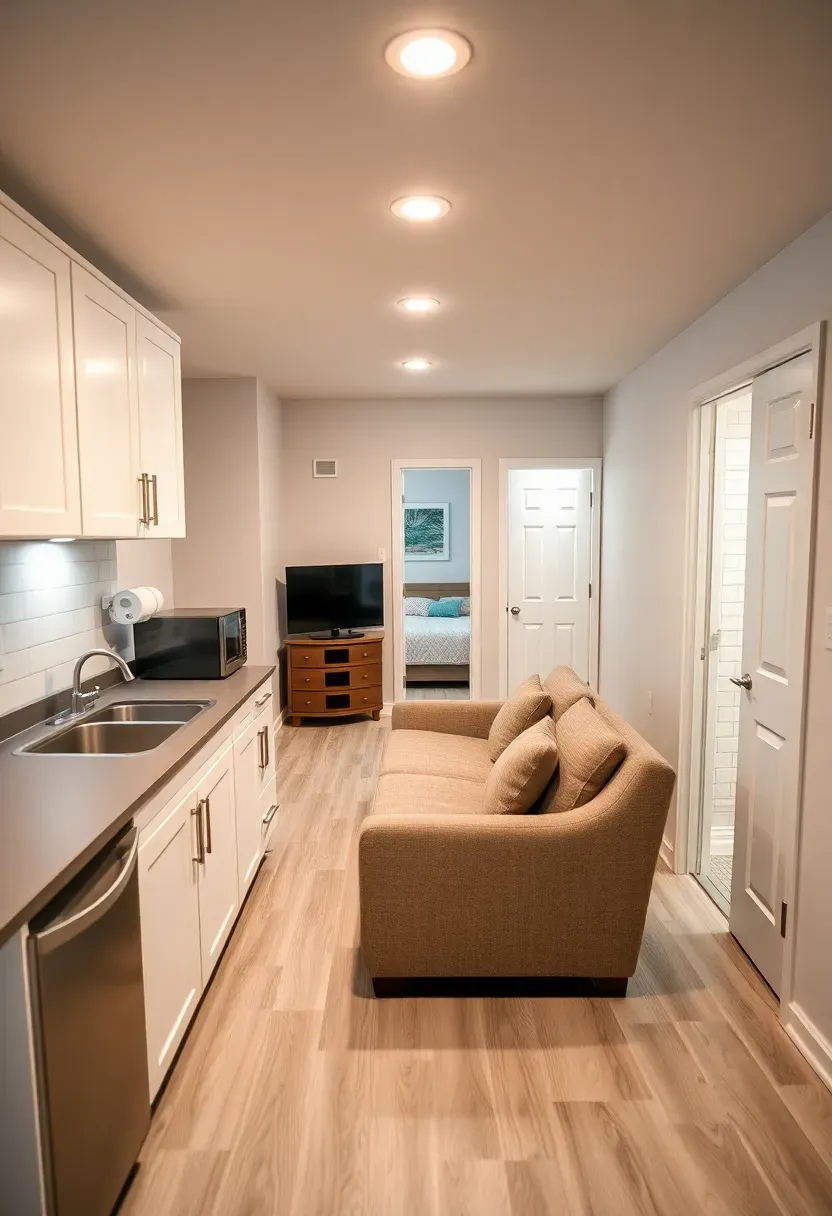
1. Open Concept Rectangle
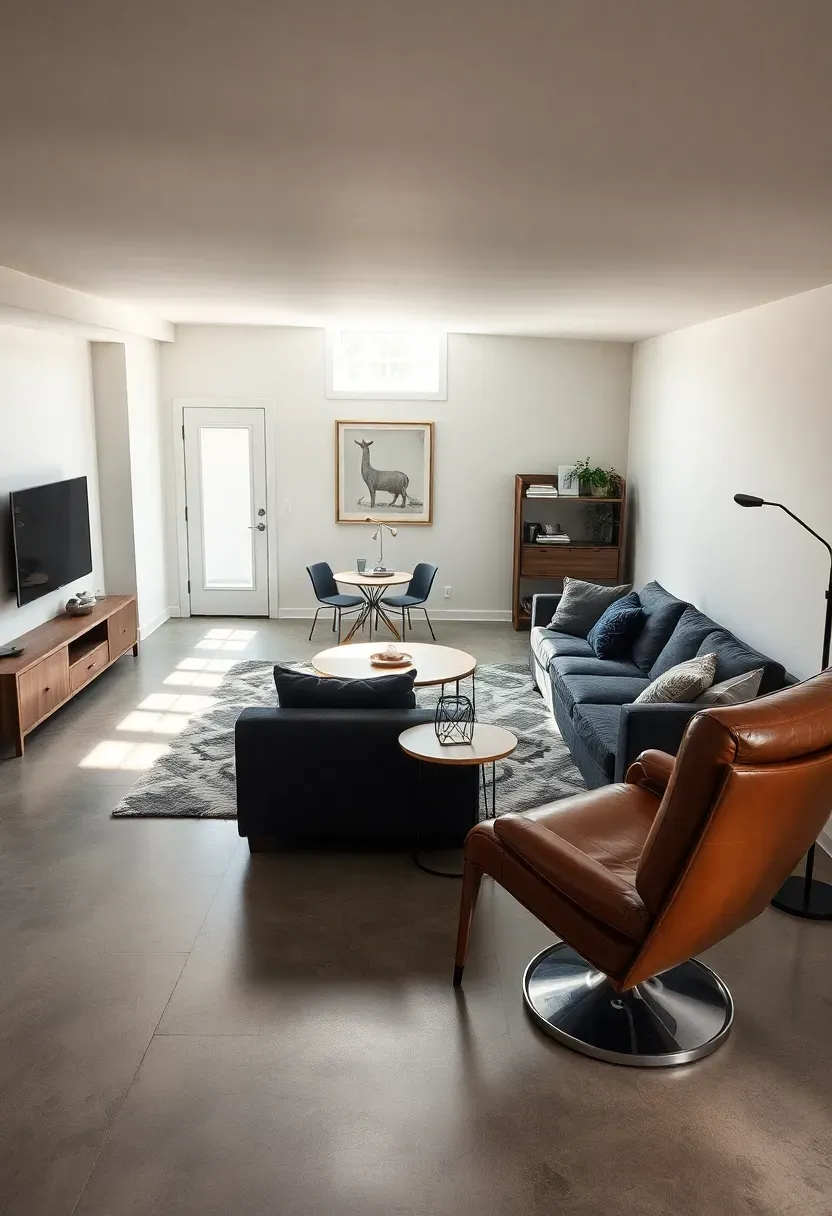
The simplest basement layout takes advantage of the full rectangular footprint by leaving it wide open. No partition walls, no hallways eating up square footage. You define separate activity areas through furniture placement, lighting changes, and flooring transitions. A sofa and TV grouping anchors the entertainment zone, a table and chairs mark dining, and a bookshelf or console creates a visual boundary without blocking sight lines. This layout works best in basements under 1,000 square feet where dividing the space would make each room feel cramped. Keep the mechanical room walled off in one corner but leave everything else breathing.
Tips
- Float furniture away from walls by 8 to 12 inches to create a sense of depth and walkways
- Use two or three different light fixtures at varying heights to signal zone changes overhead
- A long runner rug between zones acts as a visual hallway without actual walls
We picked a few things that go well with this idea: ProsourceFit Interlocking Gym Floor Tiles (36-Pack) (★4.6), ProsourceFit Interlocking Gym Floor Tiles (12-Pack) (★4.6) and bemaxx EVA Interlocking Gym Floor Mats (18-Pack) (★4.4). As an Amazon Associate we earn from qualifying purchases.
2. L-Shaped Layout Around the Staircase
Why the staircase dictates your layout
In most basements, the staircase lands somewhere near the center of the floor plan, which immediately creates an L-shape or T-shape in the usable space. Fighting this by trying to build around it leads to awkward corridors and wasted corners. The better approach is to embrace the L and assign each wing a distinct purpose.
Making it work
Put the quieter function — a bedroom, office, or reading room — in the shorter wing away from stair traffic. The longer wing becomes the main living and entertainment area since it naturally connects to the stair landing where people arrive. A half-wall or open shelving unit at the bend of the L provides separation without closing off the line of sight entirely. This layout typically yields 60 percent living space and 40 percent private space, which is a ratio that works for most families.
Watch out for
- Dead corners where the two wings meet collect clutter fast — build a closet or storage nook there instead
- The staircase wall is a perfect spot for a gallery display since everyone walks past it
- Sound carries around corners, so add a solid-core door if one wing is a bedroom
We picked a few things that go well with this idea: INCLY Pegboard Accessories Kit (120-Piece) (★4.6), INCLY Pegboard Accessories Kit (278-Piece) (★4.6) and Spampur Metal Pegboard Panels with Hooks (4-Pack) (★4.4). As an Amazon Associate we earn from qualifying purchases.
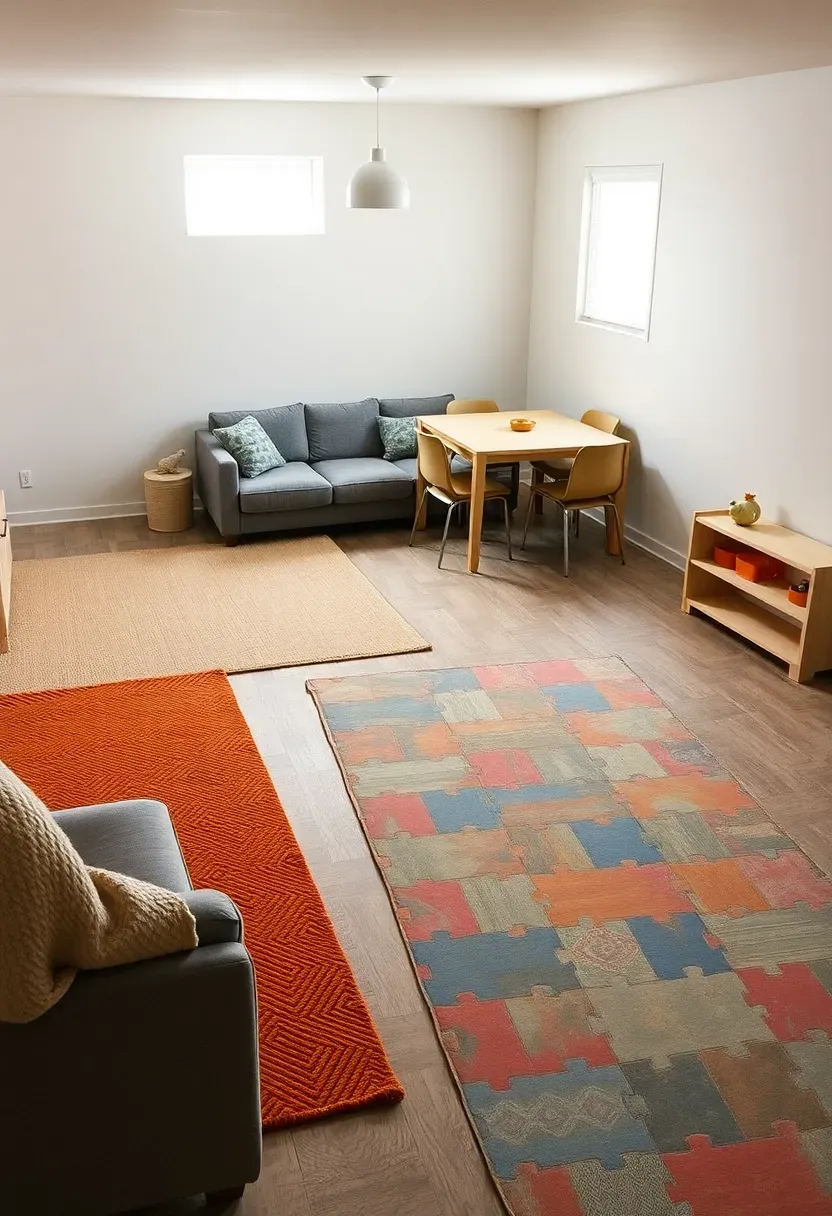
3. Multi-Zone Plan with Area Rugs
Step 1: Map your activities
List every activity the basement needs to support — watching TV, working out, kids playing, hosting friends, doing laundry. Group them by noise level and traffic pattern. Loud and active goes near the stairs. Quiet and focused goes in the far corner.
Step 2: Lay out rugs as zone blueprints
Buy your area rugs before your furniture. An 8x10 rug defines a living room zone. A 5x7 marks a reading nook or play area. The bare floor between rugs becomes the circulation path. This trick lets you test layouts without committing to walls or built-ins.
Step 3: Anchor each zone
Every zone needs one anchor piece — a sofa, a table, a desk, a workout bench. Place anchors first, then fill in secondary items. The rug edges keep things from creeping into neighboring zones over time.
Watch out
- Rugs on concrete need a moisture barrier pad underneath, not just a standard felt pad
- Leave 18 to 24 inches of bare floor between rugs so each zone reads as separate
We picked a few things that go well with this idea: Ultra Soft Fluffy Shag Area Rug (8x10) (★4.5), Lbris Washable Modern Abstract Area Rug (8x10) (★4.6) and Washable Neutral Abstract Area Rug (8x10) (★4.4). As an Amazon Associate we earn from qualifying purchases.
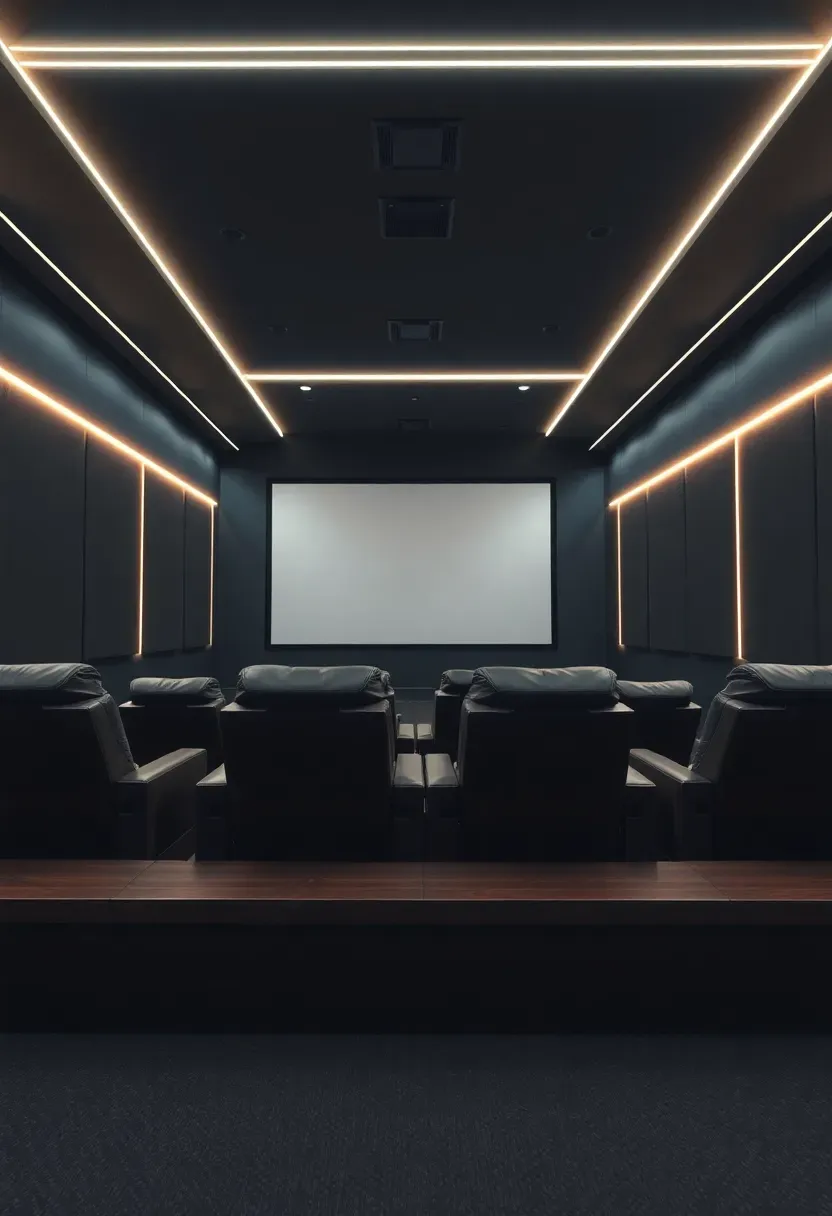
4. Home Theater at the Far End
Place the theater at the farthest point from the staircase. This does two things: it puts the maximum distance and mass between the speakers and the upstairs bedrooms, and it means nobody walks through the theater to reach other parts of the basement. Frame a dedicated room if your budget allows, but even an open-plan theater works when you position it against the back wall. The screen wall should face away from any windows or light sources. Build a riser platform 7 to 8 inches high for a second row of seating — use 2x8 floor joists on a plywood deck. Run all speaker wire and HDMI conduit during framing, not after.
Tips
- A minimum 12-foot throw distance from projector to a 120-inch screen is the standard starting point
- Dark paint on the ceiling above the theater area (even in an open plan) kills light bounce and improves contrast
- Acoustic panels on the side walls at ear height from the front row handle first reflections
Recommended
Items for this idea
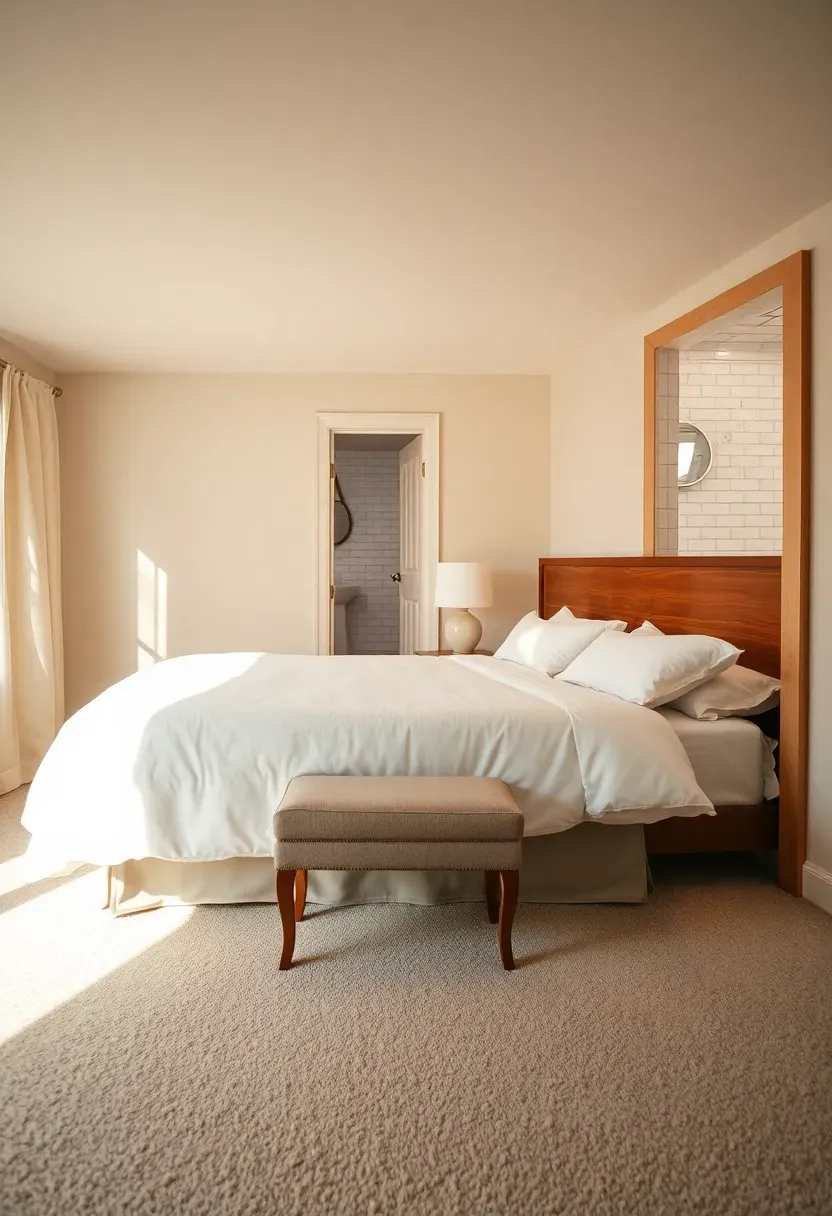
5. Guest Suite with Ensuite Bath
The issue
Guests sleeping in a basement with no private bathroom end up sharing space with the rest of the household. They feel like they are camping in your rec room, and nobody is comfortable.
The solution
Dedicate a 12x14-foot section of the basement to a bedroom with an adjacent 5x8-foot bathroom. Position the bathroom on an exterior wall or close to the existing drain stack to minimize plumbing runs. The bedroom needs an egress window — code requires a minimum 5.7 square foot opening for any sleeping room. A pocket door between the bedroom and bath saves floor space compared to a standard swing door. Add a small closet alcove with a hanging rod and shelf for suitcases.
Pros and cons
- Pro: Creates a genuinely private space that feels like a hotel room, not an afterthought
- Pro: Adds measurable resale value — appraisers count conforming bedrooms with bathrooms
- Con: Plumbing an ensuite adds $4,000 to $8,000 depending on distance from the main stack
- Con: Reduces your open basement area by roughly 200 square feet
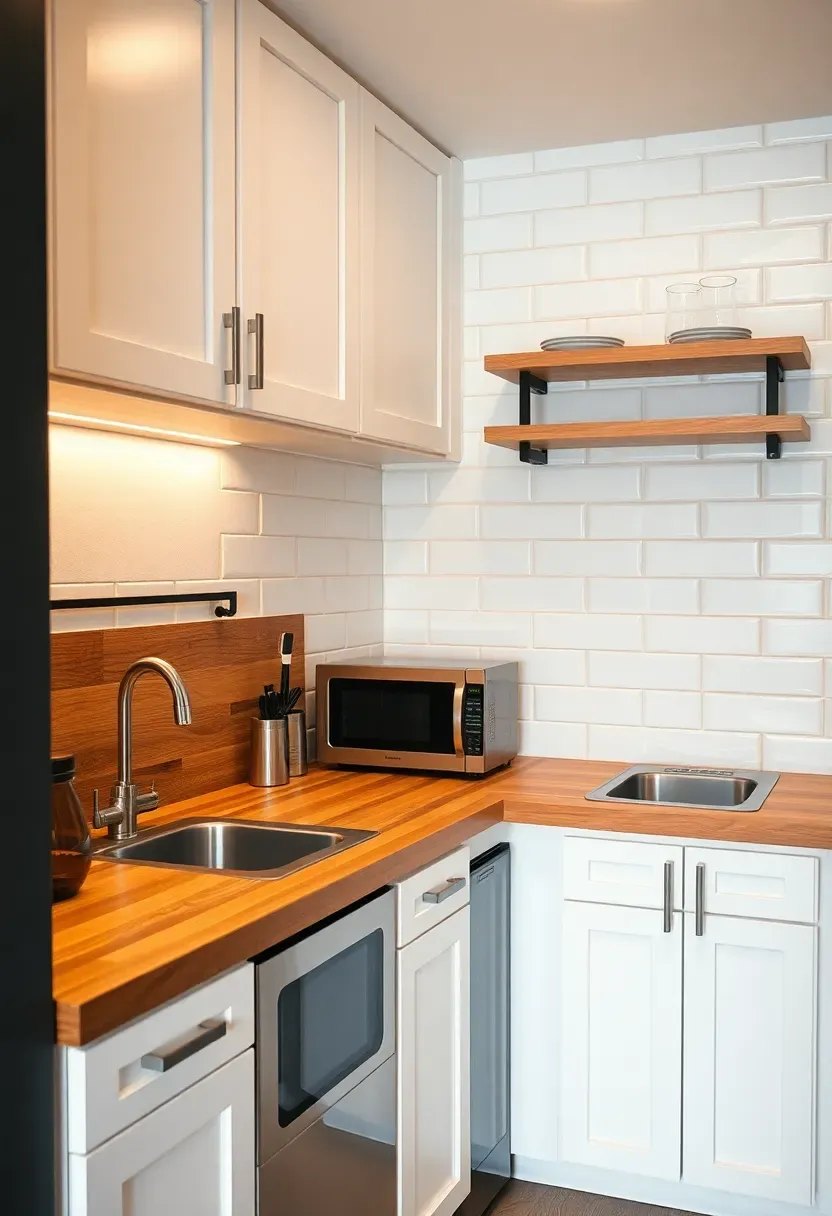
6. Kitchenette Along the Plumbing Wall
Basement kitchenettes belong on the wall where plumbing already exists — usually the wall shared with the upstairs kitchen or the wall where the main drain stack runs. This placement can cut plumbing costs by 40 to 60 percent because you are tapping into existing supply lines and draining by gravity rather than needing a pump. A functional kitchenette needs about 8 linear feet: sink in the center, counter space on both sides, under-counter fridge on one end, microwave or small oven on the other. Skip a full range — a two-burner cooktop or induction plate is enough for basement-level cooking and avoids the need for a commercial-grade range hood and gas line extension.
Tips
- Verify your local code allows a basement kitchen — some jurisdictions require a separate permit if you add cooking appliances
- A 20-amp dedicated circuit handles the fridge, microwave, and cooktop without tripping breakers
- Butcher block counters are warmer and cheaper than stone and appropriate for light-use kitchenettes
Recommended
Items for this idea
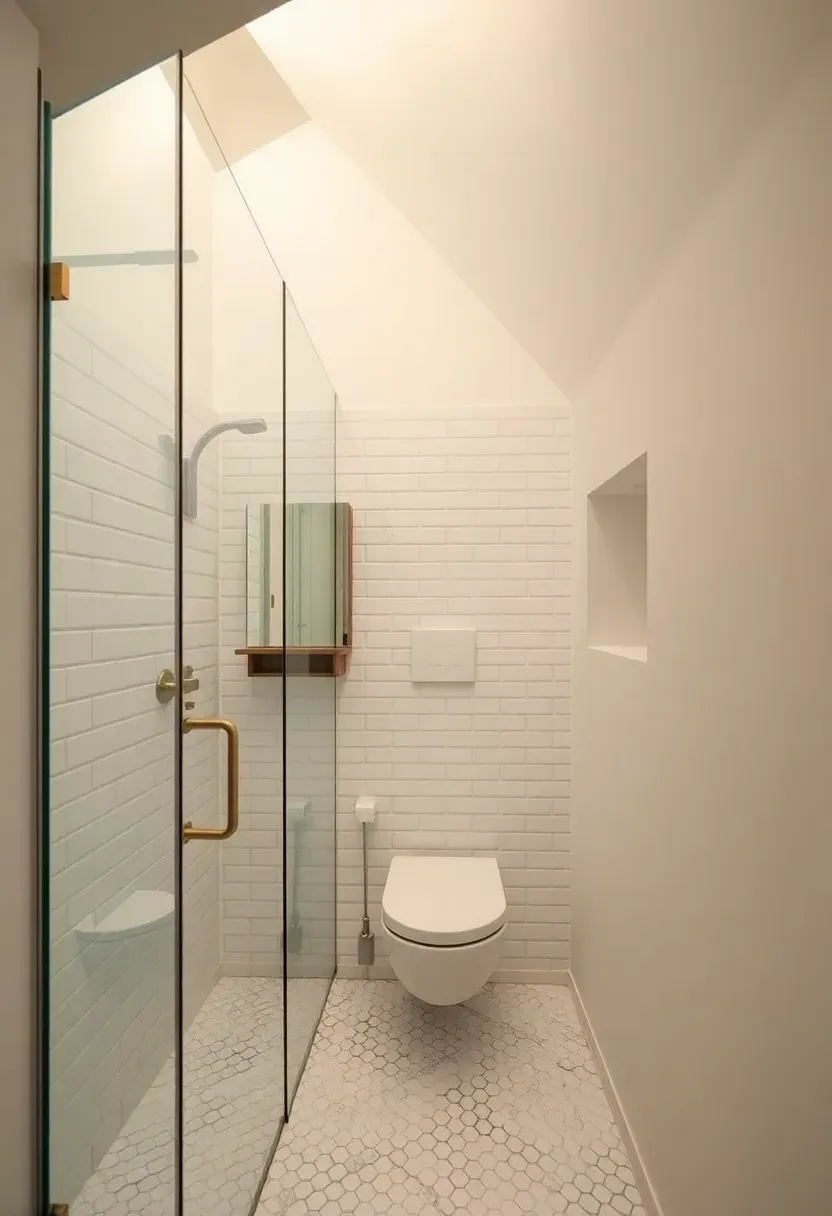
7. Bathroom Tucked Under the Stairs
The triangular void under a basement staircase usually collects boxes and forgotten luggage. That space measures roughly 4 feet wide by 8 feet long at floor level with headroom tapering from around 7 feet at the tall end to 3 feet at the low end. A three-quarter bath fits here if you plan the fixture layout carefully. Place the toilet at the tall end where you need standing headroom. The vanity sits mid-height. A compact shower stall or a sloped-ceiling shower with a linear drain goes at the transition point. Wall-hung fixtures keep the floor clear and make the small footprint feel less cramped.
Tips
- A macerating toilet (like Saniflo) lets you add a bathroom without breaking up the concrete slab for a traditional drain
- Use a frameless glass shower panel instead of a curtain to keep sight lines open in the small space
- Recessed medicine cabinets and wall niches steal storage from the stud cavity without adding bulk
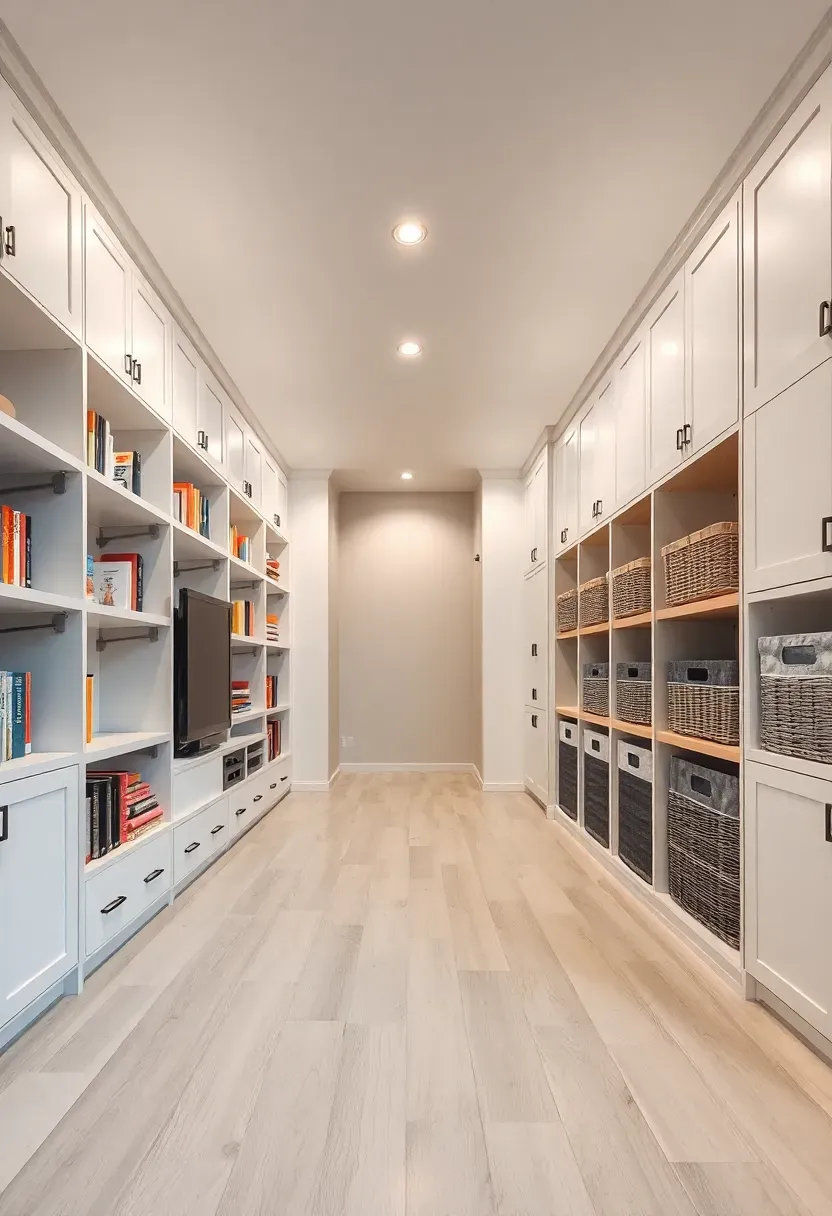
8. Built-In Storage Spine
Instead of pushing all your storage against the perimeter walls, build a freestanding double-sided storage wall down the center of the basement. This 12-to-16-inch-deep spine divides the floor plan into two rooms while providing shelving and cabinets accessible from both sides. One face might hold media equipment and display shelves for the entertainment zone. The other side stores toys, games, and craft supplies for the kids' area. The spine does not need to reach the ceiling — stopping at 7 feet lets light and air pass over the top and prevents the basement from feeling like it has been chopped into dark boxes.
Choose this layout if
- You need significant storage but want to avoid a room that is just a closet
- Two zones need visual separation without permanent walls
- Your basement is wider than 20 feet, giving each side at least 9 feet of usable depth
Recommended
Items for this idea
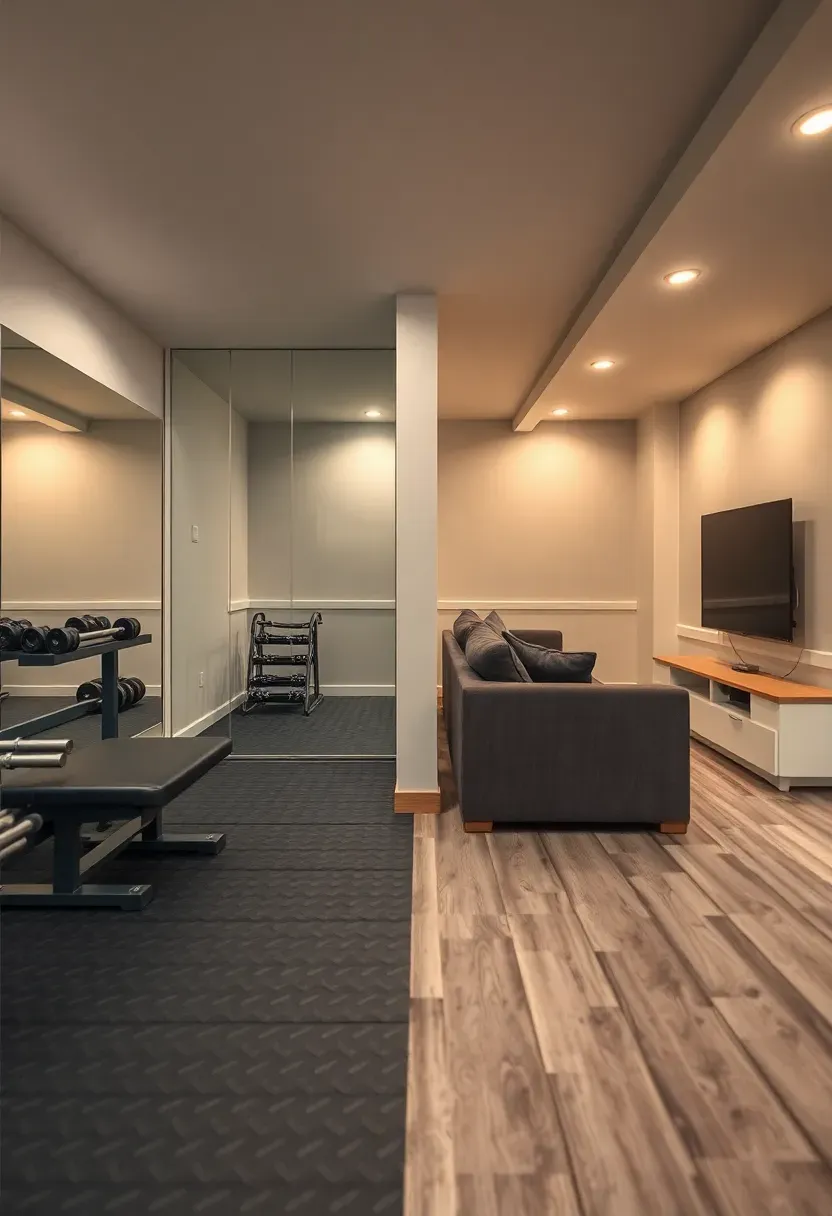
9. Dual-Purpose Gym and Rec Room
Step 1: Draw the line
A half-wall (42 inches tall) with a flat cap separates the gym from the living side. The cap doubles as a drink shelf or towel station. Position the gym half closer to the mechanical room where the concrete slab can handle equipment weight without modification.
Step 2: Floor the gym side
Rubber interlocking tiles (3/8-inch minimum thickness) go on the gym side. They protect the concrete, deaden dropped weights, and clean easily. The rec room side gets luxury vinyl plank or carpet tiles — something comfortable underfoot for lounging.
Step 3: Handle ventilation
Gyms need airflow. If your basement has a window on the gym side, use it. If not, a ceiling-mounted exhaust fan pulling 150 CFM keeps the space from getting stale during workouts. Point it away from the rec room so you are not pushing gym air into the lounging area.
Watch out
- Heavy equipment like a power rack or squat stand should sit on rubber mats directly over a concrete slab, not over any floating subfloor system
- Mirrors on the gym wall visually double the space and serve a functional purpose
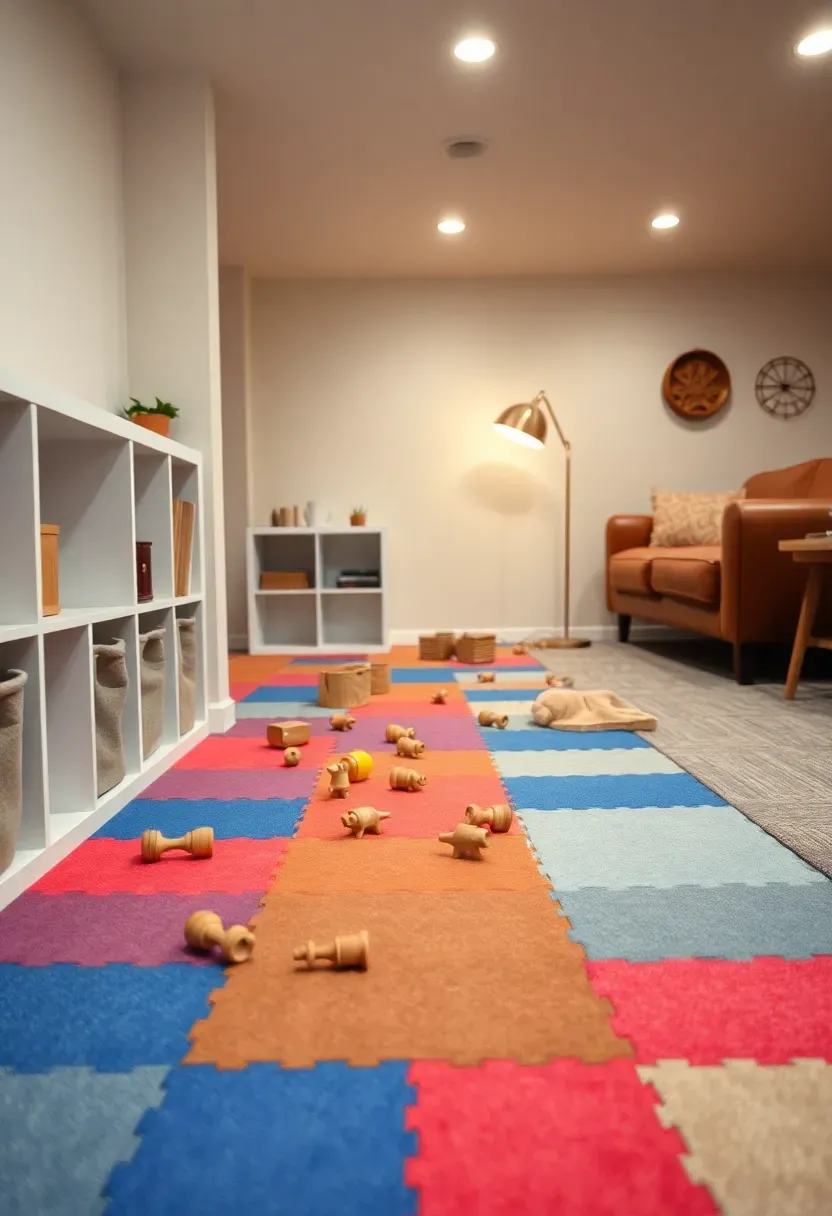
10. Kids Zone with Adult Lounge
This layout acknowledges that parents want to be in the same room as their kids but doing different things. The kids get one third of the basement floor area, closest to the stairs so they can reach the main floor bathroom easily. Foam interlocking floor tiles define their territory. The adult lounge occupies the other two thirds with a proper sofa, side table, reading light, and maybe a wall-mounted TV. The key is sight lines — arrange furniture so an adult sitting on the sofa can see the entire play area without standing up. Skip tall room dividers. A low bookshelf (30 inches high) holding baskets of toys creates a boundary that a four-year-old recognizes but does not block your view.
Tips
- Anchor toy storage at the border between zones so cleanup happens at the edge, not scattered across the whole basement
- Washable slipcovers on the lounge furniture save you from juice stains and marker mishaps
- A dimmer switch on the lounge side lets you lower lights for movie time while the play side stays bright
Recommended
Items for this idea
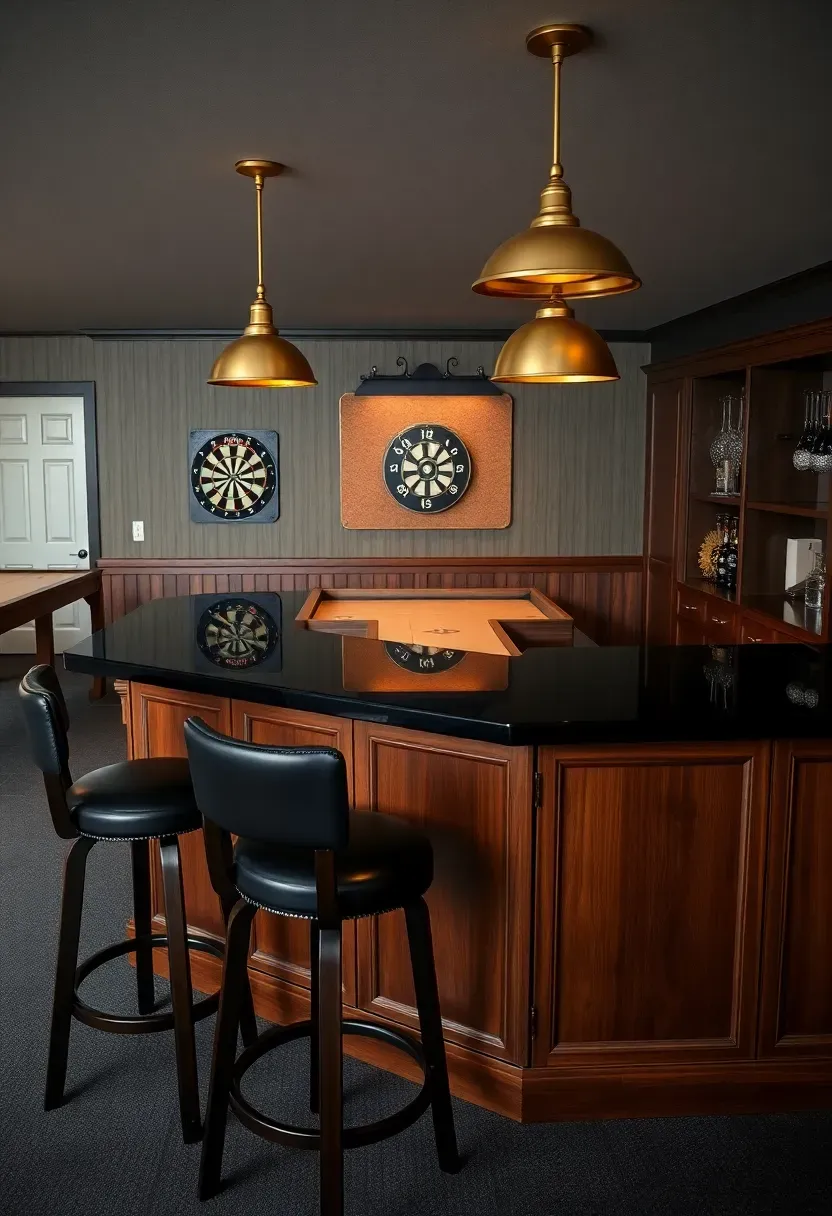
11. Bar and Entertainment Hub
A vs B: Wet bar or dry bar
A wet bar includes a sink and running water, which means plumbing costs ($2,000 to $4,000 depending on proximity to existing lines). A dry bar is just a counter, fridge, and storage — no plumbing, which means you can place it anywhere. Both work, but the choice affects your entire layout.
Wet bar layout
Position the bar as a peninsula extending from the plumbing wall. Guests sit on stools on one side while the bartender works behind. This naturally creates two zones: bar area and open floor for games, dancing, or additional seating. Total bar footprint runs about 3 feet deep by 8 feet long.
Dry bar layout
Without plumbing constraints, the bar can sit anywhere — against a side wall, in a corner, or as a freestanding island. A popular option is an L-shaped bar in one corner with the game area (pool table, darts, shuffleboard) taking the rest of the floor. This spreads people out and prevents crowding.
Recommendation
Start with a dry bar if you are unsure about budget. Plumbing can always be added later, but ripping out cabinetry to reroute pipes is a headache.
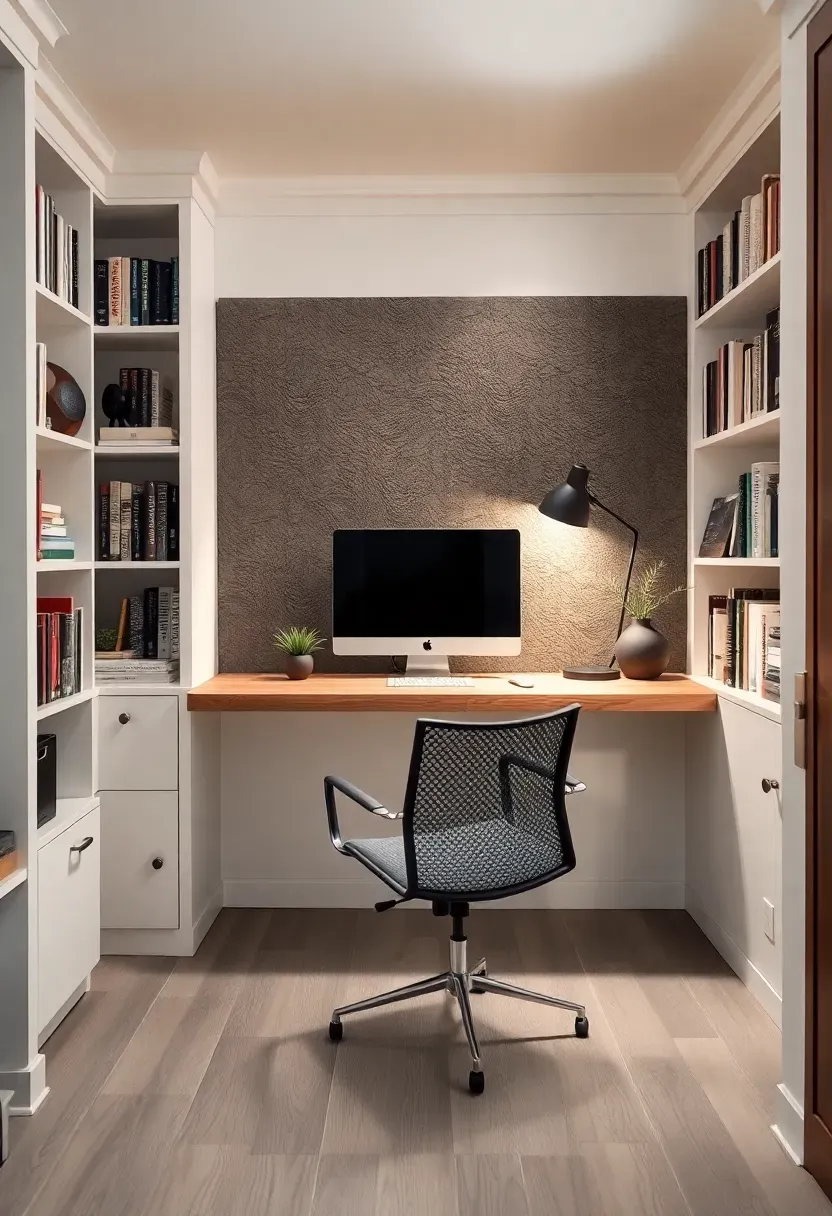
12. Home Office Alcove
Not every home office needs a whole room. In a basement layout, an alcove 6 feet wide by 4 feet deep — carved from a corner or built into the storage spine — provides a focused workspace without consuming major square footage. Build the desk as a floating countertop between two side walls or flanking bookshelves. This built-in approach eliminates the wobbly freestanding desk problem and gives you shelf space at arm's reach. Face the desk toward the room (not the wall) if possible, so your video call background is a bookshelf rather than a blank wall. Run ethernet cable during framing — basement wifi often struggles through concrete and ductwork.
Tips
- A solid-core pocket door or heavy curtain closes off the alcove during work hours and opens it back to the room at night
- Under-desk cable trays and a single power strip with USB ports keep the cord mess invisible
- Task lighting at 4000K provides enough brightness for screen work without washing out the rest of the basement
Recommended
Items for this idea
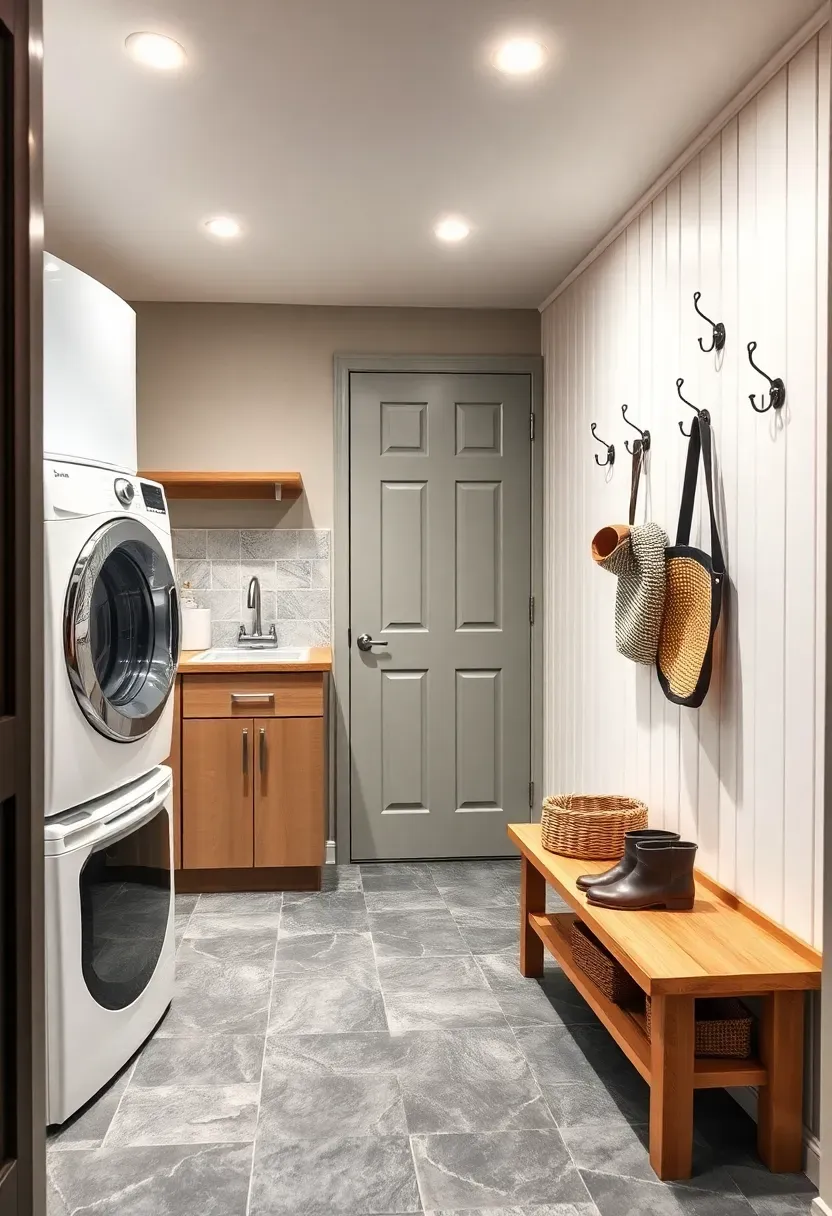
13. Laundry and Mudroom Combo
If your basement has an exterior door — walkout, bulkhead, or garage entry — combine the laundry with a mudroom right at that entry point. People come in, kick off muddy boots onto a boot tray, hang coats on wall hooks, and drop dirty clothes directly into the washing machine. It is the most logical traffic flow you can design. The mudroom side needs a bench, hooks, and a shoe rack. The laundry side needs the washer, dryer, a 36-inch-high folding counter, and a utility sink. Separate the two with a narrow divider wall or just a change in flooring — tile at the entry, LVP behind the machines.
Tips
- A floor drain near both the entry and the washer handles tracked-in snow and washer overflow
- Dryer vent runs should be under 15 feet total for efficient drying — position the dryer on an exterior wall
- A retractable clothesline over the folding counter gives you 12 feet of hang-dry space
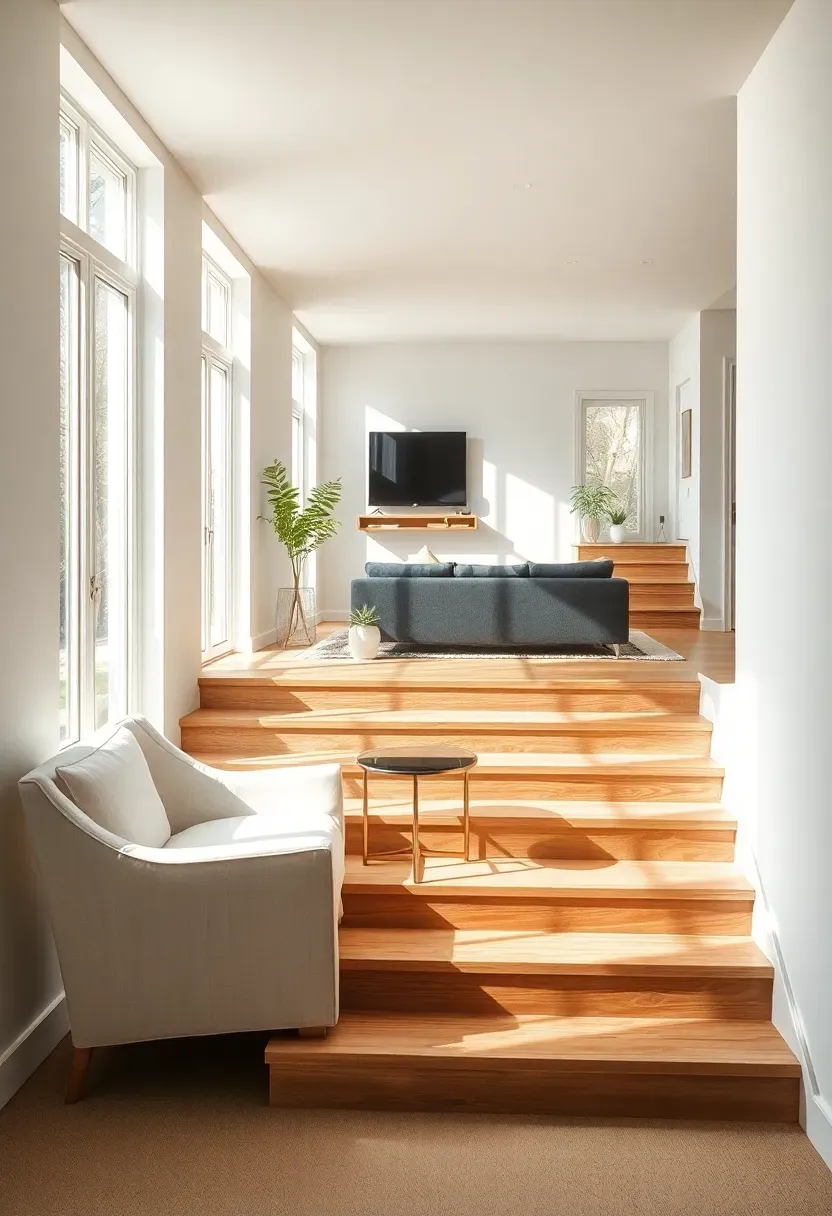
14. Daylight Basement Split-Level
Daylight basements — where the ground slopes and one wall is fully above grade — offer a layout opportunity that standard basements cannot match. Use the windowed wall as the primary living zone. Place seating, a dining area, or a sunroom along those windows where natural light floods in. Step the floor up 6 to 8 inches on a built platform at the interior (darker) half for bedrooms, a theater, or storage. The elevation change creates a psychological separation between public and private spaces. Three wide steps with integrated LED strip lighting connect the two levels. The raised section also hides plumbing runs and electrical conduit inside the platform framing.
Tips
- Window treatments on the daylight wall should be top-down/bottom-up cellular shades for privacy without losing light
- The raised platform is a natural place to hide a mini-split air handler for independent climate control
- Use the vertical face of the step-up as a long bench seat with storage underneath
Recommended
Items for this idea
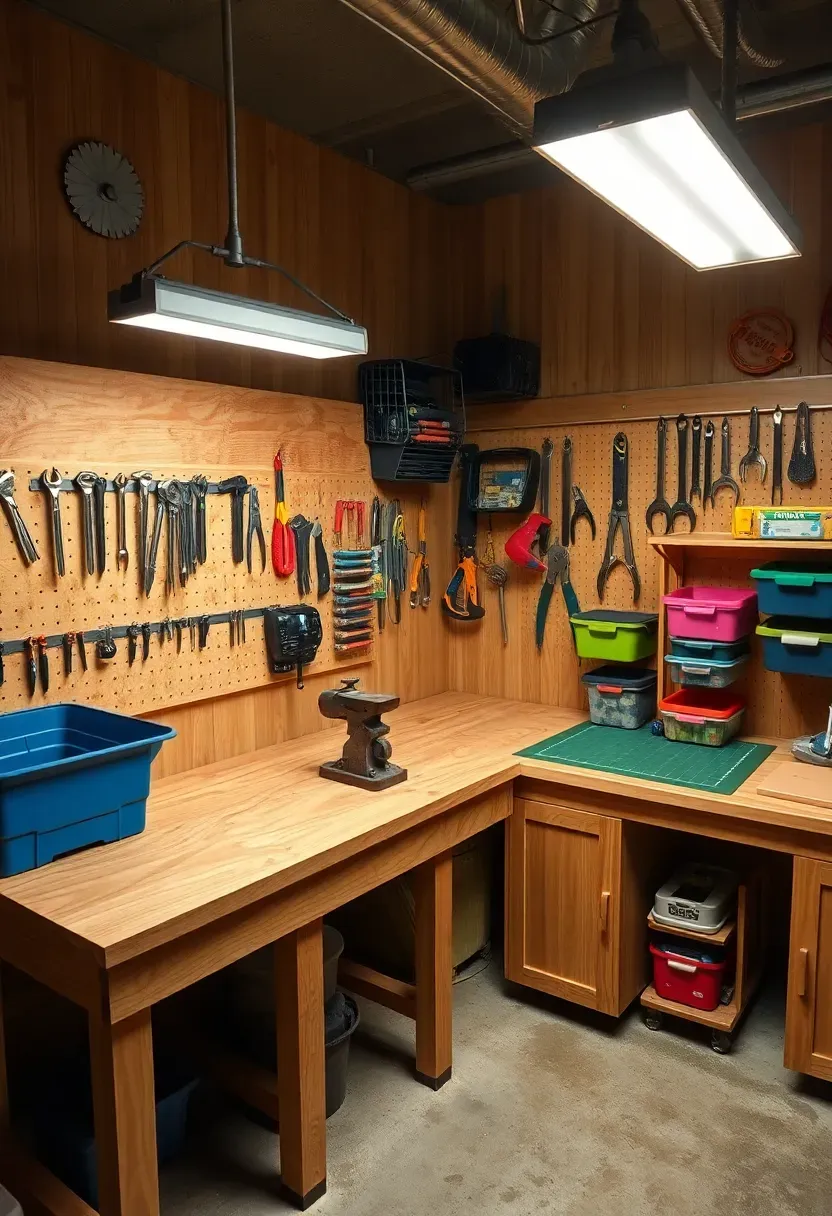
15. Workshop and Craft Corner
The problem
Workshop activities generate dust, noise, and mess. Craft projects spread supplies across every flat surface. Both need dedicated space, but dedicating an entire room to either one wastes square footage for activities that happen intermittently.
The solution
Combine them into one zone anchored by a shared workbench island in the center. The workshop wall gets a pegboard or French cleat system for tools, a dust collection hookup, and a sturdy bench with a vise. The craft side gets a countertop-height table, supply bins on rolling carts, and a cutting mat. Both share overhead LED shop lights (5000K for accurate color) and a floor that can handle spills — epoxy-coated concrete or interlocking garage tiles.
Pros and cons
- Pro: Concentrates all the messy activities in one area with one cleanup routine
- Pro: Shared tools like rulers, cutting mats, and clamps serve both purposes
- Con: Sawdust from woodworking can contaminate delicate craft materials — run a shop vac dust separator
- Con: Needs good ventilation, especially if using adhesives, stains, or spray paint
16. Rental Suite with Separate Entry
Converting a basement into a legal rental unit requires meeting local building codes for habitable space, and the layout must reflect that. The unit needs its own entrance — a walkout door, exterior staircase, or a code-compliant interior stair with fire separation. Inside, the minimum viable layout includes a kitchen or kitchenette (sink, fridge, cooking surface), a bathroom with shower, a bedroom with an egress window and closet, and a living area. Most codes require a minimum ceiling height of 7 feet in habitable rooms. Plan for a separate electrical panel, its own HVAC zone or mini-split, and either a shared or independent water heater. Total footprint runs 400 to 600 square feet for a comfortable studio or one-bedroom.
Tips
- Check zoning laws before starting — not all municipalities allow accessory dwelling units in basements
- Sound insulation between the rental ceiling and your main floor is critical for both parties — resilient channel plus mineral wool is the minimum
- A separate mailing address or unit number simplifies utility billing and lease agreements
Recommended
Items for this idea
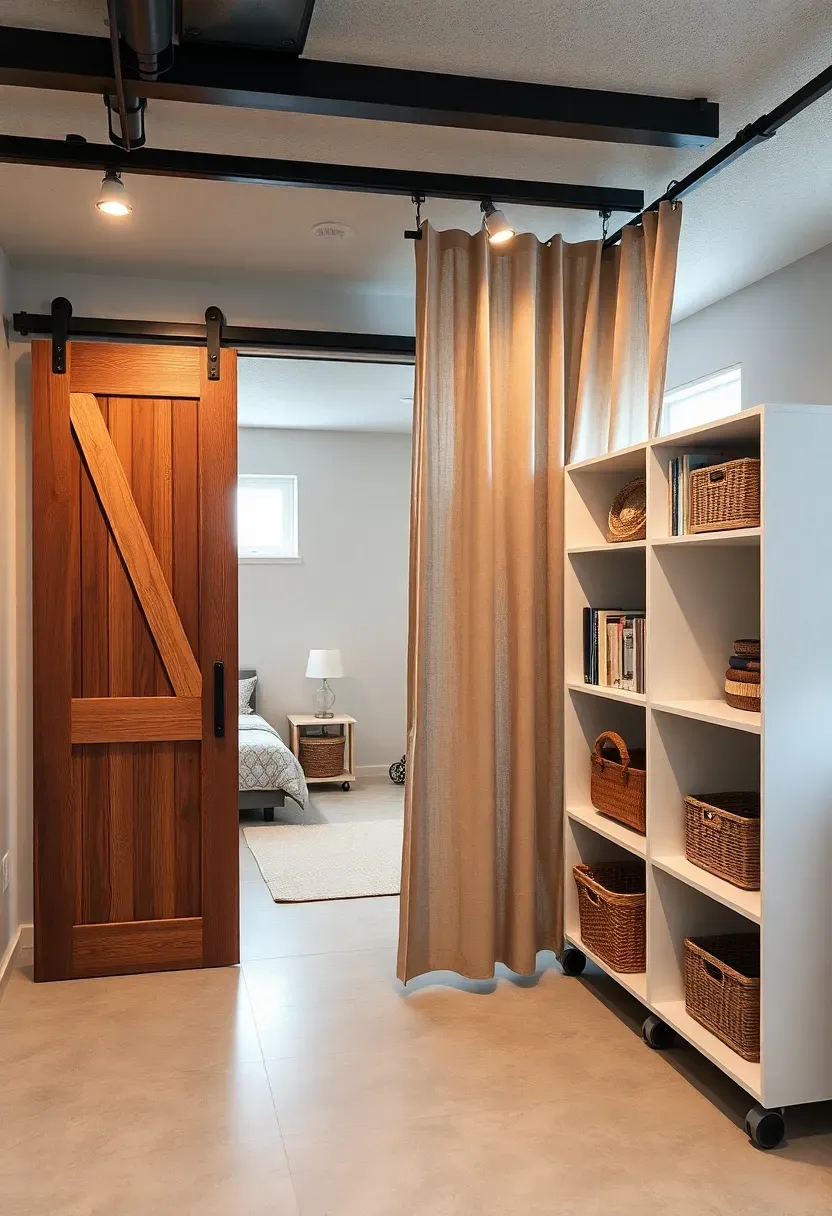
17. Flexible Partition Layout
The trend
Fixed basement walls lock you into one arrangement forever. That made sense when basements served a single purpose — storage or laundry. Finished basements serve multiple functions that change by season, by day of the week, or by who is home.
Modern approach
Replace permanent partition walls with movable elements. Sliding barn doors on ceiling-mounted tracks can close off a bedroom at night and open it to the main space during the day. Curtain tracks with heavy linen panels divide a yoga area from a play zone. Rolling bookshelves on locking casters create walls that you can reconfigure in ten minutes. The ceiling grid stays continuous — only the floor-level layout changes. This approach costs less than framing and drywall, and it lets you adjust the basement as your family's needs evolve without a renovation.
Apply at home
- Start with curtain tracks (about $3 per linear foot for ceiling-mounted hardware) as the cheapest test of a flexible layout
- Upgrade to sliding barn doors ($200 to $500 per panel plus hardware) for zones that need more sound isolation
- Rolling shelving units (IKEA Kallax on casters is a popular budget option) serve double duty as storage and walls
Quick FAQ
Does basement layout affect resale value? Absolutely. A well-planned layout with defined zones, proper egress, and a bathroom addition can return 70 to 75 percent of your investment at resale. Open concept layouts with flexible potential appeal to the broadest range of buyers, while highly specialized rooms like dedicated theaters may appeal to fewer people.
Where should I put the bathroom in a basement layout? As close to the existing drain stack as possible. Every foot of horizontal drain pipe adds cost and increases the chance you will need a sewage ejector pump. The stack is usually located near the upstairs kitchen or bathroom directly above.
Can I finish a basement with low ceilings? You need a minimum of 7 feet of ceiling height in most jurisdictions for habitable space, and 6 feet 8 inches under beams and ducts. If you are close, recessed lighting instead of hanging fixtures, a painted exposed ceiling instead of a drop ceiling, and low-profile flooring like polished concrete or thin LVP can preserve every possible inch.
How do I handle support columns in my layout? Wrap them with drywall or wood and integrate them into your design. A column between two zones becomes a natural divider. Four columns in a row can define a hallway. Two columns close together can anchor a bar countertop between them. Treat them as features, not obstacles.
What is the cheapest way to divide a basement into rooms? Curtain tracks on the ceiling cost under $50 per divider and install in an afternoon. For something more permanent but still affordable, a 42-inch half-wall runs about $200 to $400 in materials and provides zone definition without closing off light or air.
The right basement layout depends on how you actually live, not how a floor plan looks on paper. Spend a week writing down every time someone in your household says they wish they had a place to do something — watch a movie without interruption, work out without rearranging furniture, let the kids be loud. That list is your layout brief. Start with the zones that solve real daily friction, and leave room for the rest to evolve.
Pinterest cover for 17 Basement Layout Ideas
About the author
OBCD
CGI visualization and interior design content. We create detailed 3D renders and curate practical design ideas for every room in your home.