27 Basement Bar Designs That Work
I helped a friend tear out his old basement carpet last fall. Underneath was clean concrete, solid walls, and about 200 square feet that nobody used. Six weekends later he had a working bar with running water, a draft system, and seating for eight. The whole project came in under $4,000 because he did the demo and finishing himself and only hired a plumber for the drain tie-in. That experience reminded me that basement bars succeed or fail based on three decisions made before you buy a single material: where the plumbing goes, how you handle the ceiling, and what the bar actually needs to do for the people who use it.
These 27 designs cover different budgets, skill levels, and goals — from a $300 shelf-and-cart setup to a full commercial-grade build.
Table of Contents
- Granite Slab Wet Bar
- Pallet Wood Dry Bar
- Prohibition-Era Hidden Bar
- Concrete Countertop Bar
- Kegerator Draft Station
- Wine Cellar Tasting Bar
- Poolside Walkout Bar
- Black Steel Industrial Bar
- Shaker-Style Classic Bar
- Corner Nook Cocktail Bar
- Butcher Block Farmhouse Bar
- Retro Diner Counter
- Japanese Whisky Bar
- Theater Concession Bar
- Mediterranean Tile Bar
- Floating Shelf Bar Wall
- Barrel Room Bourbon Bar
- Scandinavian Light Bar
- Sports Viewing Station
- Copper-Top Pub Bar
- Murphy Fold-Down Bar
- Terrazzo Surface Bar
- Under-Stair Mini Bar
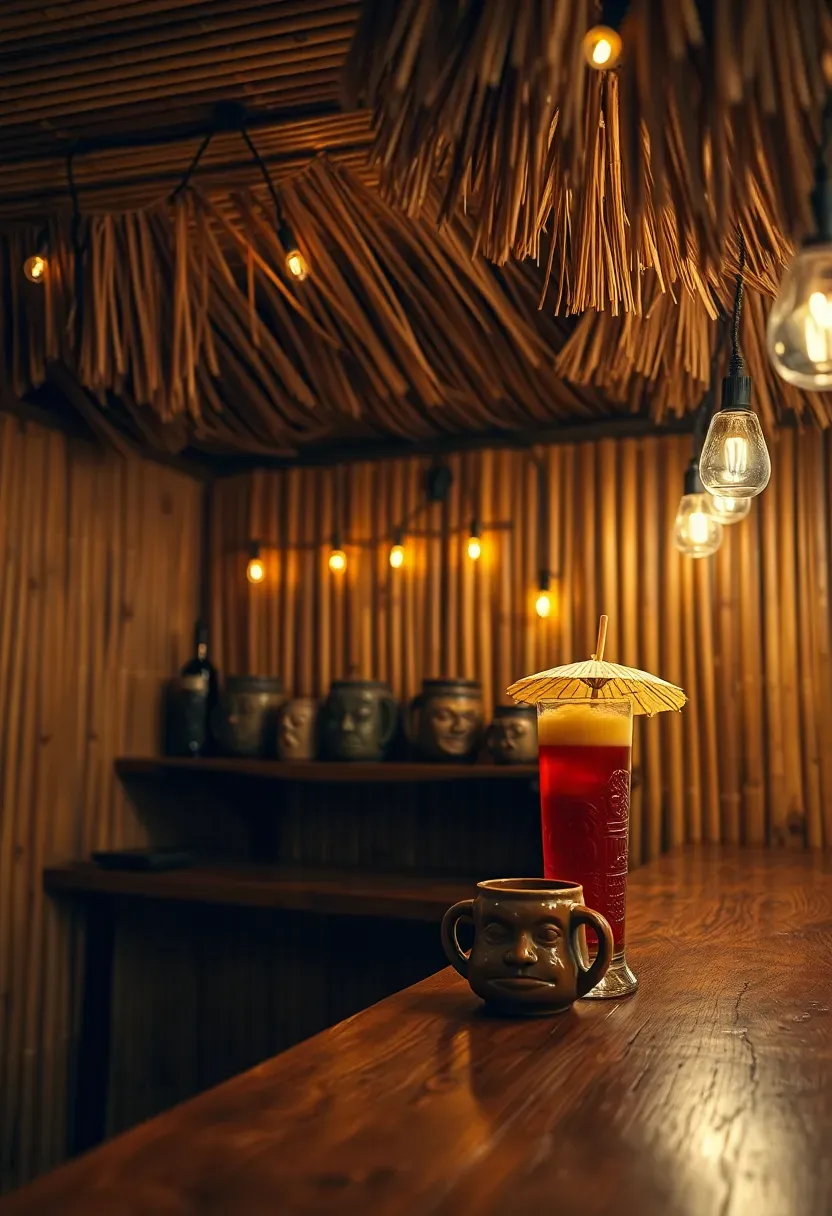
- Tropical Rum Bar
- Art Deco Cocktail Lounge
- Budget IKEA Cabinet Bar
- Full-Scale Tavern Build
1. Granite Slab Wet Bar
Granite remnants from countertop fabricators are the budget move here. A full slab for a kitchen island runs $2,000 or more, but remnant pieces large enough for a 6-foot bar top cost $200 to $500. Call local fabricators and ask what they have in stock — most are eager to clear remnant inventory. Absolute Black, Uba Tuba, and Steel Grey are common remnant options because they are high-volume kitchen colors. The polished surface handles condensation rings and citrus juice without staining. Pair with an undermount bar sink and you have a wet bar that looks like it cost three times its actual price.
Tips
- Measure your bar frame before visiting the fabricator so you can match available remnant dimensions
- Ask for a 1.5-inch eased edge profile rather than a bullnose — it reads more contemporary
- Seal granite once a year with a food-safe impregnating sealer to maintain stain resistance
We picked a few things that go well with this idea: Faux Leather Counter Stools Set of 3 (★4.5), Stoolink Leather Bar Stools Set of 2 (★4.8) and Adjustable Swivel Bar Stools Set of 4 (★4.6). As an Amazon Associate we earn from qualifying purchases.
2. Pallet Wood Dry Bar
The problem
Most budget bar builds end up looking cheap because particle board and laminate do not handle basement humidity well. Within a year, edges swell and surfaces peel.
The solution
Heat-treated pallet wood (stamped HT, not MB which indicates chemical treatment) gives you solid hardwood for free. A single standard pallet yields about 7 board feet of usable lumber after you strip it. You need roughly 8 pallets for a 6-foot bar with front face, top, and shelf backing. Sand to 150 grit, apply a dark walnut stain, and finish with three coats of water-based polyurethane. Total material cost for stain, poly, screws, and sandpaper sits around $60 to $90.
Pros and Cons
- Pros: Nearly free materials, rustic look that suits basements, repairs are easy since replacement boards cost nothing
- Cons: Disassembling pallets takes patience, boards vary in width and thickness, you must verify HT stamp for safety
We picked a few things that go well with this idea: PINDODO Industrial Black Dome Pendants (3-Pack) (★4.7), ALAISLYC Matte Black Dome Pendant Lights (3-Pack) (★4.7) and Industrial Lantern Pendant Lights (3-Pack) (★4.5). As an Amazon Associate we earn from qualifying purchases.
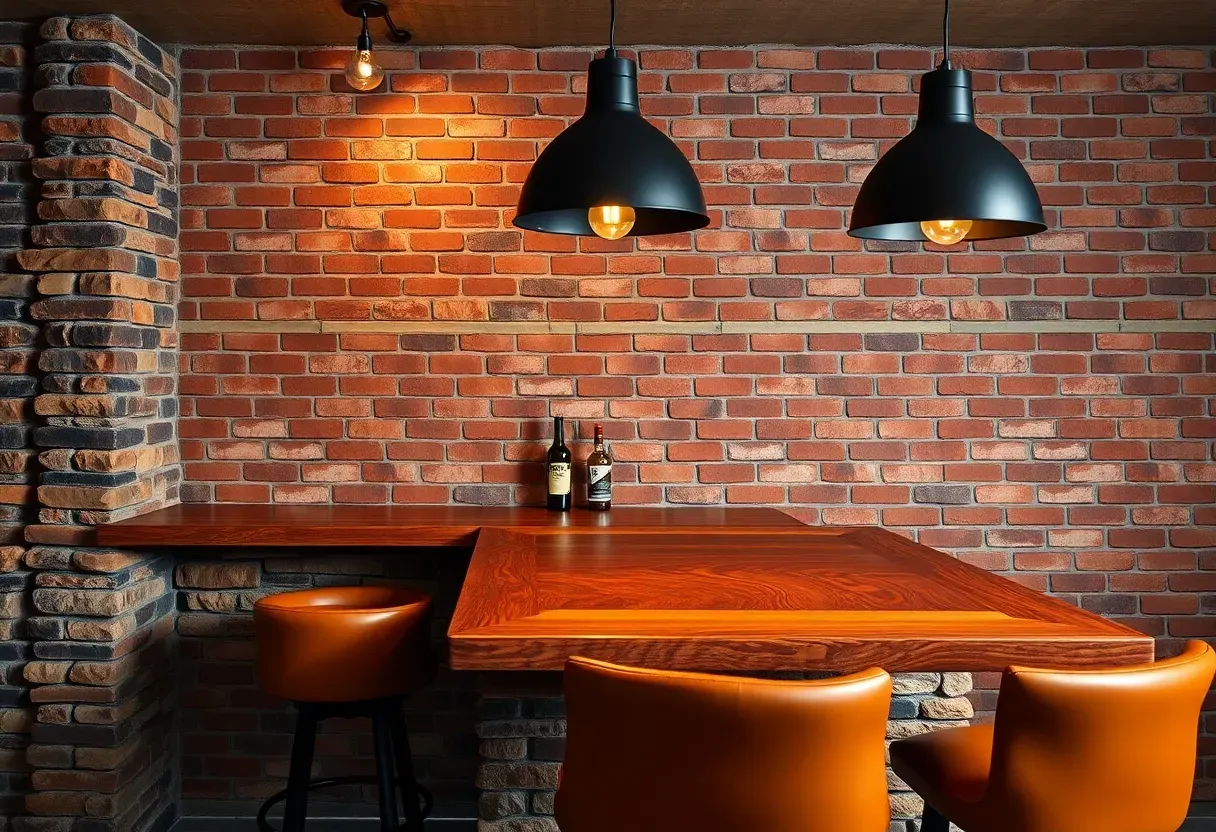
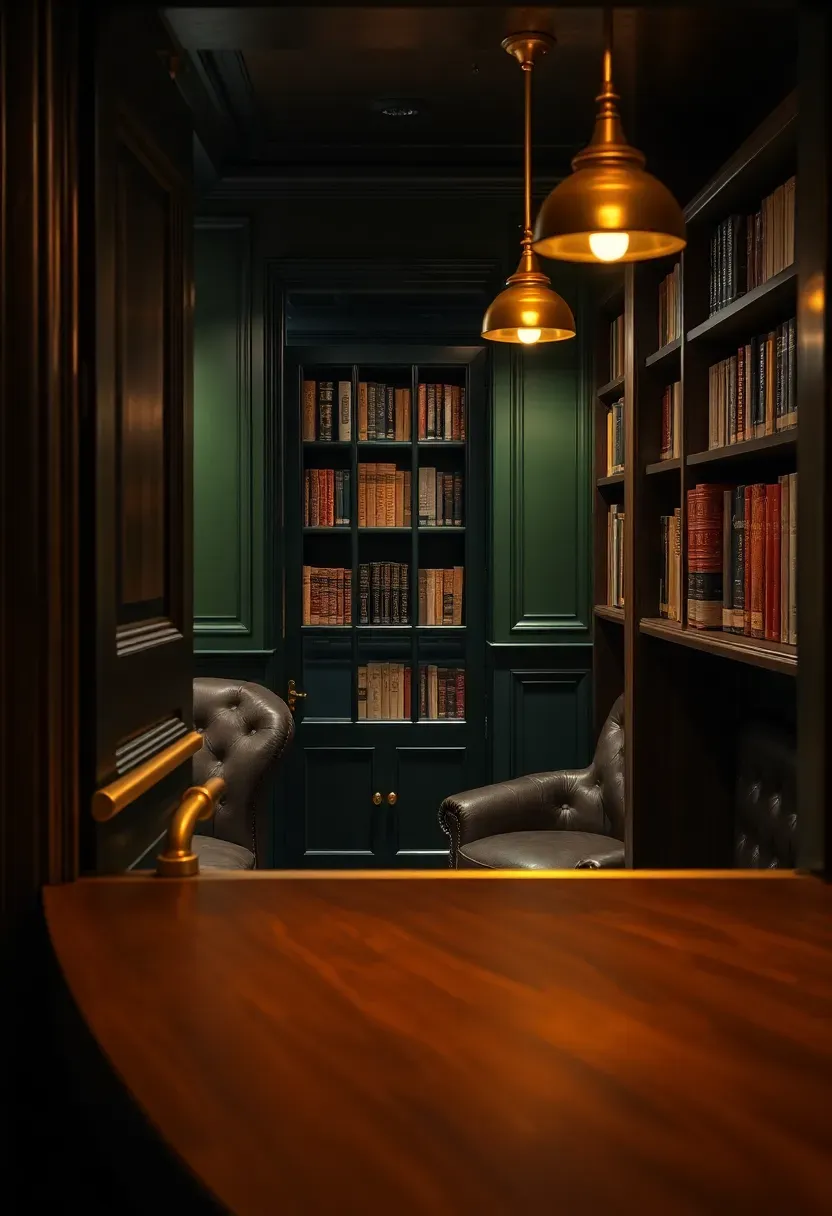
3. Prohibition-Era Hidden Bar
Concealed rooms have practical value in a basement beyond novelty. A bookcase door separates the bar zone acoustically from the rest of the lower level, which matters when you have kids sleeping upstairs. Murphy Door makes prefab hidden door systems starting at $1,200 for a 36-inch opening. The door mounts on a standard jamb and operates on a pivot hinge system that handles the weight of real books on the shelves. Behind the door, keep the palette to dark greens, deep burgundy, or charcoal. Brass fixtures catch whatever dim light you provide. The low basement ceiling actually helps here — it forces intimacy, which is exactly the atmosphere a hidden bar needs.
Design details
- Stock the bookcase door with real hardcovers for weight distribution and visual authenticity
- Brass cabinet pulls, a glass-rinser faucet, and a single large mirror behind the bottles create depth
- Wire a separate sound system inside so music stays contained within the bar space
We picked a few things that go well with this idea: KITESSENSU Cocktail Shaker Bartender Kit with Stand (★4.7), 18-Piece Stainless Steel Bartender Kit (★4.6) and HMYBAR 22-Piece Cocktail Shaker Kit (★4.8). As an Amazon Associate we earn from qualifying purchases.
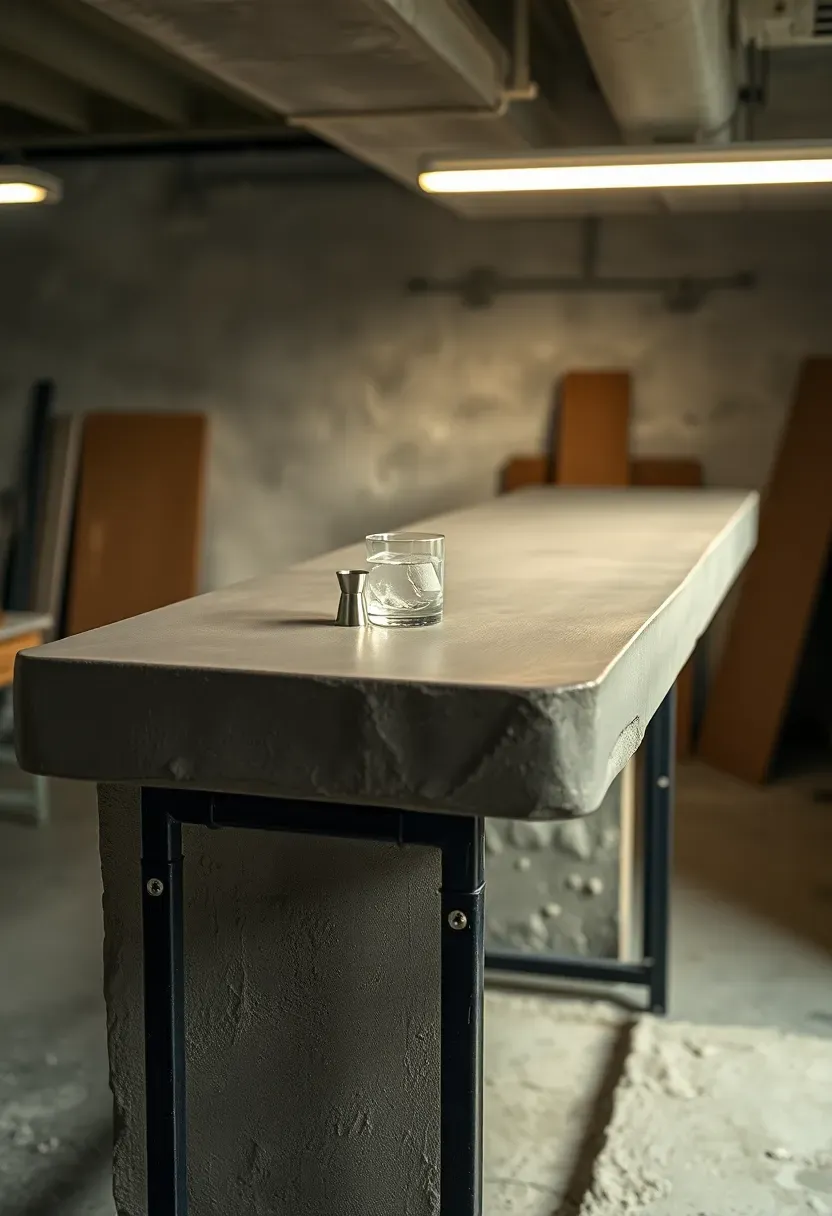
4. Concrete Countertop Bar
How to build it
Concrete bar tops are a weekend project if you prepare the form in advance. Use melamine-coated particle board for the form — the smooth surface gives a glossy underside that becomes your top when you flip the finished piece.
Step 1: Build the form
Cut melamine to your bar dimensions plus 2 inches on each side for the edge height. Screw and silicone-caulk all joints. For a 7-foot bar, make the form in two sections to keep weight manageable.
Step 2: Mix and pour
Quikrete Countertop Mix or Buddy Rhodes GFRC mix are the go-to products. Add pigment at this stage if you want color. Pour in two lifts: first a 1/4-inch face coat, then the structural layer with fiber reinforcement. Vibrate the form by running an orbital sander against the outside edges to release air bubbles.
Step 3: Cure and seal
Wait 48 hours minimum before demolding. Wet-cure under plastic for five days. Apply a food-safe penetrating sealer followed by a carnauba wax topcoat.
Watch out
Concrete cracks if the supporting frame flexes. Use a welded steel tube frame, not a wood structure, for spans longer than 4 feet.
Recommended
Items for this idea
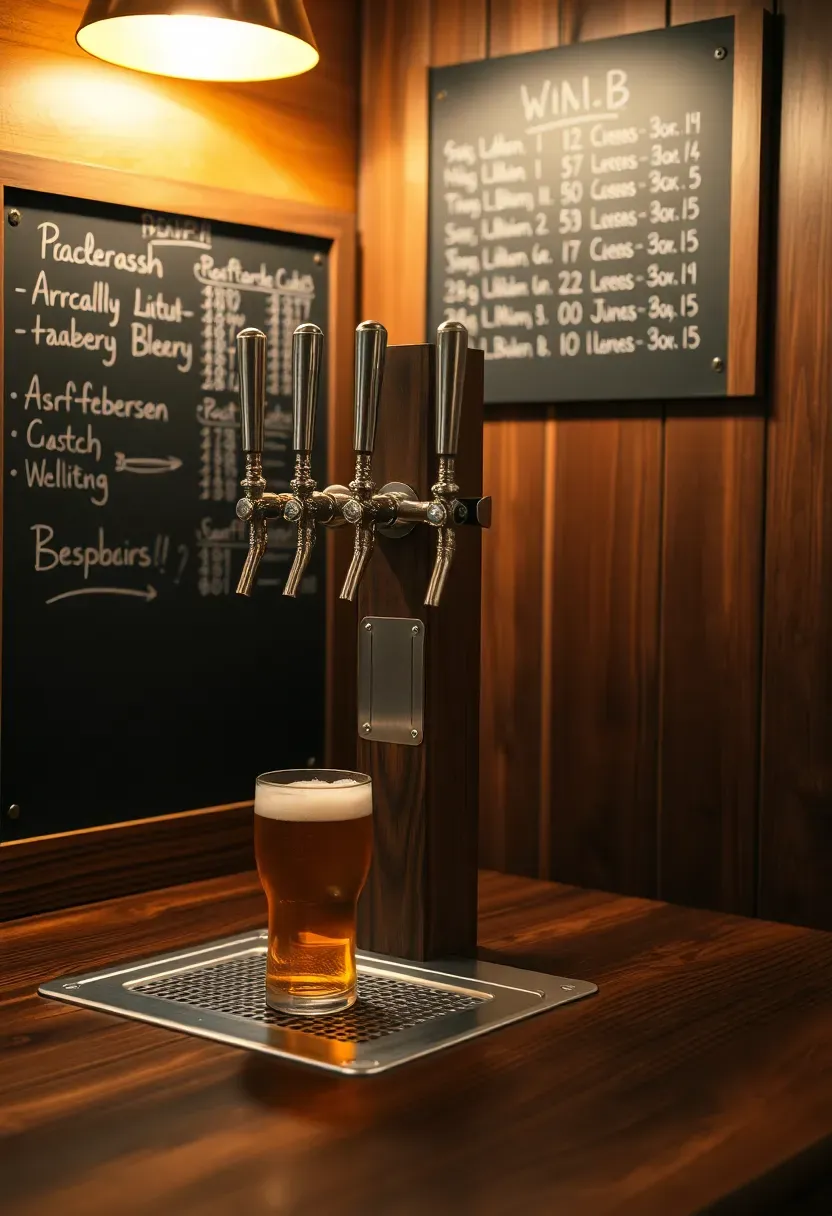
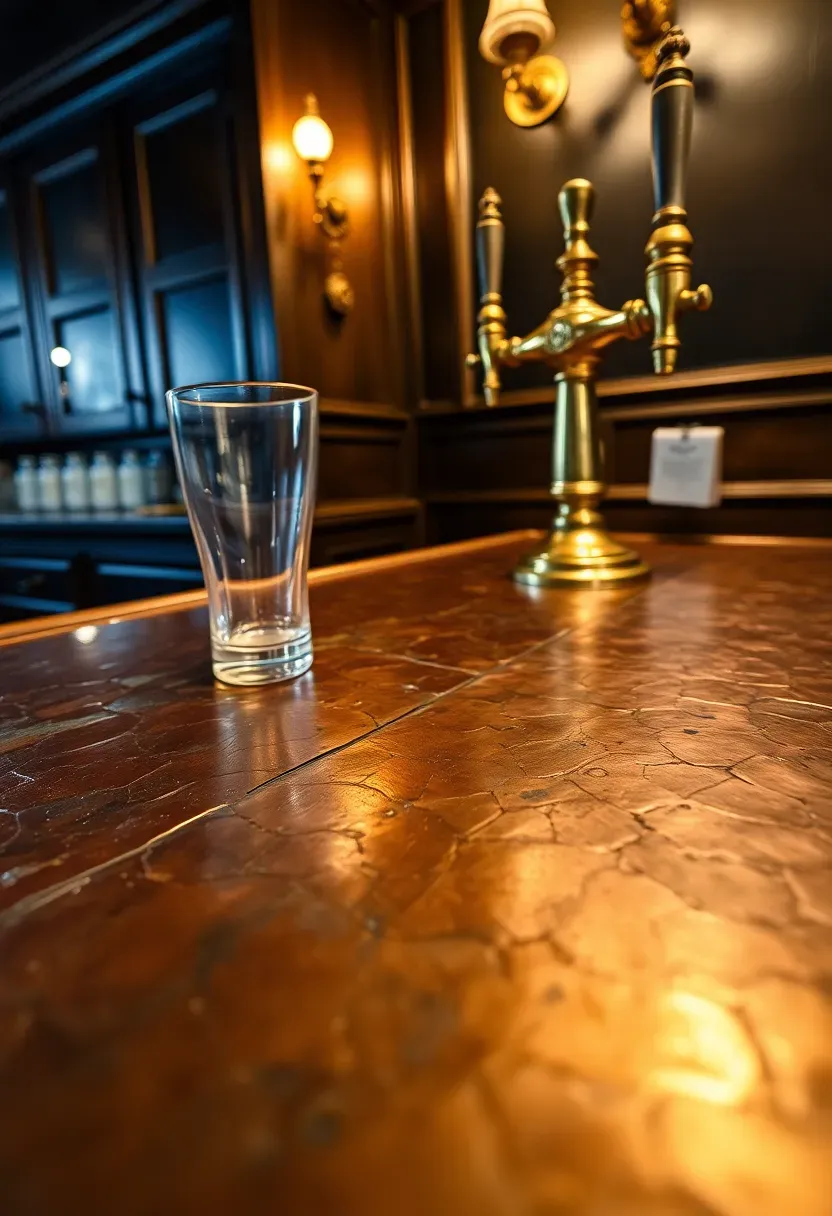
5. Kegerator Draft Station
A dedicated draft setup changes how people use the bar. Bottles and cans feel like a house party; taps feel like a real establishment. The simplest route is a commercial kegerator ($500 to $900 for a dual-tap unit from Kegco or EdgeStar) placed behind the bar with a tower extending through the countertop. Drill a 3-inch hole through your bar top, drop in the tower, connect CO2 and beer lines, and you are pouring draft beer. A standard half-barrel keg holds 165 twelve-ounce pours. At home consumption rates, that keg lasts a month easily. Keep the CO2 tank accessible for pressure adjustments — 10 to 12 PSI works for most ales, 12 to 14 for lagers.
Tips
- Clean beer lines every two weeks with BLC (Beer Line Cleaner) to prevent off-flavors and mold buildup
- Install a drip tray with a drain line into a small catch bucket rather than a plumbed drain
- A chalkboard or digital display above the taps listing what is on draft adds a professional touch
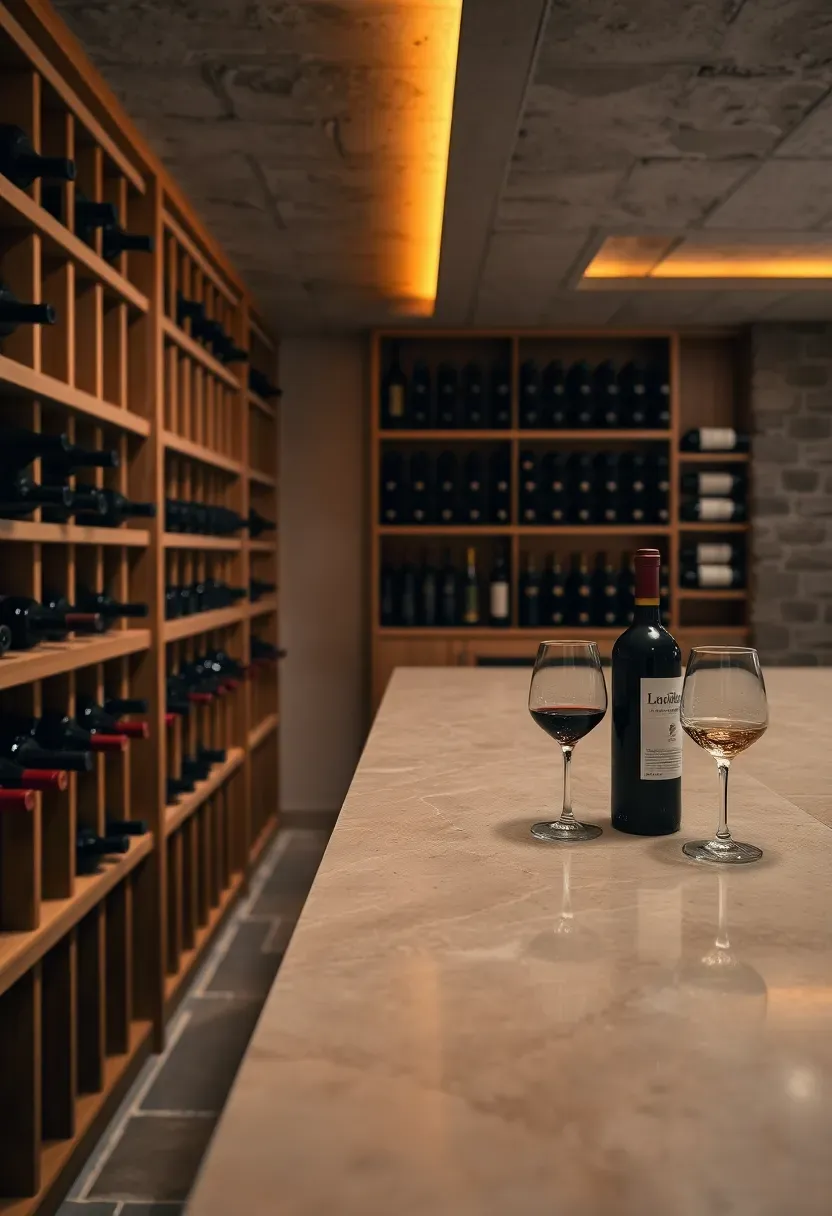
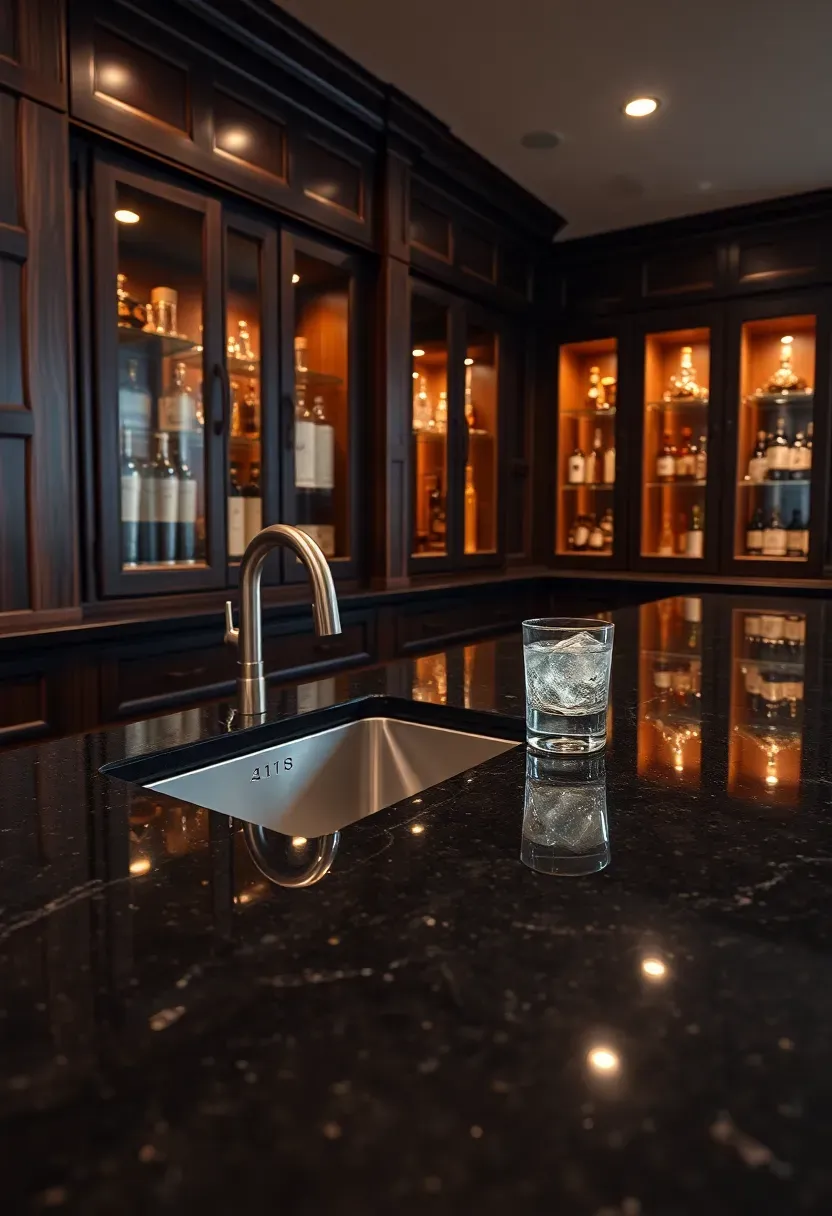
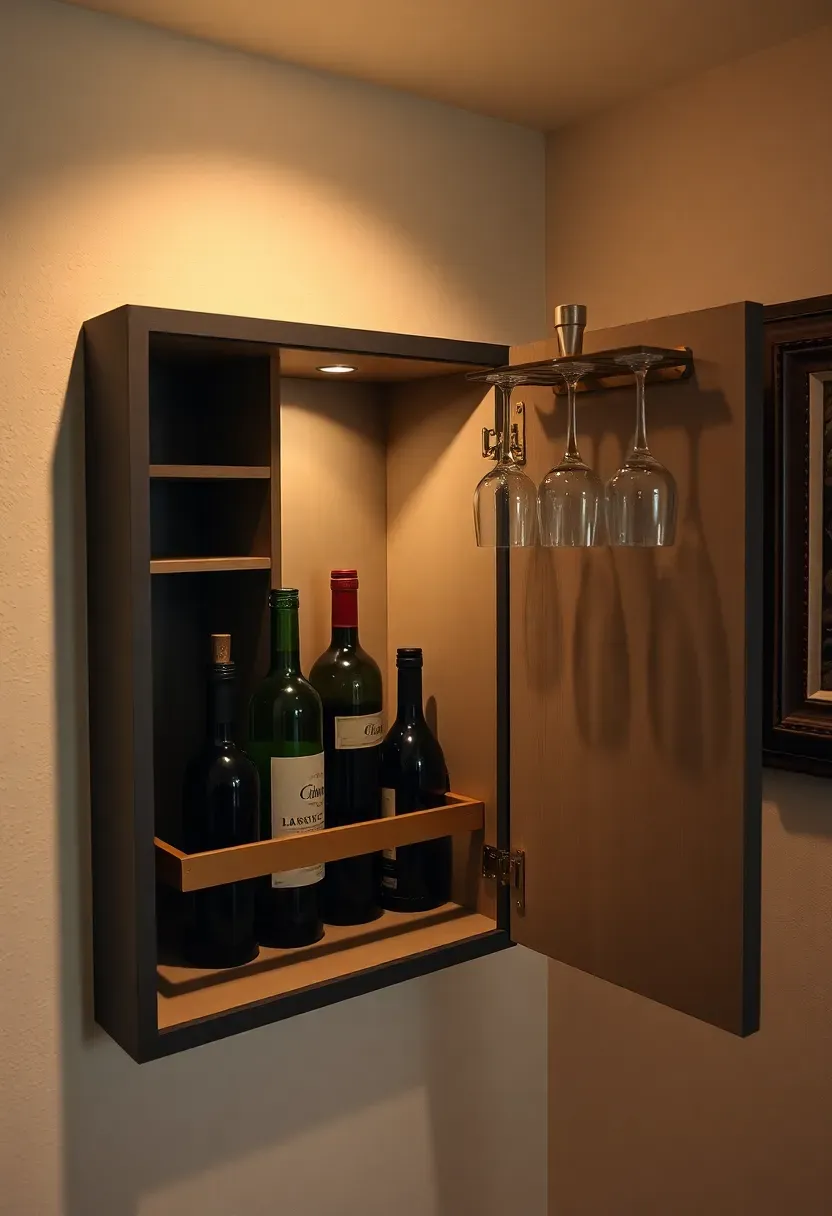
6. Wine Cellar Tasting Bar
Basements sit underground where temperatures naturally hover around 55 to 65 degrees Fahrenheit year-round — close to the ideal 55-degree wine storage temperature. Adding a cooling unit (CellarPro or WhisperKool, starting around $1,500) and a vapor barrier on the walls gets you proper cellar conditions without building a separate room. The tasting counter should be honed soapstone or slate — materials that stay cool to the touch and resist wine stains. Keep the counter narrow at 18 to 20 inches deep. This is for tasting, not dining. Racking along the opposite wall should angle bottles at 5 degrees to keep corks wet.
Tips
- Install a hygrometer and maintain 60 to 70 percent humidity to prevent cork shrinkage
- Use LED strip lighting inside racks at 2700K color temperature — warm enough to see labels without generating heat
- A small decanting station with a candle (for sediment checking) adds function and atmosphere
Recommended
Items for this idea
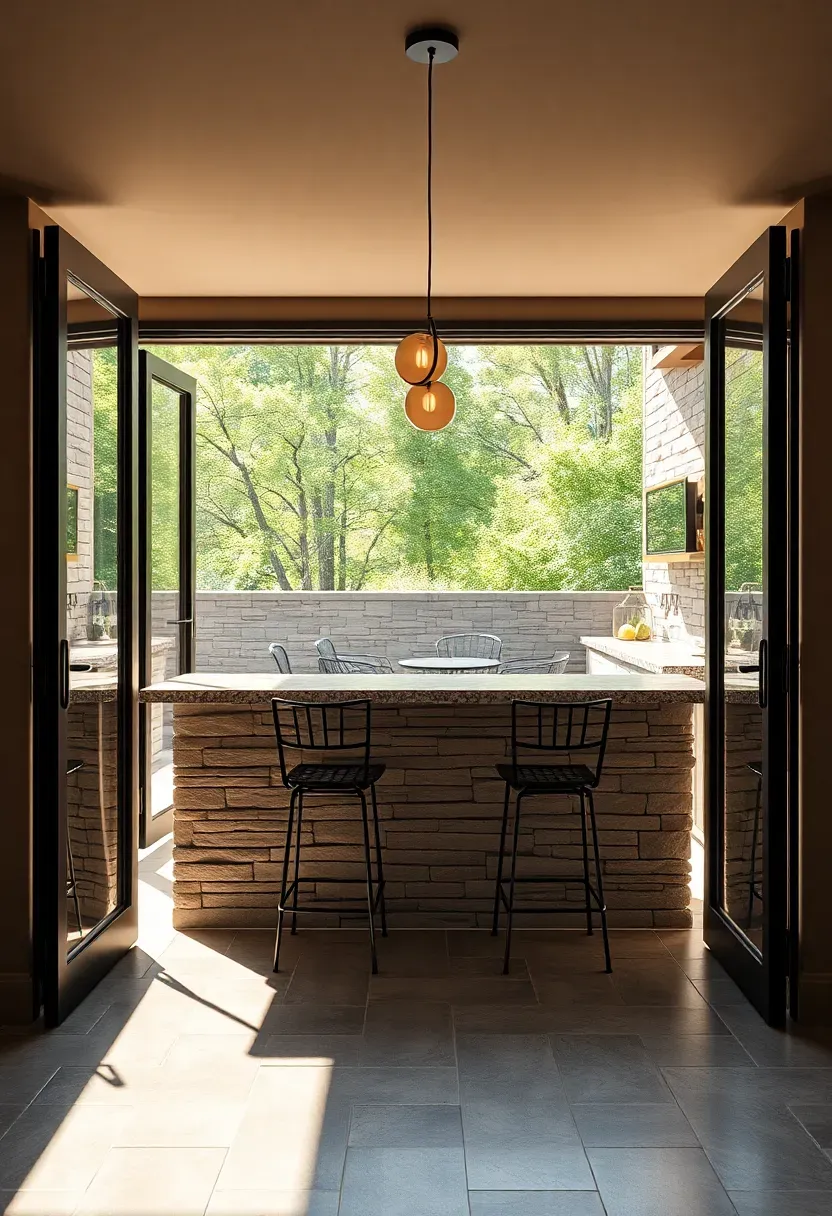
7. Poolside Walkout Bar
Why it fits
If your basement has a walkout to a patio or pool deck, a bar positioned at that threshold serves both indoor and outdoor guests from one station. The bar counter passes through the wall opening, with stools on both sides.
Building the connection
Bi-fold or sliding glass doors (Andersen 200 Series or Pella 350 Series, $2,500 to $5,000 for an 8-foot opening) replace the existing walkout door. The bar counter extends 24 inches past the exterior wall on each side. Use matching stone veneer on the bar base inside and out to unify the two zones visually. The outdoor portion needs a weather-resistant top — granite, concrete, or marine-grade teak. Run plumbing to a sink on the indoor side only to avoid freeze issues.
Choose if
- Your basement walkout faces a pool, patio, or entertaining area
- You host outdoor gatherings frequently and want a pass-through serving point
- Budget allows for the door replacement and exterior finish work
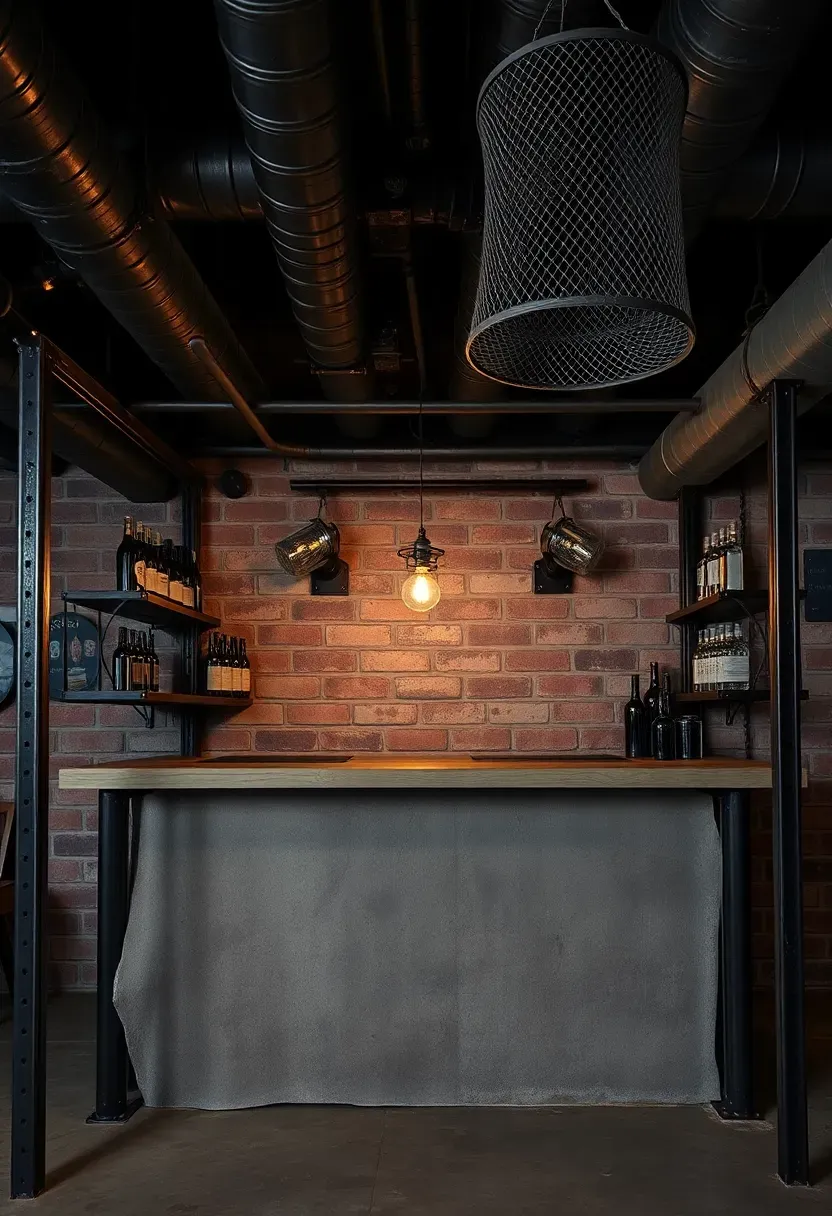
8. Black Steel Industrial Bar
Skip the drywall ceiling entirely. Spray-paint every exposed pipe, duct, and beam flat black and suddenly the mechanical systems become a design feature rather than an eyesore. The bar itself follows the same language: welded square tube steel (1.5 x 1.5 inch) for the frame, flat bar steel for the foot rail, and either concrete or reclaimed wood for the top. A metal fabricator can weld a complete bar frame for $400 to $800 depending on complexity. If you weld yourself, raw steel from a metals supplier runs about $2 per linear foot for 1.5-inch square tube. Finish all steel with a clear matte lacquer to prevent rust in the sometimes-damp basement air.
Tips
- Use magnetic spice tins repurposed as garnish holders on the steel shelving — they stick directly to the frame
- Rubber bar mats on the steel counter prevent glass breakage and dampen noise
- Edison filament bulbs in black iron pipe pendants complete the vocabulary without trying too hard
Recommended
Items for this idea
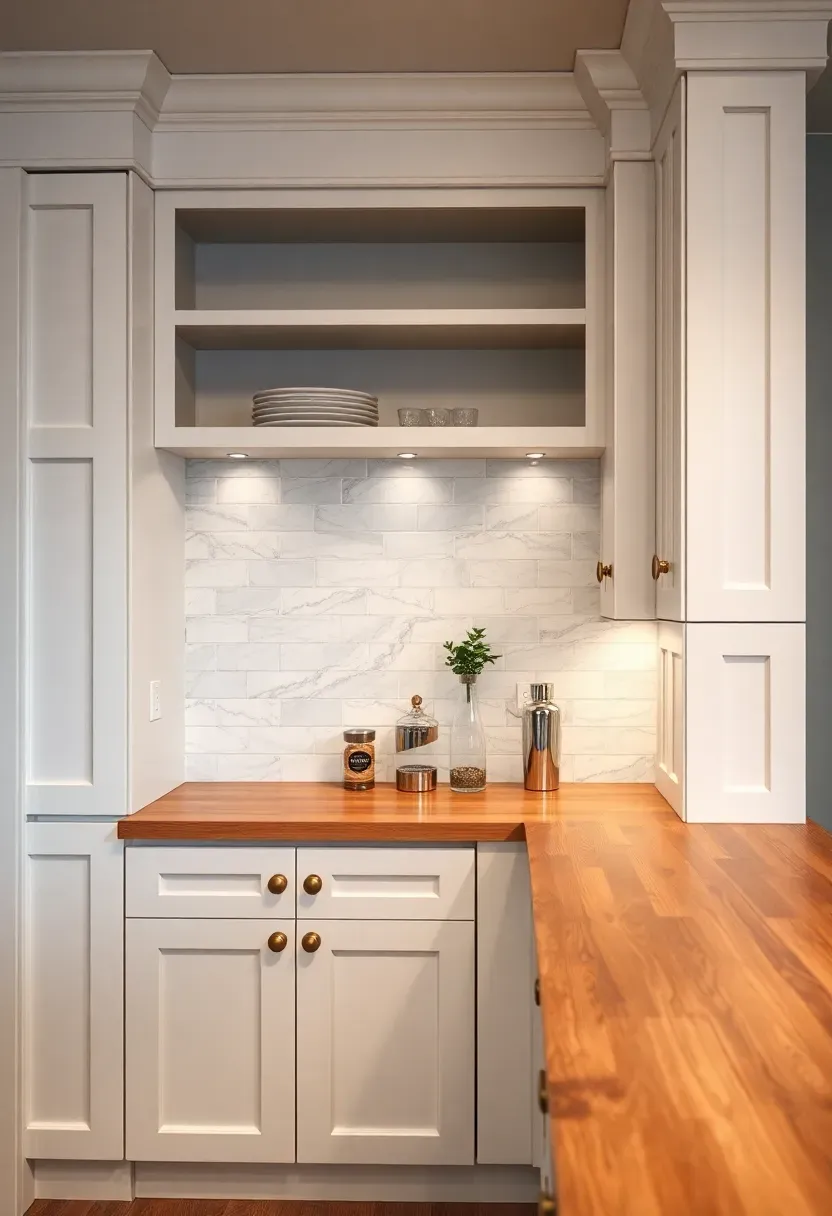
9. Shaker-Style Classic Bar
Shaker cabinetry works for a basement bar the same way it works in kitchens — the recessed panel doors are simple enough to build in a home shop and the proportions look good at any scale. Build the lower cabinets 36 inches tall (standard counter height) with 24-inch depth. Use 3/4-inch birch plywood for the boxes and poplar for the face frames and door stiles. A router with a rail-and-stile bit set ($40) and a cope-and-stick bit creates the panel doors. Paint everything in Benjamin Moore Advance (a self-leveling alkyd hybrid) for a smooth factory-like finish. The whole cabinet run for a 6-foot bar costs roughly $300 to $500 in materials if you build it yourself.
Tips
- Brass knob hardware ($3 to $6 per knob) adds warmth against white or gray painted cabinets
- A marble subway tile backsplash behind the bottle display area ties the look to a traditional kitchen aesthetic
- Soft-close hinges on every door — the $2 upgrade prevents slamming and the cabinets feel expensive
10. Corner Nook Cocktail Bar
The problem
Not every basement has 200 square feet to dedicate. Some basements have a 4x5 foot alcove or an awkward corner near the mechanical room that collects storage bins.
The solution
A corner bar uses two walls as the back and side, needing only a counter and a few shelves. Install a mirror on the back wall to double the visual depth. Floating glass shelves in front of the mirror display bottles while letting light bounce around. A curved or angled counter wraps the corner at 42-inch bar height with room for two stools. The entire footprint is under 20 square feet but it serves drinks just as well as a sprawling setup. Total build cost for a laminate or butcher block counter, mirror, glass shelves, and two stools: $400 to $700.
Pros and Cons
- Pros: Minimal footprint, low cost, uses dead space, easy to dismantle if you move
- Cons: Limited storage, no room for a sink without plumbing work, only seats two comfortably
Recommended
Items for this idea
11. Butcher Block Farmhouse Bar
Butcher block is forgiving in ways that stone and concrete are not. It dents instead of cracking, it sands out easily when scarred, and it gains character with use rather than looking damaged. A 6-foot maple butcher block countertop from Lumber Liquidators or Floor & Decor runs $180 to $350 depending on thickness. Choose 1.75-inch thickness for a bar top — anything thinner feels flimsy when people lean on it. Seal with Waterlox original tung oil finish (three coats) for water resistance that still lets the wood breathe. The bar front in white beadboard paneling nailed over a 2x4 frame keeps the farmhouse look consistent. Add iron shelf brackets and open shelving for bottles.
Tips
- Sand with 220-grit and recoat with Waterlox once a year to maintain the finish
- Place silicone coasters near the serving edge — butcher block handles water fine but standing puddles leave marks
- A galvanized steel bucket for ice doubles as a visual prop when not in use
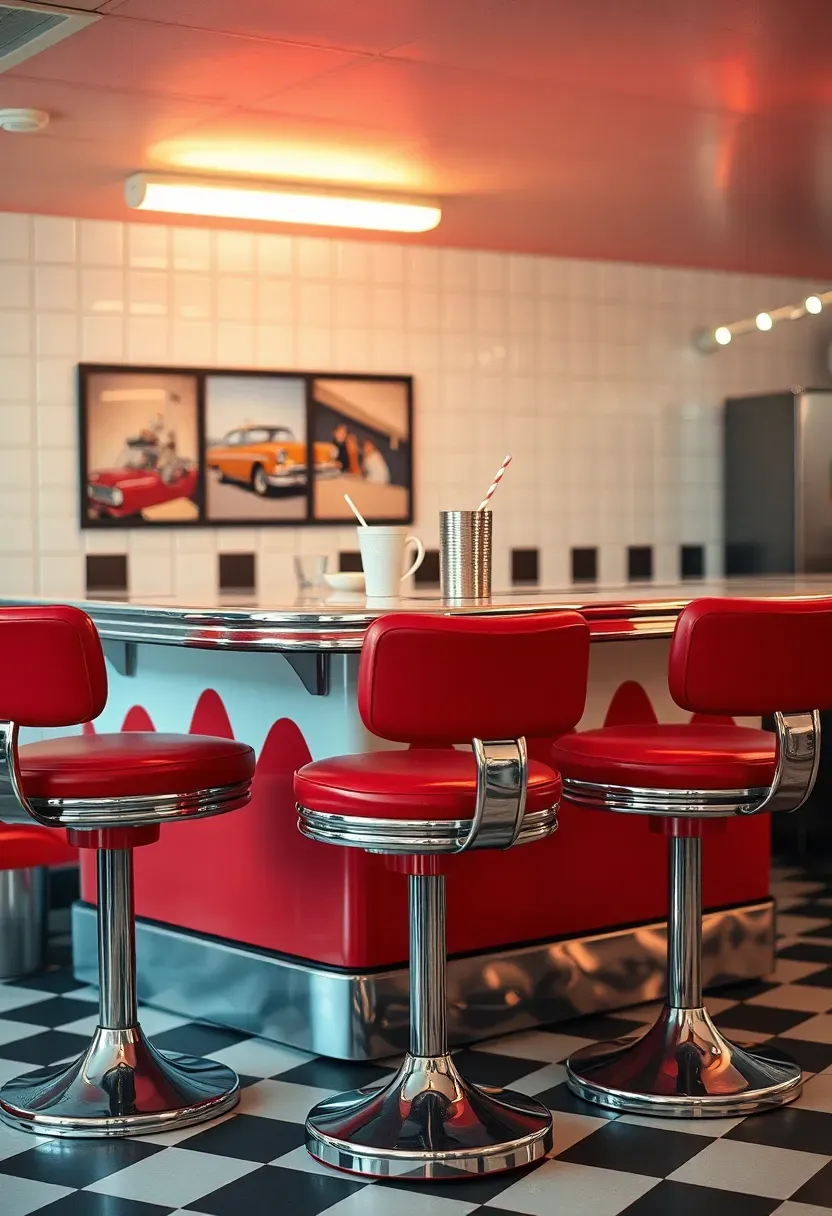
12. Retro Diner Counter
The origin
American diners peaked between 1940 and 1965 with a look defined by stainless steel, Formica laminate, chrome trim, and vinyl upholstery. The counter-service format — sitting on stools facing the person making your drink or food — is exactly what a basement bar replicates.
The modern version
Source Formica or Wilsonart laminate in a boomerang or starburst retro pattern (they still manufacture these). Apply it to a plywood subtop with contact cement. Chrome edge banding ($8 per 8-foot strip from specialty suppliers) finishes the counter edge. Red or turquoise vinyl swivel stools on chrome pedestals run $80 to $150 each from restaurant supply outlets. A black-and-white checkered vinyl tile floor ($1.50 per square foot peel-and-stick) completes the floor without breaking the budget.
Apply at home
- Hang a vintage-style neon sign (LED neon flex tubing is safer and cheaper than gas neon)
- Stock the bar with classic soda fountain supplies alongside spirits for a milkshake-and-cocktail menu
- A chrome paper towel holder and matching napkin dispenser cost under $30 together
Recommended
Items for this idea
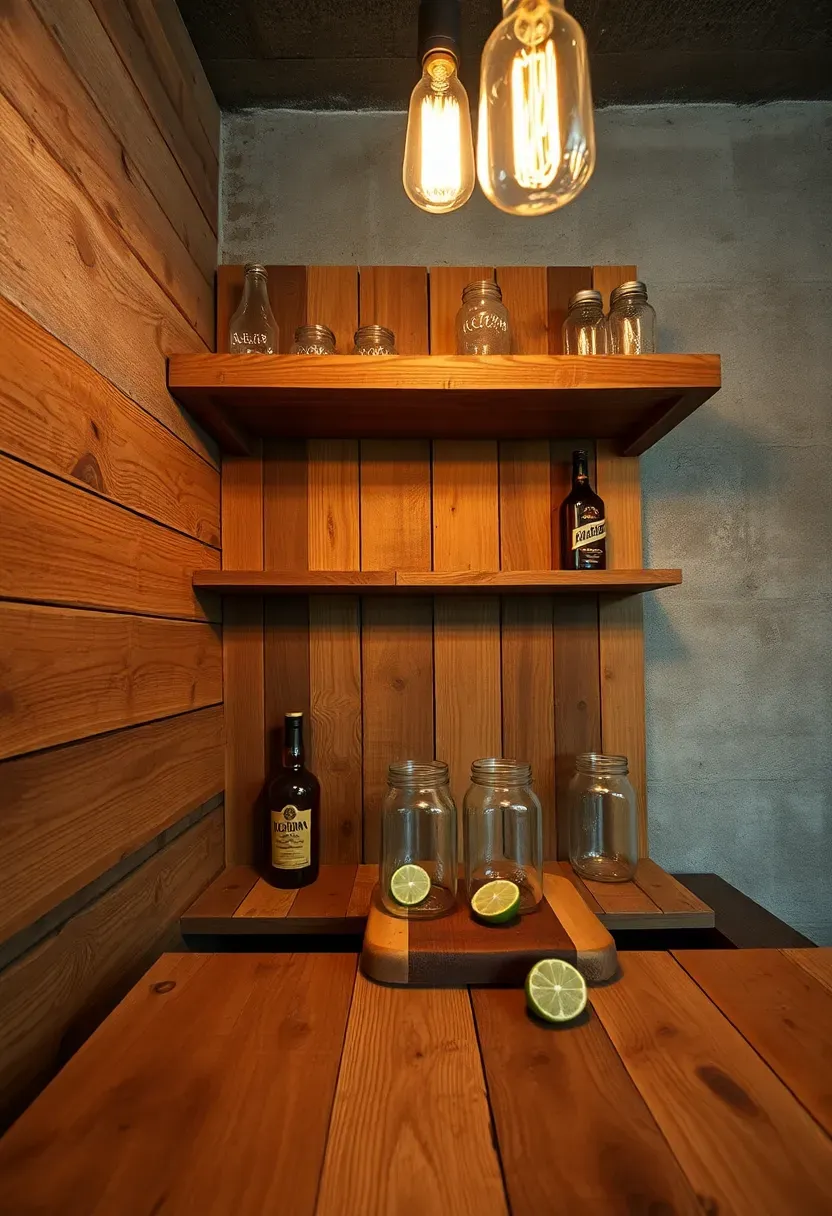
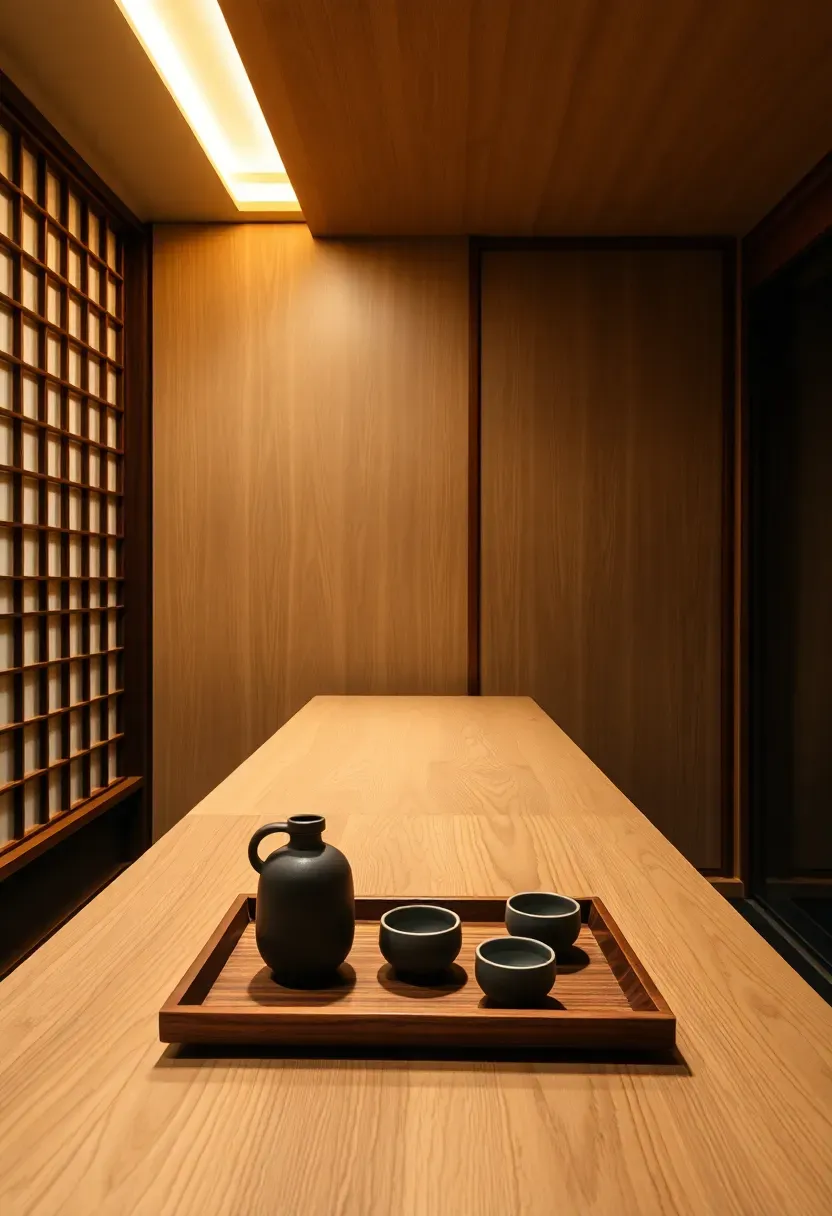
13. Japanese Whisky Bar
Japanese whisky has its own drinking culture — small pours, tall glasses with large ice spheres, minimal garnish. The bar design should match that restraint. A narrow counter in hinoki cypress or white oak (both used in Japanese architecture) seats three to four people shoulder-to-shoulder. Behind the bar, a single shelf holds bottles arranged by distillery. The lighting should come from below the counter overhang and from recessed cove lights, never overhead spots. A shoji screen partition separates the bar from the rest of the basement. Use kumiko (wooden lattice) panels if you want the look without the fragile paper.
Tips
- Stock at least Yamazaki 12, Hakushu, Nikka From the Barrel, and Hibiki Harmony as a starting lineup
- Invest in a clear ice mold ($20 to $40) — presentation matters in this style of bar
- Ceramic cups and a sake set stored on the shelf expand the offerings beyond whisky
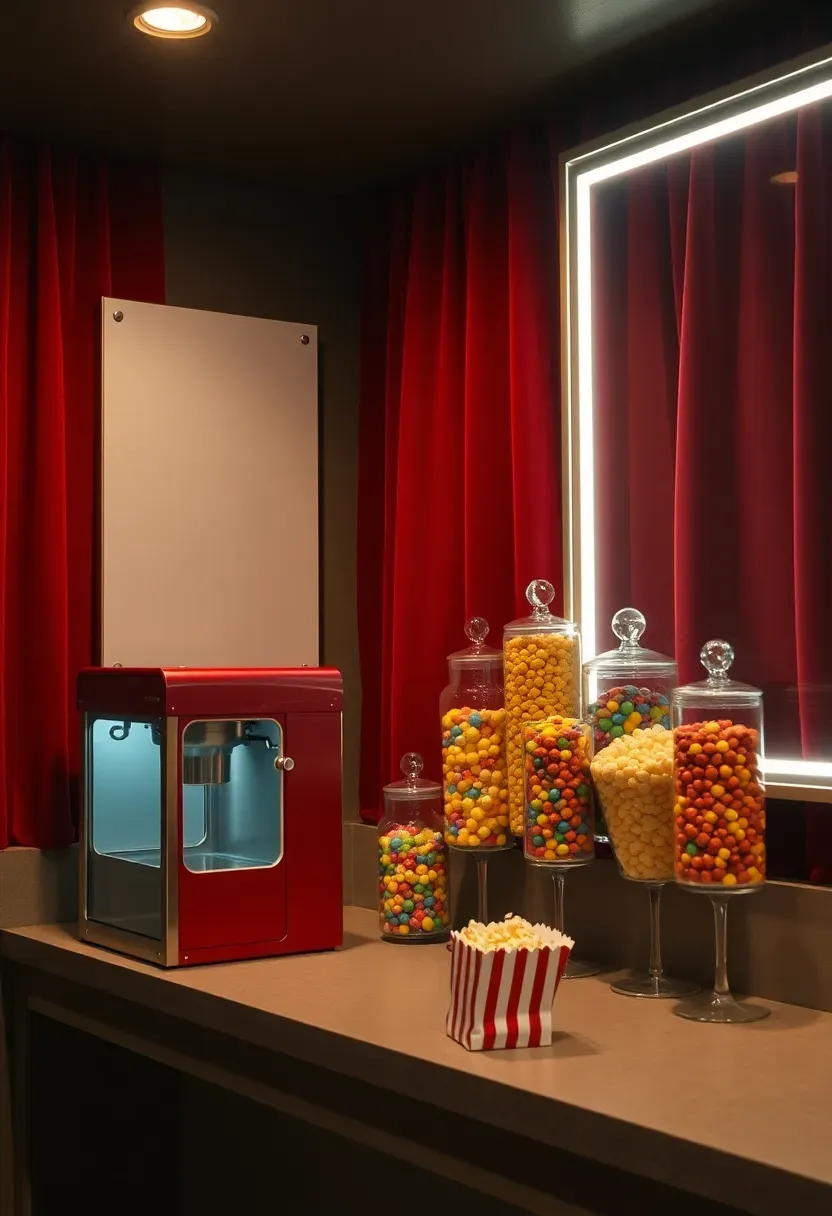
14. Theater Concession Bar
If your basement already has a home theater setup, a concession bar at the back of the viewing area makes the experience feel complete. This is not really about cocktails — it is about popcorn, candy, sodas, and maybe a bottled beer selection. A commercial popcorn machine (Paragon 4-ounce models start at $180) sits on one end of the counter. Glass apothecary jars lined up along the back wall hold candy by type. An LED-backlit menu board above lists the snack options. Red velvet or black curtain panels flanking the bar tie it visually to the theater seating area. The whole setup runs $300 to $600 because you are not building cabinetry — a simple counter on legs with open storage underneath does the job.
Tips
- A mini fridge under the counter keeps drinks cold without guests leaving to go upstairs
- Movie-themed artwork in matching frames along the wall connects the bar to the theater
- Install a dimmer switch so the bar lights drop to near-zero during screenings
Recommended
Items for this idea
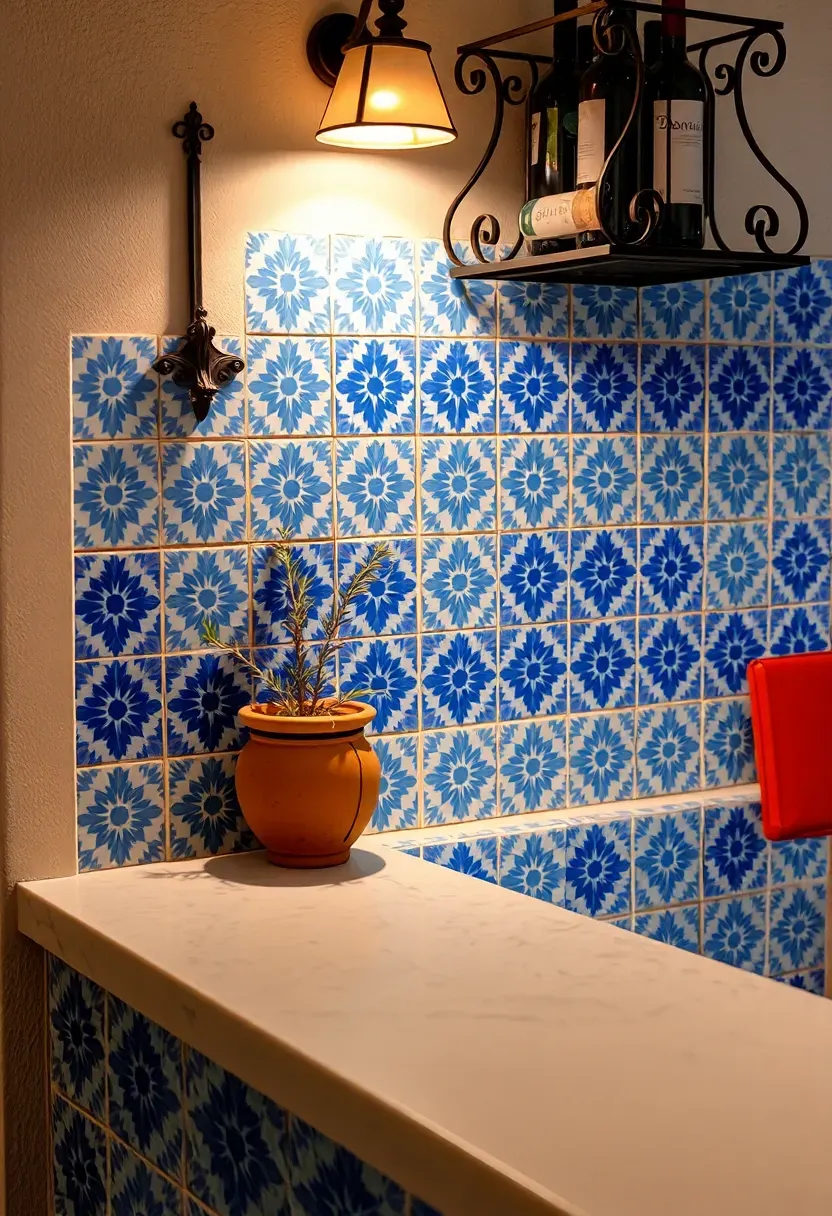
15. Mediterranean Tile Bar
Hand-painted cement tiles on the bar face turn a plain plywood box into something people photograph. Moroccan or Spanish-style cement tiles in blue-and-white patterns run $8 to $15 per square foot from online retailers like Cement Tile Shop or Clé Tile. You need about 12 to 18 square feet for the front of a standard 6-foot bar. Apply them with white thinset over cement backer board screwed to the bar frame. Grout with unsanded grout in a matching or contrasting color. The counter above should be simple — honed white marble or a light-colored quartz — so the tiles remain the focal point. Terracotta pots with herbs along the back shelf add fragrance and a functional garnish source.
Tips
- Seal cement tiles with two coats of penetrating sealer before grouting — they absorb stain like sponges
- Pair with wrought iron elements: a wine rack, wall sconces, or shelf brackets
- Fresh rosemary, mint, and basil in terracotta pots serve double duty as decor and cocktail garnishes
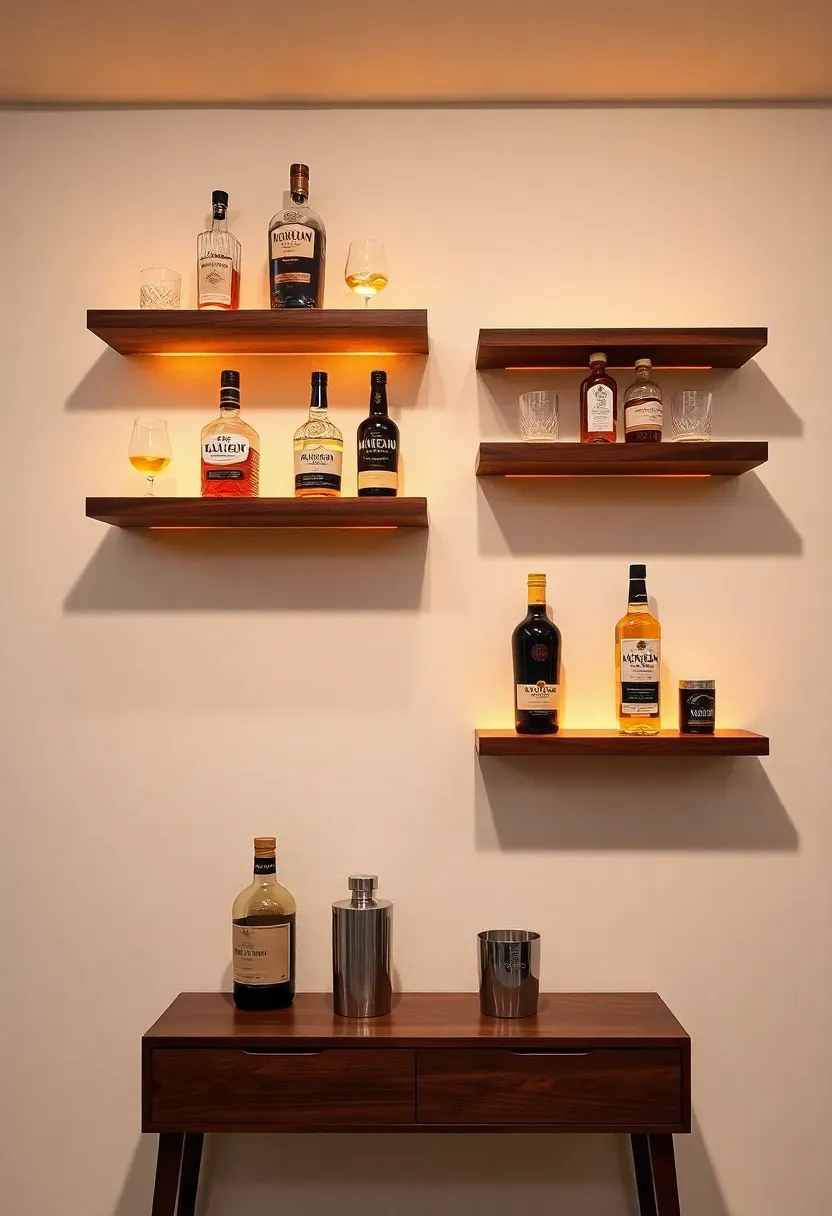
16. Floating Shelf Bar Wall
How to do it
No counter, no cabinetry, no stools. This is the bar for people who want drinks available downstairs without committing floor space to a permanent structure.
Step 1: Mount the shelves
Three to four solid wood floating shelves (2-inch thick, 8-inch deep, 48-inch long) mounted at 12-inch vertical intervals on one wall. Use heavy-duty French cleat brackets rated for 50 pounds per shelf — bottles are heavy.
Step 2: Add lighting
LED strip lights in aluminum channels mounted under each shelf illuminate the bottles from above. Warm white (2700K) highlights amber spirits; cool white (4000K) works better for clear bottles.
Step 3: Position the prep surface
A narrow console table or wall-mounted fold-down shelf below the display provides a mixing surface. When not in use, the fold-down version disappears.
Watch out
Wall studs are mandatory for shelf mounting. If your basement has steel stud framing, use toggle bolts rated for the load.
Recommended
Items for this idea
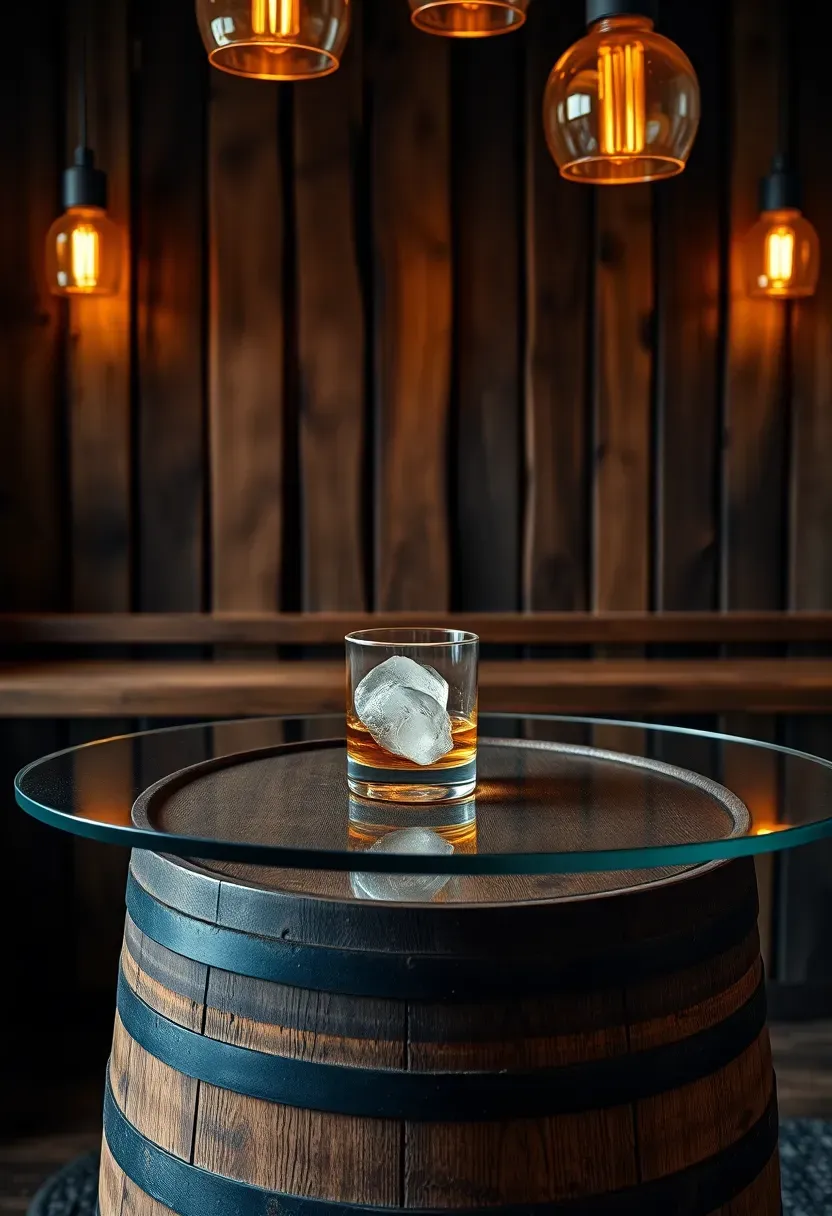
17. Barrel Room Bourbon Bar
Retired bourbon barrels cost $60 to $120 from distilleries and cooperages, and the charred oak interior still smells like vanilla and caramel years after emptying. Cut one in half horizontally and cap it with a round glass or wood top for an instant bar table. Mount barrel staves (the curved side planks) on a feature wall behind the bar for texture and aroma. A straight bar counter built from stave-clad plywood completes the theme. The charred interior of the staves faces outward, showing the dark toasted grain pattern that bourbon aging creates. Five barrels yield enough staves to cover roughly 40 square feet of wall.
Tips
- Source barrels marked as "once-used" from Kentucky distilleries — they ship nationwide for $30 to $60 in freight
- The barrel head (flat round end) makes a distinctive wall clock or menu board
- Pair with leather seating and wrought iron fixtures to stay in the distillery vocabulary
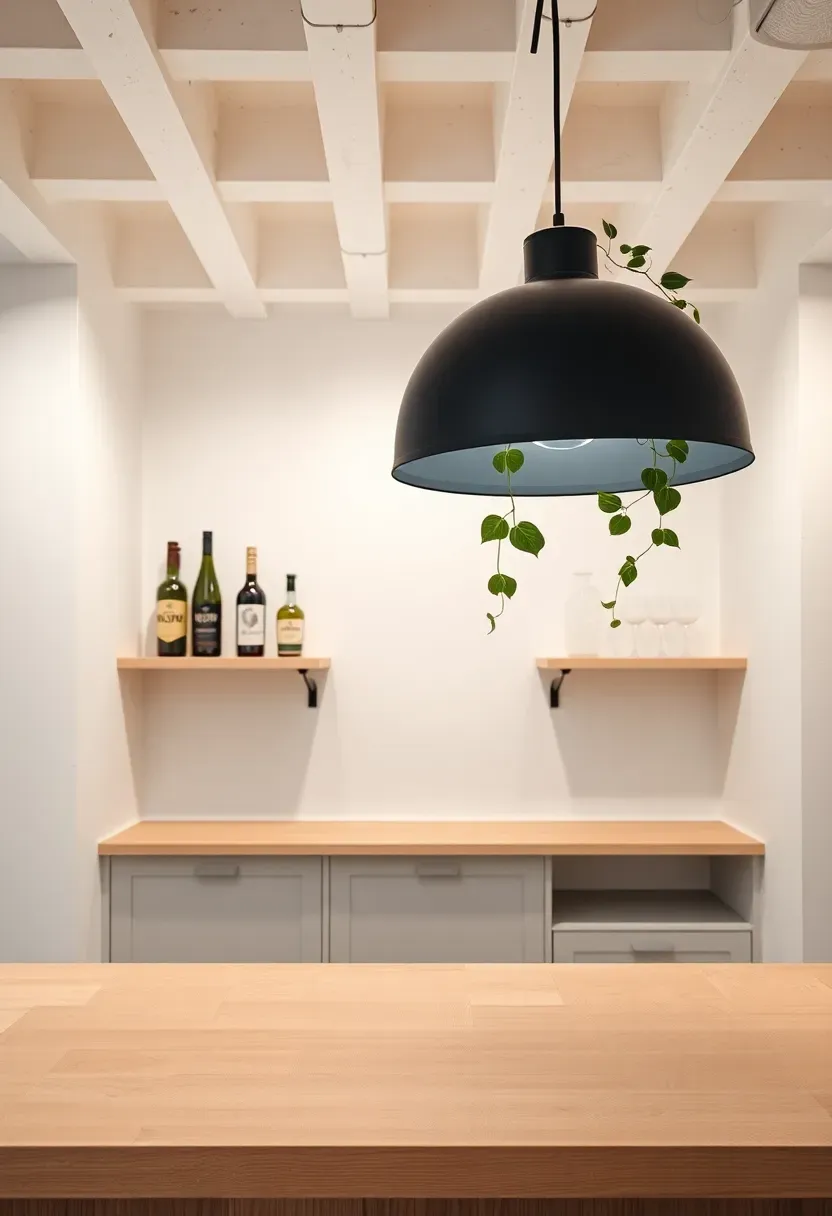
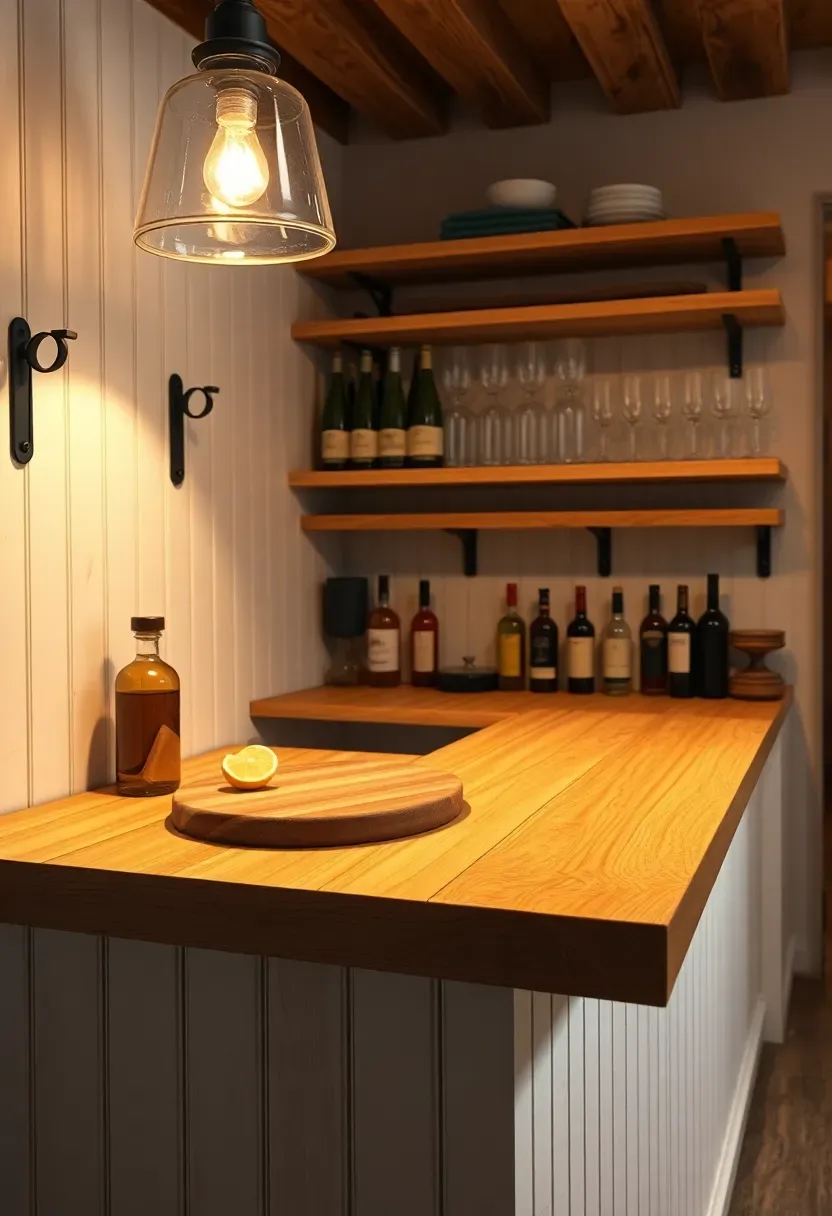
18. Scandinavian Light Bar
Most basement bars go dark. This one goes the opposite direction. Paint every surface white (walls, ceiling, exposed joists) to maximize whatever light you introduce. Use a light ash or birch plywood for the bar counter and shelving. The Scandinavian approach keeps objects to a minimum — six to eight bottles on display rather than a full collection, two or three types of glassware instead of ten. A single oversized matte black pendant light over the bar provides the contrast. The restraint makes the space feel larger than it is, which matters in basements with 7-foot ceilings.
Tips
- White-painted exposed joists cost nothing and make 7-foot ceilings feel taller
- Light-colored LVP flooring (oak-look, around $2 per square foot) brightens the floor without worrying about moisture
- A single trailing plant on the top shelf adds life without cluttering the minimal look
Recommended
Items for this idea
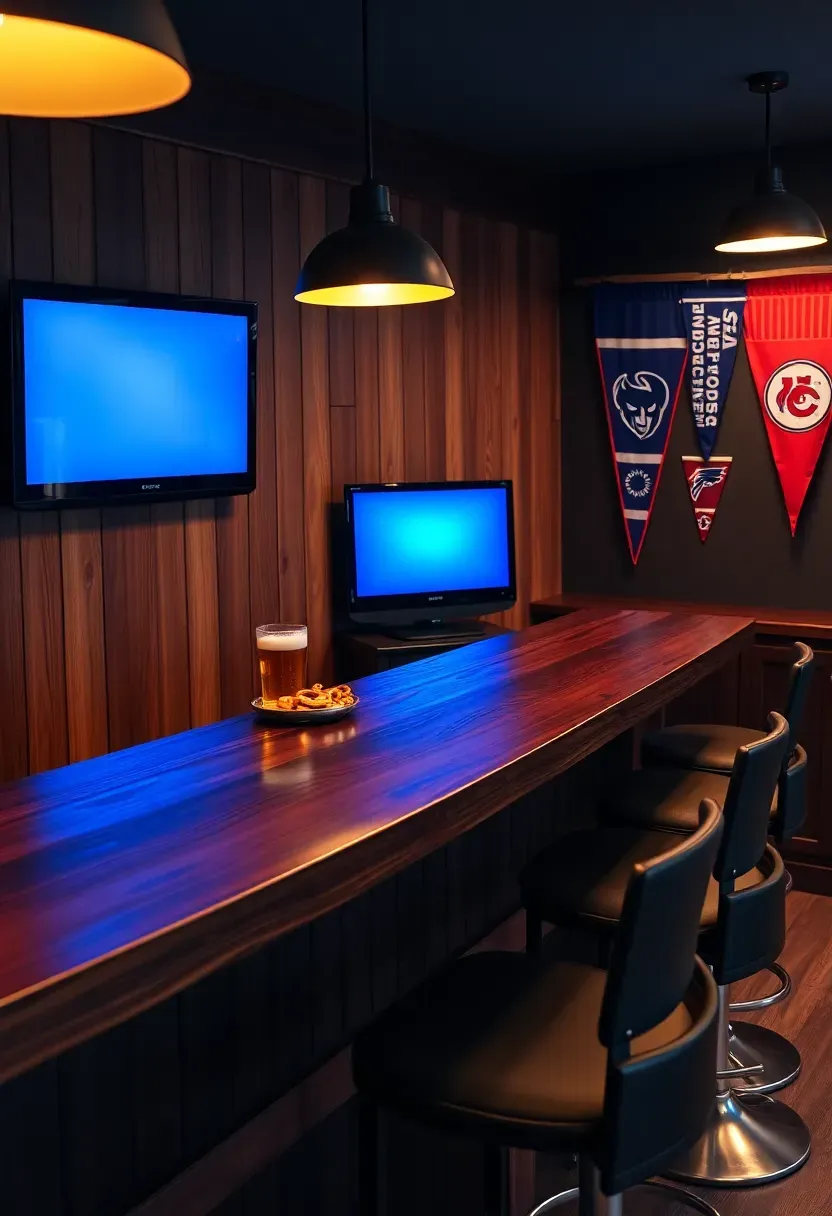
19. Sports Viewing Station
The bar faces the screens, not the bartender. That is the key layout difference between a sports bar and every other style on this list. Build a long pub-height counter (42 inches) along the wall opposite the TV mount, with stools facing the screens. Three 55-inch TVs mounted side by side cover multiple games simultaneously — total hardware cost with budget mounts is about $1,200 to $1,800 for the screens and $60 to $90 for the mounts. Run all cables through the wall via a recessed cable plate ($12 at any hardware store). The serving area sits behind the seated guests against the wall beneath the TVs, just a narrow ledge with a mini fridge.
Tips
- Acoustic foam panels on the side walls reduce echo that makes commentary and crowd noise unbearable in concrete rooms
- A padded vinyl armrest rail along the counter edge costs $4 per linear foot and saves elbows during long games
- Dedicate one TV to a scoreboard or stats feed using a Chromecast or Fire Stick
20. Copper-Top Pub Bar
Why copper
Copper develops a living patina that shifts from bright penny to deep brown to green verdigris depending on what contacts it. Beer, citrus, and water each leave different marks, so a copper bar top records its own history. A 20-gauge copper sheet (0.032 inches thick) from a metals supplier costs about $12 to $18 per square foot.
Installation
Wrap the copper sheet around a plywood subtop using contact cement on the flat surfaces and fold the edges underneath with a rubber mallet and a wood block. Soldering seams is optional for appearance but not structurally necessary if the sheet is wide enough to cover the top in one piece (copper sheets come up to 48 inches wide). Leave the surface unsealed if you want patina, or apply a clear lacquer if you prefer the bright finish.
Recommendation
Leave it unsealed. The patina is the whole point, and it protects the copper better than most coatings after it develops.
Recommended
Items for this idea
21. Murphy Fold-Down Bar
Space-limited basements benefit from furniture that disappears. A Murphy bar is a wall-mounted cabinet that folds down to reveal a counter surface, bottle storage, and glassware rack. When closed, it looks like a flat wall panel or decorative frame. Several companies sell prefab units ($250 to $600) in various finishes, or you can build one from 3/4-inch plywood with a piano hinge and a support chain. The folded-down position should place the work surface at 36 to 38 inches — comfortable standing height for mixing. Storage inside holds four to six bottles upright, a row of stemware inverted on a rack, and a small compartment for bar tools.
Tips
- Mount into wall studs with lag bolts — the loaded weight when open can exceed 40 pounds
- A magnetic latch keeps the unit closed firmly and prevents accidental opening
- Add a small LED puck light inside the cabinet so the contents are visible when you fold it down
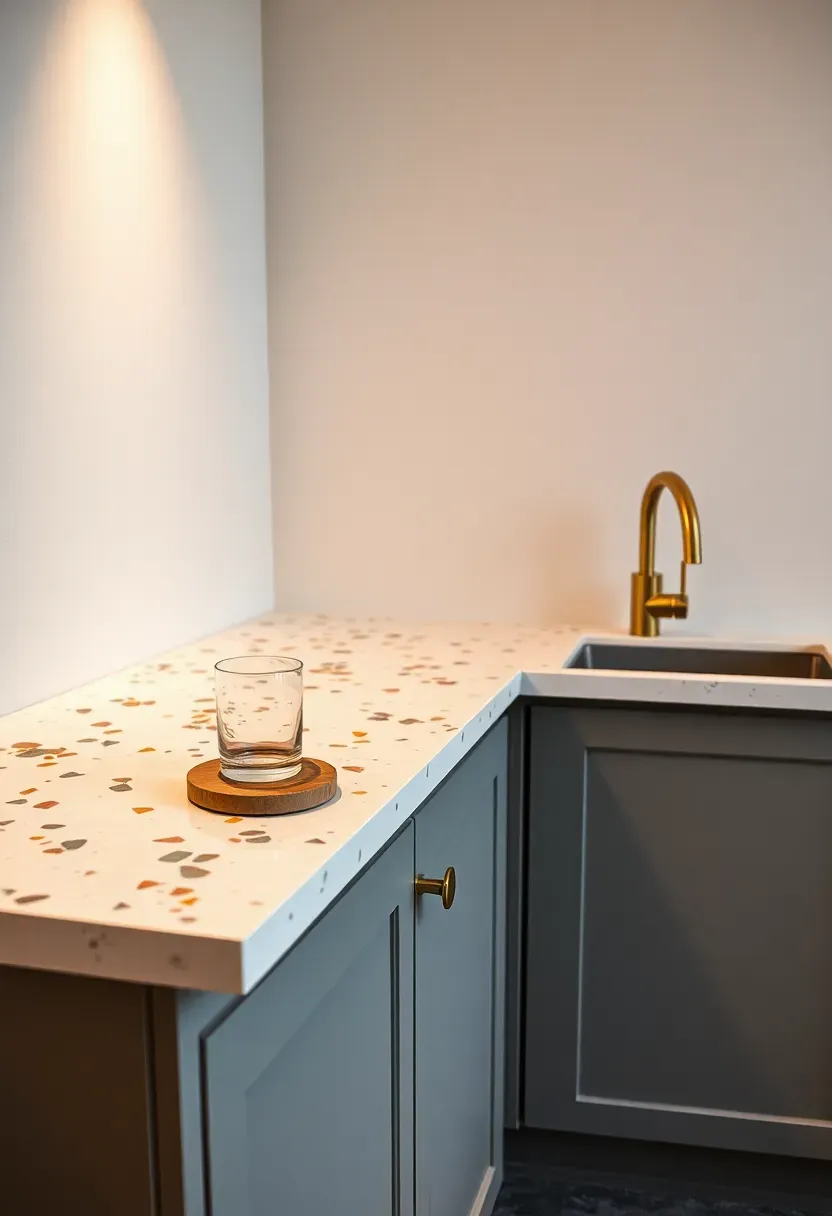
22. Terrazzo Surface Bar
Terrazzo is having a second life after decades of being associated with hospital floors. The material — marble, quartz, or glass chips suspended in a cement or resin binder — works as a bar counter because it is seamless, non-porous (when resin-based), and available in patterns no natural stone can match. Precast terrazzo slabs from companies like Diespeker or Concrete Collaborative start at $80 per square foot. For a budget alternative, pour your own using white Portland cement mixed with colored glass aggregate. The DIY route runs about $15 per square foot in materials but requires grinding and polishing equipment (rental cost about $80 per day).
Tips
- Choose aggregate chips in 2 to 3 colors maximum — too many colors looks chaotic at bar scale
- Resin-based terrazzo is non-porous and needs no sealing; cement-based versions need annual sealing
- Pair terrazzo with simple flat-panel cabinets so the counter remains the visual focus
Recommended
Items for this idea
23. Under-Stair Mini Bar
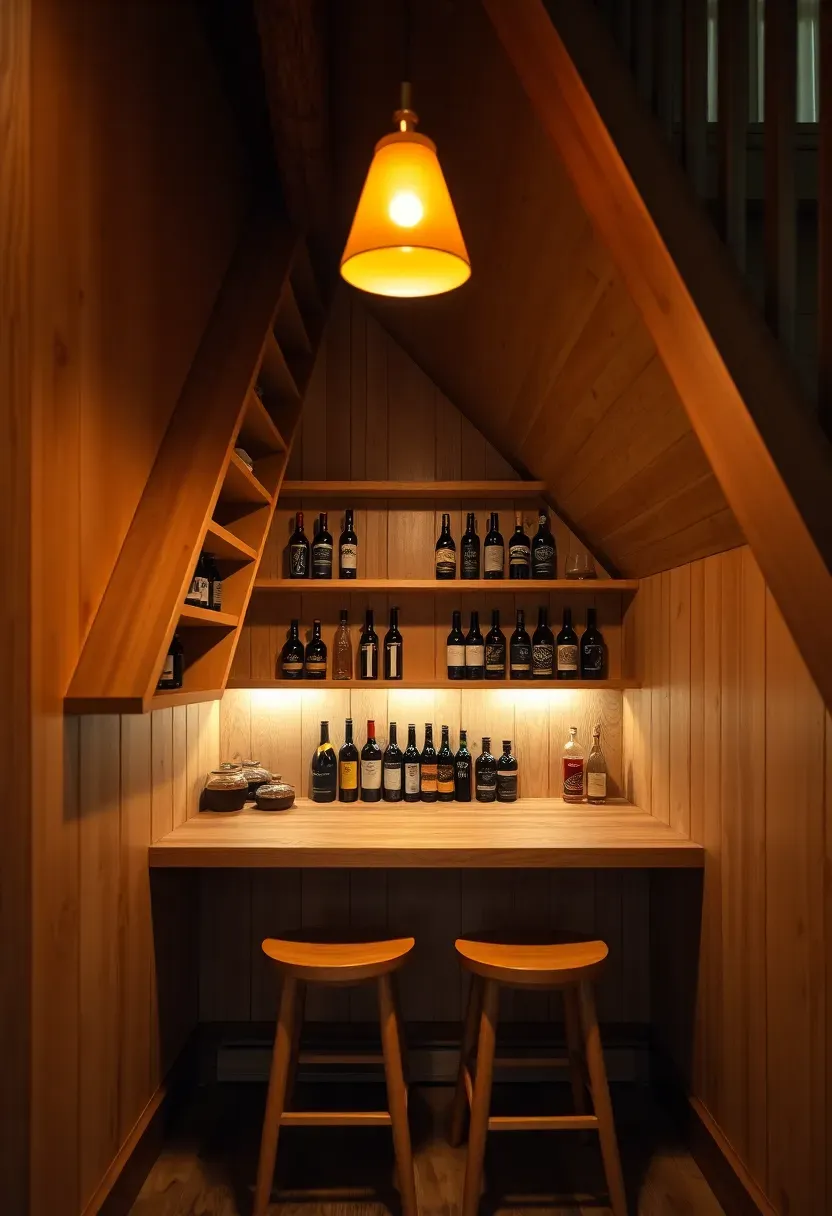
The problem
The triangular void under basement stairs wastes 25 to 40 square feet in most homes. Standard furniture does not fit the angled ceiling.
The solution
Build custom shelving that follows the stair angle from floor to the highest point. The tall end (nearest the top of the stairs) fits a standing-height counter with a mini fridge underneath. The middle section holds bottles on angled shelves. The lowest section near the floor becomes pull-out drawer storage for supplies and glassware. Frame with 2x4s, face with painted plywood, and add a single pendant light at the counter. Total cost under $400 in materials for a complete built-in bar that uses space nobody was using anyway.
Pros and Cons
- Pros: Zero floor space taken from the main basement area, surprisingly functional once built
- Cons: Headroom is limited at the short end, everything must be custom-cut to fit the angle
24. Tropical Rum Bar
The origin
Tiki and tropical bar culture started with Don the Beachcomber in 1933 Los Angeles, blending Cantonese cooking with Polynesian-inspired decor and elaborate rum cocktails. The original drinks were complex — multiple rum types, fresh citrus, house-made syrups — and the decor was maximalist on purpose.
The modern version
Bamboo reed paneling covers walls fast at $18 to $28 per 4x8 sheet. Synthetic thatch tiles for the bar overhang mount on a simple 2x4 frame and resist basement humidity better than real palm. Paint the ceiling dark blue and hang warm string lights to simulate outdoor night. Stock three rum varieties minimum: a white, an aged Jamaican, and a dark Demerara. Add orgeat, falernum, passion fruit, and lime for classic tiki cocktails.
Apply at home
- Tiki mugs from thrift stores run $3 to $8 each and add instant personality
- A small tabletop water feature ($20 to $40) adds ambient sound
- Grow a pothos or philodendron on the top shelf — they thrive in low-light basements
Recommended
Items for this idea
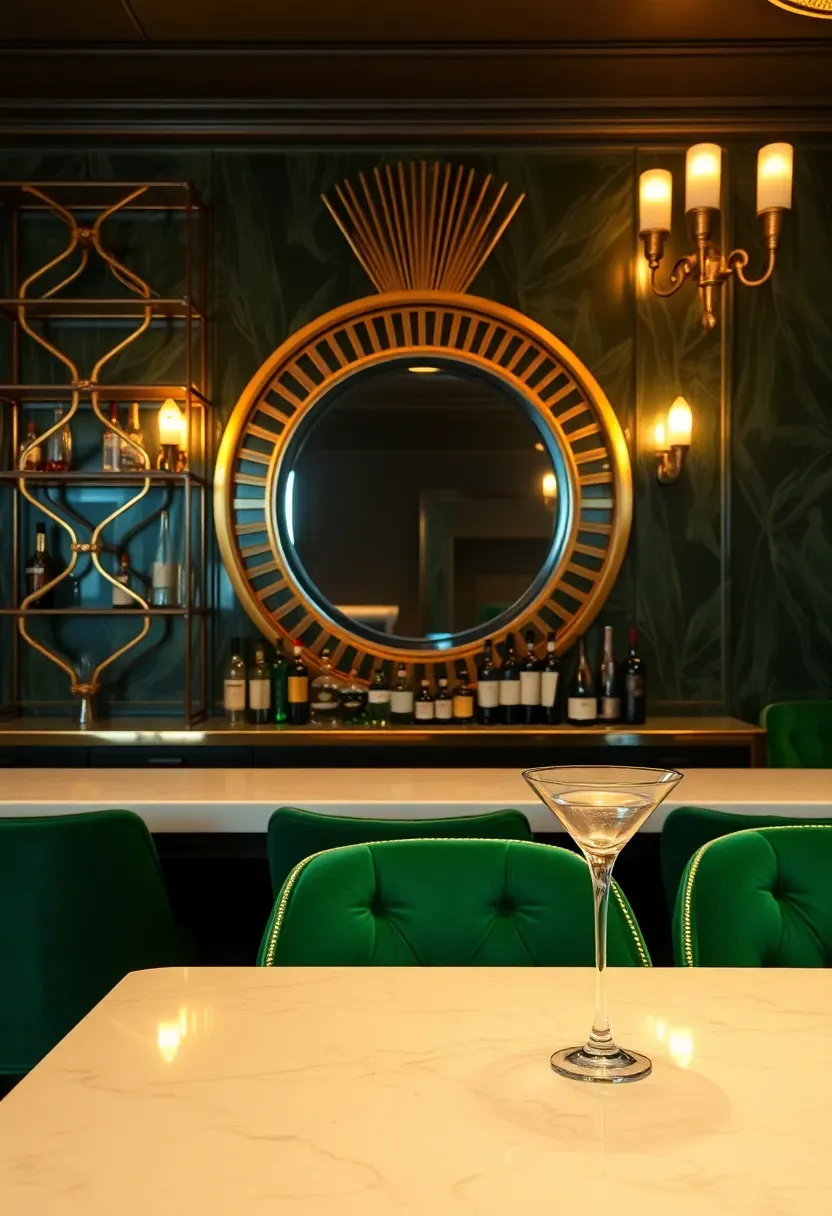
25. Art Deco Cocktail Lounge
Art Deco works underground because the style was originally designed for enclosed spaces — hotel lobbies, ocean liner lounges, movie palaces. The vocabulary includes geometric patterns (chevrons, sunbursts, stepped forms), materials like brass, marble, and lacquered wood, and a color palette of emerald green, deep navy, and gold. For the bar, a waterfall-edge marble or quartz counter with brass inlay strips makes the statement. Geometric brass shelving behind the bar holds bottles and glassware. Emerald velvet upholstery on bar stools or a banquette along the side wall adds color and acoustic dampening. A large round mirror with a brass sunburst frame on the back wall doubles as both decor and a practical way to make the basement feel larger.
Tips
- Source brass shelf brackets from commercial display suppliers rather than residential hardware stores for authentic proportions
- Emerald green paint on one accent wall (Benjamin Moore Hunter Green or similar) anchors the palette
- Fan-shaped wall sconces ($40 to $80 each) provide the signature Deco lighting pattern

26. Budget IKEA Cabinet Bar
IKEA Kallax shelving units ($70 for a 2x4 configuration) make a surprisingly solid bar base. Place two Kallax units side by side, secure them to each other and to the wall, and top with a Karlby walnut veneer countertop ($189 for 74 inches). The cubby openings hold bottles horizontally, store glassware in bins, and fit small appliances like a cocktail shaker station. Total cost including two Kallax units, one Karlby countertop, and four Capita legs for height adjustment: roughly $400 before tax. The whole thing assembles in two hours and disassembles just as fast if you move. It is not heirloom furniture, but for a first basement bar or a rental, it works better than most custom builds at four times the price.
Tips
- Add Kallax inserts (drawers, baskets) to organize small items like bottle openers, napkins, and straws
- Secure the Kallax to the wall with L-brackets — it becomes top-heavy with a full bottle load
- A coat of peel-and-stick vinyl wrap on the Kallax exterior changes the look from obvious IKEA to custom-built
Recommended
Items for this idea
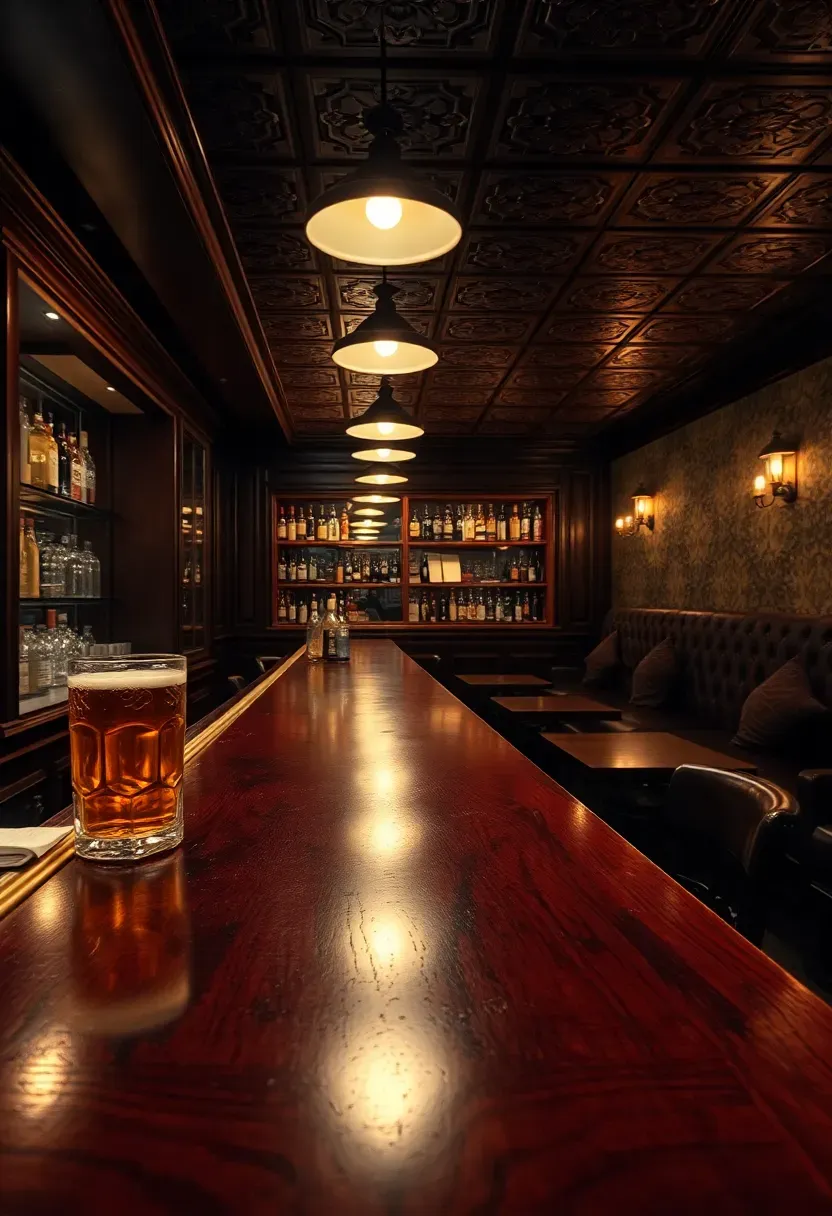
27. Full-Scale Tavern Build
This is the no-compromise version. A proper tavern-style bar runs 10 to 16 feet long with an 18-inch overhang, a brass foot rail at 6 inches off the floor, a back bar with mirrored shelving, and seating for 8 to 12 on stools with another 8 to 10 in booths along the opposite wall. You are looking at $8,000 to $25,000 depending on whether you hire a contractor or do portions yourself. The bar top should be a hardwood like mahogany, cherry, or white oak finished with a commercial bar-top epoxy (20 to 30 coats of arm-r-seal or a single pour of two-part epoxy). Tin ceiling tiles ($10 per 2x2 panel) on the ceiling above the bar area define the zone without a full ceiling treatment. The foot rail can be solid brass ($30 to $50 per linear foot) or a chrome alternative at half the cost.
Tips
- Hire the plumber and electrician; do the cosmetic work yourself to cut the budget by 30 to 40 percent
- A commercial ice bin under the bar ($150 to $300) holds more ice than any residential solution
- Booth seating with 42-inch tall backs creates acoustic separation and makes the space feel bigger than one open room
Quick FAQ
How much does a basic basement bar cost to build? A dry bar (no plumbing) using stock materials runs $300 to $1,200 for a DIY build. Adding a wet bar with sink and plumbing pushes the range to $2,000 to $5,000. Full custom builds with professional installation start around $8,000 and can exceed $25,000 with premium materials and commercial equipment.
Do I need a permit for a basement bar? Permits depend on your municipality and what work you are doing. Electrical and plumbing changes almost always require permits. Cosmetic work — building a counter, mounting shelves, painting — typically does not. Check with your local building department before running new circuits or drain lines.
What is the best countertop material for a basement bar? Granite remnants offer the best value for durability and appearance. Butcher block works for farmhouse or rustic styles and is easy to repair. Quartz resists stains without sealing. Concrete gives an industrial look at low material cost but requires more labor. Avoid marble for heavy-use bars — it etches from acidic drinks.
Can I install a bar in a basement with low ceilings? Yes, but adjust your design. Keep pendant lights on short drops or use recessed cans. Use 36-inch counter height instead of 42-inch bar height to leave more visual space above. Light colors and an open ceiling (painted exposed joists) make 7-foot ceilings feel taller.
Is a dry bar or wet bar better for a basement? A dry bar (no sink or plumbing) works for casual drink mixing and costs significantly less. A wet bar with a sink is better if you entertain frequently, make cocktails that need rinsing, or want to avoid carrying dirty glasses upstairs. If your basement already has a bathroom rough-in, the wet bar plumbing addition may only cost $500 to $1,000 extra.
A basement bar does not need to be complicated or expensive to improve how you use the lower level of your house. Start with the simplest version that matches how you actually entertain — even a shelf wall or cart setup works if you use it — and upgrade from there as you figure out what you actually need. The builds that get used the most are not always the fanciest. They are the ones placed where people naturally gather, stocked with what guests actually drink, and lit well enough to feel intentional.
Pinterest cover for 27 Basement Bar Designs That Work
About the author
OBCD
CGI visualization and interior design content. We create detailed 3D renders and curate practical design ideas for every room in your home.