25 Basement TV Wall Ideas
The TV wall in a basement gets different treatment than one upstairs. You are working with limited natural light, lower ceilings in many cases, and walls that may have been bare concrete six months ago. That combination actually works in your favor — dark rooms make screens look better, concrete backing supports heavy mounts without stud-finding drama, and the isolation from the rest of the house means you can go bold with materials and lighting without worrying about how it ties into your upstairs decor. I have built out three basement media walls over the years, and each time I learned something about what works below grade versus what just looks good in a magazine photo.
Here are 25 basement TV wall ideas covering accent materials, built-in cabinetry, lighting setups, and layout strategies for every budget.
Table of Contents
- Dark Wood Slat Panel Wall
- Floor-to-Ceiling Stone Veneer
- Recessed TV Niche with LED Backlight
- Floating Media Console with Cable Chase
- Black Accent Wall with Matte Paint
- Built-In Bookshelf Surround
- Concrete Block Feature Wall
- Shiplap Panel Behind the Screen
- Fireplace and TV Combo Stack
- Fabric-Wrapped Acoustic Panel Wall
- Brick Veneer with Industrial Brackets
- Minimalist White Wall with Hidden Wiring
- Large-Format Porcelain Tile Wall
- Rustic Barn Wood Accent
- Backlit Marble Slab Feature
- Pegboard Media Wall for Flexible Storage
- Geometric 3D Wall Panels
- Curtain Wall Behind the TV
- Gallery Wall Flanking the Screen
- Full Built-In Entertainment Center
- Moody Limewash Paint Finish
- Corrugated Metal Accent Panel
- Projector Wall with Ambient Reject Screen
- Corner TV Wall for Awkward Layouts
- Multi-Screen Sports Wall
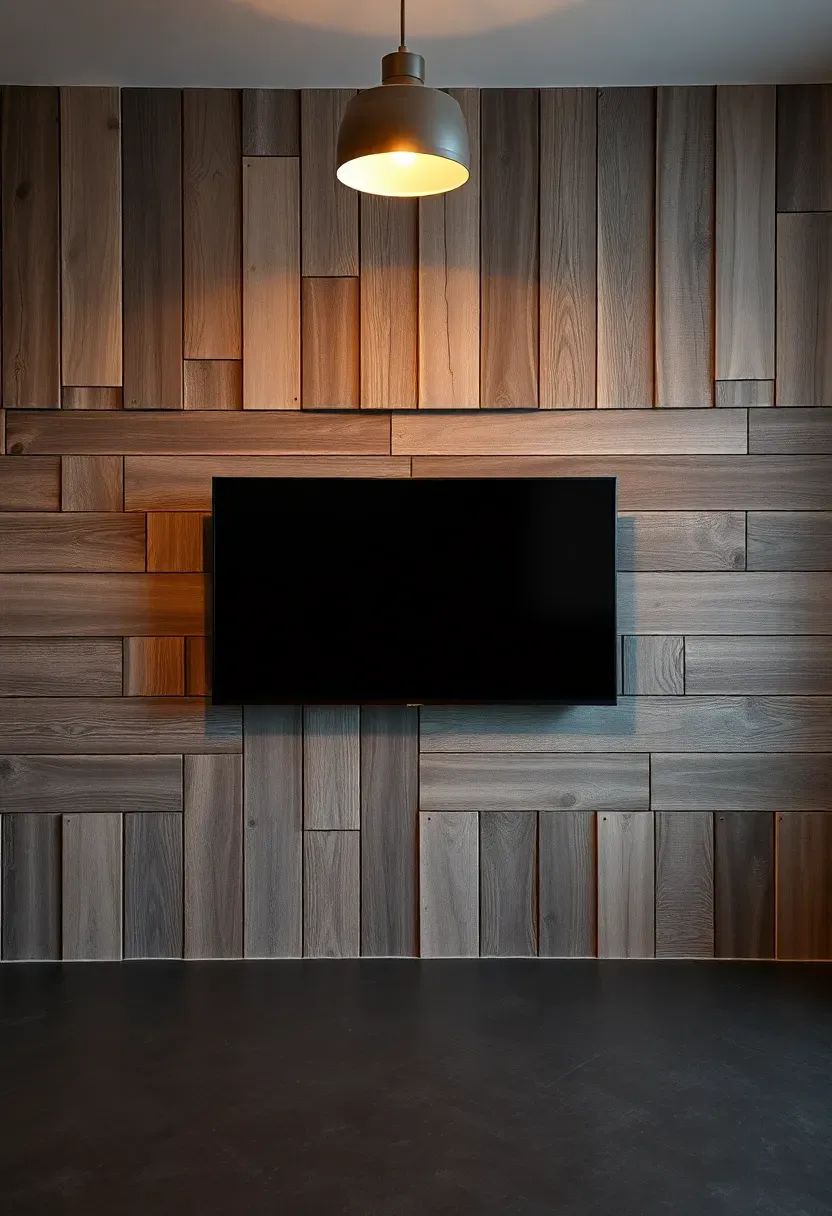
1. Dark Wood Slat Panel Wall
Vertical wood slats behind a TV add depth without making the wall feel heavy. In a basement where ceilings run 7 to 8 feet, vertical lines draw the eye upward and make the room feel taller than it actually is. Walnut-toned MDF slats on a black-painted backer board are the most common approach — the dark gaps between slats create shadow lines that look expensive but cost around $8 to $14 per square foot for materials. Mount the TV directly through the slats into the wall behind.
Tips
- Space slats 1.5 inches apart for visible shadow lines without looking gappy
- Paint the backer board the same shade as the slat edges so gaps disappear cleanly
- Run a horizontal LED strip along the top and bottom for a glow effect at night
We picked a few things that go well with this idea: Art3d Acoustic Wood Slat Panels (6-Pack) (★4.6), Art3d Deep Walnut Slat Panels (6-Pack) (★4.6) and TONOR Walnut Acoustic Slat Panels (4-Pack) (★4.5). As an Amazon Associate we earn from qualifying purchases.
2. Floor-to-Ceiling Stone Veneer
Why it works in basements
Stone veneer handles moisture better than drywall, which matters in below-grade spaces where humidity creeps up during summer months. Manufactured stone panels weigh about 8 to 12 pounds per square foot compared to 25-plus for real stone, so you can install them on standard framing without structural reinforcement. The texture absorbs some sound reflection too, which helps in rooms with hard floors.
How to install it
- Attach cement board over your studs as the base layer — never glue veneer directly to drywall
- Apply thinset mortar and press panels starting from the bottom row upward
- Leave a 1-inch gap behind the TV mount bracket for airflow
Watch out for
- Dark stone in a dark basement can feel cave-like — pair it with lighter flooring or a light-colored ceiling
- Some veneers off-gas adhesive smell for a few weeks, so ventilate during and after install

We picked a few things that go well with this idea: Suptek Glass 2-Tier TV Wall Shelf (★4.6), 70.7" Walnut Floating TV Console with Fluted Doors (★4.5) and DlandHome Floating TV Stand with LED Light (★4.3). As an Amazon Associate we earn from qualifying purchases.
3. Recessed TV Niche with LED Backlight
Building the TV into a recessed niche makes the screen sit flush with the wall surface. Frame out a box between studs that is 2 to 4 inches deeper than your TV, run power and HDMI behind the wall, and mount the TV on a bracket inside the niche. Add an LED strip around the inner perimeter set to a warm 2700K color temperature. The backlight reduces eye strain during long viewing sessions and makes the screen appear to float. This works especially well in basements because you control all the light — no competing sunlight to wash out the glow effect.
Tips
- Size the niche 4 inches wider and 3 inches taller than the TV for a balanced frame
- Use a recessed outlet kit so the power plug sits flat inside the niche
- Avoid cool-white LEDs — they cast a clinical tone that clashes with most basement color schemes
We picked a few things that go well with this idea: Govee RGBIC Smart TV LED Backlight (★4.5), HAMLITE 18ft White TV Bias Lighting (★4.0) and RGB TV LED Backlight Strip (16.4ft) (★4.4). As an Amazon Associate we earn from qualifying purchases.
4. Floating Media Console with Cable Chase
A floating console keeps the floor visible underneath, which makes tight basement rooms feel less cramped. Mount a 60 to 72-inch walnut or oak console at about 20 inches off the ground using a French cleat bolted into studs. Behind it, run a vertical cable chase — a 3-inch PVC pipe or commercial cable raceway — from the console up to the TV mount. All your HDMI cables, power strips, and streaming device wires disappear inside. The result is a wall that looks like a magazine photo but actually functions for a real entertainment setup with multiple devices.
Tips
- Use a French cleat rated for at least 150 pounds to account for gear weight
- Install a small USB fan inside the console if you are hiding a game console or receiver in there
- A single floating shelf 12 inches above the console adds display space for speakers or decor
Recommended
Items for this idea
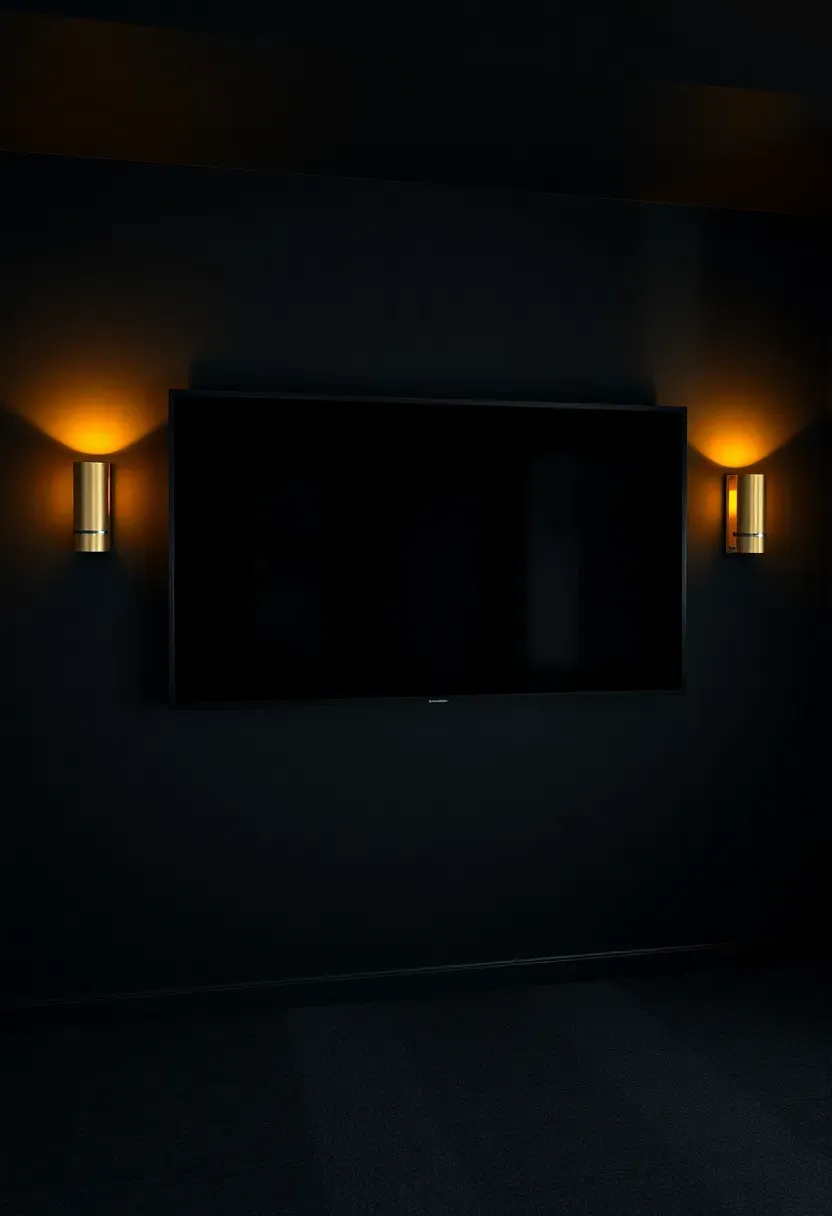
5. Black Accent Wall with Matte Paint
The case for going dark
Painting a basement TV wall black sounds aggressive, but it solves a real problem. When a screen turns off, a bright wall behind it makes the black rectangle look like a dead spot. A dark wall absorbs that contrast, and when the TV is on, colors look more vivid because there is no competing light bouncing off a pale surface next to the image. Use a true matte finish — no sheen — so the wall does not reflect the screen back at you from viewing angles.
Choosing the right black
- Pure black (like Benjamin Moore Black 2132-10) can feel flat in person — consider a very dark charcoal instead
- Matte finishes show scuffs easily, so use a washable matte formula
- Pair with warm-toned sconces or LED strips so the wall does not disappear entirely
Choose this if
You want the simplest possible upgrade. One gallon of paint, a roller, and a Saturday morning.
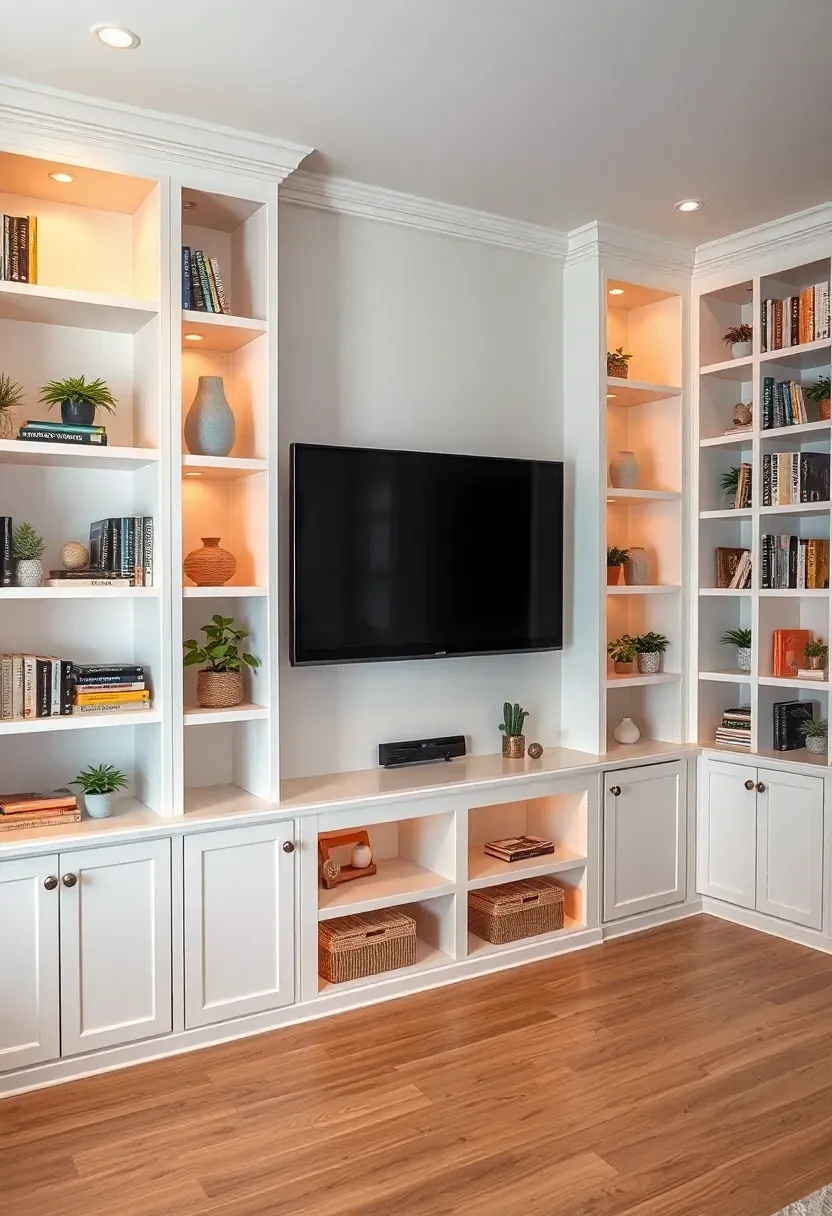
6. Built-In Bookshelf Surround
Framing the TV with built-in shelving turns a plain wall into the focal point of the room. Build two floor-to-ceiling shelf units flanking the screen with a bridging shelf or cabinet above. The TV mounts on the center section between the two bookcases. This approach hides all your equipment — receivers, game consoles, cable boxes — behind lower cabinet doors while the upper open shelves hold books, plants, and objects that give the room personality. In a basement, built-ins also double as sound dampening because filled bookshelves absorb mid-range frequencies that bounce off bare walls.
Tips
- Use 3/4-inch plywood for shelves, not particleboard — basements have humidity swings that warp cheap materials
- Stagger shelf heights so the arrangement looks curated rather than like a library stack
- Add puck lights inside the shelves to create warm pools of light on each side of the screen
Recommended
Items for this idea
7. Concrete Block Feature Wall
If your basement has exposed concrete block walls, skip the drywall on one section and lean into it. Clean the blocks, seal them with a clear concrete sealer, and mount your TV directly using concrete anchors rated for the weight. The raw industrial look works particularly well with dark leather furniture, metal coffee tables, and exposed conduit for wiring. This is the least expensive option on this list because you are decorating with what is already there. A coat of clear sealer runs about $30 for a gallon that covers 200 square feet.
Tips
- Use a hammer drill and sleeve anchors — Tapcon screws alone may not hold a 50-pound TV over time
- Seal the blocks to prevent dust from migrating off the surface into the room
- Add one or two warm wall-wash lights pointing up from the floor to bring out the block texture

8. Shiplap Panel Behind the Screen
Shiplap gives horizontal texture that widens the visual feel of a basement wall. Install tongue-and-groove pine boards horizontally across the TV wall, paint them white or a soft gray, and mount the TV in the center. The horizontal lines trick the eye into reading the wall as wider than it is, which helps in narrow basement rooms. Use a brad nailer to attach boards to furring strips — the air gap behind the shiplap also acts as a minor thermal buffer against the concrete.
Tips
- Prime and paint boards before installation — it is much easier than cutting in around 40 seams after they are up
- Leave a 1/8-inch expansion gap at each end to account for seasonal wood movement
- Run cables through the gap between the shiplap and the wall behind it
Recommended
Items for this idea
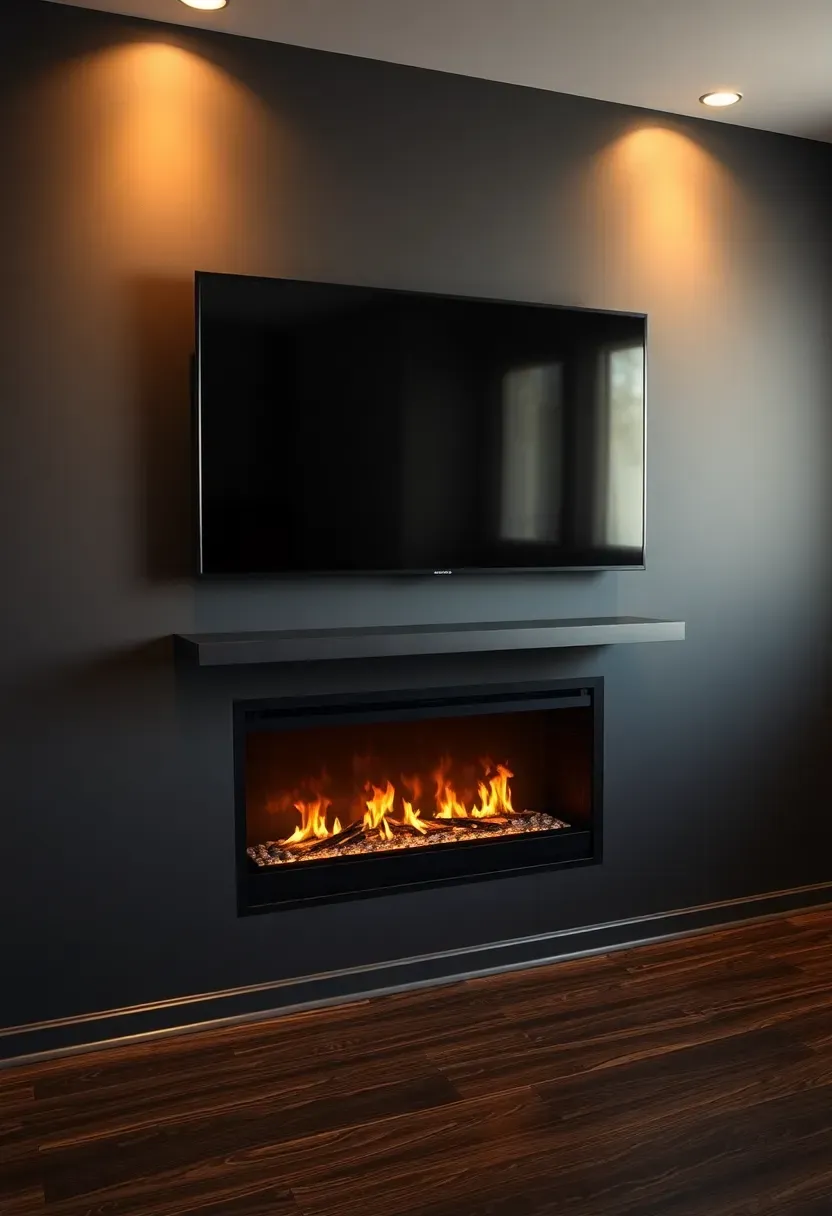
9. Fireplace and TV Combo Stack
The layout
Mount the TV above an electric fireplace insert for a two-in-one focal point. Linear electric fireplaces (the kind that are wide and shallow, about 5 to 6 inches deep) fit into a framed box on the lower portion of the wall while the TV sits 12 to 18 inches above the fireplace opening. Build a surround using cement board faced with tile, stone, or painted MDF. The heat from electric units vents forward, not upward, so the TV stays safe.
Important considerations
- Never mount a TV above a real wood-burning or gas fireplace in a basement — heat rises directly into the screen
- Keep at least 12 inches between the top of the fireplace opening and the bottom of the TV
- An integrated mantel shelf between them provides a natural visual break and a place for remotes
Choose this if
You want the basement to feel like a living room rather than a man cave. The fireplace adds warmth — literally and visually — to a space that can otherwise feel cold and utilitarian.
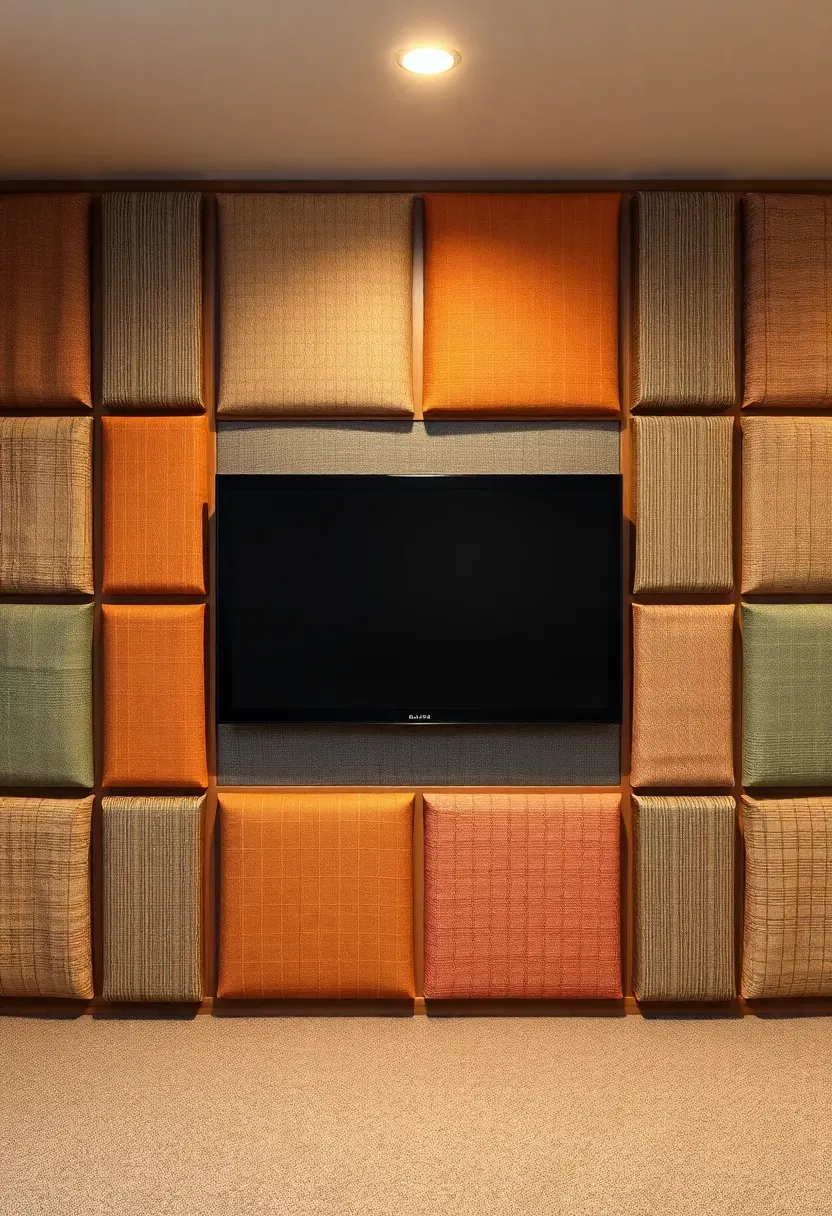
10. Fabric-Wrapped Acoustic Panel Wall
Acoustic panels do double duty: they kill echo (basements are notorious for it with all those hard surfaces) and they add color and texture to the TV wall. Build 2-inch-thick frames from 1x3 lumber, fill with rigid fiberglass insulation, and wrap in your choice of fabric. Mount them in a grid pattern around the TV, leaving the center open for the screen. A typical 24x48 inch panel costs about $25 in materials. Cover the entire wall or just the areas flanking the TV — even partial coverage makes a noticeable difference in dialogue clarity.
Tips
- Use acoustically transparent fabric (like burlap or speaker cloth) so sound passes through to the insulation
- Vary panel colors slightly for a patchwork effect, or keep them uniform for a clean studio look
- Mount panels with Z-clips so they are removable when you need wall access
Recommended
Items for this idea
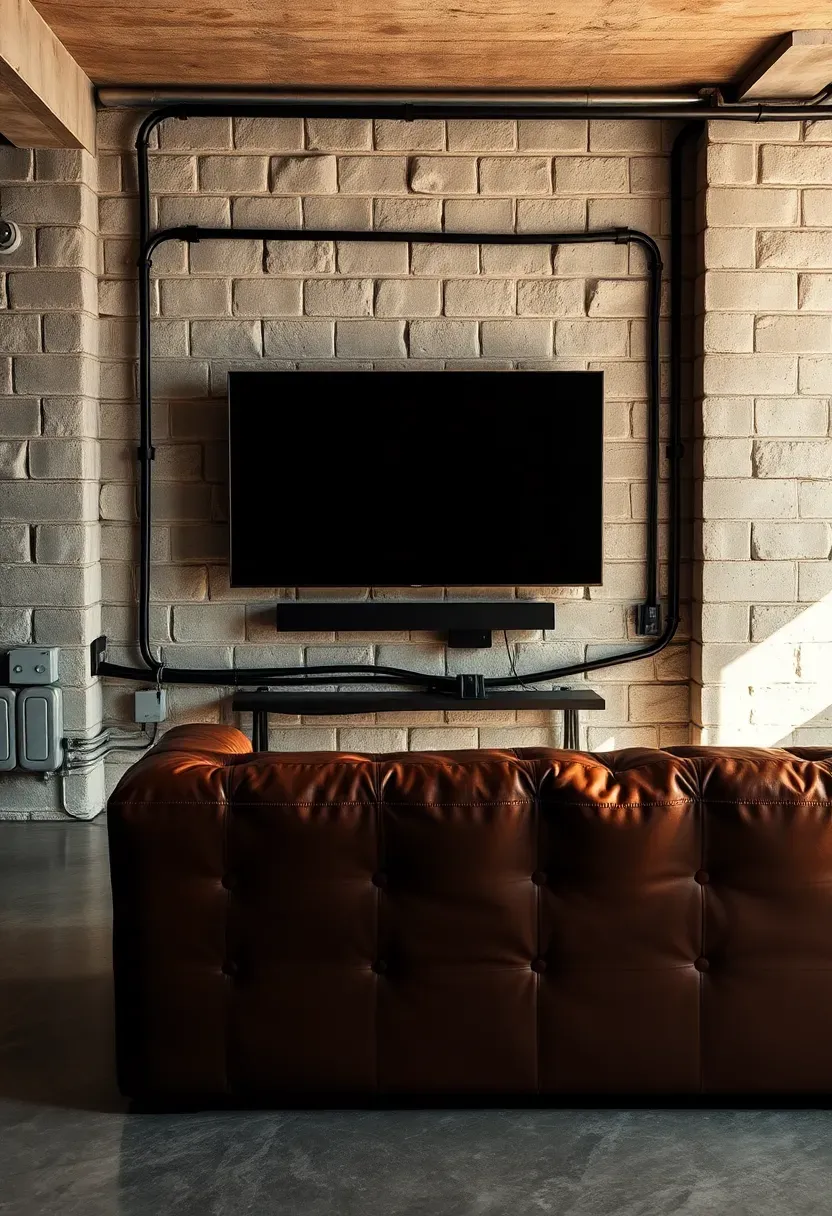
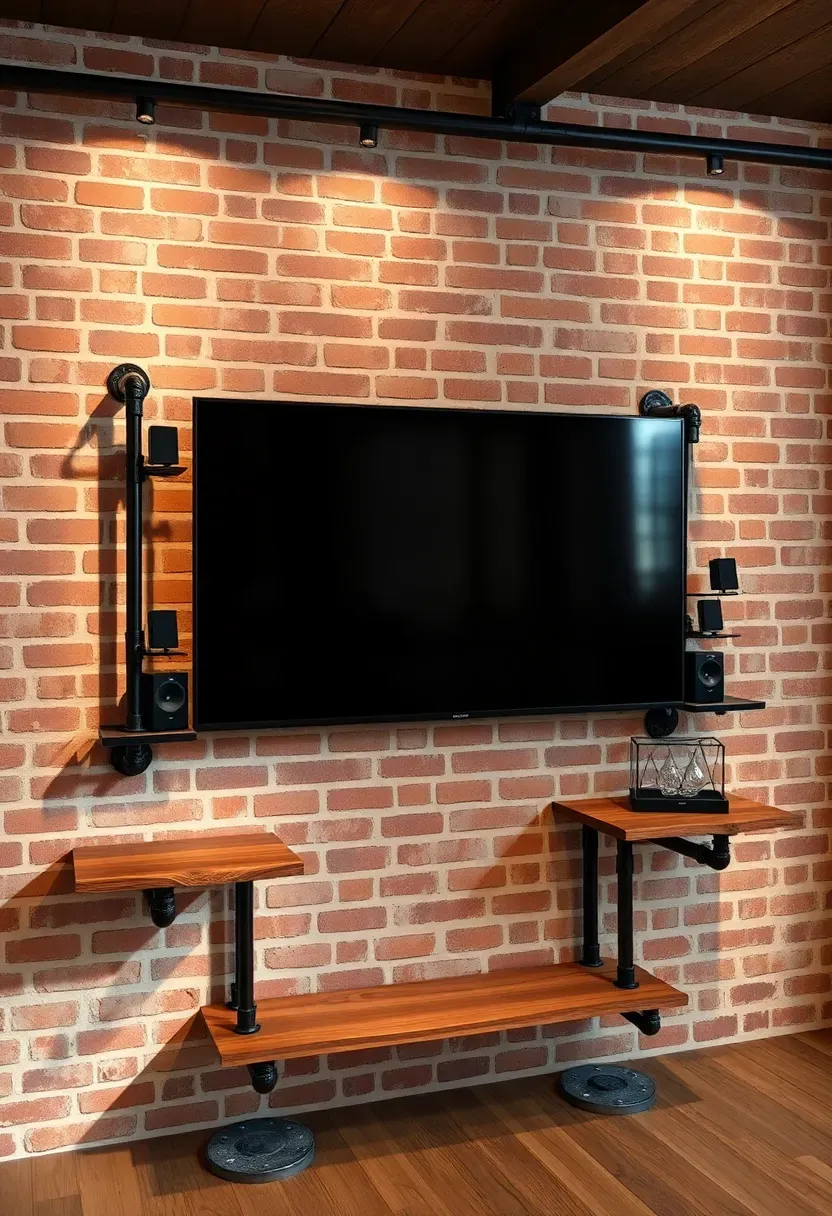
11. Brick Veneer with Industrial Brackets
Thin brick veneer (about half an inch thick) gives you the look of an exposed brick wall without the structural weight. Apply panels with construction adhesive directly to drywall or cement board, then grout the joints. Flank the TV with iron pipe brackets holding reclaimed wood shelves for speakers, game controllers, and decor. The combination reads as industrial loft — a style that naturally suits basement spaces with their lower ceilings and utilitarian bones.
Tips
- Choose a brick color with warm undertones (reds and oranges) to counteract the cool feel of below-grade rooms
- Seal the brick after grouting to prevent dust and make cleaning easier
- Black iron pipe fittings from the plumbing aisle work perfectly for shelf brackets at a fraction of furniture store prices
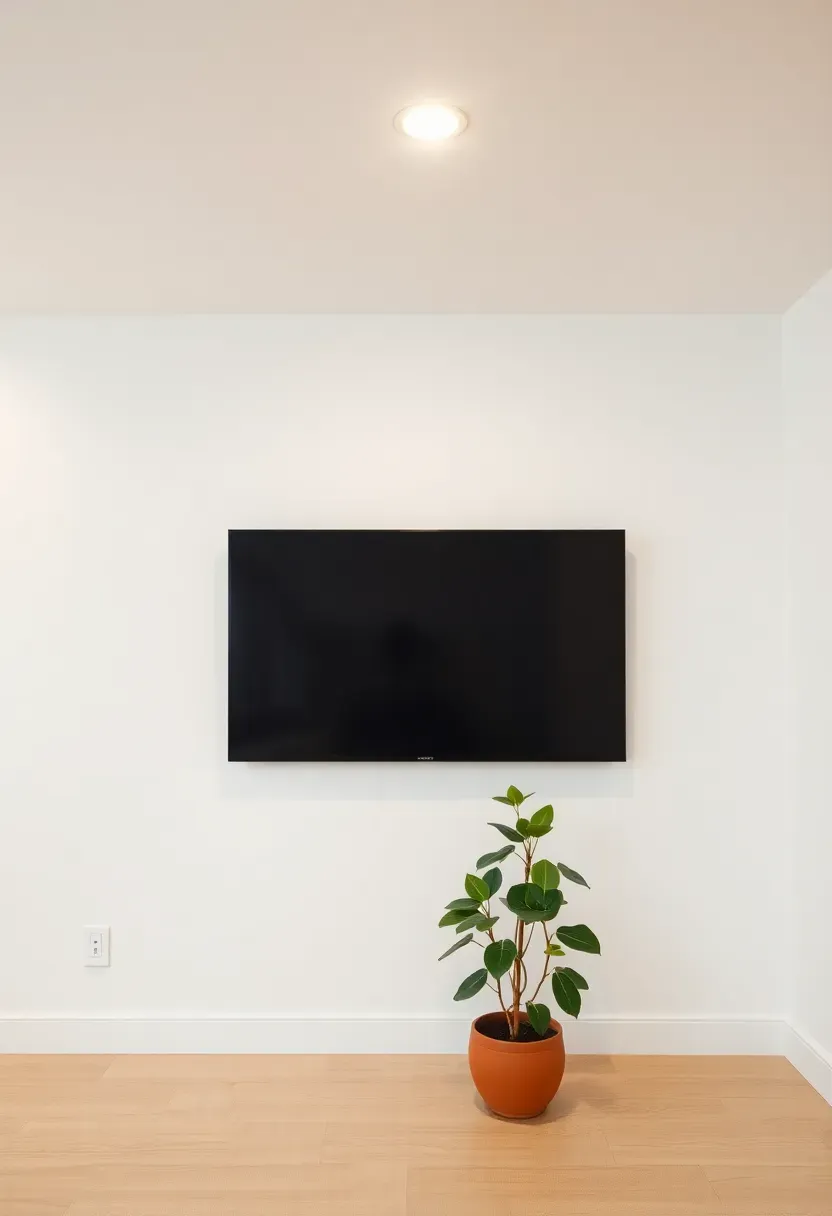
12. Minimalist White Wall with Hidden Wiring
Sometimes the best TV wall is the one that disappears. Paint the wall a clean warm white, run all cables through an in-wall rated cable kit (about $20 at any hardware store), and use a recessed outlet behind the TV. No console, no shelves, no accent material. The TV floats on the wall as the sole visual element. This works well when the rest of the basement room carries plenty of visual interest — patterned rugs, colorful furniture, a busy gallery wall on the opposite side. The blank TV wall provides a visual rest point.
Tips
- Use a warm white (slight yellow or cream undertone) rather than a cool white to avoid a sterile hospital feel
- A slim articulating mount lets you angle the TV toward different seating positions without visible hardware
- Place a single potted plant on the floor beneath the TV to keep the wall from feeling completely barren
Recommended
Items for this idea
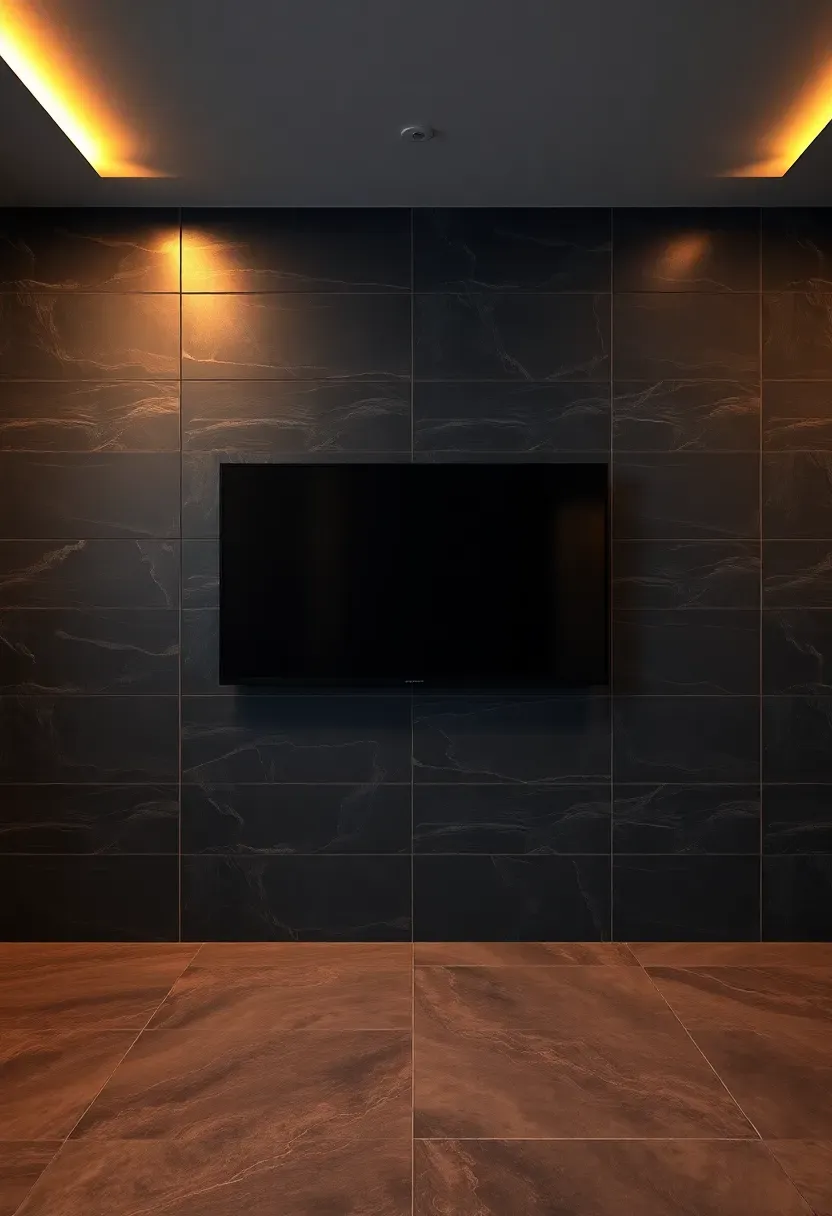
13. Large-Format Porcelain Tile Wall
Why porcelain works below grade
Porcelain tile is impervious to moisture — a real advantage on basement walls where vapor can migrate through concrete. Large-format tiles (24x48 inches or bigger) create a sleek look with minimal grout lines. Dark tiles with subtle veining mimic marble or slate at a fraction of the cost and weight. The reflective surface bounces light from the TV and any accent lighting around the room, adding perceived brightness to a naturally dim space.
Installation steps
- Install cement board as your substrate — standard drywall cannot handle tile weight
- Use large-format tile mortar (not regular thinset) which has higher bonding strength
- Rent a suction cup lifter — these tiles weigh 8 to 12 pounds each and are awkward to position alone
Watch out for
- Grout lines catch light and draw attention, so use a matching color grout for seamless joints
- Tile is extremely hard and reflective acoustically — pair with soft furnishings or acoustic panels on adjacent walls
14. Rustic Barn Wood Accent
Reclaimed barn wood brings immediate warmth and character that manufactured materials struggle to match. Each board carries its own grain patterns, nail holes, and color variations. Source boards from local salvage yards or online reclaimed lumber dealers. Attach them horizontally or vertically to furring strips on the wall. The natural imperfections distract the eye from the TV when it is off, making the wall interesting even when nothing is playing. Cost ranges from $6 to $15 per square foot depending on species and condition.
Tips
- Sand lightly and seal with a clear matte polyurethane to prevent splinters and lock in any old paint
- Check for and remove any embedded nails or staples before cutting and installing
- Mix board widths (4-inch, 6-inch, 8-inch) for a more authentic random-plank look
Recommended
Items for this idea
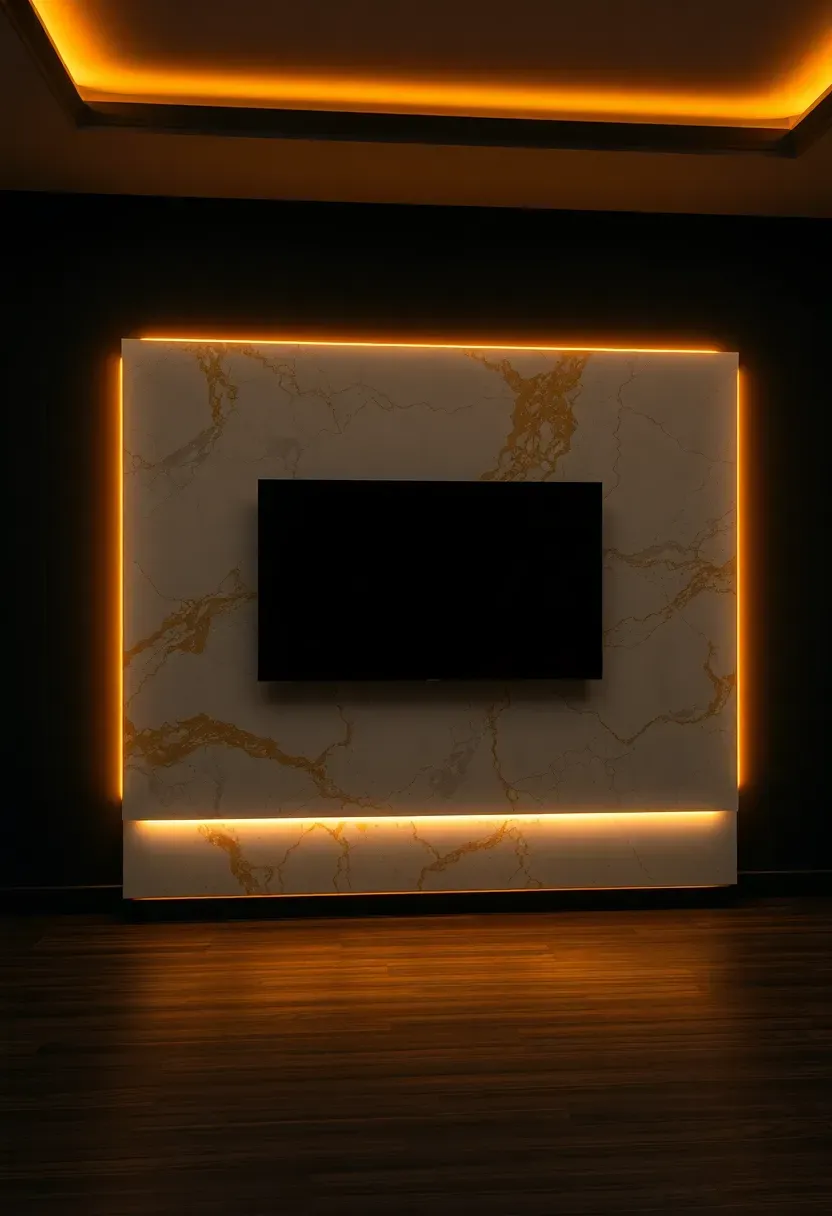
15. Backlit Marble Slab Feature
This is the high-end move. A single large slab of bookmatched marble — or a more affordable porcelain slab that mimics marble — mounted on the wall with LED strips hidden behind the edges. The light bleeds out around the perimeter and, if the stone is thin enough, can actually glow through translucent sections of the marble. Calacatta and onyx varieties have the best light transmission. The full treatment (real stone, professional install) runs $5,000 to $12,000, but porcelain slab alternatives with LED framing can hit the same effect for around $1,500.
Tips
- Porcelain slab panels (like Neolith or Dekton) are lighter and easier to install than natural stone
- Use warm amber LEDs behind the slab rather than white — it mimics candlelight through stone
- This approach works best as a single accent — do not try to cover more than the TV wall
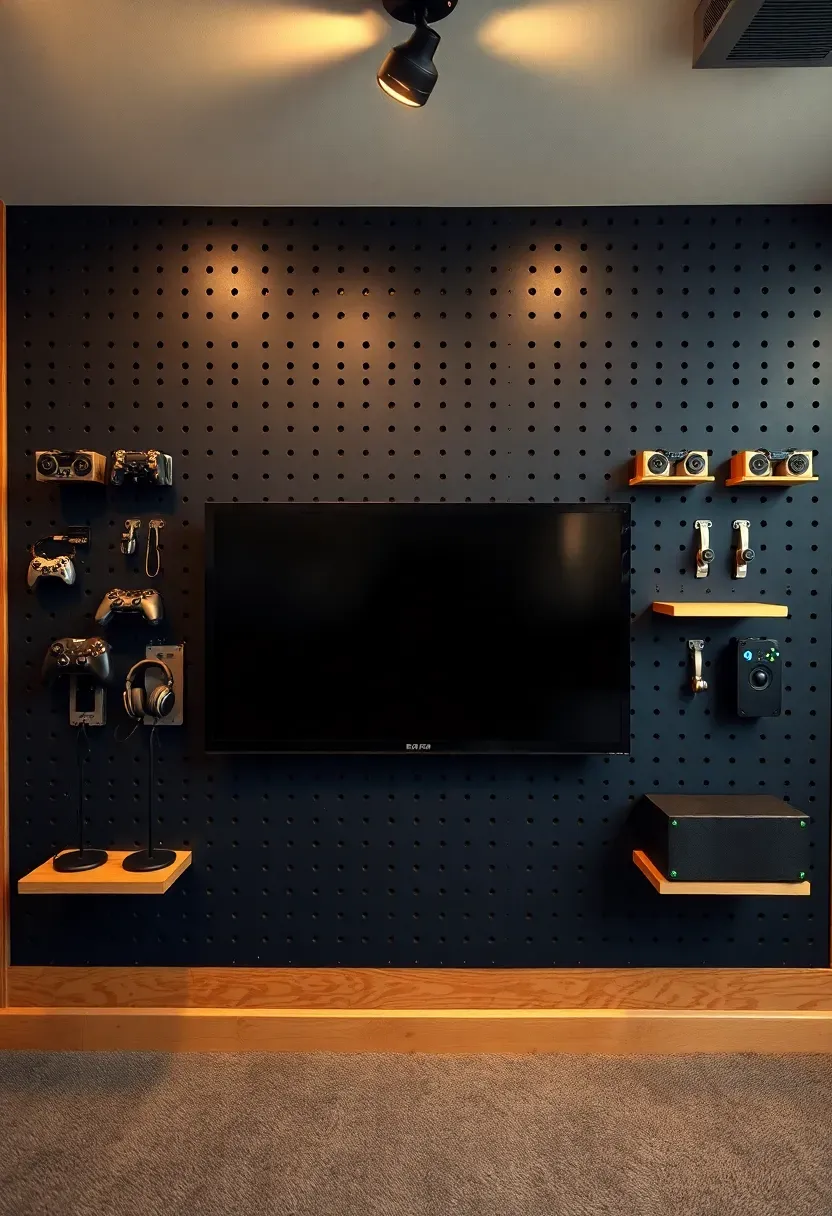
16. Pegboard Media Wall for Flexible Storage
A full-wall pegboard system lets you rearrange shelves, hooks, and accessories whenever your setup changes. Use 3/4-inch plywood with a grid of evenly spaced holes (standard pegboard hole spacing is 1 inch on center) or buy prefab metal pegboard panels. Mount the TV in the center and arrange accessories around it — hooks for headphones, small shelves for controllers, clips for cable management. When you add a new device or want to rearrange, just move the pegs. No new holes in the wall.
Tips
- Paint the pegboard a dark color so the holes blend in rather than creating a dotted pattern
- Use locking pegs (the kind with a small set screw) so shelves do not creep out of position over time
- Keep the area directly around the TV clear — cluttered pegboard next to a screen is distracting during viewing
Recommended
Items for this idea
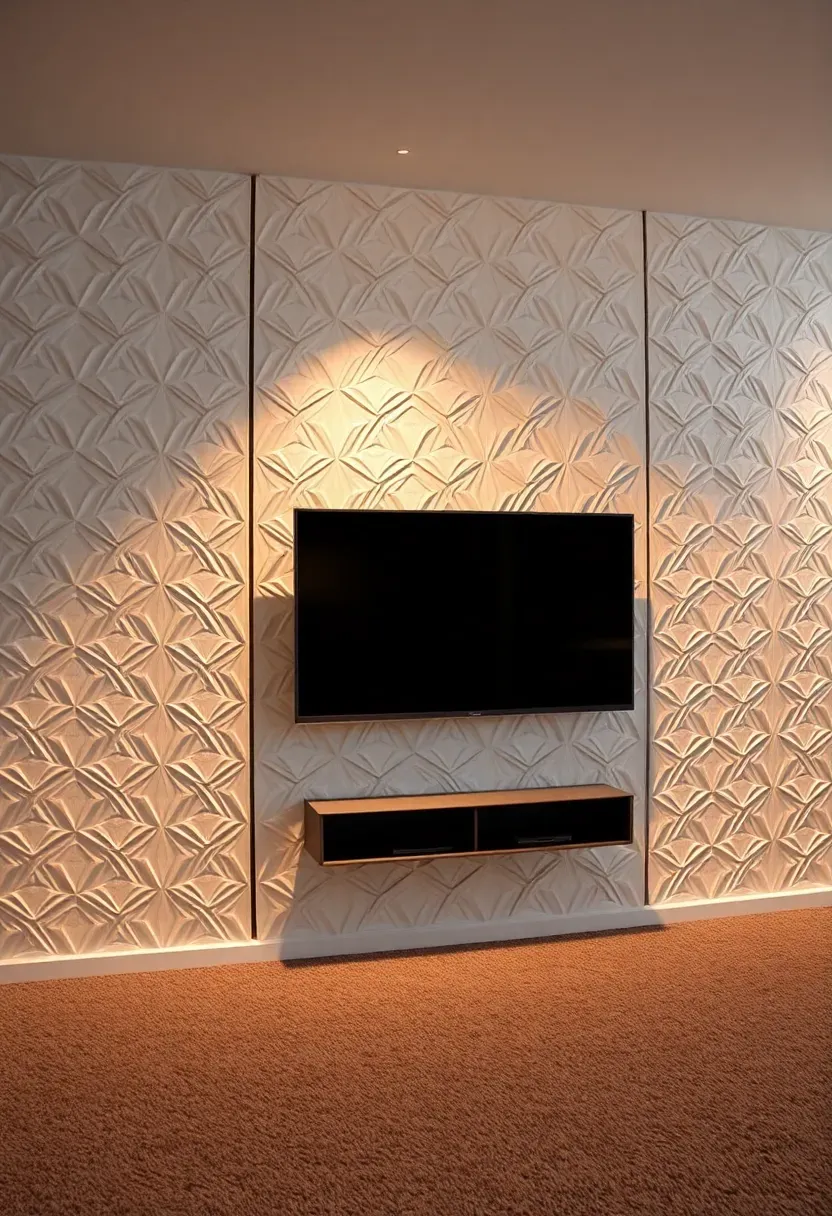
17. Geometric 3D Wall Panels
Lightweight PVC or MDF panels with raised geometric patterns add sculptural interest behind the TV. Install them with adhesive and pin nails, then paint them a single color. The magic happens when you add directional lighting — a wall washer or LED strip from above casts shadows across the raised surfaces, and the pattern shifts as the light angle changes. In a basement where you control all the light sources, you can tune this effect precisely. Panels run about $3 to $7 per square foot for PVC versions.
Tips
- White or light gray panels show shadow patterns most dramatically
- Avoid overly complex patterns directly behind the TV — keep the busiest sections to the sides
- One accent light aimed down from the ceiling at a 30-degree angle creates the strongest shadow contrast
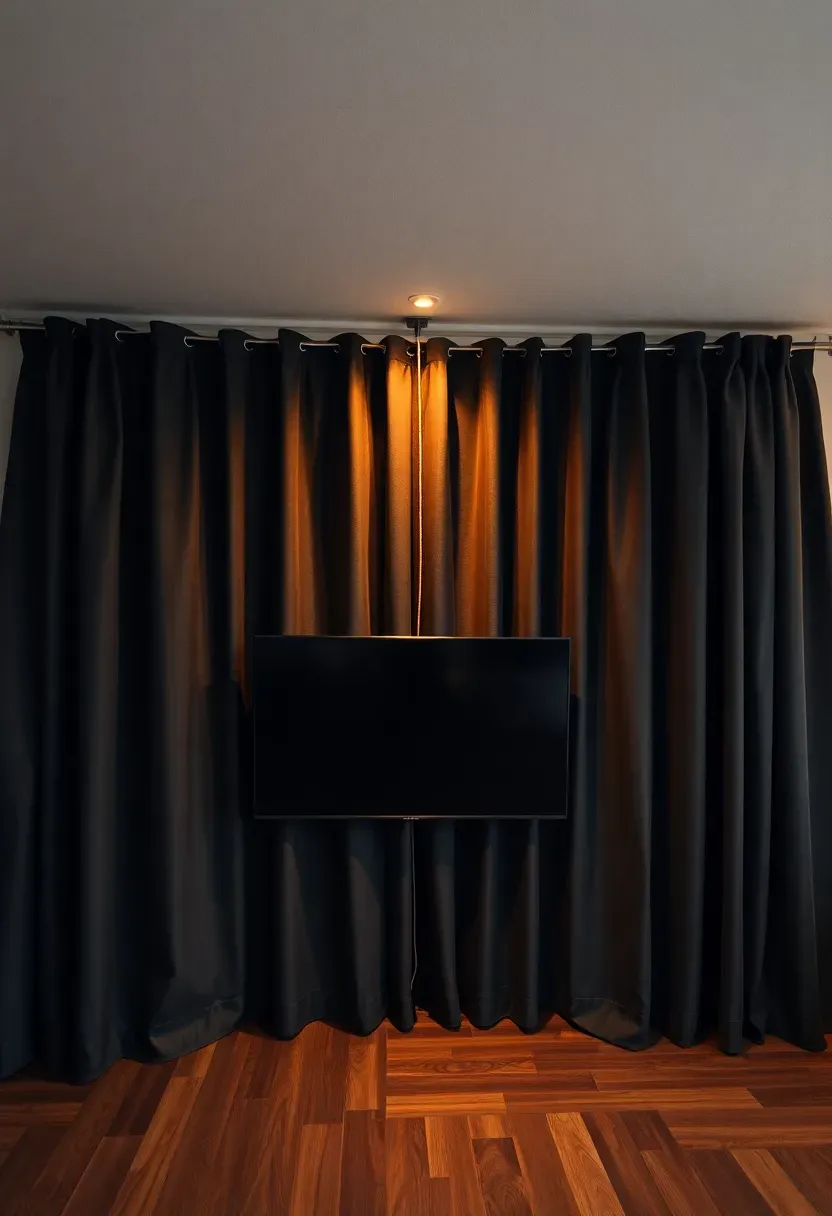
18. Curtain Wall Behind the TV
The concept
Hang floor-to-ceiling curtains across the entire TV wall. The fabric softens the room acoustically, hides any imperfections in the wall behind it, and creates a theater-like backdrop. Use a ceiling-mounted curtain track (not a standard rod, which sags over long spans) and choose a heavy blackout fabric in a dark neutral — charcoal, navy, or deep olive.
Pros and cons
Advantages:
- Cheapest full-wall treatment on this list (about $100 to $200 for fabric and track)
- Absorbs sound reflections, improving dialogue clarity
- Easy to remove or change when you want a different look
Drawbacks:
- Fabric collects dust and needs periodic washing or vacuuming
- The TV mount needs to go through the curtain into the wall, which means a small gap in the fabric
- Can look unfinished if the fabric is too thin or the track is visible

Recommended
Items for this idea
19. Gallery Wall Flanking the Screen
Treat the TV as one element in a larger gallery arrangement. Mount artwork, framed photos, or prints on both sides of the screen in a balanced but not perfectly symmetrical layout. Use frames in a consistent finish (all black, all natural wood, or all white) so the arrangement reads as intentional. The TV becomes part of the composition rather than a lonely black rectangle dominating the wall. In a basement den or family room, this approach adds personal character that pure accent walls cannot match.
Tips
- Keep frame edges aligned with the top and bottom of the TV for visual order
- Use paper templates taped to the wall before drilling to test your layout
- Leave 2 to 3 inches between frames for breathing room
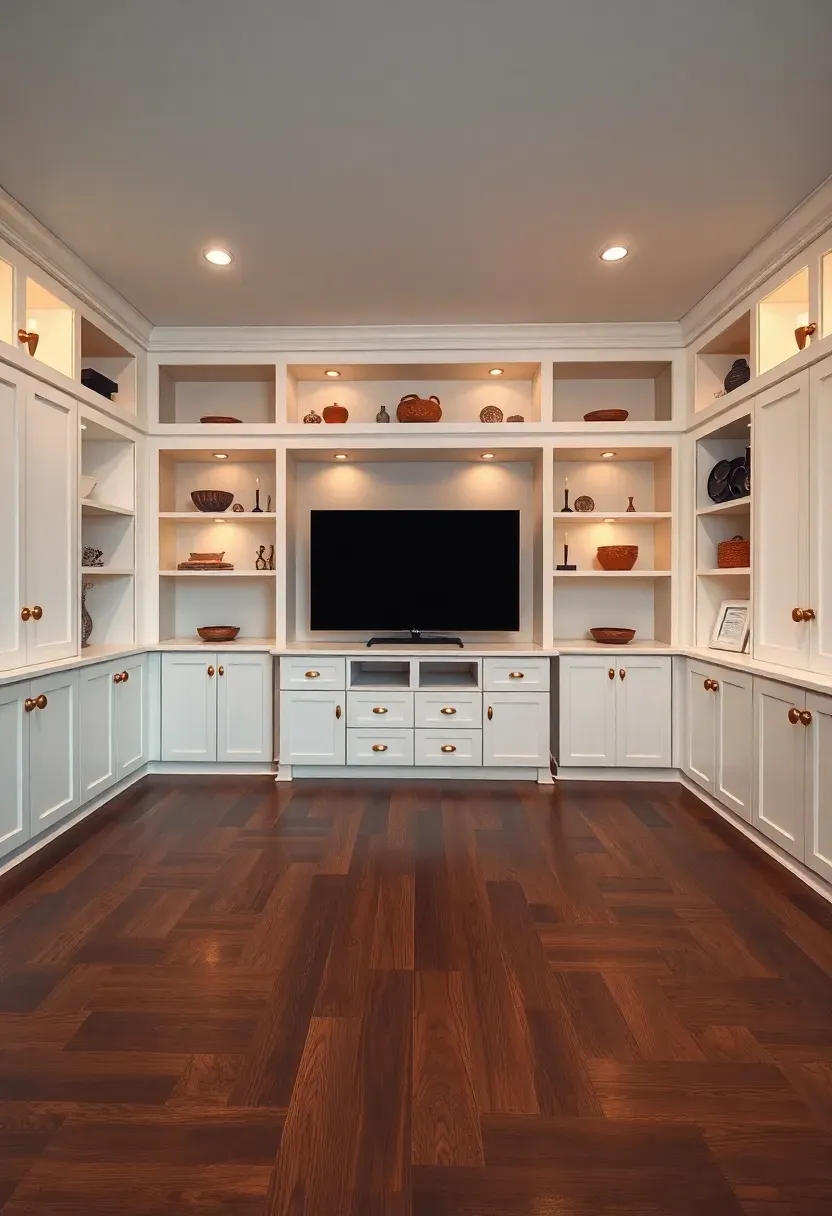
20. Full Built-In Entertainment Center
What makes this different from idea 6
Where the bookshelf surround (idea 6) is primarily open shelving flanking the TV, a full entertainment center integrates closed cabinets, drawers, open display sections, and possibly a fireplace insert into a single wall-to-wall unit. Think of it as custom furniture that replaces the entire wall surface. This is a significant investment — expect $3,000 to $8,000 for materials if you build it yourself, or $8,000 to $20,000 for a professional cabinet shop build.
Planning the layout
- Start with the TV position at eye level from your primary seating (usually 42 inches from floor to screen center)
- Place equipment cabinets at the bottom with ventilation — use perforated metal door panels or leave backs open
- Add symmetrical display sections on each side with interior puck lighting
- Bridge the top with a continuous cabinet or open shelf that ties the whole unit together
Choose this if
You are finishing a basement long-term and want a polished, permanent installation that anchors the room.
Recommended
Items for this idea
21. Moody Limewash Paint Finish
Limewash creates a cloudy, textured finish that flat paint cannot replicate. The natural lime mineral base gives walls a chalky depth with subtle color variation across the surface — lighter in some spots, darker in others. Apply it to a basement TV wall in a deep tone like forest green, warm charcoal, or tobacco brown. The mottled texture gives the wall visual interest even without additional materials. Application is done with a large masonry brush using overlapping cross-hatch strokes. One coat gives a translucent wash; two coats give fuller coverage with more contrast between light and dark areas.
Tips
- Limewash bonds best to porous surfaces — raw drywall or lime plaster, not glossy paint
- Work in sections and keep edges wet to avoid lap marks
- The color lightens significantly as it dries, so test a sample patch first
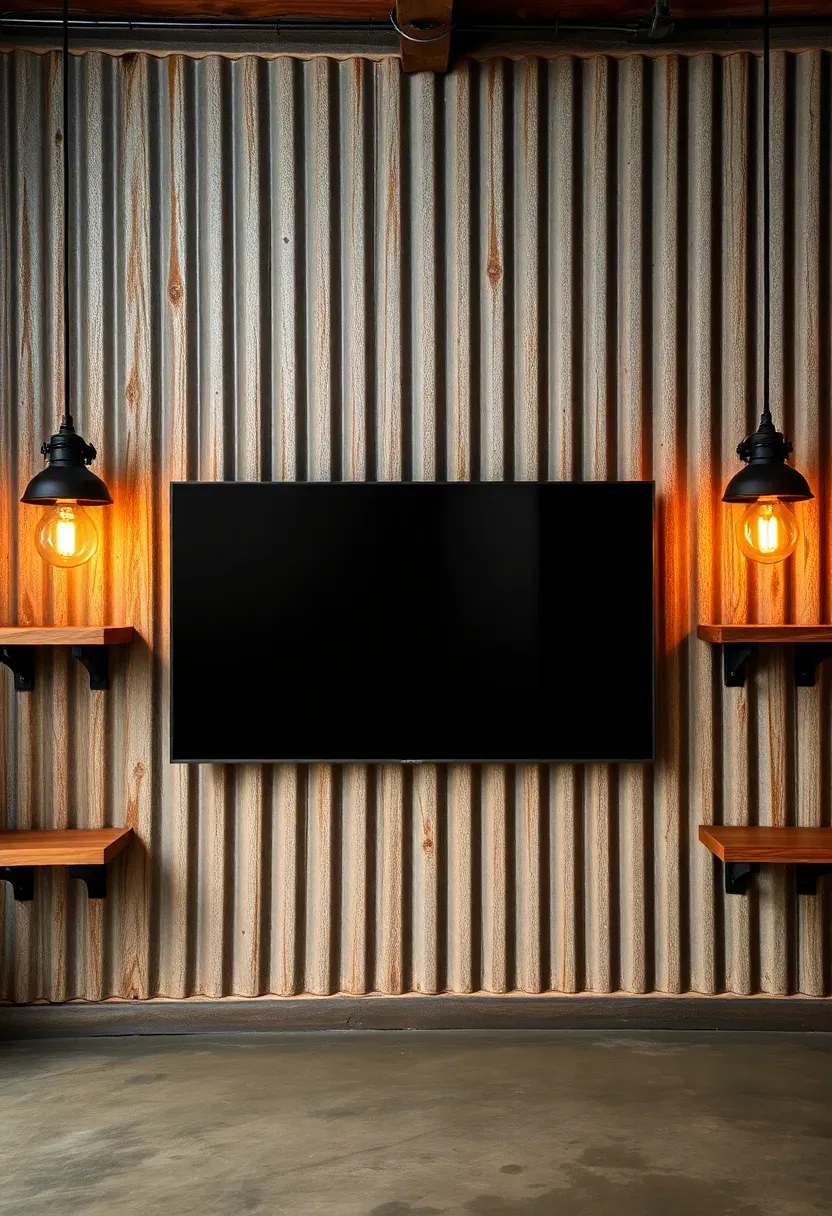
22. Corrugated Metal Accent Panel
Corrugated galvanized steel panels from the roofing section of any building supply store cost about $1.50 per square foot and install with screws into furring strips. The ribbed texture catches light in a way that flat surfaces cannot, and the industrial aesthetic pairs naturally with the utilitarian character of a basement. Use panels with a matte or weathered patina finish rather than shiny new galvanized — the glare from a bright metal surface will reflect the TV image and create distracting hot spots.
Tips
- Wear gloves during installation — edges are sharp enough to cut skin
- Apply a rust patina solution if you want an aged look without waiting years for natural oxidation
- Mount the TV using a through-bolt bracket secured to the furring strips behind the metal
Recommended
Items for this idea
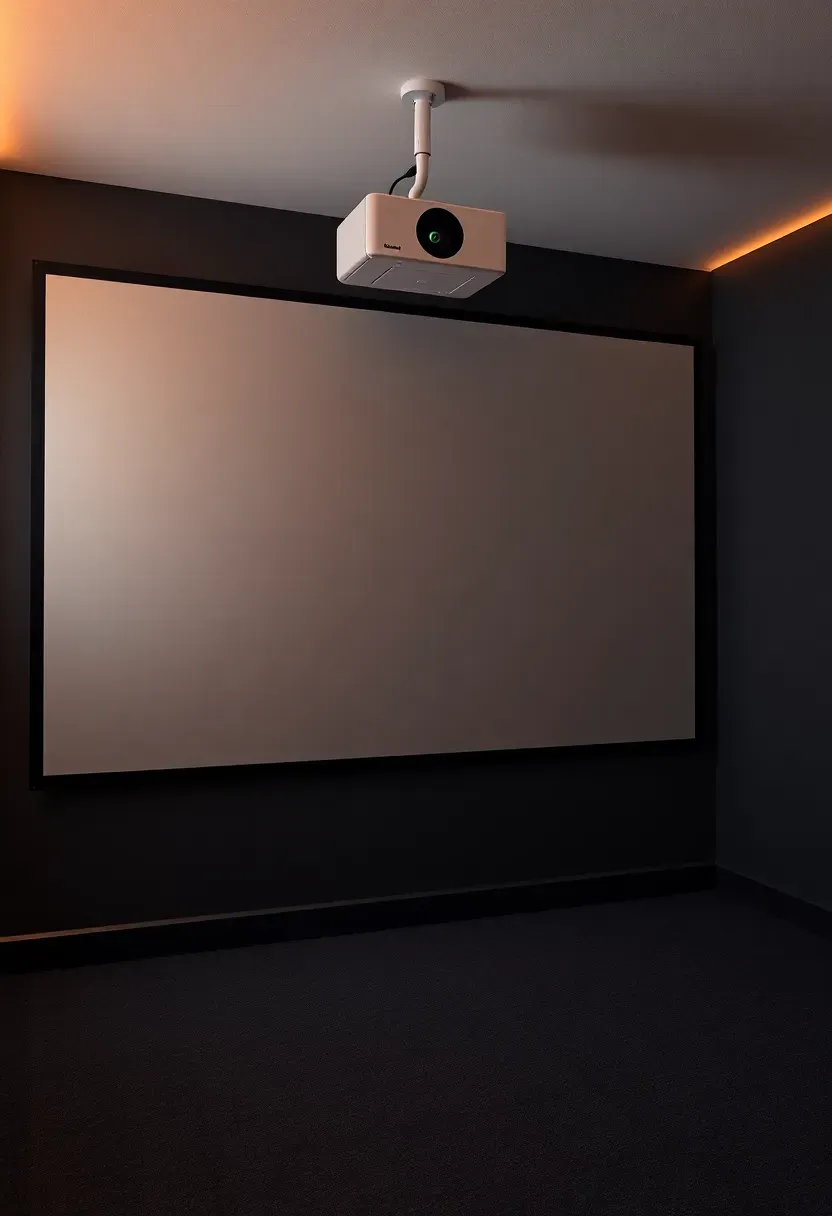
23. Projector Wall with Ambient Reject Screen
Why skip the TV entirely
A projector gives you a 100 to 150-inch image for the cost of a mid-range television. In a basement with controlled lighting, a short-throw laser projector paired with an ALR (ambient light rejecting) screen or painted wall surface delivers sharp images even with some room lighting on. ALR paint from brands like Screen Paint Supply runs about $250 per gallon and covers a 120-inch diagonal area. Apply it over a sanded and primed flat wall section.
Setup steps
- Choose your wall section — flat, smooth, and free of seams or texture
- Sand, prime with a high-hide primer, and apply two coats of ALR paint
- Mount the projector on the ceiling 8 to 15 feet back (standard throw) or 12 to 24 inches from the wall (ultra short throw)
Watch out for
- Standard throw projectors need people to avoid walking between the projector and wall
- Ultra short throw models eliminate that problem but cost $1,500 to $3,000 for decent quality
- A projector wall commits you to that viewing position — you cannot angle or tilt like a mounted TV
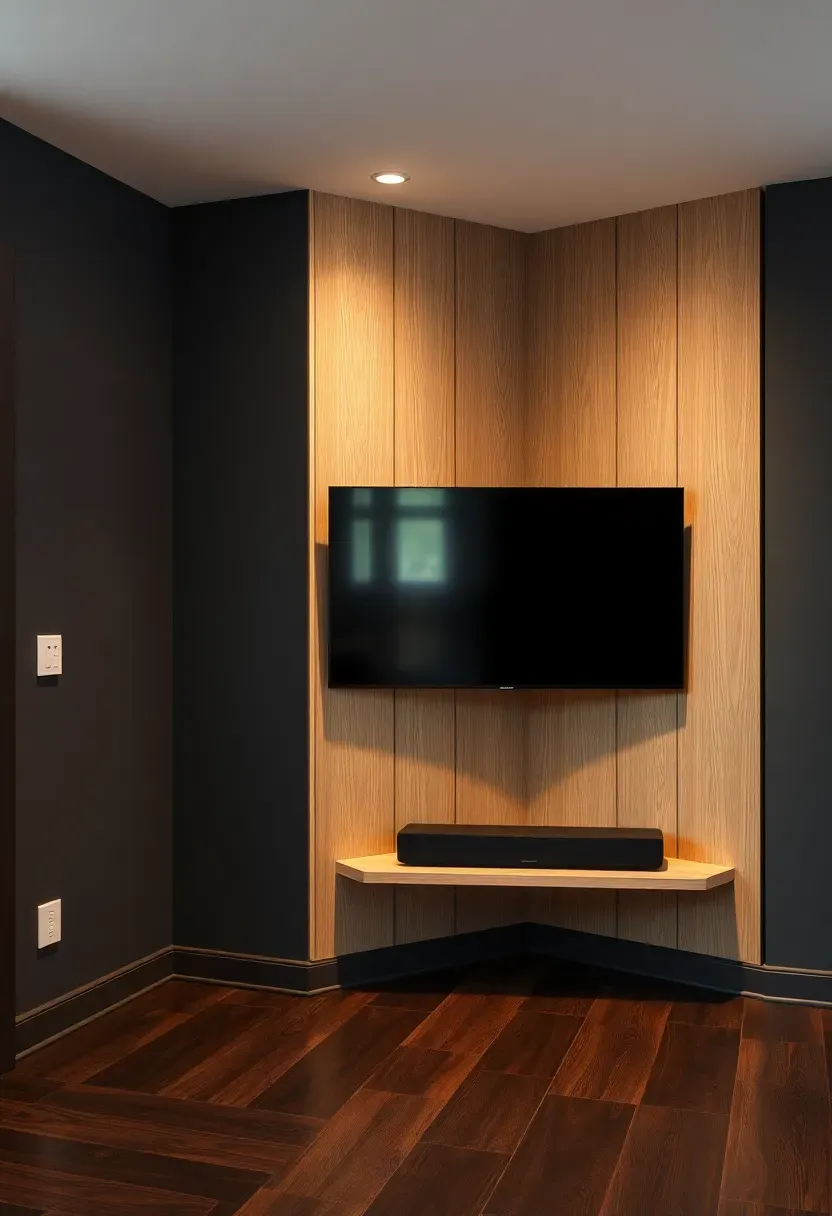
24. Corner TV Wall for Awkward Layouts
Not every basement gives you a clean flat wall for the TV. Support columns, staircase walls, mechanical chases, and ductwork create odd angles and short wall segments. A corner TV mount with a built-out panel bridging the two walls solves this. Build a flat panel at 45 degrees across the corner, face it with your preferred material, and mount the TV on the angled surface. This also frees up both adjacent walls for furniture placement and doorway clearance that a flat-wall mount would block.
Tips
- Use a full-motion corner mount so you can pull the TV out and swivel it toward the main seating area
- Build the corner panel deep enough (at least 6 inches) to hide wiring and a power outlet behind it
- Add a small floating shelf at the base of the corner panel for a streaming device or soundbar
Recommended
Items for this idea
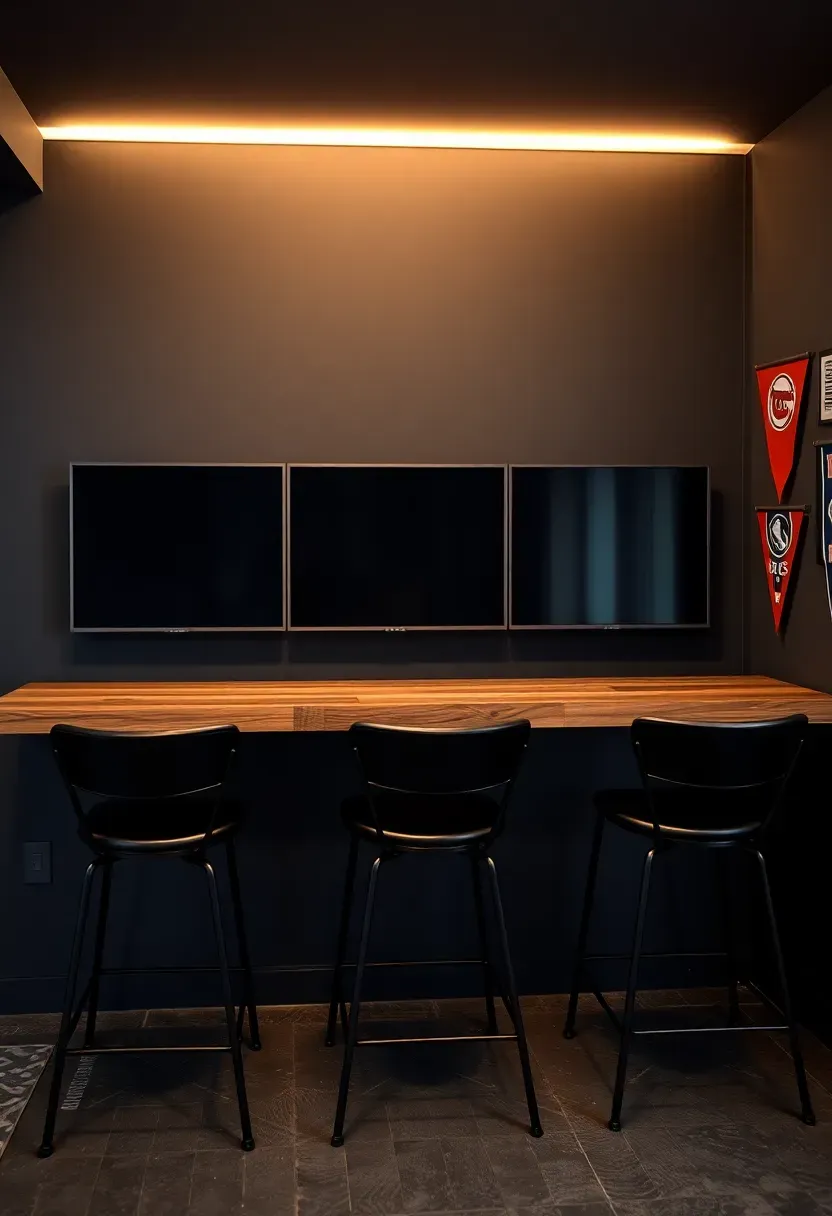
25. Multi-Screen Sports Wall
The setup
Mount two to four screens side by side on a single wall for game-day viewing of multiple events simultaneously. Use identical TV models so the color and brightness match across screens. A commercial video wall mount with micro-adjustment arms lets you align bezels within millimeters. Run each TV from its own streaming device or cable box so you can tune each screen independently.
Practical details
- Three 55-inch TVs side by side need about 12 feet of wall width with 1-inch gaps between them
- A single 20-amp circuit can handle up to three modern LED TVs (they draw 80 to 120 watts each)
- Mount a soundbar under the center screen and connect it to whichever game has your primary attention
Choose this if
You host watch parties and want the sports bar experience without leaving the house. Pair with bar-height seating and a mini fridge within arm's reach.
Quick FAQ
Do I need a special TV mount for basement walls? It depends on the wall material. Standard drywall over wood studs uses the same mounts as upstairs. Concrete or block walls require concrete anchors and a hammer drill. Toggle bolts work for hollow block. Always check the mount weight rating against your TV weight plus a 20 percent safety margin.
How far should a basement TV be from the seating? Multiply the screen diagonal by 1.5 to 2.5 for the viewing distance. A 65-inch TV works best at 8 to 13 feet. In a basement where room depth is limited, err toward the closer end of that range and consider a smaller screen rather than sitting too close to a large one.
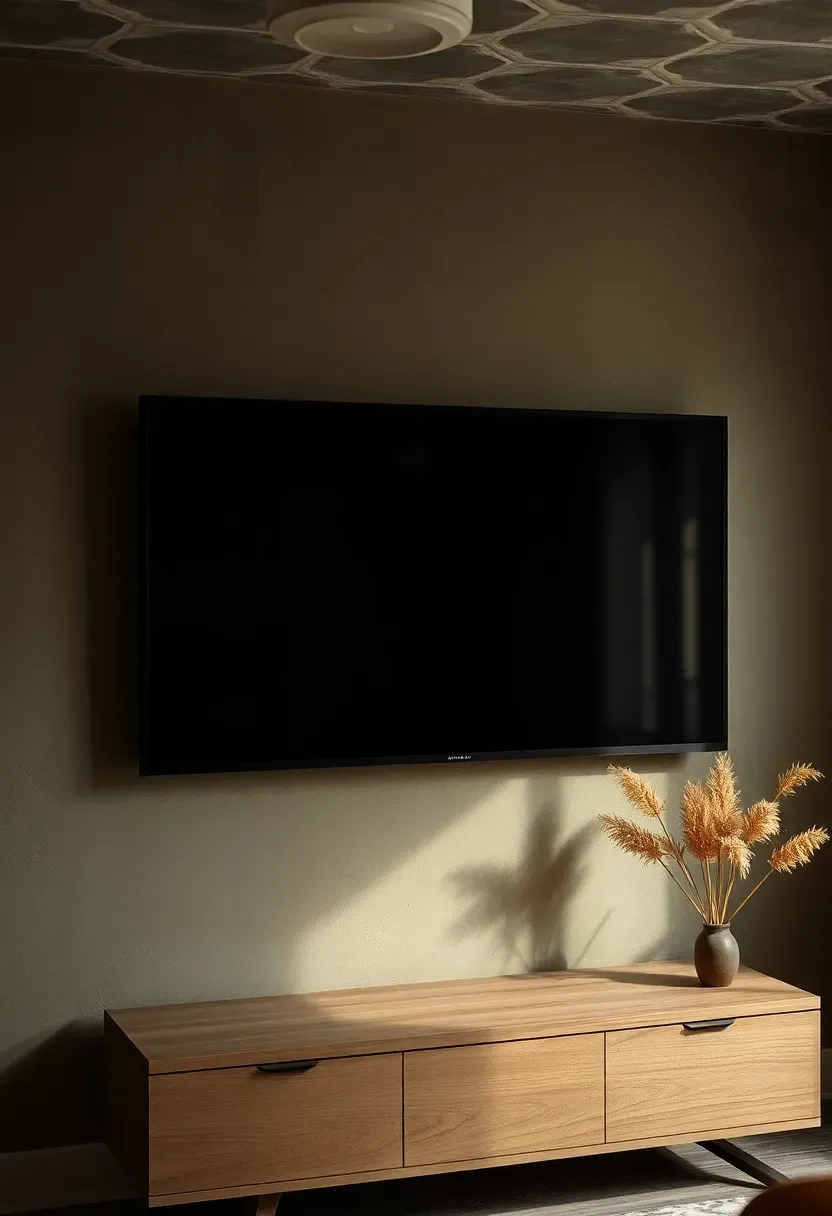
What is the best wall color behind a basement TV? Dark neutrals — charcoal, deep navy, dark olive, matte black. They reduce contrast between the screen edge and the surrounding wall, which lowers eye fatigue and makes the picture look more vivid. Avoid bright whites directly behind the screen.
Can I mount a TV on a basement wall that gets damp? Address the moisture first. Seal the wall with a waterproofing paint like Drylok, add a vapor barrier, and run a dehumidifier. Once humidity stays below 55 percent consistently, the wall is safe for mounting. Electronics and persistent moisture do not mix — the TV itself may be fine, but the outlet and wiring behind it need dry conditions.
Should I use a TV or projector in a basement media room? Both work well below grade. A TV wins on brightness and ease of setup. A projector wins on screen size per dollar and the immersive cinema feel. If your basement is fully dark with no windows, a projector makes the most of that advantage. If you have some ambient light or want a simpler install, stick with a TV.
A basement TV wall is one of the few home projects where the space itself gives you a head start. Low light, sound isolation, and the freedom to go bold with materials are built into the room before you do anything. Pick the idea that fits your budget and the finish level of your basement — whether that is sealing the existing concrete and calling it industrial chic, or building a full entertainment center that rivals a custom home theater. The best version is the one that gets you watching something you enjoy this weekend rather than endlessly planning a perfect setup that never happens.
Pinterest cover for 25 Basement TV Wall Ideas
About the author
OBCD
CGI visualization and interior design content. We create detailed 3D renders and curate practical design ideas for every room in your home.