23 Basement Stair Ideas
Basement stairs get used dozens of times a day in most households, yet they rarely receive the same design attention as, say, a kitchen backsplash or a bathroom vanity. That seems backwards. The staircase is literally the first thing you see when heading downstairs — it sets the tone for whatever room waits at the bottom. And because most basement stairs were built as cheaply as possible during original construction, even small upgrades make a disproportionate difference. A coat of paint on the risers, a carpet runner with brass rods, or a few LED strip lights can shift a dark, uninviting passage into something you actually want to walk down.
Below are 23 basement stair ideas organized from simple weekend projects to more involved renovations.
Table of Contents
- Painted Risers with Contrast Treads
- Carpet Runner with Metal Rods
- Open Riser Floating Look
- Under-Stair Storage Drawers
- LED Strip Lighting on Treads
- Shiplap Stairwell Walls
- Industrial Pipe Railing
- Stained Concrete Treads
- Built-In Bookshelf Wall
- Glass Panel Railing
- Wainscoting on the Stairwell
- Vinyl Plank Tread Covers
- Gallery Wall Descent
- Cable Rail with Wood Posts
- Tile Riser Accents
- Pull-Out Pantry Under Stairs
- Recessed Wall Niches with Lights
- Barn Door at the Top
- L-Shaped Landing Bench
- Rubber Tread Covers for Safety
- Whitewashed Wood Plank Walls
- Spiral Staircase Replacement
- Dog Nook Under the Stairs
1. Painted Risers with Contrast Treads
This is the fastest way to change how your basement stairs feel without spending much money. Sand the treads down to bare wood and apply a clear polyurethane or a light stain, then paint the risers a contrasting color — white for a clean look, navy or charcoal for something bolder. The two-tone effect gives the staircase a finished, intentional appearance even if the underlying lumber is builder-grade pine. A quart of porch-and-floor paint covers about 12 risers, so materials run roughly 30 to 40 dollars total.
Tips
- Use porch and floor enamel rather than regular wall paint — it resists scuff marks from shoes far better
- Tape off each riser carefully because sloppy lines between tread and riser ruin the effect
- Let each coat cure for at least 24 hours before walking on the stairs, even if the can says dry in 4 hours
We picked a few things that go well with this idea: Govee Warm White LED Strip (16ft) (★4.6), KOMIGAN Motion-Triggered LED Stair Kit (16 Stairs) (★4.4) and KOMIGAN Motion-Triggered LED Stair Kit (20 Stairs) (★4.4). As an Amazon Associate we earn from qualifying purchases.
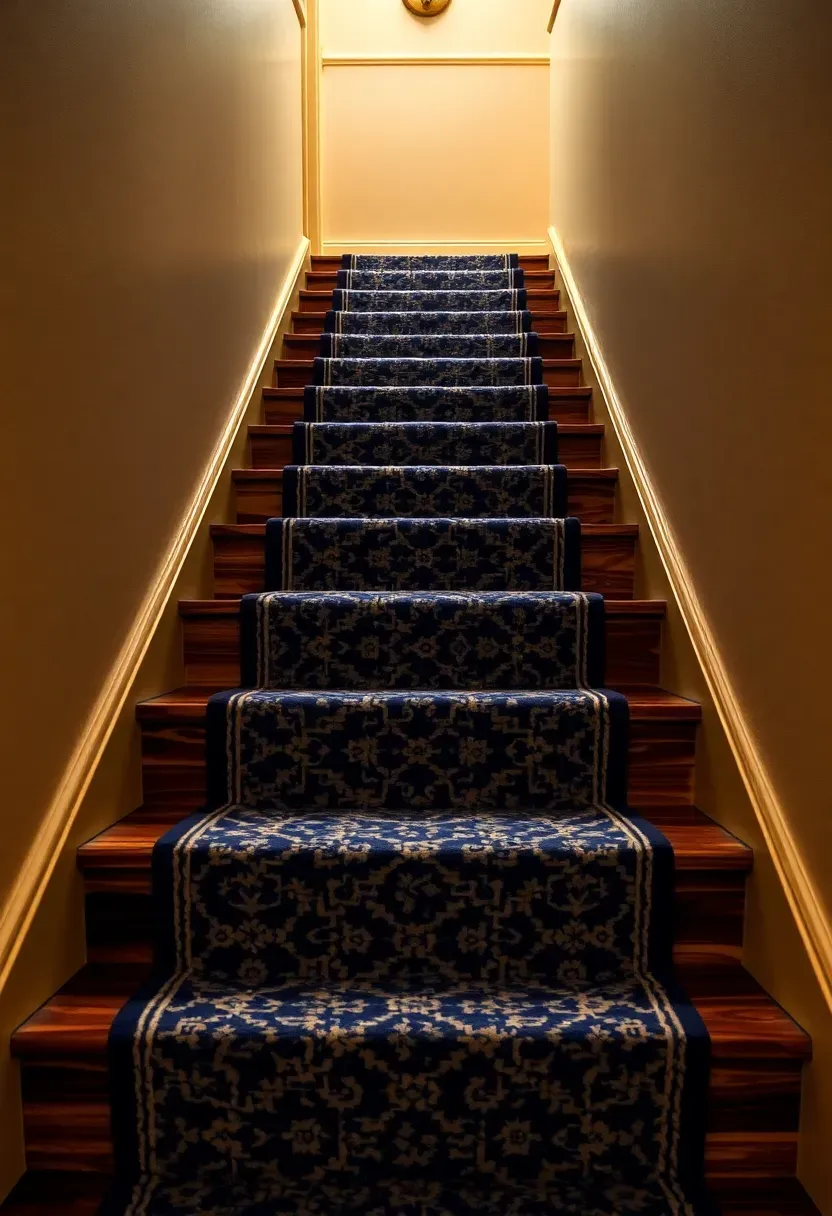
2. Carpet Runner with Metal Rods
The problem with bare basement stairs
Unfinished basement treads are noisy, cold underfoot, and slippery in socks. Carpeting the entire tread looks dated and traps moisture — a real concern below grade.
The runner solution
A carpet runner down the center solves all three problems while leaving the outer edges of each tread exposed. Brass or brushed nickel stair rods hold the runner at each step, making it removable for cleaning or replacement. Choose a low-pile, indoor-outdoor runner material so it handles basement humidity without developing mildew. A 2.5-foot wide runner on a standard 36-inch staircase leaves about 5 inches of wood showing on each side.
Pros and cons
- Adds warmth, grip, and sound dampening on every step
- Stair rods cost about 8 to 15 dollars each — budget 180 to 350 dollars for a full set on a typical basement run
- Runners collect dust and need vacuuming weekly, which is harder on stairs than flat floors
We picked a few things that go well with this idea: Solid Brass Stair Rods Set (13-Pack) (★4.2), Solid Brass Stair Rod Oval Finial (★4.2) and Solid Brass Stair Rods Set (5-Pack) (★4.2). As an Amazon Associate we earn from qualifying purchases.
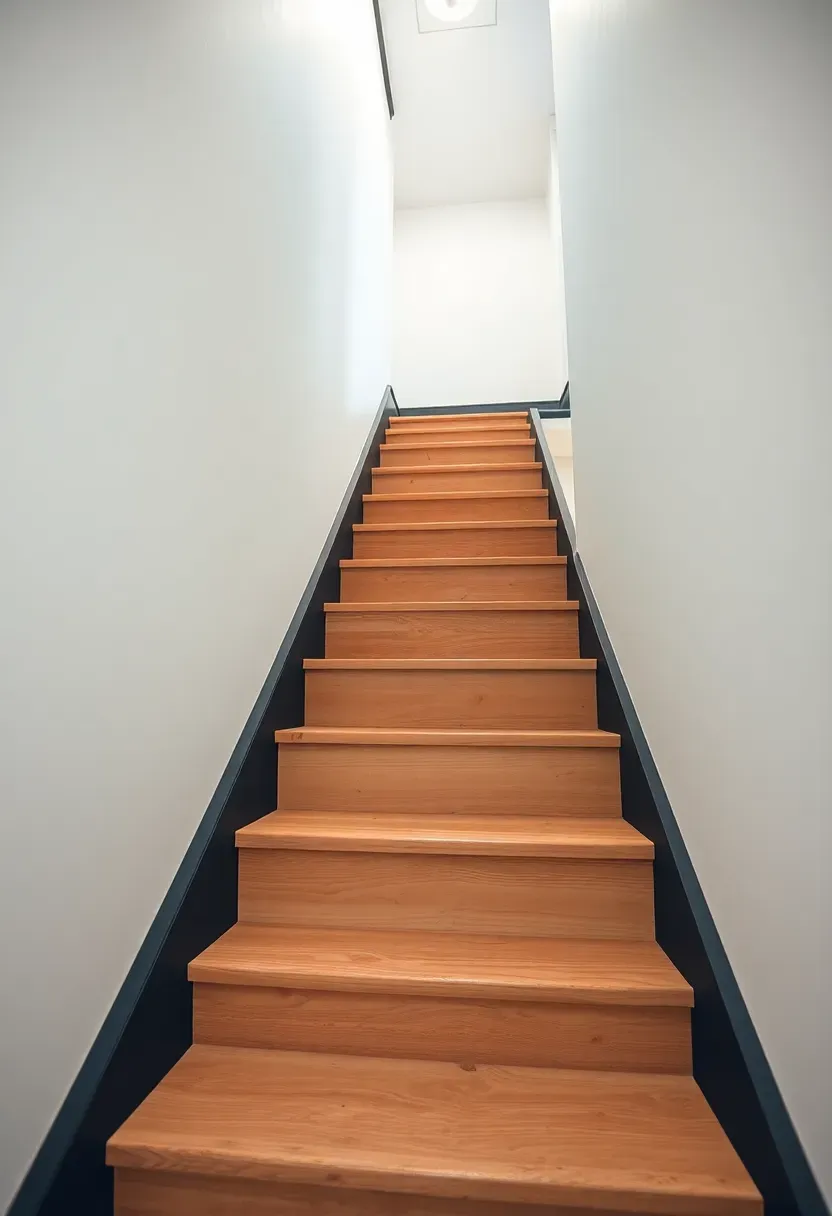
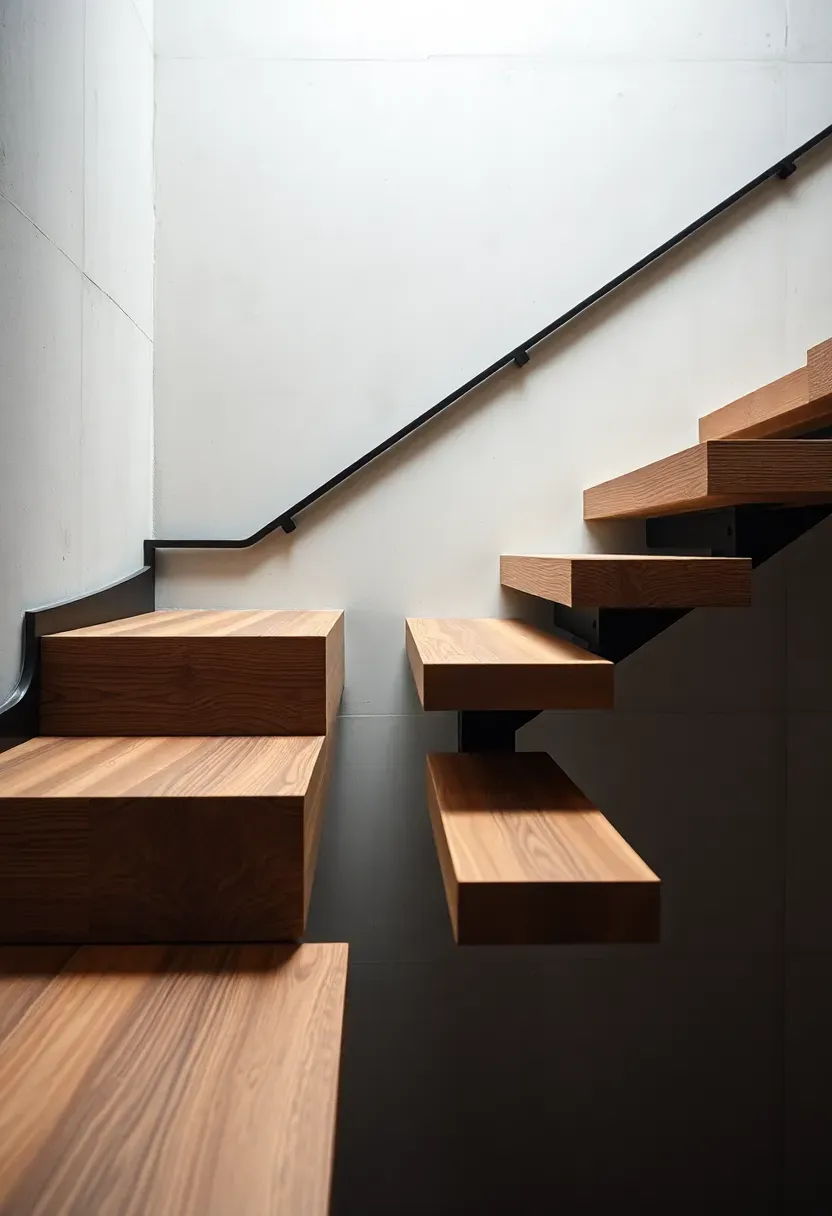
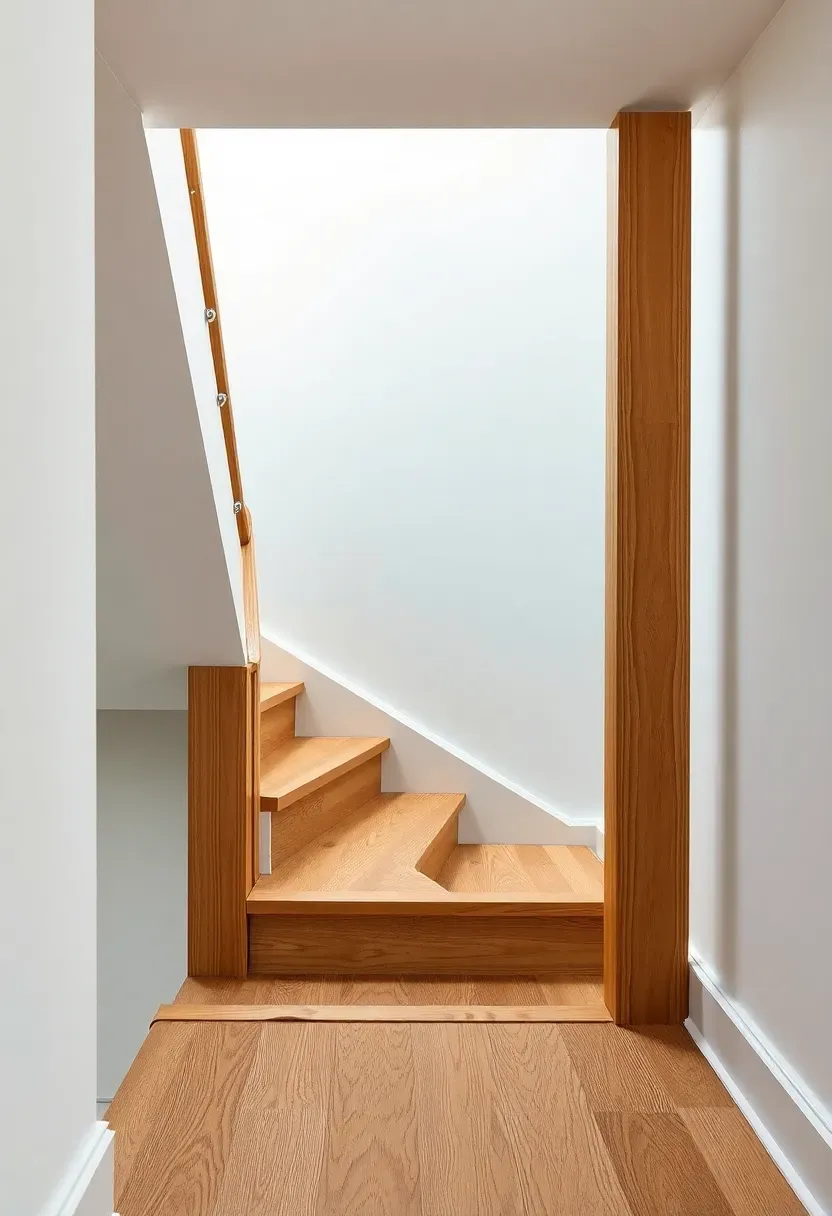
3. Open Riser Floating Look
Removing the risers between treads lets light pass through the staircase and makes a tight basement entry feel less like a tunnel. The treads need to be thick enough to handle the span without flex — at least 2 inches of hardwood or 1.5-inch butcher block laminated planks. Steel stringers bolted to the wall or floor framing carry the load, and each tread sits on welded brackets. The open gap between steps also improves air circulation between floors, which helps with that stale basement-air problem.
Tips
- Building code in most areas requires the gap between treads to be less than 4 inches, or you need a mesh or acrylic panel behind the treads
- Open risers are not ideal if you have toddlers or small pets — a temporary plexiglass barrier works until kids are older
- Staining treads a medium walnut tone contrasts well against raw or powder-coated black steel stringers
We picked a few things that go well with this idea: Rubber-Cal Diamond-Plate Stair Treads (6-Pack) (★4.4), Spurtar Non-Slip Rubber Stair Treads (6-Pack) (★4.5) and Thunder Grip Heavy-Duty Rubber Stair Treads (6-Pack) (★4.8). As an Amazon Associate we earn from qualifying purchases.
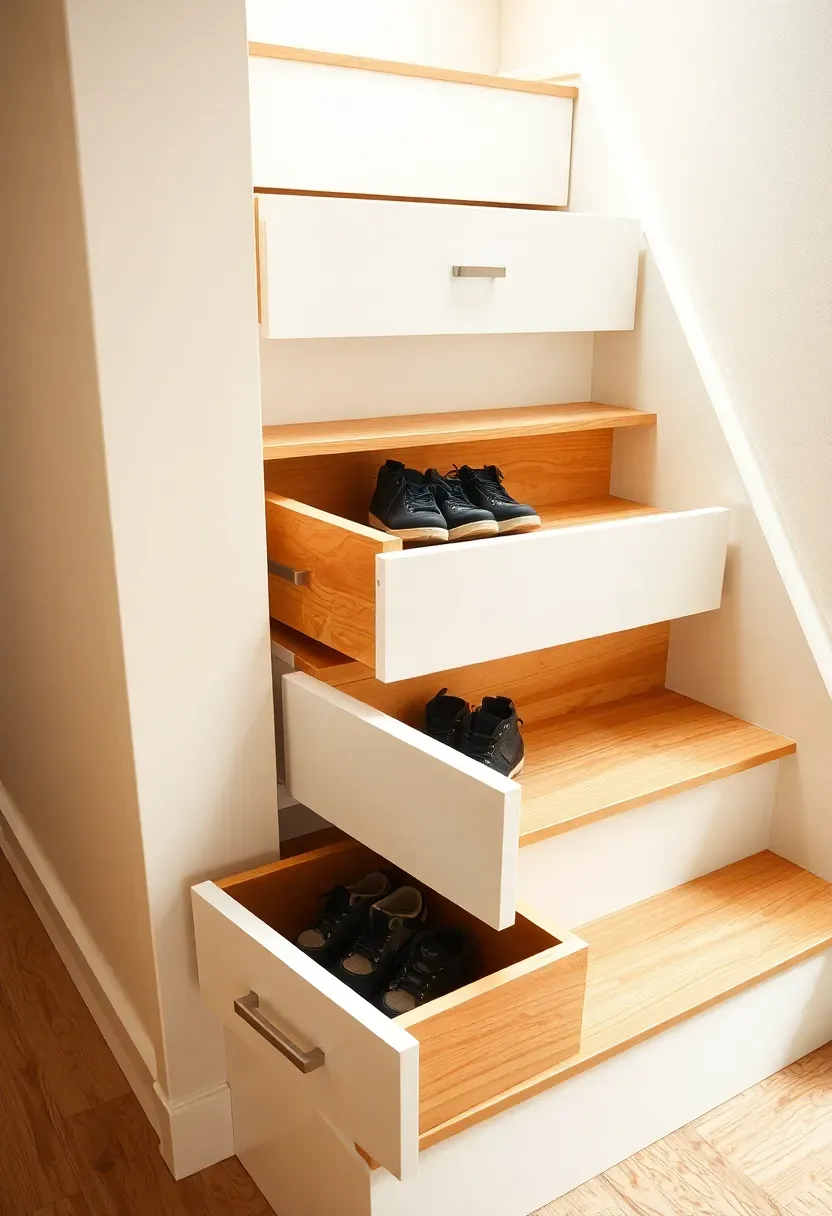
4. Under-Stair Storage Drawers
How to build them
Each riser becomes the face of a pull-out drawer that slides out from the side of the staircase. The drawer boxes sit in the triangular void beneath the treads, which is normally dead space filled with cobwebs. You need side access — meaning the staircase must have at least one open side rather than being boxed between two walls. Standard drawer slides rated for 75 pounds work fine. Start from the bottom stair where the triangle is shallowest and work up.
Step 1: Measure the void
Open the wall or panel on the accessible side of the staircase and measure the depth and height at each step. The bottom three drawers will be shallow (good for shoes or tools), while the upper drawers can hold bulkier items.
Step 2: Build drawer boxes
Use 1/2-inch plywood for the boxes. Each one tapers to match the stair angle. Face frames cover the riser front, and a finger pull or small handle lets you open each drawer.
Step 3: Install slides and test
Mount full-extension ball-bearing slides on furring strips attached to the stringer. Test each drawer with weight before finishing.
Watch out for
- Humidity inside the enclosed stair void can damage stored items — line drawers with cedar planks or add silica gel packets
- Never remove structural stringer material to make room for drawers — add the storage around the existing framing
Recommended
Items for this idea
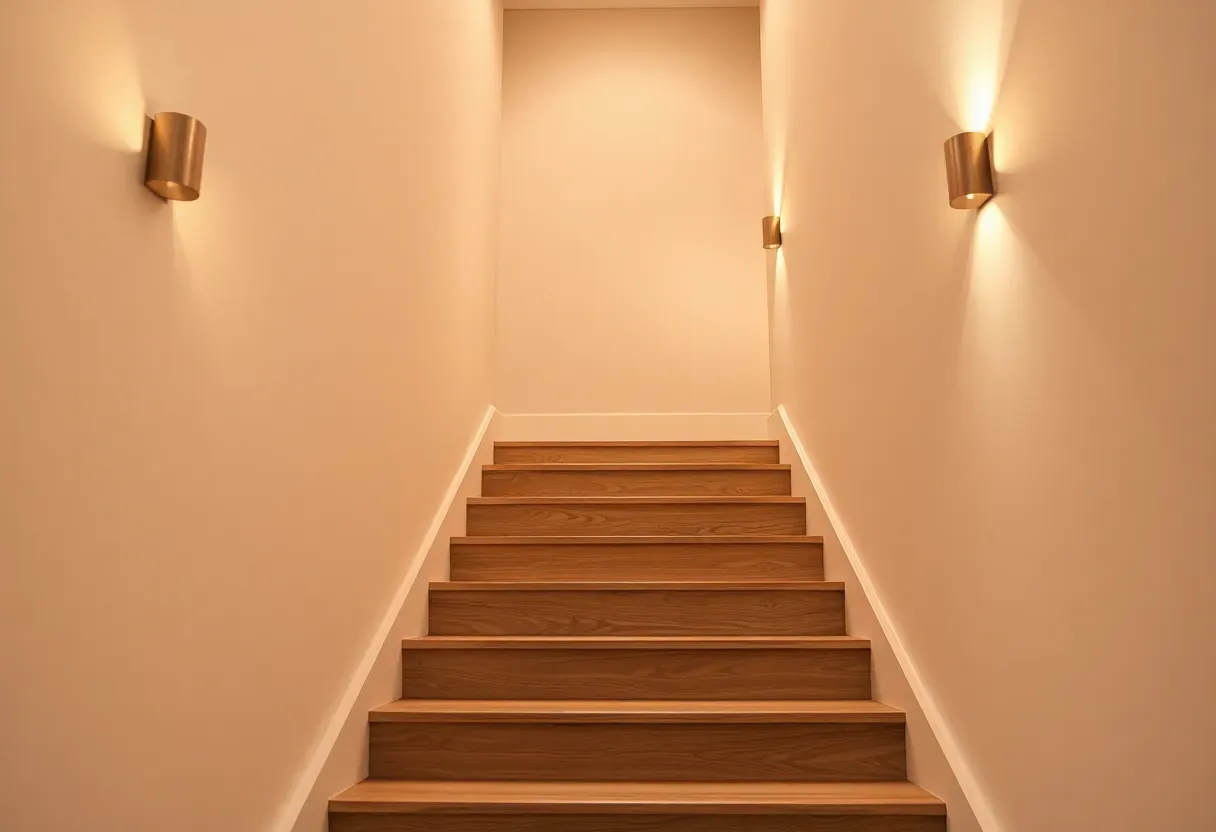
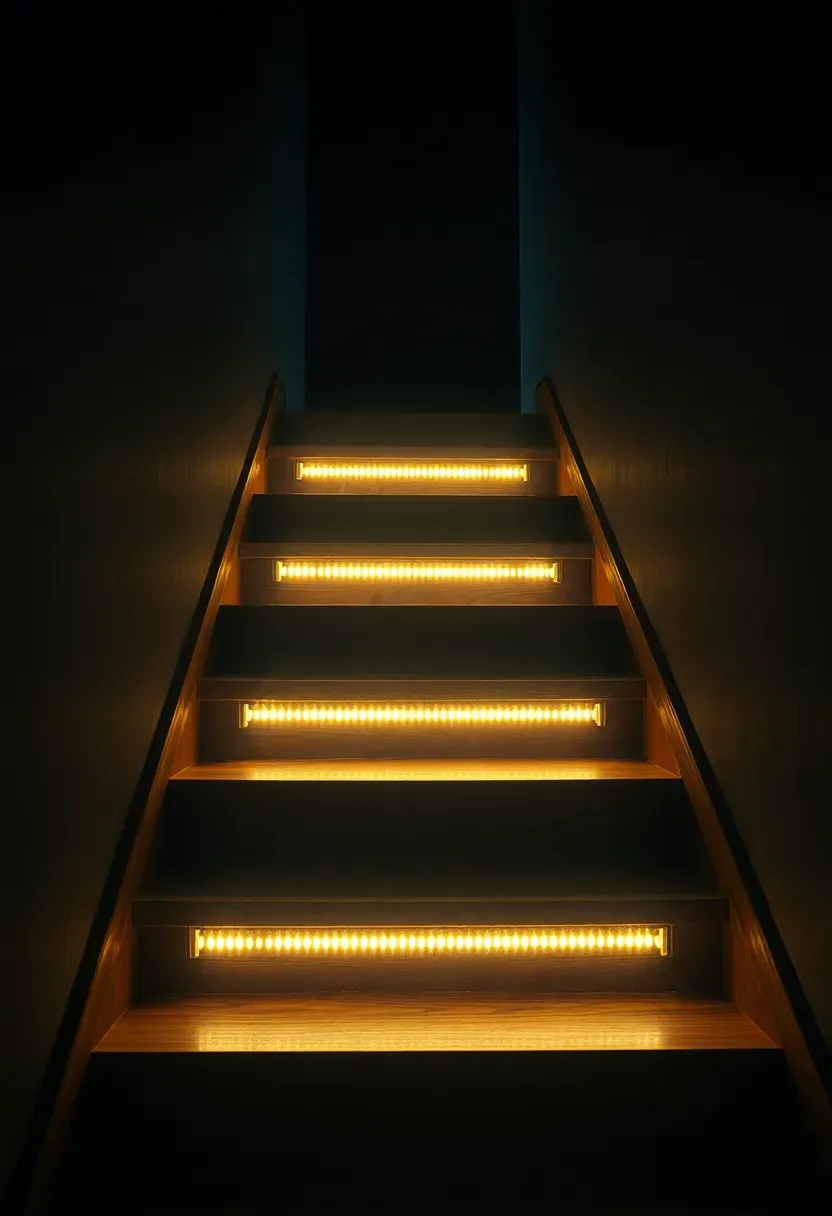
5. LED Strip Lighting on Treads
LED strips mounted under the lip of each tread nose create a floating glow effect and solve the practical problem of navigating dark basement stairs at night. Warm white (2700K to 3000K) looks best in residential settings. Run the strips with a motion sensor at the top and bottom of the stairs so the lights activate when someone approaches and shut off after 60 seconds. Total power draw for a 13-step staircase is under 15 watts, so running costs are negligible. Silicone-channel diffusers prevent visible LED dots and spread the light evenly.
Tips
- Stick with IP65-rated strips in basements — they resist the higher humidity found below grade
- A dimmer lets you drop brightness to 20 percent for a nightlight mode that will not wake anyone
- Adhesive strips alone peel off within months on wood — use aluminum channels screwed to the underside of each nosing
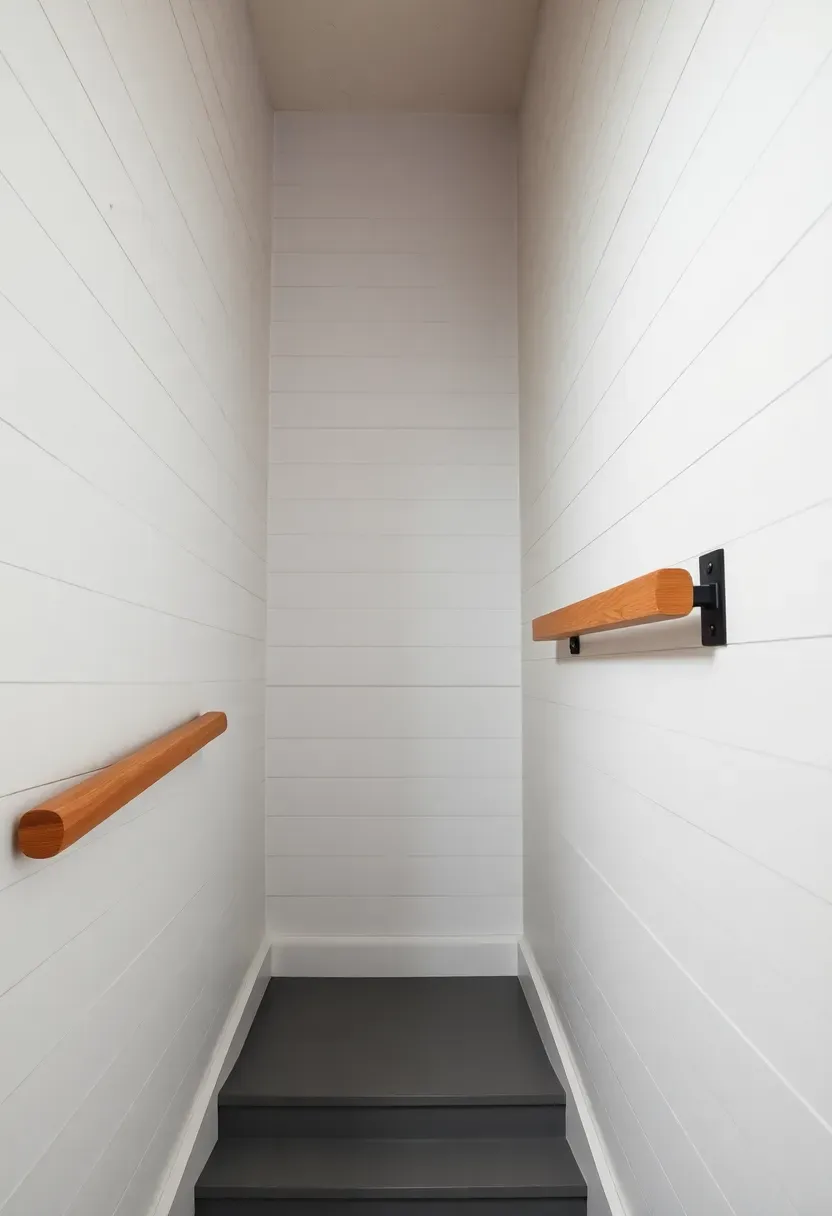
6. Shiplap Stairwell Walls
Most basement stairwells have bare drywall or exposed framing that looks unfinished. Shiplap boards cover imperfections and add texture without reducing the width of the stairwell by more than about 3/4 inch per side. Run the boards horizontally to make the descent feel wider, or vertically to emphasize ceiling height. Primed MDF shiplap costs less than real wood and handles humidity better because it does not expand and contract with moisture swings the way pine does.
Tips
- Paint the shiplap before installation — it is much faster to roll flat boards on sawhorses than to cut in around each plank on the wall
- Use construction adhesive plus a few brad nails per board instead of heavy nailing, which can crack MDF
- A single accent color on the wall facing you as you descend draws the eye and makes the stairwell feel intentional

Recommended
Items for this idea
7. Industrial Pipe Railing
Black pipe vs. galvanized
Black iron pipe has that raw industrial look and costs less. Galvanized pipe resists rust better but has a shinier, more utilitarian appearance. Both work, but black pipe with a clear matte sealer is the more popular choice for residential basement stairs.
Putting it together
Pipe railings assemble from standard plumbing fittings — floor flanges at the top and bottom anchor points, elbows at corners, tees for baluster connections. No welding required. A 3/4-inch pipe diameter feels comfortable in the hand and meets the 1.25 to 2-inch graspable handrail code requirement. Thread sealant on every joint prevents loosening over time. The whole project typically takes a Saturday afternoon.
Choose if
- You want an industrial or modern farmhouse look without spending 800 to 1200 dollars on a custom metal railing
- Your existing railing is a wobbly 2x4 nailed to the wall — pipe fittings bolted to studs are far sturdier
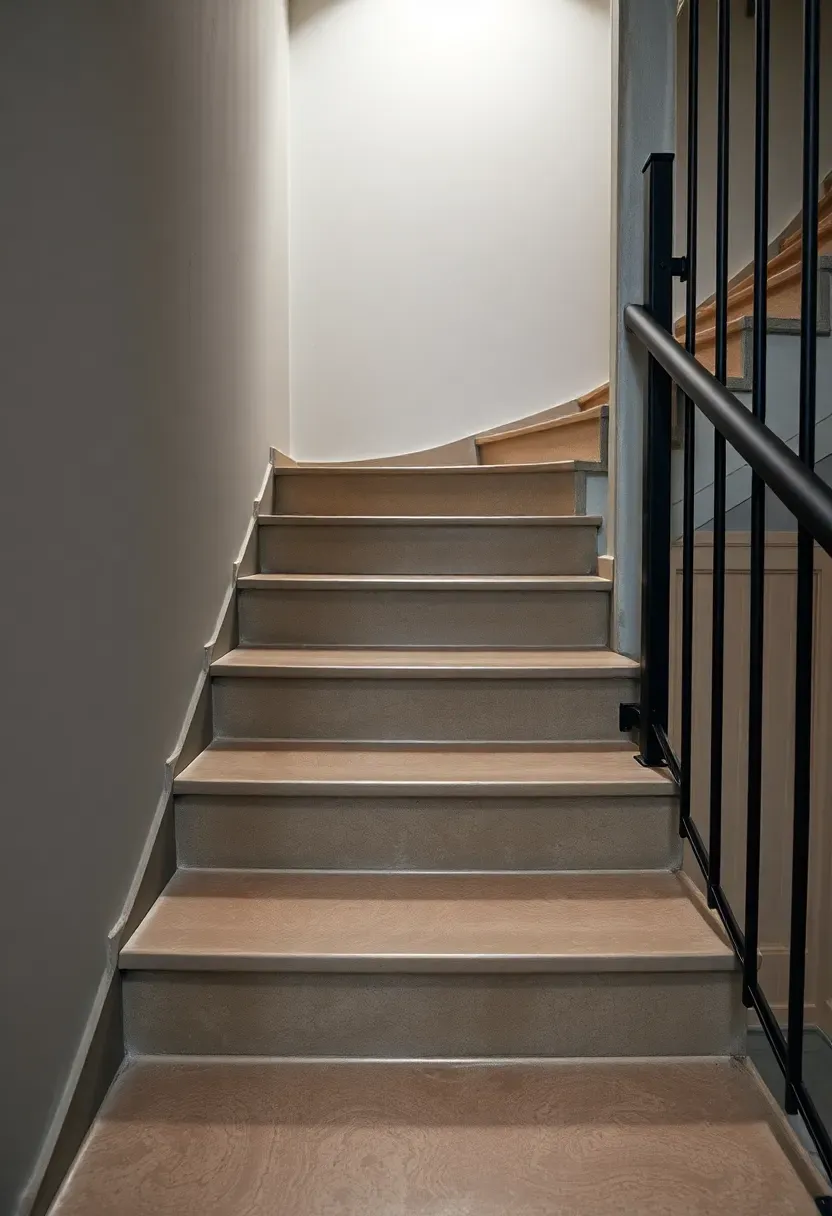
8. Stained Concrete Treads
If your basement stairs are poured concrete — common in homes built from the 1950s onward — acid staining or water-based concrete stain can give them a polished, intentional appearance. Acid stains react chemically with the lime in concrete, producing translucent earth tones that will not peel or flake. Water-based stains offer a wider color range including grays and blues. After staining, two coats of concrete sealer add a subtle sheen and make the surface easier to clean. The total cost for a standard 13-step staircase runs about 60 to 90 dollars in materials.
Tips
- Grind or sand any paint or sealer off the concrete first — stain cannot penetrate a sealed surface
- Apply stain with a pump sprayer rather than a brush for even coverage without lap marks
- Add adhesive rubber nosing strips to each tread edge because stained and sealed concrete gets slippery
Recommended
Items for this idea
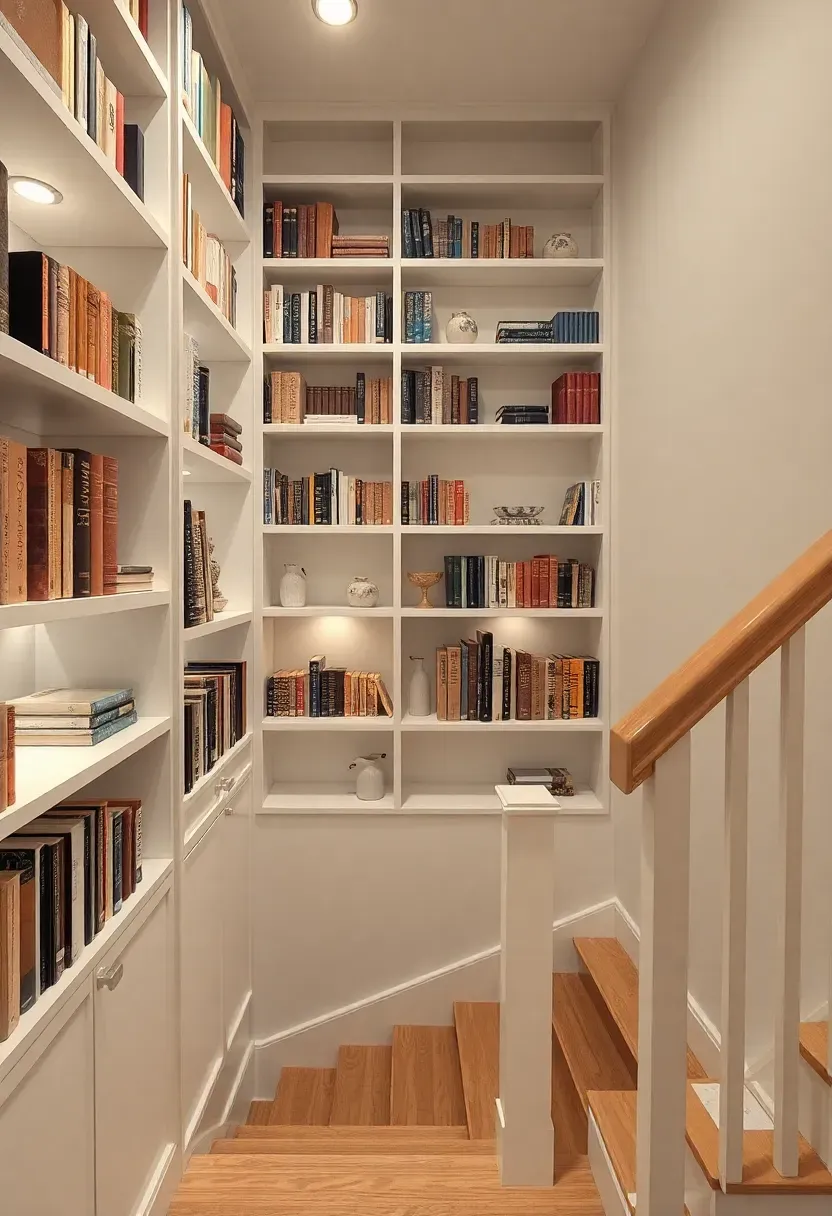
9. Built-In Bookshelf Wall
The wall running alongside a basement staircase is usually tall — often 10 to 14 feet of vertical surface measured along the stringer line. That is a lot of usable wall space. Shallow shelves (6 to 8 inches deep) fit paperbacks and small objects without encroaching on the required stairway width. Build the shelving as a single floor-to-ceiling unit anchored to the studs, with shelf spacing that varies — tighter at eye level for books, wider at the top and bottom for decorative objects or baskets. Paint the shelf backs a darker color than the shelves themselves to create depth.
Tips
- Keep the lowest shelf at least 34 inches above each adjacent tread so it does not interfere with the handrail zone
- Use a French cleat system for the entire unit so you can remove it without destroying the wall if you ever need access to wiring or plumbing behind it
- Battery-operated LED puck lights on the underside of every third shelf add reading-friendly glow to the stairwell
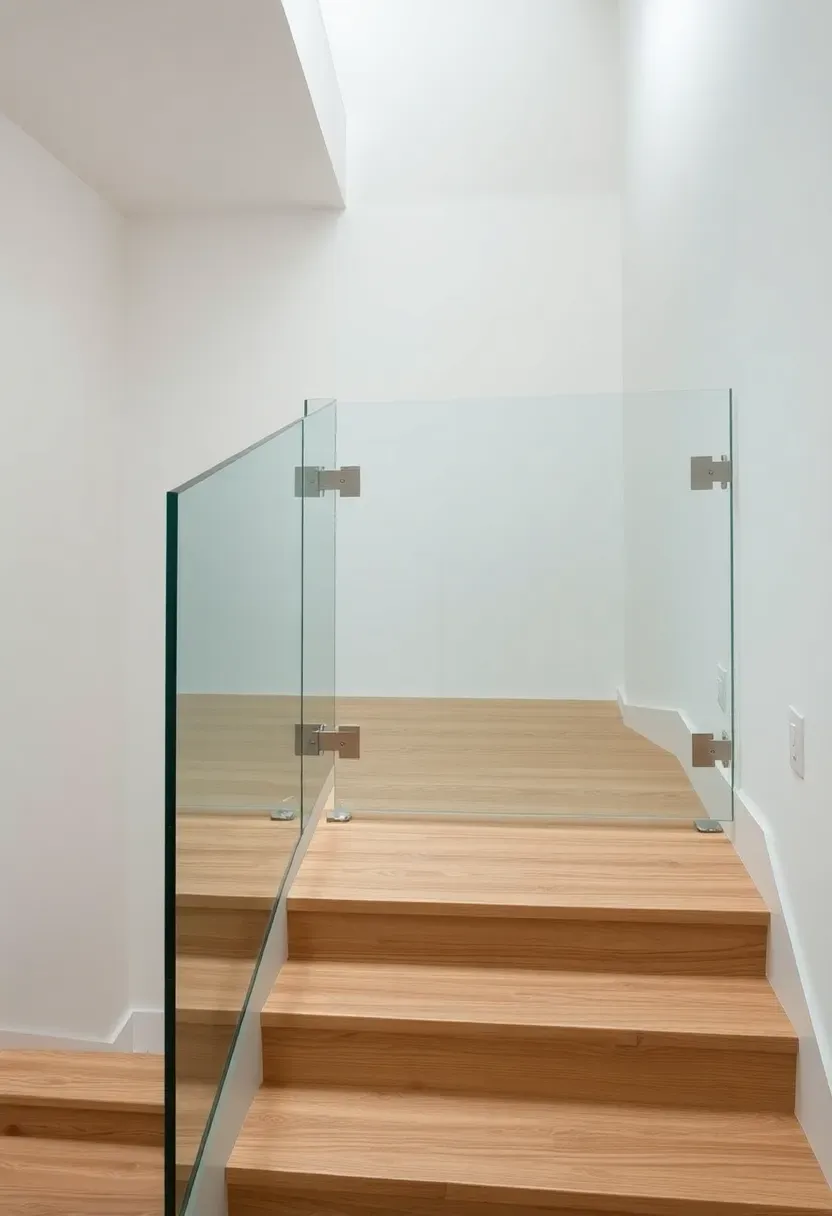
10. Glass Panel Railing
Glass vs. traditional balusters
Wood or metal balusters break up the visual line of a staircase and make narrow basement stairwells feel even tighter. Tempered glass panels eliminate that visual clutter while still meeting code for fall protection. The trade-off is cost — glass panel systems run 150 to 250 dollars per linear foot installed, compared to 30 to 60 dollars for wood balusters.
What to know before ordering
Tempered glass panels for stairs are typically 3/8-inch or 1/2-inch thick. Thicker glass is heavier but flexes less when leaned against. Standoff clamps or a channel shoe at the base hold each panel. Frameless systems look cleanest but cost more than top-rail framed versions. In a basement with limited natural light, glass railings let whatever light exists travel deeper into the stairwell.
Choose if
- You want the stairwell to feel open and bright rather than enclosed
- Your budget allows 2000 to 4000 dollars for a full-run glass railing system
Recommended
Items for this idea
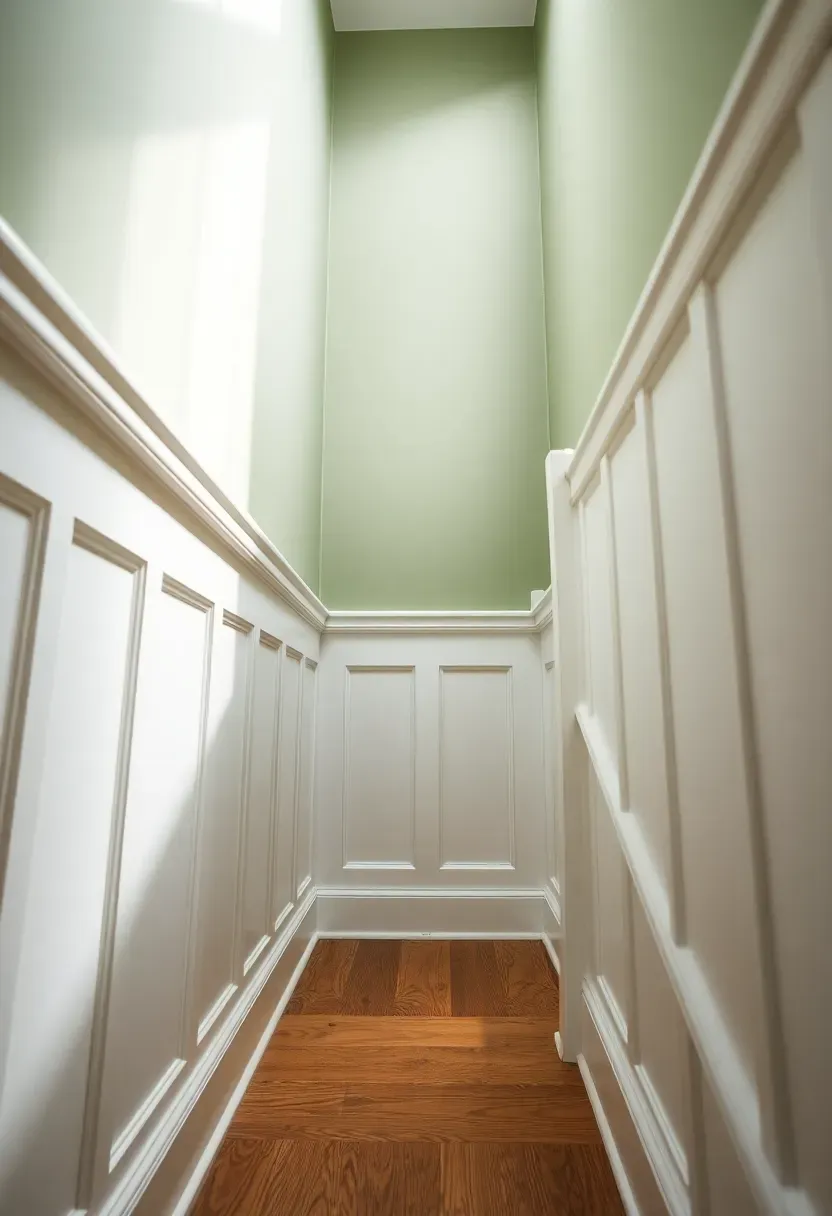
11. Wainscoting on the Stairwell
Wainscoting on the lower third of the stairwell walls protects against scuff marks from hands, bags, and laundry baskets being carried up and down. Raised-panel wainscoting suits traditional homes; flat-panel (Shaker style) works in more contemporary spaces. The cap rail follows the stair angle, which means you need to cut the top molding on that angle — a compound miter saw makes this manageable. Wainscoting panels typically rise 32 to 36 inches from each tread, following the slope of the stairs in a stepped pattern or a continuous diagonal line.
Tips
- MDF panel kits are the most affordable option and take paint well — expect about 4 to 7 dollars per square foot for materials
- A contrasting paint color above the wainscoting cap rail adds visual interest without wallpaper or additional trim
- Pre-prime and pre-paint all pieces before nailing them up to save significant cutting-in time
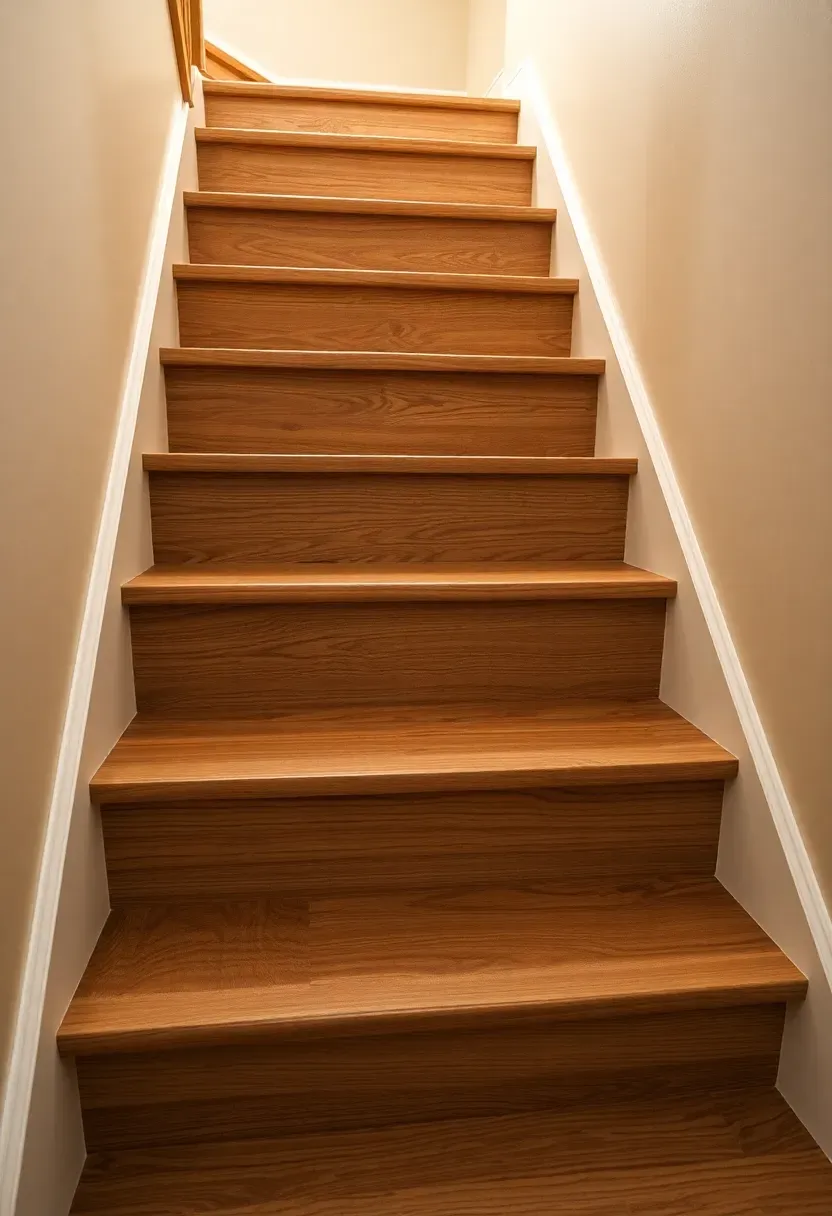
12. Vinyl Plank Tread Covers
Click-lock luxury vinyl plank (LVP) is not just for floors — it works on stair treads too. Pre-made stair nose moldings designed for LVP give each tread a finished bullnose edge. The material is waterproof, which matters in basements where humidity runs high and the occasional pipe leak is a real possibility. LVP treads also dampen sound better than bare wood or concrete. Installation goes over existing treads with construction adhesive, so there is no demolition involved. A full staircase typically uses one box of planks plus 13 stair nose pieces.
Tips
- Match the vinyl plank to whatever flooring is in the finished basement below for a seamless visual transition
- Stair nose pieces from the same manufacturer guarantee a color and texture match — aftermarket nosings often look slightly off
- Apply a bead of polyurethane caulk along the back edge of each nosing to prevent moisture from wicking underneath
Recommended
Items for this idea
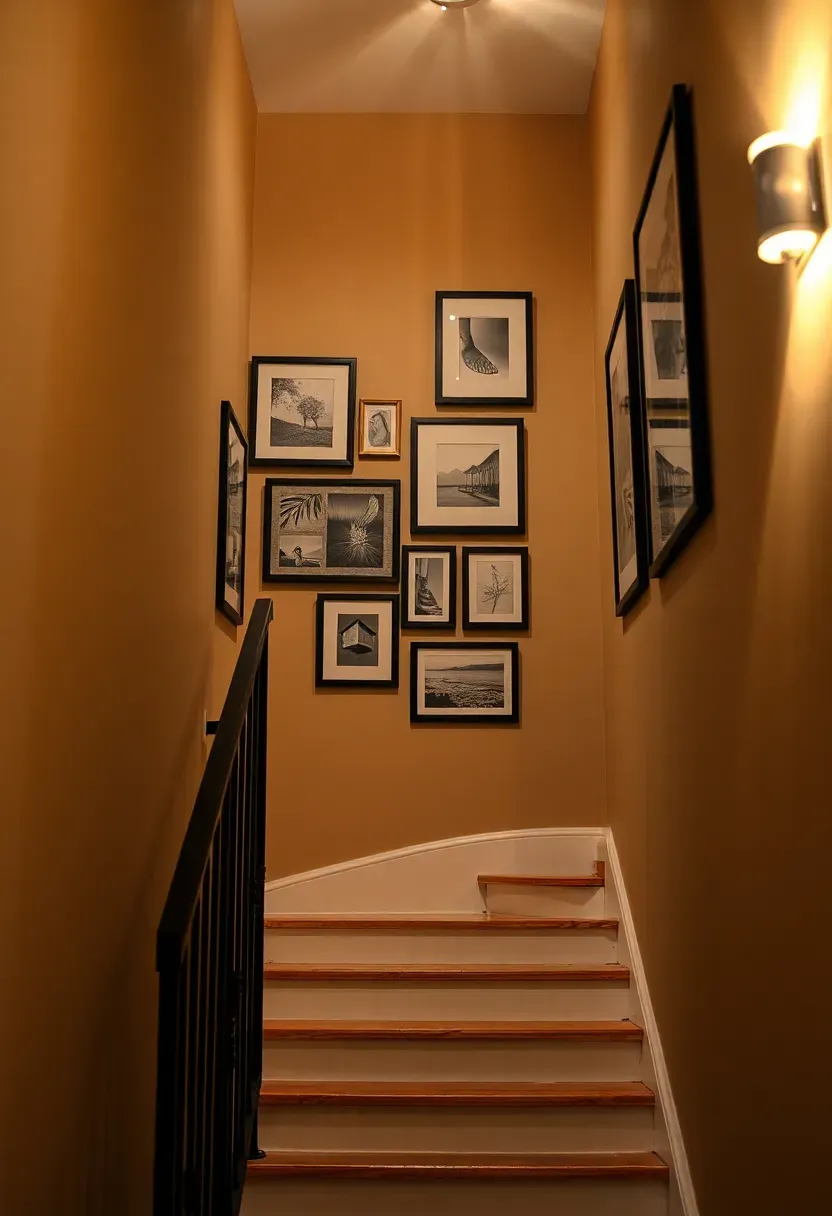
13. Gallery Wall Descent
A gallery wall along the stairwell turns a transitional space into something worth pausing on. The trick specific to stairs is keeping the center line of the arrangement parallel to the stair slope rather than level with the floor — otherwise the frames look crooked relative to the person walking. Start by laying out the arrangement on the floor using painter's tape to outline each frame. Transfer measurements to the wall. Mix frame sizes and orientations but stick to one or two frame colors for cohesion.
Tips
- Hang the lowest frames at least 8 inches above the handrail so hands do not bump them
- Use picture hanging strips instead of nails if the stairwell walls are concrete block — drilling into block in a stairwell is awkward and messy
- Black and white photographs give the most cohesive look in a tight stairwell because they do not compete with wall color
14. Cable Rail with Wood Posts
Cable railing splits the difference between the openness of glass and the warmth of wood. Horizontal stainless steel cables (usually 1/8 inch diameter) run between wooden posts at 3-inch vertical spacing to meet code. The cables almost disappear at a distance, keeping sightlines open, while the wood posts add a natural material to the stairwell. Cedar or white oak posts pair well with the silver cable. Tensioning hardware at one end of each cable lets you tighten the lines over time as they stretch slightly.
Tips
- Cable spacing must be tight enough that a 4-inch sphere cannot pass through — check your local code, as some jurisdictions are stricter
- Intermediate posts every 4 feet prevent cable deflection when someone leans against the railing
- Pre-drill post holes with a drill press for perfectly straight cable runs — hand-drilled holes wander and create uneven spacing
Recommended
Items for this idea
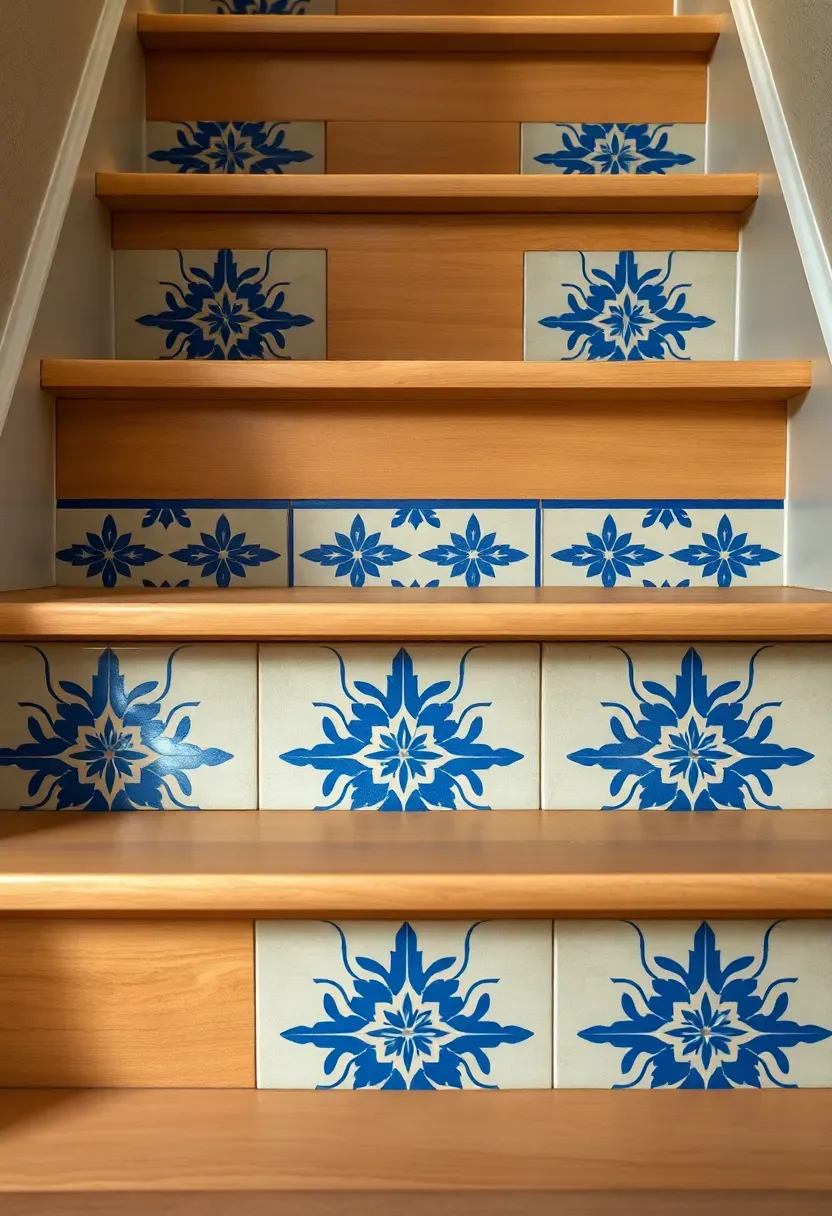
15. Tile Riser Accents
Tiling the vertical riser faces while leaving the treads in wood or another material creates a striking layered effect. Encaustic cement tiles or patterned ceramic tiles in Mediterranean blues, Moroccan geometrics, or simple subway layouts all work. Each riser face is only about 7 inches tall by 36 inches wide, so a single box of tile covers a full staircase. Thin-set mortar adheres tile directly to wood risers if you first screw a piece of 1/4-inch cement board to each riser as a substrate.
Tips
- Use the same tile pattern on every riser for a cohesive look, or alternate two complementary patterns for a patchwork stair effect
- Seal cement tiles before grouting — they are porous and will stain permanently if grout gets into the surface
- Peel-and-stick tile decals offer a similar visual for renters or anyone hesitant to commit to permanent tile
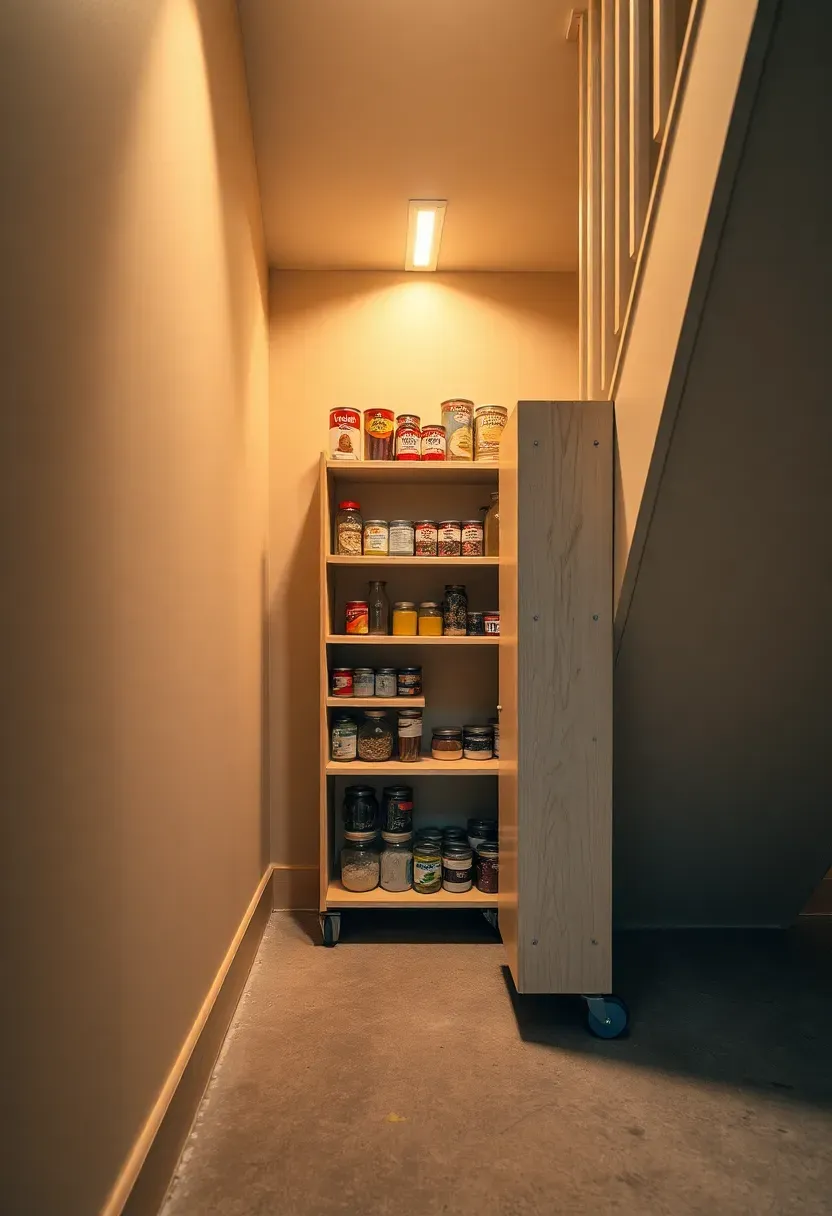
16. Pull-Out Pantry Under Stairs
The space beneath basement stairs often sits behind a small door leading to a cramped, awkward closet. Converting it to a pull-out pantry puts that triangular void to real use, especially if your kitchen storage is limited. Narrow rolling shelf units — 12 to 16 inches wide — slide out on heavy-duty casters. Each unit has 4 to 6 shelves at varying heights. The tallest unit goes at the back where the ceiling of the void is highest. Label the front of each unit so you know what is on it without pulling it all the way out.
Tips
- Add a small battery-powered motion-sensor light inside the void so you can see what you are reaching for
- Seal the floor and walls of the under-stair void with moisture-barrier paint before building shelving — basements are damp
- Heavy items like canned goods go on the bottom shelves to keep the rolling units stable
Recommended
Items for this idea
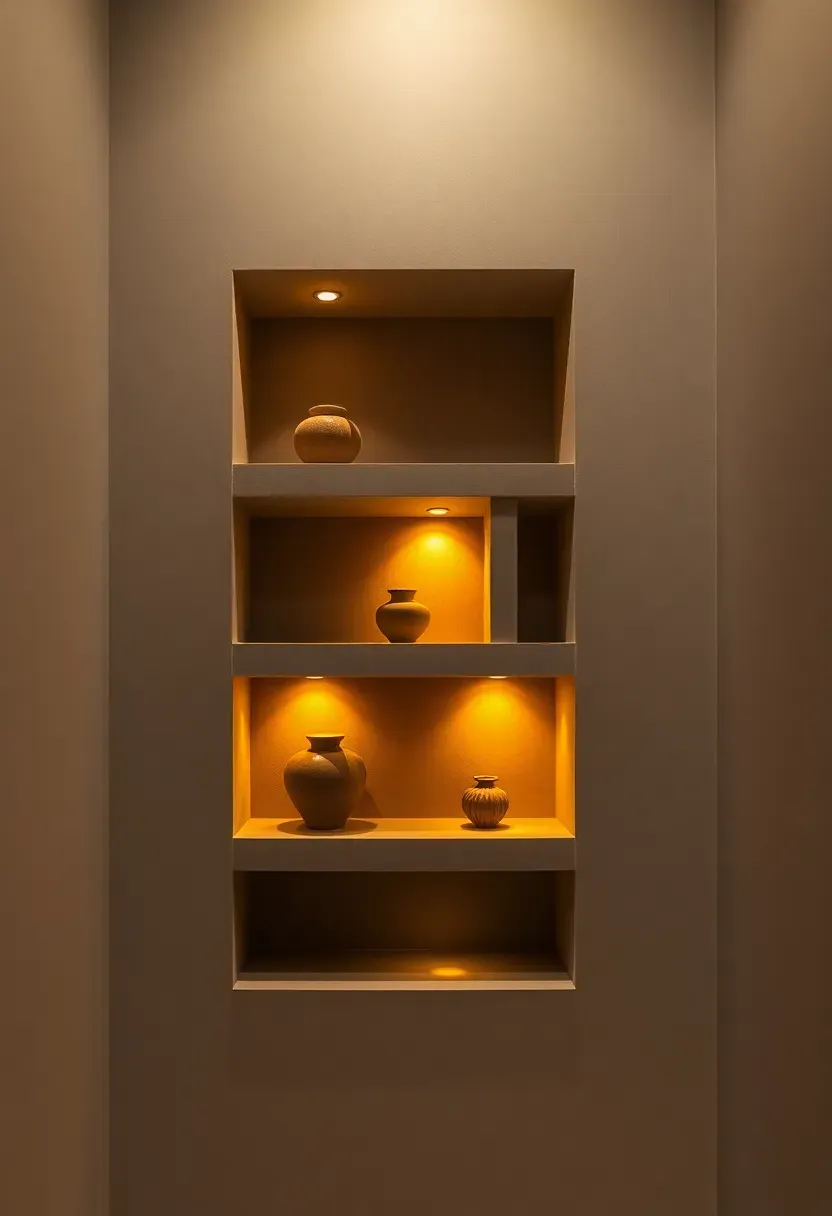
17. Recessed Wall Niches with Lights
Cutting rectangular niches into the stairwell wall between studs provides built-in display spots and ambient lighting without taking up any floor or stair width. Standard stud bays are 14.5 inches wide and 3.5 inches deep — enough for small sculptures, candles, or plants. A 3-watt LED puck light recessed into the top of each niche casts a downward glow. Three to five niches staggered at different heights along the stairwell descent create a rhythm that draws the eye downward.
Tips
- Confirm there is no wiring, plumbing, or ductwork in the stud bay before cutting — a stud finder with deep scan mode or a quick inspection from the other side of the wall saves headaches
- Drywall niches look cleanest with a rounded bullnose edge or a thin wood trim surround
- Paint the inside of each niche one shade darker than the surrounding wall to add depth
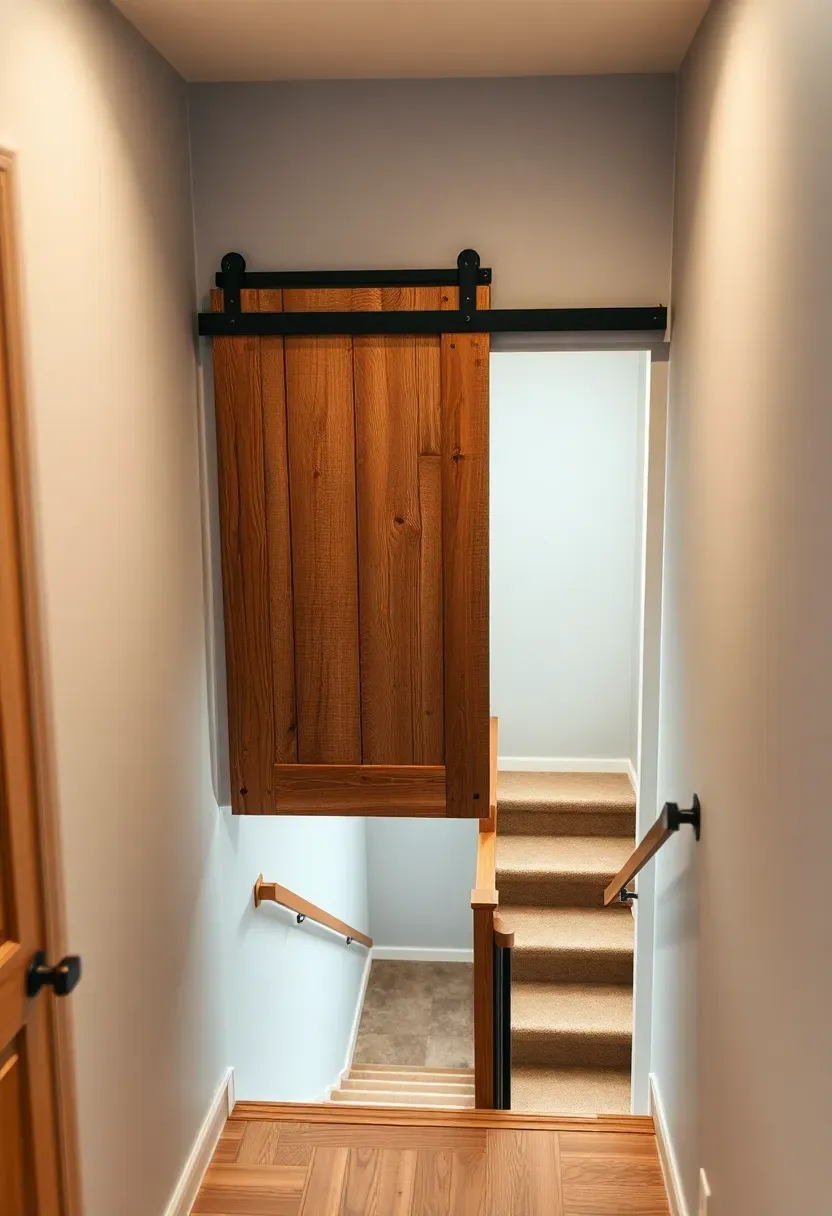
18. Barn Door at the Top
A sliding barn door at the top of the basement stairs hides the stairwell opening when the basement is not in use, blocks cold drafts from rising, and muffles sound from a basement home theater or gym. Unlike a hinged door, a barn door does not swing into the hallway, which matters when the stair opening is in a narrow corridor. A 36-inch wide door on a 72-inch track slides fully clear of the opening. Use a door at least 1.5 inches thick for sound dampening, and add a brush seal along the bottom edge to block air movement.
Tips
- Barn door hardware kits range from 50 to 150 dollars for a residential-grade track and rollers
- A soft-close mechanism prevents the door from slamming when pushed too hard — worth the extra 15 dollars
- If fire code in your area requires a self-closing door at the top of basement stairs, a barn door may not comply — check before building
Recommended
Items for this idea
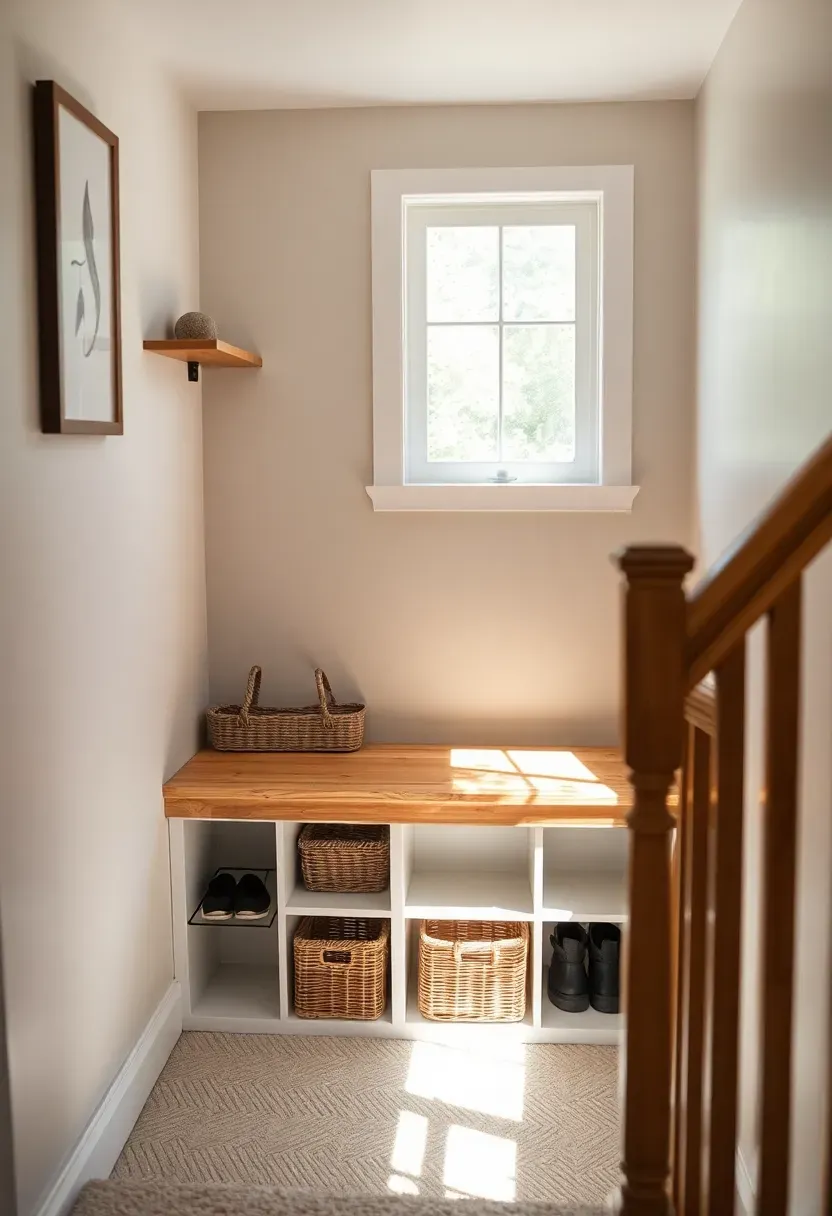
19. L-Shaped Landing Bench
If your basement stairs have an L-shaped or U-shaped turn with a landing platform, that landing is often just dead floor space. Building a bench into the landing creates a spot to sit while putting on shoes, set down laundry baskets, or even read. The bench fits against the outer wall of the landing and can include hinged-top storage or open cubbies beneath the seat. A cushion pad in an outdoor fabric (moisture-resistant) makes it comfortable without risking mildew in the below-grade environment.
Tips
- Keep the bench seat height at 17 to 18 inches — standard chair height — so it is comfortable for sitting
- Depth of 14 to 16 inches works for a landing bench without blocking the walking path
- If the landing has a window, position the bench beneath it to take advantage of natural light
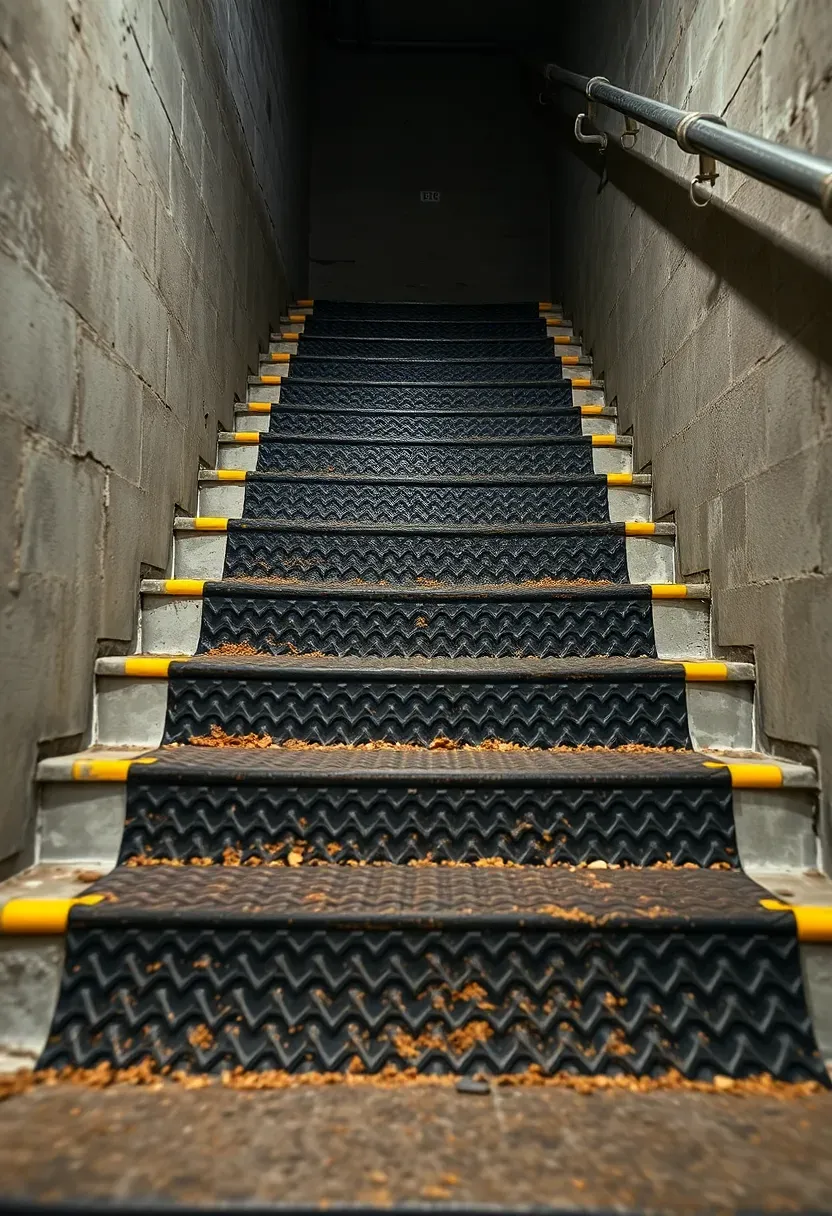
20. Rubber Tread Covers for Safety
The safety problem
Bare concrete or painted wood basement stairs are among the most common locations for household falls. Add socks, dim lighting, and hands full of laundry, and the risk goes up considerably.
The rubber solution
Molded rubber tread covers with a raised diamond or ribbed texture provide reliable grip in any footwear — or bare feet. They adhere with contact cement or double-sided tread tape. Heavy-duty versions used in commercial stairwells run about 8 to 12 dollars per tread and last decades. They also reduce noise significantly when walking in hard-soled shoes. The thick rubber cushions impacts if someone does slip, making falls less severe.
Pros and cons
- Extremely effective, inexpensive, and easy to install in under an hour for a full staircase
- Not the most visually refined option — better suited for utility stairs or unfinished basements
- Rubber off-gasses a mild odor for the first week or two after installation — ventilate the stairwell
Recommended
Items for this idea
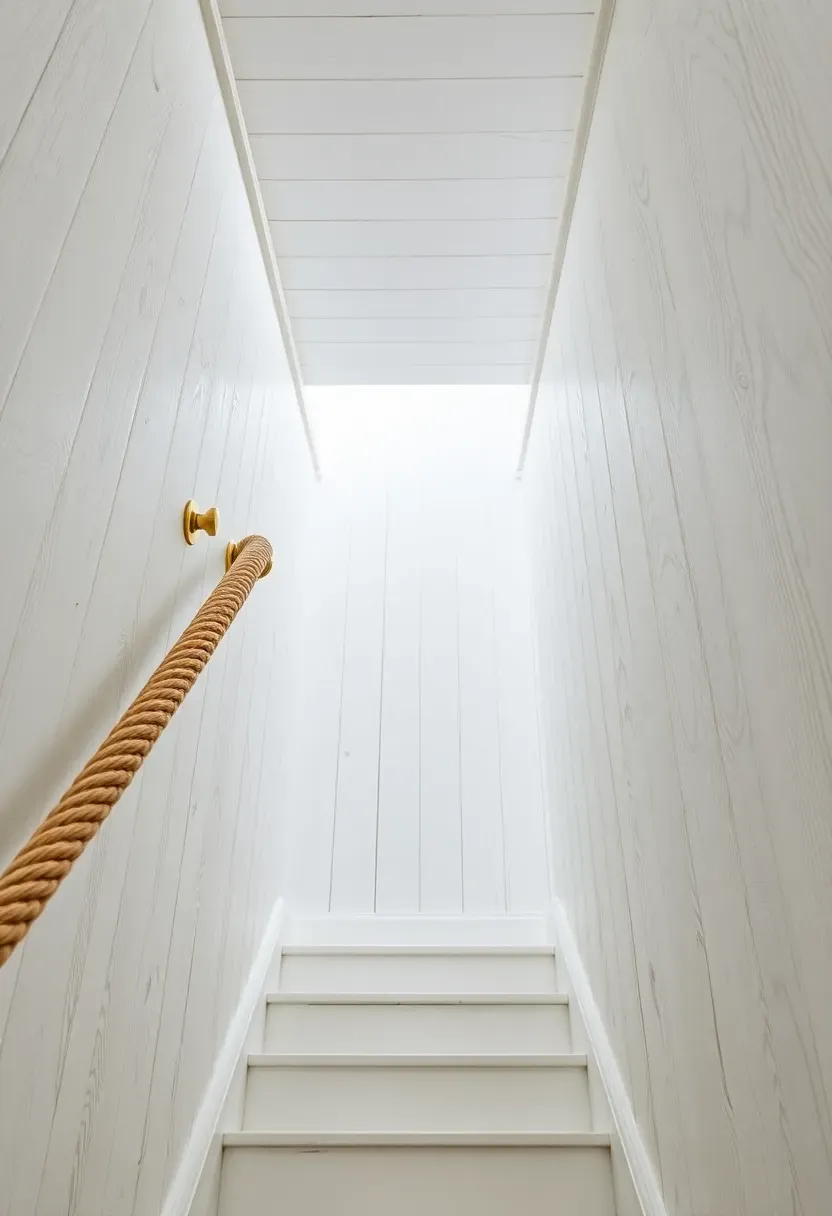
21. Whitewashed Wood Plank Walls
Whitewashing (a diluted white paint applied to raw wood and wiped back) lets the wood grain show through while brightening the stairwell significantly. Pine tongue-and-groove planks are the cheapest option and take whitewash well. The result reads as coastal, Scandinavian, or farmhouse depending on the rest of the space. In a basement stairwell that tends to feel dark and enclosed, the reflective white surface bounces whatever light exists and makes the passage feel larger than it is.
Tips
- Mix the whitewash at a 1:1 ratio of flat white latex paint to water for a medium coverage that shows plenty of grain
- Apply with a brush, then wipe with a rag in the direction of the grain while still wet — the more you wipe, the more wood shows through
- Seal with a matte water-based polyurethane to prevent the whitewash from rubbing off on clothing or hands brushing the wall
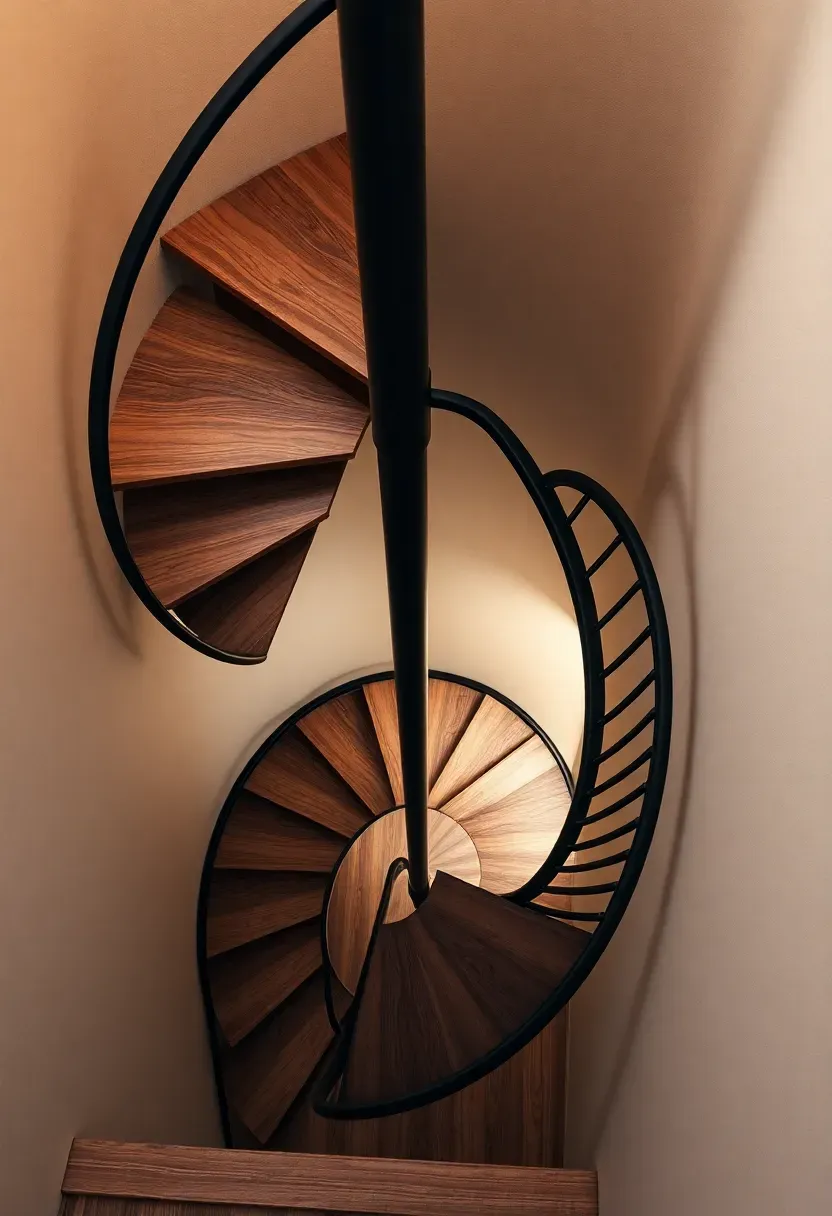
22. Spiral Staircase Replacement
When it makes sense
Spiral stairs save a massive amount of floor space — a 5-foot diameter spiral fits in roughly 25 square feet versus 40 to 50 square feet for a straight run. If your basement entry currently eats into a living area or hallway, swapping to a spiral reclaims that space. They also work well as a second access point to the basement from, say, a home office or bedroom.
What to consider
Building codes require a minimum 26-inch clear width on spiral treads (measured 12 inches from the narrow end) and a maximum riser height of 9.5 inches. Headroom of 6 feet 6 inches is the typical minimum. Steel kits from manufacturers like Arke or Dolle start around 1500 dollars for a basic model and go up from there with wood treads or custom finishes. Moving furniture downstairs through a spiral is difficult — you will still need another entry or an exterior bulkhead for large items.
Choose if
- Floor space above the stairs is more valuable to you than wide, comfortable treads
- You are adding a secondary basement access rather than replacing the only way down
Recommended
Items for this idea
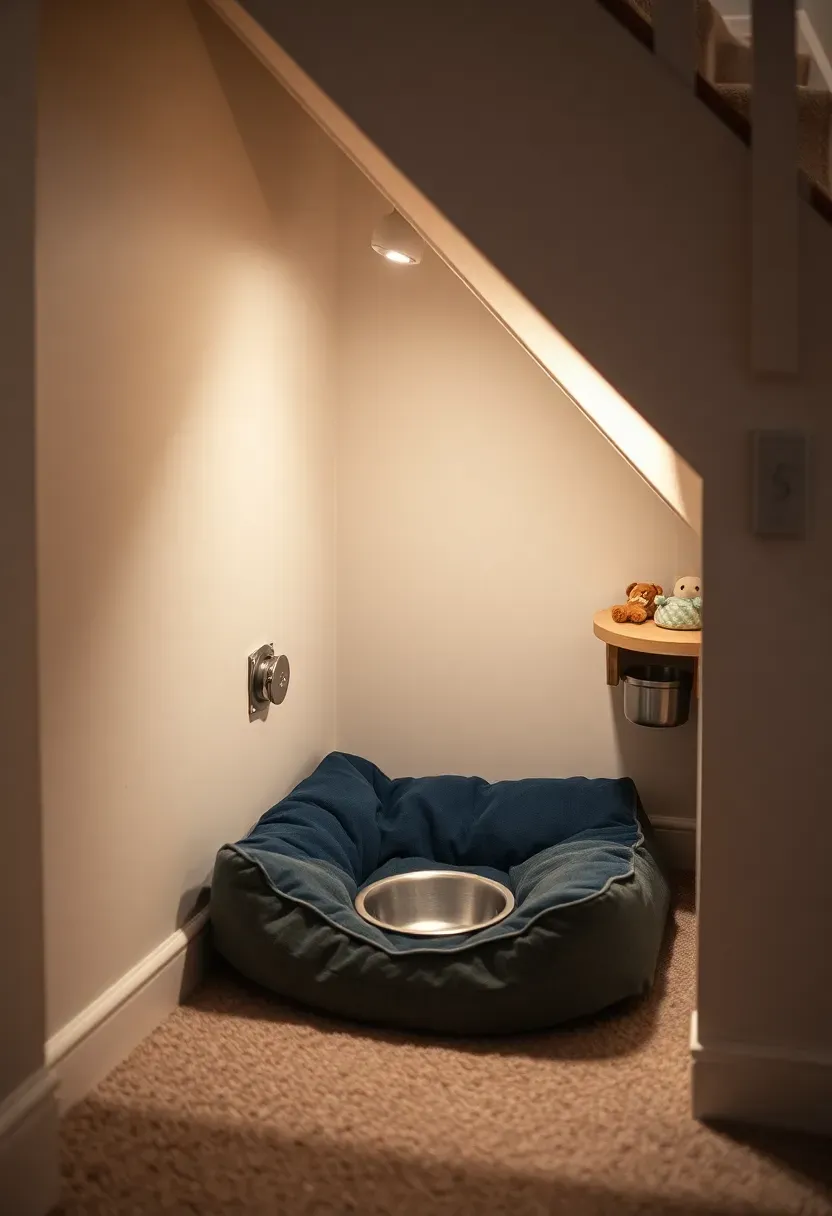
23. Dog Nook Under the Stairs
The low-ceilinged space beneath the first few stairs is too short for human storage but perfect for a dog bed or crate alternative. Frame out an opening in the side panel, sand and paint the interior, and lay down a washable mat or cushion. The enclosed feel mimics a den, which most dogs prefer for sleeping. Add a hook for a leash, a mounted water bowl to prevent tipping, and a small shelf for treats and grooming supplies. The spot stays cool in summer thanks to the basement temperature — appealing for dogs that overheat easily.
Tips
- Size the opening to your dog — a 24-by-24-inch opening suits most medium breeds, while large dogs need 30 by 30 inches
- Use semi-gloss paint inside the nook for easy cleaning when muddy paws happen
- A removable baby gate across the opening lets you contain a puppy without closing them in completely
Quick FAQ
Do I need a permit to remodel basement stairs? Cosmetic changes like painting, adding carpet, or installing lighting typically do not require permits. Structural modifications — removing walls, changing the stair configuration, or adding a spiral staircase — usually do. Check with your local building department before starting anything that alters the framing.
What is the building code for basement stair width? Most residential codes require a minimum clear width of 36 inches between finished walls or between a wall and a railing. Some older homes have stairs narrower than this, which were grandfathered in. If you are adding railings or wall treatments, measure carefully to stay at or above 36 inches.
How much does a full basement staircase renovation cost? A cosmetic refresh (paint, runner, new railing) typically runs 500 to 1500 dollars in materials for a DIY project. A full rebuild with new treads, risers, railing system, and under-stair storage ranges from 3000 to 8000 dollars with professional labor, depending on materials and complexity.
Can I add a second staircase to my basement? Yes, if you have the floor space and can meet code requirements for headroom and landing dimensions. A spiral staircase is the most space-efficient option. You will need a structural engineer to verify that cutting through the subfloor does not compromise any joists or beams, and permits are required in virtually every jurisdiction.
Are open risers safe for basements? Open risers are code-compliant as long as the gap does not allow a 4-inch sphere to pass through. In practice, this means the opening between treads must be under 4 inches. Some municipalities have stricter rules, so verify locally. For households with small children, adding a temporary mesh or acrylic panel behind the open treads is a practical safety measure.
Basement stairs deserve better than the bare-minimum treatment they usually get. Pick one or two ideas from this list that match your budget and skill level, and start there. Even a painted riser or a set of LED strips changes the daily experience of going downstairs. The bigger projects — storage drawers, glass railings, spiral replacements — add real value to the home when it is time to sell. Whatever you choose, measure twice, check your local codes, and do not skip the moisture considerations that come with every below-grade project.
Pinterest cover for 23 Basement Stair Ideas
About the author
OBCD
CGI visualization and interior design content. We create detailed 3D renders and curate practical design ideas for every room in your home.