21 Basement Shelving Ideas
Basements accumulate stuff faster than any other room in a house. Holiday decorations, sports gear, canning supplies, power tools, outgrown kids' clothes — it all ends up downstairs. Without a real shelving plan, the floor disappears within a year and finding anything takes longer than it should. The good news is that basement walls and ceiling joists offer plenty of anchoring points, and since nobody is judging the aesthetics the way they would in a living room, you can prioritize function over form. Or do both.
Below are 21 basement shelving ideas ranging from budget utility racks to finished built-ins worth showing off.
Table of Contents
- Heavy-Duty Steel Utility Shelving
- Ceiling-Mounted Overhead Storage
- Built-In Floor-to-Ceiling Cabinets
- Industrial Pipe and Plank Shelves
- Wire Rack Shelving System
- Floating Shelves for a Finished Basement
- Pegboard Wall with Adjustable Shelves
- Under-Stair Pull-Out Drawers
- Cinder Block and Board Shelving
- Corner Shelving Unit
- Rolling Cart Storage
- Modular Cube Shelving
- Wall-Mounted Bin Rails
- Library-Style Basement Bookshelf
- Garage-Grade Track Shelving
- Open Pantry Shelving for Bulk Storage
- Workshop Tool Shelf Wall
- Wine Rack and Display Shelf Combo
- Kids' Toy Storage Shelving
- Mudroom-Style Entryway Shelves
- Reclaimed Wood Rustic Shelving
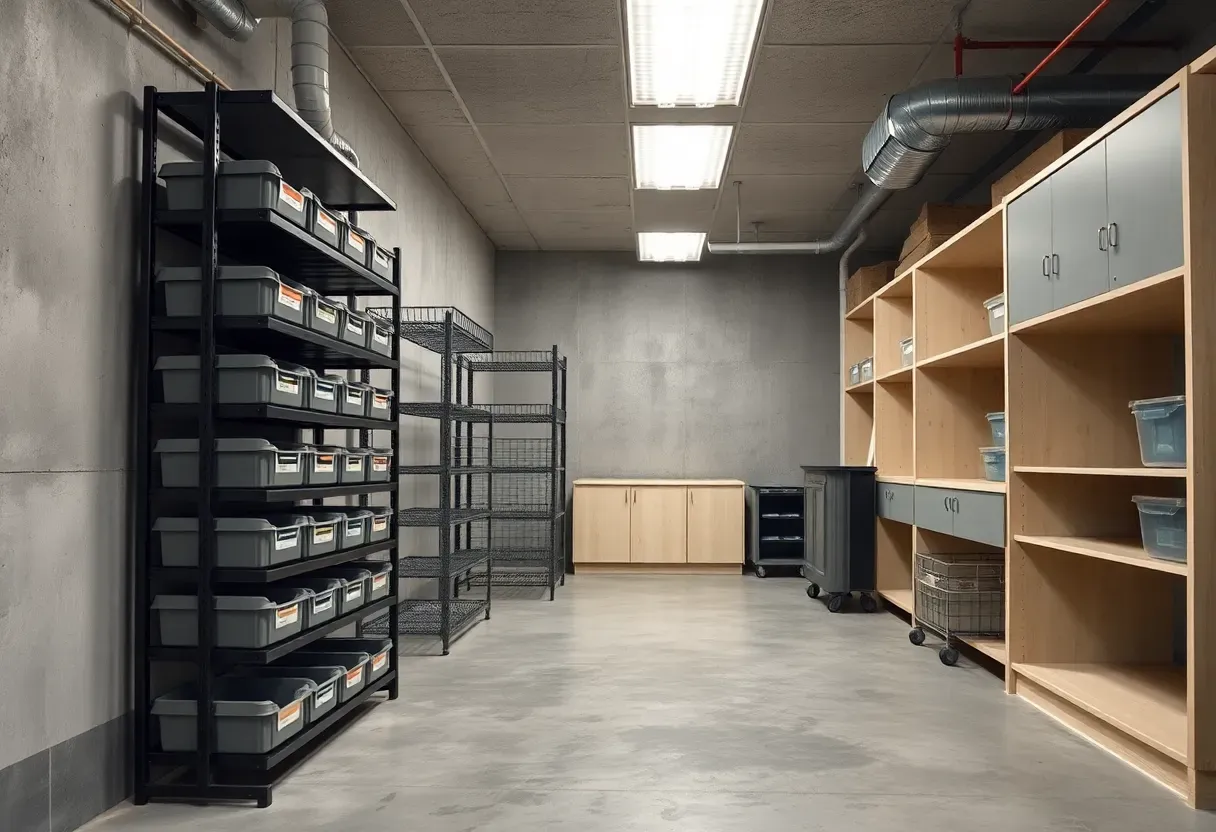
1. Heavy-Duty Steel Utility Shelving
A five-tier steel shelf rated for 300 pounds per shelf costs between $60 and $120 and assembles in about 20 minutes without tools on most models. For basements, this is the workhorse option. The open wire or solid steel decks allow air circulation, which matters in spaces prone to humidity. Bolt the unit to the wall with a single L-bracket at the top — freestanding shelves tip when you load the upper tiers heavily, and in a basement with a concrete floor, the consequences of a topple are louder and more damaging than on carpet.
Tips
- Place rubber or plastic shelf liners on wire decks to prevent small items from falling through
- Label bins on the front face so you can identify contents without pulling them off the shelf
- Keep a 3-inch gap between the shelf back and the wall to allow airflow and discourage mold
We picked a few things that go well with this idea: REIBII 5-Tier Heavy Duty Storage Shelves (★4.4), Wide 5000LBS Heavy Duty Garage Shelving (★4.2) and DYNALOAD 5-Tier Boltless Steel Utility Rack (★4.5). As an Amazon Associate we earn from qualifying purchases.
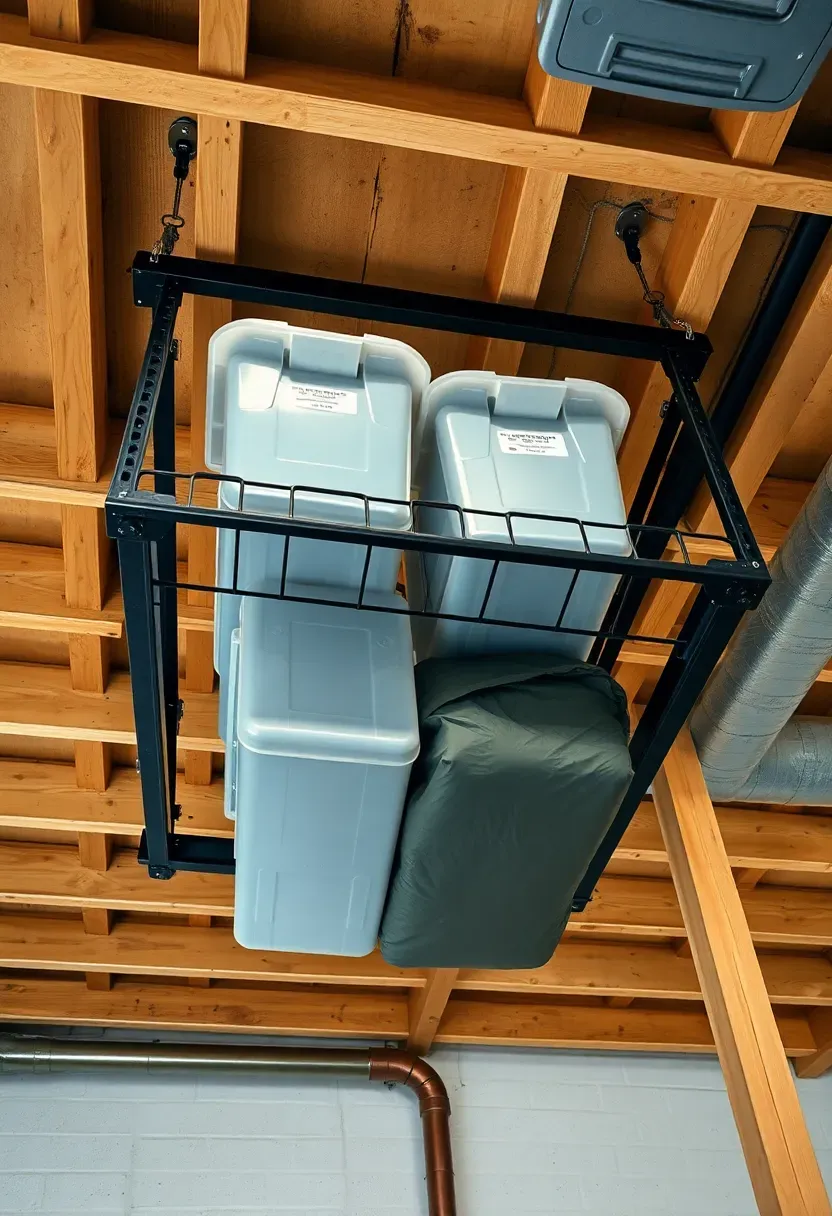
2. Ceiling-Mounted Overhead Storage
Why look up for storage
Most basements have at least 8-foot ceilings, and the space between your head and the joists is doing nothing. Overhead platforms mounted directly to ceiling joists reclaim that dead zone for seasonal items you touch once or twice a year — Christmas lights, summer camping gear, suitcases.
How to install it right
Lag bolts into joists, not drywall anchors. Each 4-by-8-foot platform needs at least six lag bolts rated for the combined load. Prefab overhead racks from brands like SafeRack or NewAge hold 600 pounds and include adjustable drop lengths so you can set the height. Leave enough clearance below to walk comfortably — 6 feet 4 inches minimum if anyone tall uses the basement.
Watch out for
- Never mount into joists that run parallel to the platform length — perpendicular attachment is stronger
- Sprinkler heads and ductwork are common obstacles; measure around them before buying
- Avoid storing anything you need frequently — climbing a step ladder every time defeats the purpose
We picked a few things that go well with this idea: Amazon Basics Fabric Storage Cubes (6-Pack) (★4.7), SONGMICS Foldable Fabric Storage Bins (6-Pack) (★4.7) and Amazon Basics 13-Inch Storage Cubes (6-Pack) (★4.7). As an Amazon Associate we earn from qualifying purchases.
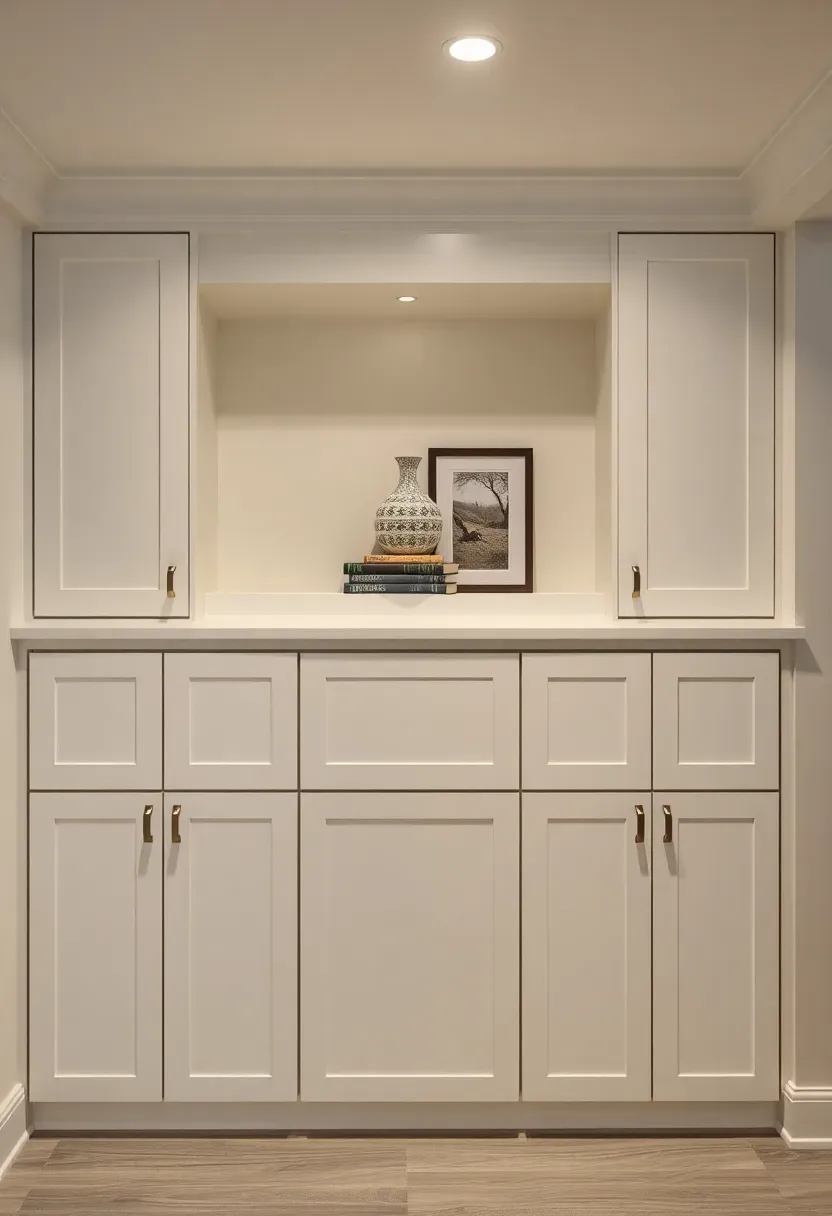
3. Built-In Floor-to-Ceiling Cabinets
Built-in cabinets turn a basement from storage dump into a room that actually looks finished. The trick is combining closed sections for things you want hidden — cleaning supplies, holiday tubs, bulk paper goods — with open shelves for items that benefit from display or quick access. MDF with a painted finish holds up fine in basements with humidity under 60%. Above that, switch to moisture-resistant MDF or plywood with a sealed edge. The cost runs $1,500 to $4,000 for a 10-foot wall depending on whether you build them yourself or hire a carpenter.
Tips
- Add soft-close hinges to cabinet doors — the sound of slamming carries through basement ceilings into rooms above
- Include at least one section with adjustable shelves so you can reconfigure as storage needs change
- Paint the interior a lighter color than the exterior to make contents easier to see
We picked a few things that go well with this idea: Black Iron Pipe Shelf Brackets (8-Pack) (★4.8), Industrial Pipe 3-Tier Shelf Brackets (2-Pack) (★4.5) and Industrial Iron Pipe 5-Tier Shelf Brackets (★4.5). As an Amazon Associate we earn from qualifying purchases.
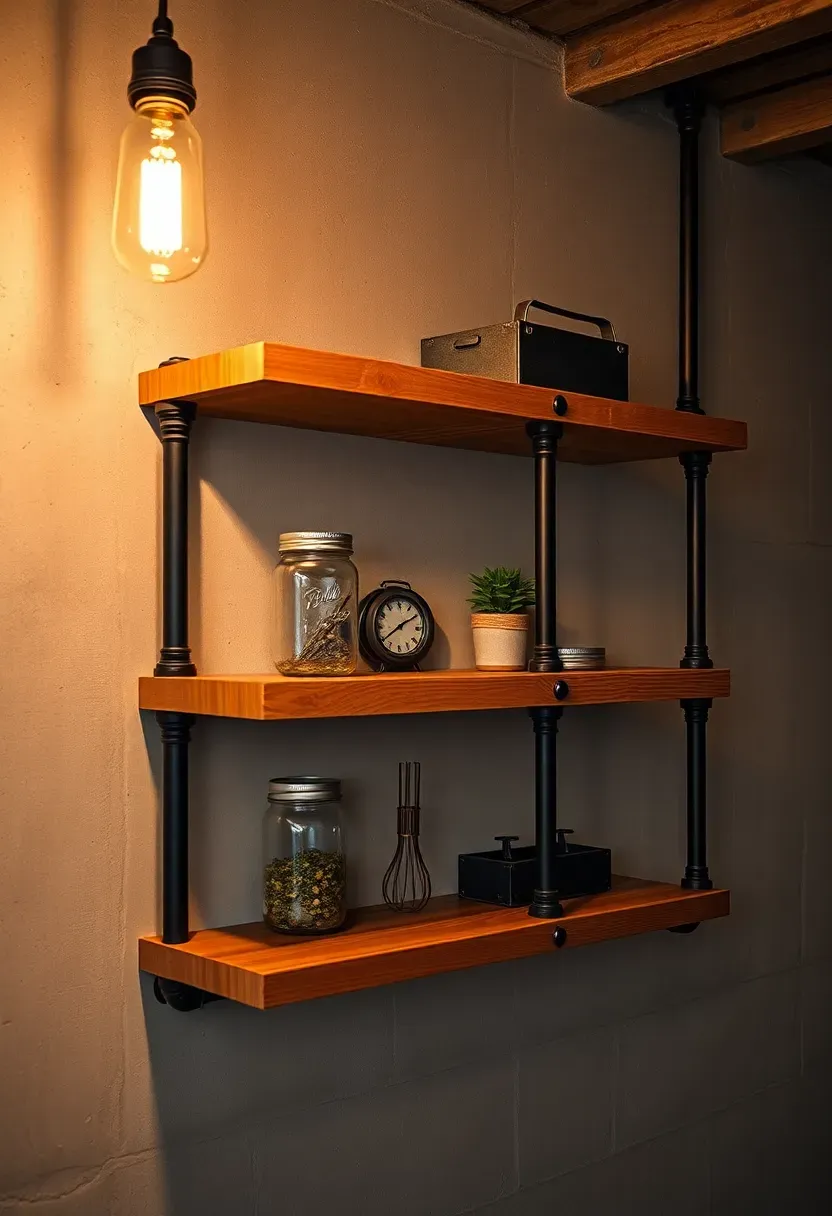
4. Industrial Pipe and Plank Shelves
Origins of the look
Black iron gas pipe as a shelving bracket started in converted warehouse lofts in the 1990s. Tenants used the exposed plumbing as a design cue and built shelves from matching fittings. The look caught on because it is genuinely sturdy — a three-quarter-inch iron pipe fitting can hold more weight than most decorative brackets.
Making it work in a basement
Today you can buy pre-cut pipe kits or source fittings at any hardware store. A single shelf run of 4 feet using floor flanges, nipples, elbows, and a 1-inch thick plank costs about $45 in materials. The flanges screw into wall studs or into concrete using Tapcon screws. The raw metal surface can rust in damp basements, so spray a clear polyurethane coat or choose galvanized fittings if your humidity runs high.
Apply at home
- Sand and stain reclaimed boards before mounting — raw wood absorbs basement moisture and warps within months
- Space shelves 14 to 16 inches apart vertically for a mix of book-height and bin-height storage
- Run the pipes all the way to the ceiling for visual impact even if the top shelf stays decorative
Recommended
Items for this idea
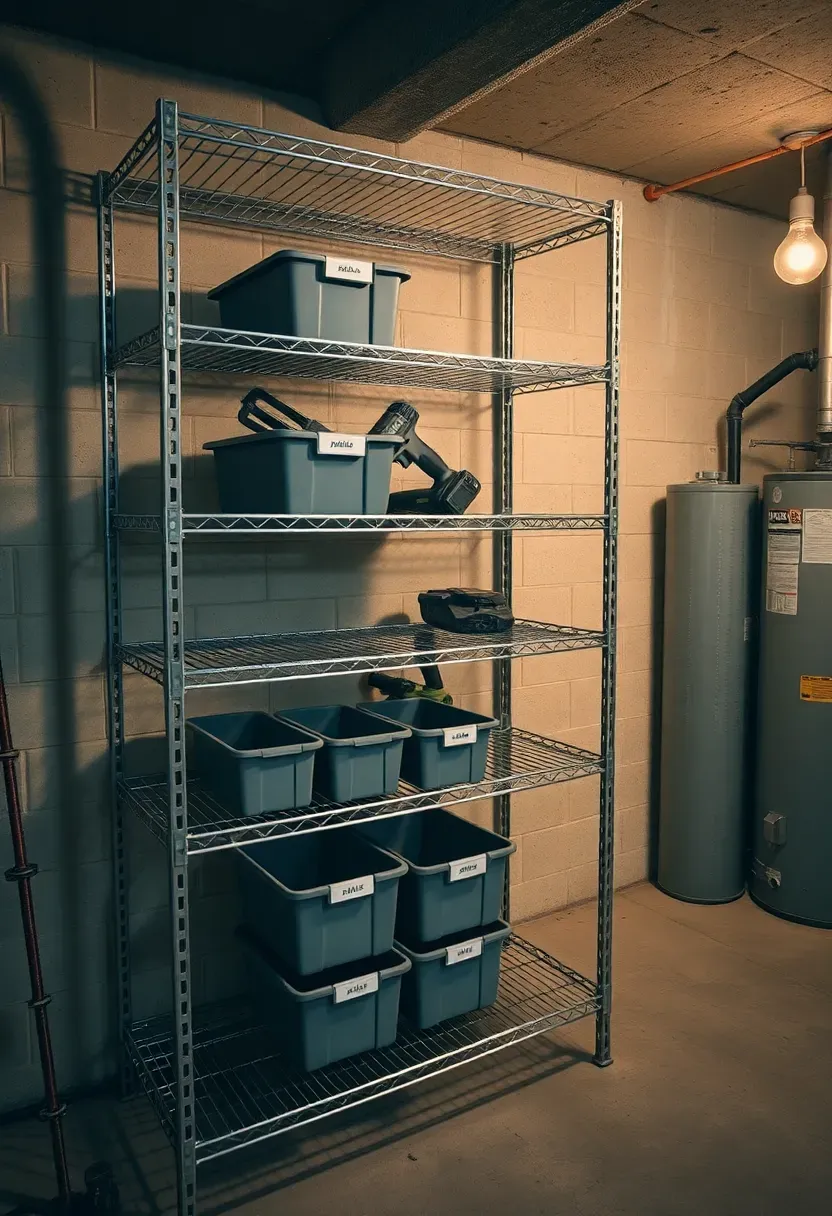
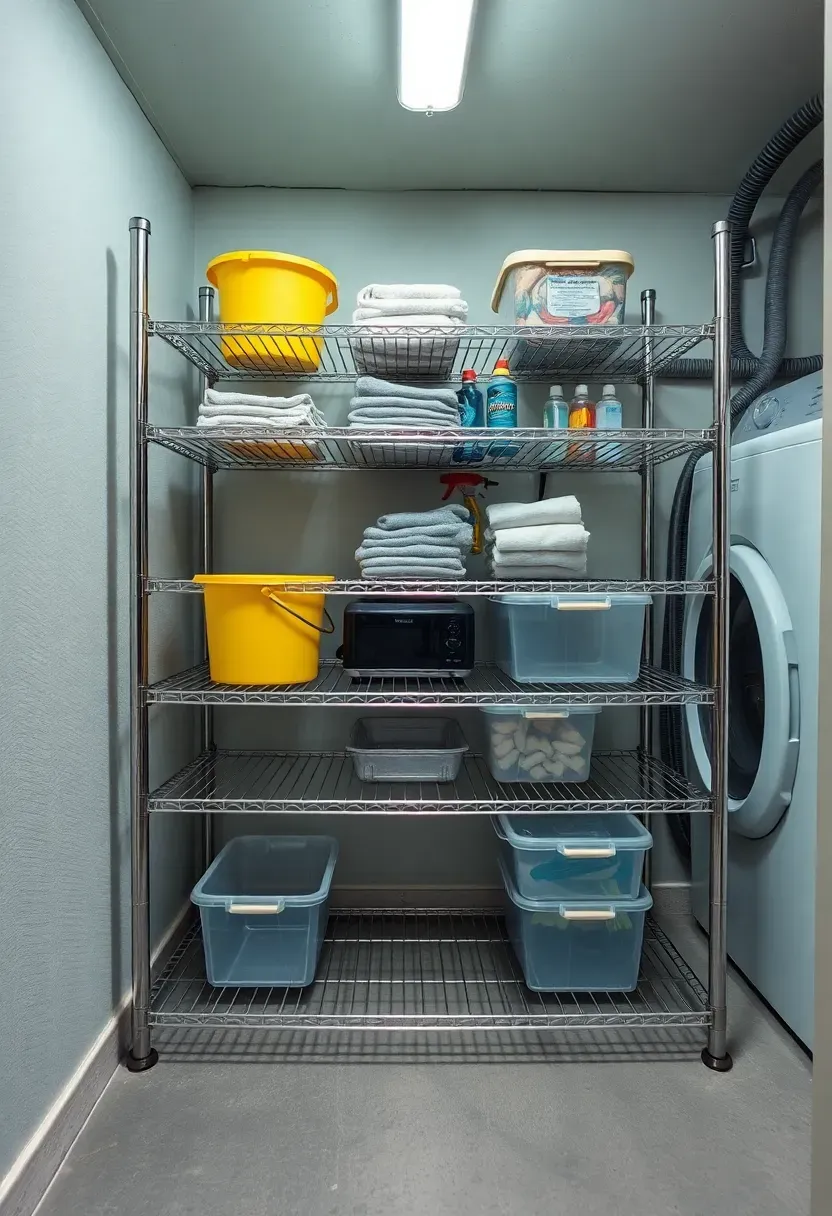
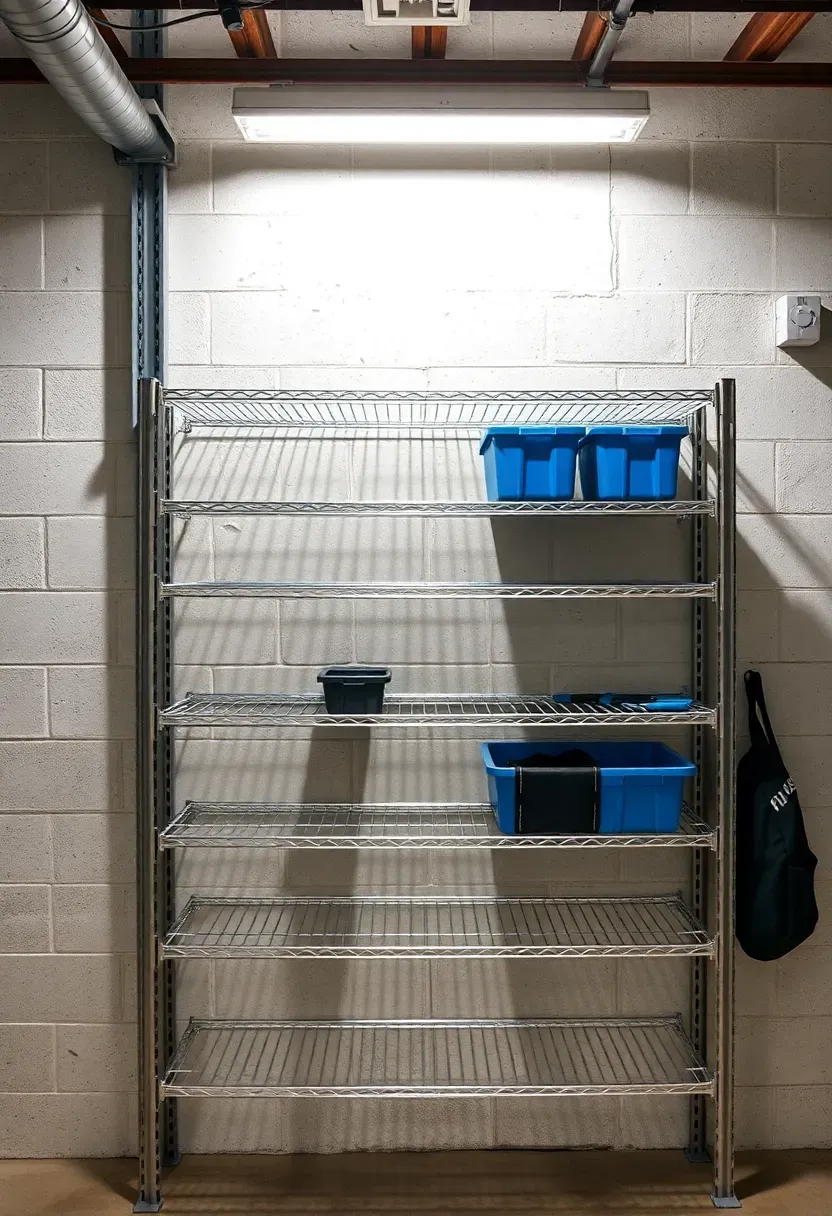
5. Wire Rack Shelving System
Wire racks — the same chrome or black epoxy-coated units used in restaurant kitchens — are arguably the most practical basement shelving available. They resist rust when coated, allow air to circulate on all sides, and adjust shelf height in one-inch increments using split sleeves on the posts. A standard 48-by-18-by-72-inch unit holds 350 pounds per shelf on four shelves. The casters available for most models let you roll the entire loaded unit aside when you need to sweep or access the wall behind it.
Tips
- Black epoxy coating resists rust better than bare chrome in humid basements
- Zip-tie adjacent units together where they share a post to create a continuous shelving wall
- Add S-hooks along the top rail for hanging brooms, dustpans, or extension cords
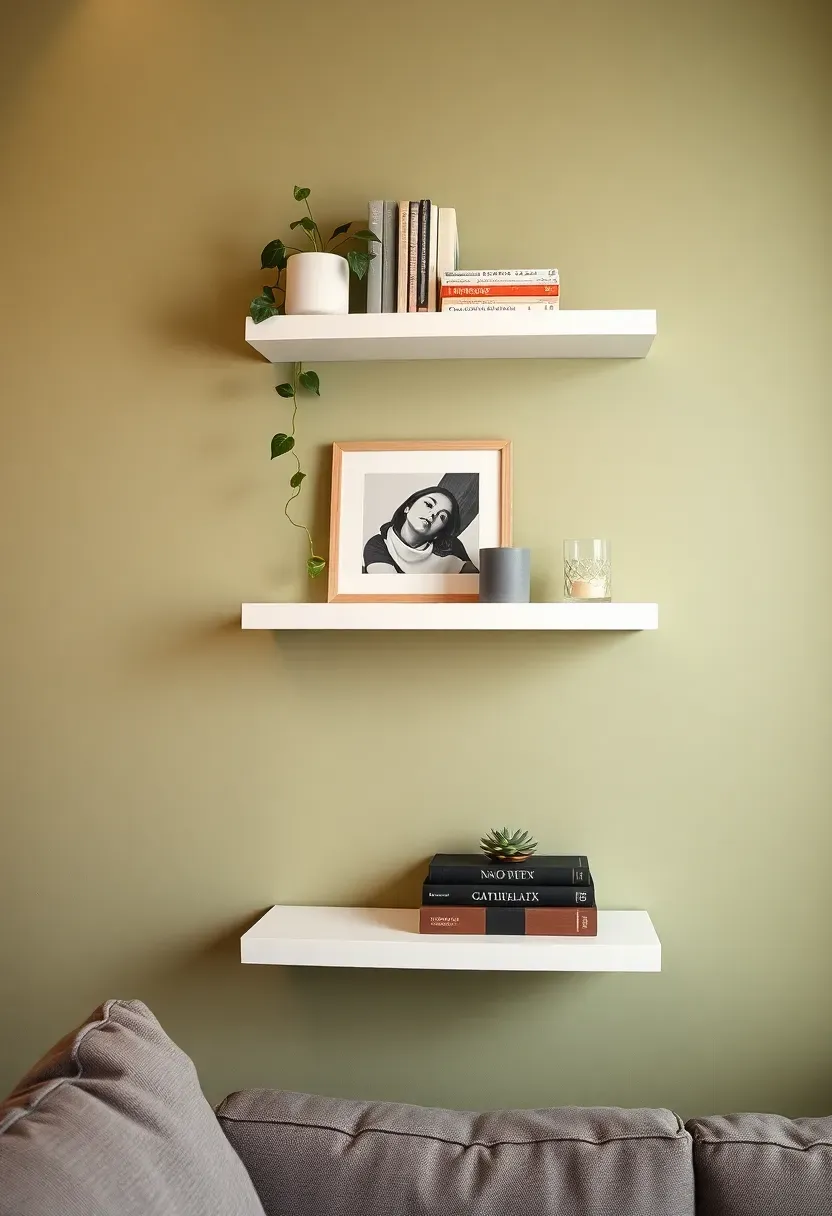
6. Floating Shelves for a Finished Basement
Floating shelves make sense once your basement is finished — painted drywall, decent lighting, maybe a carpet or LVP floor. At that point the space functions like a real room and deserves shelving that looks like it belongs in one. A 36-inch floating shelf rated for 30 pounds costs $20 to $40 and mounts with a concealed bracket system that hides hardware completely. The limit is weight: floating shelves are for display, books, and light items, not for heavy bins or tools.
Step 1: Find the studs
Use a stud finder on basement walls. If the walls are framed with steel studs (common in newer builds), use toggle bolts rated for the load instead of wood screws.
Step 2: Set level lines
Mark a level line across the wall using a 4-foot level. Floating shelves that are even slightly off-level look wrong because the wall gives a constant reference.
Step 3: Mount and load gradually
Install the bracket, slide the shelf on, and add weight gradually over a few days. This lets you spot any bracket flex before the shelf is fully loaded.
Watch out
- Drywall-only anchors fail under sustained load — always hit a stud or use rated toggle bolts
- Avoid placing heavy items at the outer ends of the shelf where leverage on the bracket is greatest
Recommended
Items for this idea
7. Pegboard Wall with Adjustable Shelves
Pegboard is cheap, flexible, and endlessly reconfigurable. A 4-by-8-foot sheet of quarter-inch tempered hardboard pegboard runs about $15. Mount it with spacers behind it — three-quarter-inch furring strips work — so hooks and shelf brackets have room to insert into the holes. The real value of pegboard in a basement is that you can rearrange the entire layout in five minutes as your storage needs shift. Add small shelf brackets from the pegboard accessory aisle for flat surfaces, wire baskets for loose hardware, and J-hooks for hanging items.
Tips
- Paint the pegboard with a light color before mounting so items stand out visually against the background
- Use locking-style hooks that clip from behind to prevent shelves from lifting off when you remove items
- Dedicate a section for frequently used items and outline their shapes with a marker for quick put-back

8. Under-Stair Pull-Out Drawers
The triangular space beneath basement stairs is one of the most wasted volumes in residential construction. In a typical straight-run staircase, that cavity holds roughly 40 cubic feet. Pull-out drawers fitted into the side or front of each stair riser turn that dead space into organized, accessible storage. Each drawer runs on full-extension ball-bearing slides rated for 50 to 100 pounds. The build requires basic carpentry skills and about $200 in hardware and plywood for a full set of six to eight drawers.
Choose if
You have a finished basement where piling boxes under the stairs looks messy, or if the under-stair area is currently blocked off behind drywall and going unused entirely.
Skip if
Your stairs are open-riser or your basement stair framing is not accessible from the side — retrofit costs escalate quickly when you need to reframe.
Recommended
Items for this idea
9. Cinder Block and Board Shelving
This is basement shelving at its most utilitarian and its cheapest. Two stacks of standard 8-by-8-by-16-inch cinder blocks at each end with planks of 2-by-10 lumber across them give you a shelf for about $5 per running foot. No tools, no fasteners, no wall damage. The weight of the blocks and the items on the shelves provide all the stability you need on a flat concrete floor. This approach works best for heavy items like paint cans, bags of soil, and bulk liquids that would test the limits of lighter shelving systems.
Tips
- Cap the top of each cinder block stack with a rubber pad to prevent the wood from sliding
- Keep the span between supports under 4 feet to avoid sagging on 2-by-10 boards
- Stack blocks in alternating directions for a more stable column
10. Corner Shelving Unit
Corners are dead zones in most basements. A purpose-built corner shelf unit — either a freestanding triangular rack or two wall-mounted shelf runs meeting at a 90-degree joint — makes that space functional. Freestanding corner units from $40 to $80 fit into a 24-by-24-inch footprint and offer five tiers. Custom built corner shelves using plywood and a French cleat system cost more but follow the exact angle of your walls, which in basements is sometimes not a true 90 degrees.
Tips
- Measure the actual wall angle with a digital angle finder before cutting custom shelves — basement corners are often 88 or 92 degrees
- Use the lower shelves for heavy items and upper ones for light items to keep the unit stable
- A small LED puck light on the underside of each shelf illuminates the dark corner without wiring
Recommended
Items for this idea
11. Rolling Cart Storage
The case for mobility
Fixed shelves define the room permanently. Rolling carts let you rearrange on demand. A three-tier steel utility cart with locking casters costs $30 to $60 and holds 300 pounds across all tiers. In a basement that serves double duty — laundry area on weekdays, workshop on weekends — you can roll supplies to wherever you need them and push them aside when finished.
Best uses in a basement
Cleaning supplies, craft materials, small power tools, gardening gear staged for spring planting. Anything you grab, use, and put back in a single session works well on a cart. What does not work: long-term bulk storage. Carts hold less volume per square foot than fixed shelving, and they roll away from where you left them if the floor slopes, which basement floors sometimes do.
Recommendation
Buy at least two: one dedicated cart for cleaning, one for your primary basement activity. Assign each a color or label so items go back to the correct cart.
12. Modular Cube Shelving
Cube shelving — the Kallax from IKEA being the most widely known — works in finished basements where you want some visual order. Each 13-by-13-inch cube fits a standard fabric storage bin perfectly. A 4-by-4 unit gives you 16 cubes in a 57-by-57-inch footprint. The modular aspect lets you add units side by side or stack them in different configurations as the room evolves. Secure tall configurations to the wall with the included anti-tip strap, which matters more on concrete floors where the feet can slide.
Tips
- Alternate open cubes and bins for a rhythm of display and concealed storage
- Add caster wheels to the bottom of a 2-by-2 unit to create a rolling side table for flexible use
- In humid basements, run a dehumidifier nearby — particleboard swells and delaminates above 65% humidity
Recommended
Items for this idea
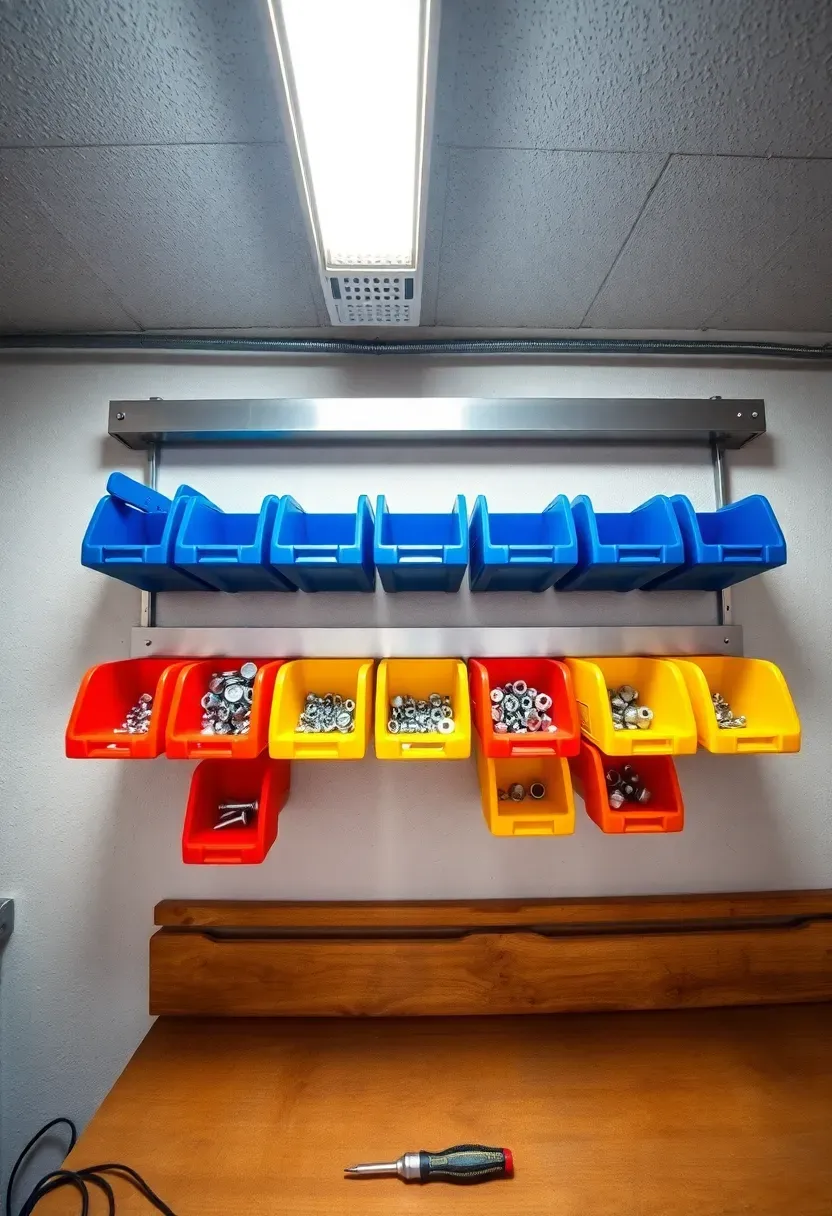
13. Wall-Mounted Bin Rails
Small parts storage is a specific problem that general shelving solves poorly. Wall-mounted bin rails — steel tracks that hold rows of small tilt-out plastic bins — are the standard solution in workshops and garages, and they work just as well along a basement wall. A 24-bin system covering a 3-foot-wide section of wall costs $25 to $50. Each bin holds screws, nails, connectors, fuses, batteries, or any small item that otherwise ends up loose in a junk drawer or rattling around the bottom of a larger bin.
Tips
- Color-code bins by category: red for electrical, blue for plumbing, yellow for general hardware
- Mount rails at eye level so you can read bin labels without bending or reaching
- Add a small magnetic strip above the rail for keeping frequently used screwdrivers or pliers within arm's reach

14. Library-Style Basement Bookshelf
A dedicated book wall in the basement makes sense once your collection outgrows the living room. Floor-to-ceiling shelves 10 to 12 inches deep hold standard and oversized books without wasted space. Pine, poplar, or birch plywood all work for the shelves themselves — the key structural decision is vertical support spacing. Keep verticals no more than 32 inches apart, or the shelves will bow under a full load of hardcovers. A 10-foot wall of built-in bookshelves using three-quarter-inch plywood costs $400 to $700 in materials for a DIY build and about double that if you hire someone.
Tips
- Add a reading chair, a floor lamp, and a small side table to make the space usable rather than just storage
- Install a dehumidifier if humidity exceeds 55% — paper absorbs moisture and pages warp over time
- Face-out display a few favorite covers on the top shelf for visual interest
Recommended
Items for this idea
15. Garage-Grade Track Shelving
Track shelving systems — vertical metal uprights screwed to wall studs with adjustable brackets that hook in at any height — bring commercial-grade flexibility to a basement. Brands like Rubbermaid FastTrack and Gladiator GearTrack offer uprights in 48 to 84-inch lengths with brackets rated for 50 to 100 pounds each. The primary advantage over fixed shelving is infinite adjustability: slide the brackets up, down, or to a different upright in seconds. This matters in a basement where what you store changes seasonally.
Step 1: Plan the layout
Map which items go where on paper first. Group by frequency of access: daily items at waist height, seasonal items up high, heavy items down low.
Step 2: Mount the uprights
Screw uprights into every stud along the run. A 10-foot wall typically hits five or six studs. Use at least two screws per stud contact point.
Step 3: Add accessories
Beyond flat shelf brackets, most track systems accept hooks, bike hangers, basket attachments, and tool holders. Buy the starter kit and add pieces as you identify needs.
Watch out
- Avoid mounting track systems to basement walls with moisture issues — the steel will rust behind the upright where you cannot see it
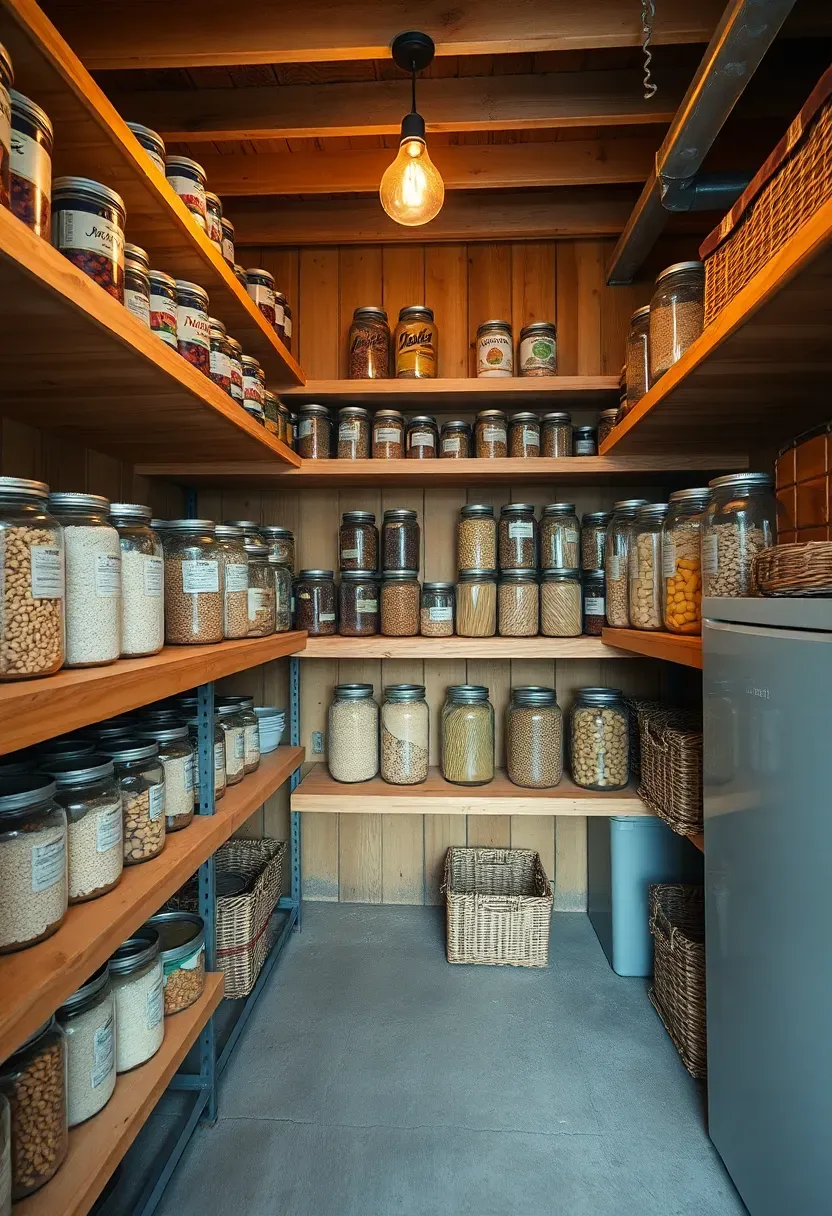
16. Open Pantry Shelving for Bulk Storage
If you buy groceries in bulk — warehouse club quantities of canned goods, rice, pasta, paper products — a basement pantry shelf keeps the main kitchen cabinets from overflowing. Sturdy shelves 16 to 18 inches deep hold two rows of cans or jars front to back. Arrange items using the FIFO method: first in, first out, with newer purchases behind older ones. A well-organized basement pantry reduces food waste because you can actually see what you have. Keep the area between 50 and 70 degrees with humidity under 60% to meet standard food storage recommendations.
Tips
- Add shelf risers or step-style organizers so you can see the second row behind the first
- Keep a simple inventory list taped to the shelf end-cap and update it when you add or remove items
- Store nothing directly on the concrete floor — elevate the lowest shelf at least 4 inches to prevent moisture wicking
Recommended
Items for this idea
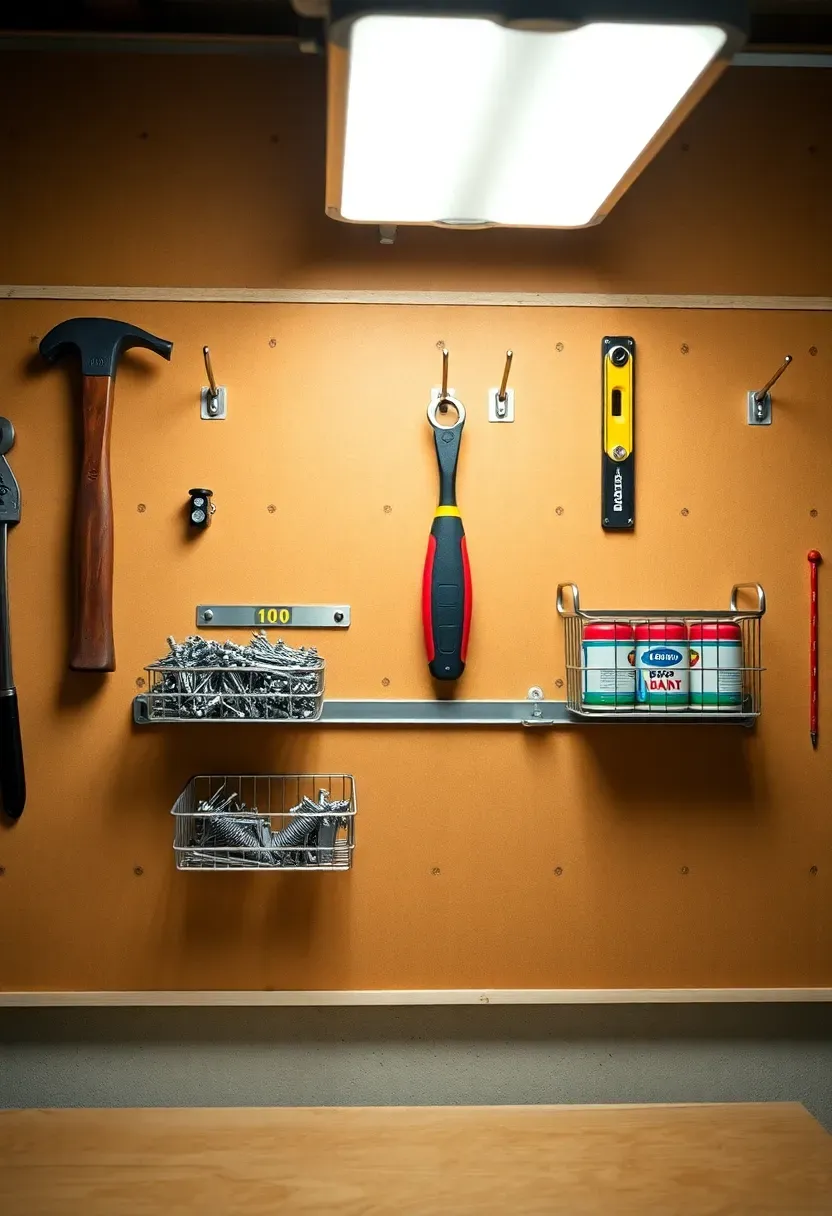
17. Workshop Tool Shelf Wall
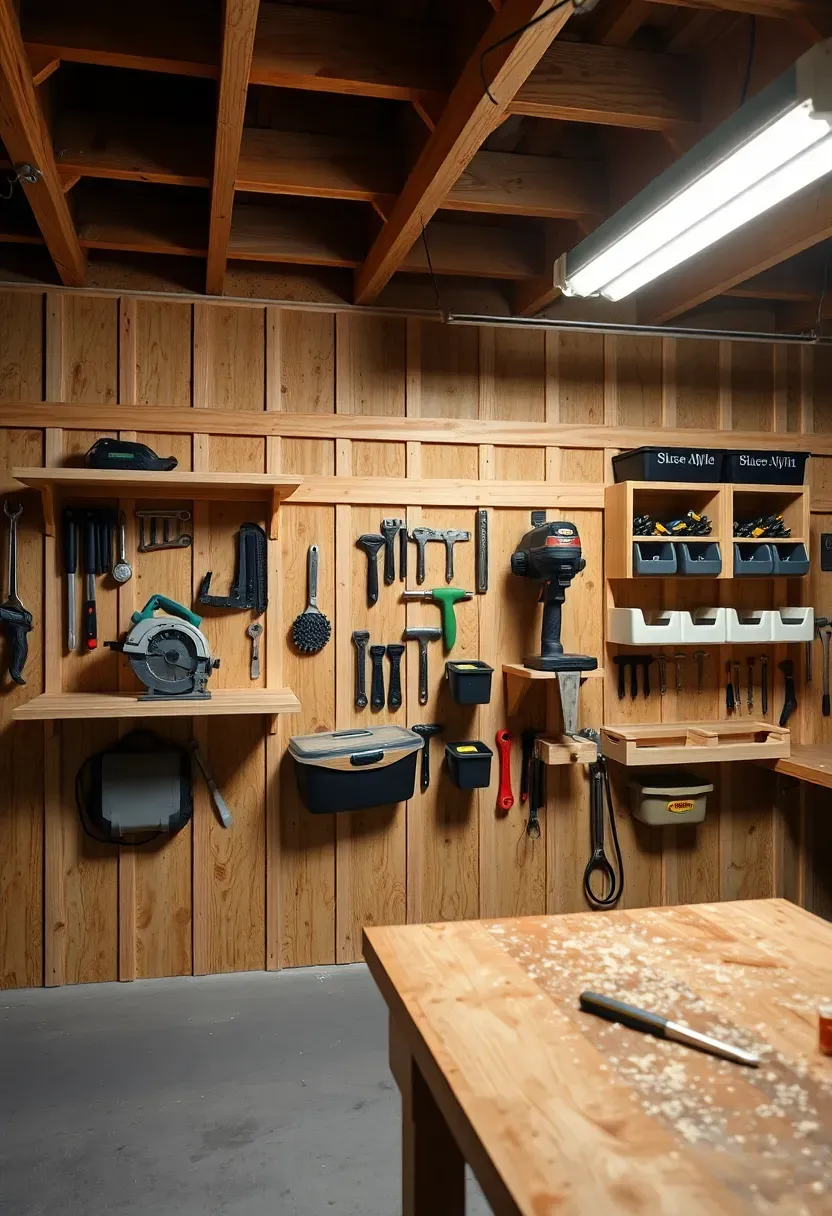
The French cleat advantage
A French cleat system uses interlocking 45-degree beveled strips to hang shelves, tool holders, and cabinets anywhere on a wall. Cut a full sheet of plywood into 3.5-inch strips at a 45-degree bevel, screw one set of strips to the wall at 8-inch vertical intervals, and attach the mating strips to the back of every shelf or holder you build.
Why it beats pegboard for tools
Pegboard works for light items. French cleats handle serious weight — 50 pounds per linear foot of cleat with proper stud attachment. A shelf holding a miter saw, a shelf holding a drill press, a rack of clamps — the cleat holds all of them. And because each piece lifts on and off independently, you can rearrange the entire wall in minutes when you add a new tool or change your workflow.
Apply at home
- Build custom tool holders sized to your specific tools rather than using generic hooks
- Add a 2-inch lip to the front edge of each shelf so vibration from nearby tools does not walk items off the edge
- Paint the wall behind the cleats a single light color so tools are easy to spot
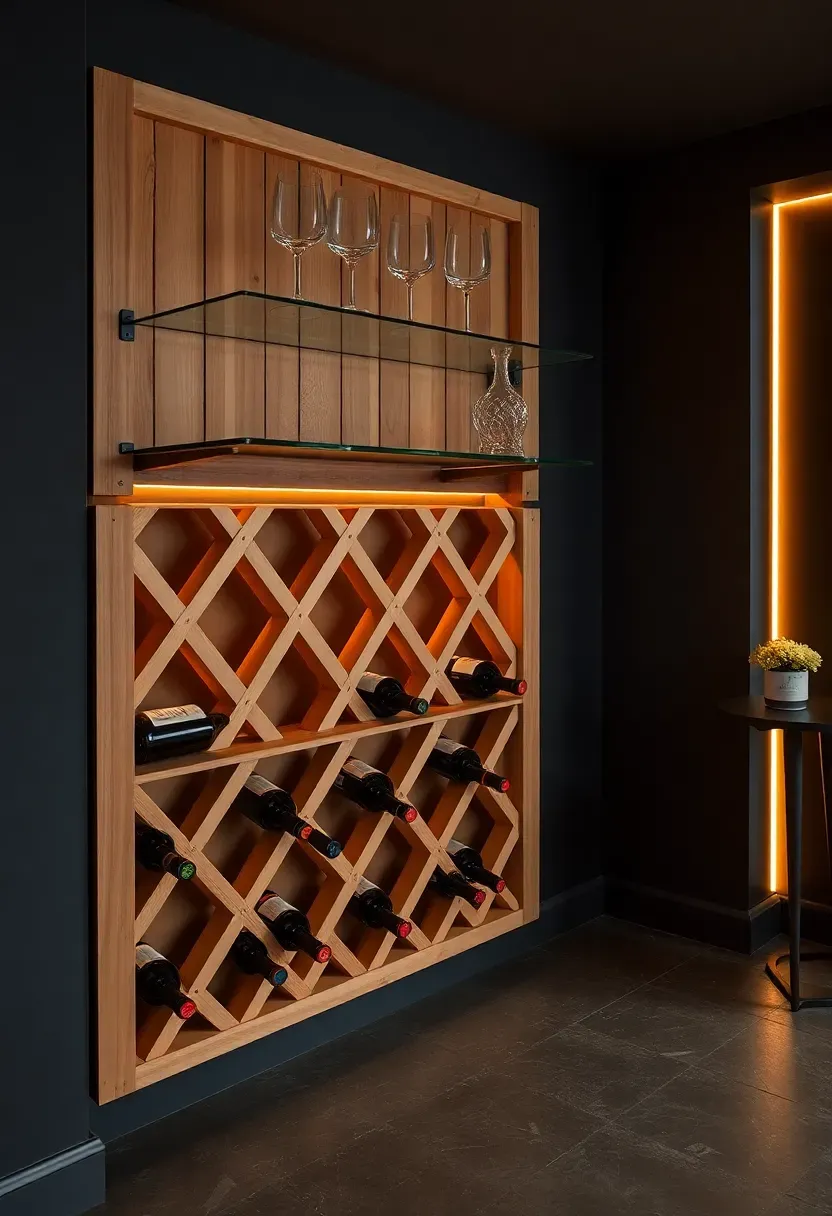
18. Wine Rack and Display Shelf Combo
Basements maintain the 55 to 58 degree temperature range that wine prefers, making them a natural spot for a small collection. A wall-mounted wine rack holding 30 to 50 bottles can share space with a display shelf for glasses, a decanter, and tasting notes. The rack keeps bottles horizontal so corks stay moist. Pine is the most common rack material; redwood and mahogany resist moisture better but cost more. Add a shelf with a stemware rail underneath for hanging glasses upside down, keeping them dust-free and within reach.
Tips
- Position the rack away from the furnace and hot water heater — temperature swings damage wine faster than a steady cool environment
- LED strip lighting on a dimmer adds ambiance without generating the heat that incandescent bulbs do
- A small hygrometer on the shelf confirms humidity stays between 60 and 70 percent, the ideal range for cork preservation
Recommended
Items for this idea
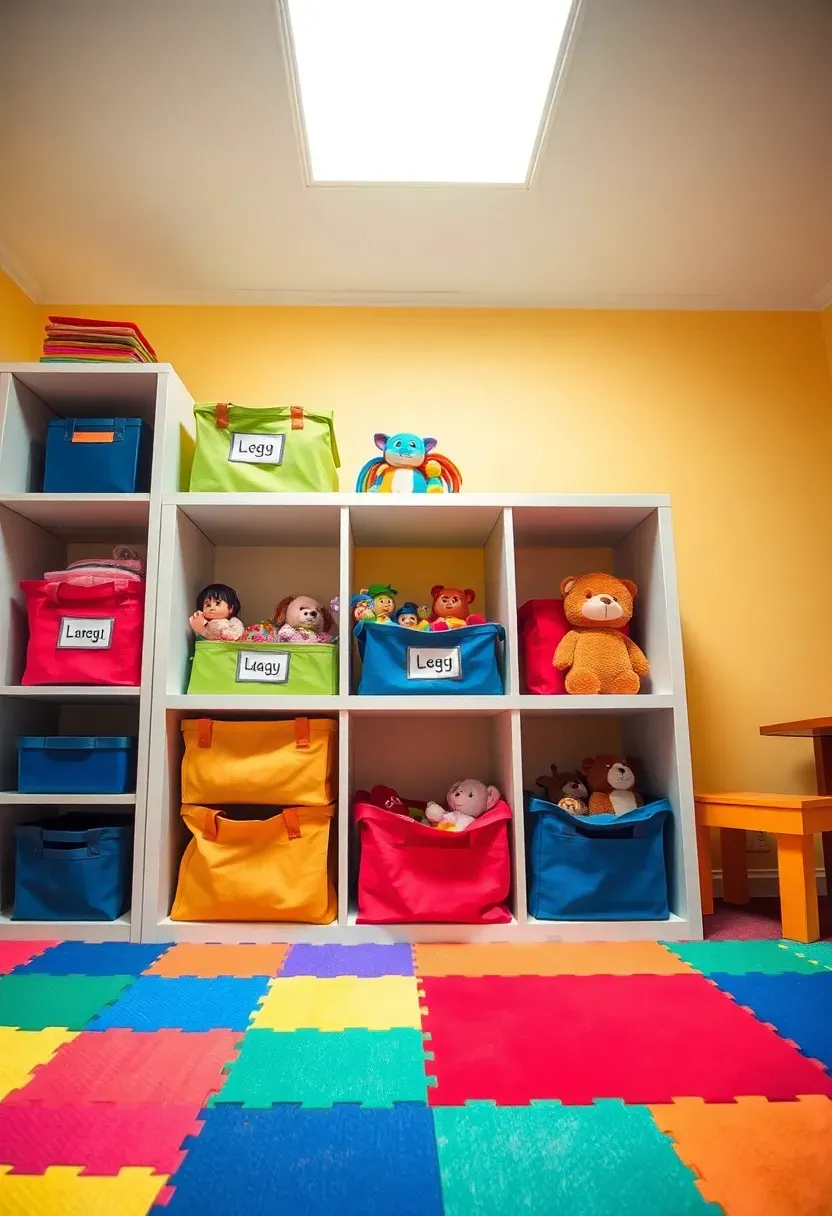
19. Kids' Toy Storage Shelving
The problem with toy storage
Kids' toys come in every size, shape, and material. Action figures, LEGO sets, board games, stuffed animals, art supplies — no single bin or shelf design handles all of them. The second problem is access: kids need to reach things themselves, or they will pull everything off the top shelf trying to get to one item at the bottom.
A better solution
Low, open shelving — no higher than 40 inches for children under 8 — with a mix of open cubes and removable bins. Each bin gets a picture label (not just text) so pre-readers know where things go. Top the unit with a flat surface for building or drawing. The bottom row should be fully open for large items like ride-on toys or a bin of balls.
Pros and cons
- Pro: Kids can clean up independently, which actually happens more often when the system is intuitive
- Pro: Visible storage means less "where is my..." frustration
- Con: Open shelving looks messier than closed cabinets — accept this or add a curtain across the front
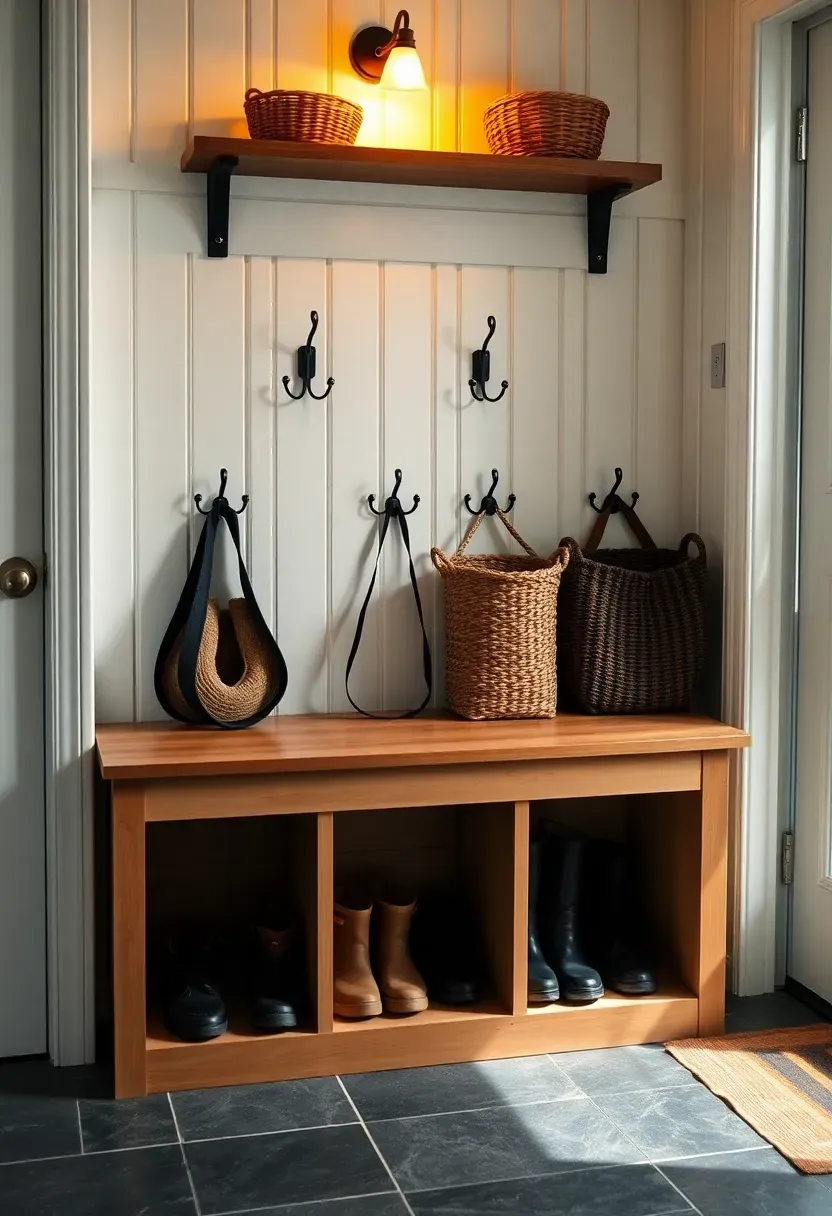
20. Mudroom-Style Entryway Shelves
If your family enters the house through the basement — common in split-levels and homes with attached garages at below-grade level — a mudroom-style shelf setup near that entry point catches coats, shoes, bags, and keys before they scatter through the house. The basics: a bench with shoe storage underneath, hooks at two heights (adult and kid), and a shelf above for baskets holding gloves, hats, and dog leashes. Built from a 2-by-4 frame with plywood panels and a few coat hooks, the whole assembly costs under $150 in materials and takes a weekend to build.
Tips
- Add a boot tray on the floor to contain wet shoes and snowmelt during winter months
- Mount a small mail sorter or key hook on the side of the unit for daily carry items
- Use a water-resistant finish on the bench seat since wet clothes and bags will sit on it regularly
Recommended
Items for this idea
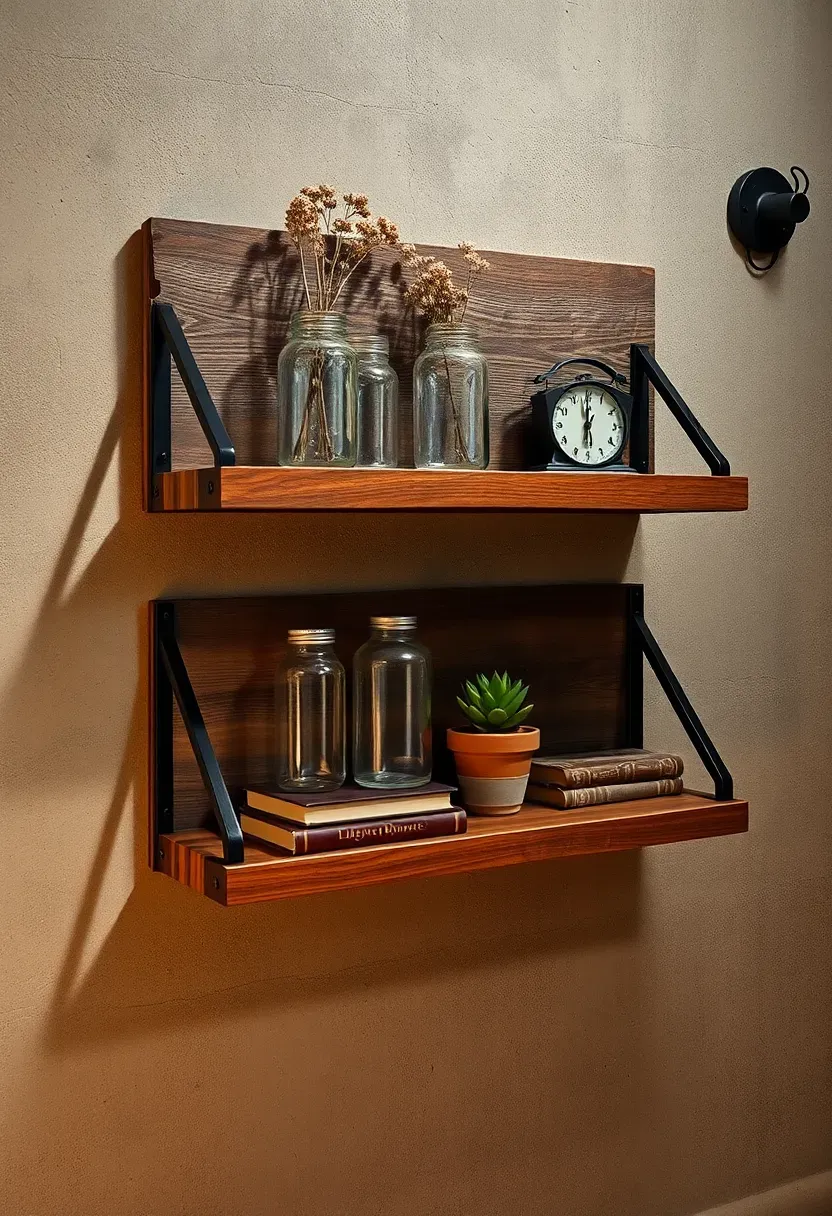
21. Reclaimed Wood Rustic Shelving
Reclaimed barn wood, pallet wood, or salvaged lumber from demolition projects brings texture and character that new lumber cannot match. The nail holes, weathered grain, and color variation make each shelf one of a kind. A single 6-foot reclaimed board on heavy-duty iron L-brackets costs $30 to $60 depending on the wood source. Sand lightly to remove splinters but keep the patina. Seal with a matte polyurethane to lock out moisture without adding a plastic-looking sheen.
Tips
- Inspect reclaimed wood for hidden nails or staples with a rare-earth magnet before cutting
- Pair warm-toned wood with black iron brackets for contrast that references early American workshop aesthetics
- Limit reclaimed shelves to lighter display items — the structural integrity of old wood varies and is hard to test without destructive methods
Quick FAQ
How far apart should basement shelves be spaced vertically? For general storage bins, 14 to 16 inches between shelves works for most standard tote sizes. For books, 10 to 12 inches is enough. Adjustable shelving systems let you change this later, which is worth the small additional cost.
Do I need to anchor shelves to basement walls? Any freestanding shelf taller than 36 inches should be anchored to the wall. Concrete walls require Tapcon screws or sleeve anchors — standard drywall anchors will not hold in masonry. A single L-bracket at the top of each unit is usually sufficient.
What shelving material holds up best in a damp basement? Metal shelving with an epoxy or powder coat finish resists moisture better than wood. If you prefer wood, use pressure-treated lumber or seal all surfaces with polyurethane. Avoid raw MDF and particleboard, which swell and disintegrate when exposed to sustained humidity.
Can I put food on basement shelves? Yes, as long as the area stays between 50 and 70 degrees Fahrenheit with humidity below 60 percent. Keep food at least 4 inches off the concrete floor, use airtight containers for dry goods, and follow first-in-first-out rotation. A standalone thermometer and hygrometer on the shelf confirm conditions are safe.
How much weight can a wall-mounted shelf hold in a basement? It depends entirely on the mounting. A shelf bracket lagged into a wood stud holds 50 to 100 pounds. A bracket on a Tapcon in solid concrete holds similar weight. A bracket on a hollow-wall drywall anchor holds 15 to 25 pounds at best. Always match your mounting method to the wall type and the intended load.
Basement shelving does not need to be complicated or expensive. A pair of $60 steel racks will organize 90% of what most homeowners need to store. From there, each additional system — a French cleat tool wall, a built-in bookshelf, overhead ceiling racks — solves a specific problem as your basement's role in the house evolves. Start with what is on the floor right now, figure out where each category of item should live, and pick the shelving type that fits. The best system is the one you actually maintain, so keep it simple enough that putting things back takes less effort than leaving them out.
Pinterest cover for 21 Basement Shelving Ideas
About the author
OBCD
CGI visualization and interior design content. We create detailed 3D renders and curate practical design ideas for every room in your home.