25 Basement Wet Bar Ideas
The difference between a wet bar and a dry bar is about four feet of plumbing. That sink changes everything. You can rinse glasses mid-party instead of hauling them upstairs. You can dump ice without dripping across the carpet. You can prep garnishes, fill a pitcher, or clean up without leaving the basement. Running water and drain lines to a below-grade bar costs anywhere from $800 to $3,000 depending on how far your basement is from existing supply lines and whether you need to break concrete for the drain. Once the plumbing is roughed in, the design choices are what make each wet bar feel different.
These 25 basement wet bar ideas cover layouts, materials, sink options, and storage configurations from simple weekend builds to full contractor jobs.
Table of Contents
- Single-Wall Wet Bar with Undermount Sink
- L-Shaped Wet Bar with Corner Sink
- Wet Bar with Open Shelving and Brass Hardware
- Rustic Reclaimed Wood Wet Bar
- Compact Wet Bar Under the Stairs
- Modern Wet Bar with Waterfall Countertop
- Wet Bar with Built-In Wine Fridge
- Industrial Pipe and Concrete Wet Bar
- Wet Bar with Stone Veneer Backsplash
- Galley-Style Wet Bar
- Wet Bar with Floating Glass Shelves
- Farmhouse Wet Bar with Apron Sink
- Wet Bar with Kegerator Cabinet
- Mirrored Backsplash Wet Bar
- Wet Bar with Quartzite Countertop
- U-Shaped Entertaining Wet Bar
- Wet Bar with Tile Mosaic Backsplash
- Dark Moody Wet Bar with Black Cabinetry
- Wet Bar with Pull-Out Trash and Recycling
- Peninsula Wet Bar with Seating
- Wet Bar with Speed Rail and Drip Tray
- Scandinavian Minimal Wet Bar
- Wet Bar with Glass-Front Cabinets
- Wet Bar with Butcher Block Counter
- Wet Bar with Integrated Ice Maker
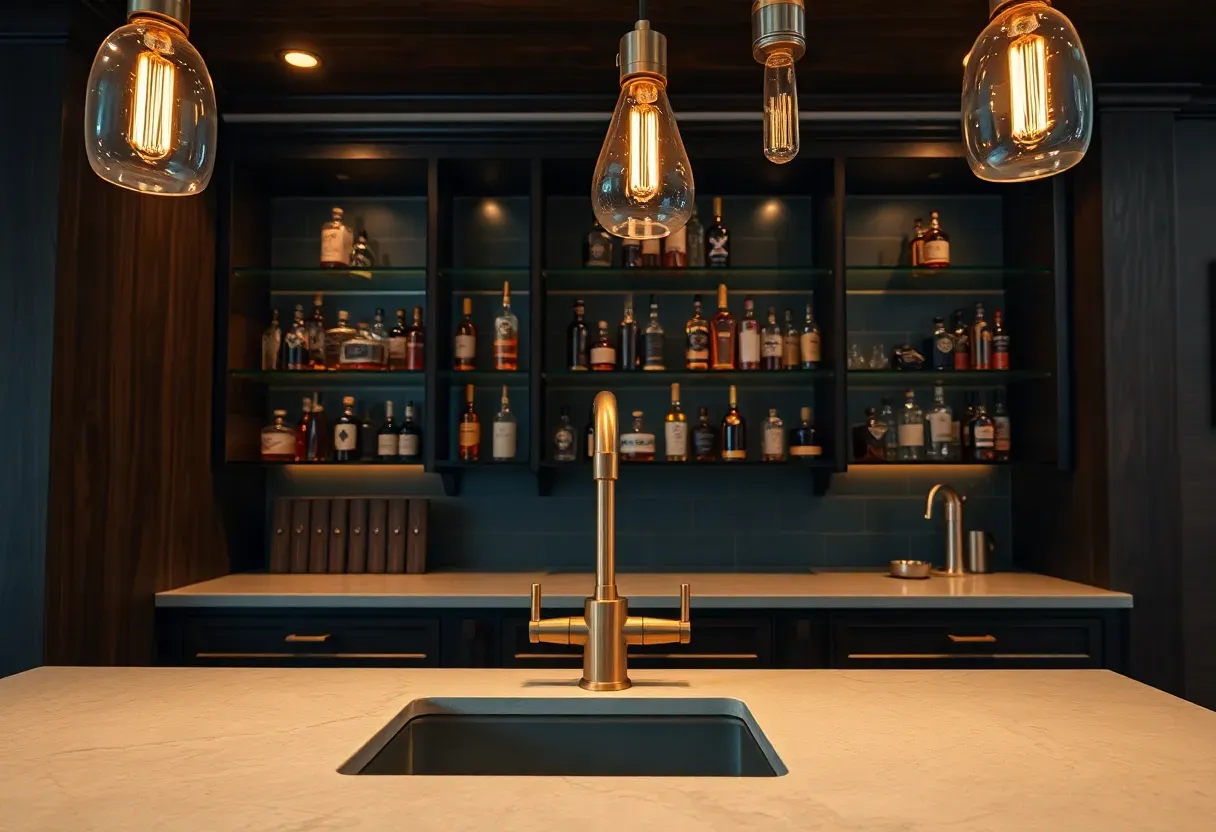
1. Single-Wall Wet Bar with Undermount Sink
The most common basement wet bar layout runs along one wall, typically 6 to 10 feet wide. An undermount sink keeps the counter surface unbroken, making cleanup easier and giving you a sleek profile. Shaker-style cabinets below hold glassware and bottles, and a simple subway tile backsplash protects the wall from splashes. This layout works in tight basements because it does not eat into floor space. Budget around $2,500 to $5,000 for cabinets, countertop, sink, and tile — not counting the plumbing rough-in.
Tips
- Position the sink off-center toward the prep side so you have a longer stretch for serving
- Use a bar-size sink (10x14 inches) rather than a full kitchen sink to save counter space
- Install a single-handle faucet — easier to operate with wet hands
We picked a few things that go well with this idea: Stainless Steel Undermount Bar Sink (15x17) (★4.6), KRAUS Kore 17-Inch Undermount Workstation Bar Sink (★4.5) and ROVATE Undermount Stainless Bar Sink (13x15) (★4.4). As an Amazon Associate we earn from qualifying purchases.
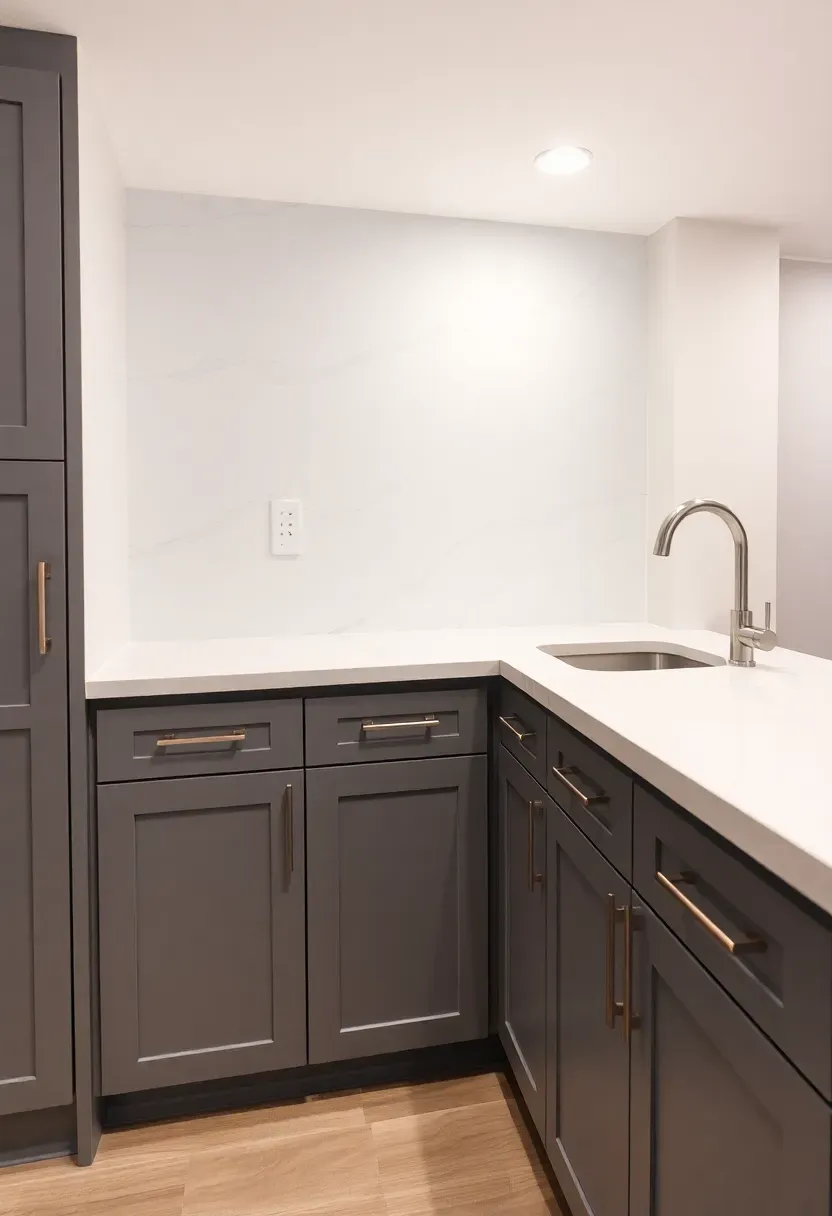
2. L-Shaped Wet Bar with Corner Sink
Why the L-shape works
An L-shaped layout gives you two distinct zones: one arm for the sink and prep, the other for serving and display. The corner where the arms meet is dead space in a kitchen, but in a wet bar it is the perfect spot for a compact sink because nobody needs to stand there while mixing drinks. You get roughly 40 percent more counter length than a single-wall bar in a footprint that only extends about 24 inches from the walls.
How to plan it
Start with the sink in the corner and run lower cabinets down both arms. One arm gets the undercounter fridge, the other gets bottle storage. Keep the total length of each arm between 4 and 6 feet to maintain comfortable proportions. Corner sinks need a specialized base cabinet — either a lazy-susan base or an angled front — so order that piece first and build around it.
Watch out for
- Corner sink base cabinets are more expensive than standard bases — expect $300 to $500 more
- Plumbing in a corner requires careful drain routing to avoid a slow-draining trap
We picked a few things that go well with this idea: 130-Can Beverage Refrigerator Cooler (3.2 Cu.Ft) (★4.3), EUHOMY 24-Inch Built-In Beverage Cooler (180 Can) (★4.4) and Commercial Back Bar Cooler 3-Door (12 Cu.Ft) (★4.5). As an Amazon Associate we earn from qualifying purchases.
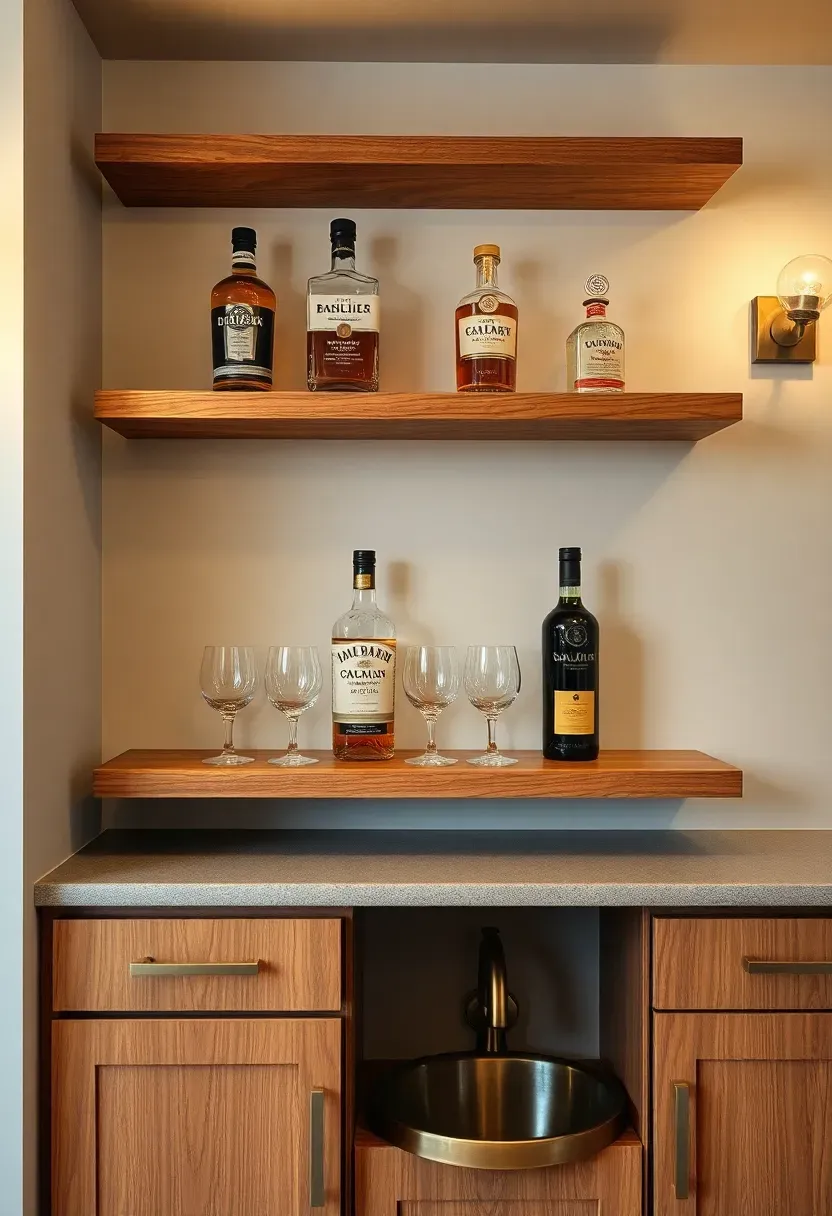
3. Wet Bar with Open Shelving and Brass Hardware
Open shelves above a wet bar serve two purposes: bottle display and easy access. Unlike closed cabinets, open shelving lets you see your whole collection at a glance and makes grabbing a bottle feel less like rummaging through a cupboard. Brass hardware — pulls, shelf brackets, a towel ring near the sink — ties the look together and ages well in a basement where humidity tends to run higher than upstairs. Use solid wood shelves at least 10 inches deep so bottles sit back from the edge with room for glasses in front.
Tips
- Stagger shelf heights: 14 inches for tall bottles on the bottom shelf, 10 inches for glasses above
- Anchor shelves into studs or use toggle bolts — loaded shelves are heavier than they look
- Brass tarnishes naturally, which many people prefer, but lacquered brass stays polished longer
We picked a few things that go well with this idea: Winco Stainless Steel Speed Rail (32-Inch) (★4.7), TMCRAFT Stainless Steel Kegerator Drip Tray (★4.6) and Winco Stainless Steel Speed Rail (42-Inch) (★4.7). As an Amazon Associate we earn from qualifying purchases.
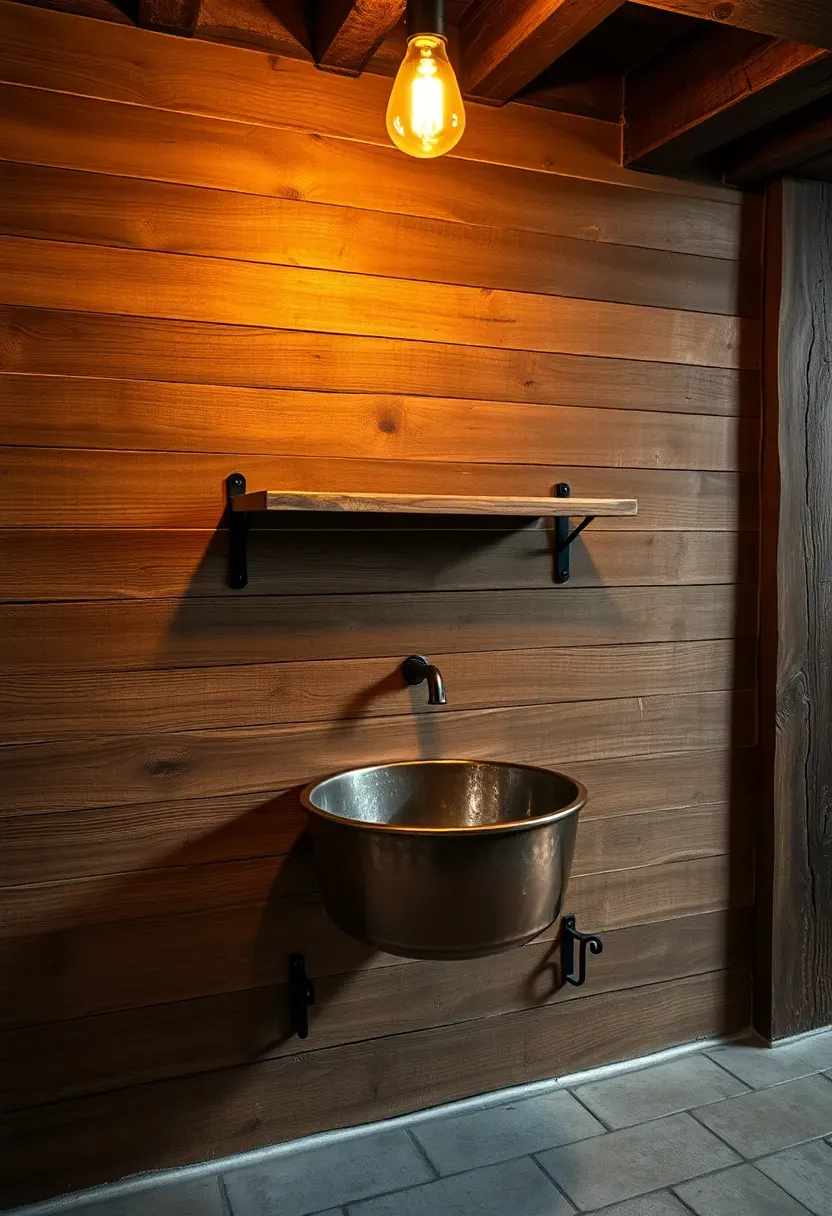
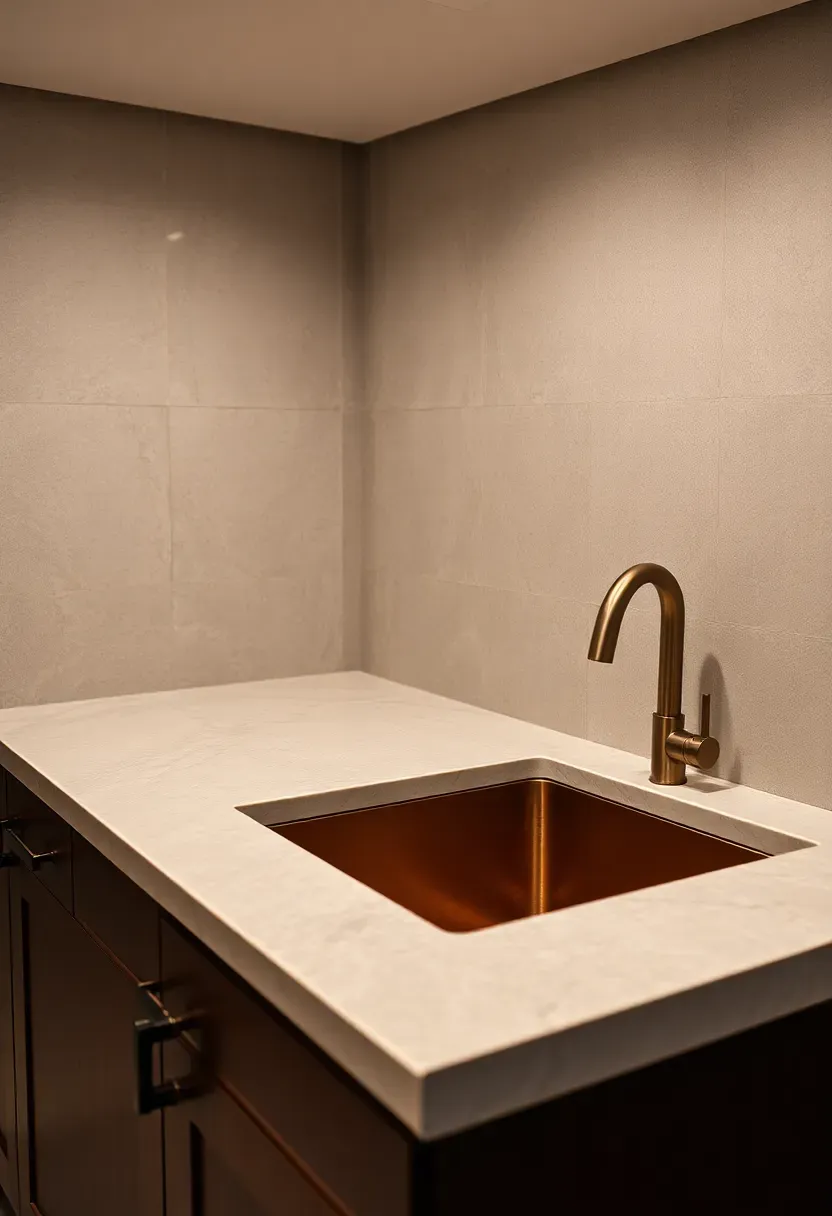
4. Rustic Reclaimed Wood Wet Bar
Step 1: Source the wood
Reclaimed barn wood from demolition salvage yards runs $5 to $12 per square foot depending on species and condition. Oak and chestnut hold up best. Inspect every board for embedded nails and pull them before cutting. You need enough material for the bar front face, side panels, and optionally the shelving behind.
Step 2: Build the frame
Construct a standard bar frame from 2x4s — 42 inches tall for a standing bar, 36 inches for a seated bar with stools. Sheathe the front and sides with the reclaimed boards using construction adhesive and finish nails. The rough texture of old wood hides minor imperfections in your carpentry.
Step 3: Add the sink and finish
A drop-in copper bar sink ($120 to $250) fits the rustic theme better than stainless steel. Cut the sink opening in your countertop, connect supply lines and the drain, and seal the wood around the sink cutout with marine-grade polyurethane to prevent water damage. Finish all exposed wood surfaces with a matte sealant.
Watch out for
- Reclaimed wood may contain lead paint — test before sanding and use proper respiratory protection
- Seal every surface that could contact water, including the underside of counters near the sink
Recommended
Items for this idea
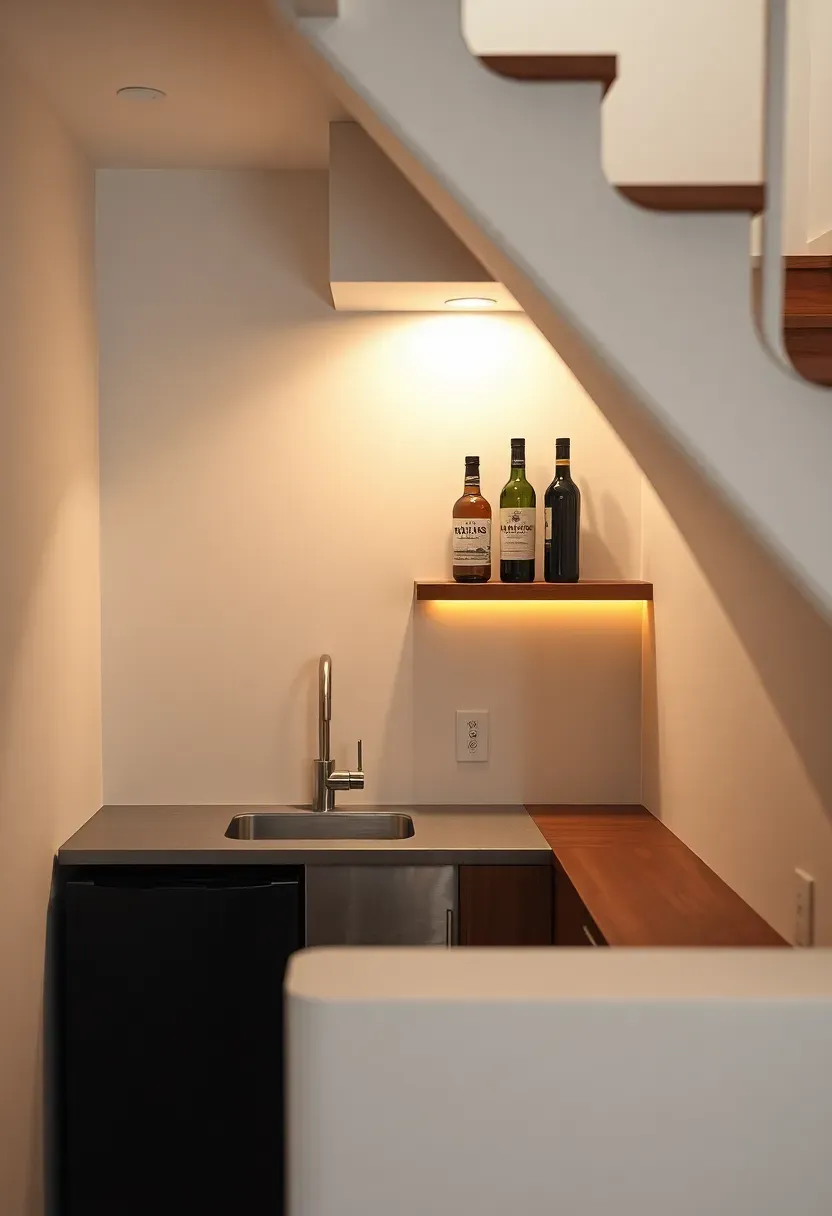
5. Compact Wet Bar Under the Stairs
The triangular space under a basement staircase is wasted in most homes. A compact wet bar slots in perfectly because you only need about 30 to 36 inches of width for a small sink and a mini fridge side by side. The sloped ceiling above follows the stair angle, so you place taller items near the entrance and shorter items as the ceiling drops. A single floating shelf on the tallest wall section holds a few bottles and glasses. This is a weekend project if the plumbing lines are nearby — maybe $1,200 to $2,000 all in.
Tips
- Measure ceiling height at three points along the stair angle before ordering cabinets
- Use a compact 15-inch-wide bar sink to maximize counter space
- LED strip lighting under the shelf compensates for the naturally dark spot
6. Modern Wet Bar with Waterfall Countertop
A waterfall countertop wraps over the edge of the bar and continues down to the floor on one or both ends. The effect is a clean unbroken slab that looks substantial and modern. Quartz is the most practical material for this because it comes in large slabs, does not need sealing, and resists stains from wine and citrus. The mitered joint where the horizontal surface meets the vertical panel requires precision cutting — this is not a DIY-friendly detail. Expect to pay $60 to $120 per square foot for fabrication and installation depending on the quartz brand. The visual payoff is significant though. A waterfall edge makes a basic wet bar look like it cost twice what it did.
Tips
- Keep the waterfall side away from foot traffic to avoid scuffs on the vertical surface
- Choose a vein pattern that flows naturally around the corner for the most convincing look
- Undermount the sink so the continuous surface is not interrupted by a rim
Recommended
Items for this idea
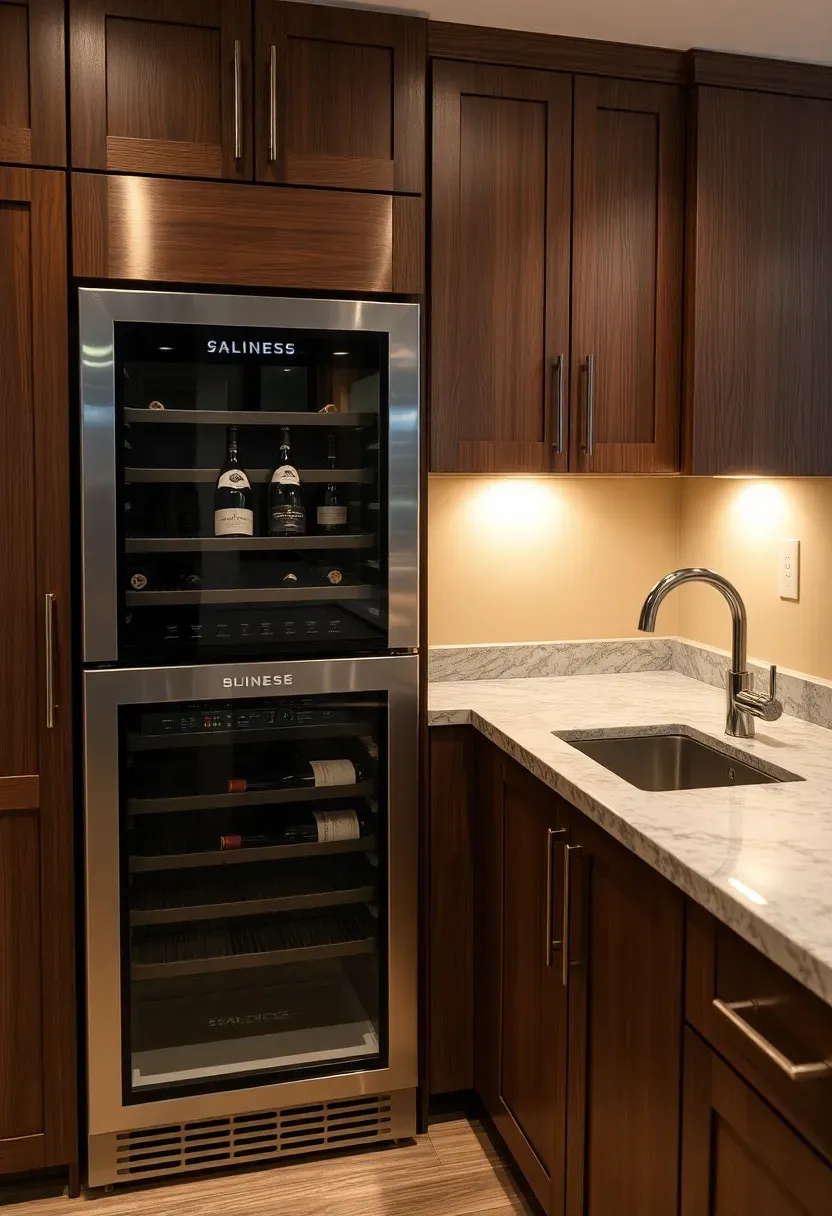
7. Wet Bar with Built-In Wine Fridge
The problem with storing wine in basements
Basements maintain cooler temperatures than upstairs rooms, which is good for wine storage. But the humidity level swings seasonally in unfinished or partially finished basements, and vibration from HVAC equipment or nearby laundry machines can disturb sediment in aging bottles. A dedicated wine fridge solves both issues.
The solution
A built-in undercounter wine fridge (15 or 24 inches wide) fits next to your wet bar sink cabinet and maintains a steady 45 to 65 degrees Fahrenheit with minimal vibration. Dual-zone models let you keep whites cooler on the bottom and reds warmer on top. Run the fridge on a dedicated 15-amp circuit to avoid tripping breakers when the compressor kicks in alongside other bar equipment.
Pros and cons
- Pro: proper storage temperature extends wine quality far beyond a room-temperature rack
- Pro: the glass door creates a display element that makes the bar feel curated
- Con: built-in wine fridges cost $500 to $2,000, and they need ventilation clearance at the back or front
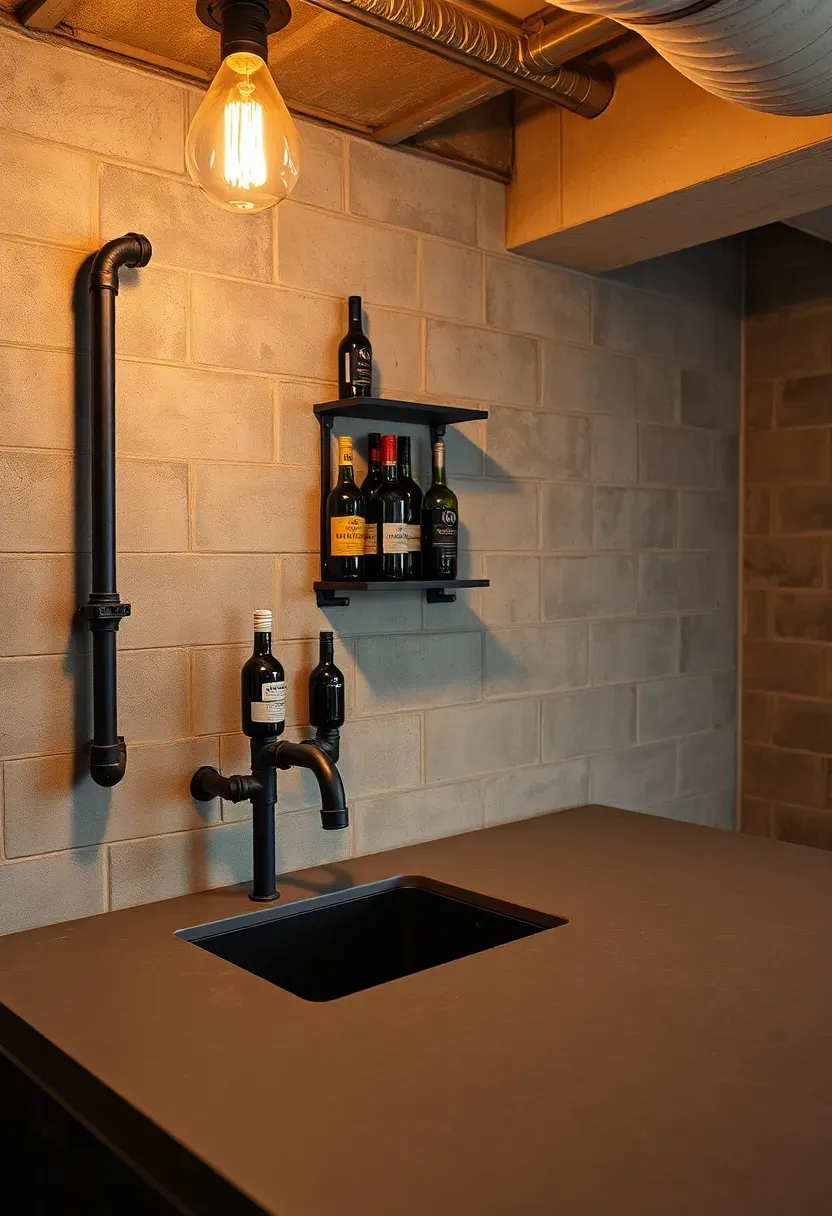
8. Industrial Pipe and Concrete Wet Bar
Black iron pipe fittings and poured concrete countertops create a raw, honest bar that leans into the fact that it is in a basement. The pipe framework bolts to the wall for shelving — you build it by threading together floor flanges, nipples, elbows, and tees from the plumbing aisle. A concrete countertop is a pour-in-place or precast project that costs about $10 to $30 per square foot in materials. The sink drops into a cutout, and the matte black or natural gray palette matches exposed ductwork and concrete floors that many basements already have. This setup looks deliberately unfinished in a way that works.
Tips
- Seal concrete countertops with a food-safe penetrating sealer — unsealed concrete stains instantly from coffee, wine, and citrus
- Test iron pipe shelving with loaded weight before final tightening — the joints can twist under heavy bottles
- Add a drip tray behind the faucet to protect the concrete surface during daily use
Recommended
Items for this idea
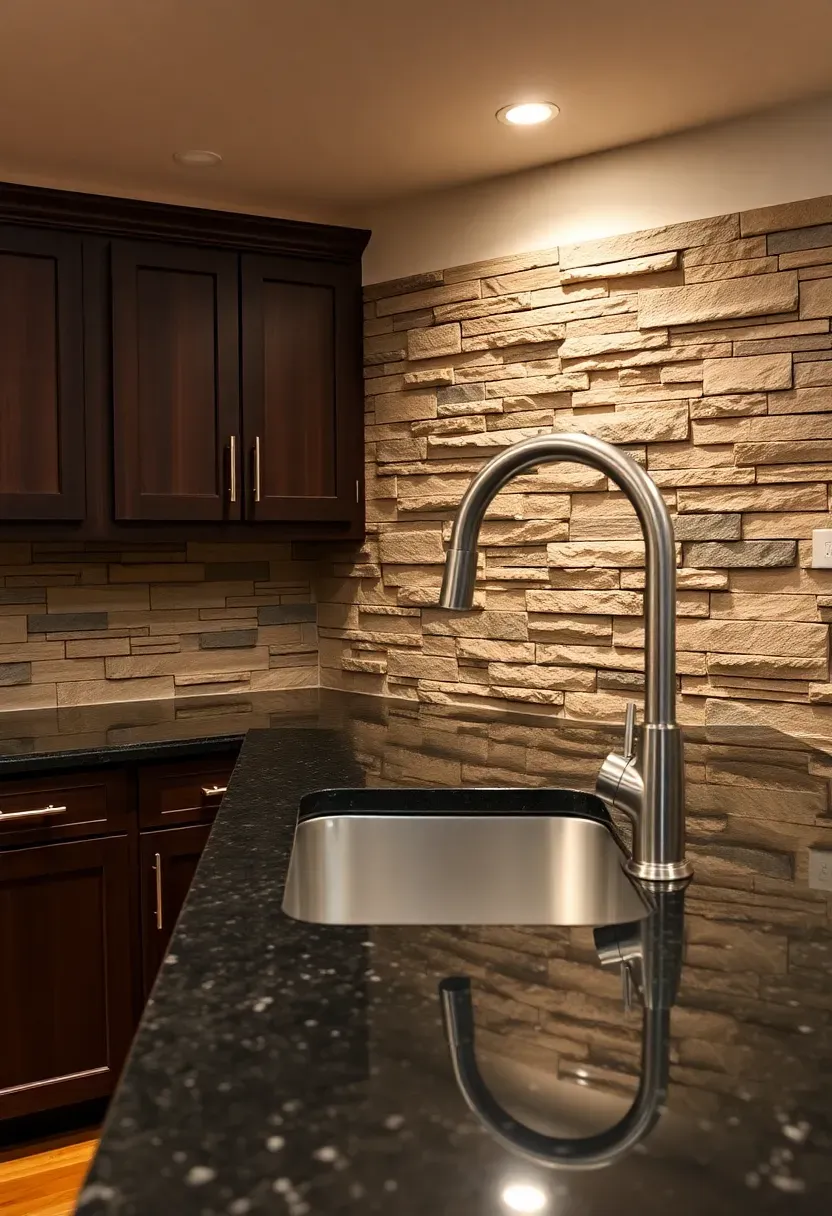
9. Wet Bar with Stone Veneer Backsplash
Stone veneer panels (manufactured or natural thin-cut) add depth and texture behind a wet bar without the weight of full-thickness stone. Panels are typically 3/4 to 1-1/2 inches thick and install with mortar or construction adhesive directly onto drywall or cement board. Stacked ledger stone in gray or warm beige tones pairs well with dark wood cabinets and brushed nickel hardware. The irregular surface catches light from pendant fixtures and creates shadows that make the bar area feel like a separate room. Budget about $8 to $20 per square foot for materials, and plan for sealing the stone to resist moisture near the sink area.
Tips
- Seal stone veneer near the sink with a silicone-based impregnator — water darkens unsealed stone permanently
- Cut stone veneer with an angle grinder fitted with a diamond blade
- Work from the bottom up and let each row set before adding the next
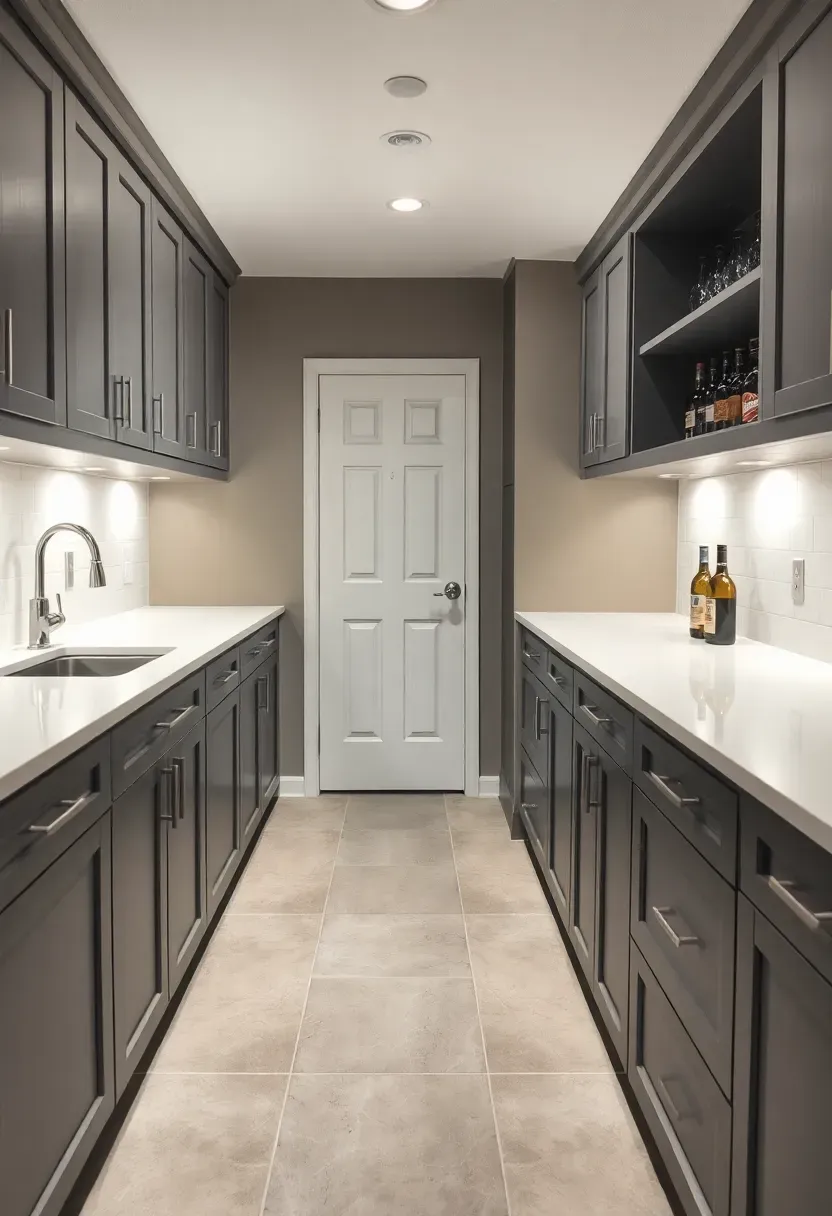
10. Galley-Style Wet Bar
A galley layout puts counters on two parallel walls with a walkway between them. In a basement, this works well in hallway-like spaces or between two rooms. One side holds the sink and undercounter fridge, the other side handles dry storage and serving. Keep the walkway at least 36 inches wide — 42 inches is better if two people will work behind the bar simultaneously. The galley layout maximizes storage and counter space per square foot because you are using both walls. It also naturally separates the bartender side from the guest side if one wall faces an open room.
Tips
- Mirror the countertop height on both sides for visual balance
- Put the sink side closer to the drain line to reduce plumbing costs
- Use upper open shelving on only one wall to avoid a closed-in tunnel feeling
Recommended
Items for this idea
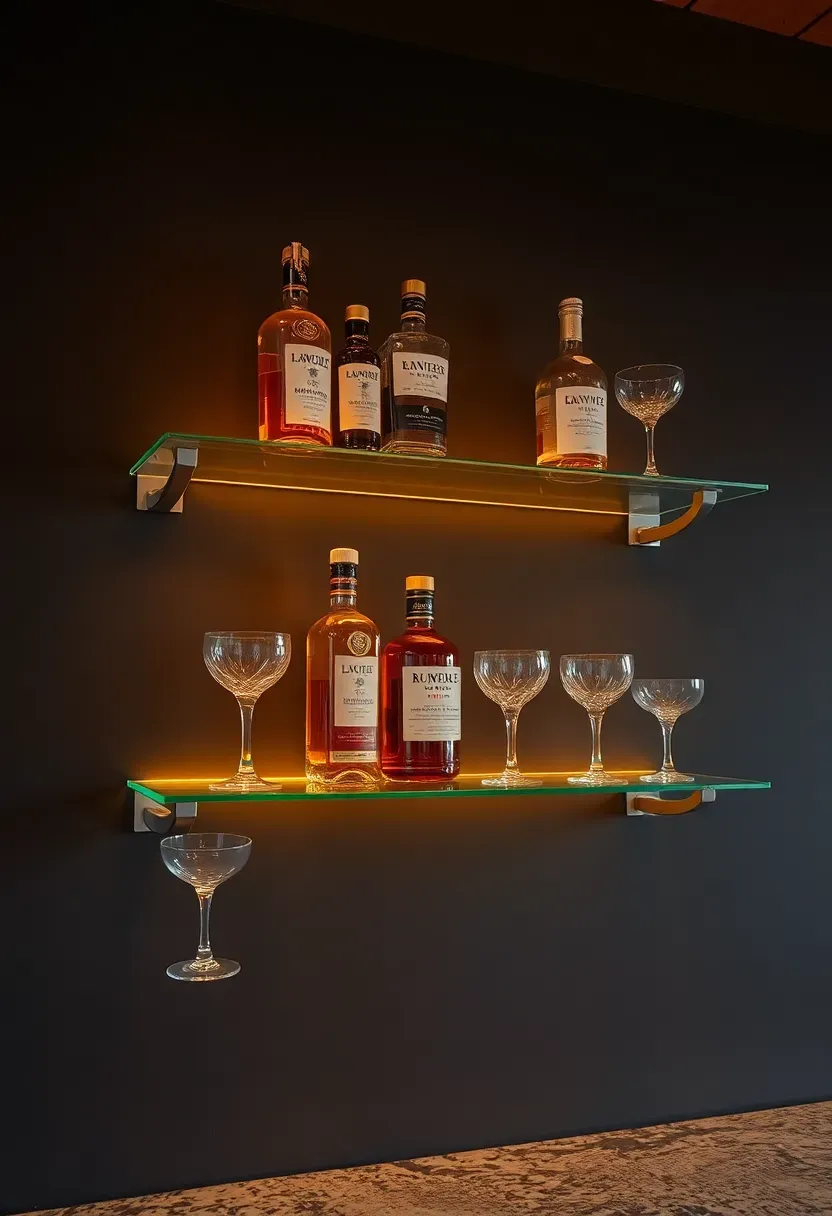
11. Wet Bar with Floating Glass Shelves
Why glass over wood
Glass shelves disappear visually, which puts all the attention on what is sitting on them — your bottles, glassware, and decanters. Tempered glass (3/8 inch thick minimum) holds plenty of weight and is required by code for safety. When backlit with warm LED strips, the glass edges glow and bottles cast long colored shadows on the wall behind them. The effect is more lounge than rec room.
How to install
Use stainless steel shelf pins or channel-style brackets rated for tempered glass. Mount into studs, not just drywall anchors, because a fully loaded shelf of bottles can weigh 40 to 60 pounds. Space shelves 12 to 14 inches apart vertically. Run LED tape along the back edge of each shelf, connected to a dimmer so you can control the mood.
Watch out for
- Glass shows fingerprints and dust more than wood — plan on wiping them down before entertaining
- Tempered glass cannot be drilled or cut after manufacturing, so order exact sizes from a glass shop
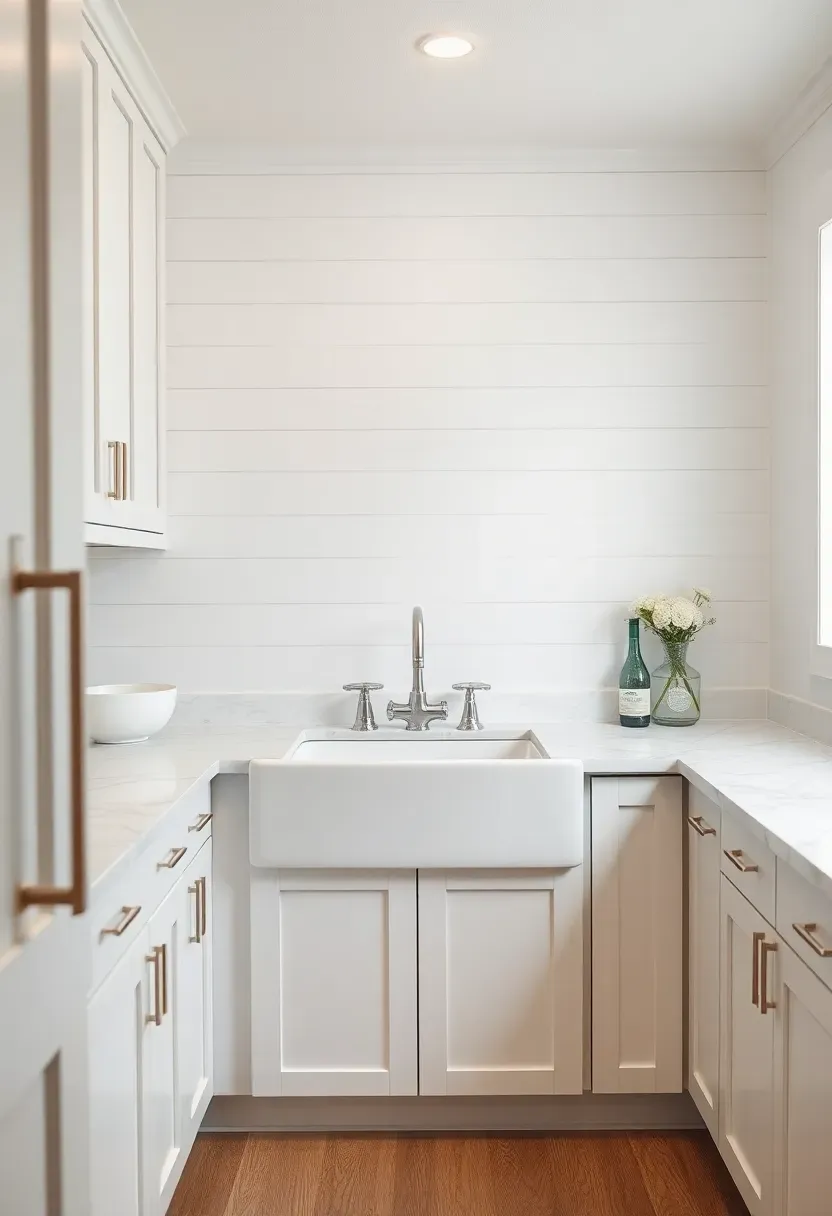
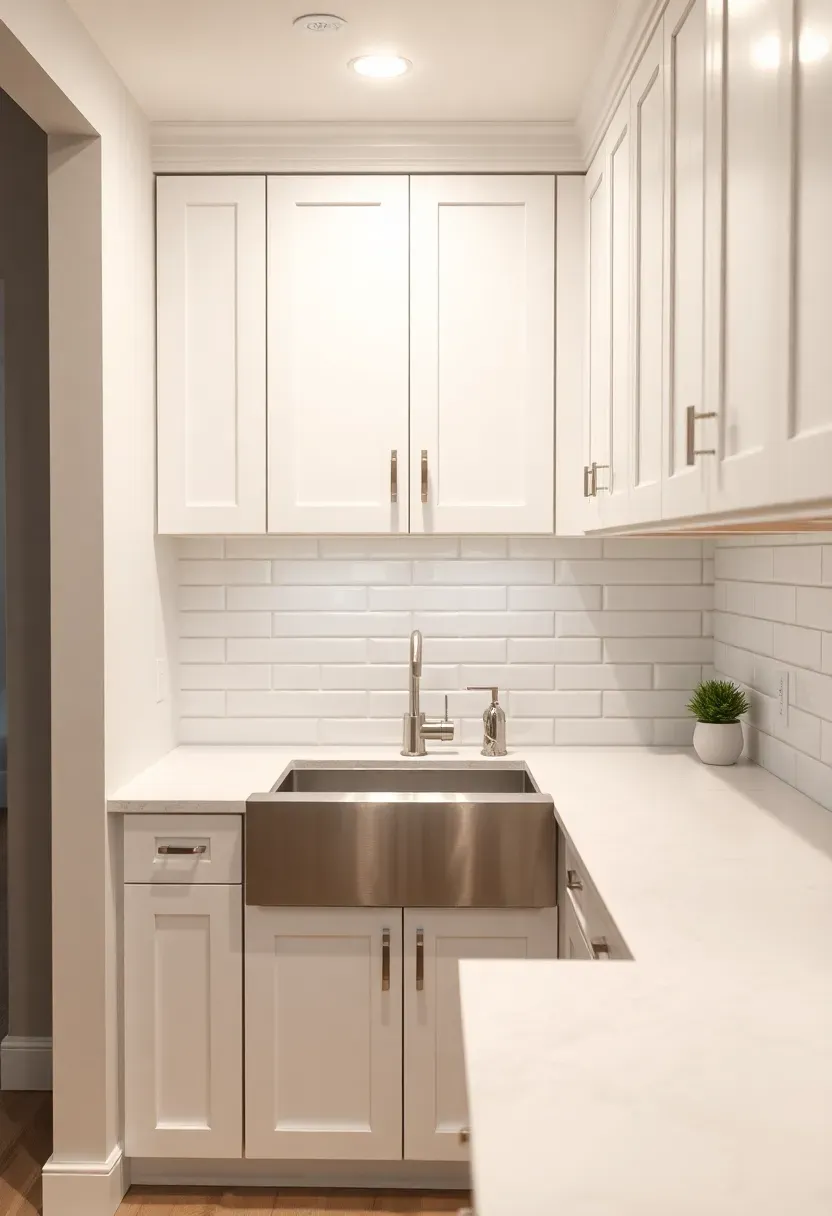
12. Farmhouse Wet Bar with Apron Sink
An apron-front sink in a wet bar is unusual, which is exactly why it works as a focal point. Fireclay apron sinks sized for bar use (20 to 24 inches wide) are available from several manufacturers and bring the farmhouse aesthetic into a basement without making it feel like a kitchen. Pair it with white shaker cabinets, a butcher block or honed marble counter, and shiplap on the backsplash wall. The exposed front of the sink becomes a design element rather than something hidden behind a cabinet door. Expect to pay $250 to $600 for a quality fireclay bar-size apron sink.
Tips
- Apron sinks require a modified base cabinet with a notched front — confirm compatibility before ordering
- Fireclay chips if you drop heavy bottles in it, so use a sink grid on the bottom
- The farmhouse look works best when the rest of the basement leans warm and rustic, not modern
Recommended
Items for this idea
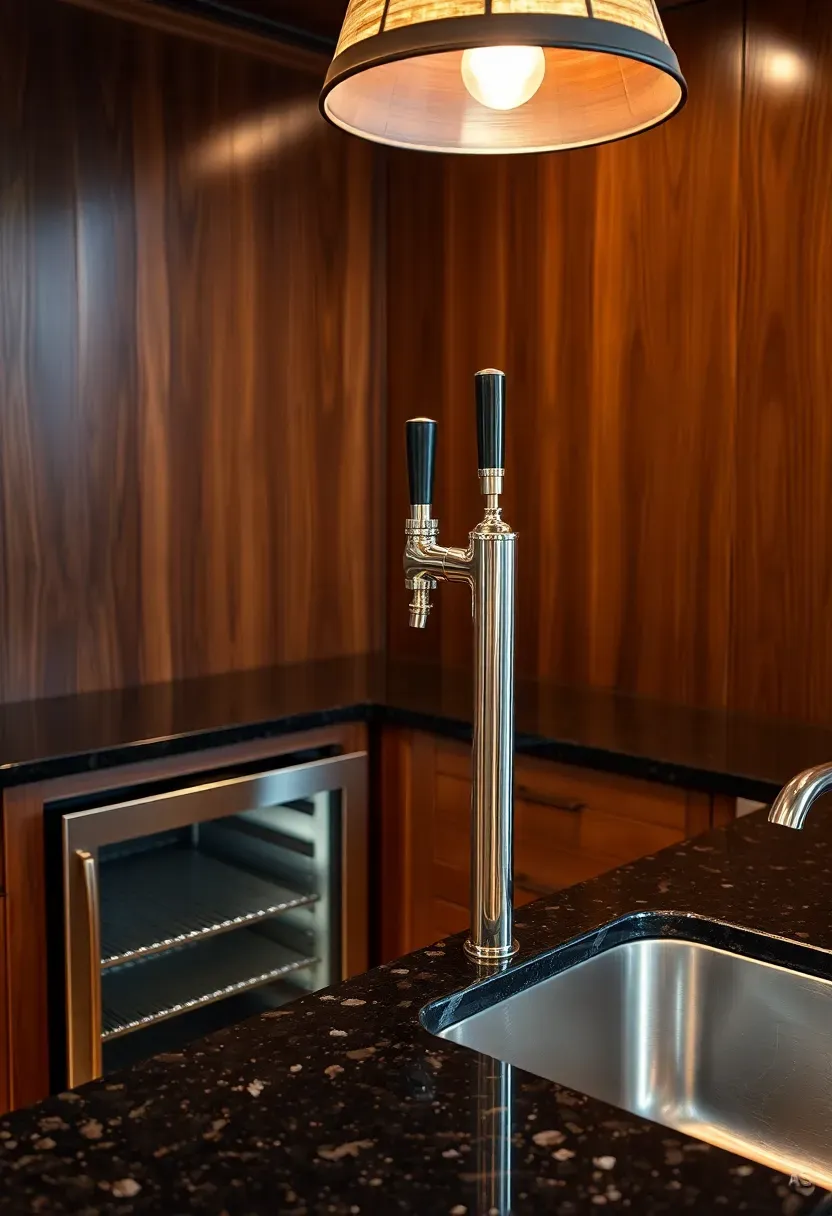
13. Wet Bar with Kegerator Cabinet
A kegerator turns a wet bar into a draft beer station. Built-in kegerator conversions fit inside a standard 24-inch base cabinet with the tap tower poking through the countertop above. The unit holds a half-barrel (15.5 gallons, about 124 pints) or two sixth-barrels for two different draft options. You need a dedicated 15-amp outlet inside the cabinet and a CO2 tank strapped to the interior wall. The wet bar sink next to the kegerator handles rinse duties — draft beer glasses need rinsing before each pour for proper head formation.
Pros and cons
- Pro: draft beer costs roughly 50 percent less per glass than bottled craft beer
- Pro: the tap tower becomes a conversation piece and a visual anchor for the bar
- Con: kegs weigh about 160 pounds full, so the cabinet floor needs reinforcement
- Con: beer lines require cleaning every two weeks with a pump kit to prevent off-flavors
14. Mirrored Backsplash Wet Bar
Mirrors behind a bar are a century-old trick for a reason: they double the visual depth of the space, reflect light from pendant fixtures, and make your bottle collection look twice as large. In a basement with no windows, a mirrored backsplash fights the underground feeling more effectively than paint color alone. Use antiqued mirror for a warmer, less gym-like look, or go with clear mirror for maximum brightness. Install the mirror on a moisture-resistant backer (cement board, not plain drywall) and use mirror mastic adhesive rated for humid environments.
Tips
- Antiqued mirror panels hide water spots and fingerprints better than clear mirror
- LED light strips along the top and bottom edges create an even glow that the mirror amplifies
- Keep the mirror height proportional — floor to ceiling mirrors overpower a small bar area
Recommended
Items for this idea
15. Wet Bar with Quartzite Countertop
Quartzite vs quartz
Quartzite is a natural stone quarried from metamorphic rock. Quartz (with no -ite) is an engineered slab made from crushed stone bound with resin. Quartzite looks more like marble — veining, movement, depth — but it is harder than granite and resists scratching and heat better than almost any other countertop material. It does need sealing once or twice a year, unlike engineered quartz.
Why it suits a wet bar
A wet bar counter takes abuse: citrus juice, red wine spills, bottles dragged across the surface, ice dropped on it. Quartzite handles all of this without etching the way marble does. The natural veining gives the countertop a character that engineered materials struggle to match. Popular quartzite colors for bars include Taj Mahal (warm cream with gold veins), Super White (marble look without marble problems), and Sea Pearl (gray with white veining).
Choose quartzite if
- You want natural stone beauty without marble fragility
- Your budget allows $70 to $150 per square foot installed
- You are willing to reseal annually
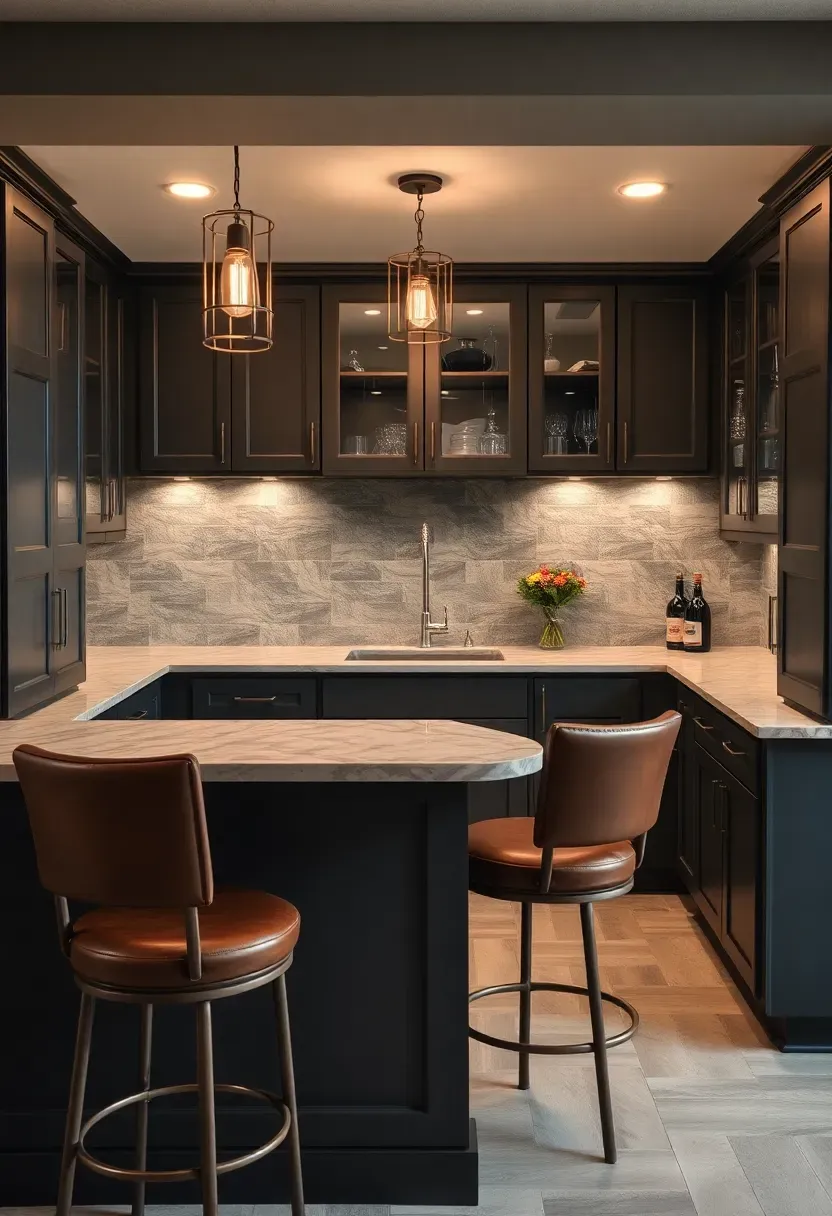
16. U-Shaped Entertaining Wet Bar
The U-shape is the largest wet bar layout and the one that works best for regular entertaining. Three connected counter sections wrap around the bartender, putting the sink, fridge, ice maker, and storage all within a pivot turn. The open side faces the room where guests sit or stand. You need at least 8 by 6 feet of floor space to pull off a functional U without cramping the interior. The outer countertop overhang serves as a bar rail with stools on the guest side. This layout mimics a commercial bar design and handles groups of 6 to 10 guests comfortably.
Tips
- Keep the interior walkway at least 36 inches wide between opposing cabinets
- Center the sink on the back wall so drain lines run straight down rather than at angles
- Install a foot rail on the guest side — 6-inch brass or matte black tubing mounted 6 inches above the floor
Recommended
Items for this idea
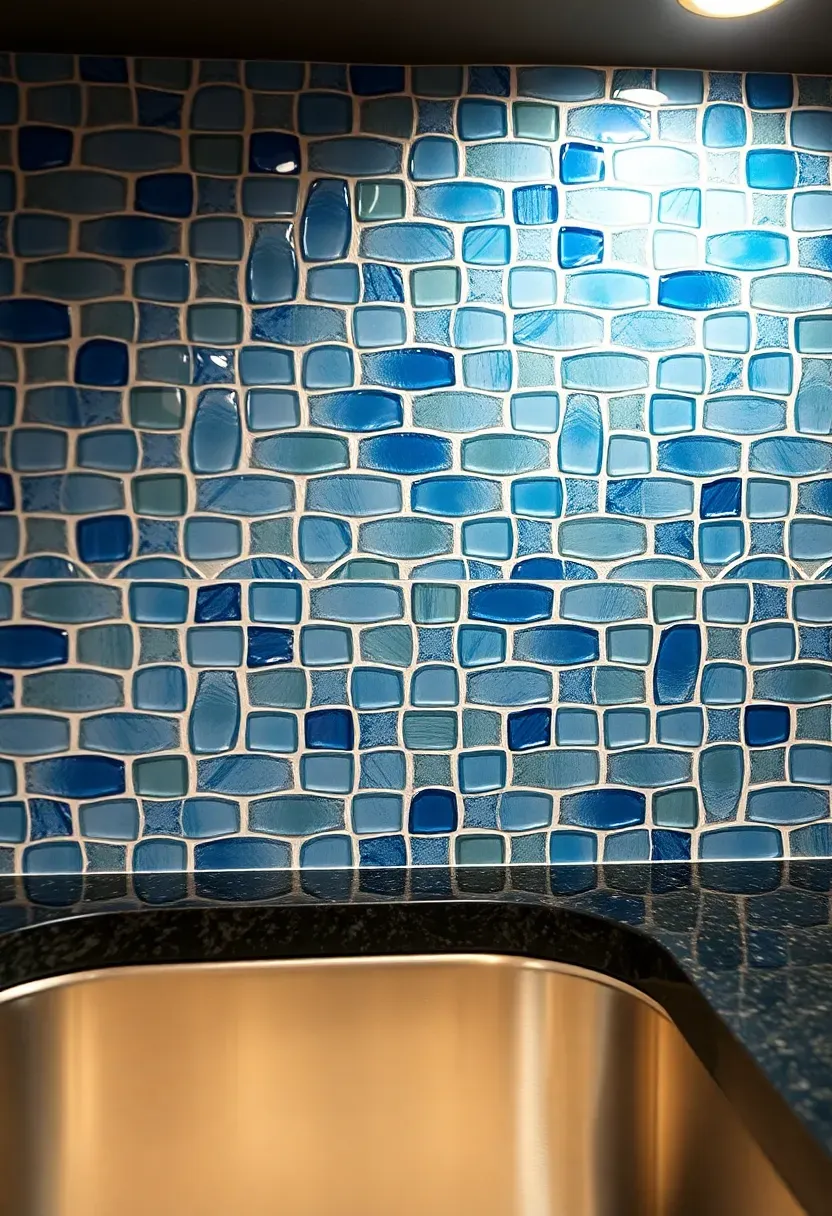
17. Wet Bar with Tile Mosaic Backsplash
Tile on a wet bar backsplash protects the wall and gives you a chance to add color that might feel risky on a full kitchen wall. A small backsplash area — typically 4 to 8 square feet — lets you use premium tile without a premium budget. Herringbone, chevron, or arabesque patterns in glass or ceramic mosaic add visual interest that flat subway tile cannot match. Blues, greens, and metallic glazes work especially well in basement bars where the lighting is controlled and you can play with jewel tones that daylight would wash out.
Tips
- Use unsanded grout for mosaic tiles with joints smaller than 1/8 inch
- Seal grout lines near the sink with a penetrating grout sealer to prevent staining
- Stick to one mosaic pattern per bar — mixing patterns reads as busy rather than curated
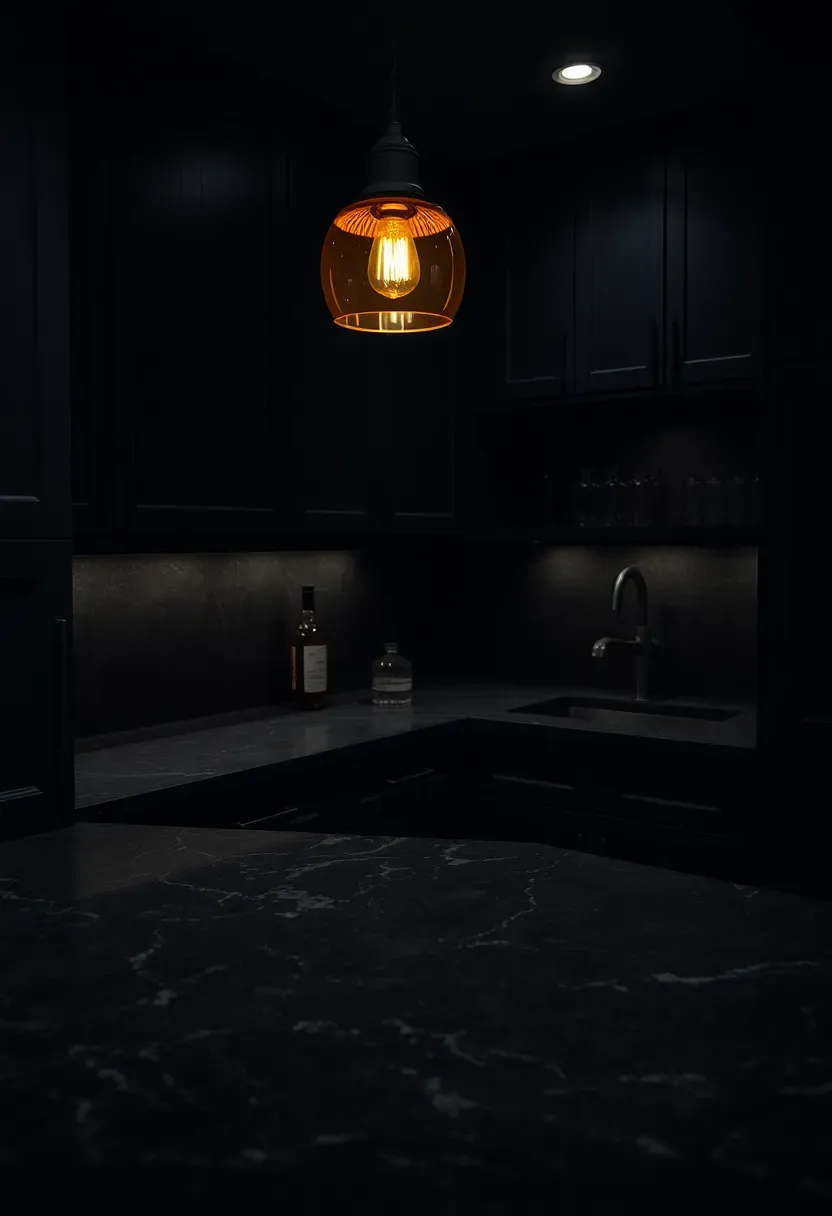
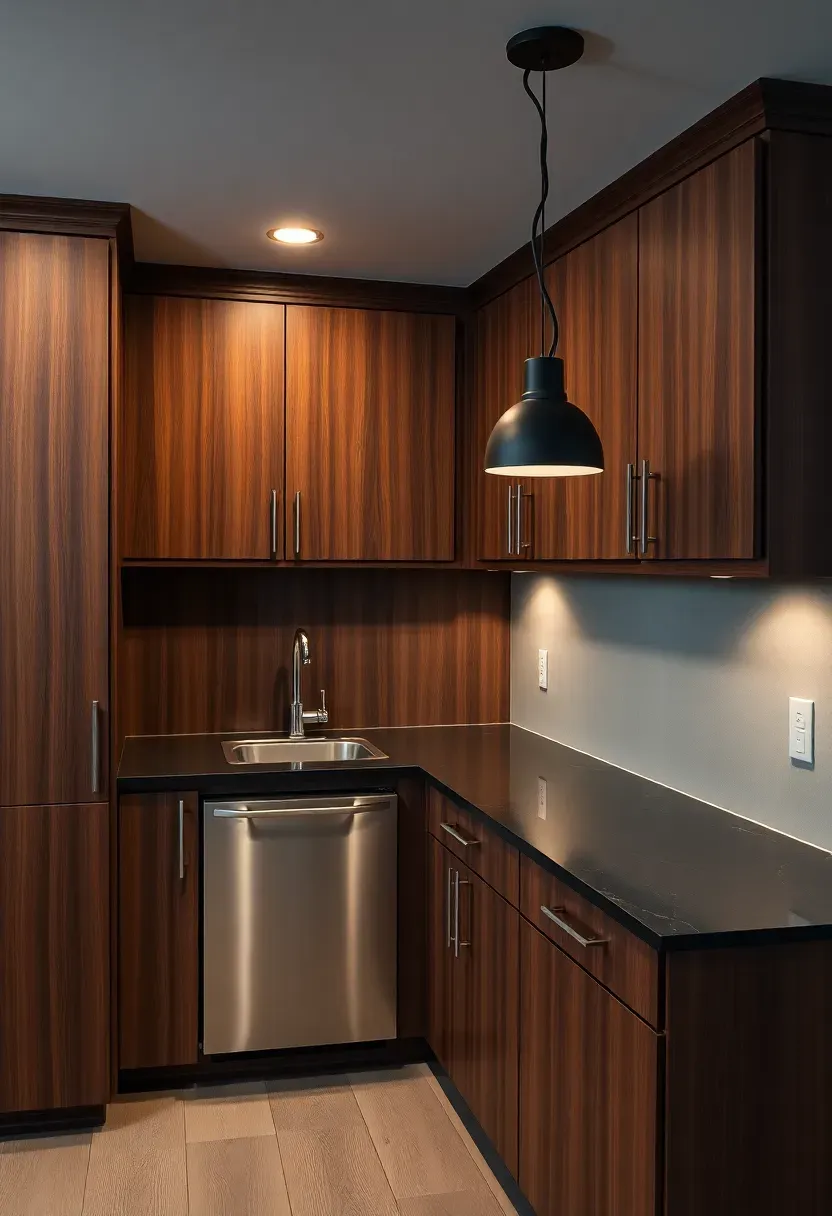
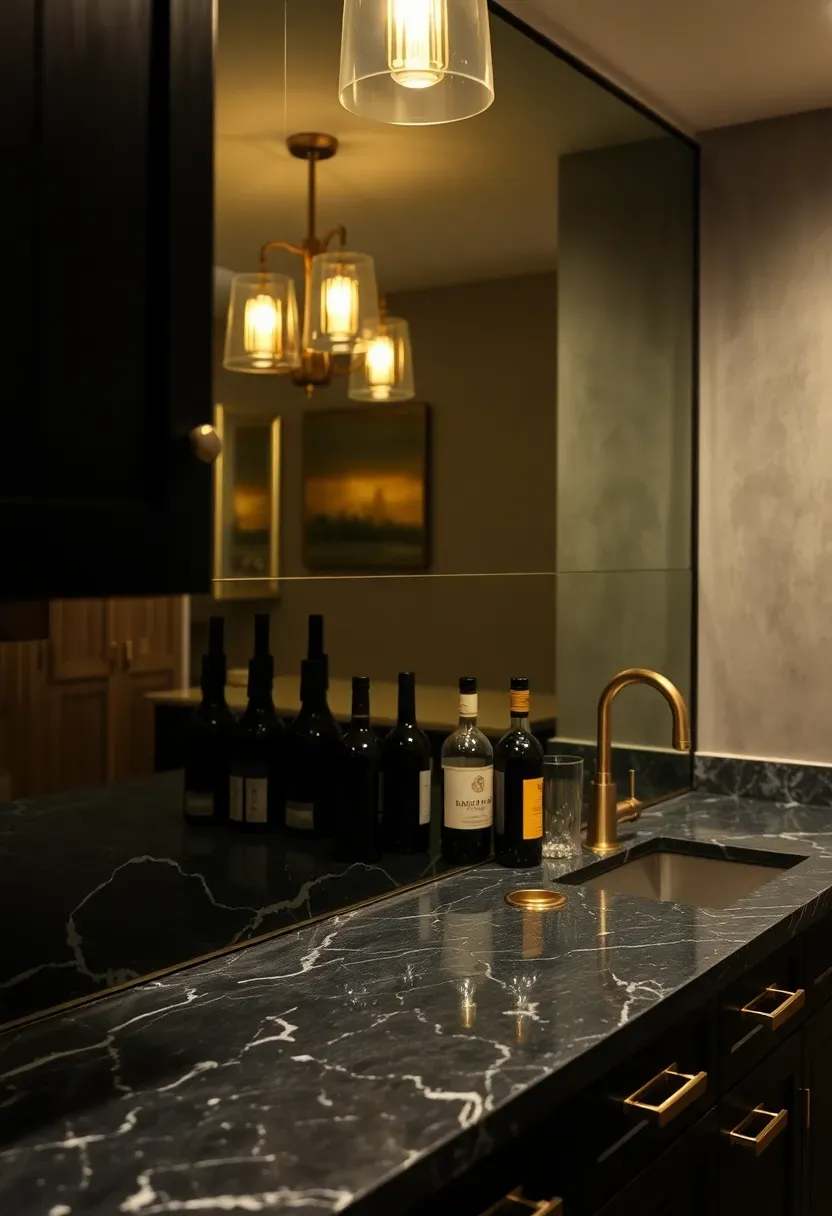
18. Dark Moody Wet Bar with Black Cabinetry
Going dark in a basement bar makes more sense than it does in any other room. You already lack natural light, so leaning into the darkness creates atmosphere instead of fighting a losing battle against it. Matte black cabinets, a charcoal or black granite countertop, and dark grout on the backsplash produce a cocktail lounge feeling. The key is warm-toned lighting: amber pendants, under-cabinet LEDs at 2700K, and maybe a backlit shelf display. Without warm light, an all-dark bar feels like a cave. With it, it feels intentional and inviting.
Tips
- Matte finishes hide fingerprints better than glossy black — important behind a busy bar
- Add one warm material as contrast: brass hardware, a walnut shelf, or a leather bar rail pad
- Black granite costs less than most people expect — $40 to $65 per square foot installed
Recommended
Items for this idea
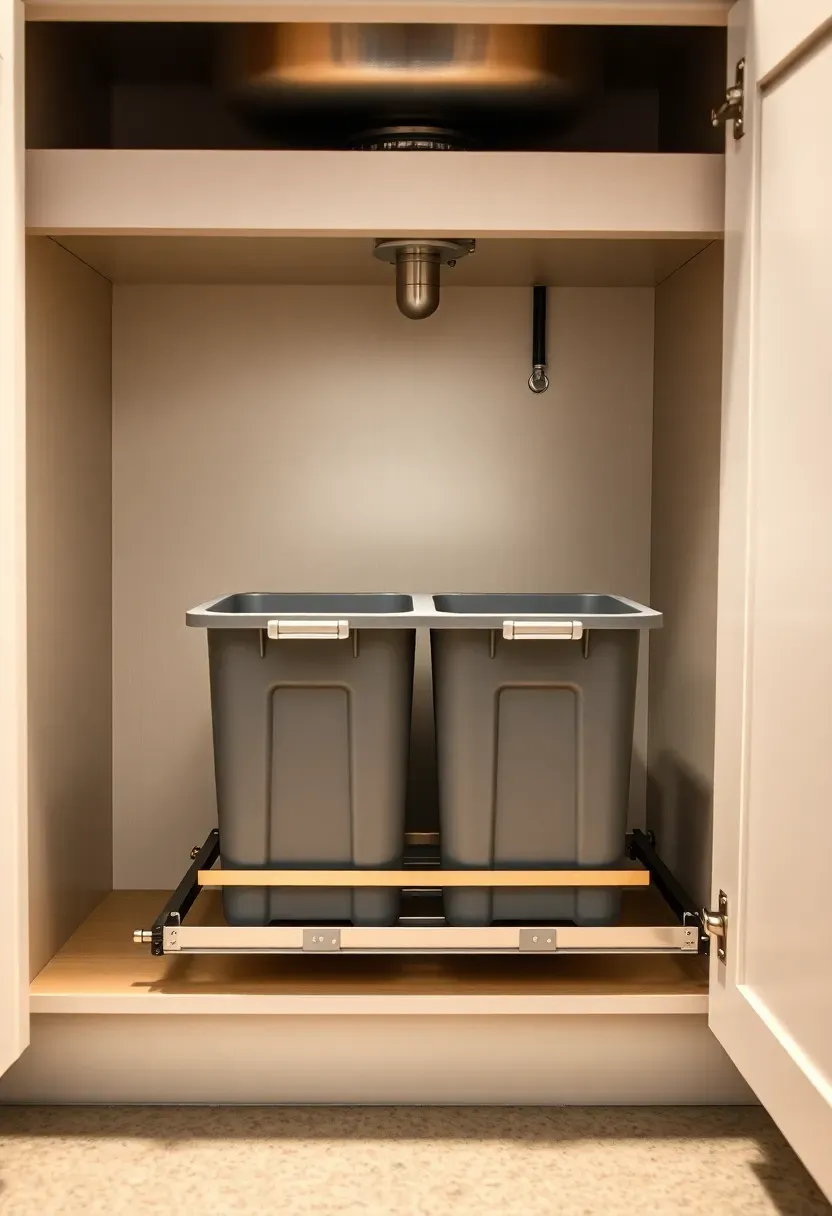
19. Wet Bar with Pull-Out Trash and Recycling
A detail most people forget
Every wet bar generates waste: bottle caps, citrus peels, torn packaging, empty cans. Without a dedicated trash and recycling setup built into the bar, you end up with a freestanding bin that blocks cabinet access or looks out of place next to the cabinetry. A pull-out dual-bin system mounts inside a base cabinet next to the sink, where waste naturally accumulates during drink prep.
What to install
Rev-A-Shelf and Knape & Vogt both make double-bin pull-out frames that fit standard 15-inch or 18-inch base cabinets. The bins hold 35 to 50 quarts each — enough for a full evening of entertaining. The slide mechanism mounts to the cabinet frame, and the bins lift out for emptying. Cost is $60 to $150 for the hardware. Soft-close slides are worth the upgrade to avoid slamming.
Watch out for
- Measure the cabinet interior carefully — sink plumbing sometimes crowds the adjacent cabinet space
- Line the bins with compostable bags for easy cleaning after parties
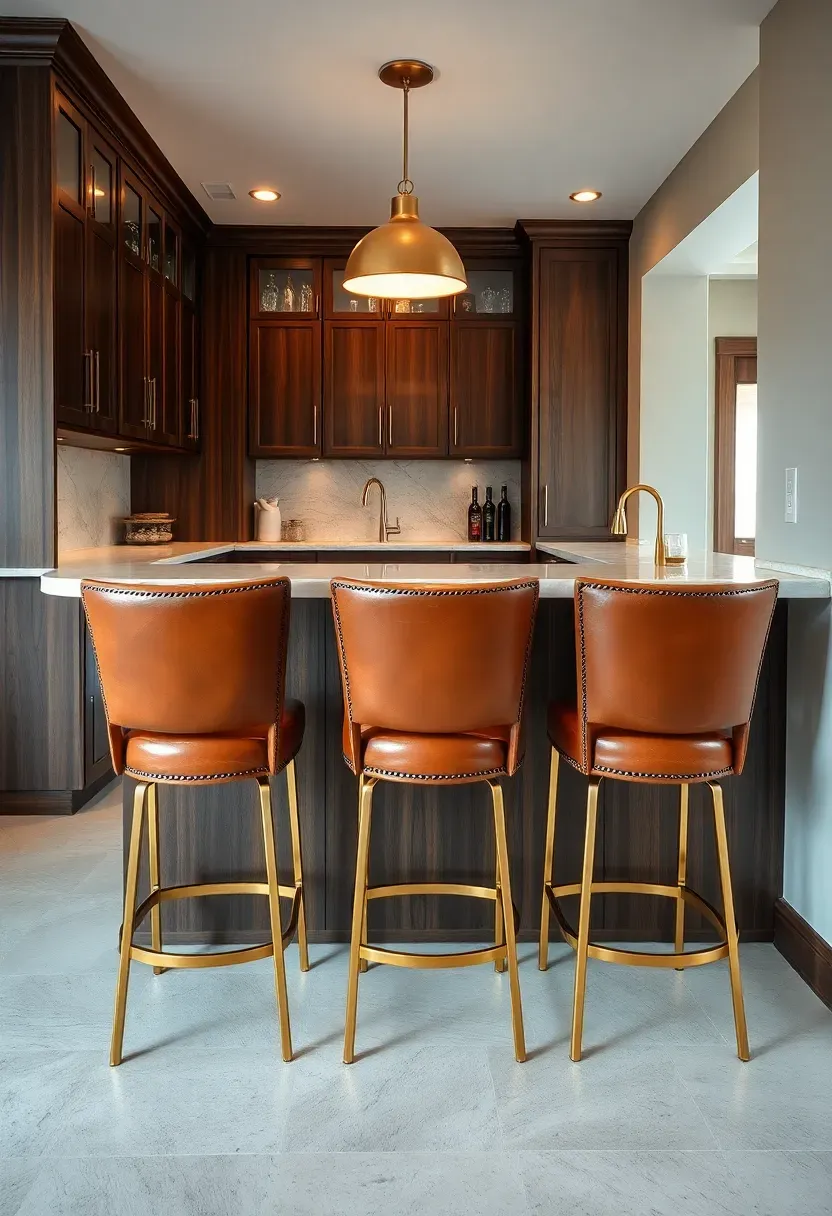
20. Peninsula Wet Bar with Seating
A peninsula bar extends from a wall into the room, creating a natural boundary between the bar zone and the rest of the basement. The bartender side has the sink, storage, and fridge. The guest side has a countertop overhang (12 to 15 inches) with stools. This layout encourages face-to-face conversation across the bar, which is the whole point of a social wet bar. The peninsula needs to be at least 6 feet long to seat three people comfortably, with 24 inches of counter width per stool.
Tips
- Build the overhang with support brackets every 24 inches if it extends more than 10 inches
- Route plumbing through the wall connection rather than through the floor if possible — it is cheaper
- Position the sink toward the wall end so splashing does not reach the guest seating area

Recommended
Items for this idea
21. Wet Bar with Speed Rail and Drip Tray
Borrowing from commercial bar design, a speed rail mounts below the counter edge on the bartender side and holds 6 to 12 bottles within arm's reach. A recessed drip tray in the countertop near the pour station catches spills and makes cleanup a non-event. These two additions cost under $100 total but make mixing drinks dramatically faster and cleaner. The speed rail is a stainless steel channel that screws into the underside of the bar top or the front face of the cabinet. The drip tray sits flush with the counter and has a removable grate for rinsing.
Tips
- Mount the speed rail at a slight angle so bottles lean back and stay stable
- Choose a drip tray with a drain fitting — you can route a small tube to a bucket below rather than emptying the tray manually
- Limit the speed rail to your six most-used spirits to avoid clutter
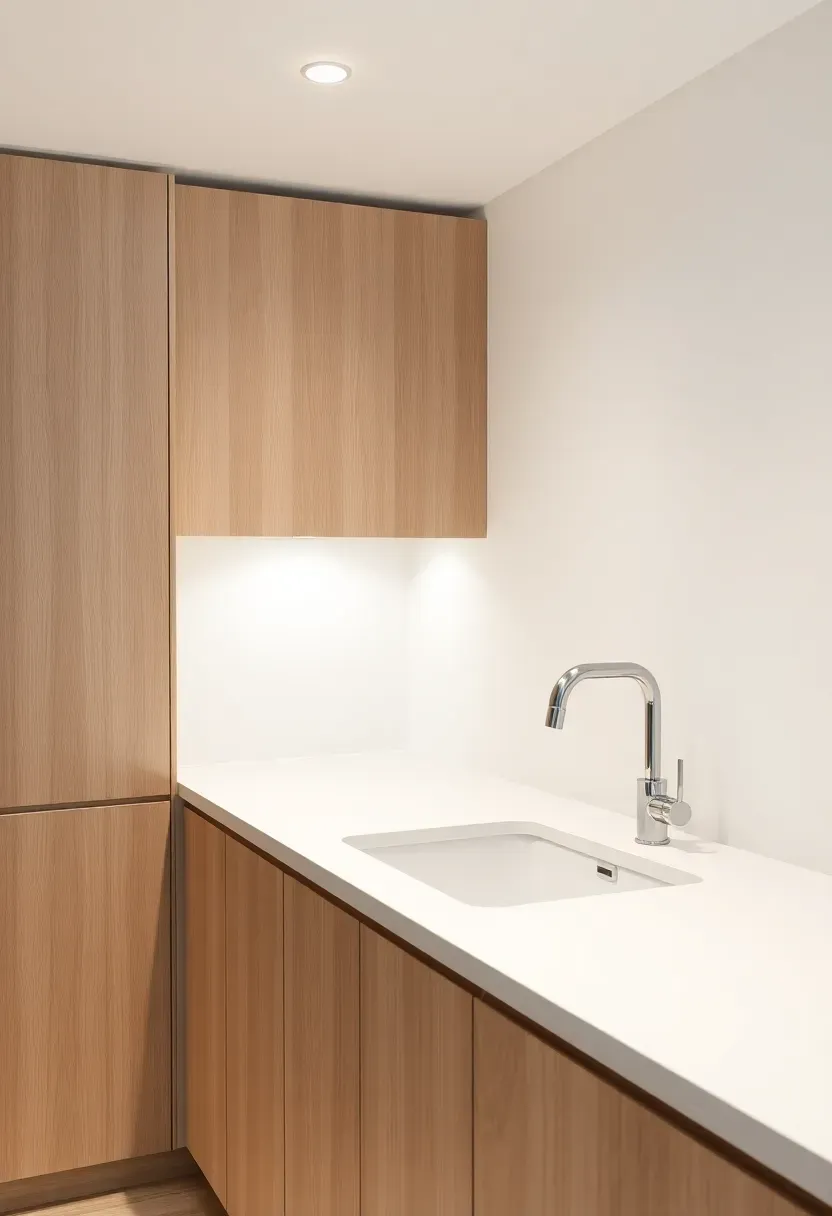
22. Scandinavian Minimal Wet Bar
Not every basement bar needs to look like a pub or a cocktail lounge. A Scandinavian approach uses light oak or birch cabinets, a white solid-surface countertop, and an integrated sink where the counter and basin are one seamless piece. Hardware is minimal — finger pulls or push-to-open doors. The backsplash is either white tile or simply painted drywall. The result is a bar that blends into the basement as a functional station rather than dominating the room as a themed feature. It suits basements that double as family rooms where a loud bar aesthetic would feel out of place.
Tips
- Integrated solid-surface sinks (Corian, Hi-Macs) eliminate the joint between counter and basin where grime collects
- Finger-pull cabinet doors avoid hardware that disrupts the clean lines
- Keep bottles stored inside cabinets rather than displayed — the minimal look breaks down fast with visual clutter on the counter
Recommended
Items for this idea
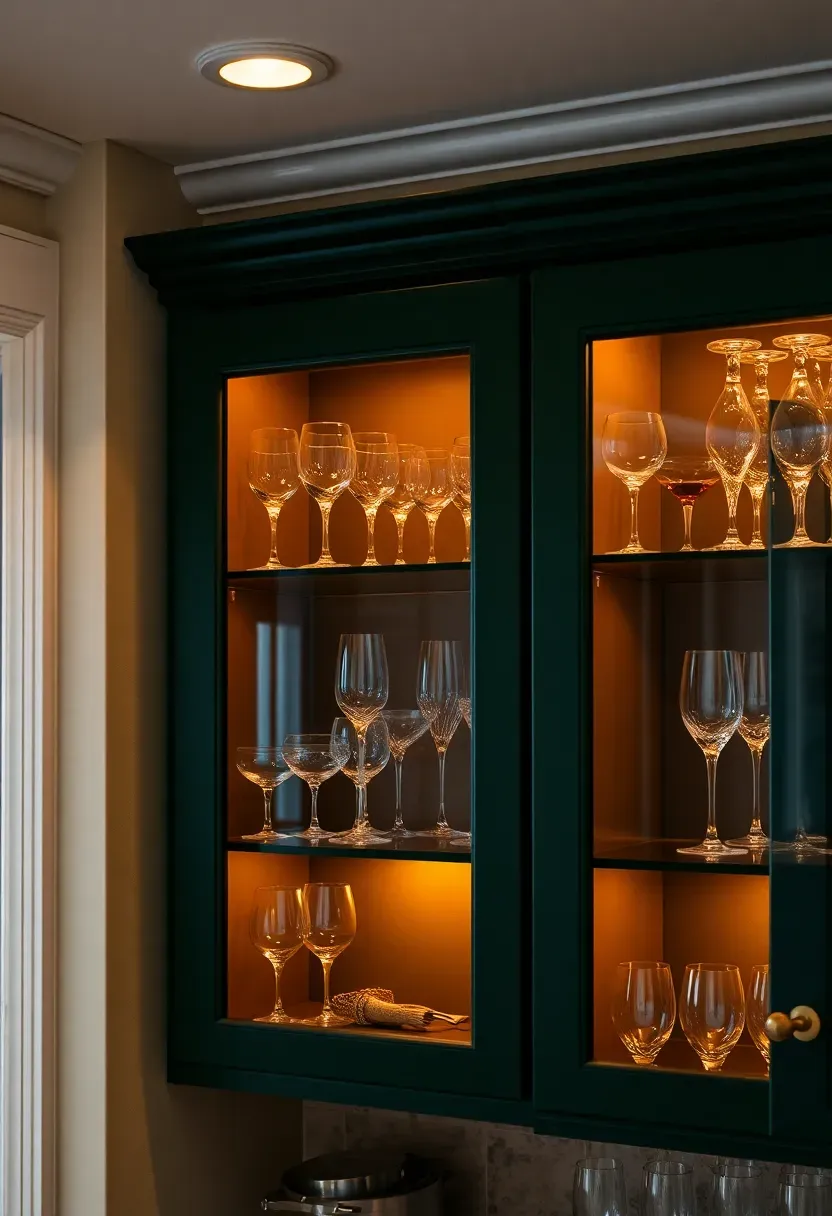
23. Wet Bar with Glass-Front Cabinets
Glass-front upper cabinets split the difference between open shelves and closed storage. Your glassware stays dust-free while remaining visible. Interior cabinet lighting — puck lights or LED tape along the top inside edge — makes the cabinet contents glow in a dim basement. Mullion-style glass doors (divided into smaller panes) add a traditional look. Full-panel glass doors feel more modern. Seeded or reeded glass hides clutter while still letting light through, which is useful if you do not want to keep the interior perfectly arranged at all times.
Tips
- Use tempered glass for cabinet doors — it is safer if a bottle tips and hits the pane
- LED puck lights with a touch dimmer let you adjust brightness for everyday versus entertaining
- Arrange glassware by type and height for the best visual effect through the glass
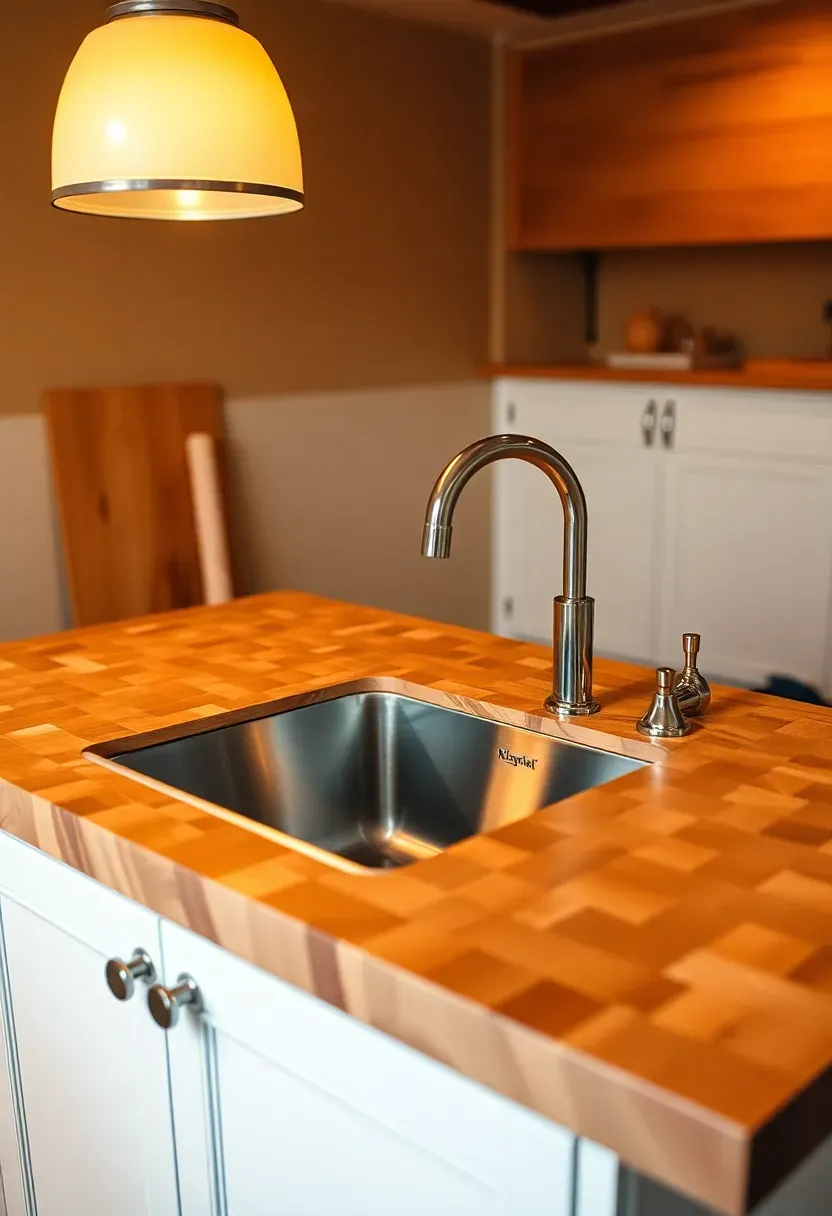
24. Wet Bar with Butcher Block Counter
Butcher block brings warmth to a basement wet bar at a fraction of hardstone prices. A 25-inch-deep, 1.5-inch-thick maple or walnut butcher block counter runs $20 to $50 per square foot — compared to $60 or more for stone. The wood surface is forgiving: it absorbs sound when you set down a glass, it does not chip or crack from dropped bottles, and it develops a patina over time that adds character. The trade-off is maintenance. Wet bar counters see more moisture than typical kitchen sections, so you need to oil the surface with mineral oil monthly and wipe standing water promptly.
Pros and cons
- Pro: warm, tactile surface that feels welcoming under your hands
- Pro: scratches and minor dings sand out easily
- Con: water rings form if wet glasses sit too long — use coasters or a bar mat near the sink
- Con: not heat-resistant — do not set a hot kettle or branding iron directly on the surface
Recommended
Items for this idea
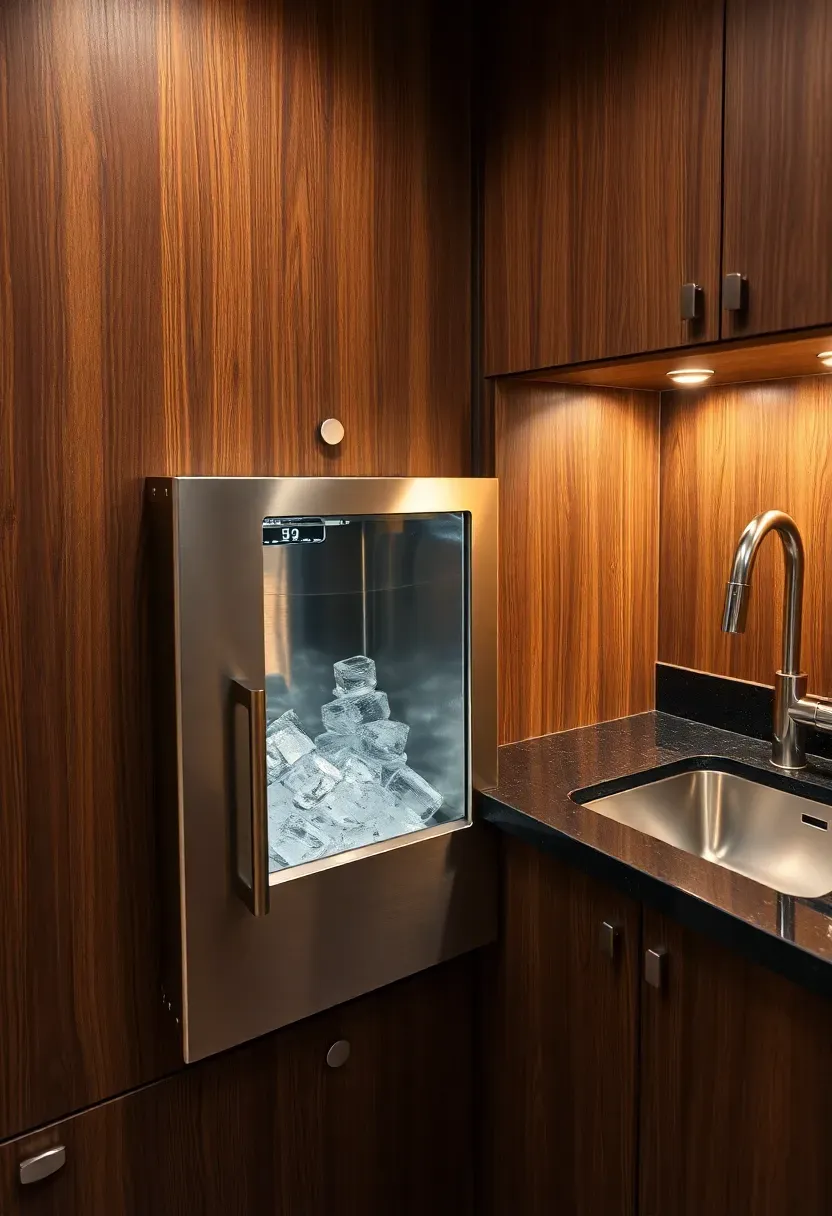
25. Wet Bar with Integrated Ice Maker
A dedicated ice maker is the single upgrade that moves a basement wet bar from residential to genuinely functional. Freezer ice absorbs odors, comes out cloudy, and melts fast. A built-in clear ice maker produces dense, slow-melting cubes that do not water down drinks. Undercounter models (15 inches wide) fit next to the sink cabinet and produce 25 to 50 pounds of ice per day — enough for a house party. They need a water supply line (the same 1/4-inch line that feeds a fridge) and a drain, which is convenient when you already have plumbing routed for the wet bar sink.
Tips
- Clear ice makers cost $1,000 to $3,000 installed, but the ice quality difference is obvious in every drink
- Position the ice maker within arm's reach of the pour station to keep the workflow tight
- Some models have a built-in storage bin that holds 25 pounds; others drain melt water and require a drain line
Quick FAQ
Do I need a permit to install a wet bar in my basement? Most jurisdictions require a plumbing permit any time you add a new drain or water supply line. The permit typically costs $50 to $200 and involves an inspection of the rough-in before you close up the walls. Skipping the permit can create problems when you sell the house and the buyer's inspector flags unpermitted plumbing work.
How much does it cost to add plumbing for a basement wet bar? If your basement already has a floor drain or a bathroom rough-in nearby, tapping into existing drain and supply lines runs $800 to $1,500. If the plumber needs to break concrete for a new drain line or install an ejector pump because the bar drain sits below the sewer main, expect $2,000 to $4,000.
Can I install a basement wet bar without breaking concrete? Yes. If your basement has above-slab plumbing access — exposed joists with visible drain lines — a plumber can tie into an existing stack without touching the floor. Wall-mounted drain connections (like those used for laundry sinks) are another option.
What size sink works best for a wet bar? A 10-by-14-inch or 12-by-15-inch single-bowl bar sink handles glass rinsing and light prep without dominating the countertop. Anything larger starts to feel like a kitchen sink and wastes valuable bar surface.
Is a wet bar worth it for resale value? A finished basement with a wet bar typically recoups 50 to 70 percent of the investment at resale, depending on your market. In neighborhoods where entertaining spaces are expected, it can be a deciding factor for buyers comparing similar homes.
A basement wet bar does not need to be complicated to be useful. Start with the plumbing — get the sink and drain roughed in properly — and build outward from there. Even a simple single-wall setup with a small sink, a mini fridge, and a few shelves makes hosting easier and keeps the party downstairs where it belongs. Pick the layout that fits your space, choose materials that match the rest of your basement, and do not overthink it. The best wet bar is the one that gets used every weekend, not the one that looks perfect in a photo.
Pinterest cover for 25 Basement Wet Bar Ideas
About the author
OBCD
CGI visualization and interior design content. We create detailed 3D renders and curate practical design ideas for every room in your home.