21 Basement Bathroom Ideas
Adding a bathroom to your basement changes how the whole level functions. Without one, people trek upstairs every time — which means the basement never really gets used as a living space. The catch is that below-grade plumbing has its own set of requirements. You are dealing with sewage ejector pumps, limited ceiling height, moisture concerns that above-grade bathrooms never face, and usually tighter budgets since it is a secondary space. These 21 ideas address those realities head-on, covering everything from layout decisions and waterproofing to the specific fixtures and finishes that hold up in basement conditions.
Each idea covers a different angle — some focus on layout and plumbing logistics, others on materials and visual design choices that work well in rooms with minimal natural light.
Table of Contents
- Upflush Toilet System
- Walk-In Curbless Shower
- Large-Format Porcelain Tile
- Floating Vanity with Open Shelf
- Recessed Medicine Cabinet
- Heated Flooring Under Tile
- Linear Drain Shower Floor
- Pocket Door Entry
- Backlit Mirror Panel
- Matte Black Fixture Package
- Compact Corner Shower
- Moisture-Resistant Beadboard Walls
- Niche Shower Storage
- Concrete-Look Porcelain Floor
- Exhaust Fan with Humidity Sensor
- Wall-Mounted Toilet
- Glass Mosaic Accent Wall
- Warm LED Vanity Lighting
- Freestanding Soaking Tub
- Waterproof Vinyl Wainscoting
- Half-Bath Under the Stairs
1. Upflush Toilet System
The problem
Traditional basement bathrooms require breaking up the concrete slab to install drain lines below the floor — expensive, messy, and sometimes impossible depending on your foundation. An upflush (macerating) system avoids all of that. The unit sits behind or beside the toilet and grinds waste into a slurry, then pumps it up through a small-diameter pipe to your existing sewer line above. Installation costs run roughly 40 to 60 percent less than traditional below-slab plumbing.
What to know
- Macerating units handle toilet waste plus a sink and shower drain from a single pump
- They require a dedicated electrical outlet and a vent connection
- Noise is noticeable during flush cycles — about as loud as a garbage disposal running for 10 seconds
We picked a few things that go well with this idea: Hurran Matte Black Centerset Bathroom Faucet (★4.6), Ryuwanku Matte Black Waterfall Sink Faucet (★4.4) and Hurran Matte Black Widespread Faucet (2-Pack) (★4.5). As an Amazon Associate we earn from qualifying purchases.
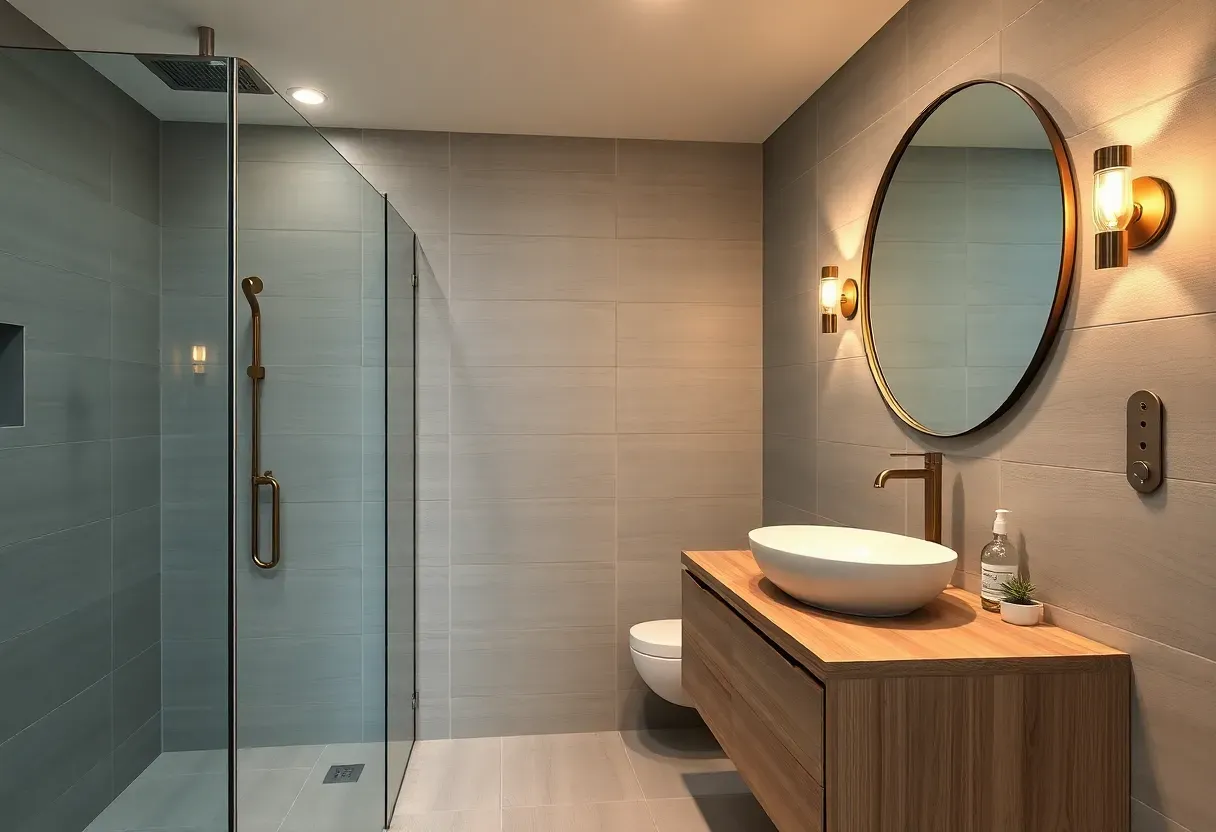
2. Walk-In Curbless Shower
A curbless shower removes the raised threshold you step over in a traditional shower, which does two things for a basement bathroom. First, it makes a small room feel bigger because the floor plane is continuous. Second, it simplifies waterproofing — instead of relying on a curb to contain water, the entire floor slopes gently toward a drain. The key detail is getting the slope right: a quarter-inch drop per linear foot toward the drain point. Use a pre-sloped foam shower pan under your tile to guarantee this angle without building up thick mortar beds that eat into already-limited ceiling height.
Tips
- Install a fixed glass panel (not a full enclosure) to control splash without boxing in the space
- Choose matte or textured tile on the shower floor for grip — polished porcelain gets dangerously slick when wet
- A trench drain along one wall keeps the slope subtle and avoids the funnel look of a center drain
We picked a few things that go well with this idea: LOAAO 24x32 LED Backlit Bathroom Mirror (★4.6), VanPokins 24x32 Dimmable LED Vanity Mirror (★4.8) and Hivone 40x32 LED Anti-Fog Bathroom Mirror (★4.7). As an Amazon Associate we earn from qualifying purchases.
3. Large-Format Porcelain Tile
Why it works below grade
Porcelain tile absorbs less than 0.5 percent moisture, making it the most reliable surface you can put in a basement bathroom. Large-format tiles (12x24 inches or bigger) reduce the number of grout lines, which means fewer opportunities for mildew to establish itself. They also create a cleaner visual with fewer seams breaking up the surface — something that matters in compact rooms where busy patterns shrink the perceived size.
Installation notes
- Use a modified thinset rated for large-format tile — standard thinset does not provide enough grip on the back of bigger pieces
- Apply a crack-isolation membrane over the concrete slab before tiling to prevent hairline foundation cracks from telegraphing through
- Keep grout joints narrow (1/16 to 1/8 inch) and use epoxy grout, which resists moisture and staining far better than cement-based grout
We picked a few things that go well with this idea: AVSIILE Black 24-Inch Linear Shower Drain (★4.8), HTOH Brushed Nickel 24-Inch Linear Drain (★4.7) and Neodrain 24-Inch Tile Insert Shower Drain (★4.7). As an Amazon Associate we earn from qualifying purchases.
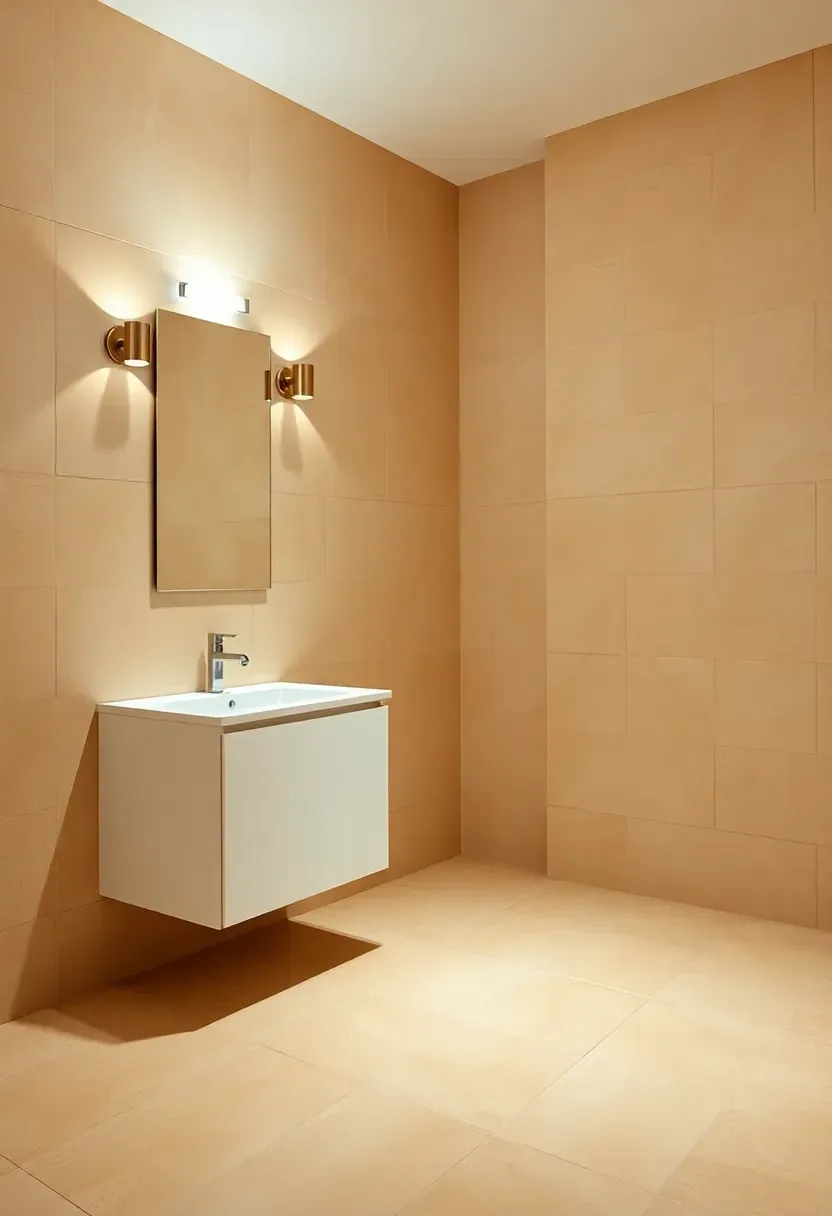
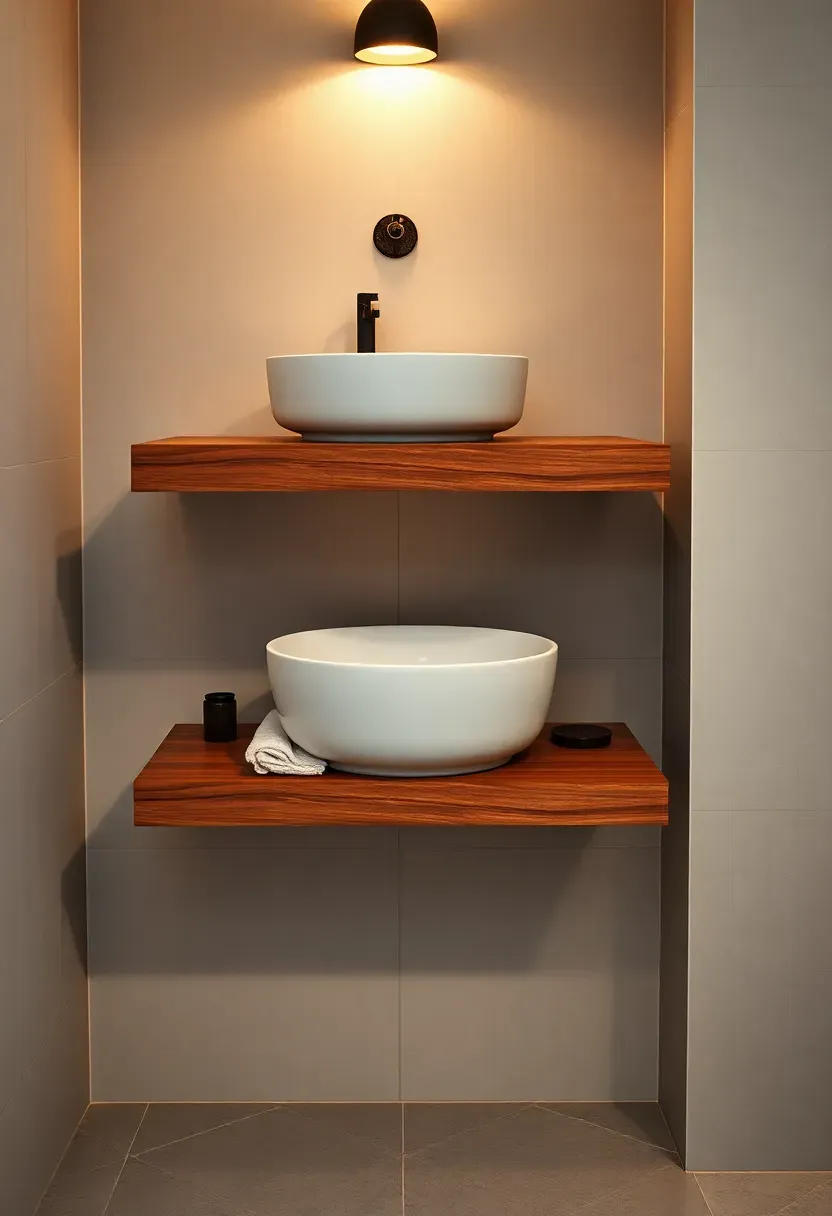
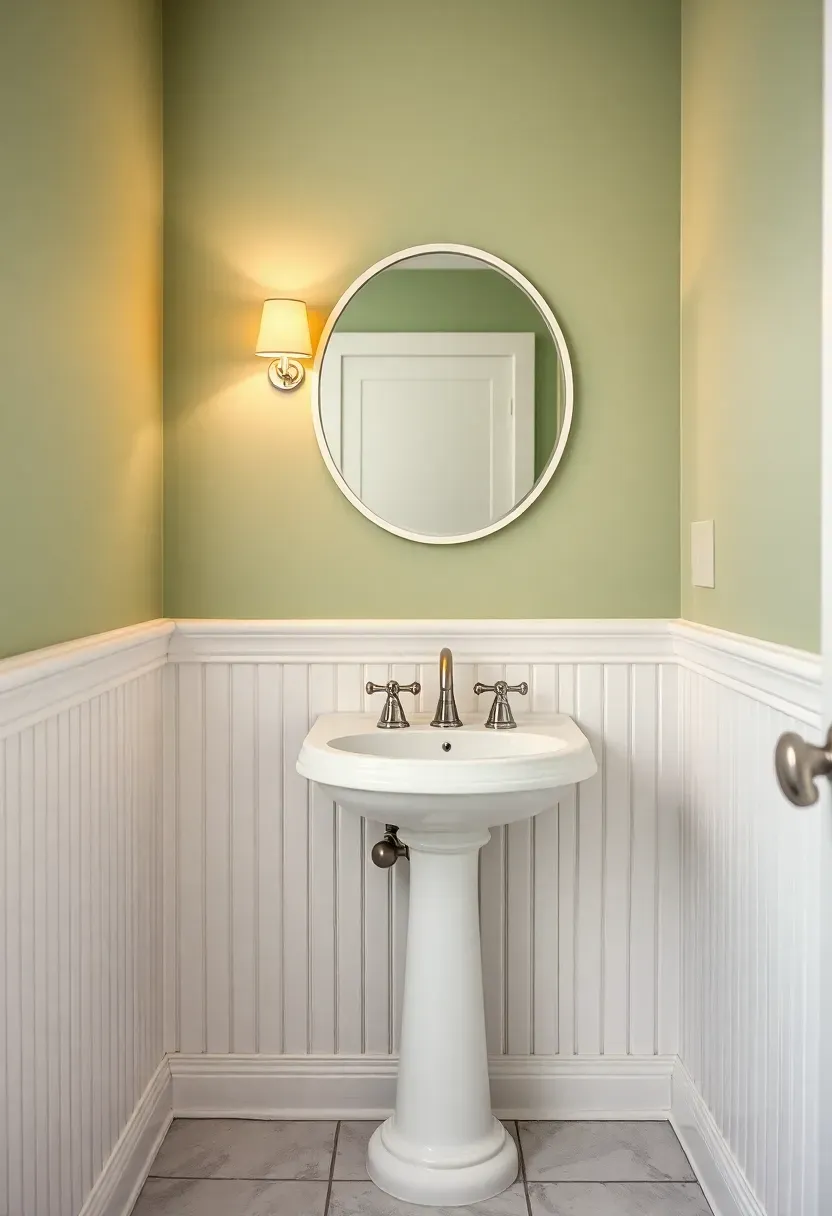
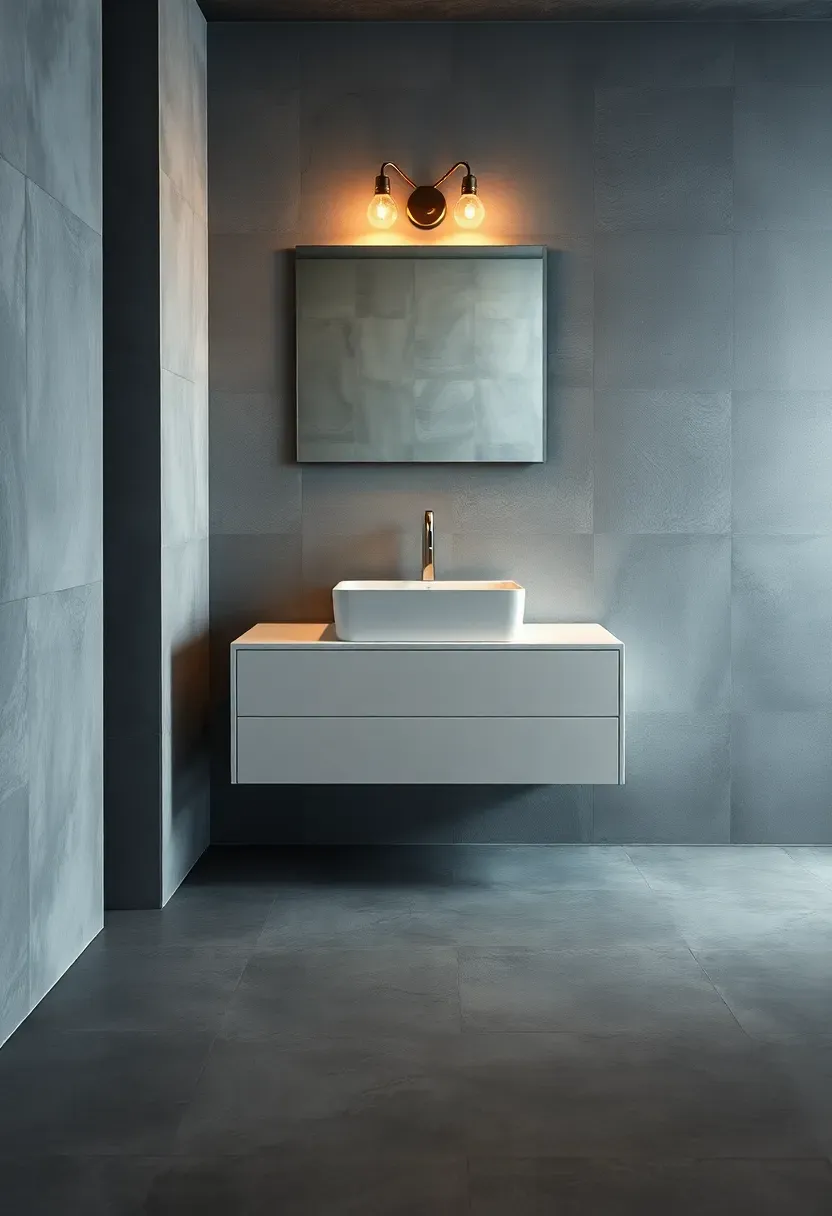
4. Floating Vanity with Open Shelf
Wall-mounted vanities pull their weight in basement bathrooms for a practical reason beyond aesthetics: they expose the floor underneath, which makes it easier to spot moisture problems early. Basements occasionally seep, and a floor-standing cabinet hides that evidence until damage is already done. A floating vanity with one open shelf below the countertop gives you accessible storage for towels or baskets while keeping the floor visible and easy to mop. Mount it at 34 to 36 inches to the countertop surface, and anchor into blocking — not just drywall — because the cantilevered weight is significant once you add a stone or quartz top.
Tips
- Choose a vanity with a moisture-sealed finish (marine-grade plywood or PVC-wrapped MDF) rather than raw wood
- Vessel sinks pair well with floating vanities and add visual height in low-ceiling rooms
- Route plumbing through the wall rather than down through the shelf for a cleaner look
Recommended
Items for this idea
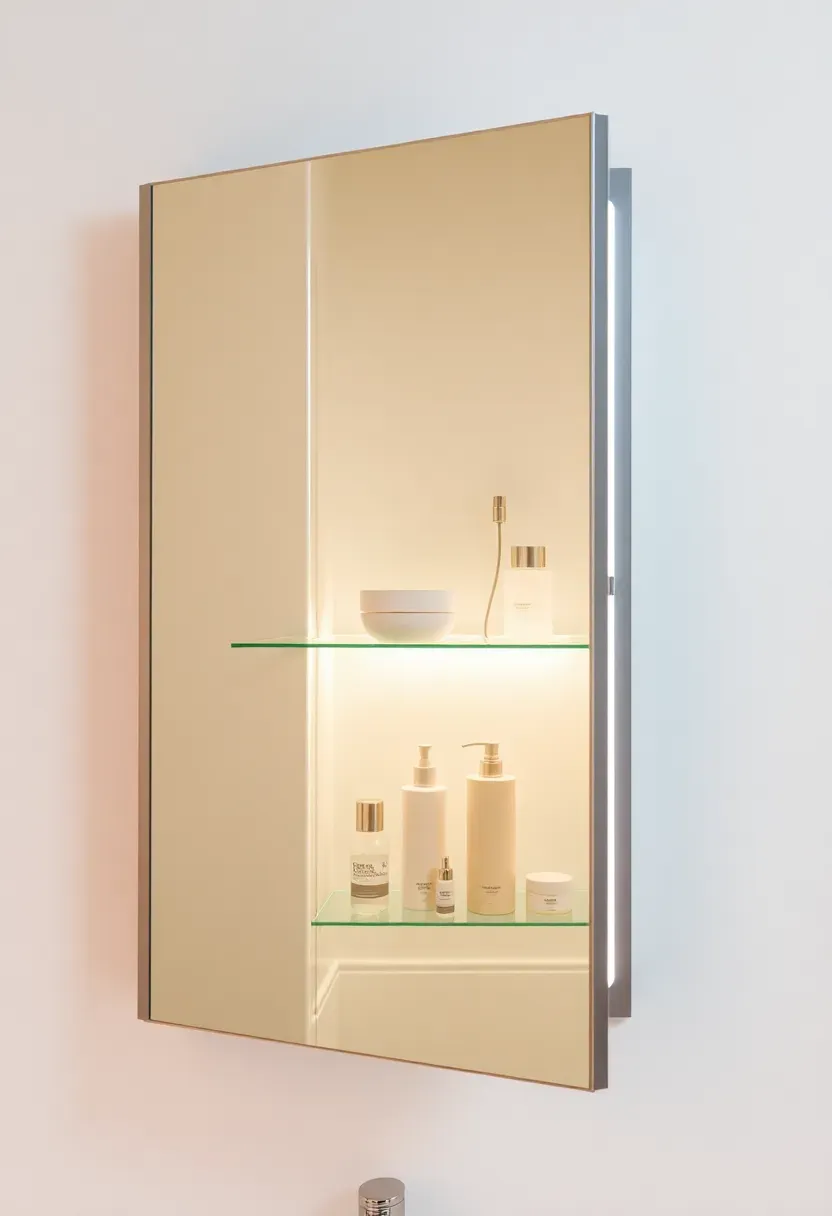
5. Recessed Medicine Cabinet
Every inch of depth matters in a basement bathroom, and a recessed medicine cabinet gives you storage without a box projecting into the room. Standard interior walls are framed with 2x4 studs, providing about 3.5 inches of cavity depth — enough for toiletries, medications, and grooming tools. If your basement walls are framed against the foundation, you may need to build a small bump-out or use a shallower model designed for 2x3 framing. Choose a cabinet with a mirrored door and internal LED lighting so it doubles as your vanity mirror, eliminating the need for a separate mirror and saving wall space.
Pros and cons
Pros: Saves floor space, conceals clutter, replaces a separate mirror
Cons: Requires cutting into a finished wall, limited depth in some framing situations, harder to relocate once installed
6. Heated Flooring Under Tile
Basement floors stay cold year-round because they sit on or near the earth. Radiant floor heating — either electric mat or cable — solves this and makes the bathroom genuinely comfortable. Electric systems are straightforward for retrofits: you lay heating mats over the slab, embed them in thinset, and tile over the top. Total system thickness adds only about 3/8 inch to the floor buildup. The operating cost is modest because bathroom square footage is small — heating a 50-square-foot basement bathroom floor typically runs 8 to 15 cents per day.
How to install
- Lay a cork or foam insulation board over the concrete slab to prevent heat from bleeding downward into the ground
- Spread modified thinset and embed the heating mat, keeping cables at least 2 inches from walls and fixtures
- Install a programmable thermostat with a floor sensor — set it to warm up 30 minutes before your morning routine
Recommended
Items for this idea
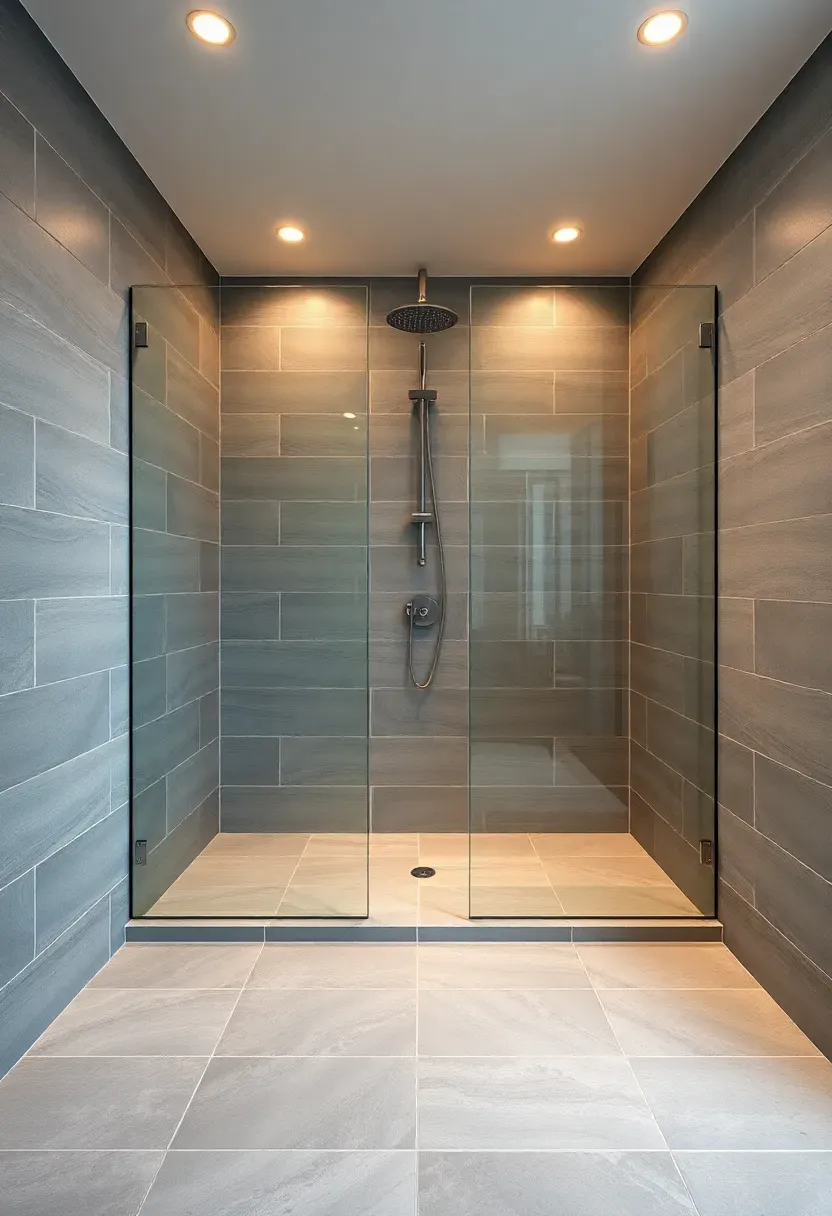
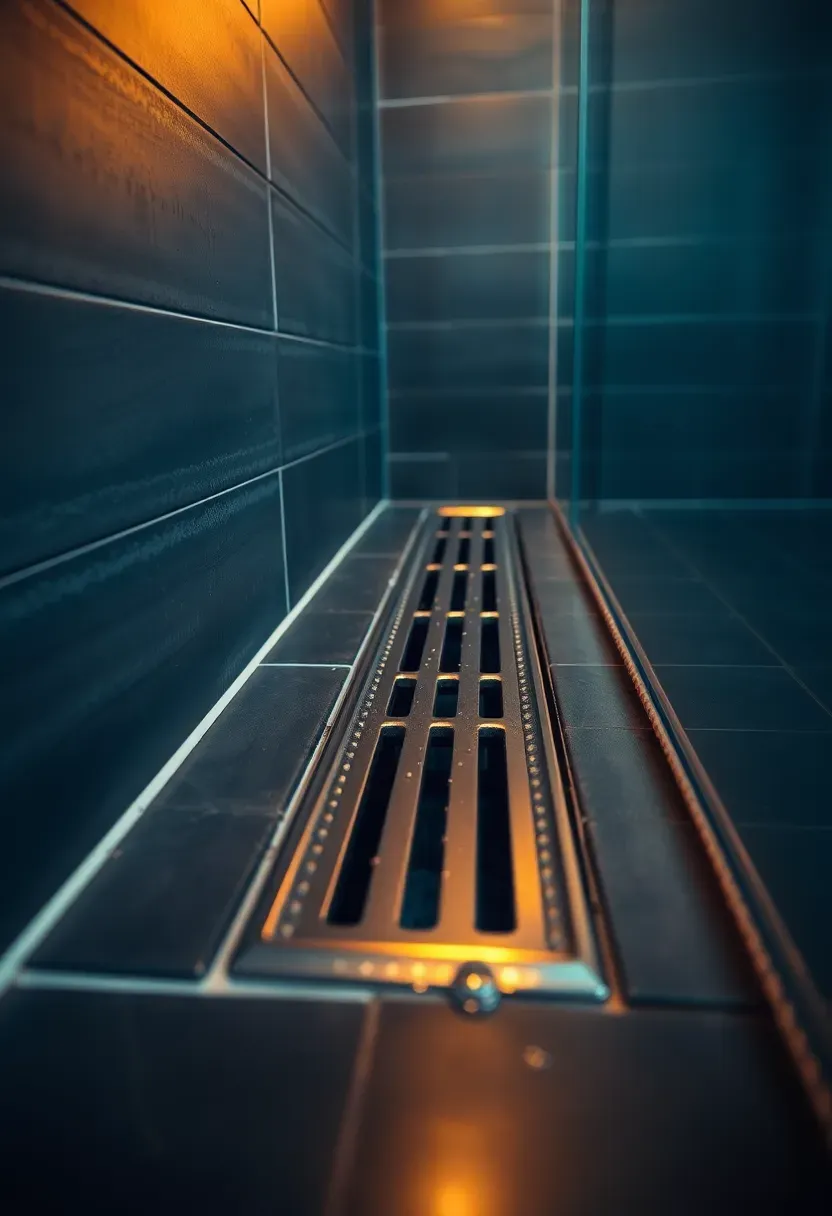
7. Linear Drain Shower Floor
Linear vs. center point drain
A center drain requires the floor to slope from all four sides toward a single point, creating a noticeable pyramid shape. A linear drain sits along one wall and only needs a single-direction slope, which looks cleaner and allows you to use large-format tiles on the shower floor without cutting them into small pie-shaped wedges. For basement showers, the linear drain has another advantage: the drain body is shallower than many point drains, requiring less depth below the finished floor — critical when you are already fighting to maintain headroom.
Choose if
- You want to tile the shower floor with the same large tiles used elsewhere for visual continuity
- Your slab has limited depth for drain bodies and trap assemblies
- You prefer a modern, minimal aesthetic
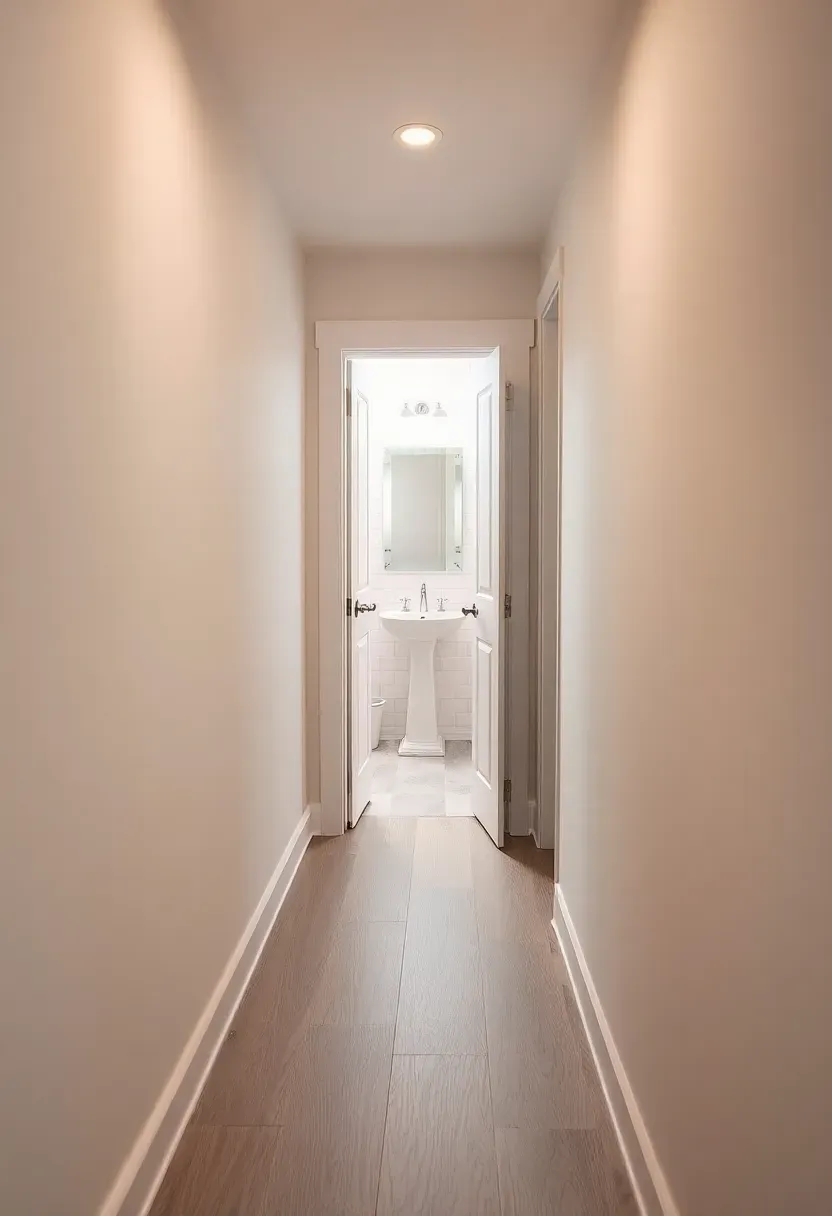
8. Pocket Door Entry
A standard 30-inch door needs 30 inches of clear swing arc, and in a tight basement layout that arc often blocks a toilet or vanity when open. A pocket door slides into the wall, reclaiming that entire swing zone. The hardware has improved significantly in the last decade — soft-close pocket door kits prevent slamming and keep the door from jumping the track, which was the main complaint with older systems. The trade-off is that you lose the wall cavity where the door lives, so you cannot run electrical or plumbing through that section. Plan your pocket door location before roughing in utilities.
Tips
- Use a solid-core door (not hollow) for sound privacy — basement bathrooms often sit near entertainment areas
- Install a privacy lock designed for pocket doors; standard knob locks do not work
- Frame the pocket with steel-stud kits rather than wood to prevent warping over time
Recommended
Items for this idea
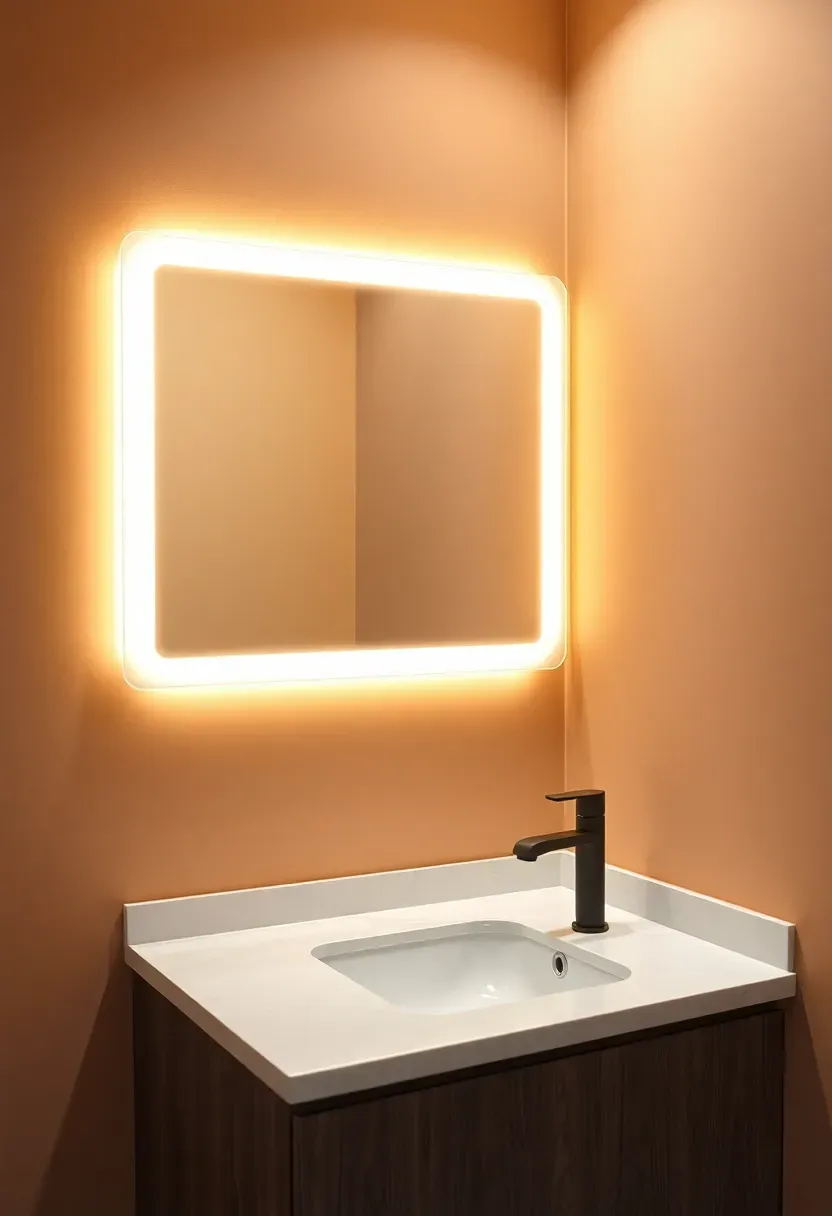
9. Backlit Mirror Panel
Basement bathrooms rarely have windows, so the mirror and lighting around it carry extra responsibility. A backlit mirror — one with LED strips mounted behind the glass — casts even, shadow-free light across your face while also providing ambient illumination that reduces the clinical feel of overhead-only lighting. The glow wrapping around the mirror's edge creates a sense of depth on the wall, which helps in windowless rooms that can otherwise feel flat. Most backlit mirrors draw 20 to 40 watts and connect to a standard switch or dimmer.
Tips
- Choose a mirror rated for bathroom use (IP44 or higher) to handle humidity
- Position the mirror so its center sits at 60 inches from the floor for comfortable use across different heights
- Pair with a separate overhead light for task visibility when shaving or applying makeup
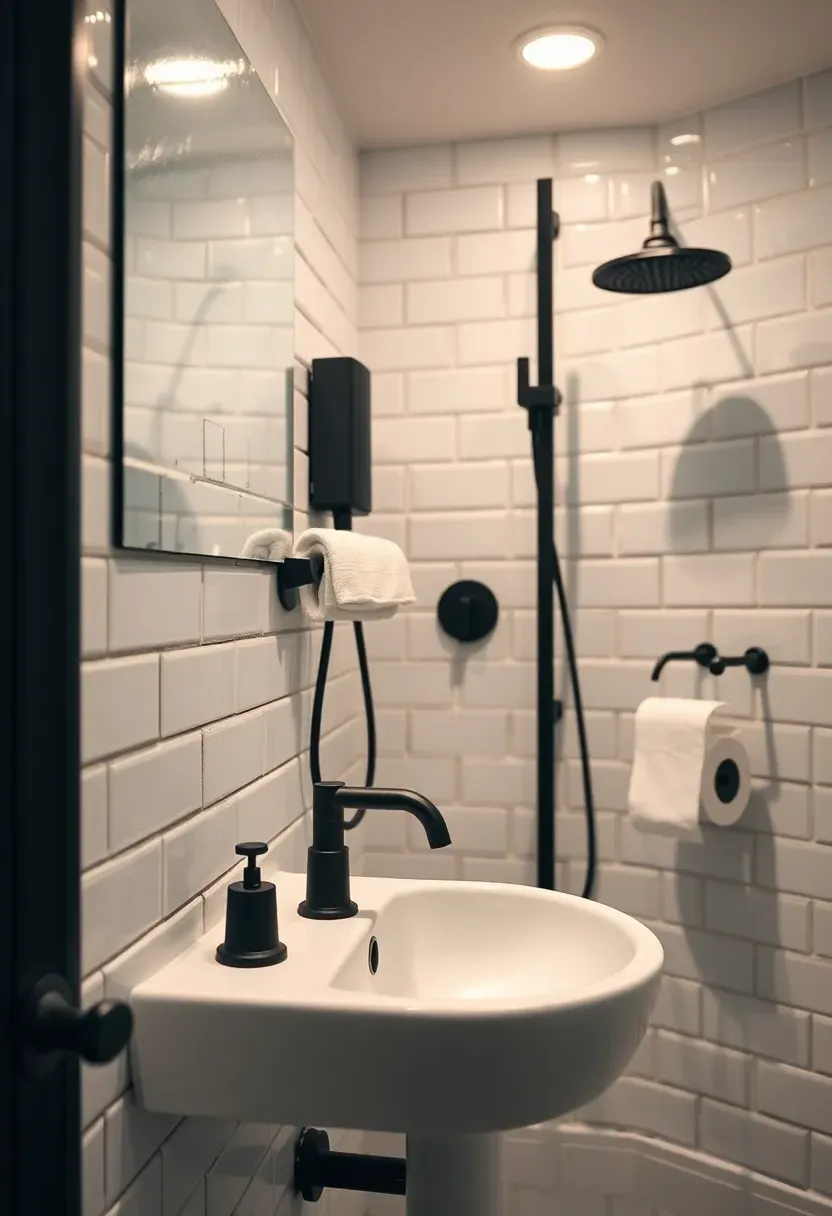
10. Matte Black Fixture Package
Coordinating all your fixtures — faucet, showerhead, towel bars, robe hooks, toilet paper holder, drain covers — in a single matte black finish gives a basement bathroom a cohesive, deliberate look without spending money on expensive tile or countertops. Matte black hides water spots and fingerprints better than polished chrome or brushed nickel, which matters in humid basement environments where condensation is constant. The finish reads as modern but not trendy, so it will not date the room in five years. Budget around $400 to $700 for a full fixture set including shower trim.
Pros and cons
Pros: Hides water spots, creates visual consistency, works with nearly any tile color
Cons: Shows dust and lint more than lighter finishes, lower-quality coatings can scratch and reveal the brass underneath
Recommended
Items for this idea
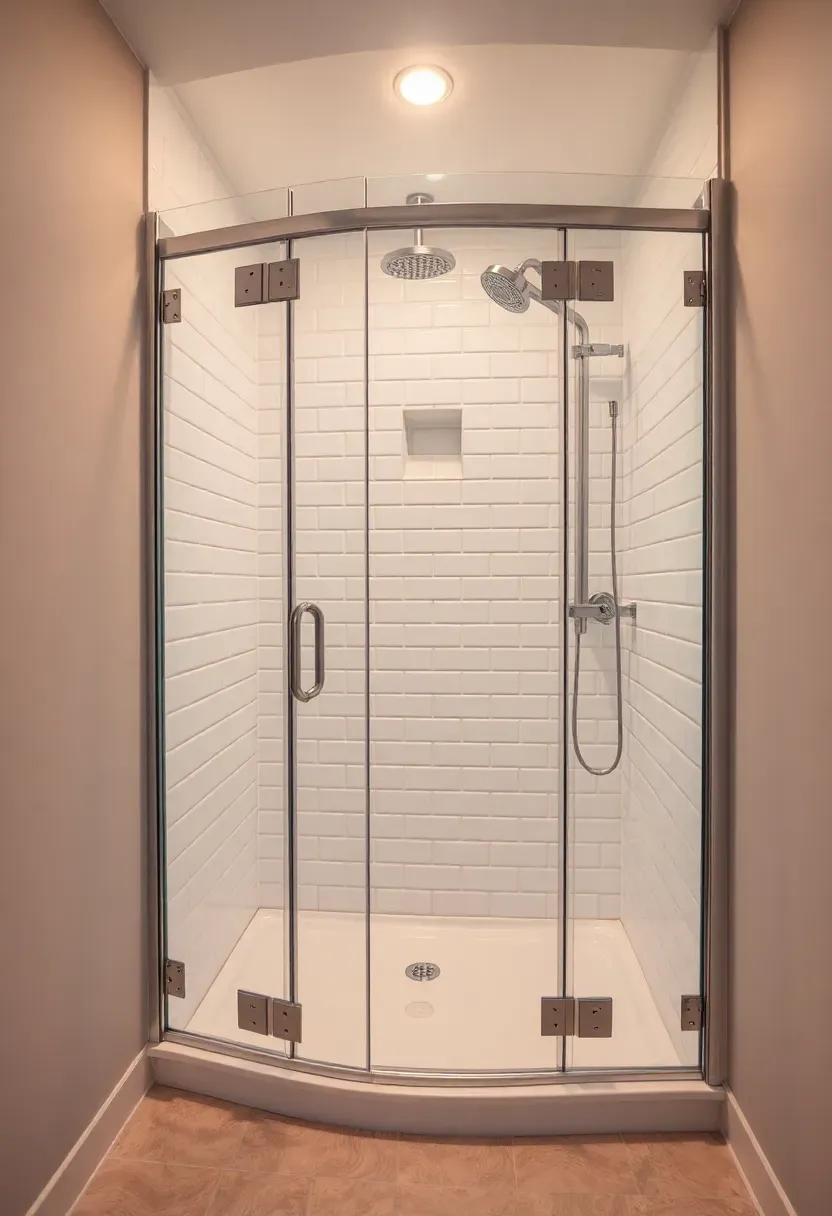
11. Compact Corner Shower
When space is tight
Not every basement has room for a full 36x48 shower. A corner unit — either a neo-angle with a diagonal entry or a 32x32 square with a curved sliding door — fits into spaces that would otherwise go unused. The diagonal entry on a neo-angle shower gives you a wider opening than you would expect from the footprint, which prevents the claustrophobic feeling that small showers sometimes create. Pre-fabricated acrylic corner units start around $350 and install in a day, but a tiled corner shower on a custom pan looks significantly better and only adds a day or two of labor.
Recommendation
If your basement bathroom is under 40 square feet, a 36-inch neo-angle corner shower is the sweet spot between comfort and space savings. Anything smaller and you will be bumping elbows against the walls.
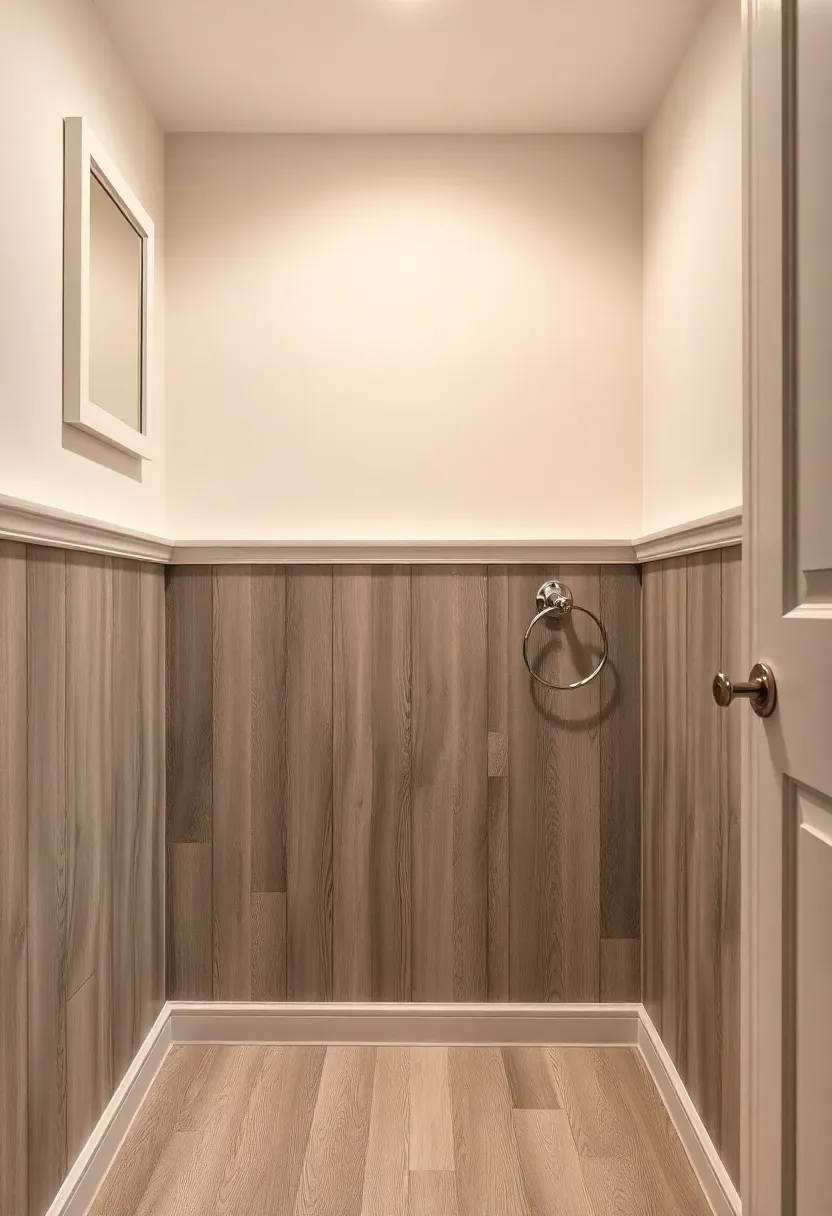
12. Moisture-Resistant Beadboard Walls
PVC beadboard (not wood) gives basement bathroom walls texture and character without the mold risk. Real wood beadboard absorbs moisture and eventually warps or grows mildew behind the paint in below-grade environments. PVC versions look identical once painted but are completely waterproof — you can hose them down. Install beadboard as wainscoting on the lower half of the wall (36 to 42 inches high) with a flat cap rail on top. This protects the most splash-prone zone while keeping the upper wall open for paint, a mirror, or shelving. It also covers any imperfections in basement walls without the cost of full re-drywalling.
Tips
- Use construction adhesive plus finish nails for PVC beadboard — nails alone will not hold in damp conditions
- Paint PVC beadboard with a semi-gloss latex for easy wipe-down
- Leave a 1/4-inch gap at the floor to prevent wicking if minor water intrusion occurs
Recommended
Items for this idea
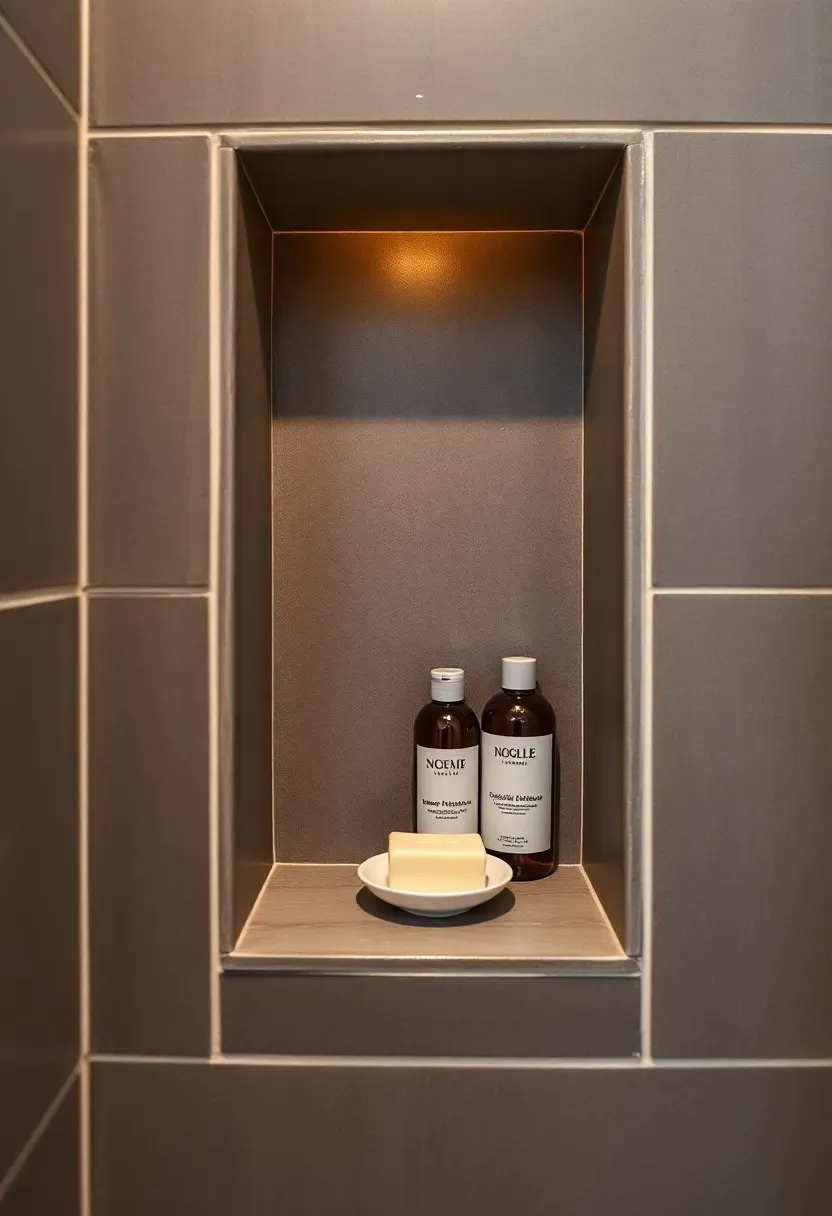
13. Niche Shower Storage
A recessed niche built into the shower wall eliminates the need for corner caddies or suction-cup shelves that fall constantly. Standard niche size is 12 inches wide by 24 inches tall — enough for shampoo, conditioner, a bar of soap, and a razor. Position the niche between studs so you do not need to cut structural framing. Place the bottom of the niche at about 48 inches from the shower floor, which puts items at a comfortable reaching height for most adults. Waterproofing is critical: the niche interior needs the same membrane treatment as the rest of the shower — many leaks originate from poorly sealed niches.
Installation steps
- Frame the niche opening between two studs using pressure-treated lumber for the header and sill
- Apply waterproof membrane to all interior surfaces of the niche, wrapping onto the surrounding wall by at least 2 inches
- Tile the interior with a slight outward slope on the bottom shelf so water drains toward the shower rather than pooling
14. Concrete-Look Porcelain Floor
Concrete aesthetic vs. actual concrete
Polished concrete floors look great in basement bathrooms but require sealing every one to two years, can develop hairline cracks, and feel brutally cold without radiant heat. Concrete-look porcelain tiles give you the same industrial aesthetic with none of the maintenance. Modern digital printing on porcelain captures the color variation, aggregate texture, and subtle imperfections of real concrete convincingly — most people cannot tell the difference once grouted.
Choose if
- You want the concrete look without ongoing sealing
- You plan to add radiant floor heat (porcelain conducts heat better than real concrete over insulation)
- Durability matters — porcelain will not crack, stain, or require resealing
Skip if
- You already have a polished concrete floor in good condition and prefer the authentic material
Recommended
Items for this idea
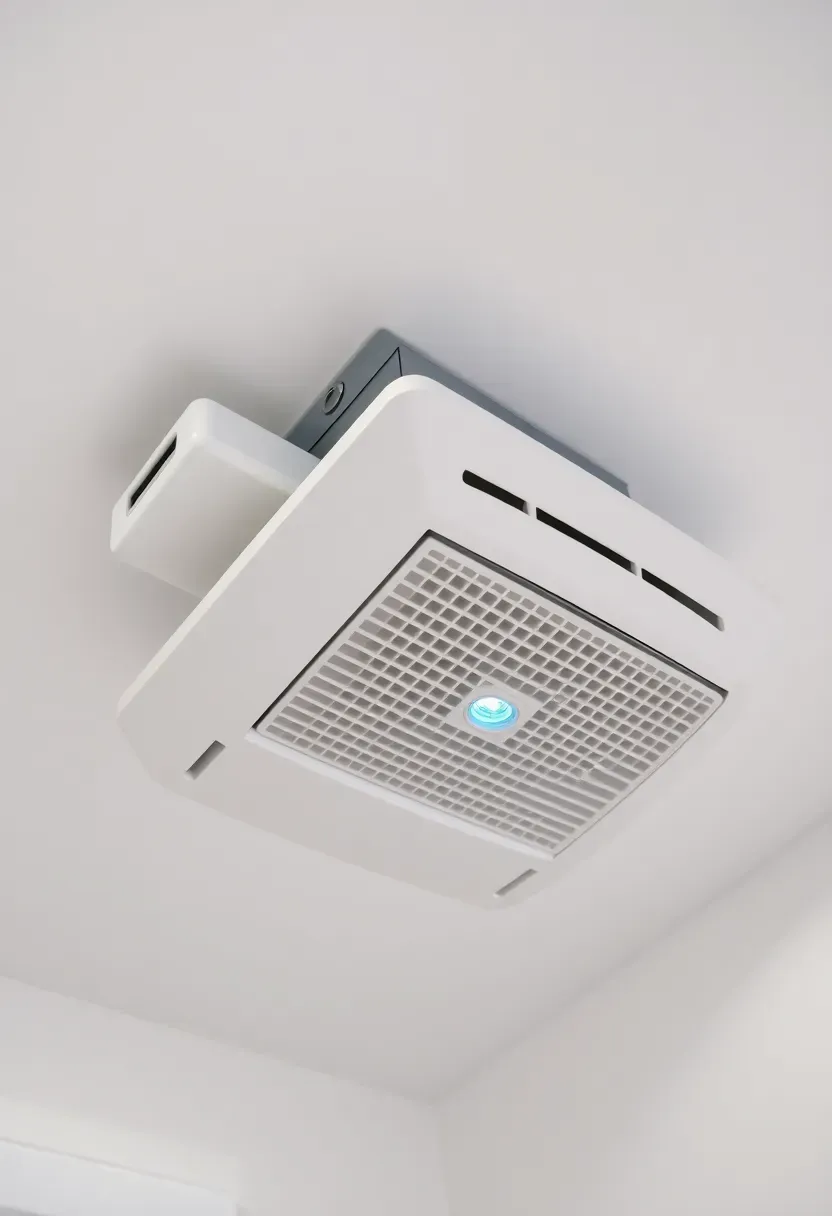
15. Exhaust Fan with Humidity Sensor
Ventilation is non-negotiable in a basement bathroom. Above-grade bathrooms can get away with an undersized fan because they have a window as backup. Below grade, your exhaust fan is the only moisture escape route. A fan with a built-in humidity sensor turns on automatically when relative humidity rises above a set threshold (usually 60 percent) and shuts off once levels drop — no relying on anyone to remember the switch. Size the fan at 1 CFM per square foot minimum, and vent the ductwork to the exterior through the rim joist, not into the basement ceiling cavity.
Watch out for
- Never vent bathroom exhaust into an attic or crawl space — the moisture will cause mold and structural damage
- Insulate the duct run to prevent condensation from forming inside the pipe in winter
- Choose a fan rated at 1.0 sone or lower for quiet operation
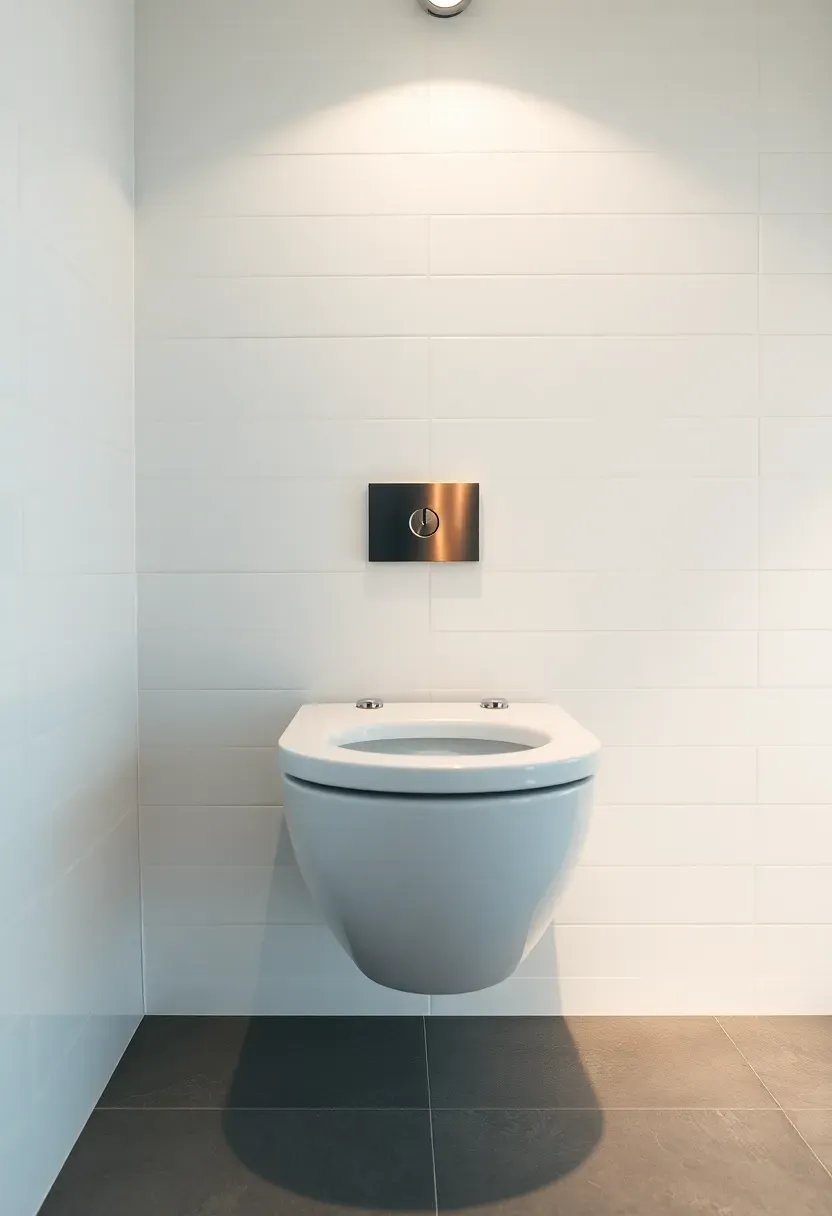
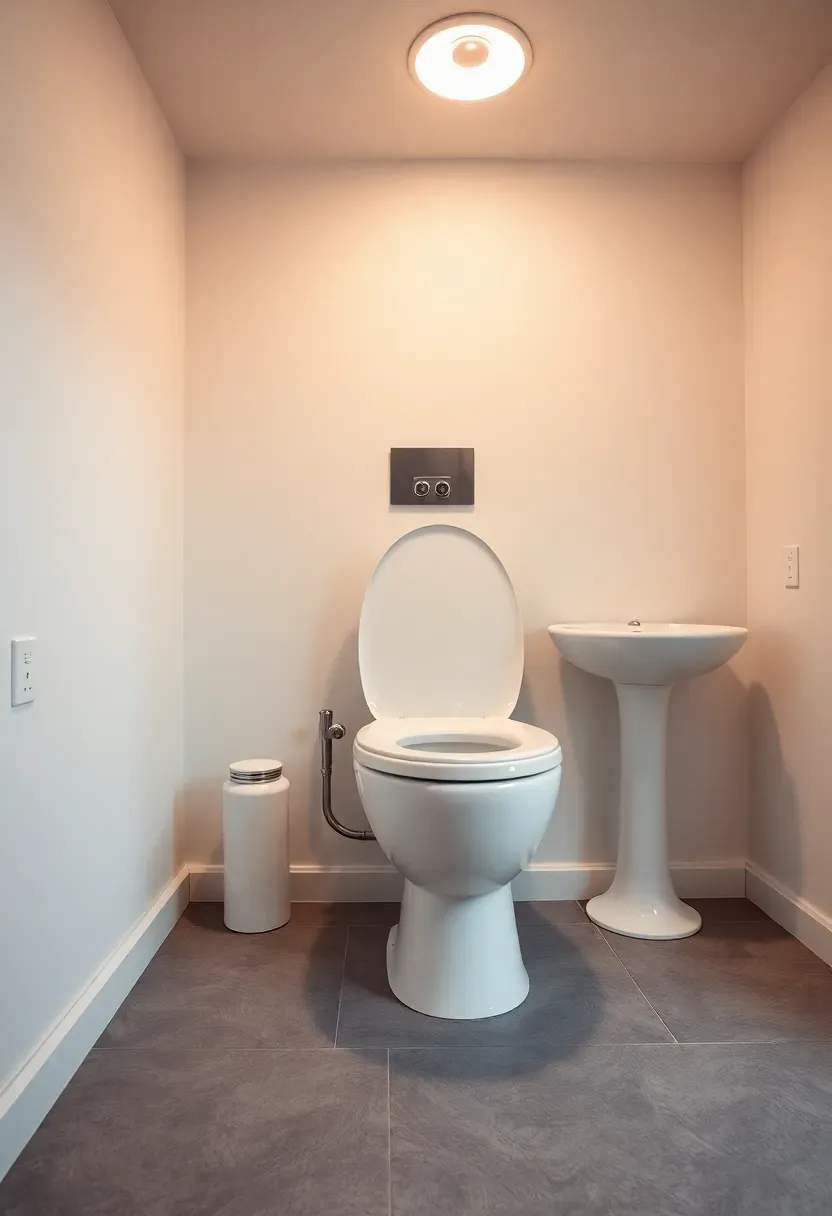
16. Wall-Mounted Toilet
A wall-hung toilet with a concealed in-wall carrier creates a cleaner look and frees up visual floor space in a small basement bathroom. The bowl mounts to a steel frame hidden inside the wall, and the tank sits behind the drywall — all you see is the bowl and a flush plate. Cleaning is dramatically easier because you can mop under and around the toilet without obstruction. The carrier frame requires a 2x6 wall or a thicker furring-out, so plan this during framing. Installation costs run higher than a standard floor-mount toilet, but the space savings and clean aesthetic justify it in compact below-grade bathrooms.
Pros and cons
Pros: Easy to clean underneath, saves 10-12 inches of floor depth, adjustable seat height during installation
Cons: Higher upfront cost ($800-1500 vs $200-400 for standard), requires thicker wall framing, tank access through the flush plate only
Recommended
Items for this idea
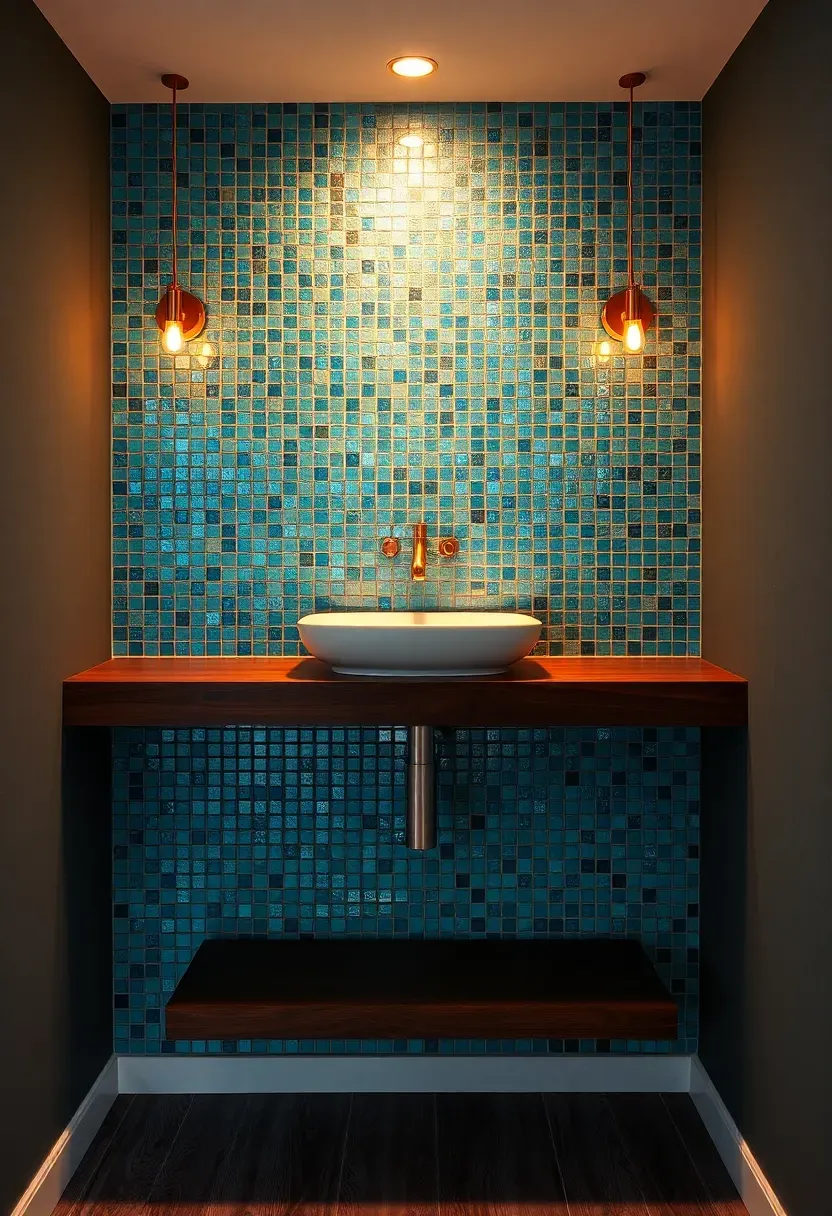
17. Glass Mosaic Accent Wall
One wall of small-format glass mosaic tile (1x1 or 2x2 inch) adds color and reflectivity to a basement bathroom without overwhelming it. Glass tiles bounce light around the room, which is particularly valuable in windowless spaces where every bit of reflectivity helps. Keep the accent wall to a single surface — typically the wall behind the vanity or the back wall of the shower. Covering all four walls with mosaic tile makes a small room feel busy and the grout maintenance becomes a chore. Stick to one color family with slight shade variations for visual interest without chaos.
Tips
- Use white or light gray grout with glass tiles — dark grout creates a grid pattern that fights the reflective quality
- Glass tiles require a white thinset; gray thinset shows through and dulls the color
- Seal grout lines with a penetrating sealer even if using epoxy grout for maximum stain resistance
18. Warm LED Vanity Lighting
Why placement matters more than the fixture
The biggest mistake in basement bathroom lighting is relying on a single overhead light. It casts downward shadows under your brow, nose, and chin — useless for grooming tasks. Side-mounted sconces at eye level (about 60 to 66 inches from the floor) on either side of the mirror eliminate those shadows by lighting your face from both sides evenly. If the mirror is too wide for flanking sconces, a horizontal bar light mounted above the mirror at 78 to 80 inches works as a backup plan.
Specs to look for
- Color temperature: 2700K to 3000K (warm white). Avoid daylight bulbs (5000K+) in windowless basements — they feel harsh
- CRI (color rendering index): 90 or above so skin tones look natural
- Lumens: 1600 total combined output from both sconces for adequate task lighting
Recommended
Items for this idea
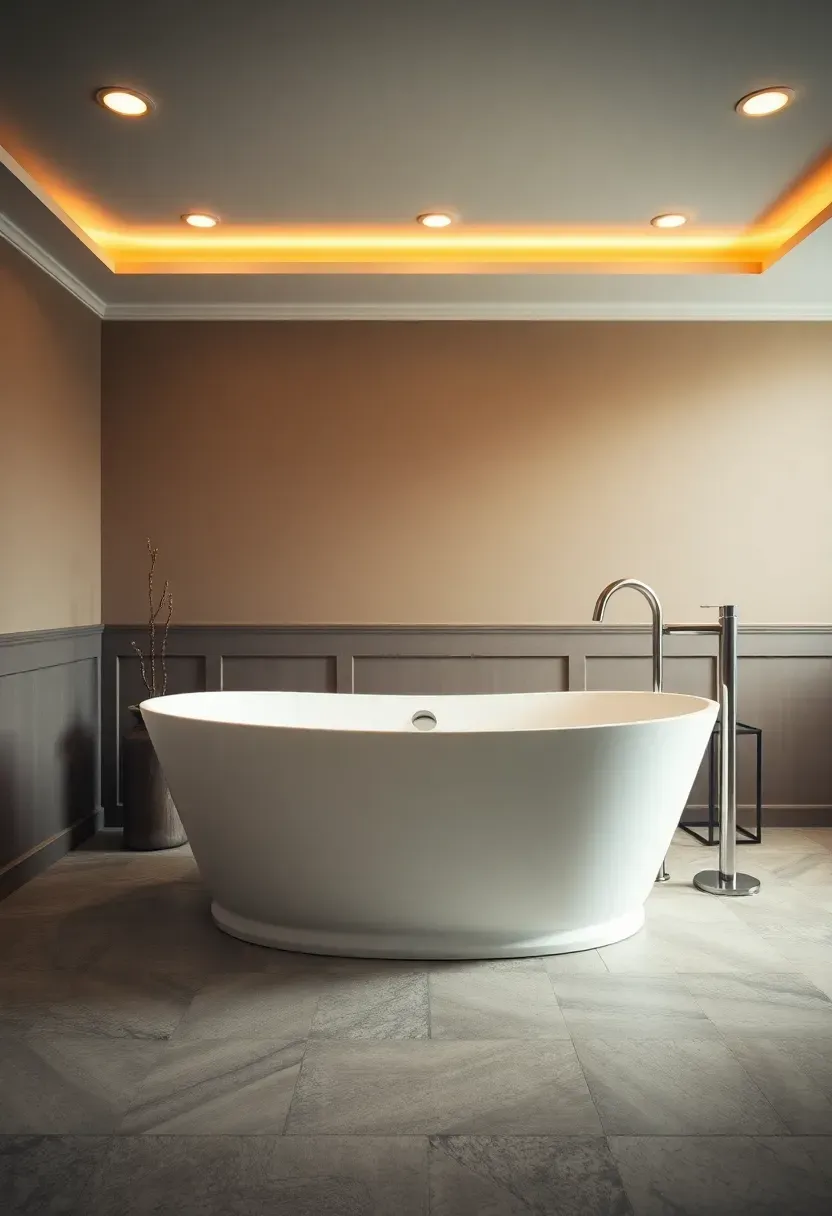
19. Freestanding Soaking Tub
When your basement has the room
If your basement bathroom is generous — say 80 square feet or more — a freestanding soaking tub turns it from a utilitarian space into somewhere you actually want to spend time. Japanese-style deep soaking tubs are worth considering: they have a smaller footprint than standard freestanding tubs (as short as 41 inches long) but deeper basins (22+ inches of water depth), so they fit tighter layouts while still submerging you to the shoulders. The plumbing requirement is a floor-mounted drain and a freestanding tub filler, both of which need to be roughed in before finishing the floor.
Watch out for
- Calculate the filled weight before committing — a 60-gallon tub plus a person can exceed 800 pounds, and your basement slab needs to handle that without issue (concrete slabs generally can, but check for any existing cracks or settling)
- Insulate the hot water supply run to minimize heat loss on the long pipe run from most basement water heater locations
20. Waterproof Vinyl Wainscoting
Vinyl vs. traditional materials
Traditional wainscoting materials — wood, MDF, even moisture-resistant drywall — all have limits in below-grade bathrooms where humidity and occasional water intrusion are realities. Waterproof vinyl plank wainscoting is a newer approach: you install luxury vinyl plank (LVP) on the lower portion of the wall using adhesive, creating a surface that is completely impervious to water. It looks like wood, wipes clean with a damp cloth, and will not swell, warp, or grow mold.
How to apply
- Cut LVP planks to your desired wainscoting height (36 to 42 inches is standard)
- Apply construction adhesive to the back of each plank and press firmly against the wall, starting from the bottom
- Cap the top edge with a PVC chair rail molding for a finished look
- Caulk the bottom edge where planks meet the floor with silicone sealant
Recommended
Items for this idea
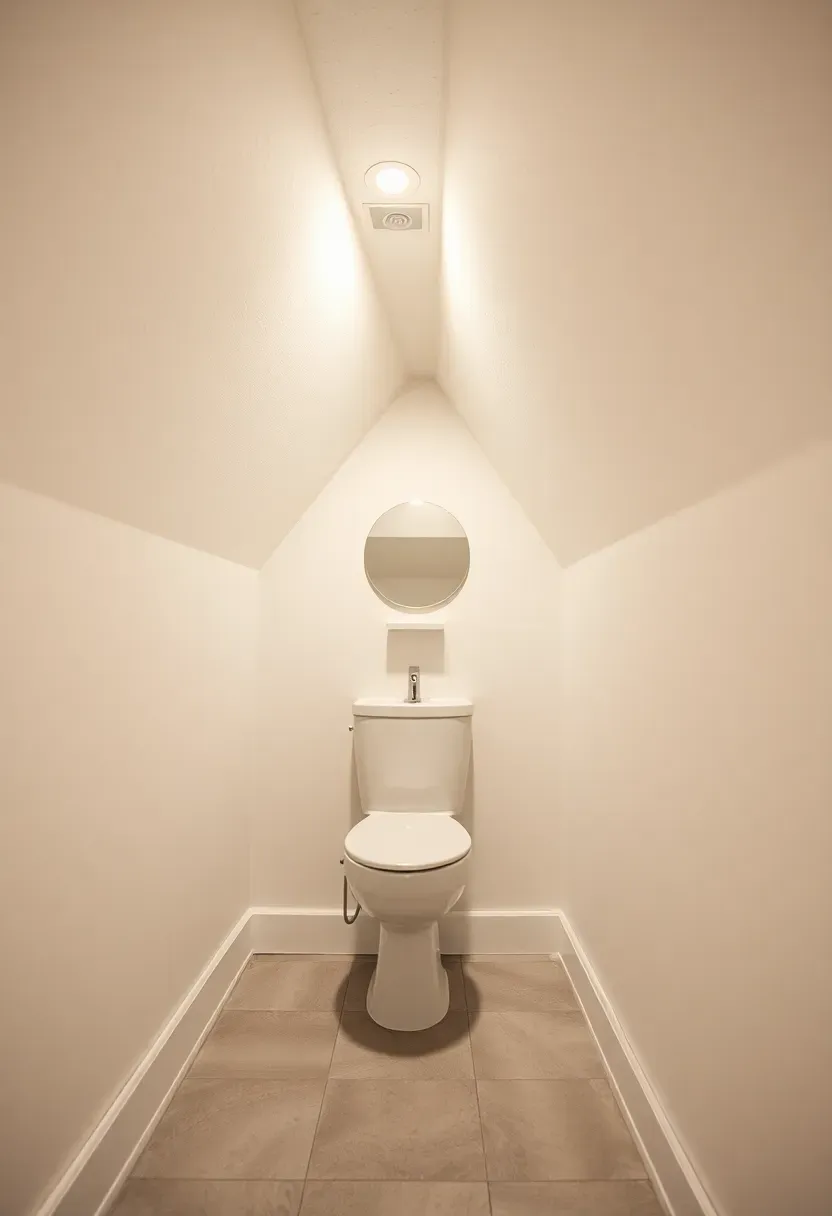
21. Half-Bath Under the Stairs
The space beneath a basement staircase usually collects boxes and holiday decorations. A half-bath fits there surprisingly well. A standard staircase creates a triangular space roughly 3.5 feet wide by 8 feet deep, which is enough for a toilet and a small sink. The angled ceiling is the main constraint — position the toilet under the tallest section (near the top of the stairs) and the sink under the lower portion where standing height is less critical. You need a minimum of 30 inches of clear headroom above the toilet seat to meet code in most jurisdictions. Pocket or barn doors work best here since a swing door eats into the limited floor area.
Tips
- Install the toilet against the back wall to maximize standing room when entering
- Use a wall-mounted sink rather than a vanity to keep the small floor area open
- Light the space with recessed cans rated for sloped ceilings
Quick FAQ
Do I need a permit to add a basement bathroom? Yes, in nearly all jurisdictions. Basement bathroom additions involve plumbing, electrical, and sometimes structural work, all of which require permits and inspections. Skipping permits can create problems when selling your home — unpermitted work must be disclosed in most states and can reduce your home's appraised value.
How much does a basement bathroom cost? A basic half-bath (toilet and sink) runs $5,000 to $15,000 depending on whether you need to break the slab for plumbing. A full bathroom with a shower adds $15,000 to $30,000. Using an upflush system instead of breaking concrete can save $3,000 to $5,000 on the plumbing alone.
Can I install a shower in a basement without breaking concrete? Yes. An upflush macerating system or an above-floor shower tray connected to an ejector pump lets you add a shower without cutting into the slab. The shower drains into a collection pit, and the pump pushes wastewater up to the main sewer line.
What flooring holds up best in a basement bathroom? Porcelain tile and luxury vinyl plank are the top performers. Both resist moisture, clean easily, and will not degrade from the humidity levels common in below-grade spaces. Avoid hardwood, laminate, and carpet — they absorb moisture and eventually fail.
Is radiant floor heating worth it in a basement bathroom? For most people, yes. Electric radiant mats cost $5 to $12 per square foot for materials, and a 50-square-foot bathroom costs roughly a dime a day to heat. The comfort difference on bare feet in a cold basement is significant.
A basement bathroom is one of the highest-return projects you can take on — it makes the entire lower level usable in a way that it simply is not without one. Start with the plumbing decisions (upflush vs. traditional, shower vs. half-bath) since those dictate your budget and timeline. Get the waterproofing and ventilation right, and the rest is finish work where you can express preferences without worrying about moisture damage down the road. Pick three or four ideas from this list that match your space and budget, and start getting quotes from plumbers who have specific experience with below-grade bathrooms — it is a specialty, and general plumbers sometimes underestimate the complexity.
Pinterest cover for 21 Basement Bathroom Ideas
About the author
OBCD
CGI visualization and interior design content. We create detailed 3D renders and curate practical design ideas for every room in your home.