29 Bathroom Ideas with Shower for a Modern Refresh
Bathroom ideas with shower used to mean one thing: a tub with a curtain or a tight glass cubicle. That has changed. Today the shower is often the room's main feature — a walk-in volume with floor-to-ceiling tile, frameless glass, a built-in bench, and lighting that actually flatters you at 7 a.m. Whether you're working with a 30-square-foot rental bathroom or planning a full primary-suite remodel, the shower can carry the design.
This guide pulls together 29 distinct directions, from honest budget swaps to higher-investment layouts. I've grouped easy wins (a new showerhead, a glass panel) alongside bigger moves (a wet room, a steam shower) so you can pick what fits your space and budget. Each section has practical notes on what works, what to avoid, and what makes the look hold up over time.
Let's walk through them one by one.
Table of Contents
- Frameless Glass Walk-In Shower
- Wet Room Layout with Open Shower
- Floor-to-Ceiling Subway Tile Shower
- Curbless Shower for Aging in Place
- Black Tile Shower with Brass Fixtures
- Built-In Shower Niche with Contrast Tile
- Marble Slab Shower Walls
- Pebble Stone Shower Floor
- Corner Shower for Tight Bathrooms
- Tub-Shower Combo with Glass Panel
- Rainfall Showerhead with Handheld Wand
- Steam Shower with Built-In Bench
- Vertical Stack Bond Tile Pattern
- Half-Wall Shower Divider
- Concrete Microcement Shower
- Two-Tone Shower with Tile Wainscot
- Skylight Above the Shower
- Industrial Shower with Black Frame Glass
- Japanese-Style Wet Room with Soaking Tub
- Penny Round Mosaic Shower Floor
- Walk-Through Shower with Two Entries
- Curved Glass Shower Enclosure
- Open Doorless Shower in a Small Bath
- Botanical Wallpaper Outside a Glass Shower
- Built-In Shower Bench with Hidden Storage
- Outdoor-Inspired Shower with Slatted Wood
- Mixed Metal Fixtures in a Tile Shower
- Color-Drenched Shower in One Bold Hue
- Smart Shower with Digital Controls
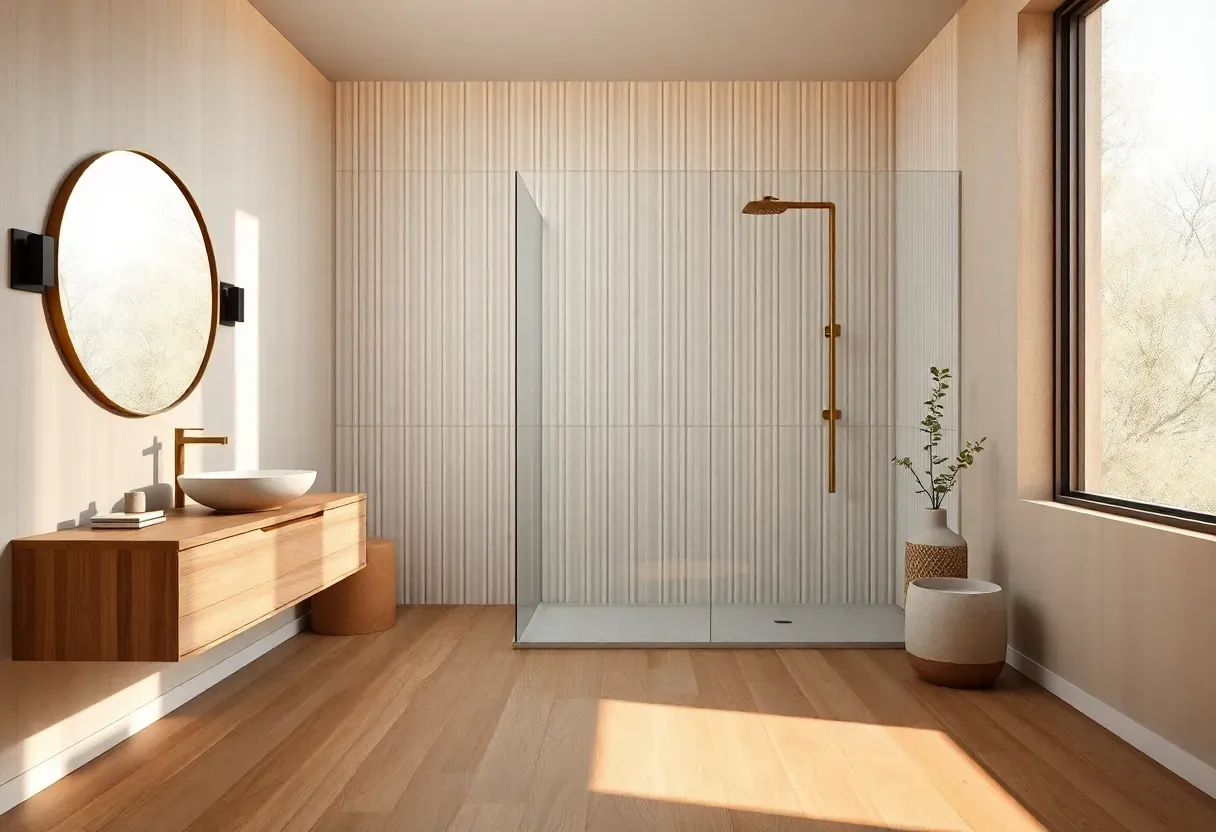
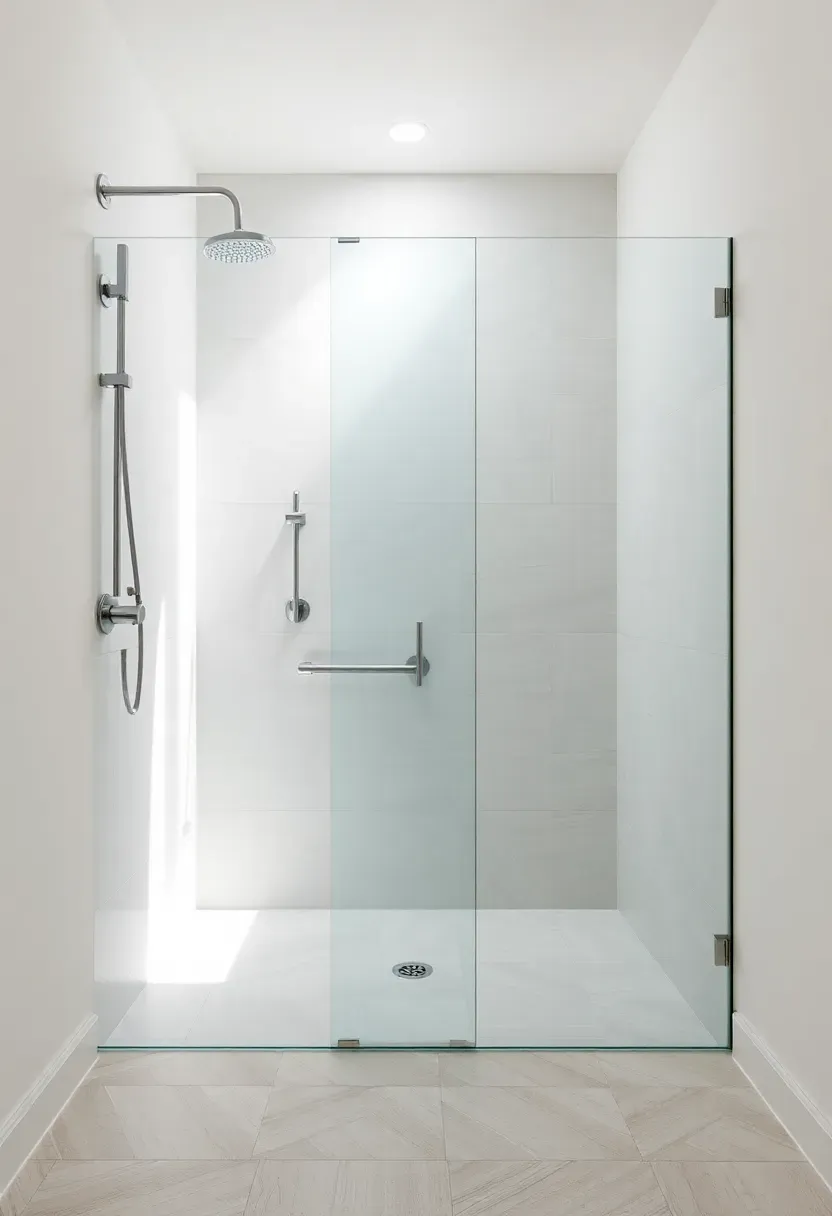
1. Frameless Glass Walk-In Shower
A frameless glass walk-in is the cleanest, most space-expanding shower idea you can pick. With no metal frame, the eye reads straight through the glass to the back wall, which makes even an 8x6 bathroom feel a foot or two larger. Pair it with a single hinged or sliding panel and you get a daily routine that feels closer to a hotel than a builder-grade tub-shower combo.
The trade-off is squeegeeing. Without a frame catching water, you'll see hard-water spots faster, so this look works best when paired with a spray-on glass coating renewed every six months.
Tips
- Spec 3/8-inch tempered glass minimum, 1/2-inch if the panel is over 36 inches wide
- Slope the floor 1/4 inch per foot toward a linear or center drain
- Add a small splash wall (12-18 inches) where the shower opens to dry flooring
We picked a few things that go well with this idea: GroGro Semi-Frameless Pivot Shower Door (★4.4), Frameless Pivot Shower Door (Brushed Nickel) (★4.2) and Semi-Frameless Magnetic Pivot Shower Door (★4.6). As an Amazon Associate we earn from qualifying purchases.
2. Wet Room Layout with Open Shower
A wet room treats the entire bathroom floor as a waterproof zone, so the shower has no curb, no door, sometimes no enclosure at all. Tiles run continuously from the vanity to under the showerhead, with the whole floor sloped slightly toward a drain. The result feels modern, accessible, and surprisingly spacious — even in 40-square-foot bathrooms.
Why people love it
The visual continuity is the main draw. With no glass enclosure breaking the room, the bathroom reads as one volume instead of "shower box plus everything else." Cleaning is also faster — you can hose down the whole floor.
What to plan for
Wet rooms need full waterproofing under the tile (membrane like Schluter Kerdi or RedGard) and proper ventilation to keep walls and the vanity from staying damp. Budget extra for the membrane and a pro who's done one before.
Pros and cons
- Pro: barrier-free, ages-in-place ready, looks high-end
- Pro: easy to mop, no door tracks to scrub
- Con: every surface needs to be water-tolerant (no painted MDF vanities)
- Con: heated floor recommended so you're not standing on cold wet tile
We picked a few things that go well with this idea: Holispa 10-Inch Brushed Gold Shower System (★4.5), Kurpot Brushed Gold Rainfall Shower Set (★4.6) and Hibbent 13'' Brushed Gold Shower Combo (★4.6). As an Amazon Associate we earn from qualifying purchases.
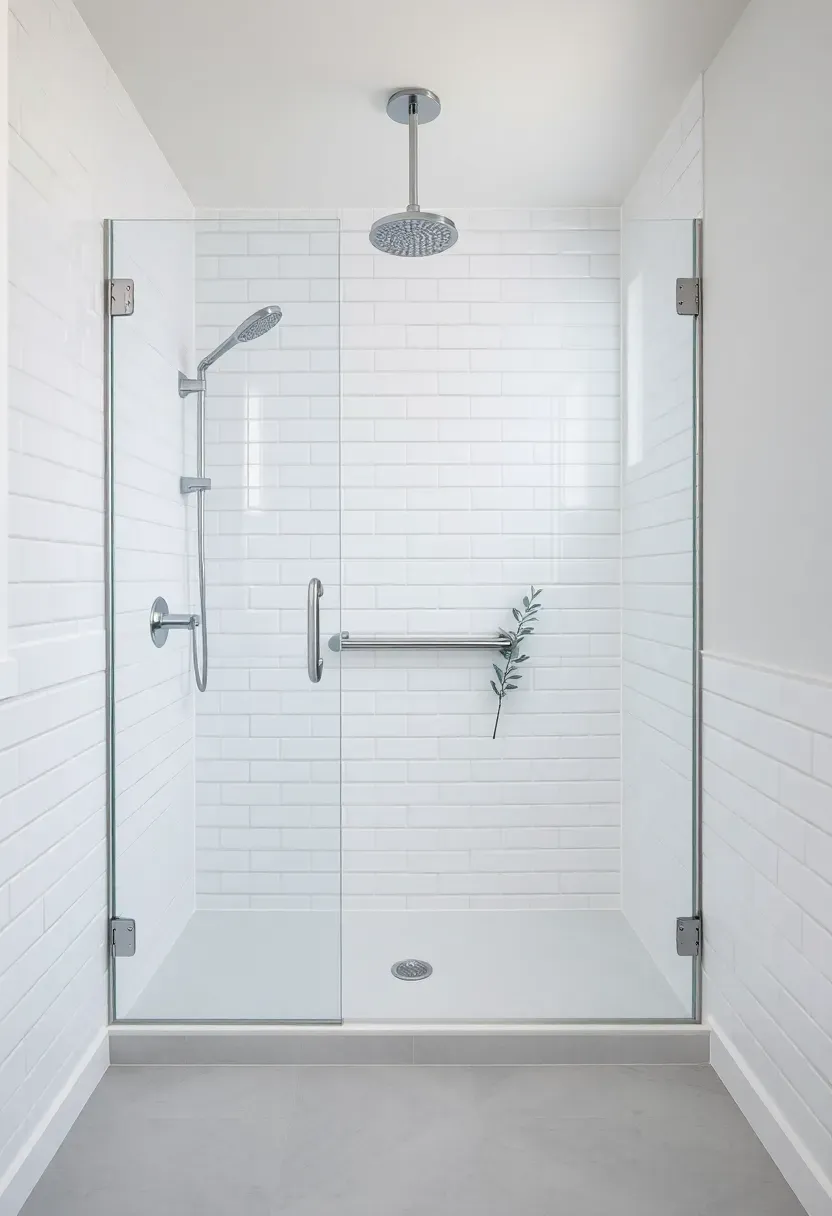
3. Floor-to-Ceiling Subway Tile Shower
Running subway tile from the shower pan all the way to the ceiling is one of those bathroom ideas with shower that ages well across decades. The vertical reach pulls your eye up, making the ceiling feel taller, and the rhythm of the small rectangles gives the wall texture without competing with anything else in the room.
White is the obvious pick, but consider 3x12 or 4x12 tile in a soft sage, deep navy, or warm beige if you want something less expected. Stack-bond (straight grid) reads more contemporary; classic 50% offset reads timeless.
Tips
- Use a thin grout joint (1/16-inch) for a more modern, less industrial look
- Choose grout one shade darker than the tile to hide hard-water staining
- Bring tile to ceiling on at least three walls; stopping short looks unfinished
We picked a few things that go well with this idea: Neodrain 24'' Linear Shower Drain Tile Insert (★4.7), Linear Brushed Nickel Shower Drain (24'') (★4.6) and AVSIILE Brushed Gold Linear Drain (24'') (★4.7). As an Amazon Associate we earn from qualifying purchases.
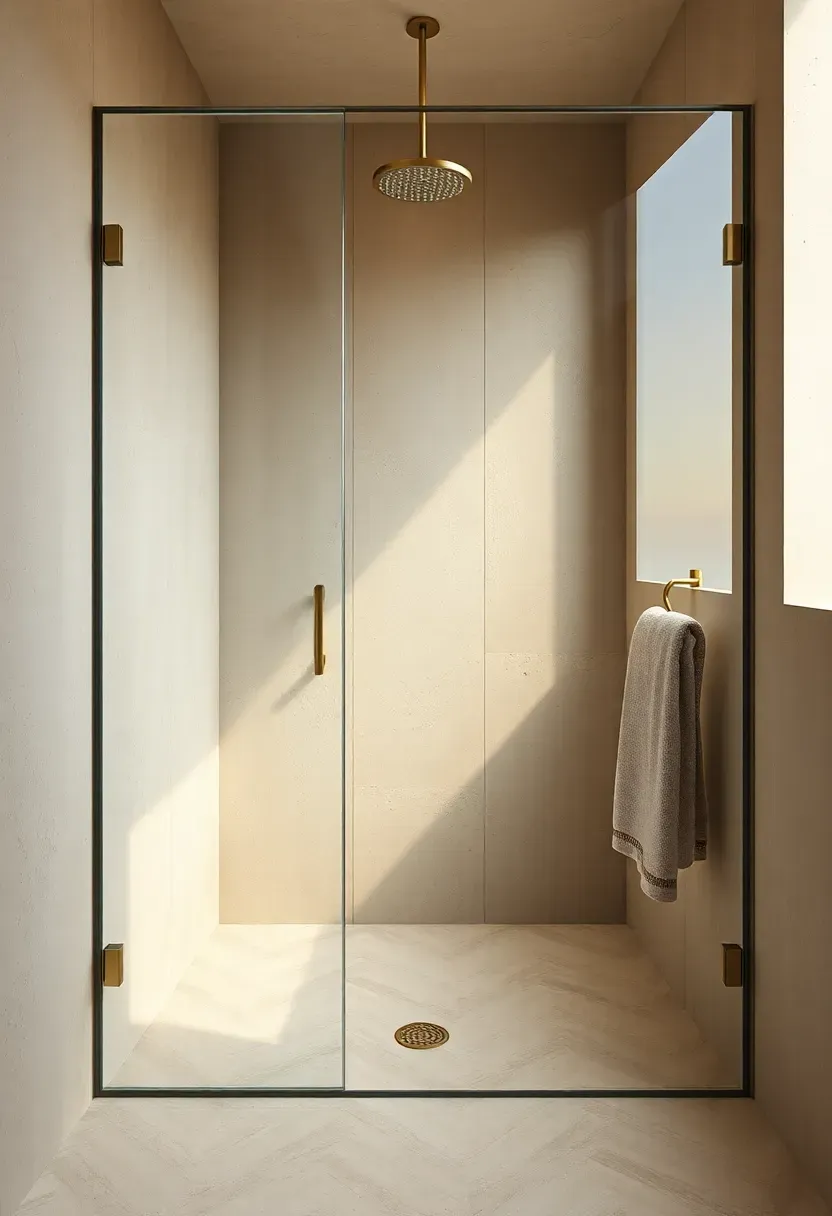
4. Curbless Shower for Aging in Place
A curbless shower removes the 4-6 inch threshold most showers have at the entry. The bathroom floor and shower floor sit at the same plane, with a linear drain handling water at the back wall or along one edge. It's the single best change for accessibility — and it just looks better than a curbed shower in almost every situation.
This is a planning-stage decision, not a retrofit. The subfloor under the shower needs to be lowered (or the rest of the bathroom raised) to create the slope, which is straightforward in new construction or a full gut, expensive otherwise.
Step-by-step approach
- Frame or recess the subfloor 1.5-2 inches lower in the shower zone
- Install a linear drain along the back wall or curb side
- Apply waterproof membrane up the walls 6-12 inches and across the floor
- Set large-format porcelain or stone tile with a uniform slope to drain
Watch out
Without a curb, water control depends entirely on slope and the splash panel. Add at least an 18-inch fixed glass panel at the entry, and don't skip the linear drain in favor of a center drain — you'll get water migrating outside the shower.
Recommended
Items for this idea
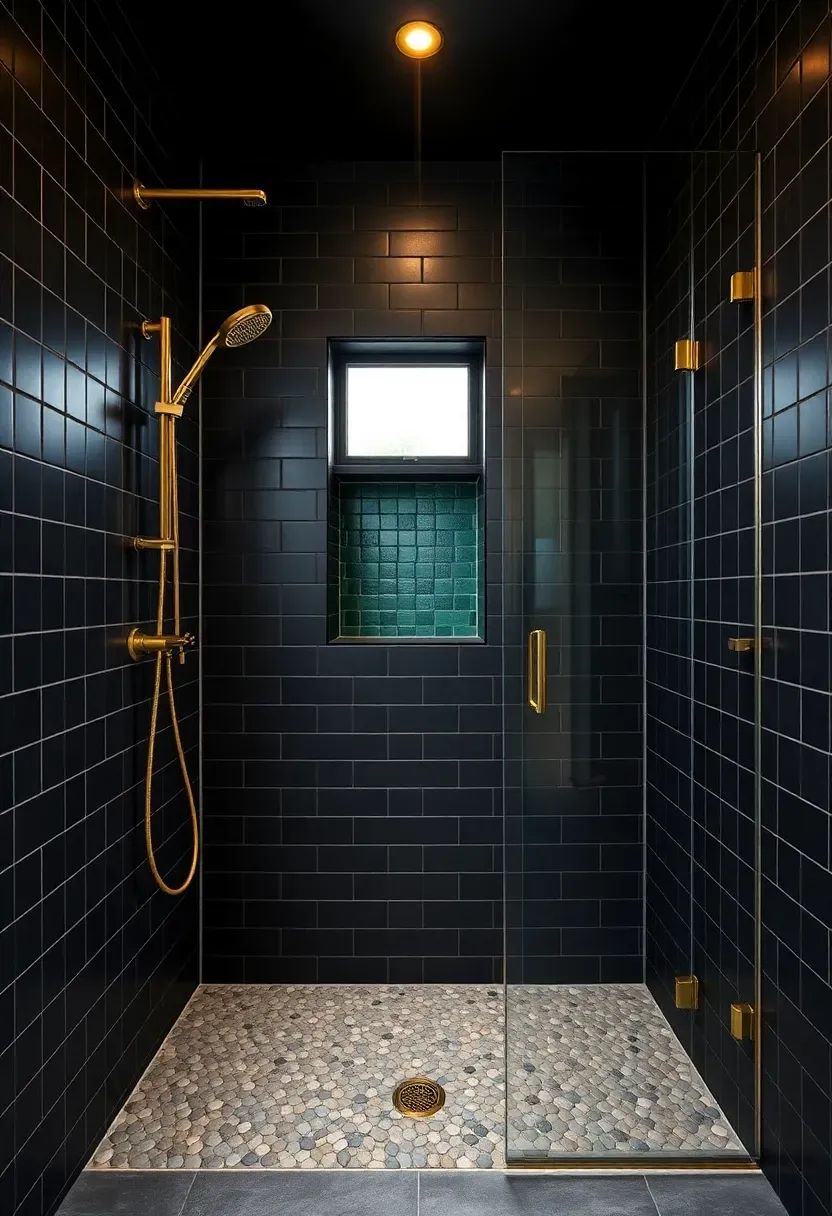
5. Black Tile Shower with Brass Fixtures
Black tile inside the shower with brass fixtures is dramatic, moody, and currently one of the most-saved bathroom design directions on Pinterest for good reason. The dark walls absorb light and create a cocoon effect, while the warm brass — rainfall head, slide bar, niche trim — keeps the space from reading cold or cave-like.
Matte black tile hides water spots and soap residue better than glossy black, which shows every drop. Pair with a light floor (white penny rounds, gray pebble) so the shower doesn't feel like a void.
Tips
- Use brushed or unlacquered brass — polished brass dulls fast in shower humidity
- Keep grout the same shade as the tile for a seamless monochrome wall
- Add at least one warm light source (3000K LED) inside the shower zone
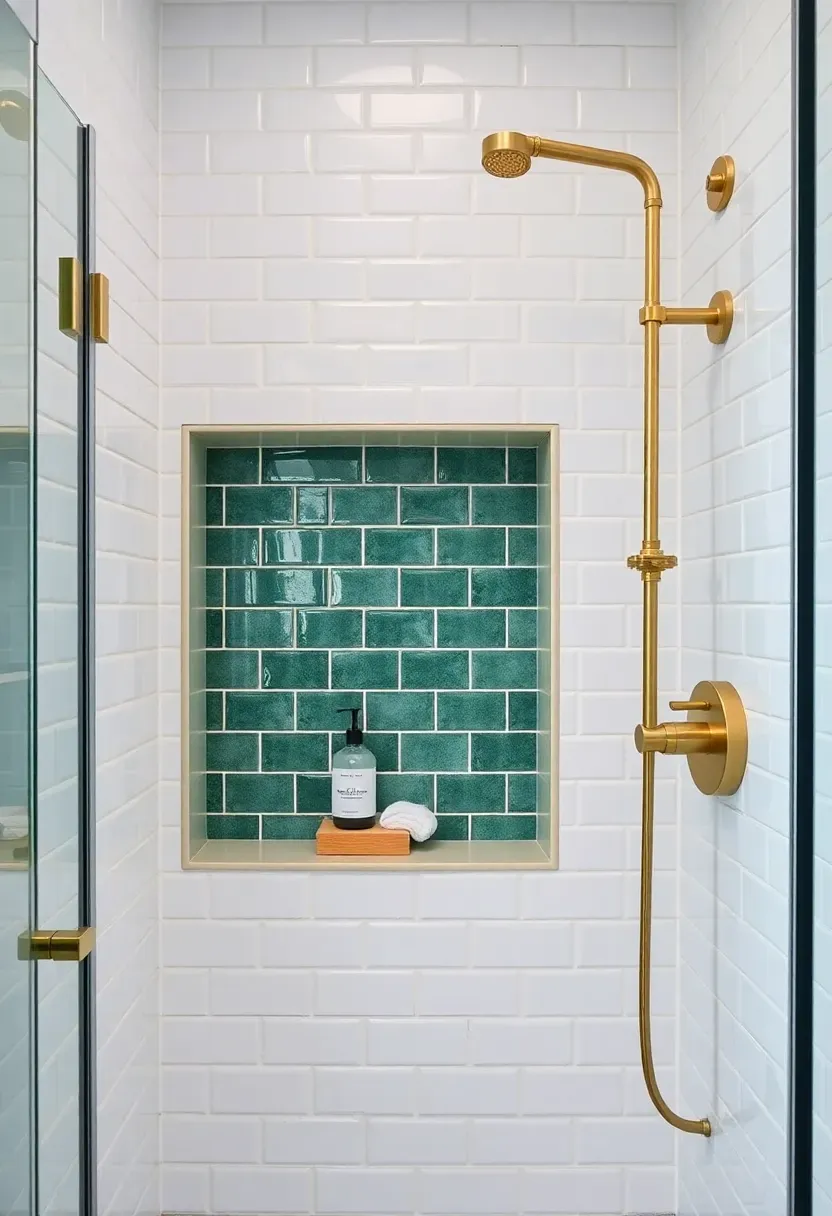
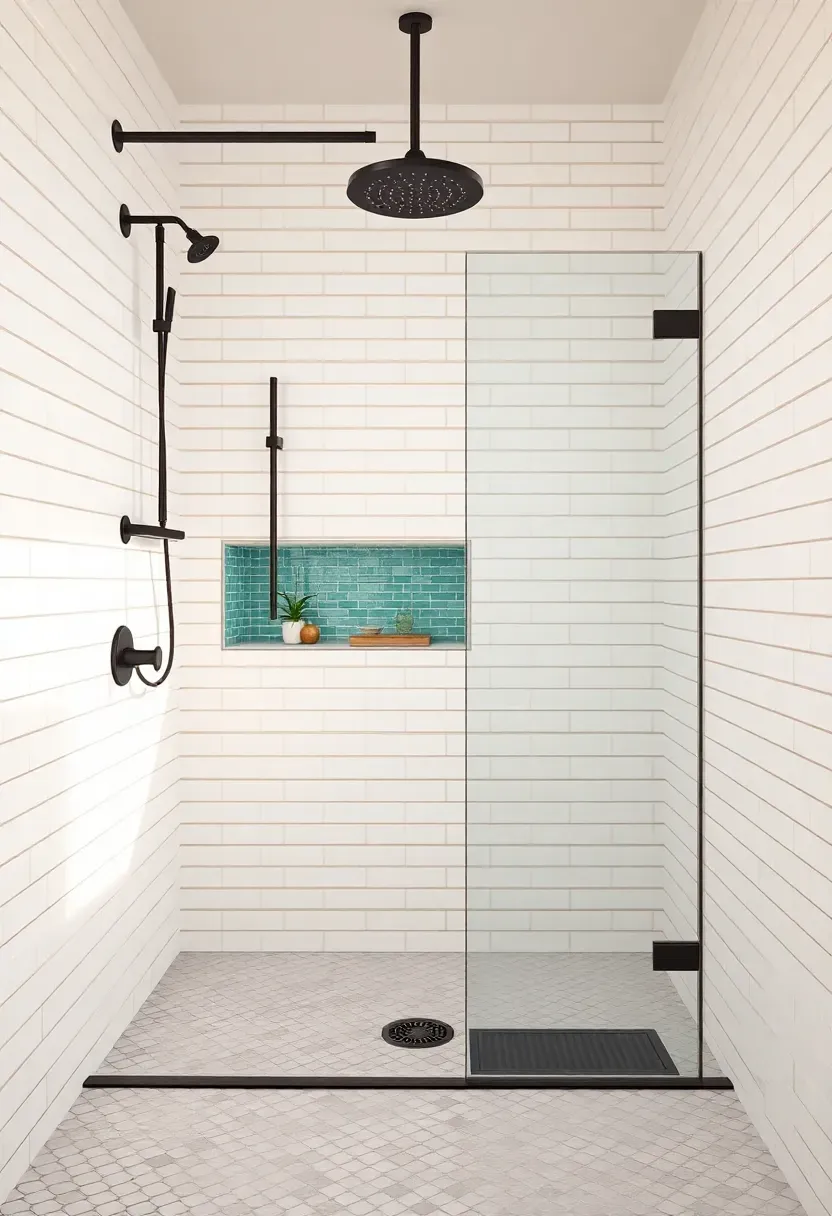
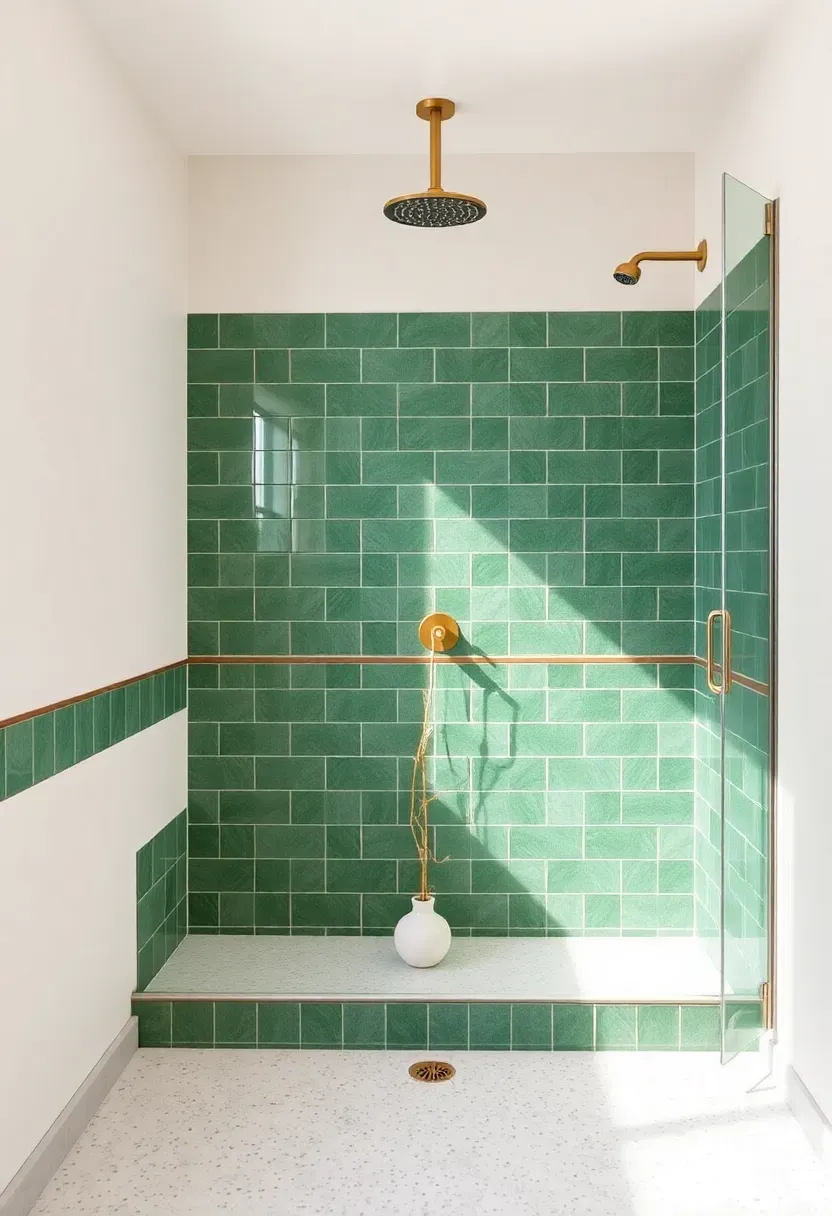
6. Built-In Shower Niche with Contrast Tile
A recessed niche keeps shampoo bottles off the floor and out of caddies, but the design move is treating the inside of the niche as a feature instead of a utility. Line it with a contrast tile — green zellige, marble mosaic, fluted ceramic — so it reads as a small intentional inset rather than just a hole in the wall.
Sizing it right
Standard niche dimensions are roughly 12 inches tall by 24-36 inches wide, set at chest height (around 48-54 inches from the floor). Frame it between studs to avoid plumbing.
Pros and cons
- Pro: zero clutter, no rust rings from caddies, looks built-in
- Pro: contrast tile gives a designer detail at low extra cost
- Con: needs framing during construction (hard to add later)
- Con: more grout joints to seal and maintain
Recommended
Items for this idea
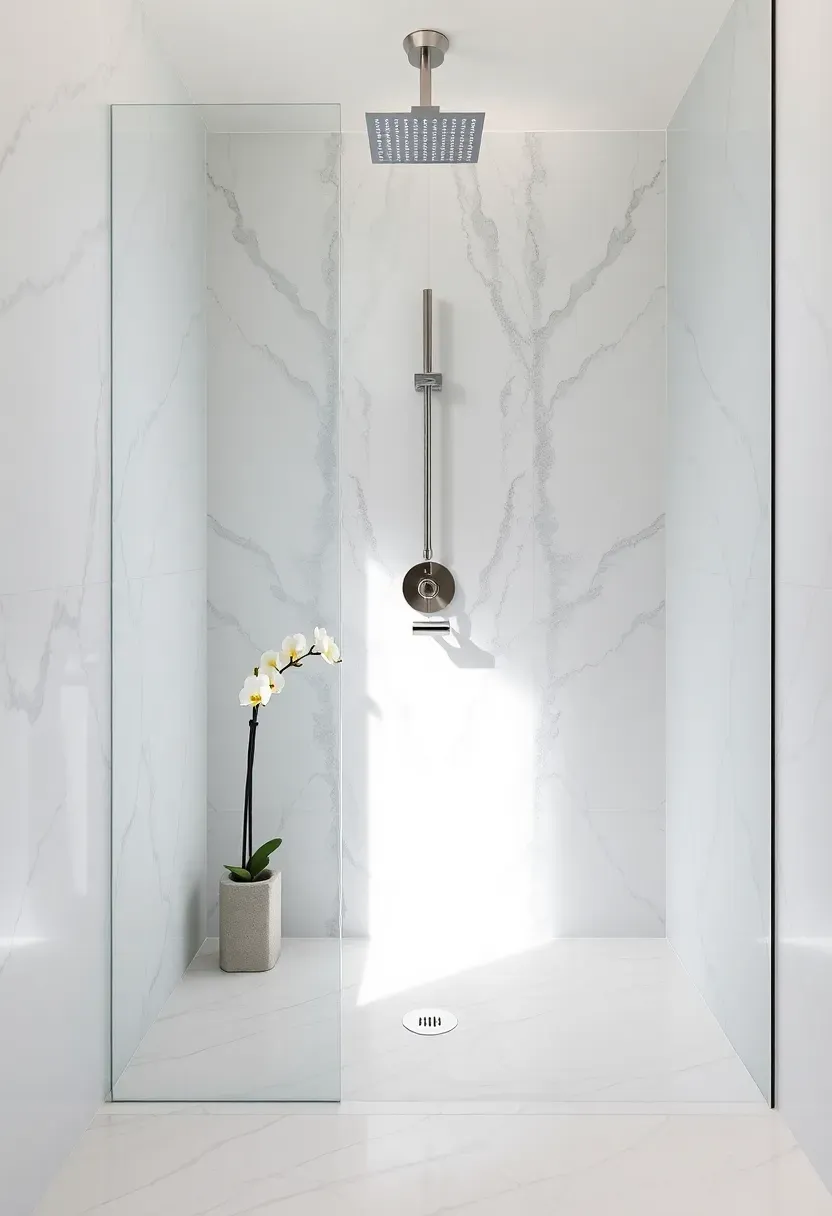
7. Marble Slab Shower Walls
Skipping tile entirely and using full marble slabs on shower walls produces the most luxurious bathroom shower idea on this list. Two or three large slabs cover most walls with almost no grout lines, letting the natural veining read as a single continuous pattern. Bookmatched panels (mirrored veining at the seam) are the signature move.
The cost is real — figure $80-200 per square foot installed for natural marble — but porcelain slabs (Neolith, Laminam, Dekton) hit a similar look for roughly half the price and are more stain-resistant.
Tips
- Seal natural marble before first use and every 6-12 months in a wet area
- Choose honed (matte) finish over polished to reduce visible water spots
- Specify porcelain slab if you have hard water; marble etches from minerals
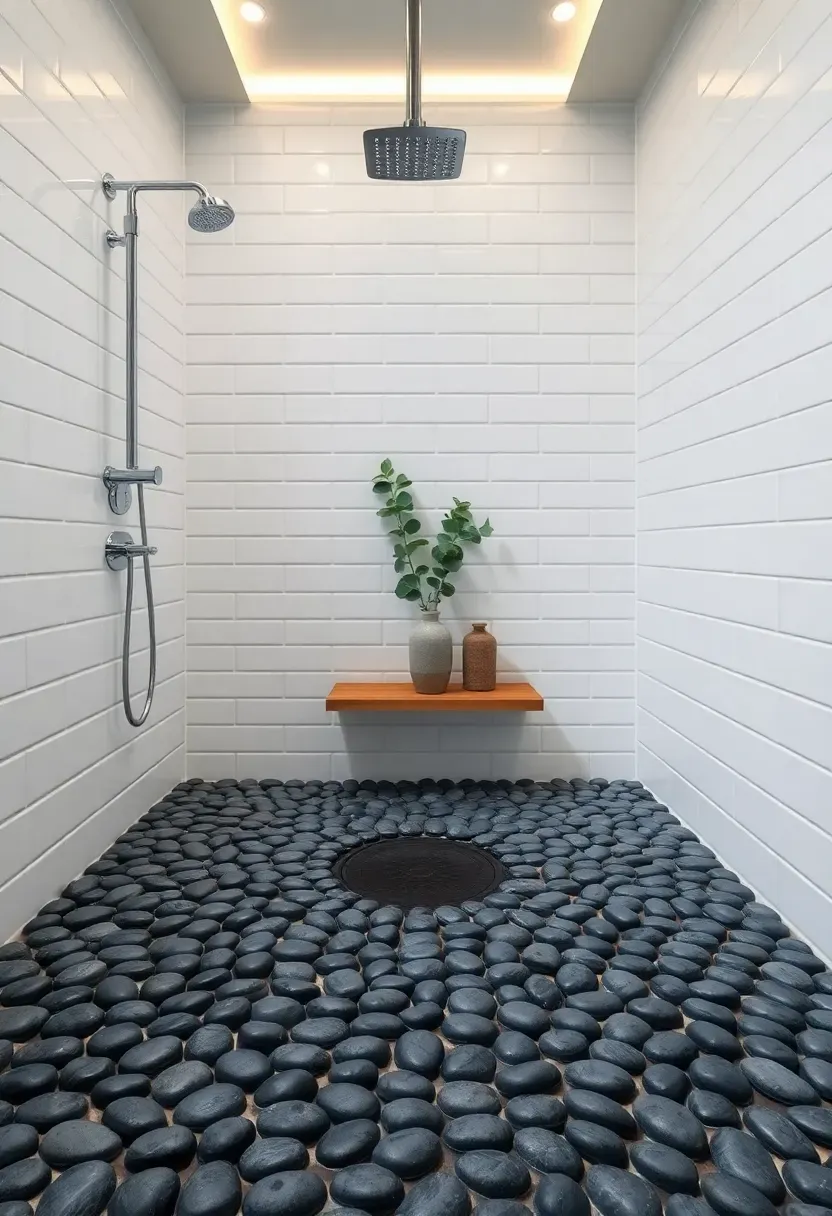
8. Pebble Stone Shower Floor
Smooth river pebbles on the shower floor add texture, grip, and a spa-cabin quality you can't fake with porcelain. The rounded stones massage your feet and the irregular surface gives serious traction even when soapy — useful for older adults or anyone who's slipped on glossy tile.
Modern pebble sheets come pre-mounted on mesh, so installation is similar to standard mosaic tile. Sliced (flat-top) pebbles are easier to clean than full round; pick those if you're worried about grime in the crevices.
Tips
- Seal pebbles with a penetrating stone sealer twice during install, then yearly
- Pair with simple wall tile so the floor stays the focal point
- Use a darker grout to hide soap and mineral deposits between stones
Recommended
Items for this idea
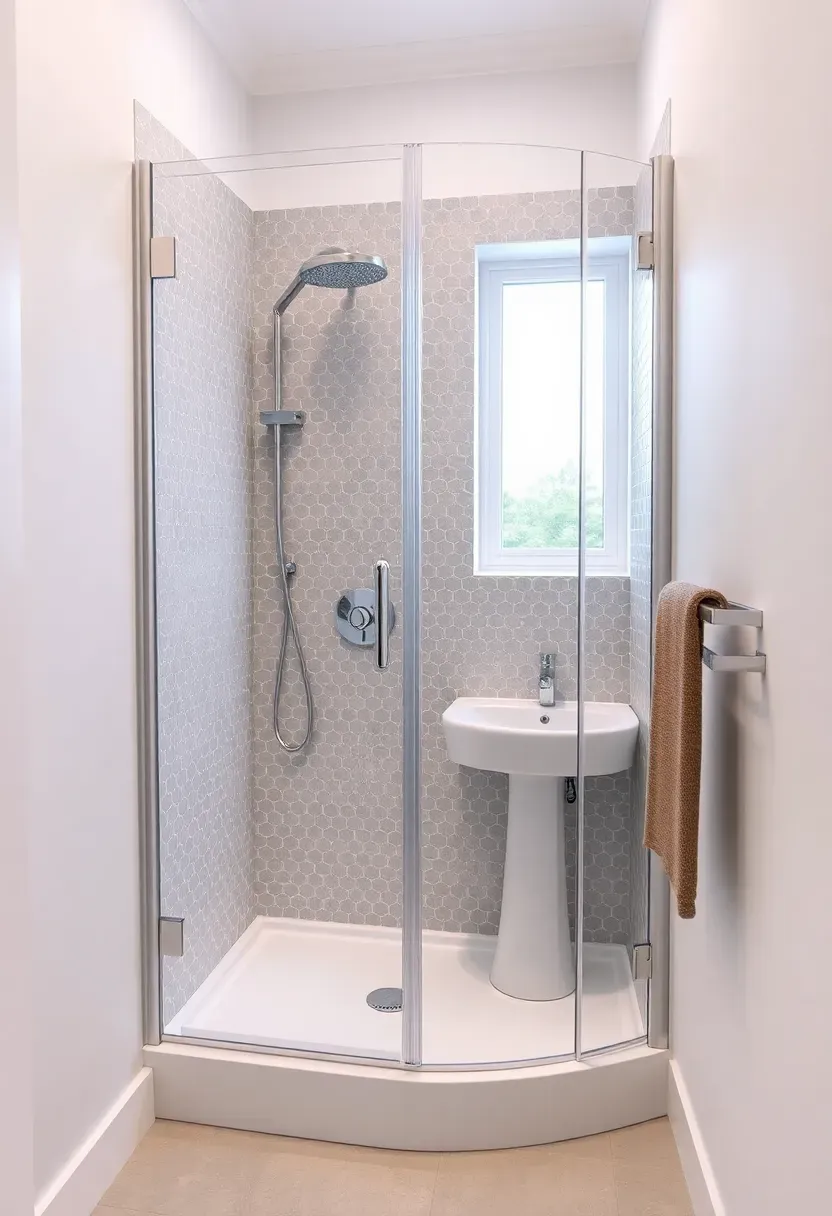
9. Corner Shower for Tight Bathrooms
When the bathroom is genuinely small (under 40 square feet), tucking a neo-angle or quadrant shower into a corner is often the only way to fit a shower without sacrificing the toilet or vanity. The angled front face gives you more circulation room than a square enclosure of the same footprint.
The compromise
You give up shower volume — most corner units are 36-42 inches per side, which feels tight for taller users. The diagonal door also cuts into the bathroom floor when open, so plan placement with the door swing in mind.
Pros and cons
- Pro: fits 32-36 inch corners that nothing else will
- Pro: keeps the longer bathroom wall free for vanity and storage
- Con: cramped for anyone over 6 feet
- Con: more glass seams = more cleaning and potential leak points
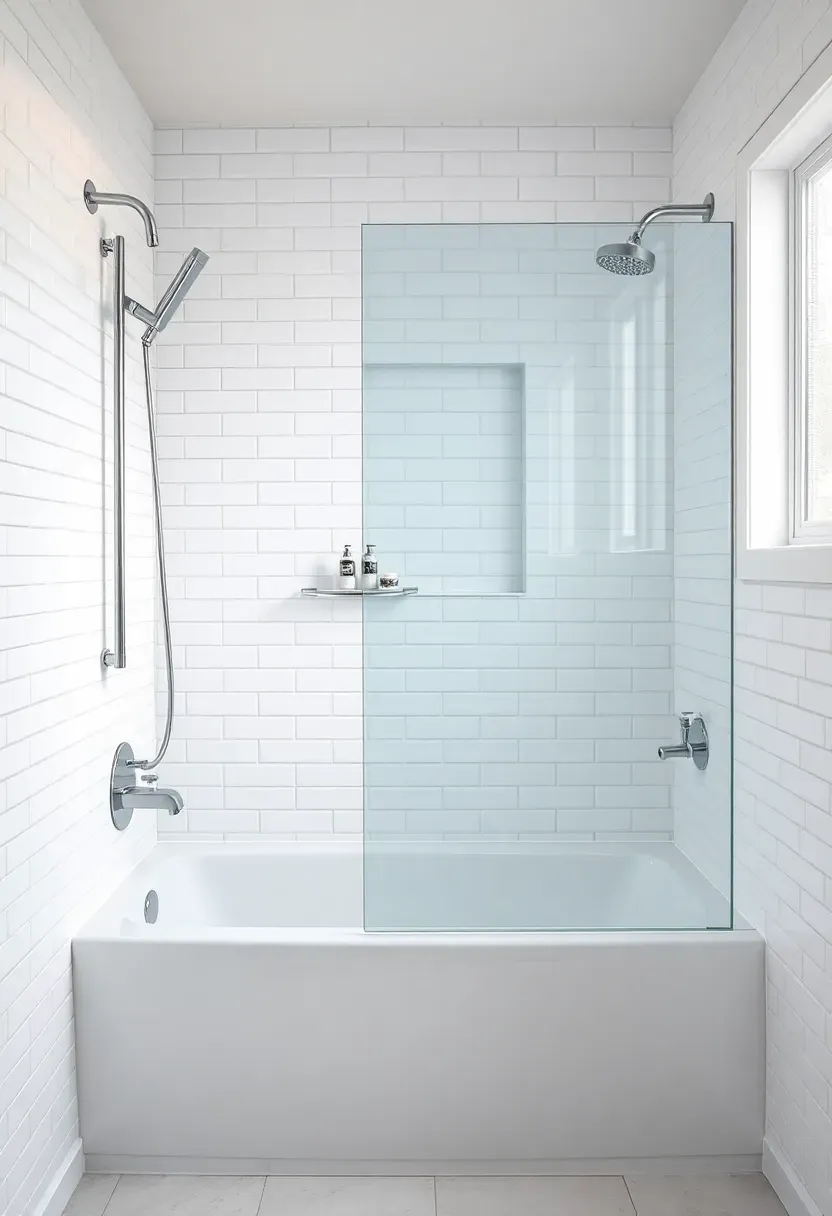
10. Tub-Shower Combo with Glass Panel
The tub-shower combo gets dismissed too fast. A standard alcove tub paired with a single fixed glass panel (instead of a curtain or sliding doors) gives you both bathing and showering, keeps the bathroom looking modern, and costs a fraction of a separate tub-and-shower layout.
The half-panel — typically 30 inches wide and ceiling height — is hinged or fixed on the showerhead end, leaving the rest of the tub open for easy entry. It's the smartest move for a 5x8 bathroom with a single tub-shower wall.
Tips
- Spec a 30-36 inch fixed panel with a small return; full enclosure isn't needed
- Choose a deep soaking tub (60x32x18 inches) for actual bath comfort
- Run subway or stack-bond tile floor-to-ceiling on all three tub walls
Recommended
Items for this idea
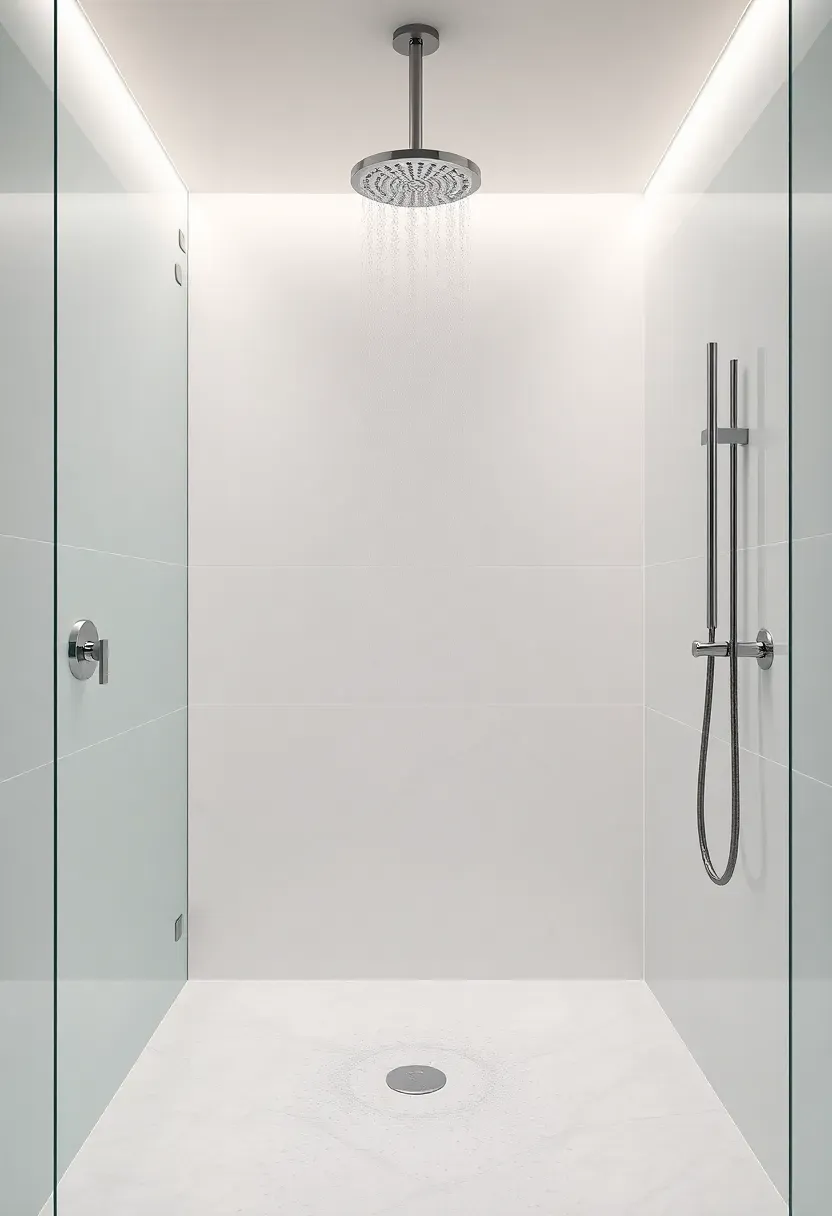
11. Rainfall Showerhead with Handheld Wand
A ceiling-mounted rainfall head paired with a separate handheld wand on a slide bar is the dual setup that solves every shower complaint. The rainfall delivers the immersive overhead pour for daily showers; the handheld handles rinsing kids, pets, and the actual shower walls when you clean.
Use a thermostatic valve with two outlets so you can run them separately or together. Most homeowners run the rainfall alone 90% of the time and add the handheld for cleaning days.
Tips
- Mount the rainfall 84-90 inches off the floor for proper drop coverage
- Choose a 2.0-2.5 GPM head; bigger doesn't mean better with low water pressure
- Place the slide bar on the opposite wall from the rainfall for max flexibility
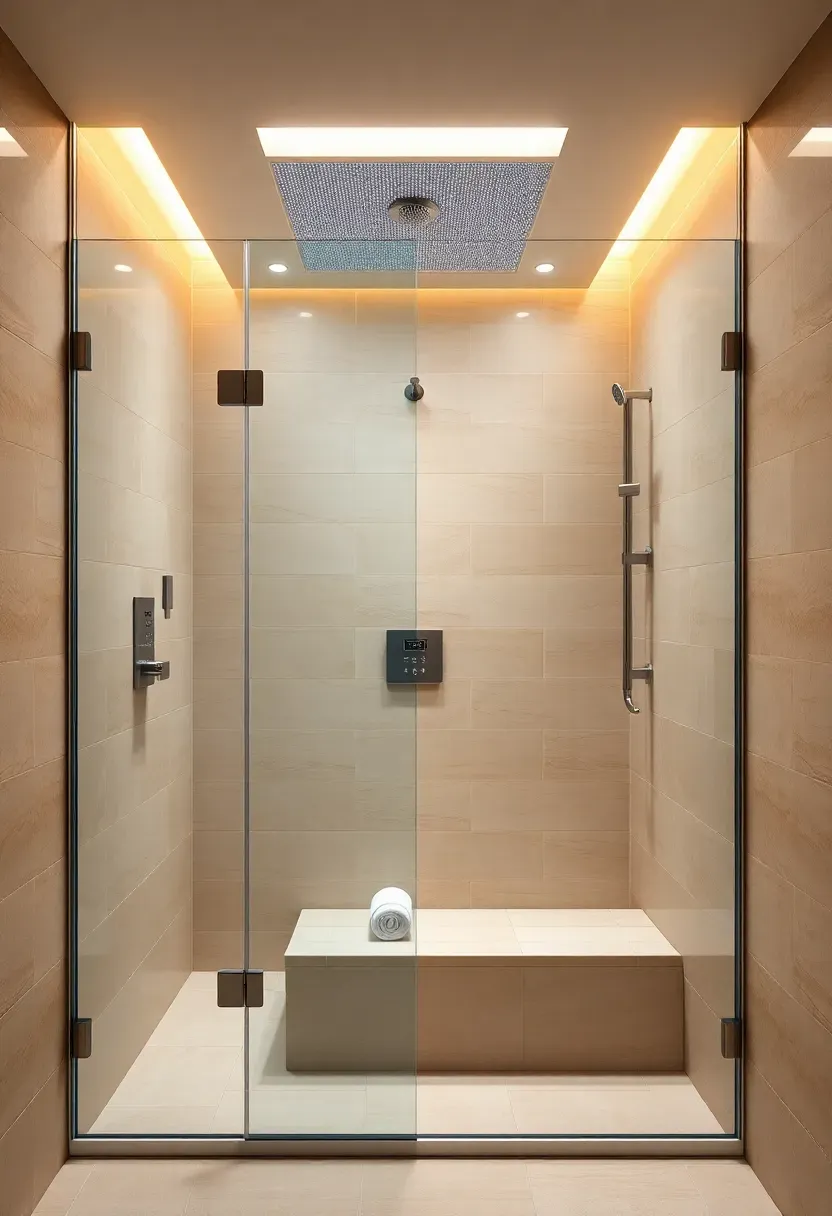
12. Steam Shower with Built-In Bench
A steam shower turns a regular daily routine into something closer to a spa visit. A small steam generator (around 7-12 kW for a typical residential shower) is hidden in a nearby closet, and a head inside the shower releases steam to fill the enclosure within a few minutes. The built-in tile bench is non-negotiable — you'll actually sit in there.
What changes from a regular shower
- The enclosure must be fully sealed top to bottom, including a transom panel above the door
- The ceiling slopes slightly (about 2 degrees) so condensation runs off rather than dripping
- Walls and ceiling need a true vapor barrier behind the tile, not just standard membrane
Pros and cons
- Pro: legitimate health benefit (circulation, congestion relief, muscle recovery)
- Pro: massive value-add for a primary suite
- Con: $3,000-6,000 for the generator and controls alone
- Con: adds 15-30 minutes to every shower if you actually use it
Recommended
Items for this idea
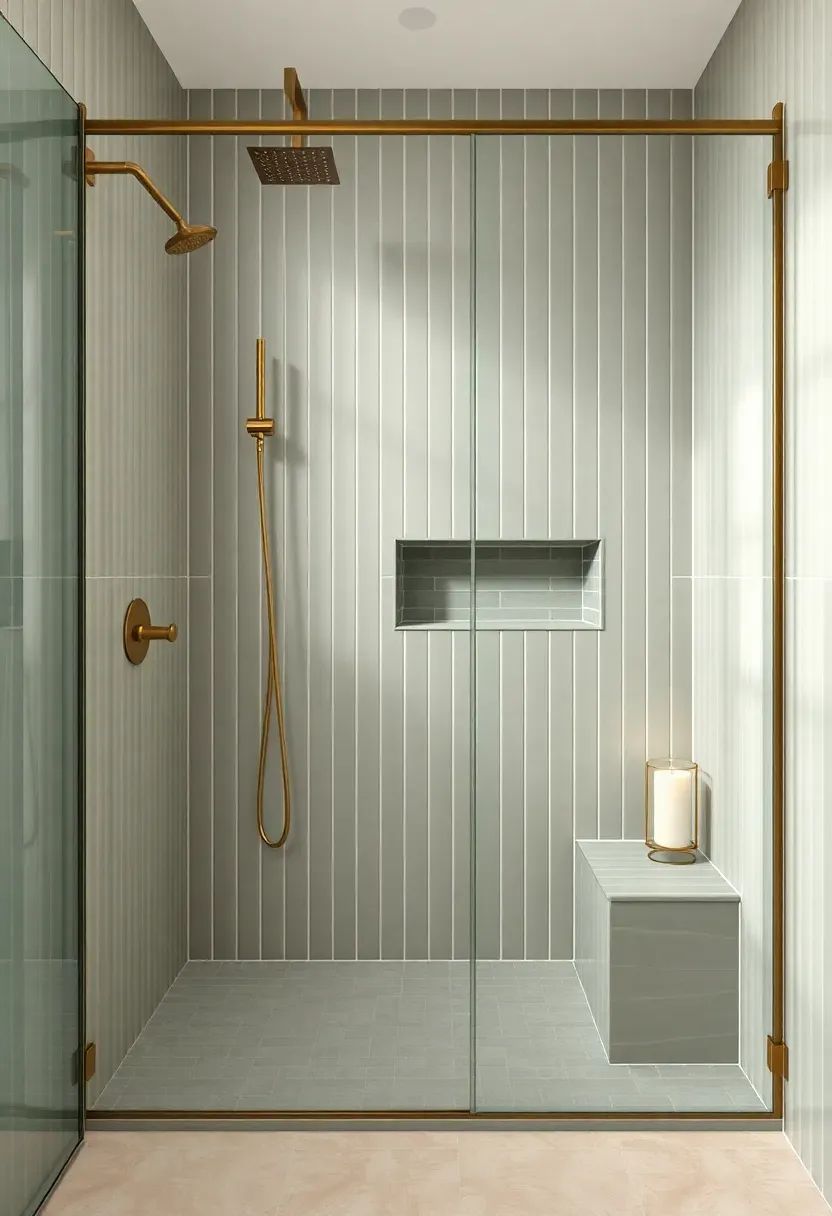
13. Vertical Stack Bond Tile Pattern
Running rectangular tile vertically — 4x12 or 3x12 stacked straight rather than offset — pulls the eye up and stretches ceiling height visually. It's a small switch from the default horizontal subway, but it changes the room's proportions in a way that feels intentional and a little less expected.
Soft sage, warm beige, and dusty pink all work especially well in this layout because the vertical lines emphasize the tile color more than horizontal patterns do.
Tips
- Use slightly elongated tile (1:3 or 1:4 ratio) for the strongest vertical effect
- Keep grout joints tight (1/16-inch) and the same shade as the tile
- Combine with a horizontal-stripe shower niche for a small contrast moment
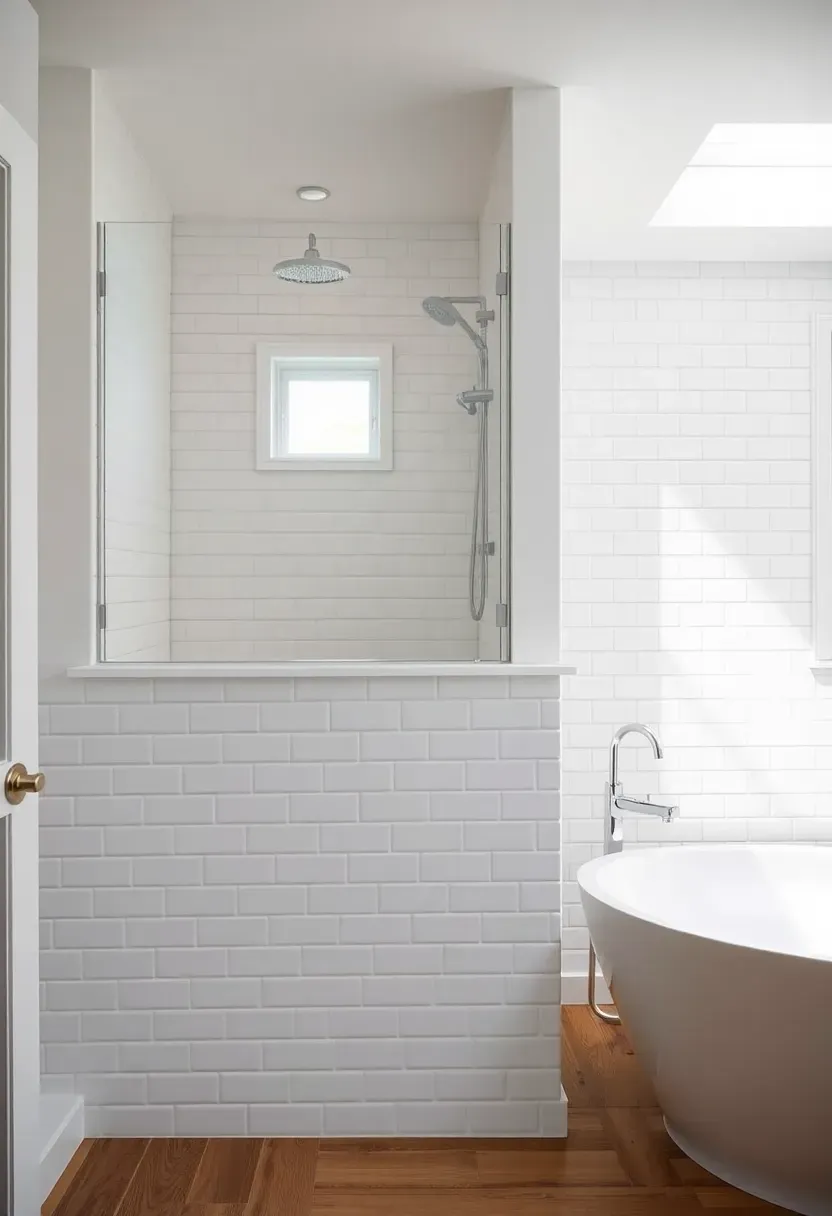
14. Half-Wall Shower Divider
A half-wall (sometimes called a knee wall) — typically 36-48 inches tall — separates the shower from the rest of the bathroom without going floor-to-ceiling. Stack a fixed glass panel above it and you get the visual openness of a frameless enclosure with a built-in surface for showerhead plumbing, niche, or even a small ledge for products.
This setup is especially useful when you want the showerhead on the bathroom-facing wall — the half-wall hides the plumbing and water spray without closing off the room.
Tips
- Top the half-wall with the same stone as your vanity for a designed feel
- Run tile up and over the top for a fully waterproof surface
- Add a 12-inch glass return at the entry to control splash without a door
Recommended
Items for this idea
15. Concrete Microcement Shower
Microcement is a thin, troweled cementitious coating that creates seamless walls and floors with no grout lines at all. The result reads as one continuous surface — modern, slightly raw, very European. It's ideal if grout maintenance is what's keeping you from a tile shower.
Step-by-step approach
- Install waterproof membrane over cement board substrate (the microcement isn't a waterproofing layer)
- Apply a fiberglass mesh basecoat for crack resistance
- Trowel two thin layers of microcement, sanding lightly between coats
- Seal with at least two coats of polyurethane sealer rated for wet areas
Watch out
Microcement looks effortless but it's craft work — a bad applicator will leave trowel marks, color streaks, or seams in the wrong places. Hire someone with shower-specific experience and ask for photos of three-year-old installs, not just fresh ones.
16. Two-Tone Shower with Tile Wainscot
Splitting the shower wall horizontally — tile up to a chair-rail height (around 48 inches), then a different material above — keeps things interesting without being busy. Green zellige below, white plaster or paint above. Or charcoal tile below, white tile above. The horizontal break also draws the eye sideways, which makes narrow showers feel wider.
Tips
- Cap the transition with a metal Schluter strip or stone bullnose for a clean line
- Pick colors that share the same undertone (warm with warm, cool with cool)
- Repeat the lower tile color in a small accent — niche, mirror frame, or floor
Recommended
Items for this idea
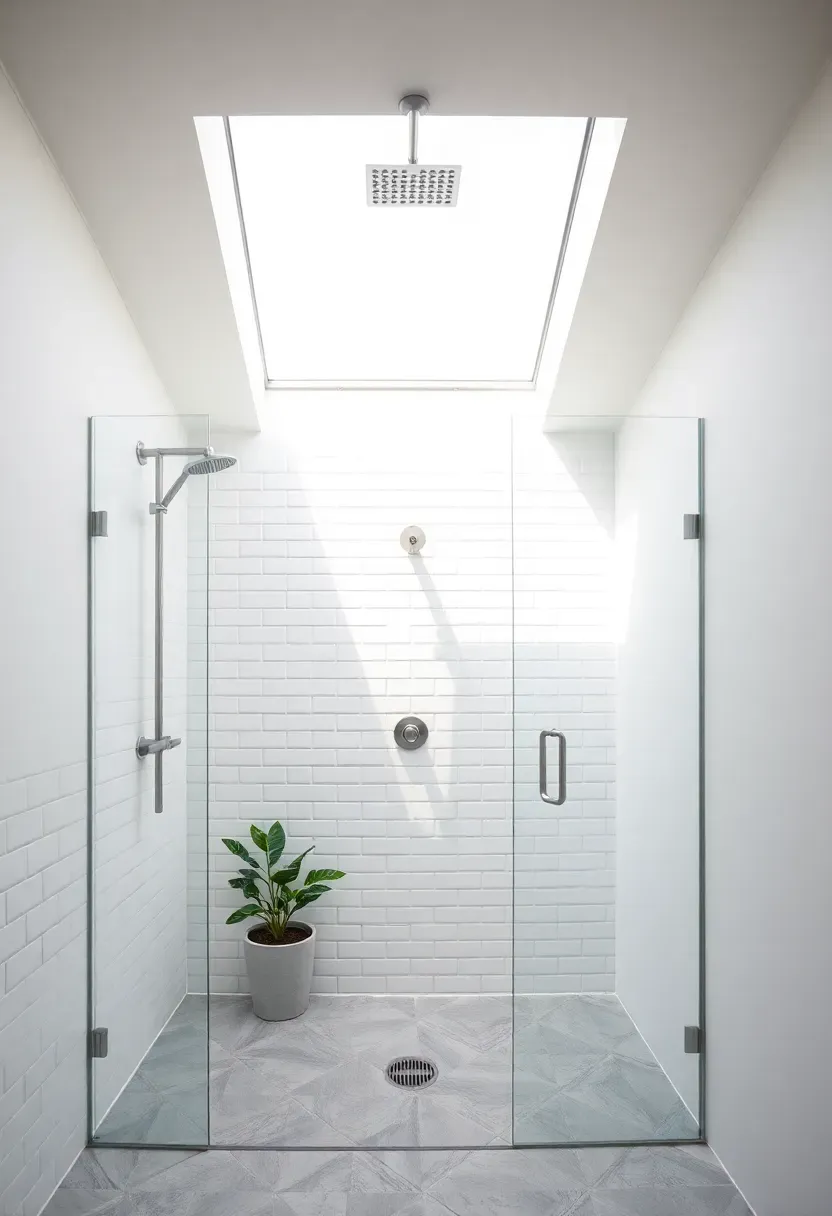
17. Skylight Above the Shower
A skylight directly above the shower is one of the most underrated bathroom upgrades. You get natural daylight on the surface where you spend the most time looking up, free ventilation if the skylight opens, and a daylit interior plant niche right in the shower zone if humidity-loving plants are your thing.
For top-floor bathrooms only — adding a skylight to a non-top floor means tunneling a light shaft through the attic, which works but adds expense.
Tips
- Choose a venting skylight (manual or motorized) for natural humidity control
- Specify low-E, tempered glass rated for shower-area condensation
- Add a remote-controlled blackout shade if light wakes you on summer mornings
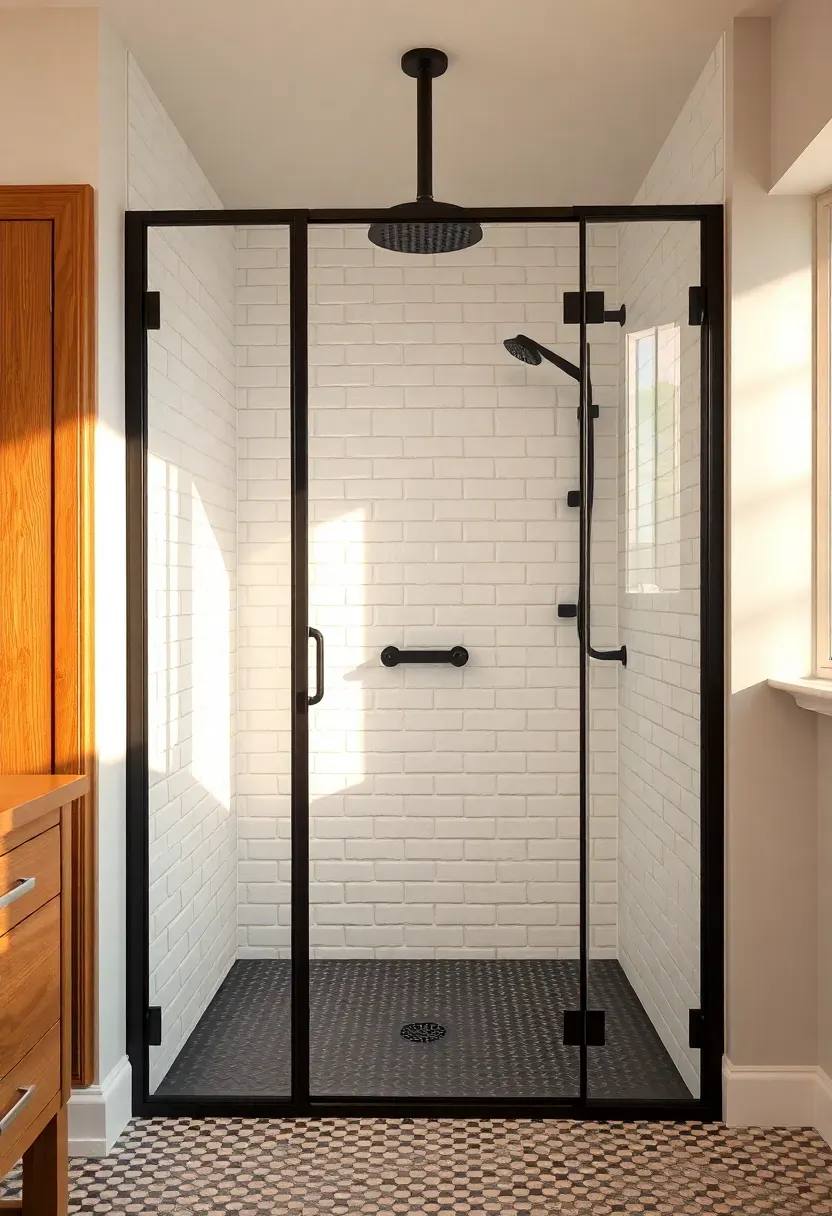
18. Industrial Shower with Black Frame Glass
Crittall-style black-frame glass enclosures borrow from European factory windows and have become the dominant industrial-modern look. The thin black grid divides the glass panel into rectangles, adding architectural detail without blocking light. It pairs unusually well with both warm minimalism (white tile, oak vanity) and full-on moody bathrooms.
Origins
The Crittall name comes from a British steel-window manufacturer that made the segmented frames standard in early-20th-century factories and lofts. Designers started bringing the look indoors as room dividers about a decade ago.
Modern application
Today the look is mostly aluminum or powder-coated steel, lighter than original Crittall, with tempered glass panels. The grid spacing matters — too tight and it feels busy; aim for 18-24 inch sections.
How to apply at home
A single fixed Crittall-style panel at the front of a walk-in shower gives most of the visual payoff at a fraction of the price of a full enclosure. Pair with white subway tile or matte black wall tile and matte black hardware throughout the bathroom.
Recommended
Items for this idea
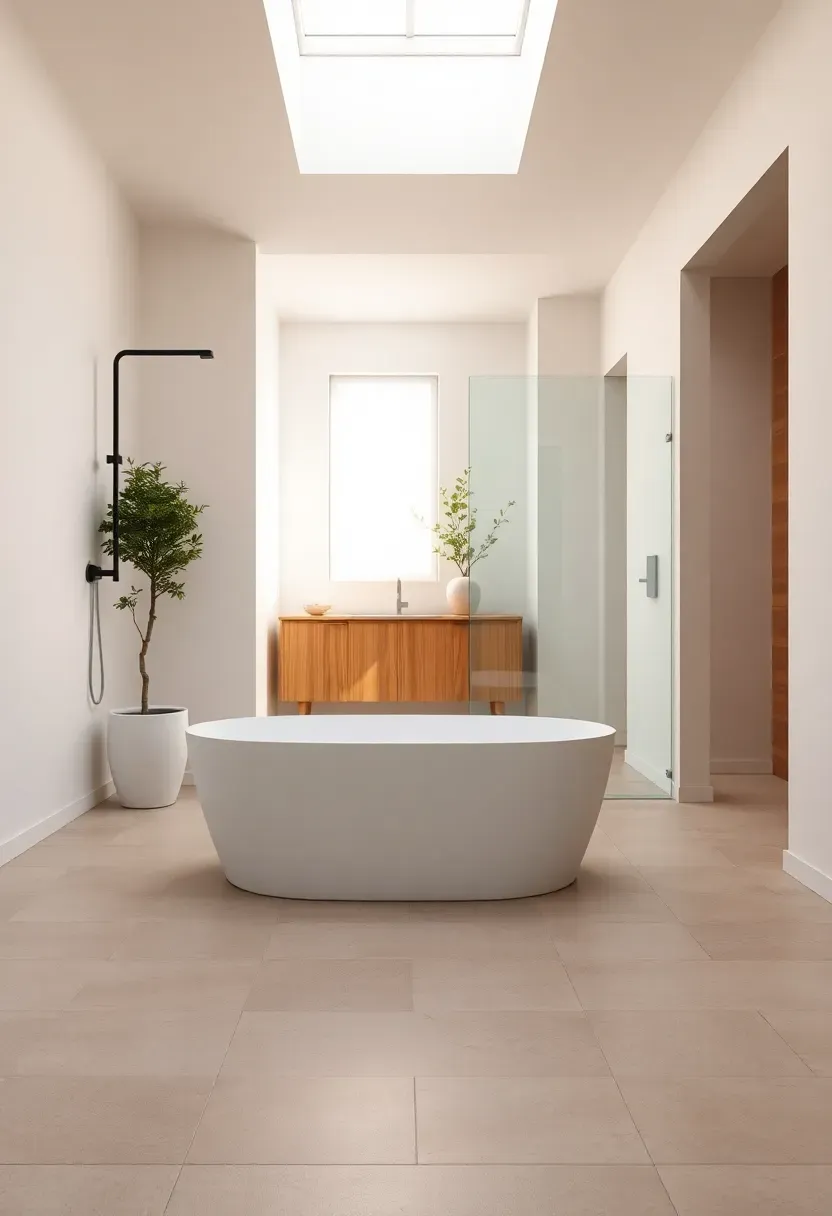
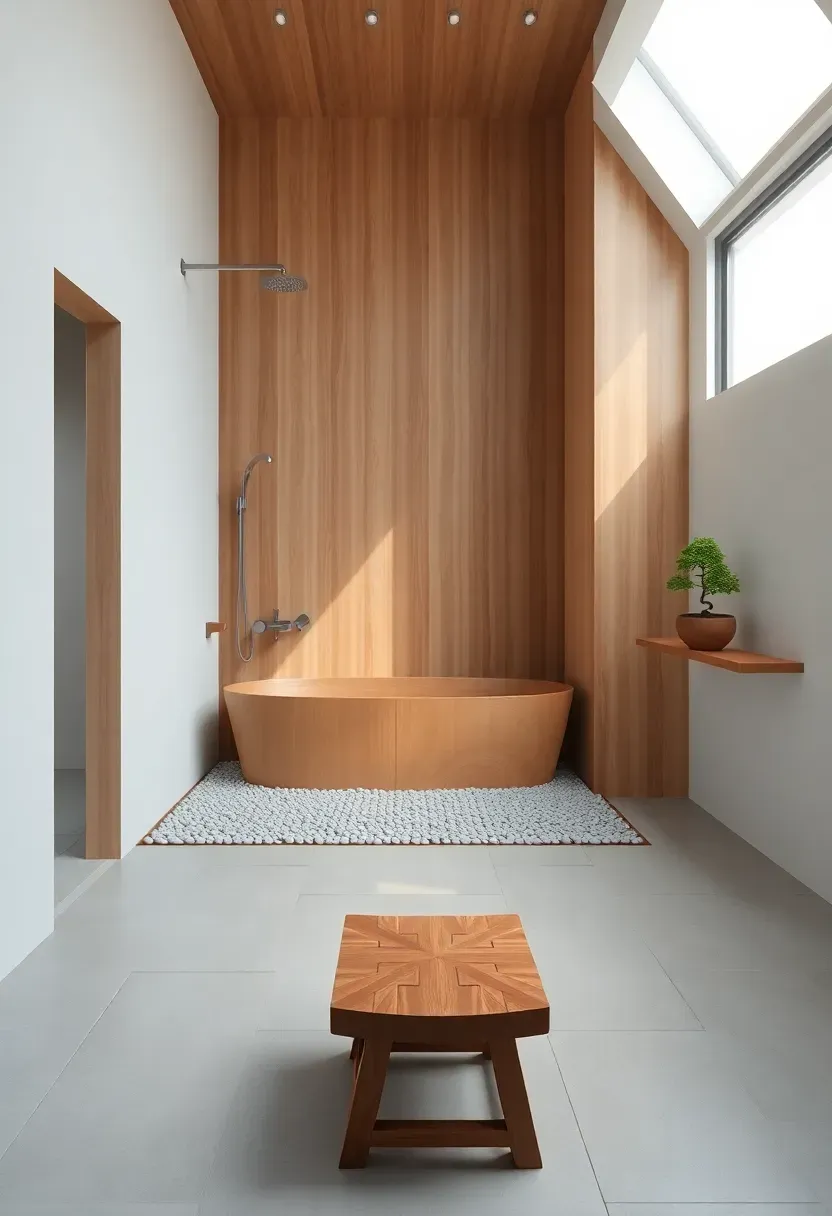
19. Japanese-Style Wet Room with Soaking Tub
Japanese bathing culture treats washing and soaking as separate acts in a shared waterproof room. You shower first to get clean, then soak in the deep tub purely for relaxation. Translated into a Western bathroom, this becomes a wet-room layout with a deep ofuro-style soaking tub next to an open shower zone.
The geometry is usually a small enclosed wet room (around 50-60 square feet) with the tub against one wall, a wall-mounted shower opposite, and tile or pebbles covering everything in between.
Tips
- Use a 24-30 inch deep tub (Japanese ofuro depth) rather than a standard 14-16 inch Western tub
- Heated floors are essential — bare feet on wet tile gets cold fast
- Add a low wooden stool inside the wet room for traditional sit-and-rinse showering
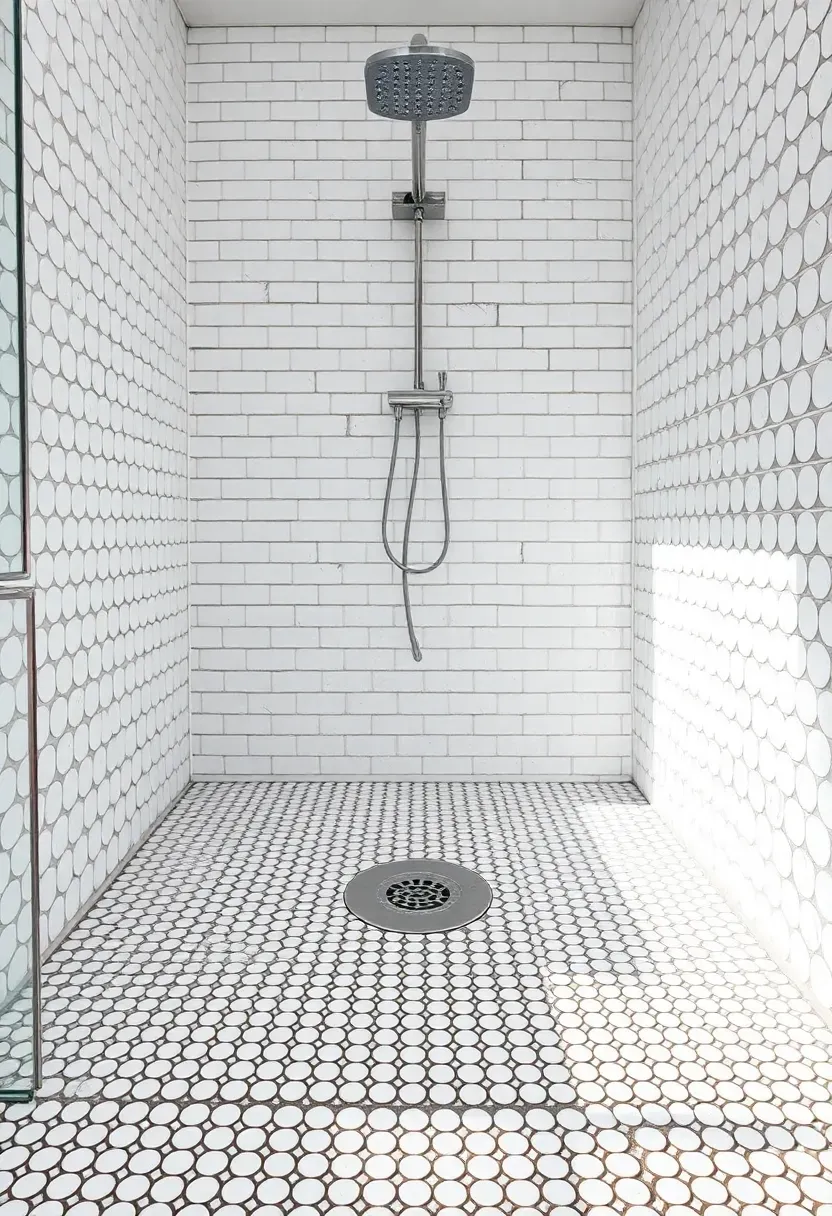
20. Penny Round Mosaic Shower Floor
Penny round tile (small ceramic circles, usually 3/4 to 1 inch) on the shower floor is a classic that hasn't aged. The dense grout pattern gives serious traction, the small format conforms easily to floor slope, and the slightly retro look pairs with everything from Victorian to mid-century modern.
White penny rounds with charcoal grout is the most-pinned combination, but soft sage, blush pink, and warm gray penny rounds all hold up against more colorful wall tile.
Tips
- Use a sanded grout in a darker shade than the tile to camouflage staining
- Reseal grout every 12-18 months in active showers
- Don't carry penny rounds onto the wall — too much pattern in a small space
Recommended
Items for this idea
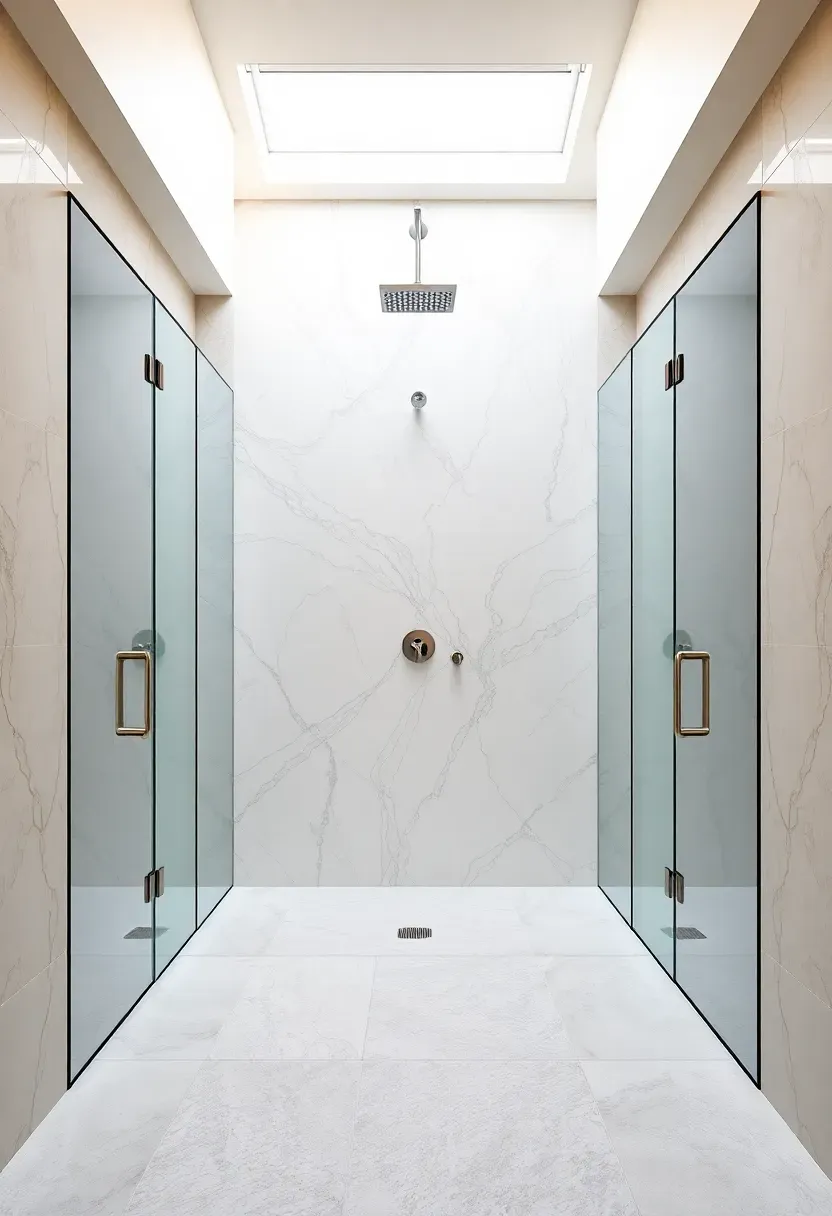
21. Walk-Through Shower with Two Entries
A walk-through shower has glass panels on two opposing sides with the showerhead and feature wall in the middle, so you can enter from either end. It works best in a long primary bathroom where the shower spans the width of the room — usually 6-8 feet — and turns the shower into the architectural centerpiece.
Why people love it
The two-sided access feels effortless: walk in from the vanity side, exit toward the closet or toilet. With both glass walls running floor-to-ceiling and the feature wall lit, the shower reads almost like a piece of furniture in the bathroom rather than a closed-off enclosure.
Pros and cons
- Pro: dramatic, very on-trend, great for resale value
- Pro: doors aren't required if the entry zones are far enough from drying floor
- Con: needs a long, wide bathroom (minimum 60 square feet)
- Con: more glass = more cleaning, and steam escapes both ends in cold weather

22. Curved Glass Shower Enclosure
A curved (quadrant) shower enclosure uses a single arced glass panel to round off a corner shower. The soft curve adds movement to a bathroom otherwise full of right angles and lets the shower take up less floor area than a square enclosure of the same usable interior space.
This is an underrated small-bathroom move — quadrant kits in the 36-42 inch range fit corners that won't accept a comfortable square enclosure.
Tips
- Pick a single curved sliding door rather than two pivot panels for smoother flow
- Choose 6mm or thicker tempered glass with a clean-coat treatment
- Match the chrome or brass-finish track to the rest of your shower fixtures
Recommended
Items for this idea
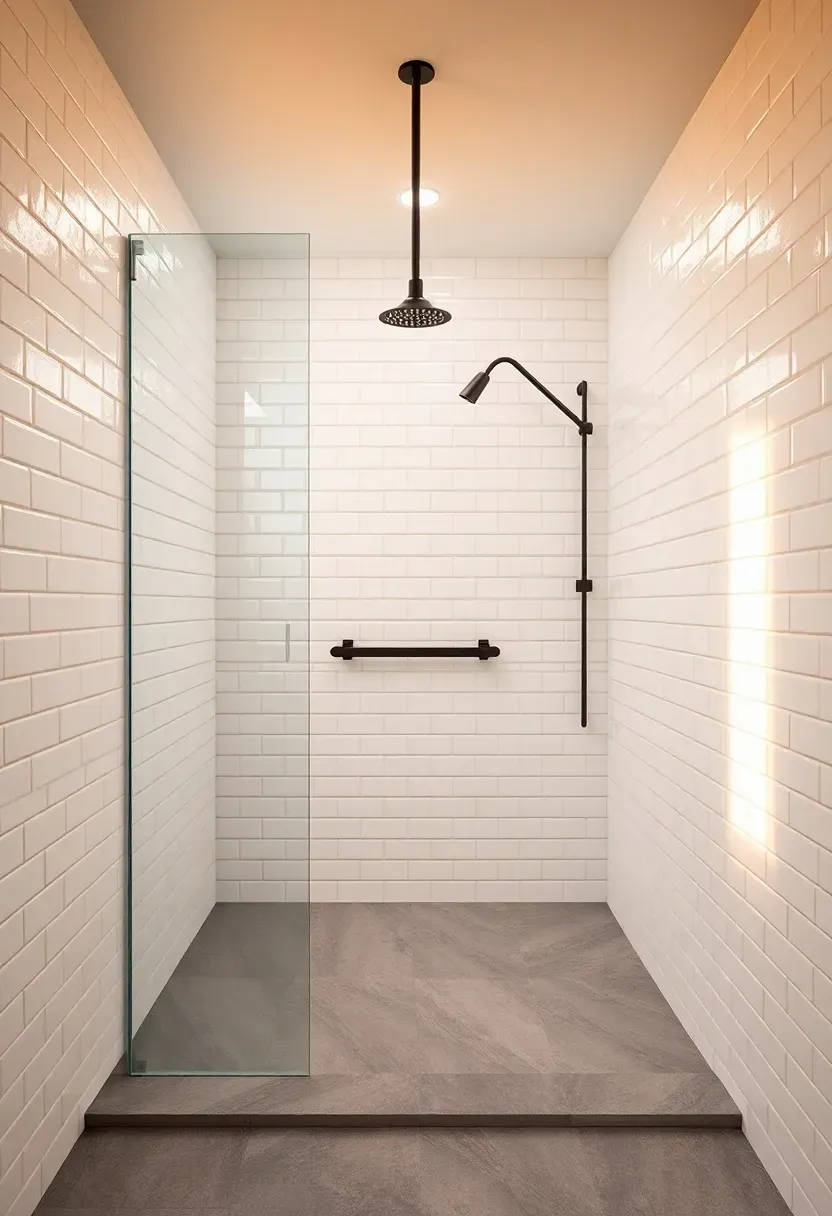
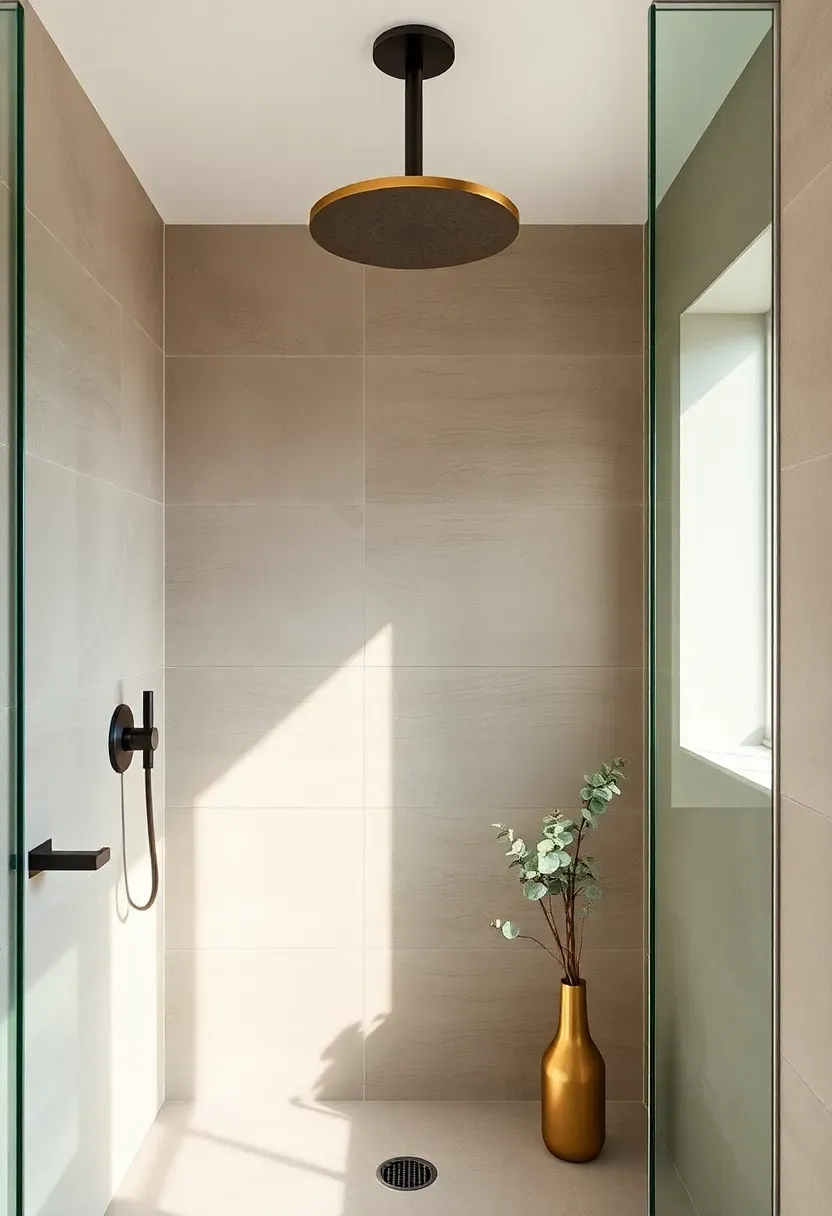
23. Open Doorless Shower in a Small Bath
Going completely doorless in a small bathroom sounds counterintuitive — until you try it. Removing the door (and often the glass enclosure entirely) makes the room read as one volume, eliminates the squeegee chore, and trades a tiny amount of containment for a meaningful gain in perceived space.
A linear drain on the back wall and a ceiling-mounted rainfall head (less spray than a wall-mounted head) are the two technical pieces that make a doorless shower work in tight quarters.
Tips
- Add a partial 18-24 inch glass splash panel where the shower opens to dry floor
- Pitch the floor 1/4 inch per foot toward the linear drain to control runoff
- Heated floors prevent the cold-tile shock when stepping out wet
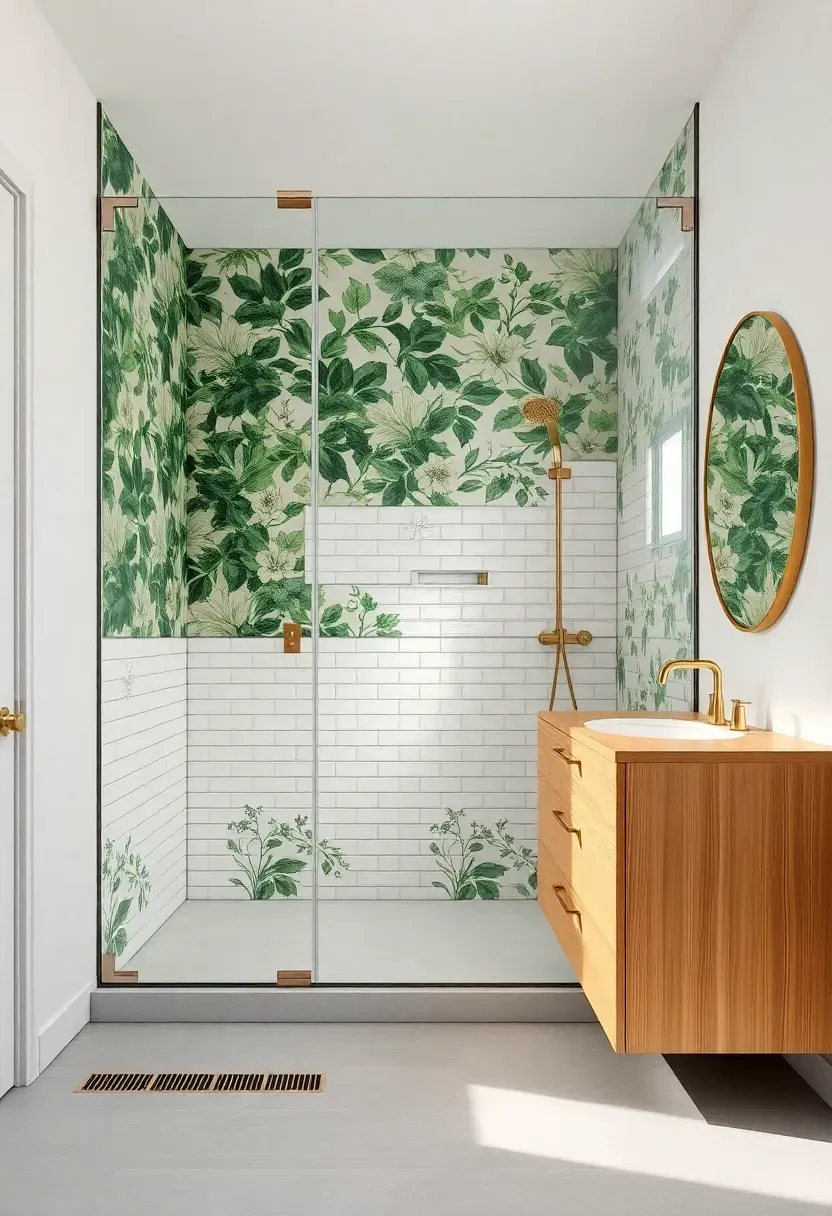
24. Botanical Wallpaper Outside a Glass Shower
Pair a frameless glass shower with a botanical or pattern wallpaper on the wall directly visible through the glass. The wallpaper sits in the dry zone outside the shower but reads as the shower's back wall through the glass — giving you the high-impact pattern of a wallpapered bathroom without exposing actual paper to direct water.
Where this works
Best in bathrooms where the shower is positioned with one open glass wall facing into the room, and you can see straight through to the back wall from the bathroom doorway. The wallpaper becomes the focal moment.
Pros and cons
- Pro: pattern-heavy looks without water risk
- Pro: easy to swap when trends move on
- Con: condensation can still affect nearby walls; use vinyl-coated paper
- Con: requires solid ventilation (an exhaust fan rated for the bathroom size)
Recommended
Items for this idea
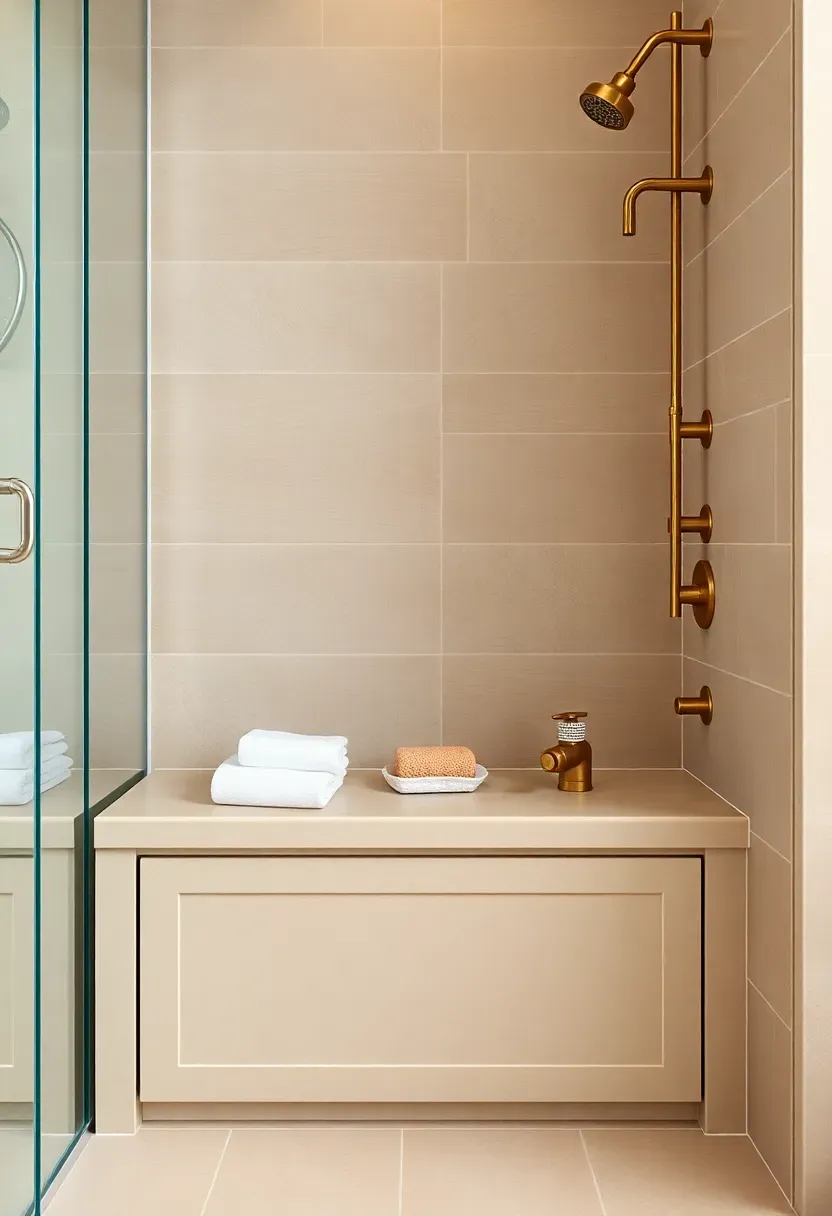
25. Built-In Shower Bench with Hidden Storage
A built-in tile bench gives you a place to sit, shave legs, set a coffee, or rest a towel — and adding pull-out drawer storage underneath turns dead space into a real organizational win. This is for showers 42 inches deep or more; smaller showers can't lose the floor area.
The bench is typically 16-18 inches deep and 17-19 inches tall (standard chair height). The hidden storage drawer underneath is best for cleaning supplies and extra shampoo bottles, kept dry behind a tile-faced front.
Tips
- Slope the top of the bench 1/4 inch toward the back wall so water drains
- Use waterproof drawer slides and a removable interior tray for easy cleaning
- Cover the bench front in matching wall tile so it disappears into the design
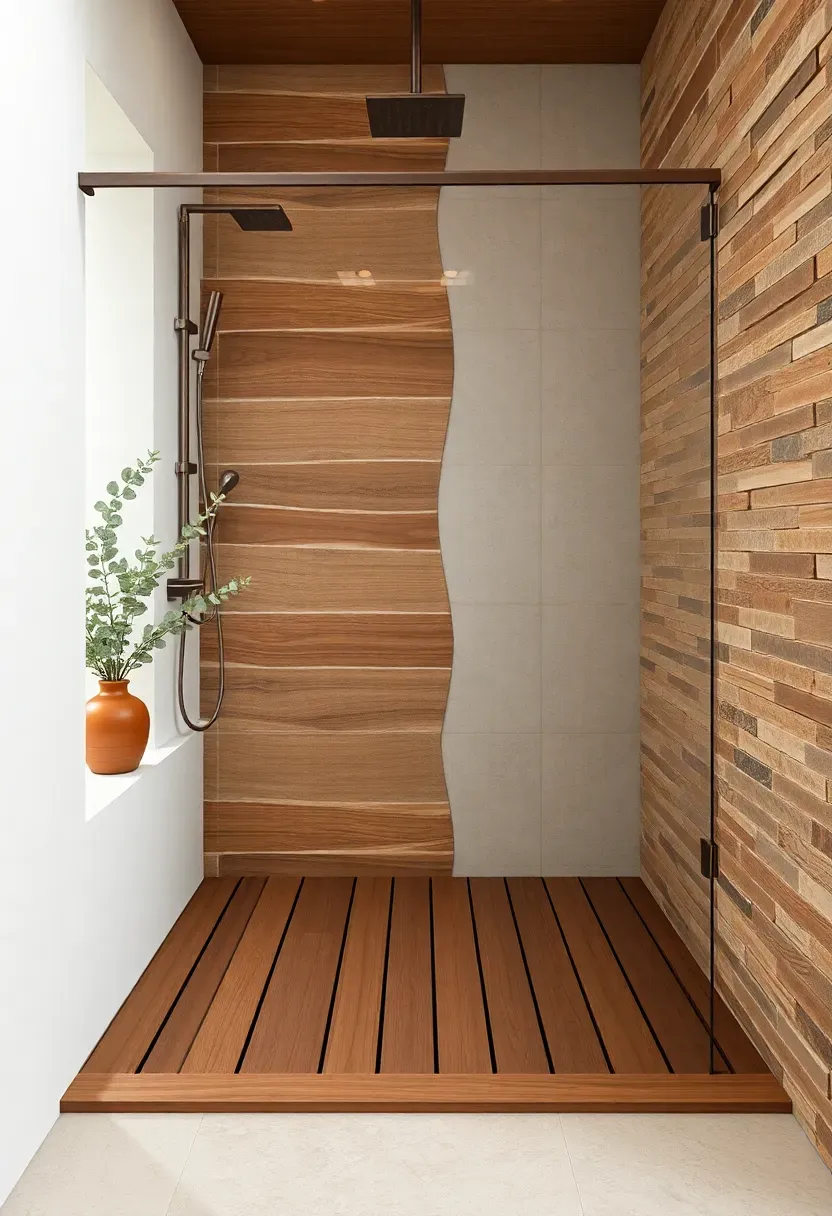
26. Outdoor-Inspired Shower with Slatted Wood
Bringing outdoor-shower energy inside means slatted teak or ipe wood underfoot, river stone or split-face tile on at least one wall, and warm brass or oil-rubbed bronze fixtures. The wood slats sit on a removable frame above a tile shower pan, so water drains through and the wood air-dries between uses.
Tips
- Specify ipe, teak, or thermally-modified ash — softwoods rot in shower humidity
- Lift the wood platform on rubber feet 1-2 inches above the tile floor
- Pull the platform out monthly to dry the underside and clean the pan
Recommended
Items for this idea
27. Mixed Metal Fixtures in a Tile Shower
The single-finish rule (everything must match) is over. Mixing two metals in a shower — brushed brass on the rainfall head, matte black on the handles, for instance — looks more curated and less builder-grade than monochrome metal. The trick is keeping it to two finishes maximum and committing to a clear hierarchy.
Step-by-step approach
- Pick a "primary" metal that takes the largest visible piece (usually the showerhead)
- Pick a "secondary" metal in a contrasting tone for handles, drains, and accessories
- Repeat the secondary metal at least twice elsewhere in the bathroom (mirror, towel bar)
- Avoid introducing a third finish — chrome, brass, and black together reads chaotic
Watch out
"Mixed metal" doesn't mean random. Both metals should appear elsewhere in the room (vanity hardware, light fixtures, mirror frame) so the shower feels connected to the broader bathroom rather than randomly assembled.
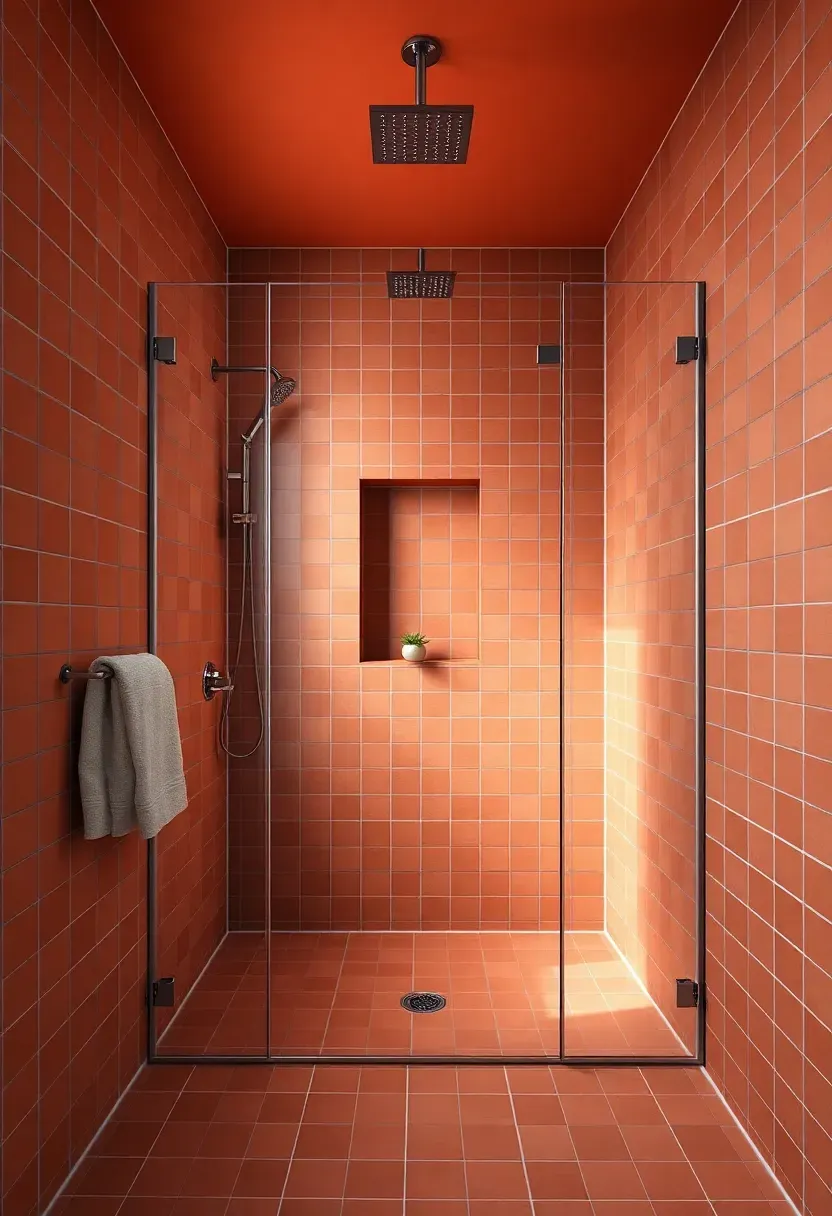
28. Color-Drenched Shower in One Bold Hue
Color-drenching wraps every surface of the shower in the same saturated hue — walls, ceiling, grout, sometimes even the fixtures. Deep terracotta, oxblood red, forest green, or aubergine all work. Without contrast, the shower reads as a single sculptural form rather than separate planes.
This approach takes courage. The shower becomes the loudest thing in the bathroom, so the rest of the room needs to be quiet — neutral vanity, white plaster walls, simple lighting.
Tips
- Match grout color to the tile within one shade for the seamless effect
- Use matte tile rather than glossy to avoid bright reflections breaking the color
- Keep fixtures simple — chrome or matching painted brass disappears into the wall
Recommended
Items for this idea
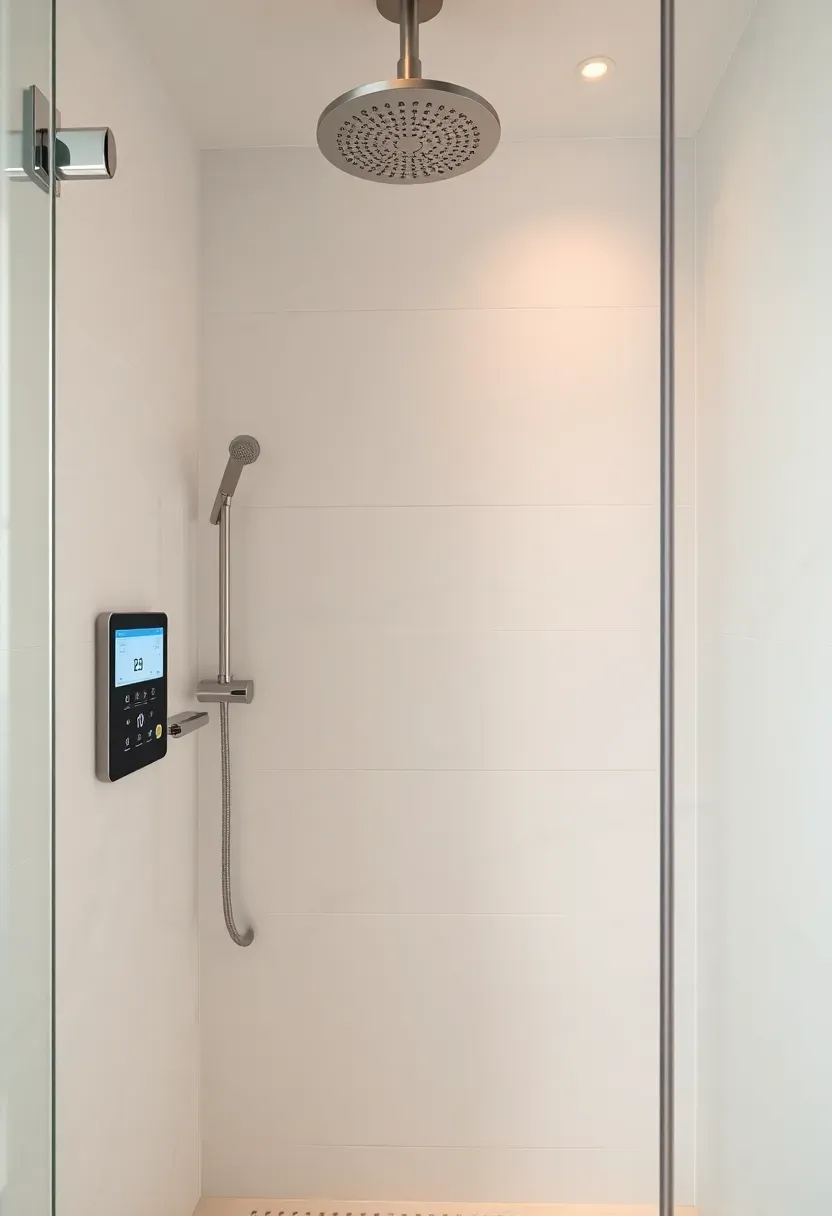
29. Smart Shower with Digital Controls
Digital shower systems (Kohler DTV+, Moen U, Grohe SmartControl) replace traditional knobs with a touchscreen or button panel that holds preset temperature and flow profiles for each household member. You walk in, tap your name, and the shower runs at your saved settings — temperature, pressure, even start time if there's a warm-up sequence.
Modern application
The technology has matured past gimmick. Voice control through Alexa or Google Home, app-based pre-warming so the shower's hot when you step in, and water-usage tracking are the most-used features in real households.
How to apply at home
A smart valve costs $1,000-3,000 plus the showerhead and controls, but it can be retrofitted into an existing tile shower in about a day. Run the touchscreen panel either inside the shower (waterproof rated) or on the dry side wall just outside the entry. Both work — outside is easier for resale because it doesn't lock buyers into the platform.
Watch out
Tech ages faster than tile. Pick a brand with a long product line history (Kohler, Moen, Grohe) over startup brands that may not have replacement parts in 10 years.
Quick FAQ
What's the best shower layout for a small bathroom? A frameless glass walk-in or doorless corner shower works best in tight bathrooms because the visual continuity makes the room feel larger. Curbless layouts with linear drains also help — there's no step or wall break interrupting the floor plane. Avoid bulky framed enclosures or sliding doors with thick tracks.
Are walk-in showers worth it without a tub? For most adults yes, especially in primary bathrooms. Walk-in showers use less water, are easier to clean, and feel more luxurious day to day. Just keep at least one tub somewhere in the home for resale value, especially if you have small children or might in the future.
What tile is best for a shower floor? Small mosaic tiles (1x1 inch, penny rounds, or pebbles) work best because more grout lines mean better grip and the small format conforms to slope toward the drain. For walls, large-format porcelain reduces grout maintenance. Avoid polished marble on shower floors — it gets slippery.
How much does a walk-in shower cost to install? A basic walk-in shower retrofit runs about $3,500 to $7,000. A full custom build with frameless glass, niche, bench, and high-end tile typically lands between $8,000 and $20,000. Steam showers and wet rooms push higher because of waterproofing and ventilation requirements.
Do showers without doors stay warm? Doorless showers can get cool if your bathroom is large or drafty. Solutions include adding a heated floor, a ceiling heat lamp, positioning the shower away from doors and windows, and using a partial glass splash wall to trap steam without fully enclosing the space.
Pick the one or two ideas that match your space and budget — a glass panel swap or new rainfall head can shift the whole feel of a bathroom in an afternoon, while a curbless layout or wet room is a real project. Either way, the shower is worth treating as the centerpiece. Save the images you like to Pinterest, then bring them to your contractor or use them as a shopping list for your next weekend upgrade.
Pinterest cover for 29 Bathroom Ideas with Shower for a Modern Refresh
About the author
OBCD
CGI visualization and interior design content. We create detailed 3D renders and curate practical design ideas for every room in your home.