21 Bathroom Lighting Ideas That Actually Work
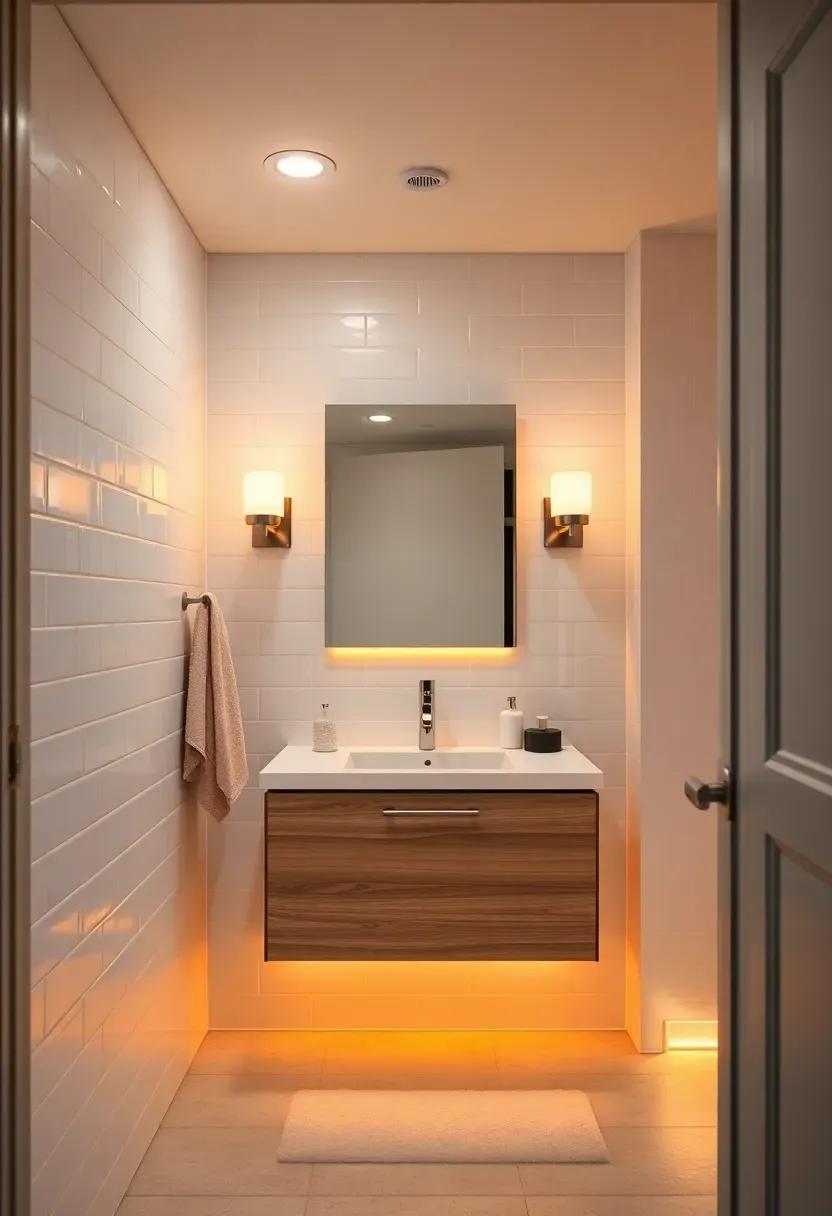
Bad bathroom lighting is one of those problems people live with for years without realizing how easy it is to fix. A single overhead fixture casts shadows under your chin and around your eyes — terrible for shaving, makeup, or just checking whether you look awake enough to leave the house. The solution is layered lighting: combine task fixtures at the vanity, ambient light from the ceiling, and accent sources that add depth. You do not need a full renovation to get there. Swapping a builder-grade bar light for a pair of sconces can change the entire room in an afternoon.
Here are 21 bathroom lighting setups organized by fixture type, placement, and style. Each one includes practical notes on sizing, bulb temperature, and moisture ratings.
Table of Contents
- Wall Sconces Flanking the Mirror
- Backlit Mirror Panel
- Recessed Shower Downlight
- Pendant Lights Over a Double Vanity
- LED Strip Under a Floating Vanity
- Flush Mount Drum Shade
- Picture Light Above the Mirror
- Wet-Rated Recessed Can Layout
- Frosted Globe Vanity Bar
- Vertical LED Vanity Strips
- Skylight Combined With Warm Downlights
- Cove Lighting Around the Ceiling
- Illuminated Niche in the Shower
- Freestanding Lamp on a Bathroom Shelf
- Oversized Lantern Pendant
- Medicine Cabinet With Built-In Lights
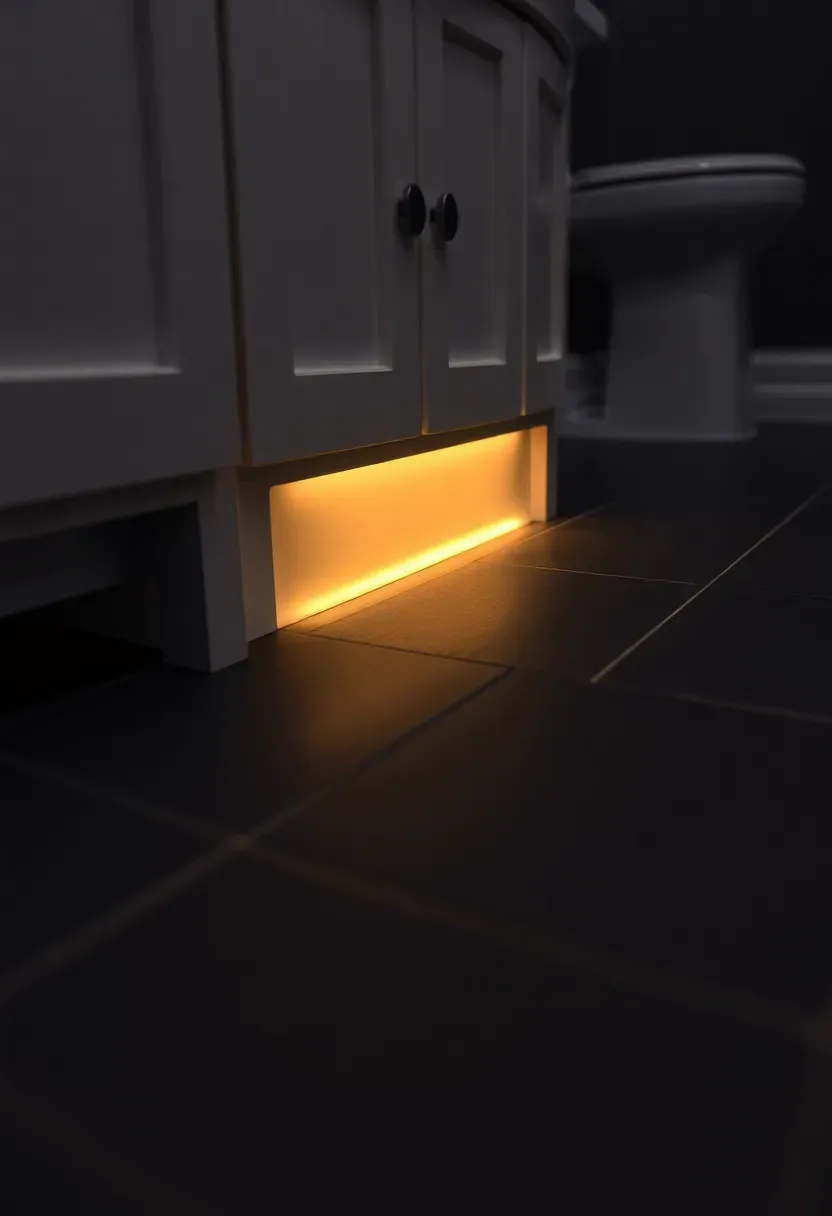
- Toe-Kick Night Light
- Black Metal Industrial Sconces
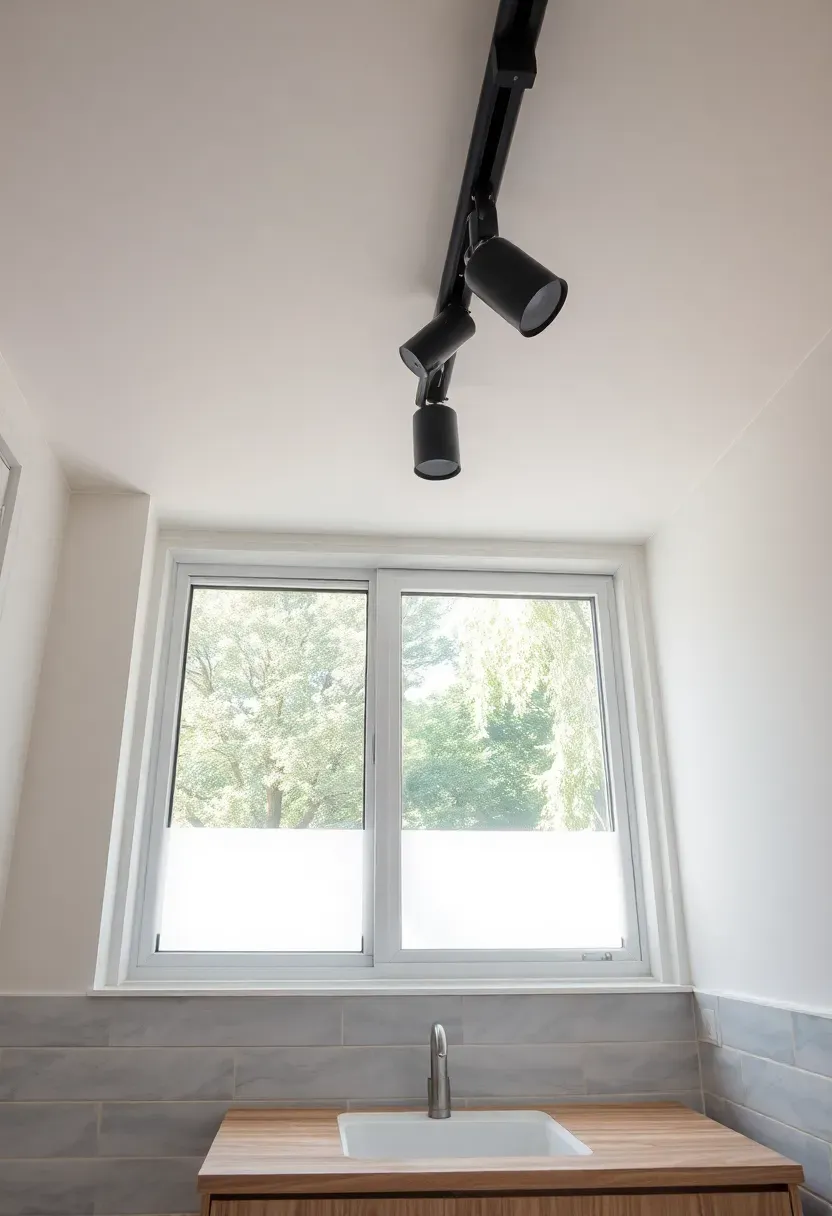
- Window Film Plus Track Lighting
- Vintage Brass Swing-Arm Sconce
- Layered Scheme for a Small Bathroom
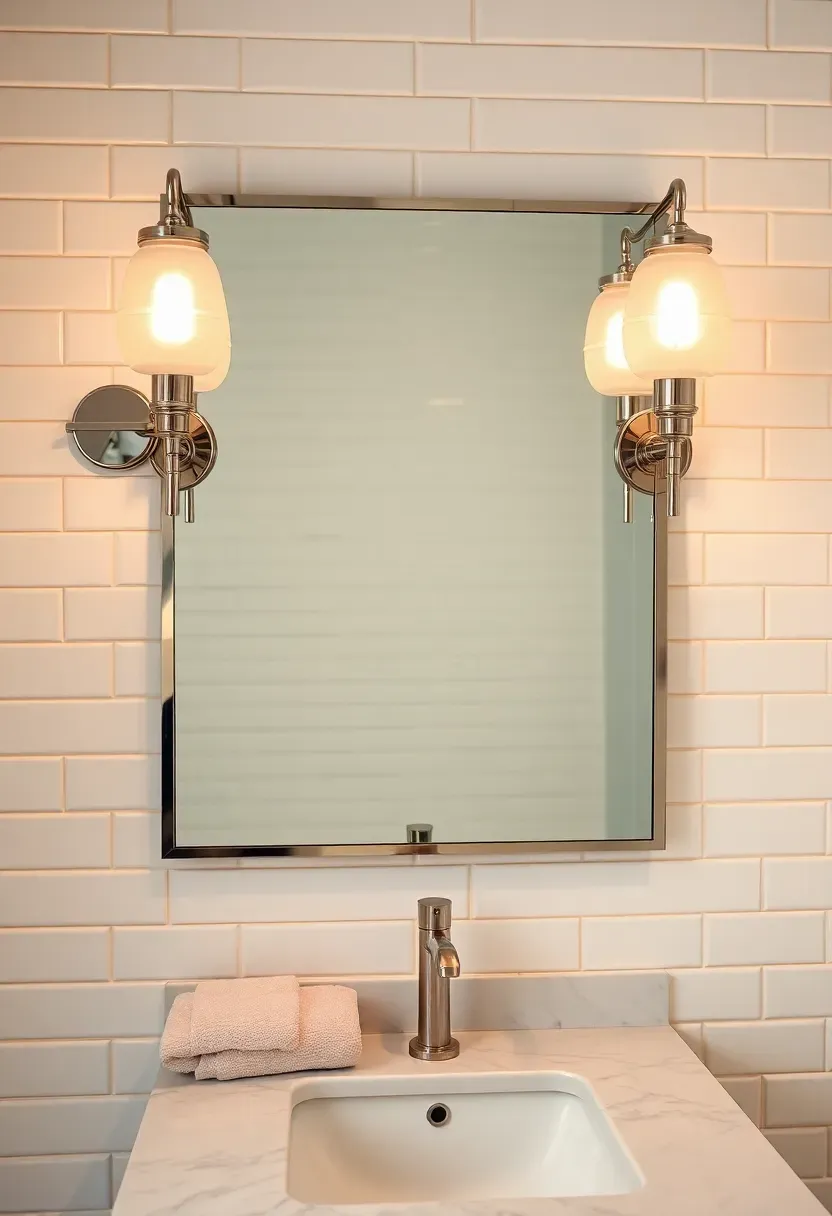
1. Wall Sconces Flanking the Mirror
Mounting a sconce on each side of the mirror at roughly eye level (around 65-66 inches from the floor) eliminates the harsh shadows that overhead-only lighting creates. The light hits your face from both sides evenly, which is why makeup artists and photographers prefer this setup. Choose fixtures with frosted or linen shades so the bulb does not create hot spots in your peripheral vision while you lean in close.
Getting the Position Right
- Mount the center of each sconce 36-40 inches apart if your mirror is standard width (24-30 inches)
- If the mirror is wider than 36 inches, mount the sconces directly on the mirror surface using mirror-mount brackets
- Use 2700K-3000K bulbs rated at 75-100W equivalent per side for accurate color rendering
We picked a few things that go well with this idea: SAMTEEN Brushed Nickel Vanity Sconce (Set of 2) (★4.5), Kira Home Beacon Brass Wall Sconce (14") (★4.4) and Globe Electric Middleton Matte Black Sconce (★4.6). As an Amazon Associate we earn from qualifying purchases.
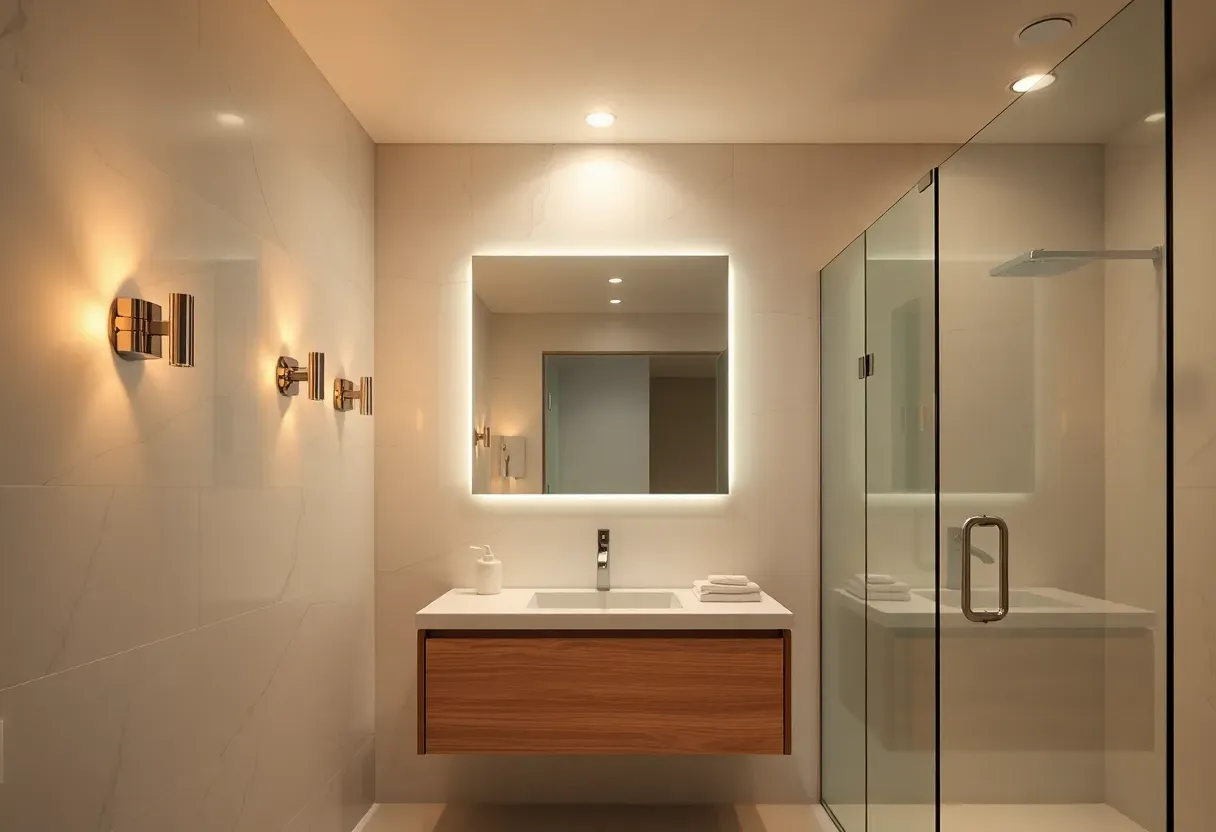
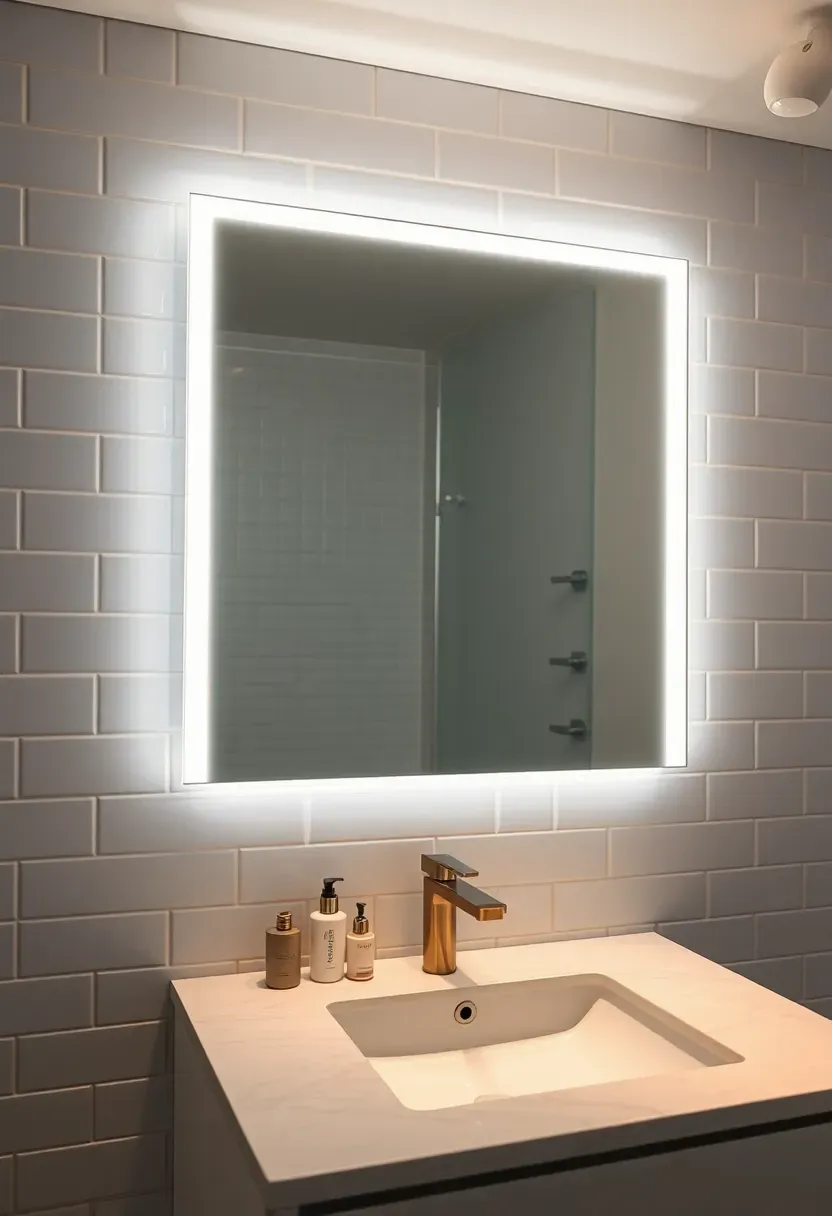
2. Backlit Mirror Panel
A backlit mirror replaces both your existing mirror and your vanity light in one piece. LEDs embedded behind the mirror cast a soft glow around the perimeter, providing enough light for grooming without any visible fixture. Most models include a defogger pad so the mirror stays clear after a hot shower — a practical bonus that separate mirrors and lights cannot offer.
What to Look For
- CRI (Color Rendering Index) of 90 or higher matters here since this is your only task light source
- Confirm the unit is hardwired, not battery-operated — battery models dim significantly within weeks
- A built-in dimmer or touch sensor lets you lower the brightness for late-night bathroom trips
We picked a few things that go well with this idea: Govee Warm White LED Strip Lights (16.4ft, IP65) (★4.5), HitLights 2700K LED Strip (16.4ft, IP65) (★4.4) and Philips Hue Lightstrip Plus V4 (6.6ft) (★4.5). As an Amazon Associate we earn from qualifying purchases.
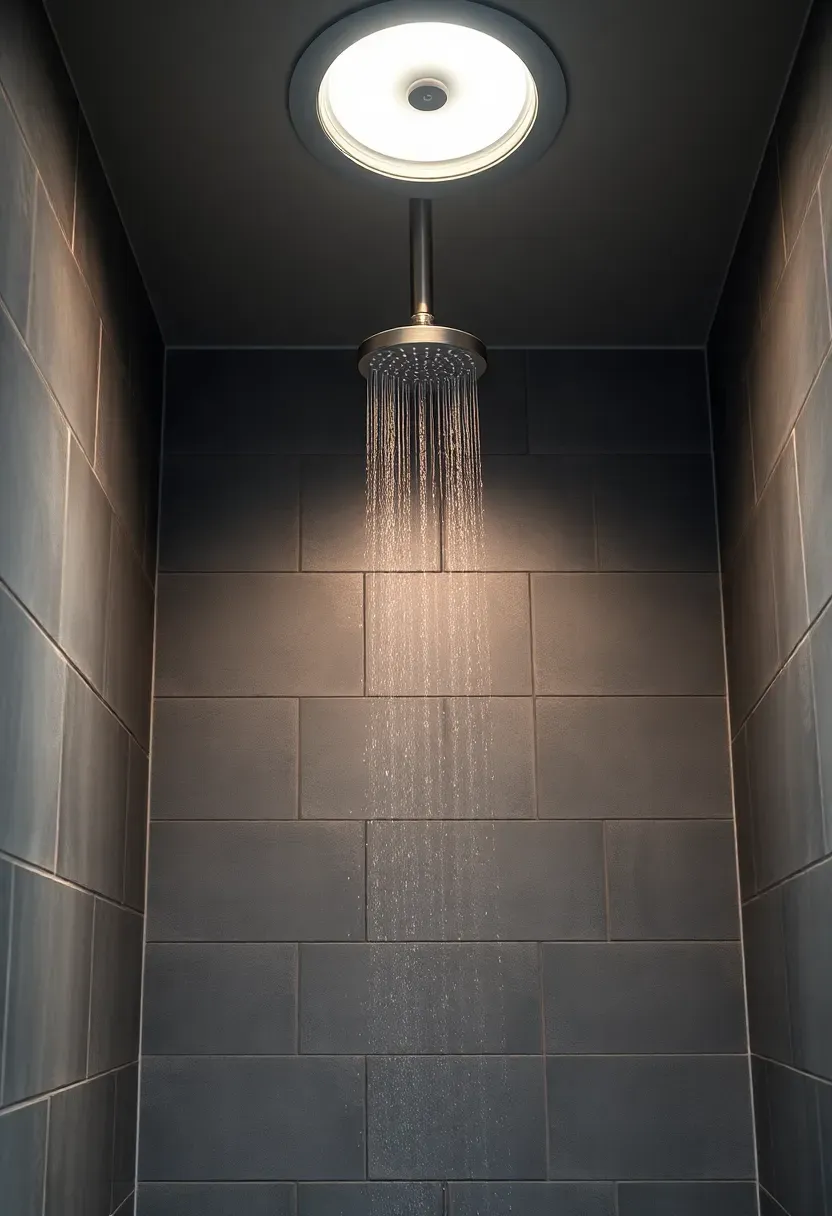
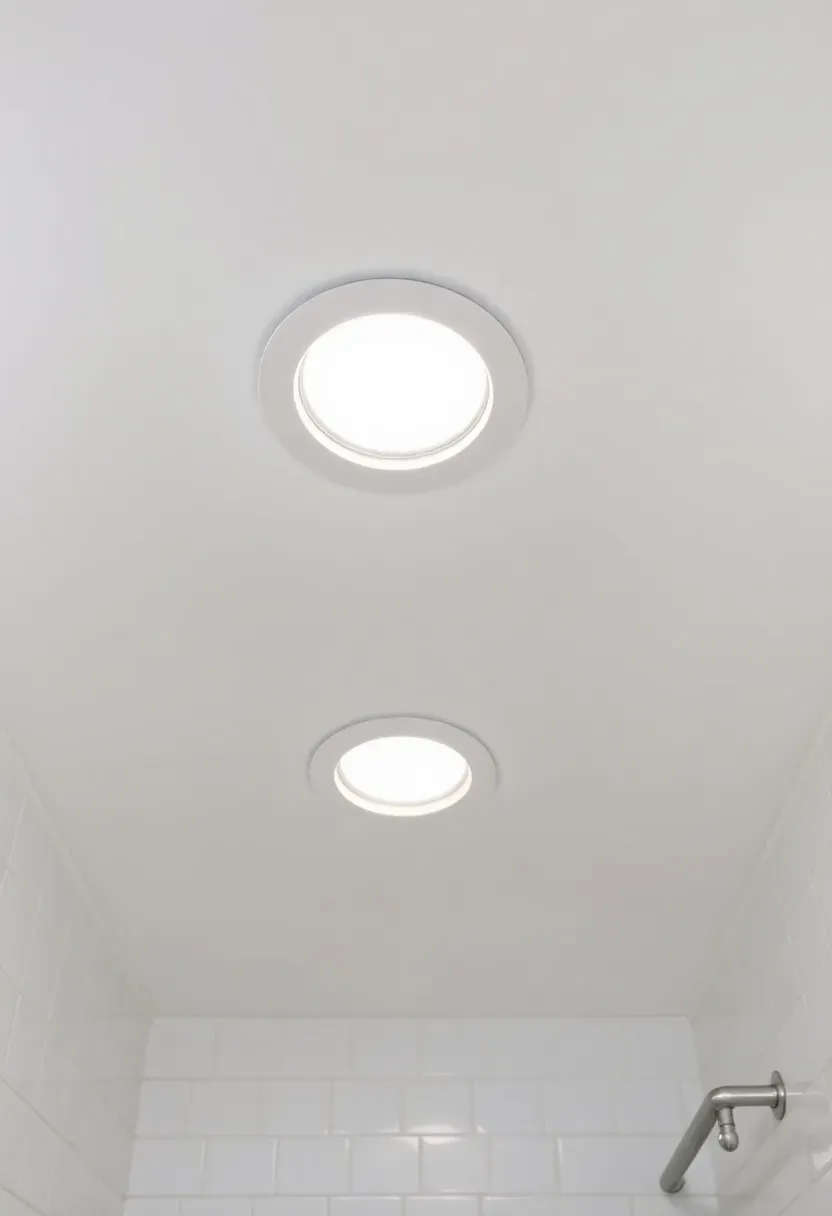
3. Recessed Shower Downlight
Why the Shower Needs Its Own Light
Most bathrooms rely on whatever spills in from the main ceiling fixture to light the shower area. That leaves the inside of the stall dim, especially if you have a glass door or curtain that blocks some of the ambient light. Dark showers feel smaller and make it harder to see what you are doing — not ideal when handling razors or reading shampoo labels.
The Fix
Install one or two IC-rated, wet-location recessed cans directly in the shower ceiling. A 4-inch trim with a frosted lens keeps water out of the housing. Aim for 3000K color temperature and about 650 lumens per fixture. Wire them to the same switch as your exhaust fan so they always turn on together — you will never forget to ventilate.
Watch Out
- "Damp-rated" is not the same as "wet-rated." Inside a shower stall requires a wet-rated fixture
- If your shower ceiling is sloped, use an adjustable gimbal trim to aim the beam straight down
- Keep the fixture at least 12 inches away from the shower head to avoid direct water spray on the lens
We picked a few things that go well with this idea: KEONJINN Backlit LED Mirror 36x28 with Defogger (★4.6), TokeShimi LED Mirror 48x36 Front+Backlit (★4.5) and TETOTE Backlit LED Mirror 24x32 (3 Color Temps) (★4.5). As an Amazon Associate we earn from qualifying purchases.
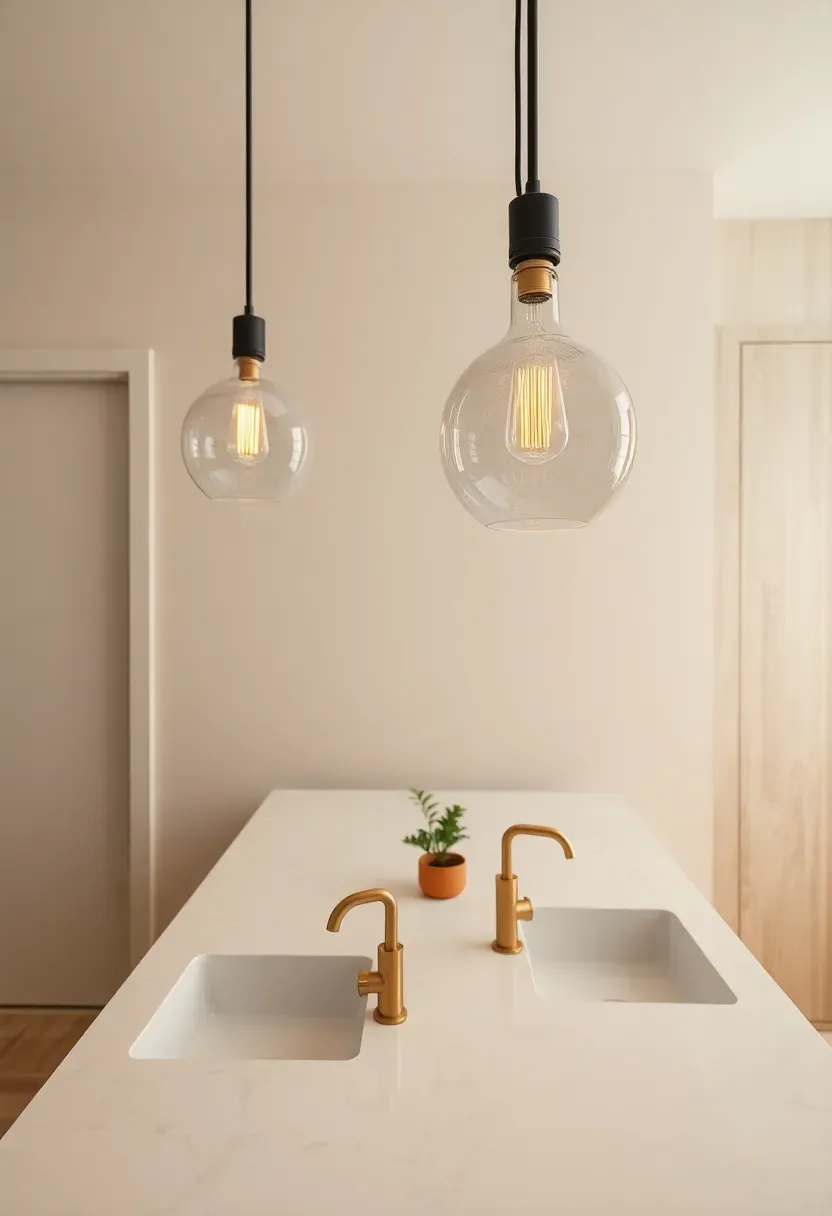
4. Pendant Lights Over a Double Vanity
Pendants bring a decorative element that recessed cans and vanity bars cannot match. Hanging one pendant above each sink basin creates two defined task zones along a shared countertop. Clear or lightly tinted glass shades keep the look open and let you see the bulb, which becomes part of the fixture's design. Stagger the hanging heights by 2-3 inches for a less rigid, more collected appearance.
Tips
- Bottom of the pendant should sit 28-34 inches above the countertop to avoid head clearance issues
- Use globe bulbs (G25 or G30) for a softer look than standard A19 shapes
- Confirm the pendant's canopy will cover your existing junction box — bathroom boxes are sometimes smaller than standard
Recommended
Items for this idea
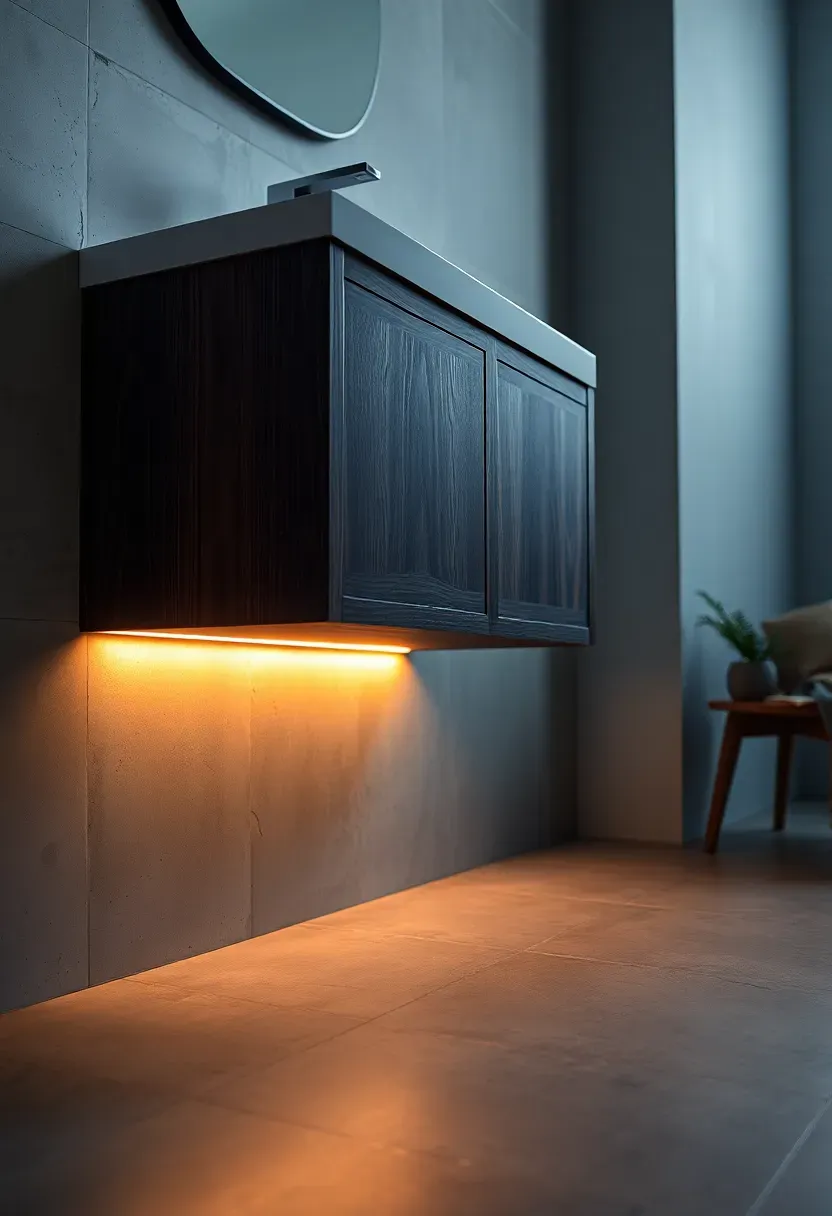
5. LED Strip Under a Floating Vanity
This is one of the simplest upgrades on the list. Adhere a strip of warm-white LEDs to the underside of a wall-mounted vanity and plug the transformer into the outlet behind the cabinet. The result is a soft glow along the floor that serves double duty: it works as a night light for middle-of-the-night trips and it makes the vanity appear to float, which visually opens up a tight floor plan.
Tips
- Choose IP65-rated strips so humidity does not corrode the adhesive backing over time
- Warm white (2700K) reads as ambient and calm; cool white (4000K+) will feel clinical at floor level
- Hide the transformer inside the vanity cabinet rather than leaving it visible on the floor
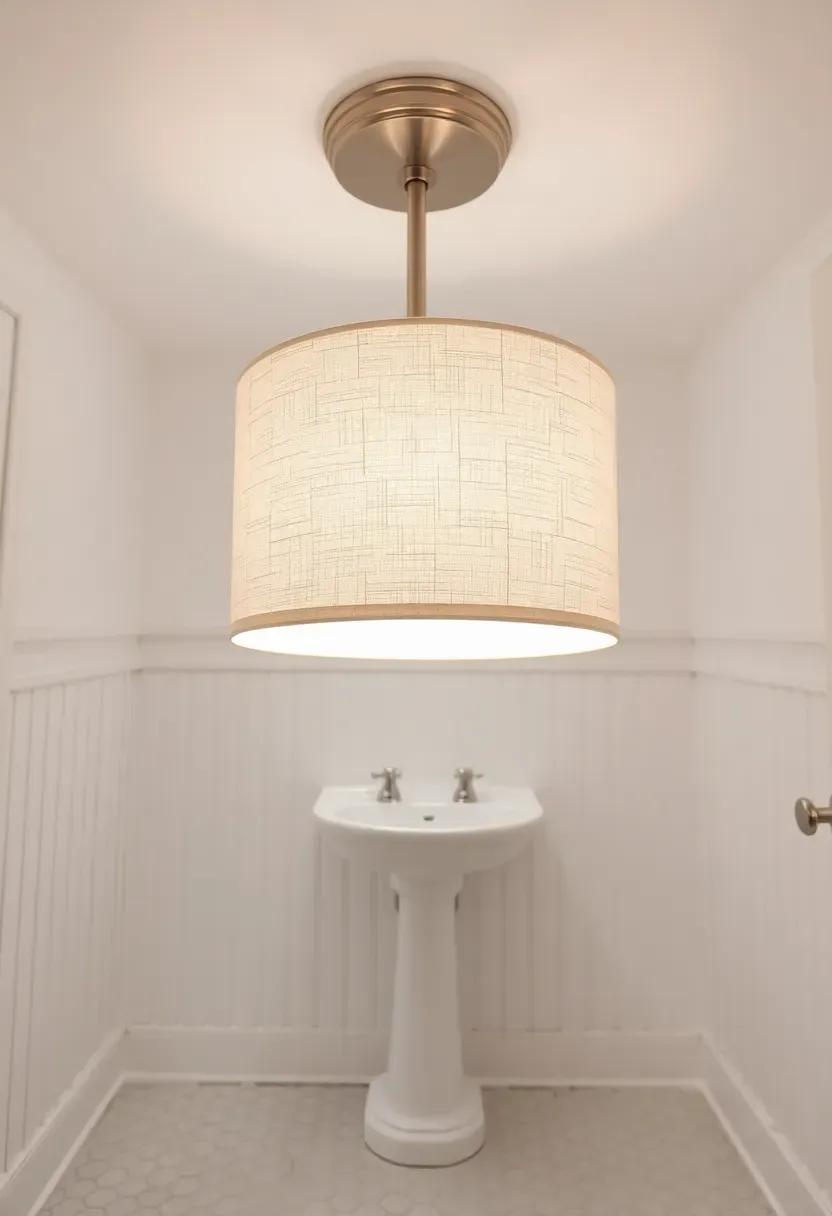
6. Flush Mount Drum Shade
The Case for a Drum Shade
Flush mount fixtures with fabric drum shades soften overhead light in a way that bare glass or exposed-bulb fixtures do not. The linen or cotton diffuses the bulb output across the entire shade surface, creating an even wash rather than a focused beam. This matters in bathrooms with lighter finishes — white tile, white counters, chrome hardware — where a bare bulb can produce uncomfortable glare.
How to Choose the Right Size
Pick a drum diameter that is roughly one-third the width of the room. A 5-foot-wide powder room wants a 14-16 inch shade. A 10-foot primary bathroom can handle a 24-inch drum without looking oversized.
Pros and Cons
- Pro: Fabric shades hide dust and minor discoloration better than clear glass
- Pro: Easy to swap the shade if you want a different color or texture later
- Con: Not suitable directly above a shower — moisture will stain the fabric over time
Recommended
Items for this idea
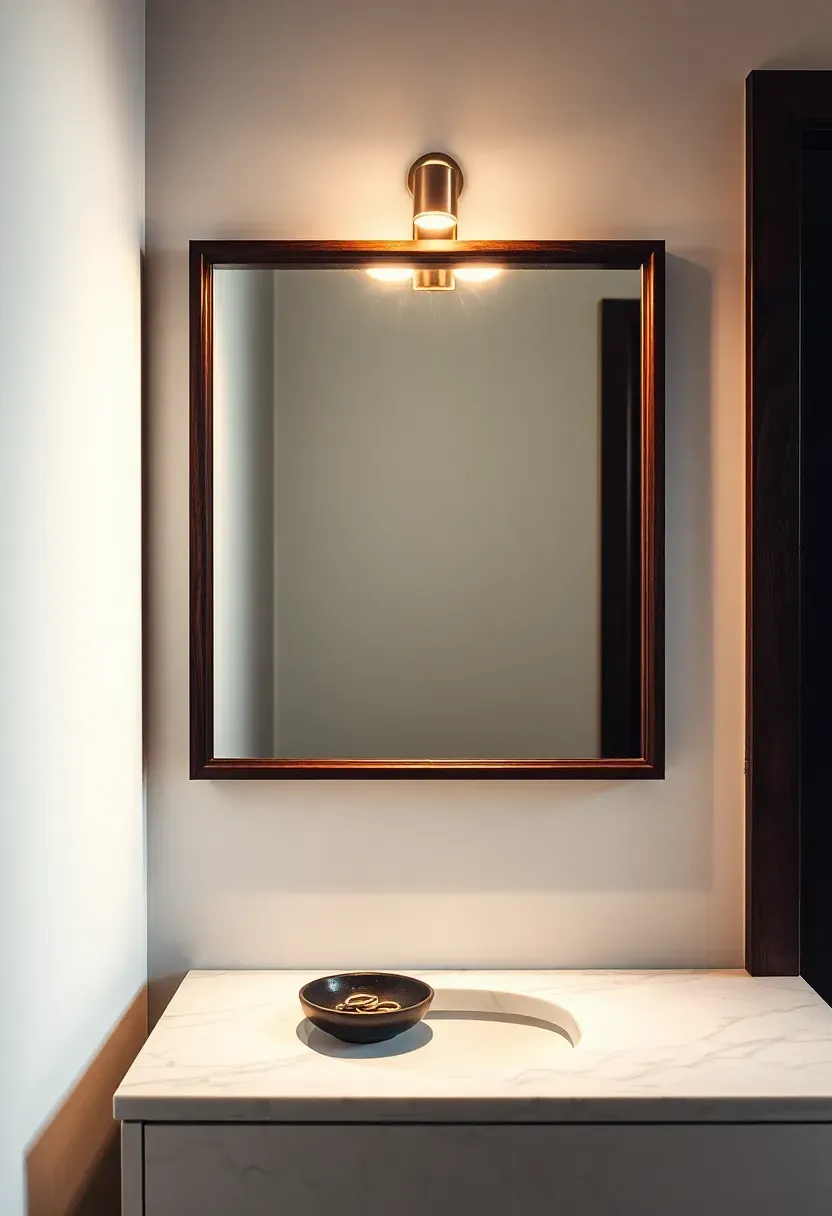
7. Picture Light Above the Mirror
Picture lights are designed to aim a narrow beam downward, which is exactly what a vanity mirror needs. A slim brass or matte black picture light mounted on the wall 3-4 inches above the mirror frame provides direct, focused illumination on your face without lighting up the entire room. It works especially well in powder rooms where you want a moody, intimate feel rather than bright clinical light.
Tips
- Choose a picture light as wide as or slightly wider than the mirror for even coverage
- LED picture lights run cool, which matters when mounted close to a wall surface
- Pair it with a dimmer so you can drop the intensity for evening guests
8. Wet-Rated Recessed Can Layout
How to Plan the Grid
A common mistake is placing one recessed can in the center of the ceiling and calling it done. That creates a single bright spot surrounded by dim edges. Instead, space 4-inch recessed cans every 3-4 feet in a grid pattern. For a typical 8x10 bathroom, that means four to six fixtures drawing 8-10 watts each — less total energy than a single old vanity bar.
Step by Step
- Measure the room and sketch the ceiling on graph paper. Mark the vanity, toilet, and shower zones.
- Place the first row of cans 18-24 inches from the vanity wall so light falls on your face, not the back of your head.
- Space remaining cans evenly, keeping them at least 12 inches from any wall to avoid scalloping.
- Wire the shower zone cans separately so you can control them with an independent switch.
Watch Out
- Use IC-rated housings if you have insulation above the ceiling — non-IC cans create a fire risk
- Retrofit LED modules fit into existing 4-inch and 6-inch housings, so you may not need new wiring
Recommended
Items for this idea
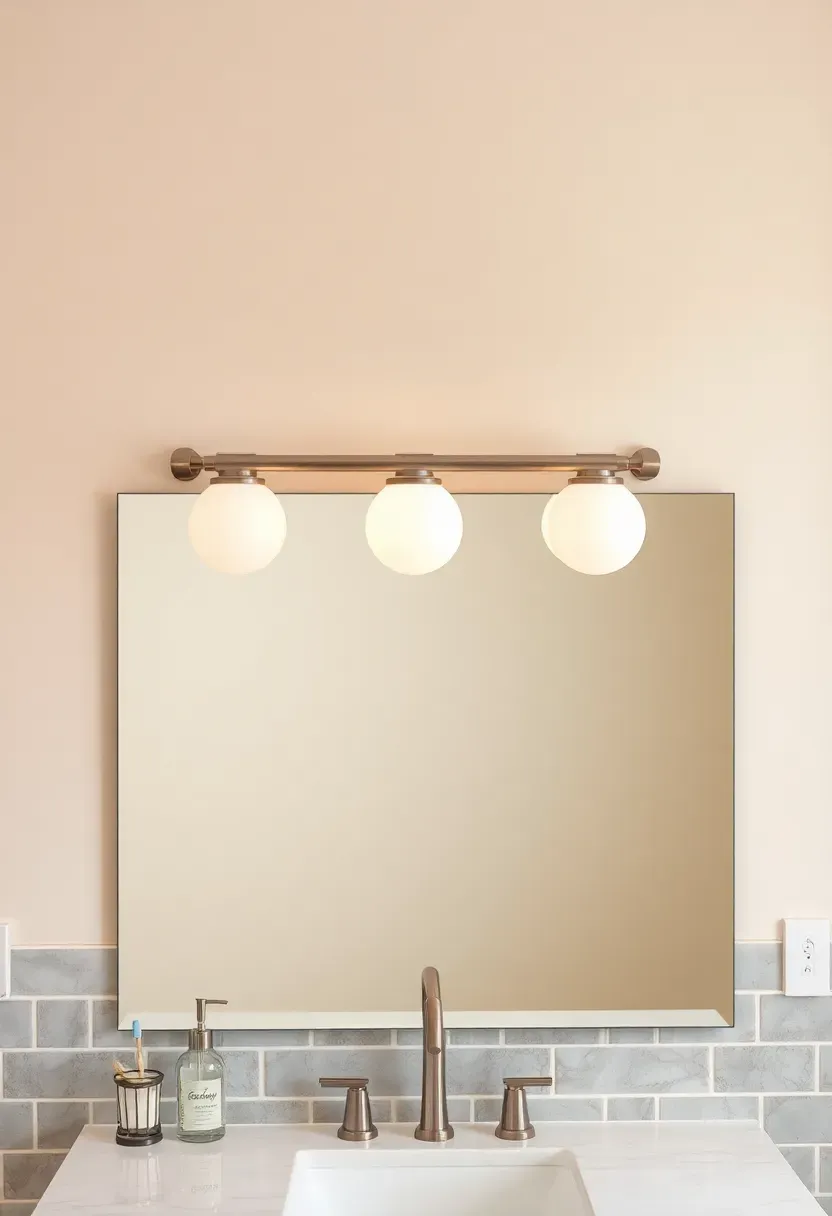
9. Frosted Globe Vanity Bar
The classic three-globe vanity bar gets dismissed as boring, but updated versions with frosted opal glass and thinner mounting hardware look significantly better than the builder-grade models from the 1990s. Frosted globes scatter light more evenly than clear glass, reducing the harsh shadows that make bare-bulb bars unflattering. Mount the bar above the mirror only if side-mounting sconces is not possible — above-mirror placement is the second-best option, not the ideal one.
Tips
- Replace standard A19 bulbs with G25 globe bulbs for a cleaner look behind frosted glass
- Keep the bar length within 2-3 inches of the mirror width so it does not look undersized or oversized
- Three globes suit mirrors up to 36 inches wide; go with four globes for mirrors 42 inches and wider
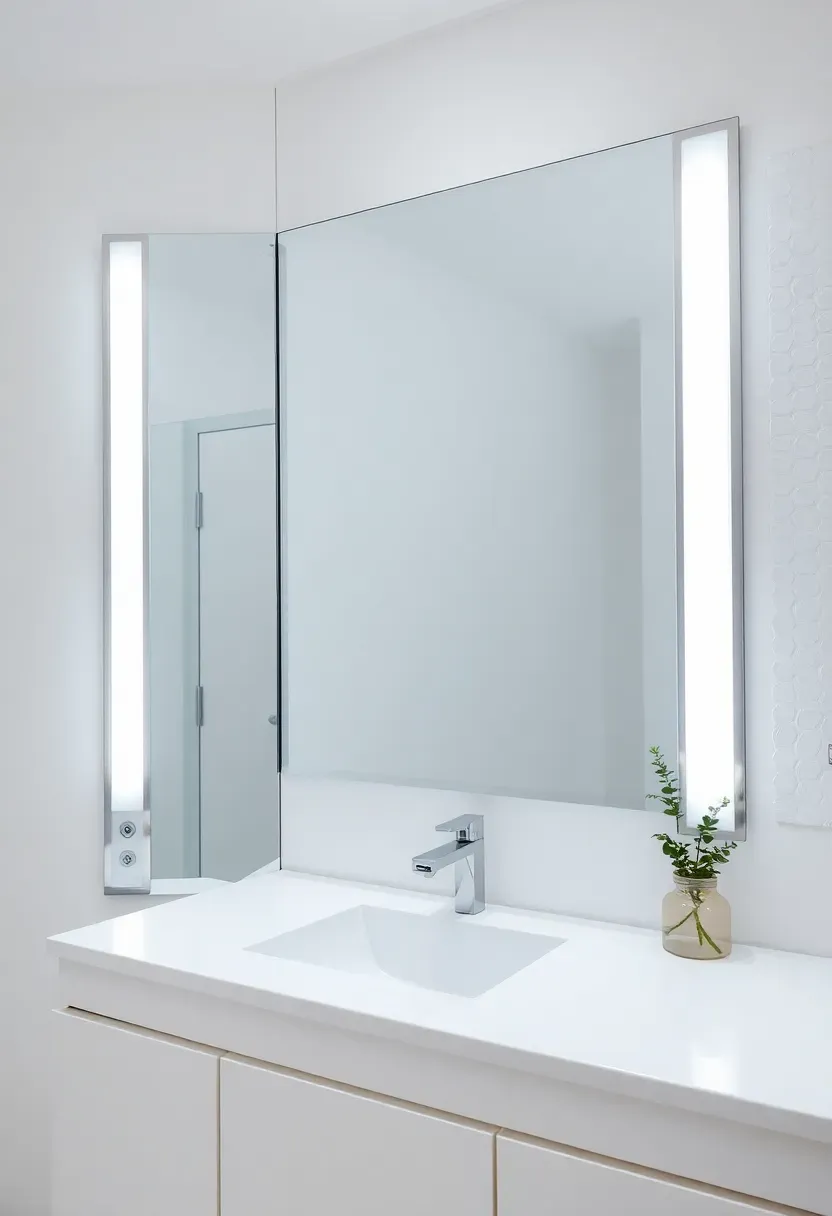
10. Vertical LED Vanity Strips
Vertical LED strips mounted on the wall beside a frameless mirror mimic the effect of flanking sconces without the bulk of a traditional fixture. The continuous light line eliminates the gap between individual bulbs, producing shadow-free illumination across your face. This setup is popular in European hotel bathrooms for a reason — it looks clean, takes up almost no wall space, and works at any mirror width.
Tips
- Use aluminum channels with frosted diffuser covers to hide individual LED diodes and prevent glare
- Mount the strips so they extend from about 60 inches to 78 inches above the floor for full face coverage
- Choose strips with a CRI above 90 for accurate skin tone rendering
Recommended
Items for this idea
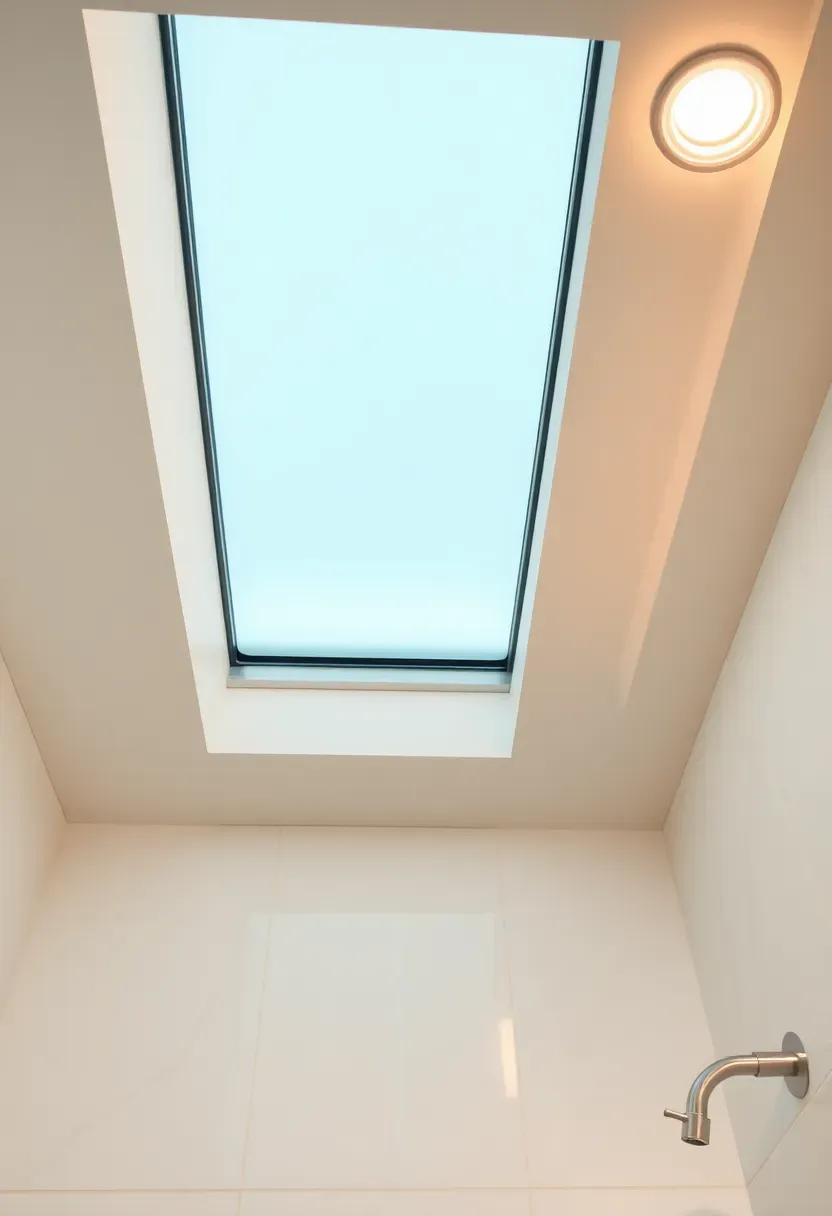
11. Skylight Combined With Warm Downlights
The Best of Both Worlds
Natural light from a skylight makes any bathroom feel larger and more connected to the outdoors. But skylights are useless after sunset and can make the room feel cold on overcast days. Flanking the skylight with two warm-toned recessed fixtures (2700K) gives you the best daytime quality from the sun and a smooth transition to comfortable artificial light in the evening.
How to Balance the Two
During the day, the recessed cans stay off or at 10-15% via a dimmer. As daylight fades, a photocell sensor or smart dimmer gradually increases the artificial light. The result feels seamless — no abrupt switch from bright natural light to harsh overhead glare.
Apply at Home
- Tubular skylights (sun tunnels) work in bathrooms where a traditional skylight is not structurally possible
- Position the recessed cans 18-24 inches from the skylight edge to blend the two light sources
- Frosted skylight glazing prevents direct sun beams that create harsh contrast with tile surfaces
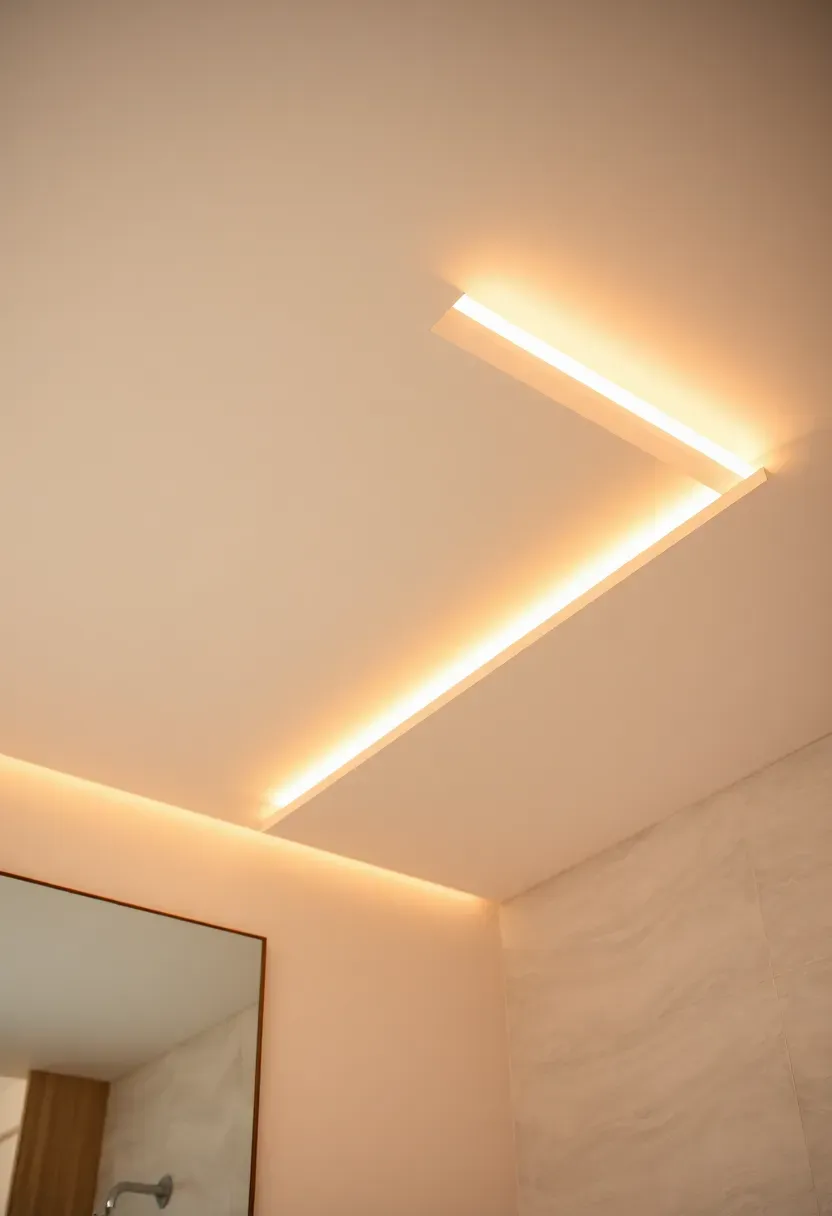
12. Cove Lighting Around the Ceiling
Cove lighting hides LED strips inside a recessed ledge or soffit near the ceiling, bouncing light off the ceiling surface for an indirect, diffused glow. The effect is a room that feels evenly lit without any visible fixture. In bathrooms with low ceilings (8 feet or under), cove lighting tricks the eye into perceiving more height because the brightest area is at the top of the room, drawing attention upward.
Tips
- Build the cove ledge 4-6 inches below the ceiling and 4 inches deep to hide the LED strip from any viewing angle
- Use tunable white strips (2700K-5000K) so you can shift from warm evening mode to bright grooming mode
- A continuous run of LED tape looks better than individual puck lights in a cove — no scalloping or dark gaps
Recommended
Items for this idea
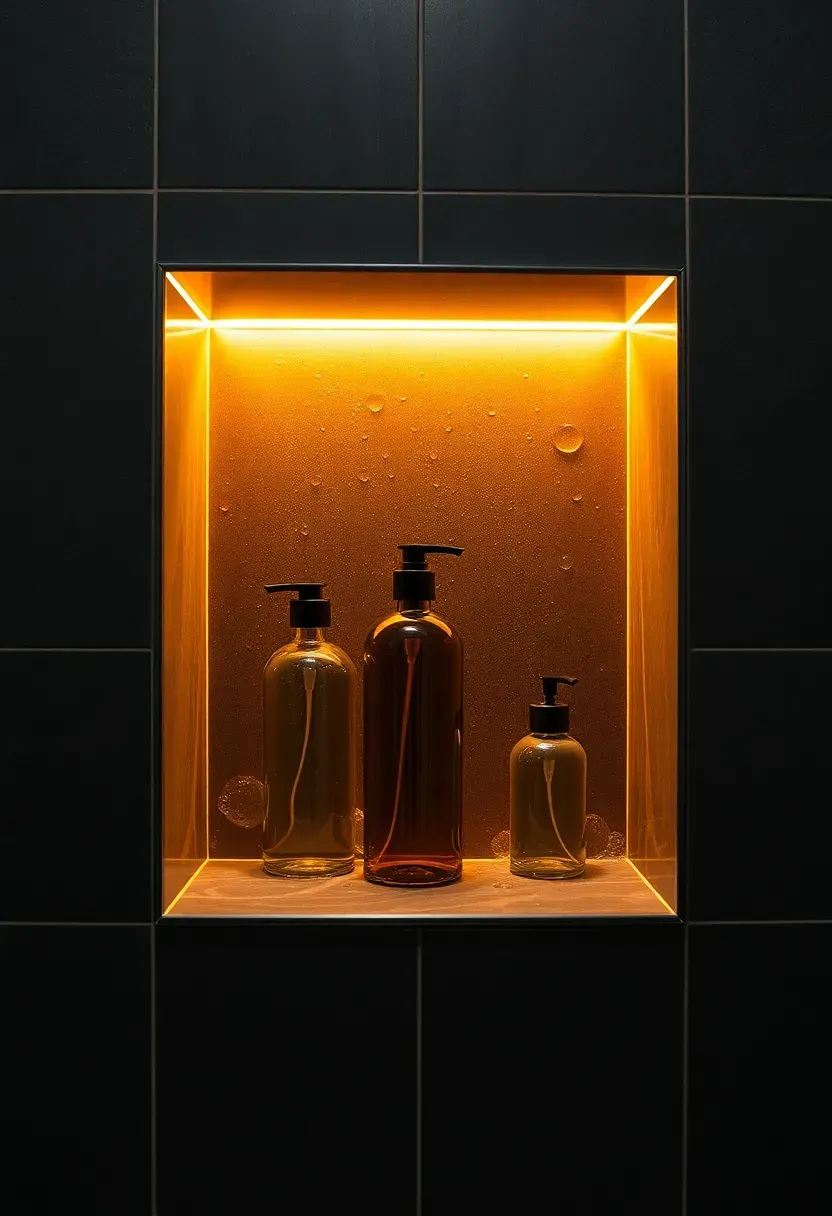
13. Illuminated Niche in the Shower
A recessed niche for shampoo and soap becomes a design feature when you add a waterproof LED strip along its top edge. The light bounces off the back wall of the niche and illuminates whatever you have stored there, making it easy to find the right bottle in a steamy shower. It also creates a warm glow that adds visual interest to an otherwise plain tile wall.
Tips
- Use IP67-rated LED strips — IP65 handles splashes but not the direct water contact that happens inside a shower
- Warm white (2700K-3000K) looks best against natural stone or warm-toned tile; neutral white (3500K) suits gray and blue tile
- Recess the strip behind a small tile lip at the top of the niche so it is invisible from the shower floor
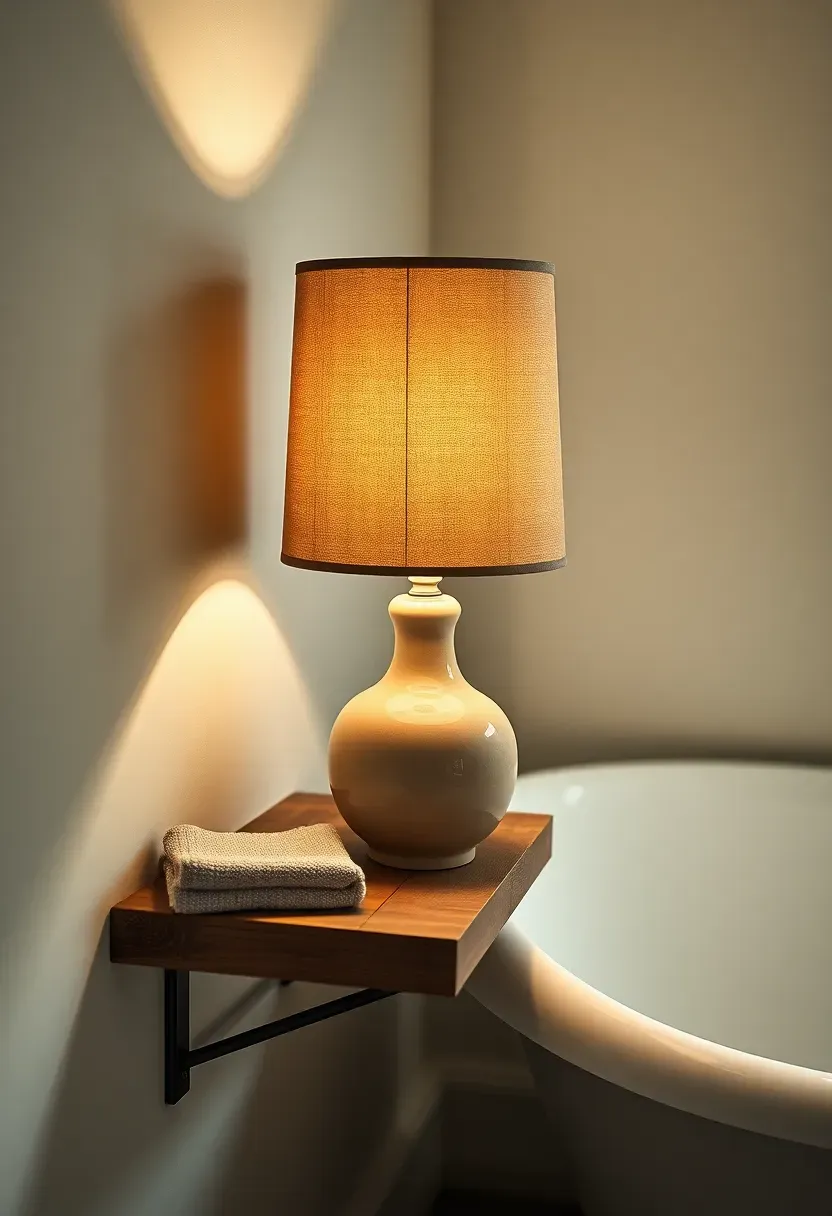
14. Freestanding Lamp on a Bathroom Shelf
Why It Works
Putting a small table lamp in a bathroom feels unexpected, and that is exactly why it works. A ceramic or glass-base lamp on a sturdy shelf near the tub or on a wide windowsill adds the kind of warm, intimate light that overhead fixtures cannot replicate. It makes the space feel more like a room you actually want to spend time in rather than a purely utilitarian box.
Choosing the Right Lamp
Keep the scale small — a lamp taller than 18 inches will look out of proportion on most bathroom shelves. A linen or cotton shade softens the light. Avoid paper shades, which will warp in humid air within weeks.
Pros and Cons
- Pro: No wiring or installation needed — plug it in and you are done
- Pro: Easy to move or replace if your taste changes
- Con: Must be kept away from direct water contact — not suitable next to an open shower
Recommended
Items for this idea
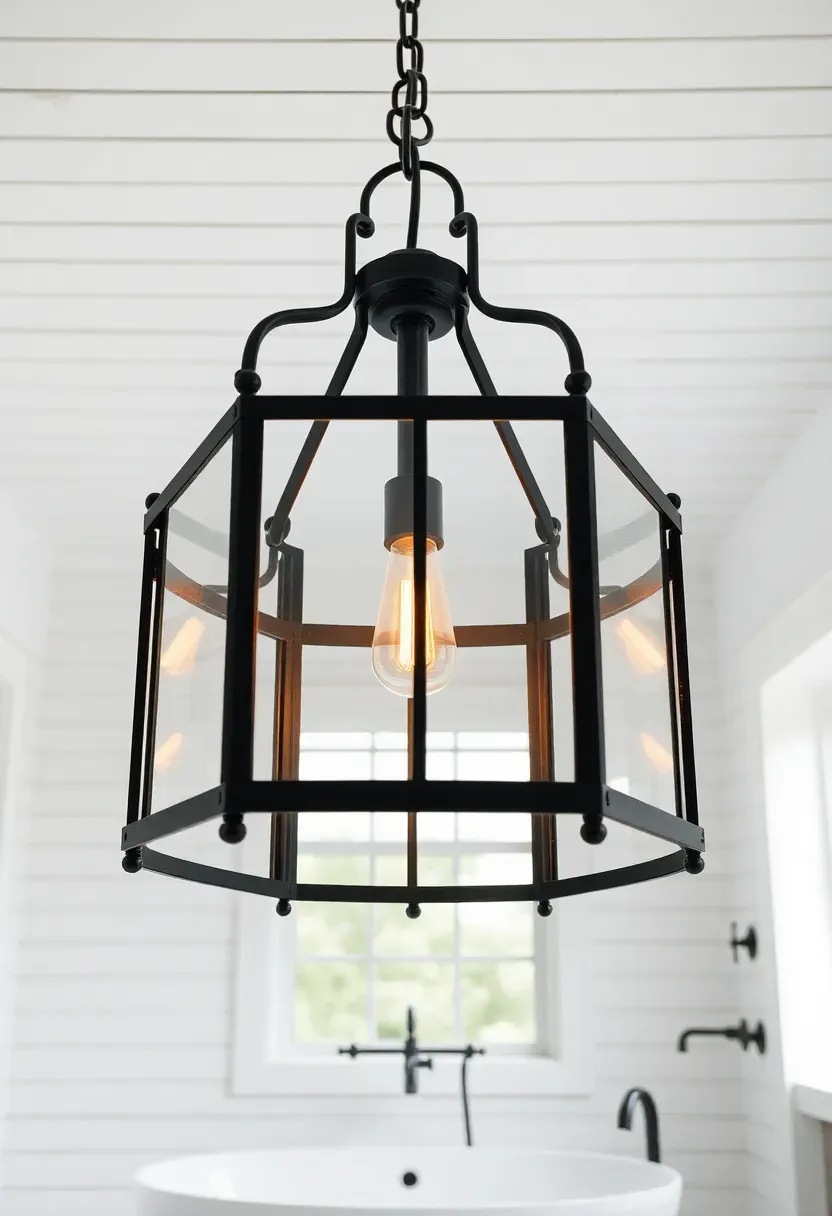
15. Oversized Lantern Pendant
A lantern pendant works in bathrooms with ceilings 9 feet or higher, where the fixture has room to hang without feeling cramped. The open frame lets light escape in all directions, providing decent ambient coverage while the shape itself reads as architectural rather than purely decorative. Black metal frames pair well with white tile and brass fittings. Aged brass or patina finishes lean more traditional.
Tips
- Size the lantern so its width is about one-quarter of the room's shortest wall dimension
- Hang it at least 84 inches from the floor to maintain clearance
- Use a candelabra-base LED bulb inside — they produce less heat and last longer in an enclosed pendant

16. Medicine Cabinet With Built-In Lights
The Problem
Standard medicine cabinets are dark inside. You open the door and squint at a shelf full of identical-looking bottles. Adding a battery-powered puck light helps, but it dies fast and the adhesive fails in humid conditions within a few months.
The Solution
Modern recessed medicine cabinets now come with integrated LED lighting on the interior shelves and along the mirror edges. The lights activate automatically when you open the door. Higher-end models include an outlet inside the cabinet for charging electric toothbrushes or razors, keeping those items hidden and powered.
Pros and Cons
- Pro: Combines storage, mirror, and vanity lighting into one recessed unit — saves wall space
- Pro: Interior lights make it easy to find small items without pulling everything out
- Con: More expensive than a basic cabinet — expect to spend $300-800 for a quality unit with integrated lighting
Recommended
Items for this idea
17. Toe-Kick Night Light
A warm LED strip tucked under the vanity toe-kick provides just enough light to navigate the bathroom at 3 AM without turning on the overhead fixture and shocking your eyes awake. Wire it to a motion sensor so it activates when you step through the doorway and shuts off 90 seconds after you leave. Your sleep cycle will thank you.
Tips
- Warm amber (2200K) disturbs circadian rhythm less than standard warm white (2700K)
- Use a motion sensor rated for low-voltage LED circuits — not all standard occupancy sensors are compatible
- If hardwiring is not an option, rechargeable USB-powered motion sensor strips mount with adhesive and last 2-3 months per charge
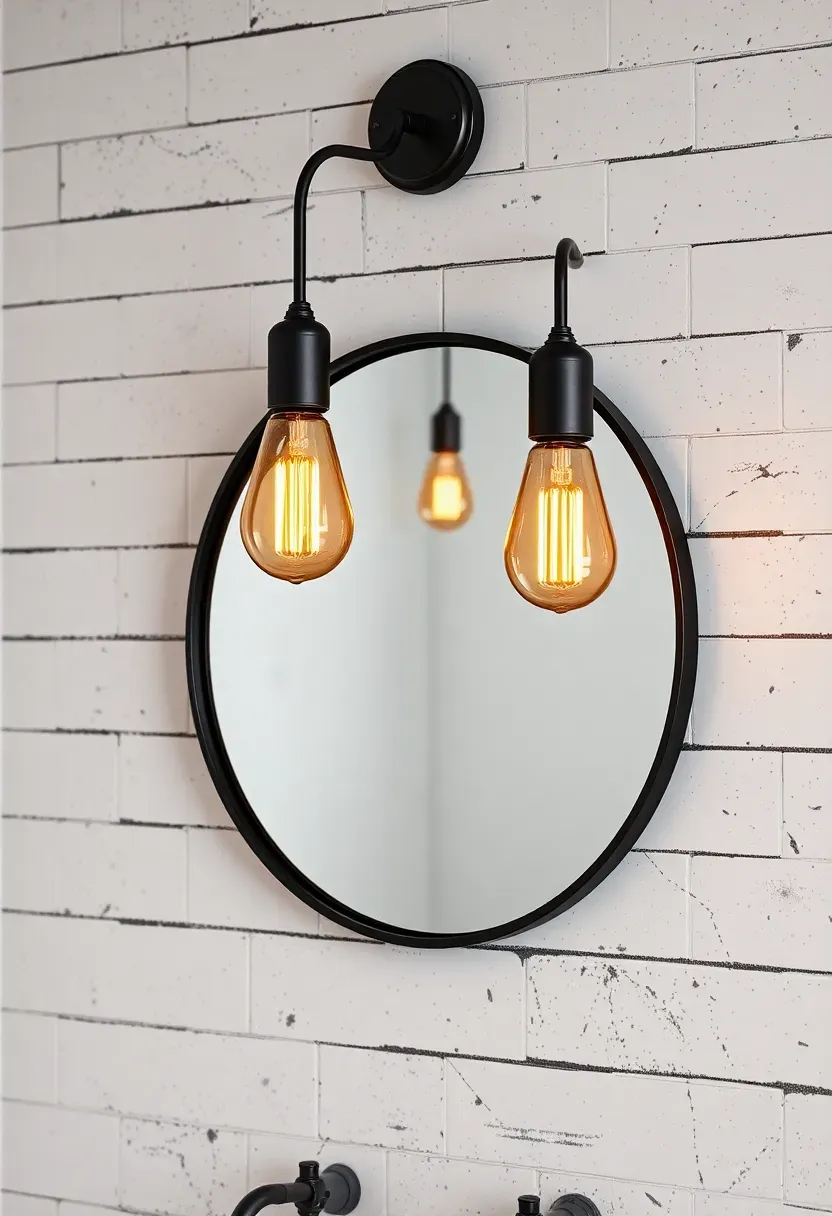
18. Black Metal Industrial Sconces
Matte black sconces with exposed hardware — visible screws, cage shades, or articulated arms — bring an industrial edge that contrasts well with softer bathroom materials like marble, ceramic, and linen. They work in loft-style apartments, converted warehouses, and any bathroom where you want the fixtures to feel intentional rather than invisible.
Tips
- Pair with a round mirror to soften the angular lines of the fixture
- Edison-style filament bulbs complete the industrial look but produce less light — supplement with recessed cans if the room needs more brightness
- A matte black finish hides water spots and toothpaste splatter better than polished chrome or brass
Recommended
Items for this idea
19. Window Film Plus Track Lighting
The Setup
Bathrooms with large windows face a dilemma: you want the daylight but you need privacy. Frosted or patterned window film solves the privacy problem while still allowing about 80% of natural light through. But film reduces the light's directionality — it enters the room as a diffuse wash rather than a clear beam. Adding a track light system on the ceiling lets you aim adjustable heads at the vanity, mirror, or any dark corner that the softened daylight does not reach.
Step by Step
- Apply window film to the lower two-thirds of the window, leaving the top clear for maximum light and sky views.
- Mount a 4-foot track light rail parallel to the vanity wall on the ceiling.
- Attach 3-4 adjustable heads and aim them at the mirror area, shower entry, and any artwork or shelving.
Watch Out
- Choose LED track heads rated for damp locations if the track is within 6 feet of a water source
- Avoid aiming a track head directly at the mirror — it will reflect the bright spot back into your eyes
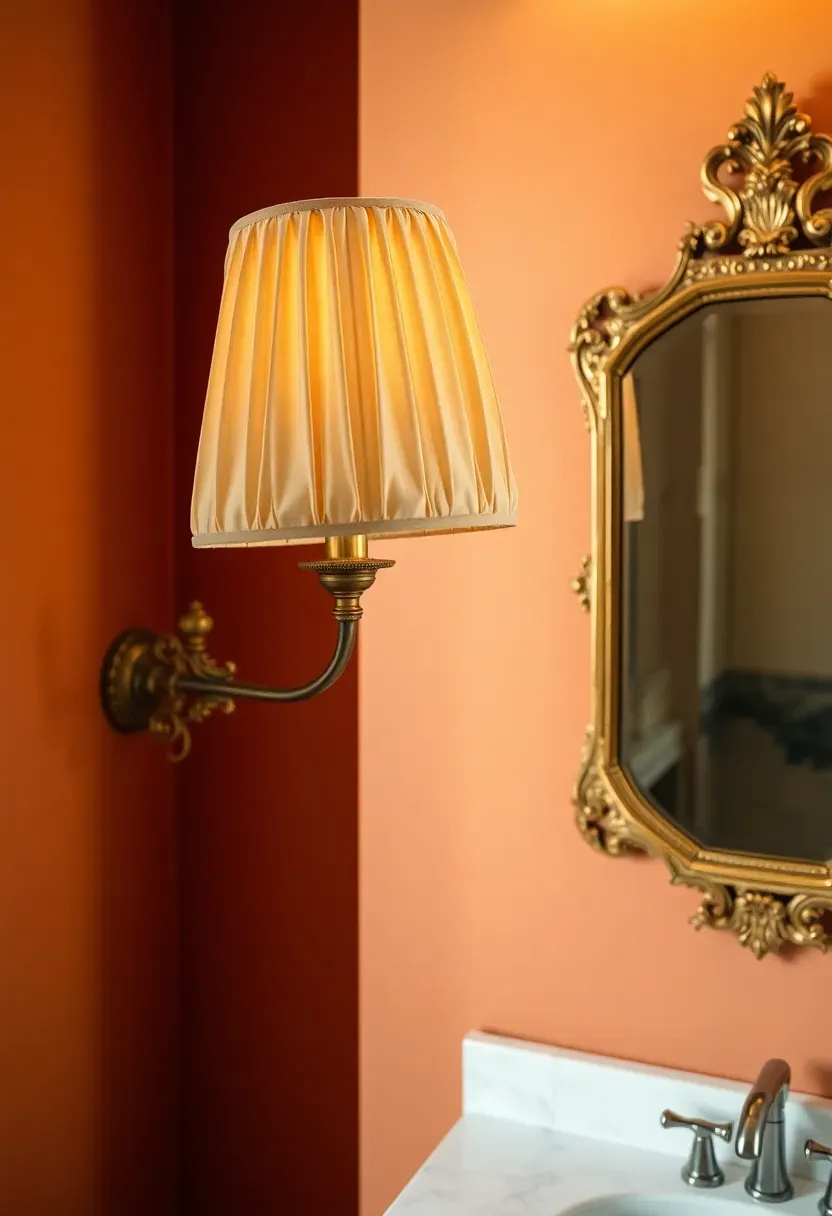
20. Vintage Brass Swing-Arm Sconce
A swing-arm sconce adjusts — you can pull it closer to the mirror when you need detail light and push it back against the wall the rest of the time. Vintage brass versions, especially those with a patina or unlacquered finish that ages naturally, add character that brand-new fixtures cannot match. Check architectural salvage shops, estate sales, and online vintage dealers before buying a reproduction.
Tips
- Rewire any true vintage fixture with new UL-listed components before installing in a bathroom
- A pleated or gathered fabric shade softens the light and adds texture that pairs well with brass
- Mount the sconce so the arm swings inward toward the mirror, not outward toward the door
Recommended
Items for this idea
21. Layered Scheme for a Small Bathroom
Ambient Layer
Start with two 4-inch recessed cans on the ceiling, spaced evenly across the room. These provide baseline light so no corner feels dark. Put them on a dimmer.
Task Layer
Add one sconce on each side of the mirror at eye level. These handle grooming and shaving. Keep them at 3000K for good color accuracy.
Accent Layer
Tuck a warm LED strip (2700K) under the vanity toe-kick or inside a shower niche. This adds depth and visual interest without increasing the brightness level. It also doubles as your night light.
The Result
Three separate light sources on two or three switches give you full control. Bright morning grooming mode, relaxed evening bath mode, and minimal night mode — all in a bathroom that might only be 40 square feet.
Quick FAQ
Do bathroom lights need to be rated for moisture? Yes. Any fixture within 3 feet of a water source (shower, tub, sink) should be damp-rated at minimum. Fixtures inside a shower or directly above a tub must be wet-rated. The rating is printed on the fixture or its packaging — look for "Suitable for Wet Locations" or the UL damp/wet label.
What color temperature works best for a bathroom? 2700K-3000K covers most situations well. It is warm enough to feel comfortable but not so warm that colors look distorted. If you do detailed makeup work, lean toward 3000K or even 3500K for more accurate color rendering. Avoid 5000K and above — it looks harsh in a small tiled room.
Can I install bathroom lighting myself? Replacing a fixture on an existing circuit is a straightforward DIY project if you are comfortable turning off the breaker and connecting wires. Adding new circuits, moving junction boxes, or wiring inside a shower should be done by a licensed electrician — water and electricity require professional-grade waterproofing.
How many lumens does a bathroom need? A rough guideline is 40-50 lumens per square foot for ambient light, plus 150-200 lumens per linear foot of vanity for task lighting. A 50 square foot bathroom needs about 2000-2500 total lumens from all sources combined.
Are LED bulbs worth the higher upfront cost? An LED bulb rated at 15,000 hours costs about $3-5 and replaces roughly 10-12 incandescent bulbs over its lifetime. In a bathroom where lights run 2-3 hours daily, one LED lasts about 15 years. The energy savings alone pay for the bulb within the first year.
Bathroom lighting is not complicated, but it does require thinking in layers rather than relying on a single fixture to do everything. Start with whatever bothers you most — usually the vanity area — and work outward from there. A pair of sconces at the mirror plus a dimmer on the overhead fixture gets you 80% of the improvement for about 20% of the cost of a full lighting overhaul. The remaining ideas on this list are for when you are ready to go further.
Pinterest cover for 21 Bathroom Lighting Ideas That Actually Work
About the author
OBCD
CGI visualization and interior design content. We create detailed 3D renders and curate practical design ideas for every room in your home.