19 Backyard Decor Ideas That Actually Look Good
Most backyard decorating advice falls into two camps: spend thousands on a landscape architect, or scatter some solar lights and call it done. Neither approach serves the person who wants a yard that feels intentional without requiring a second mortgage. The ideas here sit in the middle ground — they involve real materials, specific placement strategies, and results that hold up through a full season of weather and use. Some take an afternoon, others a weekend, but none demand professional crews or permits.
Here are 19 approaches that go beyond "add a string light" territory.
Table of Contents
- Gravel Conversation Circle
- Oversized Planter Groupings
- Lantern-Lined Pathway
- Hammock Corner with Side Table
- Weathered Wood Privacy Screen
- Sunken Fire Bowl Area
- Climbing Vine Archway
- Moroccan Tile Accent Table
- Layered Outdoor Rug Setup
- Stone Water Basin Fountain
- Hanging Planter Wall
- Bench Built Around a Tree
- Copper Candle Cluster Display
- Drift Wood Sculpture Corner
- Raised Herb Garden Border
- Woven Basket Light Shades
- Painted Cinder Block Planter Wall
- Outdoor Mirror on a Fence
- Mixed-Material Dining Setup
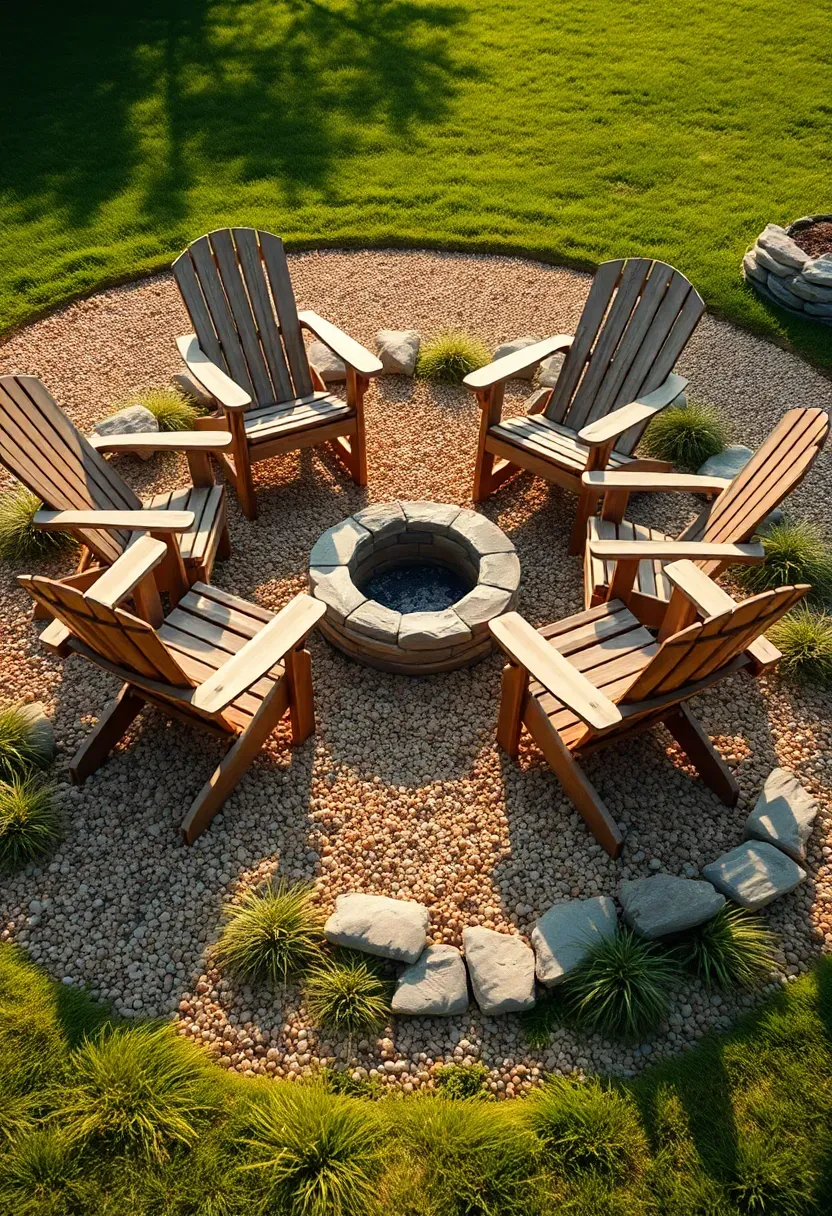
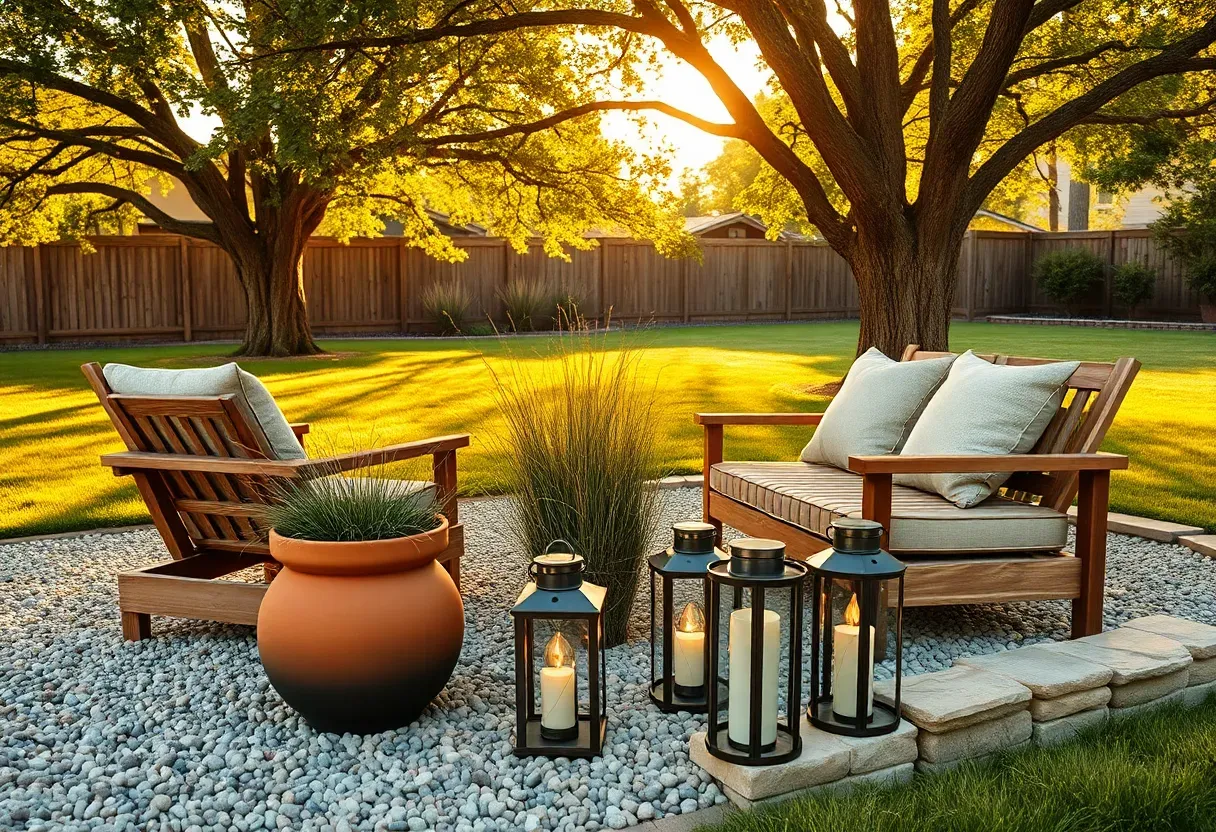
1. Gravel Conversation Circle
Forget the standard rectangle patio slab. A circular gravel pad creates a gathering spot that feels organic and costs a fraction of poured concrete. Spread three to four inches of pea gravel over landscape fabric within a border of stacked fieldstone or steel edging. Center it around a low fire ring or a wide ceramic pot. Four chairs angled inward give you seating for eight when you add a couple of stools. The crunch underfoot, the informal shape, the way it nestles into the lawn — it reads as deliberate without looking overbuilt.
Getting the Edge Right
- Steel landscape edging holds a clean circle better than plastic — spring for 14-gauge
- Set the gravel level one inch below the edging top so stones stay contained
- A three-foot radius per chair keeps spacing comfortable without sprawling
We picked a few things that go well with this idea: NEEDOMO Bronze Metal Lanterns (Set of 3) (★4.4), Black Metal Lanterns Set of 3 (★4.7) and Solar Garden Lanterns Outdoor (2-Pack) (★4.5). As an Amazon Associate we earn from qualifying purchases.
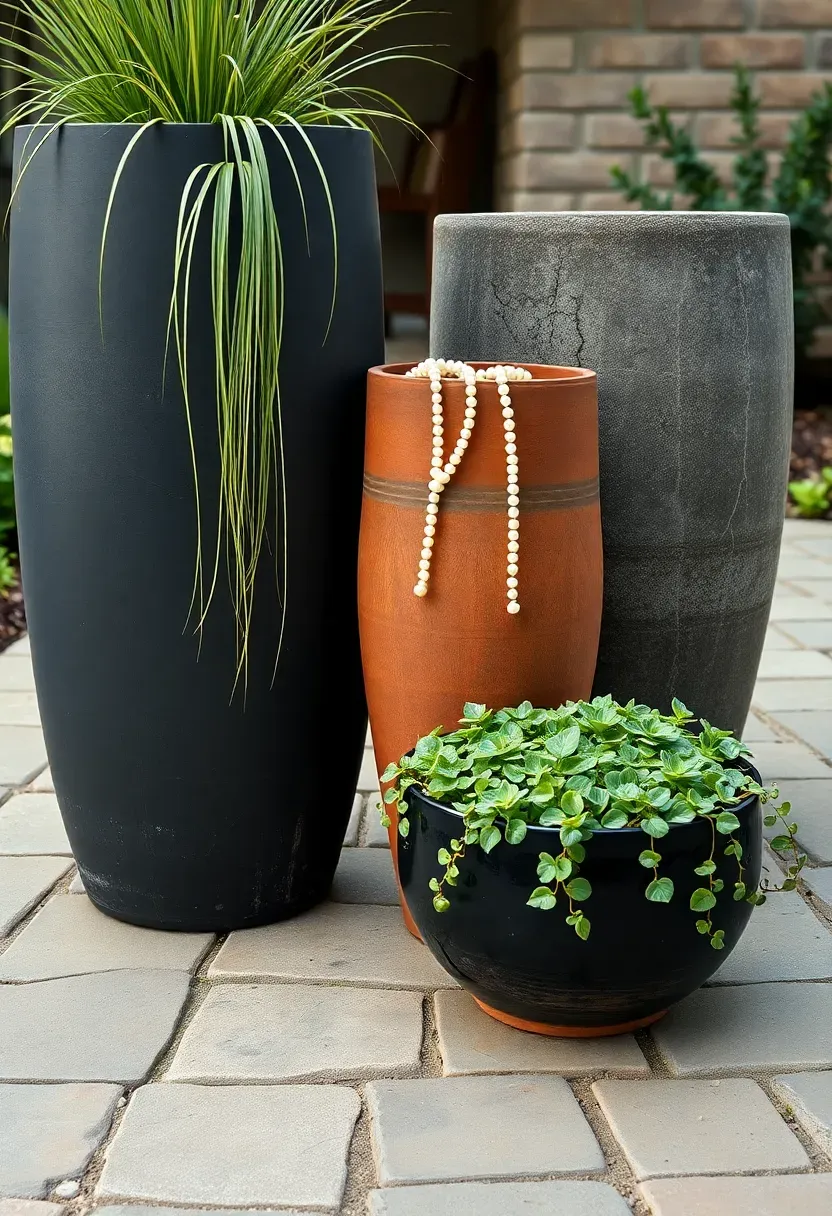
2. Oversized Planter Groupings
The Problem with One Pot
A single planter on a patio looks like it wandered away from a garden center display. It lacks weight. Grouping three to five pots of different heights but a shared color family gives you the visual mass that anchors a corner or frames an entryway. Pick vessels at least eighteen inches in diameter — anything smaller reads as an afterthought outdoors where scale shifts dramatically.
How to Arrange Them
Odd numbers work because they resist symmetry. Place the tallest pot at the back, stagger two medium pots at angles, and tuck a low bowl in front. Plant the tall pot with something vertical like fountain grass. Use trailing sedum or creeping jenny in the bowl so greenery spills onto the paving. Keep soil types consistent across the group for easier watering.
We picked a few things that go well with this idea: LuxenHome Large Green Ceramic Planter (★5.0), Kante Round Concrete Planter Bowl (20") (★4.3) and Worth Tall Stone Finish Planters (Set of 2) (★4.7). As an Amazon Associate we earn from qualifying purchases.
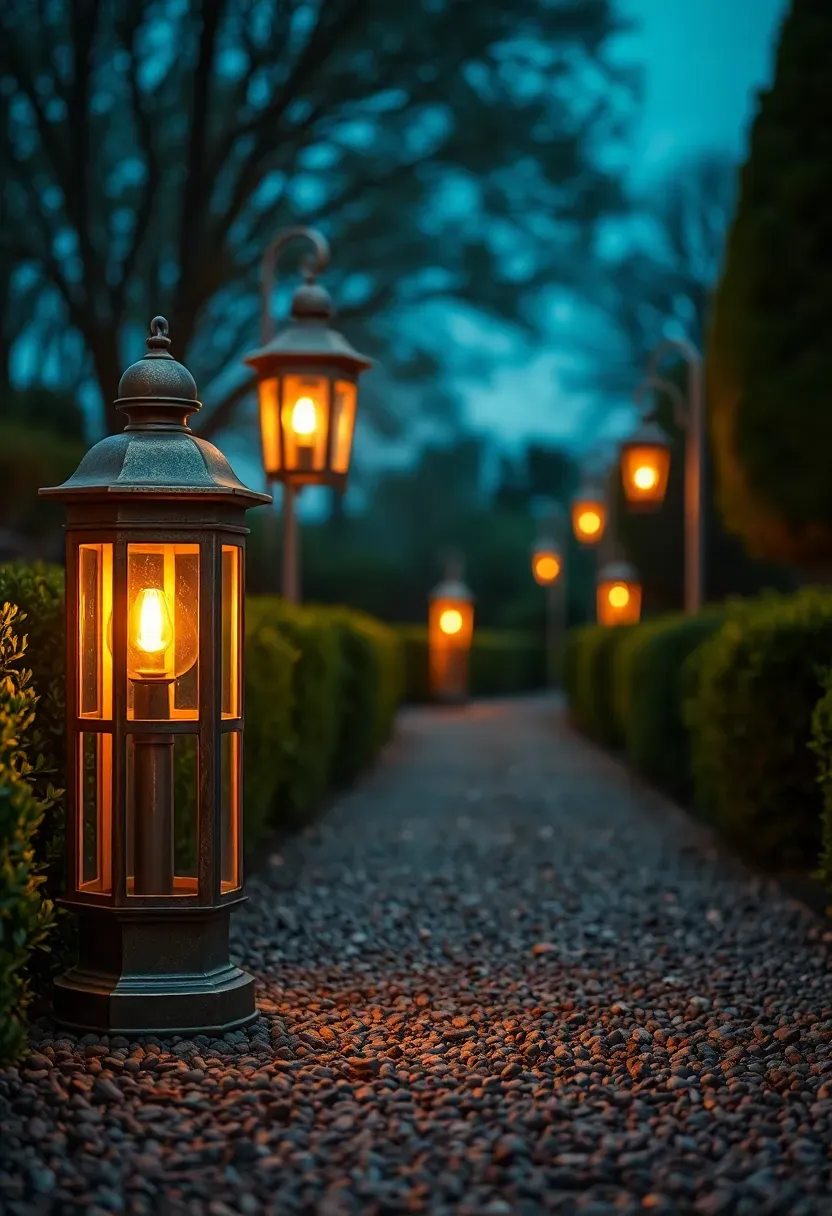
3. Lantern-Lined Pathway
There is something about a lit path that makes a backyard feel twice its size after dark. Metal lanterns — not plastic, not resin — placed every four to five feet along a walkway create rhythm and warmth that overhead fixtures cannot match. Use battery-operated LED candles rated for outdoor use so you skip the wiring entirely. Vary the lantern heights by placing some directly on the ground and others on flat stones or low brick stacks.
Practical Notes
- Brass and powder-coated steel weather best; avoid untreated iron that rusts through in one season
- Group two lanterns together occasionally to break the predictable alternating pattern
- For paths wider than three feet, stagger lanterns on alternating sides instead of lining both edges
We picked a few things that go well with this idea: KOL Heavy-Duty Steel Fire Pit Bowl (35.5") (★4.7), Steel Fire Pit Bowl with Spark Screen (35") (★4.7) and KOL Steel Fire Pit Bowl (27.5") (★4.7). As an Amazon Associate we earn from qualifying purchases.
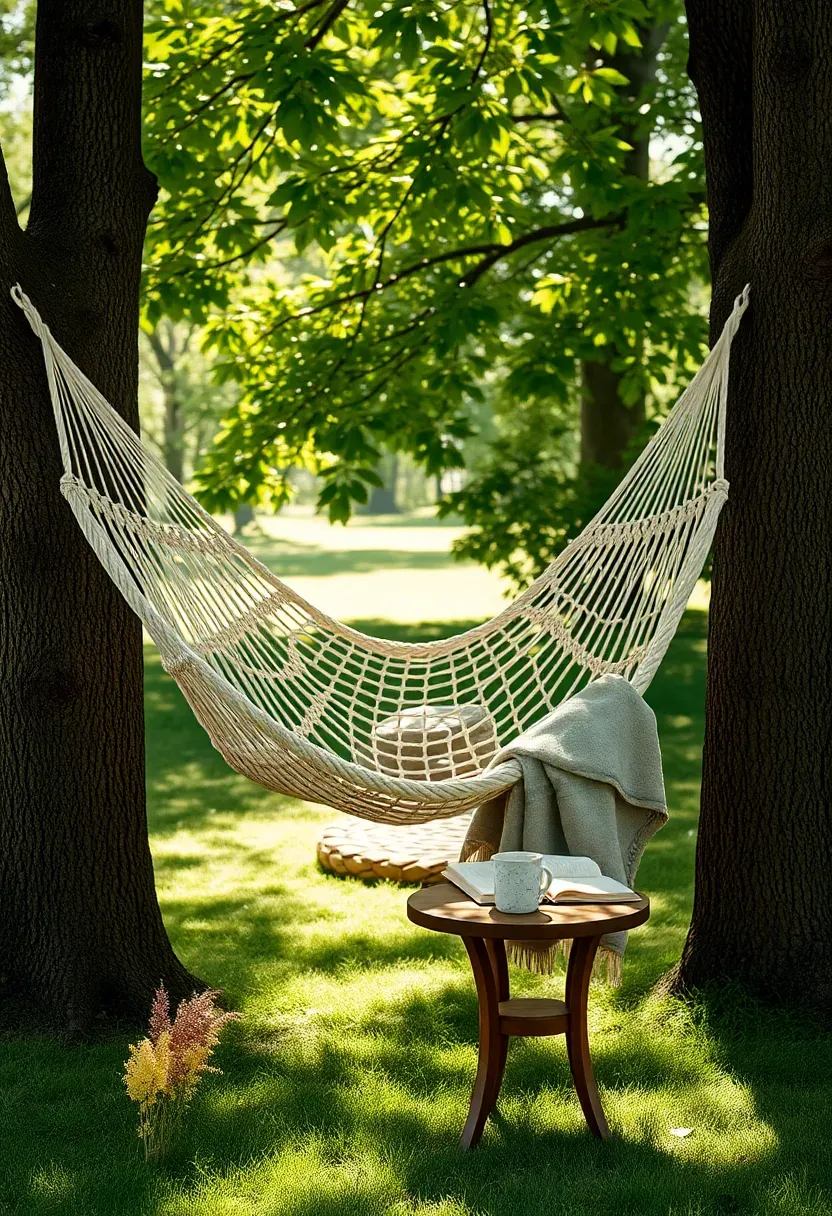
4. Hammock Corner with Side Table
Step 1: Pick Your Anchor Points
Two trees twelve to fifteen feet apart with trunks at least eight inches in diameter can support a standard cotton or polyester hammock. No trees? A hammock stand works, though it takes up more floor space. Position the setup where afternoon shade hits — nobody wants to swing in direct sun at three o'clock in July.
Step 2: Add the Details
A small side table within arm's reach makes the difference between a hammock you use and one that just hangs there. A stump slice, a folding camp table, or a concrete cylinder all work. Toss a lightweight blanket over one end for cooler evenings. Skip the decorative pillow — it ends up on the ground every time.
Step 3: Watch the Ground Below
Bare dirt under a hammock turns to mud fast. Lay down a patch of gravel or bark mulch to keep the area tidy and give your feet a clean landing.

Recommended
Items for this idea
5. Weathered Wood Privacy Screen
A solid fence blocks views but also blocks airflow and feels like a wall. Horizontal slat screens built from rough-sawn cedar with half-inch gaps between boards give you privacy from neighbors at eye level while letting breezes through. Mount the slats between two steel posts or pressure-treated 4x4s. The natural gray that untreated cedar develops after a year of weather exposure actually improves the look — no staining required. Train a climber like jasmine or clematis up one section and leave the rest bare for contrast.
Choosing Between Cedar and Pine
- Cedar: Naturally rot-resistant, weathers to silver-gray, more expensive upfront, lasts 15+ years
- Pressure-treated pine: Cheaper, needs stain to look intentional, can warp if boards are wet when installed
- Choose cedar if the screen faces your main seating area; pine is fine for utility zones
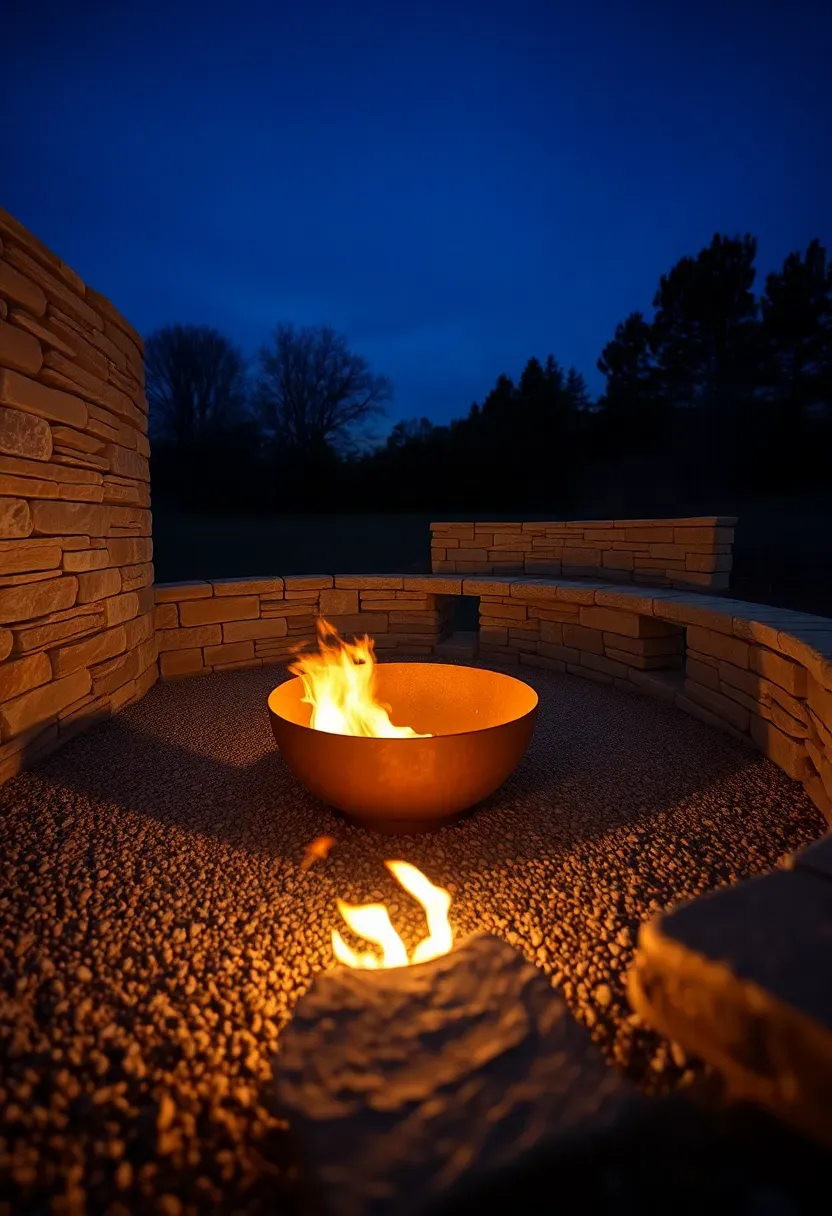
6. Sunken Fire Bowl Area
Dropping a fire feature even twelve inches below the surrounding grade changes the entire feel. You sit on the edge looking down into the flames instead of peering over a rim, and the sunken walls block wind that would otherwise scatter sparks. Excavate a shallow circle, line the walls with dry-stacked stone or concrete retaining blocks, fill the base with gravel, and set a steel fire bowl in the center. The excavated soil builds up the surrounding area slightly, creating a natural amphitheater shape without importing any extra material.
Safety Considerations
- Keep the sunken area at least fifteen feet from structures, fences, and overhanging branches
- Install a steel spark screen over the bowl opening on windy nights
- Gravel base allows drainage — standing water in a fire pit breeds mosquitoes between uses
Recommended
Items for this idea
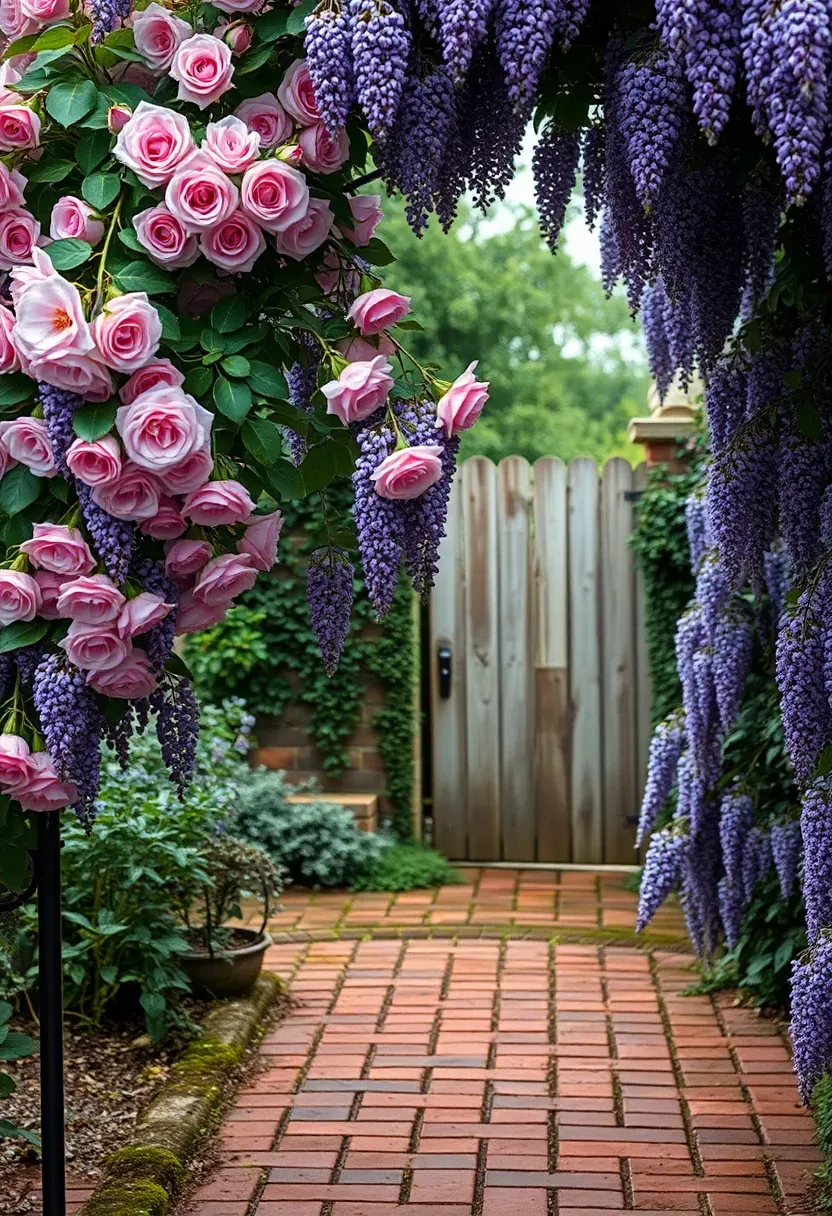
7. Climbing Vine Archway
Where It Came From
Garden arches trace back to Roman peristyle gardens where they framed transitions between outdoor rooms. The concept survived because it works — a vertical frame covered in greenery marks a threshold and makes you slow down as you pass through.
Modern Application
A six-foot-wide metal or cedar arch placed where your patio meets the lawn, or where a path enters a garden bed, gives your backyard a sense of rooms even without walls. Plant climbing roses for a cottage look, or go with star jasmine for evergreen coverage and spring fragrance. The arch itself can be simple — even a cattle panel bent into a curve between two posts creates the right shape.
Getting Vines Established
- Tie new shoots loosely with jute twine every two weeks during the growing season
- Prune the base of the vine to encourage upward growth rather than low bushing
- Full coverage takes two to three growing seasons depending on the species
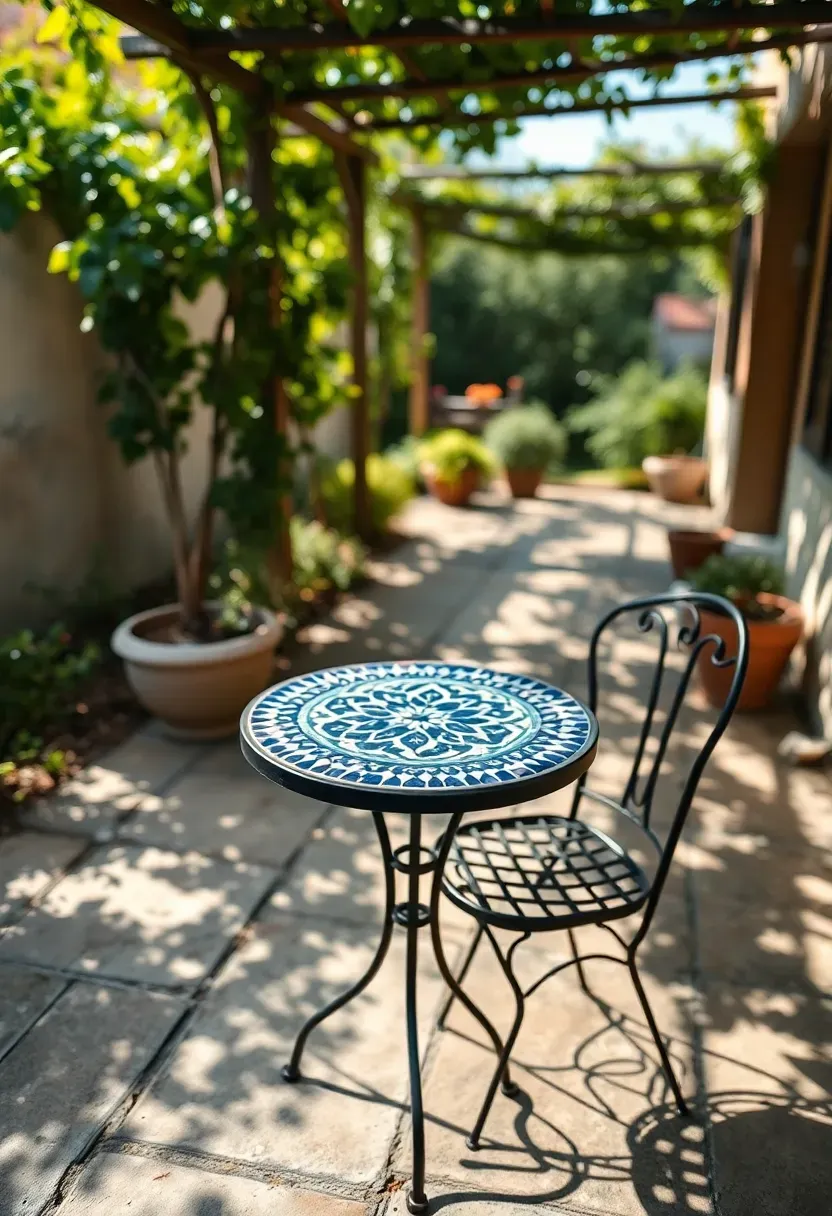
8. Moroccan Tile Accent Table
One well-placed accent table with a patterned tile top adds more character than an entire furniture set in matching beige. Zellige tiles — those slightly irregular handmade squares from Morocco — come in deep blues, greens, and warm whites that pop against green foliage. You can buy ready-made mosaic tables or tile an existing round table yourself using outdoor-rated thinset and grout. The imperfections in zellige tiles mean alignment does not need to be surgical. Place it between two chairs or next to a bench where it catches the eye without dominating the space.
Tips
- Seal grout lines with a penetrating sealer annually to prevent staining
- Pair with simple metal chairs — ornate furniture next to an ornate table looks cluttered
- A 24-inch diameter table fits two drinks and a small plate, which is all you need outdoors
Recommended
Items for this idea
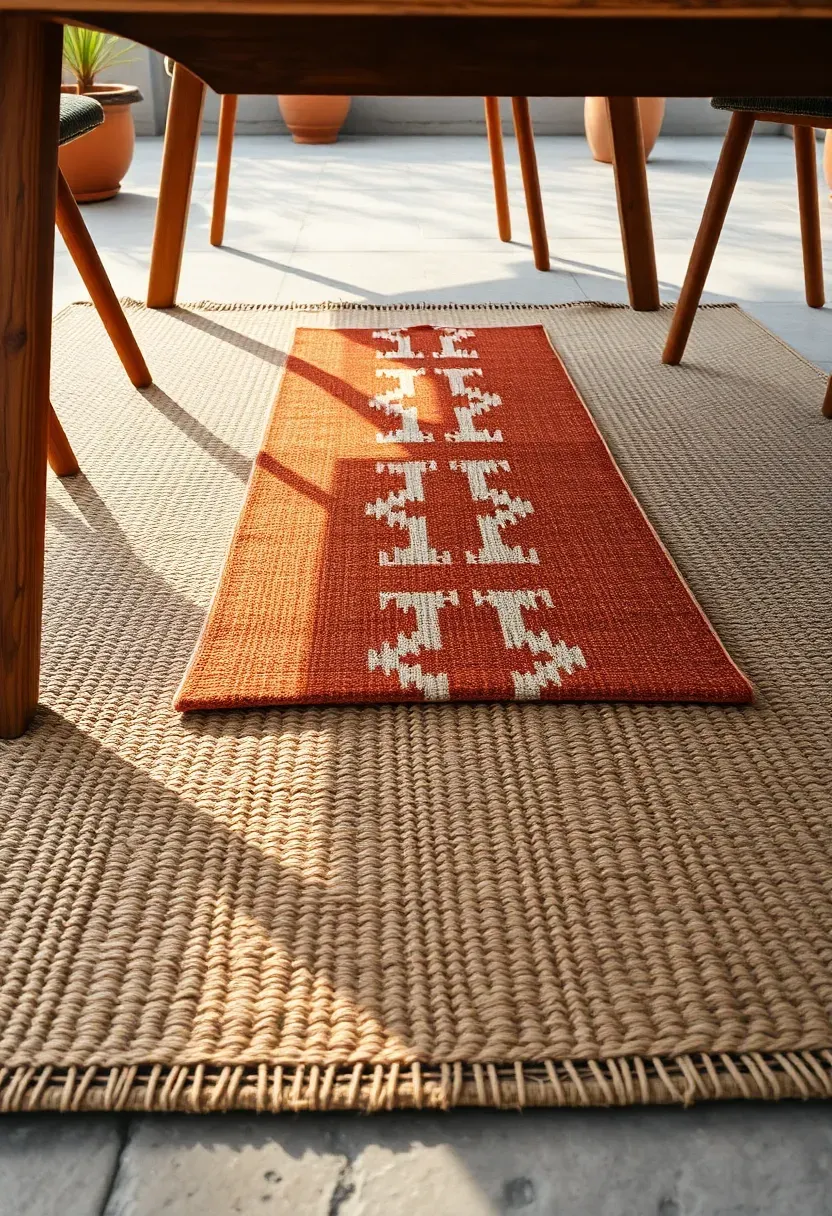
9. Layered Outdoor Rug Setup
Why Bother with Rugs Outside?
Bare concrete or wood decking under furniture looks unfinished. A single outdoor rug helps, but layering two rugs — a larger neutral jute or polypropylene base with a smaller patterned rug on top — creates the same warmth indoors that makes a living room feel pulled together. The base rug defines the seating zone. The top rug adds pattern and color without the commitment of a single bold piece covering everything.
Making It Last
Outdoor rugs trap moisture underneath if they sit on impermeable surfaces. Lift them after heavy rain or use furniture pads to create airflow beneath. Polypropylene rugs handle UV and moisture well. Natural jute looks better but needs covered or semi-covered placement to survive more than one season. Roll both rugs and store them over winter — leaving them out year-round shortens their life by half.
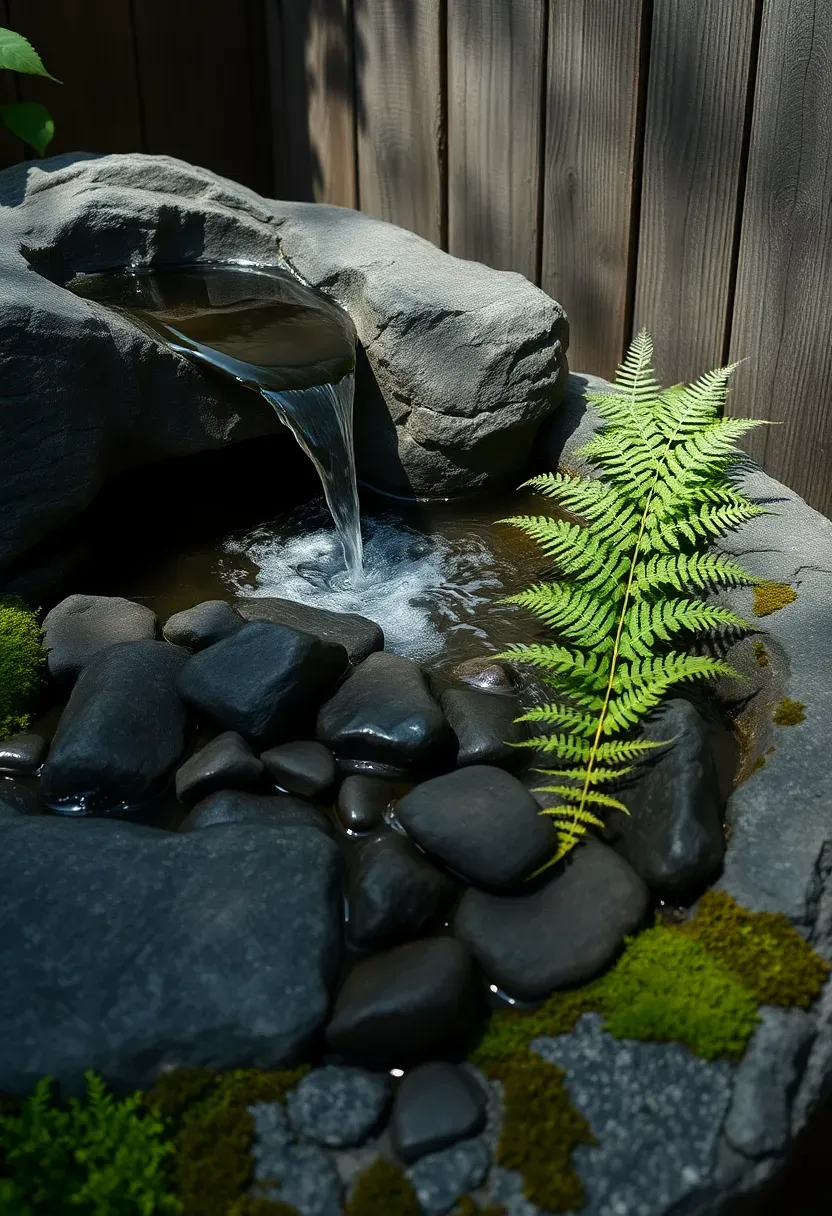
10. Stone Water Basin Fountain
Running water does two things no other backyard element can: it masks neighborhood noise and it draws birds. A recirculating stone basin fountain requires only a basin, a small submersible pump, and an outdoor electrical outlet. Set the basin on a gravel pad surrounded by ferns or hostas, and let water bubble gently over a pile of smooth river rocks. The sound should be a murmur, not a splash — adjust the pump flow rate down until you get that soft, continuous tone that blends into the background.
Tips
- Clean the pump filter monthly during warm months to prevent algae buildup
- Add a mosquito dunk tablet every 30 days if the water sits still at times
- Position the fountain where you hear it from your main seating area, not hidden in a far corner
Recommended
Items for this idea
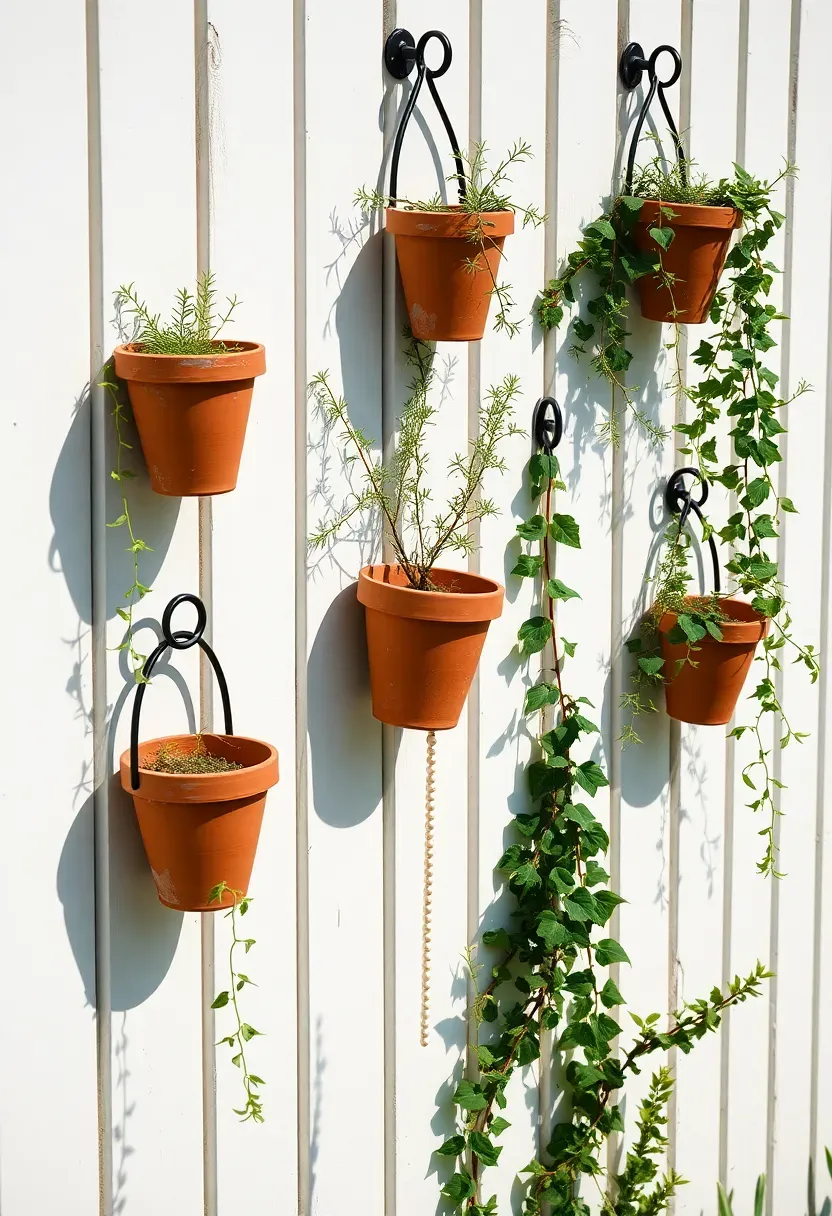
11. Hanging Planter Wall
A blank fence is wasted vertical space. Mount a grid of planters — terracotta pots in metal ring holders, or pocket planters made from felt — on a section of fence that gets at least four hours of sun. Mix trailing plants like ivy and string of pearls with upright herbs like rosemary and basil. The effect is a living wall without the complexity and irrigation demands of a true green wall system. Five to seven planters on a four-foot-wide section is enough to make an impact.
Choosing Your Mounting Method
- Metal ring holders screwed into fence boards work for standard terracotta pots
- Felt pocket planters (like Woolly Pockets) hold more soil and dry out slower
- Avoid hanging heavy ceramic pots on vinyl fencing — the weight pulls fasteners out over time
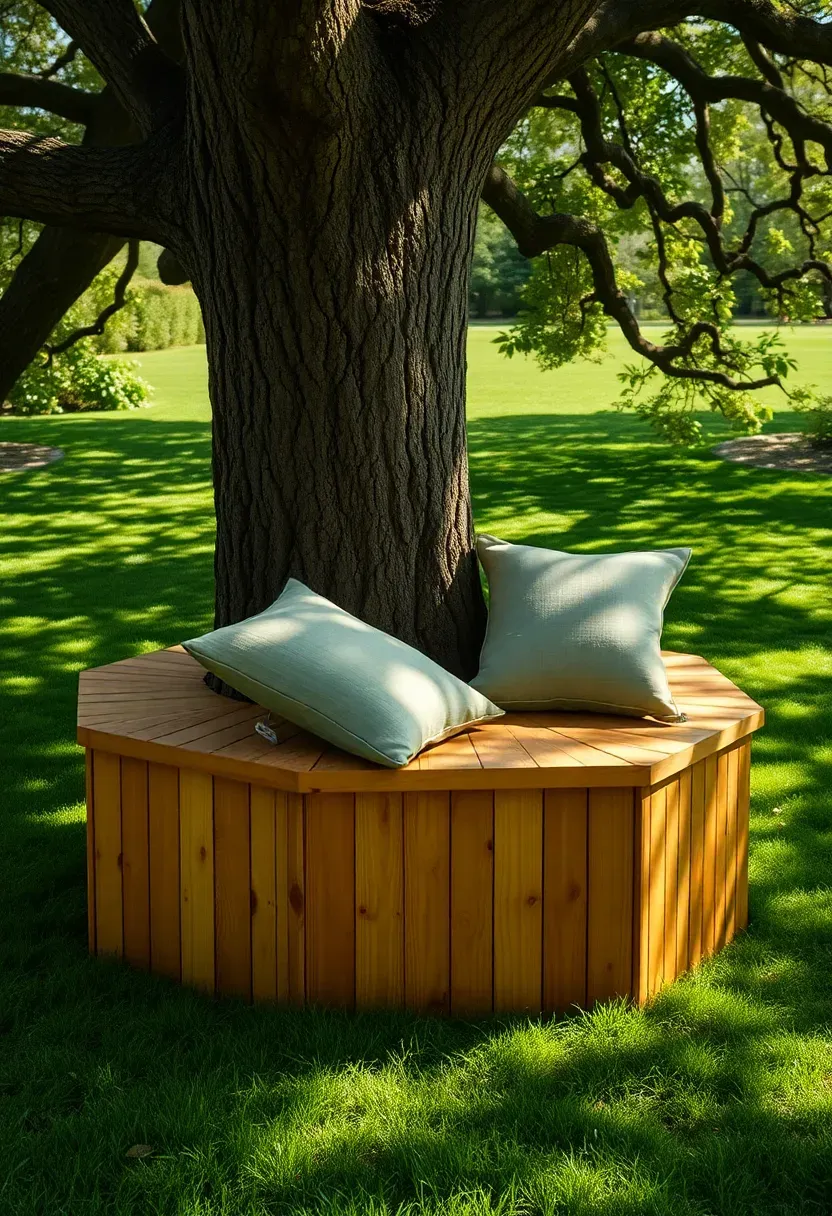
12. Bench Built Around a Tree
How to Build One That Lasts
A tree bench turns a shade tree from a background element into the centerpiece of your yard. The key measurement is leaving four to six inches of clearance between the bench frame and the trunk on all sides — trees grow, and you do not want the wood pressing into bark within a few years. Build the seat at standard bench height, around seventeen inches, using 2x6 cedar planks on a simple post-and-beam frame. A hexagonal shape works for most tree trunk diameters because each panel is short enough to cut from a single board.
Worth Knowing
The bench should not be perfectly level. Tilt each seat section slightly outward (about a five-degree slope) so rainwater runs off instead of pooling. Skip the backrest — it complicates the build and people lean against the trunk anyway. Sand the seat boards smooth and apply a single coat of exterior oil to prevent splinters without creating a slippery finish.
Recommended
Items for this idea
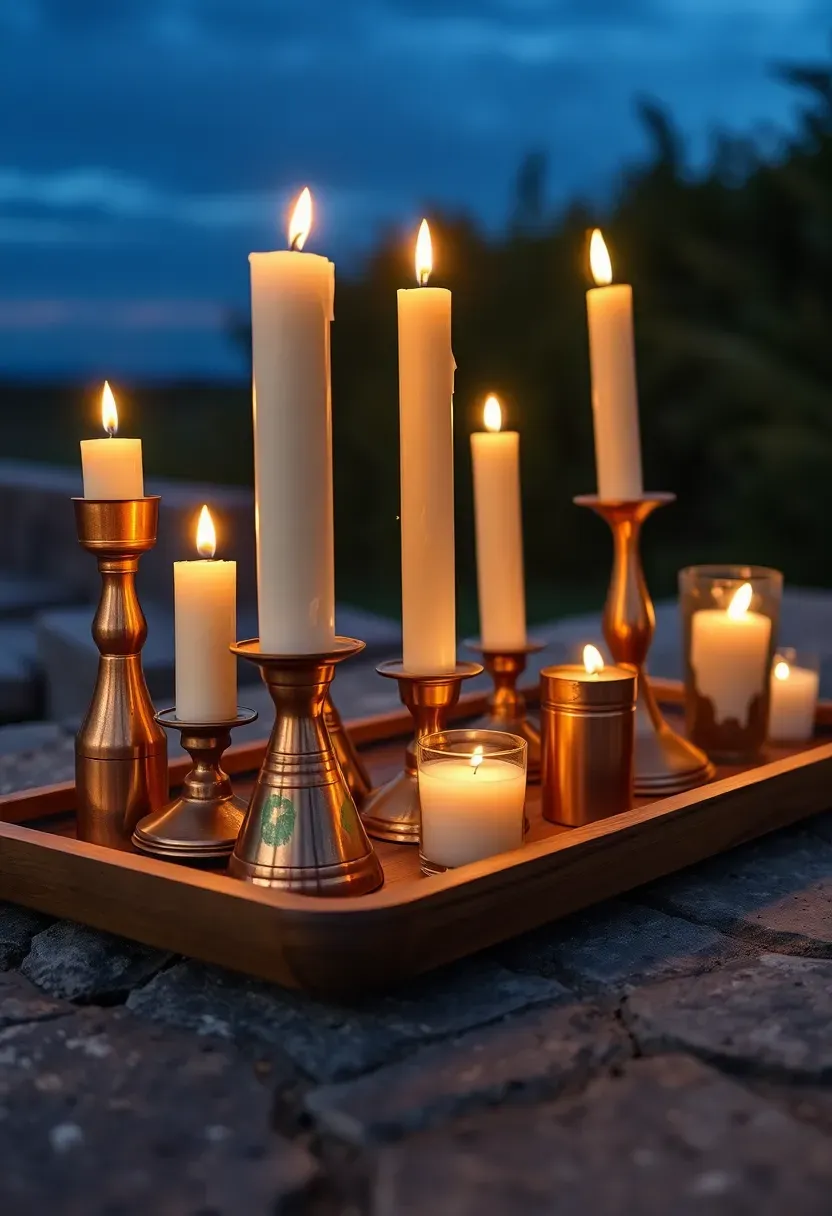
13. Copper Candle Cluster Display
Candles outdoors fail alone — a single flame on a table just looks like you forgot to bring it inside. But group seven or eight candle holders of different heights on a wooden tray or a flat stone, and suddenly you have a light installation. Copper and brass holders develop a green patina over time that looks better each season. Use thick pillar candles that resist wind, or glass hurricane sleeves for exposed spots. The cluster works on a dining table center, a low wall cap, or directly on a step.
Tips
- Vary heights by at least four inches between the shortest and tallest holder
- Place the tray on a heat-resistant surface — copper conducts heat into whatever sits below
- Battery-operated candles in copper holders give the same look without wax drips on your table
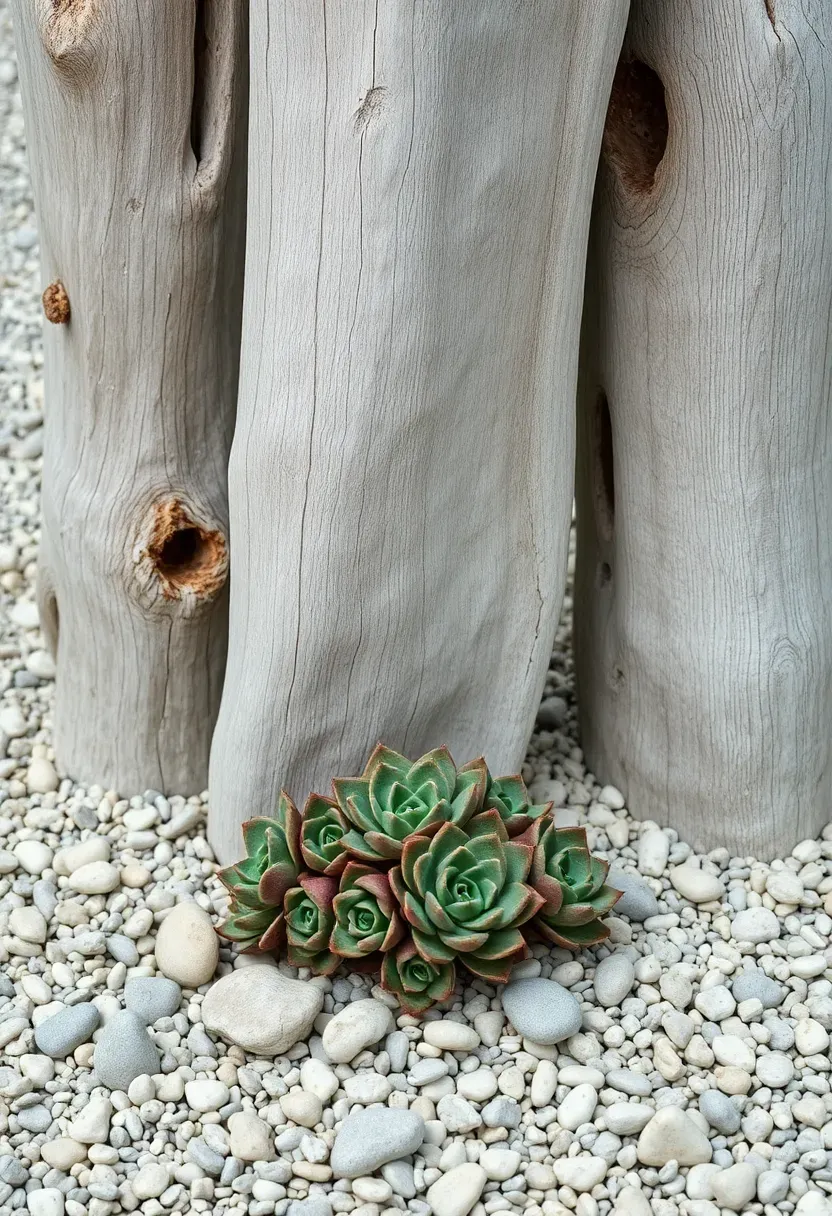
14. Driftwood Sculpture Corner
Found-object decor works outdoors in ways it never could inside. A few pieces of sun-bleached driftwood — collected from a lakeshore or bought from a landscape supplier — propped upright on a gravel bed create a sculptural focal point that needs zero maintenance. The organic shapes contrast with the geometry of fences, patios, and planters around them. Plant low succulents like hens-and-chicks at the base to soften the transition between wood and gravel.
Where to Source Driftwood
- Lakeshores and river banks after spring flooding produce the best pieces
- Landscape suppliers sell cleaned and treated driftwood by the piece or pallet
- Sand off any sharp points and check for insect bore holes before permanent placement
Recommended
Items for this idea
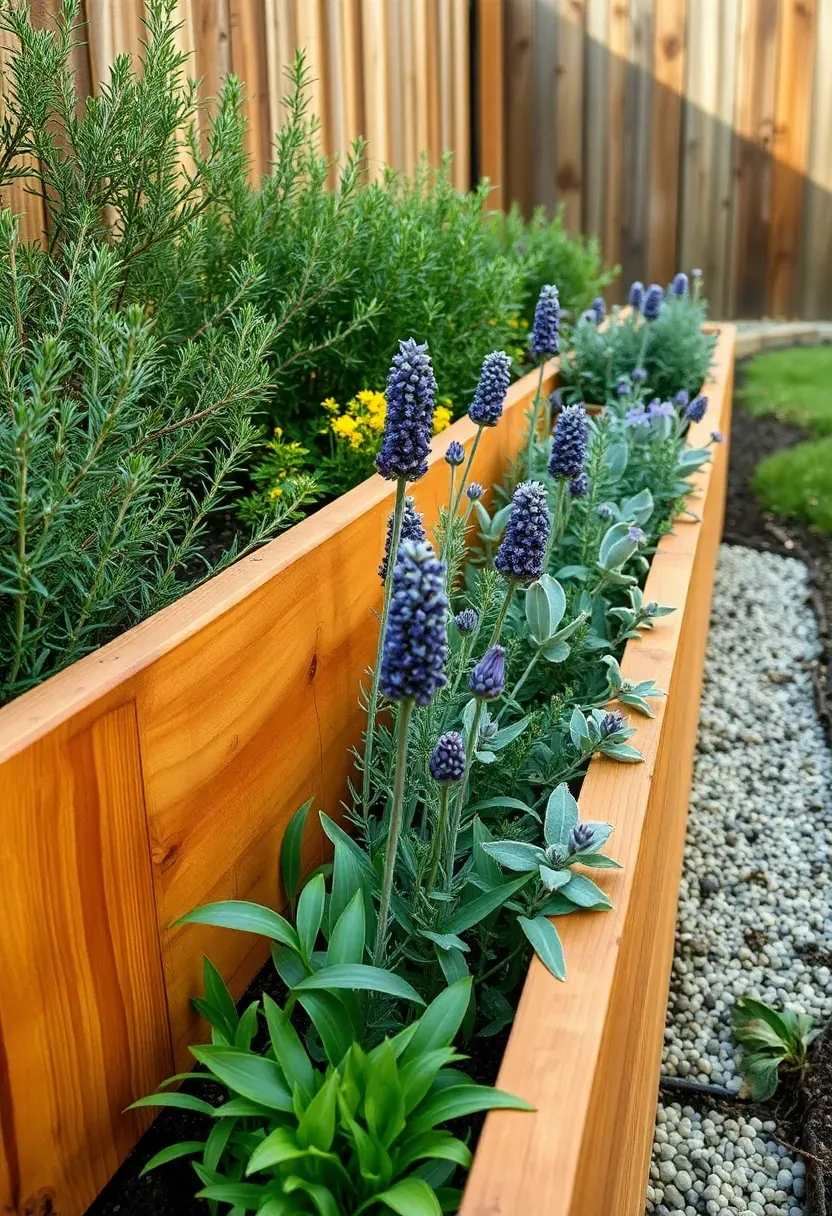
15. Raised Herb Garden Border
A raised bed along a fence line serves double duty: it defines the edge of your yard and gives you fresh herbs within arm's reach of the grill. Build a simple twelve-inch-tall frame from cedar or corrugated metal panels, fill with a mix of garden soil and compost, and plant rosemary, thyme, sage, and lavender in a row. These Mediterranean herbs thrive in well-drained raised beds and handle occasional neglect. The gray-green foliage reads as ornamental from a distance and functional up close.
Growing Notes
- Mediterranean herbs need less water than you think — let soil dry between waterings
- Mulch with pea gravel instead of bark to reflect heat and improve drainage
- Replace annual herbs like basil and cilantro each spring; the perennials come back on their own
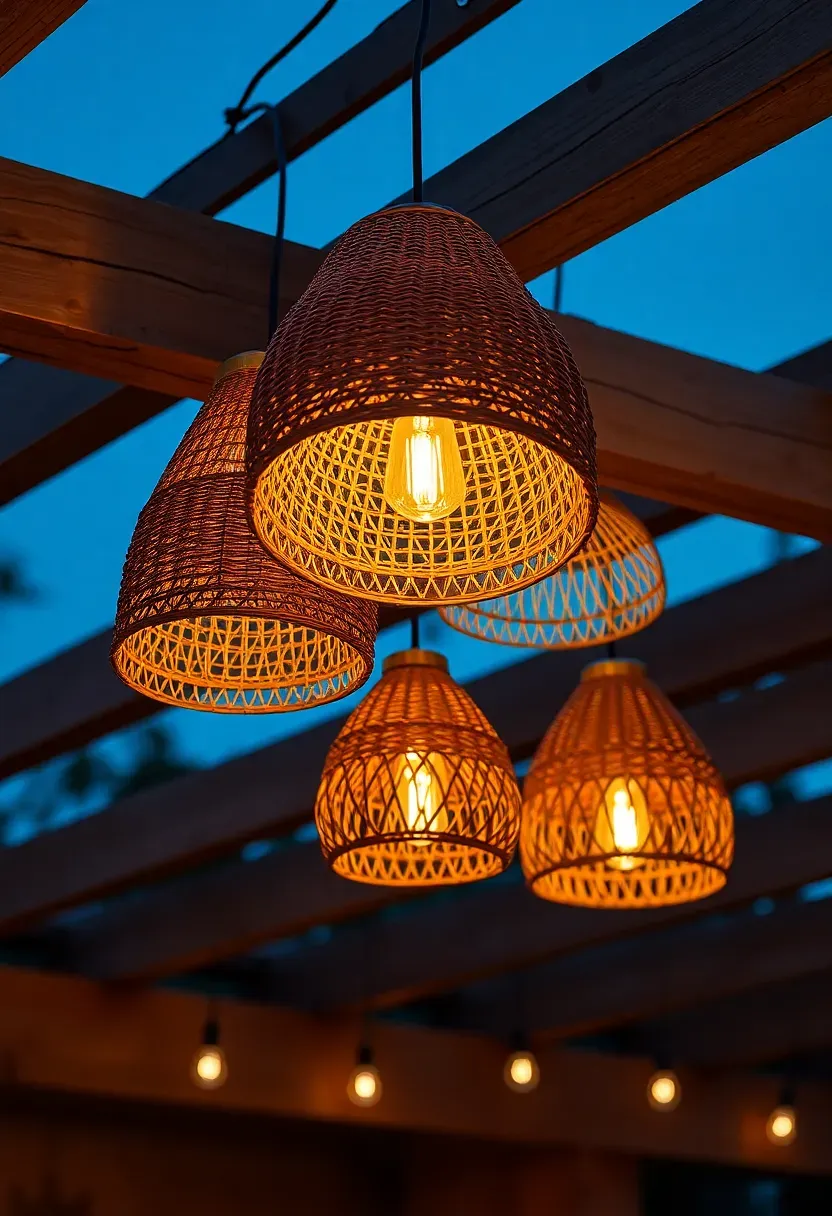
16. Woven Basket Light Shades
The Idea
Bare bulbs under a pergola or patio cover look industrial and harsh. Slip a woven rattan or bamboo basket (inverted) over the fixture and the light diffuses into a warm glow that filters through the weave pattern. The shadows cast on surrounding surfaces add texture that a plain shade cannot match.
Making It Work Outdoors
Rattan and bamboo are not waterproof, so this works best under a covered structure. Spray each basket with a UV-resistant clear coat before hanging to slow sun damage. Wire the basket to the fixture canopy with small zip ties — do not rely on just resting it on the bulb. Use warm-toned LED bulbs (2700K) to complement the natural material color. Three baskets of slightly different sizes hung at staggered heights look more intentional than matching fixtures.

Recommended
Items for this idea
17. Painted Cinder Block Planter Wall
Cinder blocks cost about a dollar fifty each. Stack them in a staggered pattern with the openings facing outward, fill each cavity with potting soil, and plant a succulent or trailing flower in every hole. Paint the exterior faces in two or three coordinating colors — sage green and warm white, or terracotta and charcoal — and you have a planter wall that looks custom-built for practically nothing. Three rows high and five blocks wide gives you fifteen planting pockets in a footprint smaller than a park bench.
Construction Details
- Use construction adhesive between courses for stability — no mortar needed for three rows
- Drill a small drainage hole in the bottom of each block cavity before filling with soil
- Place the heaviest blocks on the bottom row and work upward with the lightest for safety
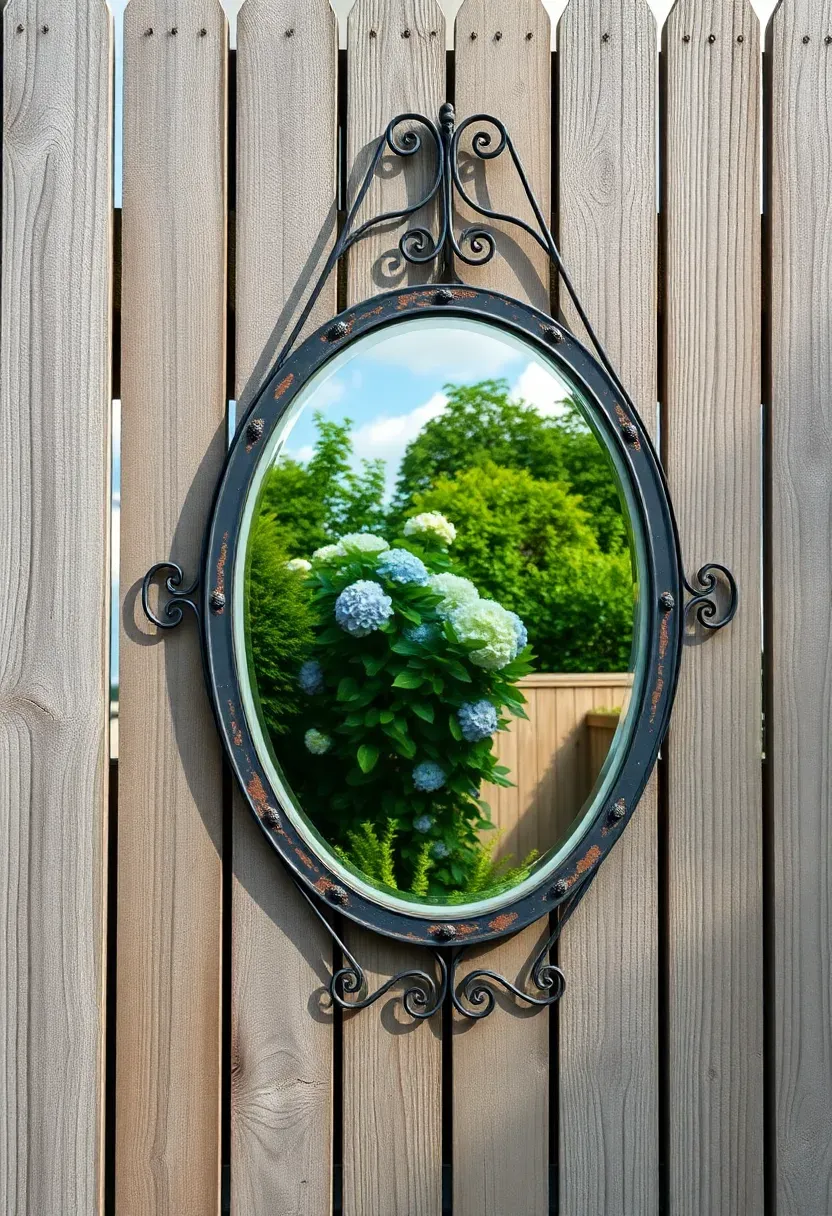
18. Outdoor Mirror on a Fence
Why It Works
Interior designers have used mirrors to make small rooms feel larger for centuries. The same trick applies outdoors. An arched or rectangular mirror mounted on a fence reflects sky, greenery, and light back into the yard, creating the illusion of depth where a flat barrier would otherwise close things in. It is particularly effective in narrow side yards or small urban backyards where every visual trick helps.
Choosing the Right Mirror
Use only mirrors rated for outdoor use — real glass in a sealed frame, or polished stainless steel panels that resist shattering. Position the mirror to reflect the most interesting view in your yard (a garden bed, a tree canopy, the sky) rather than pointing it at the house wall or a neighbor's window. Mount it at standing eye level with heavy-duty mirror clips rated for outdoor weight.
Recommended
Items for this idea
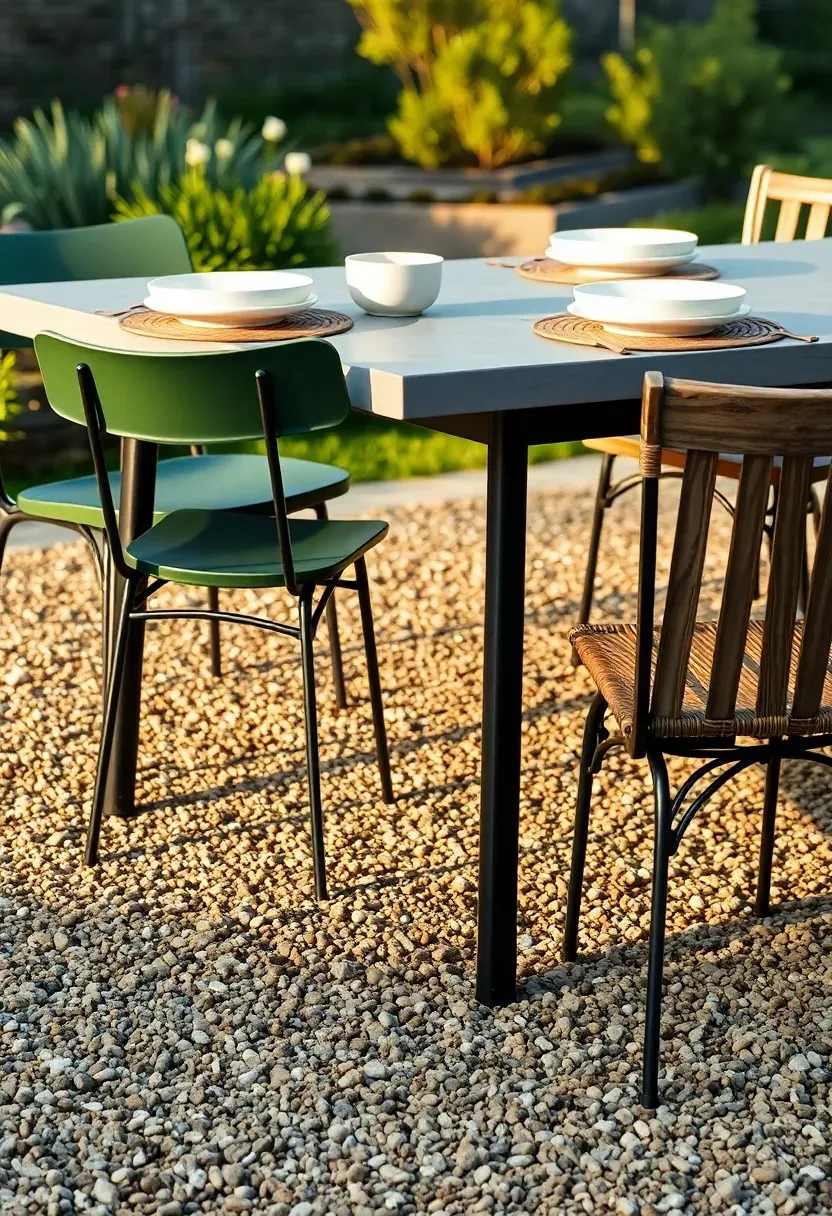
19. Mixed-Material Dining Setup
The matching six-piece patio set from a big box store is the fastest way to make an outdoor dining area look generic. Instead, pair a concrete or reclaimed wood table with chairs that share a color but not a style — a metal bistro chair next to a wooden slat chair next to a woven rattan seat. The intentional mismatch signals that the space was assembled over time rather than ordered from a single page in a catalog. Keep the table itself simple and let the chairs carry the personality.
Making Mismatched Look Intentional
- Stick to one unifying element: all chairs the same color, or all chairs the same seat height
- Limit yourself to three different chair styles maximum — beyond that it looks like a yard sale
- A single bench on one side of the table paired with individual chairs on the other creates asymmetry that feels relaxed
Quick FAQ
Do backyard decor projects need permits? Generally no, unless you are building a permanent structure over a certain height or adding electrical wiring. Fire pits sometimes require a permit depending on your municipality. Check local codes before digging or building anything anchored to the ground with concrete footings.
Which materials hold up best in rain and sun? Cedar, teak, powder-coated steel, and polypropylene textiles handle weather with minimal maintenance. Avoid untreated pine outdoors — it rots within two to three seasons. Fabrics labeled Sunbrella or solution-dyed acrylic resist UV fading far better than standard polyester.
How do I decorate a backyard on a tight budget? Start with what you already have. Regrouping existing planters, adding gravel to define a seating area, and painting old furniture in a fresh color costs almost nothing. Driftwood, river rocks, and foraged branches are free. Thrift stores often have solid ceramic pots and metal candle holders for a few dollars each.
Can renters do any of these ideas? Most of them. Anything freestanding — planters, rugs, lanterns, hammocks, furniture — requires no permanent changes. Even a gravel pad can be laid on top of landscape fabric and removed when you leave. Skip the fence-mounted projects unless your landlord approves.
What is the single highest-impact backyard decor change? Lighting. Adding lanterns, candle clusters, or string lights on a simple timer changes how you experience your yard after sunset and costs under fifty dollars for most setups.
A decorated backyard does not require a landscape plan or a contractor. Start with one idea from this list — the one that solves your yard's biggest gap — and build from there. The best outdoor spaces grew piece by piece over months, not all at once from a catalog. Pick up a few lanterns this weekend, rearrange your planters next Saturday, and by midsummer you will have a yard that actually gets used after dinner instead of just looked at through the window.
Pinterest cover for 19 Backyard Decor Ideas That Actually Look Good
About the author
OBCD
CGI visualization and interior design content. We create detailed 3D renders and curate practical design ideas for every room in your home.