21 Backyard Tiki Bar Ideas
A friend of mine built a tiki bar out of reclaimed fence boards and a roll of palm thatch he ordered online for $60. The whole project took a weekend, and now every neighbor on the block ends up at his place on Friday evenings. That is the appeal of a backyard tiki bar — it is not about building a professional cocktail lounge. It is about creating a spot that feels like vacation without leaving home. Whether you want a freestanding bamboo hut, a converted garden shed, or a simple pallet counter with a grass skirt, there is a version of this project for every skill level and budget.
Here are 21 tiki bar setups that range from quick afternoon builds to serious backyard features.
Table of Contents
- Classic Bamboo Tiki Hut
- Pallet Wood Tiki Bar
- Poolside Swim-Up Bar
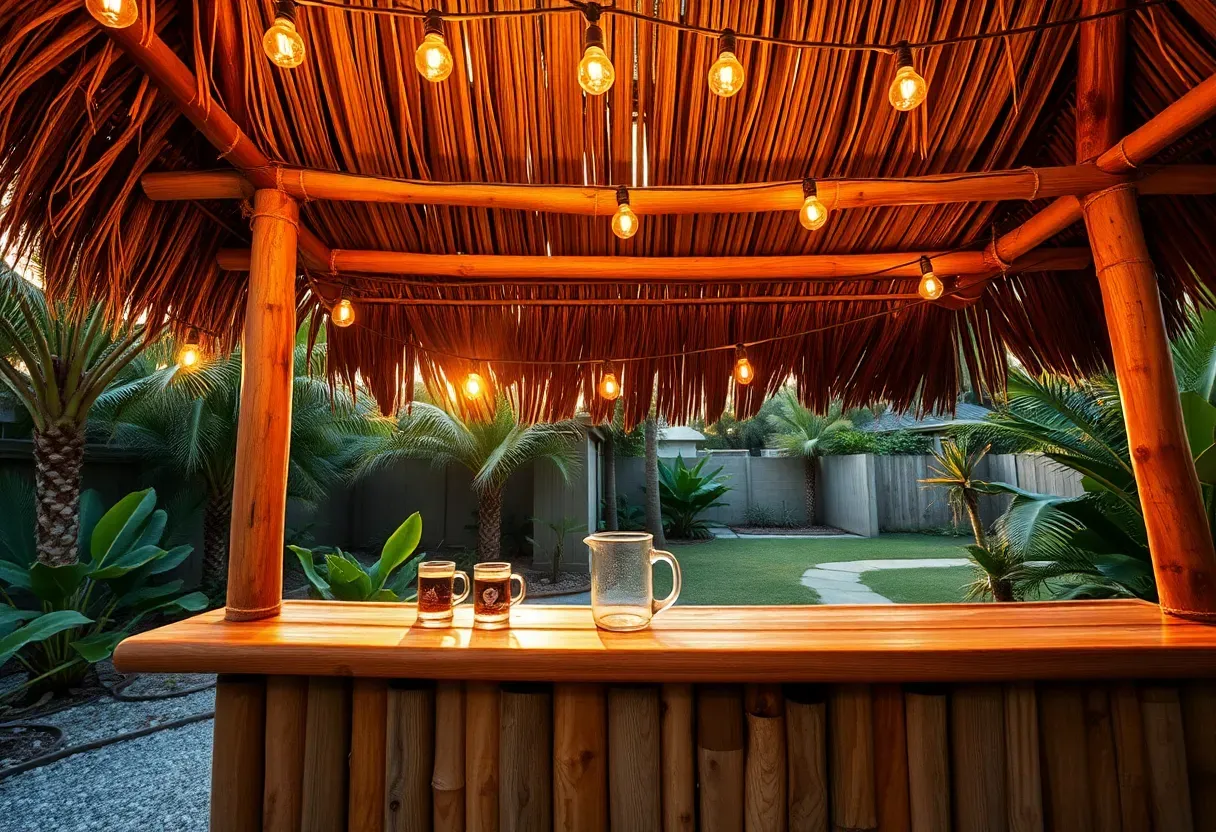
- Tiki Bar with Thatched Roof
- Corner Fence Bar
- Rolling Tiki Cart
- Tiki Bar Under a Pergola
- Surfboard Bar Top
- Floating Deck Tiki Bar
- LED-Lit Tiki Bar
- Converted Shed Tiki Bar
- Stone and Bamboo Combo Bar
- Tiki Bar with Built-In Grill
- Treehouse Tiki Bar
- Tropical Planter Wall Bar
- Tiki Bar with Waterfall Feature
- Reclaimed Boat Bar
- A-Frame Tiki Hut
- Tiki Bar with Fire Torches
- Double-Decker Tiki Bar
- Minimalist Modern Tiki Bar
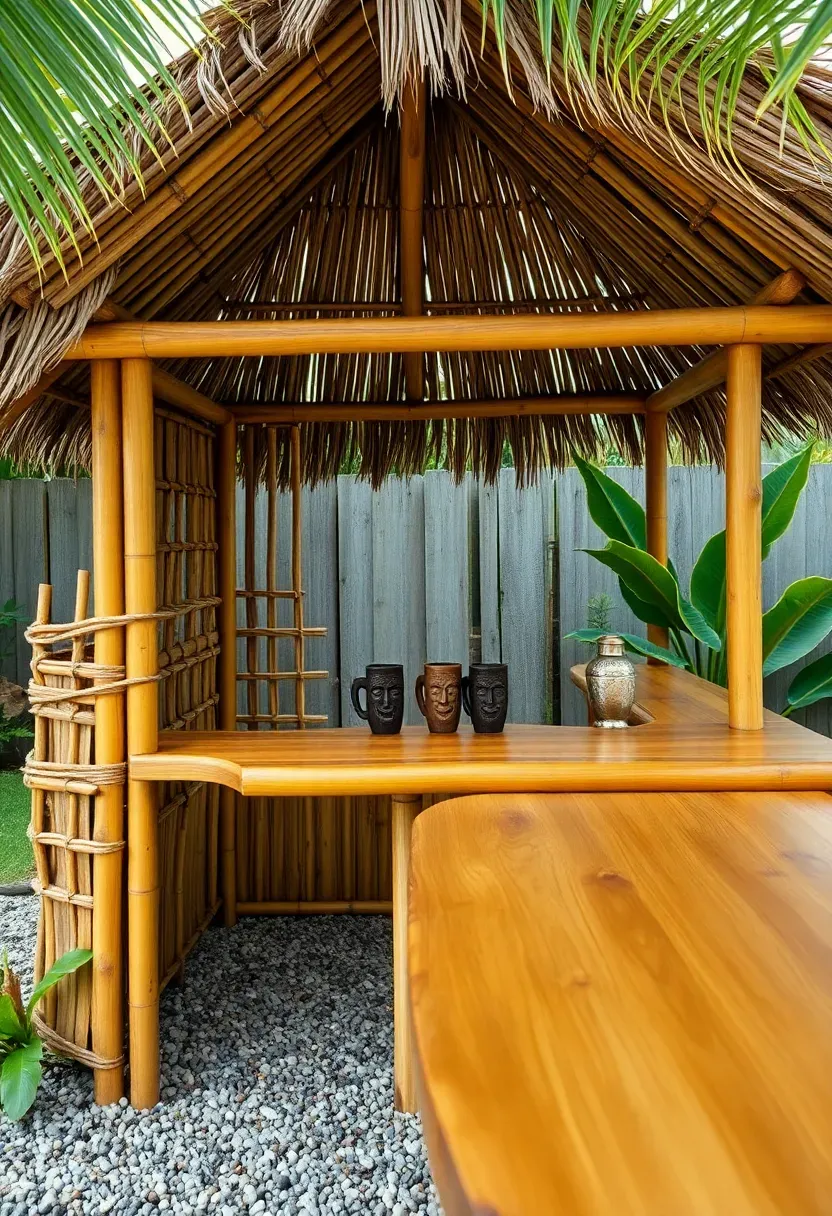
1. Classic Bamboo Tiki Hut
Why It Works
The bamboo tiki hut is the original, and for good reason. Bamboo poles lashed together with manila rope create a frame that looks authentically Polynesian and holds up surprisingly well outdoors. A standard freestanding hut with a 6x4-foot serving counter uses about 30-40 bamboo poles (1.5 to 3 inches in diameter) and runs $300-$600 in materials if you source the bamboo from a landscaping supplier. The thatched roof — either real palm fronds or synthetic Mexican rain cape — keeps bartenders shaded and adds that layered, organic texture no other material replicates.
Steps to Build
- Set four main corner posts (3-inch diameter bamboo or 4x4 pressure-treated lumber hidden inside bamboo sleeves) in concrete footings 18 inches deep.
- Lash horizontal rails at counter height (42 inches) and at the base using stainless steel screws hidden behind rope wrapping.
- Attach thatch panels to the roof frame with zip ties on the underside where they stay invisible.
Watch Out
- Untreated bamboo rots at ground contact within two seasons. Coat the bottom 24 inches with marine-grade spar varnish or set posts on metal post brackets above the concrete.
We picked a few things that go well with this idea: Belord Outdoor Tiki Bar Set (3-Piece) (★5.0), HOMREST Wicker Tiki Bar Set with Canopy (★4.7) and Auihiay Portable Tiki Bar Decor Kit (124-Piece) (★4.4). As an Amazon Associate we earn from qualifying purchases.
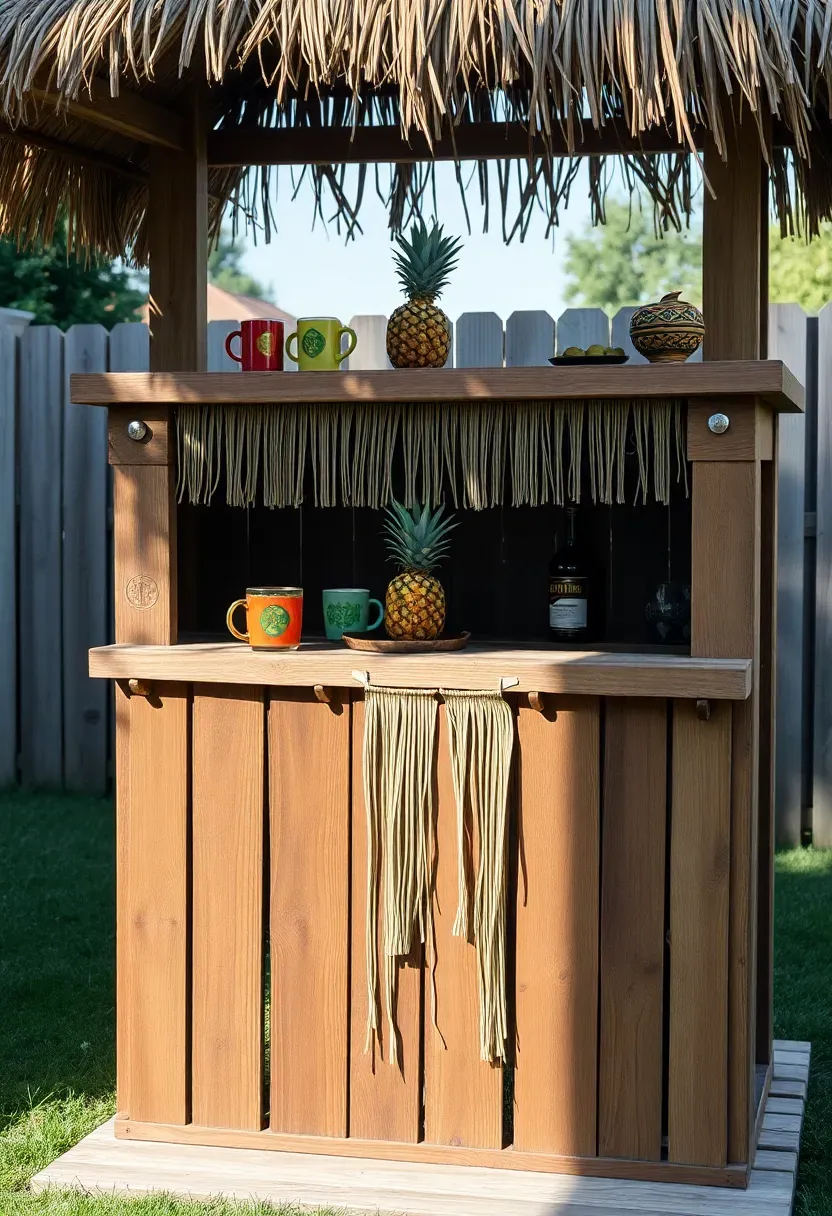
2. Pallet Wood Tiki Bar
Pallet wood is free from warehouse loading docks and construction sites if you ask. Two standard 48x40-inch pallets stood on end and braced together form the back wall of a serviceable bar. A third pallet laid flat across the top becomes your counter. Sand everything down to prevent splinters, stain with an exterior deck stain in a warm cedar or driftwood tone, and staple a grass skirt along the front panel. Total cost, assuming free pallets: under $80 for stain, hardware, thatch, and a grass skirt. The rough, imperfect grain of pallet wood actually suits the tiki aesthetic better than milled lumber because it reads as weathered and beachy rather than suburban.
Tips
- Pull all nails and check for the HT (heat treated) stamp — avoid pallets marked MB (methyl bromide), which use a toxic fumigant.
- Reinforce the counter joint with L-brackets underneath; pallets are not designed for cantilever loads.
- Add a shelf on the back side using pallet deck boards to hold bottles and supplies.
We picked a few things that go well with this idea: Metal Citronella Torches Outdoor (6-Pack) (★4.5), TIKI Bamboo Citronella Torches (12-Pack) (★4.4) and ZSZMFH Metal Outdoor Torches (6-Pack) (★4.6). As an Amazon Associate we earn from qualifying purchases.
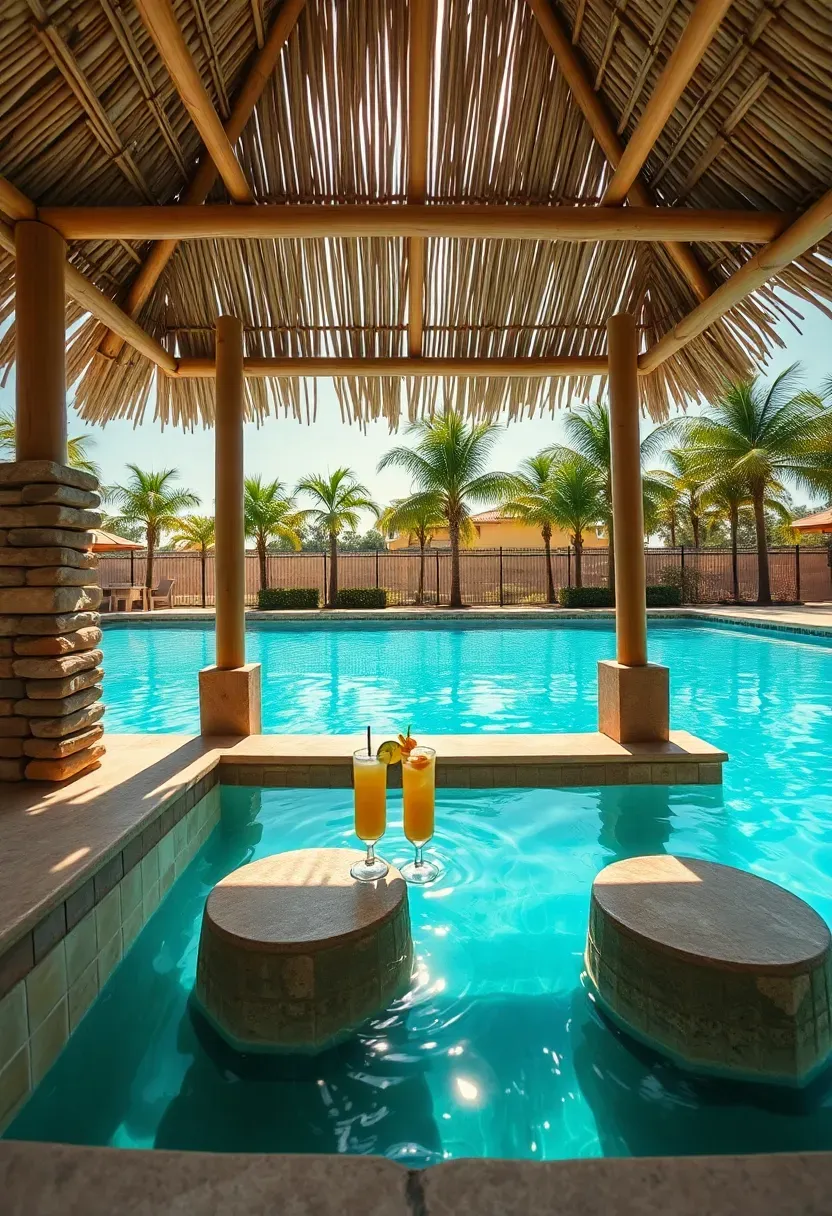
3. Poolside Swim-Up Bar
The Problem
You built a pool but nobody wants to get out of the water to grab a drink. Toweling off, walking across hot concrete, making a cocktail, walking back — people just stop going to the bar.
The Solution
A swim-up bar solves this by placing the counter at the pool edge with submerged seating on the water side. The bar structure sits on the pool deck, and a section of the pool wall includes a flat ledge at seat height (about 30 inches below water line) with a textured non-slip surface. The counter overhangs the pool edge by 10-12 inches so swimmers can lean on it comfortably. Concrete, natural stone, or tile-covered block all work for the counter material. Add a thatched roof overhead and you have the centerpiece of a resort-style backyard.
Pros and Cons
Pros: Keeps guests in the pool longer; doubles as a visual focal point; increases home resale value.
Cons: Requires professional pool modification ($3,000-$8,000); needs waterproof electrical for blender/lighting; code inspections in most municipalities.
We picked a few things that go well with this idea: Mexican Palm Thatch Roof Roll (78.8") (★4.4), Hand-Woven Mexican Palm Thatch Roll (35"x30ft) (★4.4) and SEKKVY Artificial Palm Thatch Roll (16"x197") (★4.5). As an Amazon Associate we earn from qualifying purchases.
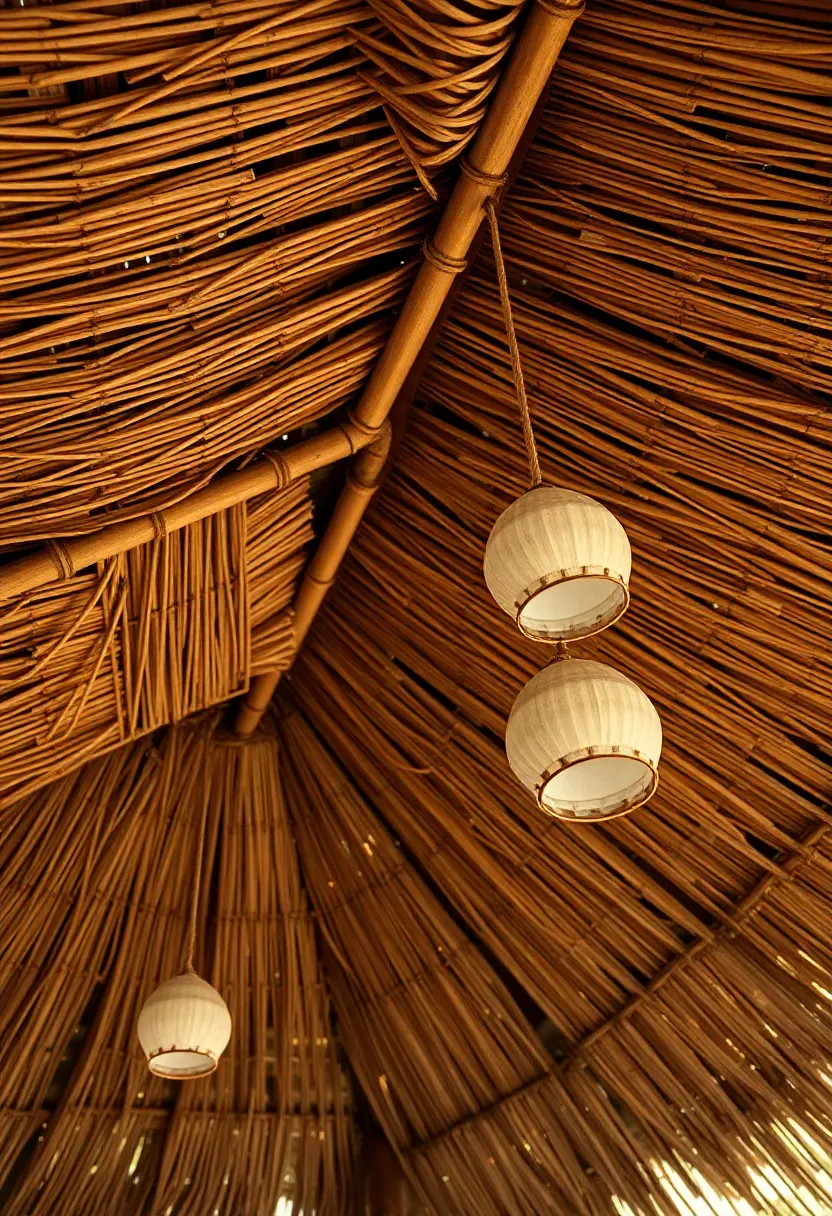
4. Tiki Bar with Thatched Roof
The roof makes or breaks a tiki bar. A bare-bones counter with a spectacular thatched roof looks ten times better than an elaborate bar with a flat metal canopy. Mexican rain cape thatch (made from dried palm leaves) comes in 4-foot rolls and overlaps like shingles, starting from the bottom row and working up. Each row overlaps the one below by about 8 inches. For a 6x8-foot roof, you need roughly 10-12 rolls at $25-$35 each. Synthetic thatch panels cost twice as much but last 10-20 years versus 3-5 for real palm. The visual difference between real and synthetic has narrowed considerably — from 10 feet away, most guests cannot tell.
Tips
- Pitch the roof at least 30 degrees so rainwater sheets off rather than pooling and rotting the thatch from inside.
- Wire or zip-tie a layer of chicken wire beneath the thatch as bird nesting prevention.
- Replace the bottom row of real thatch every other year — it degrades fastest from splash-back off the counter.
Recommended
Items for this idea
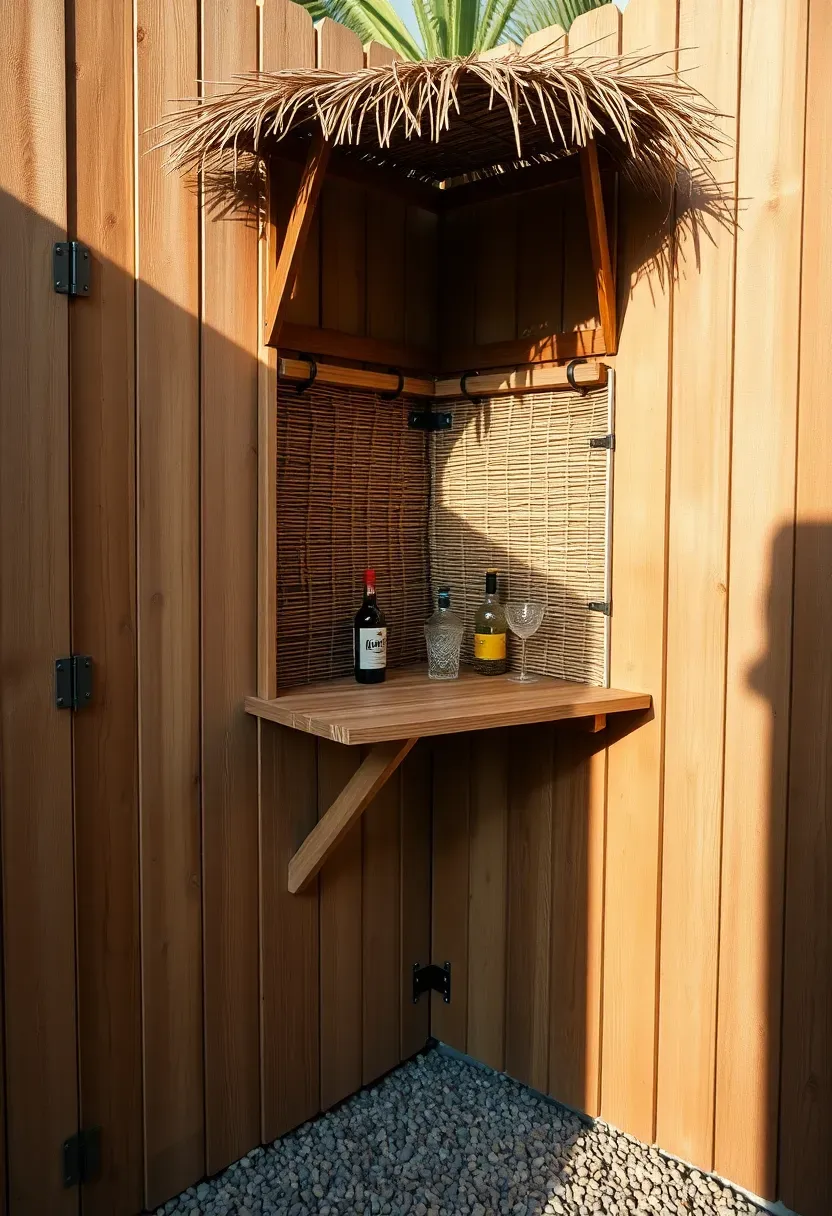
5. Corner Fence Bar
If you lack yard space for a freestanding structure, use the corner where two fence sections meet. Mount a hinged plywood counter at 42-inch height directly to the fence posts, fold it down when not in use, and add a small thatched awning above. The fence itself becomes the back wall, which you can dress up with bamboo reed fencing rolls ($20-$40 for a 6x16-foot roll) screwed or zip-tied over the existing boards. This approach uses zero floor space when closed and about 8 square feet when the counter is up. It works particularly well in narrow side yards or small urban backyards where every square foot counts.
Tips
- Use a heavy-duty gate hinge rated for 50+ pounds so the counter does not sag when loaded with bottles and glasses.
- Add a folding leg that swings down from the counter underside for support when extended.
- Confirm with your HOA (if applicable) that attaching structures to the fence is permitted — some bylaws restrict fence modifications.
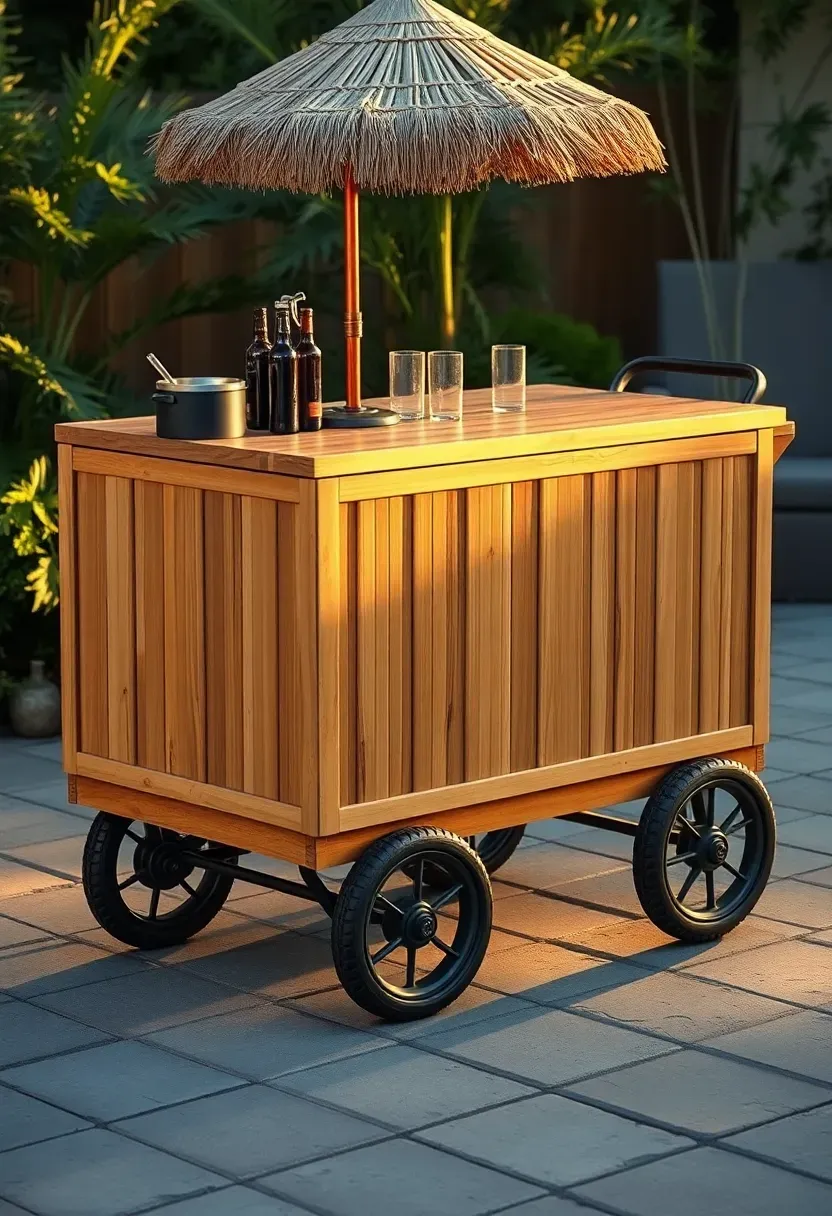
6. Rolling Tiki Cart
How to Build
A rolling tiki bar goes wherever the party goes — poolside in summer, under the patio cover in fall, into the garage for storage in winter. Start with a heavy-duty utility cart frame or build a simple box on four locking caster wheels.
- Build or buy a cart frame roughly 48 inches long, 24 inches deep, and 36 inches tall. Use exterior-grade plywood for the box.
- Wrap the front and sides with bamboo fencing or split bamboo panels attached with construction adhesive and finishing nails.
- Mount a butcher block or laminate countertop on top, extending 6 inches past the front for overhang.
- Add a towel bar on one end, a bottle opener on the side, and a small shelf below for ice bucket storage.
Watch Out
- Use 4-inch rubber wheels minimum. Smaller casters dig into grass and get stuck in patio cracks.
- Add a handle on one end so you can push it like a wheelbarrow rather than trying to steer from behind.
Recommended
Items for this idea
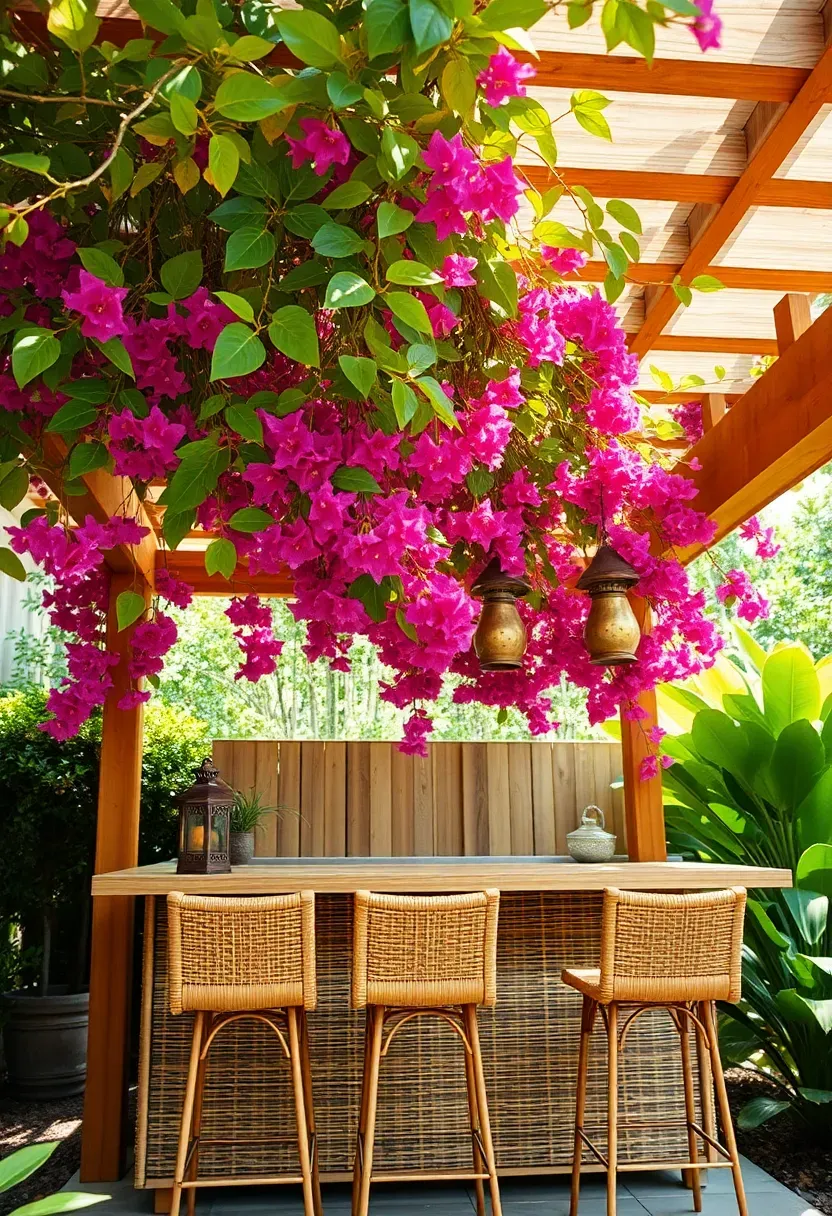
7. Tiki Bar Under a Pergola
Combining a tiki bar with a pergola gives you a permanent structure that provides real shade and a sense of enclosure without building walls. The pergola defines the space architecturally — guests recognize it as a distinct zone in the yard, separate from the dining area or the lawn. Build the bar counter against one side of the pergola so the posts serve double duty as structural support and visual framing. Train bougainvillea, jasmine, or passion vine up the posts for living walls that fill in over a season or two. The overhead rafters support hanging lanterns, fans, or additional thatch panels for rain protection.
Tips
- Size the pergola at least 10x10 feet to accommodate the bar plus 3-4 stools with comfortable spacing.
- Run electrical conduit along a pergola post during construction for future string lights or a blender outlet.
- Use stainless steel hardware at all pergola-to-bar connection points; galvanized steel stains bamboo and wood with black streaks as it corrodes.
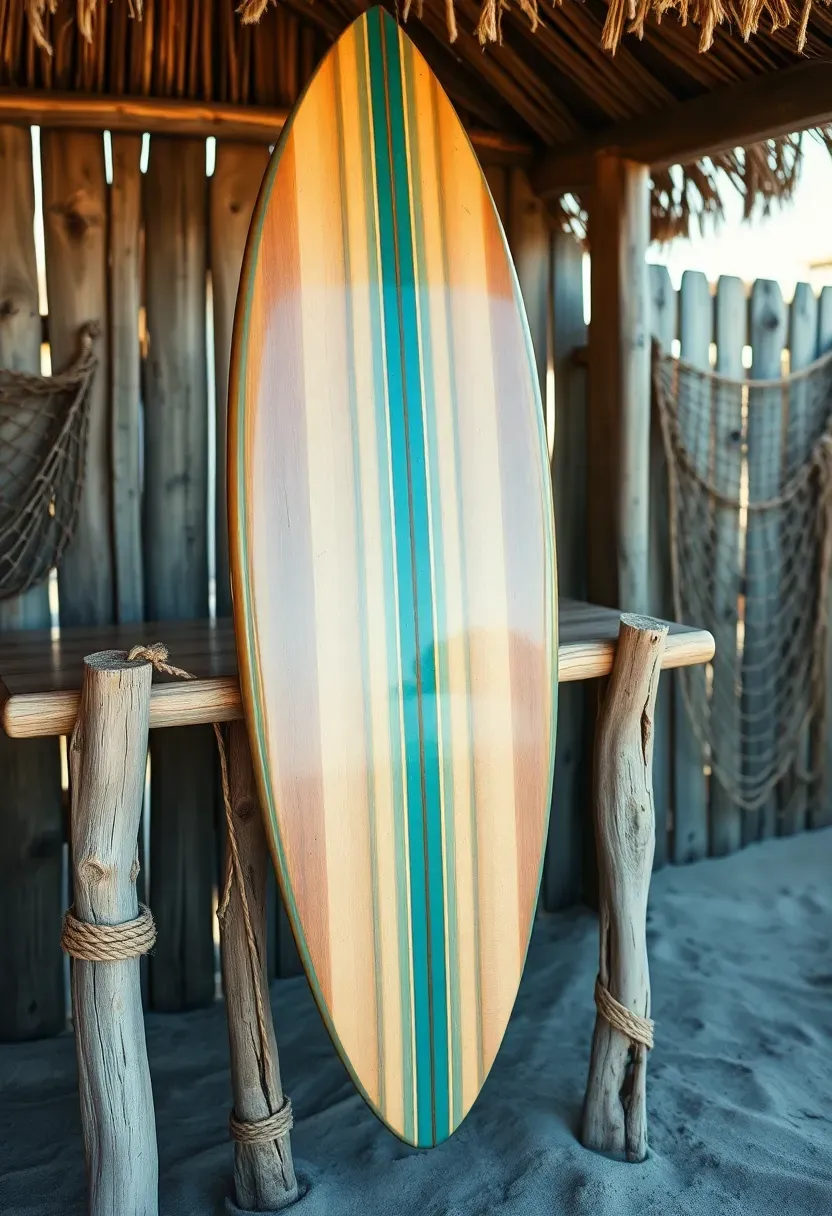
8. Surfboard Bar Top
An old surfboard flipped upside down on a sturdy base makes a bar counter that immediately says beach. Longboards (8-10 feet) work best because they provide enough surface area for drinks, cutting boards, and garnish trays. The rocker (curve) in the board means you need to mount it on a flat subframe using foam pads and lag bolts through the fin boxes. Thrift shops, garage sales, and Craigslist regularly have damaged or delaminated boards for $20-$50 that look perfect as furniture but are no longer seaworthy. Coat the deck side (which becomes your serving surface) with bar-top epoxy for a glassy, waterproof, easy-to-clean finish.
Tips
- Remove the fins and fill the fin boxes with marine epoxy before mounting — they collect standing water and breed mosquitoes otherwise.
- If the board has a fiberglass ding, sand it flush and seal with epoxy rather than trying to repair it — imperfections add character.
- Pair with driftwood legs or rope-wrapped 4x4 posts for a cohesive coastal look.
Recommended
Items for this idea
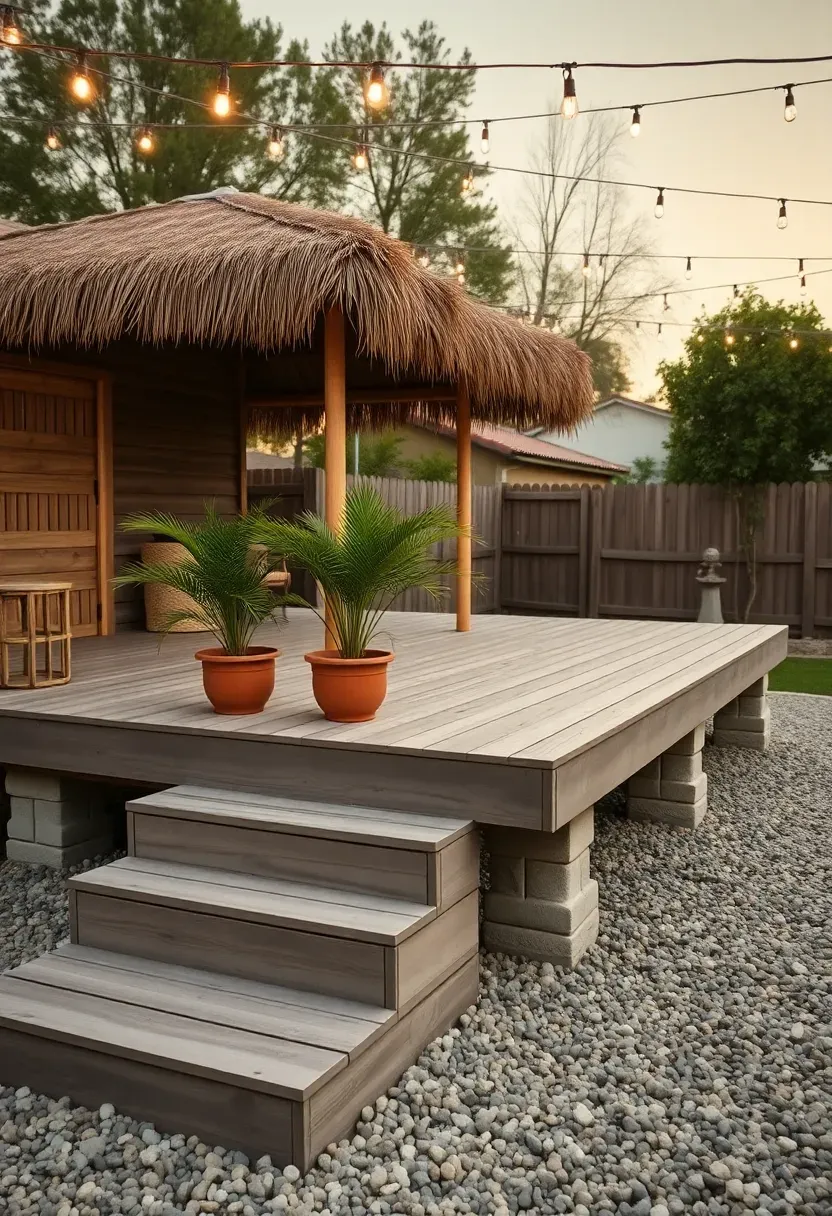
9. Floating Deck Tiki Bar
The Problem
Your yard slopes or has poor drainage, making a ground-level bar impractical. Water pools around the base after rain, wood rots, and the area turns muddy.
The Solution
A floating deck sits on concrete deck blocks rather than dug-in footings, raising the entire platform 4-6 inches above grade. Water drains underneath instead of ponding around your bar. Build a 10x12-foot deck from pressure-treated joists and composite decking boards, place the tiki bar on one end, and you have a level, dry entertaining surface that stays clean. The slight elevation also makes the space feel intentional — like stepping onto a stage. Floating decks do not require permits in most jurisdictions because they are not permanently attached to the ground, though you should verify local codes.
Pros and Cons
Pros: No digging or concrete pouring; relocatable if you change the layout; levels out minor grade changes automatically.
Cons: Maximum recommended size is about 12x16 feet without engineering; can shift slightly on freeze-thaw cycles in cold climates; not suitable for slopes greater than 12 inches over the deck span.
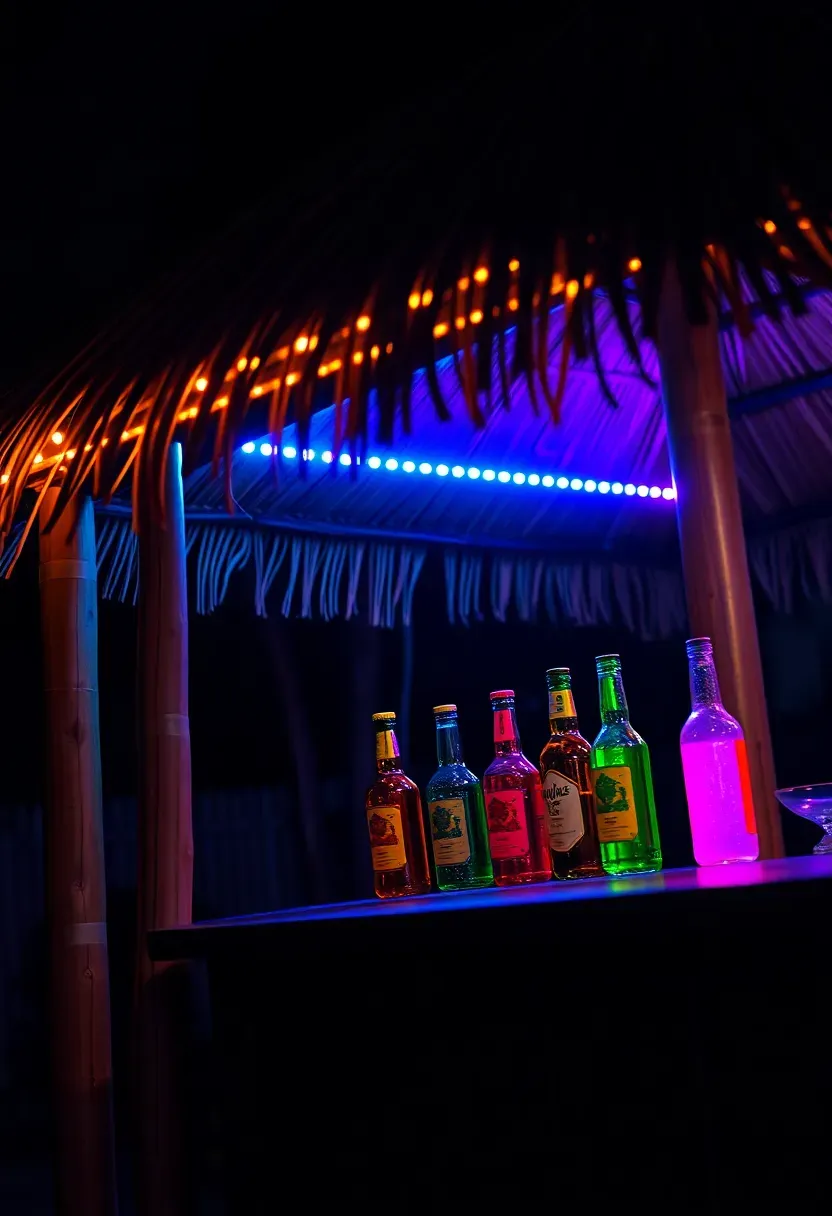
10. LED-Lit Tiki Bar
Tiki bars come alive after dark, and LED strips cost almost nothing to install. Run waterproof RGB LED strips (about $15 for a 16-foot roll) along the underside of the counter overhang, behind the bottles on the back shelf, and along the roof edge. A simple RF remote lets you switch between steady warm amber (for a torch-like glow), slow color cycling (for parties), or single colors to match a theme. Battery-powered LED strip kits exist for bars without nearby electrical outlets. The warm, low light hides imperfections in construction and makes even a rough pallet bar look polished once the sun goes down.
Tips
- Stick with warm white or amber as your default setting — cool blue LEDs kill the tropical mood.
- Use silicone-sealed LED channels rather than adhesive-backed strips directly on wood; the adhesive fails in humidity within a few months.
- Add a smart plug to control the lights from your phone so you do not have to walk to the bar to turn them on.
Recommended
Items for this idea
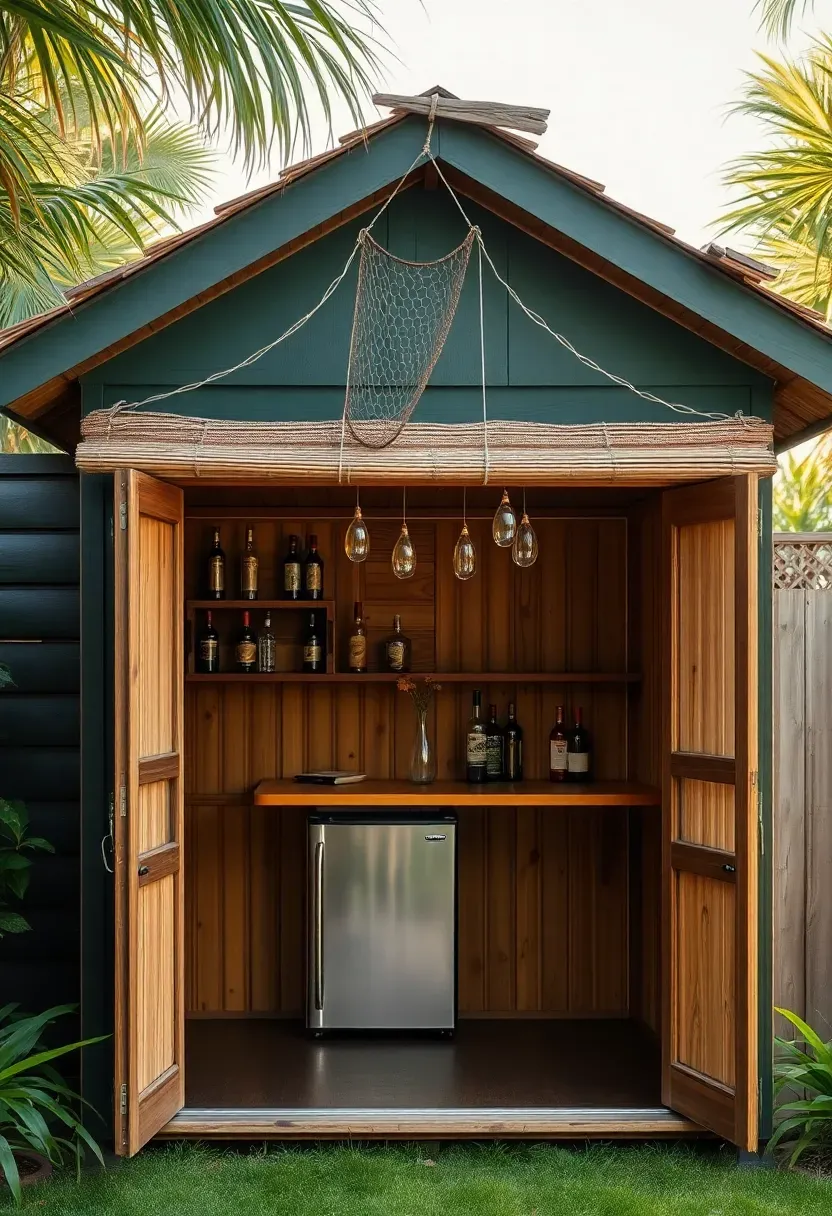
11. Converted Shed Tiki Bar
That 8x10-foot garden shed you barely use holds more tiki bar potential than any purpose-built structure. Remove the front wall (or half of it), install a fold-down counter where the wall was, and line the interior with bamboo reed panels. The remaining three walls provide built-in storage for bottles, glassware, a mini fridge, and supplies — all locked away when the bar closes. The existing roof keeps rain off without any additional construction. Add a thatched awning extension over the counter to shade seated guests, hang some fishing nets and glass floats from the ceiling, and you have a fully enclosed tiki bar with storage space that freestanding designs cannot match.
Tips
- Insulate the ceiling with 1-inch foam board before covering with bamboo panels — it keeps the interior cooler in summer and prevents condensation drips.
- Install a lockable barn-door slider on the front opening so you can secure the bar without rebuilding a wall.
- Run a dedicated 20-amp circuit for the mini fridge and blender; most sheds share a 15-amp circuit with outdoor outlets that trips when both appliances run.
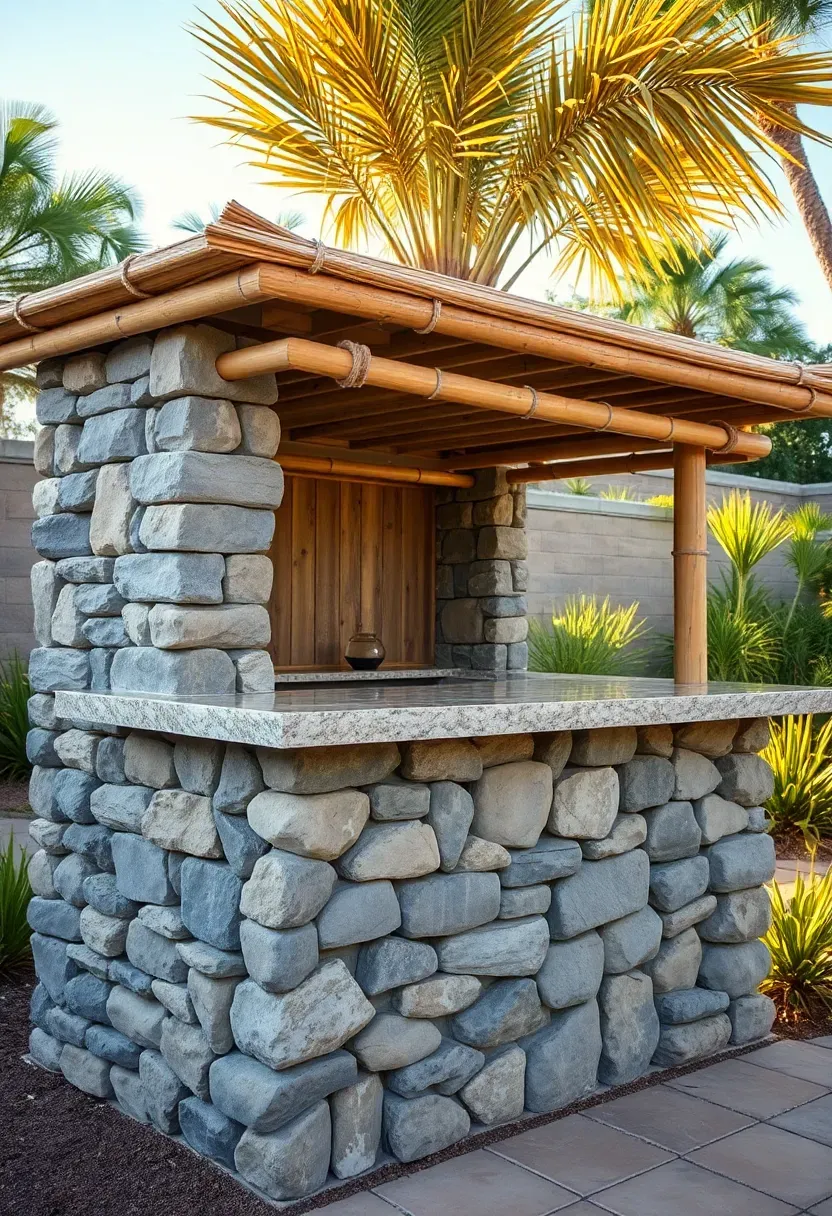
12. Stone and Bamboo Combo Bar
Step by Step
Mixing stone and bamboo gives you permanence on the bottom and tropical texture on top. This combination resists rot, looks substantial, and bridges the gap between a garden structure and a tiki aesthetic.
- Build an L-shaped or straight base wall using stacked concrete block or natural stone veneer over a concrete block core. Standard bar counter height is 42 inches; the stone base should reach about 30 inches.
- Set a granite, concrete, or butcher block counter slab on top of the stone base with construction adhesive and hidden L-brackets.
- Build the upper frame and roof from bamboo poles, starting with vertical posts bolted to the inside of the stone wall.
- Add the thatched roof, bamboo reed backing, and decorative lashing to complete the tiki look above the stone line.
Watch Out
- The stone base adds significant weight. Pour a 4-inch concrete pad beneath it or you will see settling cracks within a year.
Recommended
Items for this idea
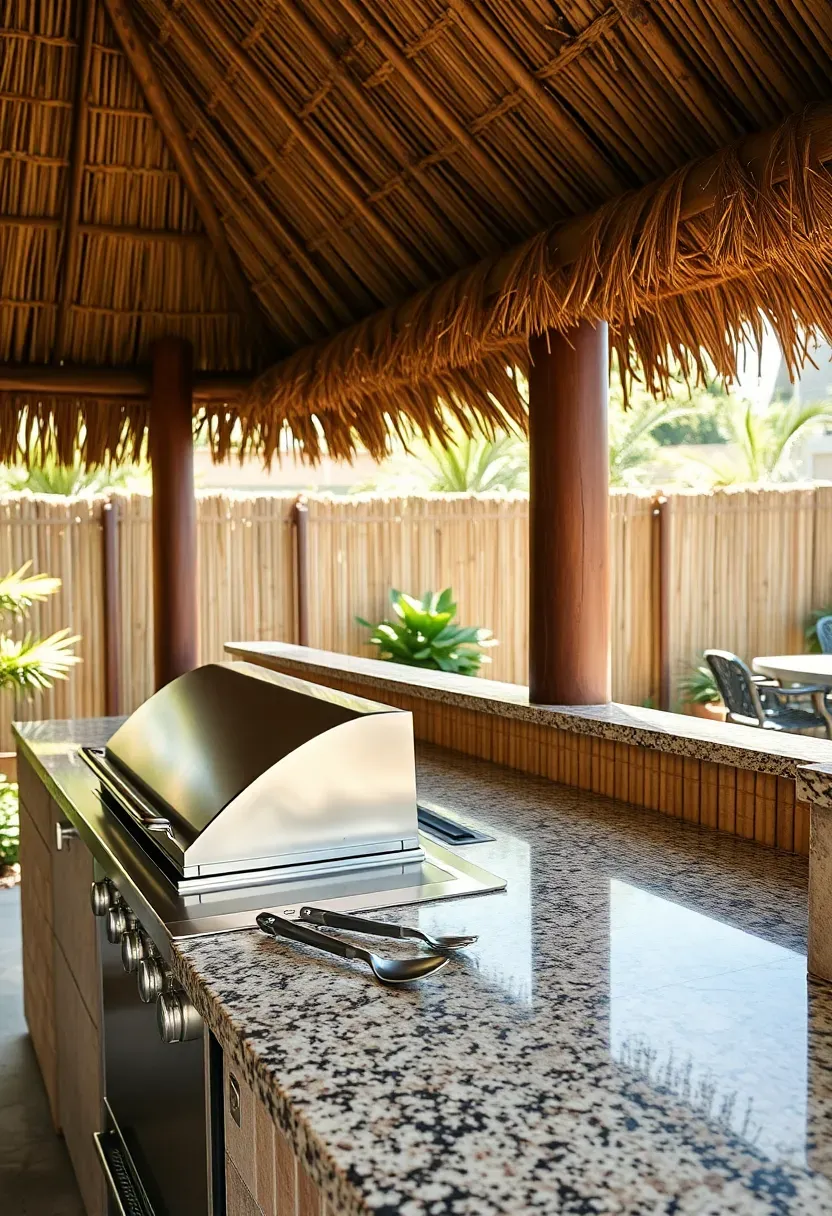
13. Tiki Bar with Built-In Grill
Putting a grill inside your tiki bar means the cook never misses the conversation. Dedicate one end of the bar counter to a drop-in grill (a 24-28 inch model fits well) and keep the remaining counter space for drinks and prep. The critical detail is separation: use a non-combustible countertop material like granite, concrete, or tile within 24 inches of the grill opening, and keep thatch, bamboo, and grass skirts well clear of the heat zone. A stainless steel heat shield between the grill and any combustible materials is a requirement, not an option. With proper clearances maintained, you get an all-in-one cooking and cocktail station that eliminates the usual back-and-forth between the grill and the bar.
Tips
- Install the grill on the downwind end of the bar so smoke drifts away from guests rather than into their faces.
- Drop a small stainless steel sink next to the grill for hand washing and rinsing utensils — a garden hose connection works fine for supply.
- Keep a fire extinguisher mounted on the back side of the bar within arm's reach of the grill.
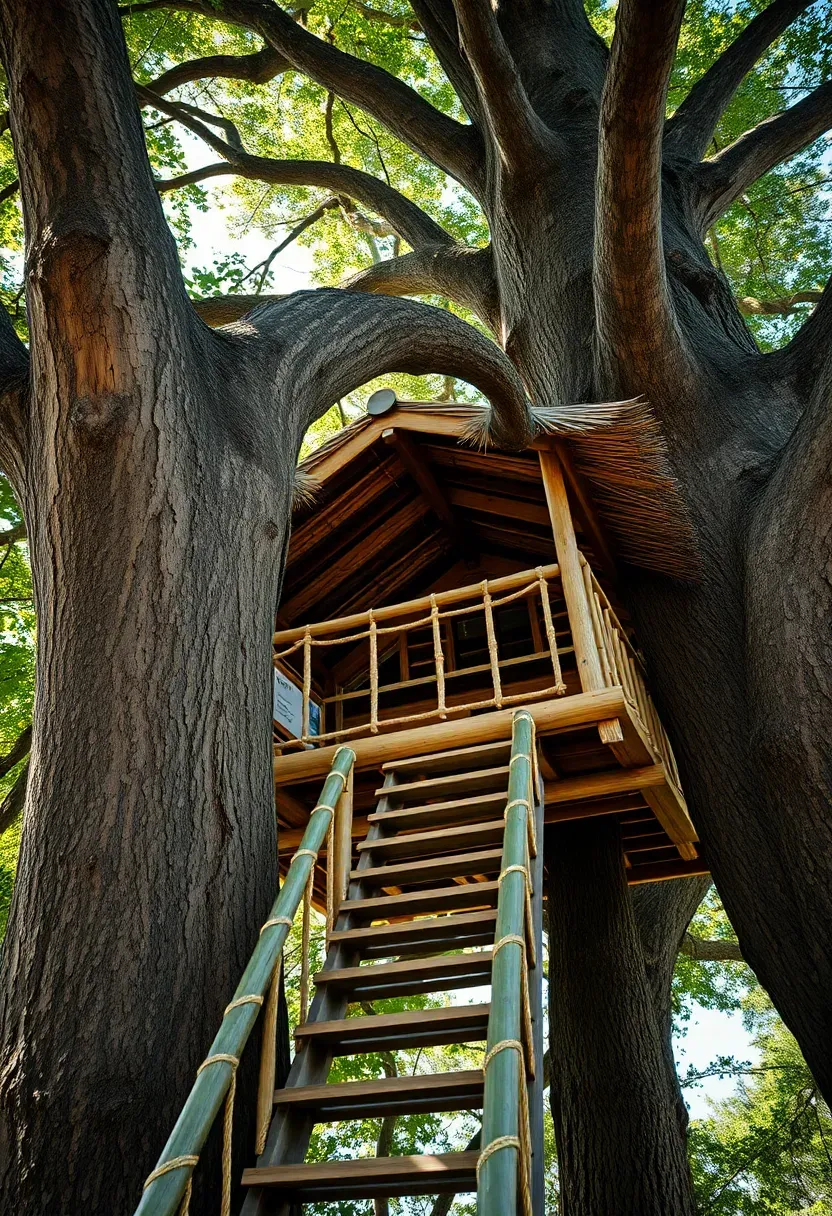
14. Treehouse Tiki Bar
If you have a mature tree with a trunk diameter over 18 inches, you can build a small bar platform 4-6 feet off the ground around or beside it. This is not a full treehouse — think of it as an elevated deck with a bar counter and a thatched roof. Use tree attachment bolts (TABs) rated for structural loads rather than standard lag bolts, which split the wood and damage the tree over time. A 6x8-foot platform accommodates a 5-foot bar counter and standing room for 3-4 guests. Access via 4-5 wooden steps with a rope railing keeps the approach feeling adventurous without being genuinely difficult. The elevation changes the perspective entirely — you are looking down at the yard instead of across it, and the tree canopy provides natural shade and screening.
Tips
- Consult an arborist before attaching anything to a living tree — some species tolerate hardware better than others.
- Leave a 2-inch gap between the platform and the trunk to allow for tree growth and wind sway.
- Limit occupancy to 6 people unless you have the platform engineered for higher loads.
Recommended
Items for this idea
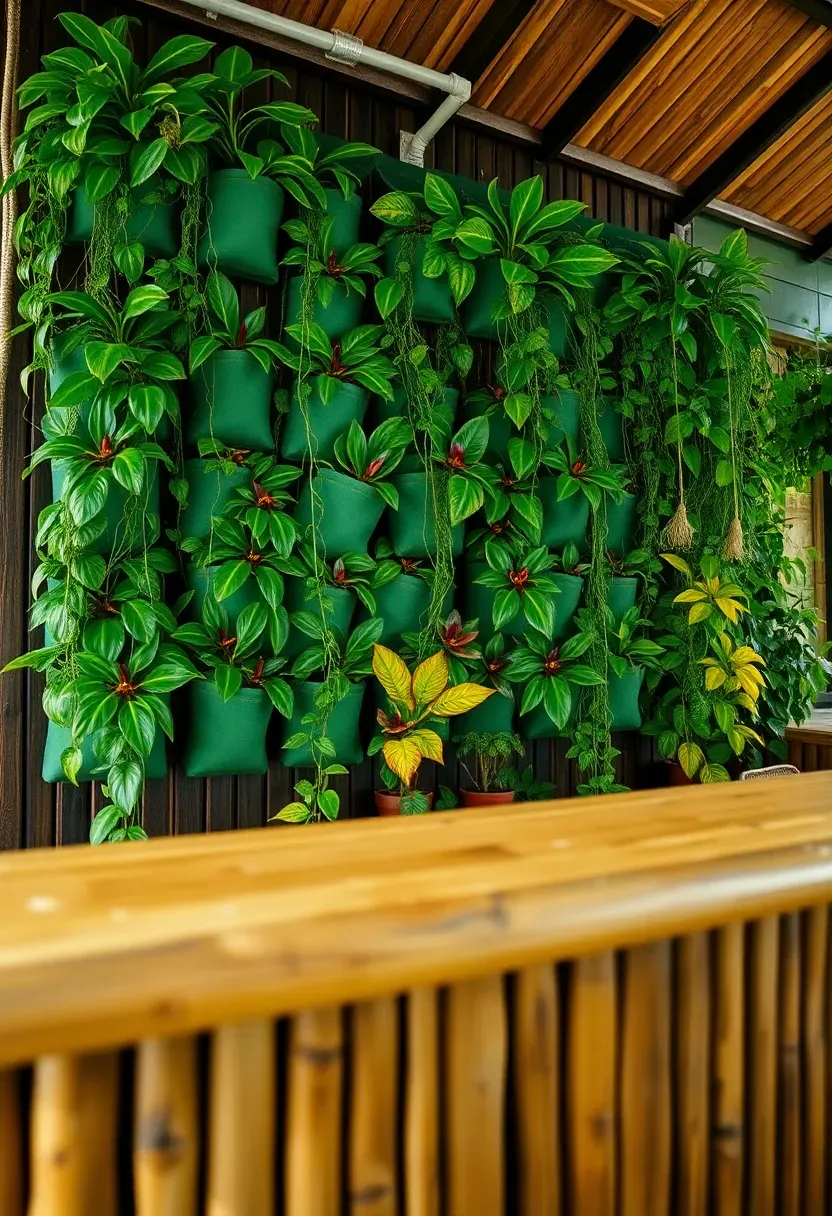
15. Tropical Planter Wall Bar
A vertical planter wall behind your tiki bar creates a living backdrop that no amount of decoration can match. Use pocket planters, wall-mounted troughs, or a felt-pocket system attached to the back wall of the bar. Fill them with shade-tolerant tropicals: pothos, bird's nest fern, bromeliads, croton, and philodendron. In zones 9-11 these stay outdoors year-round. In colder climates, treat the planters as seasonal displays and bring them inside before first frost or swap to cold-hardy ferns and ivy. The green wall absorbs sound, cools the air slightly through transpiration, and gives the bar a lush, overgrown quality that feels like drinking in a jungle clearing.
Tips
- Install a drip irrigation line across the top row connected to a battery-powered timer — hand-watering a vertical wall is tedious and uneven.
- Use a waterproof membrane between the planters and the bar's structural wall to prevent moisture damage.
- Mix in a few trailing plants (string of pearls, creeping fig) that cascade down and soften the grid pattern of the planter pockets.
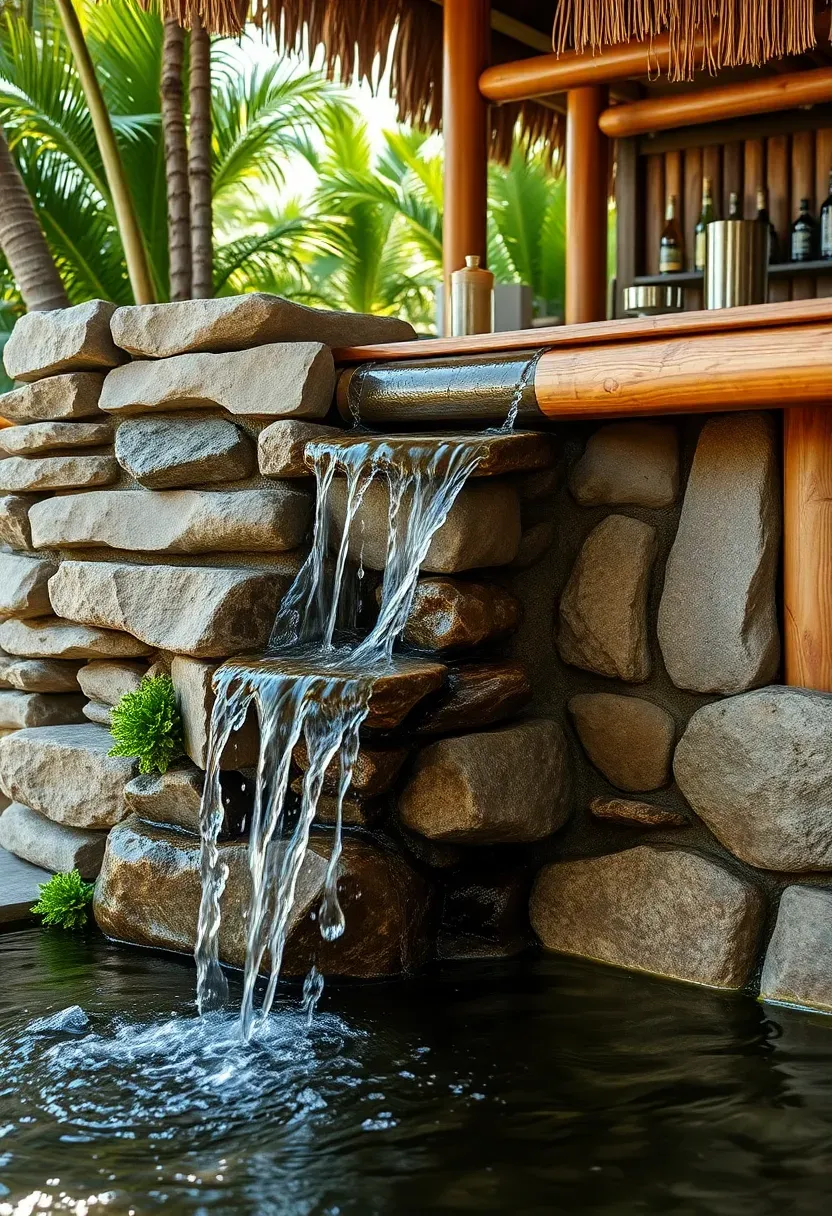
16. Tiki Bar with Waterfall Feature
Why Add Water
Moving water adds a sensory layer that no other element provides. The sound masks traffic noise and neighbor conversations, the motion draws the eye, and the humidity it creates makes nearby plants grow faster and lusher. A recirculating waterfall beside your tiki bar does not require a water line — it uses a small pond pump ($40-$80) cycling 200-400 gallons per hour through a stacked stone column or carved rock spillway into a basin below. Position the waterfall within 3 feet of the bar counter so guests hear it clearly while seated.
How to Set It Up
- Dig a basin 18 inches deep and line it with EPDM pond liner.
- Stack flat stones or use a pre-formed waterfall spillway, running flexible tubing from the pump at the bottom up through the back of the stone stack.
- Conceal the tubing, fill the basin, and test the flow rate before finishing the surrounding landscaping.
Watch Out
- Mosquitoes breed in still water. Keep the pump running continuously or add mosquito dunks (BTI tablets) to the basin.
Recommended
Items for this idea
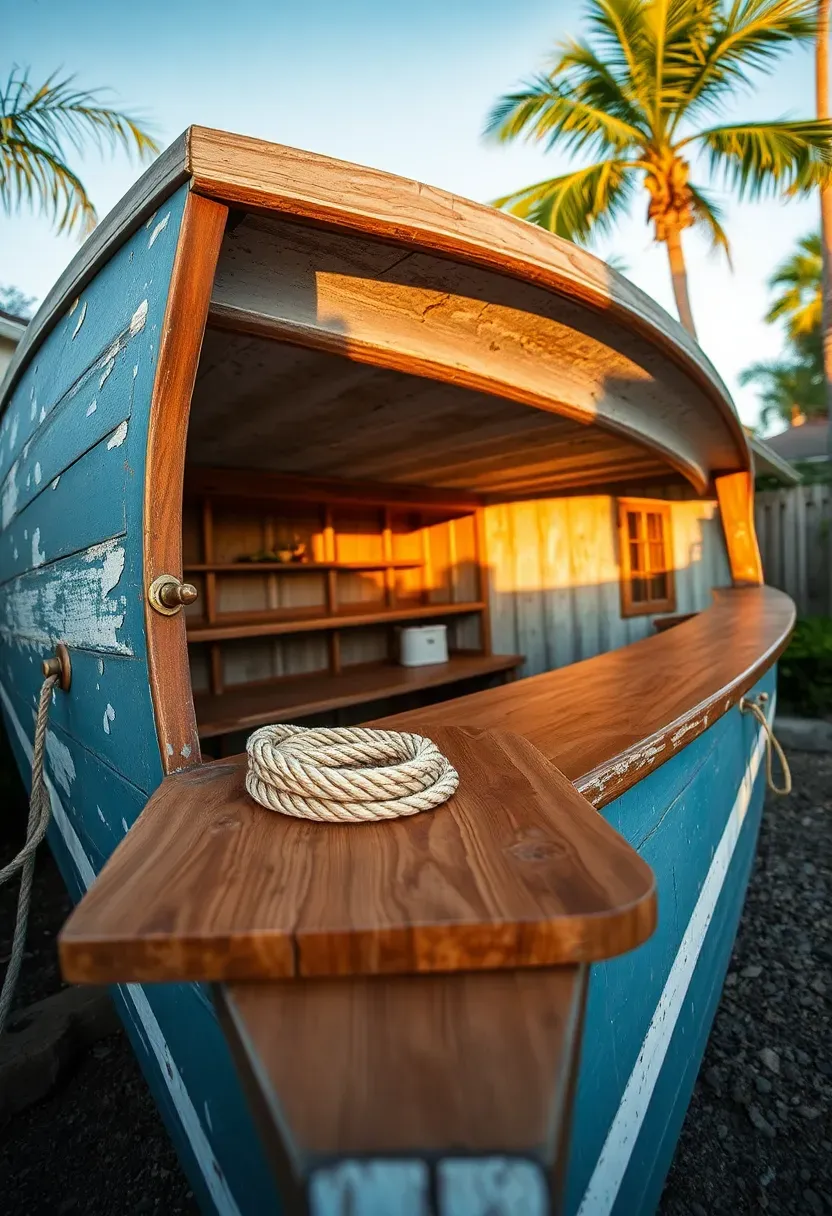
17. Reclaimed Boat Bar
Old rowboats, dinghies, and canoes make striking tiki bar foundations. Split a small wooden boat lengthwise (or find one already damaged on one side), prop the good half upright against a support frame, and mount a plank counter across the gunwales. The curved hull becomes the front face of the bar, and its natural patina — peeling paint, weathered wood, barnacle scars — contributes an authenticity that you cannot fake with new materials. Fiberglass boats work too, though they lack the warmth of wood. Check marinas, boatyards, and marine salvage dealers for boats headed to the dumpster. A boat that is worthless on water becomes the centerpiece of a backyard tiki bar for nothing more than the cost of hauling it home.
Tips
- Seal the interior of a wooden boat hull with exterior polyurethane to prevent further deterioration once it is installed as furniture.
- Add nautical rope, cleats, and a ship's wheel to the bar frame to reinforce the maritime theme.
- Mount bottle holders inside the hull curve where the hull meets the counter — the shape creates natural cradles for wine and liquor bottles.
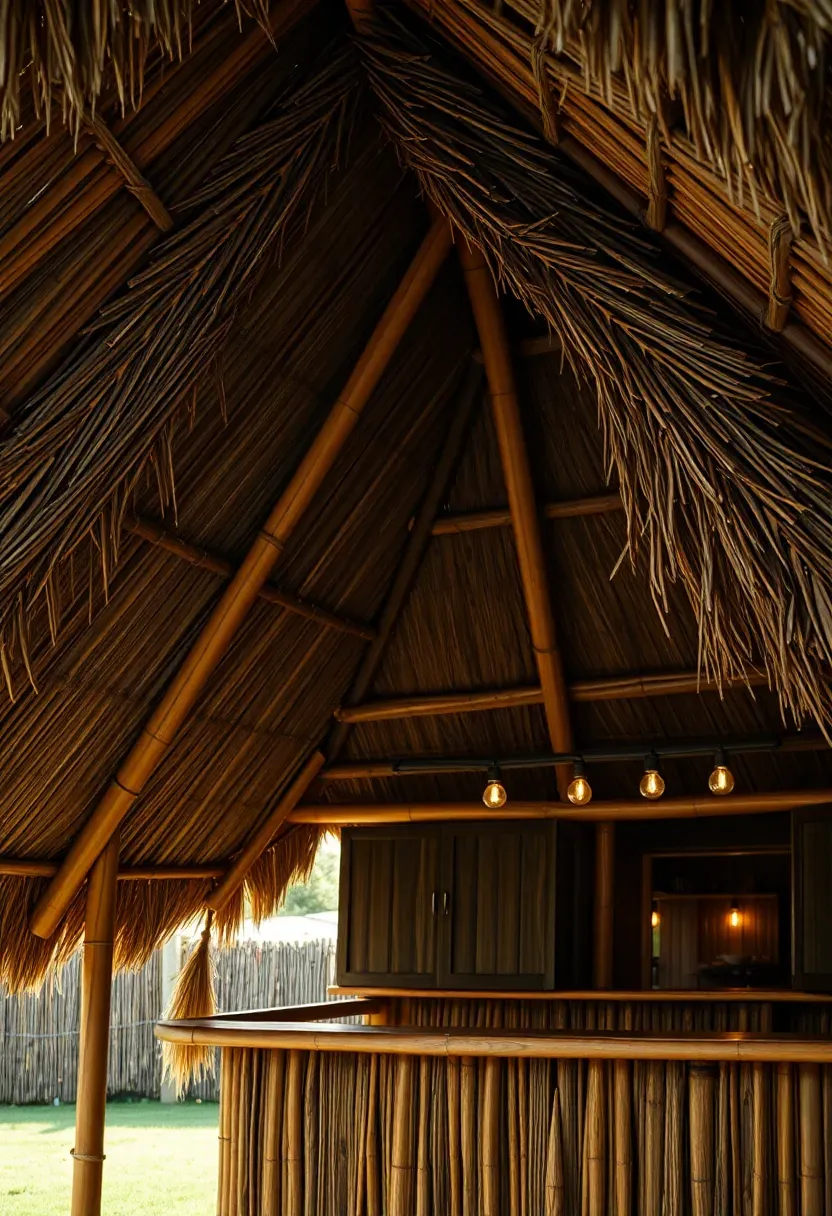
18. A-Frame Tiki Hut
The A-frame shape uses the roof as the walls, which simplifies construction and creates a dramatic, instantly recognizable silhouette in the yard. Two long rafters lean together at a steep angle (50-60 degrees), their feet spread 8-10 feet apart, and thatch panels cover both sloped surfaces down to within 3 feet of the ground. The open front and back provide ventilation and access. Inside, the bar counter runs parallel to one sloped wall, and the peak height gives you 8-9 feet of headroom at center. An A-frame uses less lumber than a conventional post-and-beam hut because the roof IS the structure. The steep pitch also sheds rain and wind exceptionally well, making it a solid choice for climates with frequent afternoon storms.
Tips
- Brace the A-frame with a horizontal collar tie at 6-foot height to prevent the feet from spreading under load.
- Leave the back partially open for cross-ventilation — a fully enclosed A-frame gets hot quickly on sunny days.
- String lights along the ridgeline inside for an overhead glow that follows the roofline angle.
Recommended
Items for this idea
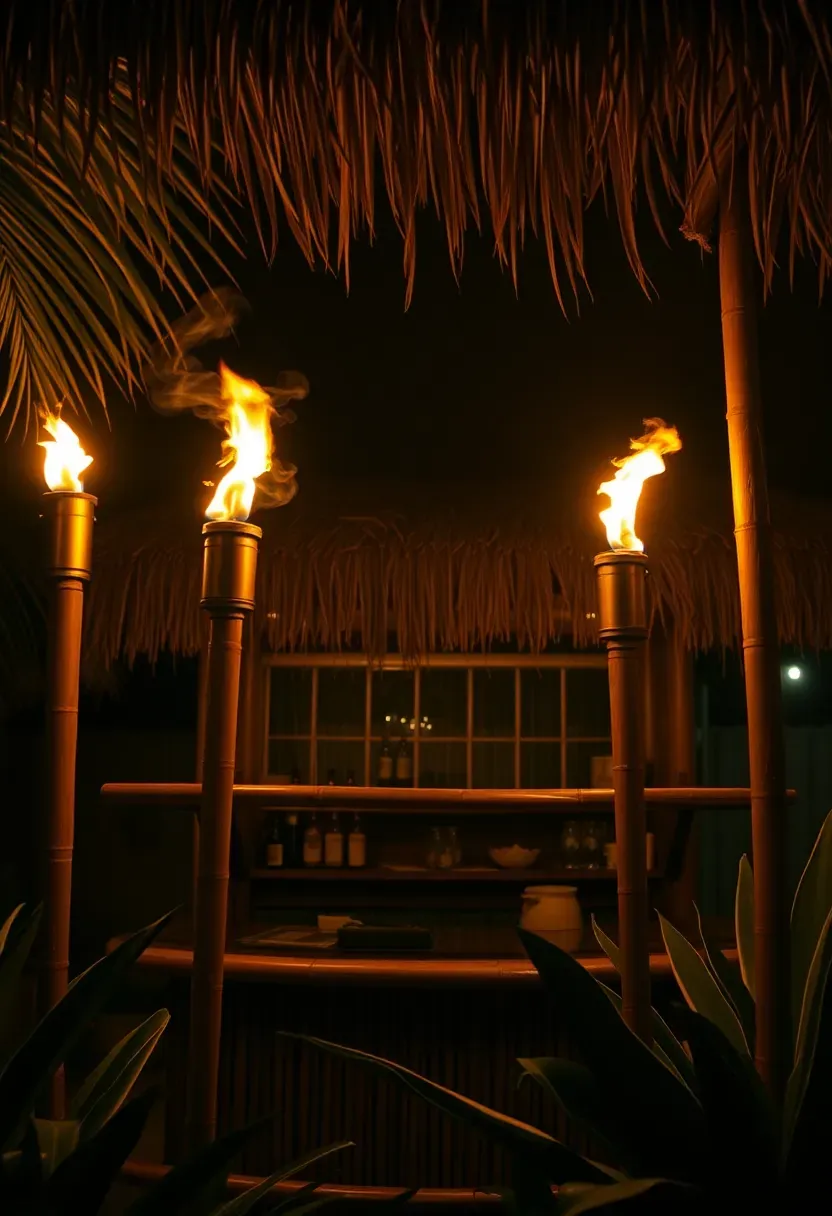
19. Tiki Bar with Fire Torches
Tiki torches predate the modern tiki bar revival by decades, and they remain the cheapest, most effective way to light and define an outdoor bar area. Bamboo torches cost $3-$8 each, burn citronella fuel that repels mosquitoes, and cast a flickering warm light that no electric fixture duplicates. Plant 6-8 torches in a semicircle around the bar at 4-foot spacing, pushing the stakes 12 inches into the soil for stability. The flame line creates a visual boundary that separates the bar zone from the rest of the yard and draws guests toward it after dark. For a more permanent installation, mount copper or stainless steel torch canisters on the tops of the bar's corner posts so the flames burn at roofline height.
Tips
- Use citronella torch fuel rather than standard lamp oil — it burns cleaner and the mosquito-repellent benefit is real within a 5-foot radius of each torch.
- Keep a bucket of sand near the bar for extinguishing torches at the end of the night. Never blow them out — the splashing fuel is a burn risk.
- In windy areas, switch to torch models with a wind guard (perforated metal sleeve around the wick) to prevent blowouts.
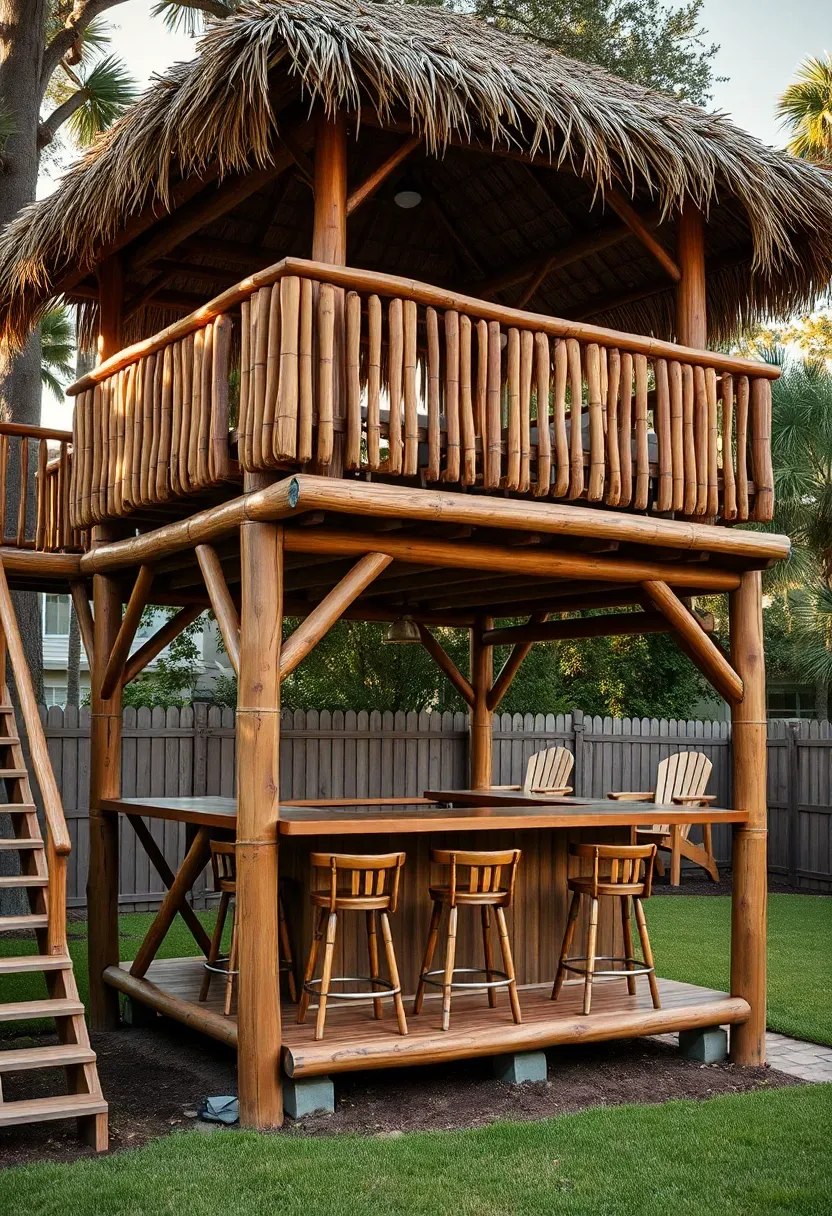
20. Double-Decker Tiki Bar
Going Vertical
When you run out of horizontal space, build up. A two-level tiki structure puts the bar on the ground floor and adds a small observation deck or lounge area on top. The upper level does not need to be large — a 6x8-foot platform with a railing and a couple of chairs gives guests a perch to watch the sunset or overlook the pool. The lower level operates as a standard tiki bar with counter, stools, and storage.
Engineering Reality
This is not a weekend project. A two-story structure needs proper footings (concrete piers below frost line), engineered lumber for the posts and beams (4x6 or 6x6 minimum), and compliance with local building codes for elevated structures. Expect to pull a permit and have inspections. Budget $5,000-$15,000 depending on size, materials, and whether you hire a contractor or build it yourself. The result is a backyard landmark that no neighbor's setup can compete with.
Choose If
- You have a large, flat yard with room for a footprint of at least 8x10 feet.
- You are comfortable with structural framing or willing to hire a professional.
- You want a year-round entertaining structure, not a seasonal decoration.
Recommended
Items for this idea
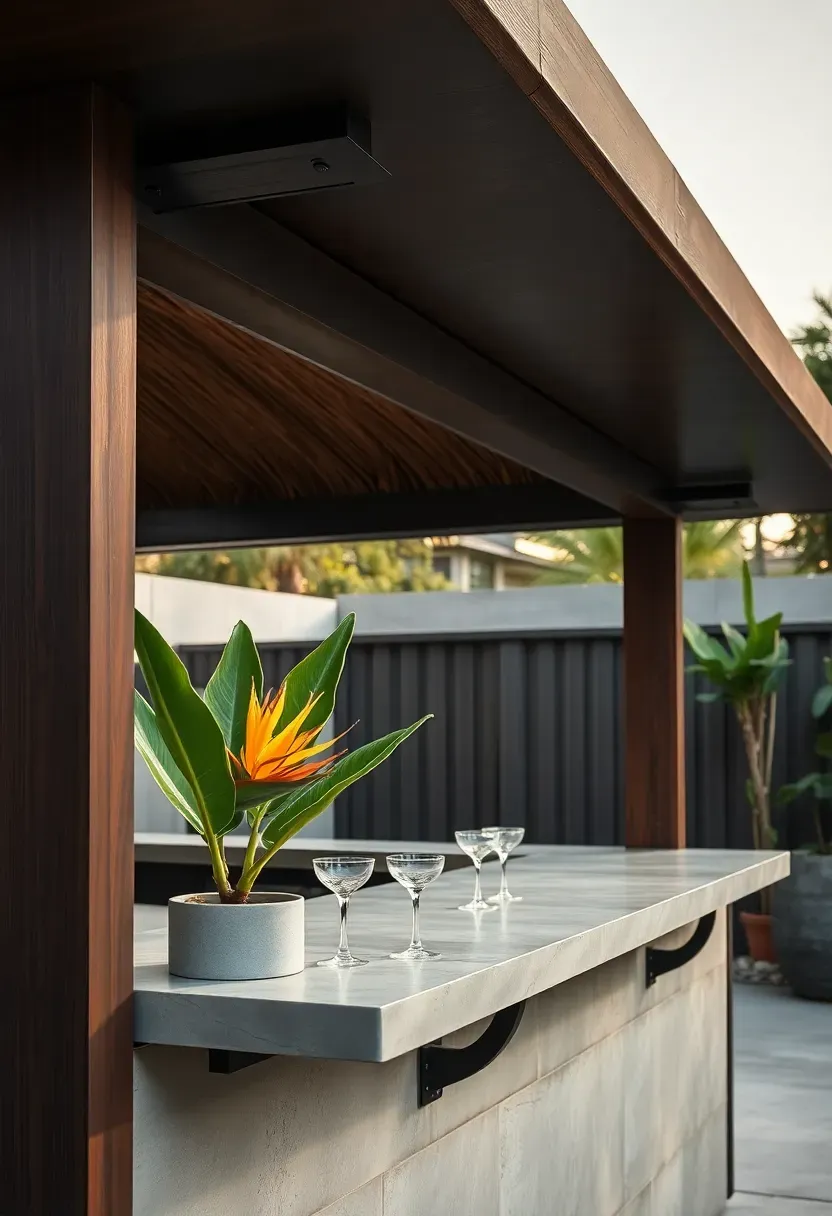
21. Minimalist Modern Tiki Bar
Not every tiki bar needs grass skirts and coconut shells. A modern interpretation keeps the thatched roof and natural materials but strips away the kitsch. Dark-stained cedar or ipe wood for the counter and frame, matte black hardware, clean horizontal lines, and a single thatch panel on the roof as a nod to tradition rather than a full thatched covering. The bar counter is a simple waterfall-edge slab — concrete, butcher block, or quartz — with no bamboo facing or rope detailing. This version fits backyards with contemporary architecture where a full-blown tiki hut would clash with the house. It reads as "outdoor bar with tropical influence" rather than "theme park ride," which works better for entertaining adults who appreciate design restraint.
Tips
- Use dark bronze or matte black screws and brackets instead of bright zinc — visible hardware should blend with the dark wood tones.
- A single statement plant (large bird of paradise or mature plumeria in a concrete pot) adds tropical context without cluttering the design.
- Skip the tiki mugs — serve drinks in clear glassware or copper cups to maintain the clean aesthetic.
Quick FAQ
How much does it cost to build a backyard tiki bar? A basic pallet or bamboo tiki bar runs $100-$500 in materials for a DIY build. Mid-range versions with stone bases, electrical, and plumbing land between $2,000-$5,000. Professional builds with concrete, custom roofing, and permits can reach $10,000-$20,000. The biggest variable is whether you pour a concrete pad or foundation, which adds $1,000-$3,000 on its own.
Do I need a permit for a tiki bar? In most municipalities, freestanding structures under 120 square feet and under 10 feet tall do not require a building permit. However, adding electrical, plumbing, or building anything attached to your house typically does require permits and inspection. Check your local building department and HOA rules before starting.
What is the best roofing material for a tiki bar? Natural Mexican rain cape palm thatch looks the most authentic and costs $25-$35 per 4-foot roll, but lasts only 3-5 years. Synthetic thatch panels made from HDPE plastic last 15-20 years, resist mold and insects, and look increasingly realistic. For the most durable option, use a solid roof (metal or plywood with shingles) and attach thatch panels over it as a decorative layer.
Can I build a tiki bar on a rental property? Yes — choose freestanding designs that do not attach to any permanent structure. Rolling tiki carts, pallet bars, and freestanding bamboo huts can all be disassembled and moved when your lease ends. Avoid pouring concrete footings or making any permanent modifications to the property.
Which wood holds up best outdoors for a tiki bar frame? Cedar and redwood resist rot naturally and last 10-15 years outdoors without treatment. Pressure-treated pine is the cheapest option and lasts 15-20 years but needs annual sealing. Ipe and teak are nearly indestructible (25+ years) but cost 3-5 times more than cedar. For bamboo elements, use Guadua or Moso species and seal all cut ends with wax or polyurethane to prevent water intrusion.
Building a backyard tiki bar is one of those projects where the planning takes longer than the actual construction. Pick one of these 21 ideas, spend a Saturday morning buying materials, and you will be mixing drinks behind your own bar by that evening. The imperfections are part of the charm — a slightly crooked thatch roof or a countertop with visible knots just makes it look more like something you would find on an actual beach. Start simple, add to it over time, and let the bar become a project that grows with each season.
Pinterest cover for 21 Backyard Tiki Bar Ideas
About the author
OBCD
CGI visualization and interior design content. We create detailed 3D renders and curate practical design ideas for every room in your home.