21 Backyard Concrete Ideas for Every Yard

Concrete gets dismissed as cold and utilitarian, which is fair if the only concrete you have seen is a flat gray slab behind a strip mall. But poured, stamped, stained, or textured concrete in a backyard is a different material entirely. It takes color. It holds curves. It ages well when sealed properly and costs roughly half what natural stone does for the same square footage. The 21 ideas here cover everything from simple walkway pours to more ambitious built-in features — all suited for residential yards and weekend-to-two-week timelines.
Here is a mix of practical pours and more creative concrete applications worth considering.
Table of Contents
- Brushed Concrete Patio with Expansion Joints as Design Lines
- Exposed Aggregate Walkway
- Concrete and Wood Hybrid Deck
- Poured Concrete Fire Pit Surround
- Stained Concrete Dining Pad
- Concrete Step Terrace on a Slope
- Stamped Flagstone-Look Path
- Concrete Planter Walls
- Polished Concrete Outdoor Kitchen Counter
- Concrete Edging for Garden Beds
- Geometric Paver and Concrete Grid
- Concrete Water Feature Basin
- Colored Concrete Pool Deck
- Concrete Bench Seating
- Boardform Concrete Retaining Wall
- Concrete Stepping Stones Through Gravel
- Concrete Pergola Footings as Design Elements
- Driveway-to-Patio Concrete Transition
- Concrete Curb Raised Beds
- Tinted Concrete Border Around a Fire Bowl
- Scored Concrete with Grass Joints
1. Brushed Concrete Patio with Expansion Joints as Design Lines
Most concrete patios have expansion joints — they are structural, not optional. But instead of treating them as an afterthought, plan the joint layout as a design grid. A four-foot-by-four-foot grid on a 16x20 patio creates clean geometric lines that read as intentional tile-like patterning. Use a standard broom finish for grip, and consider filling the joints with dark polyurethane caulk instead of leaving them raw. The contrast between light gray concrete and dark joint lines gives the surface graphic weight without any stamps or stains.
Making It Work
- Plan the joint layout before pouring — moving control joints after the fact cracks the slab
- Joints every four feet minimum prevents random cracking in most climates
- Dark-tinted caulk in the joints is easier to maintain than grout or bare gaps
We picked a few things that go well with this idea: Concrete Resurrection Semi-Transparent Stain (32oz) (★4.2), BEEST Concrete Acid Stain Burnt Ember (1 Gallon) (★4.1) and CC Concrete Coatings Vivid Acid Stain (1-Gallon) (★4.0). As an Amazon Associate we earn from qualifying purchases.
2. Exposed Aggregate Walkway
Why It Works Better Than Plain Concrete for Paths
Broom-finished concrete on a narrow path looks like a sidewalk. Exposed aggregate — where the top layer of cement paste is washed away to reveal the pebbles underneath — adds texture, color variation, and grip in wet conditions. The aggregate stones can be selected ahead of time: river pebbles for warm earth tones, crushed granite for reds and pinks, or quartz for a lighter look.
How the Process Works
Pour concrete with your chosen aggregate mixed into the top two inches. After the slab firms up but before it fully cures (about four to six hours depending on temperature), spray the surface with a retarder and pressure-wash the top layer to expose the stones. Seal the surface after full cure to lock in the color and prevent loose pebbles.
Pros and Cons
- Pro: Natural look that blends with garden surroundings, excellent traction
- Con: More labor-intensive than standard pours, harder to patch if damaged
- Best for: Garden paths, pool surrounds, side yard walkways
We picked a few things that go well with this idea: SoulMate 36-Inch Smokeless Fire Pit Ring (★4.4), Zzuvjoy 36-Inch Smokeless Steel Fire Pit Ring (★4.3) and Heavy-Duty Galvanized Steel Fire Pit Ring (36-Inch) (★4.6). As an Amazon Associate we earn from qualifying purchases.
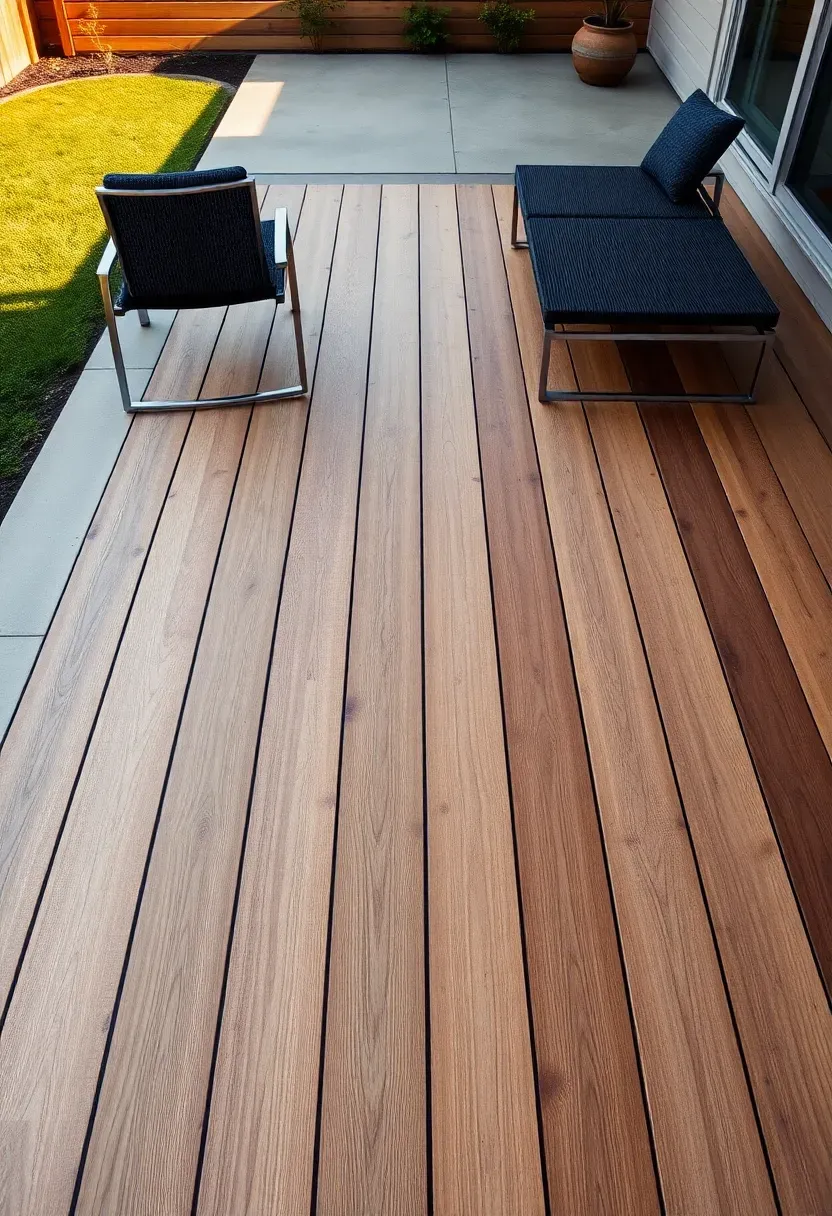
3. Concrete and Wood Hybrid Deck
Alternating strips of poured concrete and wood decking create a surface that is more interesting than either material alone. The concrete strips handle high-traffic zones and furniture legs without denting, while the wood sections add warmth and a softer feel underfoot. Space the materials in eighteen-to-twenty-four-inch-wide bands. Use ipe or thermally modified wood for the timber sections since they match concrete's lifespan better than standard cedar or pine.
Tips
- Set concrete strips flush with the wood surface — even a quarter-inch lip becomes a trip hazard
- Use stainless steel edge forms between materials to create a clean reveal line
- The wood will weather to gray over time, which actually brings it closer to the concrete tone
We picked a few things that go well with this idea: CX Pro-Formula Precast Concrete Countertop Mix (★4.5), Concrete Exchange Pour-in-Place Countertop Mix (★4.5) and Surecrete Xtreme Countertop Slurry Filler (3.5 LB) (★5.0). As an Amazon Associate we earn from qualifying purchases.
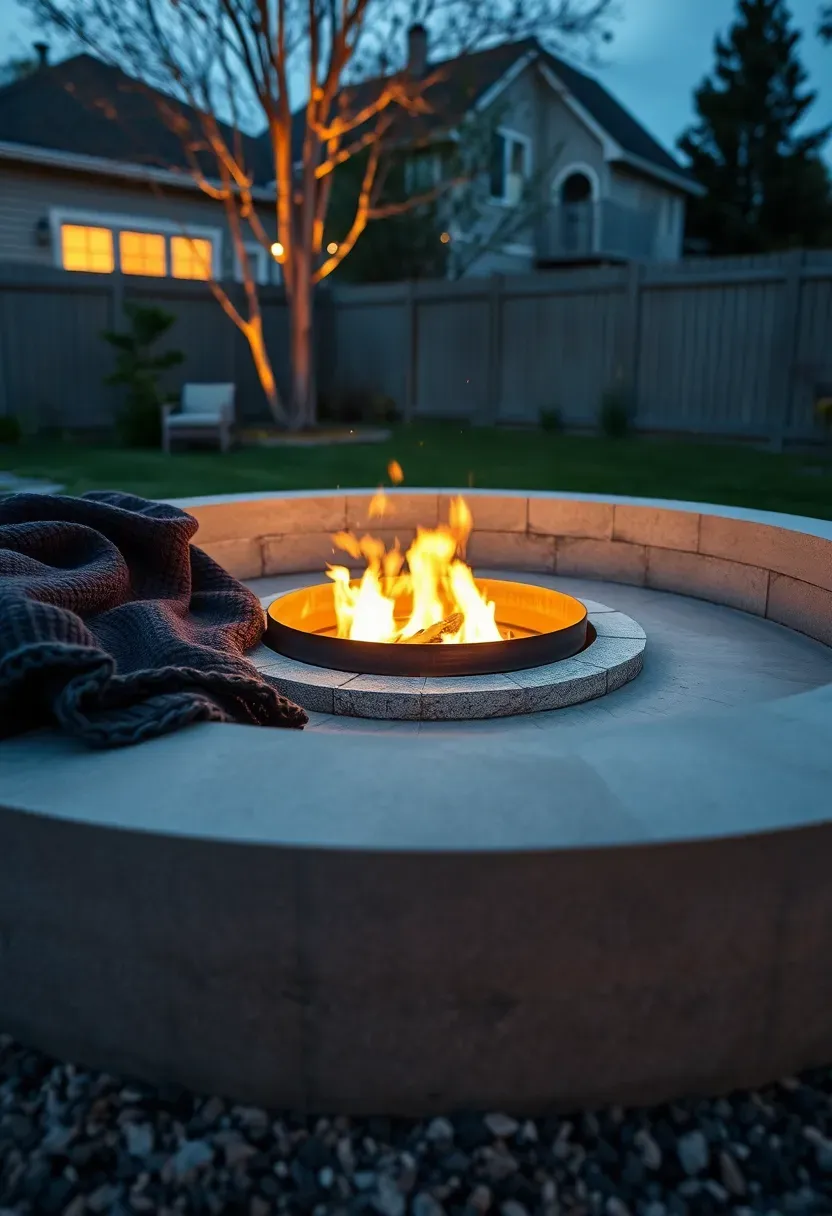
4. Poured Concrete Fire Pit Surround
The Problem with Loose Paver Fire Pits
Stacked paver fire pits shift over time. Freeze-thaw cycles push blocks apart, and heat warps the adhesive. After two winters, many of them look like they are slowly collapsing — because they are.
A More Permanent Fix
A monolithic concrete pour around a steel fire ring stays put. Form a circle five to six feet in diameter with a seat-height ledge (seventeen inches) around the perimeter. Pour the whole thing in one session so there are no cold joints. Trowel the top smooth for sitting and leave the vertical face with a rough form texture for contrast. The steel ring drops into a recessed center and lifts out for cleaning.
Worth Knowing
- Reinforce the ledge with rebar — people will sit on it, and concrete is brittle without steel
- Leave a four-inch air gap between the fire ring and concrete to prevent heat transfer cracking
- A matte sealer protects against drink stains without making the seat slippery
Recommended
Items for this idea
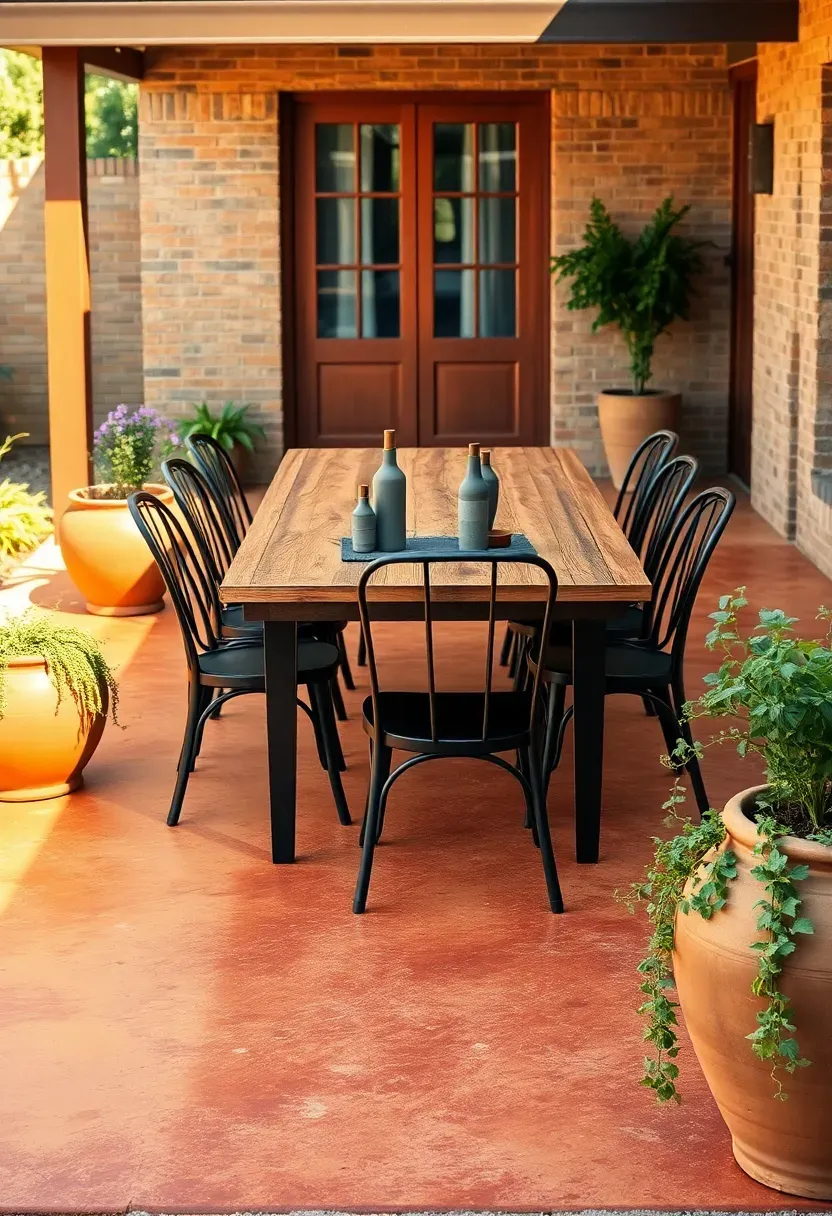
5. Stained Concrete Dining Pad
Acid staining turns ordinary gray concrete into something that resembles aged leather or natural stone. For a dedicated outdoor dining area, pour a 10x12-foot pad and stain it in warm tones — terra cotta, walnut, or amber. The chemical reaction between the acid stain and the concrete produces mottled, organic color that no two pours replicate exactly. Seal with a matte-finish exterior sealer so food and wine spills wipe up instead of soaking in.
Tips
- Test the stain on a sample slab first — color varies based on concrete mix and age
- Apply two thin coats rather than one heavy coat to avoid pooling and blotchiness
- Restain every three to five years to refresh color depth
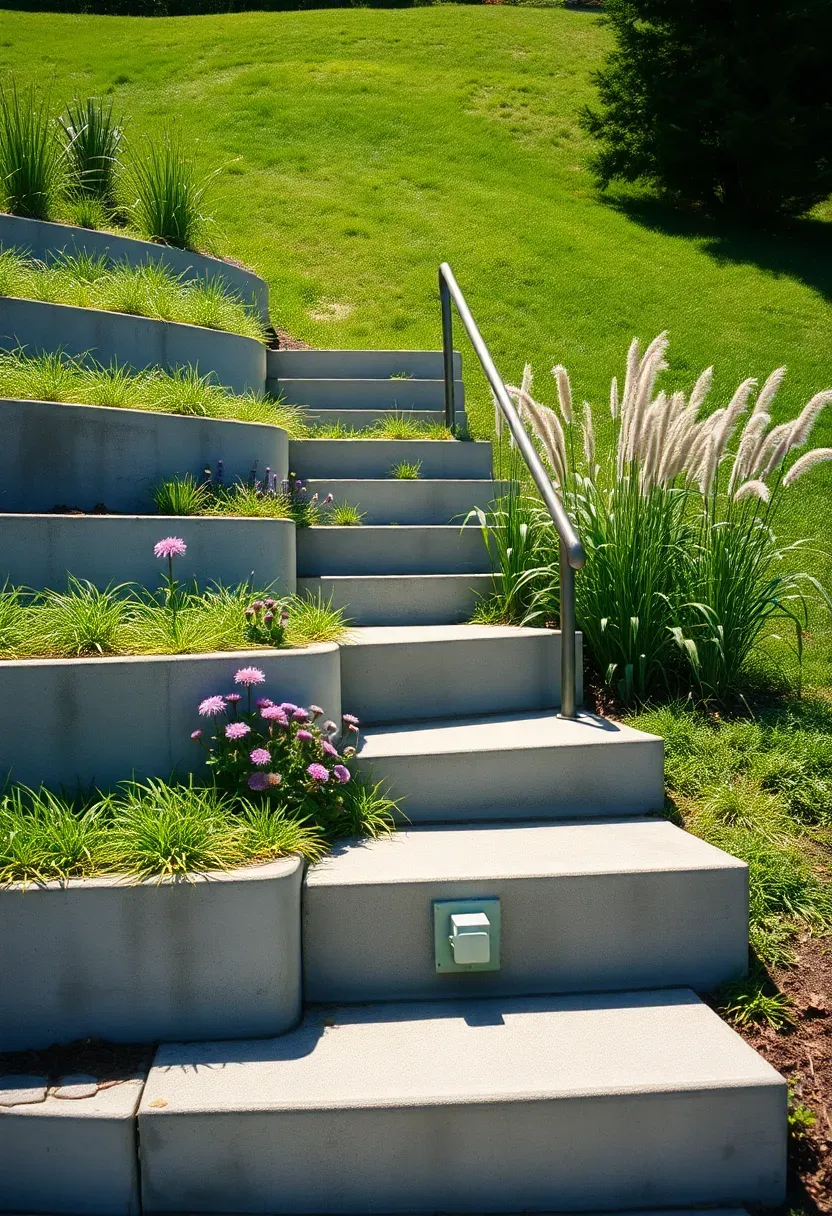
6. Concrete Step Terrace on a Slope
A sloped backyard feels unusable until you break it into levels. Poured concrete retaining steps — each about twelve to eighteen inches tall — carve flat platforms out of the grade. Use the terraced sections for planting beds, a seating pad, or lawn panels. The concrete risers do the structural work while the flat areas get whatever finish you want: grass, gravel, or additional poured concrete.
Step by Step
- Survey the slope and mark level lines every twelve to eighteen vertical inches
- Excavate each shelf six inches deeper than finish grade for a gravel base and four-inch slab
- Pour the retaining face of each step with rebar tied into the slab behind it for lateral strength
- Backfill and compact behind each step before pouring the next level up
Watch Out
- Drainage behind the retaining faces is critical — install perforated pipe and gravel backfill to prevent hydrostatic pressure from pushing the walls forward
Recommended
Items for this idea
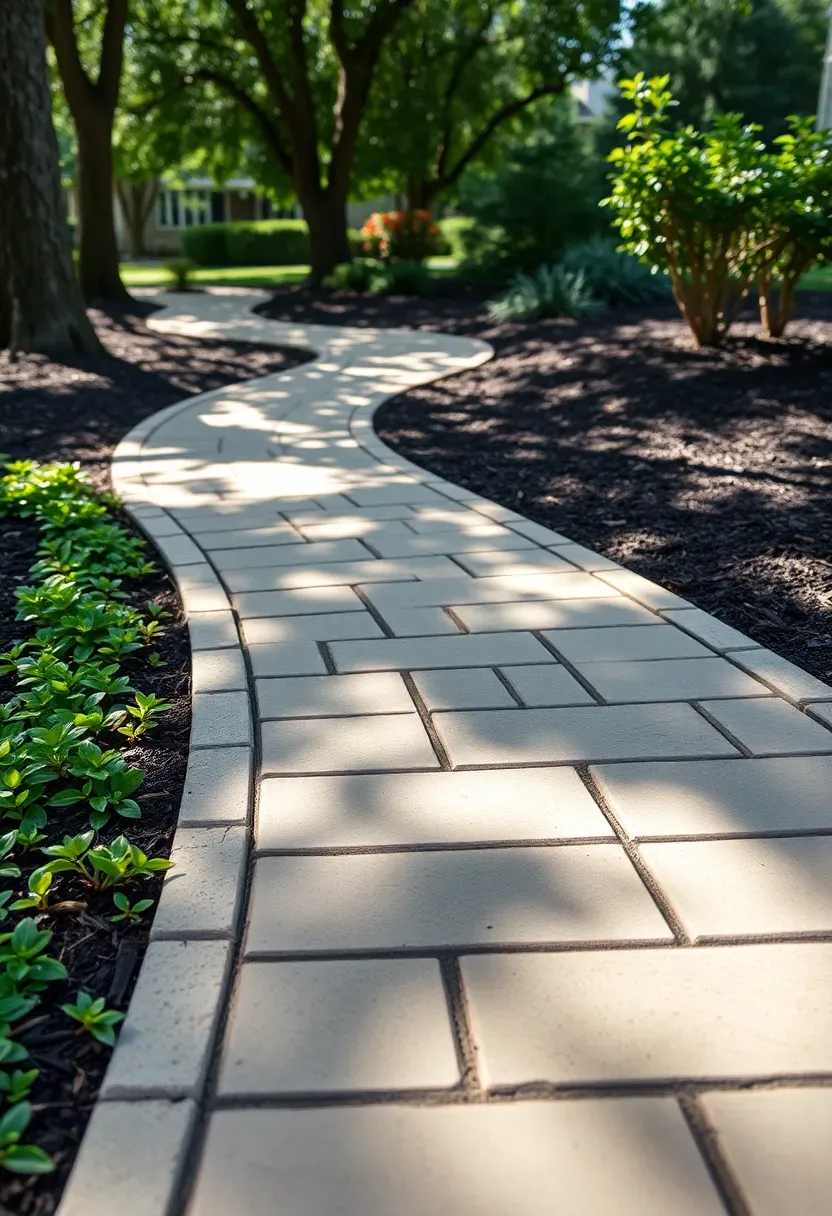
7. Stamped Flagstone-Look Path
Stamped concrete imitates natural stone at about a third of the cost. For a garden path, a flagstone stamp with an ashlar (random rectangular) pattern gives you the irregular joint lines and slight surface variation of real flagstone without the uneven footing that loose-laid stone creates. Color the concrete with an integral pigment in a sandstone or slate gray shade, then apply a release agent in a contrasting darker color before stamping. The release settles into the low points and joint lines, creating depth.
Tips
- Hire a stamping crew for paths longer than thirty feet — the timing between pour and stamp is tight
- Reapply sealer every two years to maintain color and prevent the stamp pattern from wearing flat
- Avoid very dark release colors on south-facing paths — they absorb heat and get uncomfortably hot underfoot

8. Concrete Planter Walls
Origins
Built-in concrete planters trace back to mid-century modern landscape design in Southern California, where architects like Garrett Eckbo used poured concrete to merge architecture and garden into a single material language.
Modern Take
Pour L-shaped or U-shaped concrete walls eighteen to twenty-four inches high and twelve inches wide. Fill the interior with drainage gravel, landscape fabric, and planting soil. The walls double as informal seating, define garden zones, and last decades with zero maintenance beyond occasional sealing. Plant ornamental grasses for movement and height, or low-water succulents for a desert modern look.
Applying It at Home
- Build forms from melamine-coated plywood for smooth interior faces
- Add a waterproof membrane to the inside of the planter before filling with soil
- Leave weep holes at the base of each planter for drainage — one per linear foot minimum
Recommended
Items for this idea
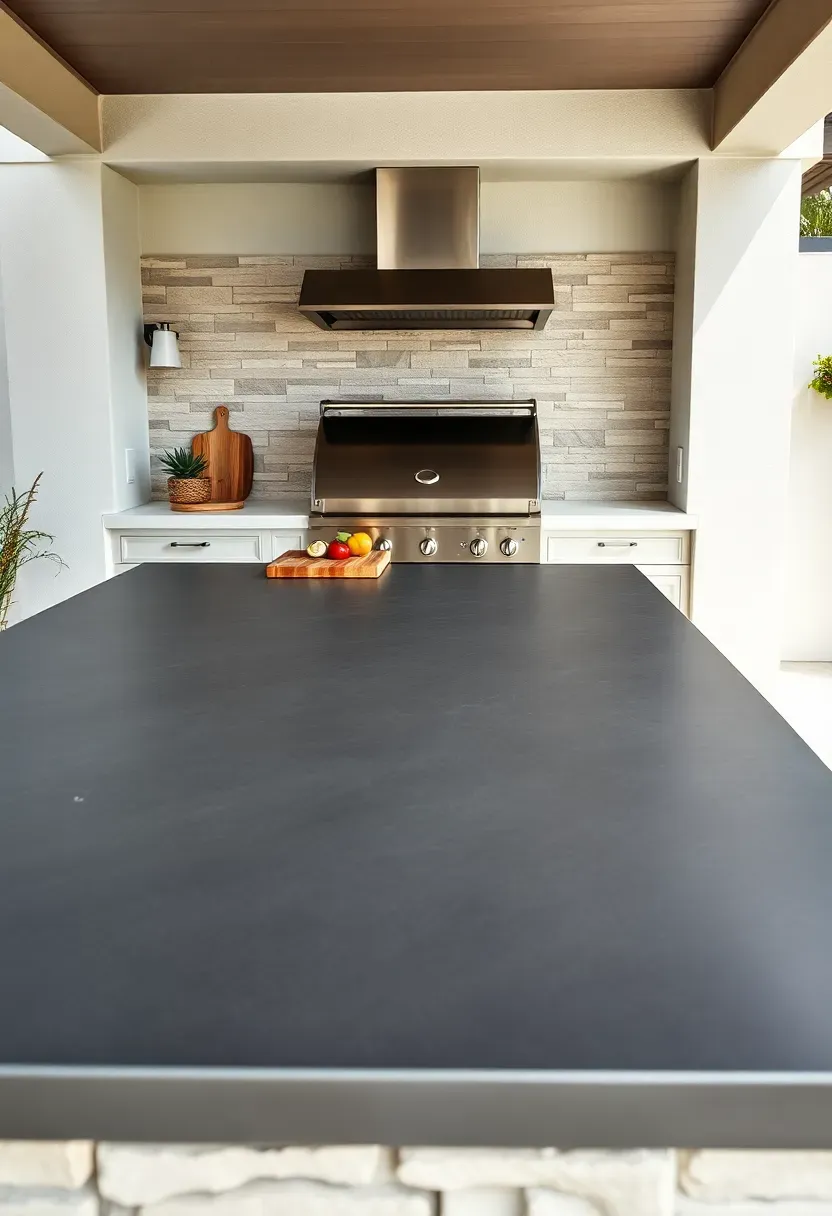
9. Polished Concrete Outdoor Kitchen Counter
Granite and tile are the default outdoor countertop materials, but poured-in-place concrete gives you custom shapes, integrated drain slopes, and a cost that undercuts stone by forty percent or more. Pour the counter on top of a concrete block or steel-framed base, then grind and polish the surface to a 400-grit matte finish. Integral charcoal or buff coloring keeps the look consistent through any surface chips. Seal with a food-safe penetrating sealer.
Tips
- Embed stainless steel mesh in the countertop for crack resistance — counters are thin slabs and flex under load
- Cast a slight pitch toward the front edge so rain runs off instead of pooling around the grill
- Leave knockouts for plumbing and electrical before the pour — cutting into cured concrete is miserable work
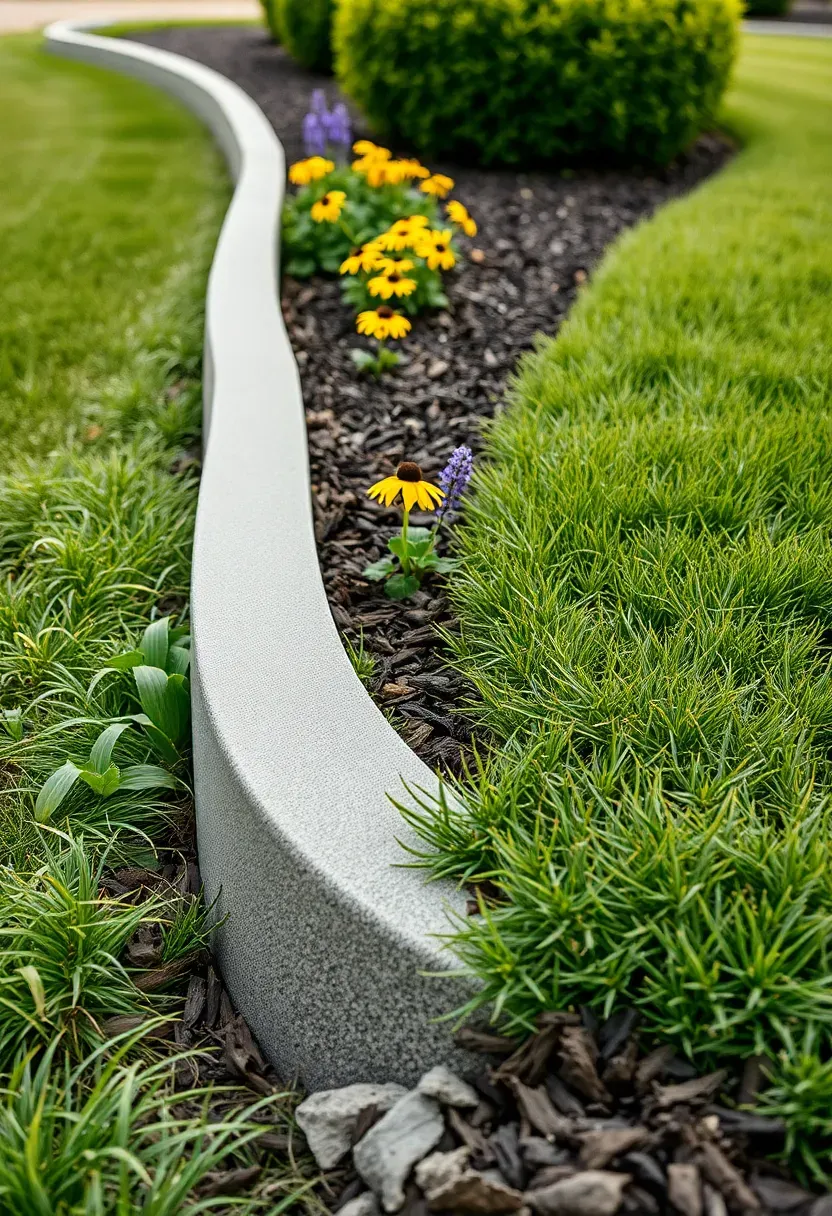
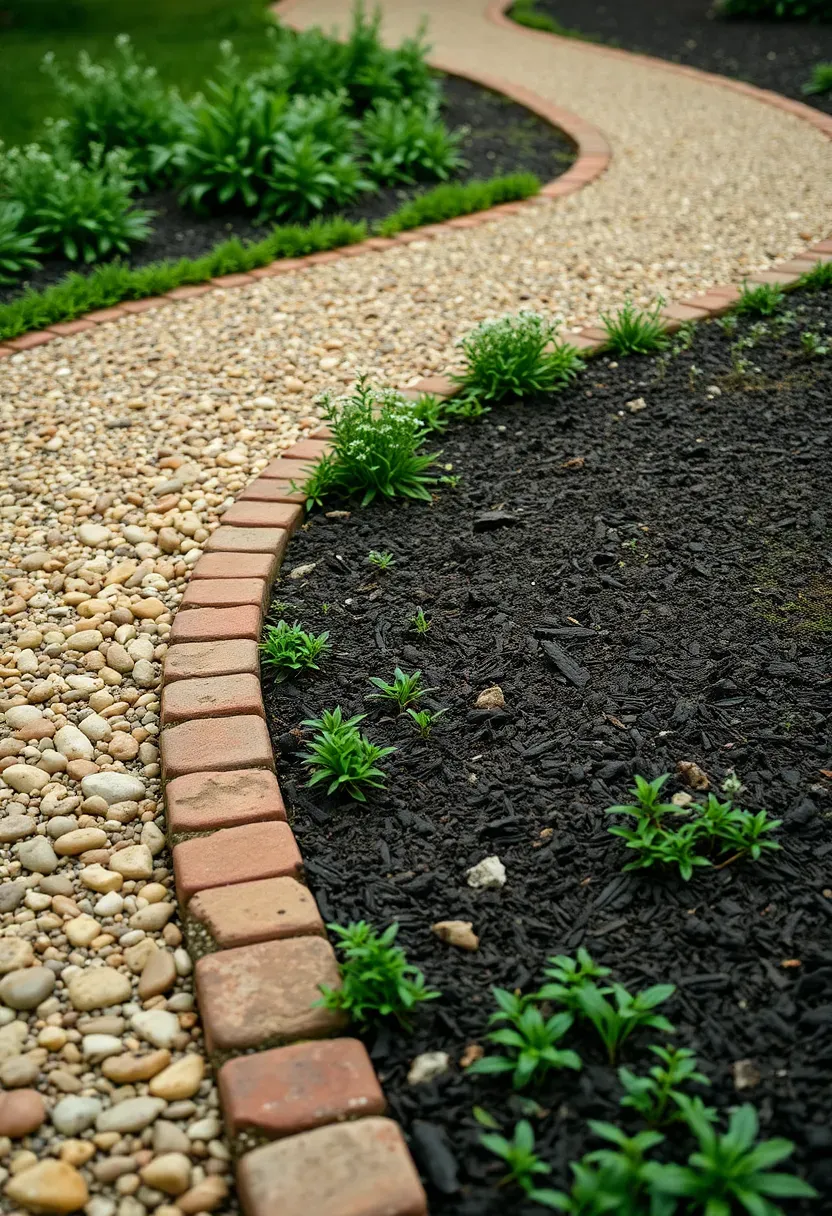
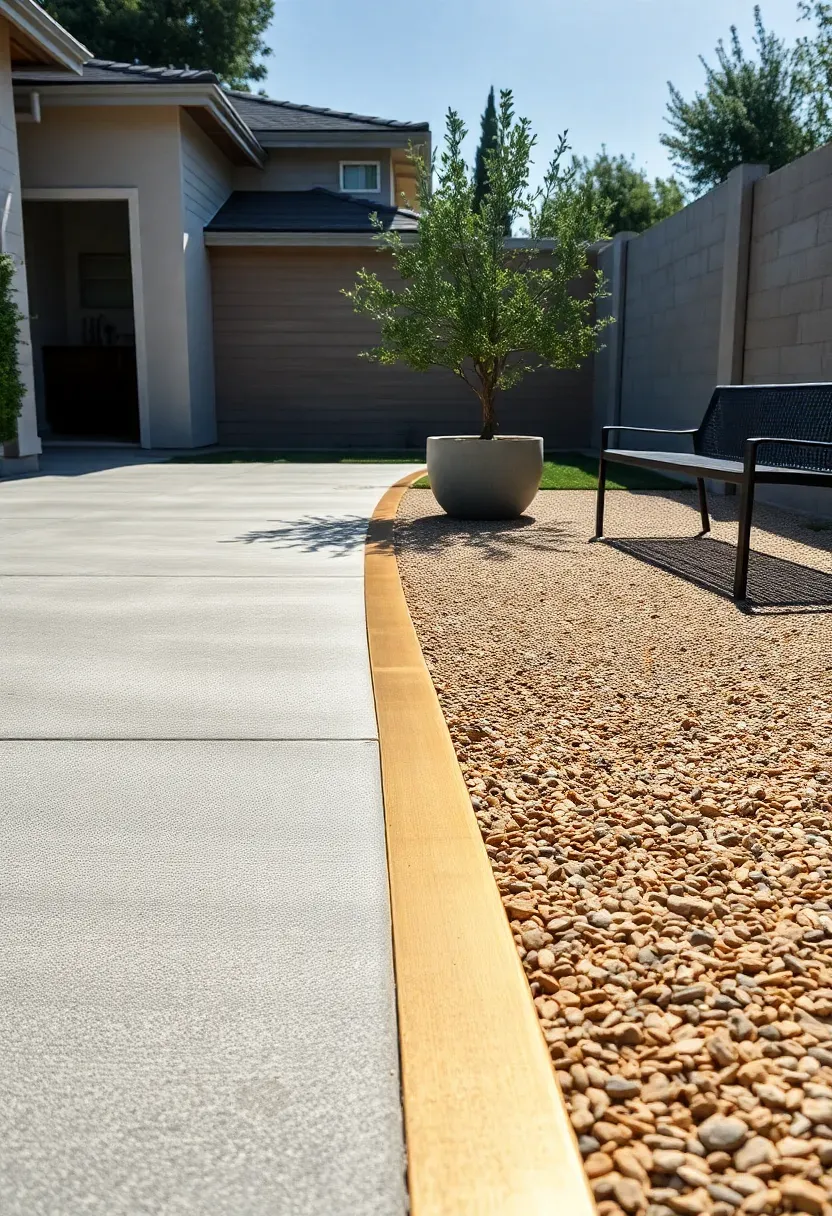
10. Concrete Edging for Garden Beds
Concrete curb edging is the least glamorous item on this list and possibly the most useful. A four-inch-wide, six-inch-deep continuous concrete curb between lawn and garden bed stops grass runners, holds mulch in place, and gives your mower a clean edge to follow. Machine-extruded curbing (done by specialty contractors with a curbing machine) lays down a continuous ribbon in any curve you want. The finish can be stamped, colored, or left plain gray.
Comparing Options
- Machine-extruded: Fast, consistent, follows curves easily, but limited to the contractor's stamp selection
- Hand-poured: More labor, but you control the width, height, and finish completely
- Choose extruded if you want fifty-plus linear feet done in a day; hand-pour for short custom sections
Recommended
Items for this idea
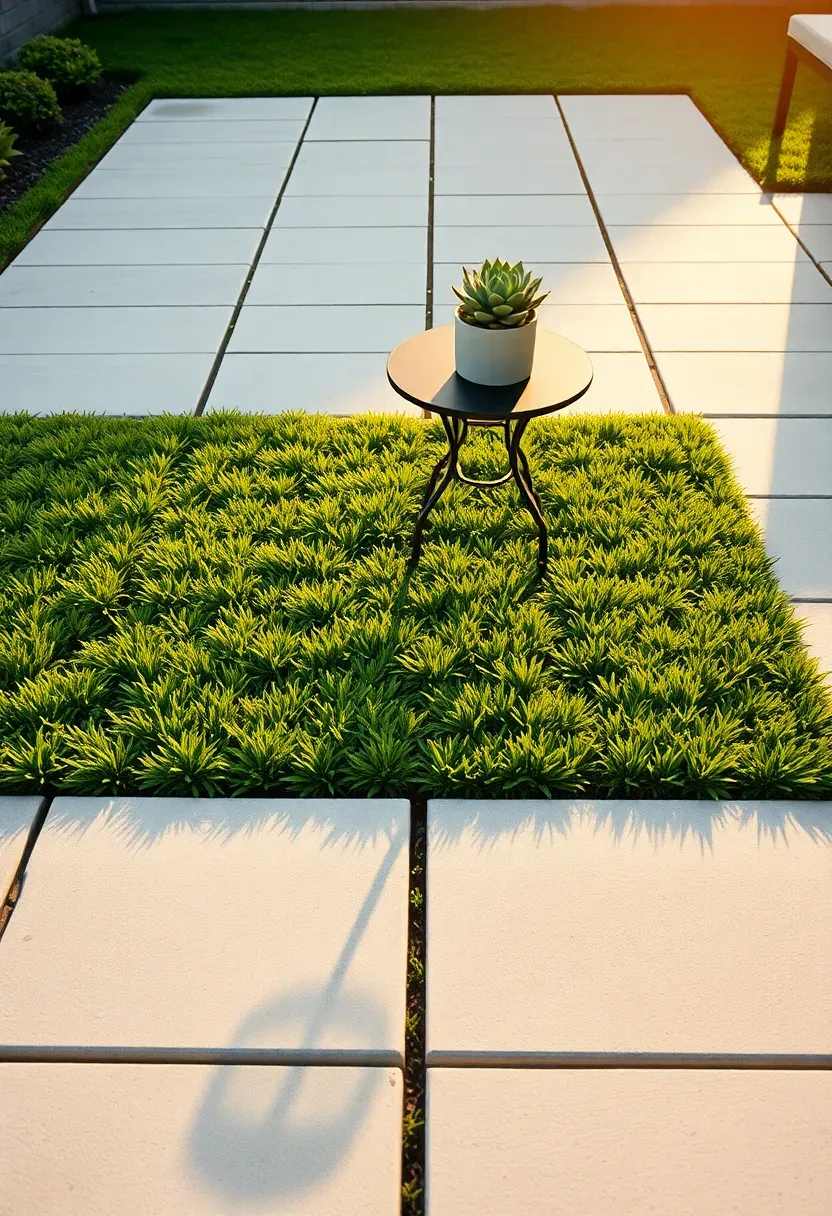
11. Geometric Paver and Concrete Grid
Large-format concrete pavers — twenty-four inches square or bigger — set in a grid with two-to-three-inch grass or creeping thyme joints create a surface that is part hardscape, part garden. The grid reads as structured from above while the green joints soften it at ground level. This approach works for patios, paths, and even parking pads where full impervious coverage is not required (and where stormwater codes may limit paved area).
Tips
- Set pavers on a compacted gravel base with leveling sand — not directly on soil
- Use creeping thyme between joints for a fragrant, low-growing alternative to grass
- Power-wash pavers annually to prevent moss buildup on the shaded edges
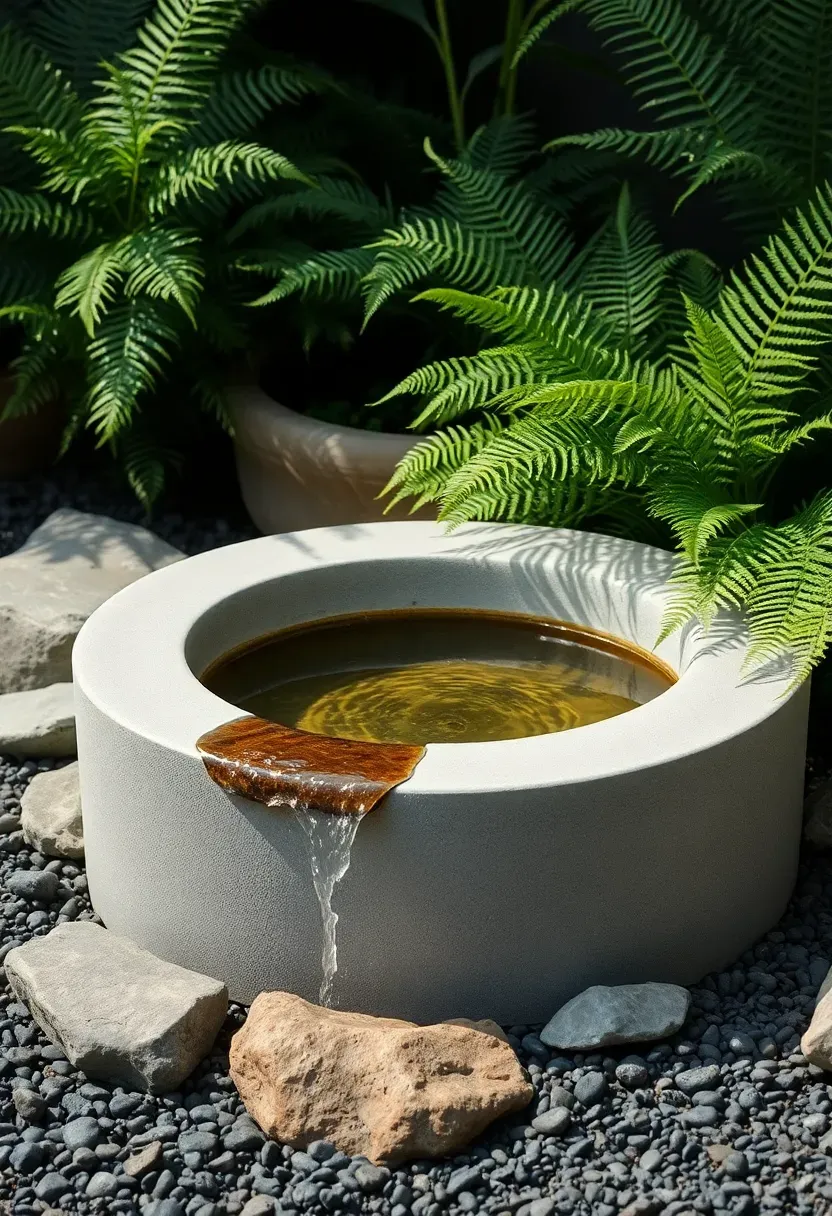
12. Concrete Water Feature Basin
Building One from Scratch
A poured concrete basin for a recirculating water feature costs less than a pre-made stone version and fits whatever dimensions your yard needs. Form a bowl shape using a sand mold or nested plywood forms, pour with a high-strength mix (5000 PSI minimum for water resistance), and seal the interior with a pond-safe concrete sealer. A small submersible pump in a hidden reservoir below the basin pushes water up through a center hole and lets it sheet over the rim.
Getting the Sound Right
Water volume and drop height control whether your feature sounds like a gentle stream or a kitchen faucet. Reduce pump flow until the water barely overflows the rim edge. Add a layer of smooth river rocks in the catch basin below to break the falling water into quieter droplets rather than a single loud splash.
Recommended
Items for this idea
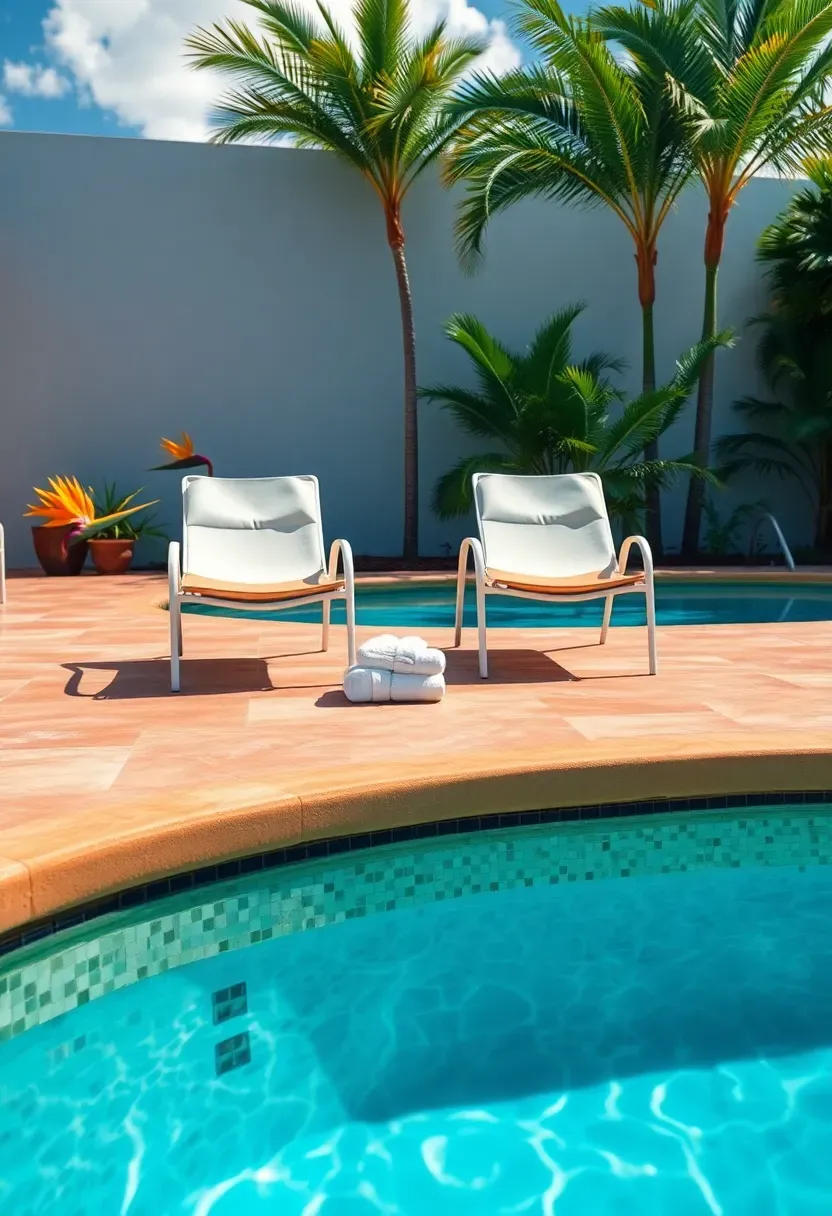
13. Colored Concrete Pool Deck
White or light gray concrete around a pool glares in direct sun and shows every leaf stain. Integral coloring in sandstone, warm gray, or buff tones cuts glare by thirty to forty percent and hides staining between cleanings. Apply a non-slip broom or salt finish for bare feet. The color runs through the full depth of the concrete, so chips and scratches do not expose a contrasting layer underneath the way surface-applied stains do.
Tips
- Lighter tones stay cooler underfoot — avoid dark browns or charcoals around pools
- Cool-deck coatings can be applied over colored concrete for additional heat reduction
- Use a silane/siloxane sealer that repels water without creating a slippery film
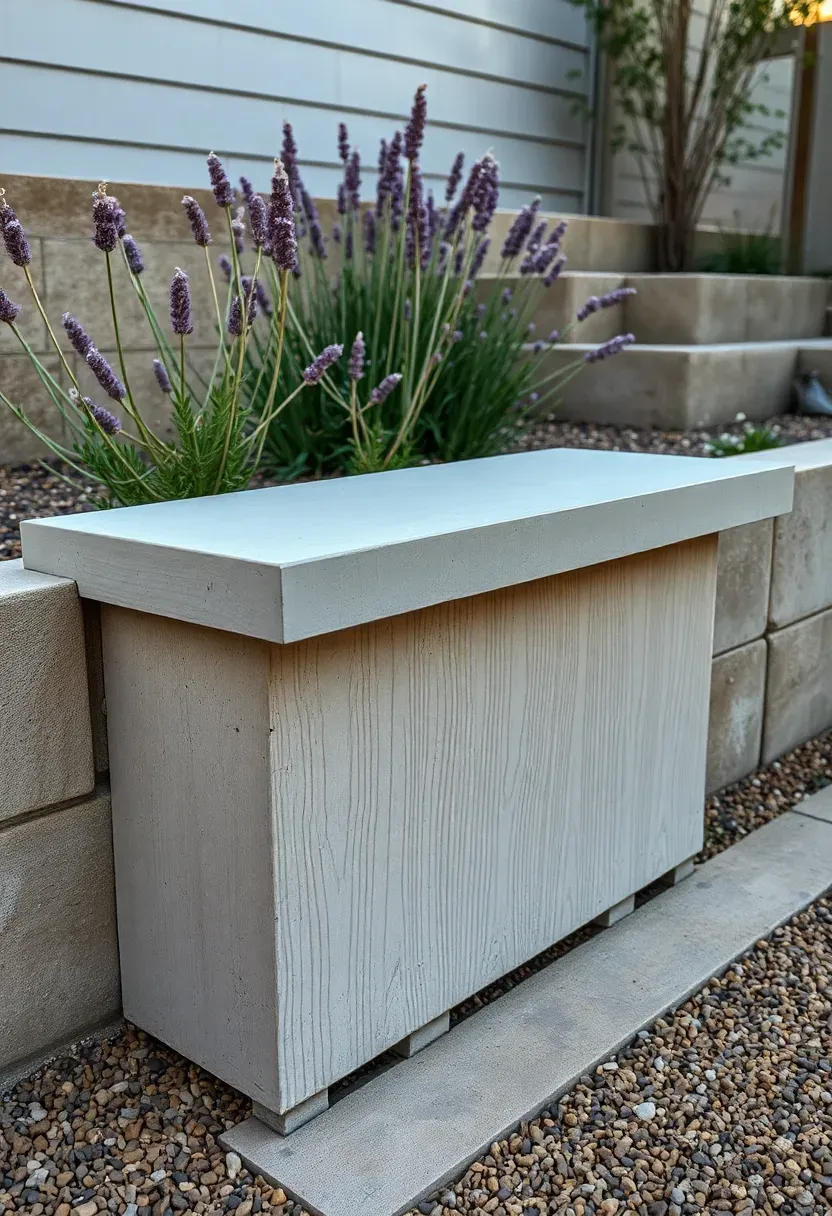
14. Concrete Bench Seating
Step 1: Plan the Dimensions
Standard bench seat height is seventeen inches. Width should be at least fourteen inches for comfortable sitting. Length depends on your space, but three to five feet per section keeps the formwork manageable for a DIY pour.
Step 2: Build and Pour
Construct forms from 3/4-inch plywood braced with 2x4 stakes every sixteen inches. Oil the form interior with release agent so the concrete does not bond to the wood. Pour with standard 4000 PSI mix, vibrate or tap the forms to release air bubbles, and screed the seat surface flat. Strip forms after 48 hours.
Step 3: Finish and Seal
Sand any sharp edges with a concrete rubbing stone. Apply a penetrating sealer to resist water absorption and staining. Leave the vertical face with the raw board texture from the form — the contrast between the rough face and smooth seat gives the bench visual depth.
Watch Out
- Freestanding benches need rebar L-hooks tying the seat to the base to prevent toppling
- Cast in threaded inserts if you want to bolt cushion clips or armrest brackets later
Recommended
Items for this idea
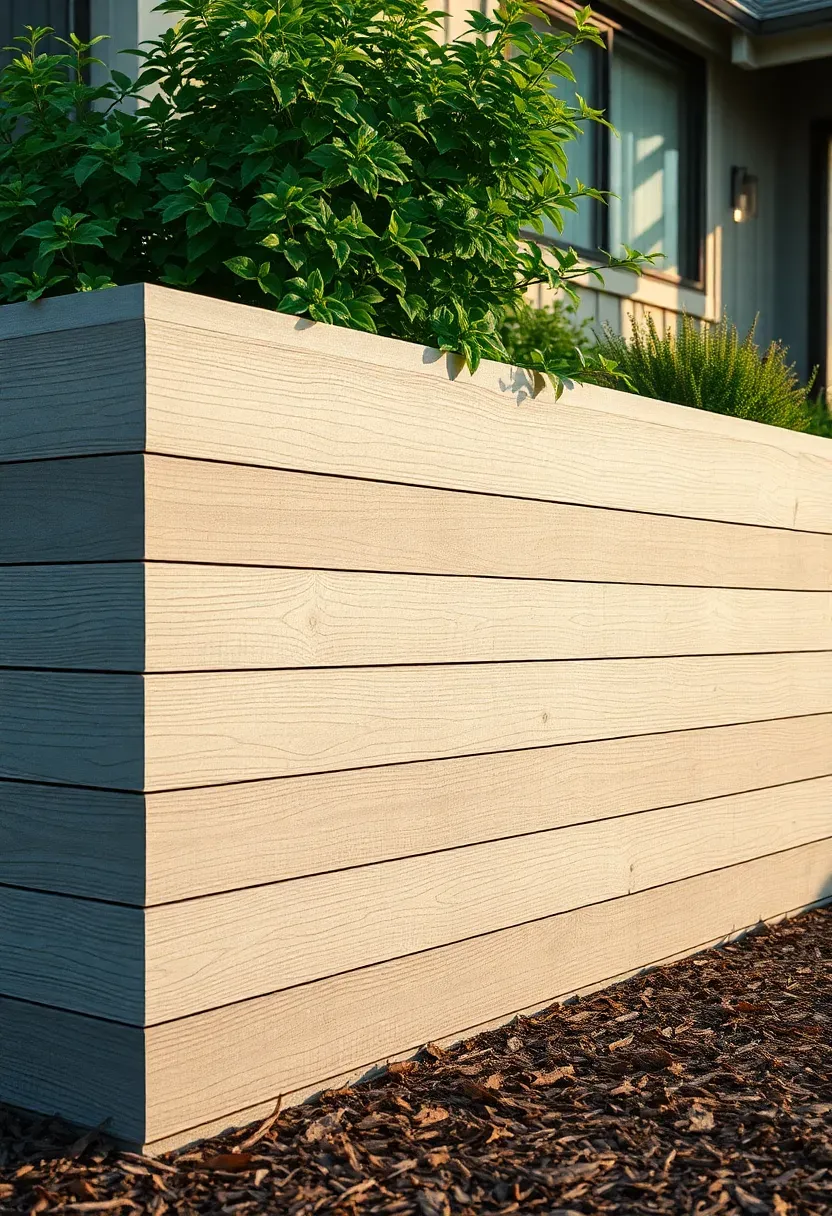
15. Boardform Concrete Retaining Wall
Boardform concrete uses rough-sawn lumber as formwork, and when the boards are stripped away, their grain pattern is cast into the concrete surface. The result is a wall that carries the warmth of wood texture in a material that will never rot or need staining. This technique works for retaining walls, garden walls, and property-line screens. Use boards of varying widths (four, six, and eight inches) for a more organic pattern rather than uniform planks.
Tips
- Apply form oil lightly — too much and the grain impression fills in and flattens
- Leave small gaps between form boards so concrete bleeds through slightly, creating thin horizontal fins that catch shadow
- Seal the finished wall with a clear matte sealer to prevent water absorption and freeze damage
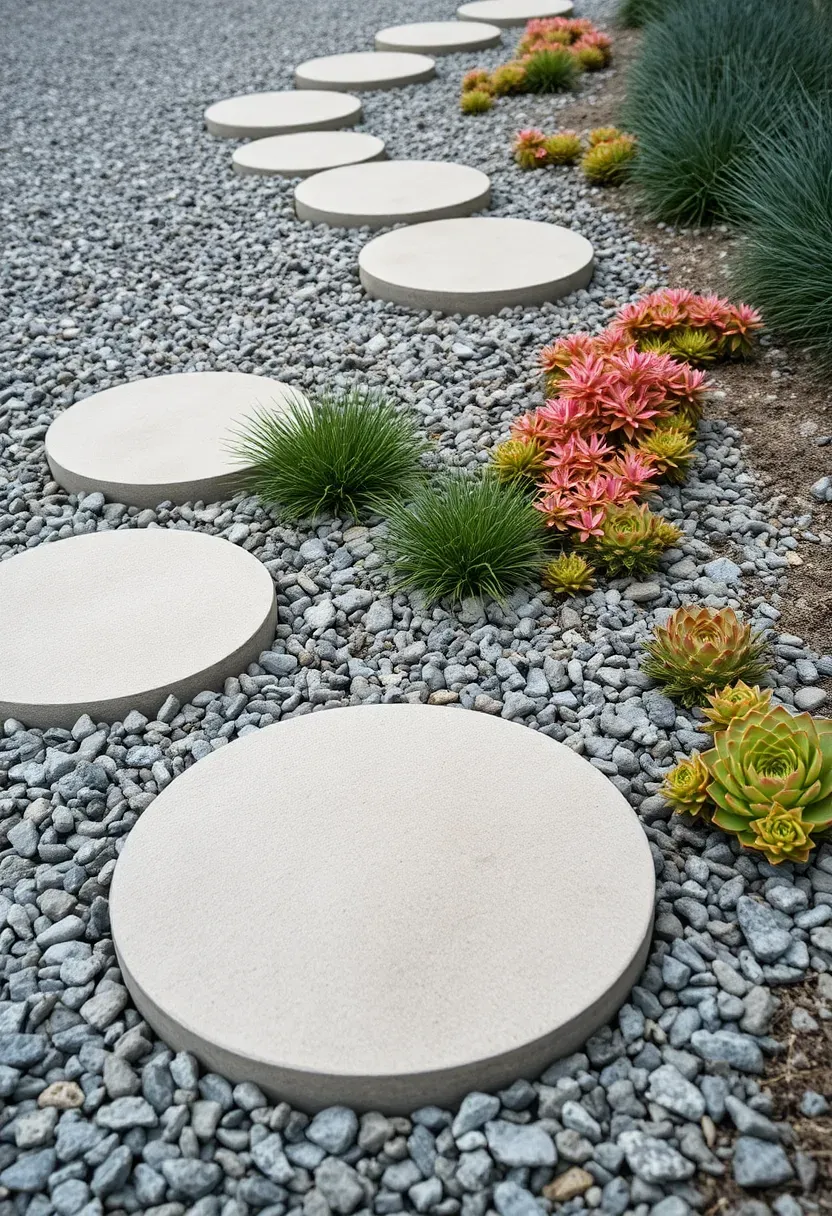
16. Concrete Stepping Stones Through Gravel
Round or irregular-shaped concrete stepping stones set into a gravel bed make a path that feels casual and allows water to drain between the stones. Cast your own by pouring concrete into flexible plastic molds or even large plant saucers. Set each stone eighteen to twenty-four inches on center (a comfortable stride) on a compacted base, then fill around them with three-quarter-inch angular gravel that locks in place better than round pea gravel.
Comparing Stone Shapes
- Round: Clean, modern, pairs well with minimalist plantings
- Irregular/organic: Naturalistic, blends with cottage or woodland garden styles
- Choose round if your yard leans contemporary; irregular for traditional or rustic settings
Recommended
Items for this idea
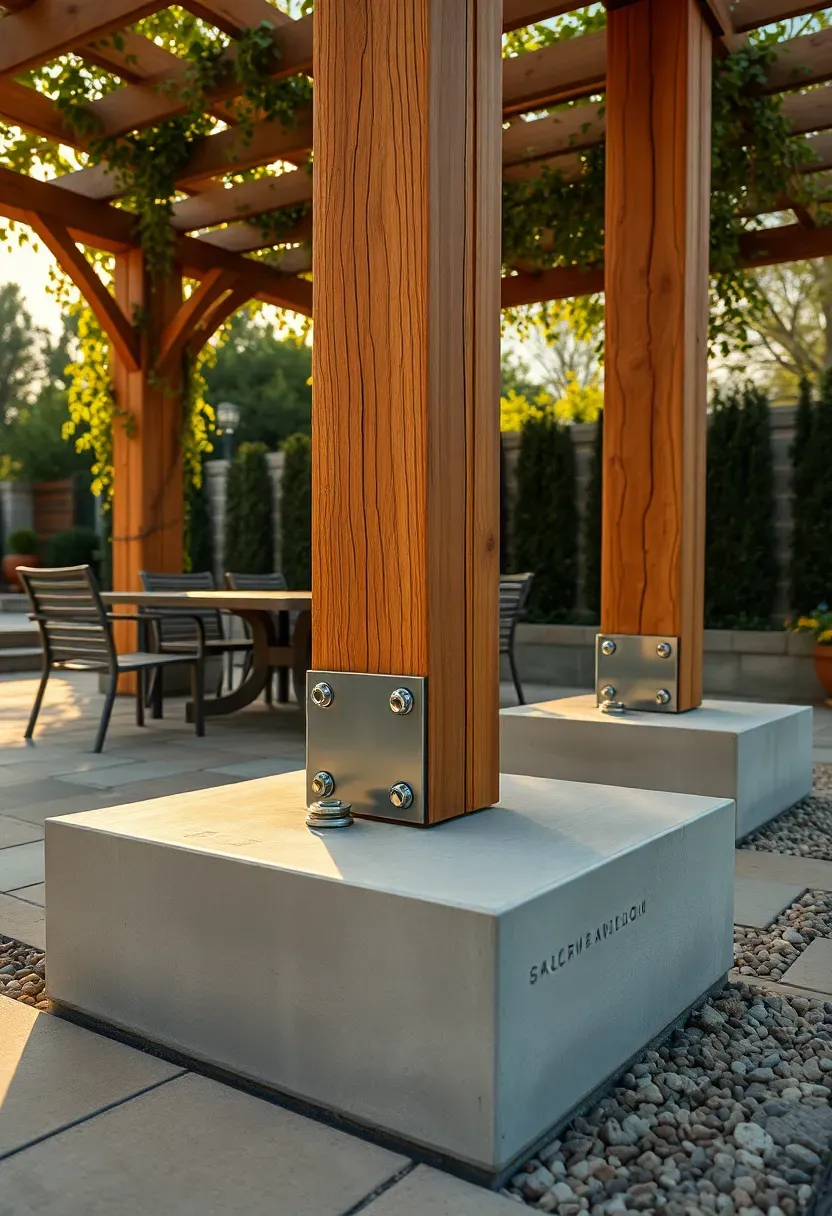
17. Concrete Pergola Footings as Design Elements
Pergola posts need footings — that is structural code. But instead of burying the concrete below grade, pour oversized footings that rise six to eight inches above the finished surface. Shape them as tapered pedestals or clean squares with chamfered edges. They anchor the pergola visually as well as structurally, and they protect the post bases from splash-back moisture that rots wood at ground level.
Tips
- Cast post brackets into the footing with J-bolts while the concrete is wet
- Size the footing top at least two inches wider than the post on all sides for visual proportion
- Trowel the top surface smooth and leave the sides with a light sand finish for texture contrast
18. Driveway-to-Patio Concrete Transition
If your driveway runs alongside or behind the house, connecting it to a backyard patio with a continuous concrete pour eliminates the awkward strip of grass or gravel between the two. Change the finish texture at the transition point — broom finish on the driveway, exposed aggregate or stamped pattern on the patio — so the two areas read as distinct even though the material is continuous. A decorative sawcut line or a one-inch-wide brass strip inlaid at the boundary marks the shift.
Tips
- Match the concrete color across both zones for cohesion even when textures differ
- The transition joint should align with the house wall plane for clean visual geometry
- Adding a slight grade change (a half-inch step) at the boundary reinforces the zone distinction
Recommended
Items for this idea
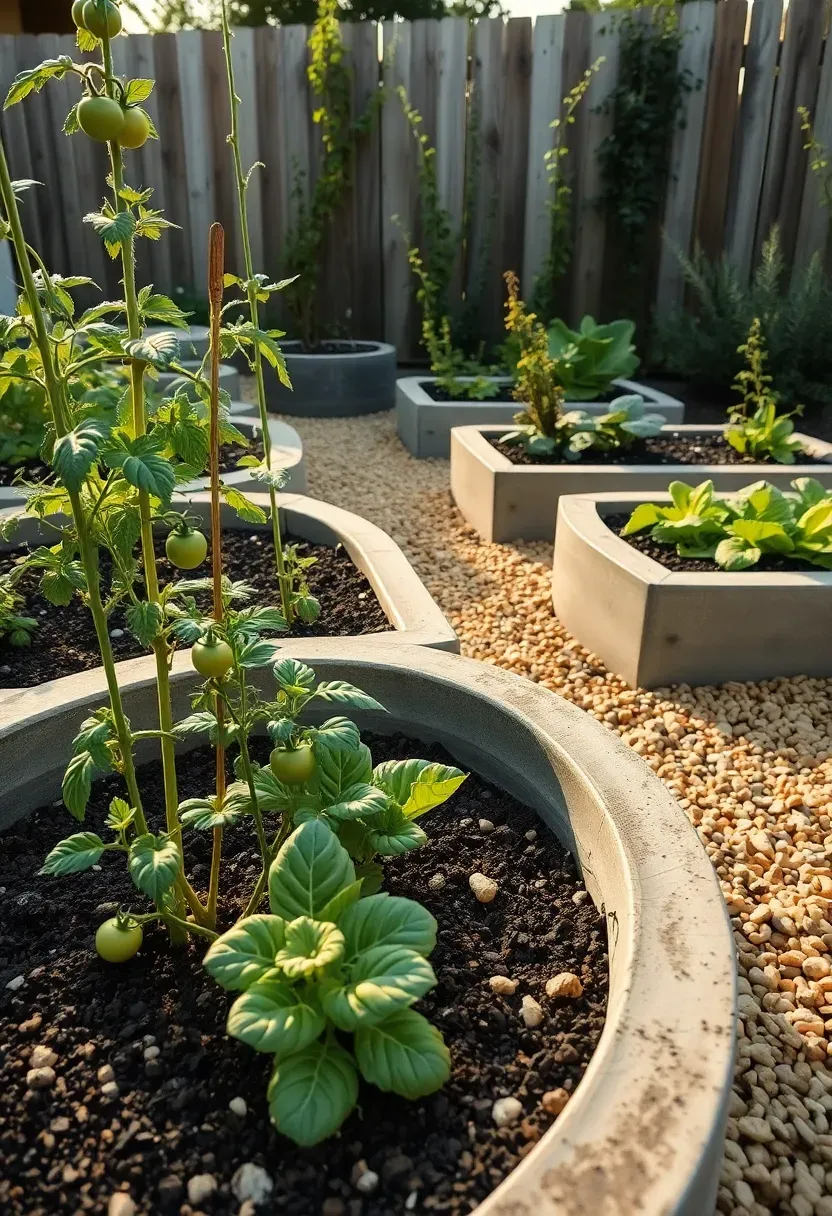
19. Concrete Curb Raised Beds
Poured concrete raised bed walls at twelve to twenty-four inches high outlast every other material option. Wood rots. Metal corrodes. Concrete just sits there decade after decade. Pour six-inch-thick walls with rebar at mid-height, and cap the top with a smooth troweled finish wide enough to sit on (eight inches minimum). Line the interior with a root barrier membrane and fill with garden soil. The uniform gray pairs well with the messy abundance of a vegetable garden.
Tips
- Pour all bed walls at the same time if possible — matching concrete color between separate pours is difficult
- Round the top edges with an edging tool during finishing to prevent chipping
- A single coat of exterior masonry paint in charcoal or sage turns plain concrete into a design feature
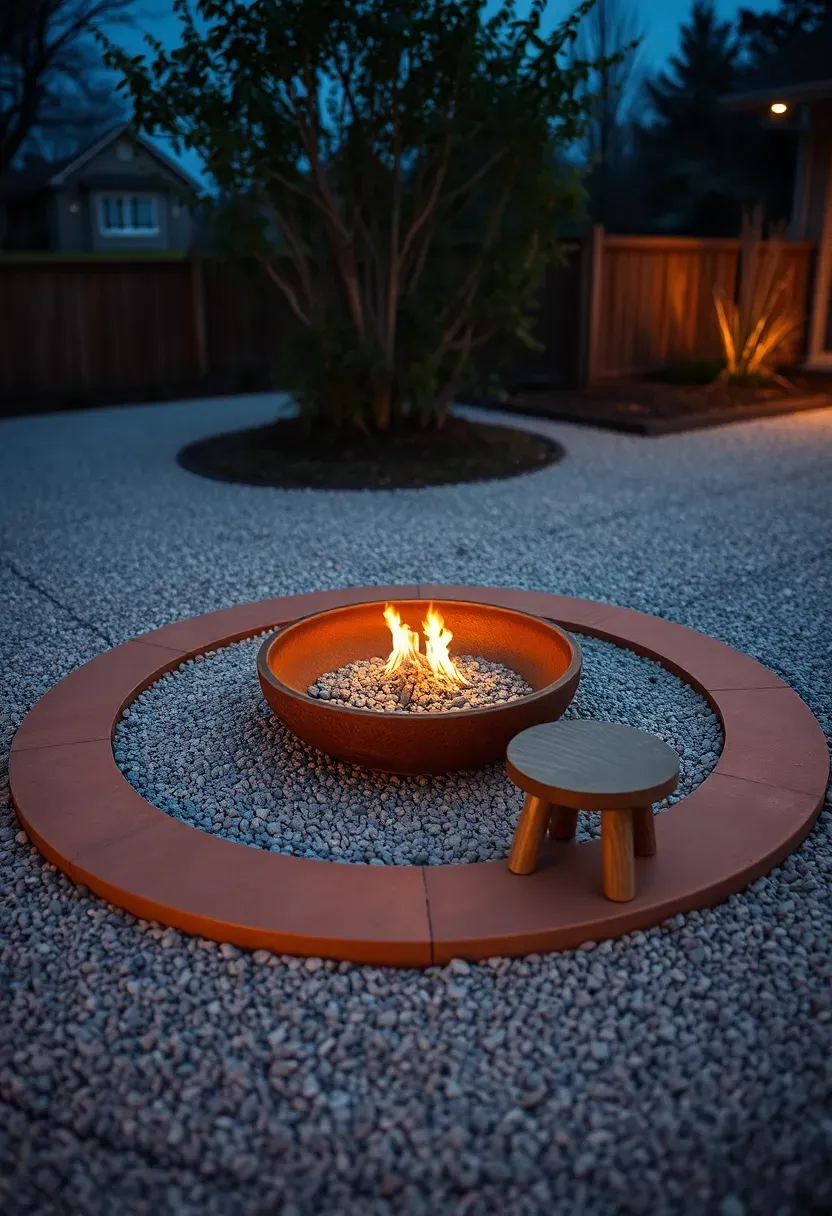
20. Tinted Concrete Border Around a Fire Bowl
A simple steel or copper fire bowl sitting on gravel looks temporary. Pour a circular concrete border — eighteen inches wide, four inches thick — around the fire area and tint it with an integral oxide pigment in a warm brown or charcoal. The border creates a finished perimeter, defines the safe distance from the flames, and gives you a surface to set drinks on. Embed small river pebbles into the wet surface for a decorative touch if the plain tinted finish feels too flat.
Tips
- Keep the concrete border at least eight inches from the fire bowl edge to avoid heat damage
- Use high-temperature-rated sealer on the inner edge that faces the fire
- A three-foot-diameter opening inside a six-foot-diameter border ring gives you the right proportions
Recommended
Items for this idea
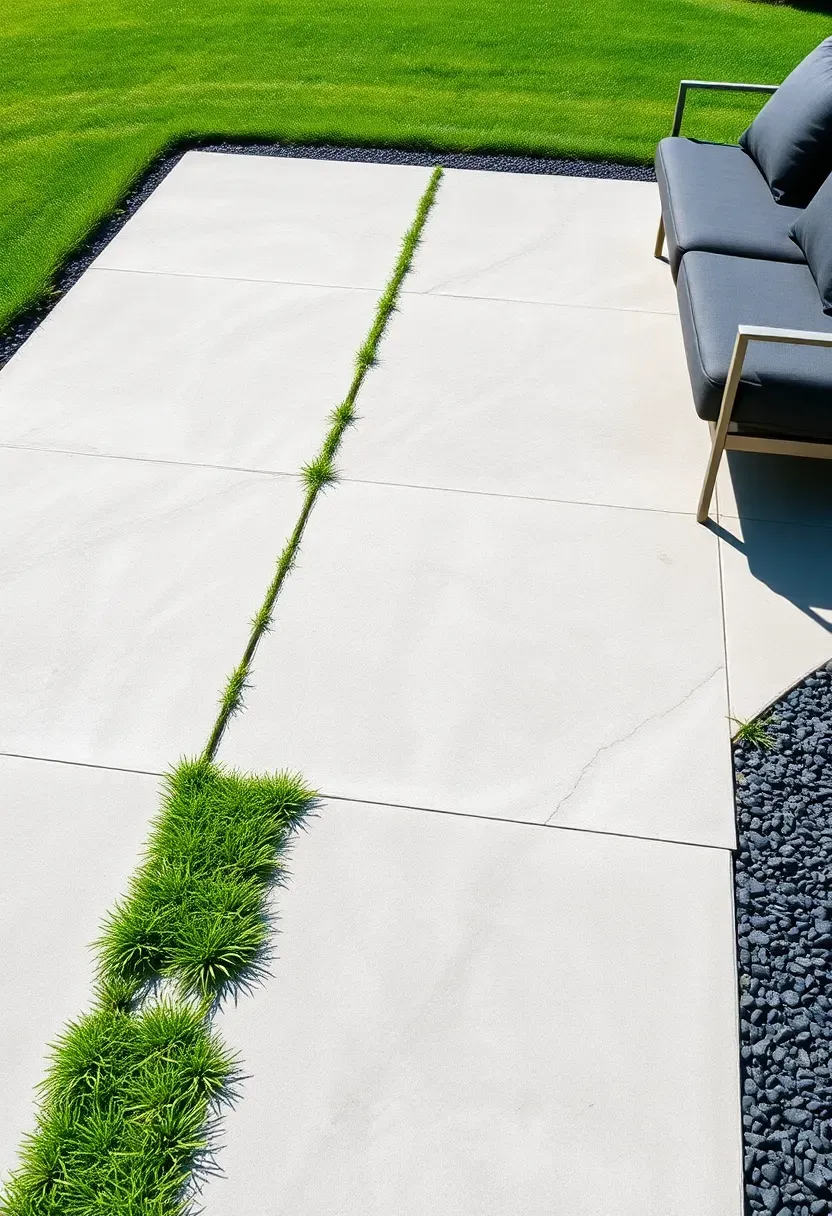
21. Scored Concrete with Grass Joints
Score deep grooves — about two inches wide and two inches deep — into a freshly poured concrete slab in a grid or running bond pattern. After the concrete cures, fill the grooves with topsoil and seed with a low-growing grass like dwarf fescue or zoysia. The grass lines soften the concrete visually, reduce heat reflection, and allow some stormwater infiltration. It is the inverse of the paver-and-grass grid: here the concrete dominates, and the grass accents.
Tips
- Score the grooves before the concrete fully sets using a groover tool or a straight edge and trowel
- The grooves need to be deep enough to hold soil and roots — anything less than 1.5 inches dries out too fast
- Irrigate the grass strips separately from the surrounding lawn since the concrete absorbs heat and dries the soil faster
Quick FAQ
Is backyard concrete cheaper than pavers? Per square foot, poured concrete typically runs $8 to $15 installed versus $12 to $25 for pavers. The gap widens on large areas because concrete pours scale efficiently while paver labor stays linear. Stamped or stained concrete adds $3 to $6 per square foot but still usually beats natural stone.
How thick should a backyard concrete slab be? Four inches is standard for patios, walkways, and most backyard applications. If vehicles will cross the slab (a parking pad or driveway extension), go to six inches with wire mesh or fiber reinforcement. Footings and retaining walls follow local code requirements, typically twelve inches wide and below frost line.
Can you pour concrete yourself? Small projects like stepping stones, edging, and planters are reasonable DIY. Anything larger than about 50 square feet benefits from a professional crew because the pour-to-finish window is tight — you have roughly two to four hours before the concrete becomes unworkable, and mistakes in a large slab are permanent.
Does concrete crack over time? Yes, all concrete cracks eventually. Control joints placed every four to eight feet direct those cracks along predetermined lines where they are invisible. Proper gravel base, adequate thickness, and rebar or fiber reinforcement minimize random cracking. Hairline cracks in a well-built slab are cosmetic, not structural.
What concrete finish is best for bare feet? Broom finish or exposed aggregate provide grip without being rough enough to scrape skin. Avoid hard-troweled smooth finishes around pools or play areas — they get slippery when wet. Salt finish (where rock salt is pressed into wet concrete and later washed out) creates a subtle pockmarked texture that is comfortable and slip-resistant.
Concrete is one of those materials that rewards planning more than spending. A well-detailed $2,000 patio with thoughtful joint lines and a good broom finish looks better at year ten than a $6,000 stamped job with sloppy formwork. Pick one or two ideas from this list that solve an actual problem in your yard — the muddy path, the uneven slope, the bare slab that bakes in the sun — and build from there. The material is forgiving in design and brutal in permanence, which means getting the layout right matters more than the finish.
Pinterest cover for 21 Backyard Concrete Ideas for Every Yard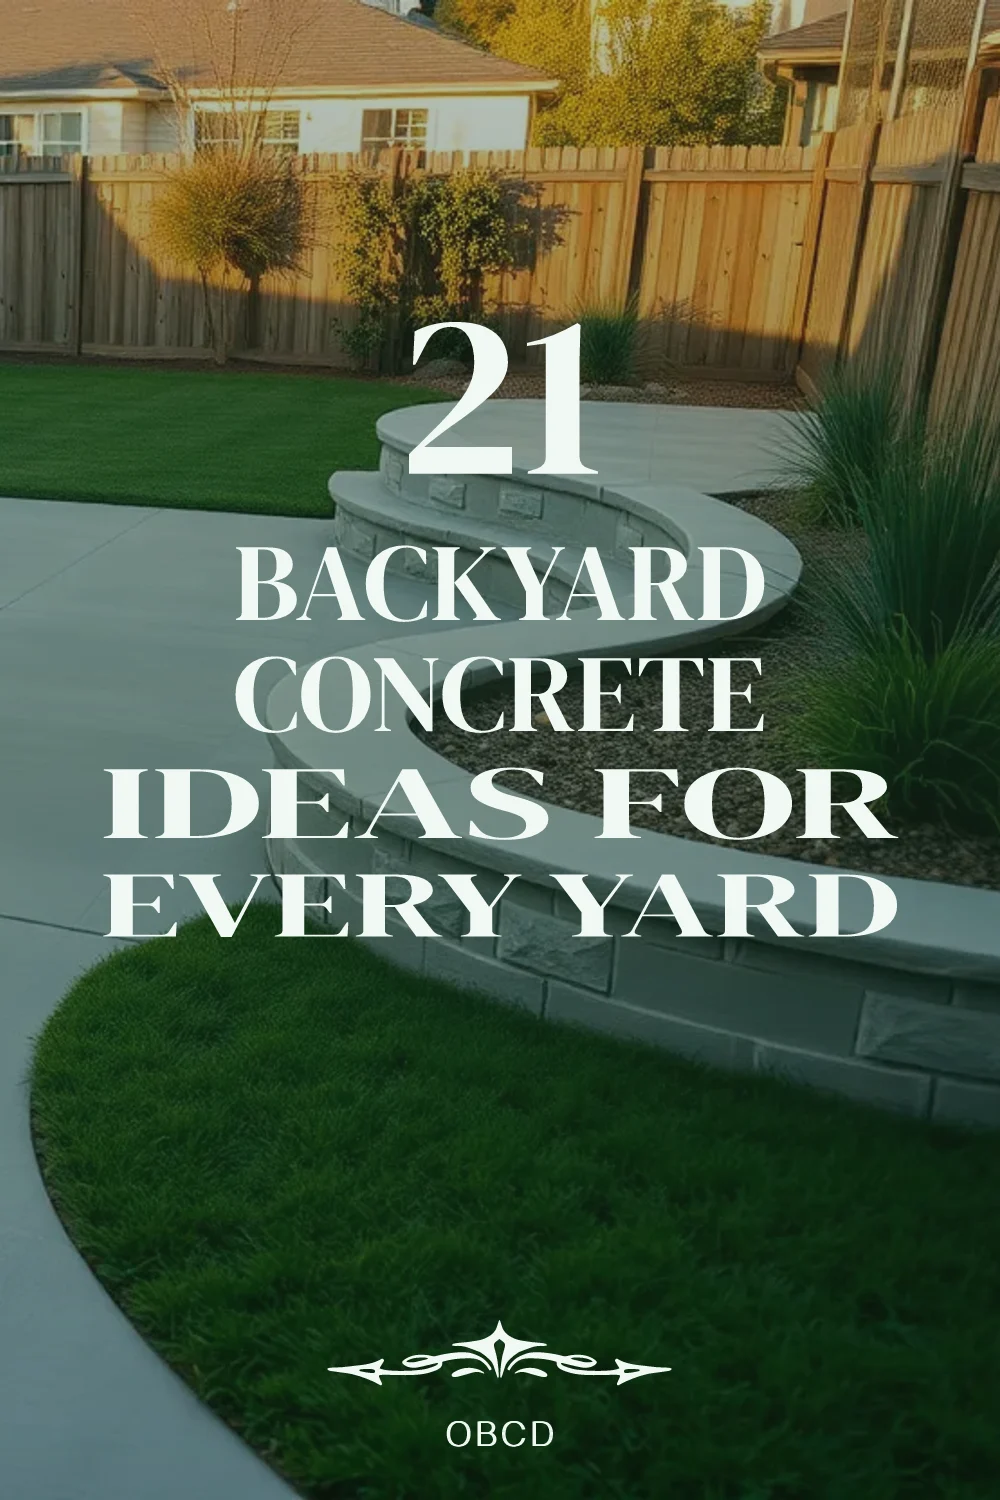
About the author
OBCD
CGI visualization and interior design content. We create detailed 3D renders and curate practical design ideas for every room in your home.