27 Backyard 2 Level Deck Designs
Our old house sat on a gentle slope that dropped about four feet from the back door to the fence line. A single flat deck would have meant either burying the far end in fill dirt or perching on stilts that looked like a dock. Splitting it into two connected levels solved both problems — the upper platform stayed close to floor height for easy kitchen access, and the lower one landed near grade for stepping right onto the lawn. If your yard has any grade change at all, or you just want separate zones without building walls, a two-level deck is one of the most practical ways to organize outdoor space. These 27 designs cover materials, shapes, stair placements, and railing options so you can find something that fits your lot.
Below are layouts grouped by terrain, material, and function — from simple step-downs to dramatic hillside cascades.
Table of Contents
- Classic Step-Down Composite Deck
- Floating Lower Lounge Platform
- Hillside Cascading Timber Deck
- L-Shaped Split Level with Planter Wall
- Wraparound Upper Deck with Sunken Fire Pit
- Ground-Level Two-Tier Cedar Deck
- Raised Dining Deck over Gravel Patio
- Modern Concrete and Wood Hybrid
- Pool Deck with Upper Observation Level
- Narrow Side-Yard Two-Level Deck
- Pergola-Topped Upper Deck
- Curved Stair Connector Design
- Tropical Hardwood Tiered Deck
- Built-In Bench Transition Level
- Hot Tub Lower Deck Platform
- Farmhouse-Style Painted Two-Level Deck
- Wide Stair Seating Connection
- Cantilevered Upper Deck over Slope
- Screened Upper Deck with Open Lower
- Diagonal Board Pattern Split Deck
- Rooftop-Inspired Upper Deck with Cable Railing
- Stone Pier Foundation Two-Level Deck
- Compact Two-Tier Deck for Small Yards
- Outdoor Kitchen Upper Deck Layout
- Japanese-Inspired Platform Deck
- Reclaimed Wood Rustic Two-Level Deck
- Full Wraparound Two-Level Deck

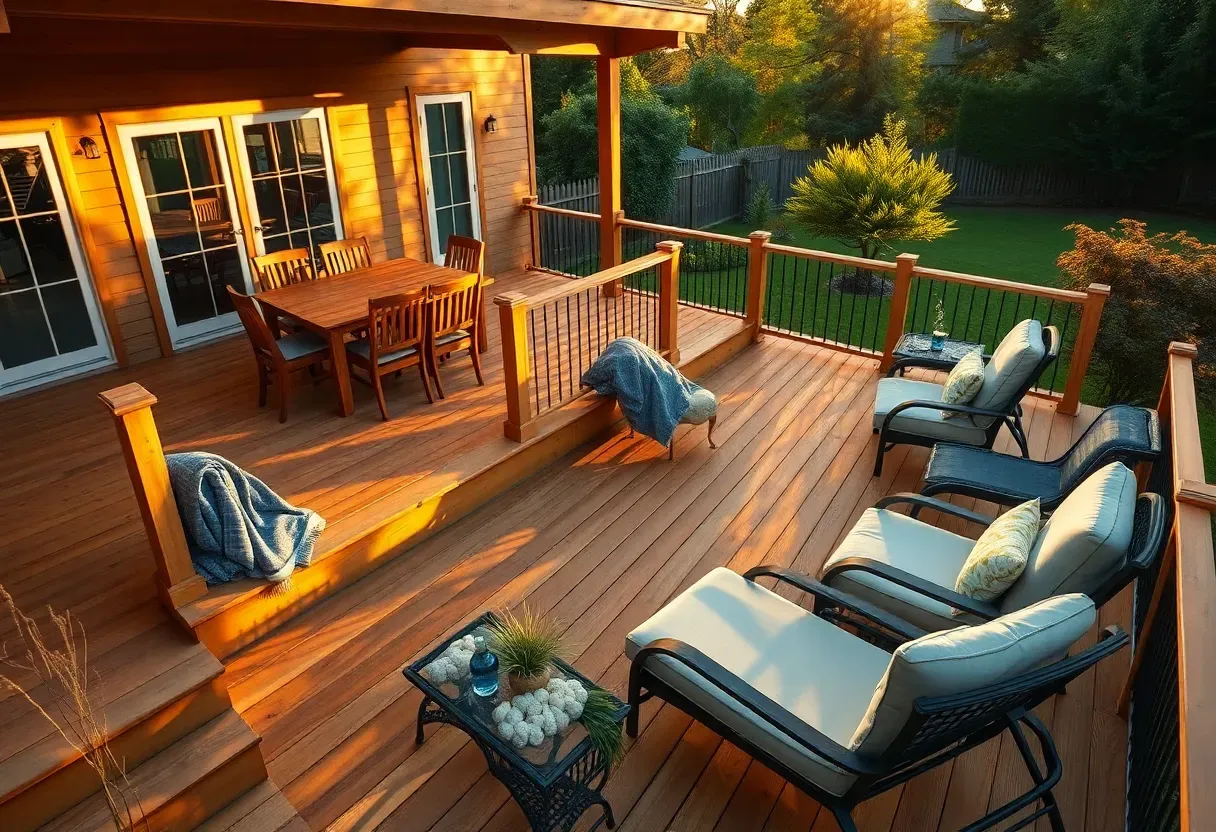
1. Classic Step-Down Composite Deck
The most straightforward two-level layout connects to your back door at the upper level, drops two or three risers, and lands on a second platform twelve to eighteen inches lower. Composite decking — brands like Trex, TimberTech, or Fiberon — eliminates the annual staining cycle that pressure-treated lumber demands. A twelve-by-sixteen upper level paired with a fourteen-by-twelve lower gives enough room for a dining table above and lounge chairs below without feeling cramped. Budget roughly $35 to $60 per square foot installed for composite on a pressure-treated frame.
Tips
- Keep the upper level within one step of interior floor height for a smooth indoor-outdoor transition
- Run deck boards in different directions on each level to visually separate the zones
- Use hidden clip fasteners instead of face screws for a cleaner surface
We picked a few things that go well with this idea: Composite Interlocking Deck Tiles (4-Pack) (★4.8), Interlocking Deck Tiles 36 sq ft (36-Pack) (★4.4) and Feilingwood WPC Composite Deck Tiles (★4.7). As an Amazon Associate we earn from qualifying purchases.
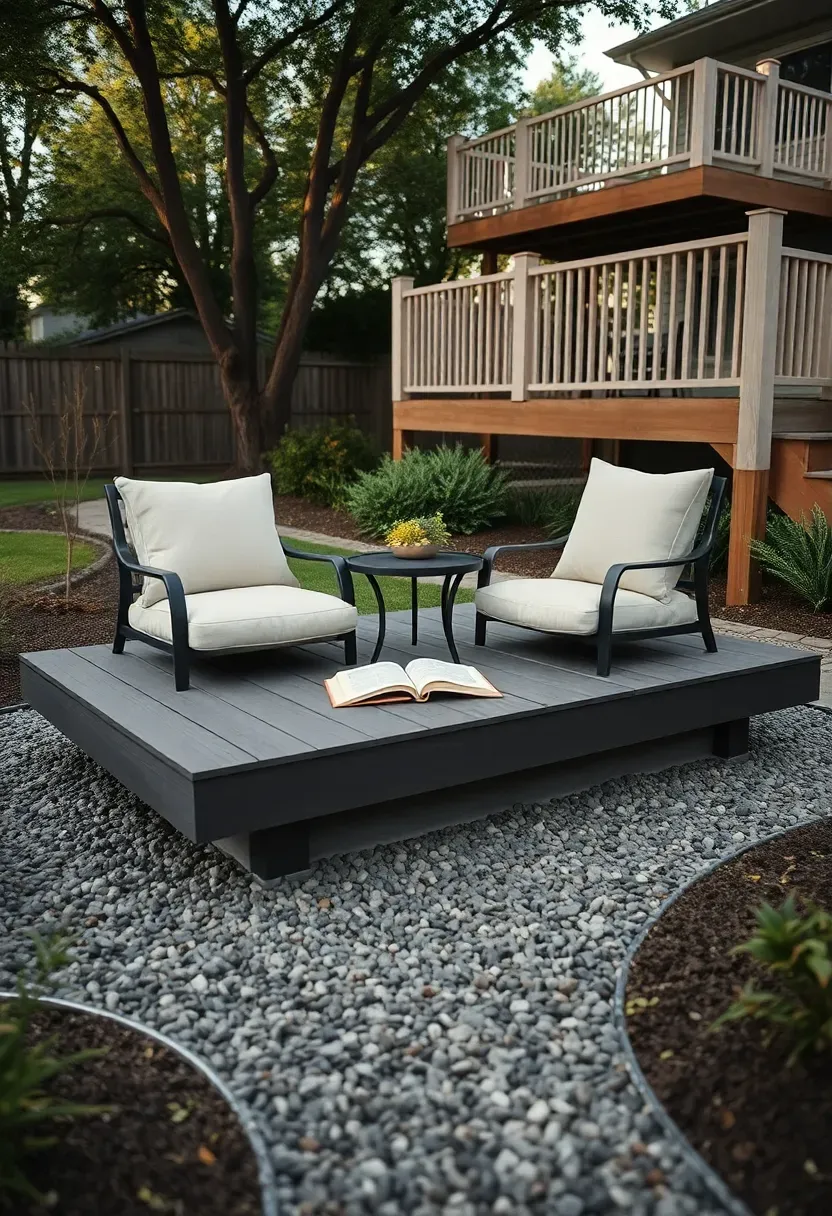
2. Floating Lower Lounge Platform
Why Detach the Lower Level
Not every two-level deck needs a physical stair connection between platforms. A floating lower platform — built at grade on deck blocks or concrete piers — can sit six to ten feet away from the main deck with a gravel or stepping-stone path linking them. This separation creates a destination feeling: the main deck is for cooking and dining, the lower float is for reading, napping, or conversation away from the grill smoke.
How to Build It
- Level the ground and set precast deck blocks every four to six feet in a grid pattern
- Lay pressure-treated joists directly on the blocks without posts since the platform sits within eight inches of grade
- Install composite or cedar decking and frame the edges with a fascia board to hide the substructure
Watch Out
- Without positive drainage underneath, water can pool and breed mosquitoes — slope the ground beneath the platform away from center
- Floating platforms shift slightly over freeze-thaw cycles; leave a quarter-inch gap at any point where the platform nearly touches the main deck
We picked a few things that go well with this idea: CELYND Stainless Steel Cable Railing (500ft) (★4.7), Steel DN Mate Cable Railing Hardware (100-Pack) (★4.7) and Muzata Cable Railing Turnbuckle Kit (100-Pack) (★4.6). As an Amazon Associate we earn from qualifying purchases.
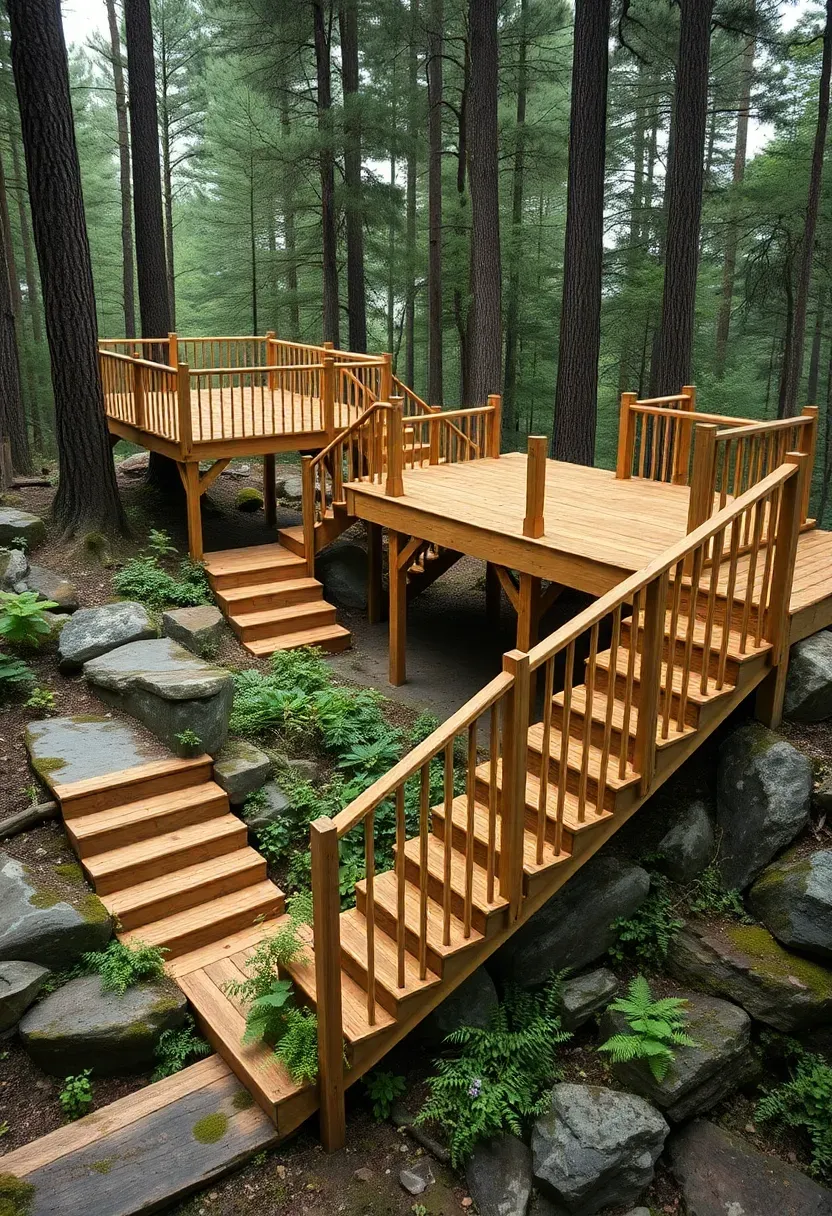
3. Hillside Cascading Timber Deck
Steep yards — anything over a fifteen-percent grade — make single-level decks impractical because the downhill posts grow tall enough to need serious lateral bracing. Splitting into two or three cascading platforms keeps every post under six feet and spreads the structural load. Pressure-treated Southern yellow pine or Douglas fir handles the span and the budget well on hillside builds where material quantities climb fast. Each platform follows the natural contour, stepping down four to five feet at a time, connected by flights of four to six stairs.
Tips
- Hire a structural engineer for slopes over twenty-five percent — soil stability and footing depth matter more than the deck framing itself
- Anchor the uppermost platform to the house ledger board for lateral support rather than relying on downhill posts alone
- Plant native ground cover around post bases to control erosion between piers
We picked a few things that go well with this idea: HILLGA 7-Piece Wicker Patio Furniture Set (★4.6), HERA'S HOUSE 5-Piece Wicker Patio Set (★4.4) and Sunshine Valley 7-Piece Wicker Set with Firepit (★4.4). As an Amazon Associate we earn from qualifying purchases.
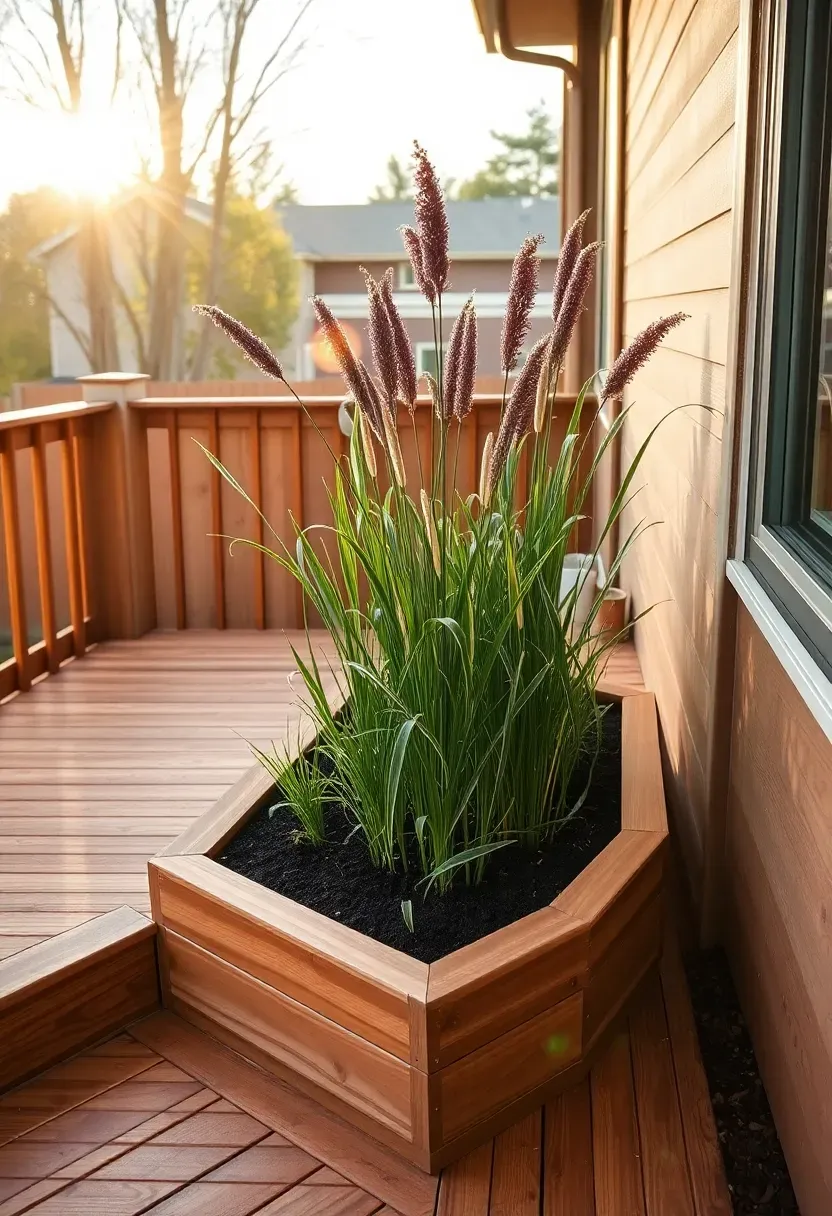
4. L-Shaped Split Level with Planter Wall
An L-shaped footprint wraps two sides of the house and turns the level change into a design feature instead of an obstacle. The vertical face between upper and lower decks becomes a built-in planter wall — a framed box lined with landscape fabric and filled with soil, planted with ornamental grasses, trailing sedum, or compact shrubs. The planter replaces what would otherwise be a blank retaining fascia, adds greenery at eye level when you are sitting on the lower deck, and costs roughly the same as a standard railing section. Frame the planter box from the same lumber as the deck substructure for a uniform look.
Tips
- Line the inside with pond liner rather than landscape fabric alone to prevent moisture from rotting the framing
- Drill weep holes at the bottom every twelve inches so soil does not stay waterlogged
- Choose plants that tolerate both full sun and the reflected heat from decking surfaces
Recommended
Items for this idea
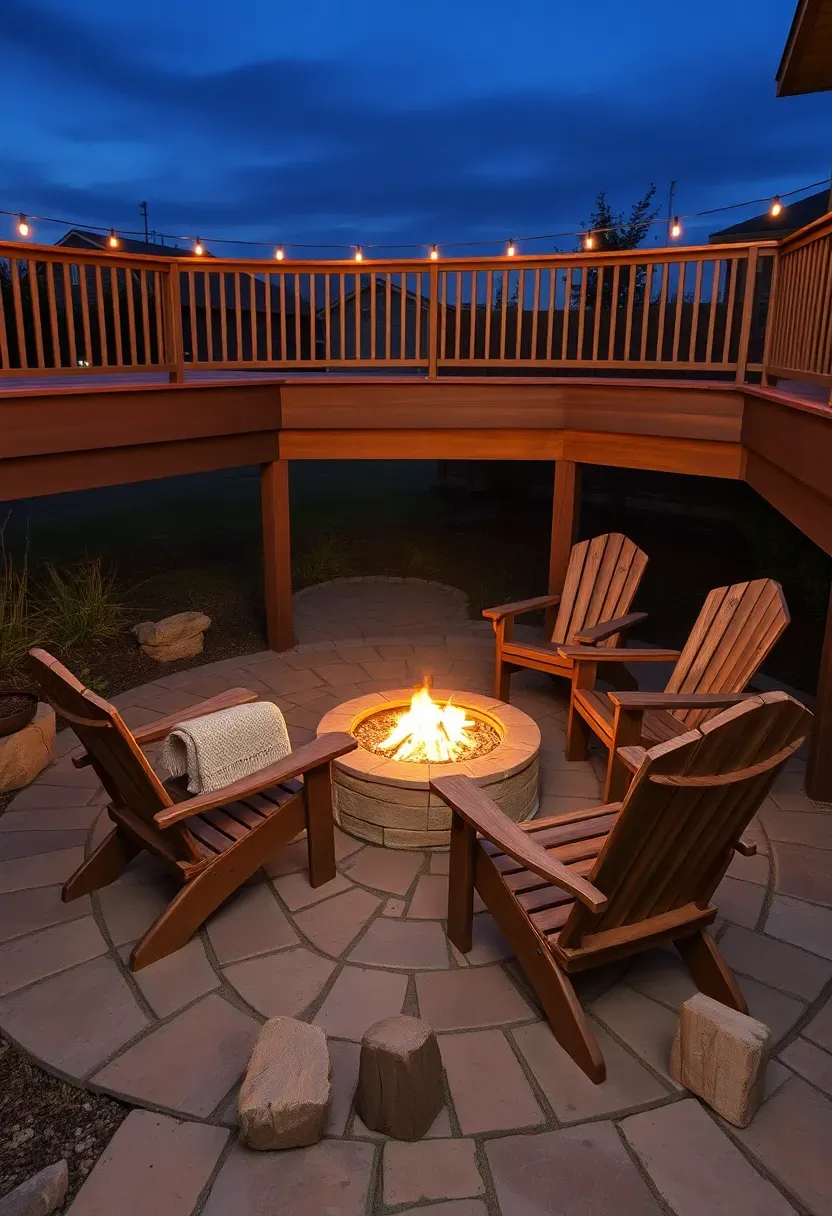
5. Wraparound Upper Deck with Sunken Fire Pit
The Problem with Flat Fire Pit Setups
Putting a fire pit on the same level as your deck raises code issues — most jurisdictions require combustible decking to be at least ten feet from an open flame. Elevating the main deck and dropping the fire pit area to grade level solves that clearance problem by default, since the pit sits on non-combustible stone or concrete pavers below.
The Solution
Build the upper deck at standard door height as a wraparound along two house walls. Drop the lower area three to four feet down, pave it with flagstone or concrete pavers, and center a gas or wood-burning fire pit in the middle. Wide stairs — at least five feet across — double as extra seating on busy nights.
Pros and Cons
- Pro: Fire pit is safely below the deck surface and smoke drifts away at a lower level
- Pro: The upper deck acts as a natural windbreak for the fire area
- Con: Cost increases significantly because the lower area requires excavation, compacted base, and hardscape materials on top of the deck framing
6. Ground-Level Two-Tier Cedar Deck
On a flat lot where the yard and back door are nearly the same elevation, you can still get the two-level look by keeping both platforms within eight inches of grade. The upper tier sits one step — roughly seven inches — above the lower. Because neither level exceeds thirty inches above grade in most jurisdictions, you skip the railing requirement entirely, which drops the project cost by fifteen to twenty percent and gives the deck a clean, open feel. Western red cedar weathers to a silver-gray patina that suits this low-profile look well.
Tips
- Set joist sleepers on gravel beds rather than digging deep footings since the load is close to grade
- Apply end-grain sealant to every cut to prevent cedar from splitting as it dries
- Leave at least six inches of clearance between the ground and the bottom of the joists for airflow
Recommended
Items for this idea
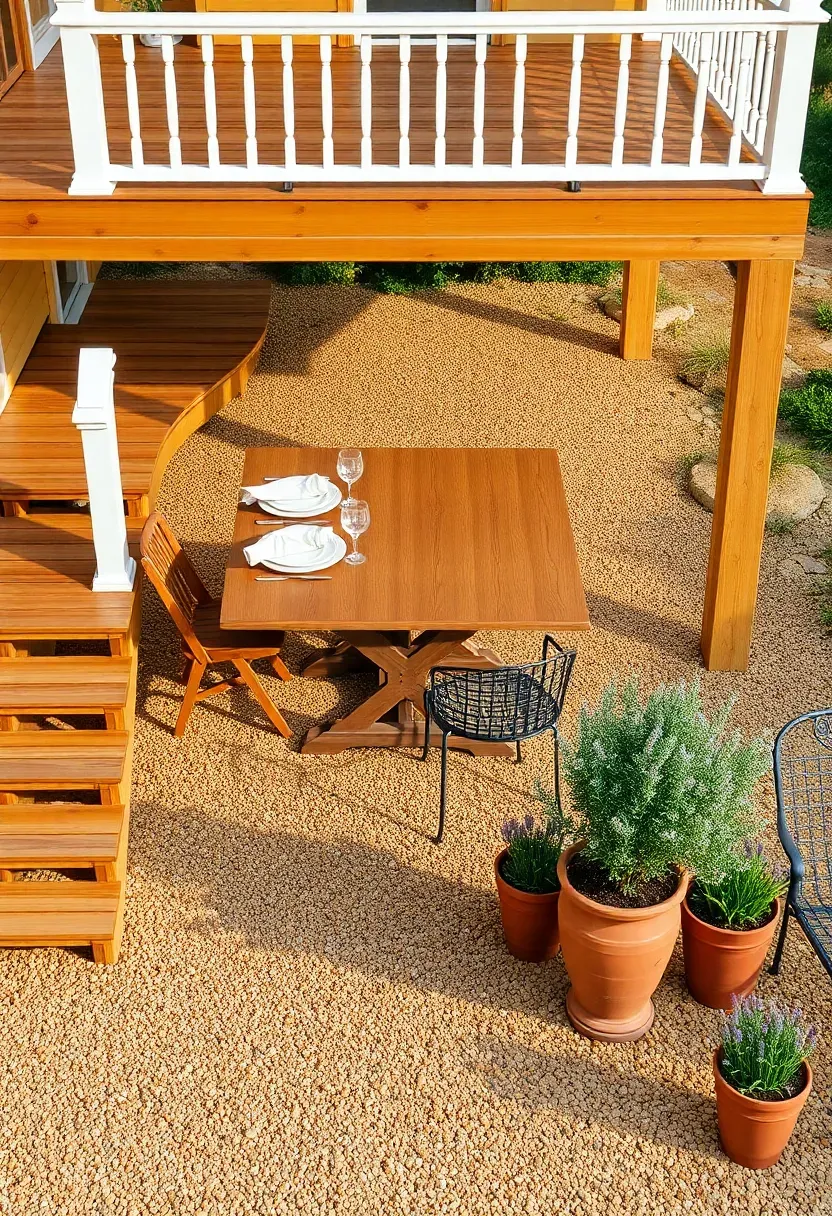
7. Raised Dining Deck over Gravel Patio
Deck vs. Gravel: Picking the Right Level
Sometimes the best lower level is not a deck at all. A compacted gravel patio underneath or beside a raised deck costs a fraction of a framed platform and drains perfectly without any slope engineering. This pairing works especially well for dining above and lounging below — the raised deck keeps the table surface clean and level for plates and glasses, while the gravel below handles spilled drinks, muddy shoes, and heavy furniture legs without showing wear.
How to Set It Up
- Build the upper deck at standard twenty-four to thirty-six inches above grade, attached to the house
- Excavate the lower area four inches deep, compact the soil, lay landscape fabric, and fill with three-quarter-inch crushed stone
- Edge the gravel with steel landscape edging or pressure-treated timbers to keep stone from migrating into the lawn
Watch Out
- Gravel tracks into the house on shoe soles — place a boot brush or coarse mat at the stair base
- Furniture legs sink into loose gravel; use flat paver pads under each leg
8. Modern Concrete and Wood Hybrid
Mixing materials between levels makes each platform feel like its own room. A poured concrete lower level — either broom-finished, stamped, or acid-stained — pairs well with composite or hardwood decking above. The concrete handles heavy outdoor furniture, grill grease, and foot traffic without denting. The wood above softens the look near the house. This combination also makes structural sense: the concrete pad serves as both finished surface and foundation, eliminating the need for a second set of posts and joists below.
Tips
- Pour the concrete pad first and cure it for at least a week before starting the upper deck framing
- Use a concrete color additive that complements your decking shade — warm gray pairs well with teak-toned composites
- Install a drip edge along the upper deck fascia to keep rainwater from staining the concrete face
Recommended
Items for this idea
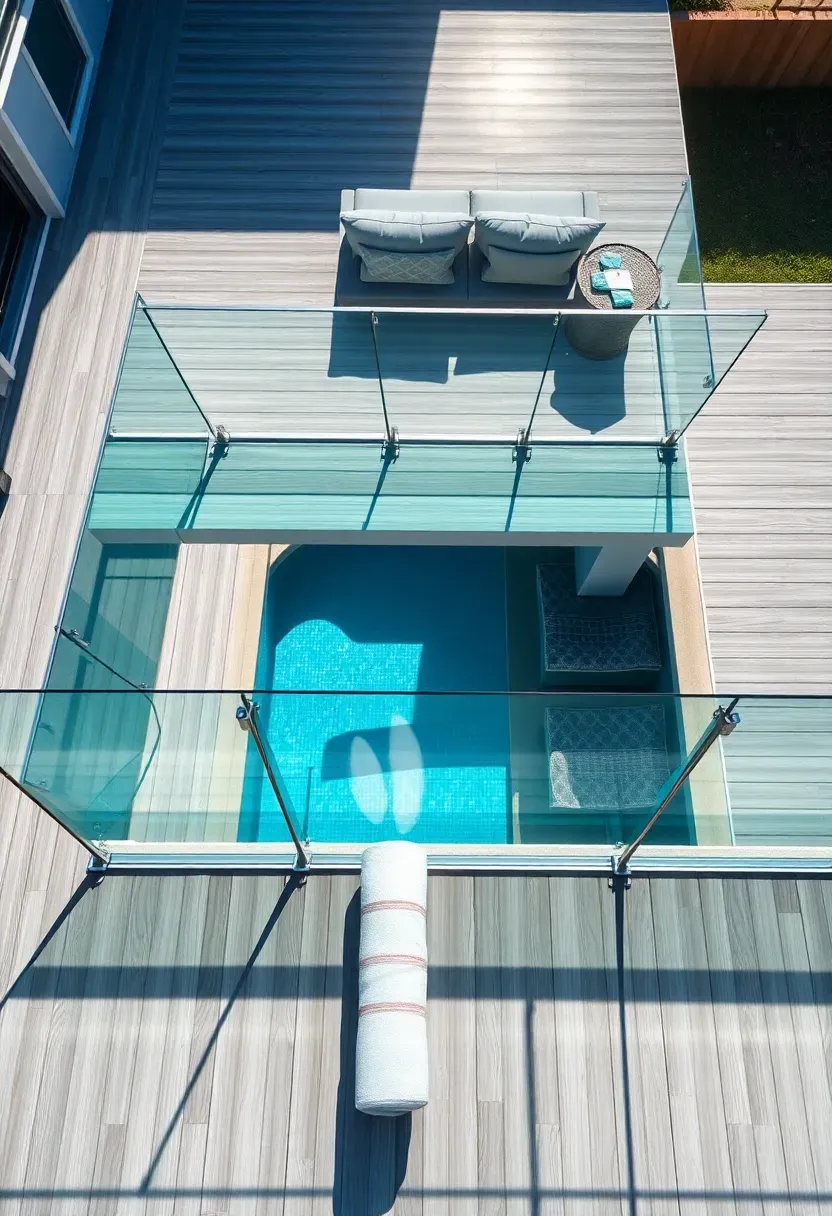
9. Pool Deck with Upper Observation Level
Making Pool Time Social
A flat pool deck puts everyone at water level, which works fine for swimmers but leaves spectators sitting in splash range without a clear sightline across the water. Adding a raised upper platform — even just eighteen to twenty-four inches above the pool surround — gives a vantage point where parents can watch kids, guests can stay dry, and the grill can live safely away from wet feet.
How to Plan It
- Position the upper level on the house side of the pool for the best overhead view
- Use glass panel or horizontal cable railing on the upper level to maintain the sightline down to the water
- Keep the lower pool surround in slip-resistant composite or textured concrete — never smooth wood
Choose If
- You have young children or host pool parties often — the elevated seating is worth the extra cost
- Your pool is set low in the yard with a natural grade change nearby — leverage that slope instead of fighting it
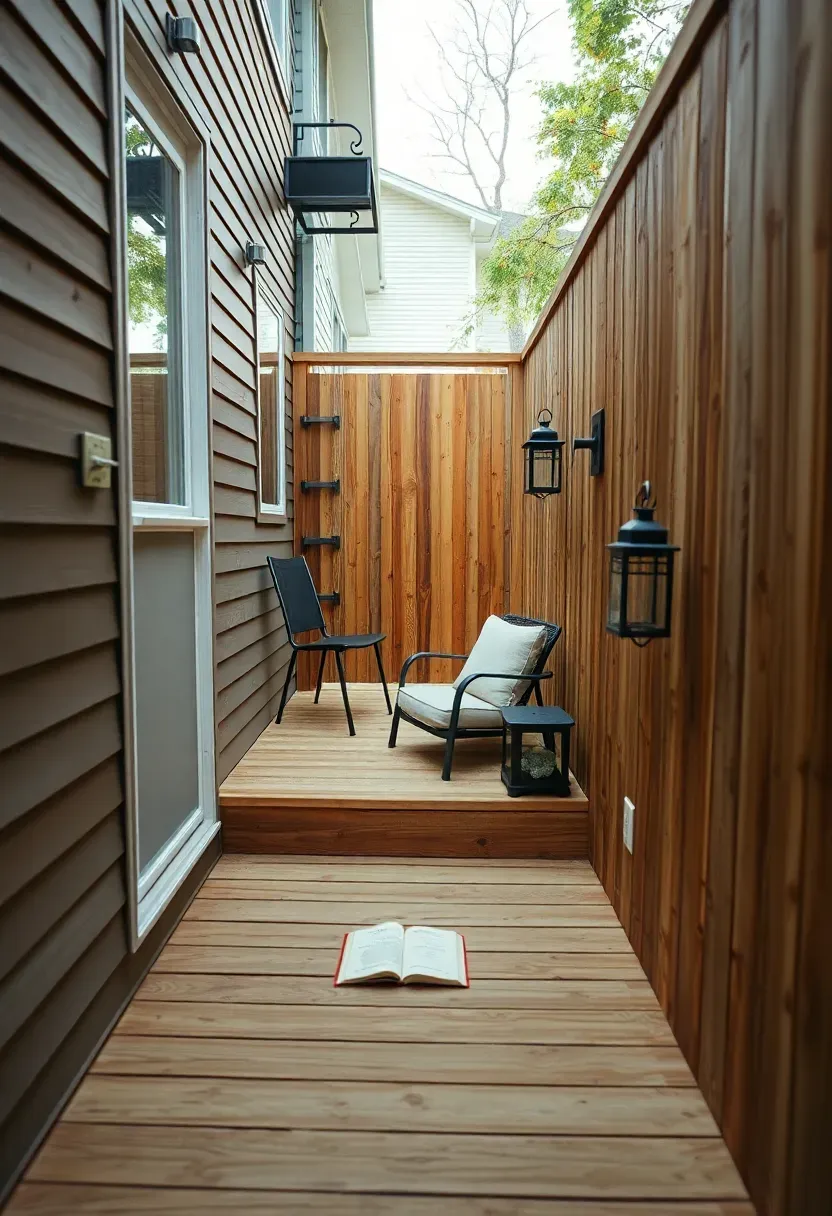
10. Narrow Side-Yard Two-Level Deck
Side yards between the house and the fence are often five to eight feet wide — too narrow for a standard patio layout but wide enough for a well-planned two-level deck. Treat it like a hallway that widens into rooms. The upper level near the back door functions as a landing and transition zone. A few steps down, the lower level expands slightly where the yard is wider, holding a pair of chairs and a small table. Run the deck boards lengthwise to emphasize depth rather than the tight width. This layout rescues dead space that most homeowners ignore completely.
Tips
- Use a single continuous railing style on both levels to unify the narrow space
- Mount low-voltage step lights on the risers between levels since side yards tend to be shaded and dark
- Keep the lower platform at grade level to avoid needing a railing on the fence side
Recommended
Items for this idea
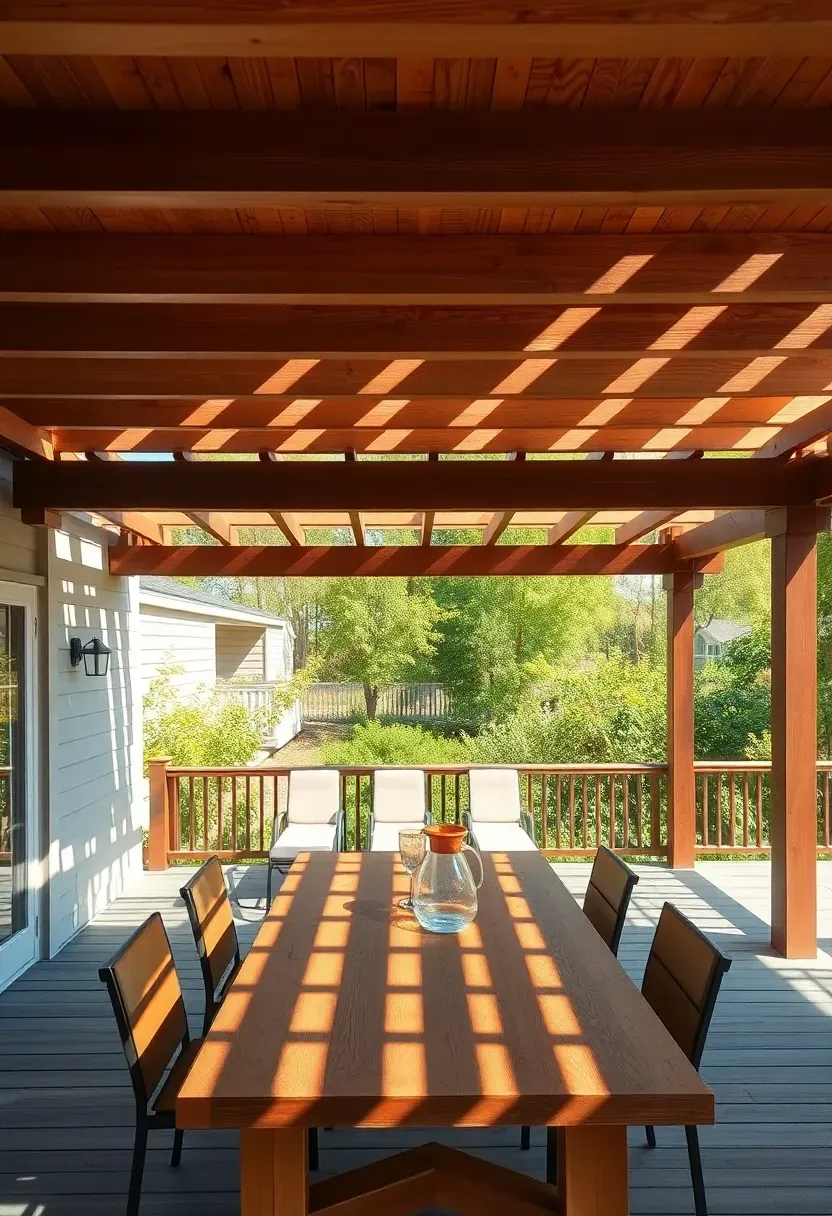
11. Pergola-Topped Upper Deck
A pergola over the upper level does double duty: it defines the dining zone overhead and makes the lower level feel more open by contrast. The psychological effect is real — moving from a shaded, enclosed upper deck down steps into full sun on the lower platform feels like going from indoors to outdoors even though both are outside. Cedar or rough-sawn Douglas fir pergola beams bolted to the deck posts keep the structure integrated rather than looking like an afterthought. Size the pergola to cover the upper level only, stopping at the stair edge.
Tips
- Space rafters eight to ten inches apart for moderate shade; closer spacing blocks more sun but adds weight and cost
- Attach the pergola to the house wall with a ledger beam using lag bolts into studs, not just into siding
- Train climbing plants like wisteria or grape vines up the posts for living shade that fills in over two to three seasons
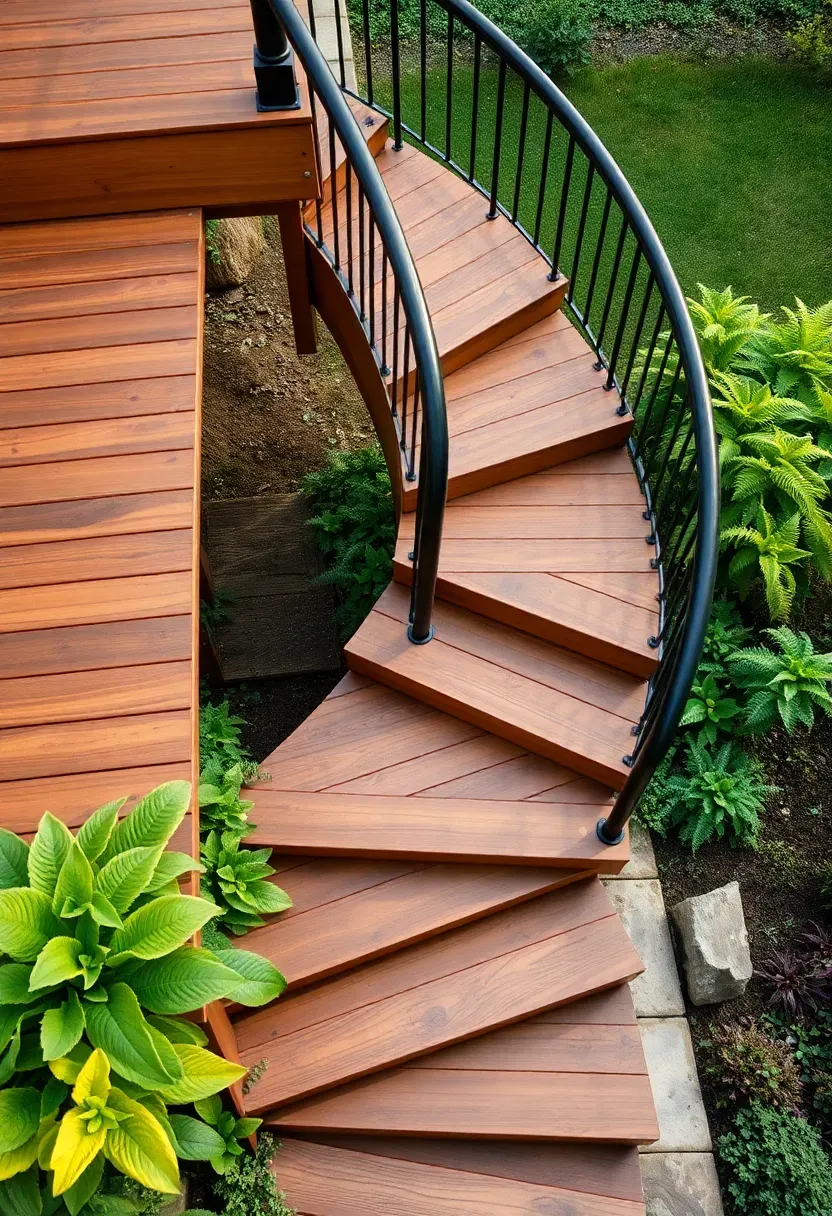
12. Curved Stair Connector Design
Straight stairs between deck levels are practical but predictable. A curved or sweeping stair adds movement to the layout and uses the vertical transition as a focal point rather than just a connector. The curve does not need to be dramatic — a gentle fifteen-degree arc over a four-foot rise is enough to break the rigid geometry. Build curved stringers from laminated layers of pressure-treated plywood bent over a form, then cap with decking material to match the platforms. This costs more than straight stairs but less than most people assume — roughly thirty to fifty percent premium on the stair portion alone.
Tips
- Maintain consistent tread depth around the entire curve — tapered treads feel unsafe underfoot
- Light the inside edge of the curve with recessed step LEDs to highlight the shape at night
- Curved stairs need a wider landing zone at top and bottom than straight runs
Recommended
Items for this idea
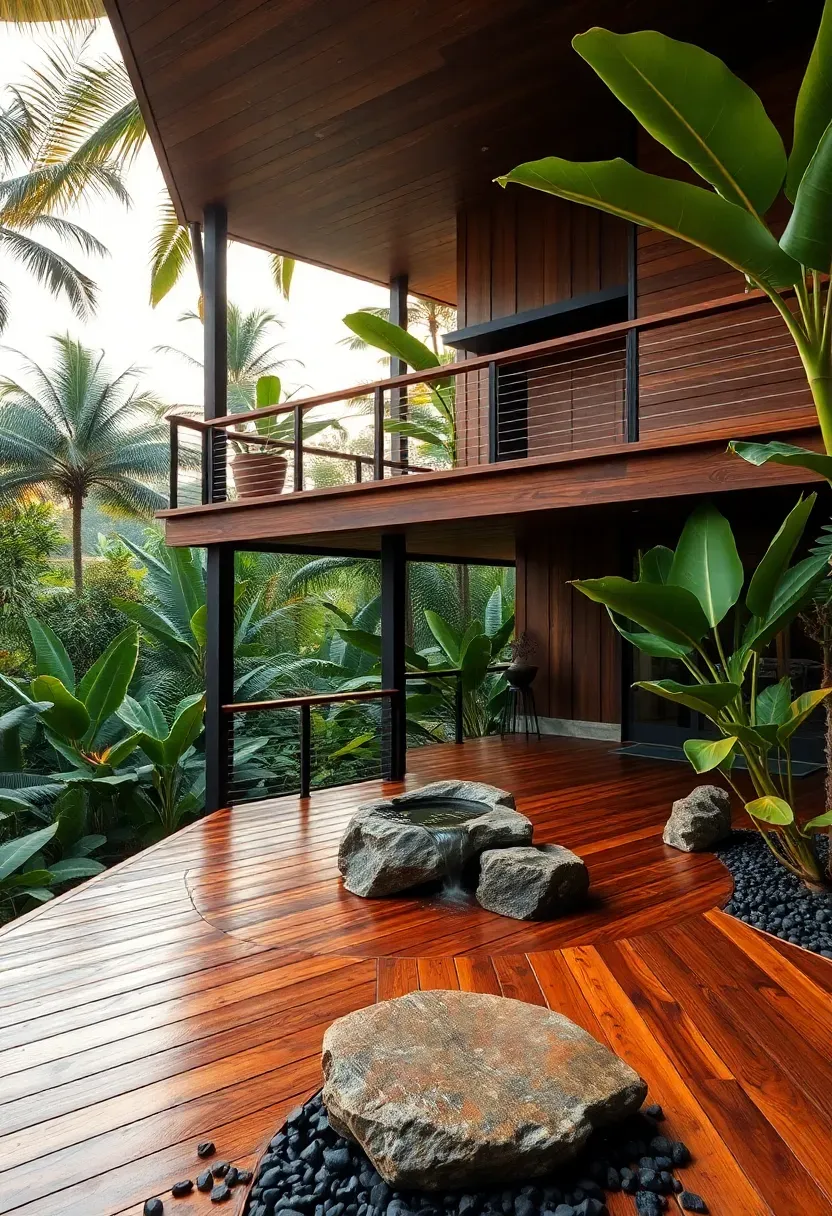
13. Tropical Hardwood Tiered Deck
Ipe vs. Cumaru vs. Garapa
Tropical hardwoods last twenty-five to fifty years without chemical treatment, resist rot, insects, and surface scratching better than any domestic species, and feel dense and solid underfoot. But they are not all the same. Ipe is the benchmark — extremely hard, dark chocolate brown, around $8 to $12 per linear foot. Cumaru is nearly as hard at about seventy percent of the price. Garapa is lighter in color (honey gold) and slightly softer but still outlasts cedar by decades.
Modern Take
Pair any of these species with black powder-coated aluminum posts and cable railing for a sharp contrast between the warm wood tones and industrial metal. The two-level layout lets you use one species on top and another below if budget is a concern — ipe on the visible upper dining level, cumaru on the lower lounge where foot traffic is lighter.
Apply at Home
- Pre-drill every screw hole — tropical hardwoods split if you drive screws without pilot holes
- Apply a UV-blocking oil finish annually to maintain color, or let the wood silver naturally
- Source boards from FSC-certified suppliers to ensure responsible forestry practices
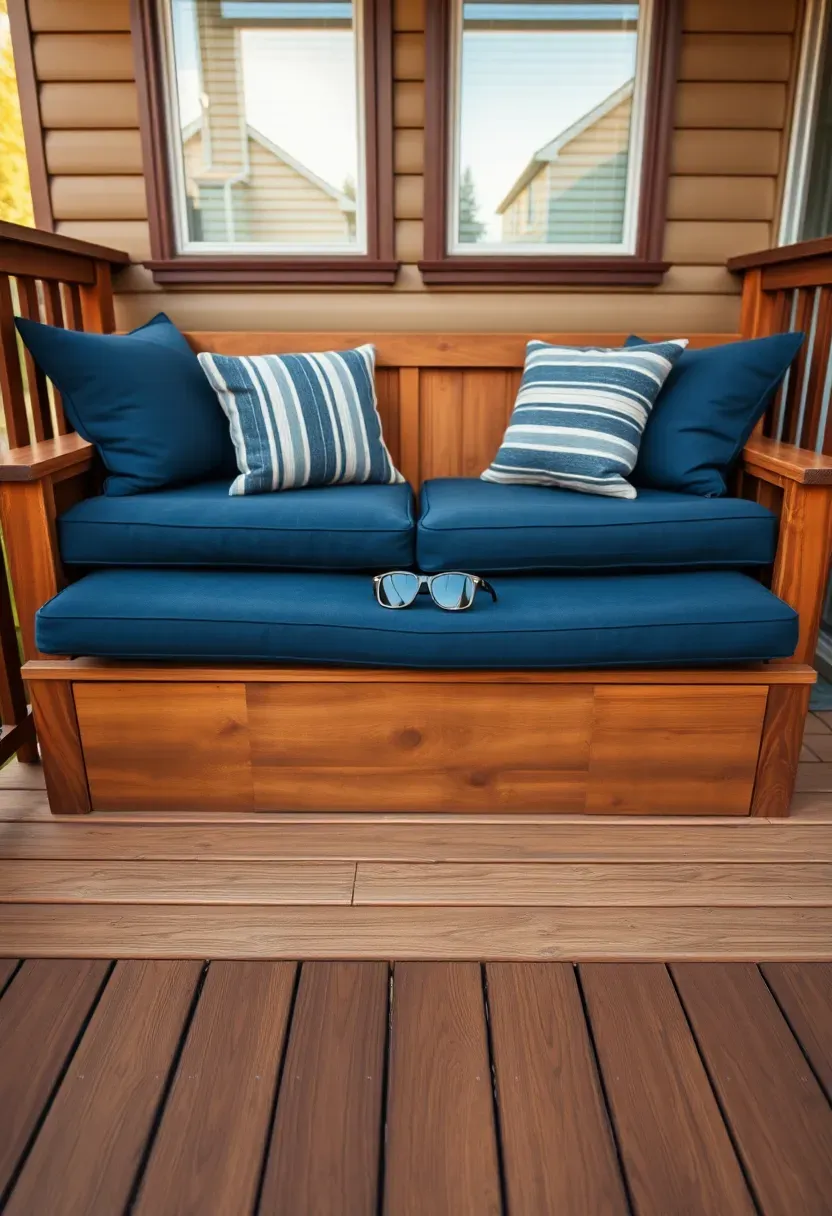
14. Built-In Bench Transition Level
Instead of a traditional riser step between levels, widen the transition into a built-in bench. The bench face becomes the retaining wall between upper and lower, the seat surface sits flush with the upper deck height, and feet rest on the lower level. This replaces two pieces of furniture — the step and a standalone bench — with one integrated element. Size the seat depth at sixteen to eighteen inches and the height at seventeen inches from the lower deck surface for comfortable sitting. Run the bench the full width of the transition or just across the center, leaving stair access at both ends.
Tips
- Add a slight backward tilt — five degrees — to the seat surface to prevent rainwater from pooling
- Notch the bench framing into the deck joists rather than just lag-bolting it to the surface for a permanent, wobble-free connection
- Removable cushions stored in a nearby deck box make the bench comfortable for extended sitting
Recommended
Items for this idea
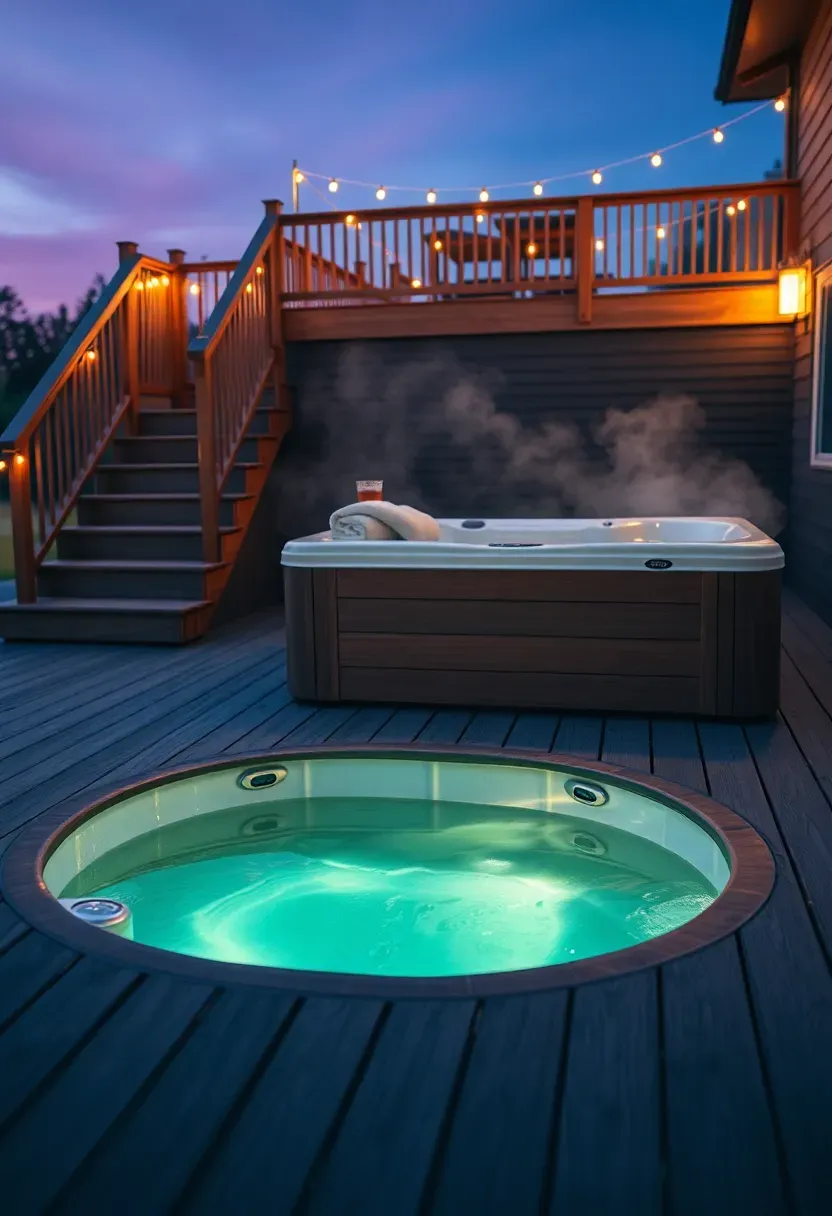
15. Hot Tub Lower Deck Platform
The Weight Problem
A filled hot tub weighs between 3,000 and 6,000 pounds depending on size. Putting that on an elevated deck requires structural upgrades — doubled or tripled joists, larger posts, deeper footings — that quickly escalate costs. Dropping the hot tub to a ground-level lower platform solves the engineering problem because the weight bears directly on a concrete pad or compacted gravel base below the deck surface.
The Solution
Build the lower level at grade specifically for the tub. Frame a cutout so the tub rim sits flush with the deck boards for a built-in look. Run the upper entertaining deck at standard house-exit height with stairs connecting to the tub platform. Leave a three-foot access panel on one side for pump and heater maintenance.
Pros and Cons
- Pro: No structural upgrades needed since the tub weight rests on the ground, not on framing
- Pro: Lower tub position means easier entry — fewer steps to climb over the rim
- Con: Drainage around a ground-level tub needs careful grading to prevent standing water
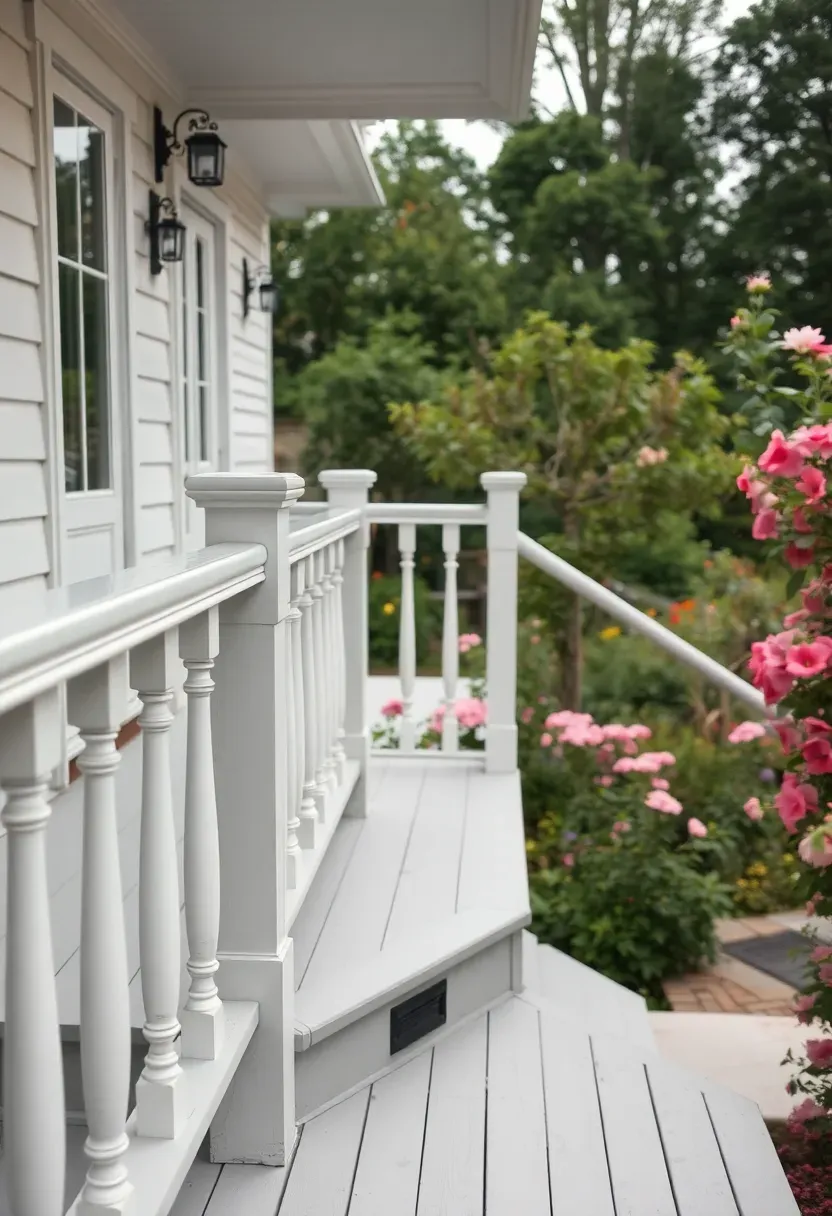
16. Farmhouse-Style Painted Two-Level Deck
Painted decks fell out of fashion when stain became the default, but a properly painted two-level deck in crisp white or soft gray gives a farmhouse property a porch-like character that stain cannot match. Use porch and floor enamel rated for foot traffic — not house paint — over a solid primer. The two-level setup reads like a classic farmhouse porch stepping down to a garden terrace. Turned post balusters, a flat-topped railing wide enough to set a glass on, and board-width planks rather than narrow composite strips complete the look.
Tips
- Sand and repaint every three to four years; painted decks show wear faster than stained ones in high-traffic paths
- Prime every surface including the underside of boards before installation to prevent moisture from lifting the paint from below
- Use a contrasting floor color and railing color — gray floor with white railing is a classic farmhouse combination
Recommended
Items for this idea
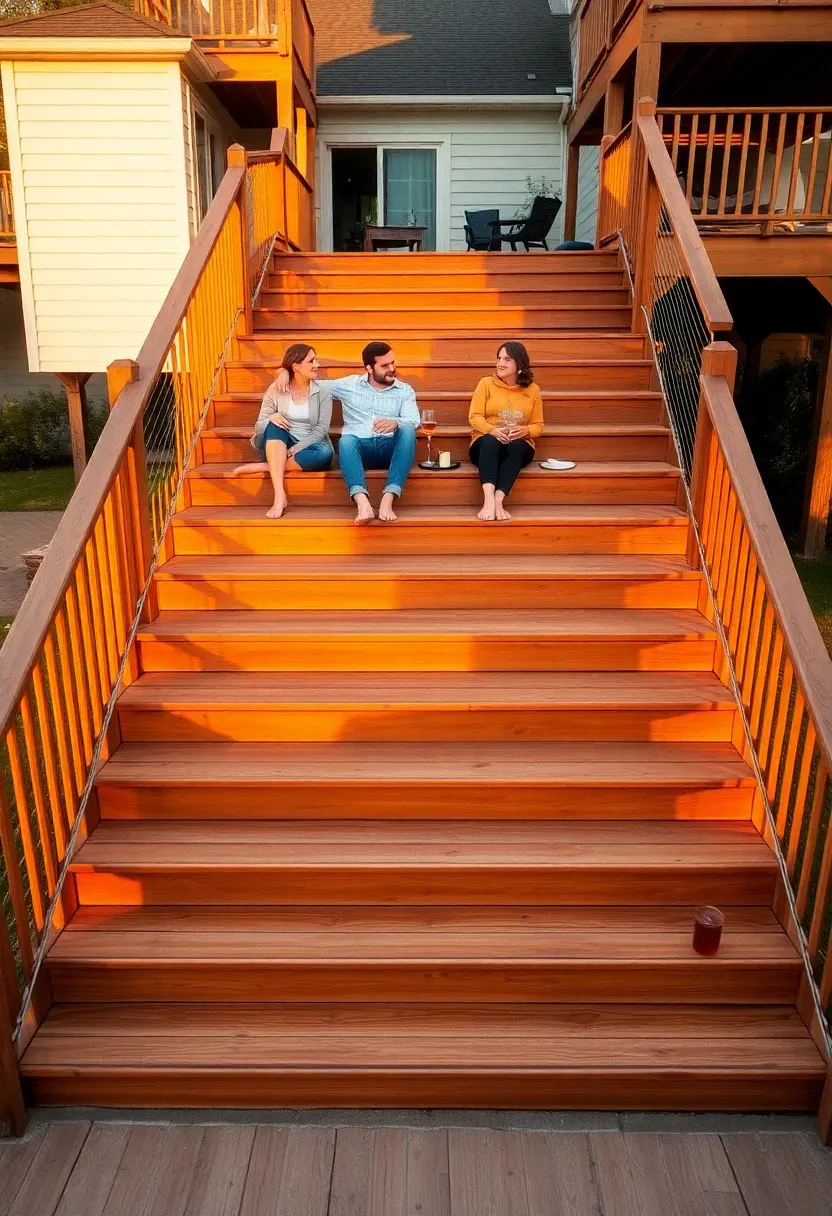
17. Wide Stair Seating Connection
Standard deck stairs are thirty-six inches wide — enough for one person. Stretch that to six, eight, or even ten feet wide and the stairs stop being a transition and start being the main seating area. During a party, wide stairs fill up with people sitting on the treads while conversation flows between upper and lower levels. Make treads deeper than code minimum — fourteen to sixteen inches instead of eleven — so there is room to sit comfortably with feet on the tread below. This layout works best when the level change is two to four feet, producing four to seven wide treads.
Tips
- Cap treads with composite or hardwood for splinter-free sitting since people will be barefoot and in shorts
- Add a railing on at least one side for code compliance even if the stair height seems low
- Tuck low-voltage LED strips under each tread nose for safe nighttime use without harsh overhead lighting
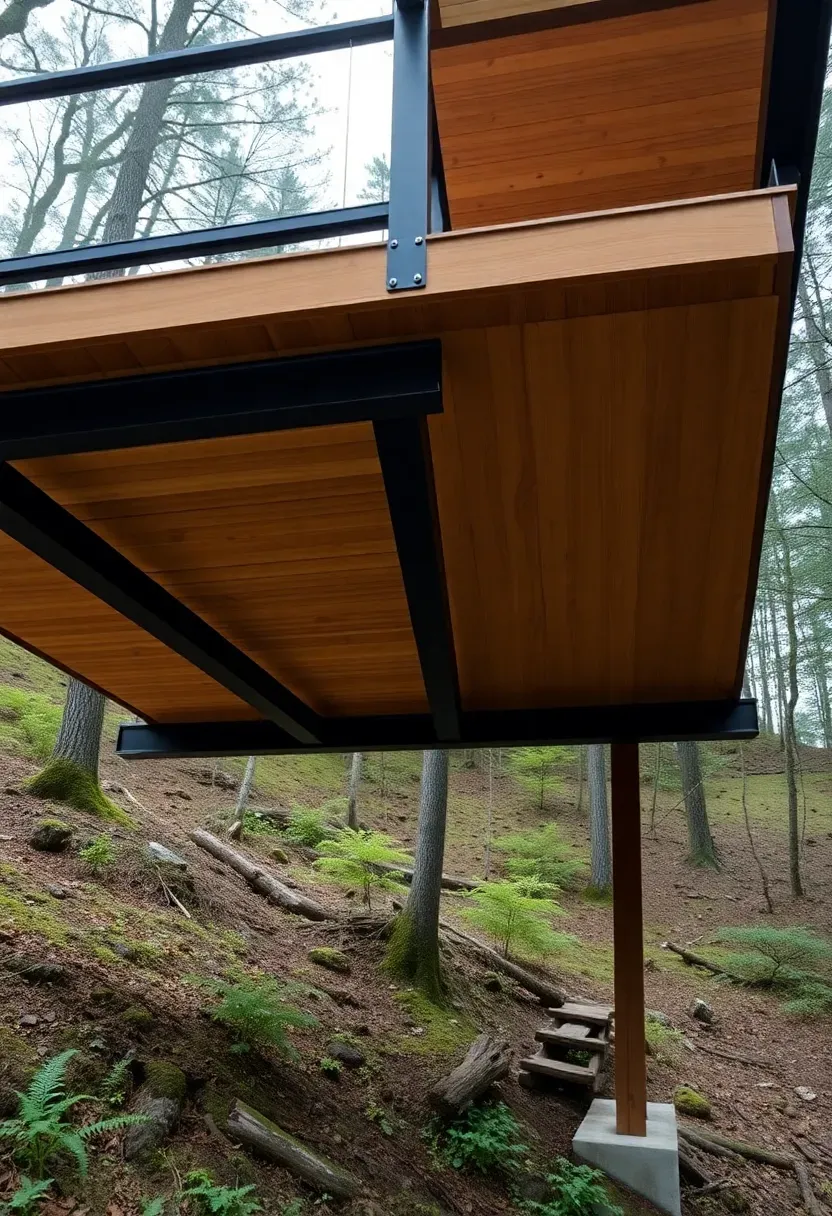
18. Cantilevered Upper Deck over Slope
On steep lots, a cantilevered upper deck eliminates the need for tall posts reaching down to grade. The deck joists extend beyond the beam, supported by the leverage of the span behind them rather than by posts underneath the overhang. Typical cantilever rules allow the unsupported extension to reach one-third to one-quarter of the total joist span — so a sixteen-foot joist can cantilever four feet past the beam. The lower level tucks underneath or beside the cantilever, anchored into the hillside with its own independent footings. This approach keeps the upper deck feeling open and airy while reducing the number of posts visible from below.
Tips
- Cantilever distances vary by lumber species, joist size, and local code — confirm with your building department before framing
- Use steel beam connections at the cantilever fulcrum point for a rigid, no-bounce feel
- Add diagonal bracing between the lower level posts and the upper structure for wind resistance on exposed hillsides
Recommended
Items for this idea
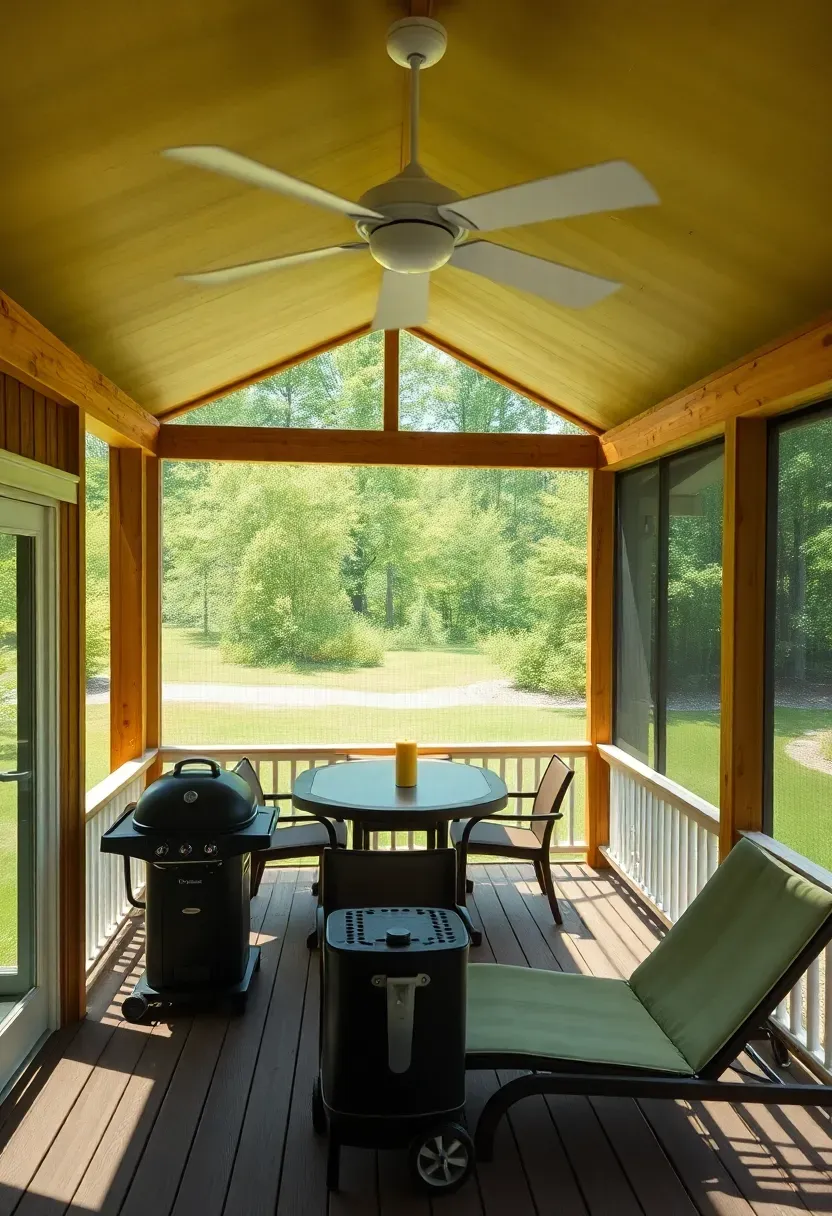
19. Screened Upper Deck with Open Lower
Bug Problem, Solved by Design
Mosquitoes, gnats, and black flies ruin evening meals on open decks from May through September in most of the country. Screening the entire deck feels like living in a cage. A two-level layout lets you screen only the upper dining area — where you eat, sit, and linger — while leaving the lower level open for grilling, sunning, and activities where bugs are less annoying because you are moving around.
How to Plan It
- Frame the upper deck with posts tall enough to support a roof or a fabric ceiling that holds the screen panels
- Install fiberglass or aluminum screen panels between the posts with removable clips so you can swap in open panels during low-bug months
- Add a ceiling fan inside the screened area — moving air deters flying insects even if a screen has a small tear
Choose If
- You live in a high-mosquito zone and want to eat outside without chemical repellents
- You entertain frequently and want one polished, bug-free zone connected to a casual open area
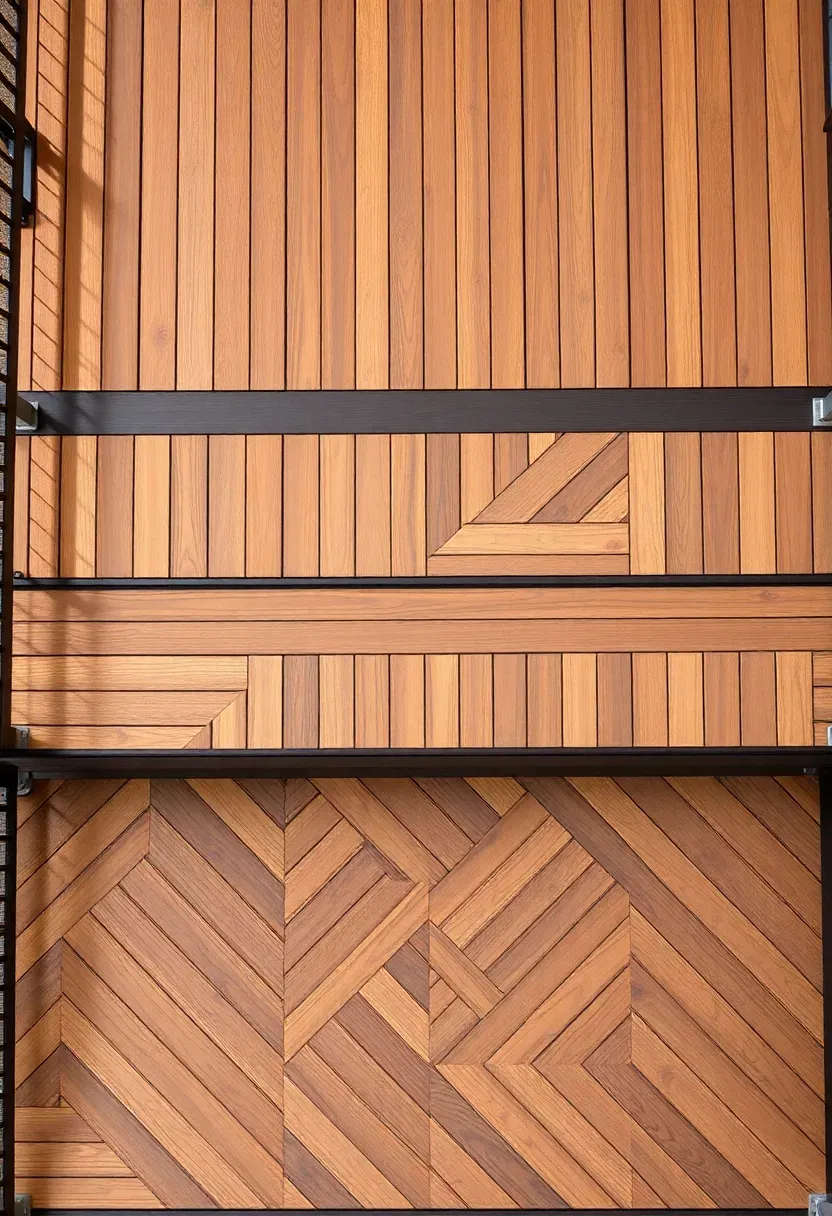
20. Diagonal Board Pattern Split Deck
Running deck boards at forty-five degrees instead of parallel to the house gives any deck a more dynamic look, and a two-level layout doubles the opportunity. Lay the upper boards at a forty-five-degree angle running one direction, then switch the lower boards to forty-five degrees in the opposite direction. The result is a subtle herringbone effect visible from above. A picture-frame border of boards running parallel to the edge contains each level neatly. This pattern requires about fifteen percent more material than straight runs due to the angled cuts and waste, but the visual payoff is substantial on a deck large enough to appreciate the geometry.
Tips
- Use a chalk line snapped corner-to-corner on the joist layout to set your starting board angle precisely
- Diagonal boards exert lateral thrust on the frame — add blocking between joists every four feet to prevent racking
- A contrasting border board color (dark frame around lighter field) emphasizes the pattern

Recommended
Items for this idea
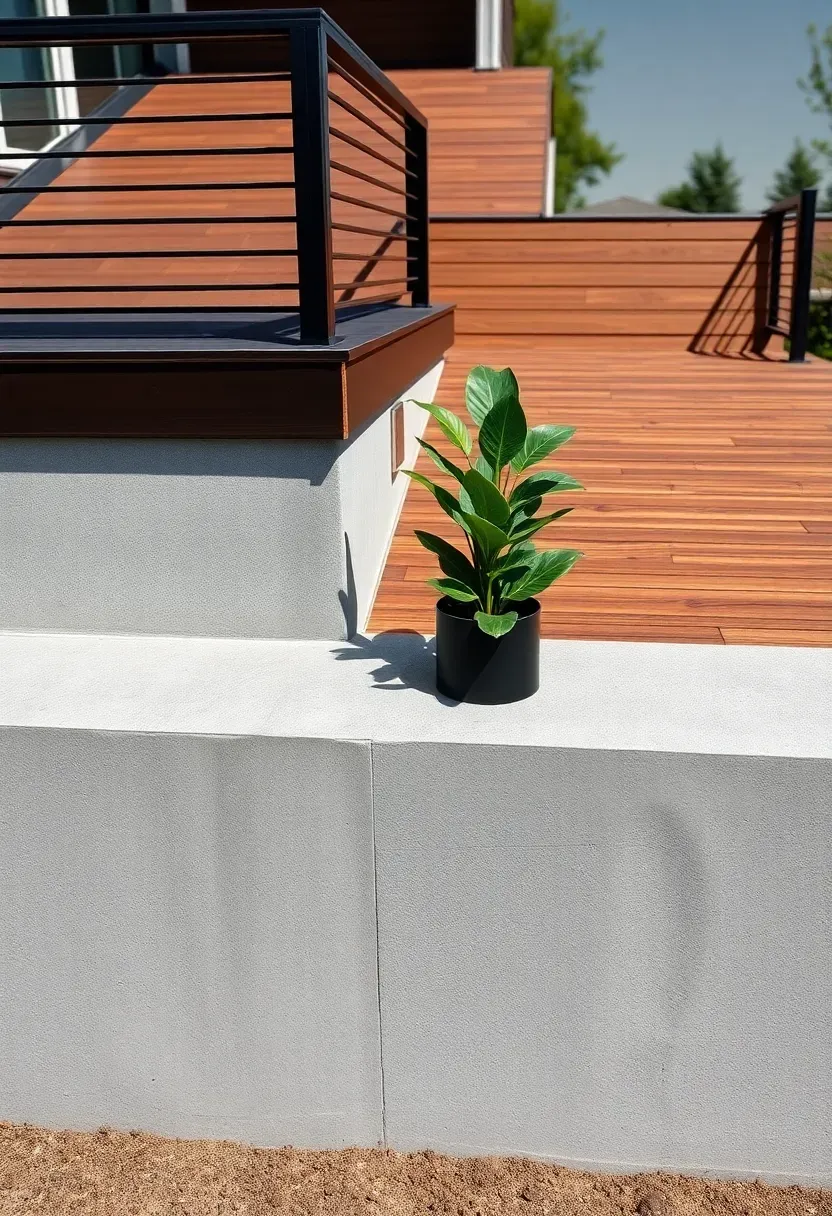
21. Rooftop-Inspired Upper Deck with Cable Railing
Horizontal stainless steel cable railing preserves sightlines that traditional wood balusters block. On a two-level deck, the upper platform is the place to use it — you want to see the yard, the lower deck, and the landscaping beyond without a visual wall of vertical pickets. Cable railing uses three-sixteenths-inch aircraft-grade stainless cable tensioned between posts at three-inch intervals. The horizontal lines echo rooftop terrace aesthetics popular in urban design and pair well with composite decking in charcoal or dark walnut tones.
Tips
- Local codes may require cables to be spaced no more than three inches apart to prevent a child from passing through
- Tension cables to at least 200 pounds of force — under-tensioned cables sag between posts and look sloppy within a year
- Intermediate posts every four feet keep cables from deflecting too much between end posts
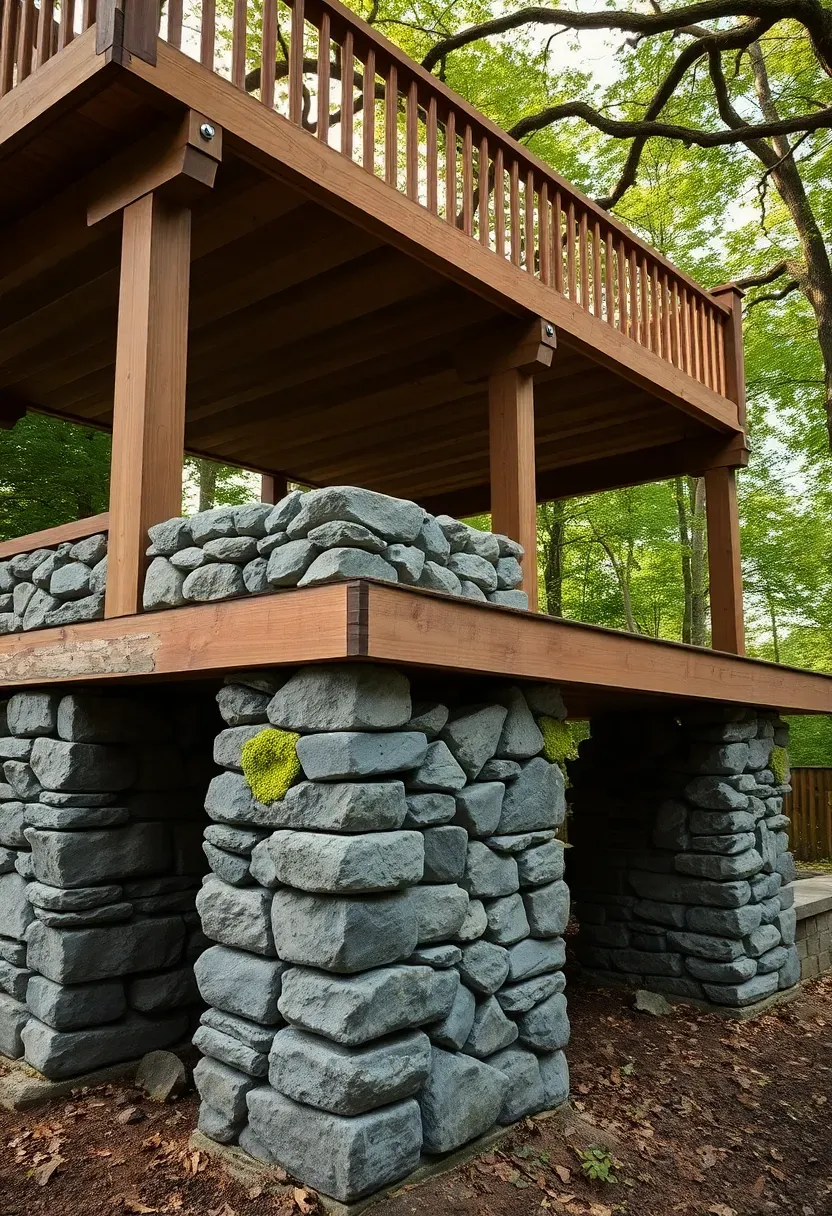
22. Stone Pier Foundation Two-Level Deck
Poured concrete tube footings are the standard for deck foundations, but exposed stone piers bring a craftsman quality that concrete cannot match. Dry-stacked or mortared stone columns — twelve to sixteen inches square — replace round concrete tubes and become a visible design element when the upper deck is high enough to expose the substructure. This works best on sites where the upper deck sits four feet or more above grade, giving the stone piers enough height to read as intentional columns rather than stubby blocks.
Tips
- Build stone piers around a steel post core for structural reliability — the stone is decorative cladding, not the load-bearing element
- Match the pier stone to any existing hardscape (retaining walls, paths, house foundation) for visual continuity
- Cap each pier with a flat stone that extends one inch beyond the column face on all sides to shed water away from the mortar joints
Recommended
Items for this idea
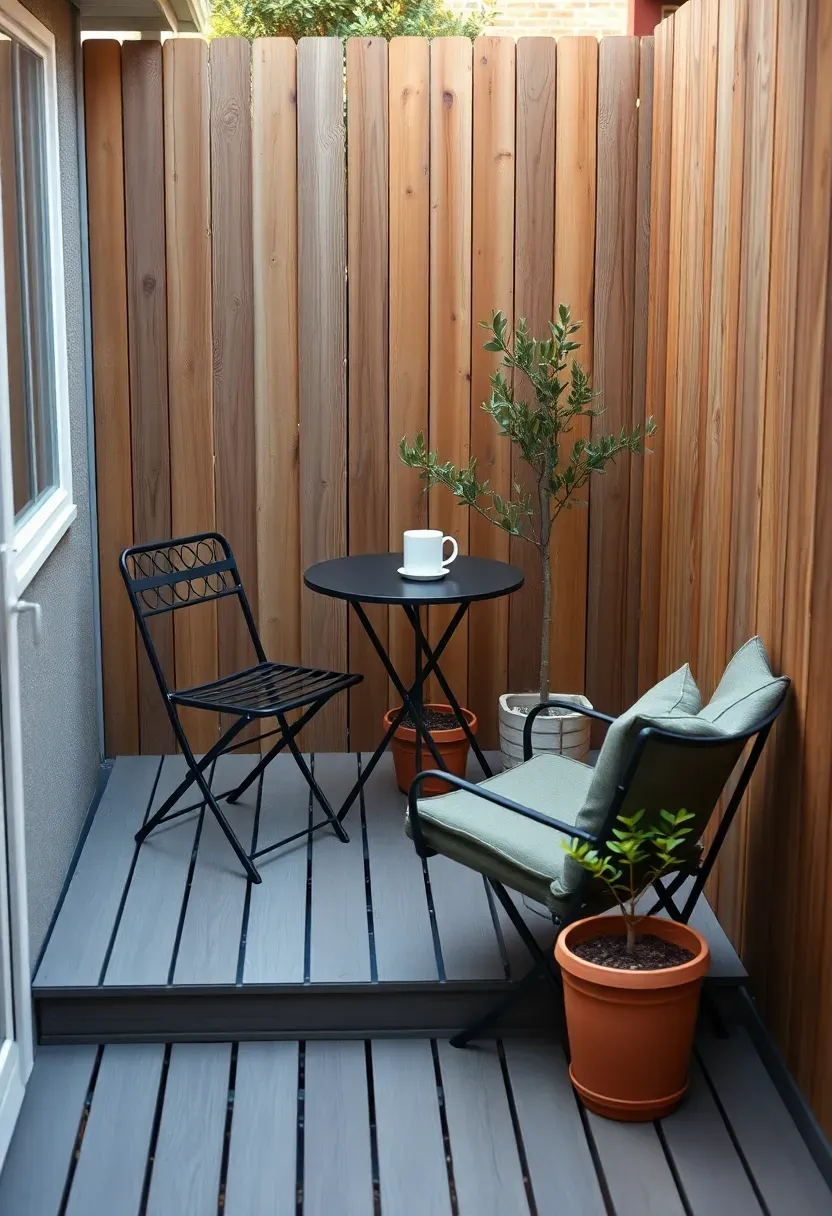
23. Compact Two-Tier Deck for Small Yards
Small Yard, Big Assumption
People with small yards often dismiss multi-level decks as a large-property luxury. But a two-tier layout actually makes a small space feel bigger than a single flat platform because the level change tricks depth perception. An eight-by-ten upper level and a six-by-eight lower level fit in a total footprint of about 130 square feet — roughly the size of a large parking space.
How to Build It
- Keep the level change to one step — seven inches — to avoid eating floor space with stairs
- Cantilever the upper deck boards two inches past the fascia to create a shadow line that emphasizes the separation
- Use the same decking material on both levels but consider a lighter shade on the lower level to make it feel more expansive
Watch Out
- In very small yards, building permits may limit how close the deck can be to the property line — check setback requirements before designing
- A deck that fills the entire yard eliminates green space; leave at least a three-foot strip along one edge for planting
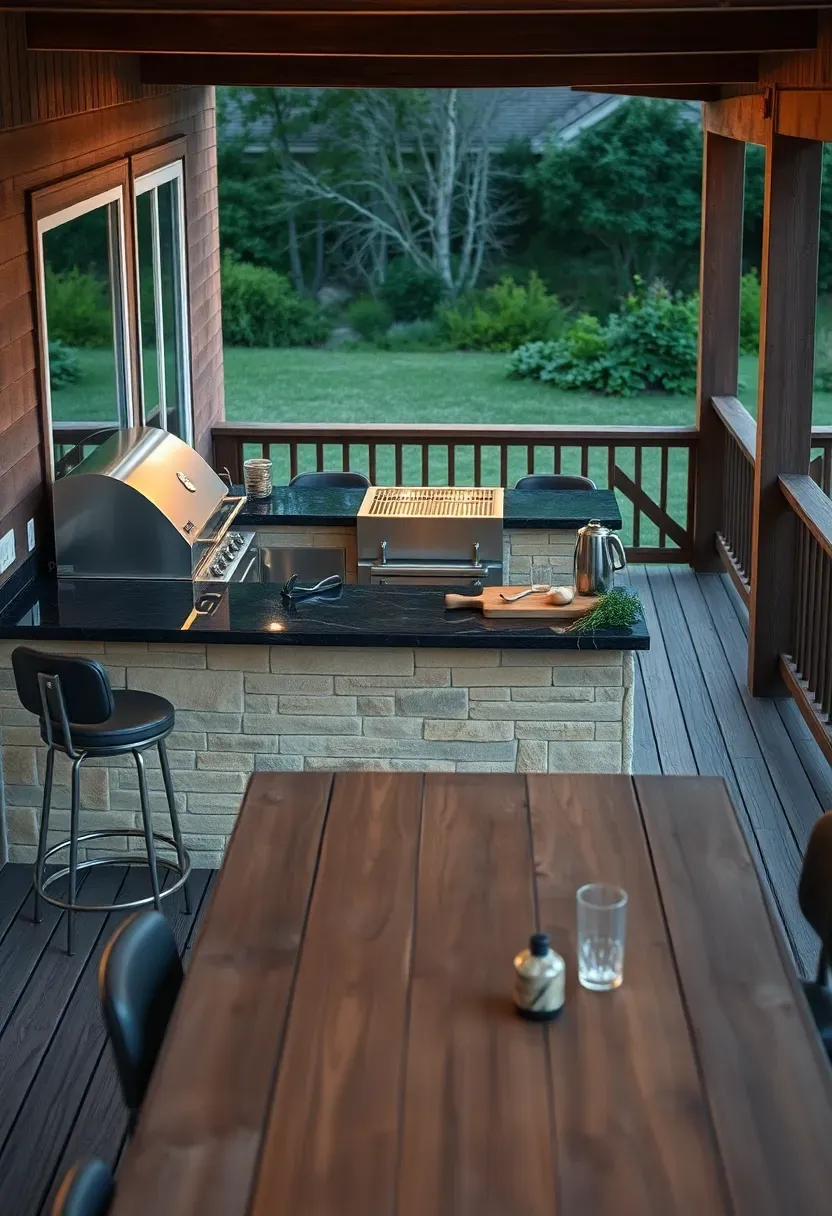
24. Outdoor Kitchen Upper Deck Layout
Placing the cooking zone on the upper level keeps grease, smoke, and heat away from the dining and lounging area below. Run utilities — gas line, electrical for outlets, and a water supply for a sink — from the house directly into the upper deck since it is closest to the exterior wall. A four-foot bar counter along the upper deck edge lets guests sit on stools and chat with the cook while looking down at the lower dining table where food eventually lands. Build a solid countertop from granite, concrete, or stainless steel rather than butcher block, which warps in outdoor humidity.
Tips
- Install a vent hood or at least a high-powered fan above the grill to direct smoke up and away rather than across the upper deck
- Route grease traps and drains away from the lower deck to prevent dripping onto diners below
- Keep a fire extinguisher mounted within arm's reach of the grill area — not inside the house
Recommended
Items for this idea
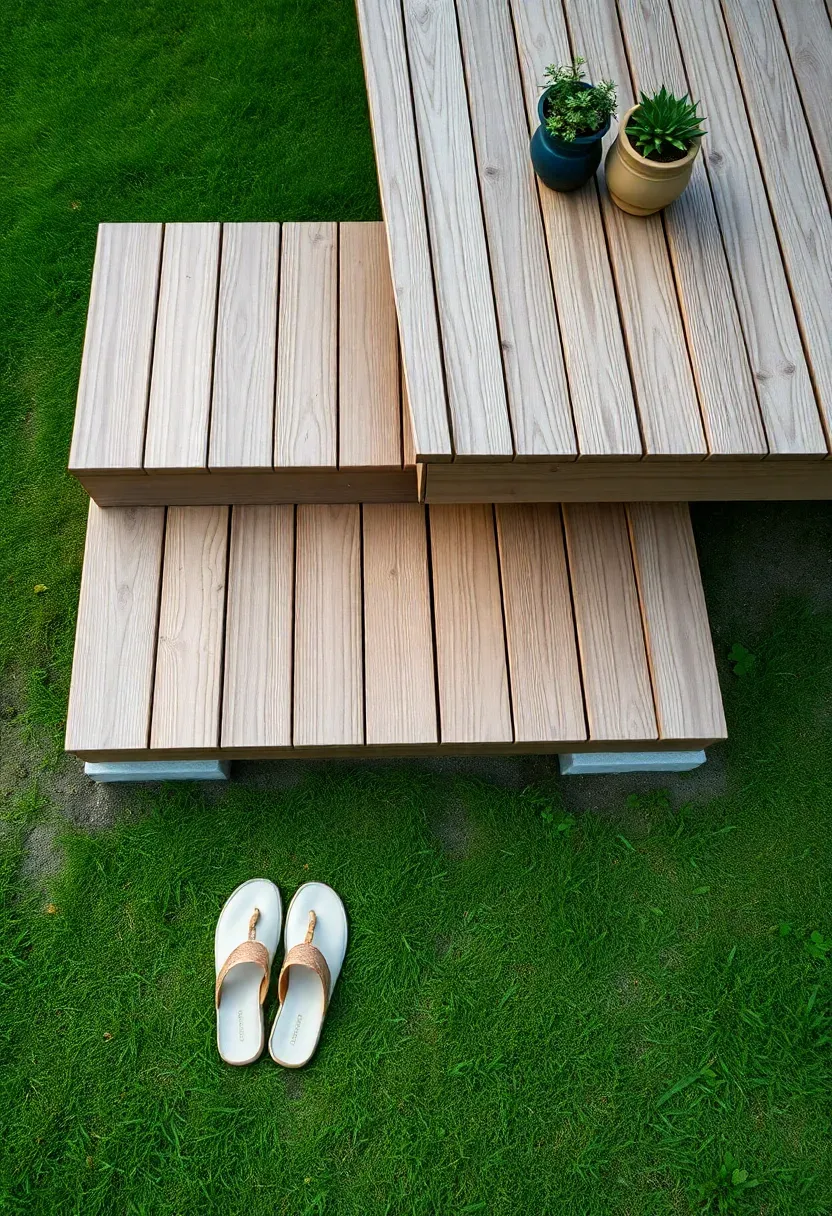
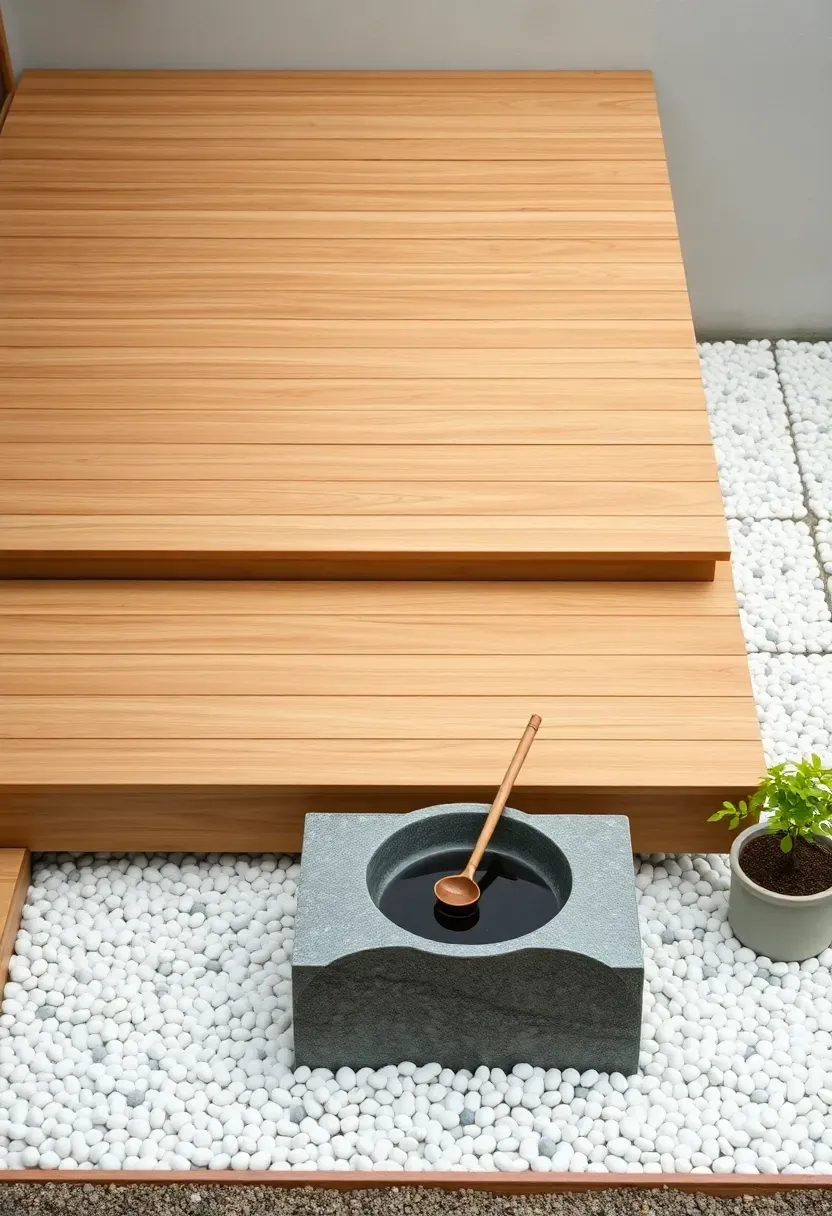
25. Japanese-Inspired Platform Deck
Origins
Japanese engawa — the narrow wooden platform wrapping traditional houses — blurs the line between inside and outside. The design principle is restraint: simple material, minimal railing, direct connection to the garden. Adapted to a two-level backyard deck, this means low platforms, wide open edges, and deliberate placement of a few natural elements rather than filling the space with furniture.
Modern Adaptation
Build both levels at near-ground height — four to eight inches above grade. Use smooth-planed cedar or cypress with a natural finish. Surround the platforms with raked gravel or river pebbles. Place a single stone water basin (tsukubai) at the corner of the lower level. The upper platform functions as the social zone; the lower one is for quiet contemplation. No railing, no pergola, no clutter.
Apply at Home
- Source rough-sawn cedar and plane it smooth rather than buying pre-surfaced material for a more authentic texture
- Use hidden fasteners exclusively — visible screw heads break the clean plane
- Position one well-chosen plant — a Japanese maple or a clump of black bamboo — where it is visible from both levels
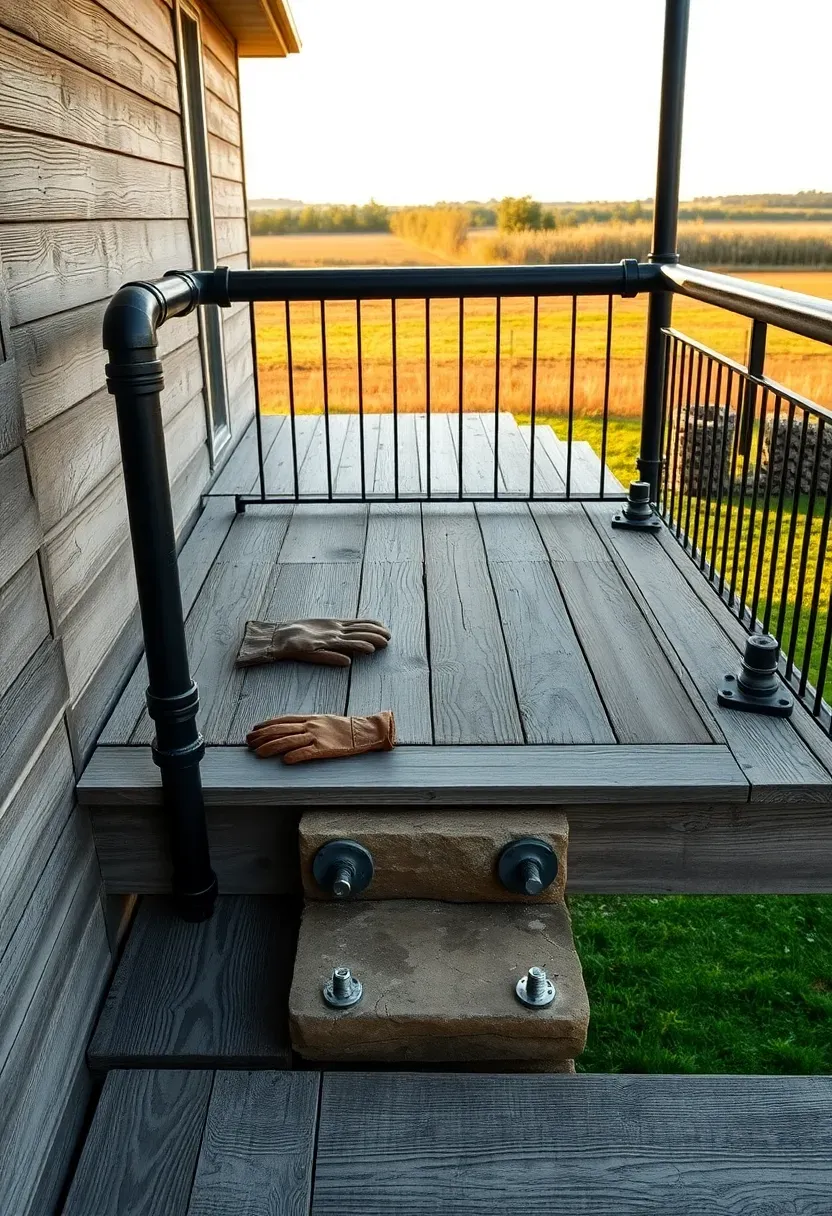
26. Reclaimed Wood Rustic Two-Level Deck
Reclaimed barn wood, factory flooring, and salvaged dock planks give a deck character that no new material can replicate. The weathered gray tones, nail holes, and width variation tell a story. On a two-level build, use the most visually interesting boards on the upper deck where they are seen up close, and reserve the less photogenic stock for the lower level and substructure. Pair reclaimed wood decking with iron pipe railings and galvanized hardware to lean into the industrial-rural aesthetic rather than fighting it with polished fittings.
Tips
- Inspect every reclaimed board for hidden nails, screws, and metal fragments with a handheld metal detector before cutting
- Sand walking surfaces enough to prevent splinters but not so much that you erase the patina
- Apply a penetrating wood preservative rather than a film-forming sealer — the wood needs to breathe and the aged look should stay visible
Recommended
Items for this idea
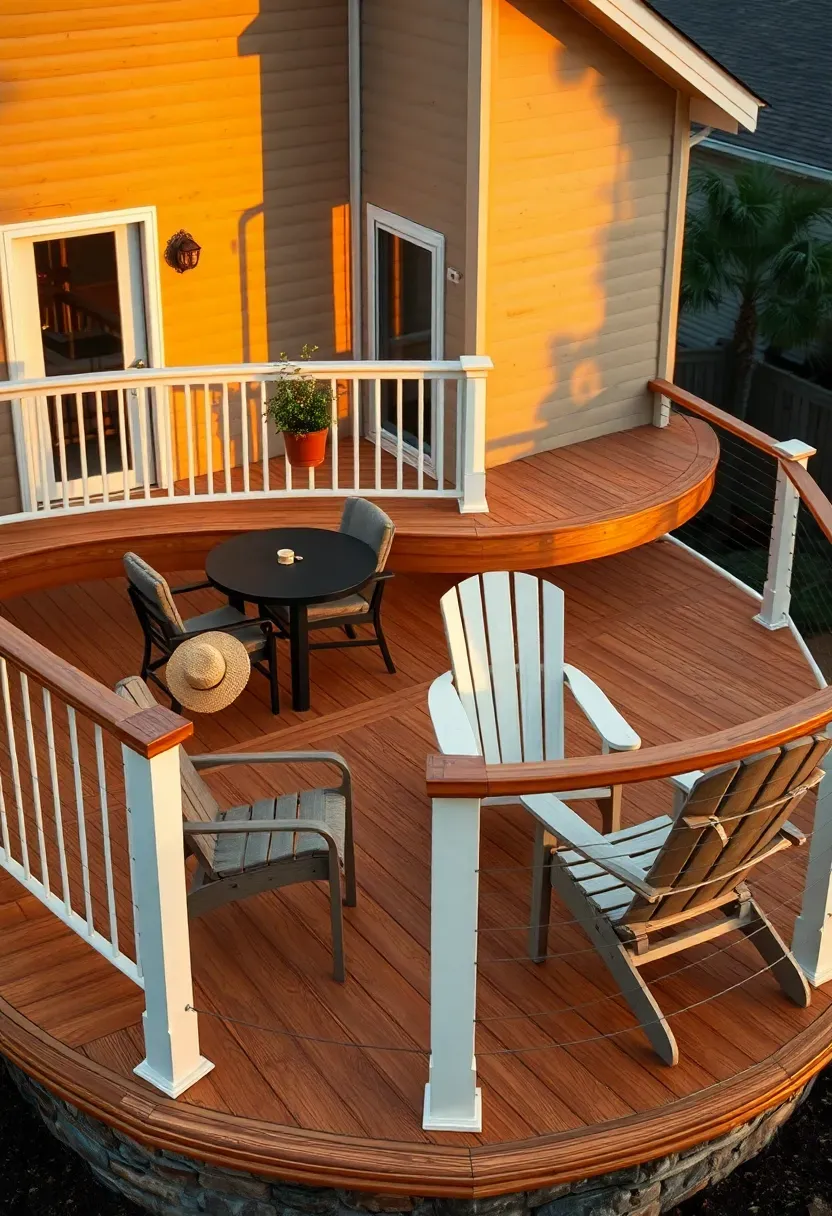
27. Full Wraparound Two-Level Deck
A wraparound deck that spans two or three sides of the house at two different heights is the most ambitious layout here — and the most rewarding if the budget allows. The upper level follows the main living area (kitchen, family room) at door height. As it wraps around the corner, it steps down to the lower level along a bedroom wing or a quieter side of the house. Each section gets its own identity: the upper back deck is for cooking and dining, the lower side deck is a private morning-coffee spot. Total deck area often exceeds 600 square feet, so material choices compound in cost — composite on a project this size runs $20,000 to $45,000 installed depending on region.
Tips
- Stagger the construction in phases if budget is tight — build the upper back section first, add the lower side wrap in year two
- Use different railing styles on each wing to reflect the function: solid privacy railing on the bedroom side, open cable on the entertaining side
- Ensure each section has its own stair access to the yard so traffic does not have to route through the entire deck to reach the lawn
Quick FAQ
How much does a two-level deck cost compared to a single level? Adding a second level increases total cost by roughly twenty to forty percent over a single platform of the same square footage. The extra framing, footings, and stairs account for most of the increase. Material choice matters more than the level count — a single-level ipe deck costs more than a two-level pressure-treated one.
Do I need a permit for a two-level backyard deck? Almost certainly yes. Any deck attached to a house or exceeding thirty inches above grade requires a building permit in most US jurisdictions. Two-level decks typically involve more complex footings and structural connections that inspectors want to review. Pull the permit before you start — retroactive permits cost more and may require tearing out finished work for inspection access.
Can I build a two-level deck on a completely flat yard? Absolutely. Many of the designs above work on flat ground by creating a modest step of seven to eighteen inches between levels. The level change is about creating distinct zones, not about accommodating terrain. Ground-level two-tier designs on flat yards often skip railings entirely, which simplifies the build.
What is the best decking material for a multi-level deck? Composite decking offers the best balance of durability, low maintenance, and consistent appearance across large areas. For a two-level project where material quantities are high, composite's no-staining, no-sealing benefit saves hundreds of hours over the deck's lifetime compared to wood. If you prefer real wood and are willing to maintain it, pressure-treated Southern yellow pine gives the lowest upfront cost while cedar and tropical hardwoods age more gracefully.
Should the two levels use the same decking color? Using the same color creates visual unity. Using different but complementary colors — such as a darker upper level and lighter lower — helps define each zone and can make the lower area feel more spacious. Both approaches work; the deciding factor is whether you want the deck to read as one connected space or two distinct rooms.
A two-level deck is one of those projects where the finished result makes you wonder why anyone builds flat. The level change gives your yard a sense of architecture that a single platform just cannot achieve. Start with the simplest version that fits your grade and budget — even a one-step split between dining and lounging zones reshapes how your backyard feels. Build the bones right, and the rest is furniture.
Pinterest cover for 27 Backyard 2 Level Deck Designs
About the author
OBCD
CGI visualization and interior design content. We create detailed 3D renders and curate practical design ideas for every room in your home.