27 Backyard Fire Pit Ideas Landscaping on a Budget
Two summers ago I dug a shallow circle in my yard, lined it with leftover retaining wall blocks, and spread three bags of pea gravel around it. Total cost was about $85. That fire pit has hosted more dinners, late-night conversations, and marshmallow sessions than any room inside my house. The landscaping around a fire pit matters as much as the pit itself — it defines the mood, controls drainage, and keeps maintenance low. These 27 backyard fire pit ideas landscaping designs show you how to build something worth gathering around without draining your savings account.
Each idea pairs a fire pit style with specific landscaping choices — ground cover, border plants, seating surfaces, and pathway materials — so you get a complete picture, not just the pit.
Table of Contents
- Pea Gravel Circle with Stacked Stone Ring
- Sunken Fire Pit with Terraced Seating
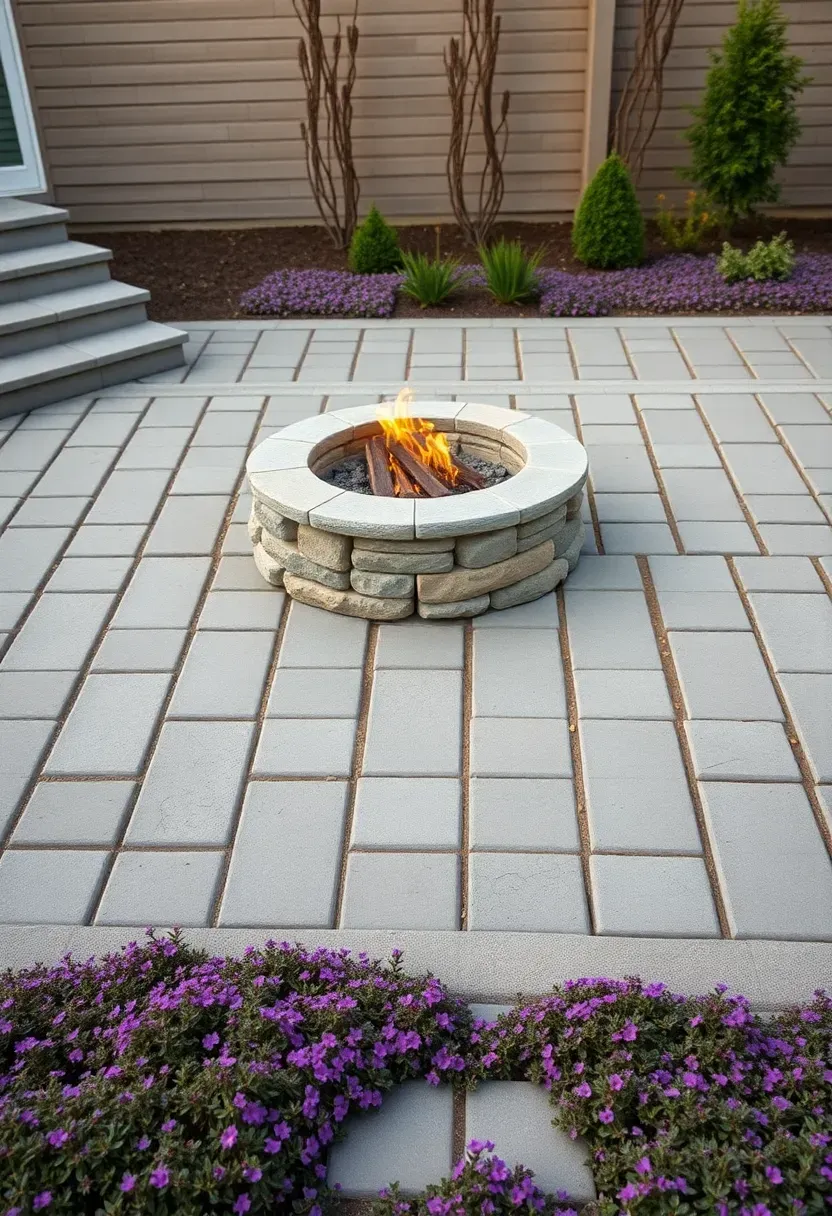
- Paver Patio Fire Pit with Creeping Thyme Borders
- Steel Fire Bowl on a Decomposed Granite Pad
- DIY Concrete Block Fire Pit with River Rock Surround
- Flagstone Patio Fire Pit with Ornamental Grasses
- Portable Fire Pit on an Existing Lawn
- Reclaimed Brick Fire Pit with Mulch Path
- Gabion Wall Fire Pit Seating Area
- Natural Boulder Fire Pit with Wildflower Meadow
- Square Cinder Block Fire Pit with Gravel Apron
- Fire Pit with Stepping Stone Walkway
- Raised Planter Wall Fire Pit Combo
- Dry Creek Bed Leading to a Fire Pit Clearing
- Rustic Log Bench Fire Pit Circle
- Zen Gravel Garden Fire Pit
- Recycled Wine Barrel Fire Table
- Fire Pit with Low Hedge Windbreak
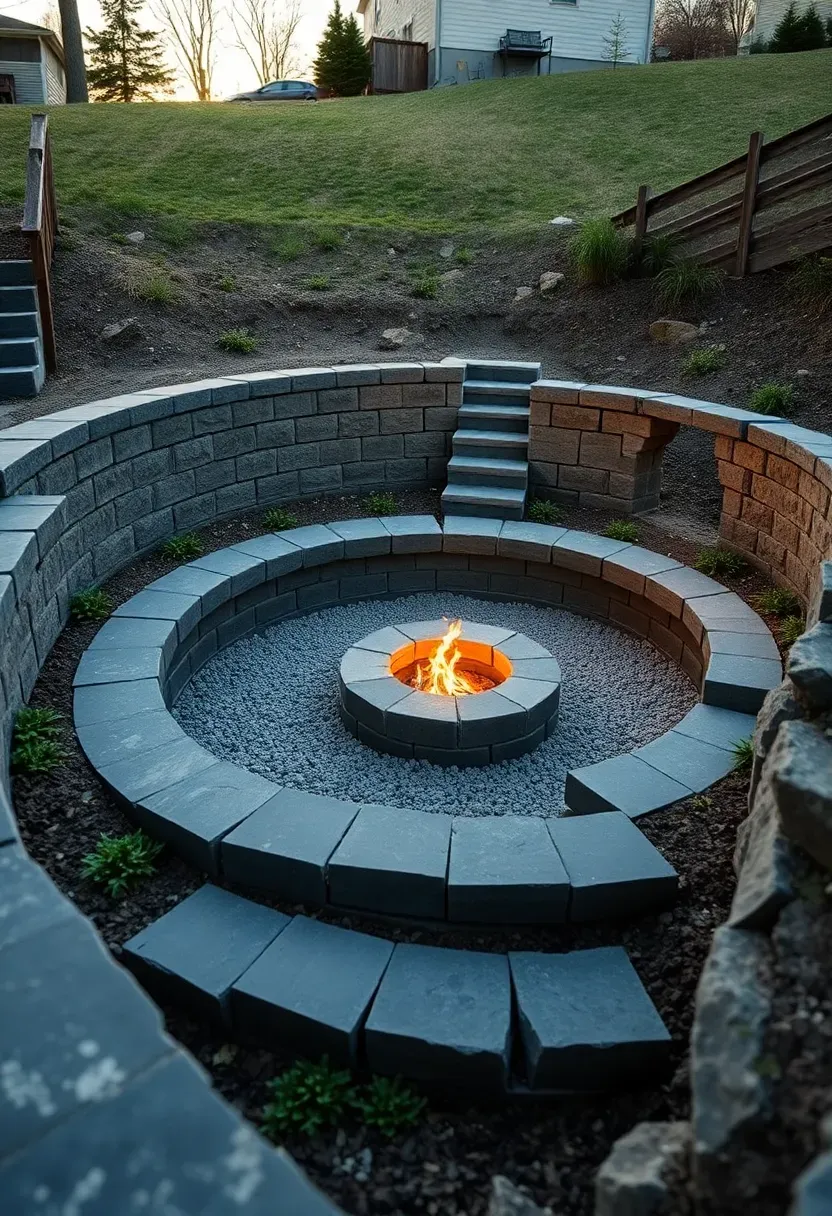
- Hillside Carved Fire Pit Terrace
- Chiminea Corner with Potted Plants
- Tire Rim Fire Pit with Sand Base
- Fire Pit with Ground Cover Mosaic
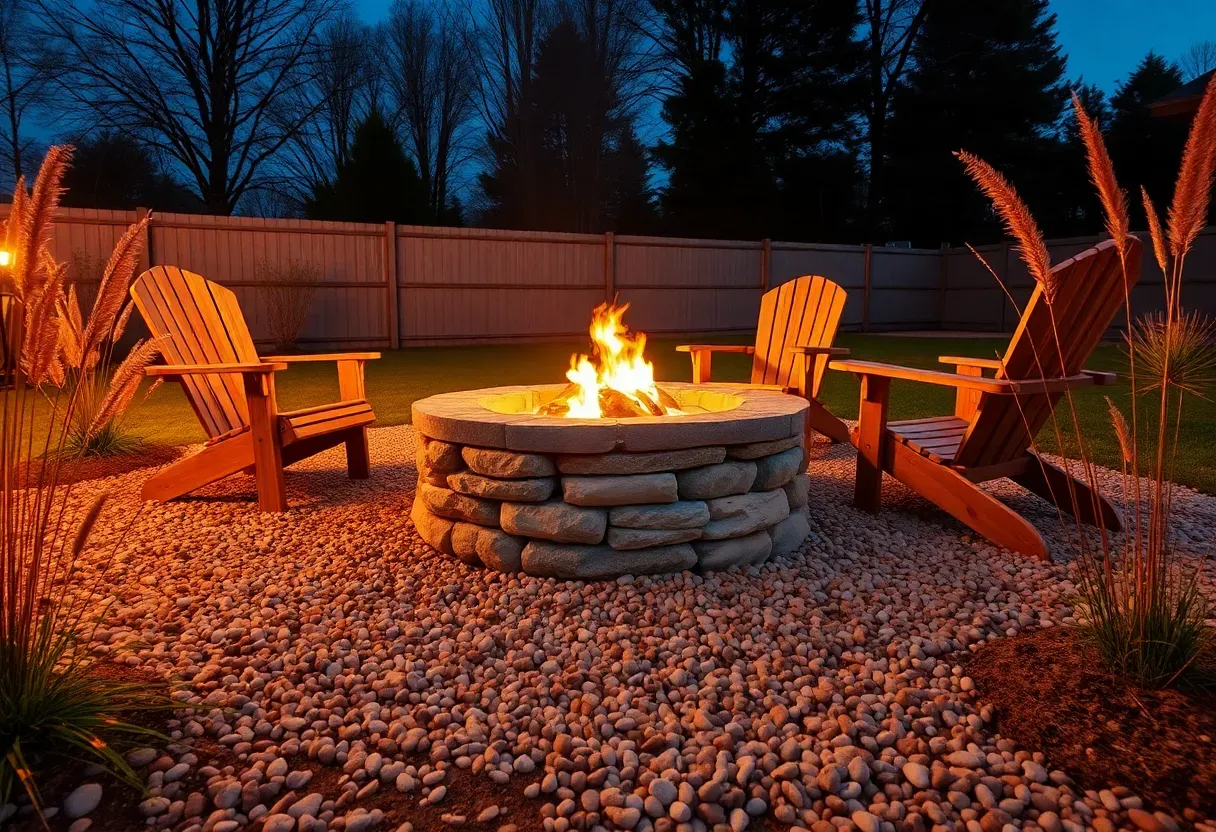
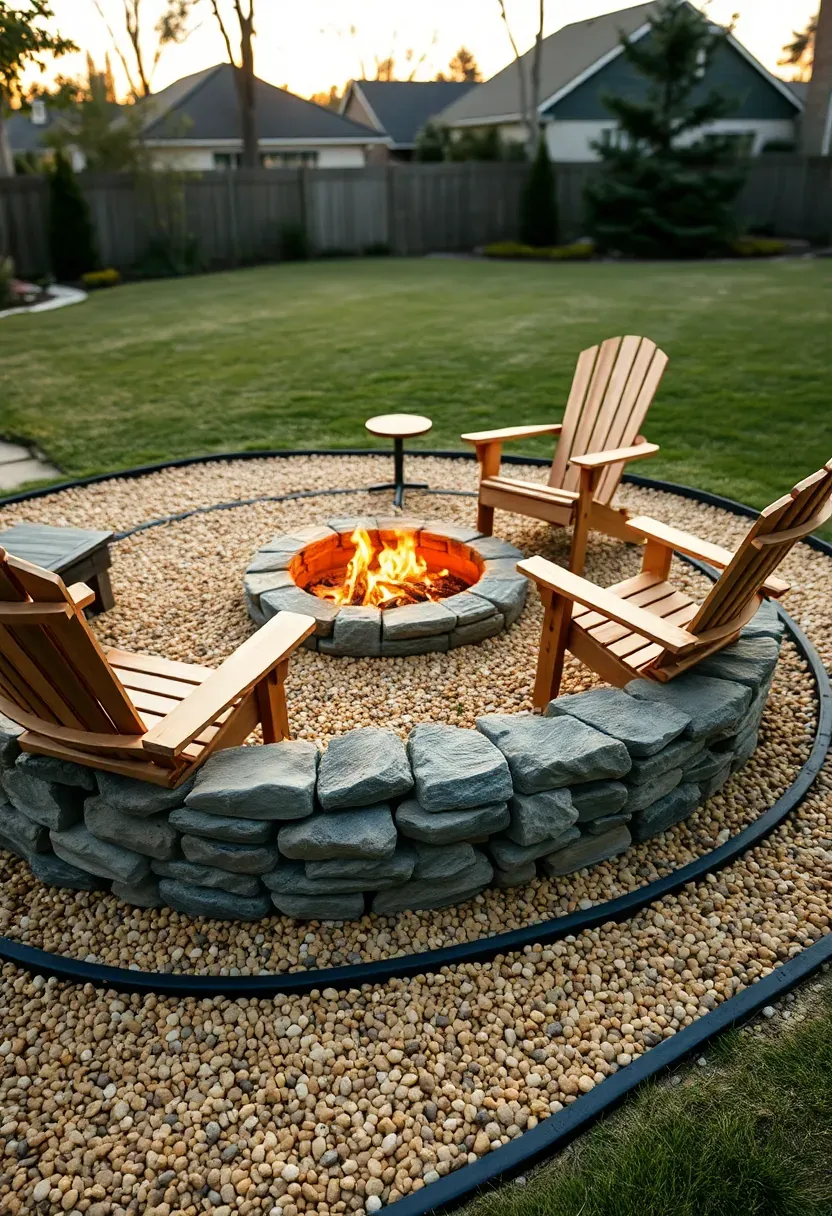
- Adirondack Ring Around a Gas Fire Bowl
- Cottage Garden Fire Pit with Lavender Border
- Fire Pit with Recycled Pallet Deck
- Desert-Style Fire Pit with Succulents and Crushed Rock
- String-Lit Fire Pit Lounge with Built-In Benches
1. Pea Gravel Circle with Stacked Stone Ring
Pea gravel is one of the cheapest ground covers you can buy — roughly $4 per bag at any hardware store — and it handles heat, drains instantly, and keeps weeds down when laid over landscape fabric. Stack natural stone or retaining wall blocks in a 36-inch diameter circle, spread gravel in a 10-foot radius around it, and you have a clean, low-maintenance fire pit area. The gravel also gives you a satisfying crunch underfoot that grass cannot match. Edge the circle with steel landscape edging to prevent gravel migration into the lawn.
Tips
- Lay landscape fabric underneath to prevent weed growth through the gravel
- Use 3/8-inch pea gravel for the most comfortable walking surface
- Add a second steel edging ring at the outer perimeter to contain everything neatly
We picked a few things that go well with this idea: OutVue 35-Inch Steel Fire Pit Bowl (★4.7), Sunnydaze 23-Inch Fire Pit Bowl Insert (★4.4) and Ash & Ember 29-Inch Cast Iron Fire Pit (★4.6). As an Amazon Associate we earn from qualifying purchases.
2. Sunken Fire Pit with Terraced Seating
Why go sunken?
A sunken fire pit blocks wind naturally, keeps flames below eye level, and creates a cozy enclosed feeling that a flat-ground setup cannot replicate. The excavation doubles as your seating — cut two or three tiers into the slope and face them with dry-stacked stone or pressure-treated timbers.
How to build it on a budget
Dig about 18 inches deep in a 12-foot diameter circle. Use the excavated soil to build up the back edge. Line the tiers with affordable retaining wall blocks ($1.50 each) and fill the floor with compacted crushed limestone. Total material cost for a two-tier version runs around $200-250.
Watch for drainage
Install a 4-inch French drain under the pit floor running to a pop-up emitter downhill. Without it, your sunken pit becomes a puddle after every rain.
We picked a few things that go well with this idea: MIGHTY109 Grey Pea Gravel (40 lbs) (★4.5), YISZM Natural River Pea Gravel (20 lbs) (★4.6) and Mulctun Natural Pea Gravel (45 lbs) (★4.7). As an Amazon Associate we earn from qualifying purchases.
3. Paver Patio Fire Pit with Creeping Thyme Borders
Creeping thyme planted between pavers and along the border does three jobs at once: it suppresses weeds, handles foot traffic, and releases a faint herbal scent when stepped on. Build a simple square paver patio (12x12 feet works well for a fire pit plus four chairs) using interlocking concrete pavers from any big-box store. Place a steel fire ring or stacked stone pit in the center. Leave 1-inch gaps between border pavers and plant creeping thyme plugs every 6 inches. By mid-summer the thyme fills in and softens the hard edges.
Tips
- Red creeping thyme adds a purple bloom in June that looks great against gray pavers
- Water plugs daily for the first two weeks, then thyme is drought-tolerant
- Sweep polymeric sand into the interior paver joints for stability; save thyme for the edges
We picked a few things that go well with this idea: Addlon 100FT LED Outdoor String Lights (★4.6), Brightown 50FT G40 Globe Patio Lights (★4.7) and Govee Smart RGBIC Outdoor Lights (48ft) (★4.2). As an Amazon Associate we earn from qualifying purchases.
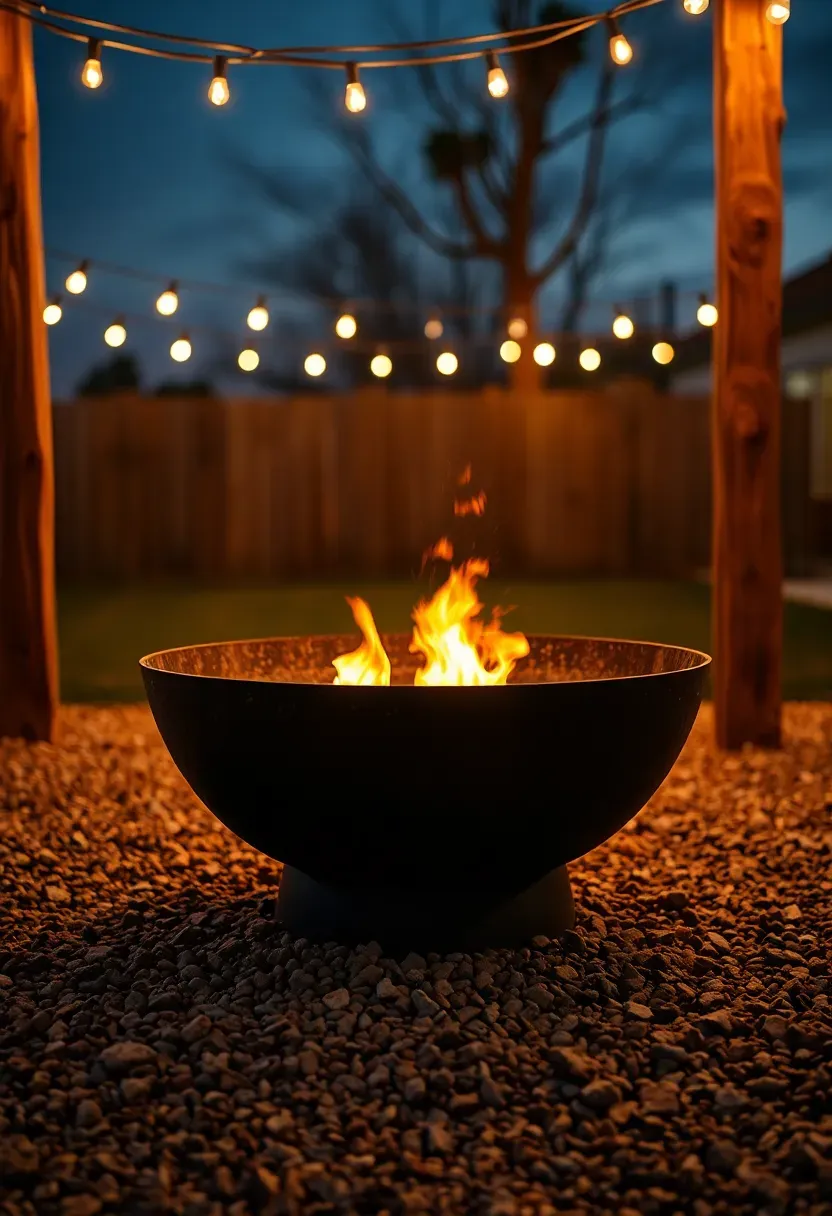
4. Steel Fire Bowl on a Decomposed Granite Pad
Step 1: Prepare the base
Clear a 10-foot circle, remove sod, and compact the soil. Lay landscape fabric and install steel or aluminum edging around the perimeter.
Step 2: Spread and compact DG
Pour 3 inches of decomposed granite (about $40-50 per ton) inside the edging. Spray lightly with water and compact with a hand tamper or plate compactor. DG hardens into a firm, natural-looking surface that drains well.
Step 3: Place the fire bowl
Set a 28-30 inch steel fire bowl in the center on a heat-resistant pad or three concrete pavers. Steel bowls develop a rust patina over time that actually looks better with age.
Watch out
DG can get dusty in dry climates. A stabilizer additive mixed in during installation reduces dust significantly for about $15 extra.
Recommended
Items for this idea
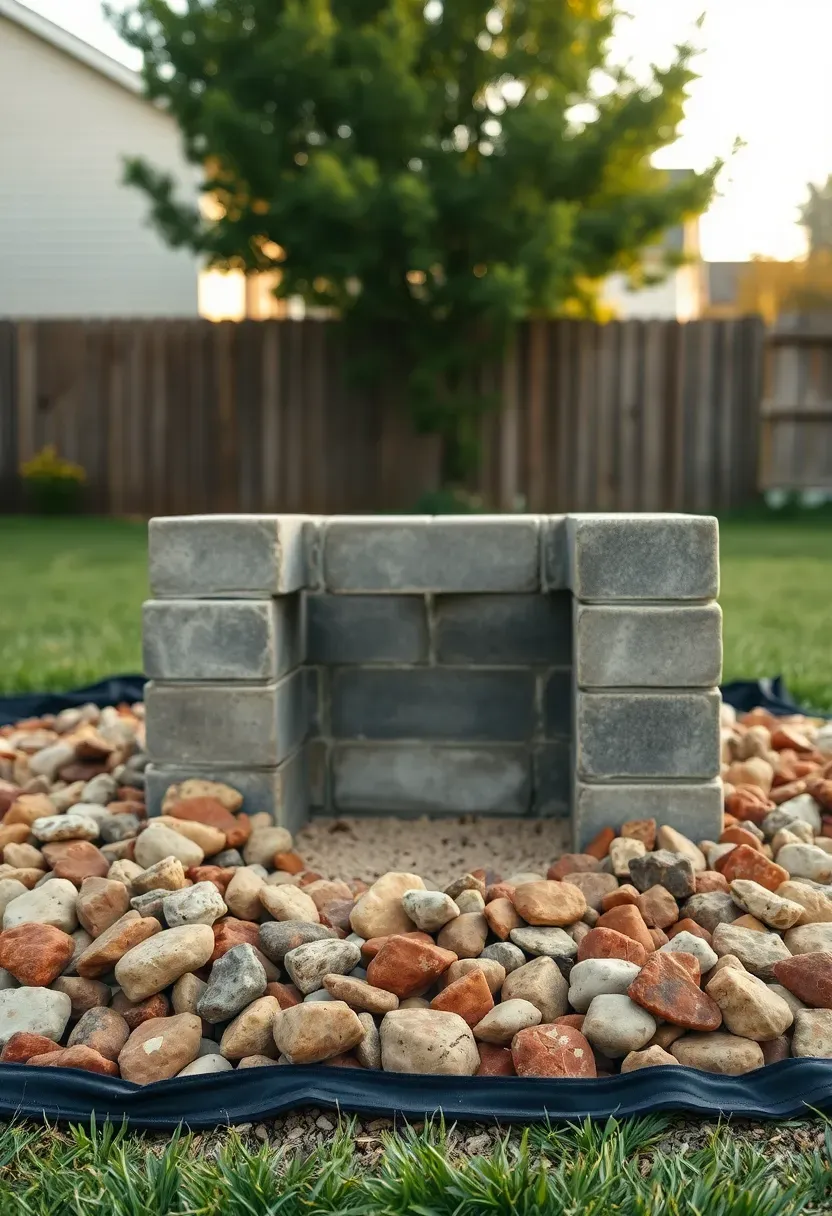
5. DIY Concrete Block Fire Pit with River Rock Surround
Standard 8x8x16 concrete blocks cost under $2 each. Stack them two courses high in a 40-inch square, fill the bottom with sand, and surround the structure with a 4-foot border of river rock over landscape fabric. River rock comes in warm tones — tan, rust, cream — that catch firelight at night. This is one of the fastest budget builds: you can finish it in a single afternoon with no mortar, no special tools, and no experience. The angular block shape gives a cleaner, more modern look than rounded stone.
Tips
- Use fire-rated concrete blocks or line the interior with fire brick for longevity
- Place a metal grate across the top for cooking if the blocks are rated for direct heat
- Avoid limestone river rock near the pit — it can crack or pop when heated
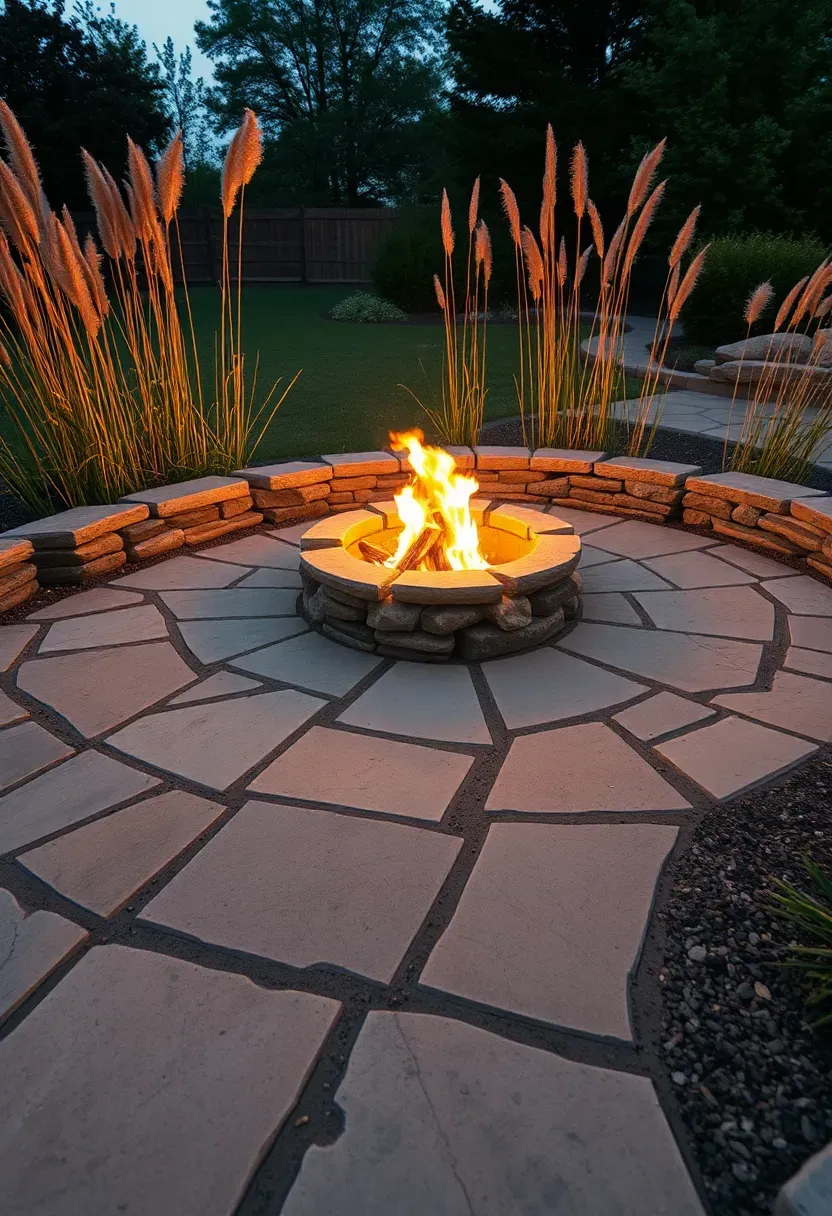
6. Flagstone Patio Fire Pit with Ornamental Grasses
Flagstone salvaged from local stone yards or Craigslist runs 30-50% cheaper than retail. Dry-lay irregular flagstone pieces on a compacted sand base for a patio that looks organic and expensive. Ring the fire pit with the same stone, stacked two or three courses. Along the outer edge, plant clumps of maiden grass, Karl Foerster feather reed grass, or blue fescue — all cheap, drought-tolerant, and beautiful when backlit by flames. The grasses sway in the breeze and add vertical interest that low ground covers miss.
Tips
- Keep grasses at least 6 feet from the fire pit to prevent any fire risk
- Cut maiden grass back to 6 inches in late winter; it regrows fast
- Fill flagstone joints with polymeric sand or plant creeping sedum in the gaps
Recommended
Items for this idea
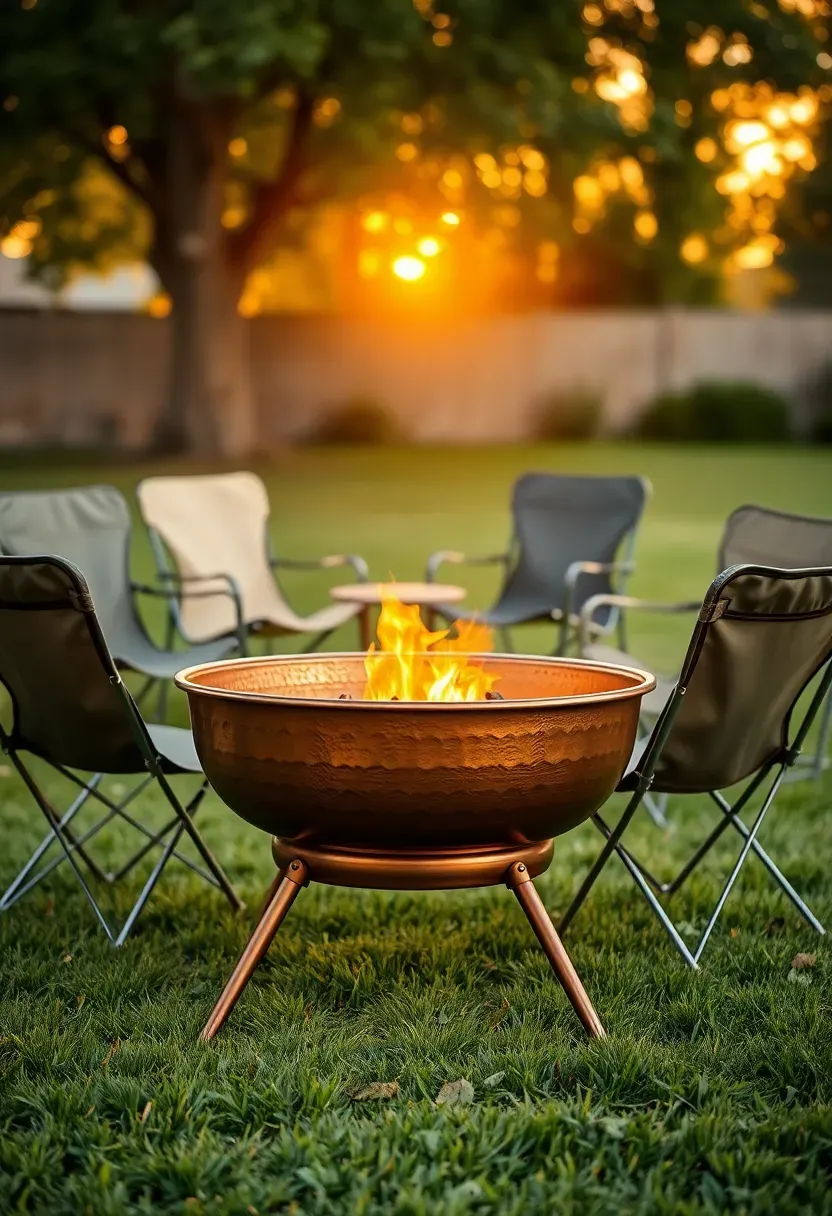
7. Portable Fire Pit on an Existing Lawn
Not every fire pit needs a construction project. A portable steel or copper fire pit ($40-80 at most retailers) placed directly on your lawn gets you 90% of the experience with zero landscaping work. This is the right move if you rent, have a small yard, or simply want to try fire pit life before committing to a permanent build.
The tradeoff
You will get a brown circle in your grass underneath the pit. Use a heat shield pad ($15-25) to protect the turf, or accept the dead spot and move the pit around the yard every few weeks.
Make it feel intentional
- Arrange four matching chairs in a circle and add a small side table
- Place two large potted plants flanking the seating area
- Lay a single outdoor rug under the chairs (not under the pit)
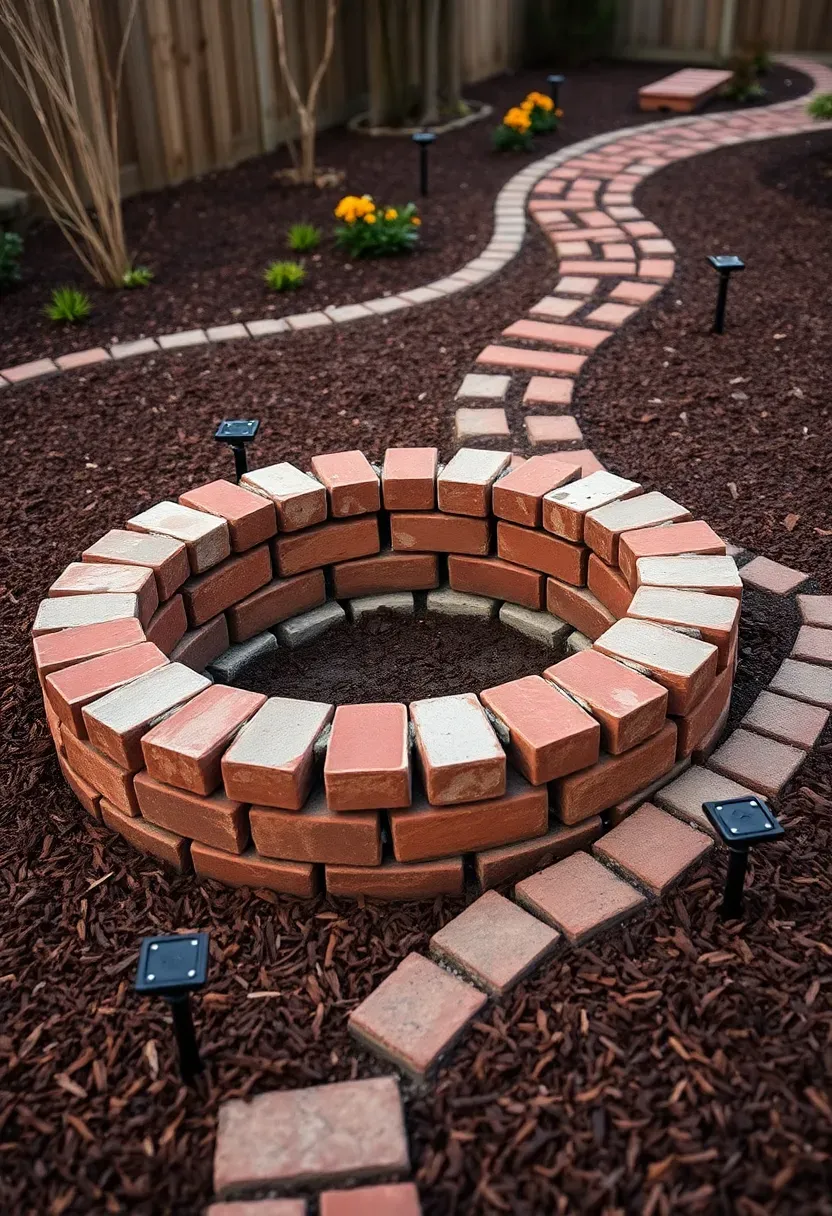
8. Reclaimed Brick Fire Pit with Mulch Path
Reclaimed bricks from demolition sites, salvage yards, or neighborhood buy-nothing groups often cost nothing. Stack them in a circle two or three courses high, using the irregular sizes and color variations as a design feature rather than a flaw. Connect the fire pit to your back door with a 3-foot-wide mulch path — hardwood bark mulch costs about $3.50 per bag and creates a soft, rustic walkway. Border the path with small solar stake lights ($1-2 each) for safe nighttime navigation.
Tips
- Avoid bricks with glazed surfaces — they can explode when heated
- Double-shredded hardwood mulch compacts better and stays in place longer than bark chunks
- Refresh the mulch layer annually; it decomposes and feeds the surrounding soil
Recommended
Items for this idea
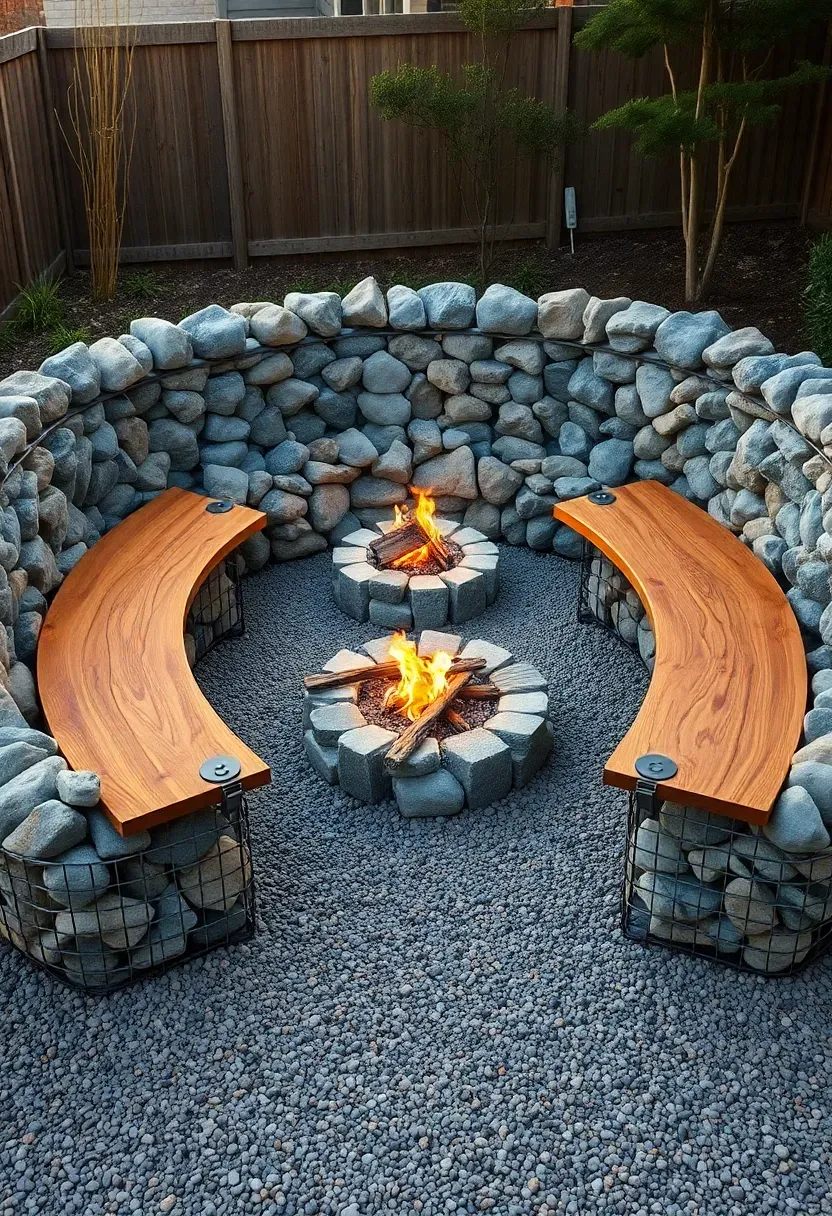
9. Gabion Wall Fire Pit Seating Area
What is a gabion wall?
Gabion baskets are wire mesh cages filled with rocks. They are used in commercial landscaping and erosion control, but they make surprisingly good — and cheap — backyard seating walls. A 3-foot-tall, 6-foot-long gabion basket runs around $30-50 for the cage alone; fill it with any rock you can source locally.
How to use them around a fire pit
Arrange three gabion baskets in a U-shape or semicircle, leaving the fourth side open for access. Top each basket with a thick wooden plank or cedar board as a seat surface. Place your fire pit in the center on a gravel pad.
Choose if
You want an industrial-modern look, have access to free or cheap rock, and like the idea of seating that doubles as a retaining wall. Skip if you prefer a softer, cottage aesthetic.
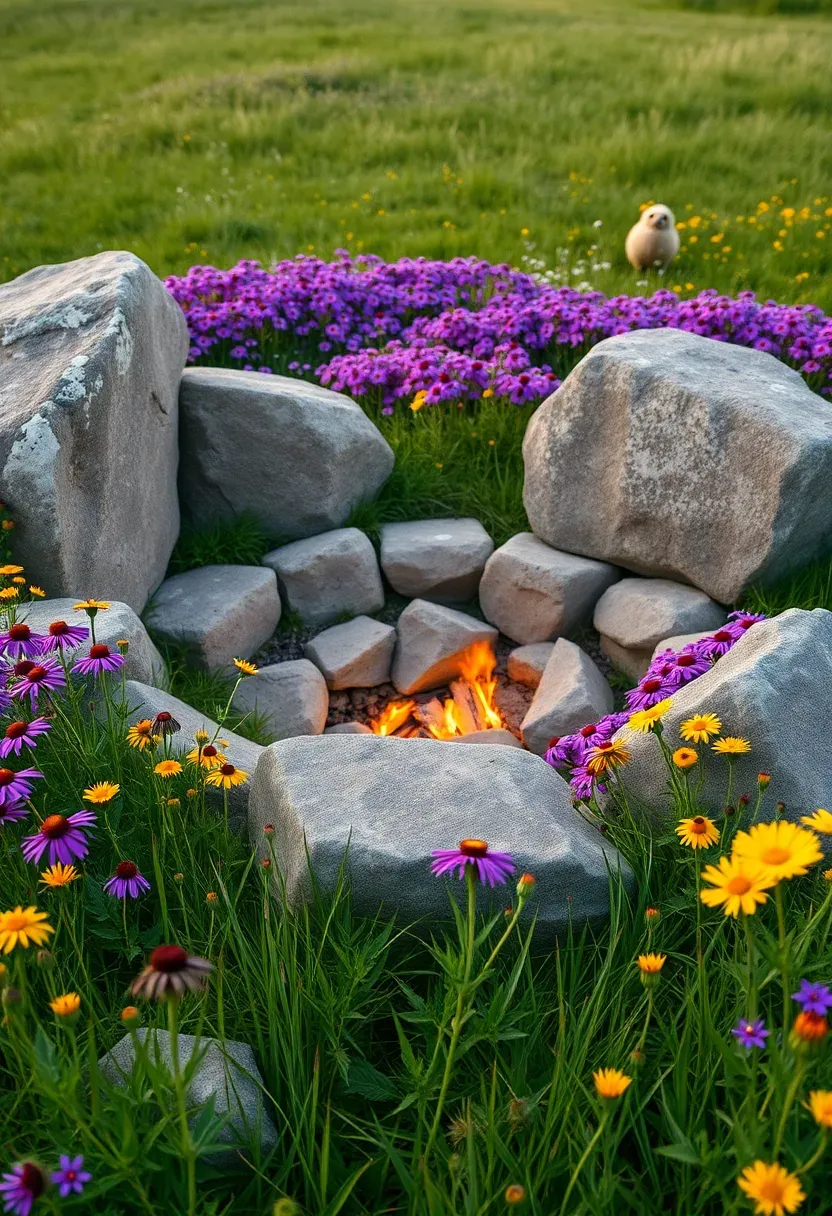
10. Natural Boulder Fire Pit with Wildflower Meadow
Surround a ground-level fire pit with four or five large boulders (check local quarries — delivery of leftover pieces is often free or under $50). Instead of gravel or pavers for the surrounding area, seed a wildflower meadow mix. Native wildflower seed blends cost $15-25 and cover 500+ square feet. Black-eyed Susans, coneflowers, and blanket flowers thrive in poor soil, need no fertilizer, and attract pollinators. Mow a 6-foot circle of short grass around the pit for safety, then let everything beyond that grow wild.
Tips
- Seed in fall for best spring germination in most climates
- A wildflower meadow takes 2-3 years to fully establish; be patient with the first season
- Keep a garden hose within reach during the first dry summer
Recommended
Items for this idea
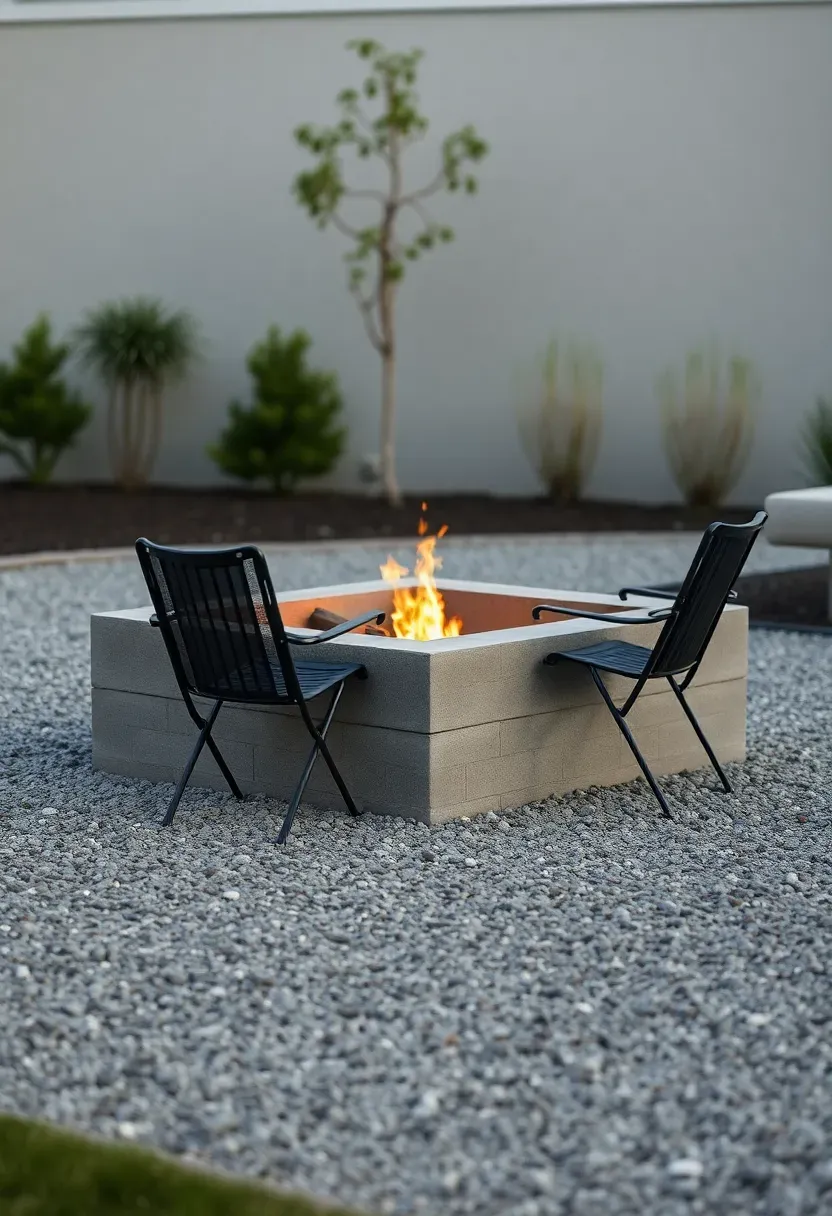
11. Square Cinder Block Fire Pit with Gravel Apron
Step 1: Layout
Mark a 4x4 foot square with stakes and string. Excavate 4 inches deep and extend the excavation another 4 feet in each direction for the gravel apron.
Step 2: Build the pit
Stack cinder blocks (the kind with hollow cores) two courses high. No mortar needed — gravity and weight hold them. Line the inside bottom with 2 inches of sand.
Step 3: Finish the apron
Fill the surrounding excavated area with crushed gravel, compacted in two lifts. The wide apron gives you room for chairs and keeps mud at bay during rainy weeks.
Watch out
Cinder blocks are not technically fire-rated. They hold up fine for occasional use, but hairline cracks can develop after a year or two of heavy burning. Replace cracked blocks as needed — they cost $1.50 each.
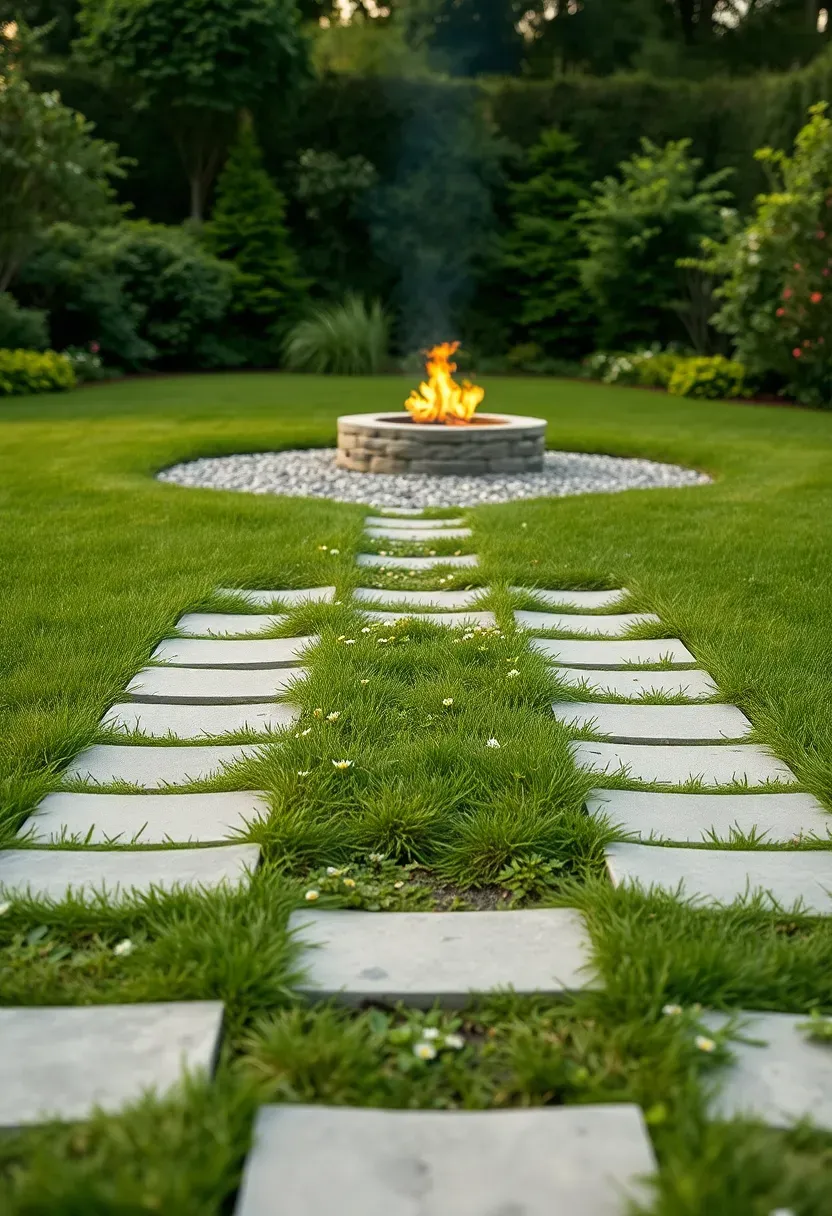
12. Fire Pit with Stepping Stone Walkway
A stepping stone path connecting your patio to a fire pit makes the space feel designed rather than plopped in the middle of the yard. Buy 12-inch square concrete stepping stones ($2 each) and set them in the turf at stride-length intervals. At the fire pit end, widen the path into a circle of stones or gravel for the seating area. Plant low ground cover — creeping Jenny, Irish moss, or clover — between the stones for a lush, garden-path look.
Tips
- Set stones flush with or slightly below the lawn surface for easy mowing
- Spacing of 24-26 inches center-to-center matches a natural walking stride
- Solar ground lights embedded next to every third stone create a runway effect at night
Recommended
Items for this idea
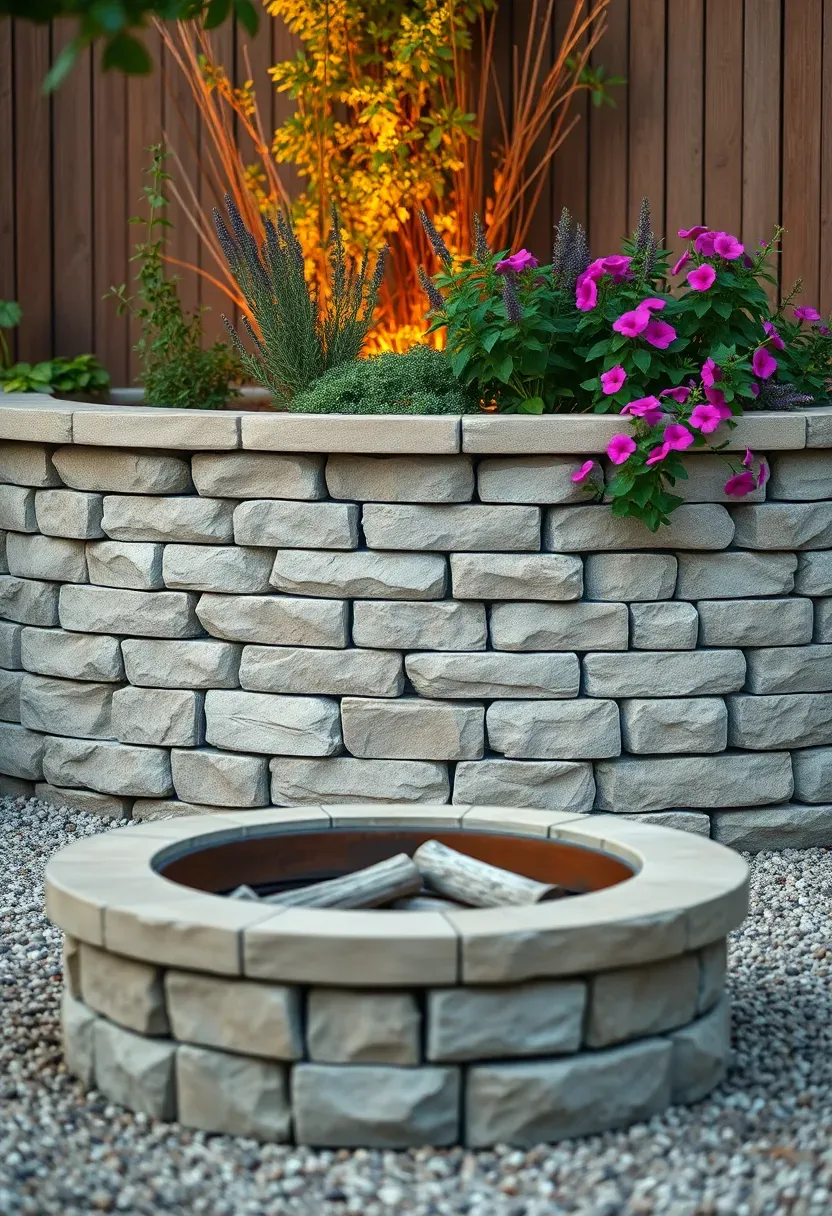
13. Raised Planter Wall Fire Pit Combo
This design does double duty: a curved retaining wall (24-30 inches tall) acts as both a planter and a backrest. Build it with stacked retaining wall blocks, fill the interior with soil, and plant herbs, trailing flowers, or ornamental grasses. The fire pit sits 4-5 feet in front of the wall. Guests sit on the wall cap with their backs to the plants. The greenery behind adds color, fragrance (especially with rosemary, sage, or lavender), and a sense of enclosure.
Tips
- Cap the wall with smooth flagstone or concrete cap blocks for comfortable sitting
- Add drip irrigation to the planter if you plant anything that needs consistent water
- Rosemary planted in the wall doubles as a fire pit herb — toss sprigs into the flames for scent
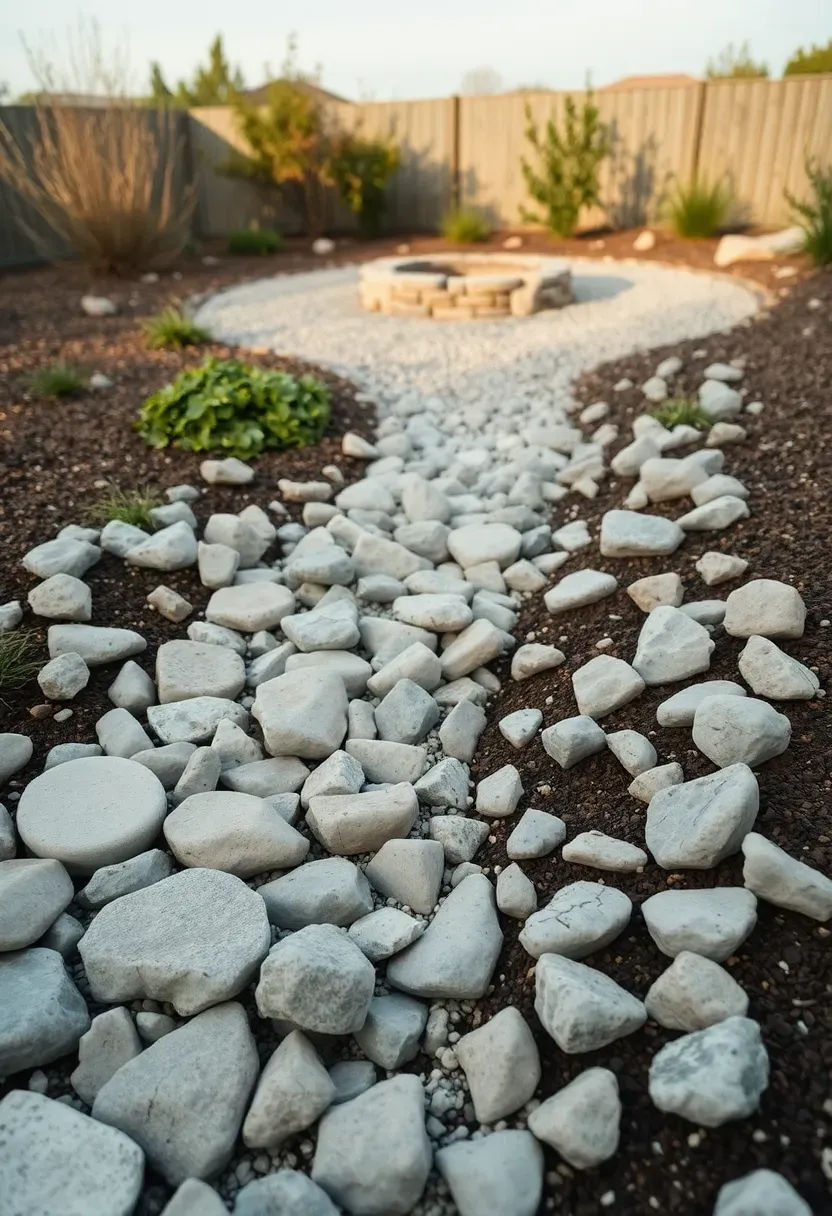
14. Dry Creek Bed Leading to a Fire Pit Clearing
The concept
A dry creek bed is a shallow, rock-filled channel that mimics a natural stream. It handles runoff, prevents erosion, and looks good year-round — even without water. Run one from a downspout or low point in your yard, meandering through the landscape, and terminating at a fire pit clearing.
How to build it cheap
Dig a 12-18 inch wide, 4-6 inch deep channel. Line with landscape fabric. Fill with a mix of river rock sizes — larger stones along the edges, smaller ones in the center. Use the excavated soil to build up low berms alongside the creek. Budget: roughly $80-120 for a 20-foot run.
At the fire pit
Widen the creek bed into a circular clearing (10-12 feet) and transition from river rock to crushed gravel for a flat seating surface around the pit.
Recommended
Items for this idea
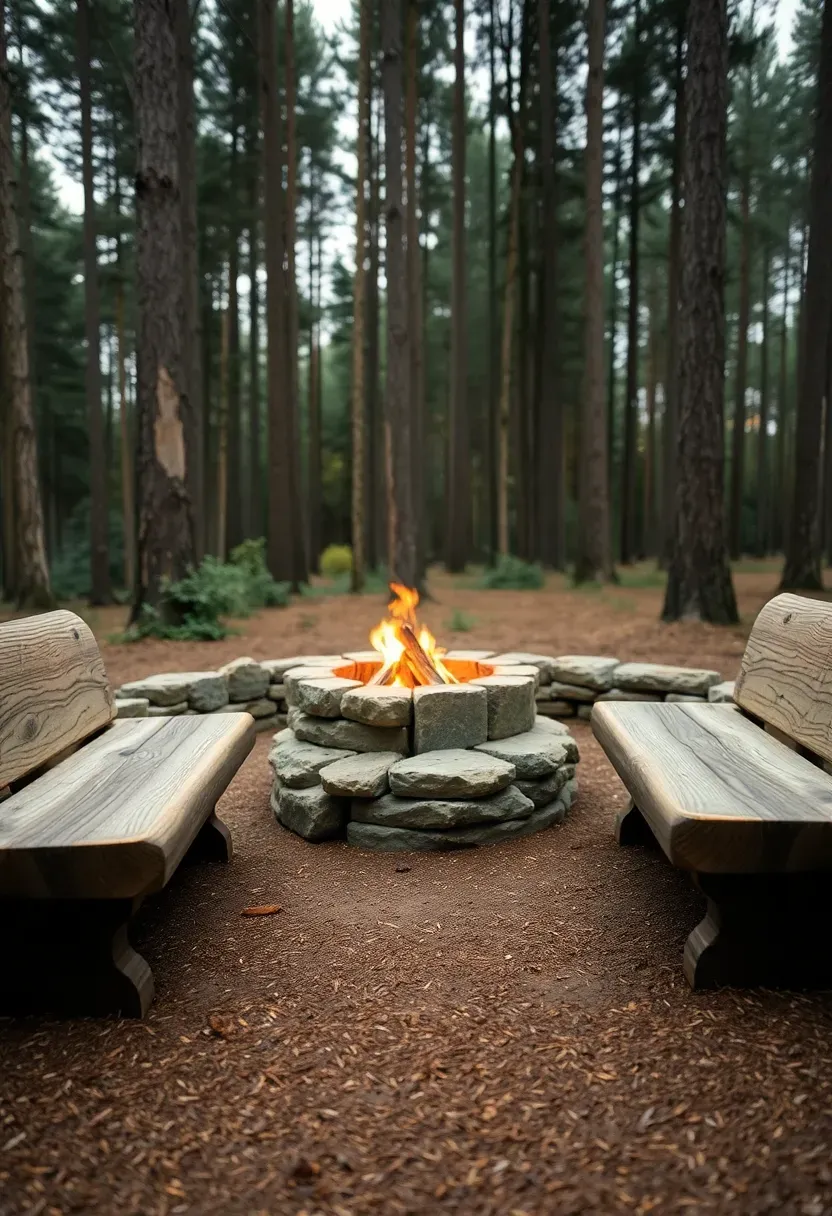
15. Rustic Log Bench Fire Pit Circle
If you have access to fallen trees or know someone who recently had a tree removed, half-log benches cost nothing and fit a wooded backyard perfectly. Cut logs to 5-6 foot lengths, split them in half with a chainsaw, and set them flat-side-up on leveled ground around the fire pit. Sand the sitting surface lightly and apply a coat of exterior wood sealer. Three or four benches arranged in a circle seat 8-12 people. Leave the bark on the underside for a natural look.
Tips
- Hardwoods like oak, maple, or locust last years outdoors; softwoods like pine rot faster
- Elevate benches on flat stones or concrete pavers to slow bottom-side rot
- Add a sheepskin or outdoor cushion for comfort during longer sittings
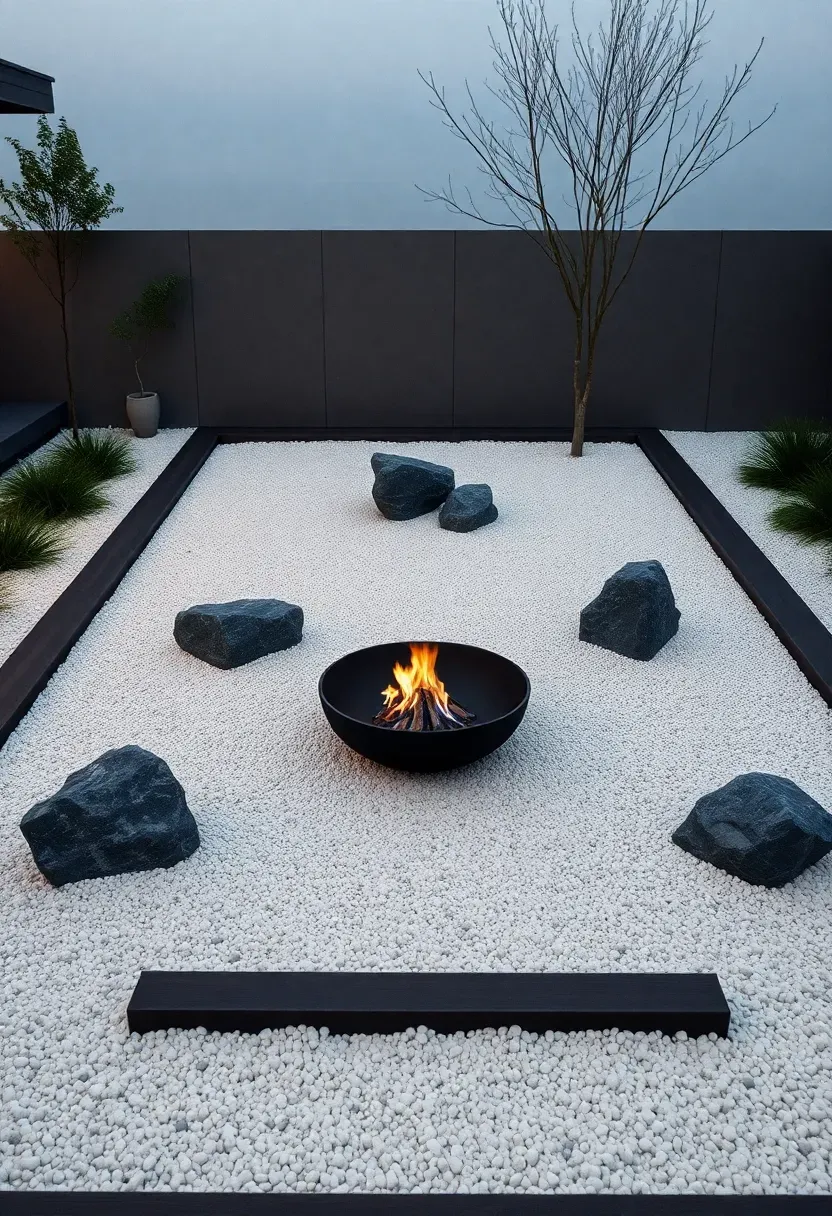
16. Zen Gravel Garden Fire Pit
Raked gravel, a few carefully placed stones, and a low-profile black fire bowl create a meditative space that costs very little. Lay landscape fabric over a 14x14 foot area, border it with dark-stained timber or black steel edging, and fill with white or light gray crushed granite. Place 3-5 larger accent boulders asymmetrically. Set a simple black steel fire bowl in the center. The contrast between the pale gravel and dark bowl is striking, especially at night when flames reflect off the light ground surface.
Tips
- Rake patterns into the gravel with a garden rake for the traditional zen look
- Keep leaf debris off white gravel with a leaf blower — dark leaves stain light stone
- Add a single Japanese maple or ornamental grass clump for a living focal point

Recommended
Items for this idea
17. Recycled Wine Barrel Fire Table
Old barrel, new purpose
Used wine barrels sell for $20-60 at garden centers, wineries, or online marketplaces. Cut the barrel to table height (about 30 inches), drop in a propane gas burner insert ($60-90), and fill the top with fire glass or lava rock. The oak staves and metal bands give a character that manufactured fire tables lack.
Landscaping around it
Place the barrel fire table on a small gravel or paver pad on your patio. Surround it with potted herbs in matching half-barrel planters. The cohesive material palette — aged wood, metal, and greenery — looks intentional with minimal effort.
Choose if
You want a tabletop fire feature rather than a ground-level pit, prefer gas over wood-burning, and like the look of salvaged materials. Skip if you want a full-size fire for larger groups.
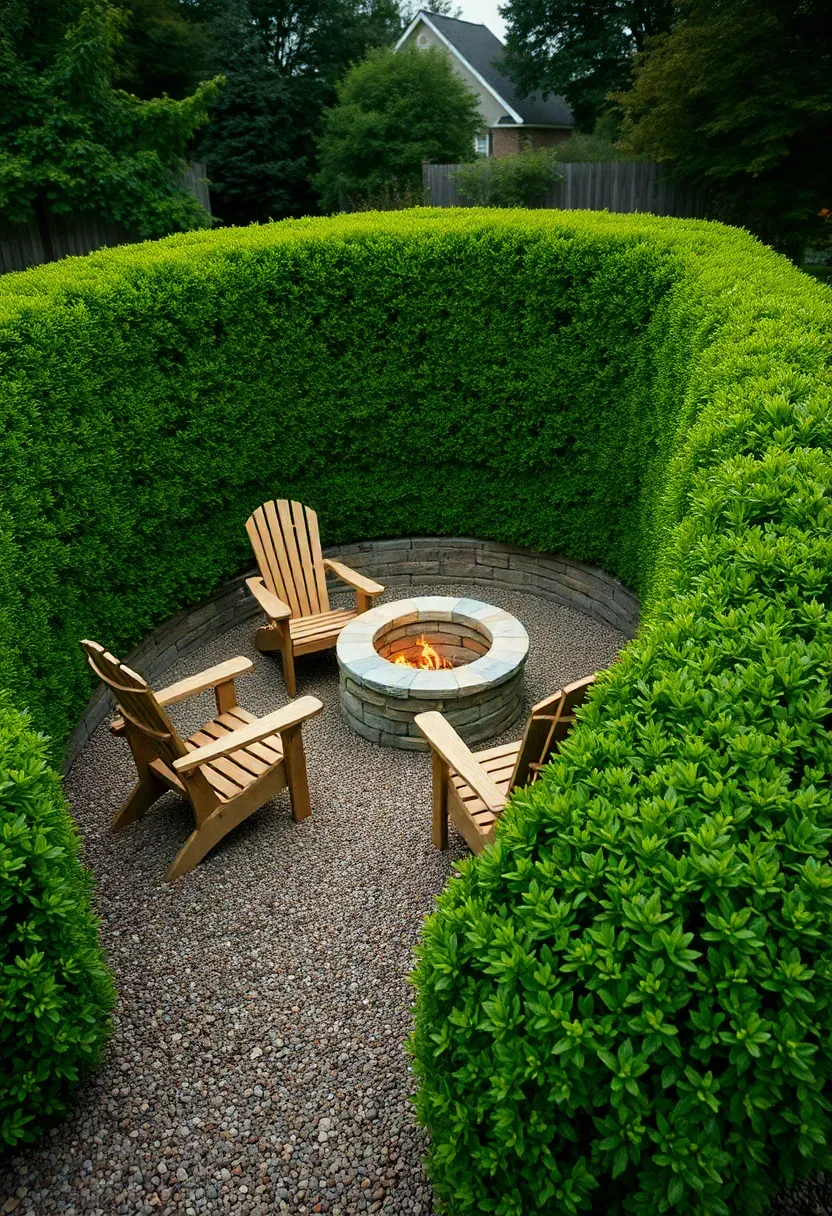
18. Fire Pit with Low Hedge Windbreak
Wind kills the fire pit experience faster than rain does. A 3-foot-tall evergreen hedge planted in a semicircle on the windward side of your fire pit blocks gusts without fully enclosing the space. Boxwood, privet, and arborvitae all work — privet is the cheapest at $5-8 per plant from bare-root stock. Plant the hedge 8-10 feet from the fire pit (far enough to avoid heat damage) and let it grow for two seasons before relying on it as a full windbreak. In the meantime, stake a section of burlap or reed fencing as a temporary screen.
Tips
- A curved hedge works better than a straight wall — it redirects wind rather than creating turbulence
- Water newly planted hedges deeply twice a week for the first year
- Trim privet hedges twice per season to keep them dense and bushy at the base

Recommended
Items for this idea
19. Hillside Carved Fire Pit Terrace
A sloped yard that seems like a disadvantage is actually an opportunity. Cut a level shelf into the hillside (12-14 feet wide, 8-10 feet deep), retain the cut bank with stacked stone or timber walls, and place your fire pit on the flat surface. The hill behind you acts as a natural wind barrier and sound buffer. Backfill any low spots with compacted gravel. The resulting space feels sheltered and private, like a room carved into the landscape.
Tips
- Angle the terrace floor slightly forward (1% grade) so rainwater drains away from the hillside wall
- Plant the top of the cut bank with ground cover to prevent erosion
- Use the excavated soil to level other parts of your yard

20. Chiminea Corner with Potted Plants
A chiminea takes up about 2x2 feet of floor space, making it the best fire option for tight yards, apartment patios, or small corners. Place it on a 6x6 foot gravel or paver pad in a corner and surround it with terracotta pots in varying heights. Plant trailing petunias, sweet potato vine, or cascading rosemary. The clay body of the chiminea echoes the terracotta pots, tying the whole arrangement together visually. A chiminea also directs smoke upward through its chimney rather than into faces.
Tips
- Buy a cast-iron chiminea if you want longevity; clay ones crack in freezing temps
- Move a clay chiminea indoors or cover it tightly during winter in cold climates
- Keep the opening facing away from the prevailing wind direction
Recommended
Items for this idea
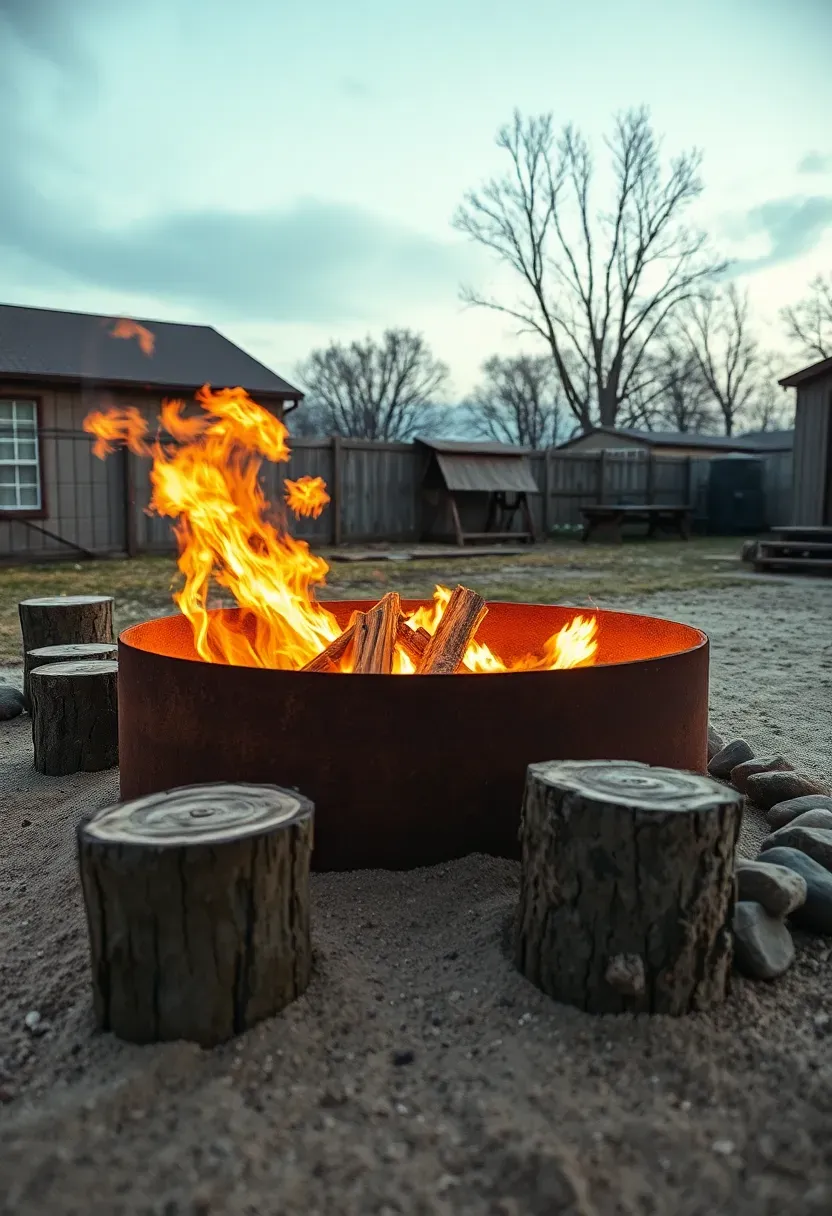
21. Tire Rim Fire Pit with Sand Base
Origins of the idea
Farmers and rural DIYers have used old tractor or truck tire rims as fire pits for decades. The thick steel handles extreme heat, the shape is naturally round, and the cost is often zero if you know someone with a junkyard connection.
Modern version
Clean the rim, knock off loose rust, and optionally spray it with high-temperature black paint. Set it on a 6-inch bed of sand (a 50-pound bag costs $4) within a cleared circle. The sand base catches ash, makes cleanup easy, and prevents ground scorching.
Apply at home
Surround the rim with a ring of larger river rocks to define the space. Add three log benches or stump seats. The raw industrial look of the rim pairs well with unfinished wood and natural materials.
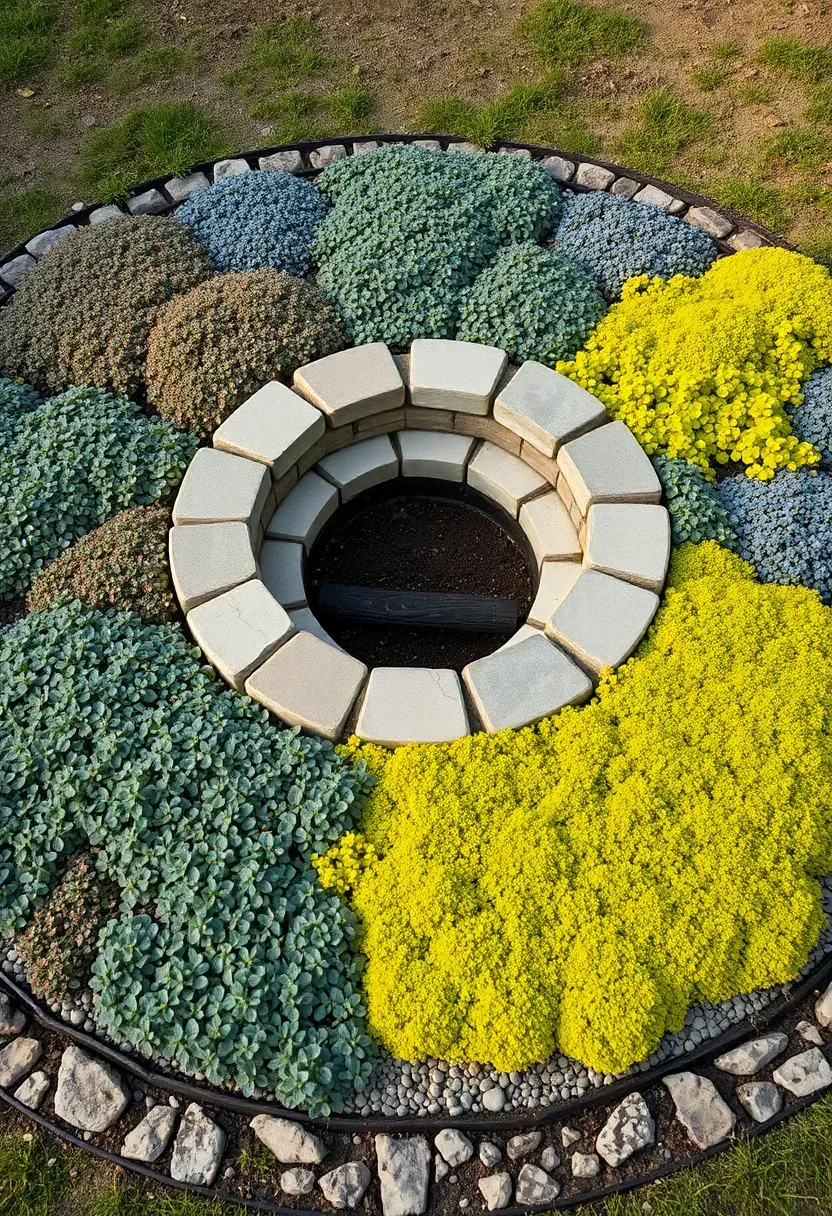
22. Fire Pit with Ground Cover Mosaic
Instead of a single ground cover, plant a patchwork of three or four varieties in alternating sections around your fire pit. Combine creeping thyme (gray-green), brass buttons (bronze), blue star creeper (blue-green), and Scotch moss (bright green). Map out the sections with string, plant plugs 4-6 inches apart in each zone, and water consistently for the first month. Within one growing season the different textures and colors create a living mosaic that looks far more expensive and deliberate than it actually is. Total plug cost for a 100-square-foot area runs $60-90.
Tips
- Choose varieties that share the same water and sun requirements for your zone
- Leave a 3-foot ring of gravel or bare stone immediately around the pit where heat would kill plants
- Mow or trim once in midsummer to keep growth dense rather than leggy
Recommended
Items for this idea
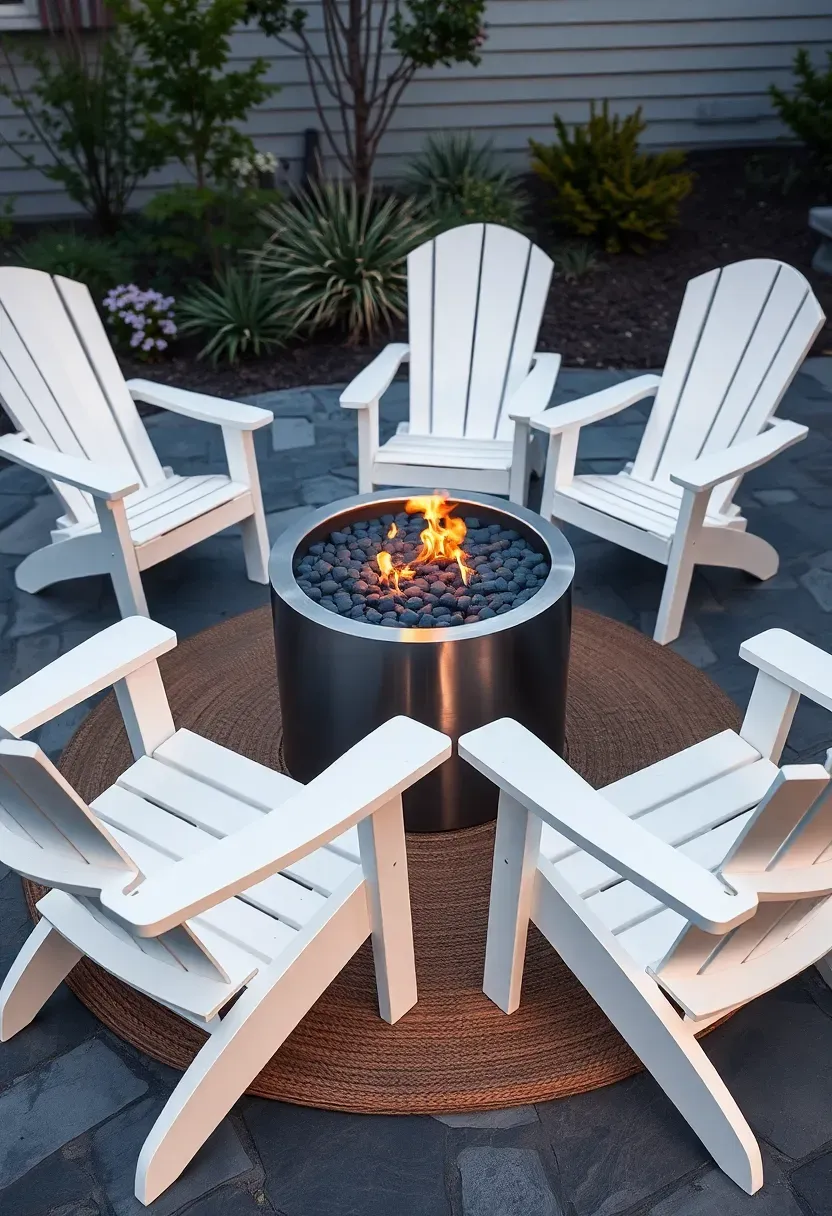
23. Adirondack Ring Around a Gas Fire Bowl
A gas fire bowl eliminates wood smoke, ash cleanup, and spark risk. Pair it with four Adirondack chairs ($30-50 each for unfinished cedar or painted resin versions) arranged in a circle on a simple bluestone or paver pad. The wide armrests on Adirondacks serve as drink holders. Paint or stain the chairs to match — white for a coastal feel, dark green for a classic look, matte black for modern. Add a round outdoor rug in the center under the fire bowl (on a heat pad) to soften the space.
Tips
- Resin Adirondacks are cheaper and maintenance-free but feel less authentic than wood
- A 20-pound propane tank lasts about 10 hours of continuous burn at medium flame
- Place chairs 3-4 feet from the fire bowl edge — close enough for warmth, far enough for comfort
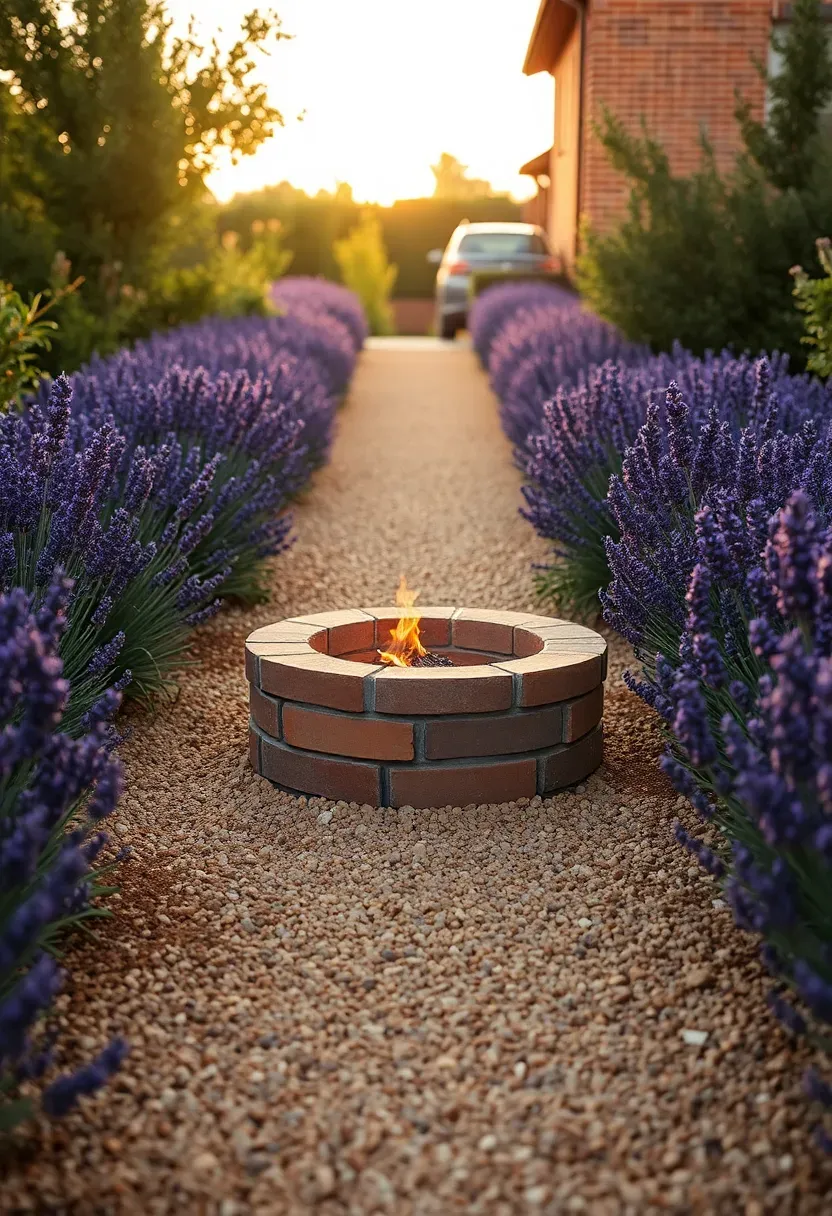
24. Cottage Garden Fire Pit with Lavender Border
Lavender planted in a wide border around a fire pit serves a triple purpose: it repels mosquitoes, smells wonderful when heated air drifts through it, and flowers for weeks in early summer. Build a simple stone or brick fire pit and plant lavender in two staggered rows, 5-6 feet from the pit edge, spacing plants 12-15 inches apart. English lavender (Lavandula angustifolia) is the hardiest variety for most climates. Fill the zone between lavender and pit with crushed gravel or decomposed granite. The purple flowers against gray stone and warm firelight is genuinely one of the best combinations you can create in a backyard.
Tips
- Lavender needs full sun and well-drained soil — amend heavy clay with sand and compost before planting
- Prune after flowering to prevent woodiness and encourage a second lighter bloom
- Harvest dried lavender bundles to toss into the fire for scented smoke
Recommended
Items for this idea
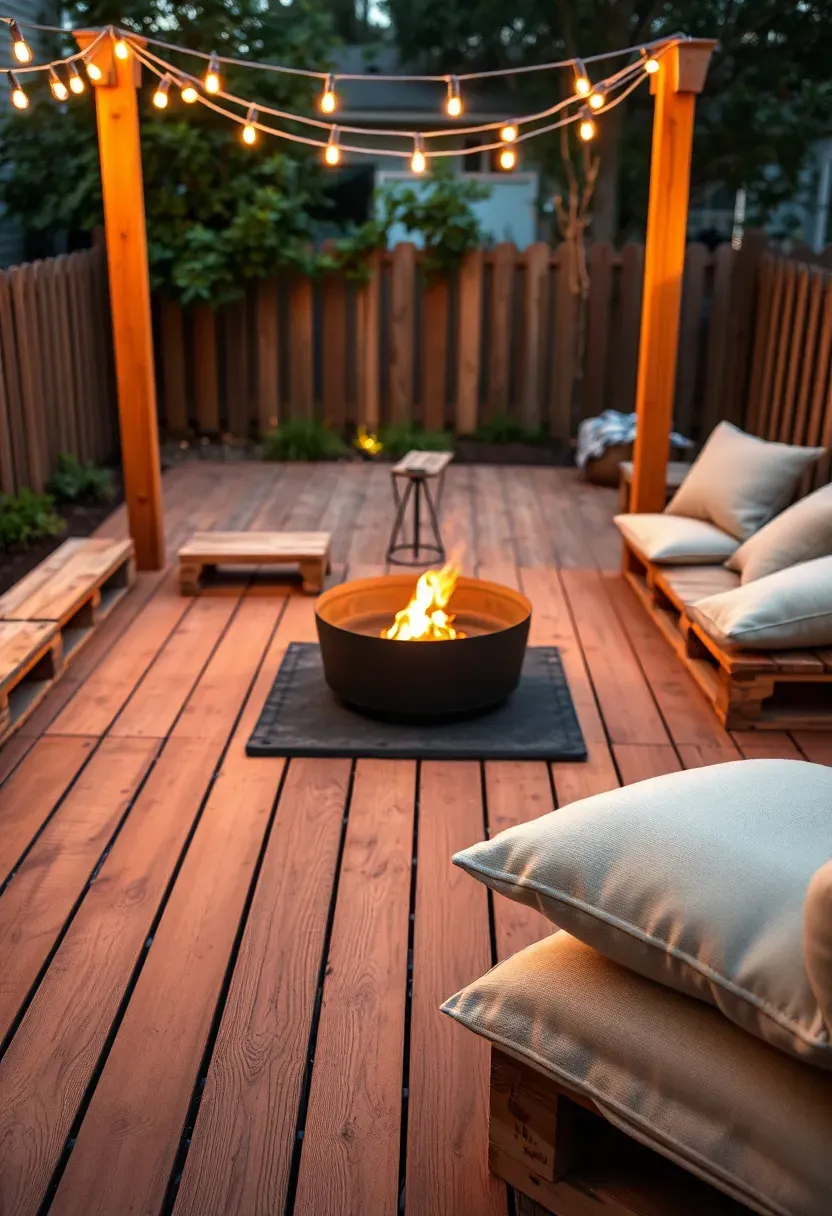
25. Fire Pit with Recycled Pallet Deck
Step 1: Source and prep pallets
Find free pallets (grocery stores, warehouses, hardware stores). Choose heat-treated (stamped HT), not chemically treated (stamped MB). Sand the top surfaces smooth and apply two coats of exterior deck stain.
Step 2: Build the deck
Level a 10x10 foot area with compacted gravel. Lay pallets side by side, shim any wobbles with cedar shingles, and screw adjacent pallets together. Fill gaps between pallet boards with narrow strips of decking or leave them for drainage.
Step 3: Add the fire pit
Place a portable fire pit on a heat-resistant pad in the center of the deck. Keep combustible materials at least 2 feet from the pit on all sides.
Watch out
Pallet wood is softwood and weathers quickly. Plan to re-stain every spring and replace individual pallets as they degrade, usually every 2-3 years.
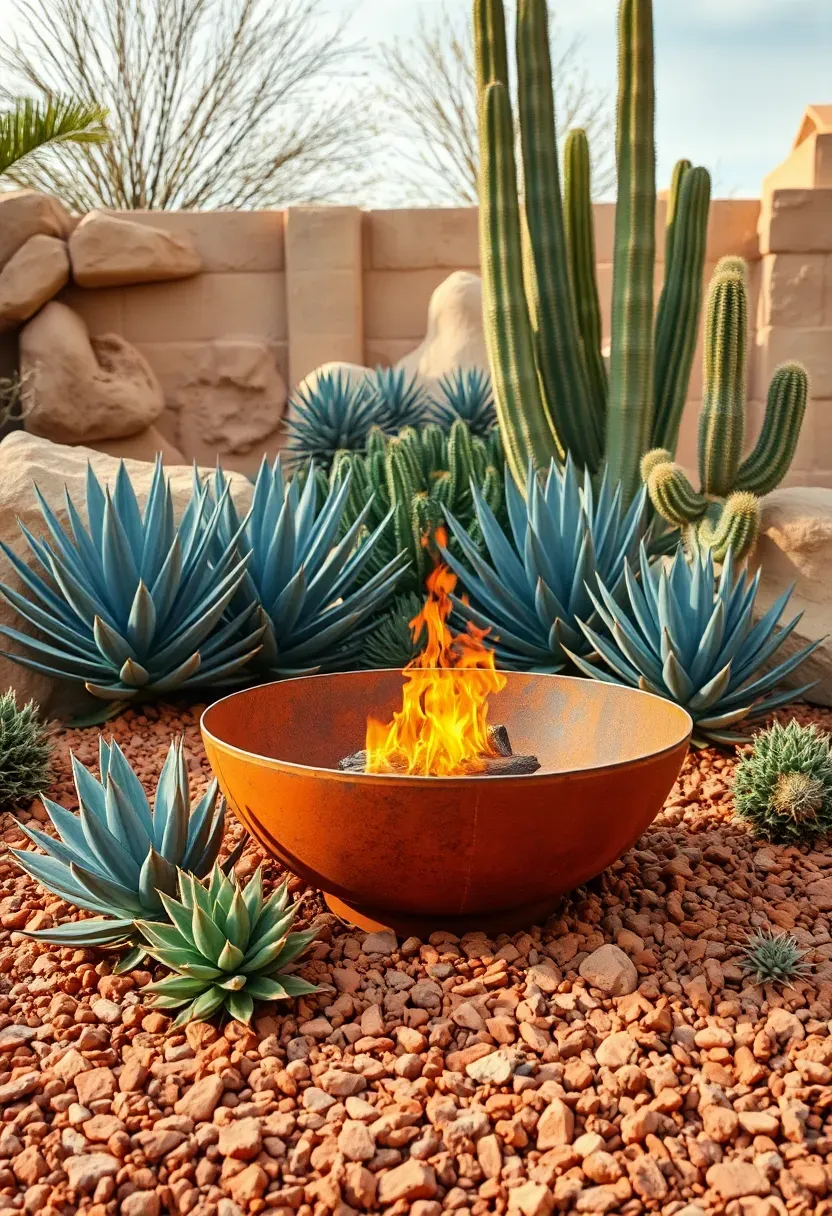
26. Desert-Style Fire Pit with Succulents and Crushed Rock
In hot, dry climates where lawns struggle and water costs add up, lean into the desert aesthetic. Spread crushed red or tan rock over landscape fabric for the ground plane. Group succulents — agave, hens-and-chicks, sedum, and prickly pear — in clusters between accent boulders. Place a Cor-Ten steel fire pit (or a DIY welded steel bowl) in the center. Cor-Ten develops a rusty orange patina that matches desert tones perfectly. This landscape needs almost zero water, no mowing, and looks better with age.
Tips
- Group succulents in odd numbers (3, 5, 7) for natural-looking arrangements
- Top-dress around succulents with a different gravel color for contrast
- Avoid placing succulents downwind of the pit — sparks can damage fleshy leaves
Recommended
Items for this idea
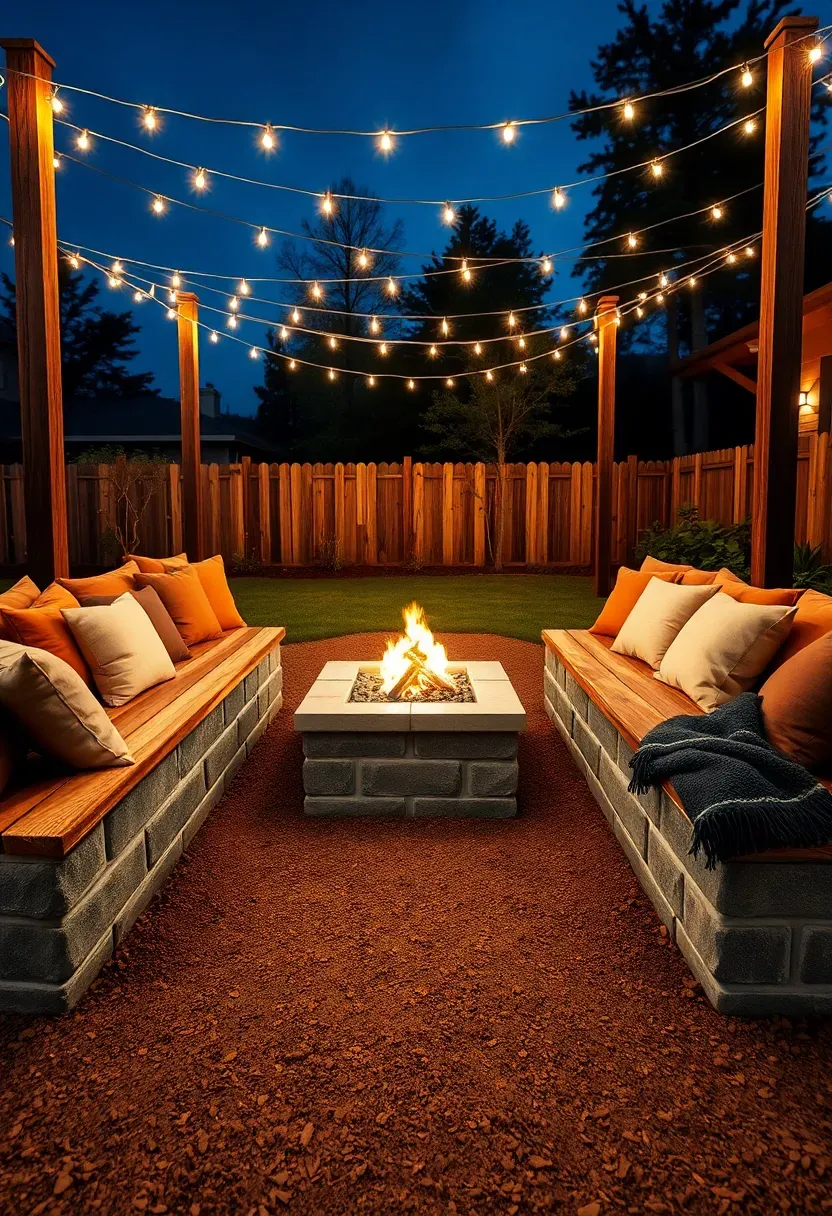
27. String-Lit Fire Pit Lounge with Built-In Benches
Built-in seating turns a fire pit from a spot you visit into a room you inhabit. Build U-shaped bench frames from cinder blocks and cap them with 2x12 cedar or pressure-treated lumber. Stain or seal the wood. Run cafe-style string lights on posts or hooks above the seating area to add overhead glow that extends the usable hours past dark. Add outdoor throw pillows and a couple of blankets folded over the bench backs. This is the most "finished" budget build on this list and usually costs $250-350 for the complete setup.
Tips
- Set string light poles in 5-gallon buckets filled with concrete — portable and stable
- Use shatterproof LED bulbs; glass bulbs near a fire pit are an unnecessary risk
- Store cushions and pillows inside when not in use; outdoor fabric resists moisture but not prolonged UV
Quick FAQ
How far should a fire pit be from my house or fence? Most local fire codes require a minimum of 10 feet from any structure, including fences, sheds, and overhanging branches. Check your municipality's specific rules — some areas require 15-25 feet. When in doubt, more distance is always safer.
Do I need a permit to build a backyard fire pit? It depends on your city and county. Many jurisdictions allow fire pits under 3 feet in diameter without a permit, but permanent masonry pits may require one. Call your local fire department's non-emergency line — they will usually answer this question in two minutes.
Which is cheaper overall, wood-burning or gas? Wood-burning pits cost less to build and fuel (especially if you source your own wood), but gas pits save on cleanup time and produce no smoke. A cord of firewood runs $150-250 and lasts most of the season. A propane refill costs about $20 and lasts 8-10 hours. Over five years, wood is cheaper; over time, gas saves labor.
Can I build a fire pit on a sloped yard? Yes, and a slope can actually work in your favor. Carve a level shelf into the hillside (see idea 19) and use the excavated soil elsewhere. The slope provides natural wind protection and a sense of privacy that flat yards lack.
What ground cover material lasts longest around a fire pit? Crushed gravel and decomposed granite outlast organic materials like mulch or bark by years. Pea gravel is comfortable to walk on, drains well, and never decomposes. Expect to top off gravel every 2-3 years versus replacing mulch annually.
A fire pit does not need to be complicated or expensive to become the best part of your backyard. Pick one idea from this list that fits your yard, your budget, and how you actually spend time outside. Buy the materials this weekend. Most of these builds take a single afternoon. The landscaping around it can grow and improve over months and years, but the pit itself — the part that draws people together and keeps them talking past bedtime — that can be ready by Saturday night.
Pinterest cover for 27 Backyard Fire Pit Ideas Landscaping on a Budget
About the author
OBCD
CGI visualization and interior design content. We create detailed 3D renders and curate practical design ideas for every room in your home.