17 Backyard Fairy Garden Ideas
My daughter found a broken terracotta pot behind our shed last spring and asked if fairies could live in it. That afternoon we filled the shard with soil, pressed in a few succulent cuttings, added a popsicle-stick door, and balanced a bottle-cap birdbath on a twig. She checked on it every morning for weeks. That is what fairy gardens do — they make a small patch of ground feel like it matters. The 17 ideas below range from simple container setups you can finish in an hour to full landscape installations that become permanent yard features. Most cost under $50 in materials.
Here you will find fairy gardens organized by scale and complexity, from tabletop planters to sprawling backyard scenes.
Table of Contents
- Broken Pot Fairy Landscape
- Tree Stump Fairy House
- Moss Carpet Miniature Meadow
- Fairy Door on a Living Tree
- Succulent Fairy Rock Garden
- Wheelbarrow Fairy Village
- Pond-Edge Water Fairy Scene
- Gnome Hollow Under a Hedge
- Fairy Herb Spiral
- Teacup Fairy Planters
- Log Slice Fairy Ring
- Fairy Treehouse with Rope Ladder
- Stone Wall Fairy Nook
- Solar-Lit Fairy Path
- Birdhouse Fairy Tower
- Driftwood Fairy Beach
- Raised Bed Fairy Kingdom

1. Broken Pot Fairy Landscape
That cracked pot you were about to toss is actually the best starting point for a fairy garden. Lay it on its side so the broken edge creates a natural cliff face. Pack soil inside and let it cascade out the opening, forming terraced levels. Plant creeping thyme or baby tears on each tier. Add a popsicle-stick fence, a few polished river stones for a path, and a tiny clay mushroom. The broken edge gives the scene depth that a regular container never could — it looks like you discovered something hidden rather than built it.
Tips
- Use E6000 glue to secure heavier miniatures so rain does not shift them
- Plant sedums along the broken edge where drainage is best
- Bury the pot base slightly in garden soil to keep it from rolling
We picked a few things that go well with this idea: Tardigrade 200-Piece Fairy Garden Accessories Kit (★4.5), 93-Piece Fairy Garden Figurines Resin Kit (★4.6) and Dracarys 100-Piece Mini Resin Fairy Animals (★4.6). As an Amazon Associate we earn from qualifying purchases.
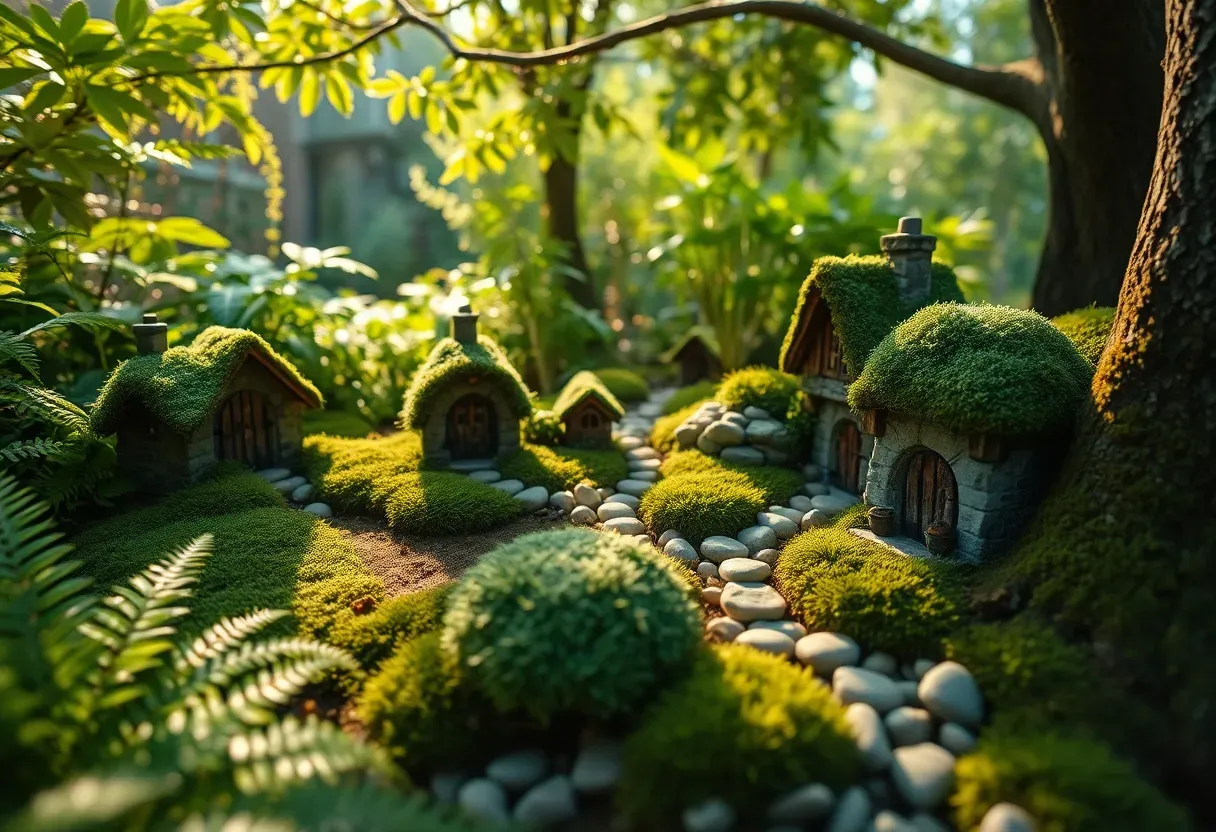
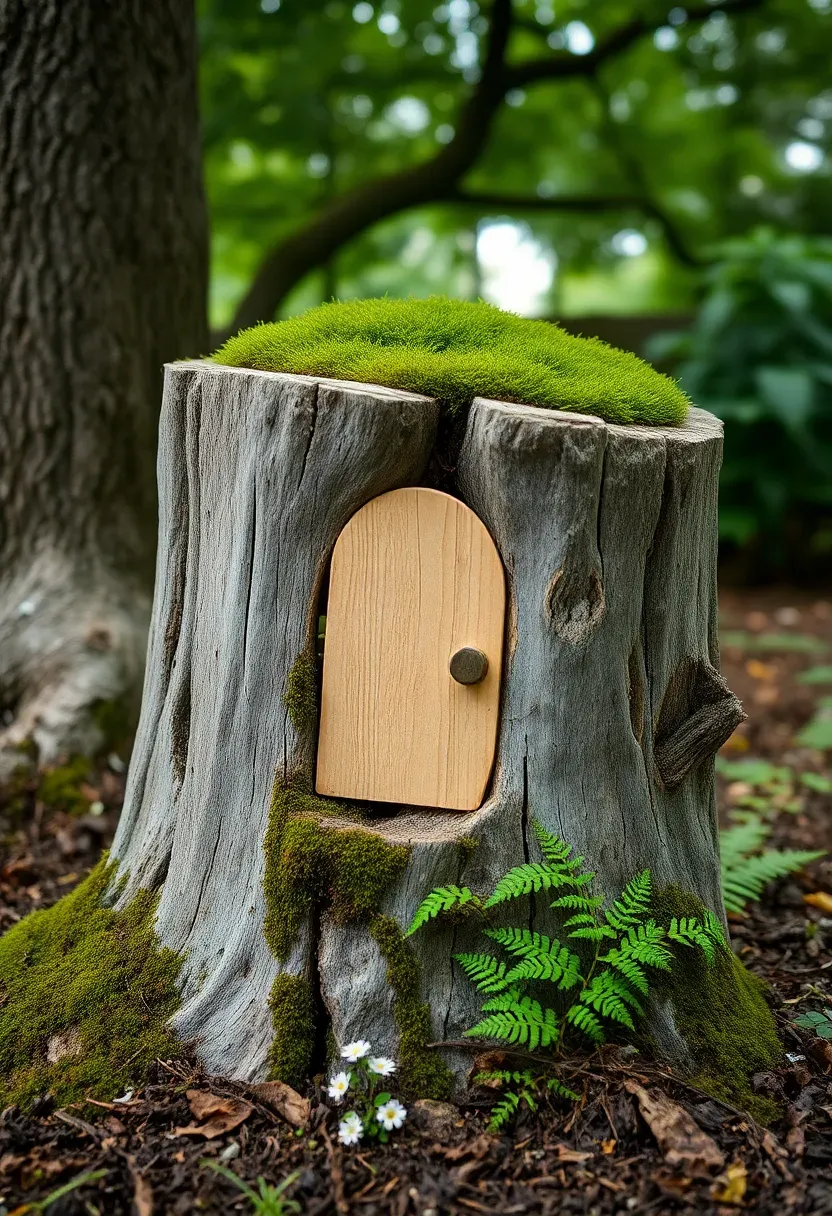
2. Tree Stump Fairy House
Why tree stumps work so well
Old stumps sit at exactly the right height for kids to peer into, and they already look like something from a storybook. The decaying wood holds moisture, which keeps nearby moss alive without much effort.
How to build it
Drill or chisel a shallow recess in the stump face for a door. You can buy resin fairy doors online for a few dollars, or make one from craft sticks and a wood-burned hinge detail. Add round window frames cut from wine corks. Let moss colonize the top naturally, or transplant a patch from a shady corner of the yard. Tuck ferns around the base to complete the forest-floor feel. The whole project takes about two hours.
Pros and cons
- Pro: Uses material already in your yard and costs almost nothing
- Pro: Becomes more charming as the stump weathers further
- Con: Softwood stumps may deteriorate within 3-4 years depending on climate
We picked a few things that go well with this idea: Magicnight Solar Mini Fairy Lights (2-Pack) (★4.2), Magicnight Solar Garden String Lights (2-Pack) (★4.0) and Magicnight Solar Firefly Lights Green Wire (16ft) (★4.1). As an Amazon Associate we earn from qualifying purchases.
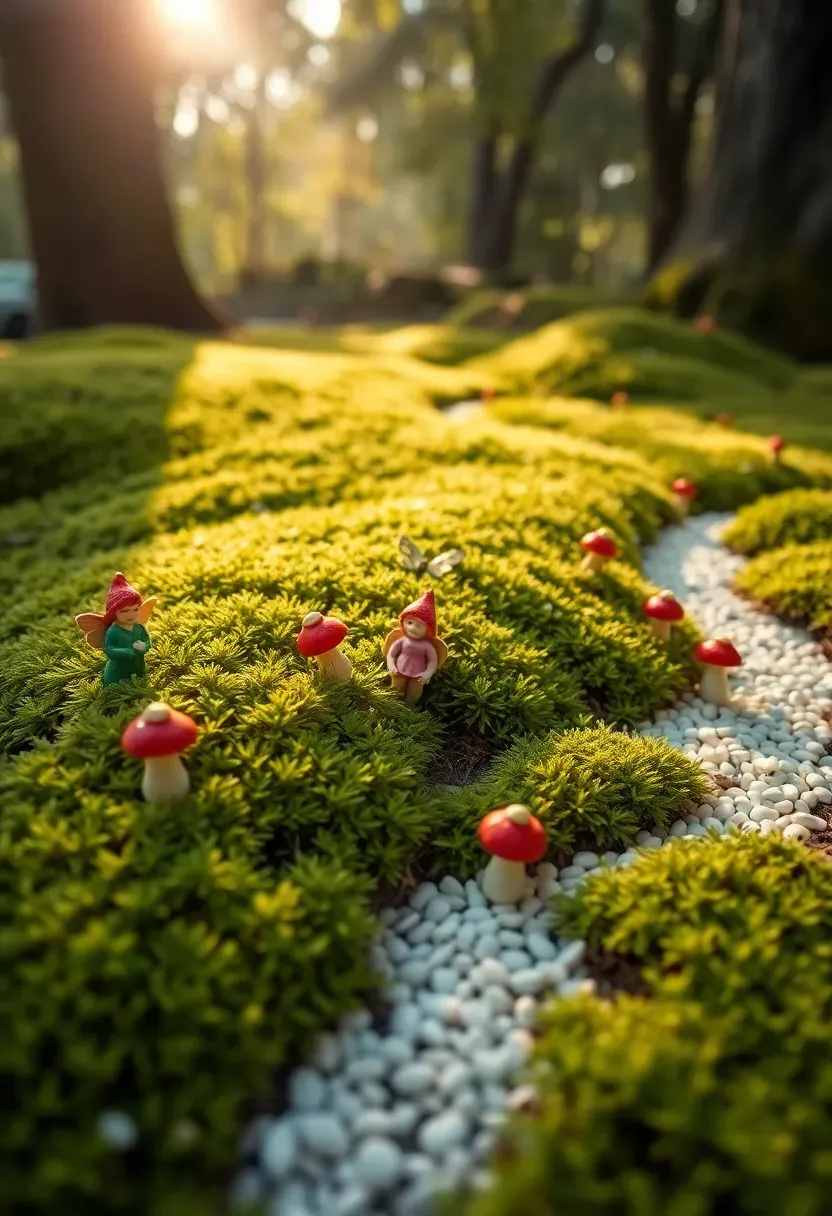
3. Moss Carpet Miniature Meadow
Moss creates the most convincing fairy-scale lawn you can get. Unlike grass, it stays short, needs no mowing, and feels soft underfoot — or under tiny fairy feet. Find a shaded spot with acidic soil (pH 5.0-5.5 is ideal) and lay sheet moss directly on compacted, damp ground. Pin it with landscape staples until it roots, usually within three to four weeks. Scatter miniature toadstools, a few pebbles arranged as stepping stones, and one or two fairy figurines sitting on acorn caps. Mist daily during the first month.
Tips
- Test soil pH with a $10 meter before planting; amend with sulfur if too alkaline
- Sheet moss from a garden center roots faster than wild-harvested patches
- Place near a downspout where natural runoff keeps moisture consistent

We picked a few things that go well with this idea: JIUMO Fairy Door for Trees Outdoor (★4.6), Jauay Glow-in-Dark Fairy Door and Windows (★4.6) and Miniature Fairy Garden Door Wall Hanging (★4.5). As an Amazon Associate we earn from qualifying purchases.
4. Fairy Door on a Living Tree
Step 1: Choose the tree
Pick a mature tree with a wide trunk and some exposed root flare. Oaks, maples, and beeches work well because their bark has enough texture to frame the door naturally.
Step 2: Install the door
Attach a purchased or handmade fairy door using outdoor-rated adhesive — not nails or screws, which damage living trees and invite disease. Position it at ground level between two root buttresses where it looks like a natural entryway.
Step 3: Build the scene
Add a doorstep from flat pebbles, a tiny mailbox from a matchbox, and a clothesline strung between two twigs with doll-sized fabric squares. Plant miniature violets or creeping jenny around the base.
Watch out
Avoid drilling into the tree. Even small holes create entry points for boring insects and fungal infections.
Recommended
Items for this idea
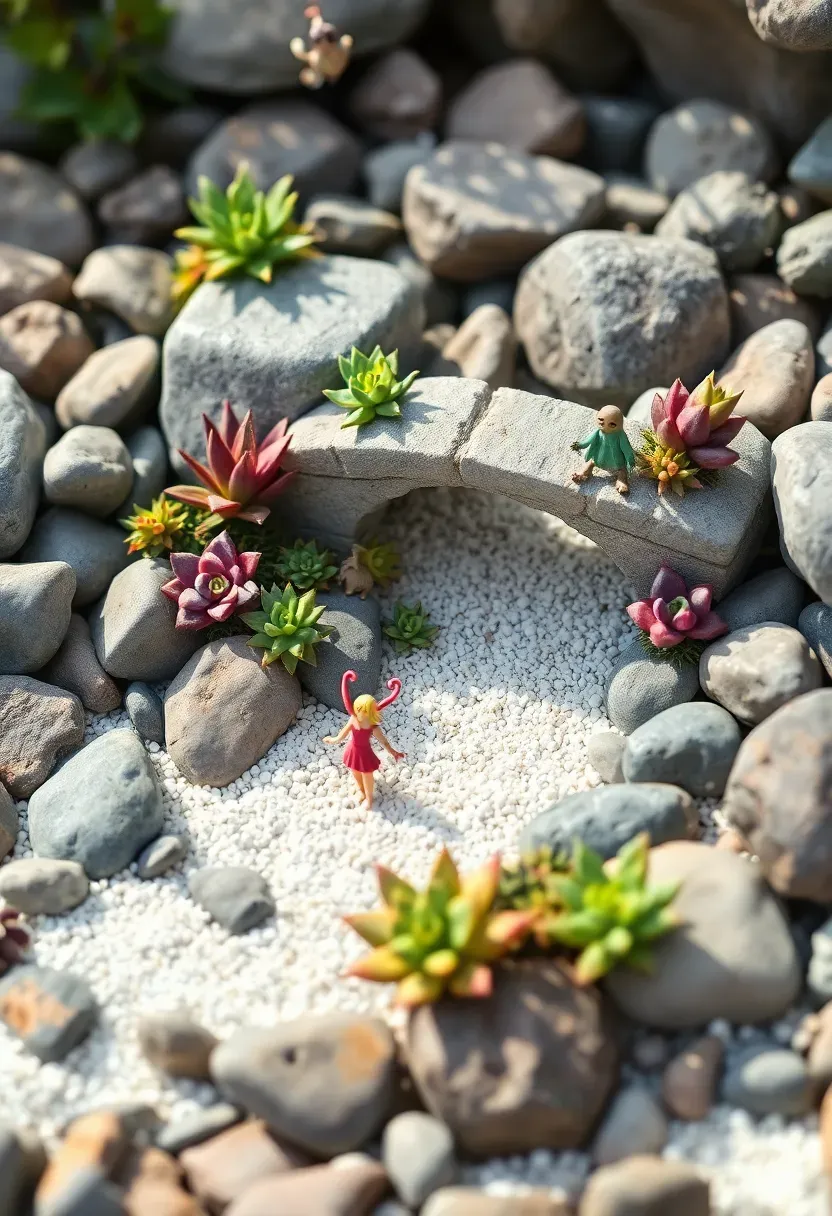
5. Succulent Fairy Rock Garden
Succulents and fairy gardens make natural partners. The plants look like miniature trees, shrubs, and ground cover without any effort to maintain scale. Arrange smooth river rocks to form walls, cliffs, and borders. Fill gaps with well-draining cactus mix. Plant echeveria as "trees," sempervivum as "bushes," and string of pearls trailing over a rock ledge as a "waterfall." Add a resin bridge over a dry creek bed made from fine sand. The whole setup needs watering only once a week in summer and almost never in winter.
Tips
- Use rocks with flat surfaces so miniature furniture sits stable
- Group succulents by water needs — echeveria and sempervivum together, lithops separately
- Top-dress with fine gravel to prevent soil splash during rain

6. Wheelbarrow Fairy Village
A rusty wheelbarrow from a flea market becomes a mobile fairy garden you can reposition with the seasons. Drill drainage holes in the bottom if there are none. Fill with potting mix, then plan your village layout before planting. The sloped interior naturally creates elevation changes — put your tallest structures at the back (near the handles) and let the terrain descend toward the front. Include two or three tiny cottages, a well made from stacked pebbles, and a gravel road connecting everything. Plant creeping thyme between buildings for green rooftops.
Tips
- Coat the inside with truck bed liner spray to slow rust-through
- Wheel it under a porch overhang during heavy storms
- The single wheel makes it easy for kids to help move it into sun or shade
Recommended
Items for this idea
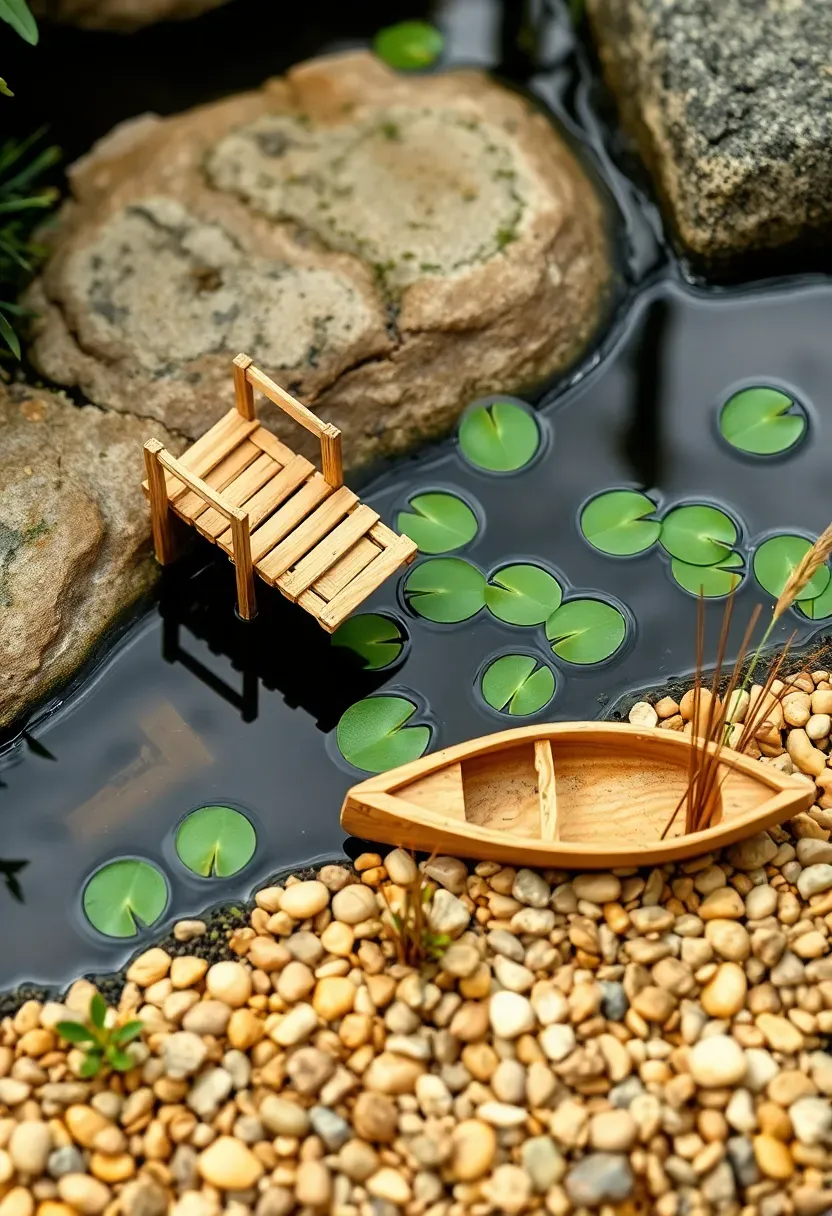
7. Pond-Edge Water Fairy Scene
If you already have a backyard pond or water feature, the damp margins are prime real estate for a fairy garden. The constantly moist soil supports moss, miniature ferns, and baby tears without supplemental watering. Build a tiny dock from craft sticks extending over the water's edge. Add a pebble beach, a rowboat carved from bark, and fishing poles made from toothpicks with thread lines. The reflected light off the water gives the scene a shimmer that dry installations cannot replicate. Just make sure any painted pieces use non-toxic, waterproof finishes.
Tips
- Seal wooden miniatures with exterior polyurethane before placing near water
- Anchor lightweight pieces with waterproof adhesive on a flat stone base
- Avoid placing anything that could fall into the pond and clog a pump
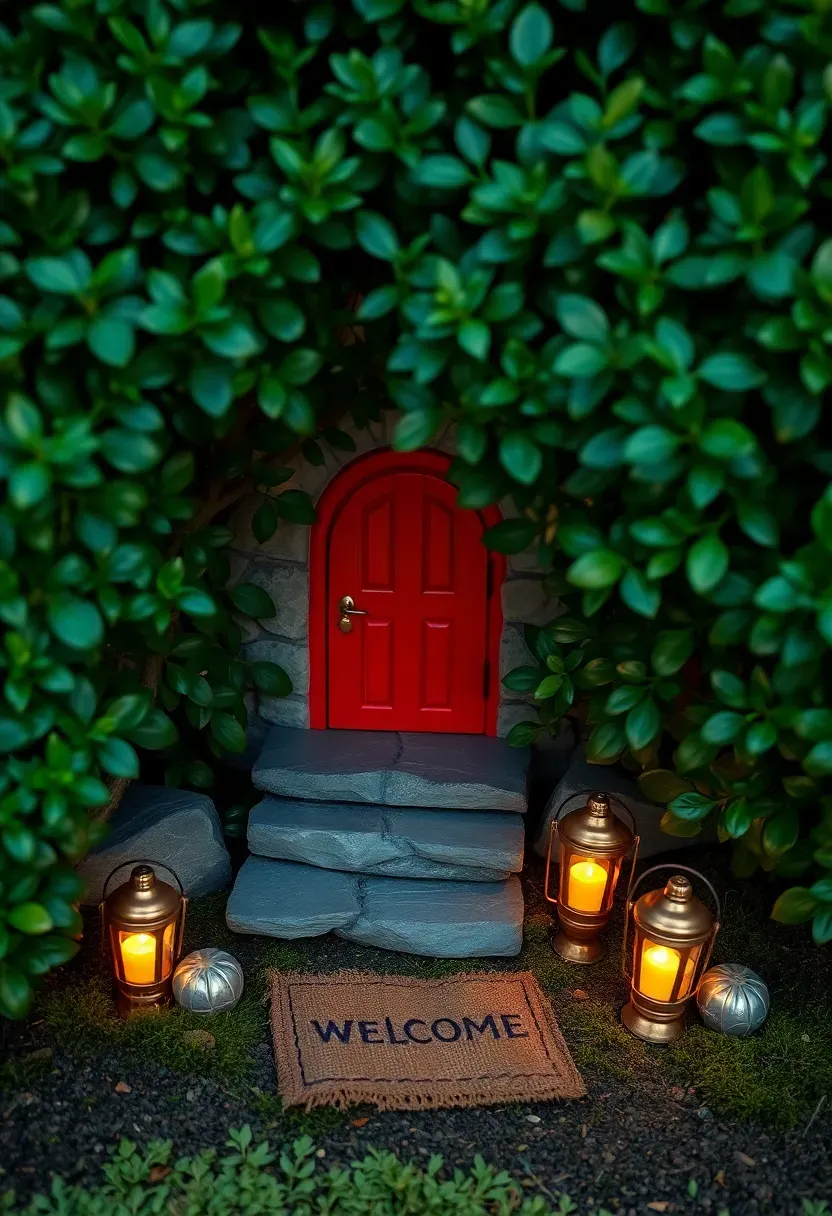
8. Gnome Hollow Under a Hedge
The gap beneath a dense hedge — boxwood, privet, or yew — already feels like a hidden world. Lean into that. Clear out dead leaves and level the soil underneath. Place a gnome-sized door against the hedge's main stem. Add stone steps leading up to it, a lantern (solar-powered tea lights work perfectly), and a welcome mat cut from a scrap of burlap. The overhead foliage provides natural shade and rain protection, so your miniatures last longer than exposed ones. Kids love this setup because it genuinely feels like discovering something secret.
Tips
- Trim the lowest hedge branches just enough to create a visible "room" without killing the hedge
- Use flat slate pieces for steps since they weather naturally and do not look out of place
- Replace solar batteries annually before they corrode inside the light housing
Recommended
Items for this idea
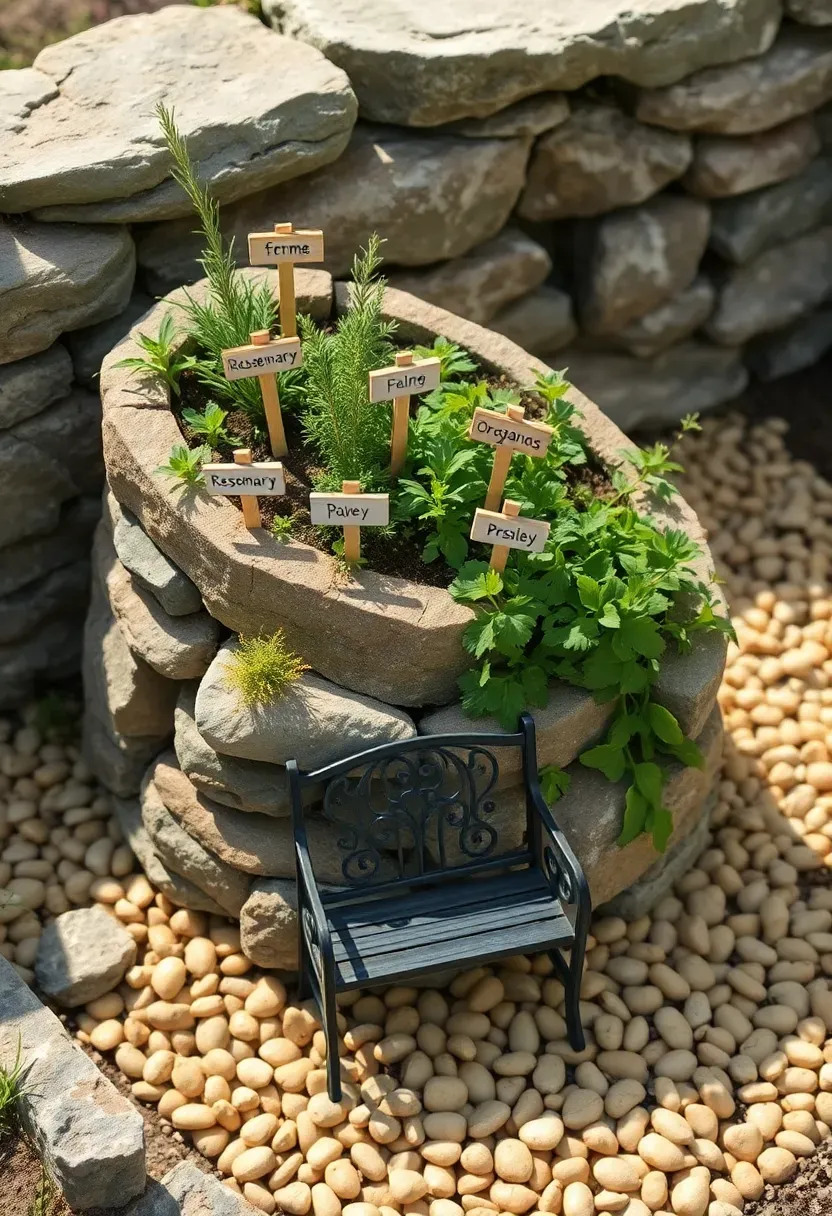
9. Fairy Herb Spiral
An herb spiral is already one of the more visually interesting garden structures — adding fairy elements makes it something kids and adults both want to spend time around. Build the spiral from stacked stones or bricks, roughly 3 feet in diameter and 2 feet tall at the center. Plant Mediterranean herbs (rosemary, thyme, oregano) at the top where drainage is best, and moisture-loving herbs (parsley, chives, mint) at the base. Tuck fairy accessories into the stone gaps: a tiny wooden sign reading "Fairy Herbs," a miniature bench at the base, a pebble path spiraling alongside the plants.
Tips
- The spiral shape creates multiple microclimates in a compact footprint
- Label herbs with tiny hand-painted signs for a storybook market feel
- Harvest regularly to keep plants compact and fairy-scale proportions intact

10. Teacup Fairy Planters
Chipped teacups from thrift stores cost about 50 cents each and make surprisingly good single-fairy containers. Drill a drainage hole in the bottom with a diamond-tipped bit (go slow, keep it wet). Fill with cactus mix, plant one small succulent, and add a single fairy figurine plus a few grains of decorative sand. Arrange several cups and saucers along a garden shelf, windowsill, or stone wall top. Each one becomes its own scene — a reading fairy, a sleeping fairy, one tending a garden within a garden. The mismatched patterns actually look better than a matching set.
Tips
- Soak thrift store cups in diluted bleach before planting to remove residue
- Group three to five cups at varying heights for the best visual arrangement
- Bring indoors during freezing weather since ceramic cracks when water inside expands

Recommended
Items for this idea
11. Log Slice Fairy Ring
Cut a fallen branch into 2-inch thick rounds and arrange them in a circle on the lawn, about 18 inches in diameter. This becomes the perimeter of a fairy ring — a concept rooted in actual folklore about circles of mushrooms marking fairy gathering places. Fill the center with moss, scatter ceramic mushroom figurines around the ring, and build a tiny campfire from twigs and a red-painted pebble. Over time the log slices will sprout real fungi, which only adds to the authenticity. It looks deliberate but also organic, like the fairies chose the spot themselves.
Tips
- Use hardwood slices (oak, maple) since softwoods decompose within one season
- Level each slice with a rubber mallet so figurines sit flat
- Spray with a wood preservative if you want to slow the natural weathering
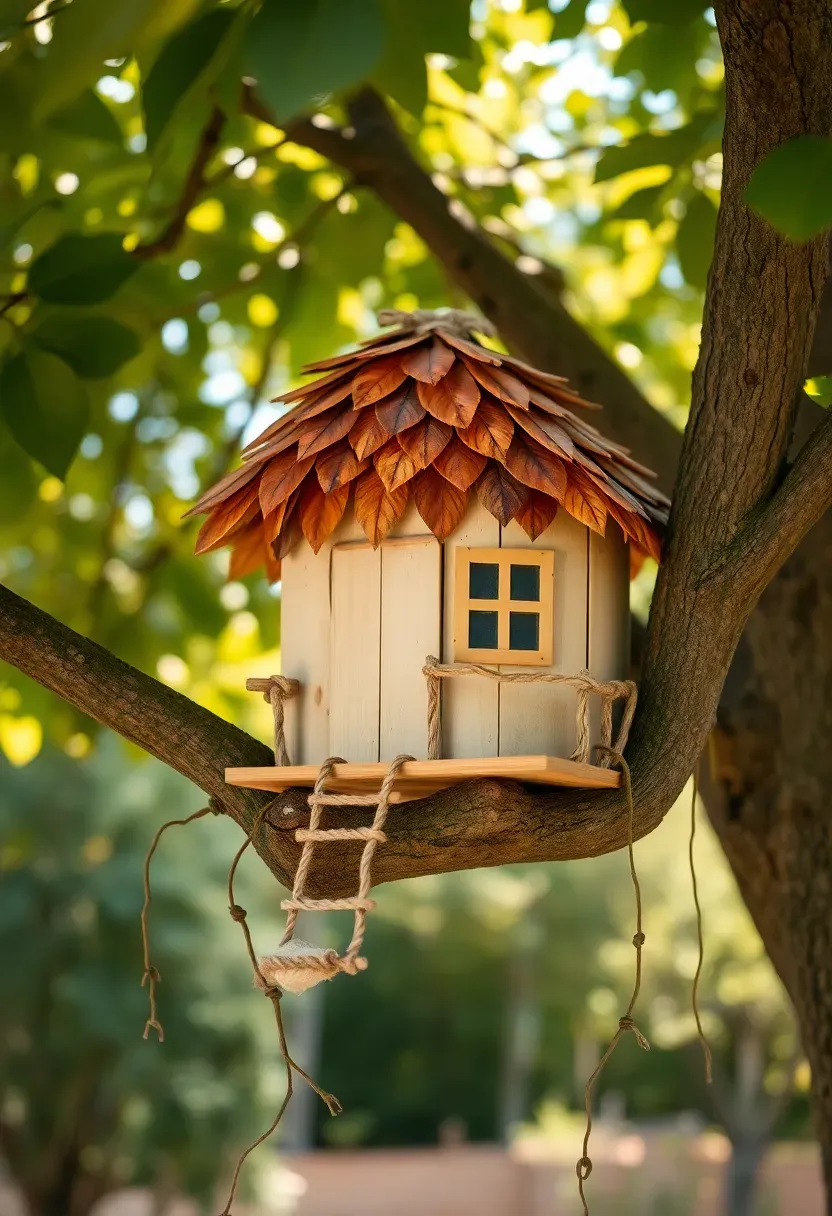
12. Fairy Treehouse with Rope Ladder
What makes it different
Most fairy gardens sit at ground level. A treehouse mounted on a low branch brings the scene up to eye height and uses vertical space that ground displays cannot reach.
Building it
Start with a small wooden platform (a 6x6 inch piece of thin plywood works). Attach it to a low, sturdy branch using zip ties wrapped in jute twine to disguise them. Build walls from craft sticks, add a leaf-shingled roof using preserved magnolia or oak leaves layered like tiles. Hang a rope ladder made from twine and matchstick rungs. The whole structure weighs under a pound, so it will not stress the branch.
Choose this if
You have a tree with accessible low branches and want a fairy garden that surprises visitors who are not looking upward.
Recommended
Items for this idea
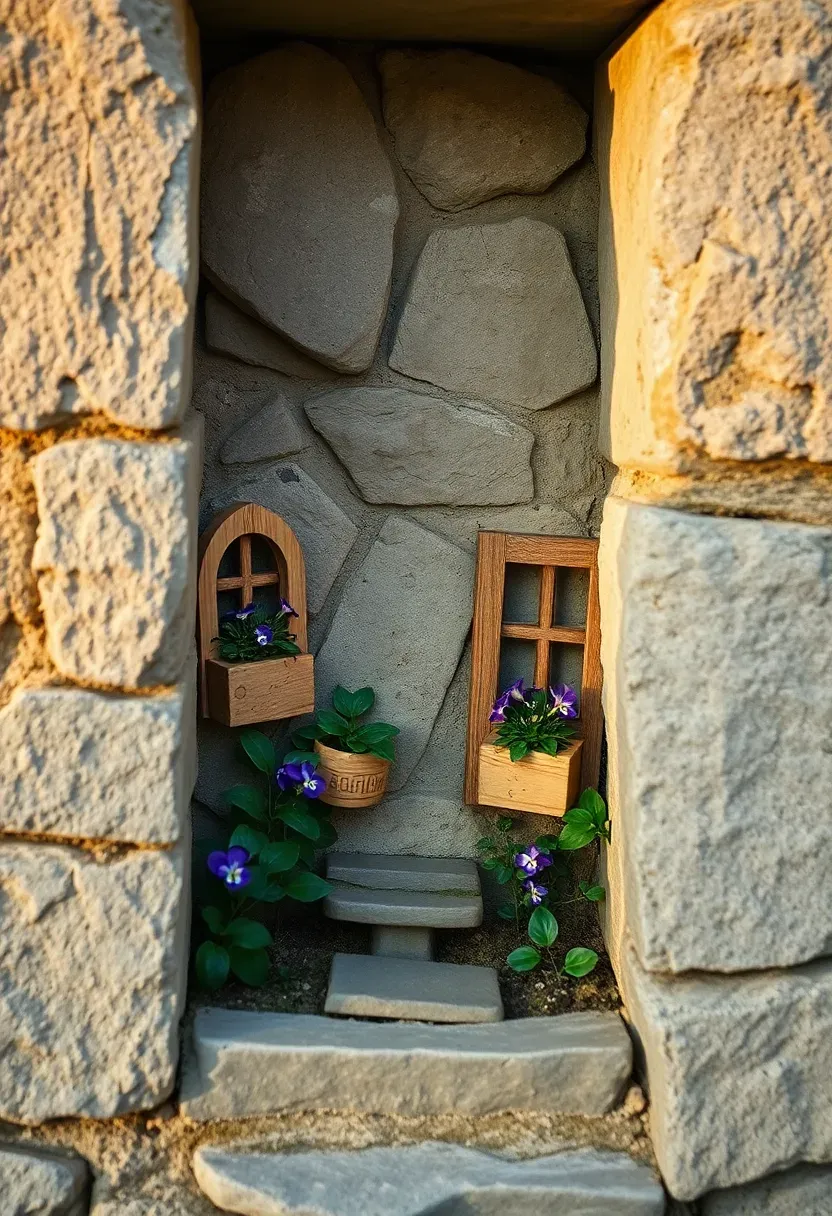
13. Stone Wall Fairy Nook
Old stone walls — whether freestanding garden walls or retaining walls — have natural gaps and recesses that look like they were designed for fairy dwellings. Find a gap between stones and build into it. Glue a tiny arched door at the back. Add window boxes made from halved wine corks planted with miniature violas. Let ivy or creeping fig trail around the opening to frame it. The thermal mass of the stone keeps the nook cool in summer and slightly warmer in winter, which is actually good for the planted elements. Multiple nooks along the same wall create an entire fairy neighborhood.
Tips
- Use outdoor-rated hot glue or construction adhesive rated for stone surfaces
- Nestle LED fairy lights into the crevices for a magical glow at dusk
- Clean out fallen leaves seasonally to prevent moisture trapping and mold

14. Solar-Lit Fairy Path
Step 1: Map the route
Decide where the path starts and ends — maybe from a fairy door at a tree base to a miniature garden bench under a bush. Use a garden hose to lay out a gently curving line.
Step 2: Build the path
Excavate a 4-inch-wide channel, 1 inch deep. Fill with fine pea gravel or sand. Press flat pebbles into the surface as stepping stones at regular intervals.
Step 3: Add lighting
Place miniature solar stake lights (sold as fairy garden accessories, about 3-4 inches tall) every 8-10 inches along the path. They charge during the day and glow softly at dusk.
Watch out
Cheap solar lights from dollar stores often last only one season before the batteries fail. Spend a few extra dollars on ones with replaceable cells.
Recommended
Items for this idea
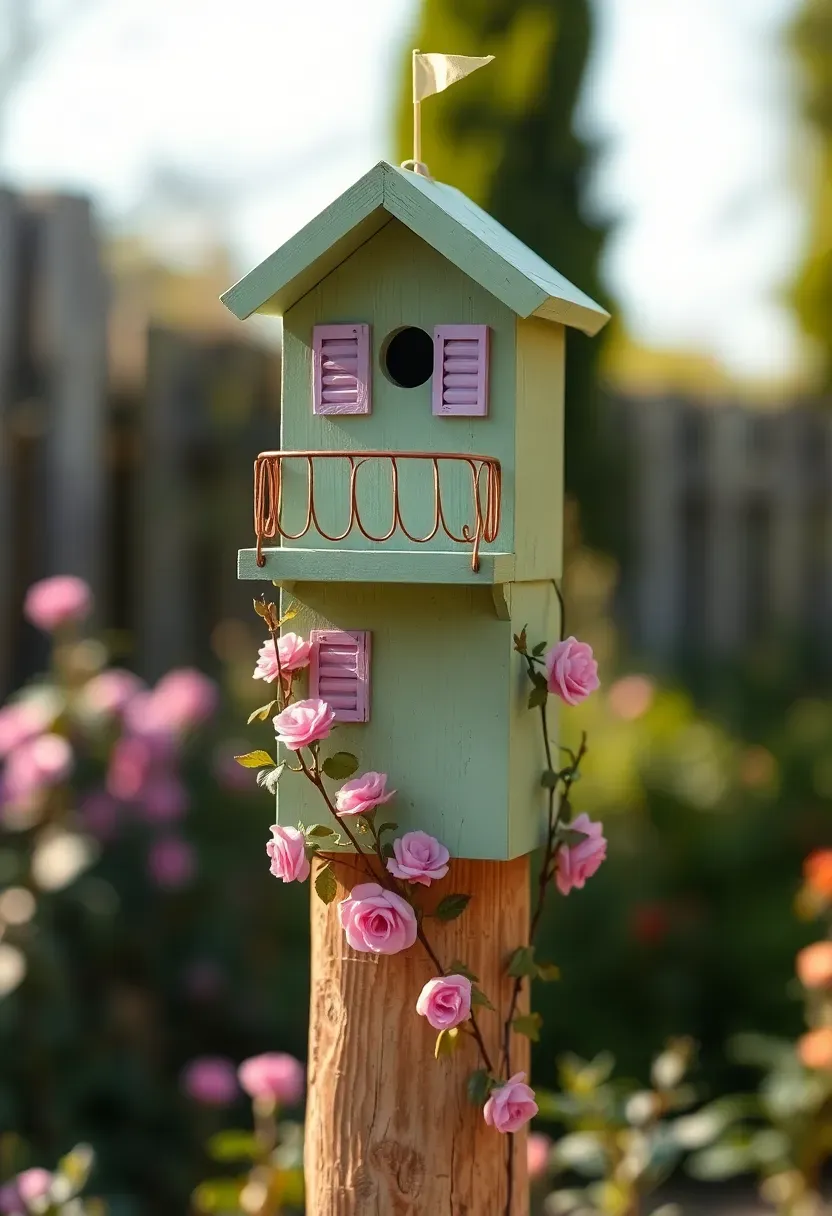
15. Birdhouse Fairy Tower
Repurpose an old birdhouse (or buy an unfinished one for $8-12) into a fairy tower. Paint the exterior with weatherproof craft paint — soft greens, warm yellows, or lavender work well for a fairy aesthetic. Add shutters from craft sticks, a balcony railing from bent wire, and a flag at the peak from a toothpick and fabric scrap. Mount it on a short post (2-3 feet high) in a garden bed. Plant climbing miniature roses or sweet peas at the base so they eventually grow up and around the tower. The entry hole becomes the fairy's front door without any modification.
Tips
- Seal all painted surfaces with outdoor clear coat to prevent peeling
- Remove the perch peg below the entry hole — it looks more like a door without it
- Position away from actual birdhouses to avoid confusing nesting birds
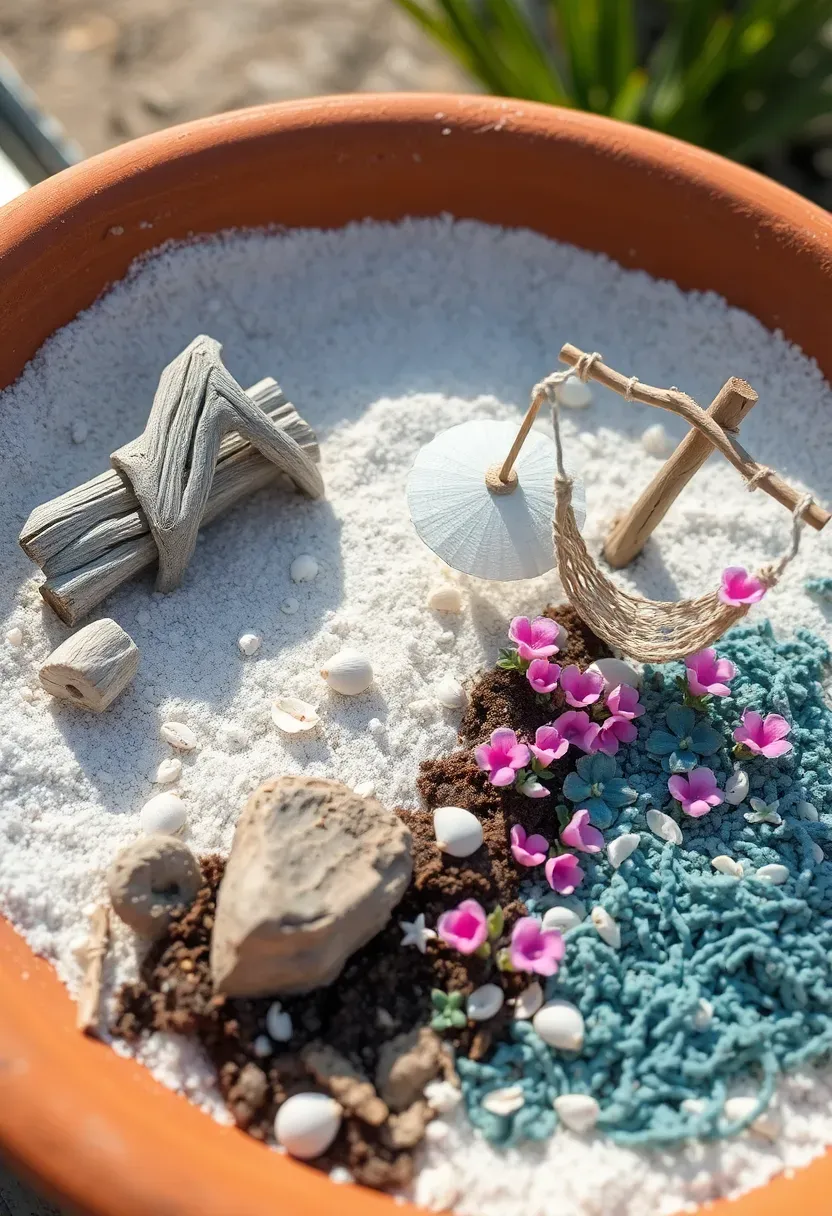
16. Driftwood Fairy Beach
Build a fairy beach scene using collected driftwood, fine sand, and miniature coastal accessories. Use a shallow terracotta saucer or a wooden tray as the base. Fill one half with sand for the beach, the other with soil for a planted area featuring sea thrift, blue star creeper, or miniature sedums. Arrange driftwood pieces as logs, lean-tos, or bridges. Add tiny seashells, a beach umbrella made from a toothpick and paper circle, and a hammock strung between two upright driftwood sticks. This works especially well if you live far from the coast and want a bit of that shoreline feeling in your backyard.
Tips
- Rinse driftwood in fresh water and dry in sun before use to remove salt and insects
- Tilt the container slightly so any rain drains toward the sand side
- Replace sand annually since it compacts and collects debris over time
Recommended
Items for this idea
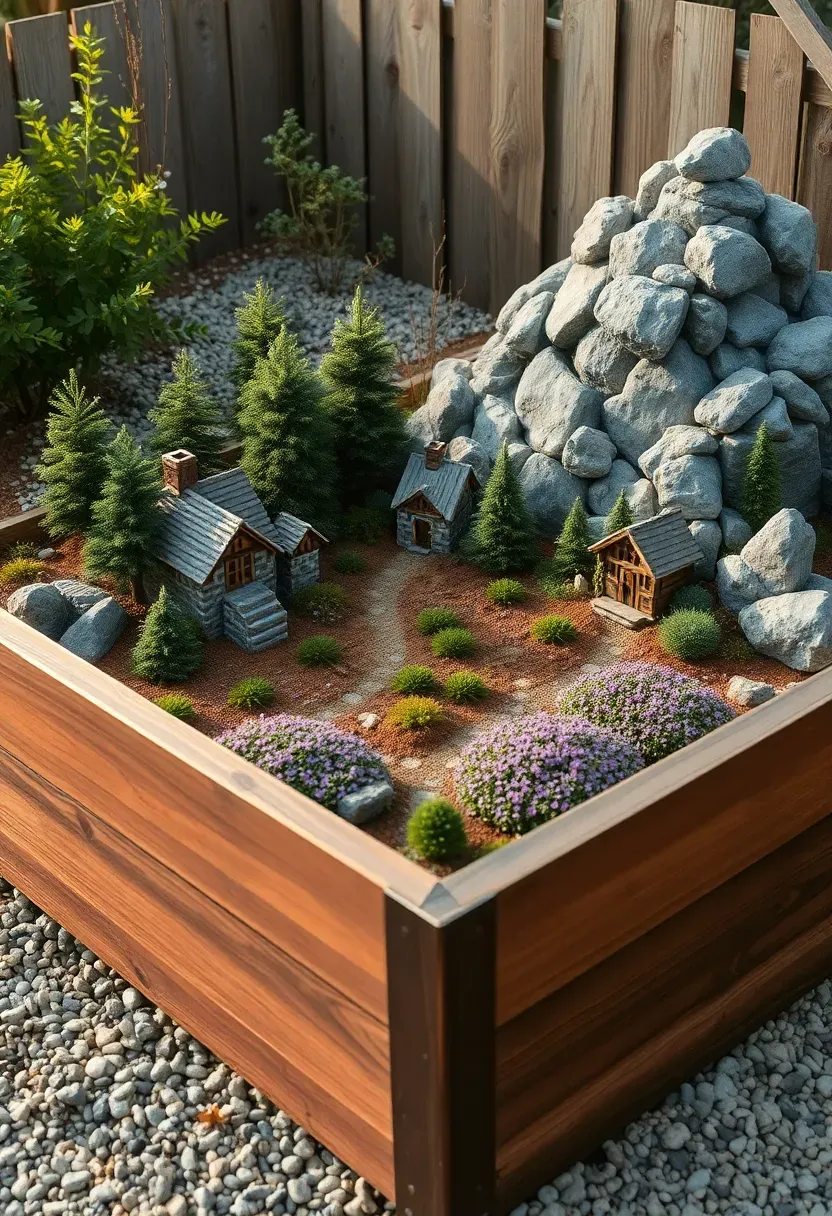
17. Raised Bed Fairy Kingdom
If you want to go all in, dedicate an entire raised bed to fairy gardening. A 4x4 foot bed gives you enough room for distinct zones — a village center with clustered cottages, a forest section planted with dwarf conifers and ferns, a meadow area of creeping thyme, and a mountain range built from stacked flat rocks. Connect everything with pebble roads. This becomes an evolving project rather than a one-afternoon build. Kids can add new structures over weeks and months, and the plants fill in gradually to create a landscape that looks more natural with time. Budget about $80-120 for the full setup including the raised bed frame.
Tips
- Sketch a rough zone map before planting so each area has appropriate soil and light
- Use dwarf mondo grass as miniature "trees" since it stays compact for years
- Install a small drip irrigation line so watering does not displace tiny accessories
Quick FAQ
Do fairy gardens survive winter outdoors? Most resin and ceramic miniatures handle frost if they are sealed properly. The bigger risk is waterlogged soil cracking containers. Move terracotta and teacup setups to a sheltered spot or indoors before the first hard freeze. Stone and ground-level installations generally overwinter without issues.
Which plants stay small enough for a fairy garden? Creeping thyme, baby tears, miniature sedums, dwarf mondo grass, and Irish moss all stay naturally compact. Avoid anything labeled "vigorous grower" since it will overwhelm the scene within a few months. Trim regularly and remove any plant that starts to dominate.
Are fairy gardens safe for pets? The plants listed here are non-toxic to dogs and cats. The main concern is small resin figurines — if your dog chews on things, stick with larger stone accessories or skip figurines entirely. Avoid cocoa shell mulch, which is toxic to dogs.
How much does a backyard fairy garden cost? A simple container fairy garden runs $15-30 including the pot, soil, one plant, and a few accessories. A raised bed fairy kingdom with multiple zones, lighting, and a dozen miniatures costs $80-150. Most people start small and accumulate pieces over time.
Can I build a fairy garden in full sun? Yes, but your plant choices narrow. Use succulents, creeping thyme, and sedum instead of moss and ferns. Shade from a nearby tree or fence for part of the day helps. Resin figurines may fade in direct UV, so look for UV-resistant options or accept the weathered look.
A fairy garden does not need to be perfect or expensive or Instagram-ready. The ones my kids remember best are the messy ones — a cracked pot with a crooked door, a pile of rocks with a pebble path leading nowhere in particular. Start with whatever container or corner of the yard you have, add one or two details that suggest a tiny inhabitant lives there, and let the rest develop over time. The garden will change with the seasons, and that is part of what makes it worth checking on every morning.
Pinterest cover for 17 Backyard Fairy Garden Ideas
About the author
OBCD
CGI visualization and interior design content. We create detailed 3D renders and curate practical design ideas for every room in your home.