21 Backyard Ideas on a Budget
We spent $340 on our backyard last summer. That covered a truckload of pea gravel, four solar path lights from the hardware store, a used fire pit off Marketplace, and enough lumber scraps to build a planter box. Neighbors assumed we hired someone. We did not. The secret to a good-looking yard on a tight budget is not finding the cheapest version of expensive things — it is choosing materials and projects that look better because they are simple. Gravel ages well. Untreated cedar weathers to silver. Wildflowers fill in gaps on their own. The 21 ideas here all come in under $200 per project, and most under $75.
Below you will find budget backyard upgrades organized from ground-level hardscaping to furniture, lighting, and planting ideas.
Table of Contents
- Pea Gravel Patio
- Pallet Lounge Sofa
- DIY Concrete Fire Pit
- Vertical Herb Wall
- String Light Canopy
- Raised Bed from Fence Boards
- Painted Cinder Block Bench
- Gravel and Stepping Stone Path
- Tire Planter Stack
- Outdoor Rug on Concrete
- Dollar Store Solar Lanterns
- Privacy Screen from Old Shutters
- Wildflower Meadow Strip
- Painted Fence Mural
- Stock Tank Plunge Pool
- Tree Stump Side Table
- Hanging Mason Jar Lights
- DIY Pergola from 4x4 Posts
- Mosaic Stepping Stones
- Thrift Store Bistro Set
- Bamboo Roll Privacy Fence
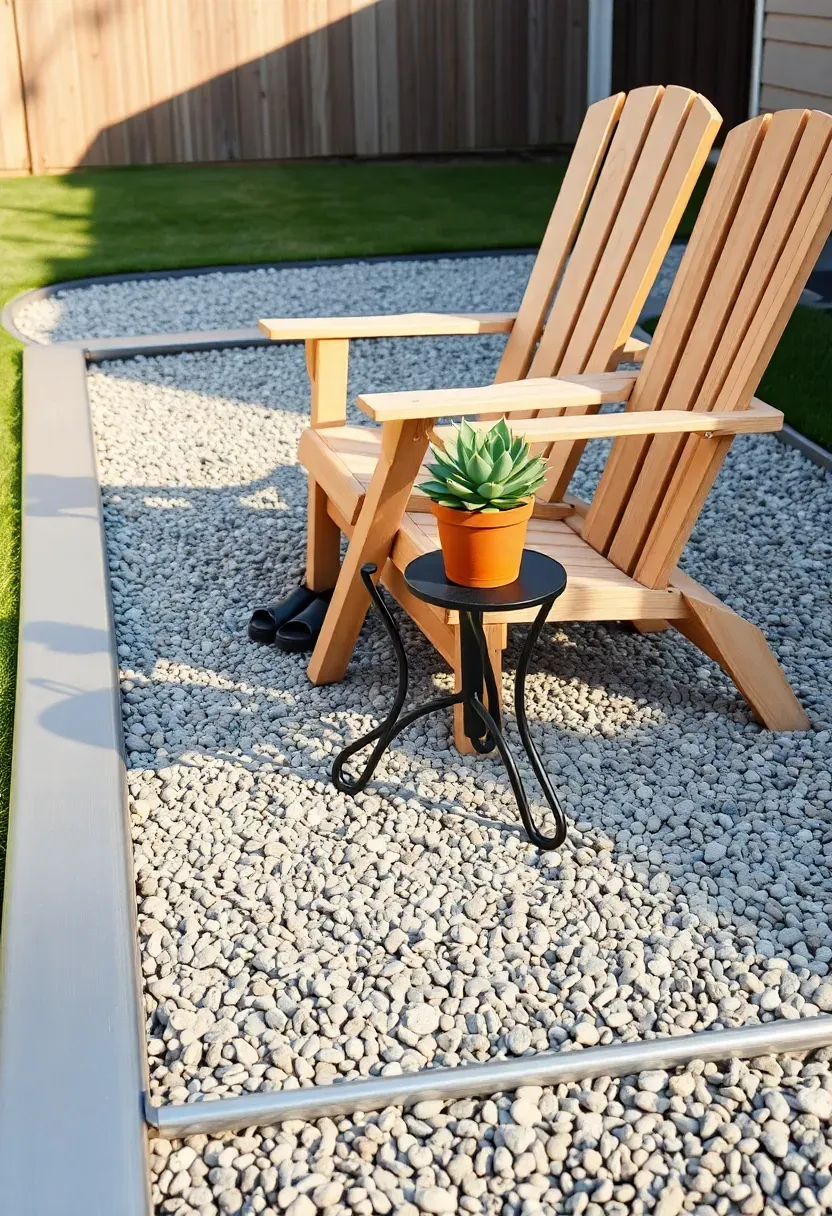
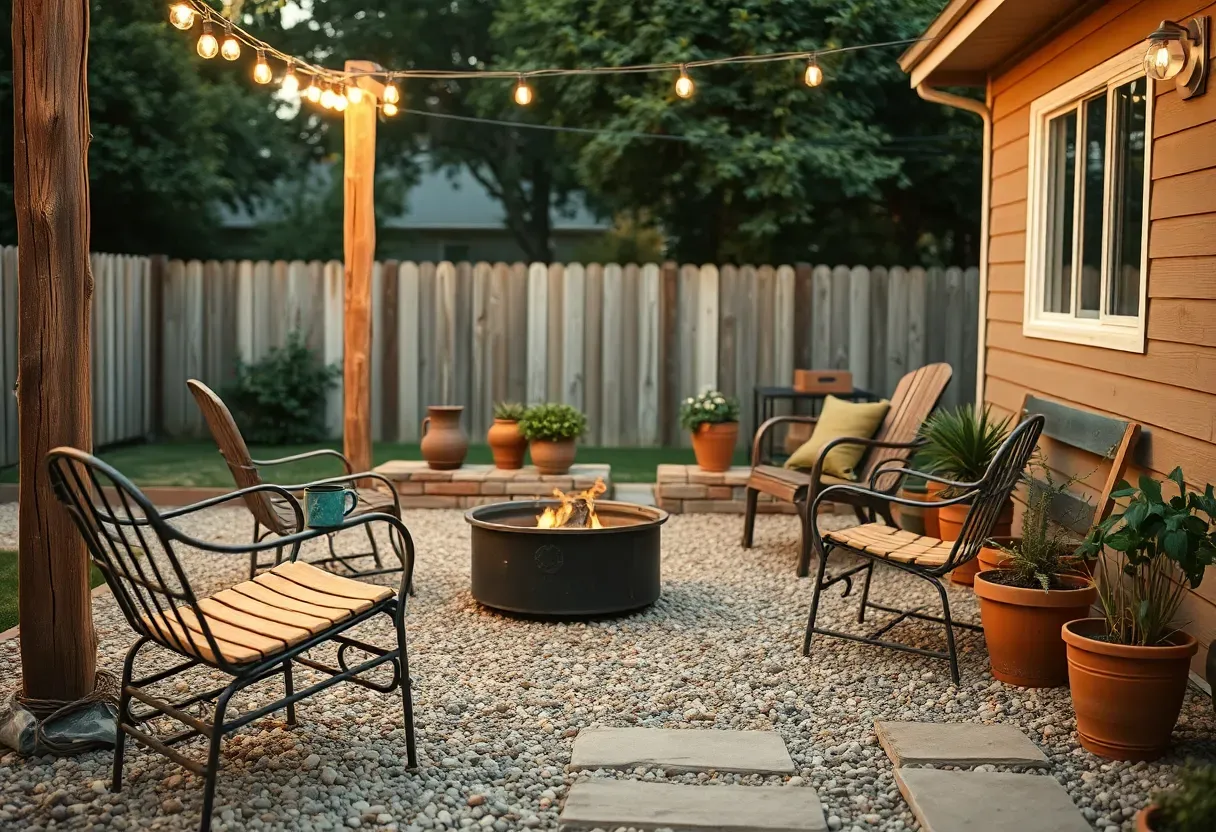
1. Pea Gravel Patio
Pea gravel is the fastest way to create a usable outdoor surface without pouring concrete or laying pavers. A 10x10-foot area needs about one ton of gravel, which costs $40-$80 depending on your region. Edge it with steel landscape edging or pressure-treated 2x6 boards staked into the ground. Lay landscape fabric underneath to prevent weeds from pushing through. Rake the surface flat, set your furniture on top, and you have a patio that drains perfectly and never cracks. The stones shift slightly underfoot, which actually feels pleasant compared to hard concrete.
Tips
- Keep gravel depth at 2-3 inches — thinner layers expose the fabric, thicker ones make chairs wobble
- Choose 3/8-inch pea gravel over larger river rock for a more stable walking surface
- Add a leaf blower to your fall routine since rakes tend to pull gravel out of the edging
We picked a few things that go well with this idea: Brightever 100FT Edison String Lights (52 Bulbs) (★4.6), addlon 50FT Outdoor Edison String Lights (★4.6) and addlon 48FT Weatherproof Edison Patio Lights (★4.5). As an Amazon Associate we earn from qualifying purchases.
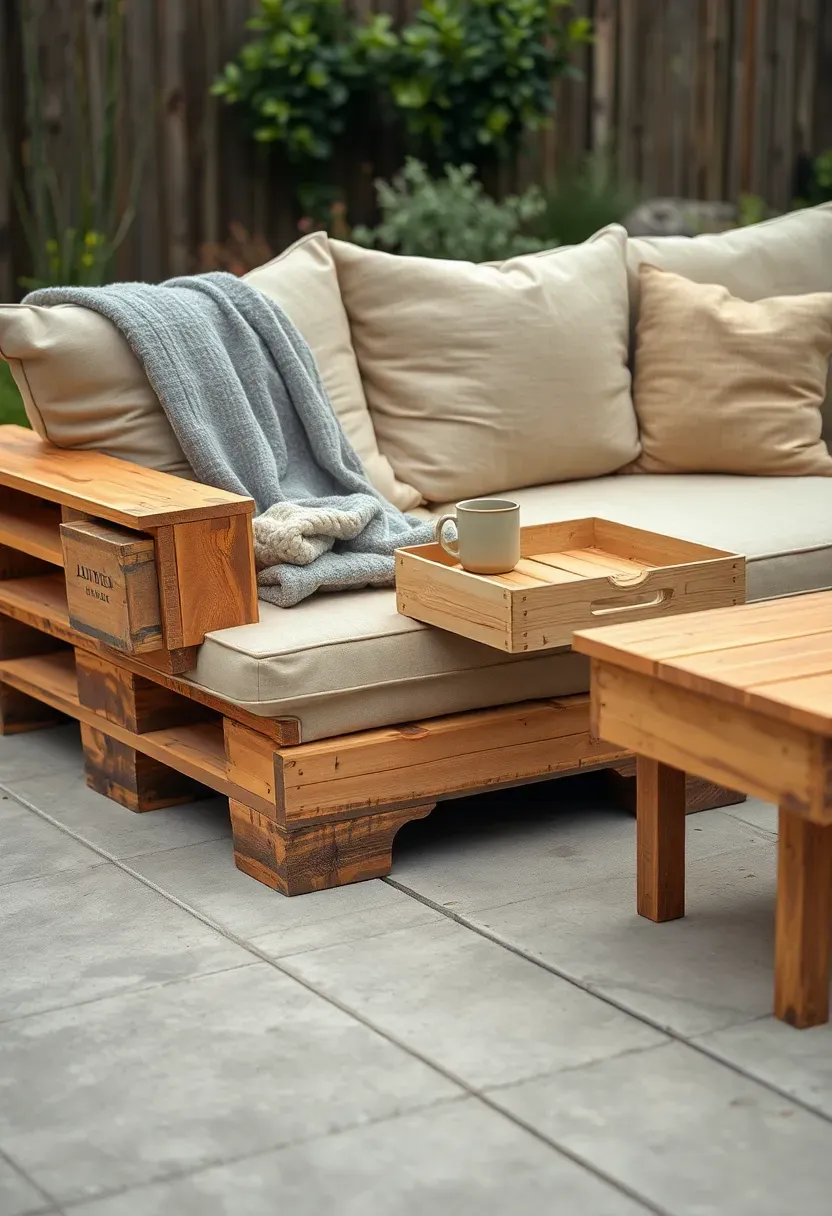
2. Pallet Lounge Sofa
Why pallets work outdoors
Free pallets from warehouses and shipping companies are built from hardwood meant to carry heavy loads. That same durability makes them survive rain and sun far better than particleboard furniture from big box stores. The slatted design lets water drain instead of pooling.
How to build it
Sand every surface with 80-grit paper to remove splinters. Stack two pallets for the seat base and secure them together with 3-inch deck screws. Stand a third pallet upright behind them as a backrest and screw it to the base through the back edge. Apply an exterior wood stain or leave it raw if you like the weathered look. Top with outdoor cushions — IKEA sells full sets under $60. The whole build takes about 90 minutes.
Pros and cons
- Pro: Materials are free if you source pallets from local businesses
- Pro: Modular design lets you add sections later for an L-shape
- Con: Cushions need indoor storage during heavy rain unless they are waterproof-rated
We picked a few things that go well with this idea: Grey Pea Gravel Landscape Rocks (40 LBS) (★4.5), All Purpose Pea Gravel (50 lb) (★4.2) and FANTIAN Mixed Color Pea Gravel Pebbles (2 lbs) (★4.6). As an Amazon Associate we earn from qualifying purchases.
3. DIY Concrete Fire Pit
A fire pit turns any backyard into a place people actually want to sit after dark. Retaining wall blocks from home improvement stores cost about $2-3 each. You need 36 blocks for a three-course-high ring with a 36-inch interior diameter. No mortar required — the weight holds everything in place.
Step 1: Clear and level the base
Dig out a 4-foot circle about 3 inches deep. Fill with gravel and tamp it flat with a hand tamper or the end of a 4x4 post.
Step 2: Stack the blocks
Lay the first ring on the gravel, staggering each course like brickwork. Check with a level after each ring.
Step 3: Add a grate or ring insert
A steel fire ring insert ($20-$30) protects the blocks from direct flame and extends their life. Place it inside the finished stack.
Watch out
- Keep the pit at least 10 feet from any structure, fence, or overhang
- Check your local fire codes before building — some municipalities require permits
We picked a few things that go well with this idea: HDPE Folding Adirondack Chair with Cup Holders (★4.4), VINGLI Folding Wood Adirondack Chair (★3.3) and SERWALL Folding HDPE Adirondack Chair (★4.5). As an Amazon Associate we earn from qualifying purchases.
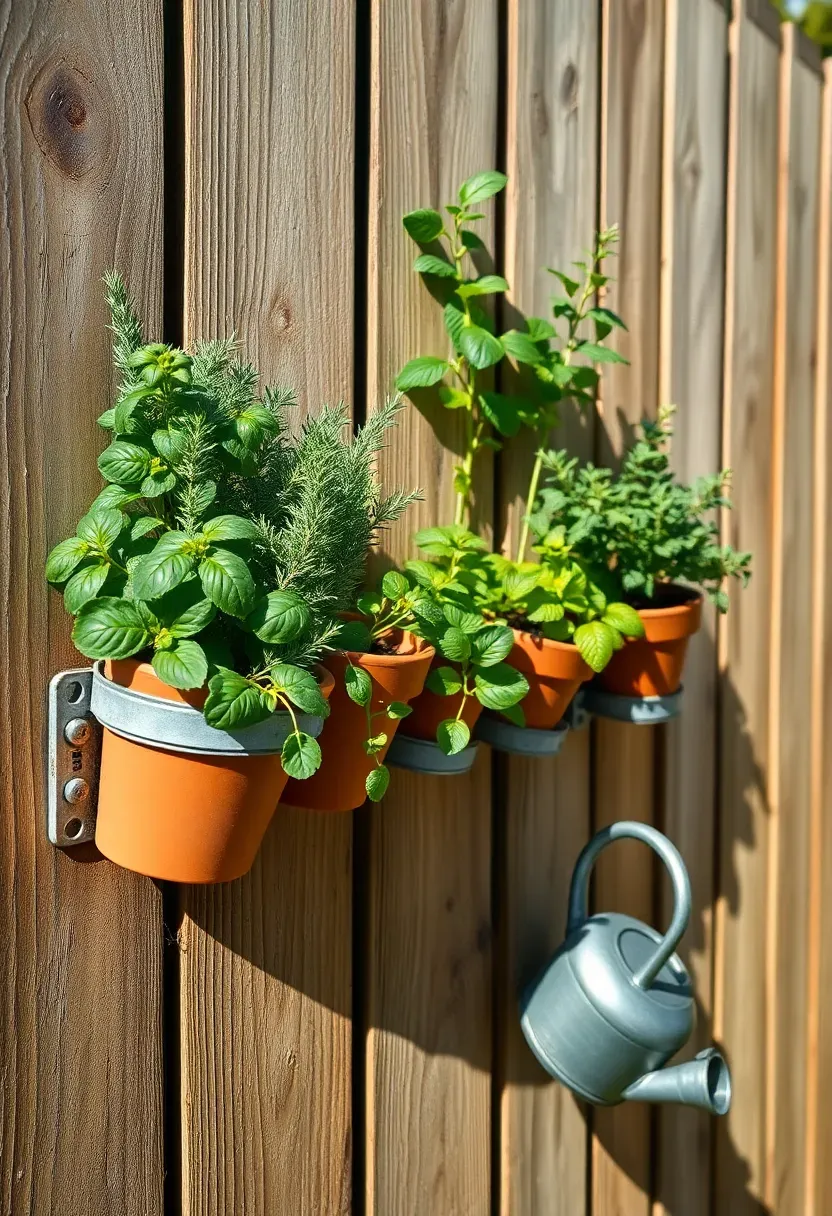
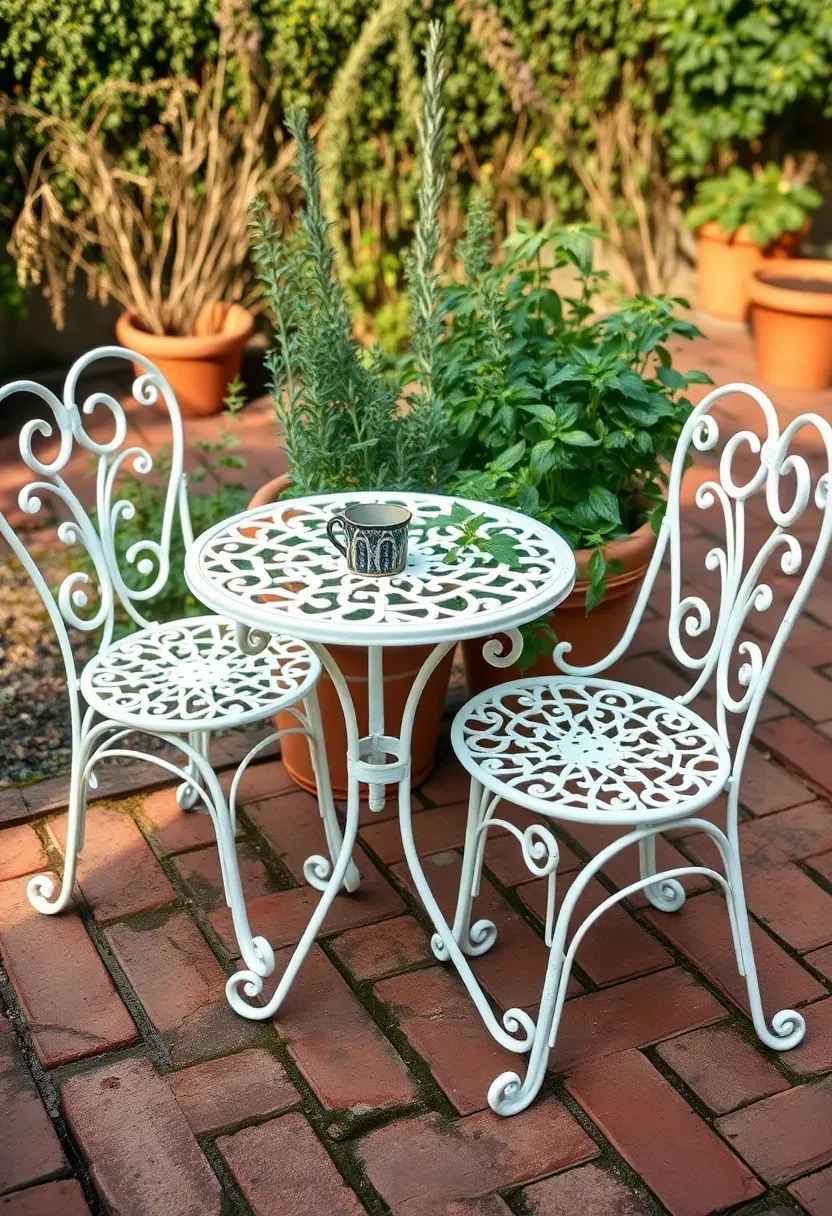
4. Vertical Herb Wall
Fence space is wasted space in most yards. Mount a row of 4-inch terracotta pots using pipe clamps screwed directly into the fence boards. Each clamp costs about $1 and holds one pot securely. Plant basil, rosemary, thyme, mint, and parsley — herbs that do well in the shallow soil of small pots as long as they get 6+ hours of sun. Water daily in summer since terracotta dries fast. The setup costs around $25 for ten pots with hardware and gives you fresh herbs from May through October. It also makes a bare fence look intentional rather than neglected.
Tips
- Group herbs by water needs: rosemary and thyme together (less water), basil and mint together (more water)
- Drill drainage holes in any pots that do not already have them
- Paint the pipe clamps with spray enamel to prevent rust stains on the fence
Recommended
Items for this idea
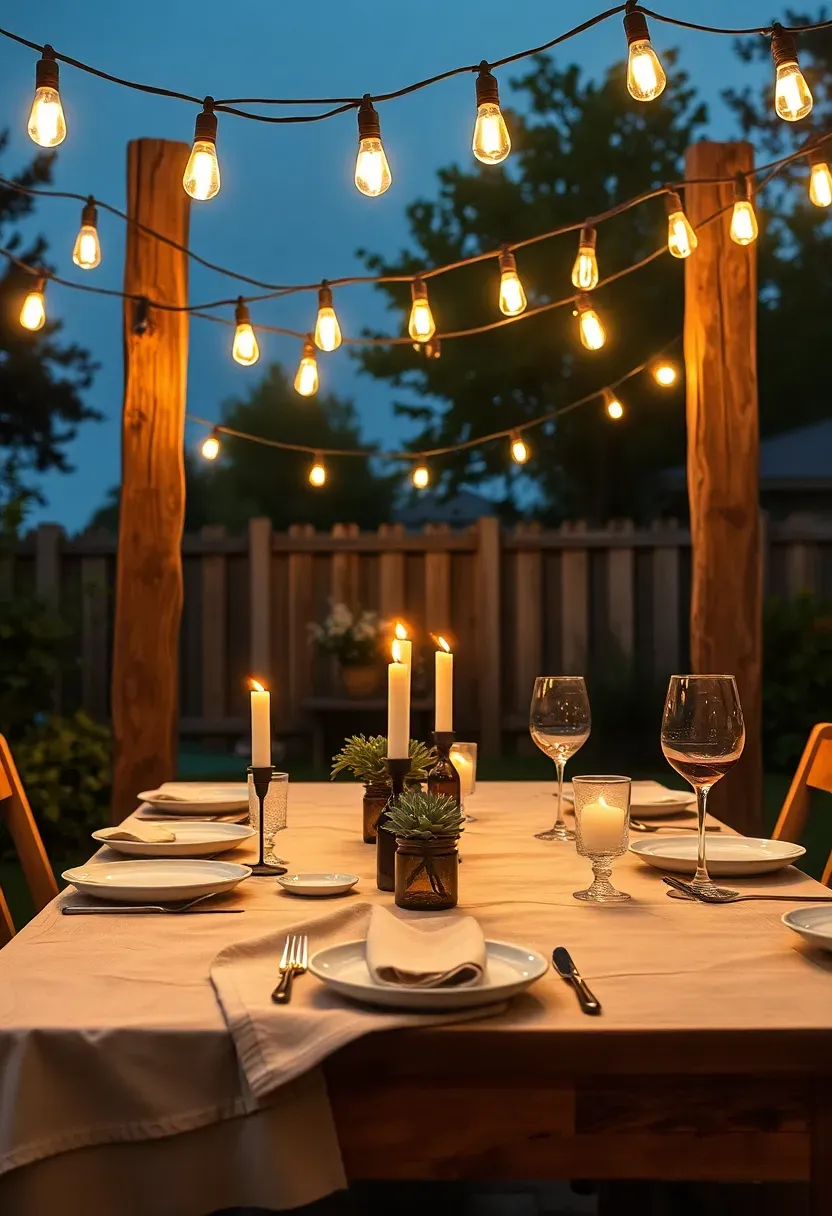
5. String Light Canopy
The problem with dark backyards
Most people stop using their yard after sunset because there is nothing out there to see. A single overhead fixture on the house casts harsh shadows and attracts bugs. The yard feels like a dark void past the porch.
The fix
Run café-style string lights between two points — fence posts, the house eaves, or freestanding 4x4 posts set in 5-gallon buckets filled with concrete. Use 48-foot commercial-grade strands with Edison bulbs (about $25-$35 per strand). Hang them in gentle swoops rather than pulling them taut, which looks rigid. The warm glow defines the edges of your outdoor room without blinding anyone. Two strands crossing in an X pattern cover a 15x15-foot area.
Pros and cons
- Pro: Instantly makes any backyard feel like a restaurant patio
- Pro: LED versions use very little electricity — around $3-4 per month left on every night
- Con: Bulbs can break in wind storms, so keep a spare pack on hand
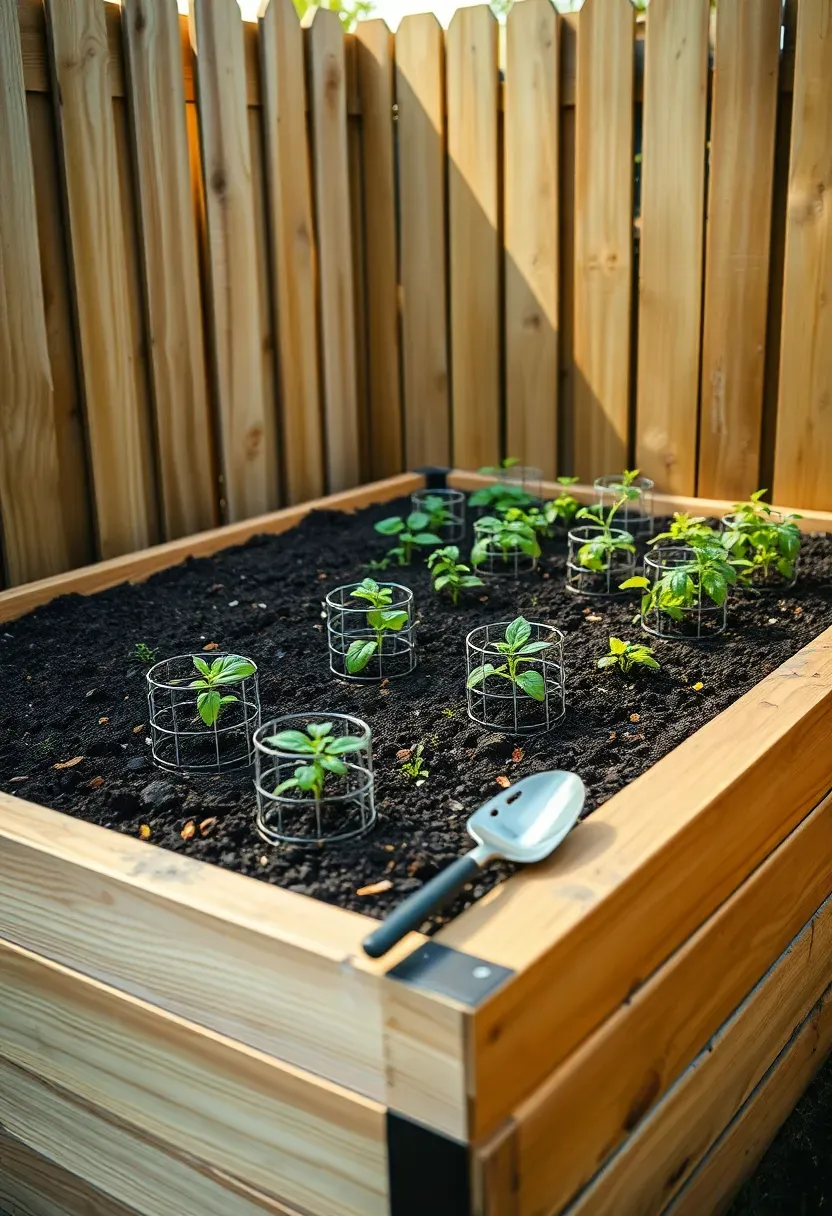
6. Raised Bed from Fence Boards
Cedar fence boards are sold in 6-foot lengths at about $3-4 each. Buy eight of them, cut four in half to make 3-foot pieces, and screw them together into a 6x3-foot rectangle, two boards high. That gives you a 12-inch-deep bed, which is enough depth for tomatoes, peppers, lettuce, and most root vegetables. Fill with a 50/50 mix of topsoil and compost — a cubic yard costs about $30 from a landscape supply yard. The entire project runs $50-$65 and takes maybe 45 minutes. Cedar resists rot naturally without chemical treatment, so it lasts 5-8 years in ground contact.
Tips
- Place the bed where it gets morning sun and some afternoon shade in hot climates
- Line the bottom with hardware cloth if you have burrowing pests like moles or voles
- Avoid treated lumber for vegetable beds — the chemicals can leach into soil
Recommended
Items for this idea
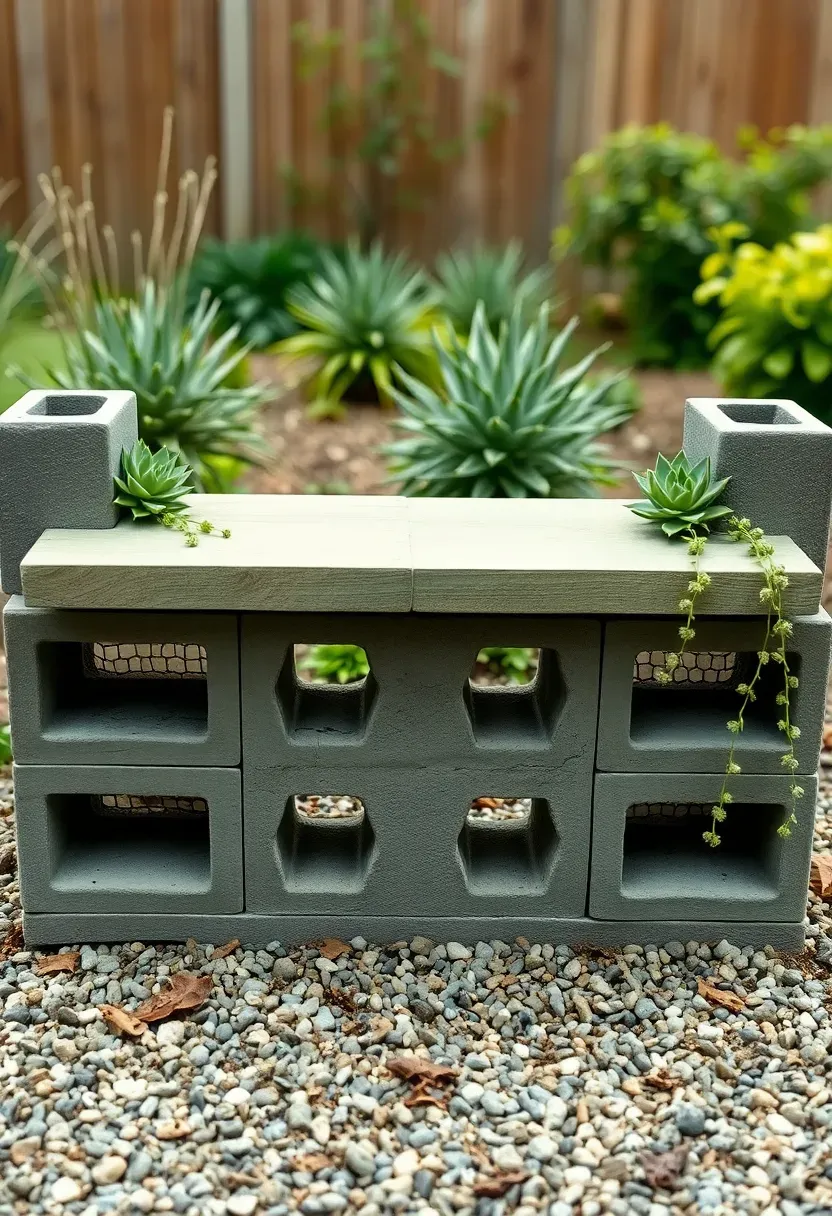
7. Painted Cinder Block Bench
This might be the simplest outdoor seating project that exists. Stack three cinder blocks on each side, slide two 8-foot 4x4 posts through the holes, and you have a bench. Total cost: about $20. The blocks weigh enough that the bench stays put without fasteners. Paint everything with exterior masonry and wood paint in a single color — sage green, terracotta, slate blue, or matte black all look good. Fill the open block cells with soil and plant trailing succulents or small ornamental grasses for a built-in planter on each end.
Tips
- Use 4x4 cedar or redwood posts for the seat — they resist rot without treatment
- Apply rubber furniture pads under the blocks if they sit on concrete to prevent scratches
- Stack four blocks high for a bar-height bench along a fence
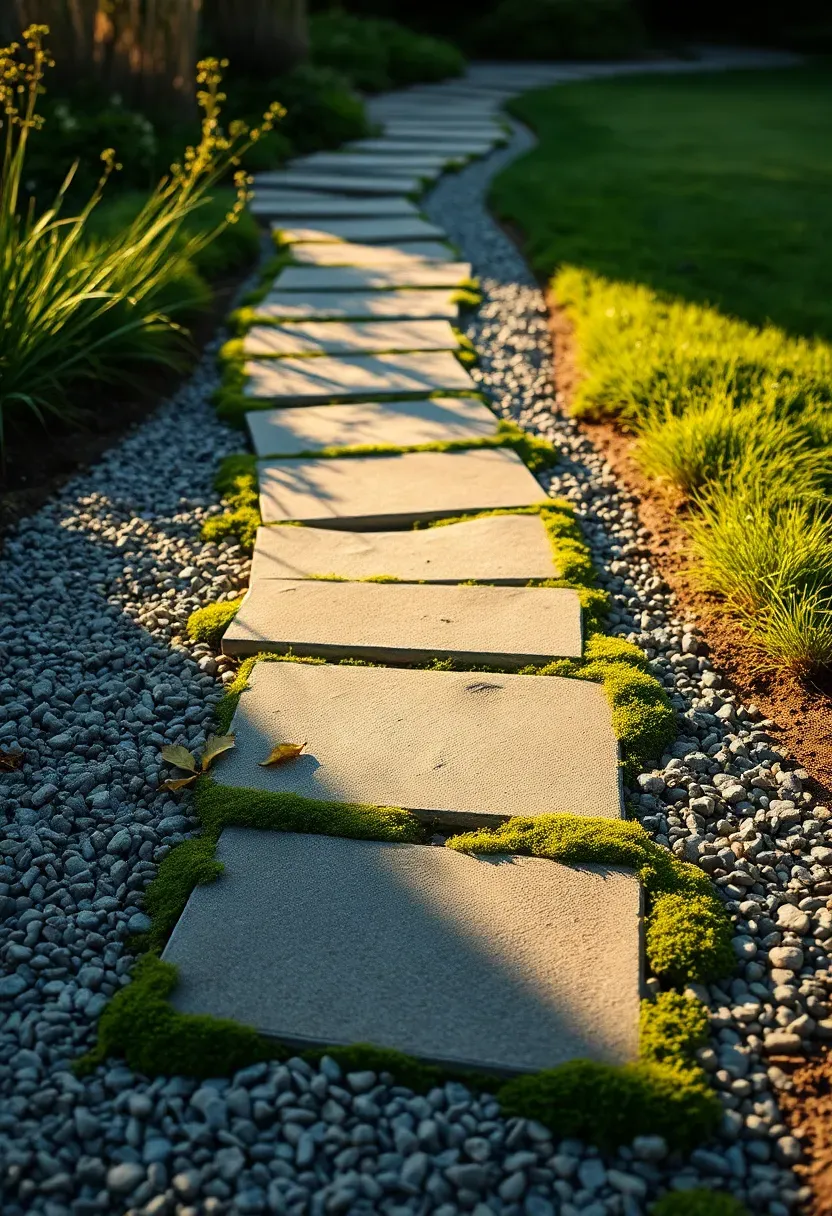
8. Gravel and Stepping Stone Path
Step 1: Plan the route
Lay a garden hose on the ground in the shape you want. Gentle curves look more natural than straight lines in a residential yard. Mark both sides with landscape paint.
Step 2: Dig and line
Remove 3 inches of soil between the marks. Lay landscape fabric and secure it with staples every 18 inches.
Step 3: Set stones and fill
Place 12x12 or 16x16 concrete pavers every 18-22 inches along the path (one comfortable stride apart). Fill around them with pea gravel or decomposed granite. Brush gravel into all gaps so the pavers sit flush.
Step 4: Edge it
Aluminum landscape edging along both sides keeps the gravel from migrating into the lawn. This entire path costs about $2-3 per linear foot.
Watch out
- Avoid smooth, polished stones — they get slippery when wet
- Tamp each paver firmly into the gravel base so it does not rock
Recommended
Items for this idea
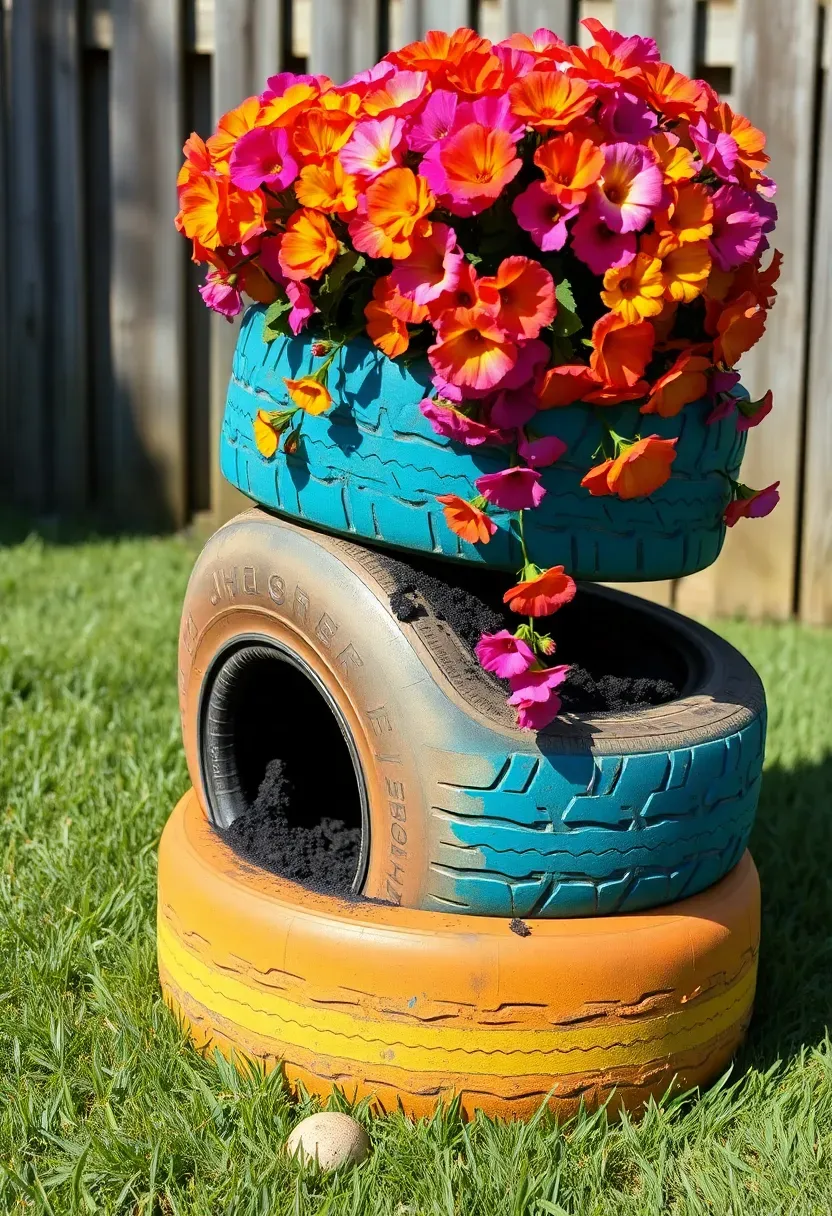
9. Tire Planter Stack
Old tires are free from most auto shops — they actually pay to dispose of them, so you are doing them a favor. Stack two or three tires, fill the bottom one with rocks for drainage and the upper ones with potting soil. Paint the outside with exterior spray paint in whatever colors fit your yard. Plant trailing flowers like petunias, wave petunias, or sweet potato vine so greenery spills over the edges. The black rubber absorbs heat, which warm-season plants actually appreciate. One stack makes a surprisingly large planter — a single tire holds about 3 cubic feet of soil.
Tips
- Drill 4-5 drainage holes through the bottom tire sidewall
- Use light-colored paint in hot climates to reduce heat absorption
- Stack different sizes for a tiered wedding-cake shape
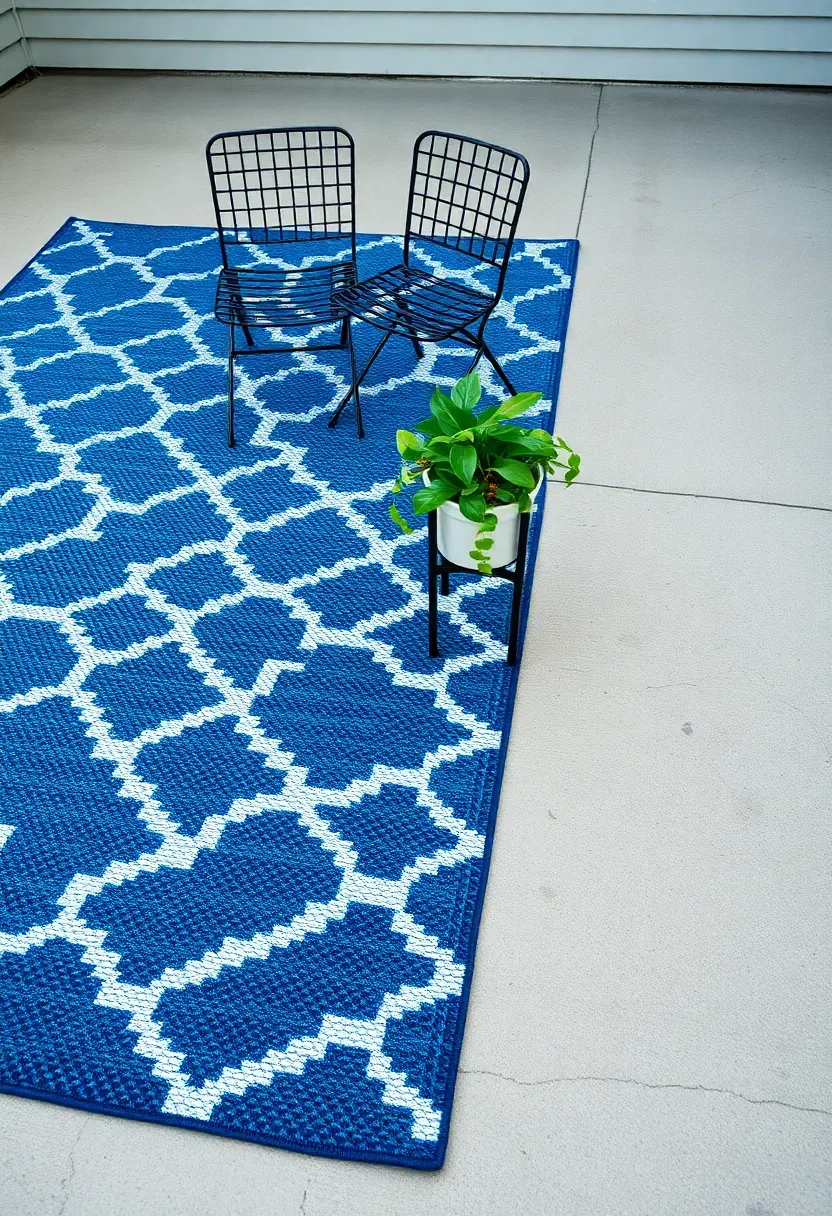
10. Outdoor Rug on Concrete
The problem
Bare concrete slabs look utilitarian and feel uninviting. Staining concrete costs $2-4 per square foot and requires acid etching. Pavers over concrete start at $6 per square foot.
The solution
A 5x8-foot outdoor polypropylene rug costs $30-$60 and covers the worst section of your patio instantly. These rugs are made to withstand UV, rain, and foot traffic. They dry within hours after a storm. Choose a geometric or solid pattern in a color that contrasts with your furniture. The rug defines a seating area and makes the space feel furnished rather than accidental. Roll it up and store it over winter to extend its life to 4-5 seasons.
Choose this if
- You rent and cannot modify the patio surface
- Your concrete is cracked or stained but structurally sound
- You want a seasonal refresh without permanent commitment
Recommended
Items for this idea
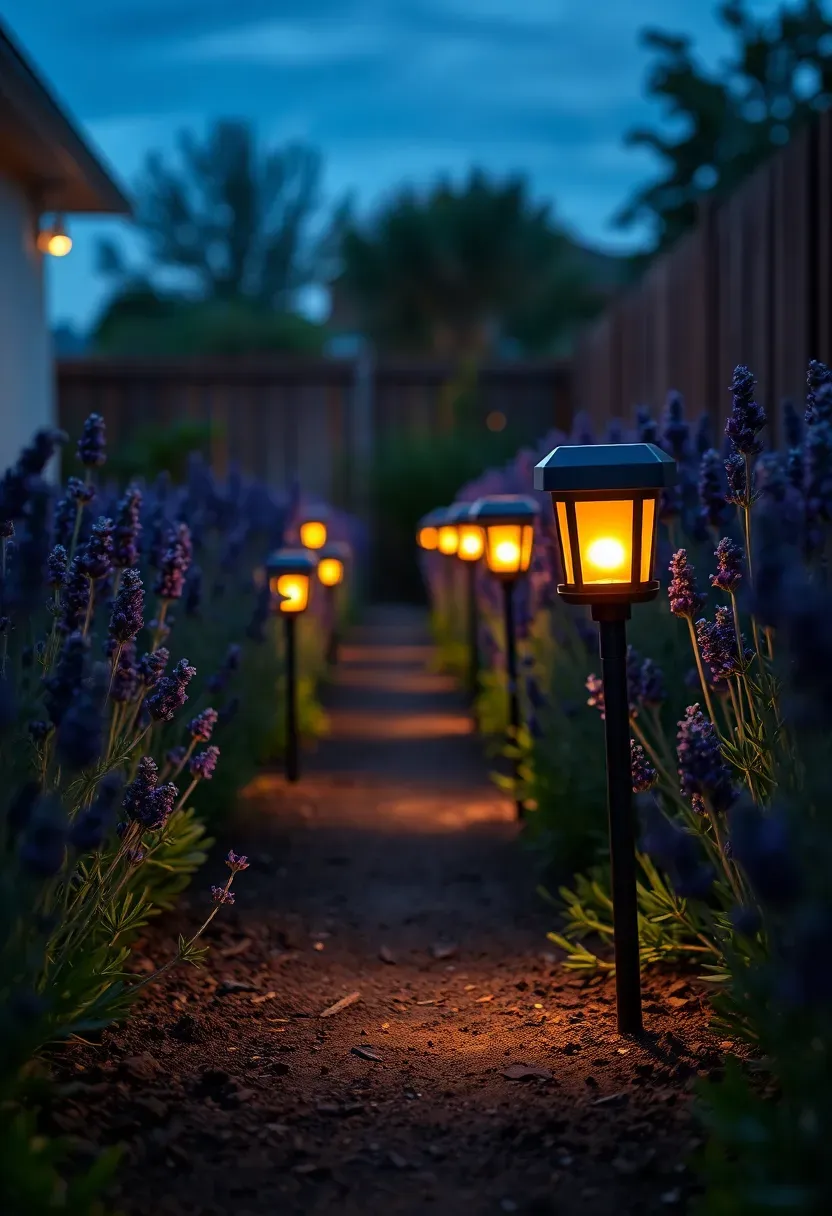
11. Dollar Store Solar Lanterns
Solar path lights from dollar stores and discount retailers have improved a lot in the last few years. The $1-2 versions now run for 6-8 hours on a full charge and produce a warm amber glow. Buy 10-15 of them and line both sides of a path, the perimeter of a patio, or the border of a garden bed. They need zero wiring, no electricity cost, and install in seconds — just push the stake into the ground. Replace them every 1-2 seasons when the batteries weaken. At $15-$30 for a full set, they are the cheapest lighting upgrade available.
Tips
- Place them where they get direct sun for at least 4-5 hours to fully charge
- Mix heights by pushing some deeper into the soil than others
- Group 3-4 together at path intersections for brighter spots
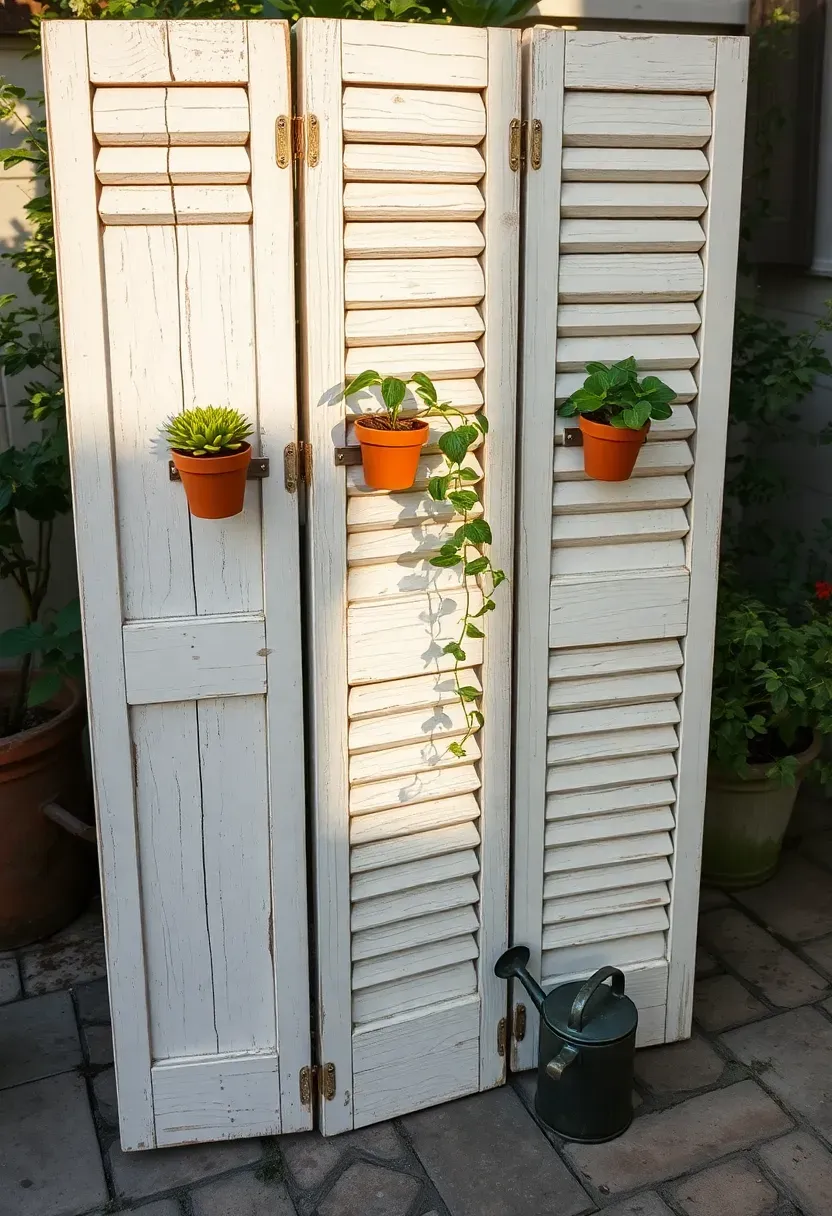
12. Privacy Screen from Old Shutters
Thrift stores and architectural salvage shops sell old wooden shutters for $5-$15 each. Hinge three of them together with exterior-grade hinges and you get a freestanding privacy screen that folds for storage. Paint or stain them to match your outdoor furniture, or leave the original patina if it looks good. The louvered slats let air flow through while blocking direct sightlines from neighbors. Set the screen behind a seating area or next to an outdoor shower. Add small shelf brackets between the slats to hold candles or small pots.
Tips
- Use three hinges per connection point for stability in wind
- Screw a flat foot plate to each bottom corner to keep the screen from tipping
- Spray with exterior polyurethane to protect the wood from moisture
Recommended
Items for this idea
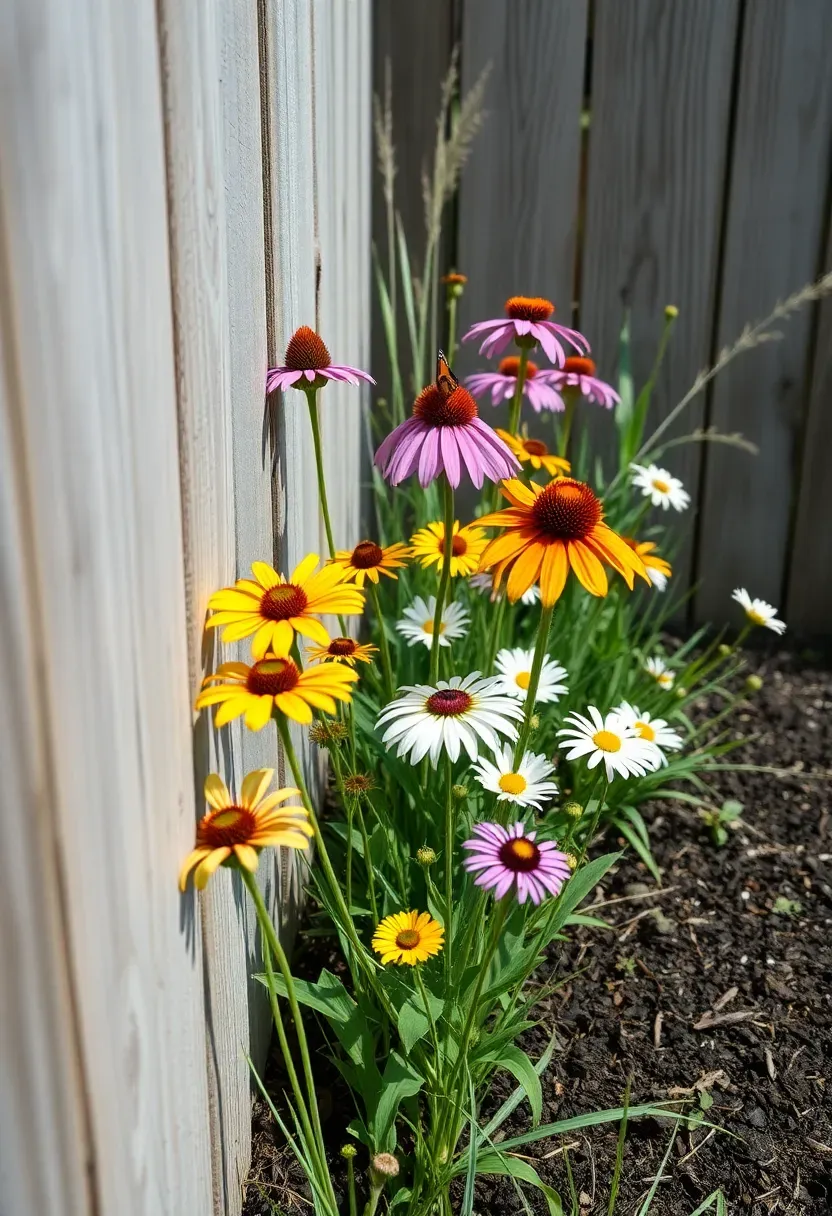
13. Wildflower Meadow Strip
A packet of regional wildflower seed mix costs $5-$10 and covers 200-400 square feet. Rake a 3-4 foot strip along your fence line, scatter the seeds, press them into the soil with your feet or a roller, and water lightly for two weeks. Then mostly ignore them. Native wildflowers are adapted to your climate and soil, so they need less water and zero fertilizer once established. By midsummer you will have coneflowers, black-eyed Susans, bachelor buttons, and poppies depending on your region. The strip reseeds itself each fall, returning denser every year. Mow it once in late winter to clear dead stalks.
Tips
- Buy seed mixes labeled for your USDA hardiness zone, not generic "wildflower" blends
- Avoid areas with heavy foot traffic — wildflowers do not recover from being walked on
- Leave seedheads standing through winter to feed birds and self-sow
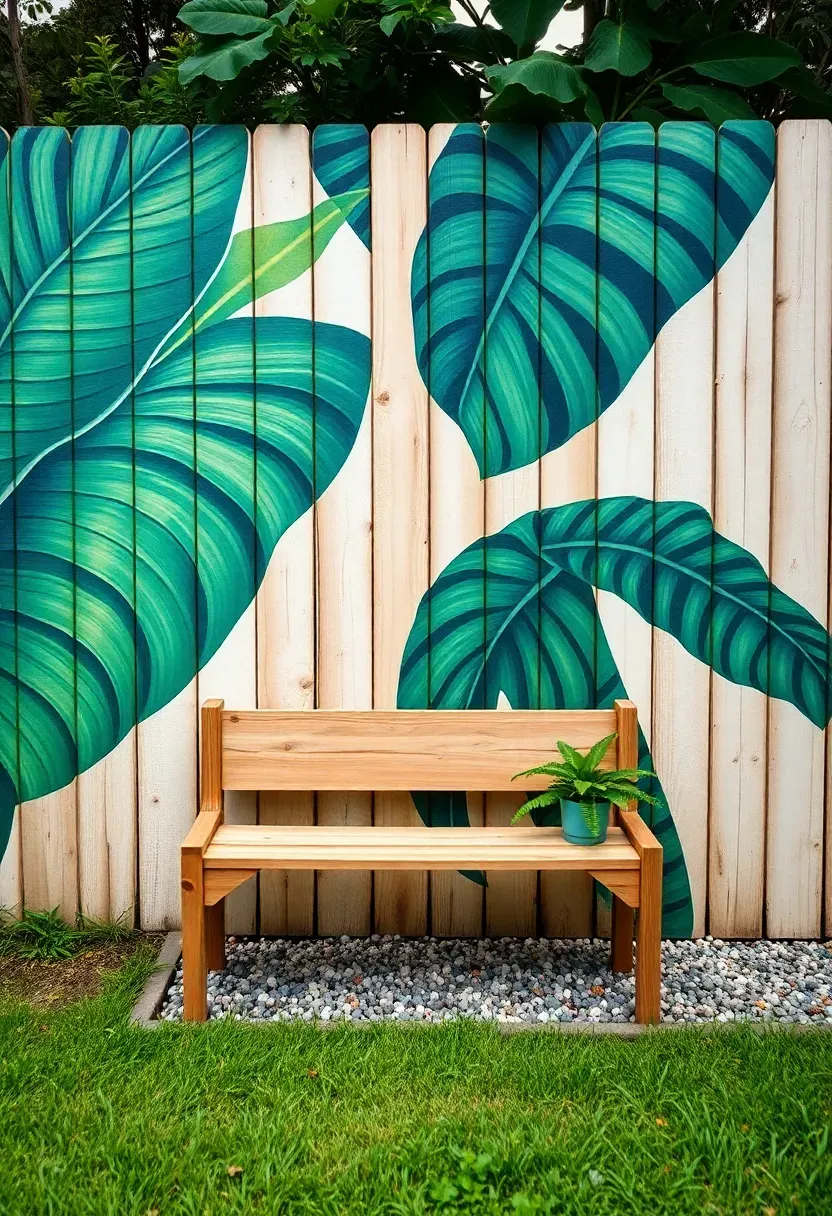
14. Painted Fence Mural
A quart of exterior latex paint costs $8-$12, and three or four colors are enough for a simple mural. Tropical leaves, abstract geometric patterns, a sunset gradient, or oversized flowers all work well on fence boards. Sketch your design with chalk first, then paint with a 2-inch brush for large areas and an artist brush for details. The fence becomes a focal point instead of a forgettable boundary. Start with a 6-8 foot section to test the concept before committing to the entire fence. Use satin or semi-gloss exterior paint for durability — flat finishes fade faster.
Tips
- Prime bare wood first with exterior primer so the colors pop
- Simple bold shapes read better from a distance than intricate details
- Power-wash the fence and let it dry for 48 hours before painting
Recommended
Items for this idea
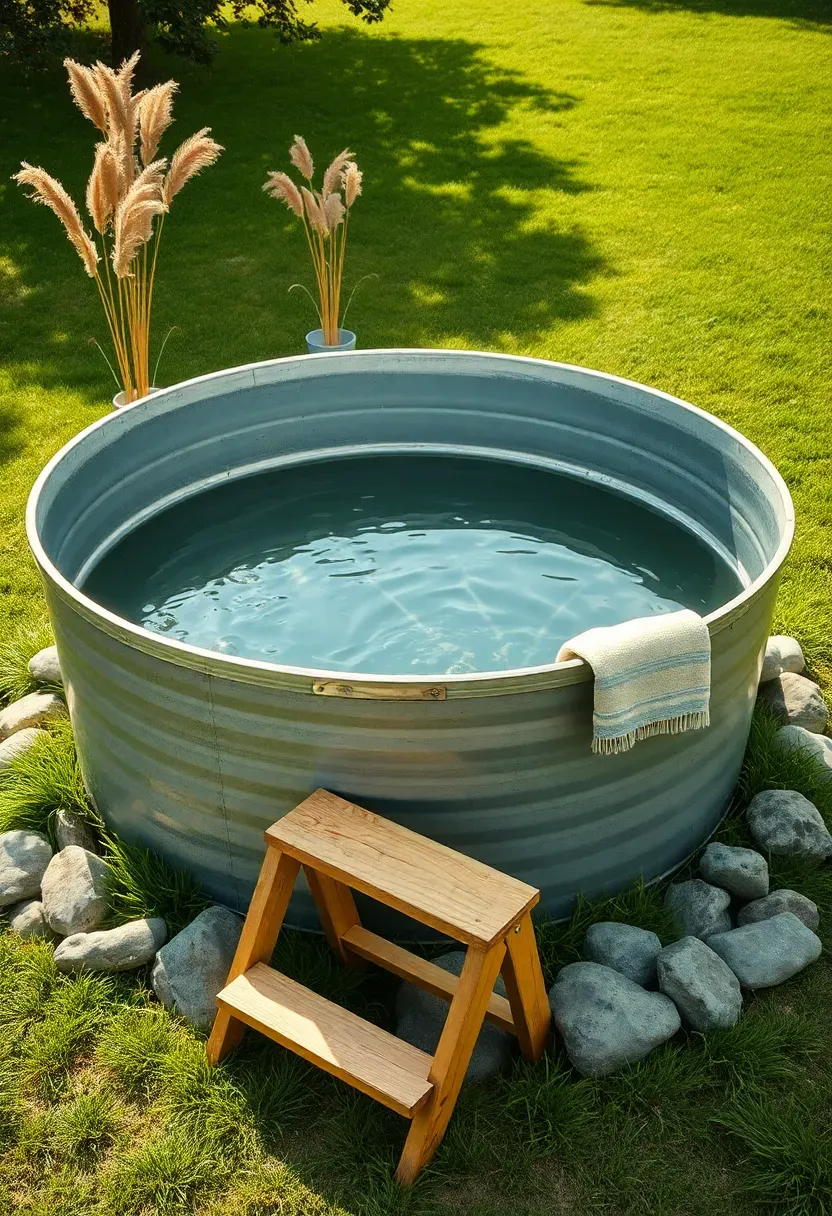
15. Stock Tank Plunge Pool
What it is
An 8-foot oval galvanized stock tank from a farm supply store costs $350-$500 — a fraction of any in-ground pool. It holds about 700 gallons, deep enough to sit in with water at chest level. People have been using these in Texas and the Southwest for years.
How to set it up
Level a gravel pad, set the tank, and fill it with a garden hose. Add a small submersible pump ($30) and a pool filter cartridge to keep the water circulating. Treat with standard pool chemicals or a saltwater chlorinator. Surround the base with river rock or wood decking to hide the utilitarian look and provide a dry step-out area.
Choose this if
- You want a cool-down spot but cannot afford a pool installation
- Your yard is too small for even an above-ground pool
- You like the industrial farmhouse look
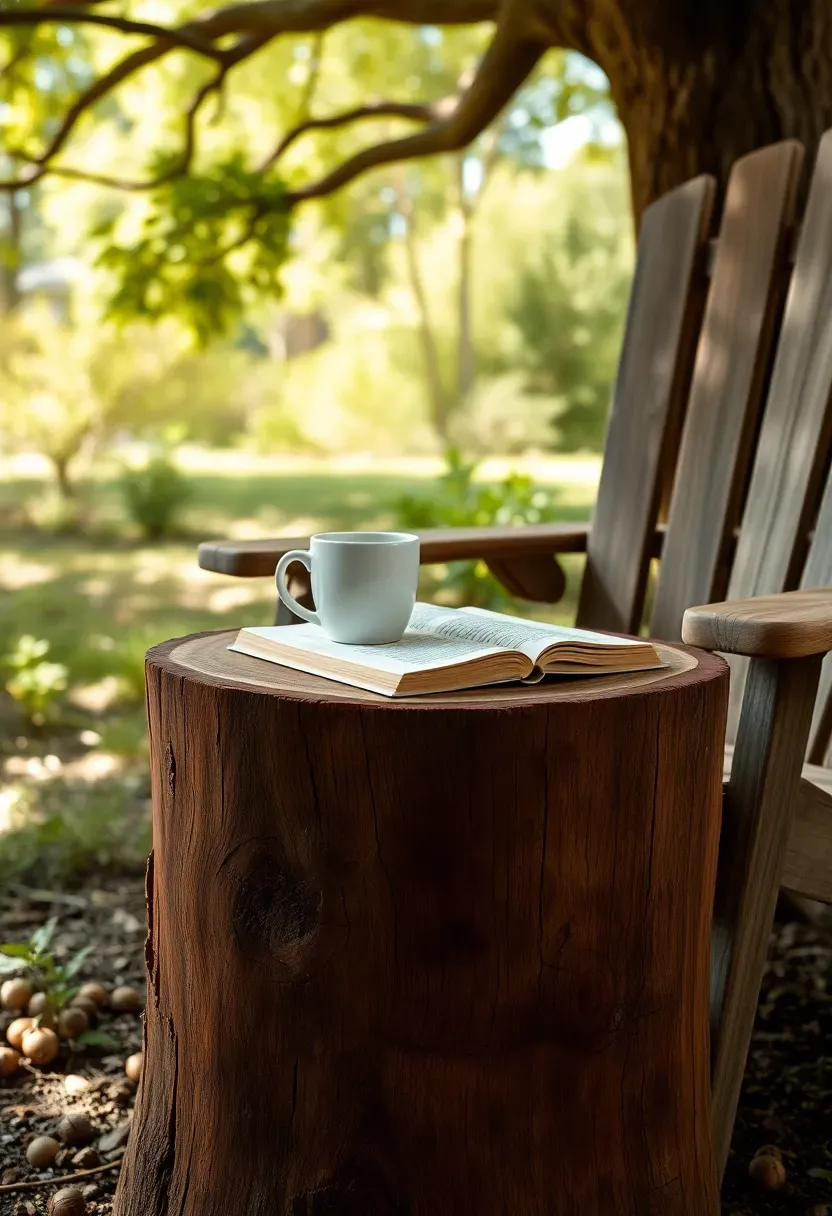
16. Tree Stump Side Table
If you had a tree removed recently, ask the crew to leave an 18-24 inch stump. Sand the top flat with a belt sander or orbital sander (60-grit, then 120-grit). Brush on two coats of exterior polyurethane to seal the wood and prevent water damage. The natural bark edges give it character that no store-bought table has. Set it next to a chair as a drink rest and book holder. If you do not have a stump in your yard, check Craigslist — people give away fresh-cut rounds constantly. A 14-16 inch diameter round works best as a side table height when the stump is about 18 inches tall.
Tips
- Apply a wood hardener to the bark edges to keep them from peeling
- Level the top with a hand plane if sanding alone does not get it flat
- Set on three rubber feet to promote airflow underneath and prevent rot
Recommended
Items for this idea
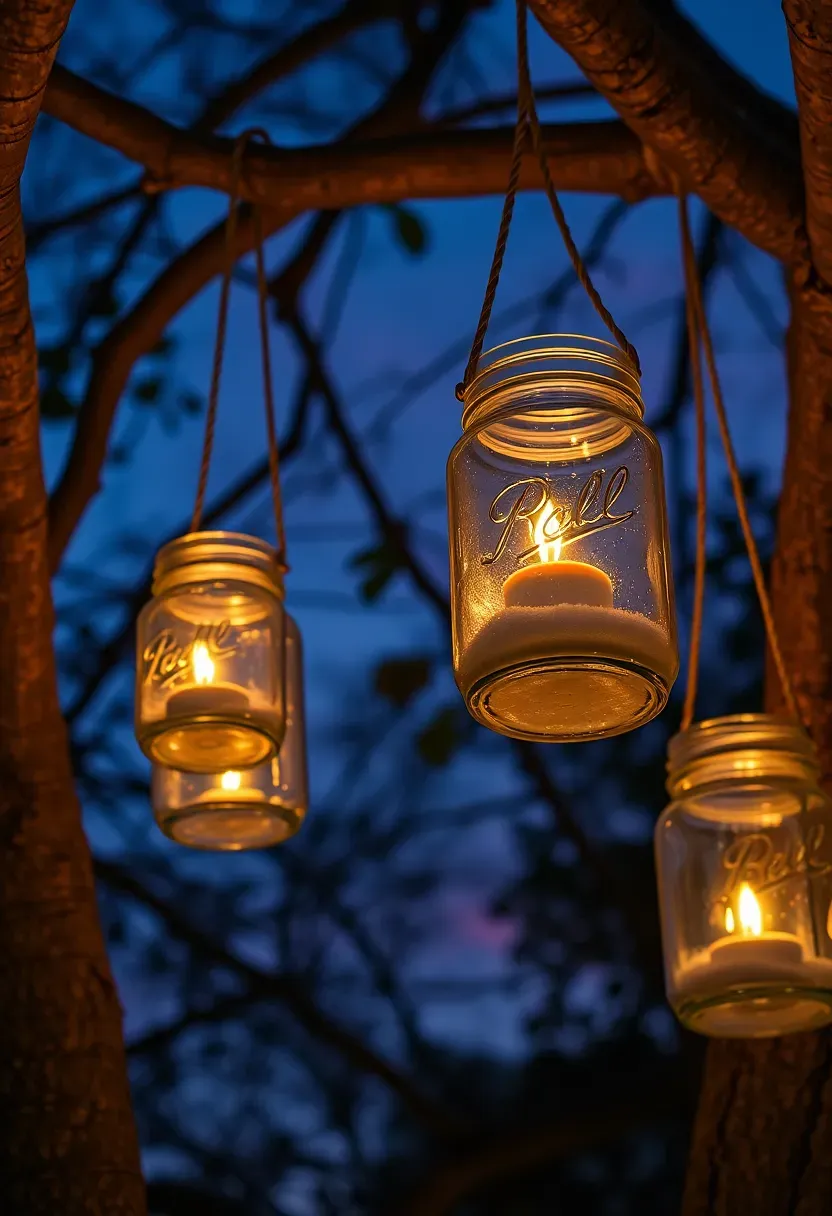
17. Hanging Mason Jar Lights
Wrap 14-gauge galvanized wire around the mouth of a mason jar just below the threads, twist it tight with pliers, and form a loop handle. Drop in a battery-operated LED tea light or a short strand of fairy lights. Hang them from tree branches, pergola rafters, shepherd hooks, or fence-mounted cup hooks. A dozen jars create a floating cloud of soft light across your seating area. Total cost for 12 jars with LED candles: about $20-$25. The glass catches and refracts the light in a way plastic lanterns never do.
Tips
- Use wide-mouth quart jars for the most light output
- Fill the bottom inch with sand or small pebbles to weigh them down in wind
- Switch to citronella tea lights in mosquito season for dual-purpose lighting
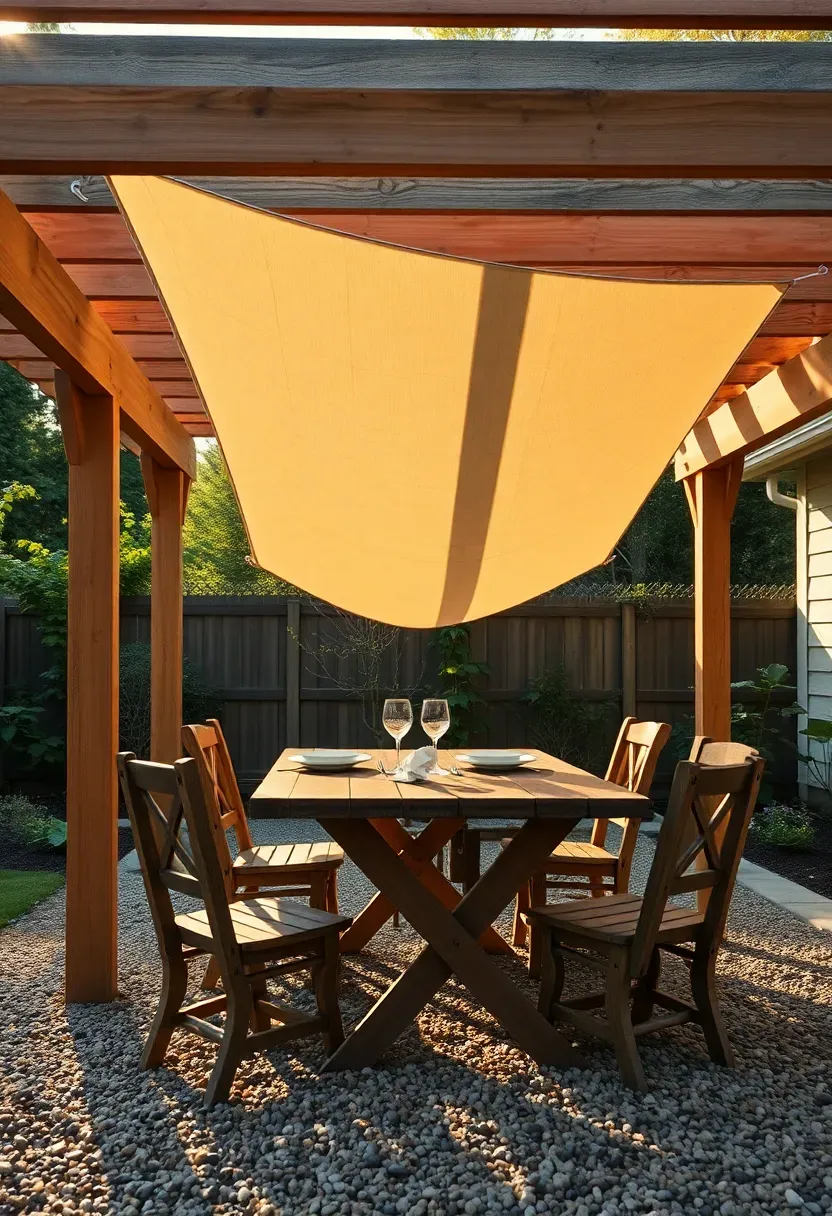
18. DIY Pergola from 4x4 Posts
Step 1: Set the posts
Dig four holes 24 inches deep, set 10-foot 4x4 pressure-treated posts in concrete, and let them cure for 48 hours. Space them to create an 8x8 or 8x10-foot footprint.
Step 2: Add beams and rafters
Bolt two 2x8 beams across the tops of the posts, then lay 2x6 rafters perpendicular every 16 inches. Notching the rafters where they rest on the beams creates a clean look.
Step 3: Add shade
Drape a canvas shade sail, bamboo roll shade, or climbing vines across the top. The slatted rafters alone provide partial shade from high sun.
Watch out
- Check local codes — pergolas over a certain size often require a permit
- Materials run $150-$200 for the lumber alone, making this the priciest project on the list
Recommended
Items for this idea
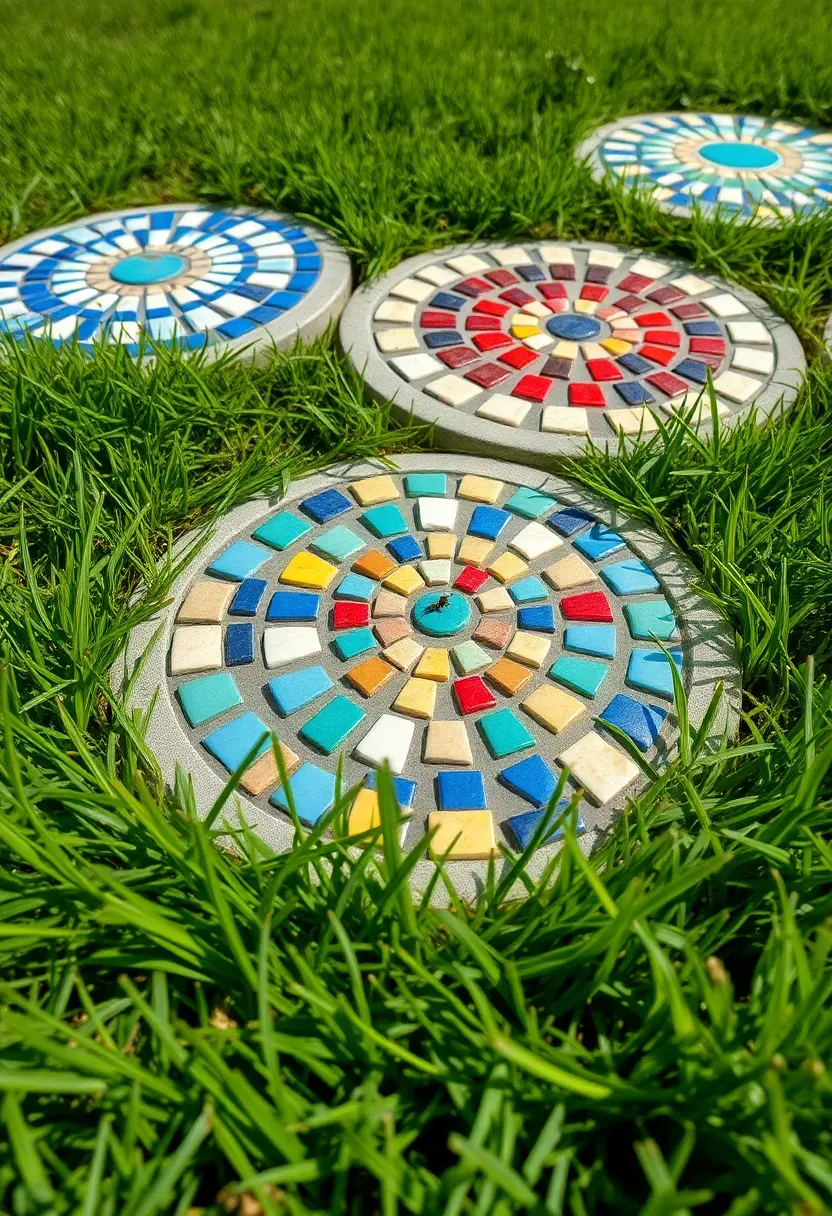
19. Mosaic Stepping Stones
Buy a bag of quick-set concrete ($5), pour it into a 12-inch round cake pan or pie tin, and press broken ceramic tile pieces, glass gems, or flat marbles into the surface before it sets. Each stone costs about $1-2 in materials if you use broken plates and mugs from thrift stores. Let them cure for 24 hours, pop them out of the mold, and set them into the lawn or garden bed. Make each one different — this is a project kids enjoy and actually produces results adults appreciate too. A set of 8-10 mosaic stones across a lawn creates a whimsical path that looks handmade because it is.
Tips
- Press tile pieces in shiny-side up so the mosaic stays visible after rain
- Spray finished stones with concrete sealer to keep colors bright
- Wet the tile pieces before pressing them in so they bond better with the concrete
20. Thrift Store Bistro Set
Why secondhand beats new
New patio furniture sets from retailers start at $200 and are often made from lightweight aluminum that dents and tips over. Thrift stores, estate sales, and garage sales regularly have cast iron or wrought iron bistro sets for $20-$40 that weigh three times as much, seat more comfortably, and last decades. The previous owner's chipped paint is actually a feature — it gives you a reason to repaint in exactly the color you want.
How to refinish
Wire-brush any loose paint and rust. Spray with a rust-converting primer. Apply two thin coats of Rustoleum in your chosen color. Let each coat dry 4 hours before the next. The whole process takes one afternoon and costs $12 in paint.
Pros and cons
- Pro: Heavy iron furniture stays put in wind, unlike cheap aluminum
- Pro: Classic designs that never go out of style
- Con: Requires maintenance — touch up chips annually to prevent rust
Recommended
Items for this idea
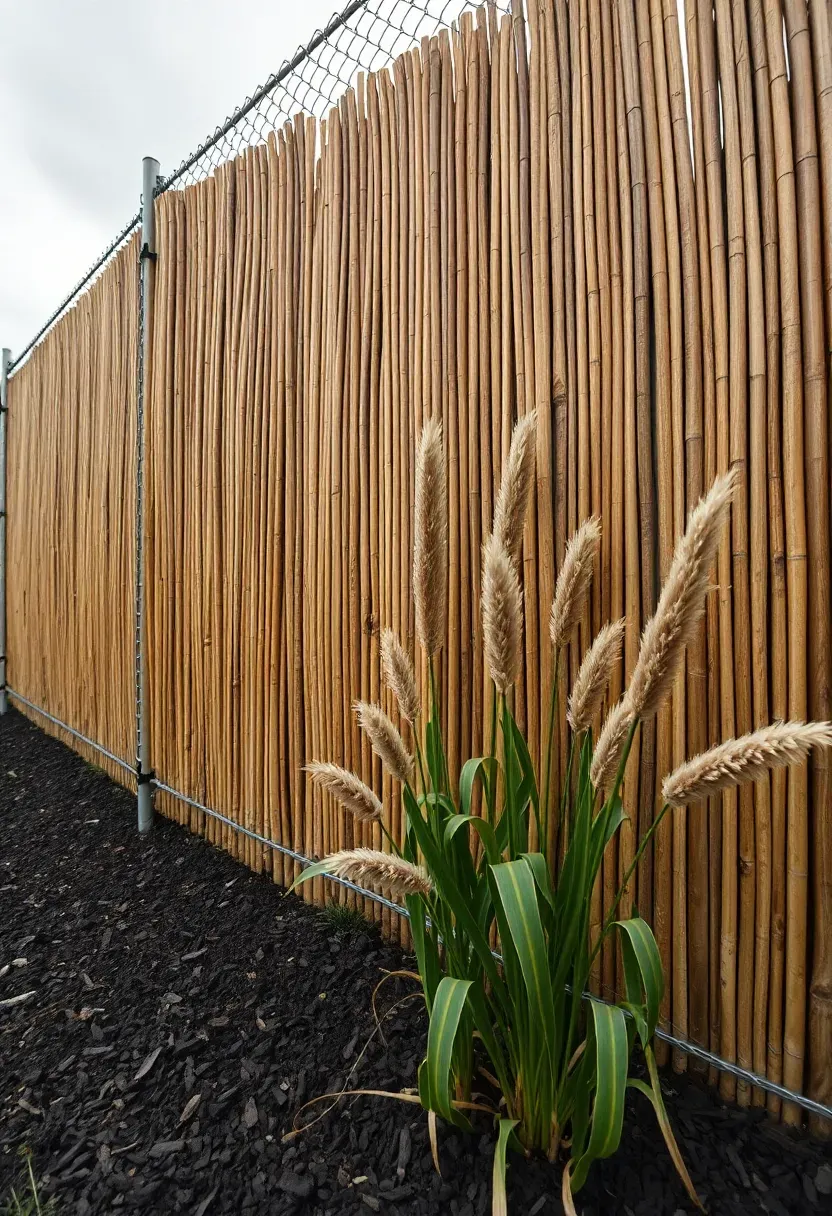
21. Bamboo Roll Privacy Fence
Bamboo fencing rolls come in 6-foot-tall by 16-foot-long sections and cost $25-$45. Attach them to an existing chain link fence, wood fence, or metal posts using zip ties or galvanized wire every 12 inches. The bamboo hides ugly chain link instantly and adds a natural, resort-like texture to the yard. It also works as a standalone screen when attached to T-posts driven into the ground. One roll covers a significant stretch of fence line. The bamboo weathers to a silver-gray over 2-3 years, or you can spray it with an exterior sealant to keep the golden tone.
Tips
- Choose tonkin bamboo for the tightest weave and best privacy
- Double up the zip ties at the top where wind stress is greatest
- Leave a 1-inch gap at the bottom so rainwater does not wick into the bamboo and cause rot
Quick FAQ
How much does a full backyard makeover cost on a budget? Most people spend $500-$1,500 to cover a seating area, some lighting, a focal point like a fire pit, and basic landscaping. You can do individual projects from this list for as little as $5-$20 each and spread them over several weekends rather than doing everything at once.
Which budget backyard project gives the biggest visual impact? String lights and a gravel patio together change a yard more than anything else on this list. They define a space and make it usable after dark, which effectively doubles the hours you spend outside.
Do I need permits for backyard projects? Fire pits, pergolas, and anything that changes grading or drainage may require permits depending on your municipality. Freestanding structures under a certain height (usually 8-10 feet) often do not need them, but always check local codes first.
Can renters do budget backyard upgrades? Yes — many ideas here are temporary or reversible. Outdoor rugs, potted plants, solar lights, freestanding screens, and container gardens leave no permanent marks. Just photograph the yard before you start so you can restore it when your lease ends.
What is the cheapest ground cover for a backyard? Pea gravel costs $40-$80 per ton and covers about 100 square feet at 2 inches deep. Decomposed granite is similar in price. Clover seed is the cheapest living ground cover at about $5 per 1,000 square feet, and it stays green with minimal watering.
A good backyard does not require a contractor or a five-figure budget. Start with one project from this list — the fire pit or the gravel patio are the best starting points because they create a place to sit and gather. Add lighting next, since it extends your outdoor time into the evening. Then layer in plants, furniture, and details over weeks and months. The yards that look the most inviting are rarely the most expensive ones. They are the ones where someone actually spent time outside, noticed what was missing, and built it themselves on a Saturday afternoon.
Pinterest cover for 21 Backyard Ideas on a Budget
About the author
OBCD
CGI visualization and interior design content. We create detailed 3D renders and curate practical design ideas for every room in your home.