29 Backyard Greenhouse Ideas for Every Budget
My neighbor built a greenhouse out of old windows she found on the side of the road. It cost her maybe $200 in lumber and silicone, and she grew tomatoes through December in zone 6b. That scrappy project got me thinking about how many different ways you can put a greenhouse in a backyard — from a $50 cold frame made of hay bales and a storm window to a $15,000 Victorian-style glasshouse with automatic ridge vents. The range is enormous, and the right choice depends on your climate, your yard layout, what you want to grow, and honestly how much you enjoy building things. These 29 ideas cover the full spectrum.
From basic cold frames to architect-designed structures, the ideas below move roughly from simplest to most ambitious.
Table of Contents
- Lean-To Greenhouse Against the House
- Salvaged Window Greenhouse
- Hoop House with Cattle Panels
- Cold Frame Station
- A-Frame Greenhouse
- Geodesic Dome Greenhouse
- Walk-In Polytunnel
- Mini Greenhouse Cabinet
- Victorian Glasshouse
- Greenhouse with Attached Potting Shed
- Underground Walipini
- Gothic Arch Greenhouse
- Greenhouse on a Raised Deck
- Solar-Heated Greenhouse
- Greenhouse with Living Roof
- PVC Pipe Greenhouse
- Greenhouse Built Into a Hillside
- Orangery-Style Greenhouse
- Greenhouse with Aquaponics System
- Greenhouse with Stone Knee Wall
- Pallet Wood Greenhouse
- Greenhouse with Rain Collection
- Shipping Container Greenhouse
- Greenhouse Dining Room
- Year-Round Tropical Greenhouse
- Greenhouse with Integrated Cold Storage
- Reclaimed Barn Frame Greenhouse
- Greenhouse with Automated Climate Control
- Community Garden Greenhouse
1. Lean-To Greenhouse Against the House
A lean-to uses one existing wall of your house as its back, which cuts material costs roughly in half and borrows thermal mass from the building. The south-facing wall of a brick or stone house works best — the masonry absorbs heat during the day and radiates it back overnight. Most lean-to frames are aluminum or treated wood, with polycarbonate twin-wall panels that insulate better than single-pane glass. A typical 8x12 lean-to runs $800-2,500 depending on whether you buy a kit or build from scratch. Plumbing and electrical access from the house wall is a major bonus.
Tips
- Check local building codes — some municipalities count lean-tos as additions and require permits
- Slope the roof at least 25 degrees to shed snow and maximize winter sun angle
- Install a vent fan on the gable end because lean-tos trap heat fast against dark walls
We picked a few things that go well with this idea: Yardenaler 8x10 Polycarbonate Greenhouse Kit (★4.3), 12x8 Polycarbonate Greenhouse Aluminum Frame and Greengro Portable Walk-In Greenhouse (8 Shelves) (★4.1). As an Amazon Associate we earn from qualifying purchases.
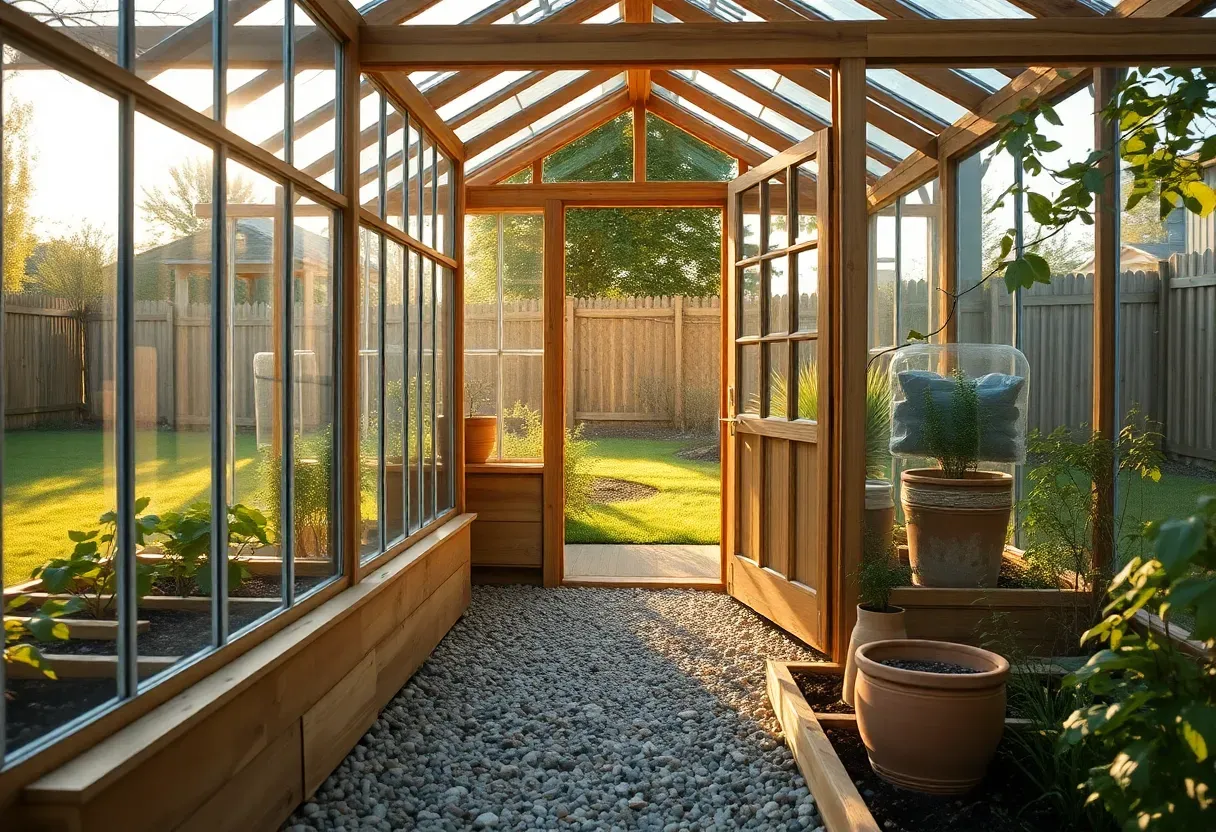
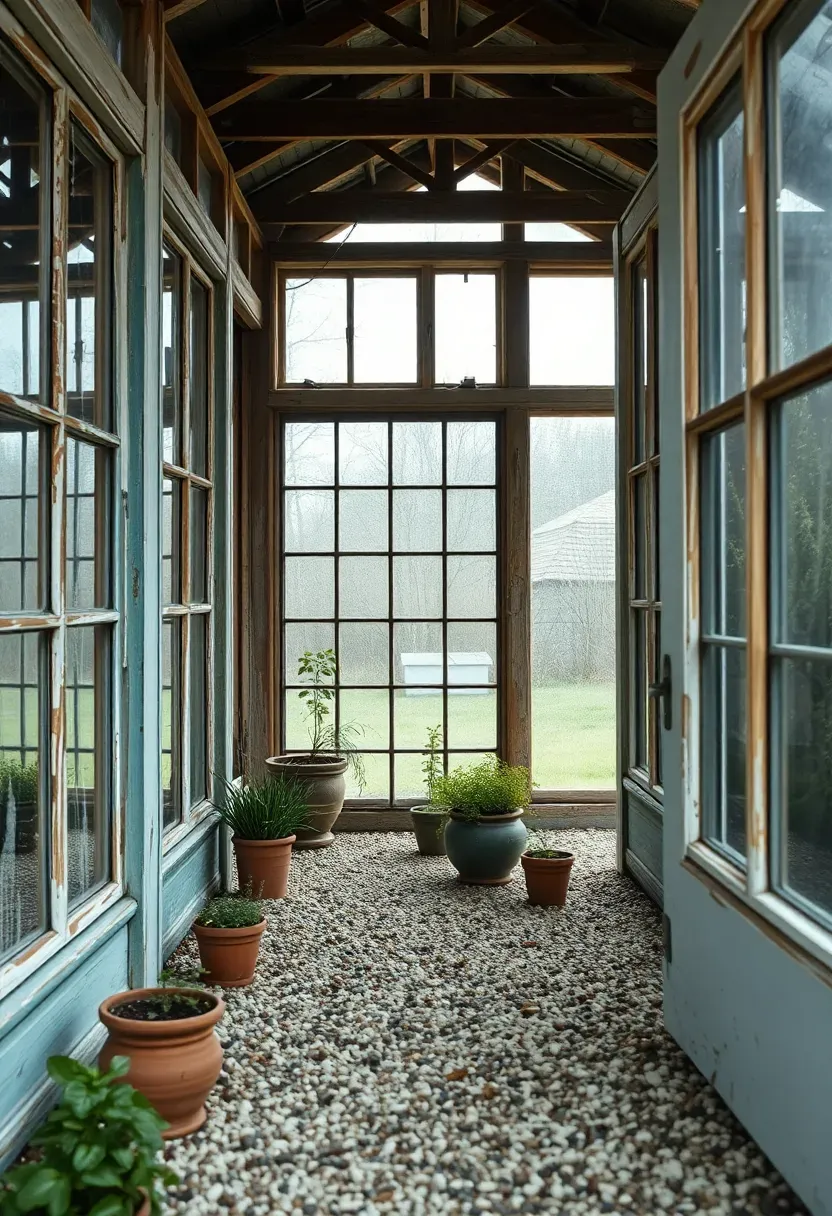
2. Salvaged Window Greenhouse
Why Build with Old Windows
Old single-pane windows show up on marketplace listings, demolition sites, and curb alerts constantly. They are heavy, fragile, and inefficient for a house — but perfect for a greenhouse where you want maximum light transmission and do not mind some thermal loss.
How to Build One
Frame a simple 2x4 structure to match the window sizes you collected. You will rarely find matching dimensions, so build the frame around the windows rather than forcing windows into a standard frame. Use exterior-grade silicone to seal gaps. A gravel floor with landscape fabric underneath handles drainage and keeps mud under control.
Pros and Cons
- Nearly free materials if you are patient with sourcing
- Charming, one-of-a-kind appearance that ages well
- Single-pane glass loses heat quickly and each pane is a potential break point
We picked a few things that go well with this idea: Yardenaler Wooden Greenhouse Shelf Kit (2-Pack) (★5.0), Yaheetech Wood Potting Bench with Sink (★4.2) and Palram Canopia Steel Greenhouse Work Bench (★4.0). As an Amazon Associate we earn from qualifying purchases.
3. Hoop House with Cattle Panels
A hoop house is the fastest greenhouse you can build. Sixteen-foot cattle panels from a farm supply store bend into a natural arch when secured to a wooden base frame. Cover with 6-mil greenhouse plastic rated for UV resistance and you have a functional growing space in a single weekend.
Step 1: Build the base
Construct a ground-level frame from pressure-treated 2x6 lumber, typically 8 feet wide by whatever length you want. Stake it into the ground with rebar.
Step 2: Bend and secure panels
Slide cattle panel ends into brackets or clamp them to the outside of the frame. Each panel creates about a 6-foot-tall arch.
Step 3: Cover and ventilate
Stretch greenhouse film tight over the arches and secure with wiggle wire channel. Cut roll-up sides for ventilation — this is critical because hoop houses overheat quickly.
Watch out
Cattle panels eventually rust in humid environments. Coat with a rust-inhibiting primer before covering if you want them to last more than five years.

We picked a few things that go well with this idea: Amylove Dual Spring Auto Vent Opener (2-Pack) (★4.3), Solar Heat Sensitive Auto Vent Opener (★4.2) and Buycitky Solar Auto Greenhouse Vent Opener (★4.4). As an Amazon Associate we earn from qualifying purchases.
4. Cold Frame Station
Cold frames are greenhouses stripped to their most basic form: a bottomless box with a transparent lid. They sit directly on the ground, warming the soil beneath and protecting plants from frost and wind. A single cold frame extends your growing season by four to six weeks on each end — starting seeds earlier in spring and harvesting greens well into December. Build them from scrap lumber and an old glass door or shower panel. The angled top should face south at roughly 35-45 degrees to catch low winter sun.
Tips
- Prop the lid open on warm days — temperatures inside can spike 30 degrees above ambient
- Line the north wall interior with aluminum foil or reflective insulation to bounce light back onto plants
- Group multiple frames together as a "cold frame station" for succession planting

Recommended
Items for this idea
5. A-Frame Greenhouse
The A-frame is structurally simple — two sloped surfaces meet at a ridge with no vertical walls. This shape sheds snow and rain effortlessly and costs less to frame than a traditional gable greenhouse because the roof and walls are the same surface. The steep angle means you lose floor space along the edges, but tall plants like tomatoes and peppers thrive in the center where headroom peaks. Cedar or Douglas fir make good frame choices. Most A-frame greenhouses work best at 8-10 feet wide; go narrower and the usable floor area shrinks too much.
Tips
- Use the low-headroom edges for cold-hardy ground crops like lettuce, radishes, and strawberries
- Install a ridge vent at the peak because hot air rises and collects there aggressively
- A 10x16 A-frame fits a standard suburban lot without overwhelming the yard
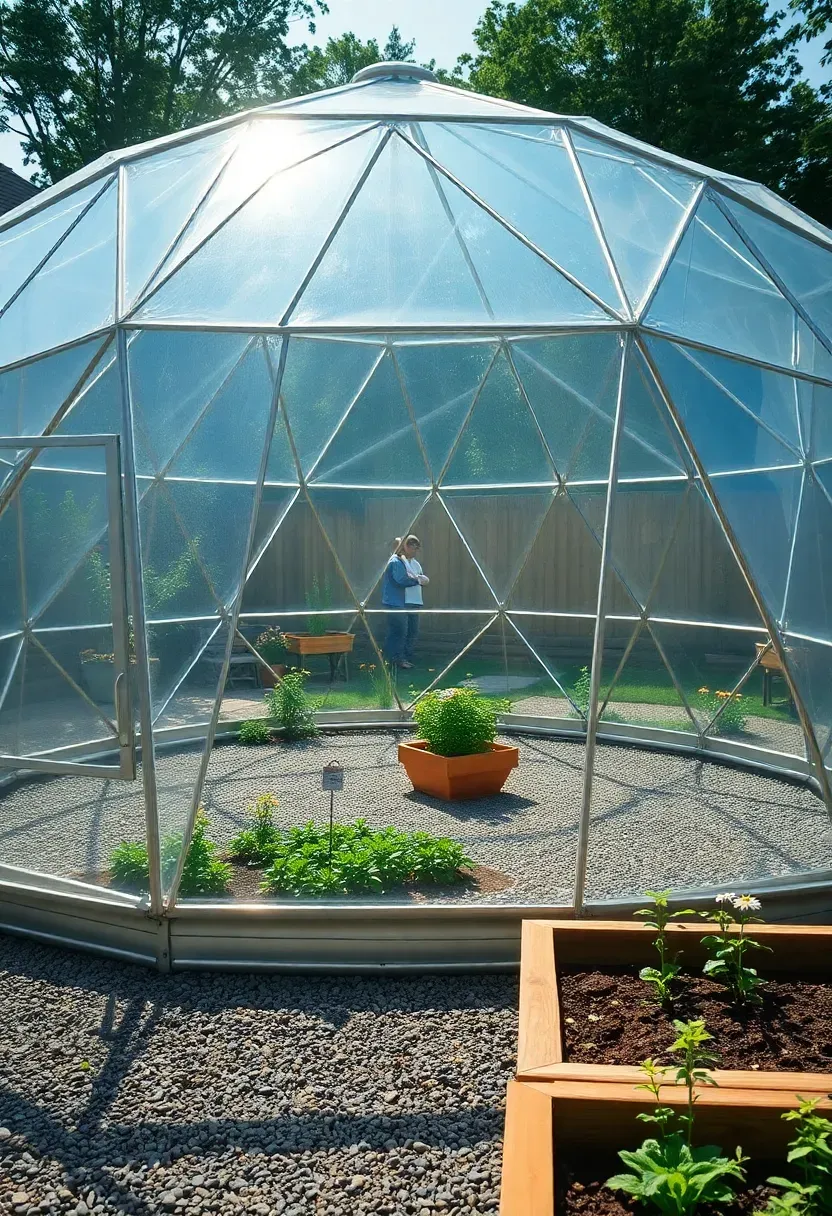
6. Geodesic Dome Greenhouse
What Makes Domes Different
A geodesic dome distributes structural stress across the entire surface, so it handles wind and snow loads that would crush a conventional greenhouse. Domes also enclose the maximum volume for the least surface area, which means better heat retention per square foot.
Building the Frame
Most backyard domes use a 2-frequency or 3-frequency icosahedron pattern. You cut struts from conduit pipe or wood in two or three lengths, then bolt them together with hub connectors. Online calculators generate the exact measurements for your desired diameter. A 14-foot dome creates roughly 150 square feet of growing space.
Choose Your Covering
Polycarbonate triangles last longest. Greenhouse film is cheaper but needs replacement every 3-4 years. Some builders use individual glass triangles, though cutting triangular glass is not a beginner skill.
Recommended
Items for this idea
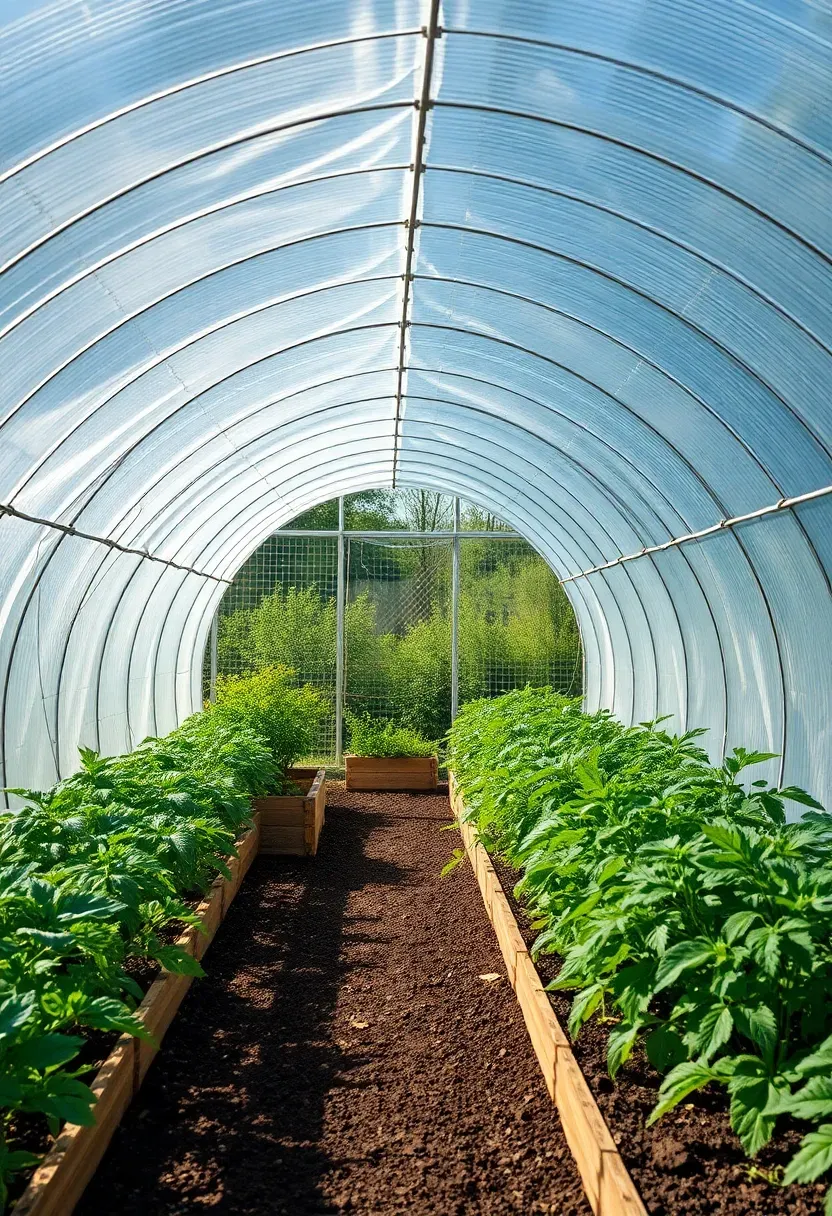
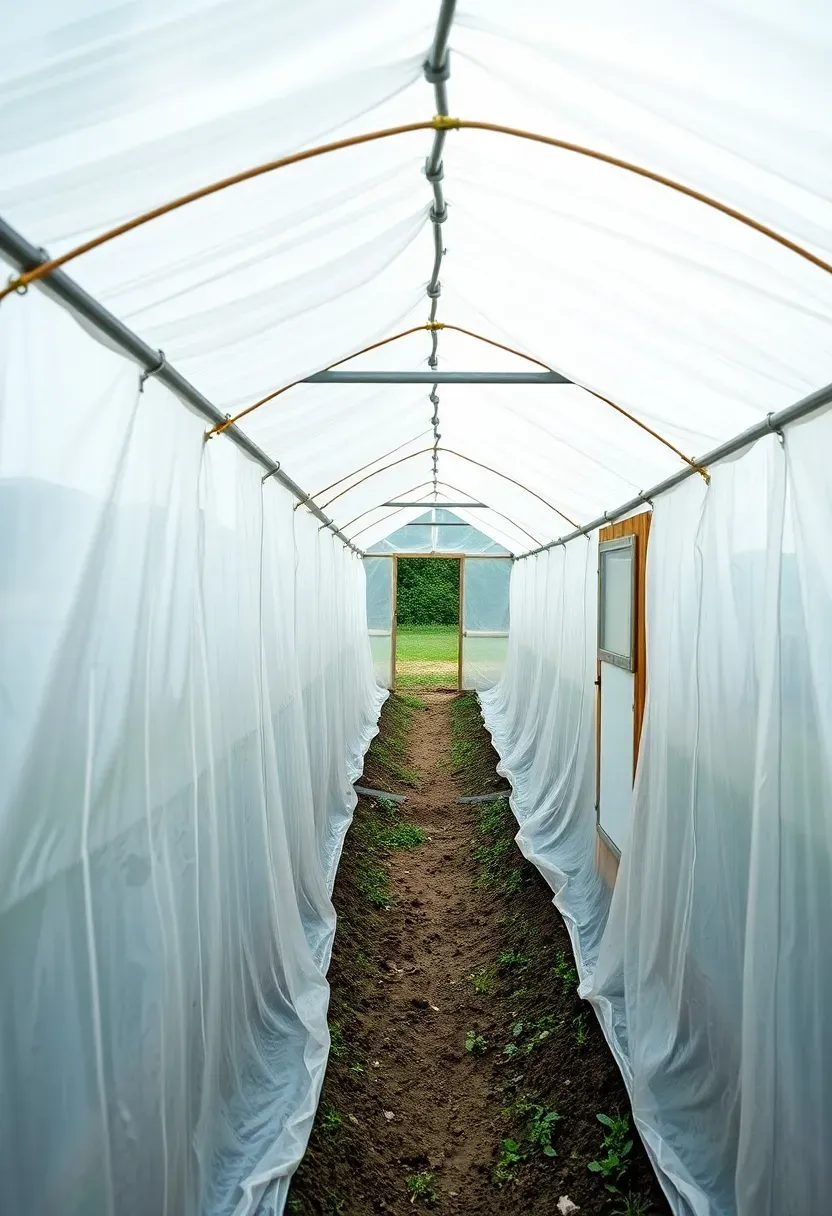
7. Walk-In Polytunnel
Polytunnels are the workhorse greenhouses of market gardeners, and a backyard version makes sense if you want serious growing capacity without serious spending. A 14x30-foot tunnel costs about $500-900 in materials: galvanized steel hoops, 6-mil UV-treated polyethylene, and lumber for the endwalls. They look agricultural rather than decorative, which bothers some people and delights others. The interior stays surprisingly warm — I have measured 85 degrees inside a polytunnel when it was 45 outside on a sunny March day.
Tips
- Bury the bottom edge of plastic in a trench rather than clamping it — wind will eventually pull clamps loose
- Install a thermostatically controlled exhaust fan on one endwall
- Plant tall crops on the north side so they do not shade shorter plants
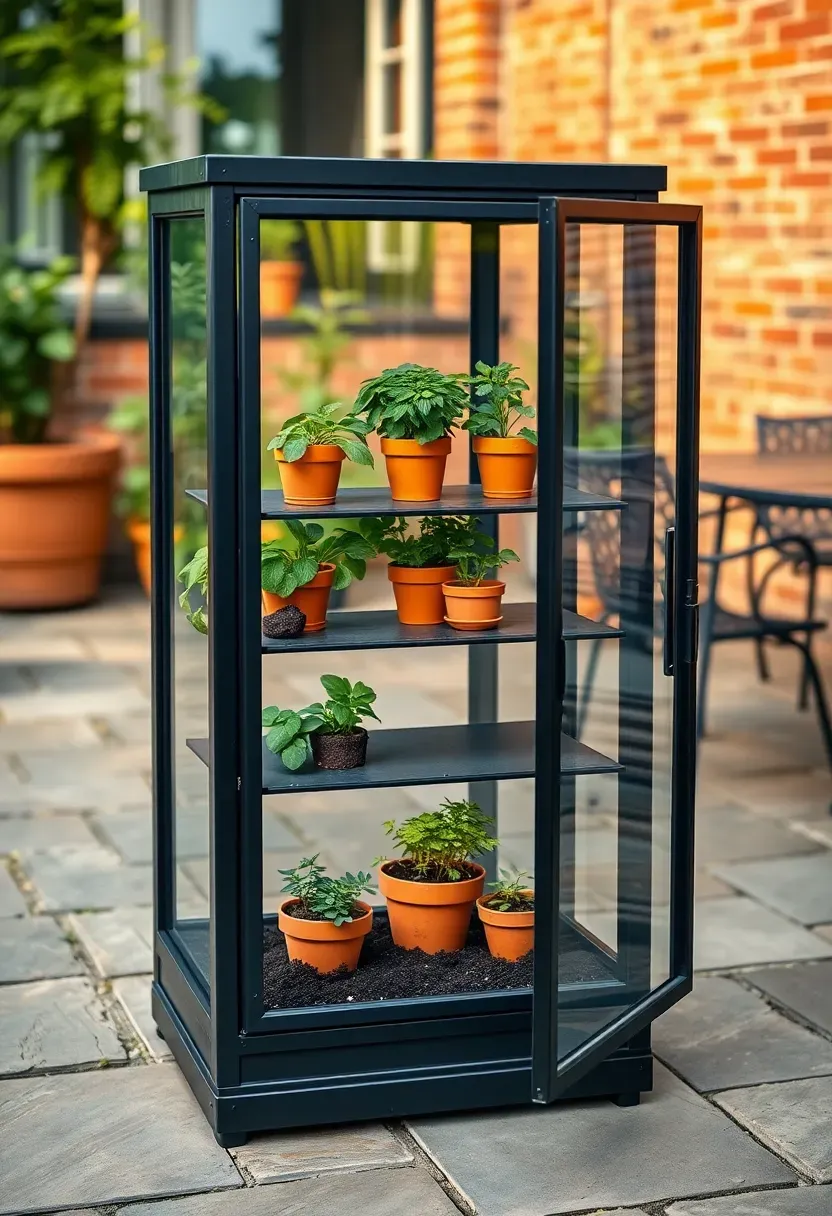
8. Mini Greenhouse Cabinet
Not every greenhouse needs a foundation and a building permit. A greenhouse cabinet stands 4-6 feet tall, 2-3 feet wide, and fits on a patio, balcony, or right next to the back door. Commercial versions from IKEA or gardening suppliers cost $60-200. They use glass or polycarbonate shelves inside a metal frame with zippered plastic or glass doors. These are not serious growing structures — they will not keep plants alive through a hard freeze — but they work well for hardening off seedlings, overwintering tender perennials, and extending the herb season by a month or two.
Tips
- Weight the base or anchor it to a wall because these blow over in strong wind
- Crack the door on sunny days; small volumes overheat fast
- Add a seed-starting heat mat on the bottom shelf for earliest spring starts
Recommended
Items for this idea
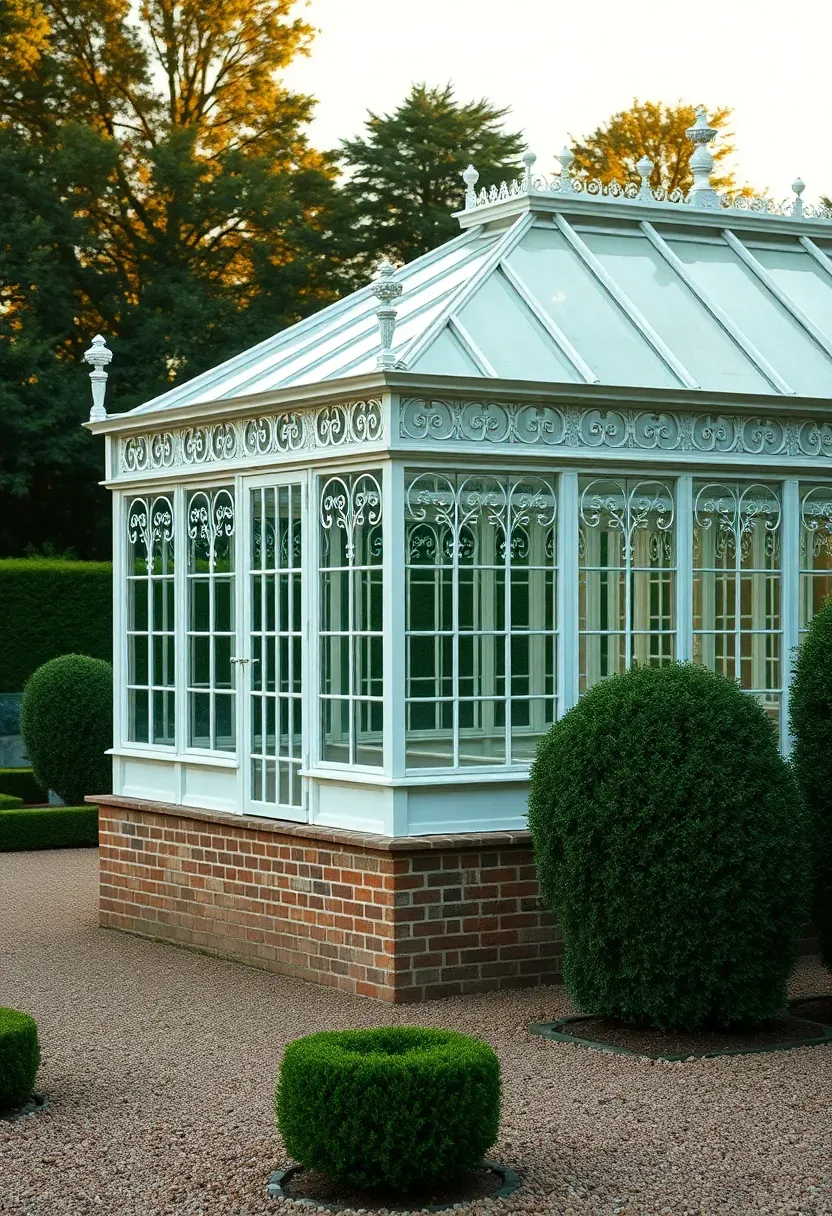
9. Victorian Glasshouse
Origins
Victorian-era greenhouses emerged in 1800s England when sheet glass became affordable and botanical collecting was a national obsession. The style features ornamental ridge cresting, finials, and slender iron or steel frames that maximize glass surface area. Original examples survive at Kew Gardens and various country estates.
Modern Versions
Companies like Hartley Botanic and Alitex build faithful reproductions starting around $8,000 for a small model and reaching well past $50,000 for a full-scale structure. The aluminum frames are powder-coated to mimic painted iron. Glass is typically toughened safety glass or laminated panels. These are as much garden architecture as functional growing spaces.
Apply at Home
If the price tag is too steep, adapt the aesthetic with a standard greenhouse frame by adding finials from an architectural salvage yard, painting the frame white or dark green, and laying a brick or flagstone floor.
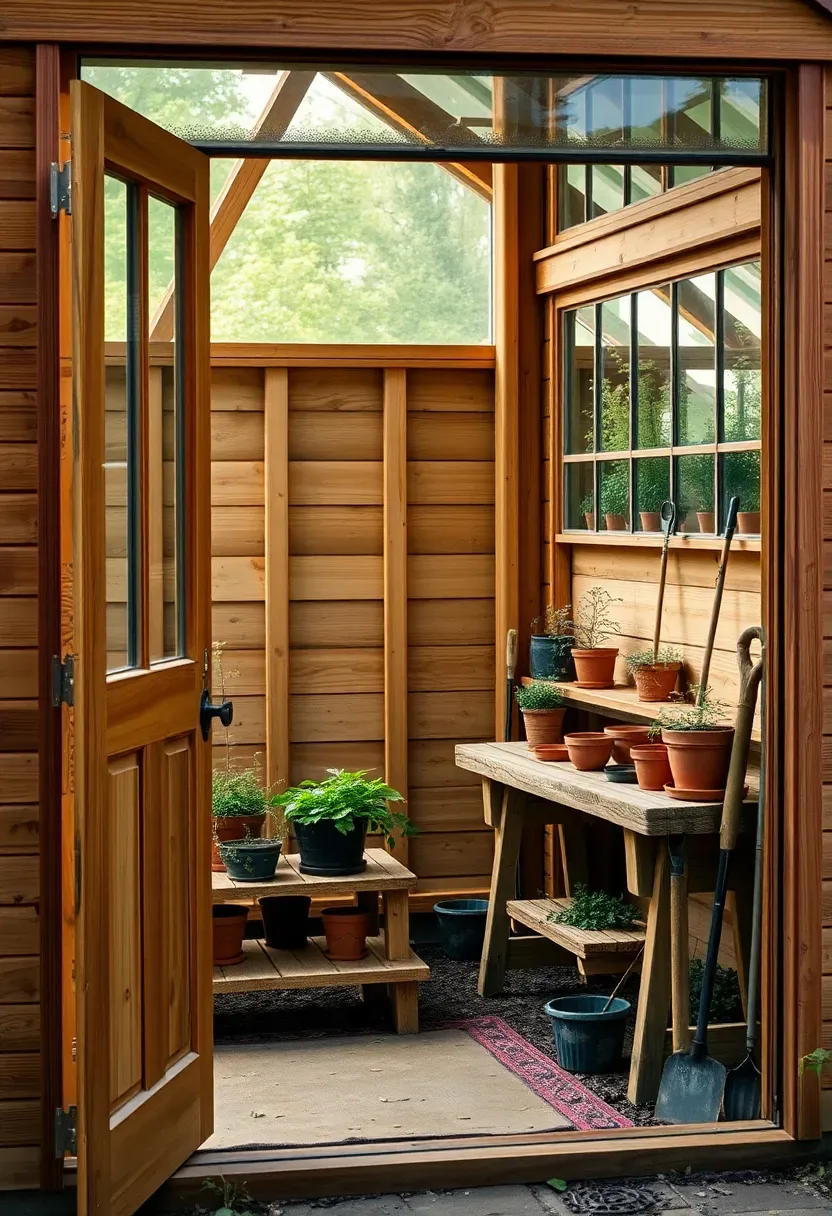
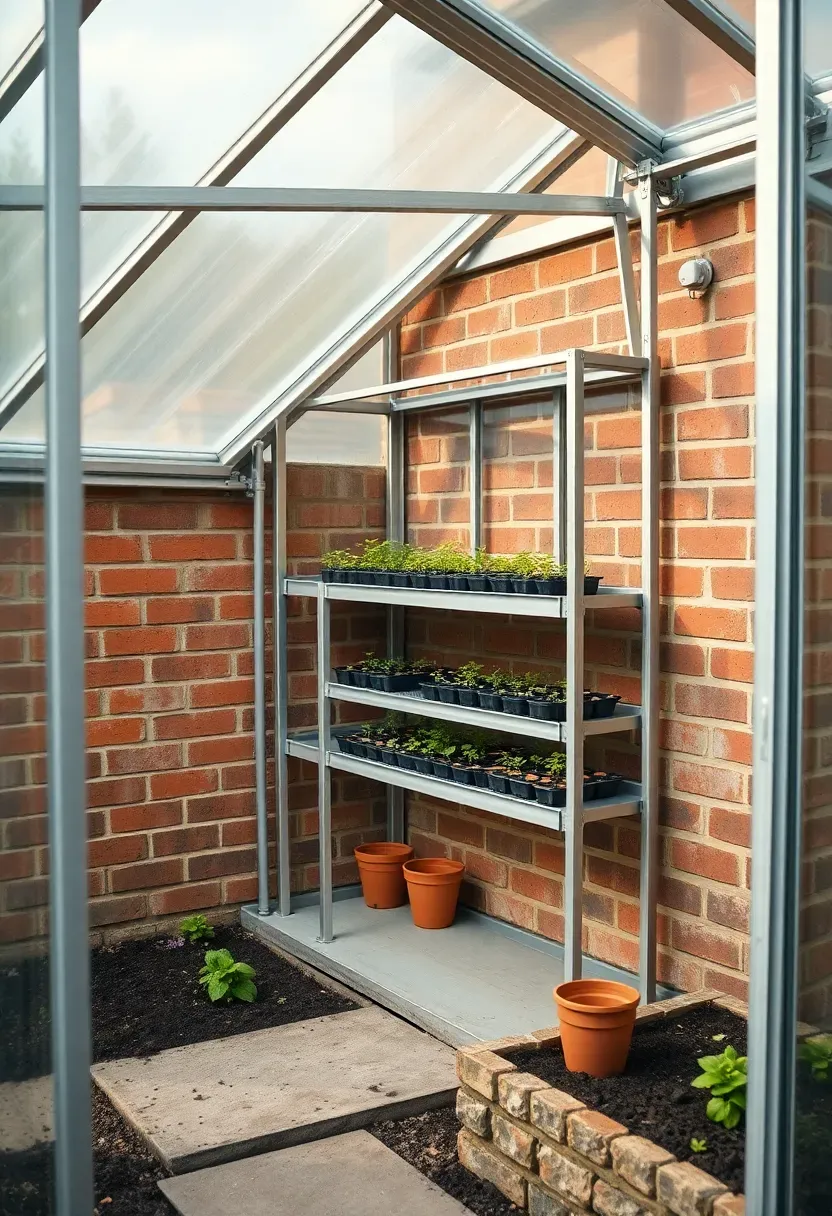
10. Greenhouse with Attached Potting Shed
Pairing a greenhouse with a potting shed solves the perennial problem of where to store soil, pots, tools, and seeds without cluttering your growing space. The shed shares a wall with the greenhouse, so you can step between them without going outside. Build the shed portion with solid walls and a standard roof — it does not need glazing. Inside, install a potting bench at waist height, hooks for tools, and shelving for supplies. The shared wall can include a window or pass-through to borrow warmth from the greenhouse side during winter.
Tips
- Run electricity to the shed for grow lights, a radio, and a small heater
- A sink with running water in the potting shed saves countless trips to the house
- Use the shed's solid north wall as the greenhouse's back wall for thermal mass
Recommended
Items for this idea
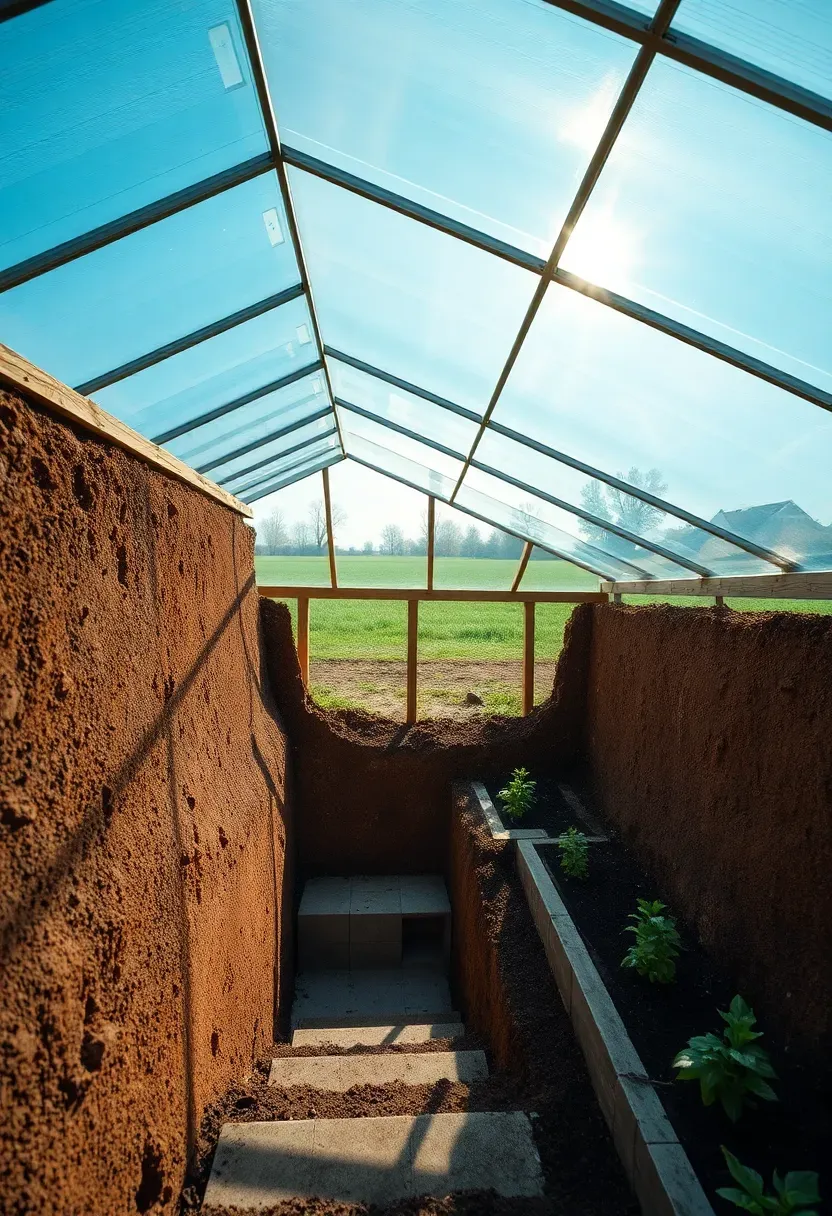
11. Underground Walipini
What It Is
A walipini (from the Aymara word for "place of warmth") is a greenhouse dug 6-8 feet into the ground. Only the angled glazed roof protrudes above the surface. The surrounding earth acts as insulation, maintaining temperatures between 50-70 degrees year-round in most climates without any supplemental heating.
Why Consider One
Heating costs drop to nearly zero. Wind damage is not a factor. The structure is practically invisible from the yard. In cold climates (zones 3-5), a walipini can grow greens and root vegetables through winter when above-ground greenhouses would need constant heating.
The Tricky Parts
Drainage is the main challenge — you are essentially building a lined pit that will collect groundwater if your water table is high. Excavation costs vary dramatically by soil type. Check with your local utility company before digging. Building codes may classify it as a basement structure requiring engineering approval.
12. Gothic Arch Greenhouse
The pointed arch shape is not just decorative — it handles heavy snow loads better than a rounded quonset because snow slides off the steep shoulders instead of accumulating. Gothic arch greenhouses are taller at the center than semicircular ones of the same width, giving you more usable headroom for trellised crops. Kit versions from companies like Bootstrap Farmer and Growers Solution run $1,500-4,000 for structures between 14 and 20 feet wide. The frames are typically bent galvanized steel tube, covered in polycarbonate or greenhouse film.
Tips
- The extra height makes these ideal for growing vertical crops like cucumbers, pole beans, and indeterminate tomatoes
- Anchor the base with concrete-filled sono tubes in areas with high winds
- Gothic arches look surprisingly elegant in residential settings compared to standard hoop houses
Recommended
Items for this idea
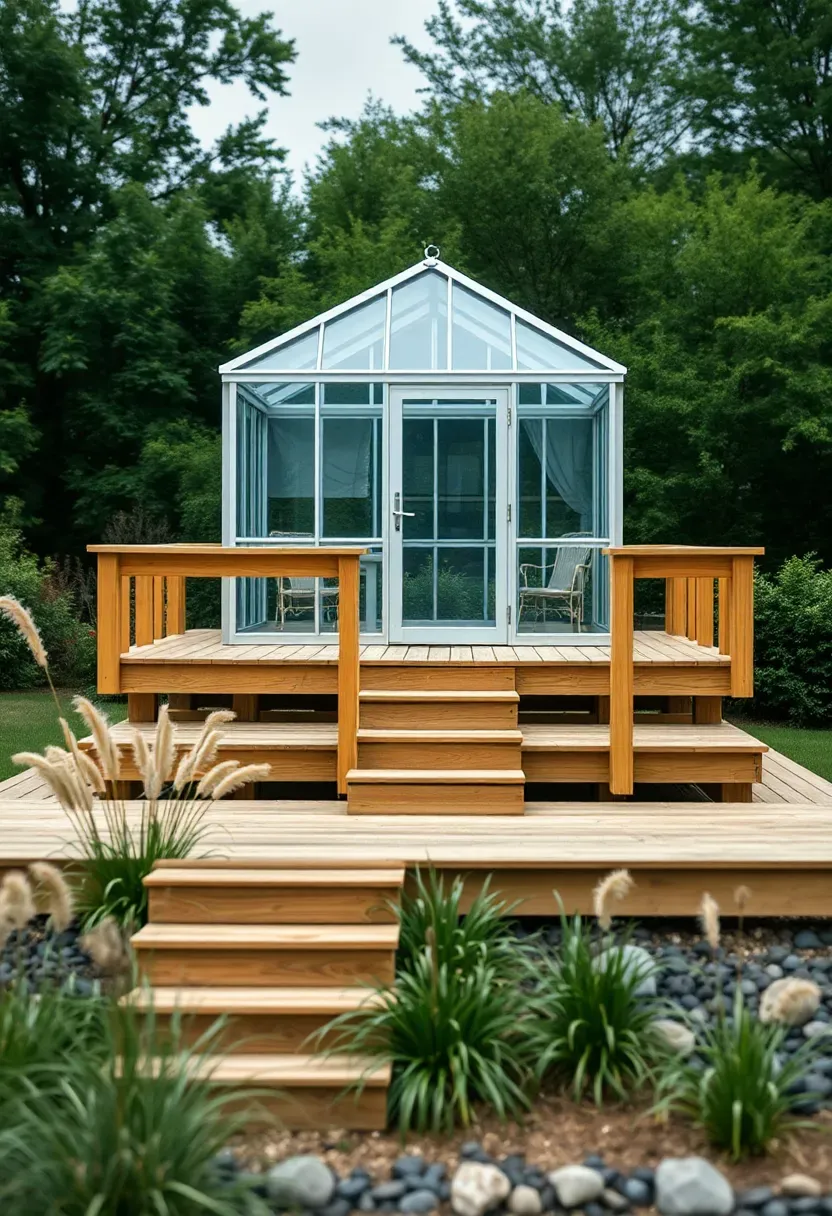
13. Greenhouse on a Raised Deck
The Problem
Wet, poorly drained yards flood greenhouse floors, rot wooden base frames, and drown plants. Some yards have shallow bedrock or hardpan clay that makes in-ground growing impossible.
The Solution
Build a raised deck platform and set the greenhouse on top. A pressure-treated or composite deck raised 12-24 inches above grade keeps everything dry and level. The deck surface allows water to drain through gaps between boards. You gain storage space underneath for pots, bags of soil, and overwintering root vegetables in crates. The elevation also deters slugs, voles, and ground-nesting pests. Plan for the combined weight of the greenhouse frame, benches, plants, and wet soil — the deck needs appropriate joist spacing and footings.
Pros and Cons
- Solves drainage problems permanently without regrading the yard
- Adds 18-24 inches of interior headroom by raising the floor
- Costs more than a ground-level installation and requires carpentry skills
14. Solar-Heated Greenhouse
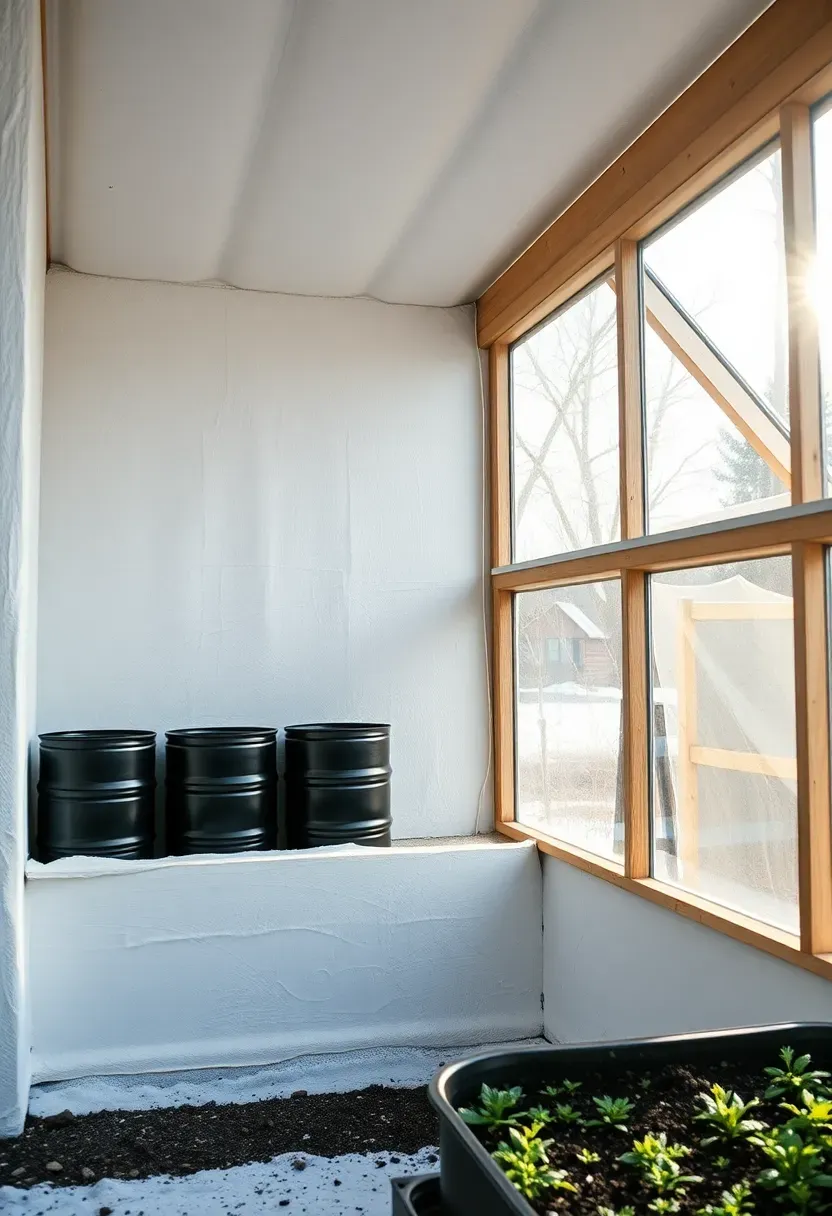
A passive solar greenhouse collects, stores, and redistributes solar energy without fans, pumps, or electricity. The south wall is fully glazed. The north wall is insulated and often lined with thermal mass — water barrels painted black, a stone or concrete wall, or even stacked jugs of water. During the day, sunlight heats the thermal mass. At night, the stored heat radiates back into the greenhouse, keeping temperatures 15-25 degrees above the outside. Orientation matters enormously: true south within 15 degrees, with no shading from trees or buildings on the south side between 9 AM and 3 PM.
Tips
- A 55-gallon drum of water stores roughly 2,000 BTUs per degree of temperature change
- Insulate the east, west, and north walls to R-19 minimum
- Add a reflective interior surface on the north wall to bounce light back onto growing beds
Recommended
Items for this idea
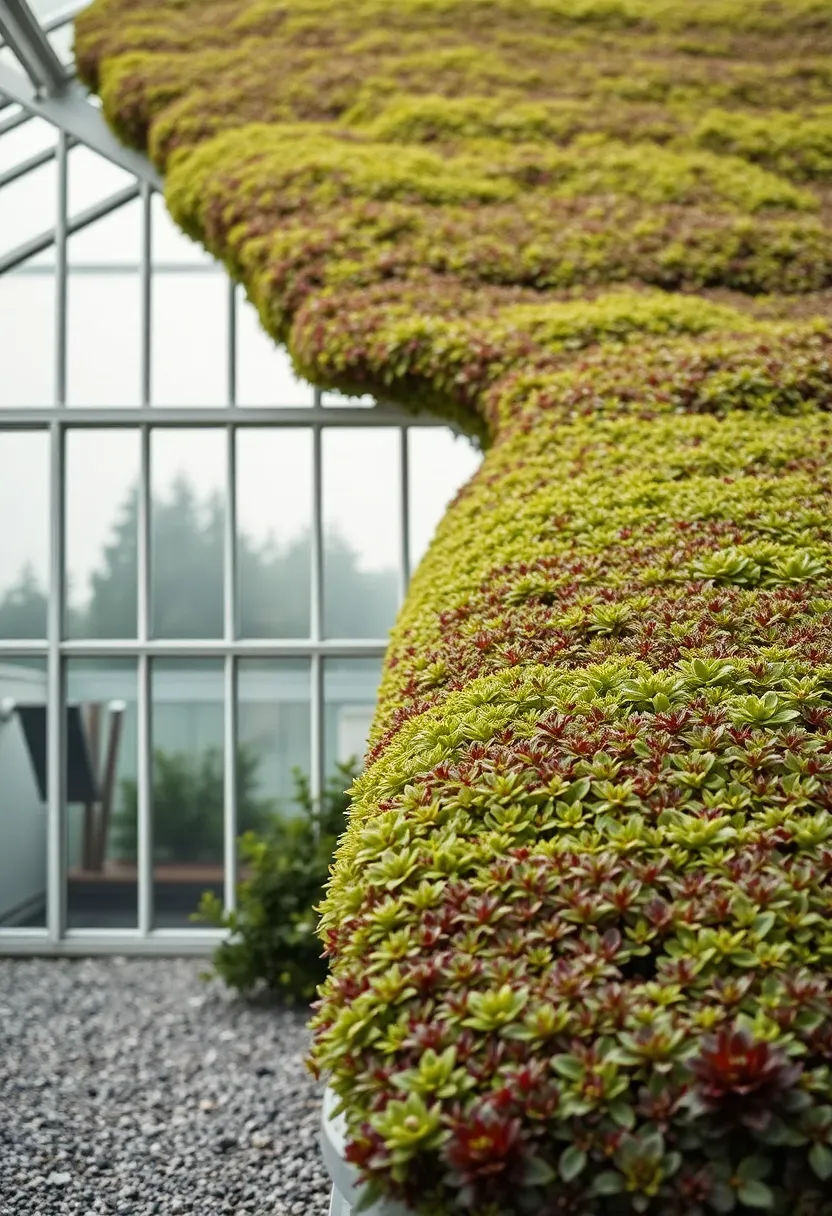
15. Greenhouse with Living Roof
A living roof on a greenhouse sounds contradictory — you are blocking light on the surface meant to let it in. But the approach works when you green only the north-facing roof slope and keep the south slope fully glazed. The planted surface insulates the north side, reducing heat loss in winter and heat gain in summer. Sedum and other succulent ground covers are the standard choice because they survive without irrigation and add almost no weight once established. A waterproof membrane, root barrier, drainage layer, and lightweight growing medium go between the plants and the roof structure.
Tips
- Keep soil depth under 4 inches to limit weight — a saturated living roof weighs 15-25 pounds per square foot
- The north roof slope does not contribute much light anyway, so covering it costs little in growing performance
- A living roof manages stormwater runoff from the greenhouse

16. PVC Pipe Greenhouse
Step 1: Layout the base
Build a rectangular ground frame from 2x6 lumber. Common sizes are 10x12 or 10x20 feet. Drill holes in the frame or pound rebar stakes along the outside to hold the PVC pipes.
Step 2: Bend the ribs
Slide 1-inch or 1.25-inch PVC pipes (schedule 40 for rigidity) over the rebar stakes on opposite sides. The pipes arc naturally into a quonset shape. Space ribs 3-4 feet apart.
Step 3: Add a ridge pole
Run a length of PVC along the top of the arches and zip-tie or bolt it in place. This adds lateral stability so the whole structure does not wobble.
Step 4: Cover and finish
Pull 6-mil greenhouse plastic over the frame and secure with snap clamps (spring clamps designed for pipe). Frame the endwalls with PVC and add a door using a zipper system or a hinged plywood panel.
Watch out
PVC degrades in UV light within 2-3 years and becomes brittle. Paint exposed sections with white latex paint or wrap with UV-protective tape. Schedule 40 pipe handles wind better than schedule 20 but costs about 40% more.
Recommended
Items for this idea
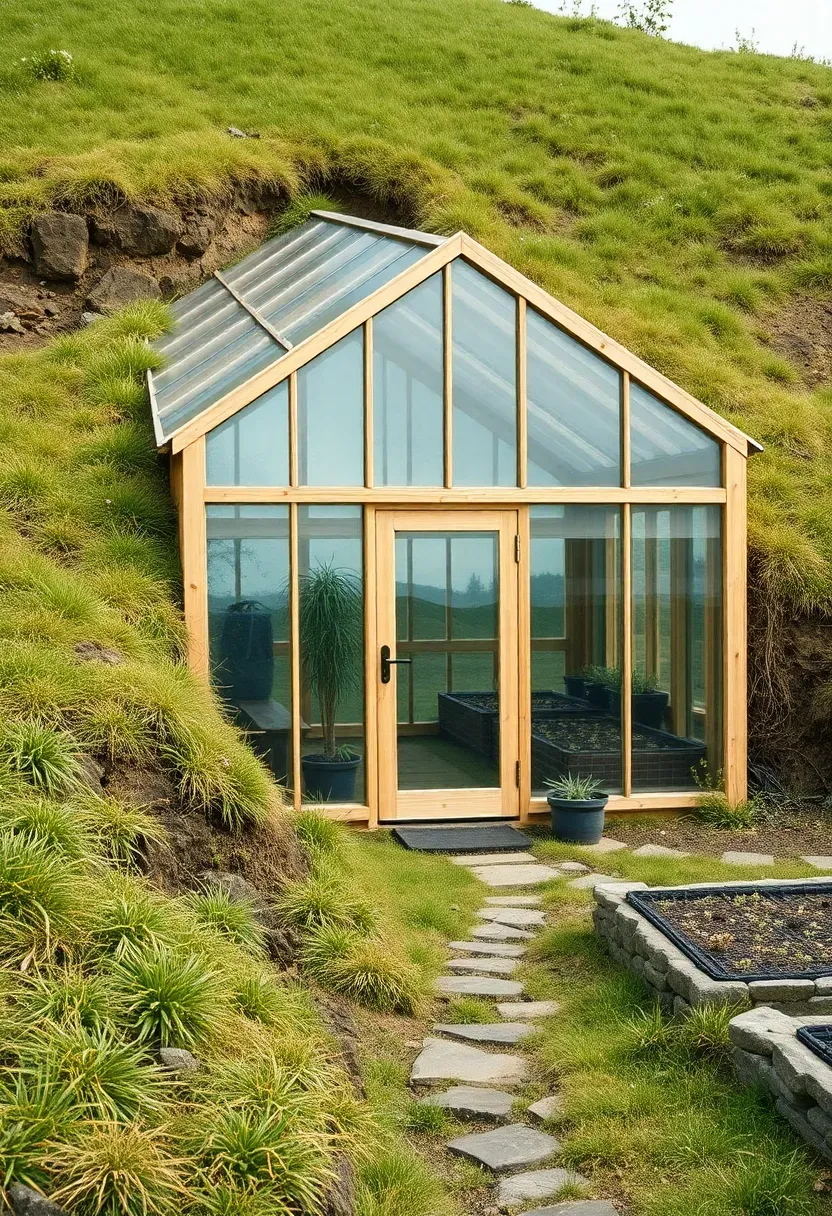
17. Greenhouse Built Into a Hillside
If your yard has a slope, use the terrain instead of fighting it. A hillside greenhouse tucks into the earth on three sides, with only the south face exposed and glazed. The surrounding soil provides insulation equivalent to R-40 or more, which far exceeds what you can achieve with conventional wall construction. Temperatures stay remarkably stable — rarely dropping below 45 degrees even in cold climates without supplemental heat. The excavation cost varies, but in soft soil you might manage it with a rented mini excavator in a day. A retaining wall of concrete block, stone, or pressure-treated timber holds back the hillside.
Tips
- Install a French drain behind the retaining wall to redirect groundwater away from the structure
- The earth-sheltered design makes these greenhouses nearly invisible from neighboring properties
- Ventilation needs careful planning since you only have one open face for airflow
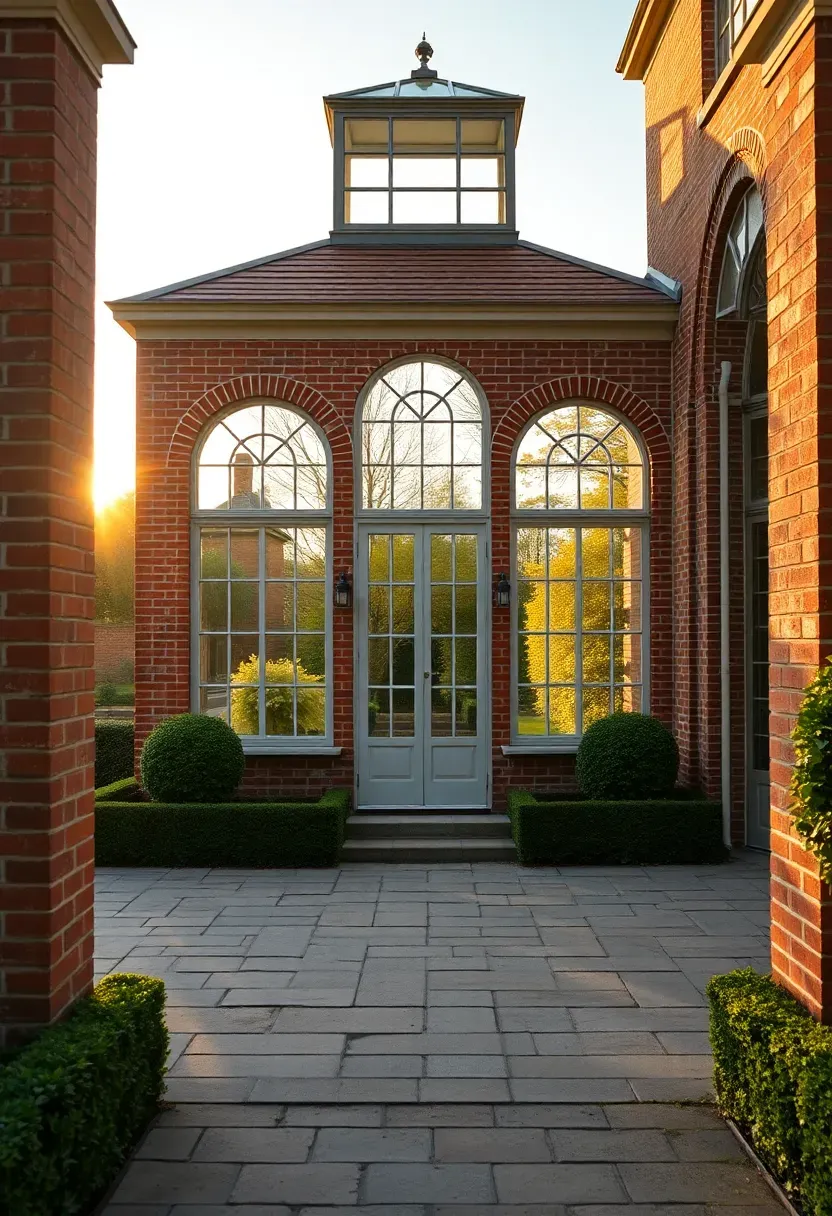
18. Orangery-Style Greenhouse
Origins
Orangeries appeared in 17th-century European estates as heated rooms for overwintering citrus trees. Unlike fully glazed greenhouses, they have solid masonry walls on three sides with large south-facing windows and a partially glazed roof. The heavy construction retains heat far better than an all-glass structure.
Modern Versions
Contemporary orangeries blend greenhouse function with living space. Brick or stone pillars frame floor-to-ceiling glass panels, and a flat or low-pitched roof with a glazed lantern lets in overhead light. They work as garden rooms that double as growing spaces — citrus, figs, and olive trees in large pots along with comfortable seating.
Apply at Home
Build or convert a small outbuilding with south-facing French doors and a skylight. The solid walls give you places to hang tools and shelves. A tile or stone floor with radiant heating underneath lets you use the space year-round as both greenhouse and retreat.
Recommended
Items for this idea
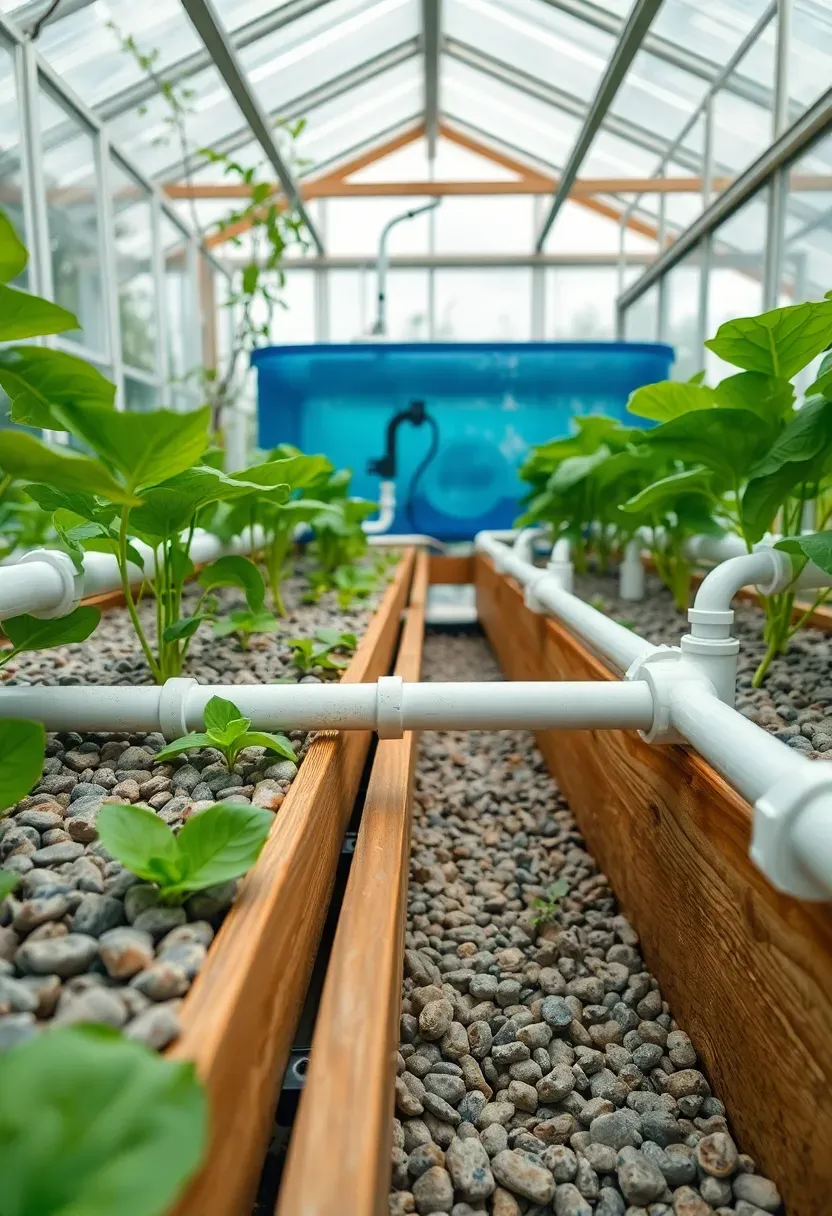
19. Greenhouse with Aquaponics System
Aquaponics pairs fish farming with soilless plant growing. Fish waste provides nitrogen-rich fertilizer for plants; plants filter the water before it returns to the fish tank. Inside a greenhouse, this closed loop produces vegetables and protein year-round. A basic system needs a fish tank (100-300 gallons), grow beds filled with clay pebbles or gravel, a water pump, and an air pump. Tilapia tolerate temperature swings and grow fast. Lettuce, basil, and Swiss chard perform well in the grow beds. The greenhouse keeps water temperatures stable enough for the fish without expensive aquarium heaters.
Tips
- Start with a single 100-gallon tank and two 4x4 grow beds to learn the system before scaling
- Monitor pH daily — fish want 6.8-7.2, plants want 5.5-6.5, so you run it at 6.8 as a compromise
- A backup battery for the water pump prevents fish kills during power outages
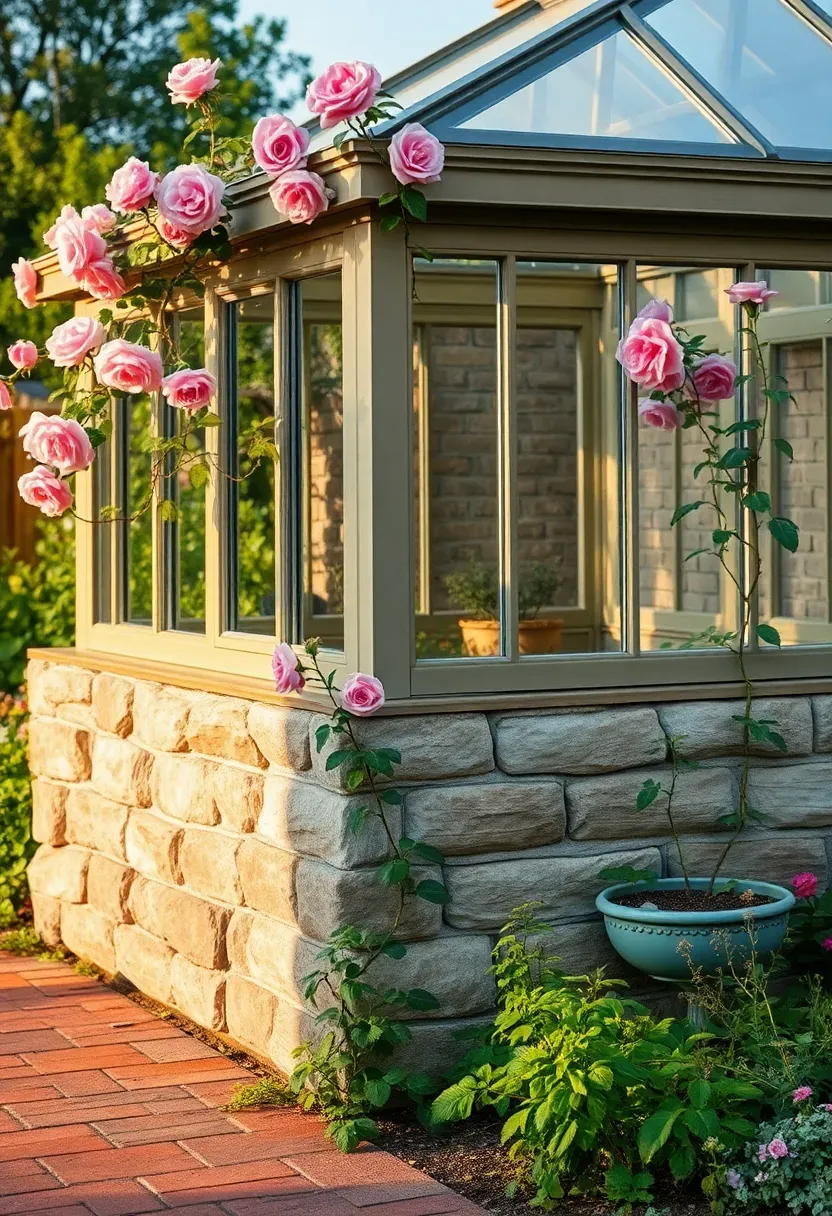
20. Greenhouse with Stone Knee Wall
A knee wall — typically 24-36 inches of stone, brick, or concrete block — replaces the lower glass panels of a traditional greenhouse. This trades some light transmission for significant thermal mass. The masonry absorbs solar heat during the day and releases it slowly overnight, buffering temperature swings that stress plants. Stone or brick also protects the lower frame from splash damage, lawn mower strikes, and general wear. The aesthetic payoff is substantial too: a stone knee wall grounds the greenhouse visually and connects it to paths, retaining walls, or the house foundation if they use matching material.
Tips
- Use local fieldstone for a rustic look or cut limestone for something more formal
- Insulate the outside face of the knee wall below grade to prevent heat from conducting into cold soil
- Plan a gap at the base of the glass panels above the knee wall for drainage
Recommended
Items for this idea
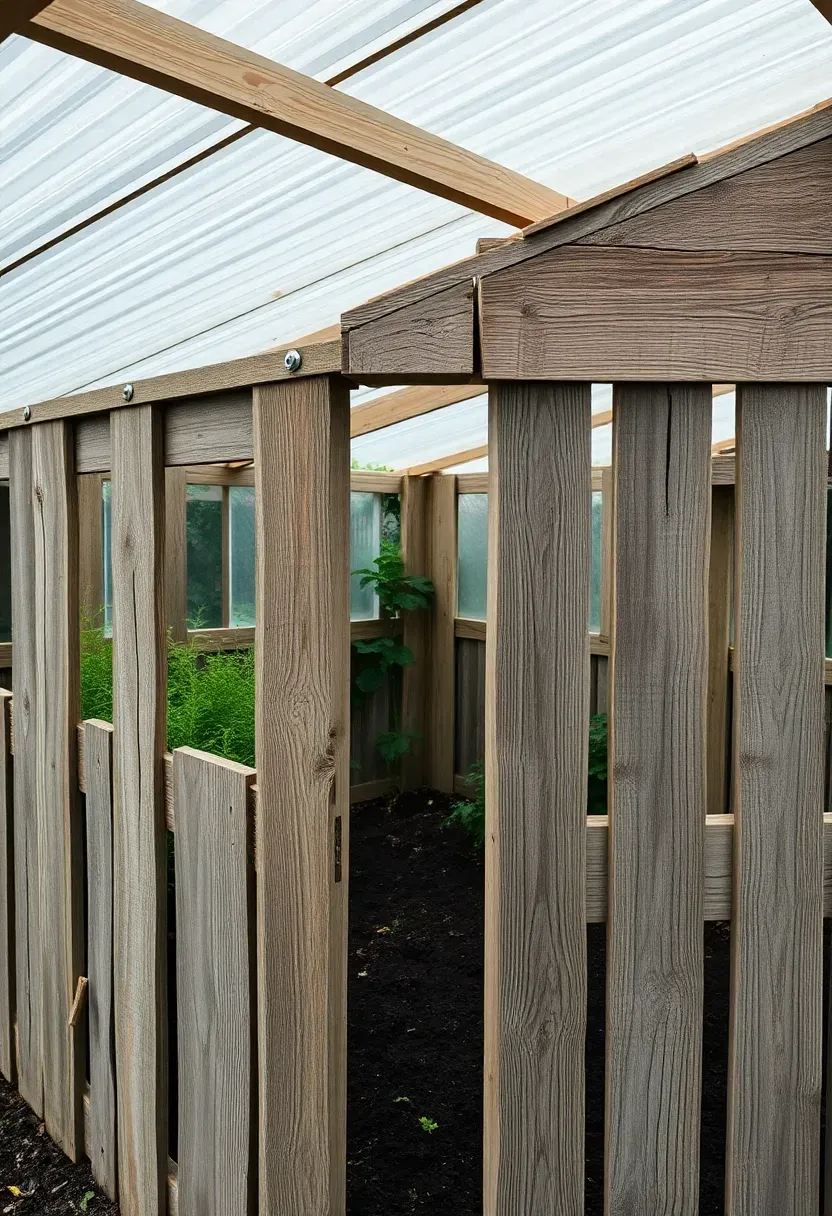
21. Pallet Wood Greenhouse
Why Pallets
Free pallets appear behind grocery stores, warehouses, and hardware suppliers. The wood is rough-cut softwood — not pretty, not uniform, but structurally adequate for a lightweight greenhouse frame. A single standard pallet yields about 12 board feet of lumber once disassembled.
How to Build
Disassemble pallets carefully with a pry bar or reciprocating saw. Sort boards by length and width. Build a post-and-beam frame using doubled-up pallet boards for the main uprights and single boards for cross members. Clad the lower walls with pallet boards and use corrugated polycarbonate sheets for the upper walls and roof — this hybrid approach provides light where you need it and structure where you need it.
Choose If
You have more time than money, enjoy salvage projects, and accept a rustic finished product.
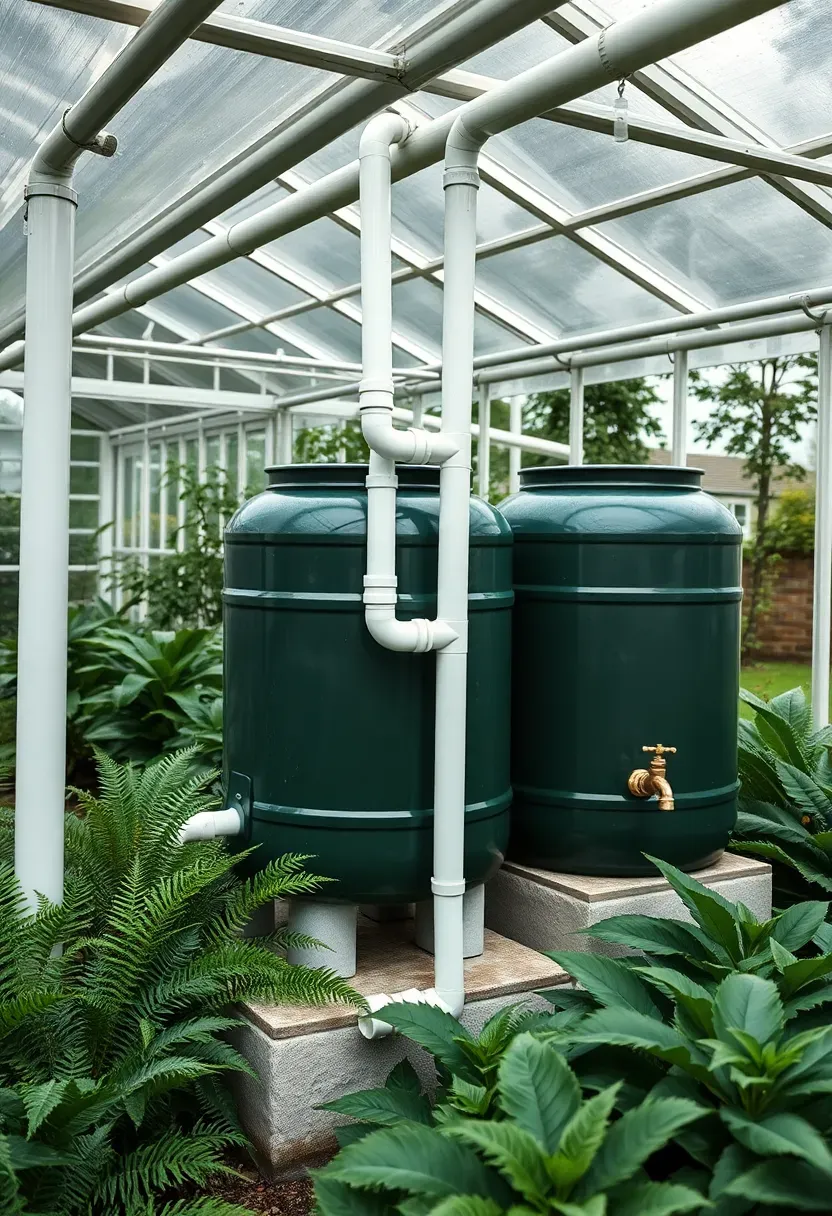
22. Greenhouse with Rain Collection
A greenhouse roof is a perfect catchment surface. A 10x20-foot greenhouse in an area receiving 30 inches of rain annually collects roughly 3,700 gallons of water per year — enough to irrigate the greenhouse plants without municipal water. Install gutters along both eaves, run downspouts to food-grade storage barrels or a buried cistern, and connect a gravity-fed or low-pressure pump system to drip irrigation inside the greenhouse. Rainwater is slightly acidic (pH 5.5-6.0) and contains no chlorine or fluoride, which most plants prefer over treated tap water.
Tips
- Use a first-flush diverter to discard the initial gallon of roof runoff, which carries bird droppings and dust
- Elevate barrels 3-4 feet above the greenhouse floor for gravity-fed watering
- Check local regulations — some jurisdictions restrict rainwater harvesting
Recommended
Items for this idea
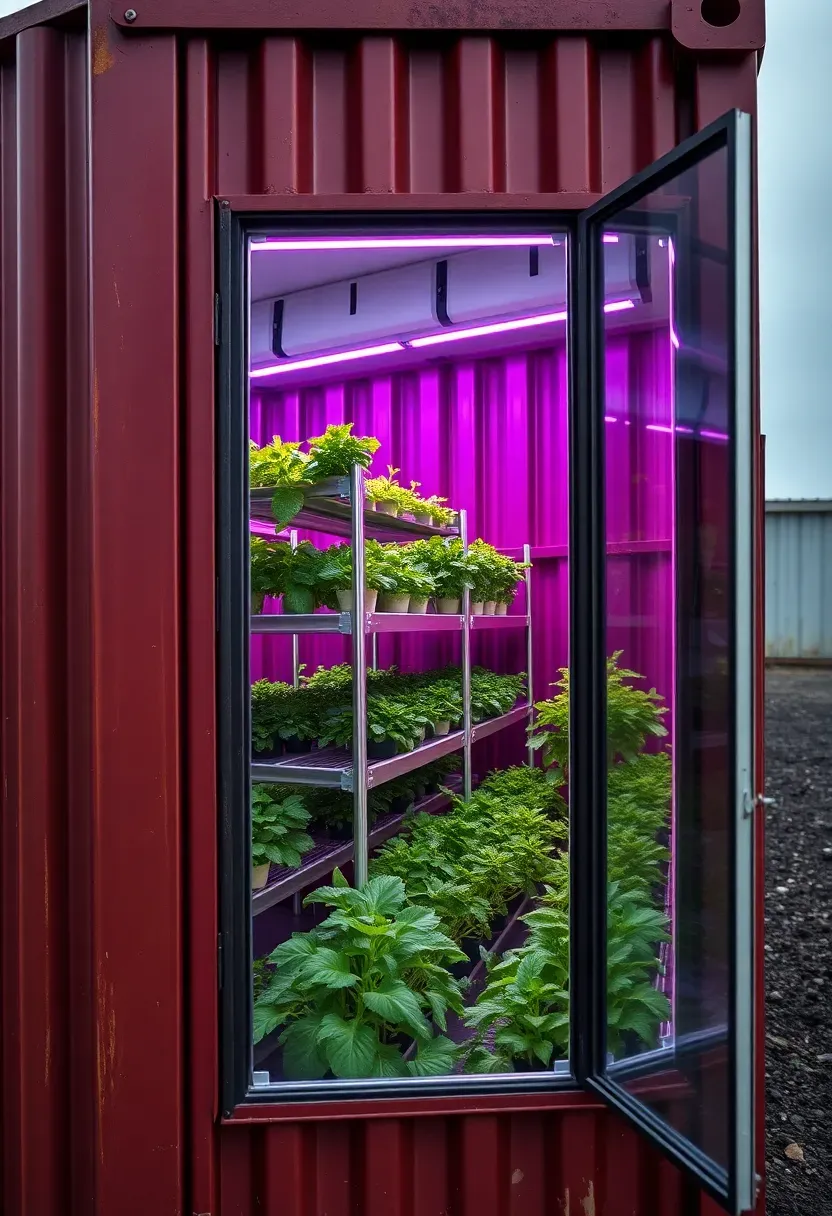
23. Shipping Container Greenhouse
The Concept
Cut out one long side of a 20 or 40-foot shipping container and replace it with greenhouse glazing. The three remaining steel walls provide structural rigidity, security, and thermal mass. The container sits on level ground without a foundation — its steel frame is already engineered to support stacking loads at sea.
Practical Considerations
Shipping containers cost $1,500-3,000 used. Cutting the side panel requires a plasma cutter or angle grinder with a metal-cutting wheel. You will need to weld in a frame to support the glazing and maintain structural integrity. Insulate the remaining steel walls and ceiling with closed-cell spray foam to prevent condensation. Orient the open side south.
Recommendation
This approach makes sense if you want a secure, animal-proof, theft-resistant growing space — or if you already have a container on your property. The industrial aesthetic works in modern or rural settings but clashes with traditional suburban landscapes.
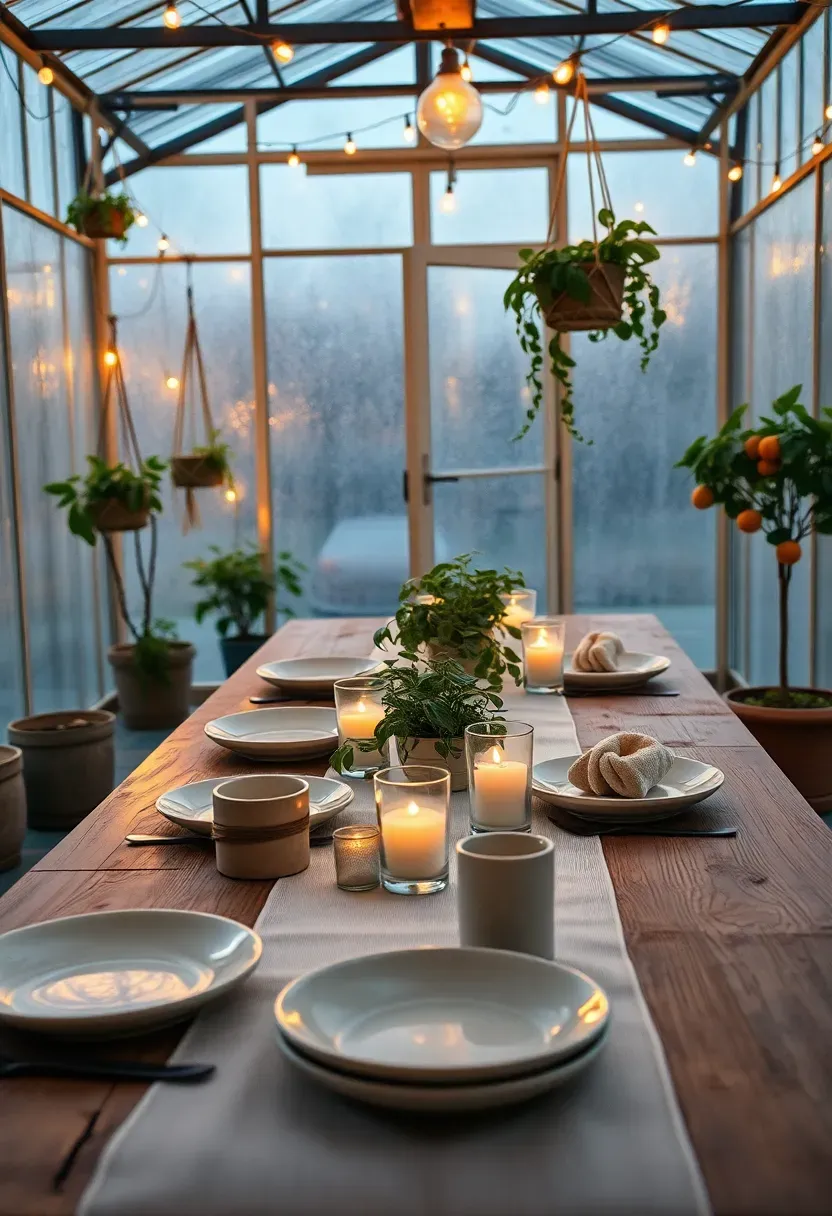
24. Greenhouse Dining Room
A greenhouse dinner is not a new idea — the Victorians did it constantly. But the trend has returned with force because people realized that eating inside a greenhouse in October, surrounded by the smell of warm soil and ripening tomatoes, is a genuinely good experience. Dedicate a section of your greenhouse (or the whole thing if it is small) to a table and chairs. A farm table with a bench on each side fits most residential greenhouses. String lights overhead, candles on the table, and the condensation on the glass walls creates an atmosphere no restaurant can replicate.
Tips
- Use a bistro set for daily meals and bring in the larger table for dinner parties
- Gravel or flagstone floors handle spilled wine better than wood decking
- Grow fragrant plants nearby — jasmine, rosemary, lemon verbena — so the room smells alive
Recommended
Items for this idea
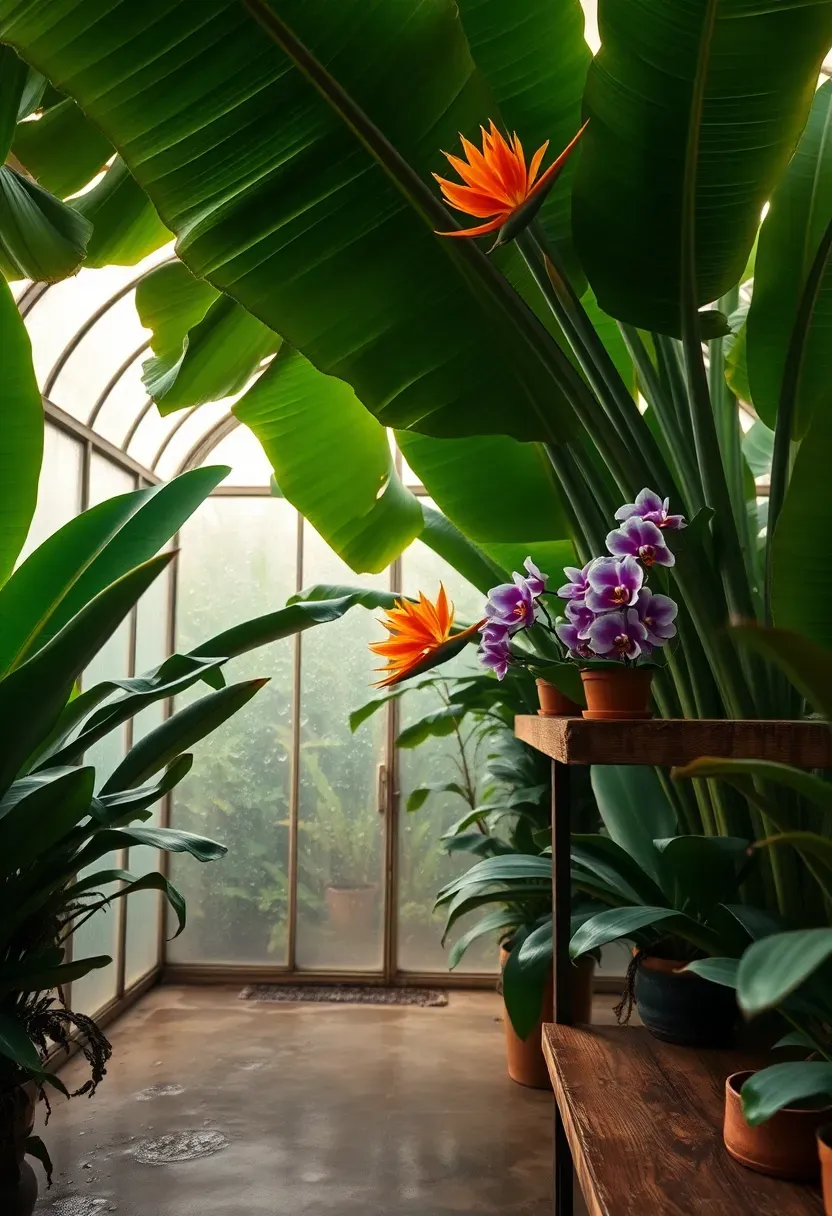
25. Year-Round Tropical Greenhouse
Growing tropical plants in a temperate climate requires commitment. You need to maintain minimum temperatures of 55-65 degrees (depending on species), keep humidity above 60%, and provide supplemental light during short winter days. Banana plants, bird of paradise, plumeria, orchids, and tropical fruit like passion fruit and papaya are all possible. The heating bill is the main ongoing cost — a well-insulated 12x16 greenhouse in zone 6 might need $800-1,500 in annual heating fuel. Double-wall polycarbonate and an insulated north wall reduce this significantly.
Tips
- A gas or propane heater with a thermostat is more reliable than electric in cold climates
- Mist the plants daily or install a humidifier on a timer
- Shade cloth in summer prevents leaf scorch — tropical plants often grow under canopy in nature
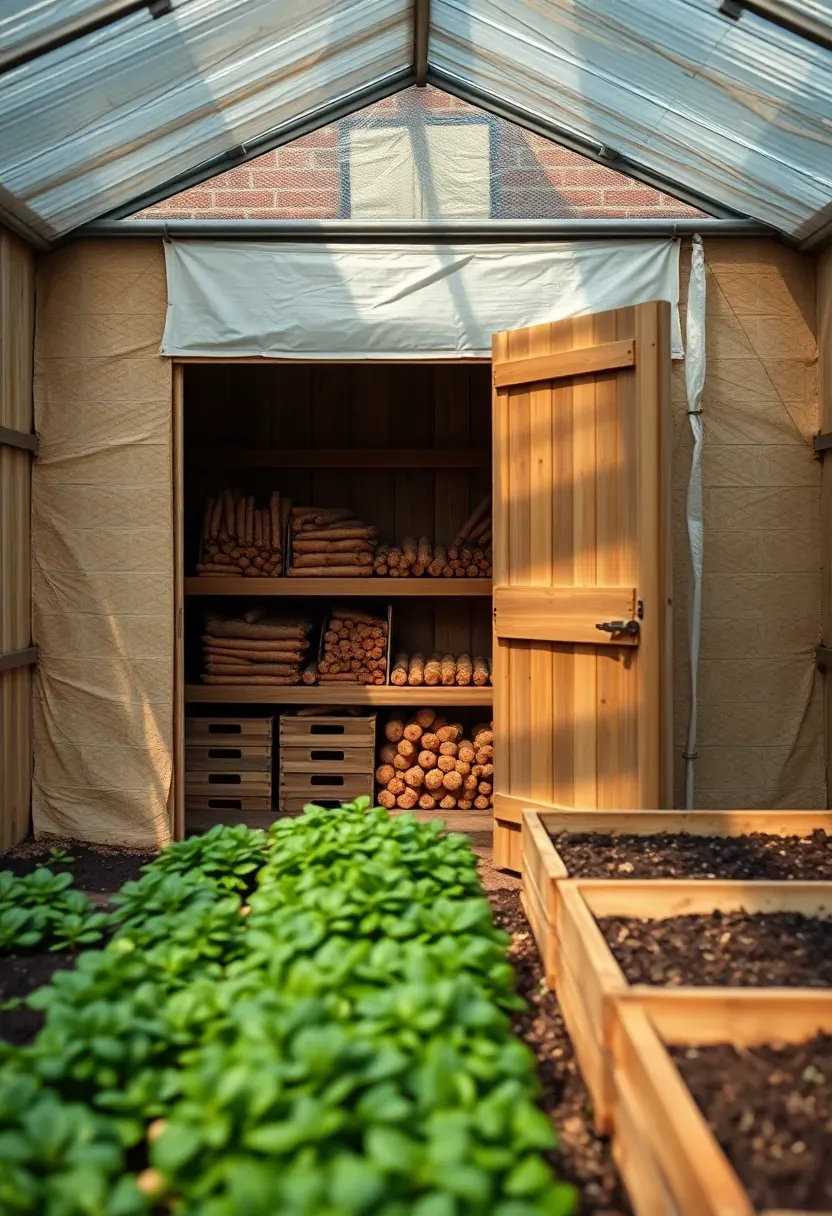
26. Greenhouse with Integrated Cold Storage
The Problem
You grow more than you can eat fresh, but dragging produce to a separate root cellar or basement is inconvenient. Food rots in the greenhouse because daytime temperatures spike too high for storage.
The Solution
Partition the north end of your greenhouse into an insulated cold storage room. Build a stud wall with rigid foam insulation (R-15 minimum), install an insulated door, and add a vent to the outside that you open on cold nights to flush the room with cool air. The cold room stays 35-45 degrees through winter — perfect for storing root vegetables, apples, cabbages, and cured squash. The greenhouse side of the shared wall benefits from the cold room's thermal buffer on the north side.
Pros and Cons
- Harvest and store in the same building, reducing trips and handling damage
- No energy cost for cooling — you are using outdoor cold air
- Reduces usable growing space by 15-20% depending on partition size
Recommended
Items for this idea
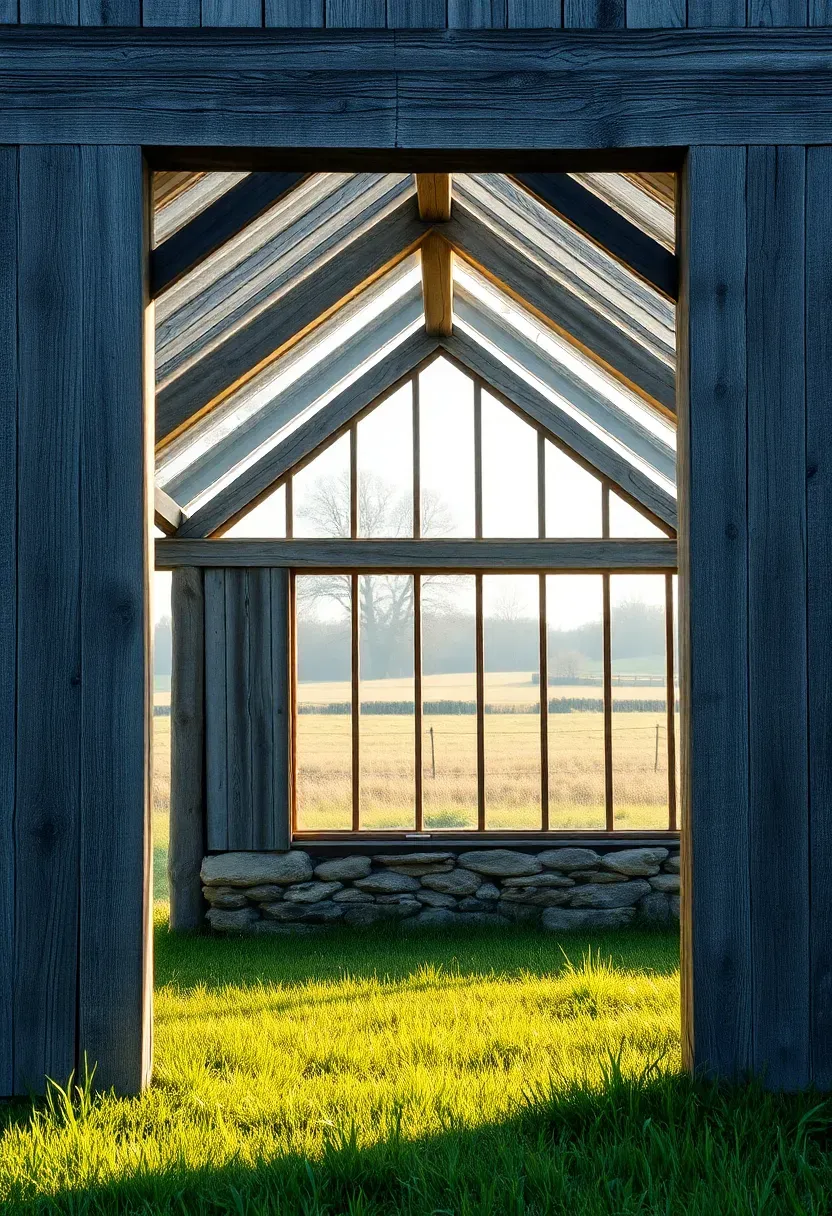
27. Reclaimed Barn Frame Greenhouse
Old barn frames — hand-hewn beams, mortise-and-tenon joints, weathered oak or chestnut — are available from barn dismantling companies for a fraction of what new timber-frame construction costs. Re-erecting the frame on a greenhouse foundation and infilling with glass or polycarbonate creates a structure with genuine character that no new build can match. The massive timbers provide structural strength far beyond what a greenhouse needs, so wind and snow loads are irrelevant. A typical 16x24 barn frame with glass infill runs $10,000-25,000 depending on timber quality and glazing choice.
Tips
- Have the frame inspected for structural soundness before buying — look for rot at joint pockets and insect damage
- Barn frames often need minor modifications to accommodate a glazing system
- The heavy timbers cast shadows inside, so plan your growing beds around the light patterns
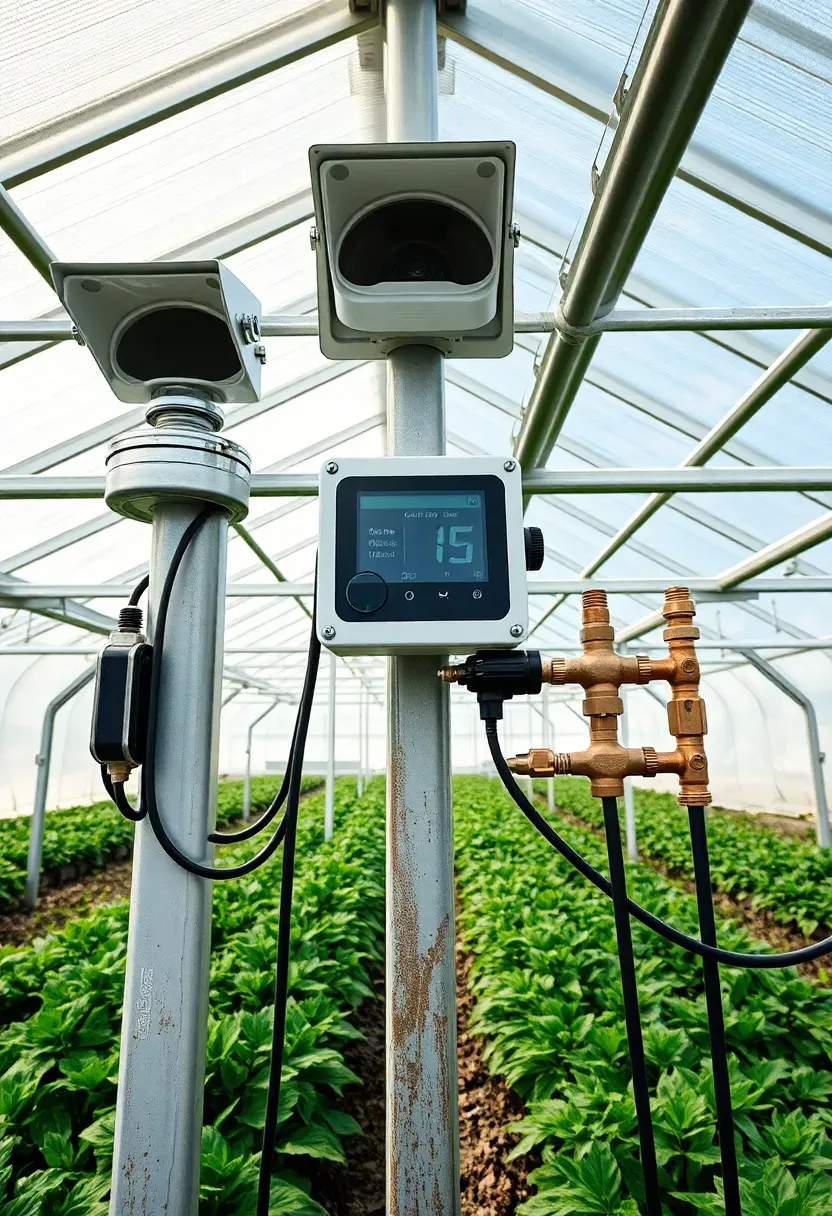
28. Greenhouse with Automated Climate Control
Manual greenhouse management means checking temperatures, opening vents, turning on fans, and adjusting watering — sometimes multiple times per day. Automation handles all of it. Wax-cylinder vent openers ($25-40 each) require no electricity and open vents automatically when temperatures rise. A thermostat-controlled exhaust fan costs under $100 and prevents overheating. Drip irrigation on a timer with a moisture sensor ensures consistent watering without your presence. For more control, a greenhouse controller like an Inkbird or SensorPush monitors temperature and humidity remotely via your phone.
Tips
- Start with vent openers and a fan thermostat — these two additions solve 80% of management headaches
- Soil moisture sensors cost $15-30 and prevent both over and under watering
- A Wi-Fi-connected thermometer sends alerts to your phone when temperatures drop below a set threshold
Recommended
Items for this idea
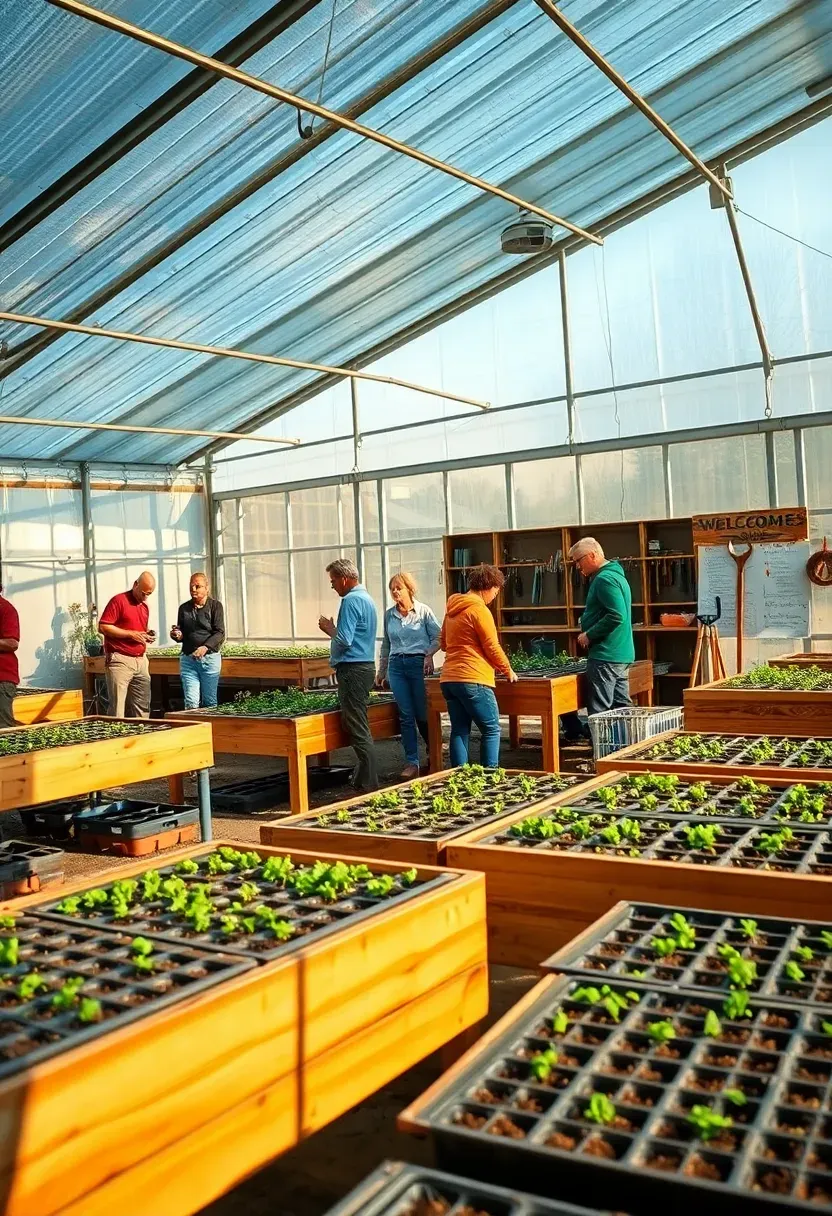
29. Community Garden Greenhouse
A shared greenhouse in a community garden splits costs, labor, and knowledge among multiple growers. A 16x32 structure that costs $5,000 to build becomes manageable when ten families contribute $500 each. Scheduling systems (a shared calendar on the door or a simple online spreadsheet) prevent overcrowding. Shared seed-starting in spring benefits everyone — one heated greenhouse can produce transplants for dozens of individual garden plots. The social dimension matters too: greenhouse time becomes a gathering point where gardening knowledge passes between generations and experience levels.
Tips
- Draft a simple agreement covering maintenance responsibilities, key access, and plant spacing
- Designate shared zones (seed starting tables, tool storage) and individual zones (assigned bench space)
- A monthly potluck using greenhouse-grown produce builds community and keeps people invested
Quick FAQ
How much does it cost to build a backyard greenhouse? Costs range from under $100 for a cold frame or PVC hoop house to $15,000+ for a Victorian glasshouse or timber-frame structure. Most functional backyard greenhouses fall in the $500-3,000 range using kit systems or DIY construction with polycarbonate panels and a wood or metal frame.
Do I need a permit for a backyard greenhouse? It depends on your municipality. Many areas exempt structures under 120 square feet from permit requirements, but some require permits for any permanent structure with a foundation. Check your local zoning and building codes before pouring concrete or setting posts.
Which direction should a greenhouse face? Orient the longest wall or the largest glass surface toward true south (in the Northern Hemisphere). This maximizes winter sun exposure when you need it most. A deviation of up to 15 degrees east or west of true south has minimal impact on performance.
Can I heat a greenhouse without electricity? Yes. Passive solar design with thermal mass (water barrels, stone walls, concrete floors) stores daytime heat and releases it overnight. Compost piles inside the greenhouse generate heat through decomposition. Propane or natural gas heaters with battery-ignition also work independently of the electrical grid.
What is the best greenhouse covering material? Twin-wall polycarbonate offers the best combination of light transmission, insulation, impact resistance, and longevity. It lets in about 80% of available light while insulating twice as well as single-pane glass. Glass looks better and lasts longer but costs more and breaks on impact. Greenhouse film is cheapest but needs replacing every 3-4 seasons.
The right greenhouse is the one you will actually use. A $200 cattle-panel hoop house that gets you growing tomatoes in March is worth more than a $10,000 glasshouse that sits empty because you overbuilt and lost enthusiasm before finishing the project. Start with what your budget, skills, and yard can handle today. You can always expand later — and if the greenhouse bug bites, you almost certainly will.
Pinterest cover for 29 Backyard Greenhouse Ideas for Every Budget
About the author
OBCD
CGI visualization and interior design content. We create detailed 3D renders and curate practical design ideas for every room in your home.