17 Backyard Hardscape Ideas
The first summer in our house, I dragged patio chairs onto bare dirt because the deck was rotting and I did not want to deal with it yet. By August, every rain turned the yard into a mud pit that the dog tracked inside daily. That fall I ripped out the old deck, laid a 200-square-foot flagstone patio over compacted gravel, and the backyard became usable year-round for the first time. Hardscaping is the unglamorous backbone of any outdoor space — it controls drainage, defines zones, and gives you surfaces that hold up without mowing, watering, or reseeding. These 17 ideas cover materials and layouts from budget gravel pads to mortared stone walls.
Here you will find hardscape concepts organized by material type, difficulty level, and budget range, with notes on drainage, maintenance, and realistic DIY feasibility.
Table of Contents
- Flagstone Patio
- Pea Gravel Courtyard
- Concrete Paver Terrace
- Dry-Stack Stone Retaining Wall
- Brick Herringbone Walkway
- Decomposed Granite Seating Area
- Poured Concrete Slab with Saw Cuts
- Bluestone Landing Pad
- Cobblestone Border Edging
- Travertine Pool Surround
- Gabion Wall Feature
- Permeable Paver Driveway Extension
- Sandstone Stepper Path
- Mortared Stone Fire Pit Pad
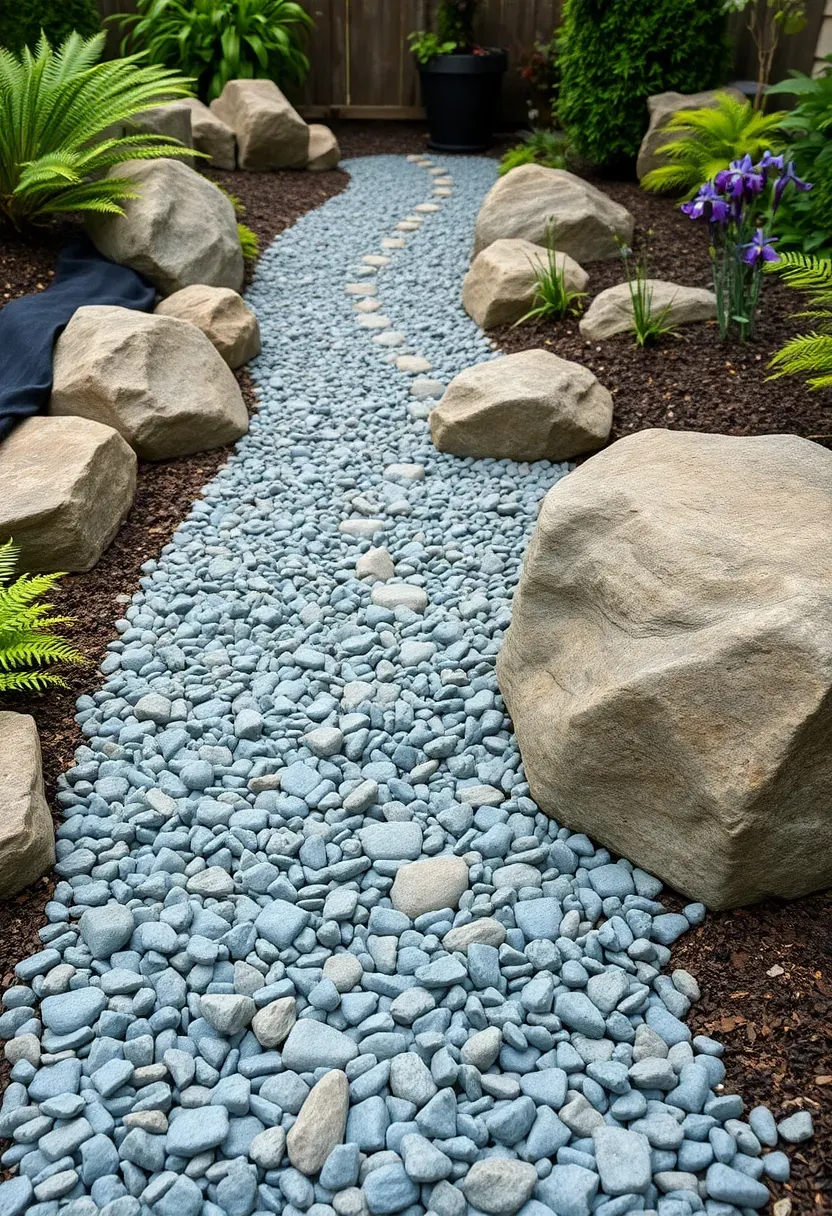
- Slate Chip Dry Creek Bed
- Exposed Aggregate Concrete Patio
- Boulder Staircase on a Slope
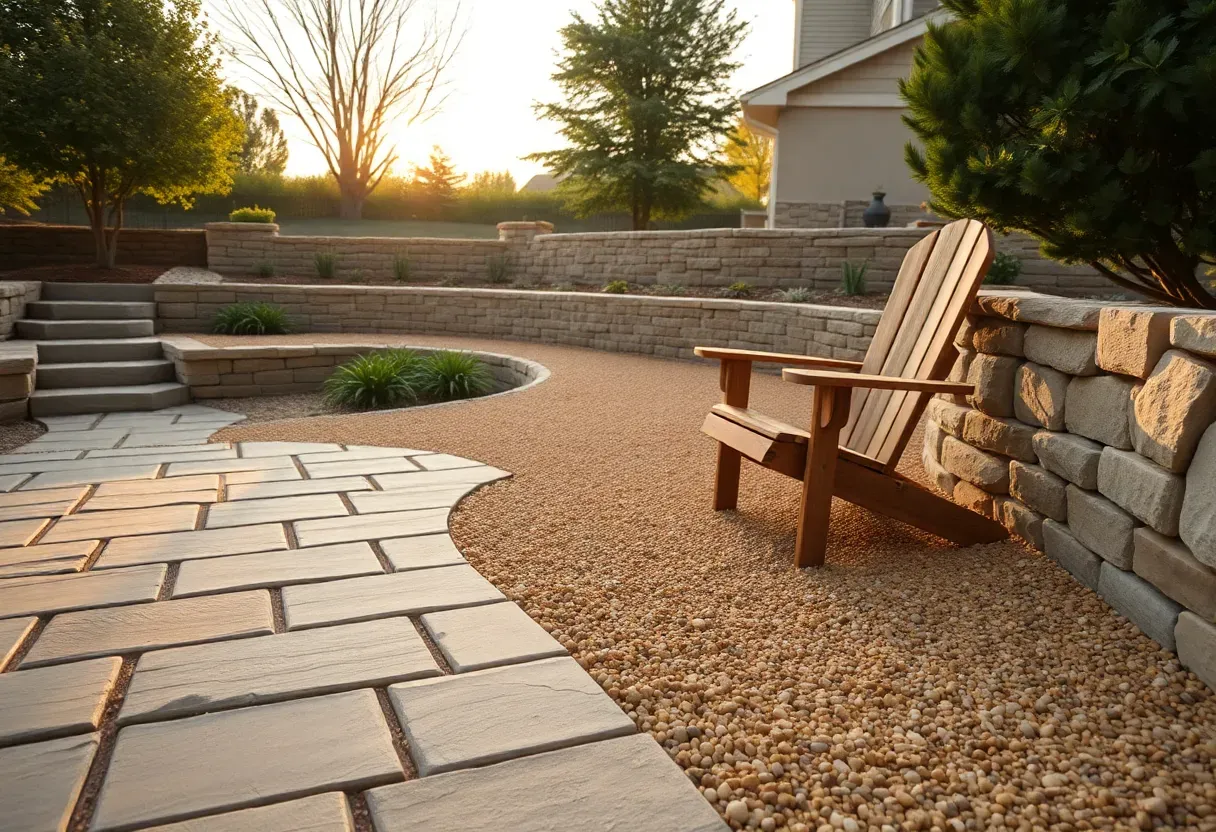
1. Flagstone Patio
Flagstone is quarried sedimentary rock — usually sandstone, limestone, or slate — split into flat irregular pieces between one and three inches thick. It works well dry-laid on a compacted gravel base or mortared onto a concrete slab for a more permanent installation. Dry-laid flagstone costs $8 to $15 per square foot in materials, and the joints can be filled with polymeric sand, pea gravel, or planted with creeping thyme for a softer look. The irregular shapes mean more cutting and fitting during installation, but they also hide imperfections well. Expect a weekend project for a 150-square-foot patio if you have a helper.
Tips
- Sort stones by thickness before laying — group similar thicknesses together to reduce shimming
- Excavate at least 6 inches and fill with 4 inches of compacted 3/4-inch crushed stone for a stable base
- Slope the finished surface 1/4 inch per foot away from the house for drainage
We picked a few things that go well with this idea: Cameron Natural Flagstone Patio Slabs (2000 lbs) (★4.4), TierraVerde Rubber Stepping Stones (4-Pack) (★4.4) and Non-Slip Rubber Stepping Stones (5-Pack) (★4.6). As an Amazon Associate we earn from qualifying purchases.
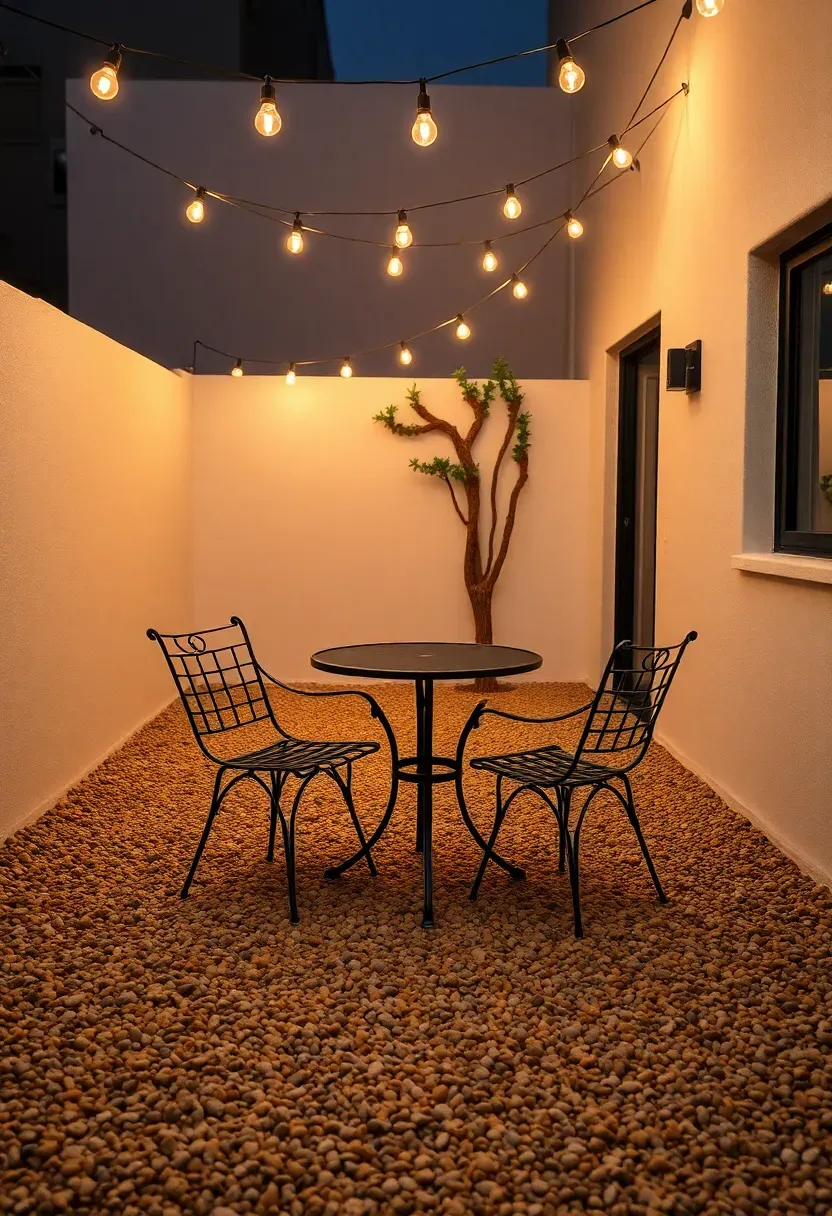
2. Pea Gravel Courtyard
Why gravel makes sense for casual spaces
Pea gravel is one of the cheapest hardscape materials available — around $1 to $3 per square foot at 3 inches deep. It drains instantly, never cracks, and you can reshape it with a rake in ten minutes. For a courtyard or dining area, it provides a defined surface without the commitment of concrete.
Getting the base right
The mistake most people make is dumping gravel directly on soil. Within a season, the stones sink and weeds push through. Line the excavated area with commercial-grade landscape fabric, install steel or aluminum edging to contain the gravel, and compact the sub-base with road base gravel before adding the pea gravel layer on top. Total depth should be about 6 inches including the sub-base.
Choose if
- You want a weekend project under $500 for a 200-square-foot area
- You do not mind the crunch underfoot and occasional raking
- You need a surface that handles heavy rain without ponding
We picked a few things that go well with this idea: Plate Compactor Tamper Pad Kit (★3.4), Plate Compactor Pad with Clamps (★4.1) and Polyurethane Compactor Paver Pad Kit (18"). As an Amazon Associate we earn from qualifying purchases.
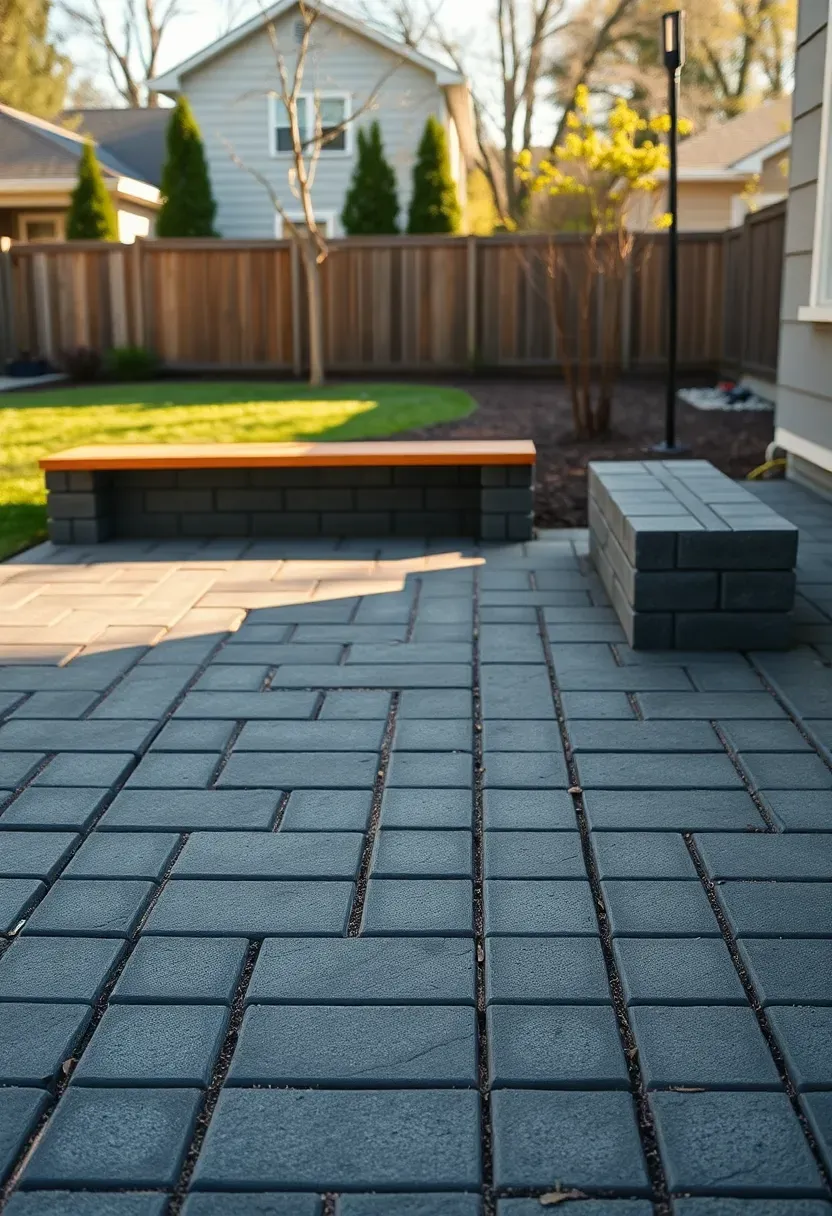
3. Concrete Paver Terrace
Concrete pavers are manufactured blocks available in dozens of shapes, colors, and textures. They interlock without mortar, sitting on a screeded sand bed over compacted gravel. A standard 4x8-inch paver in running bond pattern creates a clean, uniform surface that suits both modern and traditional yards. Material cost runs $3 to $7 per square foot, with professional installation adding $8 to $15 per square foot on top of that. The real advantage over poured concrete is repairability — if a section settles or a paver cracks, you pop out the affected pieces and relay them without touching the rest.
Tips
- Use a plate compactor on the finished surface to lock pavers into the sand bed
- Sweep polymeric sand into the joints and mist with water to activate the binding agent
- Choose a paver thickness of at least 2-3/8 inches for any area that might see vehicle traffic
We picked a few things that go well with this idea: Tandefio Galvanized Steel Gabion Basket (★3.8), AdirPro Welded Gabion Baskets (3-Pack) (★3.7) and AdirPro Gabion Wire Cage (3 Cu Ft) (★3.7). As an Amazon Associate we earn from qualifying purchases.
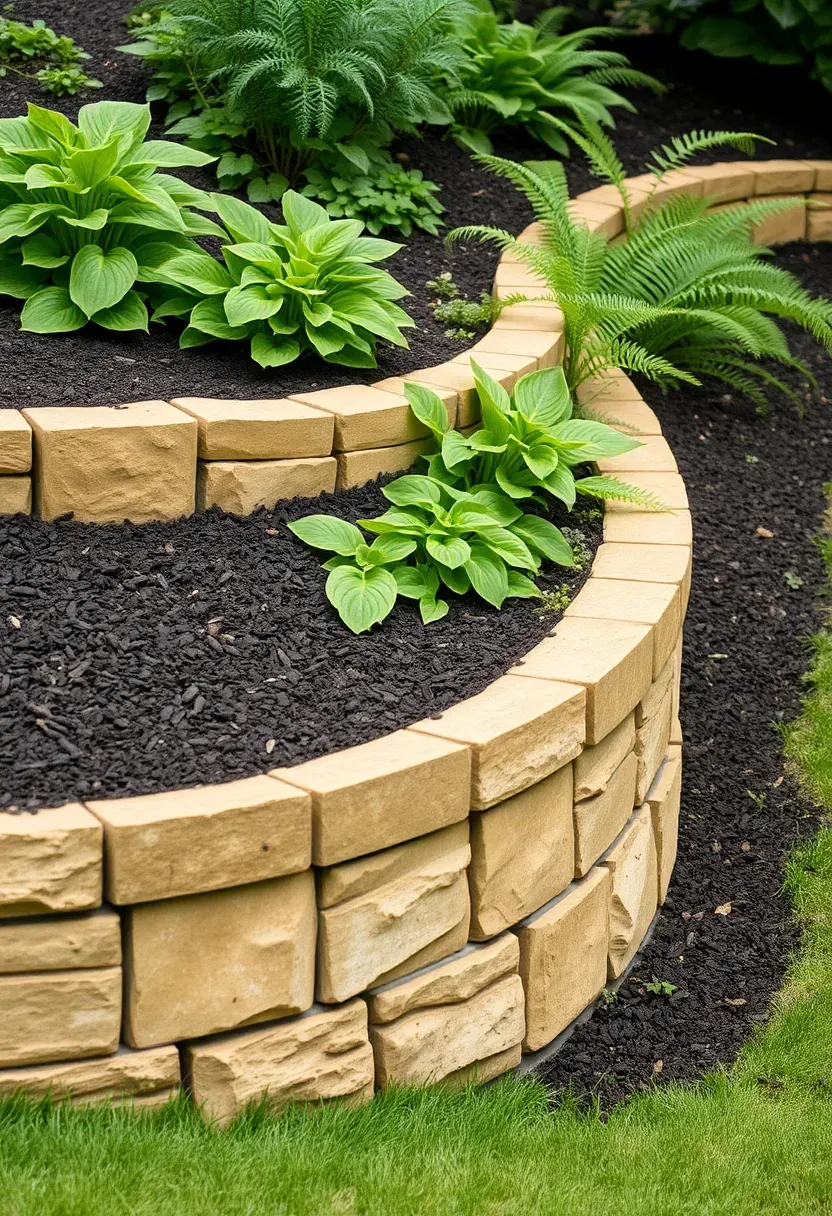
4. Dry-Stack Stone Retaining Wall
The slope problem
Any yard with more than a few feet of grade change needs something to hold the soil in place. Without a retaining wall, rain erodes the hillside, mulch washes into the lawn, and planting beds lose soil every season.
How dry-stack solves it
Dry-stack walls use gravity and friction — no mortar, no concrete footing for walls under 3 feet tall. Natural fieldstone or manufactured wall block gets stacked with a slight backward lean (called batter) so the wall's own weight resists the soil pressure behind it. Backfill behind the wall with crushed stone and lay perforated drain pipe at the base to relieve hydrostatic pressure. Material cost for manufactured block runs $5 to $10 per square face foot. Natural stone costs more but looks less uniform and blends better with woodland landscapes.
Pros and cons
- Pro: No concrete work required for walls under 36 inches
- Pro: Excellent drainage through the open joints
- Con: Height limited to about 3 feet without engineering — taller walls need a permit and professional design
Recommended
Items for this idea
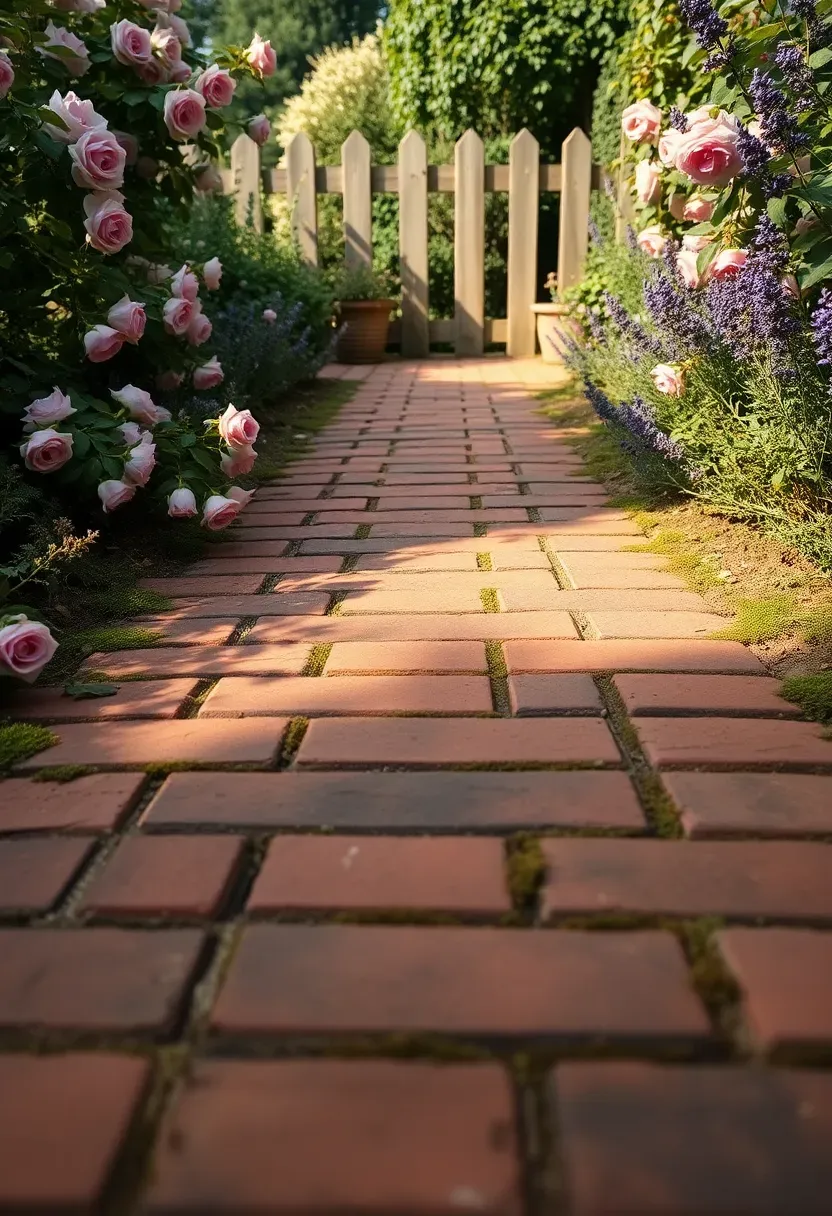
5. Brick Herringbone Walkway
Clay brick has been a paving material for centuries, and herringbone is its strongest pattern — the interlocking 45-degree or 90-degree arrangement resists shifting under foot traffic better than stacked bond or basket weave. Salvaged brick runs $0.25 to $0.75 per brick, while new clay pavers cost $0.50 to $1.50 each. A 3-foot-wide walkway uses roughly 4.5 bricks per square foot in a 90-degree herringbone layout. The warm red-orange color of clay develops a patina over years that concrete pavers cannot replicate. Be aware that clay brick absorbs water and can spall in hard freeze-thaw climates — in northern states, choose pavers rated for severe weathering (SW grade).
Tips
- Snap a chalk line down the center of the path and work outward to keep the pattern symmetrical
- Cut edge bricks with a diamond blade wet saw rather than a chisel for clean lines
- Set bricks on 1 inch of coarse sand over 4 inches of compacted gravel base

6. Decomposed Granite Seating Area
Decomposed granite (DG) is crushed rock particles that compact into a firm, natural-looking surface. It comes in shades of gold, tan, grey, and rust depending on the parent rock. At $1 to $4 per square foot installed, it sits between gravel and concrete on the cost spectrum. The stabilized version includes a resin binder mixed in that prevents the surface from loosening — worth the extra dollar per square foot for any area with regular foot traffic. DG pairs well with boulder seating, built-in benches, or metal furniture. It reads as more refined than plain gravel while still feeling casual and desert-appropriate.
How to install
- Excavate the area to 4 inches below finished grade
- Compact the native soil, then add 2 inches of road base and compact again
- Spread 2 inches of DG (stabilized or natural), wet it, and compact with a plate compactor in two passes
- Edge with steel landscape edging to prevent the DG from migrating into adjacent beds
Watch out
- Unstabilized DG sticks to shoes and gets tracked indoors — use stabilized in high-traffic zones
- DG needs periodic raking and occasional top-dressing every year or two

Recommended
Items for this idea
7. Poured Concrete Slab with Saw Cuts
Poured concrete gets dismissed as plain, but a well-finished slab with intentional saw-cut patterns looks sharp and lasts decades. Saw cuts serve a structural purpose too — they control where the concrete cracks as it cures and expands, routing any fractures along the scored lines instead of randomly across the surface. A 4-inch slab on grade costs $6 to $12 per square foot installed, including gravel base, formwork, and finishing. You can add color with integral pigment mixed into the batch, or apply acid stain after curing for a mottled, organic look. Broom finishing provides traction in wet weather without looking industrial.
Tips
- Cut control joints within 24 hours of pouring, to a depth of 1/4 the slab thickness
- Space joints no more than 10 feet apart in each direction for a 4-inch slab
- Seal the surface with a penetrating silicone sealer every 2-3 years to prevent moisture absorption and staining
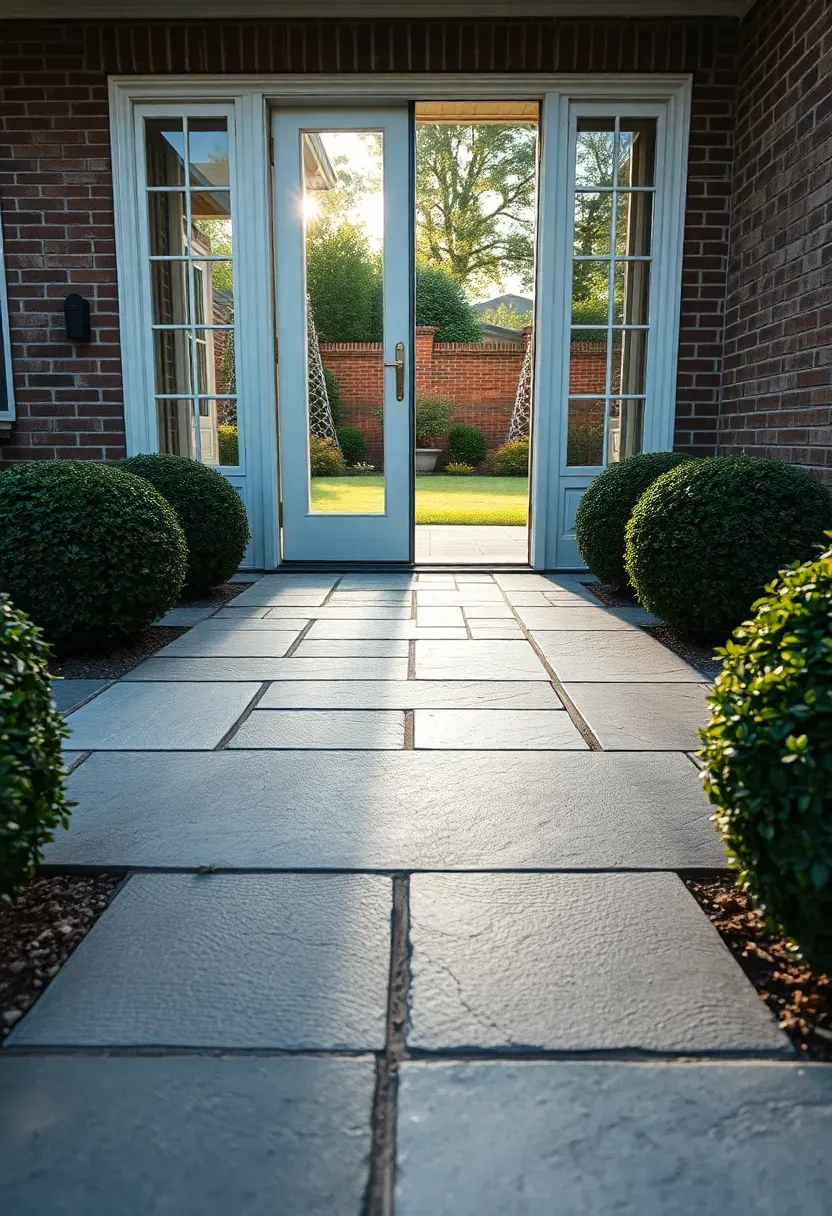
8. Bluestone Landing Pad
Bluestone vs. other natural stone
Pennsylvania bluestone is a dense sandstone with a distinctive blue-grey color that ranges from solid blue to multicolored with rust and brown tones. It is harder and more weather-resistant than most limestone or sandstone, which makes it ideal for high-traffic areas like doorway landings and transitions between indoor and outdoor spaces.
Modern take
A landing pad — typically 6 by 8 feet — creates a visual threshold at a back door or sliding glass exit. Use large-format thermal-finished slabs (24 by 36 inches or bigger) for a clean, contemporary look. Thermal finishing applies a flame to the surface that pops off a thin layer, leaving a textured but flat surface with excellent grip when wet. Budget $15 to $25 per square foot for material, plus installation on a mortar bed over concrete.
Choose if
- You want a high-end natural stone look without committing to a full patio
- Your back door opens onto grass or mulch and you need a transition surface
- You prefer the grey-blue color palette over warm sandstone tones
Recommended
Items for this idea
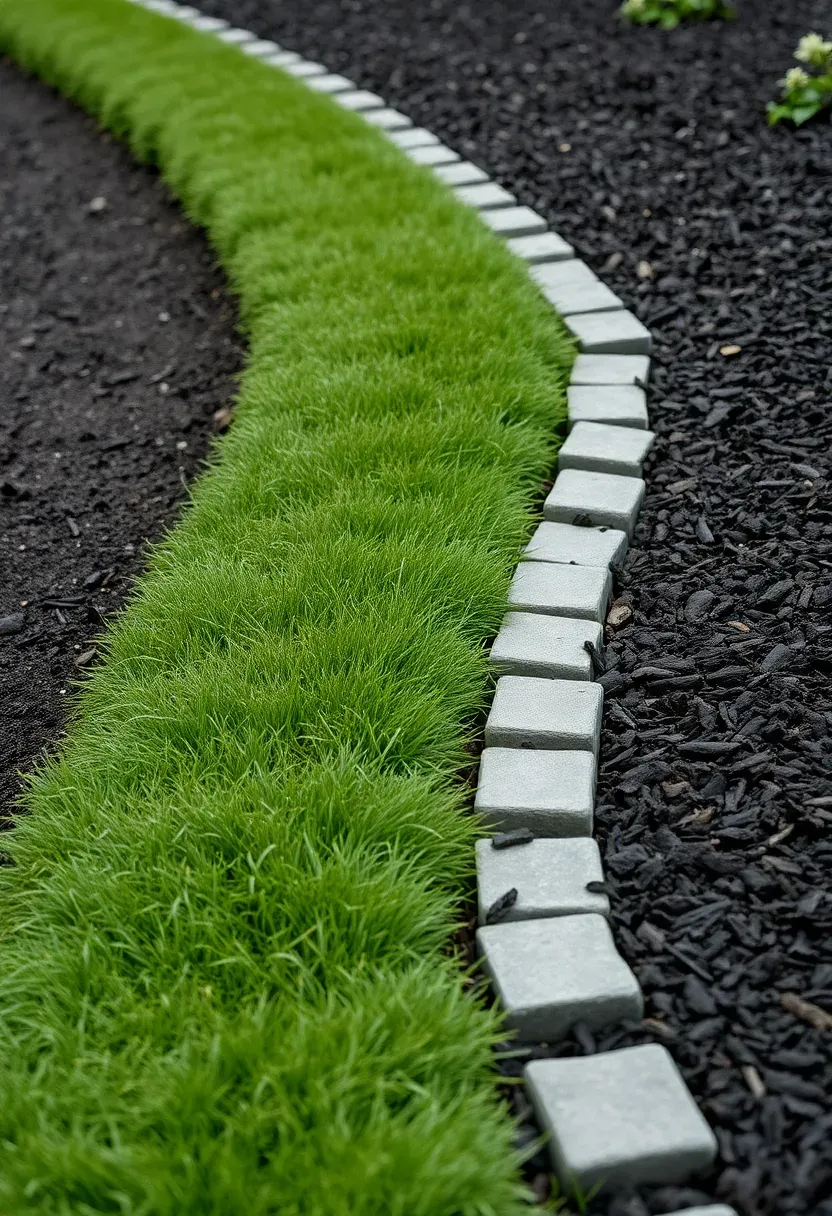
9. Cobblestone Border Edging
Granite cobblestones (also called setts) are small, roughly cubic stones traditionally used for European road surfaces. As border edging, they create a durable transition between lawn and planting beds, driveways and garden areas, or patio surfaces and gravel zones. Standard sett sizes are 4x4x4 inches or 4x4x8 inches. Set them in a concrete haunch — a small trench of concrete that locks them in place permanently. The total cost for a cobblestone border runs $8 to $14 per linear foot installed. Unlike plastic or metal edging, cobblestone borders never bend, rust, or become visible through thin mulch. They also allow clean mower edges since the stones sit flush with the lawn.
Tips
- Dig a trench 8 inches wide and 6 inches deep, fill halfway with concrete, press setts into the wet mix
- Use a string line for straight runs and a garden hose as a template for curves
- Leave 1/4-inch gaps between setts and fill with mortar or polymeric sand
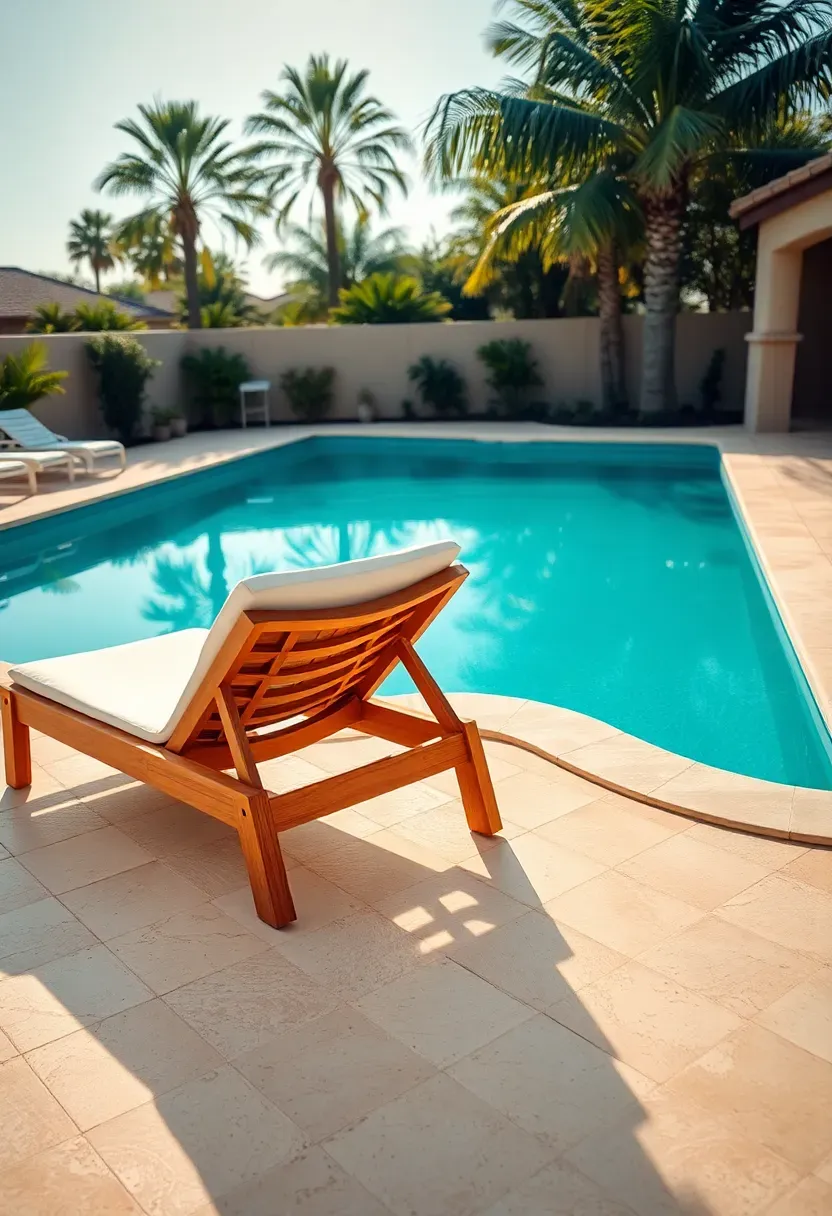
10. Travertine Pool Surround
Travertine is a limestone formed in hot springs, recognizable by its pitted surface and warm cream-to-walnut color range. It stays notably cooler underfoot than concrete or porcelain tile in direct sun, which is why it dominates pool deck applications in hot climates. Tumbled travertine pavers with a natural surface provide grip when wet without feeling rough. Expect to pay $7 to $15 per square foot for pavers, with installation on a sand bed or mortar adding $10 to $18 per square foot. The main drawback is porosity — travertine absorbs pool chemicals and can stain if not sealed annually. Use a breathable impregnating sealer rather than a topical coating, which traps moisture and causes the stone to flake.
Tips
- Select filled and honed pavers for a smoother look, or tumbled and unfilled for a rustic texture
- Install bullnose coping pieces along the pool edge — they are rounded to prevent shin scrapes
- Avoid dark-colored travertine near pools in full sun — walnut and chocolate shades absorb more heat
Recommended
Items for this idea
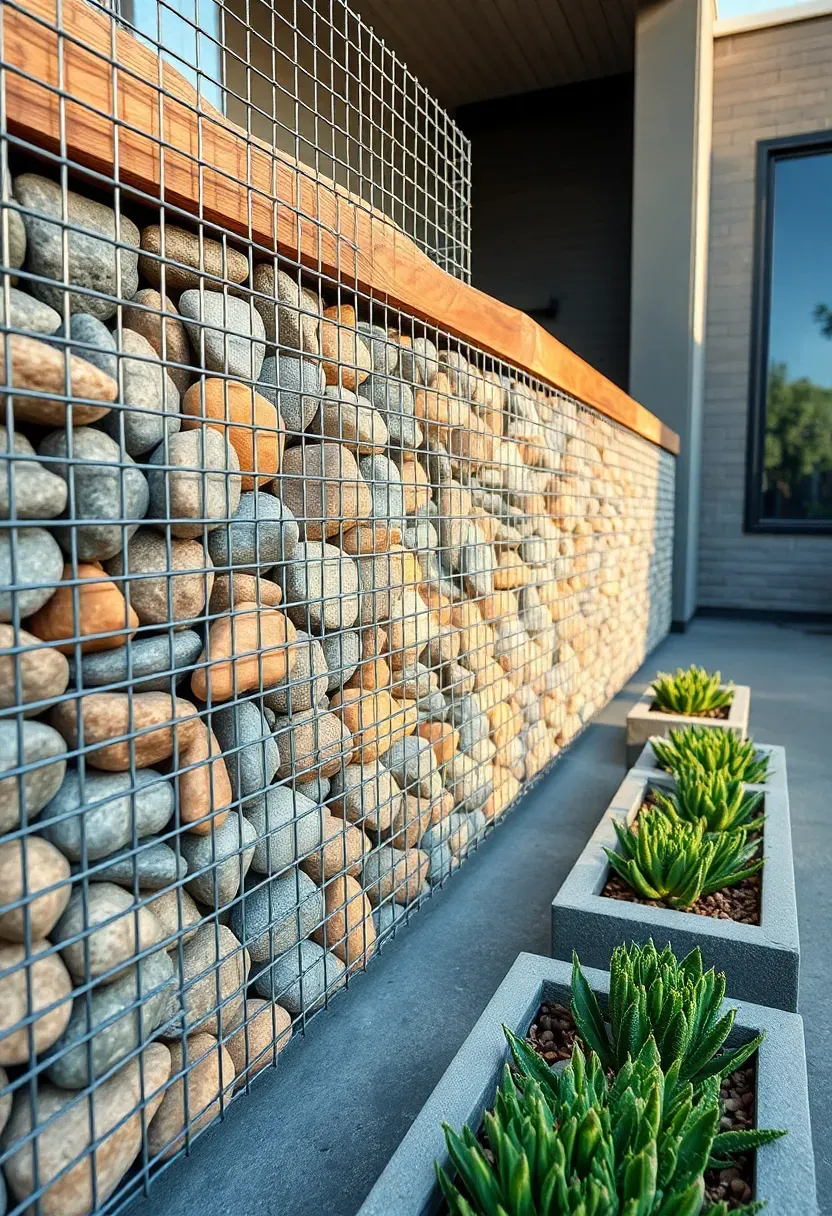
11. Gabion Wall Feature
What is a gabion wall
Gabions are wire mesh cages — typically welded steel in a rectangular shape — filled with rock, broken concrete, or other heavy material. Originally used in civil engineering for erosion control and retaining embankments, they have crossed over into residential landscape design as decorative walls, benches, planters, and privacy screens.
Why designers use them now
The industrial texture of wire and stone reads as intentionally rough in a way that complements modern architecture. A gabion bench wall 18 inches tall and 24 inches deep provides permanent seating that never rots, fades, or needs cushions (though you can add them). The wire cages cost $30 to $60 per linear foot for a 3-foot-tall wall, and filling them with local river rock keeps material costs under $100 per cubic yard. Assembly is basically stacking and filling — no masonry skills needed.
Pros and cons
- Pro: Fully permeable, so they double as retaining walls with built-in drainage
- Pro: Can be disassembled and relocated if you redesign the space
- Con: Wire mesh will rust over time unless you use galfan-coated or stainless steel cages
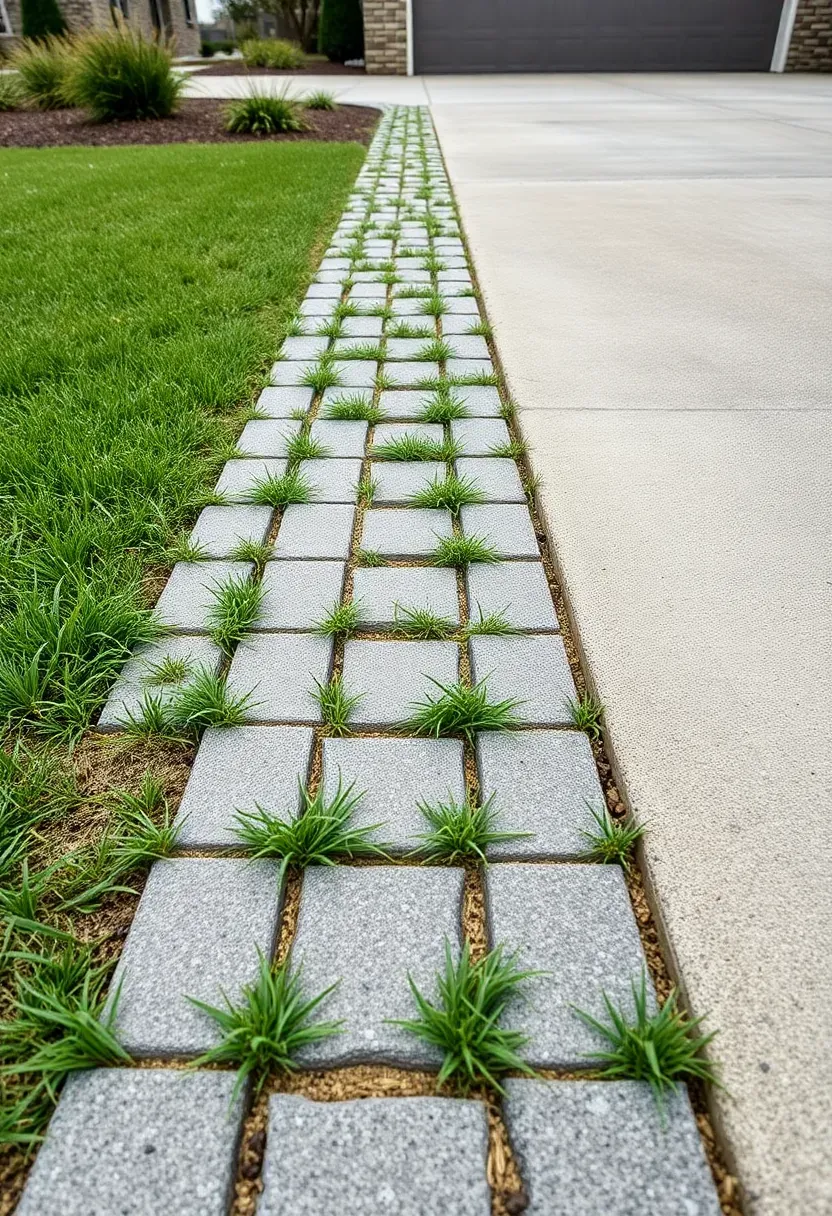
12. Permeable Paver Driveway Extension
Many backyards connect to a driveway or garage apron where you need a hard surface for parking an extra vehicle, storing a boat trailer, or turning around. Permeable pavers solve the problem without adding impervious surface area that increases stormwater runoff — an issue some municipalities now regulate. These pavers have wide joints or open-grid patterns that allow rain to drain through into a deep gravel reservoir below. The reservoir stores water temporarily and releases it slowly into the soil. Material costs are $6 to $12 per square foot, about 30% more than standard pavers, but some areas offer stormwater fee credits that offset the difference.
How to install
- Excavate to 18-24 inches depending on soil permeability — clay soils need more reservoir depth
- Line with non-woven geotextile fabric to prevent soil migration into the gravel
- Fill with open-graded aggregate (#2 stone) in lifts, compacting each layer
- Screed a bedding layer of ASTM #8 stone, set pavers, and fill joints with #8 or #89 aggregate
Watch out
- Permeable systems fail if fine sediment clogs the joints — avoid directing muddy runoff onto the surface
- Vacuum or pressure wash joints annually to maintain infiltration rates
Recommended
Items for this idea
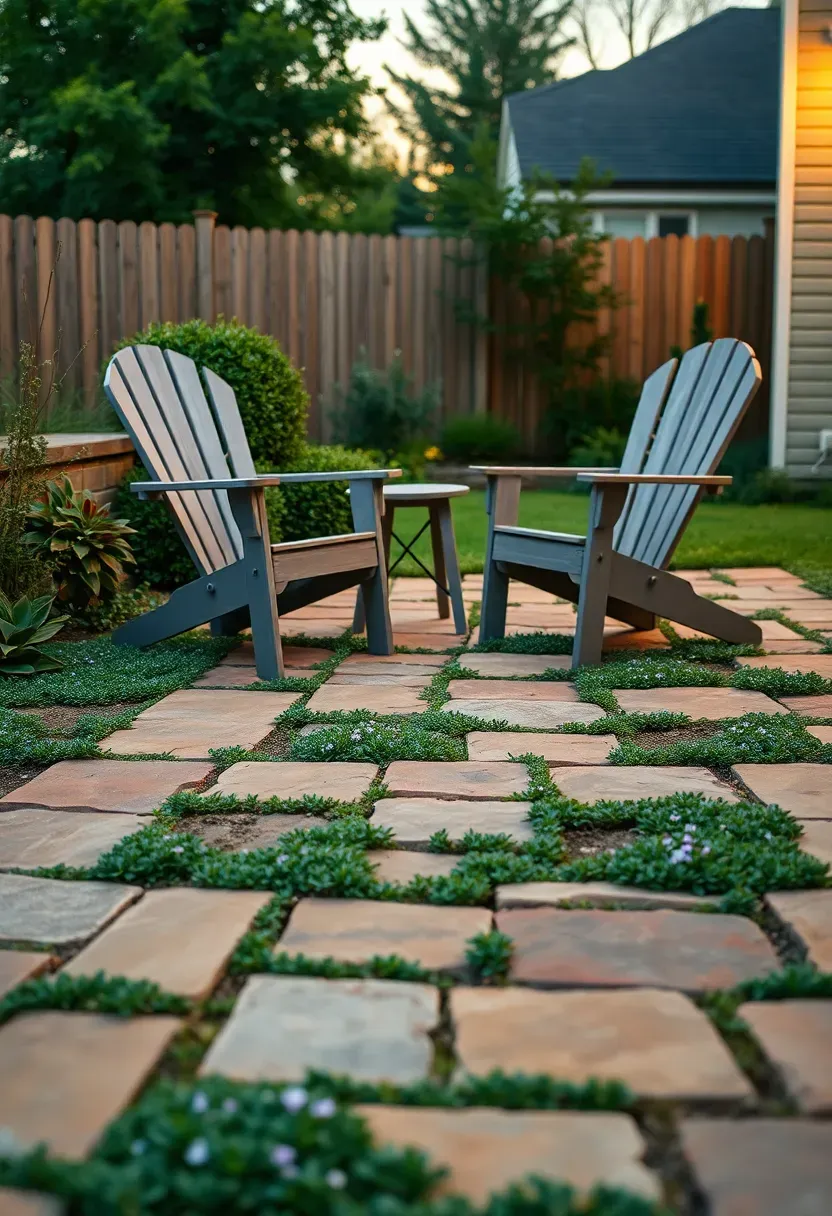
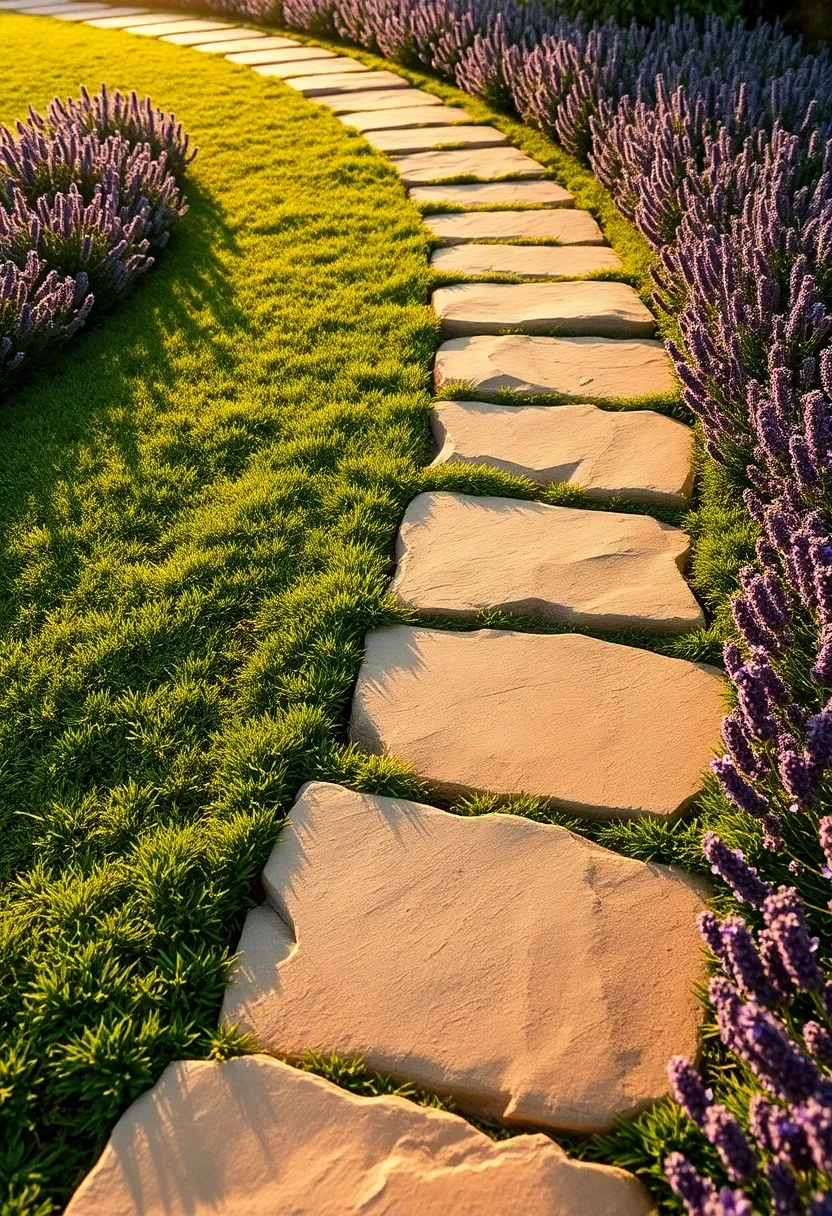
13. Sandstone Stepper Path
Individual stepping stones set into lawn or ground cover create a path that feels casual and invites you to slow down. Sandstone steppers — typically 18 to 24 inches across and 2 inches thick — are sold at stone yards for $5 to $15 per piece. The installation is dead simple: place the stone on the grass, cut around it with a spade, remove the sod to a depth matching the stone thickness plus an inch of sand, set the stone, and fill gaps with soil. The top surface should sit about half an inch above the surrounding turf so the mower clears it. A 30-foot path needs roughly 15 to 18 stones spaced at a comfortable stride length of 22 to 24 inches center to center.
Tips
- Choose stones with a consistent thickness to avoid wobbling — test each one before buying
- Flatten the sand bed with a hand tamp and check level before setting each stone
- Plant creeping thyme or Irish moss in the gaps for a living-path effect
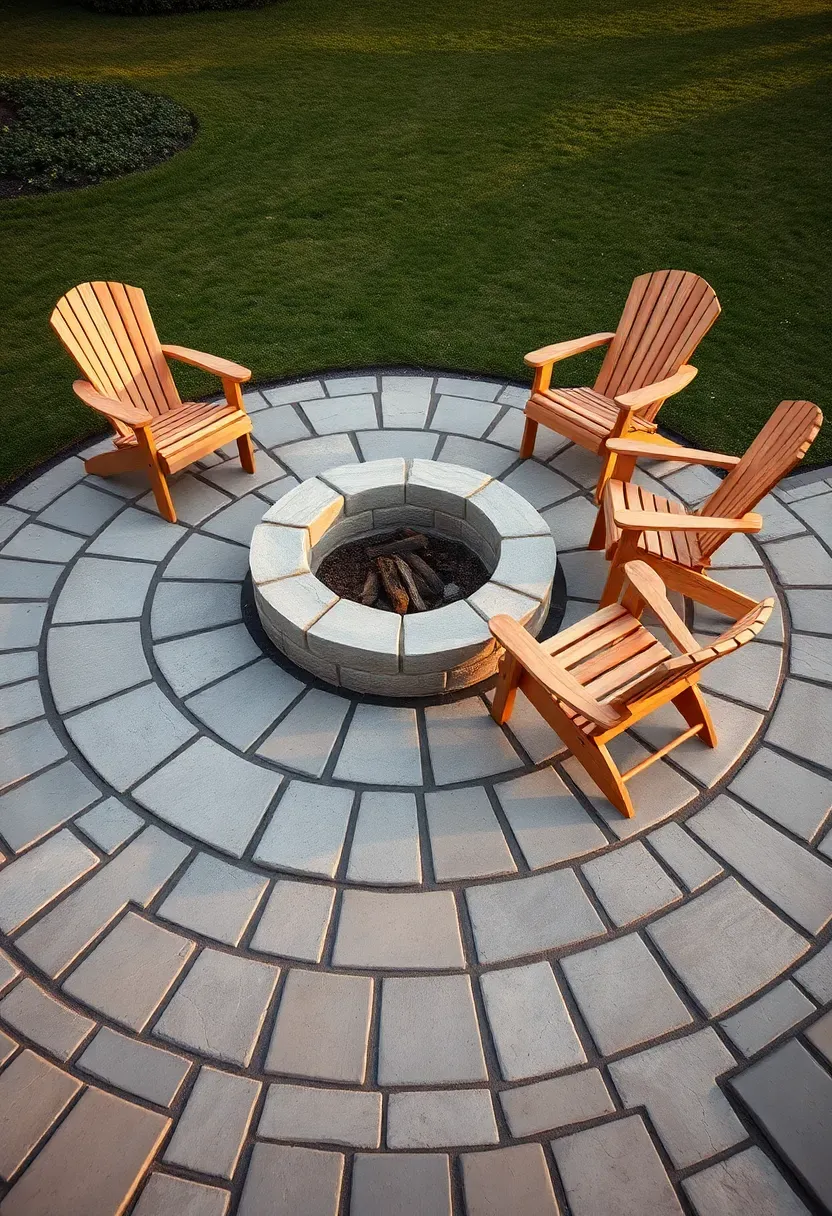
14. Mortared Stone Fire Pit Pad
The bare-ground fire pit problem
Setting a fire ring directly on grass kills the turf, creates a mud circle, and offers no protection from embers reaching nearby plants or structures. A dedicated hardscape pad solves all three issues and gives the fire pit area a finished look.
Building it right
A fire pit pad should extend at least 4 feet beyond the outer edge of the ring in all directions — for a 36-inch fire pit, that means a pad roughly 12 feet in diameter. Flagstone or cut limestone mortared onto a 4-inch concrete base provides a non-combustible, cleanable surface. Set the fire pit ring on the pad with heat-resistant mortar or dry-stacked fire brick. Run a gas line under the pad before pouring if you plan a gas fire pit. Total cost for a 12-foot circular pad in flagstone runs $1,500 to $3,000 in materials, or $3,500 to $6,000 professionally installed.
Pros and cons
- Pro: Permanent, level surface that does not erode or settle unevenly
- Pro: Keeps sparks and ash off combustible materials
- Con: Cannot be easily relocated once mortared in place
Recommended
Items for this idea
15. Slate Chip Dry Creek Bed
A dry creek bed handles the water that pools in low spots or flows across yards during heavy rain. Instead of fighting the drainage path, you formalize it with graded stone — larger boulders along the banks, medium river rock in the channel center, and slate chips as the visible surface material. Slate chips in grey, blue, or purple tones create a convincing streambed look even when dry. Lay landscape fabric under the entire channel, with 4 inches of base gravel below the decorative stone. Size the channel based on your runoff volume: 12 to 18 inches wide handles most residential situations, while yards collecting water from neighboring properties may need 24 to 36 inches. The cost runs $5 to $10 per linear foot for a basic installation.
Tips
- Place the largest boulders at curves where water would naturally deposit them
- Vary stone sizes within the channel — all-uniform gravel looks artificial
- Plant moisture-loving species like ferns, astilbe, or Japanese iris along the banks

16. Exposed Aggregate Concrete Patio
Exposed aggregate is regular concrete with the top layer of cement paste washed away before it fully cures, revealing the stone aggregate underneath. The result is a pebbly, textured surface with natural color variation that hides dirt and provides better traction than smooth concrete. You can select the aggregate type — round river pebbles for a smooth feel, crushed granite for more texture, or even glass beads for a decorative effect. The cost premium over standard concrete is modest, roughly $2 to $4 more per square foot, since the technique uses a surface retarder and pressure washer rather than expensive materials. The exposed stone surface holds up well to furniture, foot traffic, and freeze-thaw cycles without the scaling that plagues stamped concrete.
Tips
- Apply surface retarder within 10 minutes of finishing, then cover with plastic sheeting
- Pressure wash the surface 12 to 24 hours later, depending on temperature and retarder depth
- Seal with a wet-look sealer to enhance stone colors, or leave unsealed for a matte natural appearance

Recommended
Items for this idea
17. Boulder Staircase on a Slope
When a yard drops more than 3 or 4 feet, you need steps. A boulder staircase uses large, flat-topped rocks — typically 300 to 800 pounds each — as individual treads set into the hillside. Each boulder is placed by machine (a compact excavator or skid steer with forks), partially buried in the slope so it cannot shift. The organic, irregular look suits naturalistic landscapes where poured concrete steps would feel out of place. Budget $150 to $400 per step depending on stone size and local availability. A 6-foot elevation change needs roughly 8 to 10 steps with 7-inch rises. The main limitation is access — you need a path wide enough for equipment to reach the slope.
How to install
- Mark step locations starting from the bottom, spacing treads for a 6-to-8-inch rise and 15-to-18-inch run
- Excavate a shelf for each boulder deep enough to bury at least one-third of the stone
- Set each boulder with equipment, check that it is stable and tilted slightly forward (1/4 inch) for drainage
- Backfill behind and beside each stone with compacted gravel and topsoil
Watch out
- Boulders with rounded tops are slip hazards — choose stones with flat, textured surfaces
- Handrails may be required by code if the staircase has more than 3 steps — check local building regulations
Quick FAQ
How thick should a gravel base be under hardscape pavers? Most paver manufacturers recommend a minimum of 6 inches of compacted gravel base for pedestrian areas and 8 to 12 inches for driveways. The base prevents settling and frost heave. Use angular crushed stone (not round river gravel) because it compacts more tightly and interlocks.
Do I need a permit for a backyard retaining wall? In most jurisdictions, retaining walls under 4 feet tall measured from the bottom of the footing to the top of the wall do not require a permit. Walls taller than that typically need engineered drawings and a building permit. Always check your local codes — some areas have stricter thresholds, especially near property lines or easements.
Which backyard hardscape material is most budget-friendly? Pea gravel and decomposed granite are the least expensive options at $1 to $4 per square foot. They require minimal tools, no cutting, and install in a day for most backyard-sized areas. The tradeoff is periodic maintenance — raking, top-dressing, and edging repair — that you avoid with more permanent surfaces like concrete or stone.
Can I install hardscape over tree roots? Building hardscape over major tree roots risks damaging the tree and creates an unstable base as roots grow and shift. If roots cross the planned area, consider a floating deck, stepping stones with generous spacing, or rerouting the hardscape layout. For minor surface roots, you can sometimes build up the grade with gravel rather than cutting into the root zone.
How do backyard hardscape materials handle freeze-thaw cycles? Natural stone (bluestone, granite, slate) and properly rated concrete pavers withstand freeze-thaw well. Clay brick must be SW-rated for severe weather. Poured concrete needs control joints and proper curing. Travertine and softer limestone are more vulnerable — use a penetrating sealer and avoid deicing salts, which accelerate spalling.
Hardscaping is not the flashiest part of a backyard project, but it is the part that determines whether the space actually gets used. A patio that drains properly, a path that stays dry, a wall that holds soil in place — these are the pieces that make everything else work. Pick one area of your yard that annoys you most, figure out the water situation first, then choose a material that fits your climate and budget. You can always add more later. The best backyard hardscapes grow section by section over a few seasons rather than trying to do everything at once.
Pinterest cover for 17 Backyard Hardscape Ideas
About the author
OBCD
CGI visualization and interior design content. We create detailed 3D renders and curate practical design ideas for every room in your home.