21 Backyard Porch Ideas for Year-Round Comfort
Most backyards have a porch that gets used about four months out of the year. The rest of the time, it sits there collecting leaves and hosting spiders. That is a waste of square footage you already paid for. The fix usually is not a full renovation — it is a few deliberate upgrades to seating, shade, and lighting that make the space usable in heat, rain, and cooler evenings. These 21 backyard porch ideas range from quick weekend projects to more involved builds, but every one of them targets the same goal: getting you outside more often.
Here is a mix of structural upgrades, furniture arrangements, and finishing details organized from foundational choices to final touches.
Table of Contents
- Covered Porch with Exposed Rafters
- Screened-In Porch for Bug-Free Evenings
- Wraparound Porch Extension
- Ceiling Fan Installation for Airflow
- Deep Seating Sectional Layout
- Outdoor Dining Table Under Cover
- Porch Swing Daybed
- Stone or Tile Porch Flooring
- Built-In Bench Along the Railing
- Retractable Shade Screens
- Outdoor Fireplace on the Porch
- Pendant Lighting Instead of Recessed
- Tongue-and-Groove Porch Ceiling
- Container Garden Border
- Outdoor Bar Cart Station
- Privacy Lattice with Climbing Plants
- Heated Porch Floor System
- Hammock Corner Setup
- Outdoor Ceiling-Mounted Speakers
- Weatherproof Storage Bench
- Mixed Material Railing Design
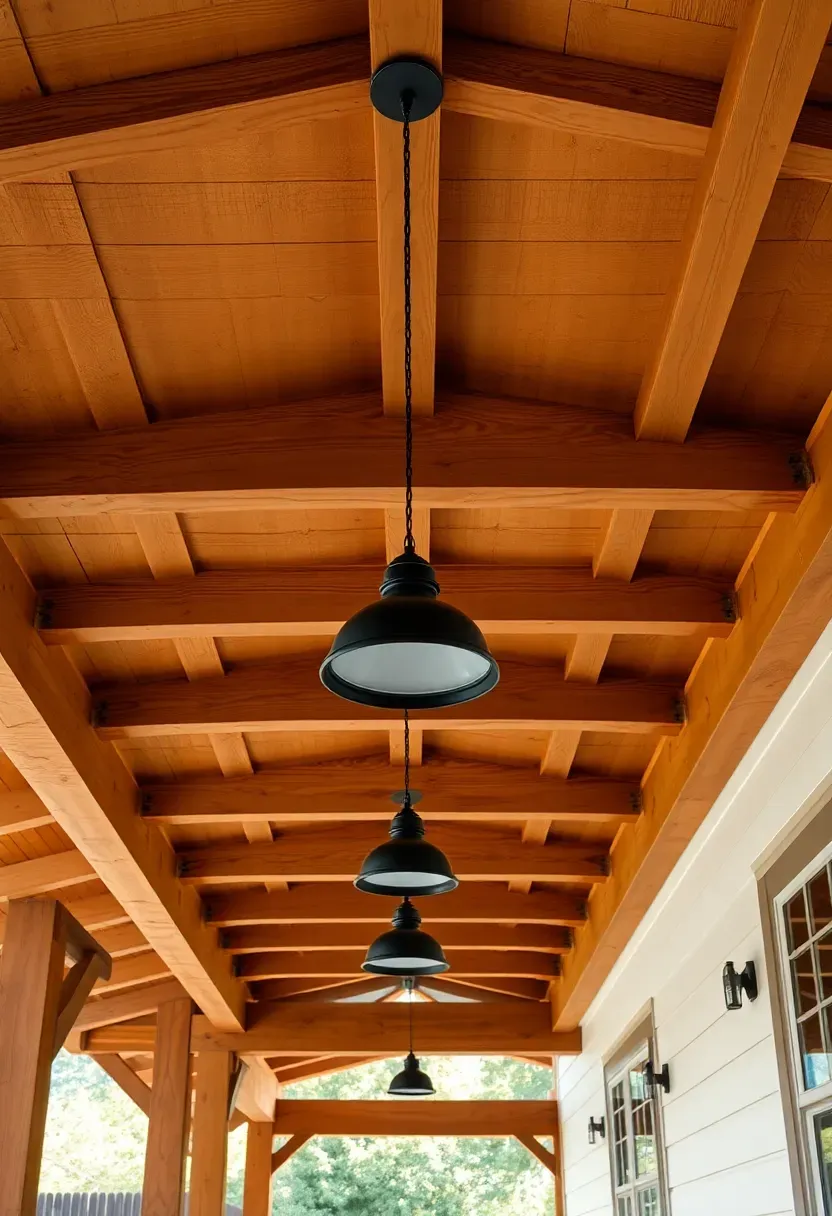
1. Covered Porch with Exposed Rafters
A covered porch is the single most impactful upgrade you can make to a backyard. It blocks direct sun and light rain, extending your usable season by at least two months on each end. Exposed rafters — where you leave the structural beams visible rather than closing them behind a flat ceiling — add architectural weight and give you mounting points for fans, lights, and hanging plants without additional framing work.
Tips
- Use pressure-treated Douglas fir or cedar beams rated for outdoor exposure; pine will warp within two seasons without heavy treatment.
- Space rafters at 16-inch centers if you plan to mount anything heavier than string lights between them.
- Stain the rafters a shade darker than the deck to create visual separation between floor and ceiling planes.
We picked a few things that go well with this idea: SunloungeCo 5-Piece Wicker Sectional Sofa Set (★4.6), 7-Piece Modular Rattan Sectional Sofa Set (★4.4) and Devoko 5-Piece Wicker Patio Sectional (★4.1). As an Amazon Associate we earn from qualifying purchases.
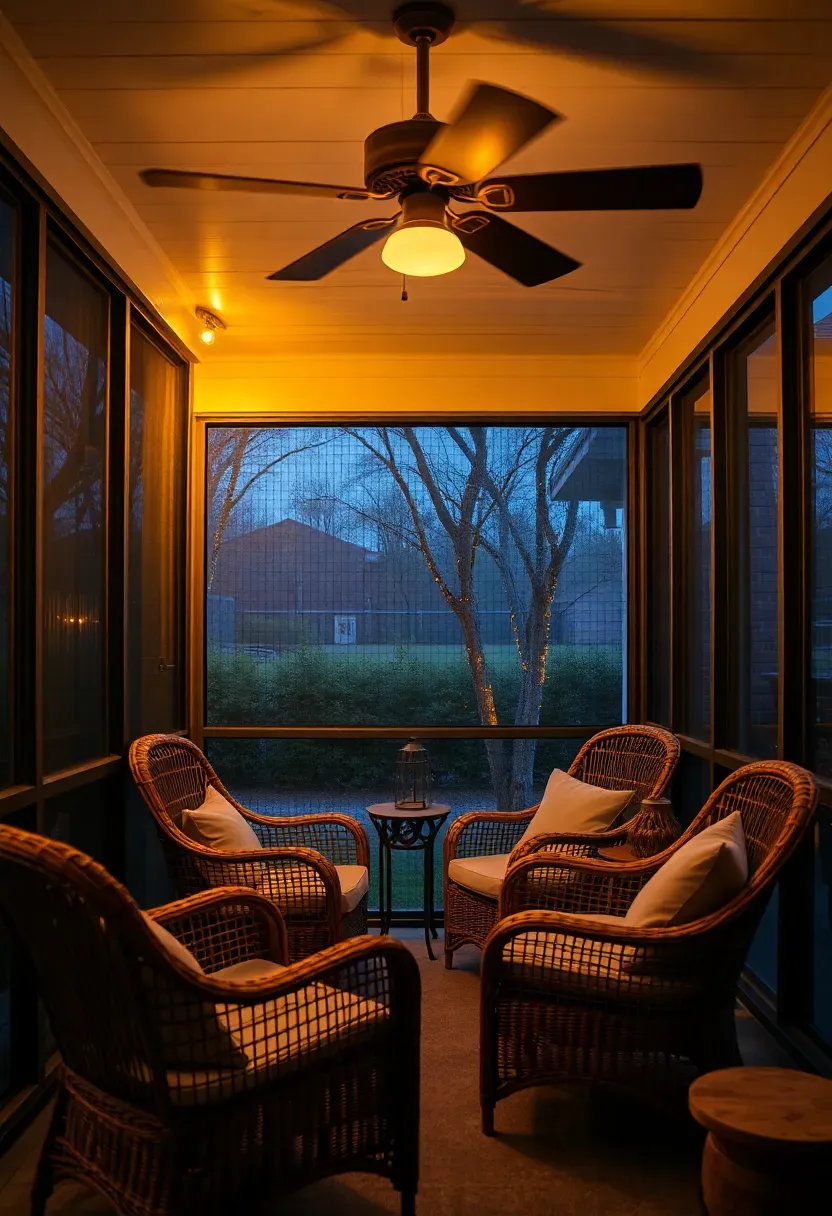
2. Screened-In Porch for Bug-Free Evenings
The Core Problem
Mosquitoes, gnats, and no-see-ums make evening porch time miserable in humid climates. Citronella candles and bug sprays help, but they do not solve the problem — they just make it slightly more tolerable while you smell like a tiki bar.
The Fix
A screened-in porch uses fine mesh panels (typically 18x16 or 20x20 mesh fiberglass screening) mounted in aluminum or wood frames around your existing porch structure. The screen keeps insects out while maintaining full airflow and sightlines to your yard. A properly installed screen porch also keeps out leaves and larger debris, reducing cleaning time.
Pros and Cons
Pros: Insect-free outdoor living; maintains breeze and views; adds usable square footage that appraisers count as living space in many markets.
Cons: Screening limits the feeling of being fully outdoors; frames partially obstruct views; replacement screens cost $150-400 when pets or storms damage them.
We picked a few things that go well with this idea: Honeywell Belmar 52" Outdoor Ceiling Fan with Light (★4.7), Fanbulous 52" Wet Rated Outdoor Ceiling Fan (★4.6) and Honeywell Belmar 52" Outdoor Fan (No Light) (★4.7). As an Amazon Associate we earn from qualifying purchases.
3. Wraparound Porch Extension
If your existing porch covers only one wall of the house, extending it around a corner creates two distinct zones — one for dining, one for lounging — without building a separate structure. The L-shape or U-shape layout lets you follow the shade as the sun moves throughout the day, which is more practical than it sounds once you actually live with it.
How to Plan the Extension
Step 1: Match the Roofline
The extension roof should continue the same pitch and material as your existing porch roof. Mismatched roof angles look like afterthoughts from the street.
Step 2: Set Foundation Piers
Pour concrete piers at each corner and every 8 feet along the span. These carry the weight of the roof structure without pouring a continuous foundation wall.
Step 3: Connect the Decking
Run deck boards continuously around the corner rather than butting two separate sections together. This eliminates the seam that traps water and creates a visual break.
Watch Out For
- Building codes in most municipalities require a permit for covered porch extensions over 200 square feet.
- Check that the extension does not block egress windows for bedrooms on the adjacent wall.
We picked a few things that go well with this idea: Waterproof Vintage Lantern Porch Pendant Light (★4.4), Aoceley Modern Black Outdoor Pendant Lantern (★4.7) and BesLowe 13" Modern Outdoor Pendant Lantern (★4.8). As an Amazon Associate we earn from qualifying purchases.
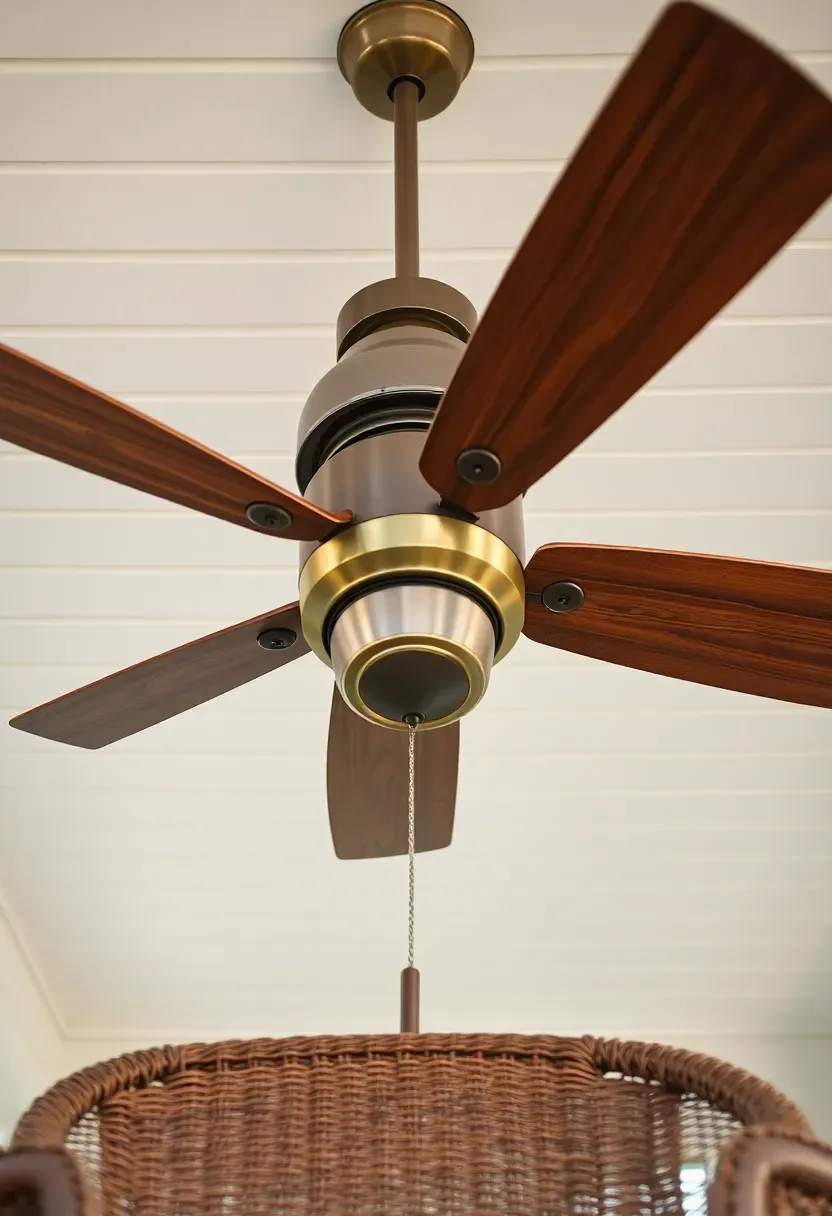
4. Ceiling Fan Installation for Airflow
A ceiling fan on a covered porch drops the perceived temperature by about 4 to 6 degrees Fahrenheit. That difference matters in July and August when sitting still in 90-degree heat feels borderline unbearable. Damp-rated fans (not just indoor-rated) handle the humidity and occasional sideways rain that covered porches experience.
Tips
- Mount the fan at least 7 feet above the porch floor and 10 to 12 inches below the ceiling for proper air circulation.
- Choose a fan with at least a 52-inch blade span for porches wider than 10 feet; smaller fans move air in too narrow a column to cover a seating area.
- Run a dedicated 20-amp circuit to the fan location — do not tap into an existing light fixture circuit, which may not handle the motor load safely.
Recommended
Items for this idea
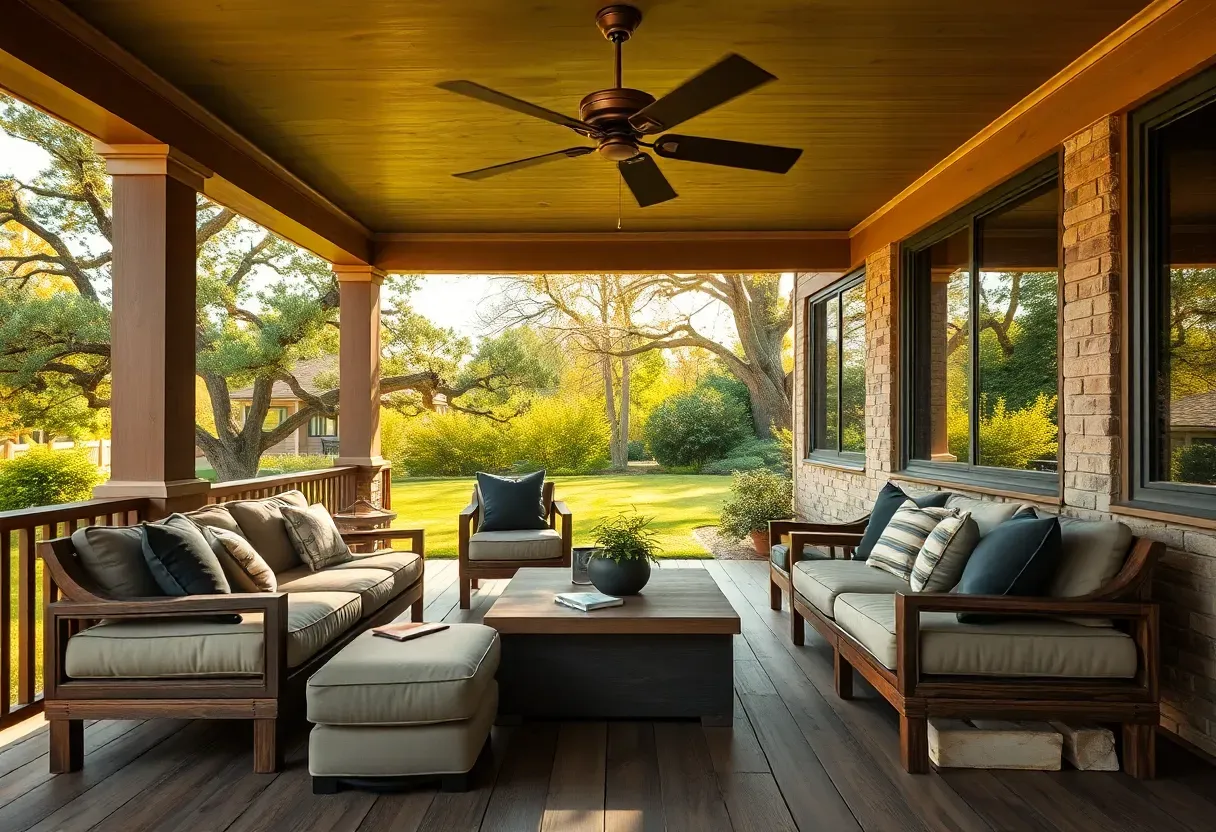
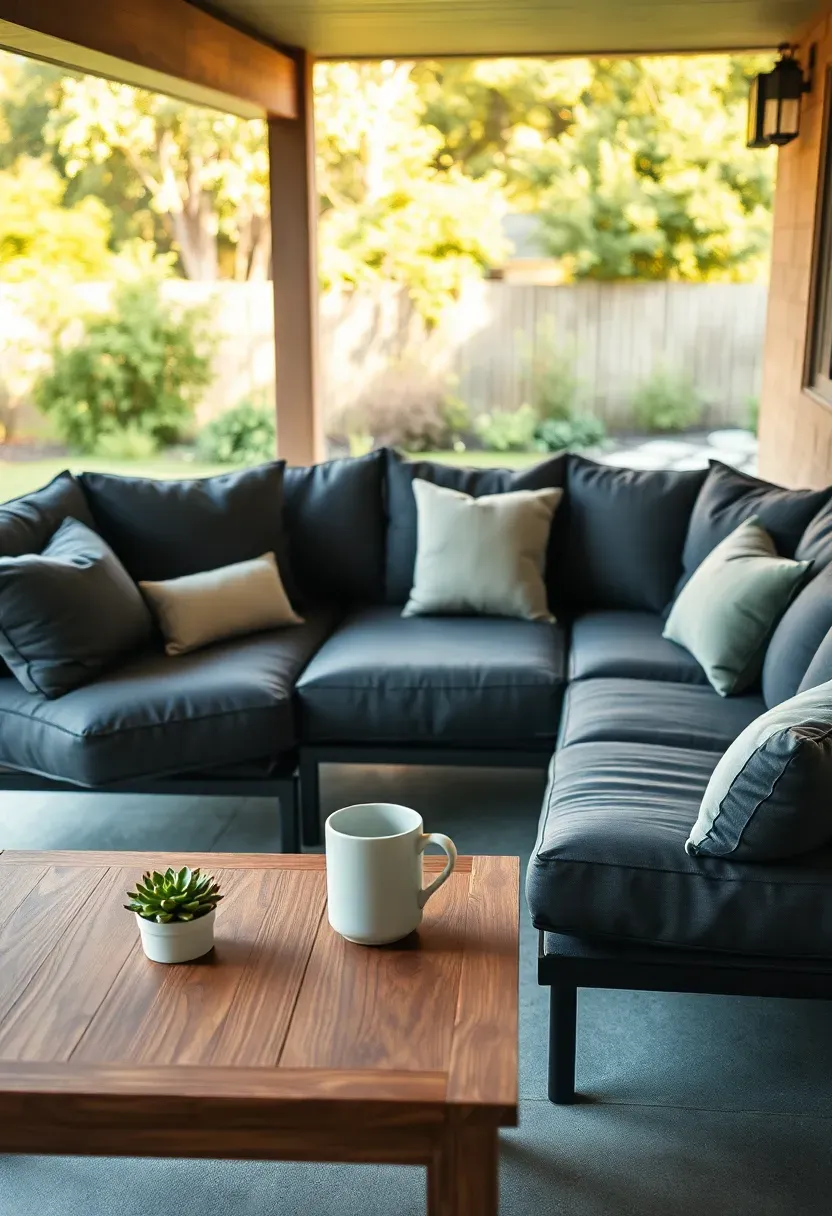
5. Deep Seating Sectional Layout
Standard outdoor chairs with their shallow seats and upright backs are fine for dining but miserable for relaxing. Deep seating — where the seat depth measures 25 to 30 inches and the back reclines slightly — lets you actually lean back and settle in the way you would on an indoor sofa. An L-shaped sectional configuration maximizes seating capacity while defining the porch conversation area without needing walls.
Tips
- Measure your porch footprint before ordering; sectionals need at least an 8x10-foot clear area to avoid cramping walkways.
- Stick to solution-dyed acrylic fabric (Sunbrella is the most common brand) for cushion covers — it resists UV fading and mildew growth.
- Anchor the sectional arrangement with an outdoor coffee table or ottoman in the center to give the grouping a focal point and a place to set drinks.
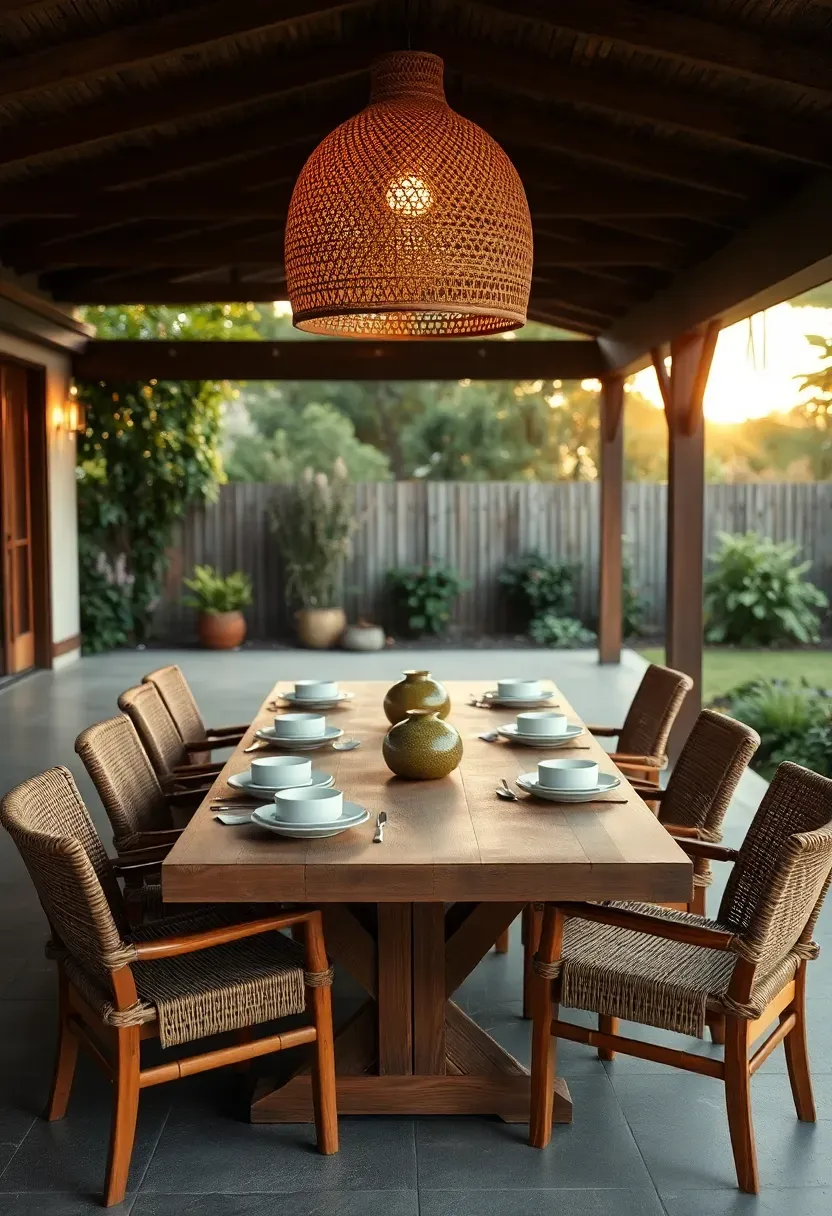
6. Outdoor Dining Table Under Cover
Why It Works
Eating outside on a covered porch combines the best parts of indoor dining (shade, protection from rain) with the best parts of outdoor dining (fresh air, garden views, the sound of birds). It is not a new concept, but most people underestimate how much more they cook and eat at home when they have a dedicated outdoor table that is always ready — no setup or teardown required.
Choosing the Right Table
A rectangular table seats more guests per square foot than round options. For a porch, a table 72 to 84 inches long and 36 to 40 inches wide seats six comfortably while leaving room to walk behind chairs. Teak holds up best without treatment; aluminum frames with a faux-wood top offer the look at lower cost and weight.
What to Watch Out For
- Leave 36 inches of clearance between the table edge and any wall, railing, or furniture so chairs can push back fully.
- Avoid glass tabletops on covered porches — they show every water spot and fingerprint and become unbearably hot in direct afternoon sun.
- If your porch is partially exposed, choose a table with an umbrella hole as backup shade even under a roof.
Recommended
Items for this idea
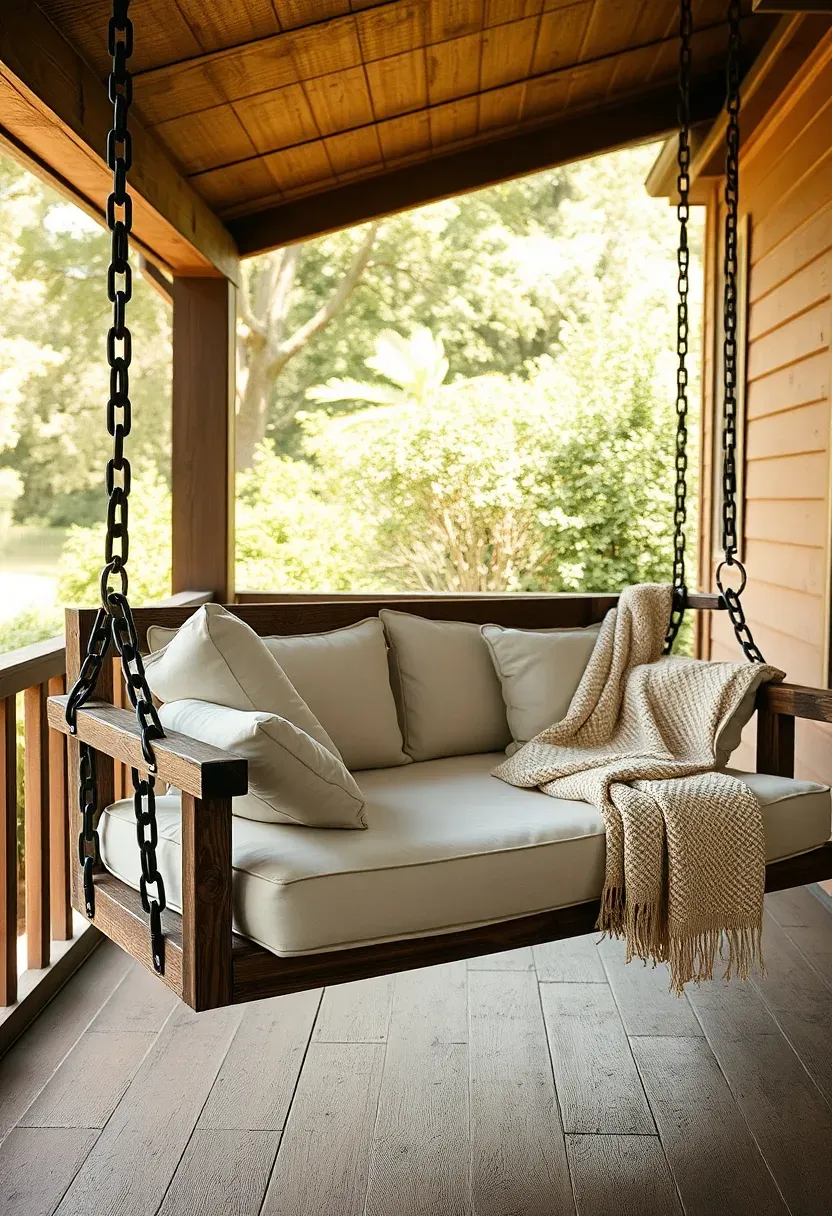
7. Porch Swing Daybed
A regular porch swing is comfortable enough for an hour. A daybed swing — wider, deeper, with a proper mattress-style cushion instead of a thin pad — is comfortable enough for an afternoon nap. These wider swings (typically 4 to 6 feet long and 30 to 36 inches deep) hang from the porch ceiling on heavy chains or rope and swing gently without the rocking limitation of a chair.
Tips
- The ceiling structure needs to support at least 800 pounds at each hanging point (the daybed plus two adults plus dynamic swinging load).
- Use a 4-inch thick outdoor foam mattress with a zippered, washable cover rather than individual cushions that shift apart.
- Hang the daybed so the mattress surface sits 18 to 20 inches off the floor — low enough to sit on comfortably, high enough to swing without dragging.
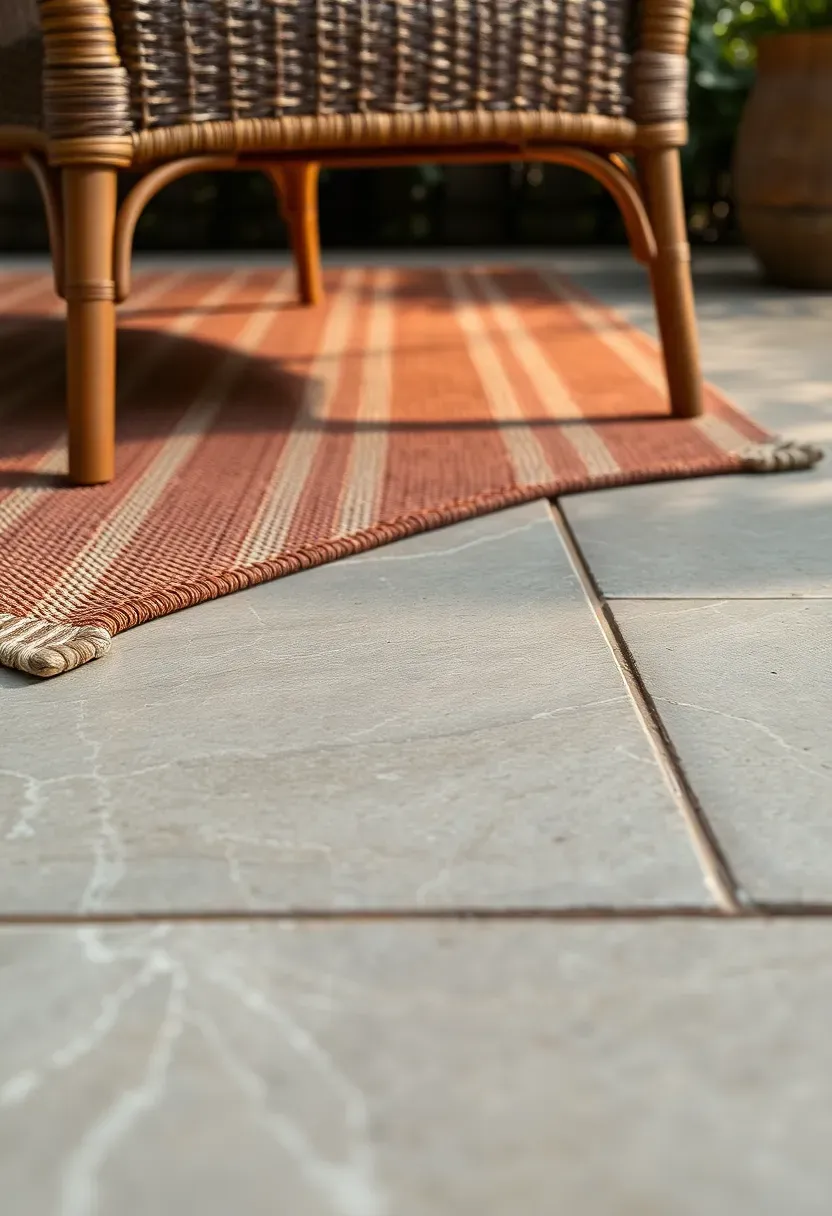
8. Stone or Tile Porch Flooring
Comparing: Natural Stone vs. Porcelain Tile
Both options outperform wood decking in durability and low maintenance, but they serve different priorities.
Natural Stone (Slate, Bluestone, Travertine)
Each piece has unique color variation and texture. Stone feels substantial underfoot and ages with a patina that many homeowners find appealing. Installed cost runs $12 to $30 per square foot depending on the stone type. The tradeoff: natural stone requires periodic sealing (every 1-3 years) and some types — especially lighter limestone — stain easily from dropped food or spilled drinks.
Porcelain Tile
Porcelain rated for outdoor use (look for a water absorption rate below 0.5%) mimics the look of stone, wood, or concrete at a lower price point ($4-$12 per square foot installed). It does not need sealing, resists staining, and comes in consistent sizes that speed up installation. The downside is that porcelain can feel generic compared to real stone, and cheaper versions chip at the edges.
Choose Based On
Go with stone if: Budget is flexible and you want a one-of-a-kind floor with natural character.
Go with porcelain if: You want durability with minimal upkeep and a predictable look across the entire surface.

Recommended
Items for this idea
9. Built-In Bench Along the Railing
Built-in benches solve two problems simultaneously: they add seating capacity without cluttering the porch with individual chairs, and they create a visual perimeter that defines the space. When built with a hinged seat, the bench doubles as storage for cushions, blankets, or outdoor games — which is useful on porches where a storage closet is not practical.
How to Build It
Step 1: Frame the Base
Build a box frame from 2x4 pressure-treated lumber, attaching it to the porch railing posts and deck framing. Height should be 17 to 18 inches from the porch floor.
Step 2: Add the Seat Surface
Use 1x6 or 5/4x6 deck boards for the seat top. If making a storage bench, hinge the boards in sections rather than one continuous lid — shorter sections are lighter and easier to lift one-handed.
Step 3: Finish and Cushion
Sand all edges, stain or paint to match the porch, and add a continuous outdoor cushion with ties to prevent sliding.
Watch Out For
- Drill drainage holes in the bottom of storage benches to prevent water from pooling inside and rotting stored items.
- Check that the bench height does not create a climbing hazard for small children near the railing top.
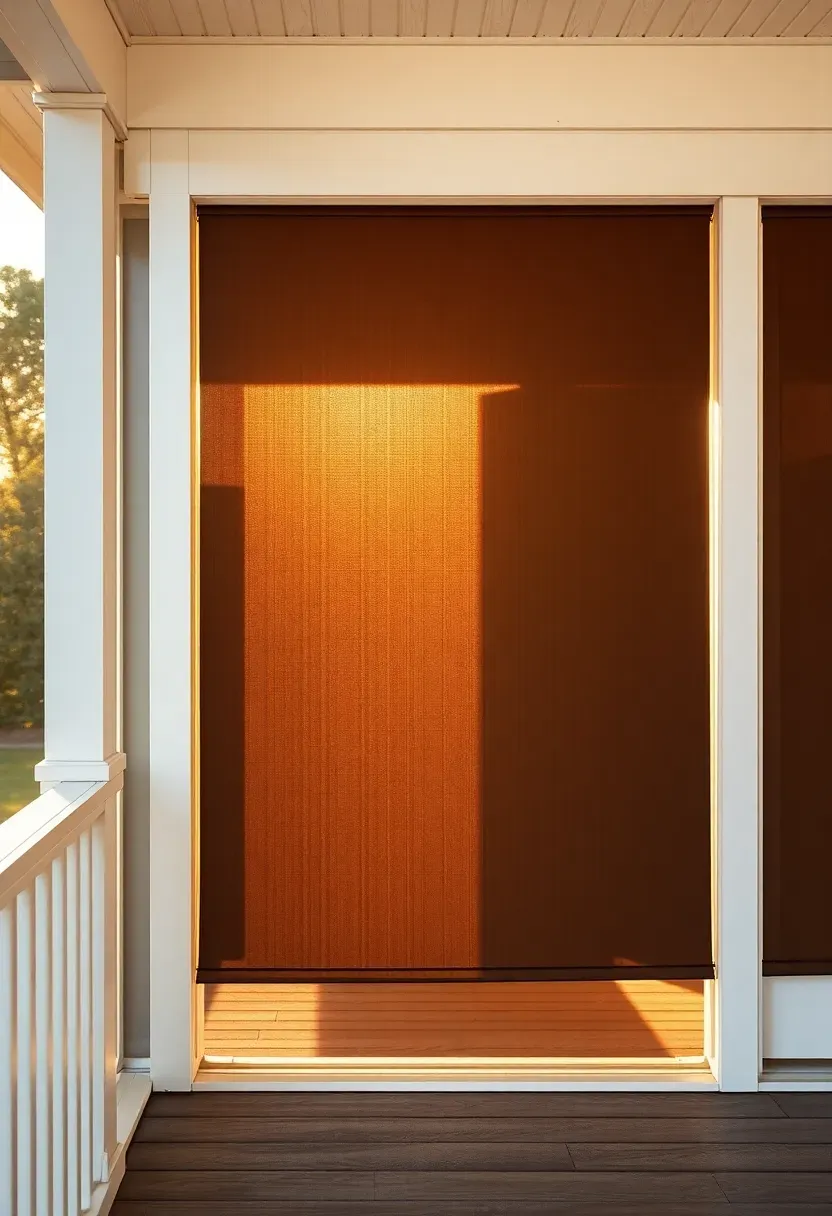
10. Retractable Shade Screens
Even a covered porch gets blasted by low-angle sun in the morning and late afternoon. Retractable shade screens mount to the porch header or underside of the roof beam and roll down on a track system to block direct sun from the sides. When you do not need them, they roll back up into a housing that is barely visible from the yard.
Tips
- Choose solar mesh fabric with a 90% or 95% UV block rating — this filters glare and heat while preserving your view of the backyard.
- Motorized screens with a remote or app control cost more upfront ($300-800 per opening) but get used far more often than manual pull-down versions because the convenience removes the friction of adjusting them.
- Measure each opening independently — porch openings are rarely identical widths, and a screen that is even half an inch too narrow leaves a gap that insects exploit.
Recommended
Items for this idea
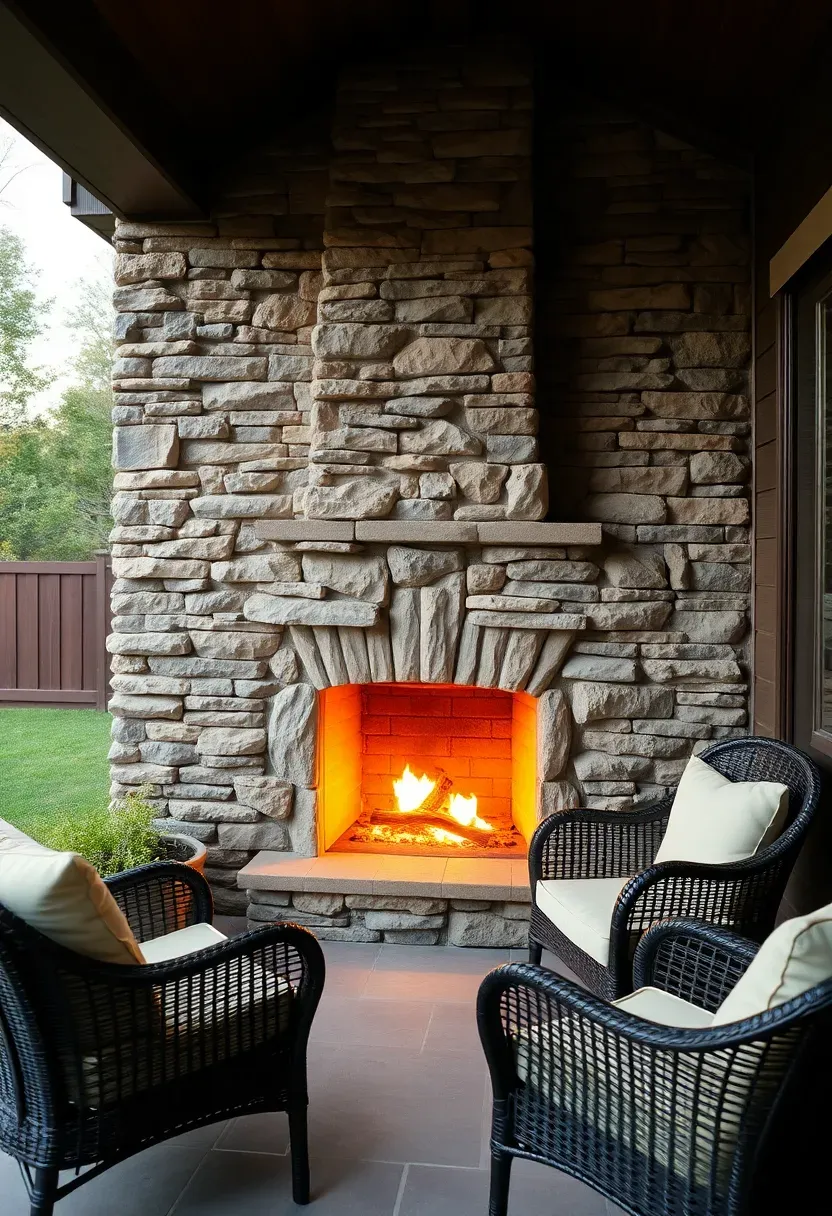
11. Outdoor Fireplace on the Porch
Why It Matters
A fireplace on the porch extends your outdoor season into late fall and early spring — and in milder climates, through the entire winter. Beyond warmth, fire is a natural gathering point. People orient toward it, conversation picks up, and the porch shifts from a place you sit alone to a place where groups collect without being asked.
Placement and Safety
Position the fireplace against an exterior wall or in a corner where the chimney or vent can route straight up through the porch roof or out a sidewall. Maintain a minimum 36-inch clearance between the firebox opening and any combustible furniture, cushions, or overhead beams. Gas units (natural gas or propane) are simpler for porch installations because they produce no sparks or ash.
What to Watch Out For
- Most building codes require a non-combustible hearth pad extending at least 18 inches in front of and 12 inches beyond each side of the firebox.
- If you go with a wood-burning unit, factor in chimney cleaning and the need for dry wood storage nearby.

12. Pendant Lighting Instead of Recessed
Recessed can lights on a porch ceiling do the job, but they have the personality of a parking garage. Pendant lights hang down into the space, creating pools of warm light at specific points — over a dining table, above a seating area, beside the entry. They also add a decorative element that recessed cans simply cannot offer.
Tips
- Use damp-rated or wet-rated pendant fixtures (check the UL listing) on covered porches; indoor fixtures corrode within a season.
- Hang pendants 30 to 36 inches above a dining table surface, or 7 feet above the floor in open seating areas where people walk underneath.
- Cluster two or three pendants at different heights over a long table rather than spacing them evenly — the asymmetry feels more intentional and less commercial.
Recommended
Items for this idea
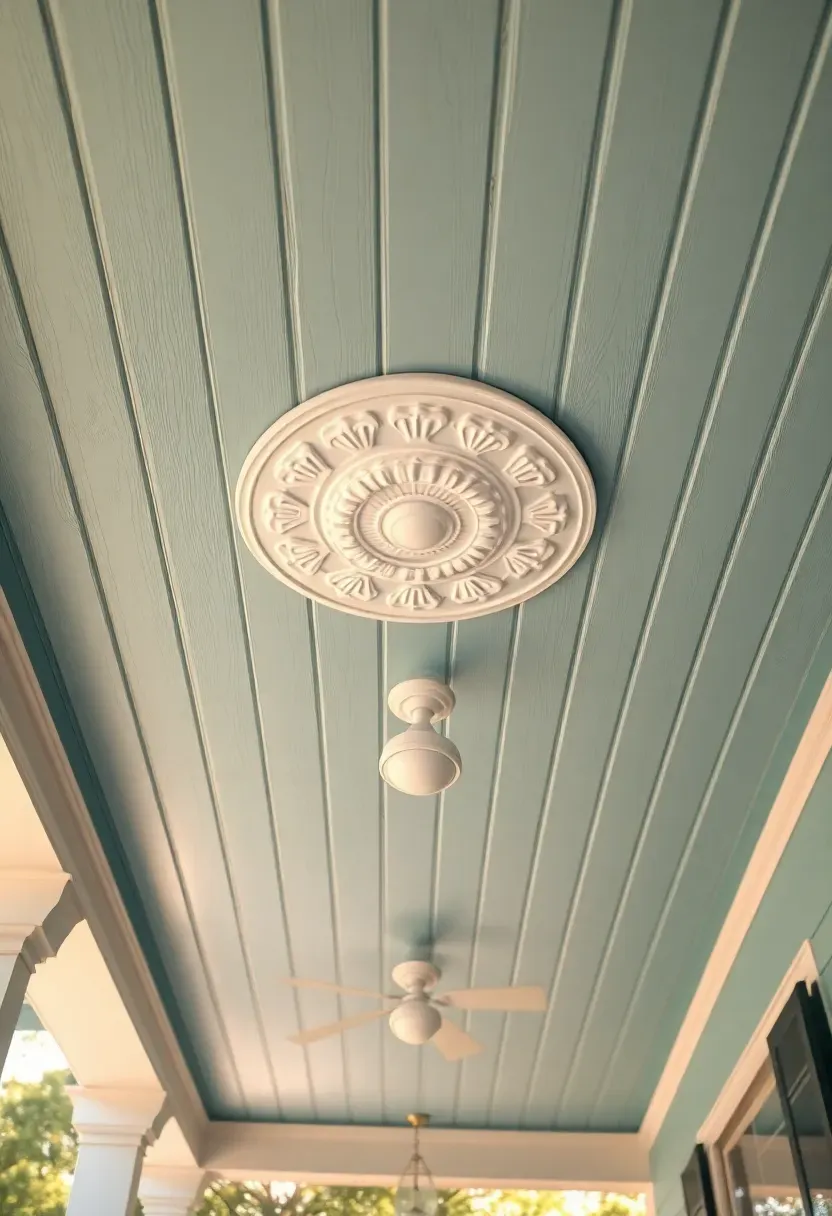
13. Tongue-and-Groove Porch Ceiling
An exposed joist ceiling is fine for a rustic look, but tongue-and-groove boards create a clean, finished plane overhead that makes the porch feel like an actual room. The boards interlock tightly, concealing the structure above while creating a flat surface you can paint any color. The traditional choice in the American South is "haint blue" — a pale blue-green that mimics the sky and supposedly keeps wasps from building nests (they mistake it for open air).
Tips
- Use PVC tongue-and-groove boards on porches with high humidity or rain exposure; real wood boards expand and contract with moisture and eventually show gaps.
- If using real wood, cypress and cedar resist rot best without chemical treatment.
- Paint or stain the boards before installation — it is far easier to coat flat boards on sawhorses than to paint overhead after they are nailed up.

14. Container Garden Border
Lining the porch perimeter with container plants creates a living boundary between the covered space and the open yard. The containers soften the hard edges of posts and railings, bring color and texture to what would otherwise be a monotone surface, and give you the flexibility to rearrange or swap plants seasonally without any permanent planting beds.
Tips
- Use pots at least 14 inches in diameter for visual weight; small 6-inch pots disappear against porch posts and railing bases.
- Mix heights by combining tall grasses or ferns in back with trailing plants like sweet potato vine or creeping jenny in front.
- Set pots on plant caddies with wheels if you move them for cleaning — a 16-inch terracotta pot full of damp soil weighs 50 to 80 pounds.

Recommended
Items for this idea
15. Outdoor Bar Cart Station
The Core Problem
Every time you want a drink on the porch, you walk back inside to the kitchen, rummage through cabinets, carry everything out, and then repeat the trip for ice or a forgotten glass. The constant back-and-forth kills the relaxation the porch is supposed to provide.
The Fix
An outdoor bar cart parked on the porch keeps glassware, a few bottles, a cutting board, and a small ice bucket within arm's reach. Teak or powder-coated aluminum carts handle weather exposure; carts with a bottom shelf hold larger items like a pitcher or wine bucket. Position it near the seating area but against a wall or railing where it will not block foot traffic.
Pros and Cons
Pros: Eliminates kitchen trips during entertaining; doubles as a display piece; rolls indoors easily for winter storage.
Cons: Exposed liquor bottles degrade in prolonged heat and sunlight; ice melts fast without shade; you need to restock it before each gathering.
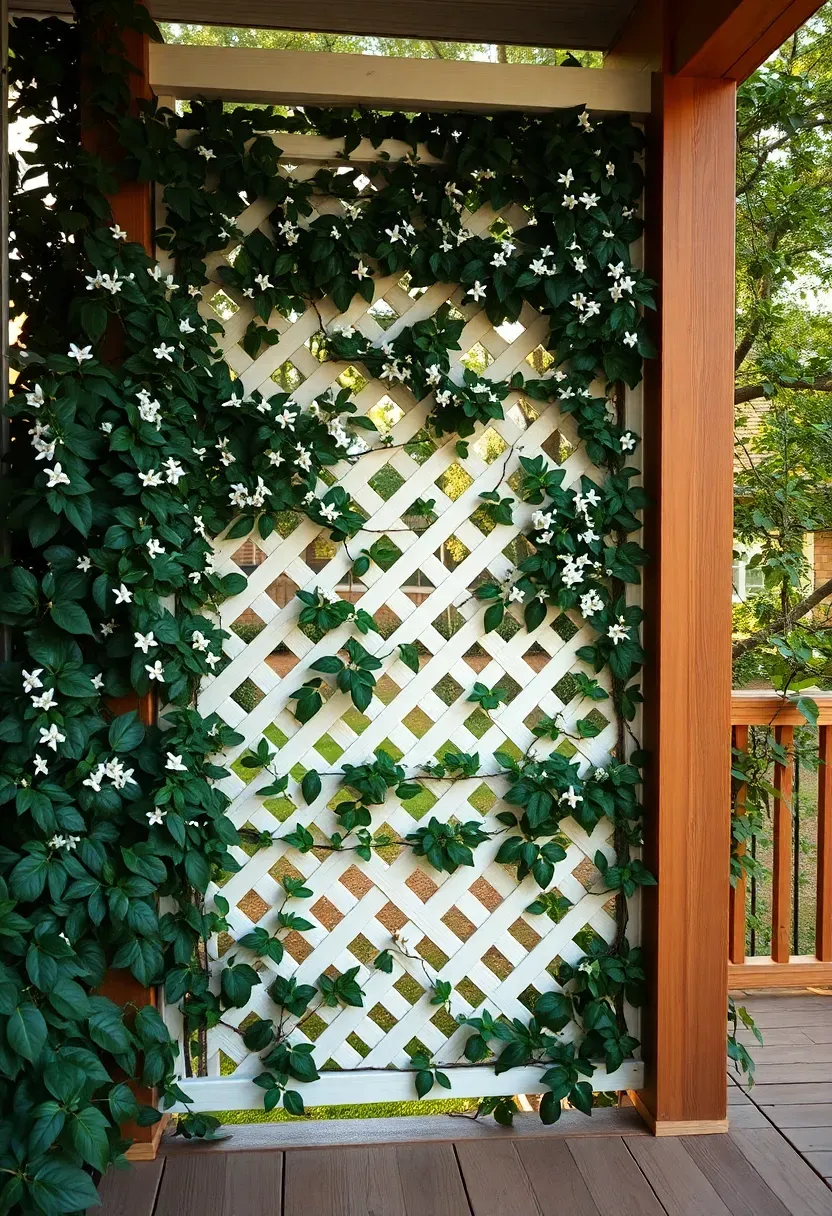
16. Privacy Lattice with Climbing Plants
A lattice panel mounted between porch posts blocks sightlines from neighbors while letting air and dappled light through. On its own, lattice is functional but visually basic. Add a climbing plant — jasmine, clematis, or confederate jasmine in warm climates; climbing hydrangea or Virginia creeper in cooler zones — and within one to two growing seasons the lattice disappears under a living wall that smells as good as it looks.
Tips
- Use vinyl or composite lattice rather than thin wooden lattice, which splits and rots within a few years under the weight of mature vines.
- Mount the lattice 2 inches off the porch post surface using spacer blocks so climbing plants can weave behind the grid for a fuller look.
- Prune climbing plants annually in late winter to prevent them from growing into the porch roof structure, where they trap moisture and attract insects.
Recommended
Items for this idea
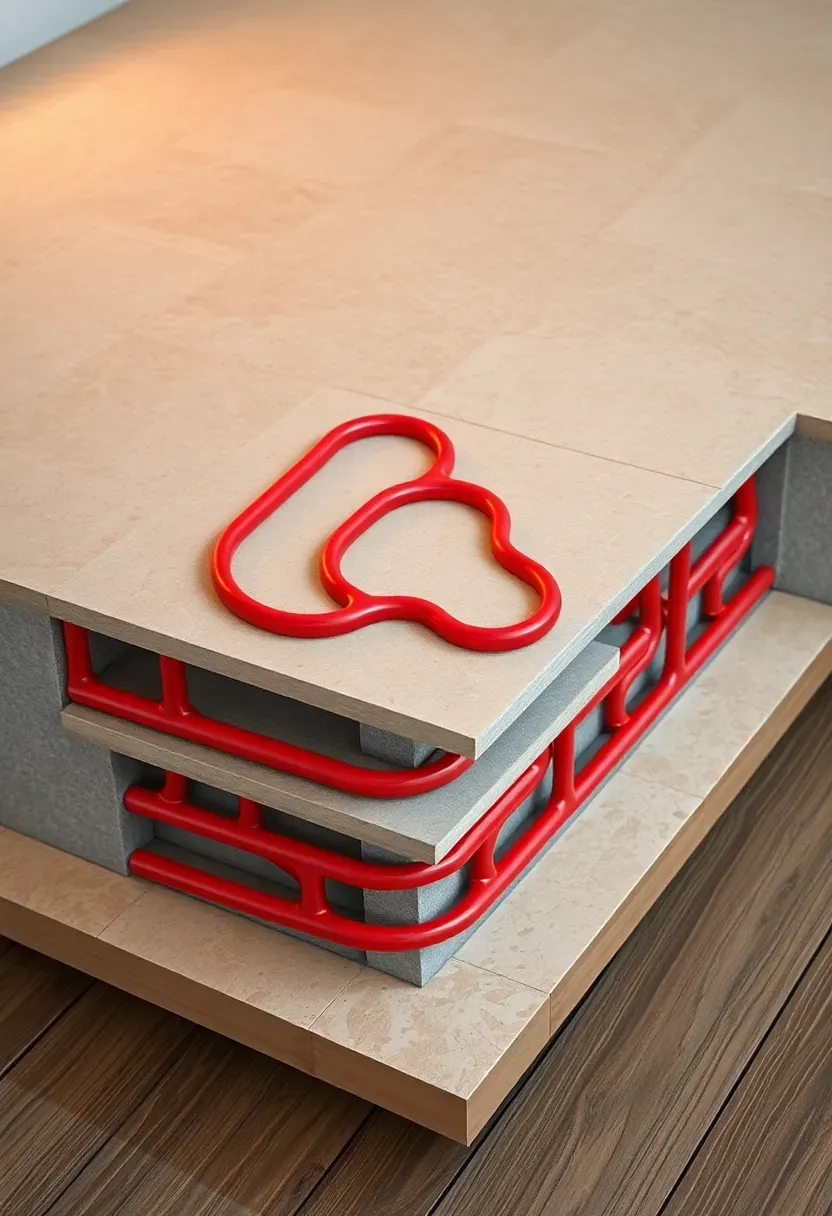
17. Heated Porch Floor System
This one is for cold-climate homeowners who want their porch to be usable from October through April. Radiant floor heating — typically PEX tubing embedded in a thin-set mortar bed under stone or tile flooring — warms the porch surface to around 75 to 85 degrees Fahrenheit, radiating heat upward to your feet and the surrounding air. It does not heat the entire outdoors, but it makes a covered porch comfortable in temperatures as low as the mid-30s when combined with a windbreak.
How to Install
Step 1: Prepare the Subfloor
The porch deck must be structurally sound and level. Install a cement backer board over the existing deck surface to create a stable base for the mortar bed.
Step 2: Lay PEX Tubing
Arrange PEX tubing in a serpentine pattern across the floor, spacing loops 6 to 9 inches apart. Connect the tubing to a dedicated boiler or water heater located inside the house.
Step 3: Cover and Tile
Apply thin-set mortar over the tubing, embed it evenly, and install stone or porcelain tile on top. The tile must be rated for freeze-thaw cycling if your area gets below freezing.
Watch Out For
- Operating costs run $40-$80 per month in heating season depending on porch size, insulation, and local energy rates.
- The system adds significant weight; confirm your porch framing can support the mortar and tile load (typically 15-25 pounds per square foot).
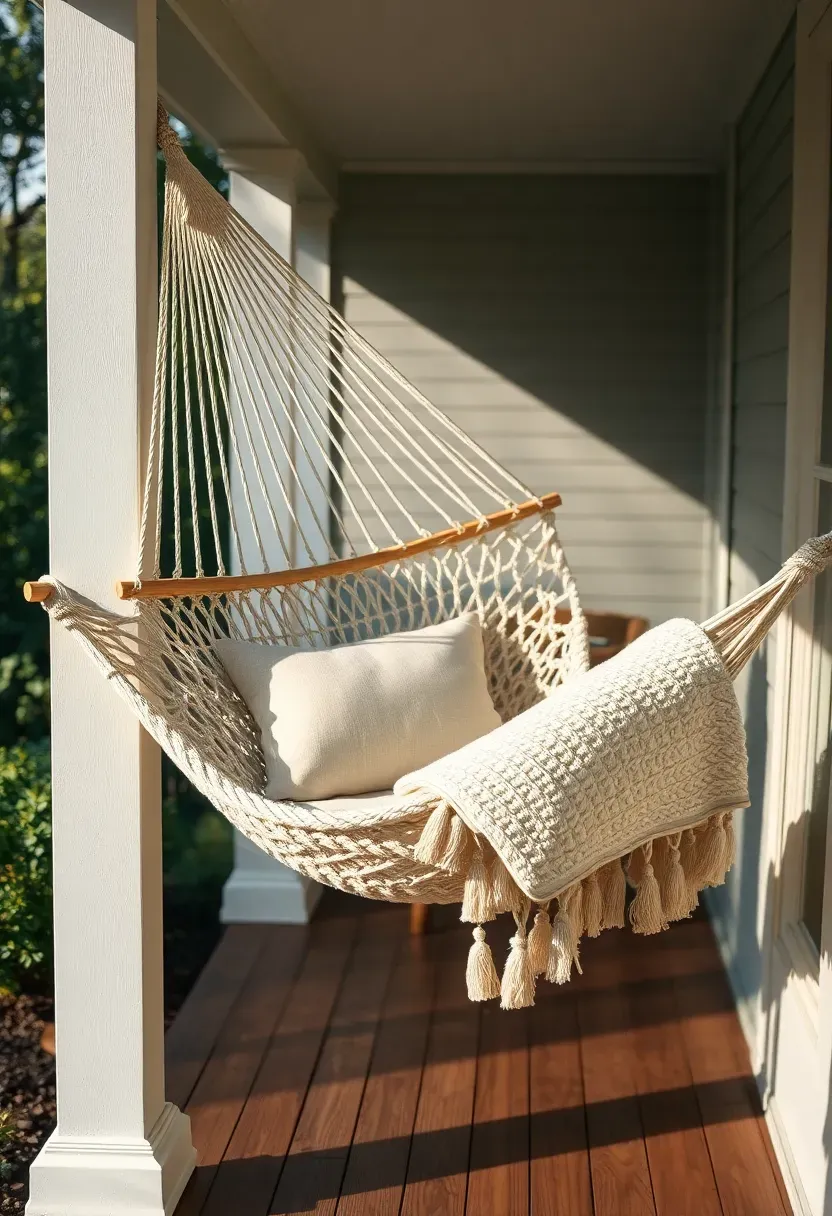
18. Hammock Corner Setup
A hammock requires exactly two anchor points and about 12 to 15 feet of diagonal distance between them. Most covered porches have corner posts spaced at just the right distance for a standard 11 to 13-foot hammock. Hanging one diagonally across a porch corner uses dead space that is too small for furniture but perfect for a hammock's catenary curve.
Tips
- Install heavy-duty screw hooks (rated for at least 300 pounds each) directly into porch posts, not into trim or fascia boards.
- Hang the hammock so the lowest point of the fabric sits 18 inches above the floor — low enough to get in easily, high enough to swing without dragging.
- Use a spreader-bar hammock for a flatter, more chair-like sit; use a gathered-end hammock (no spreader bar) for a deeper, cocoon-like recline.
Recommended
Items for this idea
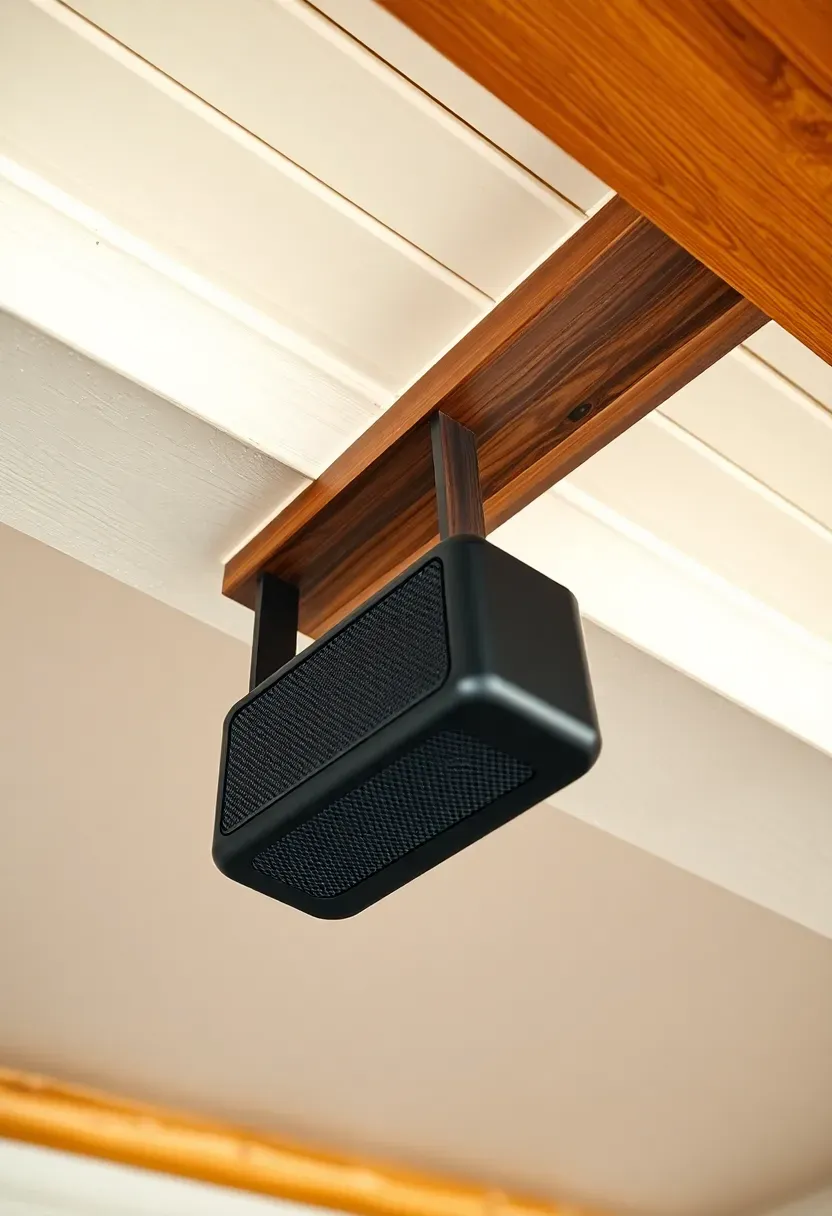
19. Outdoor Ceiling-Mounted Speakers
Why Bother
Playing music through a phone speaker on the porch is like watching a movie on a laptop screen — technically functional, but you are missing most of the experience. Ceiling-mounted outdoor speakers deliver even sound coverage across the porch without taking up floor or table space, and once installed, they are always ready.
Getting It Right
Choose speakers rated IP65 or higher for moisture and dust resistance. Mount them in the ceiling or under the eaves, angled slightly downward toward the seating area. Two speakers spaced 8 to 12 feet apart cover most standard porches. Run speaker wire through the ceiling cavity back to a receiver or amplifier inside the house, or use wireless Bluetooth ceiling speakers that connect directly to your phone.
What to Watch Out For
- Wired speakers sound better and have zero latency, but they require running cable during construction or renovation — retrofitting wire through a finished porch ceiling is tedious.
- Keep volume reasonable; sound carries farther outdoors than indoors, and what sounds comfortable to you may be clearly audible two houses away.
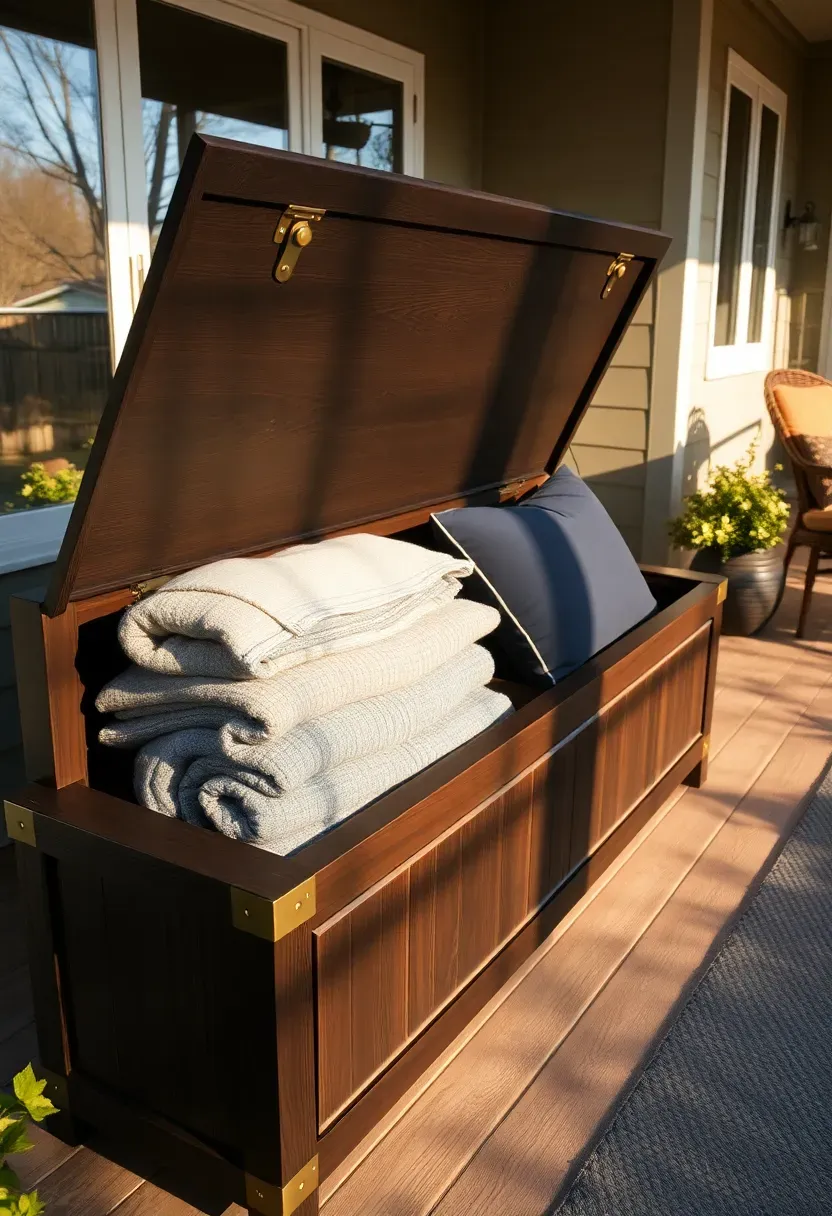
20. Weatherproof Storage Bench
Porch clutter accumulates fast: blankets, citronella candles, dog toys, garden gloves, sandals. Without a storage solution, everything piles on chairs or gets dragged inside. A weatherproof storage bench — typically 4 to 5 feet long with a hinged lid and a sealed interior — gives you 10 to 15 cubic feet of hidden storage while providing additional seating for guests.
Tips
- Choose a bench with a gas-lift hinge so the lid stays open on its own while you dig through the contents with both hands.
- Line the interior with a removable cedar panel or cedar blocks to repel moths and mildew if you store textiles inside.
- Position the bench against the wall farthest from the yard so rain does not blow directly onto the lid seal during storms.
Recommended
Items for this idea
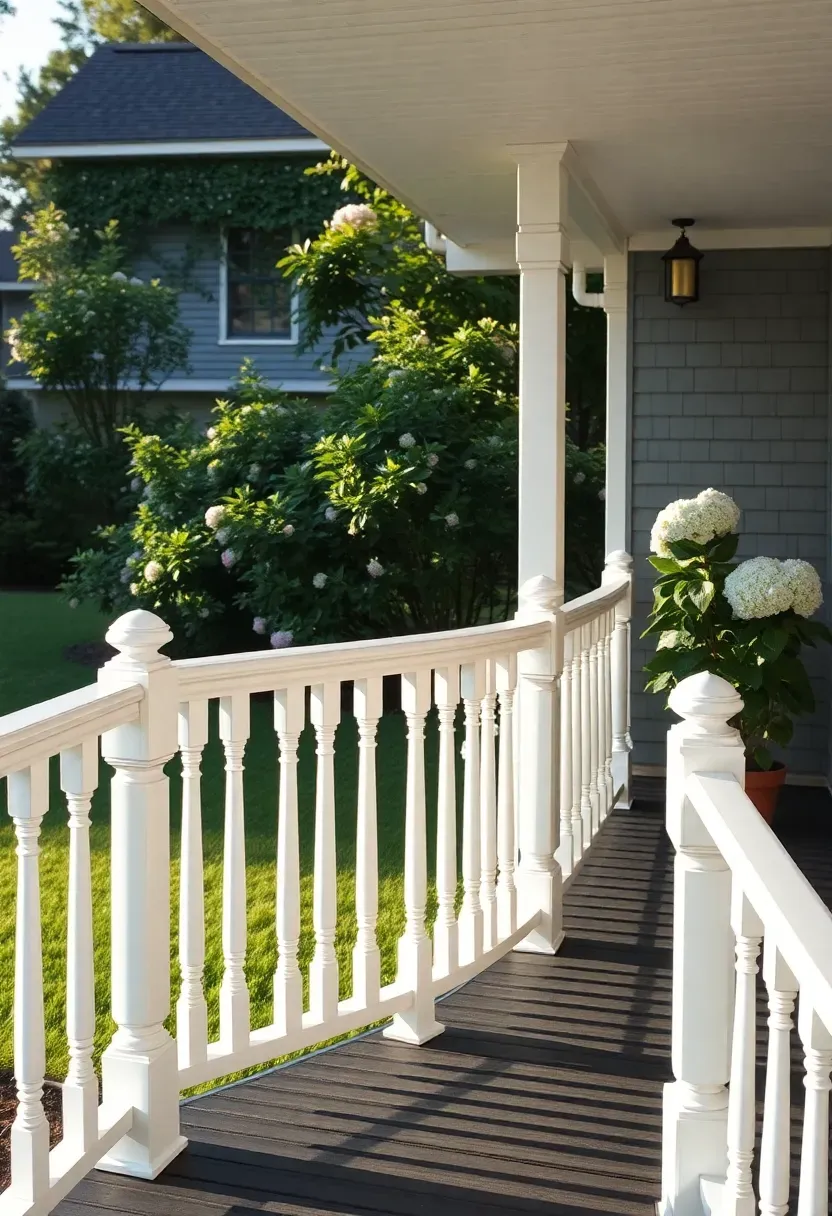
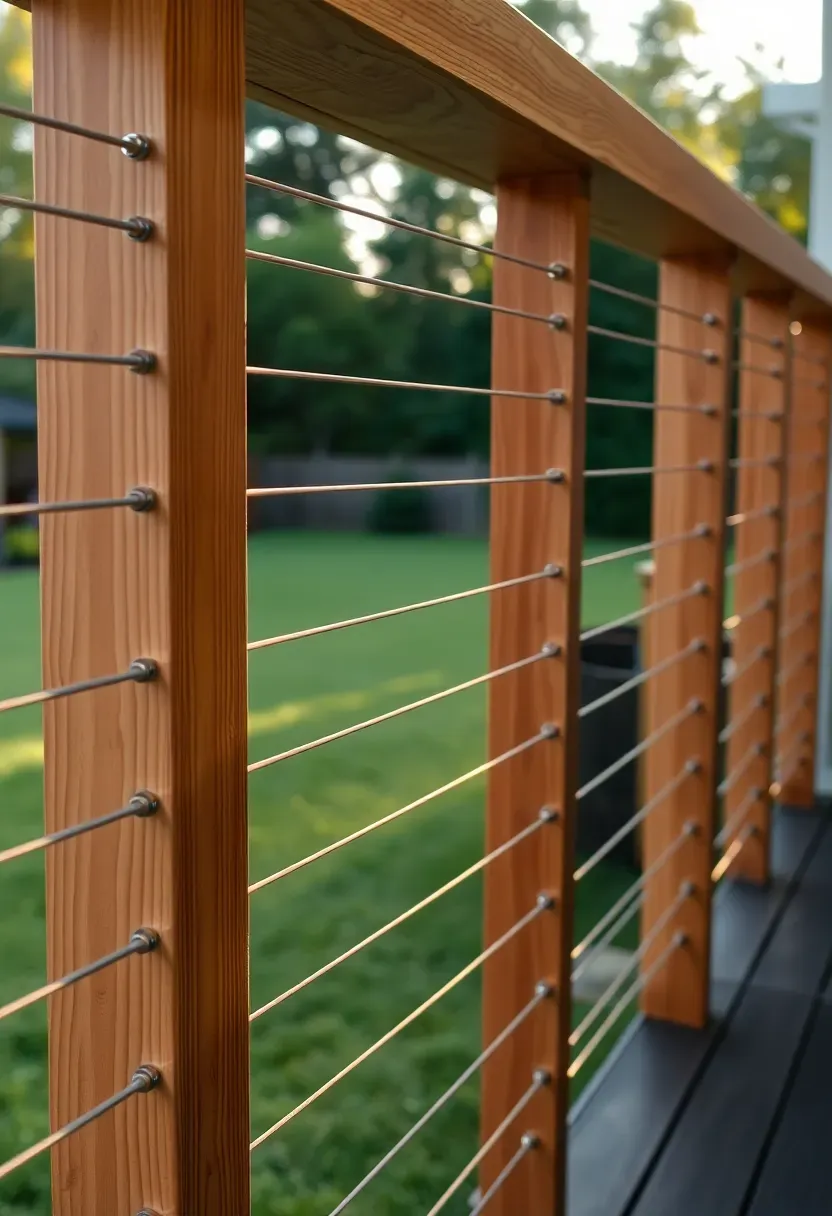
21. Mixed Material Railing Design
Comparing: All-Wood vs. Cable-and-Wood vs. Metal-and-Wood
Porch railings are one of the most visible design elements from both inside and outside the house, yet they are often treated as an afterthought — whatever the builder installs by default. Mixing materials gives the railing personality and can improve your backyard view.
All-Wood (Traditional)
Vertical wood balusters between wood posts with a wood cap rail. This is the default on most porches built before 2010. It is familiar, paintable, and code-compliant everywhere. The downside: closely spaced balusters (required at 4-inch maximum gaps for code) create a visual barrier that chops up your view of the yard.
Cable-and-Wood
Horizontal stainless steel cable lines strung between wood posts. Cables are nearly invisible from a distance, preserving open sightlines to the garden. The modern look works well on contemporary and transitional homes. Cables require periodic tensioning as they stretch over time, and some municipalities restrict horizontal cable railings due to child-climbing concerns.
Metal-and-Wood
Wrought iron or aluminum balusters set between wood posts with a flat wood cap rail. This blends the warmth of wood with the durability and thinner profile of metal balusters. The iron or aluminum will not rot, split, or need repainting as often as wood balusters.
Choose Based On
Go with all-wood if: Your home is traditional or historic and consistency matters for the architectural style.
Go with cable-and-wood if: Unobstructed views are your priority and local codes allow horizontal infill.
Go with metal-and-wood if: You want lower maintenance than all-wood with a warmer look than all-metal.
Quick FAQ
How much does it cost to build a covered backyard porch? A basic covered porch (200 square feet, composite deck, standing-seam metal roof) runs $15,000-$25,000 in most U.S. markets. Screened-in versions add $3,000-$7,000. Costs climb with stone flooring, fireplaces, or electrical work for fans and lighting.
Which backyard porch material holds up best in wet climates? Composite decking (like Trex or TimberTech) paired with aluminum or vinyl structural elements resists moisture, rot, and insect damage far better than pressure-treated pine. For the porch floor, porcelain tile over a cement board substrate handles standing water without deterioration.
Can I build a backyard porch without a permit? Small uncovered decks (typically under 200 square feet and 30 inches above grade) are exempt in many jurisdictions. Any covered structure, screened enclosure, or porch with electrical wiring almost always requires a building permit. Check your local building department before starting — unpermitted work creates problems when selling.
What is the best porch orientation for shade? A north-facing porch stays shaded most of the day in the Northern Hemisphere. East-facing porches get morning sun and afternoon shade. West-facing porches are the hardest to shade — you will need retractable screens or deep roof overhangs to handle late-day sun.
Do backyard porch additions increase home value? National Association of Realtors data shows that covered outdoor living spaces recoup 50-75% of their cost at resale, depending on the local market. In regions with mild climates where outdoor space gets year-round use, the return is at the higher end.
A backyard porch should pull its weight all year, not just during the two pleasant months when the weather cooperates. Start with one or two ideas from this list that address whatever keeps you from using your porch right now — whether that is bugs, heat, rain, or just a lack of comfortable seating. Small targeted upgrades compound. A ceiling fan plus a sectional plus a few pendant lights adds up to a space that feels like a room, not a hallway between the back door and the yard.
Pinterest cover for 21 Backyard Porch Ideas for Year-Round Comfort
About the author
OBCD
CGI visualization and interior design content. We create detailed 3D renders and curate practical design ideas for every room in your home.