23 Backyard Privacy Fence Ideas That Block Views
I spent three years staring at my neighbor's above-ground pool before I finally built a proper privacy fence. That experience taught me something: most people do not actually want total isolation from their surroundings — they want control over what they see and who sees them. The right fence material and height depend on your sightlines, your local code limits, and honestly, how much you are willing to maintain over the next decade. These 23 backyard privacy fence ideas cover materials from basic cedar boards to steel-and-stone combinations, with real costs and maintenance expectations for each.
Below you will find options organized from the most common wood builds to creative alternatives like living walls, gabion cages, and mixed-material designs.
Table of Contents
- Board-on-Board Cedar Fence
- Horizontal Slat Fence
- Stockade Fence with Cap Rail
- Shadowbox Fence
- Composite Privacy Panels
- Vinyl Privacy Fence
- Corrugated Metal Panels
- Gabion Wall Fence
- Living Fence with Arborvitae
- Bamboo Roll Fence
- Brick and Wood Combo
- Stacked Stone Columns with Wood Infill
- Lattice Top Privacy Fence
- Vertical Garden Fence
- Louvered Fence Panels
- Corten Steel Panels
- Pallet Wood Privacy Fence
- Concrete Block Wall
- Reed and Willow Screening
- Horizontal Cable Rail with Planters
- Frosted Glass Panel Fence
- Woven Wood Privacy Screen
- Mixed Metal and Wood Modern Fence
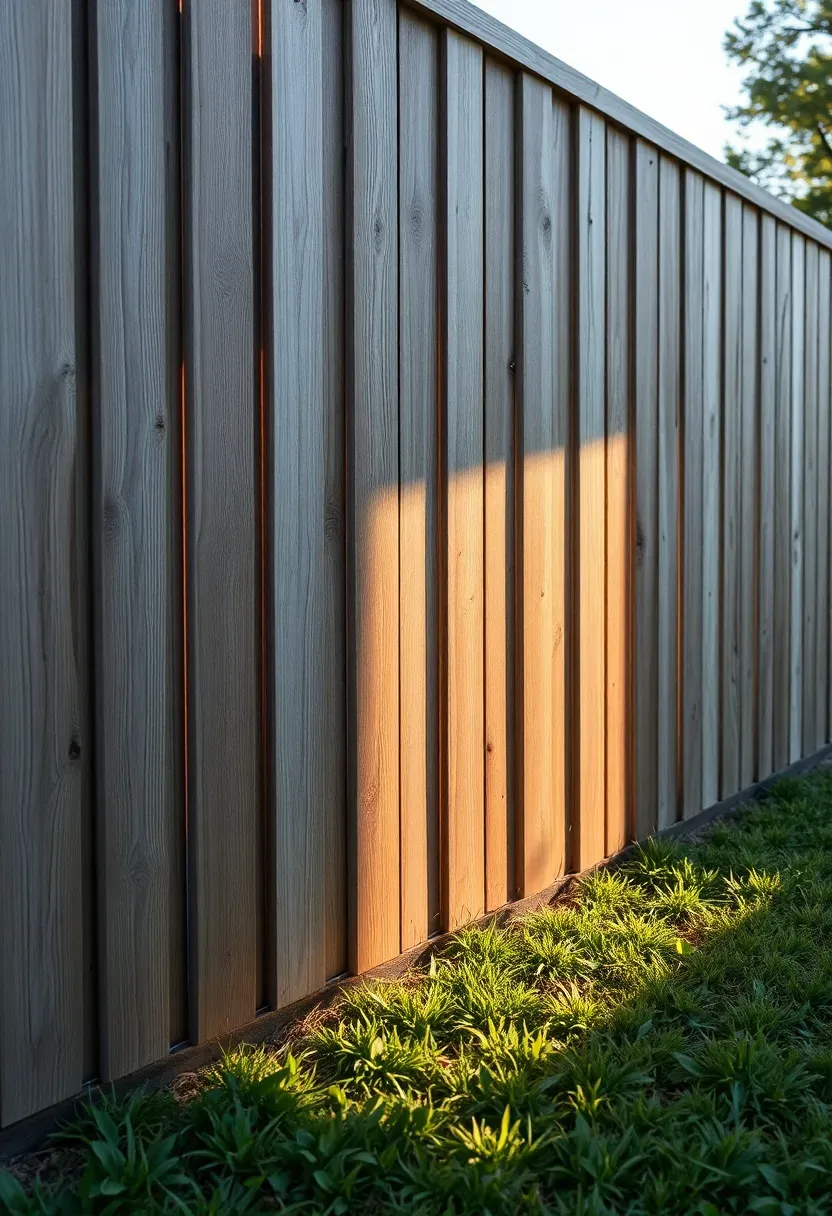
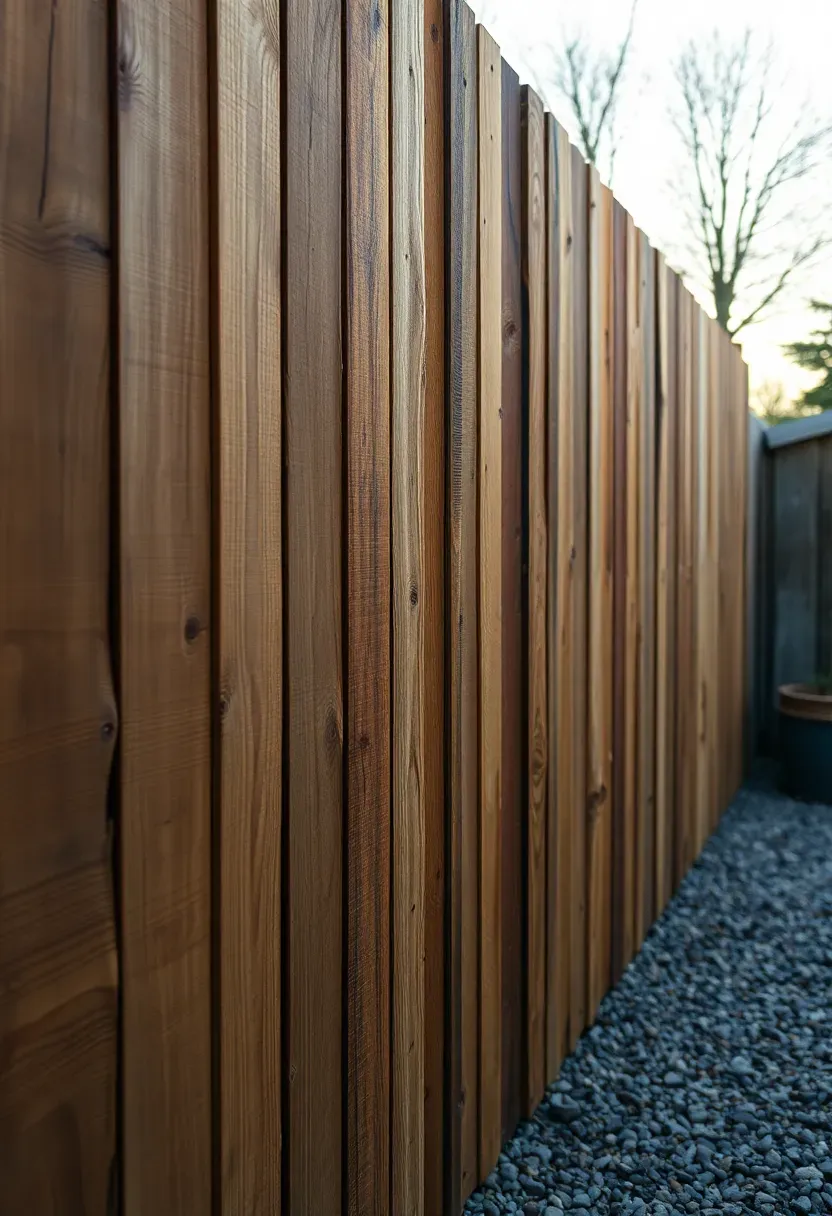
1. Board-on-Board Cedar Fence
Board-on-board construction overlaps adjacent fence boards by about an inch, so there are no gaps between pickets when viewed from either side. This gives you full privacy without the flat, featureless look of a solid stockade fence. Cedar is the go-to wood because it naturally resists rot and insects without chemical treatment, though it will gray to silver within two years if you skip stain. Expect to pay $18 to $35 per linear foot installed, depending on board width and post spacing.
Tips
- Use 1x6 dog-ear or flat-top boards with 1-inch overlap for the best balance of privacy and material cost.
- Set posts in concrete at 6-foot centers rather than 8-foot to prevent rail sag over time.
- Apply a penetrating oil-based stain within 60 days of installation before the wood surface closes up and stops absorbing finish.
We picked a few things that go well with this idea: MTART Metal Louvered Privacy Screen (72") (★4.4), Enclo Concord Cedar Privacy Screen Panel (★4.4) and No-Dig Metal Privacy Fence Screen (48x60) (★4.6). As an Amazon Associate we earn from qualifying purchases.
2. Horizontal Slat Fence
Why Horizontal Works
Horizontal fencing has become the default in contemporary yard design for a reason: it makes a yard feel wider. Vertical pickets draw the eye up and emphasize the fence as a barrier. Horizontal boards pull the eye sideways and blend with the landscape, particularly when the wood tone matches surrounding plantings or hardscape.
Building It Right
Use 1x6 or 1x4 boards attached to vertical posts set at 6-foot maximum intervals. Without proper post spacing, horizontal boards sag in the middle under their own weight — it happens faster than you would expect, usually within the first wet season. Attach boards with stainless steel screws rather than nails to allow individual board replacement later.
Pros and Cons
Pros: Clean contemporary aesthetic; makes small yards feel more spacious; easy to customize gap width for partial or full privacy.
Cons: More prone to warping than vertical boards because the wood grain runs along the unsupported span; requires closer post spacing; horizontal rails can become a ladder for children and pets climbing the fence.
We picked a few things that go well with this idea: Thompson's WaterSeal Clear Waterproofer (1 Gal) (★4.5), Thompson's WaterSeal Solid Wood Stain (1 Gal) (★4.5) and Vermont Natural PolyWhey Exterior Stain (Quart) (★4.6). As an Amazon Associate we earn from qualifying purchases.
3. Stockade Fence with Cap Rail
Stockade fencing is the cheapest way to get solid privacy. Pre-assembled panels of tightly spaced pointed pickets come in 6-foot and 8-foot widths and install fast because you are handling full sections rather than individual boards. The weak point has always been the top edge — raw picket tips split and rot first. Adding a flat cap rail (a 1x4 or 2x4 laid flat across the top) protects those end-grain cuts and gives the fence a finished look that separates it from the generic builder-grade appearance.
Tips
- Buy panels rated "premium" or "select" — budget stockade panels use thinner pickets with more knots that split within a few seasons.
- Attach the cap rail with galvanized screws into every third picket to keep it straight and secure.
- Pre-stain the cap rail before installation so the underside gets coverage; once mounted, you cannot reach beneath it with a brush.
We picked a few things that go well with this idea: Bamboo Reed Fencing Roll (3x16 ft) (★4.4), Backyard X-Scapes Dark Bamboo Fence Roll (★4.2) and Natural Reed Privacy Fence Roll with Zip Ties (★4.4). As an Amazon Associate we earn from qualifying purchases.
4. Shadowbox Fence
How It Differs from Solid Fencing
A shadowbox fence mounts boards on alternating sides of the horizontal rails, leaving a narrow gap between each board. Viewed straight on, it looks fully solid — but at an angle, air and filtered light pass through. This makes it a good compromise when you want privacy from direct views but do not want to block all breeze and light from one side of the yard.
When to Choose This Style
Pick a shadowbox design when your fence runs along a property line where wind exposure is a concern. A fully solid 6-foot fence acts like a sail in storms and puts massive lateral force on posts. The gaps in a shadowbox reduce wind load by roughly 40 percent while still blocking sightlines from the most common viewing angles — which is someone standing at normal height looking straight across.
Choose If
- You live in a windy area and want reduced post stress
- Your HOA requires the fence to look good from both sides
- You prefer filtered light over a solid shadow line on your yard
Recommended
Items for this idea
5. Composite Privacy Panels
Composite fencing uses the same wood-fiber-and-plastic material found in composite decking. Panels come in tongue-and-groove or interlocking profiles that create a seamless face without visible fasteners. The pitch from manufacturers is that composite never needs staining, will not rot, and lasts 25-plus years. That is mostly accurate. What they downplay is that composite can sag between posts in direct sun, fades unevenly over time, and costs roughly twice what cedar does installed — typically $30 to $55 per linear foot.
Tips
- Reduce post spacing to 6 feet on center (or even 5 feet in hot climates) to prevent mid-span sag.
- Choose a manufacturer that offers color-matched post sleeves so aluminum structural posts do not clash with the panel color.
- Scrub panels with oxygenated bleach once a year to prevent mold staining on the textured surface.
6. Vinyl Privacy Fence
The Case For It
Vinyl privacy fencing is the lowest-maintenance fence material available. No painting, no staining, no sealing — ever. A pressure washer once or twice a year is the entire maintenance routine. White vinyl is the classic look, but tan, gray, and wood-grain textured options have expanded the choices considerably in the last five years. For homeowners who genuinely do not want to touch a stain brush again, vinyl delivers on that promise.
The Case Against It
Vinyl becomes brittle in extreme cold and can crack from impact. It yellows over a decade or more in intense UV exposure. The worst issue is that a damaged panel usually means replacing the entire section, since panels are continuous extrusions rather than individual boards. Installed cost runs $20 to $40 per linear foot, which puts it between cedar and composite.
Recommendation
Vinyl is the right call if you want a clean, bright look with zero annual upkeep and your area does not see sustained temperatures below zero. Skip it if you live where ice storms regularly drop branches on fences.
Recommended
Items for this idea
7. Corrugated Metal Panels
Corrugated metal fencing borrows from agricultural and industrial buildings, and it works better in a backyard than most people expect. Galvanized steel panels resist rot entirely, cost less than wood per square foot of coverage, and install fast because a single sheet covers 26 inches of linear fence. The ribbed profile adds visual texture that flat materials lack, and the panels age into a matte patina rather than decaying.
How to Build
- Set 4x4 treated wood or steel posts at 8-foot intervals in concrete footings.
- Mount horizontal 2x4 rails at top, middle, and bottom of each bay.
- Screw corrugated panels to the rails using self-tapping metal roofing screws with rubber washers to seal each penetration.
- Cap the top edge with a wood or metal trim piece to cover the sharp corrugated edge.
Watch Out For
- Sheet metal edges will cut you during handling — wear heavy gloves and long sleeves on install day.
- Metal panels conduct heat and can become scorching in direct afternoon sun; do not place against a seating wall or anywhere bare skin might contact the fence.
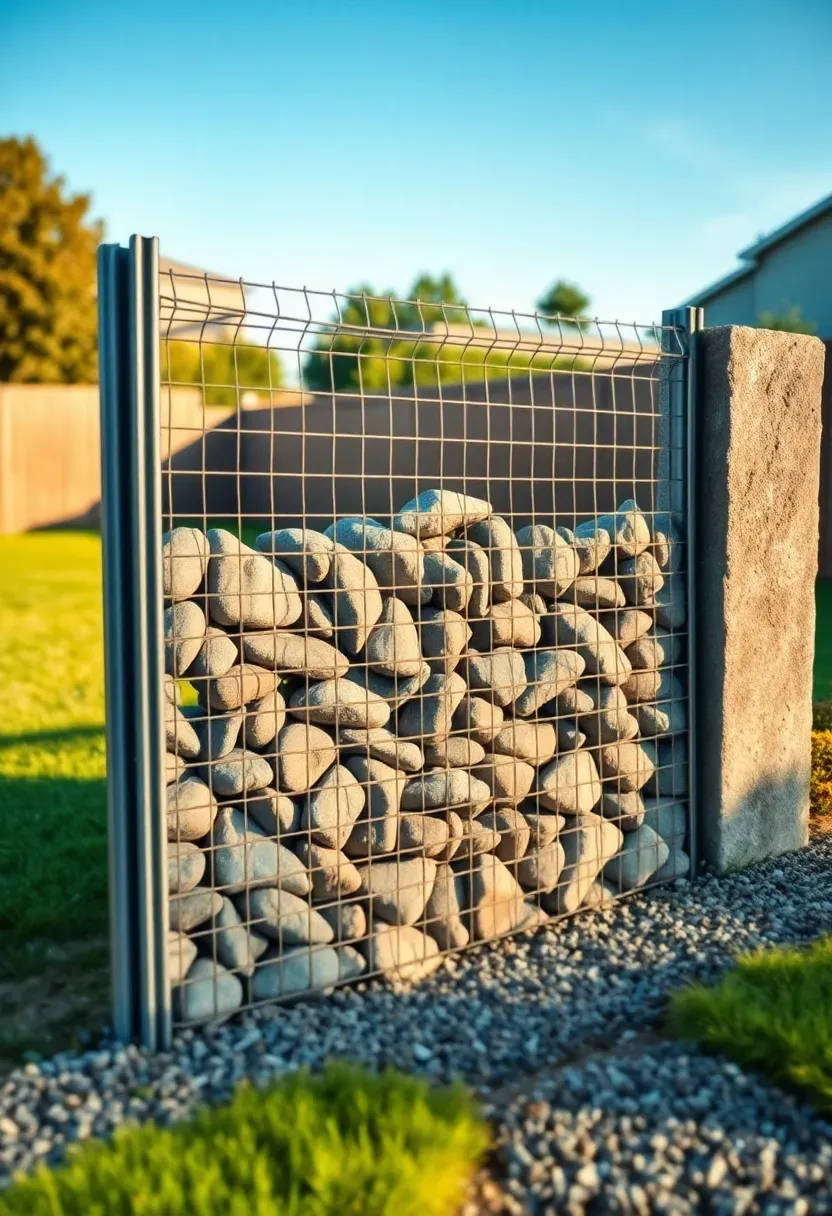
8. Gabion Wall Fence
Gabion cages — welded wire baskets filled with stone — come from civil engineering where they hold back hillsides and riverbanks. In a backyard, they create a fence that is essentially a low stone wall without the masonry skill or expense. You buy the wire cage panels, assemble them into boxes on site, and fill them with whatever aggregate you choose: river rock, crushed granite, recycled concrete, even firewood logs for a completely different aesthetic.
Tips
- Use cages at least 12 inches deep for stability; thinner cages tip over before you fill them.
- Fill with stones sized between 4 and 8 inches — smaller rocks shift and compact, leaving visible voids at the surface.
- Line the bottom of each cage with landscape fabric to prevent soil from migrating up into the stone fill and encouraging weed growth.
Recommended
Items for this idea
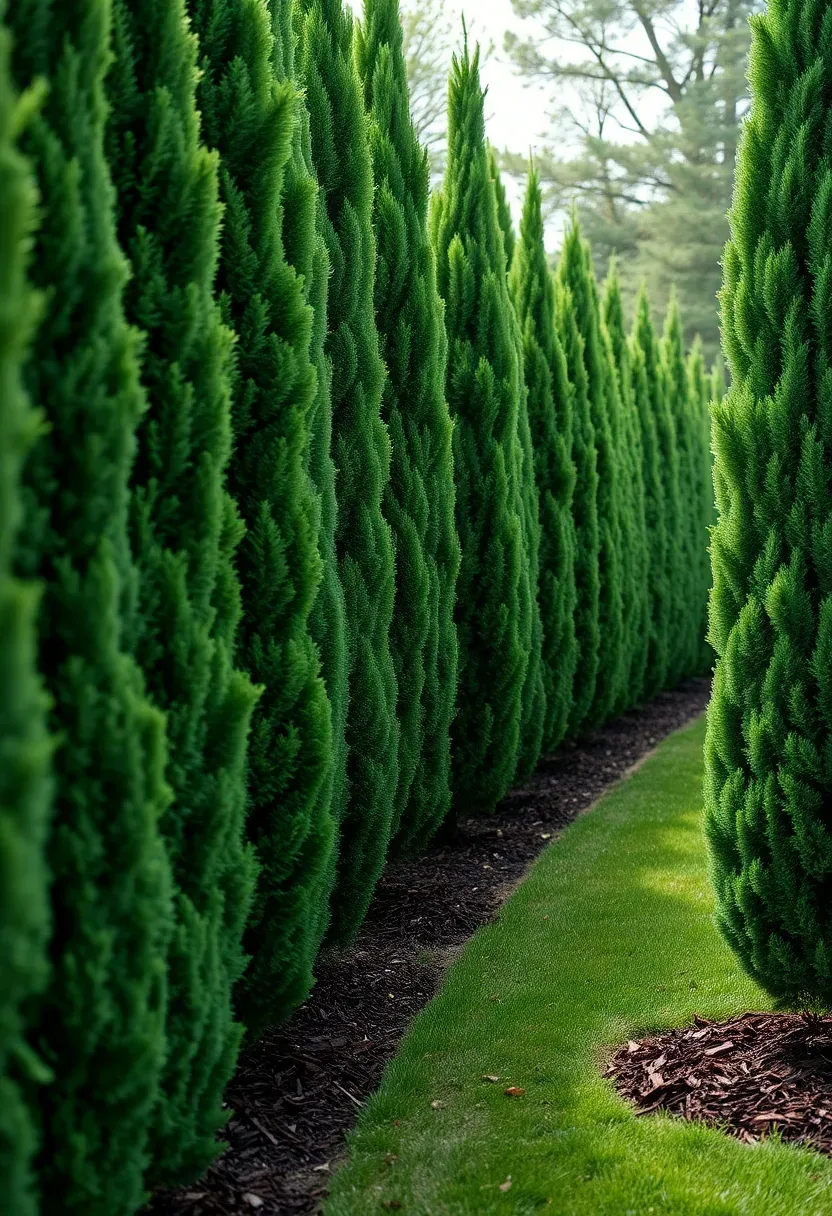
9. Living Fence with Arborvitae
Why Plant Instead of Build
A living fence costs less upfront than almost any built fence, produces zero construction waste, and actually increases in value and density every year instead of deteriorating. Arborvitae (Thuja) is the most common choice because it grows in a naturally narrow columnar shape, stays green year-round, and tolerates heavy pruning without dying back.
Getting the Spacing Right
Plant 'Green Giant' varieties 5 to 6 feet apart for a filled-in screen within 3 to 4 years. 'Emerald Green' (narrower) can go 3 to 4 feet apart. Closer spacing fills gaps faster but creates competition for water and nutrients once the root systems overlap, which leads to thinning at the base — exactly where you need density most.
Downsides to Consider
- You wait 2 to 4 years for full privacy; a built fence works on day one.
- Deer browse arborvitae aggressively in winter; if deer pressure is high in your area, wrap the lower 5 feet with mesh from November through March.
- Root systems spread 15 to 20 feet and can interfere with nearby foundations, patios, or underground utilities.
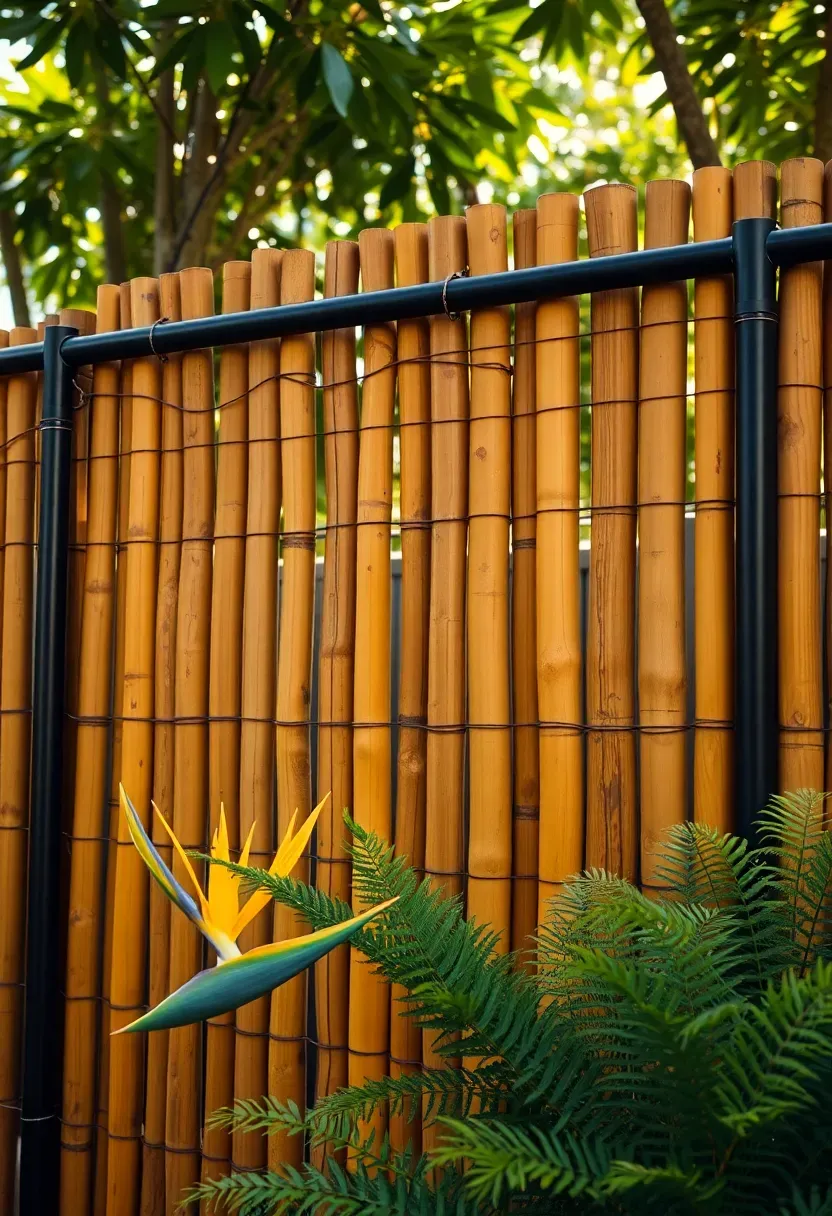
10. Bamboo Roll Fence
Bamboo roll fencing comes in pre-wired panels, usually 6 or 8 feet tall and 16 feet long, that unroll and attach to existing posts or a metal frame. It is one of the fastest privacy solutions — you can screen an entire yard perimeter in an afternoon. The natural texture and warm color make it popular for tropical, coastal, or Asian-inspired yards. Installed cost is remarkably low: $3 to $8 per linear foot for the material.
Tips
- Buy Tonkin bamboo (solid-walled poles) rather than split bamboo mats, which deteriorate within two seasons outdoors.
- Secure with stainless steel wire ties at 12-inch intervals along each horizontal support to prevent sagging.
- Spray with a UV-protective exterior sealant annually; untreated bamboo grays and cracks after one year of sun exposure.
Recommended
Items for this idea
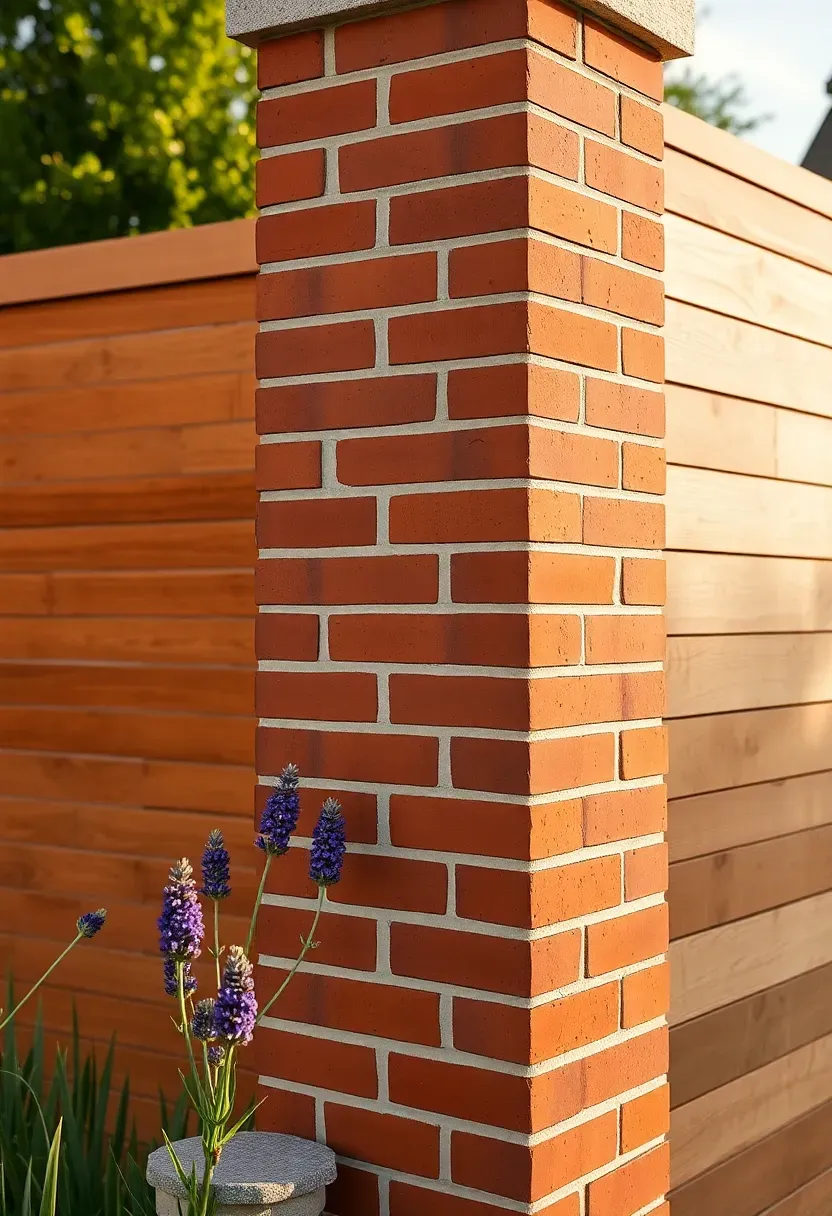
11. Brick and Wood Combo
How This Combination Works
Brick columns spaced every 8 to 10 feet provide structural permanence and a masonry anchor point. Between the columns, wood fence panels — either vertical or horizontal — fill in the privacy wall. The brick handles the structural load and ground contact (where wood fences fail first), while the wood provides the privacy surface at a fraction of what a full brick wall would cost. When a wood panel eventually needs replacement after 15 to 20 years, you pull it out and install a new one between the same brick columns.
Material Choices
Match the brick to your house exterior if possible. For the wood infill, cedar or redwood hold up best. Pressure-treated pine works as a budget option but needs staining immediately — the greenish tint of fresh PT lumber clashes with brick.
Budget Reality
Brick columns with footings run $400 to $700 each. Between columns, wood infill adds $15 to $25 per linear foot. A 100-foot fence with columns every 10 feet costs roughly $6,000 to $9,500 total — more than all-wood but significantly less than an all-brick wall.
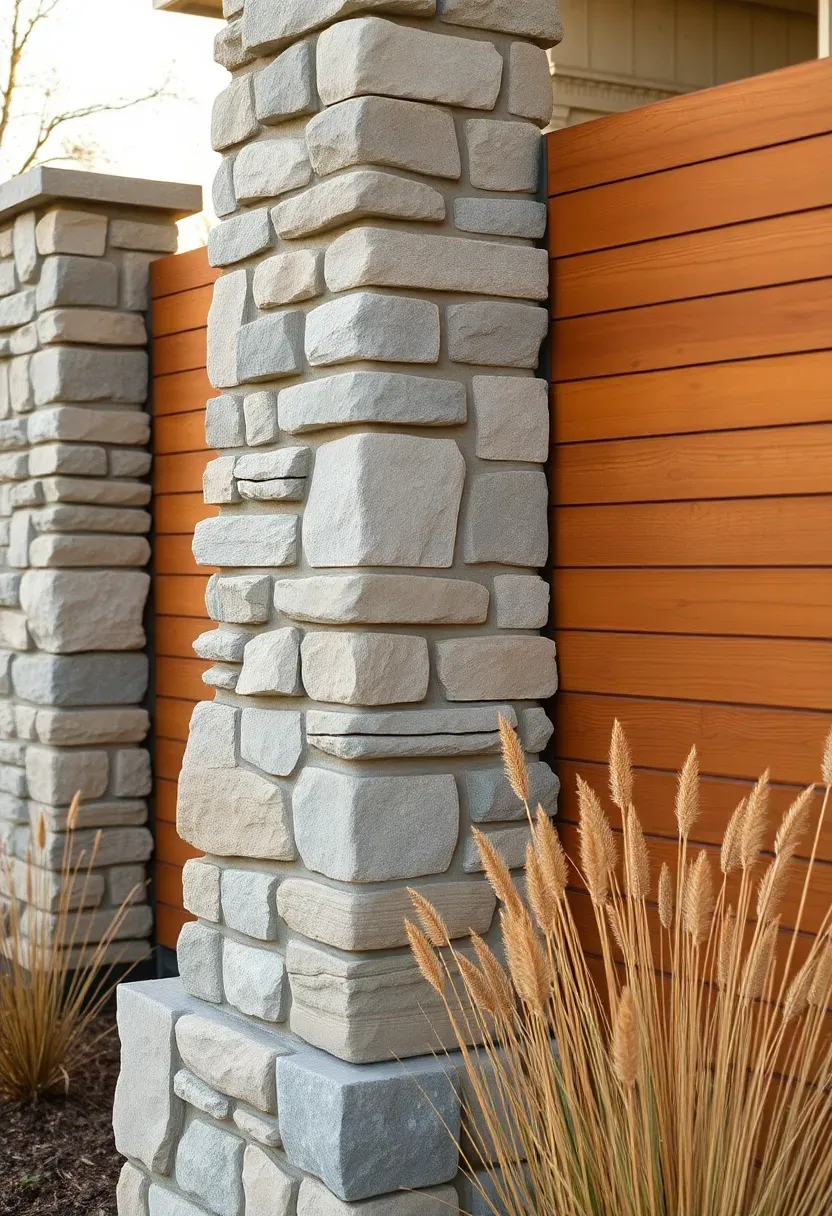
12. Stacked Stone Columns with Wood Infill
This approach is visually similar to brick-and-wood but uses dry-stacked or mortared natural stone for the columns instead of brick. Fieldstone, limestone, or river rock columns have a more rustic, organic character that suits rural and transitional-style homes. The stone columns do the same structural job as brick — they anchor the fence and outlast the wood infill by decades.
How to Build
- Pour a concrete footing 12 inches below grade for each column location.
- Build stone columns using a concrete block core wrapped with natural stone veneer, or dry-stack flat fieldstone if you have masonry experience.
- Set galvanized metal brackets into the column as you build to receive horizontal rails for the wood infill.
- Install wood panels between columns using the same methods as a standard fence bay.
Watch Out For
- Stone columns are heavy — the footing needs to be sized for the load, typically 24 inches square and 12 inches thick minimum.
- Mortared stone joints crack in freeze-thaw climates; use flexible masonry caulk at the stone-to-wood transition points.
Recommended
Items for this idea
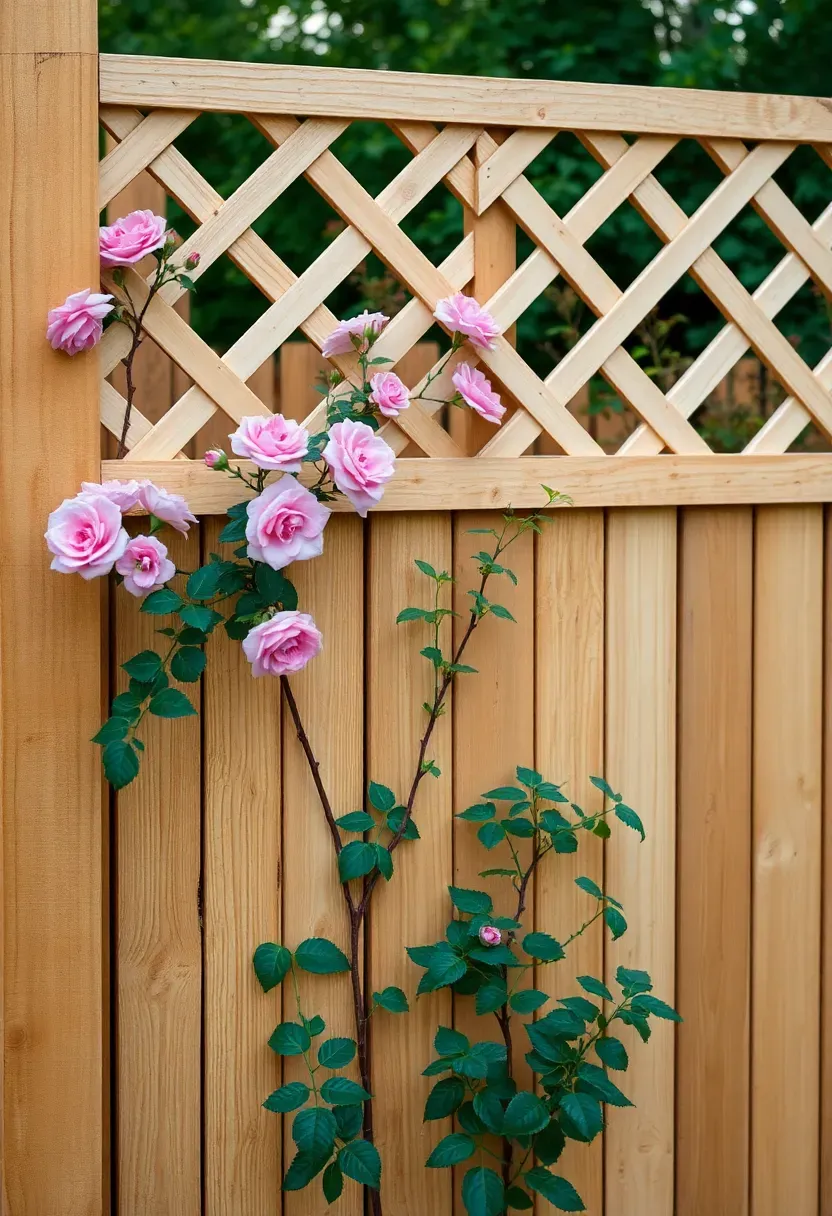
13. Lattice Top Privacy Fence
A full 6-foot solid fence can feel like a compound wall, especially in smaller yards. The lattice-top design solves this by making the lower 4 to 5 feet solid for privacy and the upper 1 to 2 feet an open lattice grid. This lets light and breeze pass through at eye level (when standing) while blocking views at seated height where privacy matters most. If you plant climbing vines at the base — jasmine, clematis, or climbing roses — the lattice fills in with foliage that adds seasonal color and fragrance.
Tips
- Use pressure-treated lattice rated for ground contact, not the thin decorative lattice sold for deck skirting — it splits within a year.
- Frame the lattice section with a trim border on both sides so raw edges are hidden and the panel has rigidity.
- Mount the lattice section so it can be removed independently for maintenance or vine management.
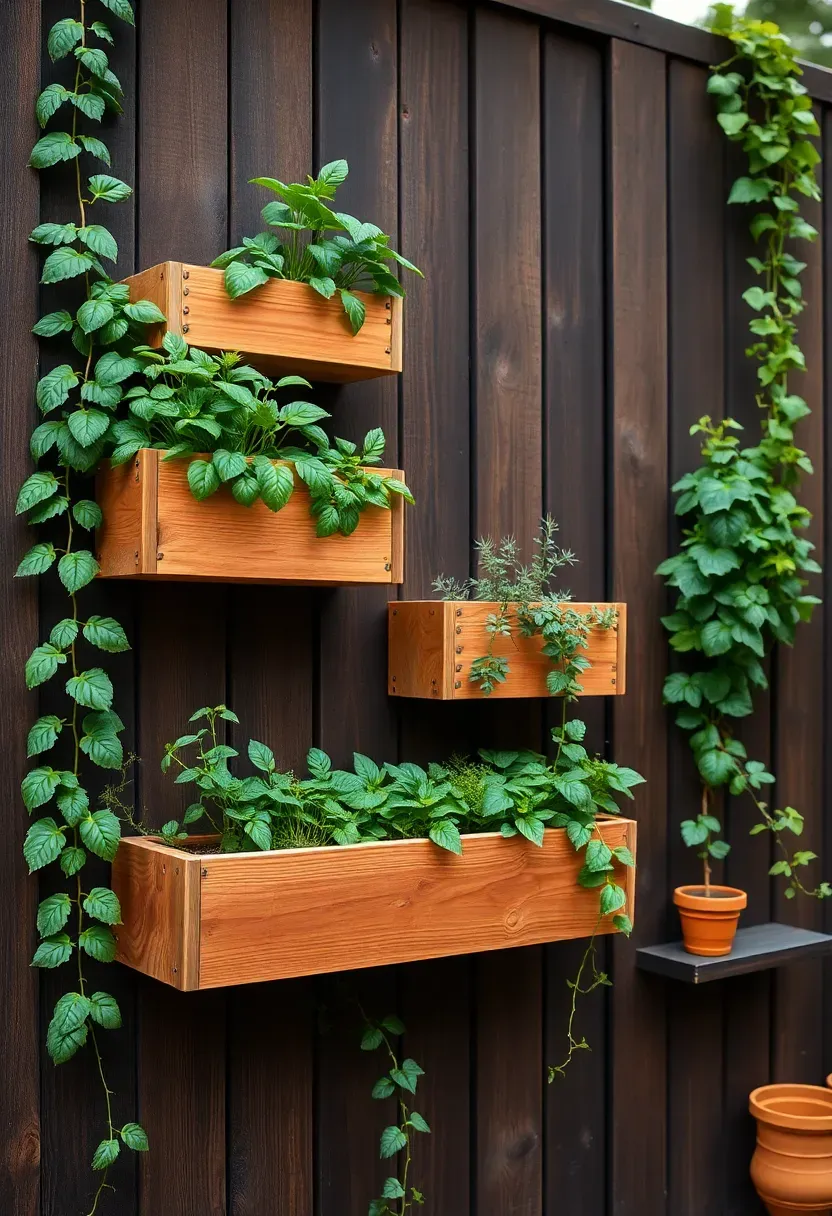
14. Vertical Garden Fence
The Problem
A standard privacy fence blocks views but gives you nothing back. It is a blank wall taking up linear footage in your yard — useful for one purpose, dead space for everything else.
The Solution
Mount planter boxes, pocket planters, or modular green-wall panels directly onto the fence face. This converts that blank surface into a growing area for herbs, succulents, trailing flowers, or even shallow-rooted vegetables like lettuce and strawberries. A south-facing fence in USDA zones 5 through 9 gets enough light for most edible plants from April through October.
Pros and Cons
Pros: Doubles the function of your fence; softens the visual mass of a tall privacy wall; provides fresh herbs within arm's reach if placed near an outdoor kitchen or grill.
Cons: Adds weight to the fence structure — reinforce posts if mounting more than one row of soil-filled planters; drip irrigation is almost mandatory because wall-mounted planters dry out fast in wind and sun; soil stains the fence surface beneath each planter over time.
Recommended
Items for this idea
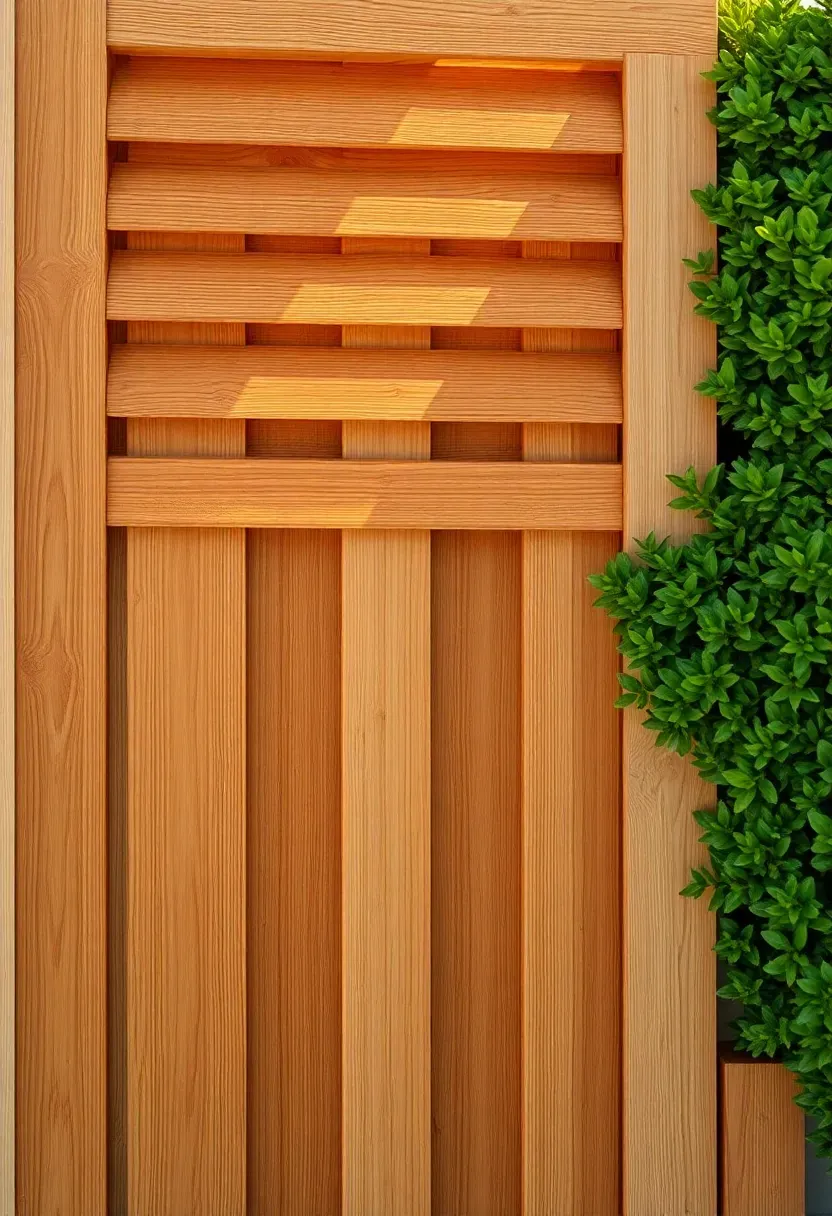
15. Louvered Fence Panels
Louvered fences use angled slats — like a window blind turned sideways — to block direct views while allowing air and angled light to pass through. The angle of the louvers determines how much privacy you get: steeper angles (45 degrees) block more sightlines, while shallower angles (30 degrees) let in more light. Some systems use adjustable louvers that pivot, letting you open up the fence during mild weather and close it down for full privacy when the neighbors have guests over.
Tips
- Fixed-louver panels are simpler and cheaper to build; adjustable systems cost roughly double and include more hardware that can corrode or jam.
- Orient the louver angle so it blocks views from the most common sightline — typically the neighbor's elevated deck or second-floor windows.
- Pressure-wash louvered fences annually; the angled surfaces collect pollen, dust, and cobwebs faster than flat fence boards.
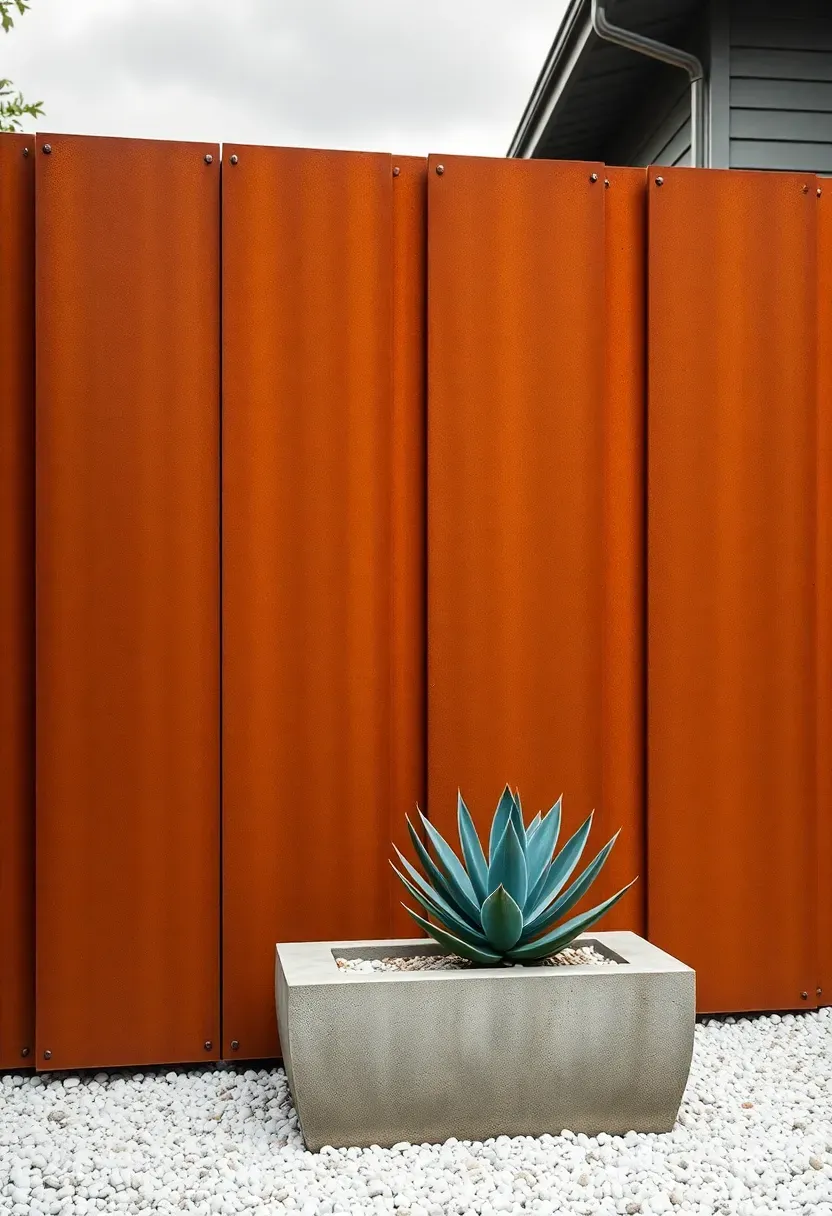
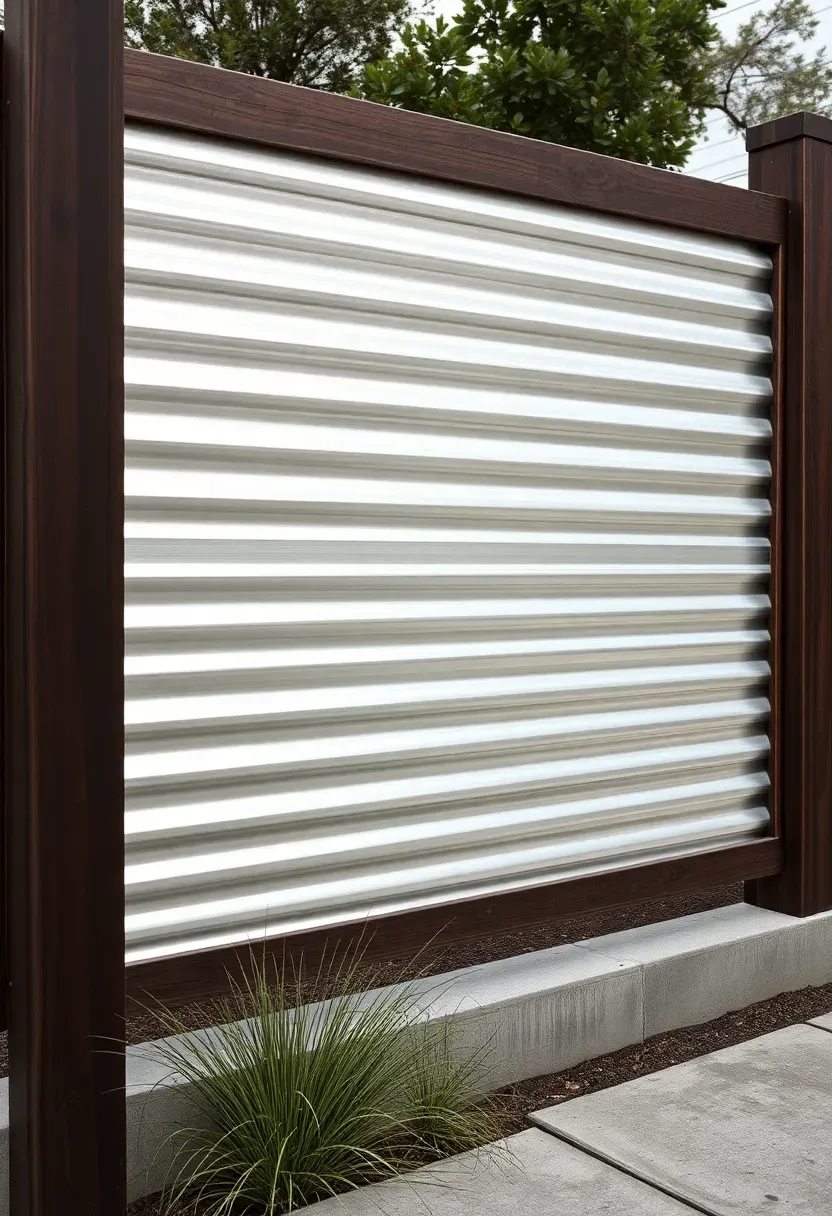
16. Corten Steel Panels
Corten (weathering steel) develops a stable rust-colored oxide layer that protects the underlying metal from further corrosion. The result is a fence that looks intentionally aged from the moment the patina forms — usually within 6 to 12 months of installation — and then stays essentially unchanged for 50-plus years. It pairs well with concrete, gravel, and native plantings in contemporary and industrial-style landscapes.
Tips
- During the initial rusting phase, rain runoff carries orange-brown stain onto adjacent surfaces. Keep the fence 6 inches away from concrete paths, light-colored pavers, or painted surfaces until the patina stabilizes.
- Use 14-gauge or thicker panels for structural rigidity; thinner corten flexes in wind.
- Corten cannot be welded to galvanized or stainless steel without corrosion at the joint — use mechanical fasteners with nylon washers to isolate dissimilar metals.
Recommended
Items for this idea
17. Pallet Wood Privacy Fence
Honest Assessment
Pallet fences dominate Pinterest boards, and the pitch is always the same: free materials, weekend project, rustic charm. The reality is messier. Pallet wood varies wildly in quality, thickness, and chemical treatment. Some pallets are heat-treated (stamped HT) and safe; others are methyl bromide treated (stamped MB) and should not be reused. Even with good pallets, the wood is rough, often twisted, and requires significant labor to disassemble, de-nail, and sort.
When It Actually Works
Pallet fencing makes sense for short runs — a 20-foot screen around a compost bin, a temporary barrier for a garden bed, or a workshop yard fence where appearance is secondary. For a full backyard perimeter, the time spent processing pallets often exceeds the cost savings versus buying new fence boards.
If You Proceed
- Only use HT-stamped pallets; reject any marked MB or with no stamp at all.
- Sand or plane boards to a consistent thickness before assembly so the fence face sits flat.
- Apply two coats of exterior stain to unify the color variations between boards from different pallet sources.
18. Concrete Block Wall
A concrete block wall (CMU) is the most permanent privacy barrier you can build. Properly footed and reinforced with rebar, a block wall lasts 75 to 100 years with zero maintenance. Standard 8x8x16 blocks stacked 6 feet high create a wall roughly 8 inches thick that blocks sound as well as sightlines — a significant advantage in neighborhoods where traffic, barking dogs, or pool parties are the real reason you want privacy.
How to Build
- Excavate a trench 12 inches wide and 18 to 24 inches deep. Pour a concrete footing with #4 rebar running horizontally.
- Lay blocks in a running bond pattern with mortar joints. Insert vertical rebar into the footing and thread it through block cells every 4 feet.
- Fill rebar cells with concrete grout. Cap the wall with precast concrete cap blocks or natural stone coping.
- Apply stucco, paint, or stone veneer to the finished wall if you want a surface treatment beyond raw block.
Watch Out For
- Most jurisdictions require a building permit and engineering for masonry walls over 4 feet tall.
- Drainage matters — a solid block wall acts as a dam for water runoff; install weep holes or French drains at the base if the fence runs along a slope.
Recommended
Items for this idea
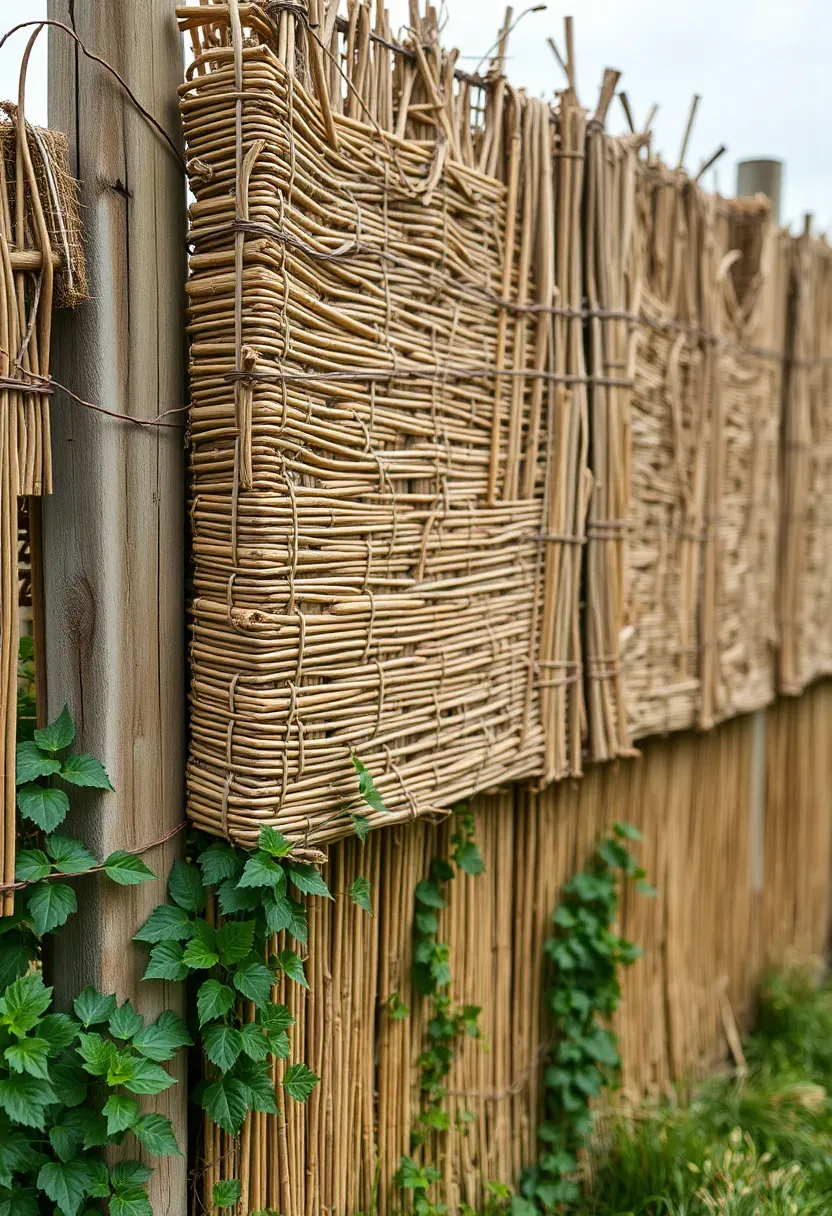
19. Reed and Willow Screening
Reed and willow screens are the temporary, nature-forward option for renters or anyone who does not want a permanent structure. Pre-woven panels of dried reeds or willow branches zip-tie onto chain-link, wire, or wood fences to add instant privacy with a soft, textured look. They are also useful as a quick seasonal screen around hot tubs, outdoor showers, or dining areas.
Tips
- Expect 2 to 4 years of life outdoors; reed and willow are not treated for weather and eventually dry-rot.
- Double-layer panels (two sheets overlapped) give genuine opacity; single layers still show silhouettes and movement.
- Secure to the supporting fence at 6-inch intervals along all edges — loose attachment lets wind catch the panel like a sail and tear it free.
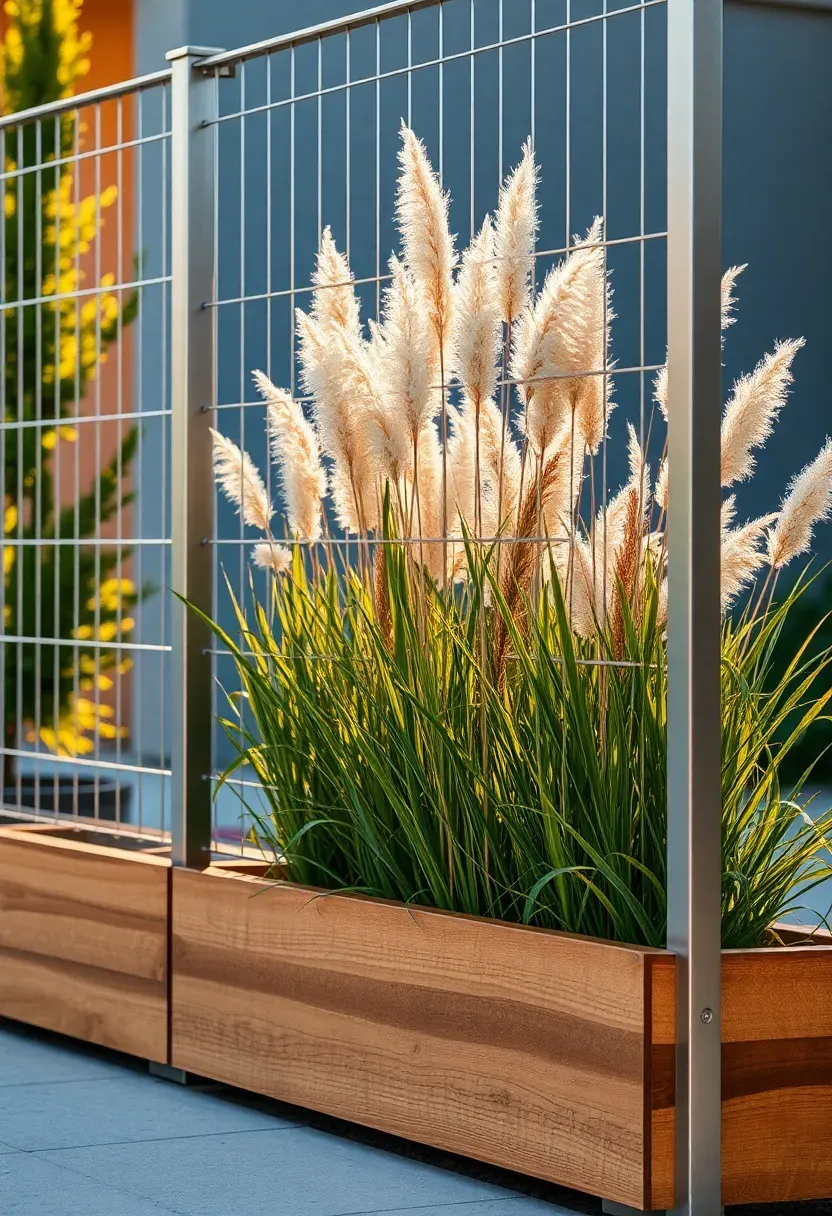
20. Horizontal Cable Rail with Planters
The Concept
Cable rail by itself provides zero privacy — it is designed to be see-through. But when you pair cable railing with built-in planter boxes at the base filled with tall ornamental grasses (Miscanthus, Karl Foerster feather grass, or pampas), the plantings create a soft, living privacy screen above the structural railing below. The cable prevents the planters from tipping and gives you a leaning rail at the perimeter.
Best Plants for This Setup
- Miscanthus sinensis 'Gracillimus': grows 5 to 7 feet, fine textured, arching habit
- Karl Foerster feather reed grass: strictly upright, 4 to 5 feet, tolerates partial shade
- Pampas grass (Cortaderia): dramatic plumes, 6 to 10 feet, but aggressive spreaders — use contained planters only
Design Note
This works best as a partial-perimeter screen — along a patio edge or pool surround — rather than a full property-line fence. The grasses die back in winter in cold climates, leaving you without privacy for 3 to 4 months.
Recommended
Items for this idea
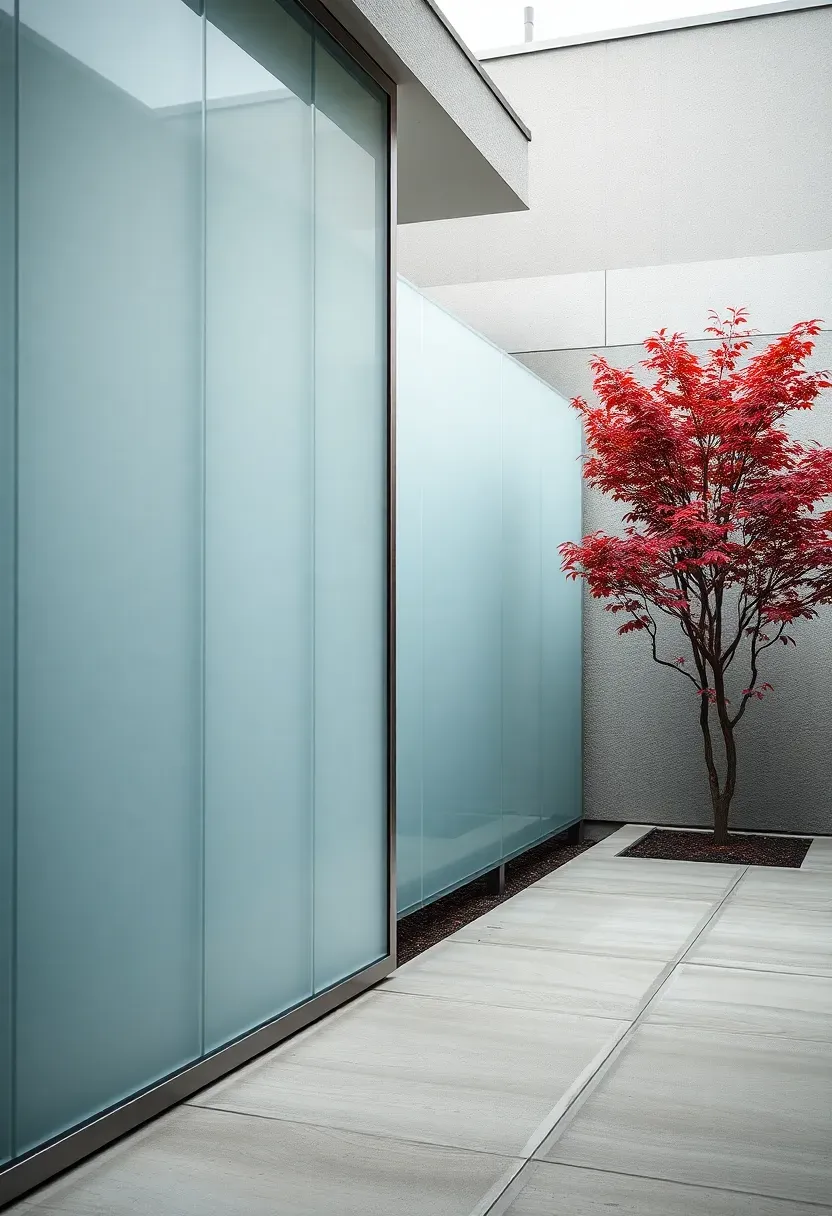
21. Frosted Glass Panel Fence
Frosted or sandblasted glass panels in aluminum frames create a privacy fence that blocks views while transmitting diffused light. This matters in narrow side yards or north-facing gardens where a solid fence would darken the space significantly. The effect is similar to a shower glass partition — shapes and movement are barely visible, but colors and details are obscured.
Tips
- Use tempered glass rated for exterior use at a minimum of 3/8-inch thickness; anything thinner flexes in wind gusts and eventually fails at the frame.
- Aluminum frames should be powder-coated, not painted — powder coating resists chipping and UV degradation far longer.
- Clean panels twice a year with a glass cleaner and squeegee; water spots and mineral deposits build up on frosted surfaces and reduce the light-diffusing effect.
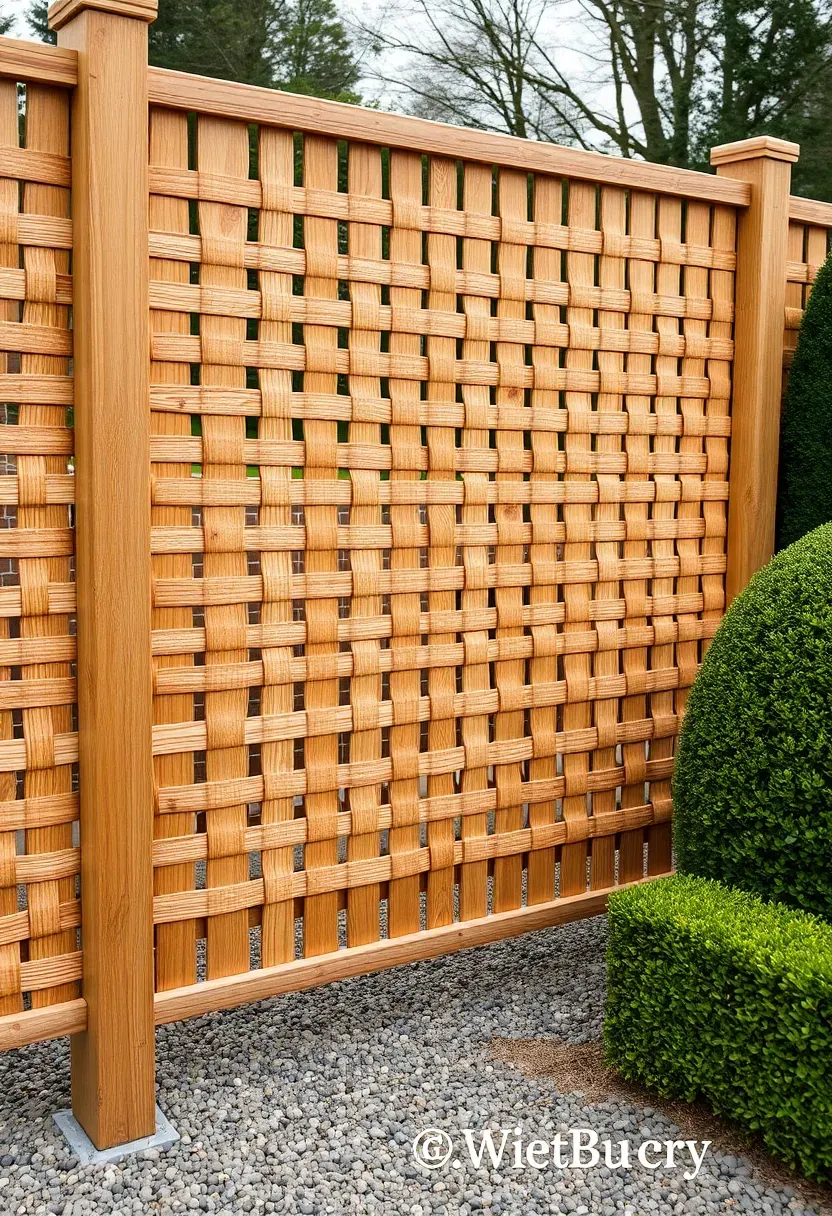
22. Woven Wood Privacy Screen
How It Is Built
A woven fence threads thin, flexible wood strips (typically 1/4-inch thick cedar or willow) between vertical or horizontal supports in a basket-weave pattern. The resulting surface has a textile-like texture that stands apart from every other fence style on this list. It originated as an English garden tradition and has recently reappeared in high-end landscape design.
What to Know Before Building
The weaving process is labor-intensive — significantly more so than nailing boards to rails. Expect to spend a full day on a single 8-foot panel. The flexible strips must be green (freshly cut, still pliable) or soaked in water before weaving; dried strips snap. Once woven and dried in place, the panel holds its shape and tightens as the wood shrinks.
Best Applications
- Garden dividers and accent screens where you want a focal point rather than a full perimeter fence.
- Pair with a standard fence as a decorative section above a gate or at an entry point.
- Short runs (20 to 40 feet) where the handcrafted look justifies the extra labor.

Recommended
Items for this idea
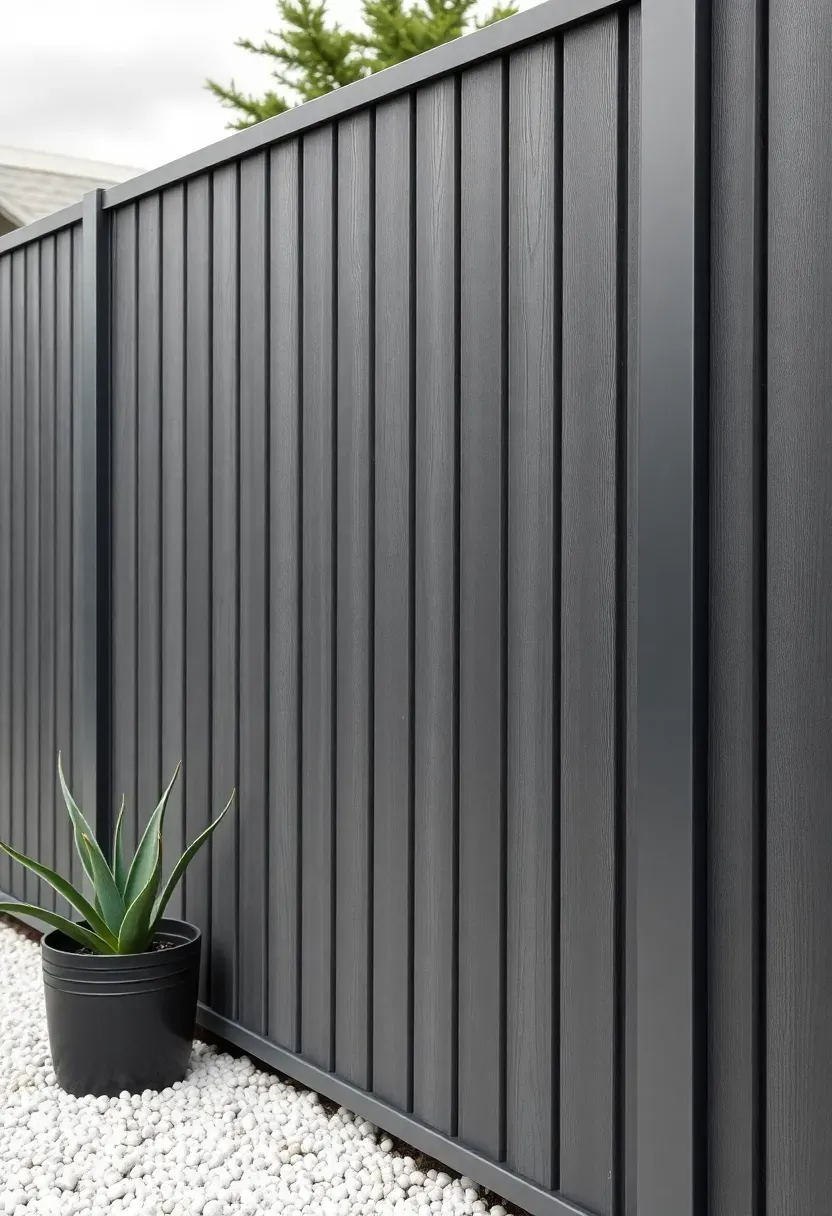
23. Mixed Metal and Wood Modern Fence
This design uses steel structural frames — typically powder-coated black square tube — with wood infill panels between them. The steel handles the structure and ground contact while the wood provides the privacy surface and warmth. It is the approach used on most high-end residential projects where the architect wants a fence that reads as architecture rather than a yard boundary.
How to Build
- Have a metal fabricator weld frames from 2x2-inch square steel tube with internal mounting tabs for the wood infill.
- Set frames in concrete footings with steel base plates or direct-burial galvanized posts.
- Bolt horizontal wood boards (ipe, cedar, or thermally modified ash) to the internal tabs using stainless fasteners.
- Powder-coat all steel components before assembly — field painting steel fence frames never holds up to the factory finish.
Watch Out For
- Get exact measurements before fabrication; steel frames are not adjustable on site the way wood posts are.
- Budget $45 to $75 per linear foot for this level of fence — it is a premium build for a premium look.
Quick FAQ
How tall can I build a privacy fence without a permit? Most municipalities allow 6-foot fences in rear yards and 4-foot in front yards without a permit, but this varies widely. Check your local zoning code and HOA rules before ordering materials — violations often mean tearing down a finished fence.
Does a privacy fence actually increase property value? In neighborhoods where most homes have fencing, yes — appraisers factor fence condition into curb appeal and functional outdoor space. The bump is modest, typically 1 to 3 percent of home value. Where fencing is uncommon, the return is less predictable.
What is the cheapest backyard privacy fence option? Stockade panels from a home center run $40 to $60 per 8-foot section, making them the cheapest built option at roughly $5 to $8 per linear foot for materials. Bamboo roll fencing is even cheaper but does not last as long.
Should I hire a contractor or DIY my privacy fence? Straight runs on flat ground are reasonable DIY projects if you own a post-hole digger and a level. Sloped terrain, corners, and gates are where most DIY fences go sideways — literally. Get quotes for those sections even if you handle the straight runs yourself.
Which fence material blocks the most noise? Concrete block and gabion walls reduce noise by 10 to 15 decibels. Wood and vinyl fences barely reduce sound at all — maybe 3 to 5 decibels — because they vibrate rather than absorb acoustic energy.
Privacy fences are one of the few home improvements that pay off in daily quality of life from the day they go up. Pick the material that fits your budget and maintenance tolerance, get the posts deep enough, and do not cheap out on fasteners — those three decisions determine whether your fence still looks good in ten years or becomes the thing your neighbors wish you would fix.
Pinterest cover for 23 Backyard Privacy Fence Ideas That Block Views
About the author
OBCD
CGI visualization and interior design content. We create detailed 3D renders and curate practical design ideas for every room in your home.