25 Backyard Pathway Ideas
A few years ago my backyard had no clear route between the patio and the garden shed. I walked across open lawn, wore down the grass into a mud track by November, and spent every spring reseeding the same strip. The fix was not complicated: a 30-foot flagstone path with gravel joints took one weekend and about $280 in materials. That single addition gave the whole yard a sense of purpose — a clear circulation spine that connected spaces instead of leaving them floating in a sea of grass. Pathways do more than solve mud problems. They direct movement, create visual rhythm, and give your landscape a backbone that beds, borders, and furniture can anchor to.
Below you will find 25 pathway ideas organized from loose-material options through cut stone, brick, poured surfaces, and finishing details.
Table of Contents
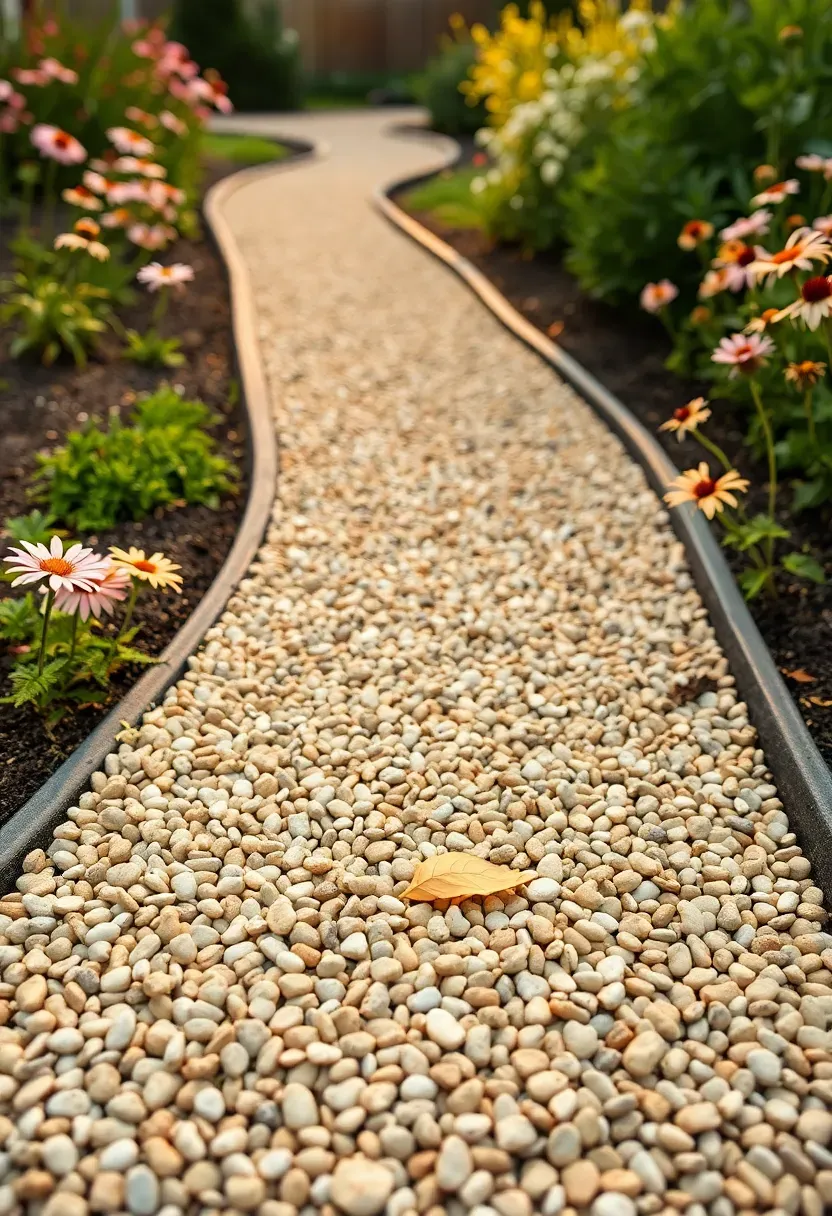
- Pea Gravel Path
- Irregular Flagstone Walkway
- Brick Herringbone Path
- Stepping Stones Through Lawn
- Decomposed Granite Trail
- Wood Slice Rounds
- Crushed Limestone Path
- Bluestone Slab Walkway
- Cedar Boardwalk
- Concrete Paver Path
- Mosaic Pebble Walkway
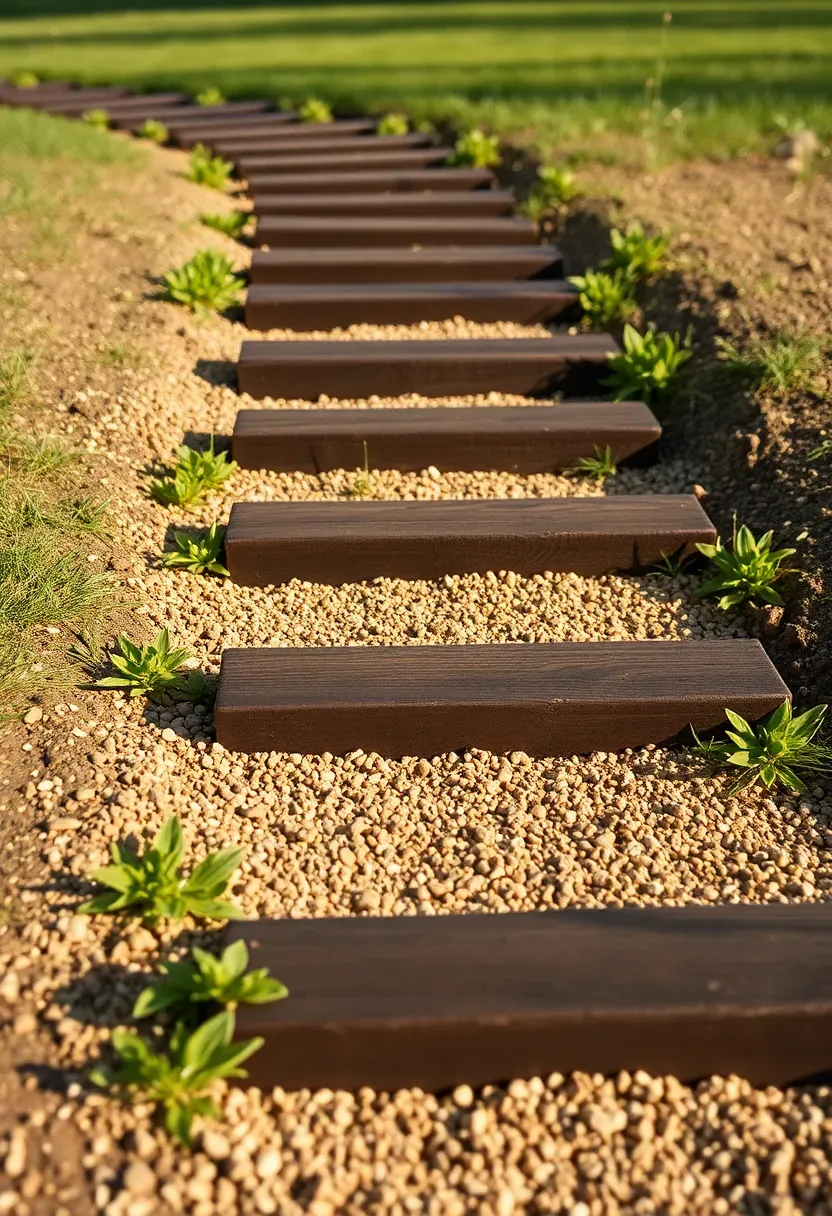
- Railroad Tie Steps
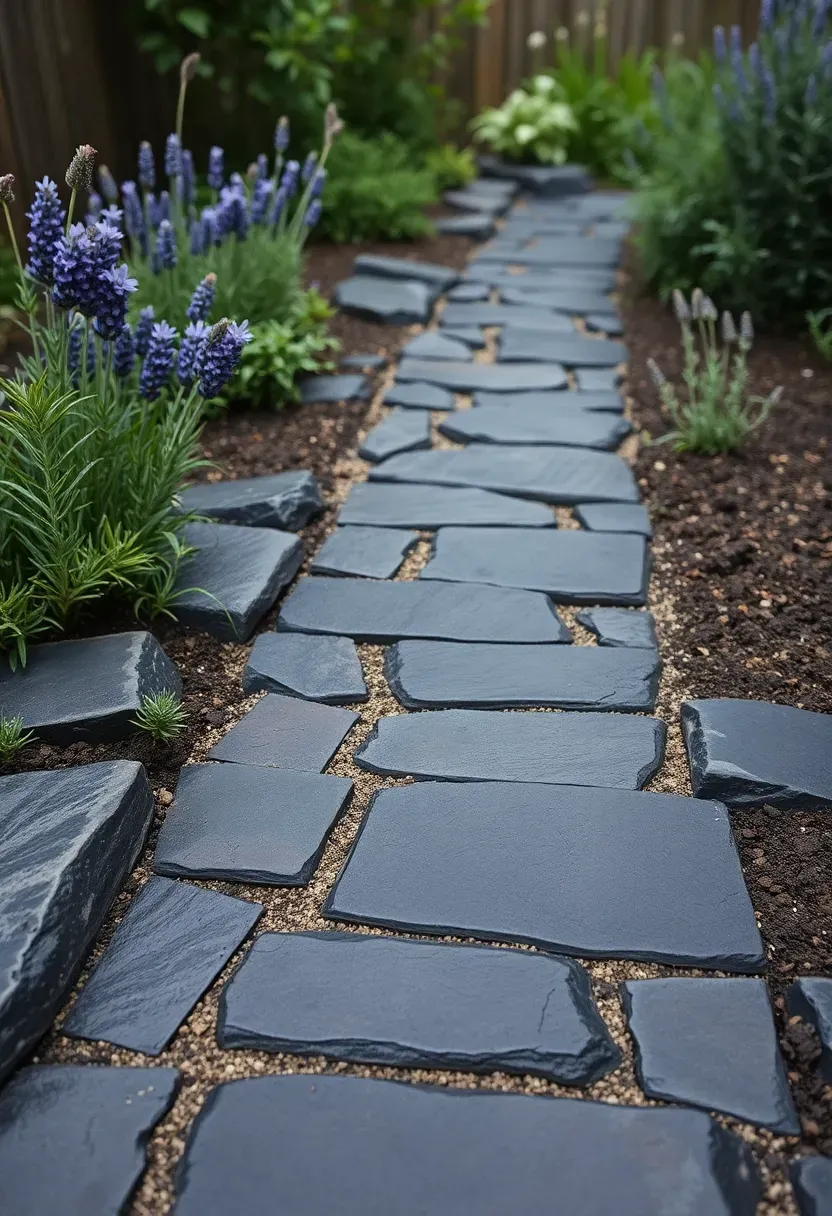
- Dry-Laid Slate Path
- Mulch Trail
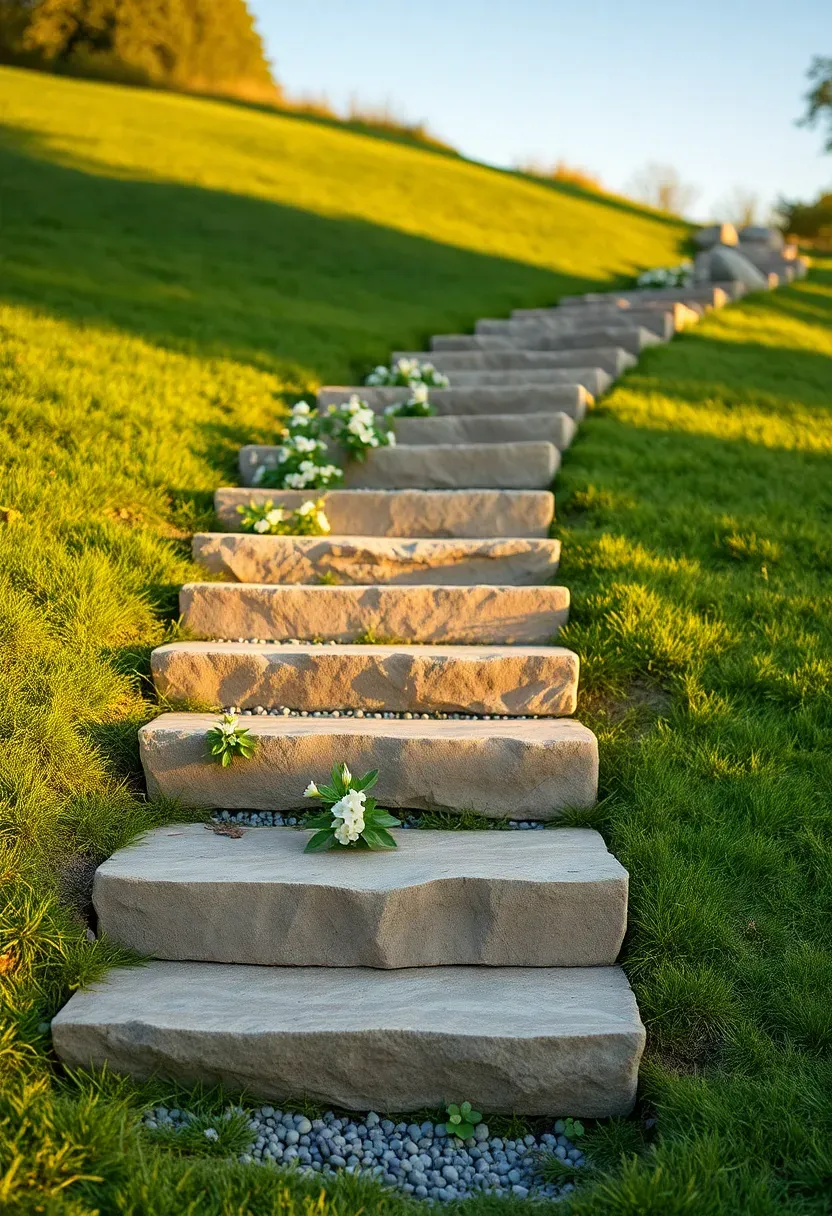
- Stacked Stone Steps on a Slope
- Poured Concrete with Exposed Aggregate
- River Rock Border Path
- Reclaimed Pallet Boardwalk
- Sandstone Slab Path
- Grass Joint Pavers
- Shell Path
- Cobblestone Walkway
- Travertine Tile Path
- Gravel-and-Timber Hybrid
- Solar-Lit Night Path
1. Pea Gravel Path
Pea gravel is the fastest backyard path you can build. Dig a 3-inch deep trench the width you want (3 feet works for most yards), stake steel or aluminum edging along both sides, lay landscape fabric, and pour in 3/8-inch rounded pea gravel. A ton of material covers roughly 30 linear feet at proper depth and costs $35-$60 depending on your area. The rounded stones compact loosely enough to drain instantly after rain but pack tight enough for comfortable walking. Gravel paths work especially well on curves because the material conforms to any shape without cutting.
Tips
- Use 3/8-inch stone rather than 3/4-inch — smaller gravel locks together better underfoot and migrates less.
- Install edging that rises at least 1 inch above the gravel surface to keep stones from spilling into beds.
- Add a slight crown to the center so water drains to the sides rather than pooling along the path.
We picked a few things that go well with this idea: Waterproof Solar Pathway Lights (12-Pack) (★4.4), ALEPOD Solar Pathway Lights (8-Pack) (★4.4) and Mancra Glass Metal Solar Path Lights (8-Pack) (★4.5). As an Amazon Associate we earn from qualifying purchases.
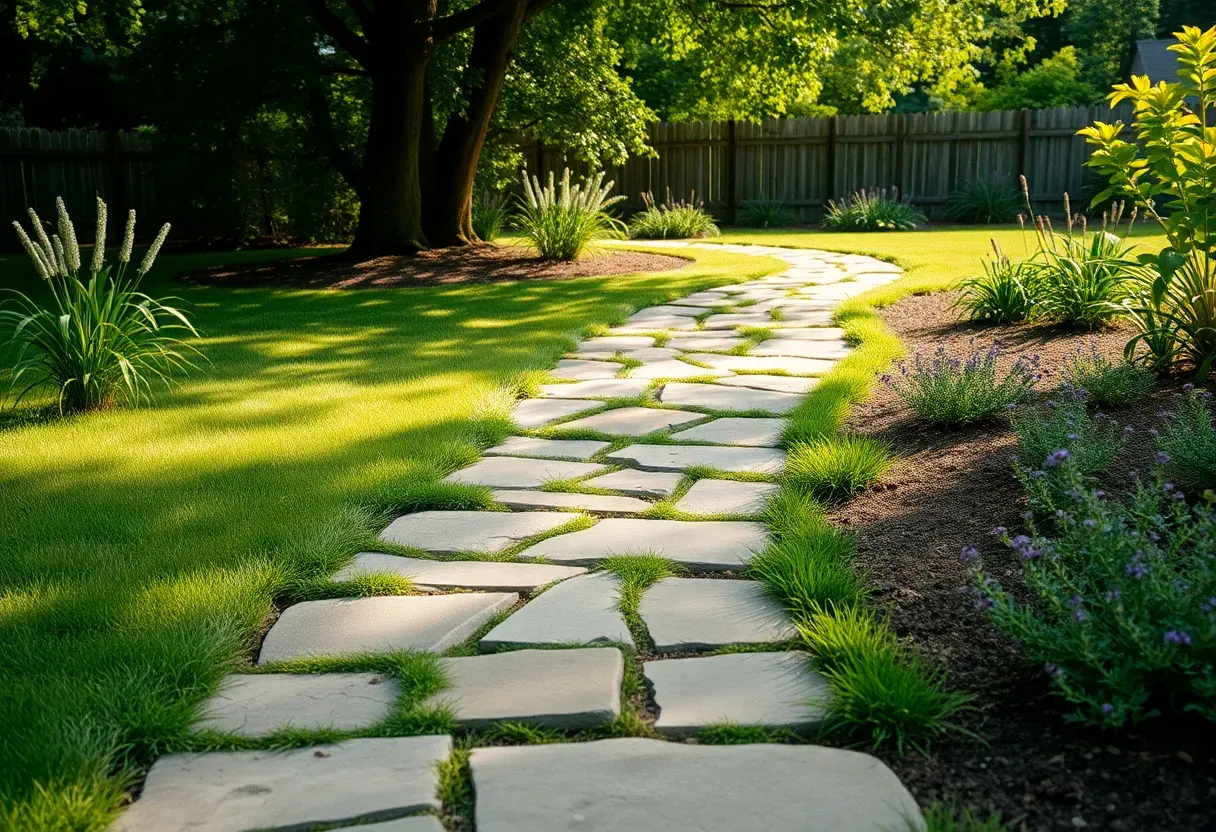
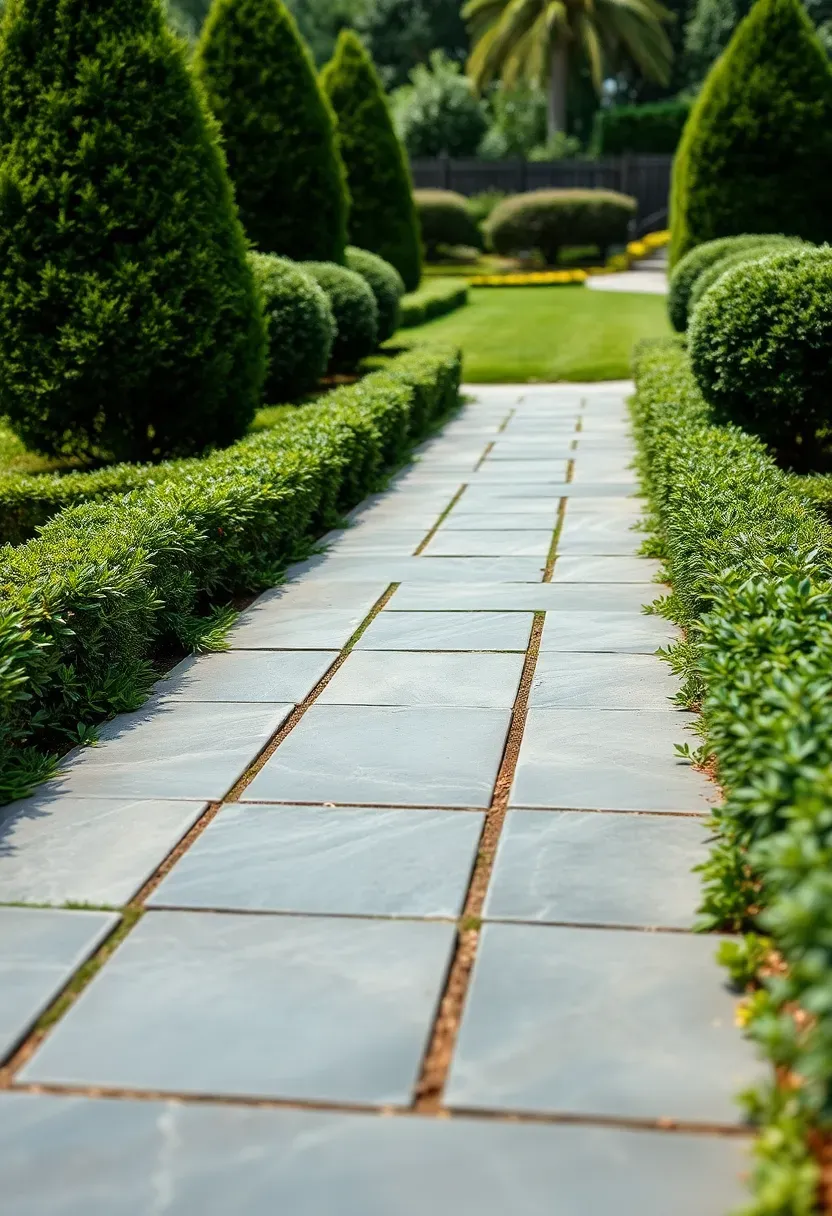
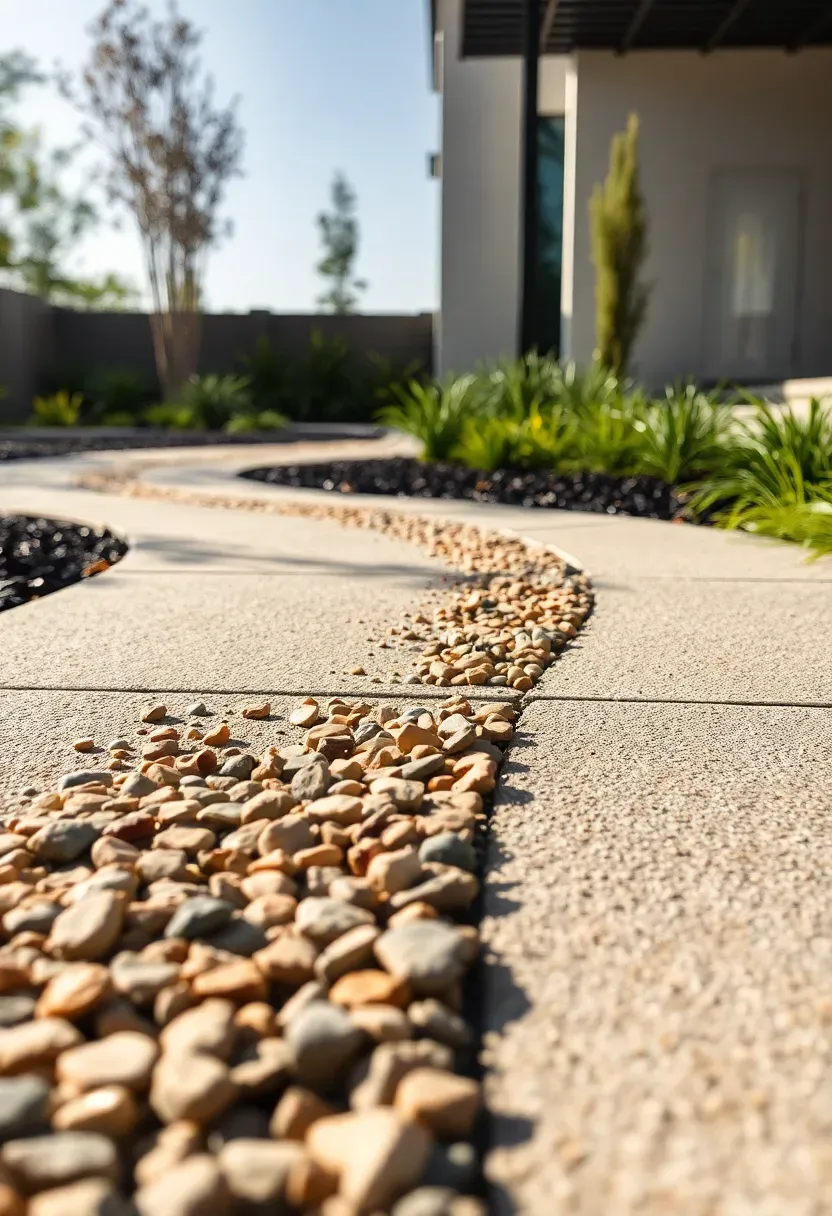
2. Irregular Flagstone Walkway
Why Flagstone Works So Well
Natural flagstone — typically sandstone, limestone, or slate — comes in irregular shapes that fit together like a puzzle. This randomness is actually an advantage. Unlike pavers that demand precise spacing and straight lines, flagstone tolerates imperfect installation and still looks intentional. Each piece is unique, and the finished path has a handmade quality that manufactured materials cannot replicate.
How to Lay It
Excavate 4 inches, spread 2 inches of compacted crusher run base, and set stones on an inch of coarse sand. Arrange the largest pieces first along the path center, then fill edges with smaller ones. Keep joints between 1-2 inches wide and fill with polymeric sand or plant creeping thyme for a softer look. A 30-foot path requires roughly 100-120 square feet of stone at $3-$6 per square foot.
Watch Out
- Thin flagstone (under 1.5 inches) cracks under freeze-thaw cycles — buy 2-inch minimum thickness for cold climates.
- Avoid dark-colored flagstone in full sun areas; it absorbs heat and becomes uncomfortable barefoot in summer.
We picked a few things that go well with this idea: Galvanized Steel Landscape Edging (33ft, 10-Pack) (★4.5), VEVOR Bendable Steel Landscape Edging (6-Pack) (★4.6) and Worth Garden Steel Lawn Edging (33ft, 10-Pack) (★4.6). As an Amazon Associate we earn from qualifying purchases.
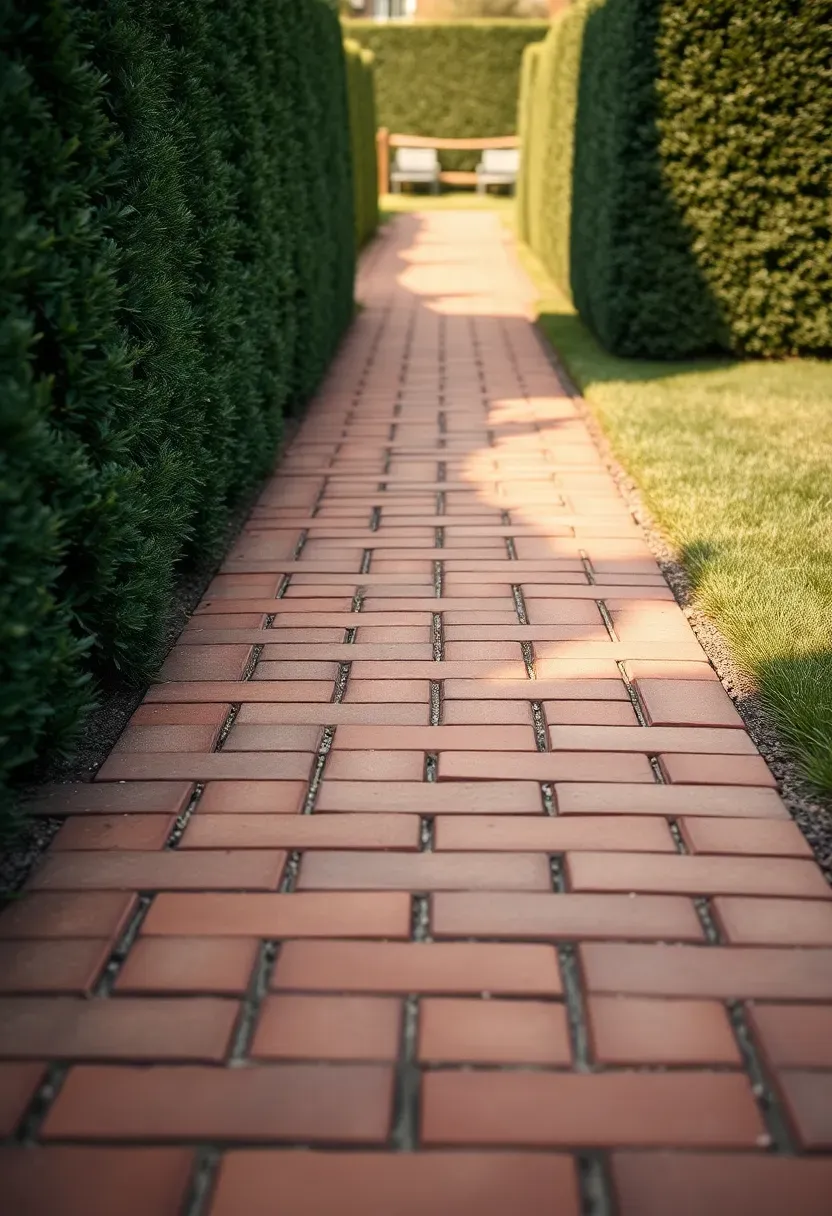
3. Brick Herringbone Path
Brick paths feel permanent in a way gravel and stepping stones do not. The herringbone pattern — bricks set at alternating 45-degree angles — is the strongest layout because interlocking angles resist shifting under foot traffic. Standard clay pavers run $0.50-$1.50 each, and a 3-foot-wide path uses about 5 bricks per square foot. Set them on a compacted sand bed with soldier-course borders (bricks turned perpendicular along the edges) to lock the field pattern in place.
Tips
- Use concrete sand, not play sand, as the setting bed — angular grains interlock and resist washing out during heavy rain.
- Rent a plate compactor for $60-$80/day to vibrate bricks into the sand bed after laying; hand tamping leaves uneven spots.
- Sweep polymeric sand into joints and mist with water to bind everything together — regular sand washes out within weeks.
We picked a few things that go well with this idea: DOMINATOR Polymeric Sand Gray Beige (10 lb) (★4.2), Rhino Power Bond Polymeric Sand (10 lb) (★4.1) and Alliance Gator Maxx G2 Polymeric Sand (50 lb) (★4.5). As an Amazon Associate we earn from qualifying purchases.
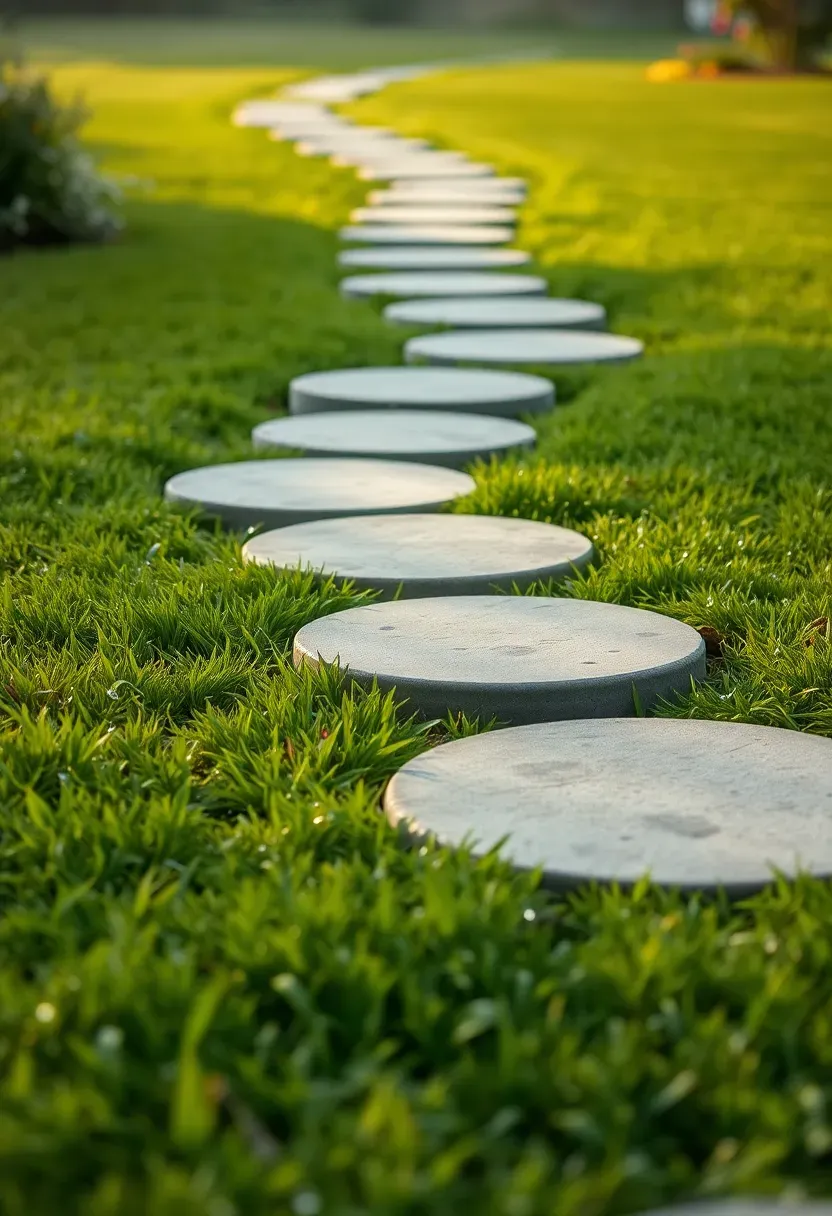
4. Stepping Stones Through Lawn
The Problem
You want a path across your yard but do not want to commit to a full hardscape installation. Maybe you are renting, or you are not sure about the final layout yet, or you just prefer the look of mostly-grass with a subtle walkway running through it.
The Solution
Stepping stones set flush with the grass surface give you a defined route that you can mow right over. Place stones 24-26 inches on center (a comfortable stride length), cut around each one with a spade, remove turf and 2 inches of soil, add a thin sand bed, and drop the stone in so its top sits level with the surrounding lawn. Precast concrete rounds cost $2-$5 each at home centers, or use natural stone slabs for a more organic feel.
Pros and Cons
Pros: Cheap and reversible; mower passes over without obstruction; adjustable layout — just pick up and move stones if the route changes.
Cons: Individual stones can shift or sink in clay soil; grass between stones still needs regular mowing; ice-covered stones get slippery in winter.
Recommended
Items for this idea
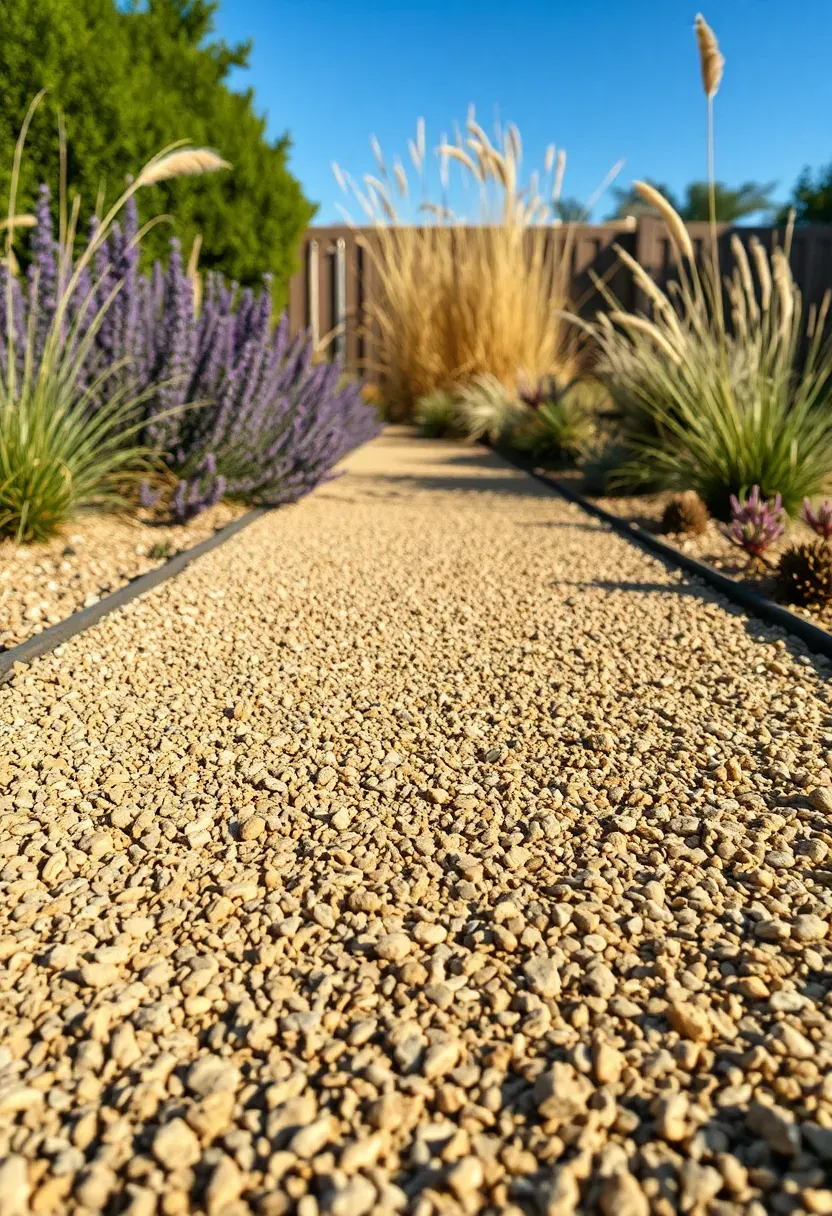
5. Decomposed Granite Trail
Decomposed granite (DG) packs into a firm, natural-looking surface that splits the difference between loose gravel and solid pavement. It comes in warm tans, rusty golds, and gray tones that blend with most landscapes. Spread it 2-3 inches deep over compacted subgrade with landscape fabric underneath. A cubic yard costs $40-$60 and covers about 80 square feet at 3-inch depth. The real advantage over pea gravel: DG contains enough fine particles to self-compact into a nearly solid crust after wetting and tamping, so it does not shift underfoot like loose stone.
Tips
- Wet DG thoroughly and run a plate compactor over it in two passes — the fines bind together and create a walkable surface within hours.
- Add stabilizer resin (sold separately) mixed into the top inch for high-traffic areas; it prevents erosion and keeps the surface hard through rain.
- Reapply a thin topping layer every 2-3 years where foot traffic wears through the crust.
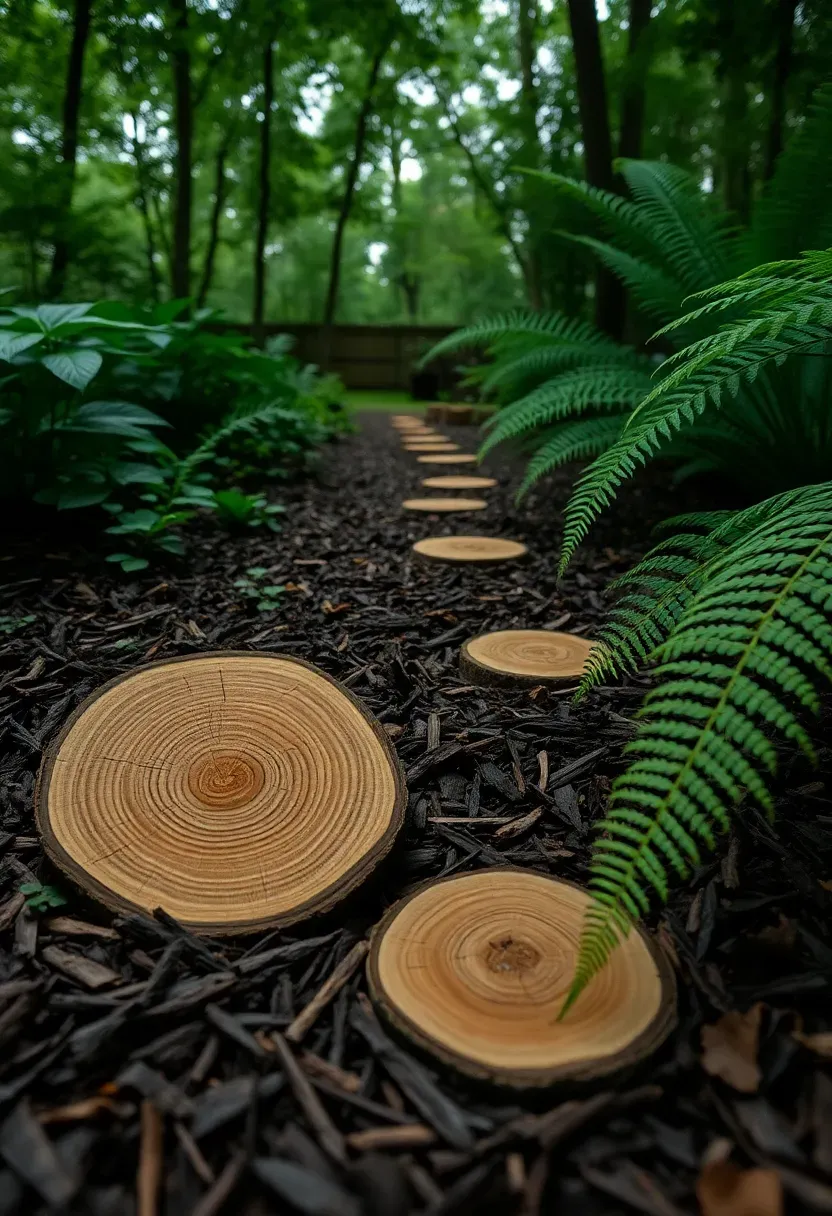
6. Wood Slice Rounds
Cross-cut sections from a fallen tree make rustic path surfaces with zero material cost if you have access to a chainsaw and a downed trunk. Cut rounds 3-4 inches thick from logs 10-14 inches in diameter, soak them in wood preservative for a week, then set them into a shallow excavation on a sand bed. Space rounds 2-4 inches apart and fill gaps with mulch or gravel. The organic look works well in cottage gardens and wooded lots where manufactured materials would feel out of place.
Tips
- Use hardwoods like oak, black locust, or cedar — softwoods like pine rot within 2-3 years even with preservative.
- Seal the cut faces with linseed oil or deck sealant to slow moisture absorption from the ground.
- Replace individual rounds as they decay rather than rebuilding the whole path; this is the main advantage of the modular format.
Recommended
Items for this idea
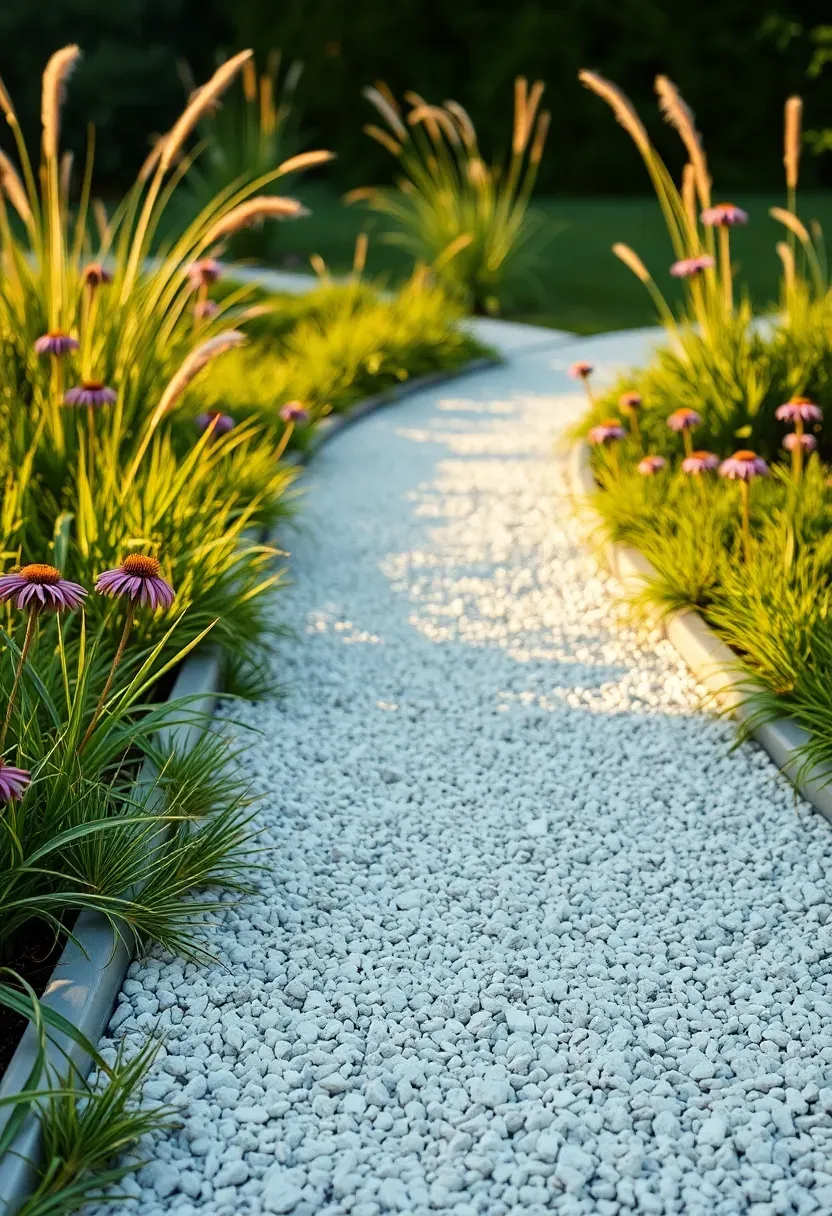
7. Crushed Limestone Path
Crushed limestone compacts harder than pea gravel because its angular fragments lock together under pressure. The bright white-to-cream color gives paths a clean, almost formal appearance that contrasts nicely with green lawns and planting beds. Installation follows the same process as any loose-material path — fabric, edging, pour, compact — but the finished surface feels closer to walking on packed dirt than walking on beach stones. A ton runs $30-$50 and covers similar area to pea gravel.
Tips
- Order "minus" grade (sometimes called "screenings") that includes fine dust particles; these fines fill voids and create a tighter surface.
- Limestone raises soil pH slightly in adjacent beds — this benefits lavender, clematis, and most vegetables but can stress acid-loving plants like blueberries and azaleas.
- Sweep the surface with a stiff broom monthly to redistribute loose material from edges back to the center.
8. Bluestone Slab Walkway
Bluestone is the benchmark for high-end residential paths. Its blue-gray color, consistent cleft texture, and ability to be cut into precise rectangles make it the go-to choice when you want a walkway that reads as architectural rather than rustic. Thermal-finished bluestone (heat-treated for grip) runs $8-$15 per square foot for material alone. Lay it on a compacted base with polymeric sand joints for a dry-laid installation, or mortar it onto a concrete sub-slab for a permanent bond that prevents any movement.
Tips
- Buy "full range" color bluestone rather than single-color lots — the natural mix of blues, grays, and subtle purples looks richer than uniform pieces.
- Seal bluestone with a penetrating stone sealer every 2-3 years; unsealed surfaces absorb leaf tannins and develop dark stains under trees.
- Keep joints under 3/8 inch for a formal look; wider joints suit cottage or rustic settings.
Recommended
Items for this idea
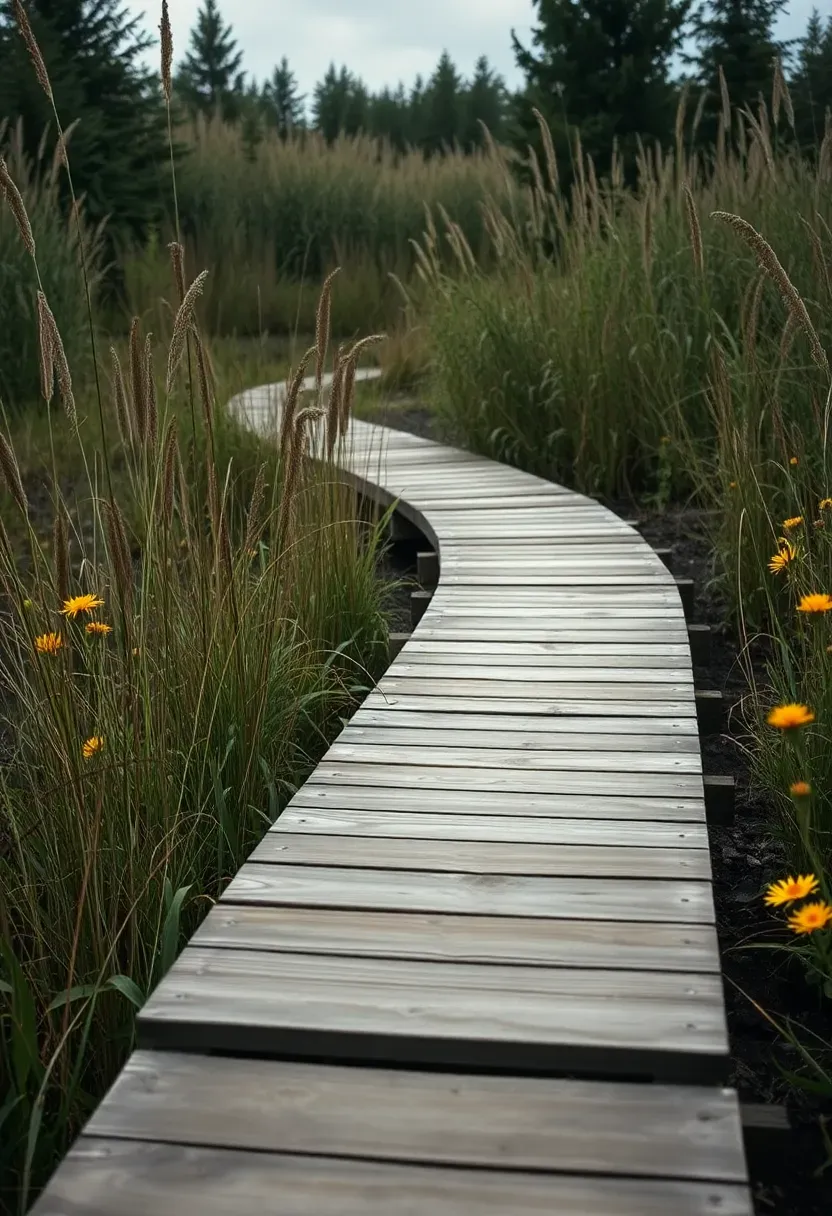
9. Cedar Boardwalk
When the Ground Is the Problem
Some backyards have sections that stay wet — low spots that collect runoff, areas near downspouts, or boggy patches along creek banks. Building a ground-level path here means fighting mud and standing water year-round.
Raising the Path
A simple boardwalk built from cedar 2x6 decking on pressure-treated 4x4 sleepers lifts the walking surface 4-6 inches above grade. No concrete footings required for a lightweight garden boardwalk — just level the sleepers on compacted gravel pads every 4 feet. Cedar resists rot naturally and weathers to a silver-gray patina within a year. Material cost for a 20-foot section runs $150-$250 depending on lumber prices.
Pros and Cons
Pros: Solves drainage issues completely; creates visual interest with elevation change; cedar lasts 15-20 years without chemical treatment.
Cons: More expensive than ground-level paths; boards can get slippery when wet unless you add anti-slip strips; requires occasional board replacement as individual pieces weather.
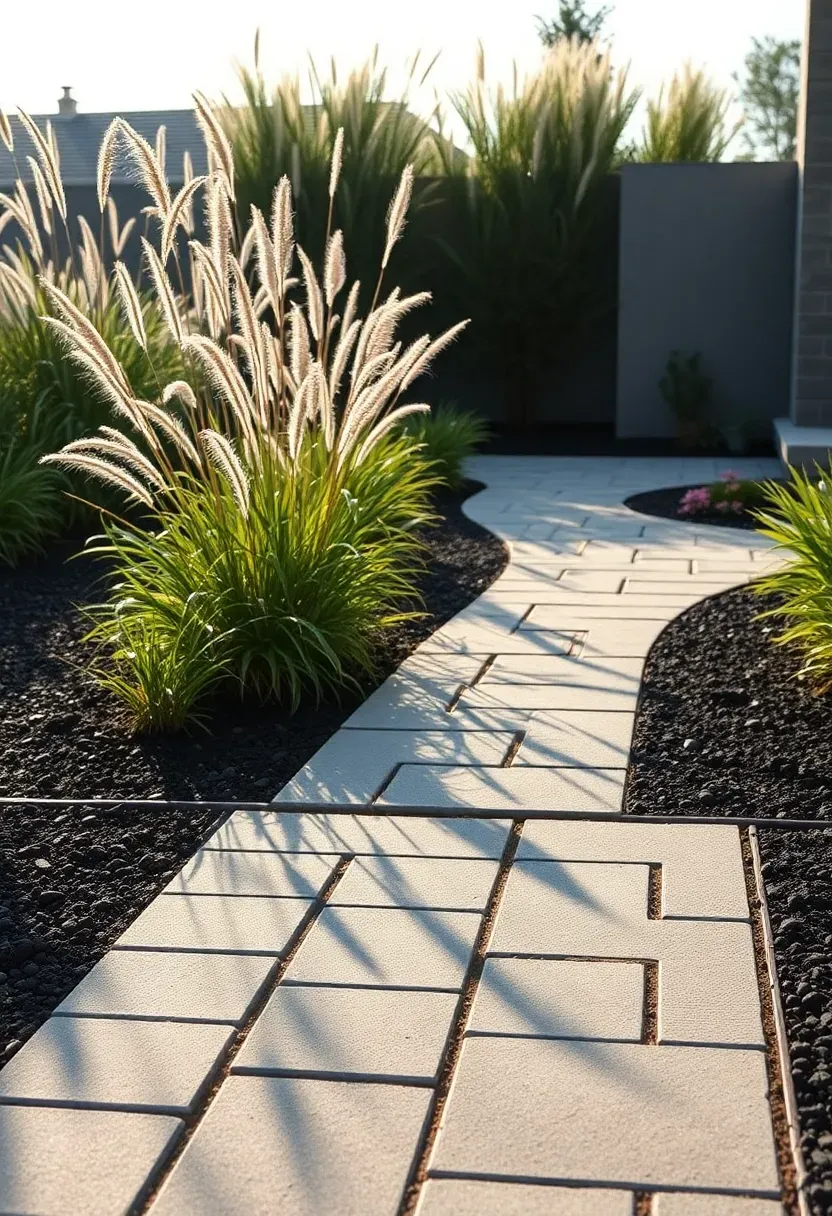
10. Concrete Paver Path
Concrete pavers give you the regularity and strength of poured concrete with the repairability of individual units. If a section settles or a paver cracks, you lift that one piece, re-level the sand bed, and drop in a replacement. Standard 4x8-inch pavers in running bond pattern cost $0.50-$2.00 each and install identically to brick — compacted base, sand setting bed, edge restraints, polymeric sand joints. The color options go far beyond brick: charcoal, slate gray, tan, red, and blended multicolor are all standard.
Tips
- Stick with through-colored pavers rather than surface-dyed ones; color that goes all the way through does not show chips or wear marks.
- Lay a 6-inch compacted gravel base in freeze-thaw climates — skimpy bases cause heaving and uneven settling within 2 winters.
- Use a string line and check levels every 4-5 feet during installation to maintain consistent slope for drainage.
Recommended
Items for this idea
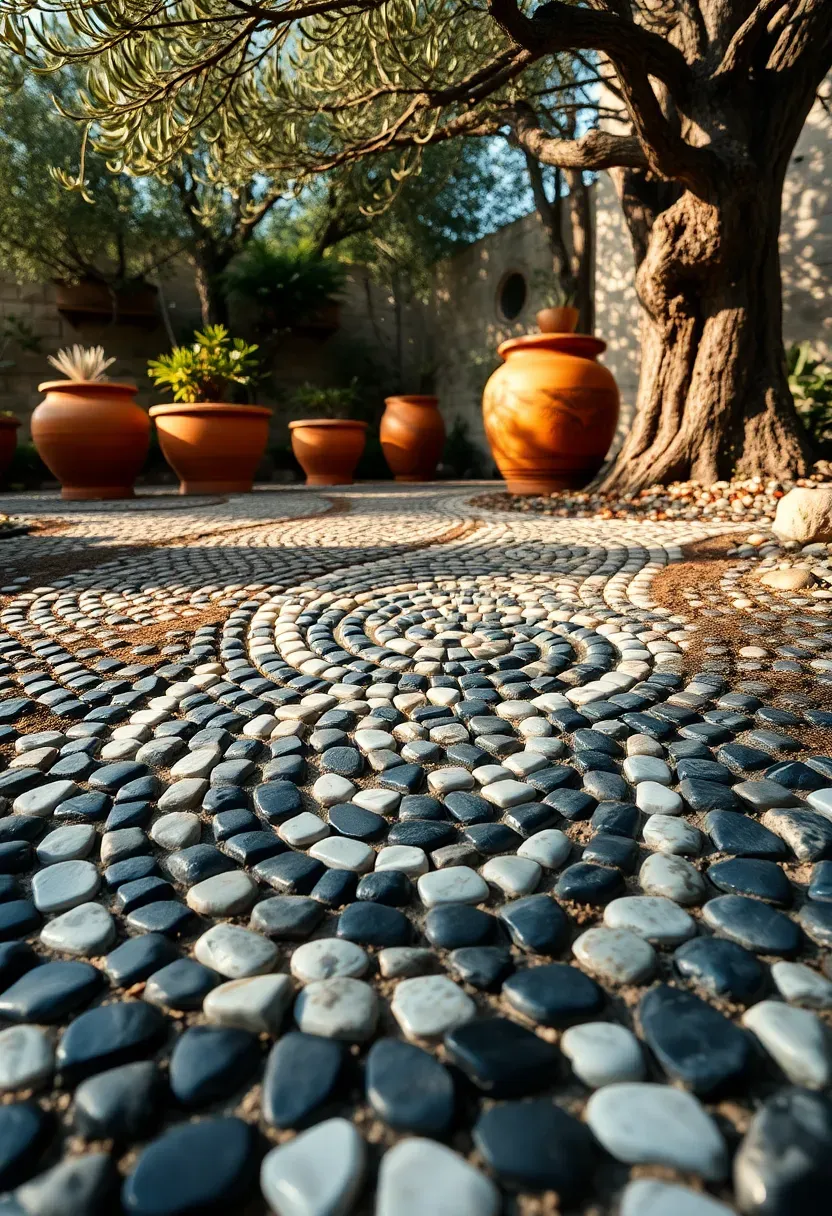
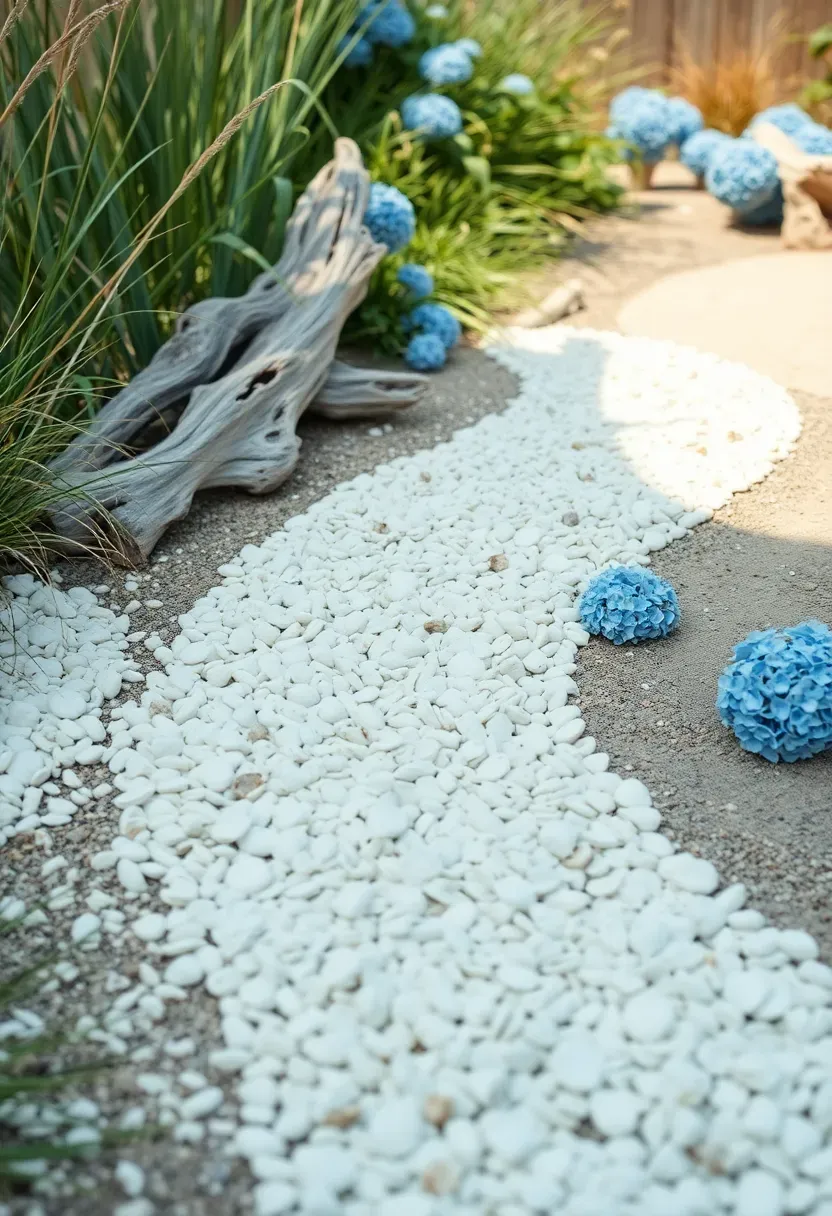
11. Mosaic Pebble Walkway
Pebble mosaics turn a path into a genuine craft project. Select flat river stones in contrasting colors — black and white is the classic Mediterranean combination — and set them vertically (on edge, not flat) into a wet mortar bed spread over a concrete sub-slab. The stones pack tightly together to create patterns: spirals, waves, fans, or simple stripes. This technique is centuries old and shows up in gardens from Portugal to China. Expect to cover about 3-4 square feet per hour of careful hand-setting, so plan this for a small accent section rather than a 50-foot main path.
Tips
- Sort stones by size into buckets before starting — consistent stone diameter within each pattern section keeps lines clean.
- Press stones in until mortar reaches about two-thirds up their height; too shallow and they pop out, too deep and the pattern disappears.
- Mist the finished surface and cover with plastic for 48 hours to slow-cure the mortar; rapid drying causes cracking.
12. Railroad Tie Steps
On gentle slopes where a ramp is too gradual and a staircase feels excessive, railroad ties make excellent step risers. Sink the bottom tie into the slope, backfill behind it with compacted gravel to form the tread, and repeat up the grade. Each tie is 6-7 inches tall — a comfortable riser height. Used railroad ties cost $15-$25 each at landscape suppliers. The heavy weight (200+ pounds per tie) means they stay put without anchoring on moderate slopes, though driving rebar pins through pre-drilled holes adds security on steeper grades.
Tips
- Wear gloves when handling used ties — the creosote preservative stains skin and irritates it.
- Use new landscape timbers (4x6 or 6x6 pressure-treated lumber) instead of genuine railroad ties if you plan food gardens nearby; creosote can leach into surrounding soil.
- Angle each tread surface slightly forward (1/4 inch per foot) so rainwater sheds off the front edge rather than pooling on the step.
Recommended
Items for this idea
13. Dry-Laid Slate Path
Slate splits naturally into thin, flat pieces that make elegant path surfaces. Its color range — charcoal, purple, green, rust — adds visual interest without relying on manufactured dyes. Dry-lay slate the same way you would flagstone: compacted base, sand setting bed, pieces fitted together like a jigsaw. Slate tends to be thinner than sandstone flagging (often 1-1.5 inches), so keep it on stable, well-compacted bases to prevent cracking. Cost runs $4-$8 per square foot for natural cleft slate.
Tips
- Tap each piece lightly with a rubber mallet after setting; slate cleaves along hidden internal planes and will break under hard blows.
- Choose "unfading" slate varieties (like Vermont green or Pennsylvania black) that hold their color permanently rather than weathering types that turn brown over time.
- Avoid using slate on steep slopes — the smooth cleft surface gets dangerously slick when wet unless you apply anti-slip grit treatment.
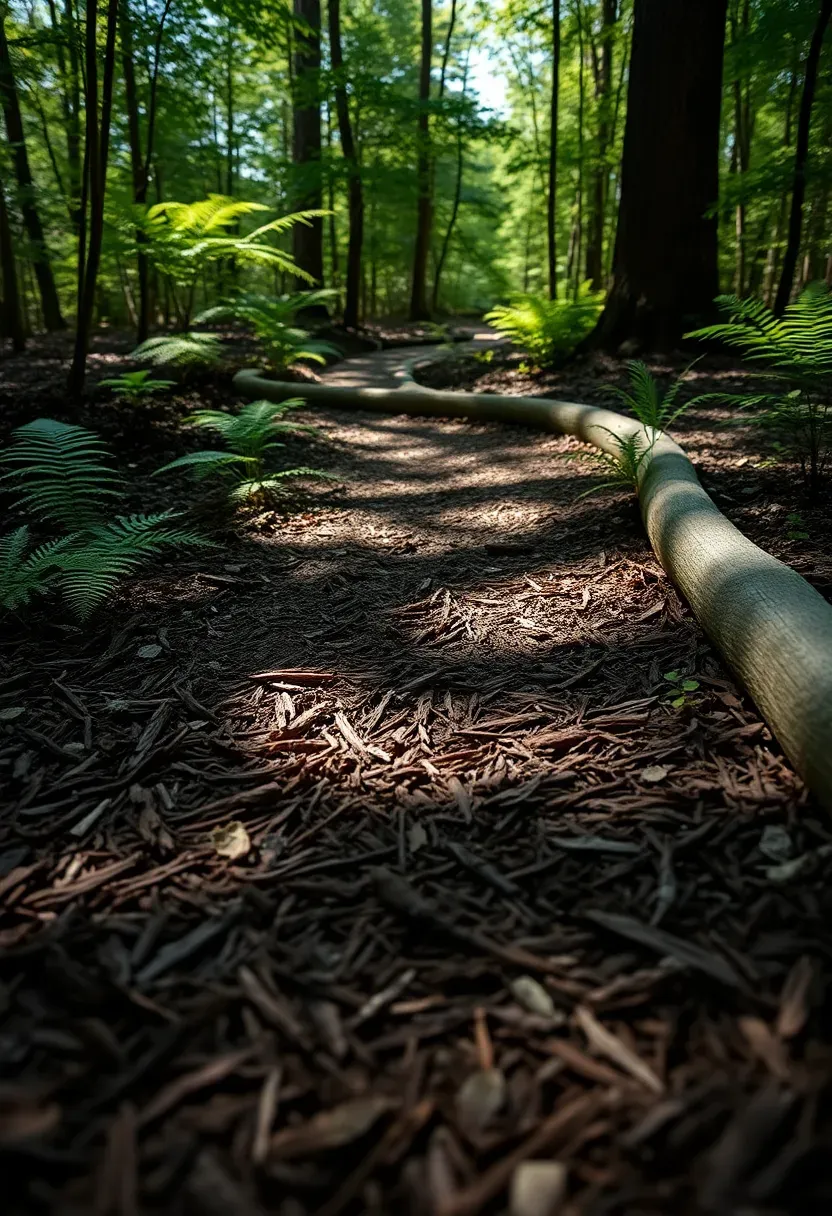
14. Mulch Trail
For a completely informal path through wooded or naturalized areas, hardwood mulch does the job for almost nothing. Spread 3-4 inches of double-shredded hardwood between simple log edging or directly into a mowed-out strip through tall grass. Mulch paths feel soft underfoot, suppress weeds along the route, and blend into woodland settings where stone or concrete would look harsh. A cubic yard of bulk mulch costs $25-$40 and covers roughly 80 square feet at 4-inch depth.
Tips
- Double-shredded hardwood stays in place better than chunk bark because the fibers knit together.
- Replenish the surface every spring — mulch paths compress and decompose faster than mulch in static beds because of foot traffic.
- Lay landscape fabric underneath only if weeds are aggressive; in shaded woodland settings, the thick mulch layer alone usually suppresses growth.
Recommended
Items for this idea
15. Stacked Stone Steps on a Slope
Step 1: Assess the Grade
Measure total rise from bottom to top of the slope. Divide by 6-7 inches (comfortable riser height) to determine how many steps you need. A 3-foot rise needs about 5-6 steps.
Step 2: Excavate and Set
Start at the bottom. Dig a flat shelf into the slope, set the first stone slab (minimum 2 inches thick, 18-24 inches deep front-to-back), and backfill behind it with compacted gravel. Each stone should tilt backward about 1/4 inch so water runs off the back edge rather than cascading down the face.
Step 3: Stack Upward
Repeat for each step, overlapping the back edge of each lower stone by 1-2 inches with the front of the next. This overlap locks steps together visually and structurally. Natural stone slabs for steps run $8-$15 per linear foot at stone yards.
Watch Out
- Never stack more than 5-6 steps without a landing — building codes in most areas require a resting platform every 4 feet of rise.
- Mortar is optional for dry-stacked garden steps, but pin each stone with construction adhesive if children will use the path regularly.
16. Poured Concrete with Exposed Aggregate
Standard poured concrete paths look utilitarian unless you add texture. Exposed aggregate — where you pour normal concrete, let it set partially, then wash away the top cream layer to reveal embedded stones — gives the surface a pebbled, organic texture that hides dirt, provides excellent traction, and holds up for decades. The process requires timing: wash too early and stones dislodge, too late and the surface sets smooth. Most contractors charge $8-$15 per square foot installed. DIY is possible for short sections if you are comfortable with concrete work and have a helper for the wash-down phase.
Tips
- Spray retarder compound on the surface immediately after screeding — this slows the top layer while the base cures, giving you a wider wash window.
- Use a pressure washer on low setting (1200-1500 PSI) for the reveal rather than scrubbing by hand; you get more consistent depth.
- Control joints cut every 6-8 feet prevent random cracking; score them while concrete is still workable.

Recommended
Items for this idea
17. River Rock Border Path
The Concept
Rather than using river rock as the walking surface (uncomfortable and unstable), use it as a decorative border flanking a solid-surface path. A 6-8 inch band of 2-3 inch river rock along each side of a flagstone, paver, or concrete path softens the transition between hardscape and lawn. The rounded stones catch light differently than flat path surfaces, adding depth and dimension.
How to Install
Excavate a shallow channel along each path edge, line with landscape fabric, and fill with a single layer of river rock. Keep the rock surface slightly below the path edge so it does not roll onto the walking surface. Total additional cost is minimal — a 50-pound bag of decorative river rock covers about 2-3 linear feet of border.
Choose If
- Your path edges look too abrupt against the lawn or beds
- You want to add visual width without increasing the walkable surface
- Drainage along path edges is poor and you need a permeable buffer strip
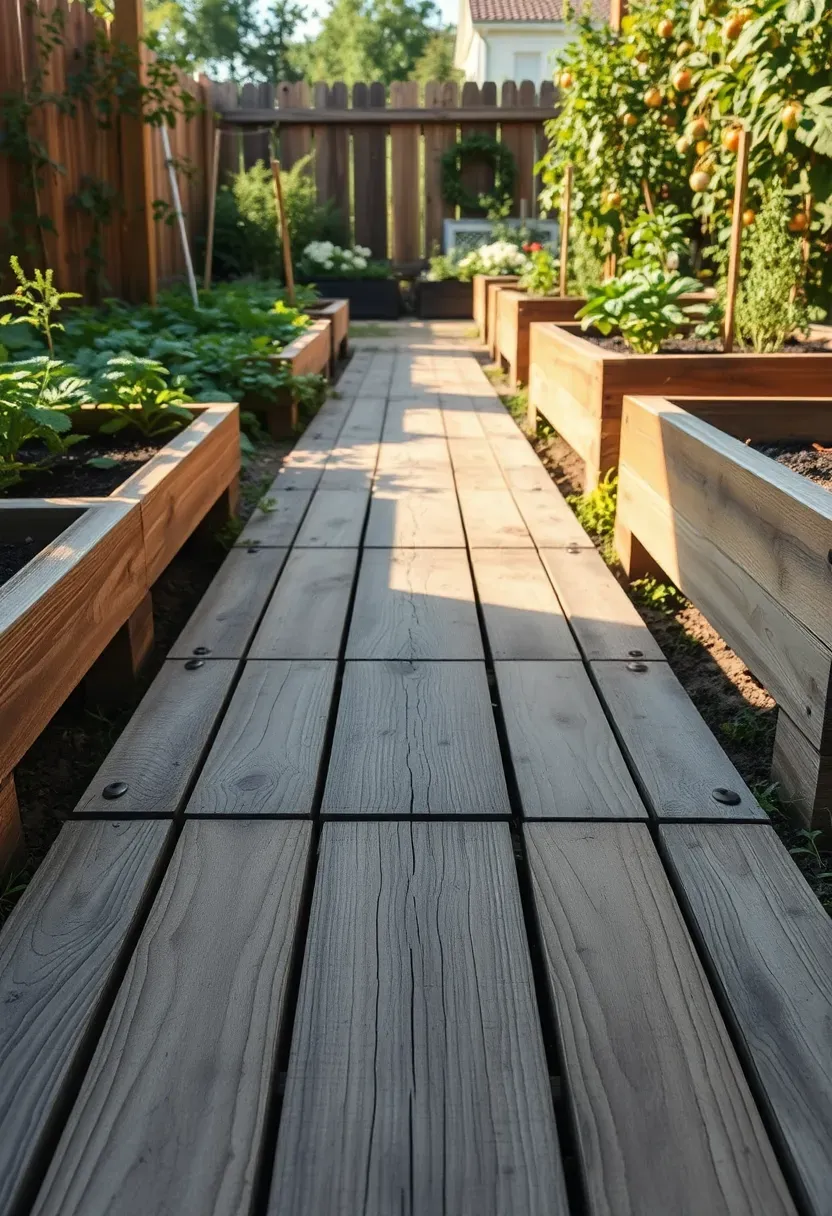
18. Reclaimed Pallet Boardwalk
Free pallets from warehouse districts, Craigslist, or local businesses can be disassembled and reassembled into a rustic boardwalk path. Pull the deck boards off with a pry bar, sand rough edges, and screw them across pressure-treated 2x4 runners spaced 16 inches apart. The weathered wood has an instant patina that new lumber takes years to develop. This path works best in casual settings — kitchen gardens, backyard play areas, or connecting a shed to the main yard.
Tips
- Only use heat-treated pallets (stamped "HT") — chemically treated pallets (stamped "MB" for methyl bromide) are not safe for garden use.
- Pre-drill screw holes near board ends to prevent splitting in dry, brittle pallet wood.
- Elevate the boardwalk on gravel pads or concrete blocks to keep wood off wet soil; ground contact halves the lifespan.
Recommended
Items for this idea
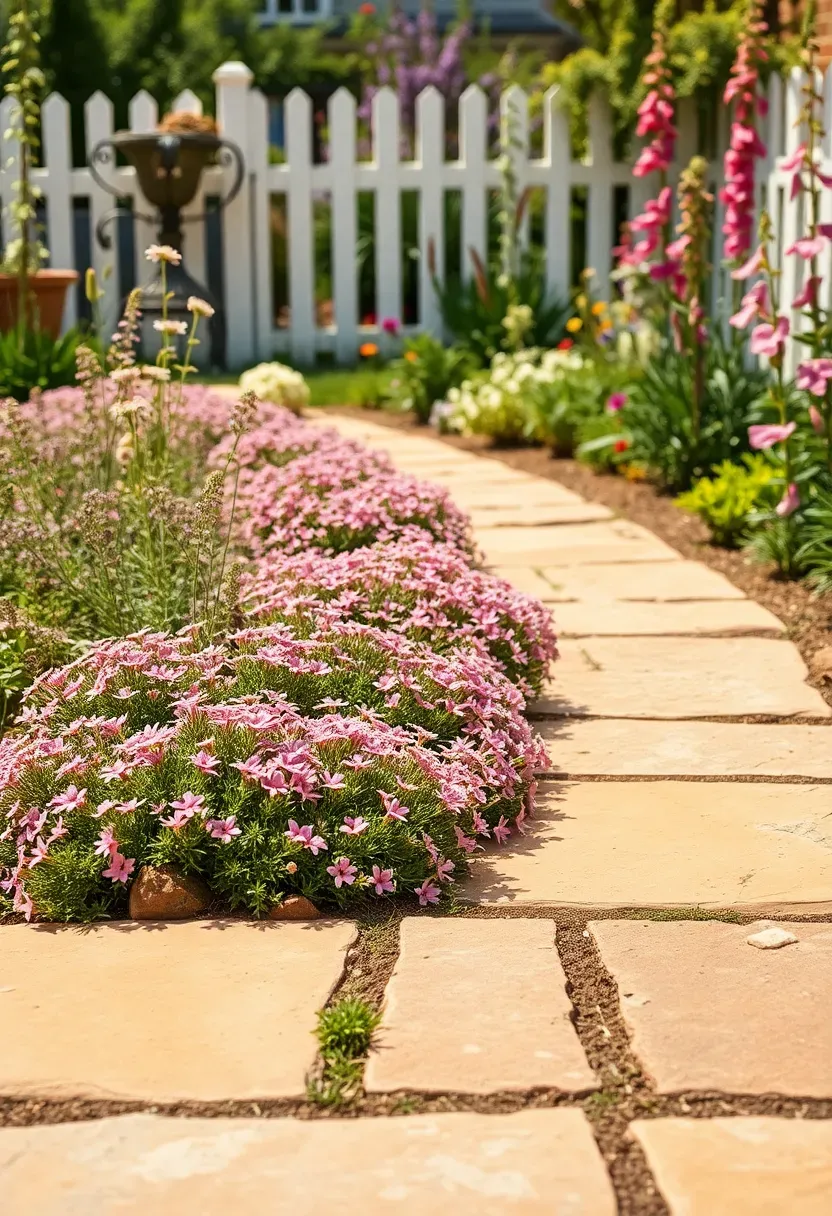
19. Sandstone Slab Path
Sandstone offers warmer colors than bluestone or slate — buff, gold, peach, and reddish-brown depending on the quarry. It is softer than granite or bluestone, which makes it easier to cut and shape with basic masonry tools but also means it wears faster in high-traffic areas. Sandstone works best for garden paths with moderate foot traffic rather than main entry walkways. Slab thickness of 2 inches minimum is important; thinner pieces split along bedding planes when the ground shifts.
Tips
- Seal sandstone with a breathable impregnating sealer to prevent algae growth and staining — unsealed sandstone is porous and darkens unevenly over time.
- Source local sandstone when possible; shipping heavy stone long distances adds $3-$5 per square foot to cost.
- Plant woolly thyme or Corsican mint in wide joints for a cottage garden feel; both tolerate light foot traffic and release fragrance when stepped on.
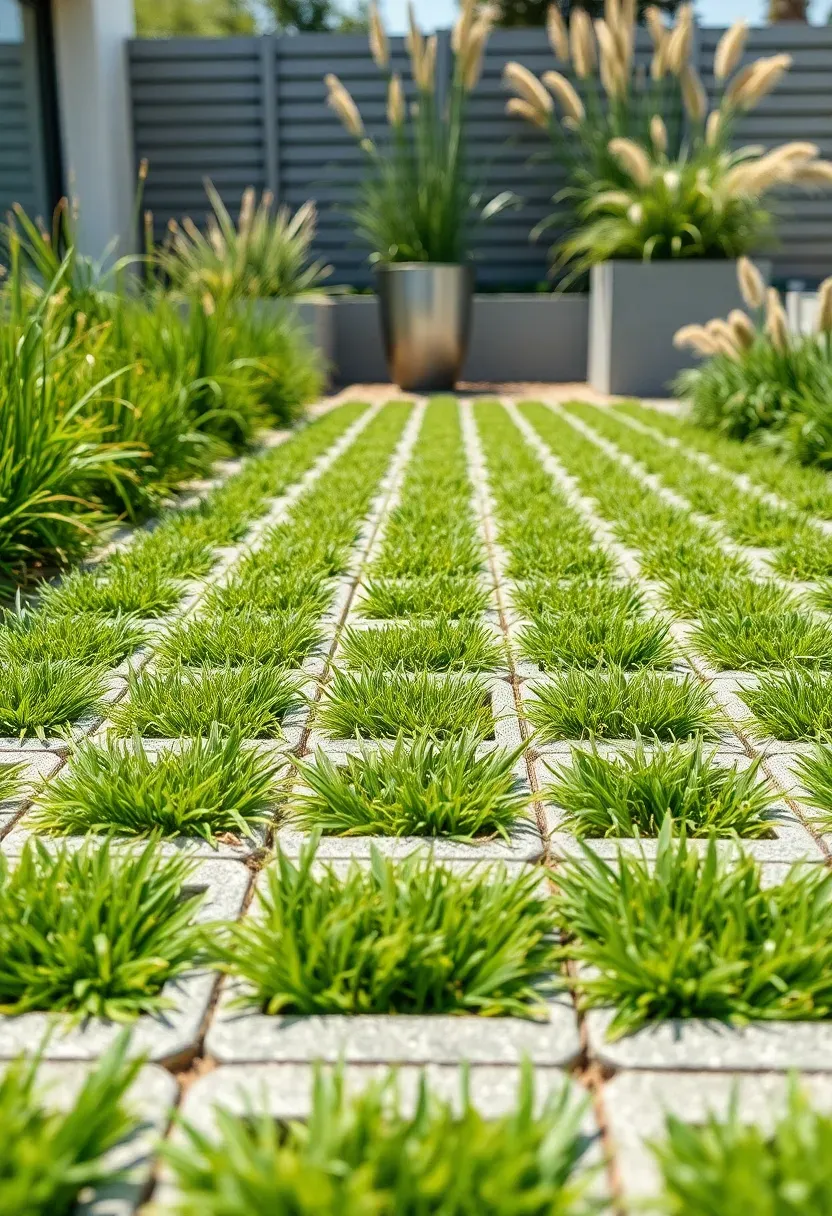
20. Grass Joint Pavers
Permeable grid pavers — concrete blocks with open cells that allow grass to grow through — combine hard walking surface with green softness. The result is a path that reads as lawn from a distance but feels solid underfoot. Each paver typically covers 16x16 inches with 30-40% open area for turf. Set them on a standard gravel-and-sand base, fill cells with topsoil, and seed or plug with grass. They handle vehicle weight too, so they double as overflow parking surfaces when needed.
Tips
- Use a turf-type tall fescue for the fill grass — it tolerates shade from the paver walls and recovers from foot traffic better than bluegrass.
- Mow the entire surface at 3-inch height; shorter cuts stress grass in the confined cells.
- Fertilize grass joint areas at half the rate of your regular lawn — excess growth creates mowing problems in the grid openings.
Recommended
Items for this idea
21. Shell Path
Crushed oyster shell and clamshell are traditional path materials in coastal regions, and they ship reasonably to inland areas too. The pale white-to-cream color reflects sunlight, keeping the surface cooler than dark stone in summer. Shells compact moderately well, provide excellent drainage, and have a distinctive crunch underfoot. Spread 2-3 inches over landscape fabric with edging to contain the material. A cubic yard costs $40-$70 and covers similar area to gravel.
Tips
- Crushed shell is sharp-edged when fresh — avoid it for paths where bare feet are common until the surface weathers and rounds off over a season.
- Shell raises soil pH significantly; keep it away from acid-loving plants like blueberries, rhododendrons, and camellias.
- Mix shell with a small percentage of crushed stone dust (10-15%) to improve compaction and create a harder walking surface.
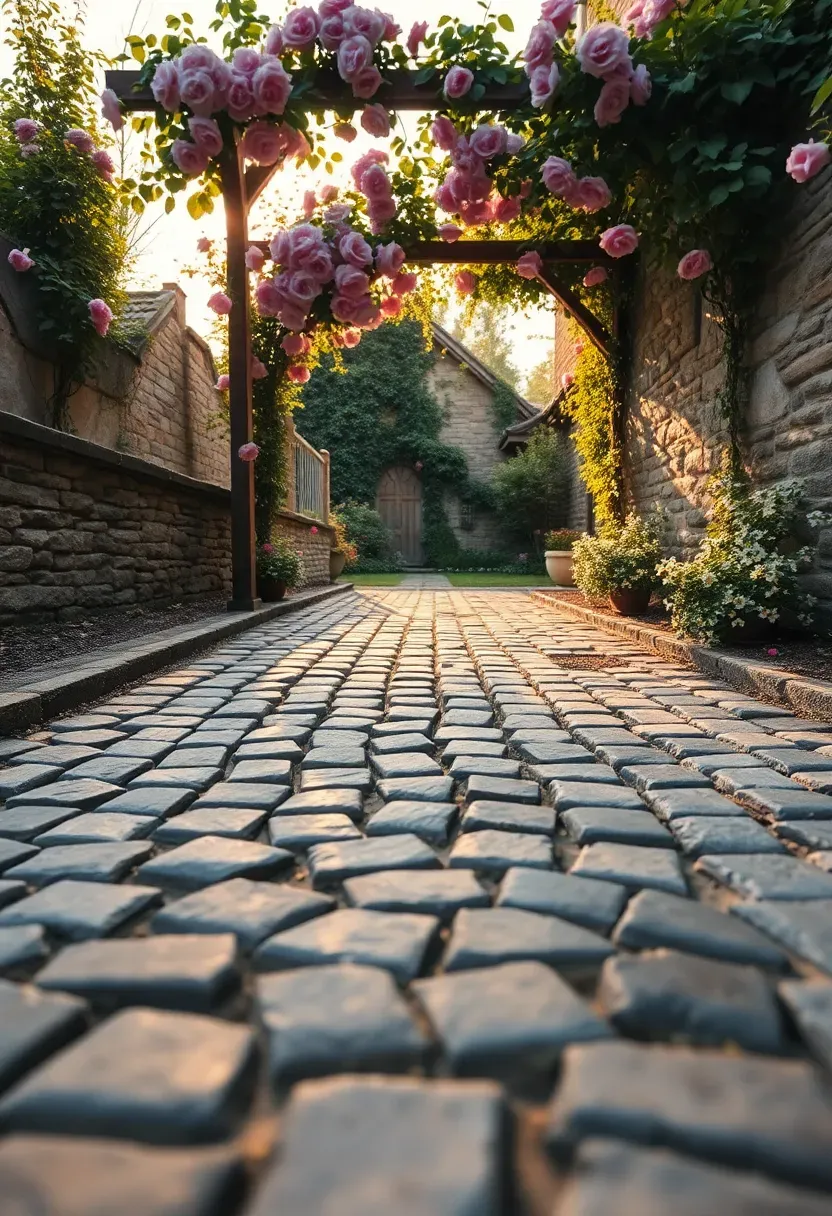
22. Cobblestone Walkway
Cobblestones (technically called setts) are small, roughly cubic pieces of granite, basalt, or sandstone traditionally used in European streets. Their chunky proportions and hand-hewn texture bring an old-world character that flat pavers lack. Authentic cobblestones run $8-$20 per square foot, but reclaimed setts from demolition salvage yards can cost significantly less. Set them in a mortar bed over concrete for a permanent installation, or dry-lay on compacted sand for a more rustic, slightly uneven surface.
Tips
- Cobblestones create an inherently bumpy surface — this adds charm but makes wheeled items (strollers, carts, wheelchairs) difficult to roll. Reserve cobbles for decorative or low-traffic paths.
- Fan pattern and running bond are the two classic layouts; fan pattern requires cutting perimeter stones while running bond uses whole pieces throughout.
- Fill joints with mortar rather than sand for cobblestone paths — the irregular shapes leave wide gaps that sand alone cannot stabilize.
Recommended
Items for this idea
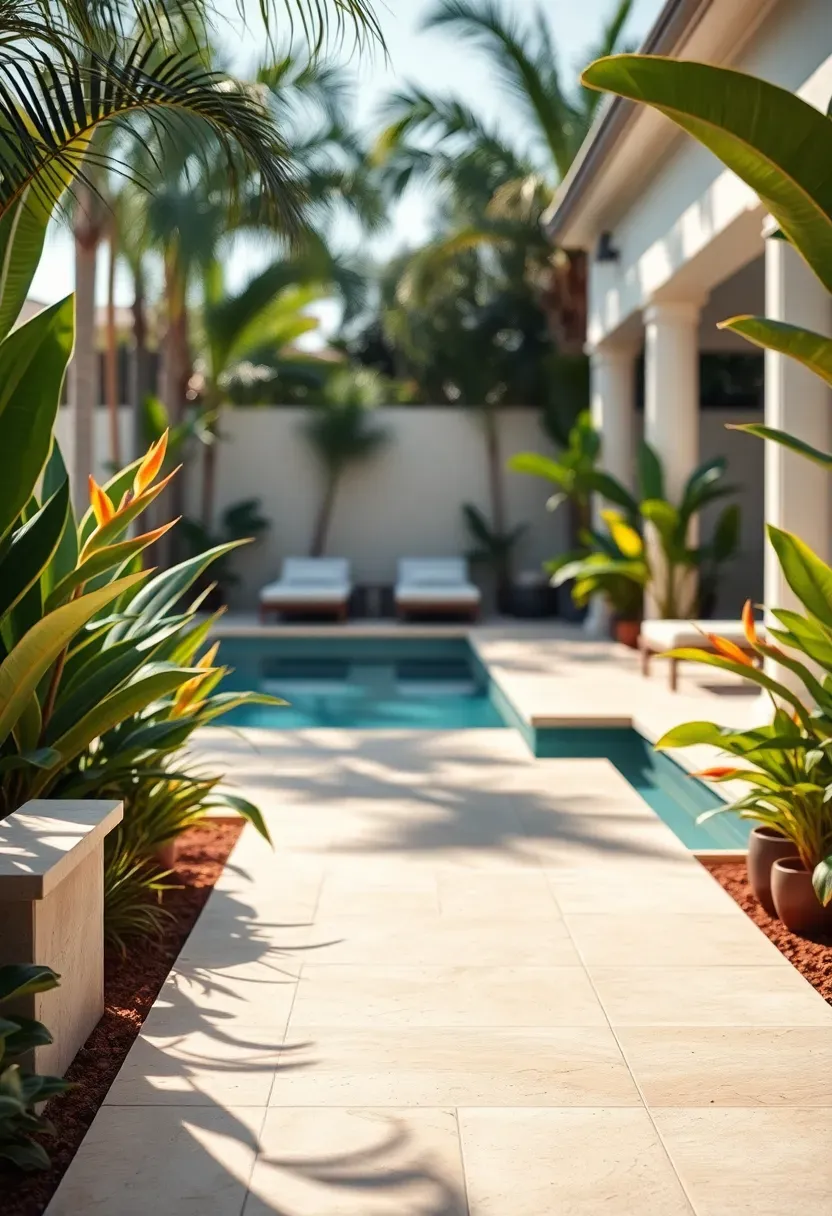
23. Travertine Tile Path
Travertine vs. Concrete Pavers
Travertine is natural limestone with a distinctive pitted surface that gets filled and honed for outdoor use. It stays noticeably cooler underfoot than concrete pavers or dark stone — surface temperatures run 20-30 degrees lower in direct sun, which is why it dominates pool deck installations in warm climates.
What to Expect
Filled and honed travertine tiles in 12x24 or 16x24 inch formats cost $5-$12 per square foot for material. They install on a mortar bed over concrete sub-slab for best durability. The ivory and walnut color options look refined without reading as pretentious. Expect some surface pitting to develop over years as the soft filler material weathers — this is normal and adds character.
Choose If
- You want a path material that stays barefoot-comfortable in summer heat
- Your backyard connects to a pool area and you want visual continuity
- You prefer a smooth, sophisticated surface over textured or rustic options
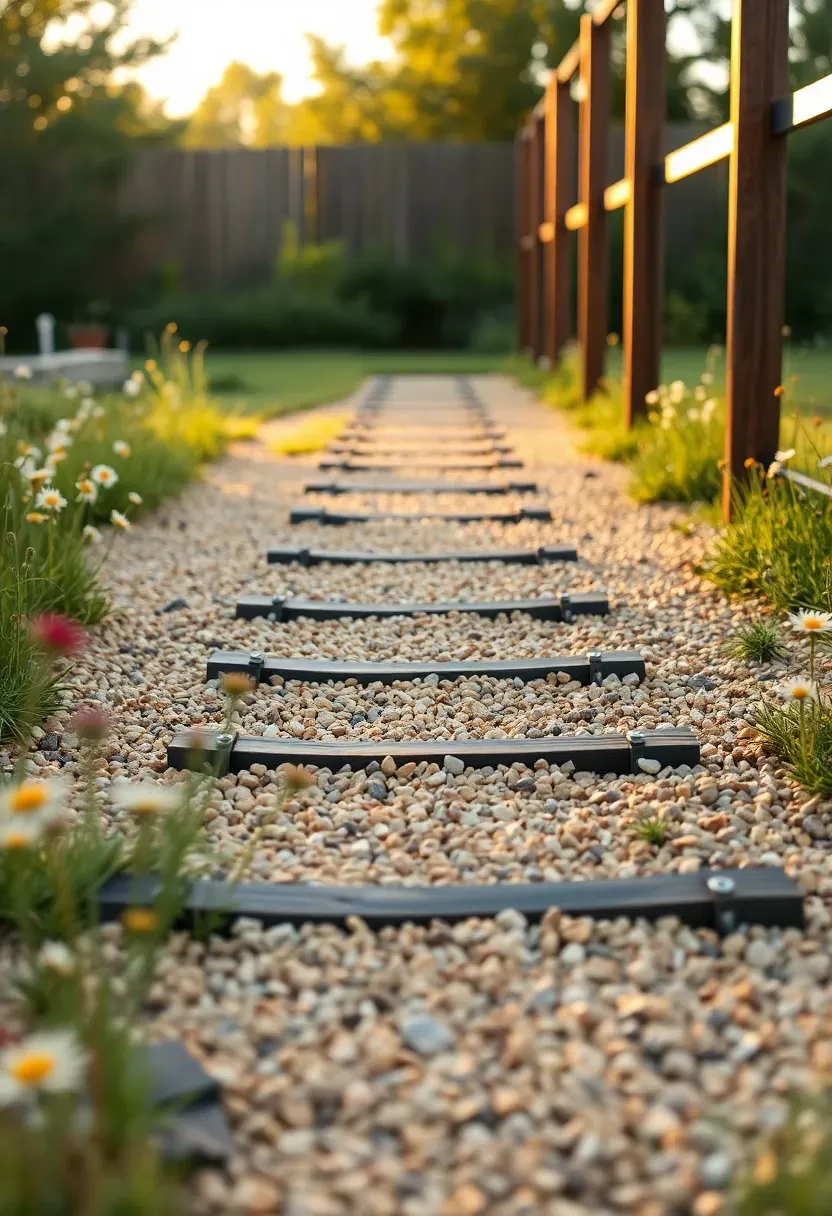
24. Gravel-and-Timber Hybrid
Landscape timbers laid across a gravel path at regular intervals create a ladder-like pattern that adds visual rhythm and prevents gravel migration on slight slopes. Space 4x4 or 4x6 pressure-treated timbers every 24-30 inches, secure them with rebar stakes driven through pre-drilled holes, and fill between with compacted gravel. The timbers act as speed bumps for loose stone — gravel that would gradually creep downhill on a sloped path gets trapped between the cross-members instead.
Tips
- Cut timbers to exact path width minus 1/4 inch so they sit tight within the edging without binding.
- Countersink rebar pins 1 inch below the timber surface to avoid trip hazards.
- Use the same gravel color between timbers and in adjacent beds for a cohesive look; mixing materials creates visual clutter.
Recommended
Items for this idea
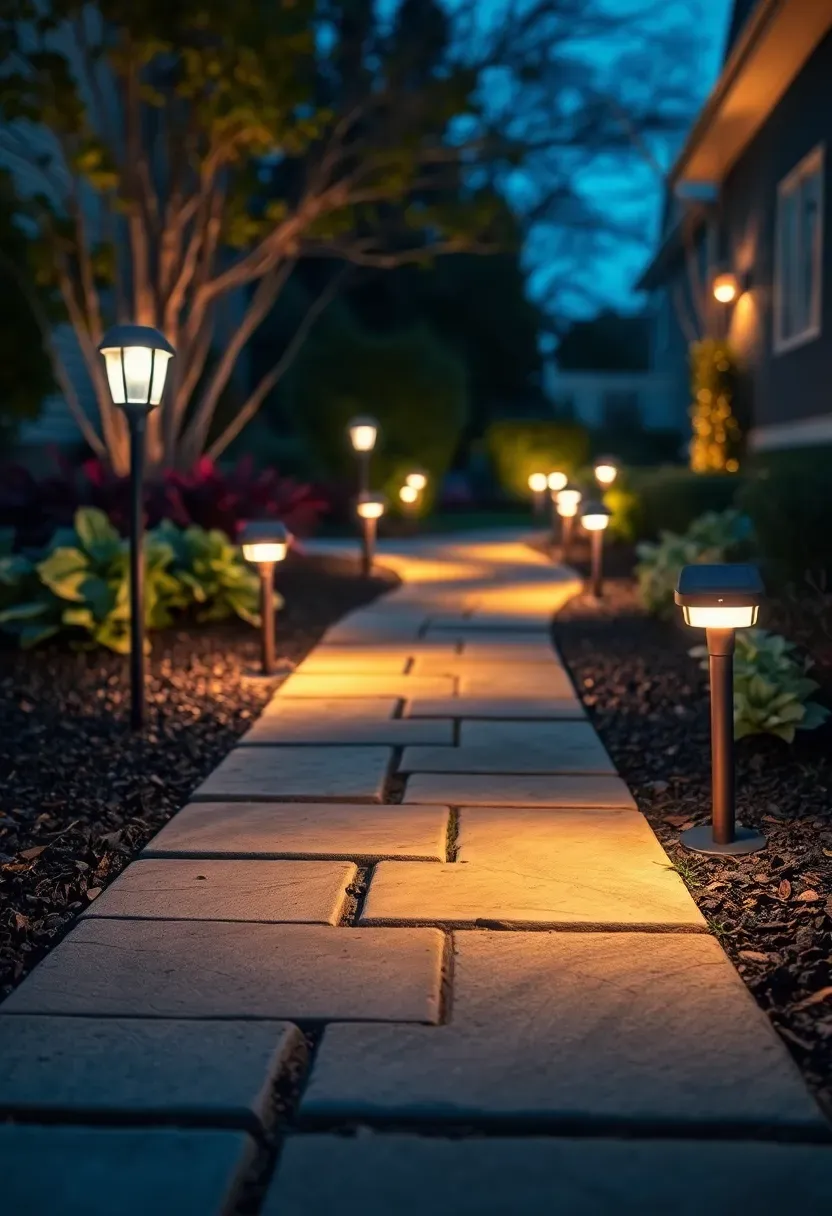
25. Solar-Lit Night Path
Any path material benefits from lighting, but the simplest approach is solar stake lights positioned every 6-8 feet along both sides. Modern solar path lights with warm-white LEDs (2700K color temperature) produce enough glow to navigate safely without the harsh blue-white glare of older models. Decent units cost $3-$8 each and last 2-3 seasons before batteries weaken. For a 30-foot path, 10-12 lights spaced alternately on each side create a staggered pattern that illuminates the full walking surface without looking like an airport runway.
Tips
- Position lights where they receive at least 6 hours of direct sun — shaded solar panels do not charge fully and lights dim early.
- Angle light heads slightly inward toward the path surface rather than straight up; this directs light where you actually need it.
- Replace NiMH batteries every 18-24 months for about $1 each rather than buying new lights — the solar panel and LED last far longer than the battery.
Quick FAQ
Does a backyard pathway need a concrete foundation? Most garden paths do not. Flagstone, pavers, gravel, and stepping stones perform well on a compacted gravel-and-sand base without concrete. Concrete sub-slabs are only necessary for mortared installations (mosaic pebble, travertine tile) or paths that carry vehicle weight. Dry-laid paths on proper base material handle foot traffic and freeze-thaw cycles for decades.
How wide should a backyard pathway be? Three feet is the minimum for comfortable single-file walking. If two people will walk side by side regularly, go to 4-4.5 feet. Paths wider than 5 feet start reading as patios and lose the sense of directed movement that makes a walkway effective.
Which pathway material lasts longest with the least maintenance? Concrete pavers and natural stone (bluestone, granite cobble) last 25-50 years with almost no maintenance beyond occasional sweeping and re-sanding joints every few years. Gravel paths need annual topping, mulch paths need annual replacement, and wood paths need board replacement every 10-15 years.
Can I build a backyard pathway over tree roots? Stepping stones and raised boardwalks are the safest options near trees. Never excavate or compact base material within the drip line of established trees — cutting roots destabilizes the tree and compacted soil suffocates them. Stepping stones laid directly on the surface or a boardwalk elevated on point supports both avoid disturbing the root zone.
What is the cheapest backyard pathway to install? Mulch trails cost $25-$40 for materials covering a 30-foot path. Stepping stones through lawn run $20-$50 depending on stone choice. Pea gravel paths cost $70-$120 for the same length including edging and fabric. All three are single-afternoon projects for one person.
The right path material depends on your yard, your traffic, and honestly your tolerance for maintenance. Gravel and mulch are forgiving and cheap but need annual attention. Stone and pavers cost more upfront and then mostly leave you alone. Pick one idea from this list, build a short test section this weekend, and see how it feels before committing to a 100-foot run. A path that actually gets built beats a perfect path that stays in the planning stage.
Pinterest cover for 25 Backyard Pathway Ideas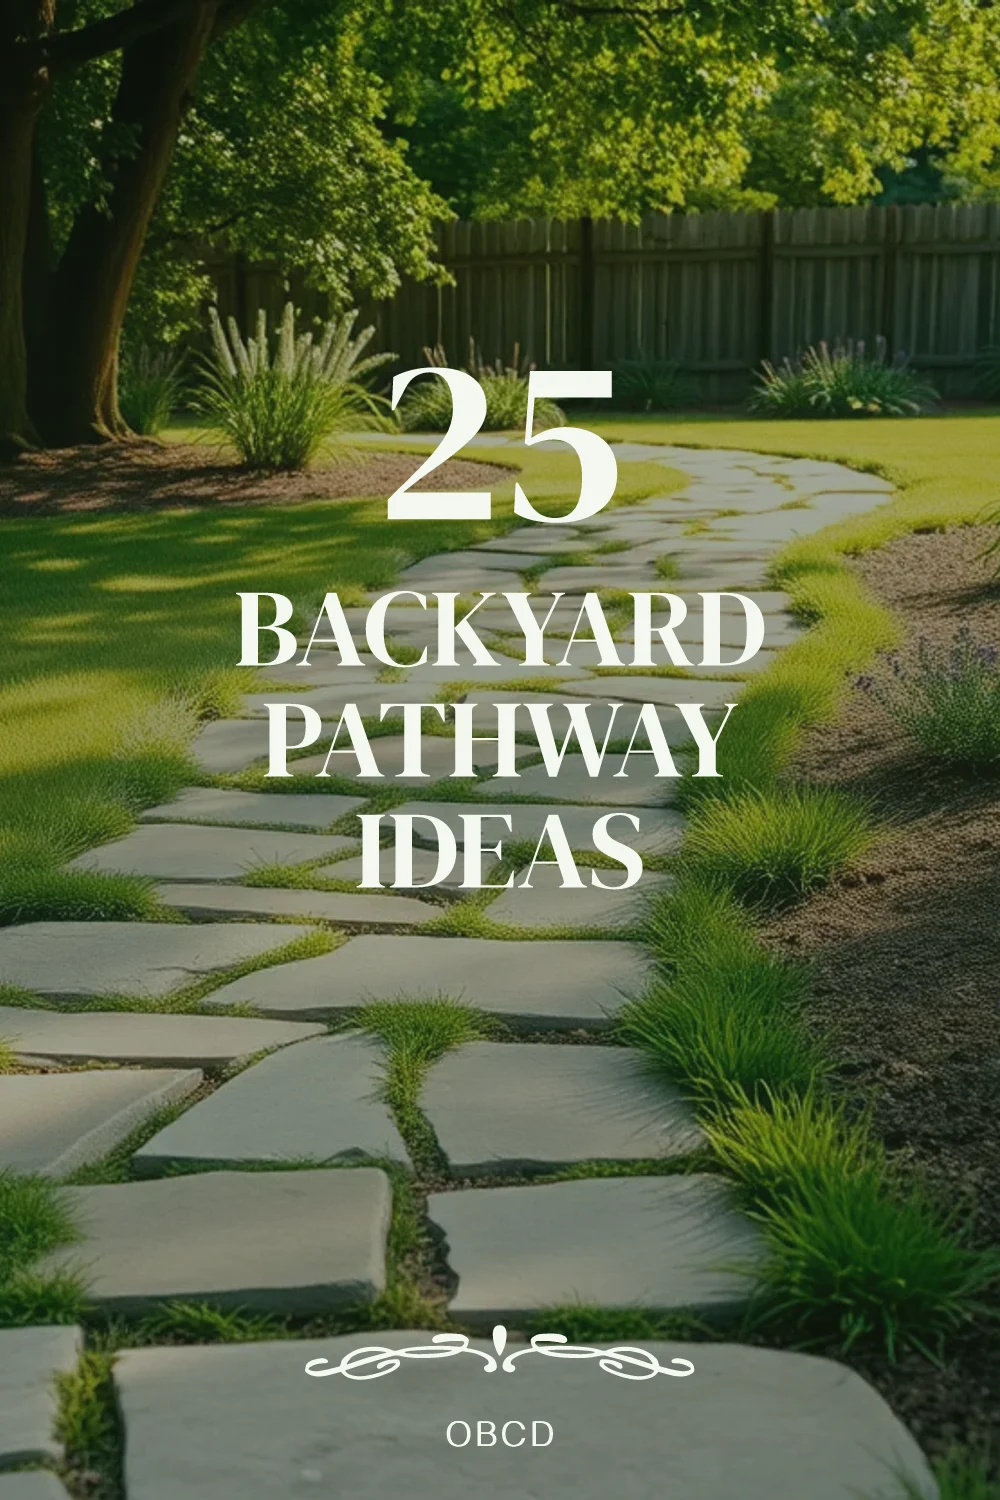
About the author
OBCD
CGI visualization and interior design content. We create detailed 3D renders and curate practical design ideas for every room in your home.