21 Backyard Oasis Ideas
My neighbor spent $45,000 on a backyard renovation last summer. The pool contractor, the landscaper, the electrician — they all came and went over six weeks. What he ended up with looked like a resort lobby dropped into a suburban lot. But here is the thing: my other neighbor built something equally inviting for under $4,000 using a stock tank pool, some well-chosen plantings, and a simple cedar pergola she assembled from a kit. The difference between a backyard and a backyard oasis is not really about budget. It is about layering — water, shade, greenery, lighting, and comfortable places to sit, combined with enough intention that the space feels enclosed and separate from the rest of your property.
These 21 ideas range from full-scale pool builds to weekend projects you can knock out with basic tools.
Table of Contents
- Natural Swimming Pool
- Stock Tank Plunge Pool
- Tropical Plant Border
- Pergola with Climbing Vines
- Sunken Fire Pit Lounge
- Cascading Water Wall
- Outdoor Daybed Pavilion
- Gravel Courtyard with Fountain
- Palm and Fern Understory
- Floating Deck Over Lawn
- Hot Tub Alcove with Privacy Screen
- Overhead String Light Canopy
- Hammock Grove
- Pond with Water Lilies
- Outdoor Shower Station
- Mediterranean Courtyard Garden
- Tiki Bar and Counter Seating
- Zen Rock Garden Corner
- Drought-Tolerant Desert Oasis
- Bamboo Privacy Wall
- Nighttime Fire and Water Combo

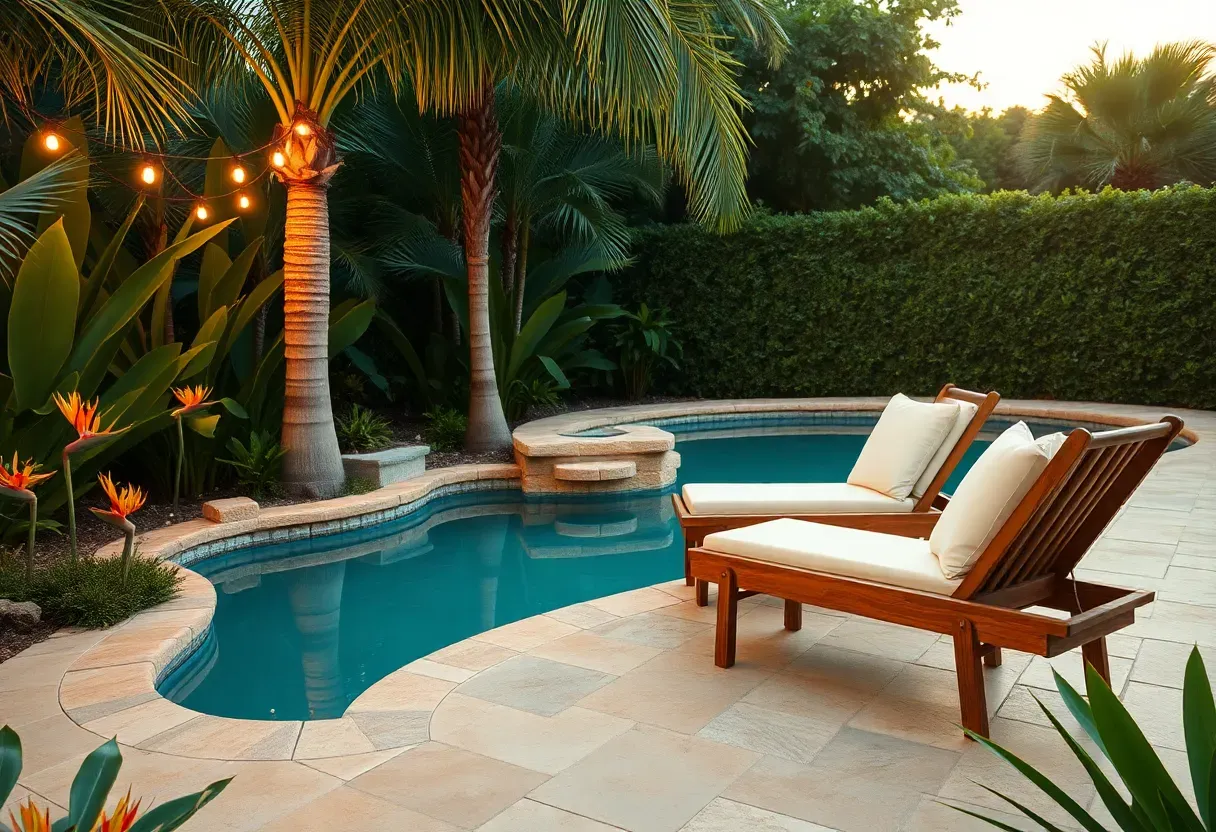
1. Natural Swimming Pool
Why Go Chemical-Free
Conventional pools rely on chlorine or salt systems to keep water clear. Natural swimming pools use a separate regeneration zone — a shallow planted area where gravel, beneficial bacteria, and aquatic plants filter the water biologically. The swim zone connects to this planted zone through a pump that circulates water between the two. You get clean, soft water without the dry skin and bleached swimsuits.
How to Build One
Excavate two connected areas: the swim zone (typically 6-8 feet deep) and the regeneration zone (12-18 inches deep, covering at least 50% of the total surface area). Line both with EPDM pond liner, install a low-wattage circulation pump, and plant the shallow zone with cattails, water irises, and submerged oxygenating plants. Expect to spend $50,000-$80,000 for professional installation, or $15,000-$25,000 if you handle excavation and planting yourself.
Watch Out
- The regeneration zone needs full sun for at least 6 hours daily — shade kills the filtration plants.
- Autumn leaf fall can overwhelm the system; install a net cover from October through December if you have deciduous trees nearby.
We picked a few things that go well with this idea: Brightever 100FT Edison String Lights (52 Bulbs) (★4.6), Addlon 50FT Outdoor Edison String Lights (★4.6) and Addlon 48FT Commercial Edison Patio Lights (★4.5). As an Amazon Associate we earn from qualifying purchases.
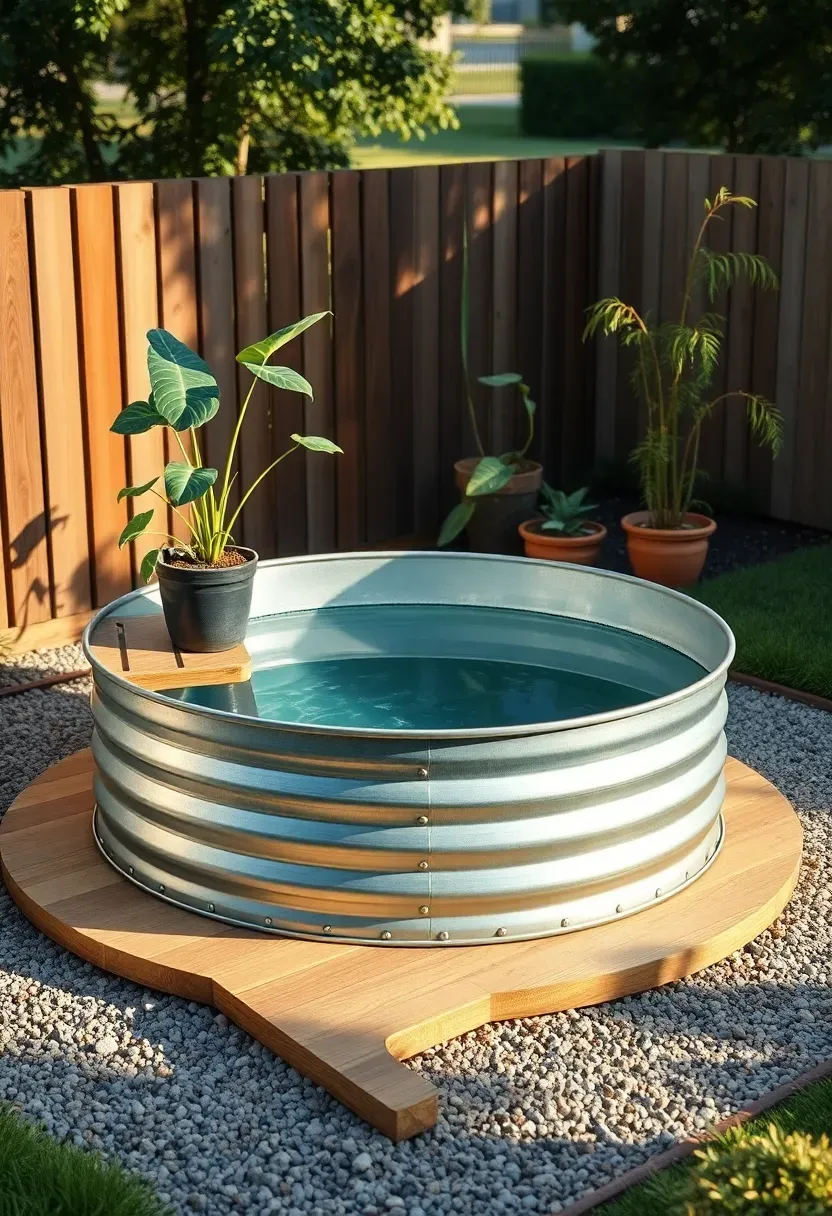
2. Stock Tank Plunge Pool
A galvanized steel stock tank from a farm supply store costs $200-$500 for a 6-8 foot round model and holds enough water for two adults to cool off on a hot afternoon. This is not a lap pool — it is a plunge pool, meant for sitting chest-deep with a cold drink. Set the tank on a level gravel pad, add a small cartridge filter and pump ($150-$300), and you have a functional pool for under $800 total. Paint the exterior with heat-resistant enamel in black or dark green if you want it to blend with the landscape rather than looking like farm equipment.
Tips
- Drill a 1.5-inch hole near the bottom for the return fitting rather than running hoses over the rim.
- A floating solar cover cuts heat loss by 50% and keeps debris out overnight.
- Line the bottom with a pool-safe rubber mat to prevent the galvanized surface from feeling slippery underfoot.
We picked a few things that go well with this idea: Bestway TANX 10ft Stock Tank Pool Set, Stock Tank Pool Protective Liner (8ft) (★4.6) and Round Stock Tank Pool Cover (8ft) (★3.9). As an Amazon Associate we earn from qualifying purchases.
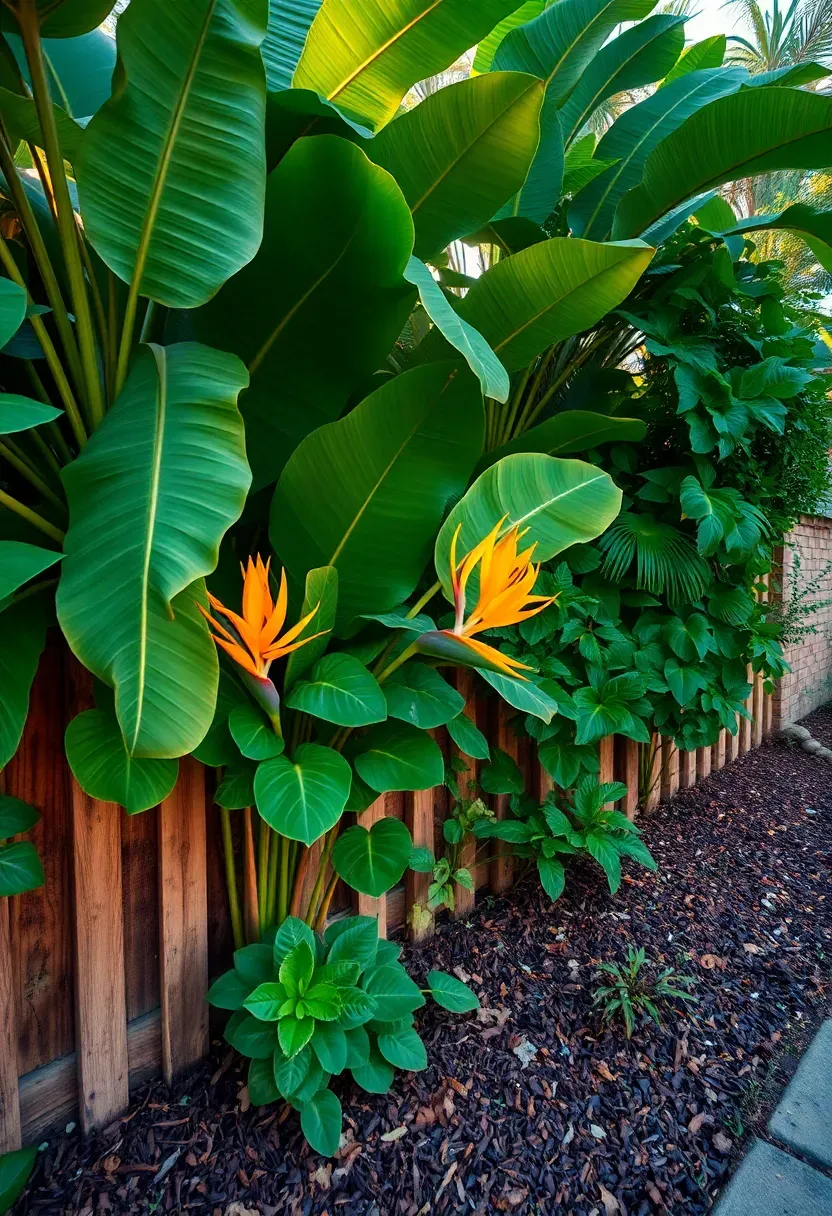
3. Tropical Plant Border
Nothing says oasis faster than big, dramatic foliage. You do not need to live in zone 10 to pull this off. Hardy banana (Musa basjoo) survives down to zone 5 with heavy mulching, elephant ears (Colocasia) grow from bulbs you can lift in fall, and canna lilies push out wide paddle-shaped leaves that look distinctly tropical in any climate. Plant them in dense masses along your fence line — three rows deep if you have the space — with the tallest species at the back and low groundcovers like creeping jenny at the front. The goal is a green wall that blocks sightlines and makes you forget you are 30 feet from your neighbor's garage.
Tips
- Water deeply twice a week rather than lightly every day — tropical plants develop better root systems with deep, infrequent watering.
- Mulch 4-6 inches deep with shredded hardwood to retain moisture and protect root zones through winter.
- In zones 5-7, cut banana plants to 12 inches after first frost, mound mulch over the stump, and cover with a leaf bag until spring.
We picked a few things that go well with this idea: Lazy Daze Double Cotton Rope Hammock (★4.4), SUNCREAT Double Rope Hammock with Spreader Bar (★4.2) and Sunnydaze Cotton Rope Outdoor Hammock (★4.3). As an Amazon Associate we earn from qualifying purchases.
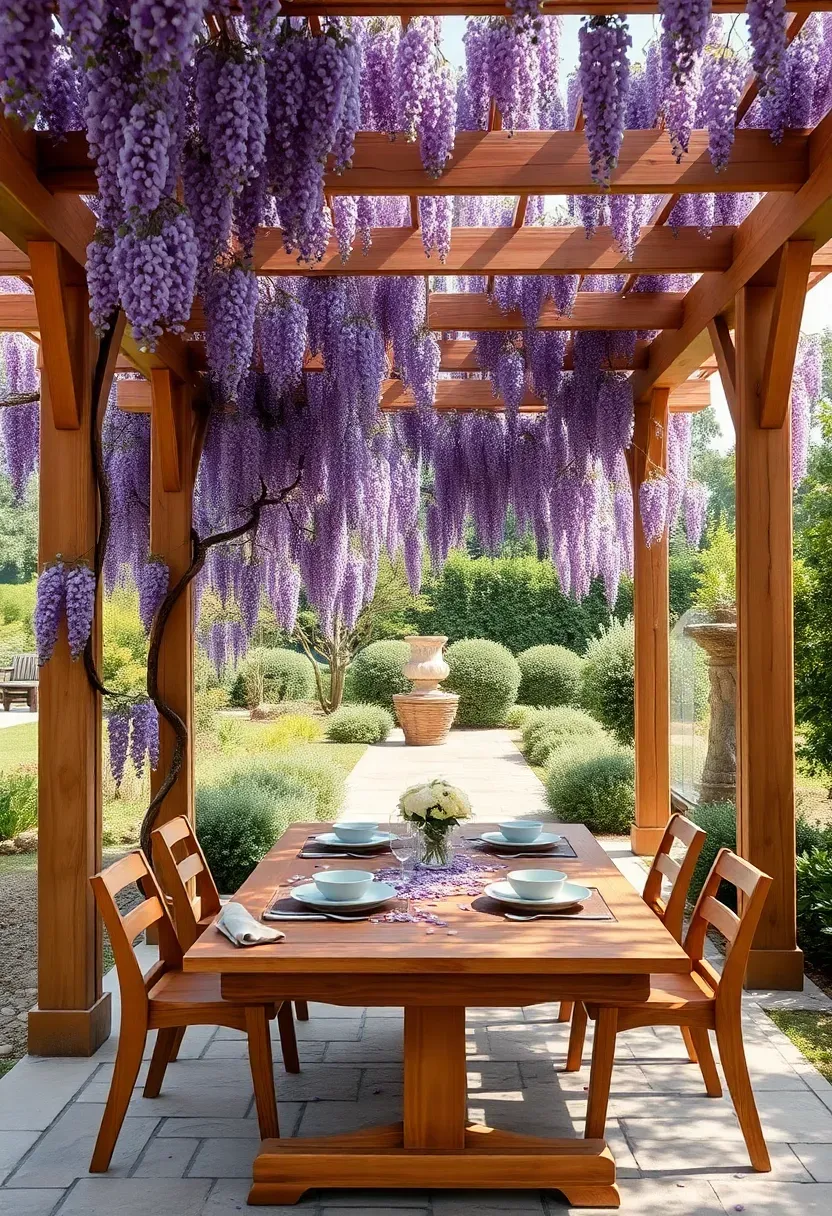
4. Pergola with Climbing Vines
The Problem
Your patio gets direct overhead sun from 11 AM to 4 PM, making it unusable during the hottest part of the day. A solid roof feels too permanent and blocks stargazing. An umbrella blows over in wind.
The Solution
A pergola with open rafters provides partial shade on its own, and climbing vines fill in the rest over one to three growing seasons. Wisteria is the classic choice but grows aggressively — grapevines or climbing hydrangea offer better-behaved alternatives. Build or buy a cedar or pressure-treated pergola with rafters spaced 12-16 inches apart, install stainless steel cable or wire mesh between rafters for vines to grip, and plant one vine at each post base. By year two, you will have dappled, shifting shade that no manufactured shade structure can match.
Pros and Cons
Pros: Living shade that improves each year; attracts pollinators; seasonal interest with blooms and fall color.
Cons: Annual pruning required; bare in winter (unless you add evergreen climbers like star jasmine in warm zones); takes 1-3 years to fill in fully.
Recommended
Items for this idea
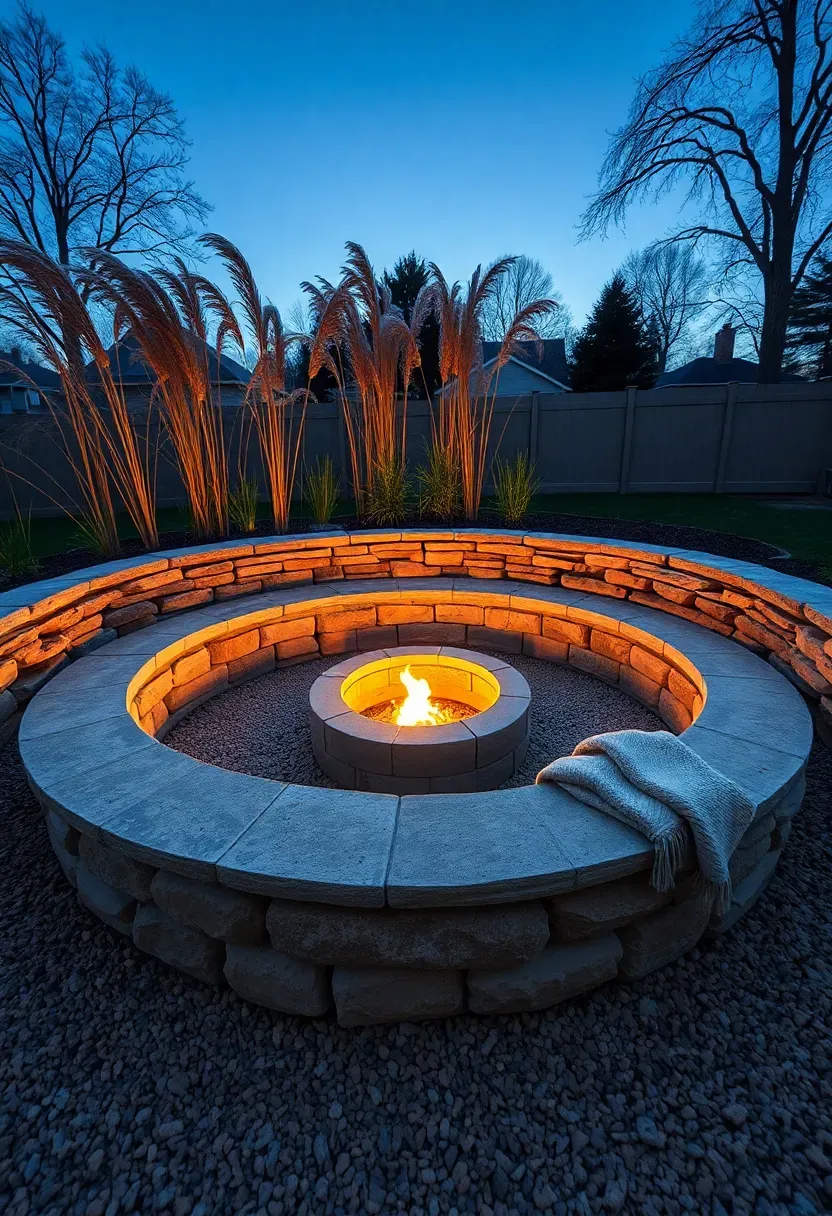
5. Sunken Fire Pit Lounge
Digging down 18-24 inches creates a sense of enclosure that a surface-level fire pit cannot match. The sunken bowl shelters flames from wind, retains heat around seated guests, and gives the gathering area a room-like feeling even though it has no walls. Line the excavation with stacked stone or concrete block, pour a 4-inch gravel drainage base beneath the fire bowl, and build a bench seat into the perimeter wall at 18-inch height. A sunken fire pit seats 8-10 people comfortably in a 12-foot diameter circle and becomes the gravitational center of any backyard oasis once the sun goes down.
Tips
- Slope the gravel base slightly toward the center and install a French drain below to handle rainwater — standing water in a sunken pit is the most common problem.
- Use fire-rated stone or brick for the inner ring; regular concrete block can crack or explode from trapped moisture when heated.
- Keep the seating wall cap smooth and wide enough (12-14 inches) to double as a side table for drinks.
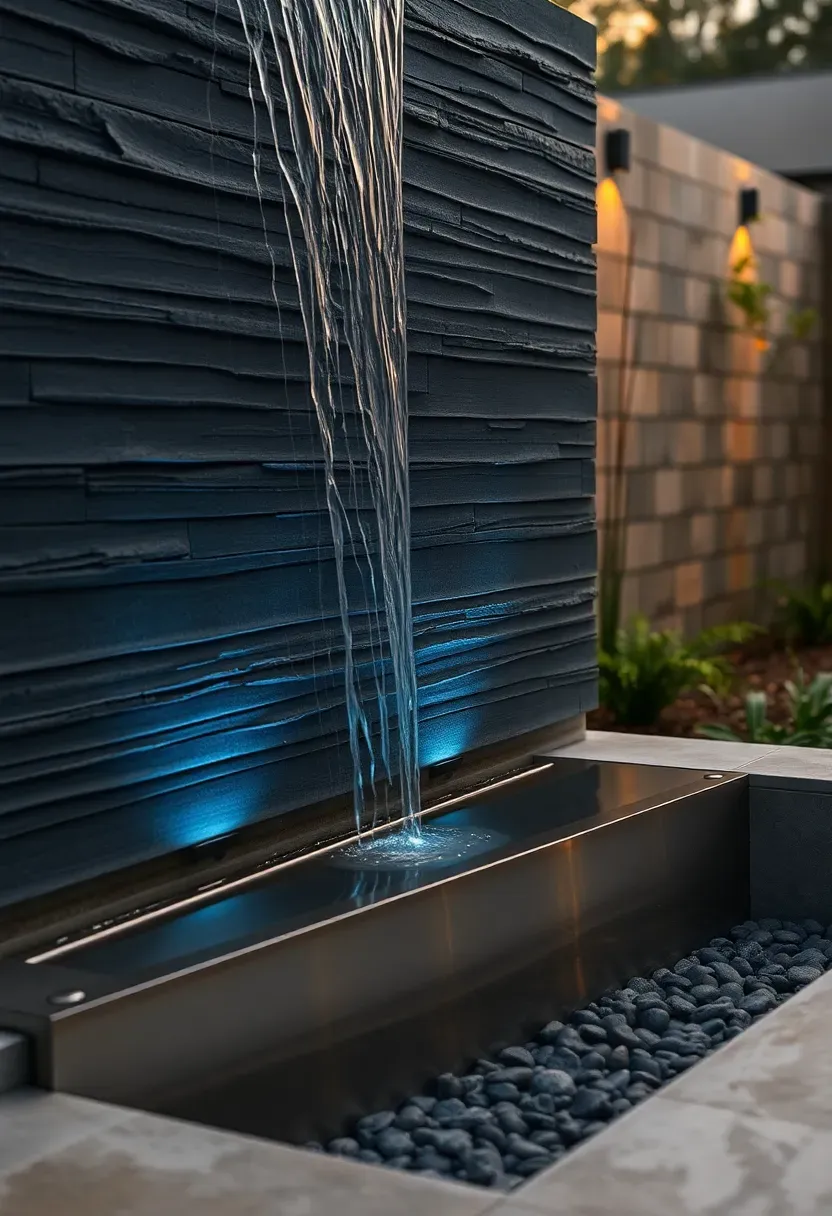
6. Cascading Water Wall
A water wall does two things at once: it provides the calming sound of moving water, and it blocks noise from the street, neighbors, or nearby traffic. A freestanding water wall panel — stacked slate, poured concrete, or corten steel — stands 4-6 feet tall and recirculates water from a basin at the bottom through a hidden pump. Prefabricated units run $800-$2,500 depending on material and size. Custom-built versions using natural stone veneer over a concrete block frame cost more but let you match the wall to your existing hardscape.
Tips
- Position the water wall where you will hear it from your primary seating area — sound attenuates quickly outdoors, so closer is better.
- Use distilled water or add a mineral treatment to prevent white calcium deposits on dark stone surfaces.
- Clean the pump intake screen monthly during summer; algae and debris clog small pumps faster than you would expect.
Recommended
Items for this idea
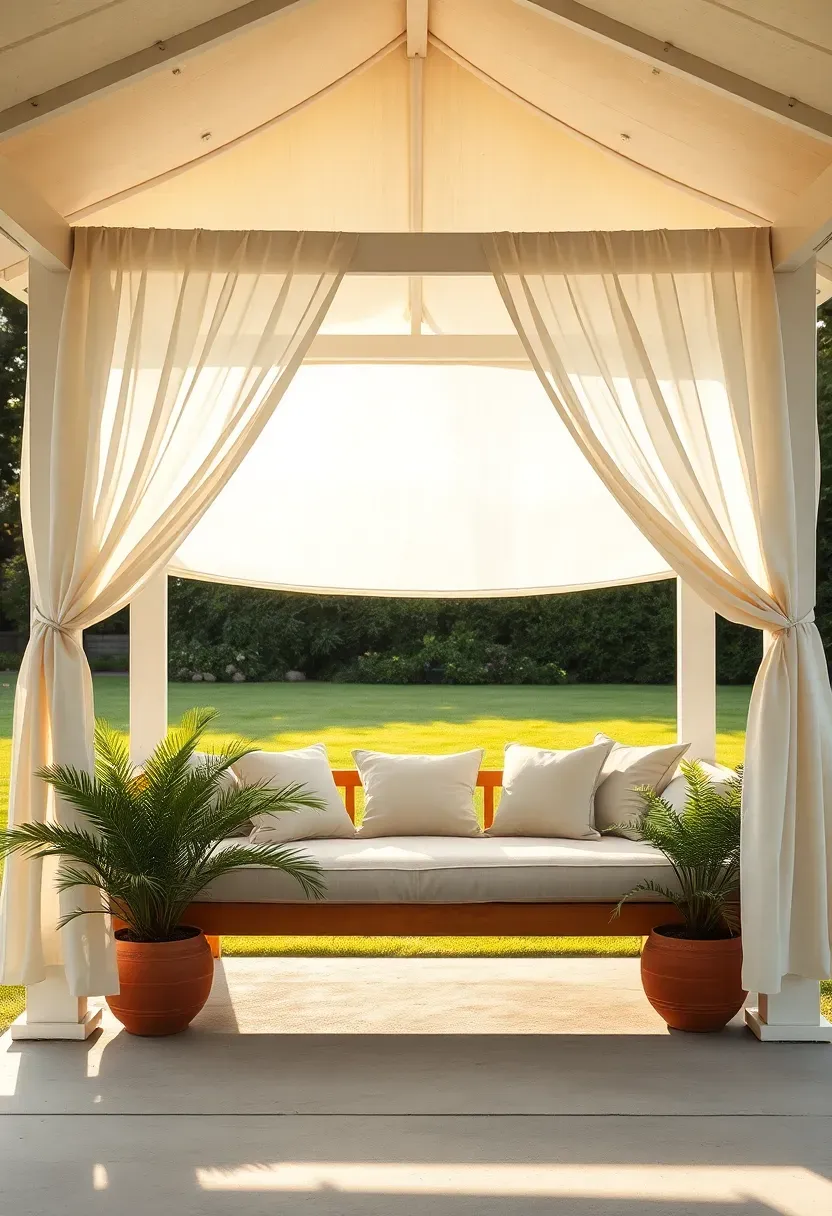
7. Outdoor Daybed Pavilion
Think of this as the backyard equivalent of a cabana. A simple four-post structure with a fabric canopy top and optional curtain sides creates a semi-enclosed space for reading, napping, or just lying down and staring at the sky. The daybed itself can be a repurposed twin mattress on a weatherproof frame, a purpose-built outdoor daybed from a patio furniture line ($600-$2,000), or a DIY platform built from pressure-treated 2x6s topped with an outdoor mattress pad. What makes it feel like an oasis is the overhead canopy and the curtains — even if you never close them, their presence suggests privacy and enclosure.
Tips
- Choose Sunbrella or equivalent solution-dyed acrylic fabric for the canopy — it resists UV fading for 5+ years.
- Anchor corner posts in concrete footings if your area gets wind above 25 mph regularly.
- Add a mosquito net layer inside the curtains for evenings — nothing ruins a daybed nap faster than mosquitoes.
8. Gravel Courtyard with Fountain
This approach works well on flat, compact lots where lawn maintenance feels like a chore. Replace the grass with a 4-inch compacted gravel surface (decomposed granite or pea gravel), place a self-contained fountain as the focal point, and ring the perimeter with drought-tolerant plantings in raised beds or large containers. The gravel drains instantly, never needs mowing, and provides a clean neutral surface that lets furniture, planters, and the fountain stand out. A recirculating stone or concrete fountain in the $300-$800 range provides ambient sound without plumbing connections.
Tips
- Install steel or aluminum landscape edging to keep gravel from migrating into adjacent beds.
- Decomposed granite compacts firmer than pea gravel and is more comfortable for chair legs and table bases.
- Scatter a few large boulders (200-500 lbs each) in the gravel field to break up the flat plane and add visual weight.
Recommended
Items for this idea
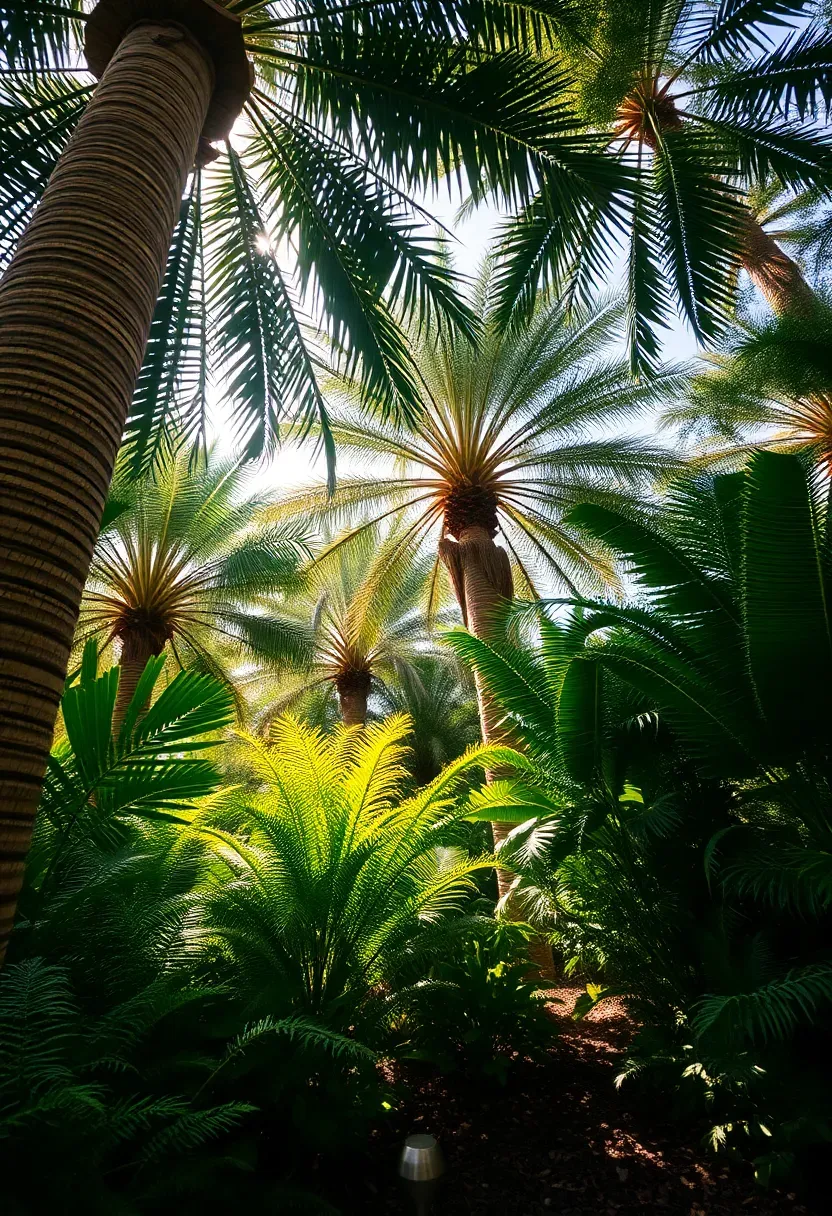
9. Palm and Fern Understory
Building a Canopy Layer
A real oasis has overhead cover — not a roof, but a living canopy. If your climate supports palms (zones 8-11), plant a cluster of three to five palms of varying heights to create an irregular overhead layer. Windmill palms (Trachycarpus fortunei) are the most cold-hardy option, surviving temperatures down to 5 degrees Fahrenheit. Beneath them, fill the floor with shade-loving ferns: autumn fern, holly fern, and maidenhair fern all thrive under palm canopy.
Modern Take
In colder climates, substitute tall ornamental grasses (Miscanthus, Pampas grass) for the overhead layer and use native ferns beneath. The visual effect — tall feathery plumes above, delicate fronds below — mimics the tropical canopy structure without requiring warm winters.
Apply at Home
- Start with three palms or tall grasses at different heights (8 ft, 12 ft, 15 ft) to create natural layering.
- Plant ferns in groups of 5-7 of the same species for mass effect rather than scattering singles.
- Add low-voltage path lighting at ground level to uplight the canopy at night — this single move makes the planting feel three times more dramatic.

10. Floating Deck Over Lawn
A floating deck sits on concrete blocks or adjustable pedestal feet rather than permanent footings, which means no permits in most jurisdictions and easy removal if you change your mind. Build a 10x12 or 12x14 frame from pressure-treated joists, set it on precast deck blocks at 4-foot intervals, and top with composite decking boards. The deck surface rises 6-8 inches above grade, creating a defined platform that feels distinct from the surrounding lawn without any excavation. Use it as a base for your outdoor seating arrangement, dining set, or daybed.
Tips
- Check local codes — most areas exempt decks under 200 square feet and 30 inches high from permits, but verify before building.
- Leave a 1-inch gap between the deck edge and any adjacent structure for airflow and drainage.
- Run a line trimmer under the deck perimeter monthly, or lay landscape fabric before building to suppress grass growth underneath.
Recommended
Items for this idea
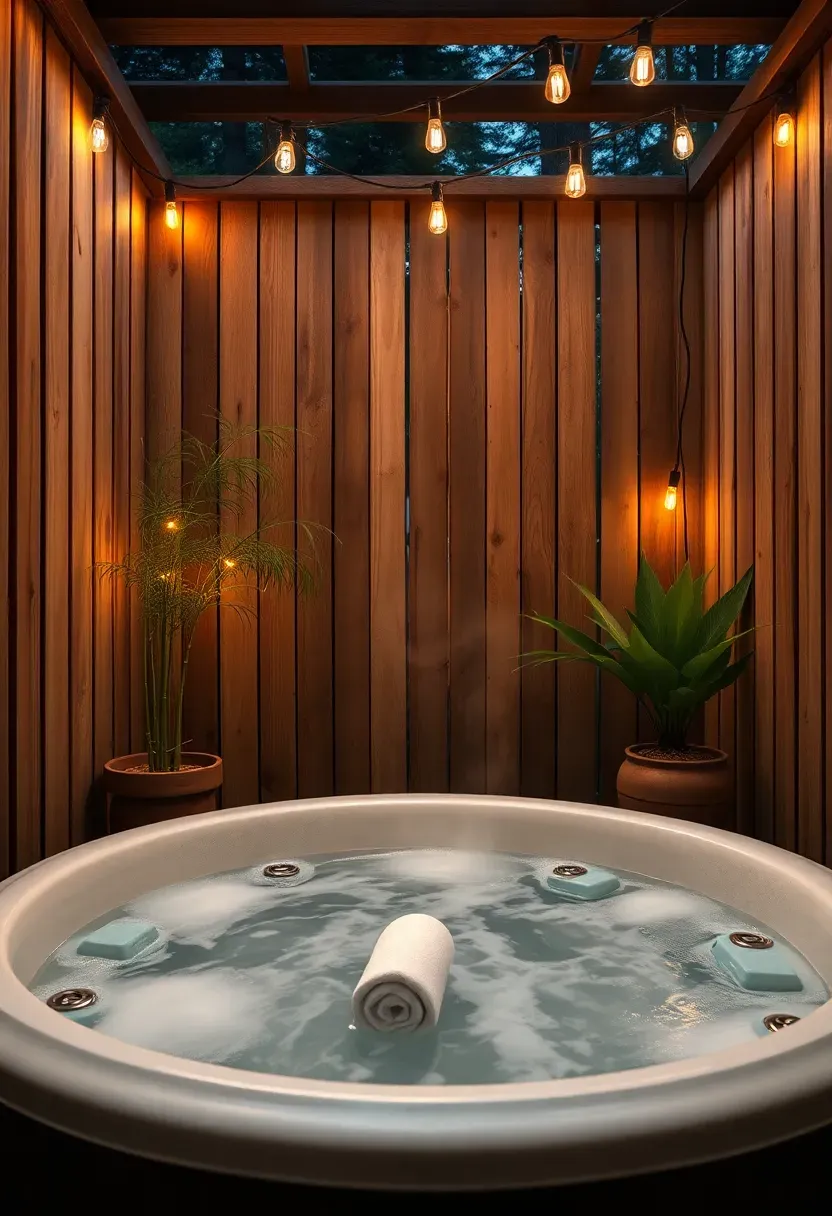
11. Hot Tub Alcove with Privacy Screen
Dropping a hot tub into an open backyard feels exposed. Build a three-sided alcove around it using cedar privacy screens — 6 feet tall, with 1-inch gaps between boards for airflow — and the same hot tub suddenly feels like a private spa. The screens block wind (which strips heat and raises operating costs), shield you from neighbor sightlines, and give you something to mount string lights or towel hooks onto. Leave the fourth side open toward your best view or your house entry point.
Tips
- Set hot tub on a reinforced concrete pad rated for 100 lbs per square foot — a filled tub with occupants weighs 4,000-6,000 lbs.
- Plant tall ornamental grasses or bamboo outside the screen to soften the structure and add a second privacy layer.
- Install a waterproof Bluetooth speaker into one screen panel so you are not balancing a phone on the tub rim.
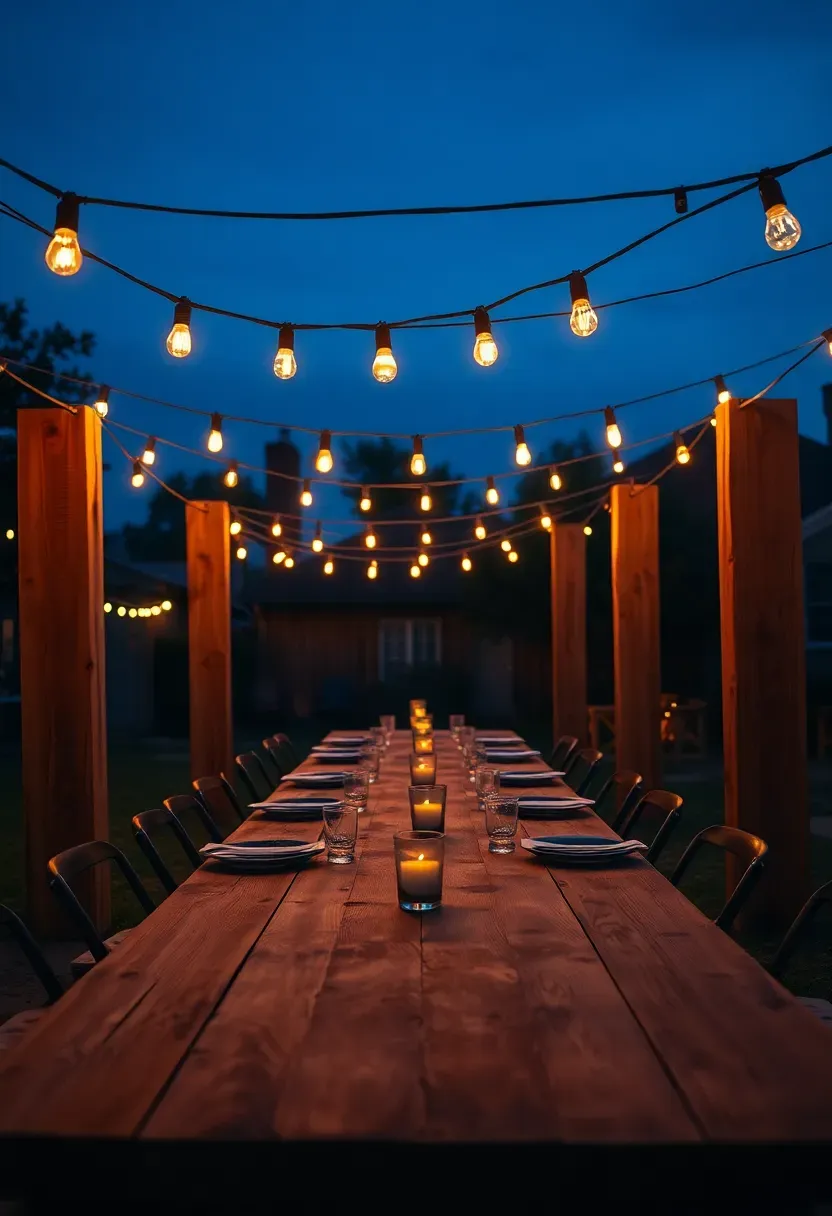
12. Overhead String Light Canopy
String lights are the simplest oasis upgrade and the one with the highest impact-per-dollar ratio. Run parallel strands of commercial-grade Edison bulb string lights between posts, trees, or house-mounted hooks at 8-10 foot height, spaced 3-4 feet apart, covering your primary seating area. The warm glow turns any backyard into an inviting space after dark and extends usable hours well into the evening. Commercial-grade lights with shatterproof LED bulbs run $25-$60 per 48-foot strand and last 25,000+ hours.
Tips
- Use 4x4 cedar posts set in concrete as dedicated light poles if you lack trees or structures at the right positions.
- Hang lights in a slight catenary curve (natural sag) rather than pulling them drum-tight — tight lines stress connection points and look rigid.
- Put all strands on a single outdoor smart plug so you can set them on a sunset timer from your phone.
Recommended
Items for this idea
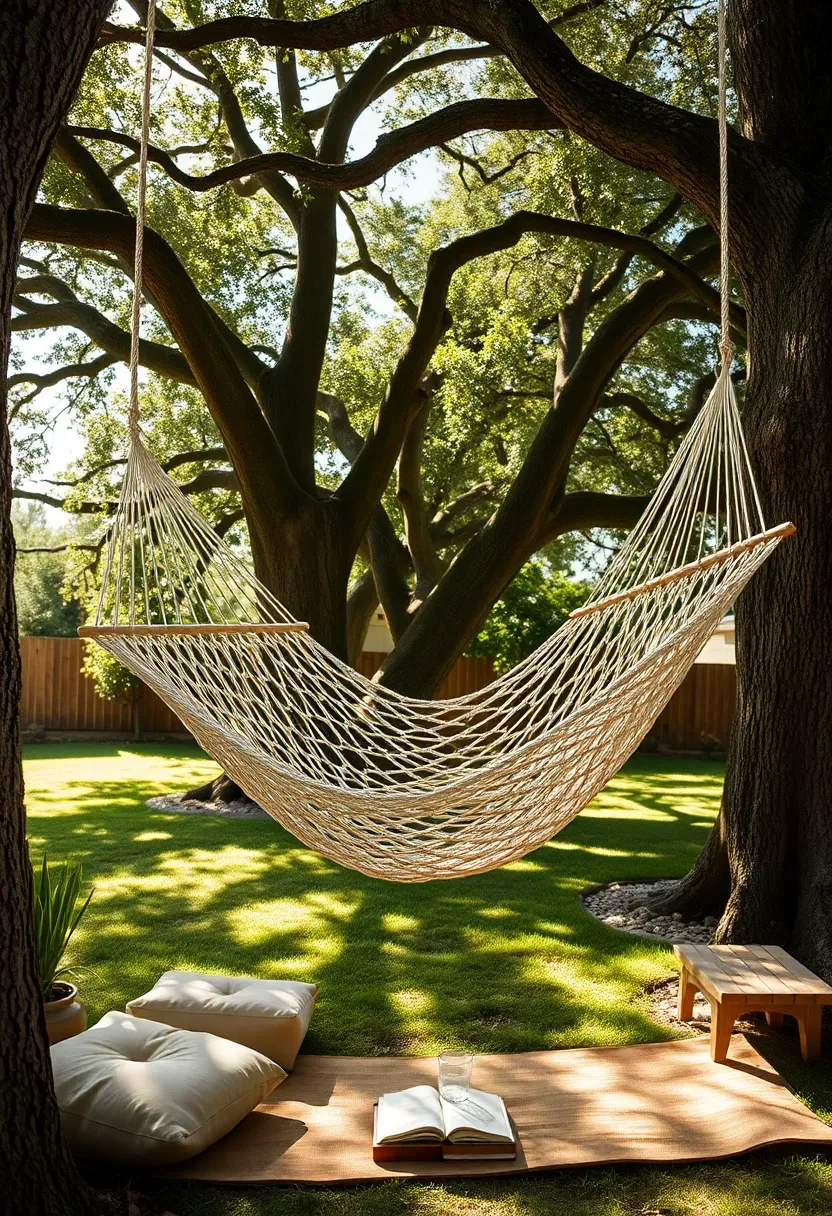
13. Hammock Grove
If you have two or more mature trees spaced 10-14 feet apart, you already own the infrastructure for a hammock grove. Hang two or three hammocks at staggered heights and angles, scatter some outdoor floor cushions underneath, and add a low side table for drinks. This works because hammocks demand engagement with the canopy above — you lie in them looking up through leaves. The overhead tree cover provides natural shade, the gentle movement is inherently relaxing, and the setup costs almost nothing. A quality cotton rope hammock runs $40-$80; tree-mounted hardware is $15 per set.
Tips
- Mount hammock hardware at 4-5 feet high on the tree using 3/8-inch lag bolts with wide washers to distribute pressure.
- Angle hammocks at 30 degrees off-center from the hanging line for the flattest, most comfortable lie.
- Avoid nylon hammocks for a backyard oasis — cotton and polyester blends breathe better and feel less utilitarian.
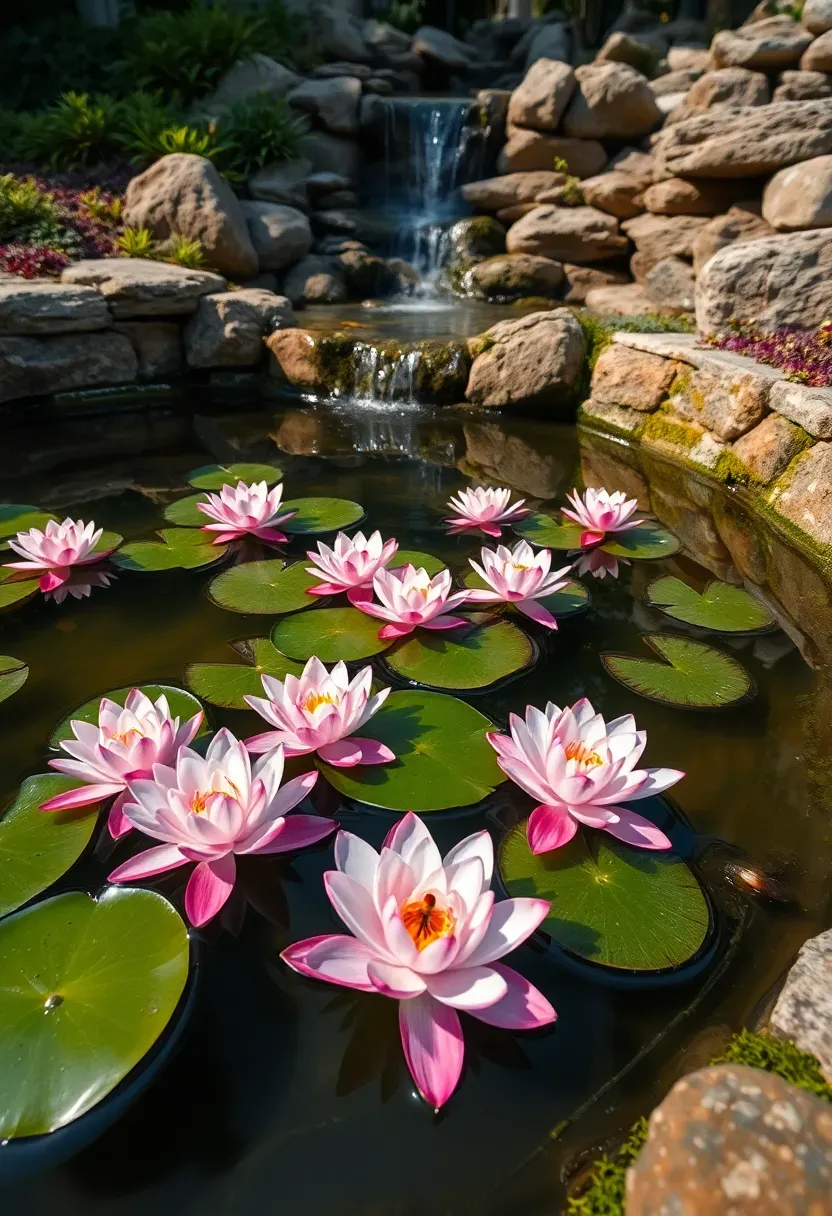
14. Pond with Water Lilies
A backyard pond brings a stillness that moving water features cannot replicate. The surface reflects sky and surrounding plantings, water lilies add seasonal color from June through September, and the pond becomes a habitat for dragonflies, frogs, and birds within its first year. Dig a kidney-shaped basin 2-3 feet deep at center, line with 45-mil EPDM rubber, fill, and add a small pump only if you want a waterfall or fountain — still ponds work fine with balanced planting and occasional maintenance.
Tips
- Cover 60-70% of the water surface with floating plants (water lilies, water lettuce) to suppress algae by blocking sunlight.
- Add a few bunches of submerged oxygenating plants like hornwort to keep water chemistry balanced.
- Place the pond where it gets 5-6 hours of sun — water lilies need direct light to bloom, but full all-day sun promotes excessive algae.
Recommended
Items for this idea
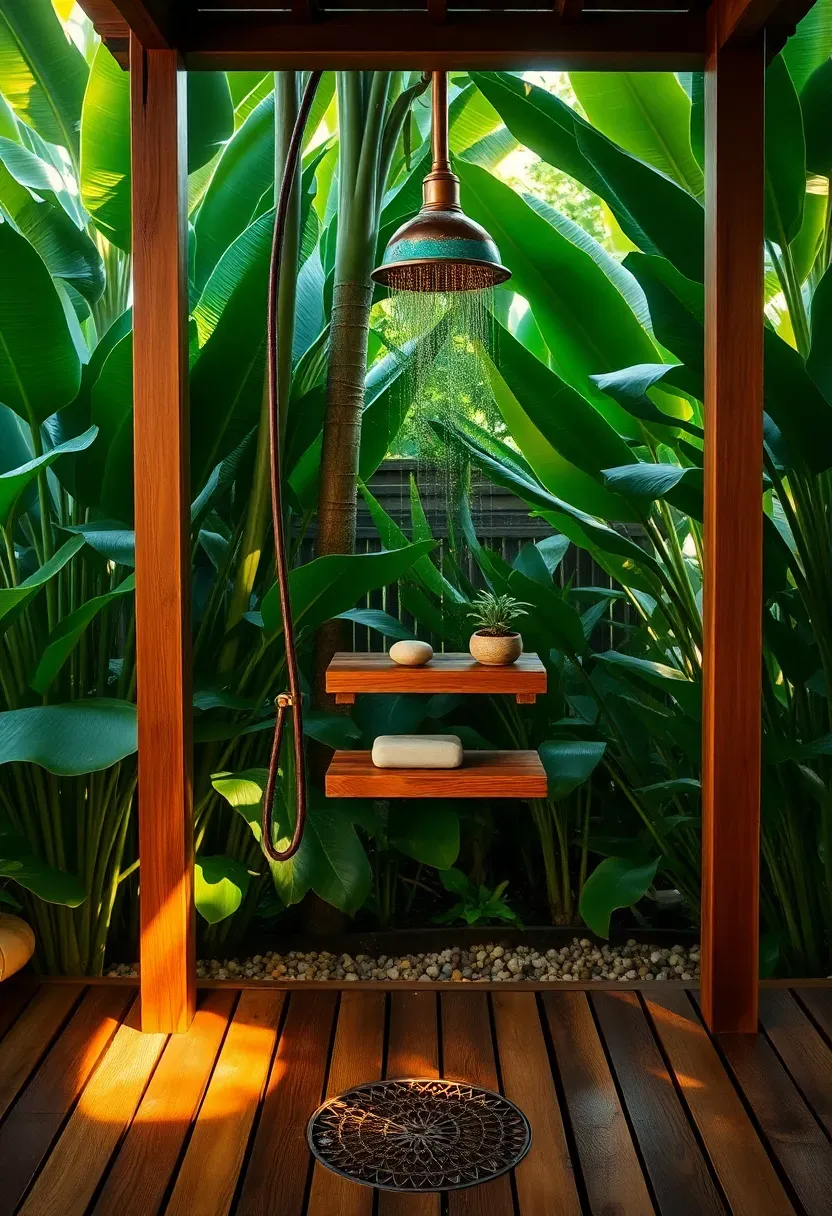
15. Outdoor Shower Station
An outdoor shower is practical near a pool, after gardening, or for rinsing off sandy feet — but it also adds a resort quality that few other features match. The simplest version connects to your garden hose bib with a diverter valve and a freestanding shower pole ($80-$200). A more permanent installation ties into your hot water line, uses a proper mixing valve, and drains through a gravel dry well. Build a 3x3-foot slatted teak or cedar deck as the floor, mount a rainfall showerhead at 7 feet, and screen two sides with lattice or living plants.
Tips
- Hot water access changes everything — a cold-only outdoor shower gets used in July; a hot-and-cold one gets used April through October.
- Slope the slatted deck slightly and place a gravel-filled basin beneath for drainage — do not let runoff pool on soil near your foundation.
- Mount a teak shelf inside for soap and shampoo rather than keeping bottles on the deck floor where they get knocked over.
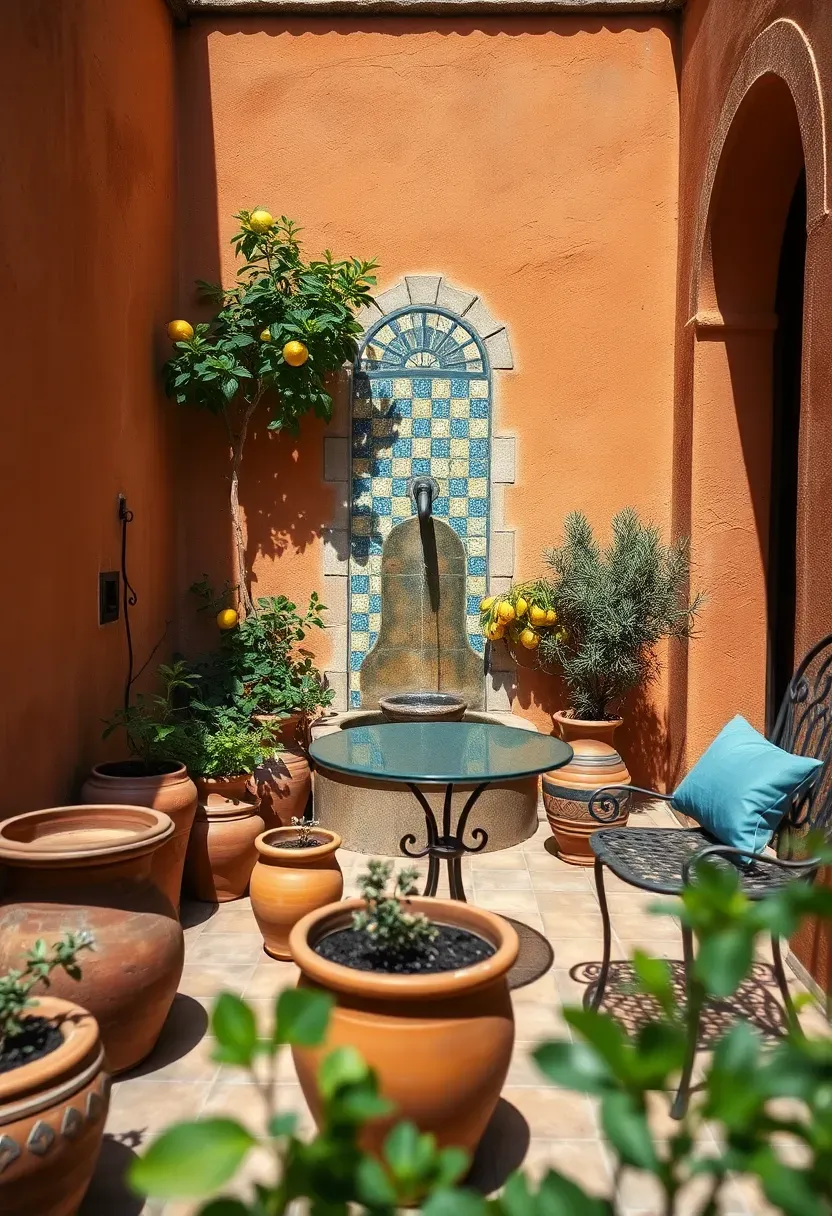
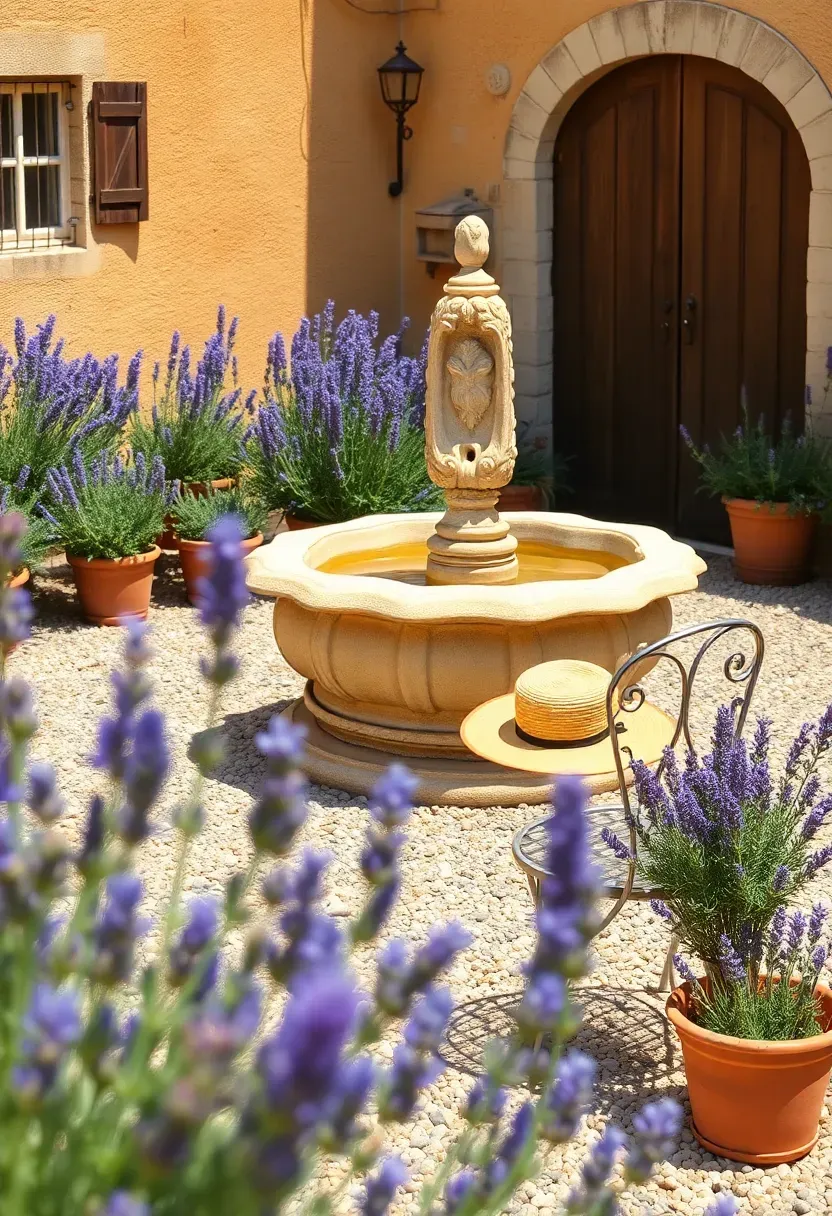
16. Mediterranean Courtyard Garden
Origins
The enclosed courtyard is one of the oldest garden forms, dating back thousands of years across North Africa, Spain, and the Middle East. These spaces were designed around water — a central fountain or channel that cooled the air through evaporation — with walls that provided shade and wind protection. The courtyard garden was less about decoration and more about creating a livable microclimate in hot, dry regions.
Modern Adaptation
You can build a Mediterranean-inspired courtyard in any backyard corner by defining the space with walls, fences, or tall hedges on three sides, placing a small fountain or water basin at the center, and filling in with terracotta pots of citrus, rosemary, lavender, and trailing geraniums. The floor should be stone, tile, or gravel — not grass. Wrought iron or painted metal furniture fits the aesthetic better than wicker or wood.
Apply at Home
- Use stucco-finished walls or rendered cinder block to create the enclosure cheaply.
- Group terracotta pots in odd numbers (3, 5, 7) at varying heights for a collected, lived-in appearance.
- Lay reclaimed terracotta tile or saltillo tile as the floor surface — it develops a beautiful patina over time and stays cool underfoot in shade.
Recommended
Items for this idea
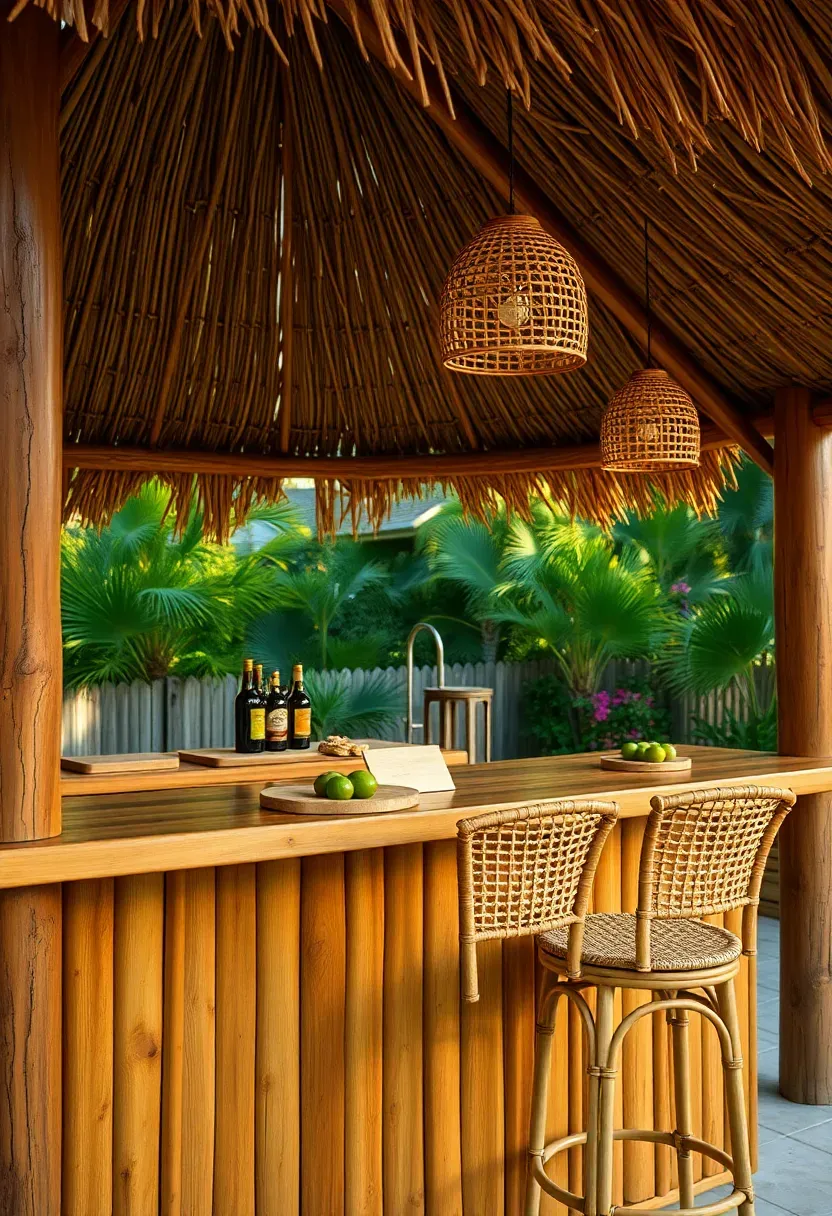
17. Tiki Bar and Counter Seating
A backyard bar creates a natural gathering point and gives guests a reason to stay outside rather than drifting back into the house. Build a simple L-shaped counter from pressure-treated framing, face it with bamboo panels or cedar planks, and add a countertop of finished butcher block, polished concrete, or tile. Mount a thatched palapa umbrella or build a small roof section over the bar for weather cover. Three bar stools on the guest side, a shelf behind for bottles and supplies, and a small bar fridge underneath — that is the complete setup.
Tips
- Set the bar counter height at 42 inches (standard bar height) so guests can stand or use 30-inch seat-height stools comfortably.
- Face the bar toward your pool, fire pit, or best view so the bartender has a reason to enjoy the position too.
- Run a dedicated 20-amp outdoor circuit to the bar location for the fridge, blender, and string lights — extension cords across a patio are a tripping hazard.
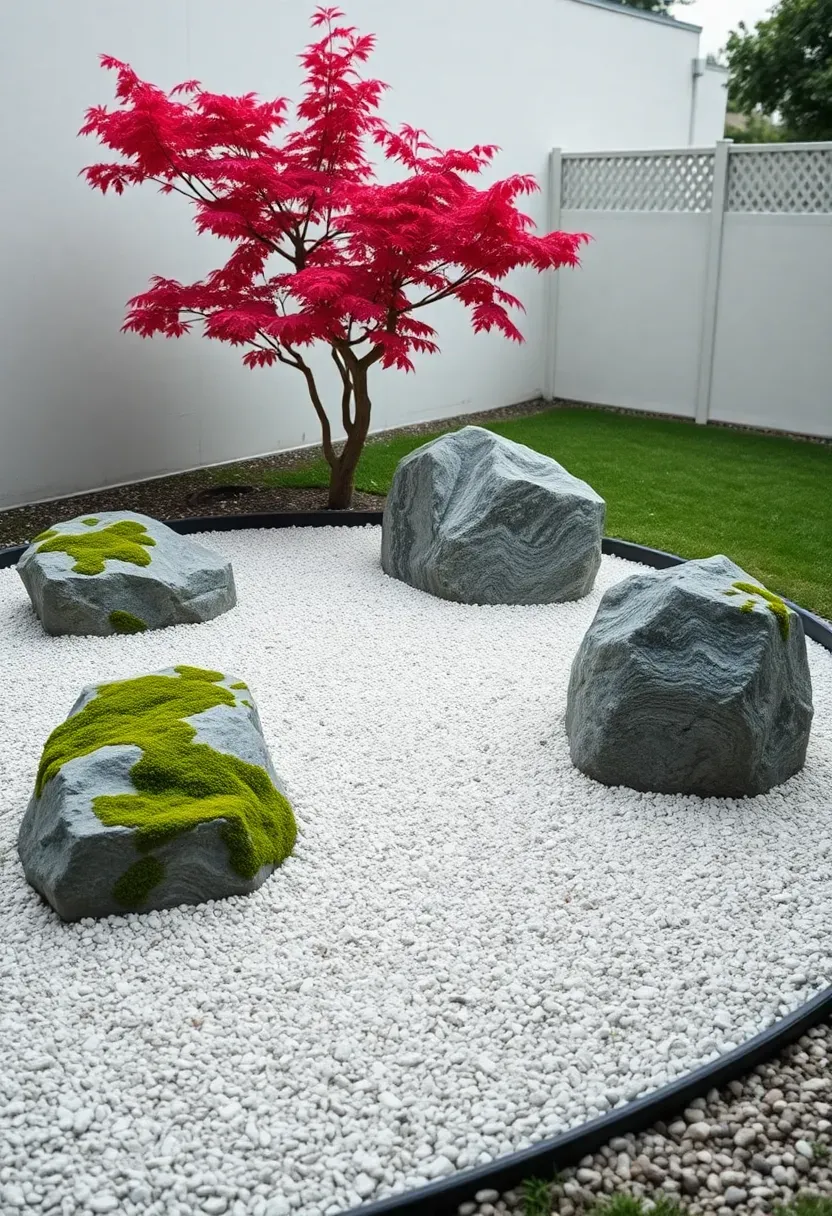
18. Zen Rock Garden Corner
You do not need to convert your entire yard into a Japanese garden. Carve out an 8x10-foot corner, edge it with black steel or natural stone, fill it with 3 inches of white decomposed granite, place three boulders in an asymmetrical grouping, and add a single specimen plant — Japanese maple, dwarf pine, or a clump of black bamboo. Rake the gravel in parallel lines or concentric circles around the boulders. This quiet corner becomes a visual resting point in a busy backyard and requires essentially zero maintenance beyond occasional raking and weed pulling.
Tips
- Use angular crushed granite rather than round pea gravel — angular stone holds rake patterns, round stone does not.
- Position the largest boulder at the back-left or back-right and the smallest in the foreground to create depth.
- Add a single stone lantern or a flat meditation stone for sitting — restraint is the entire point, so resist the urge to accessorize.
Recommended
Items for this idea
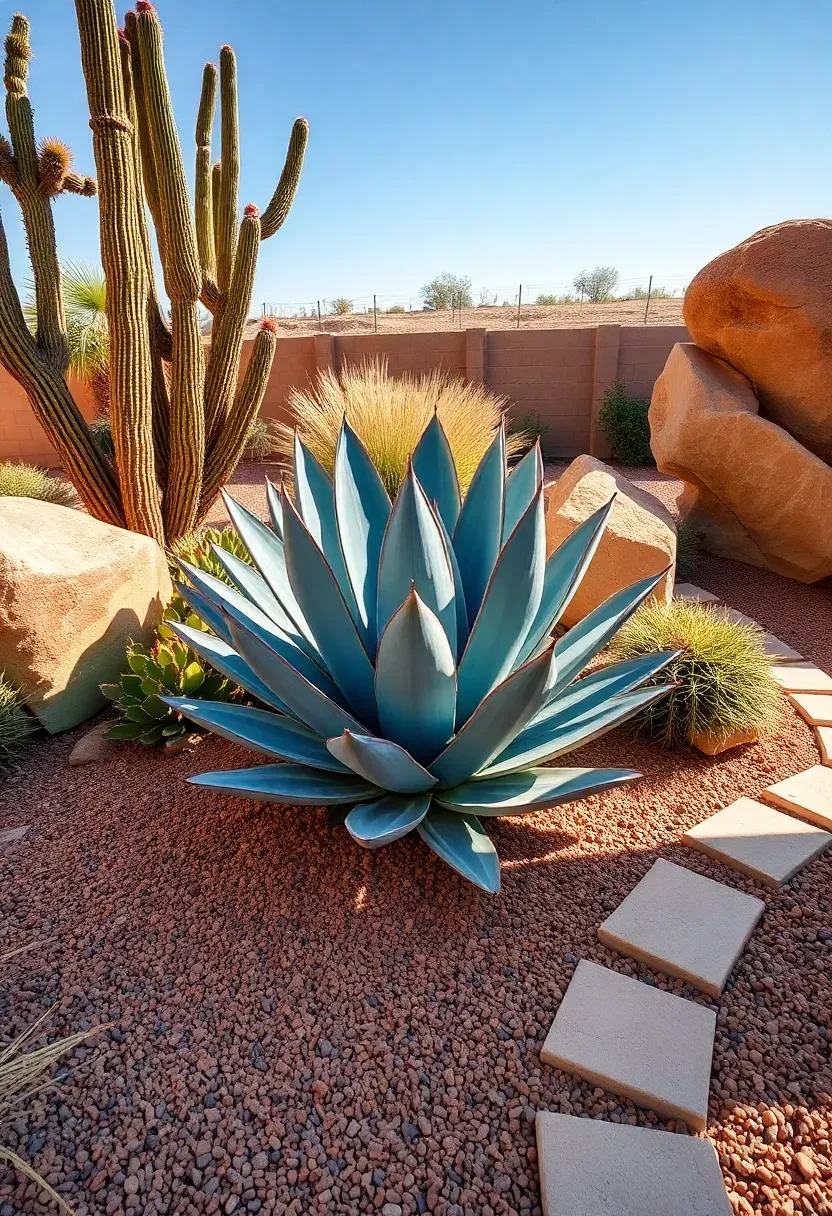
19. Drought-Tolerant Desert Oasis
A Different Kind of Oasis
Not every backyard oasis needs lush green tropicals or a swimming pool. In arid and semi-arid climates — or anywhere you want to minimize water use — a desert oasis built around agave, yucca, prickly pear, ocotillo, and ornamental grasses creates a landscape that feels dramatic and intentional. The sculptural forms of desert plants cast strong shadows, and a gravel or decomposed granite ground plane ties everything together cleanly.
How to Layer It
Plant the tallest elements (ocotillo, tall yucca) as vertical accents, mid-height agave and prickly pear as the middle layer, and low groundcovers like desert marigold or trailing lantana at the edges. Scatter large boulders for visual anchoring. The key is spacing — desert plants need air circulation and look better with room between them, unlike tropical plantings where density is the goal.
Choose If
- You live in USDA zones 8-11 or any dry-summer climate.
- Your water bill matters and you want a yard that survives on rainfall alone after establishment.
- You prefer bold sculptural forms over soft, leafy textures.
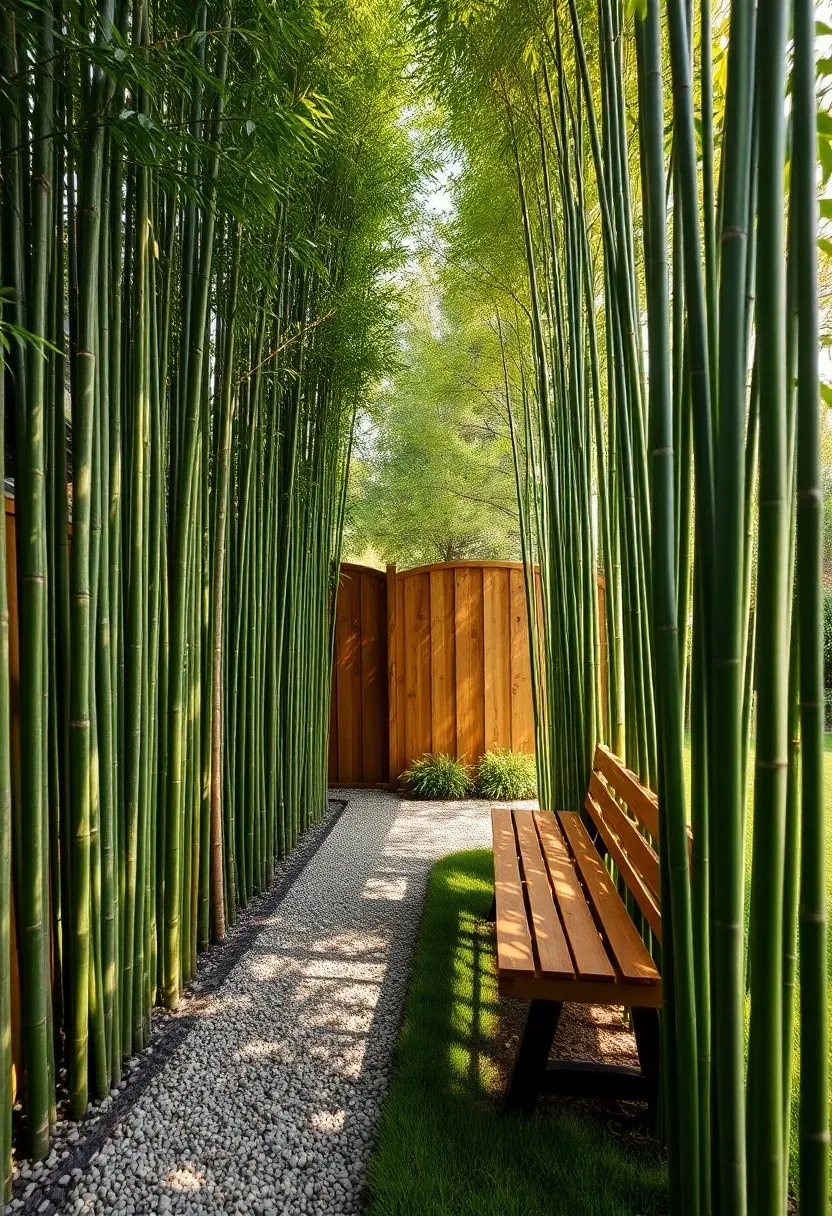
20. Bamboo Privacy Wall
Clumping bamboo (not running bamboo — that distinction matters) grows into a dense vertical screen 15-25 feet tall within 3-5 years, creating a living wall that blocks views, absorbs sound, and rustles in the breeze with a sound that is genuinely calming. Plant Bambusa multiplex or Bambusa oldhamii (in zones 8-11) in a trench or large planters along your fence line, spaced 3-5 feet apart. They will merge into a continuous screen. In colder climates (zones 5-7), use Fargesia species, which max out at 12-15 feet but remain evergreen.
Tips
- Never plant running bamboo (Phyllostachys species) without a 60-mil HDPE rhizome barrier buried 30 inches deep — it will invade your neighbors' yards and you may face legal liability.
- Bamboo is a heavy feeder. Apply a balanced fertilizer in spring and midsummer for the densest growth.
- Thin older canes at ground level every two years to maintain airflow and prevent the interior from becoming a dead thicket.
Recommended
Items for this idea
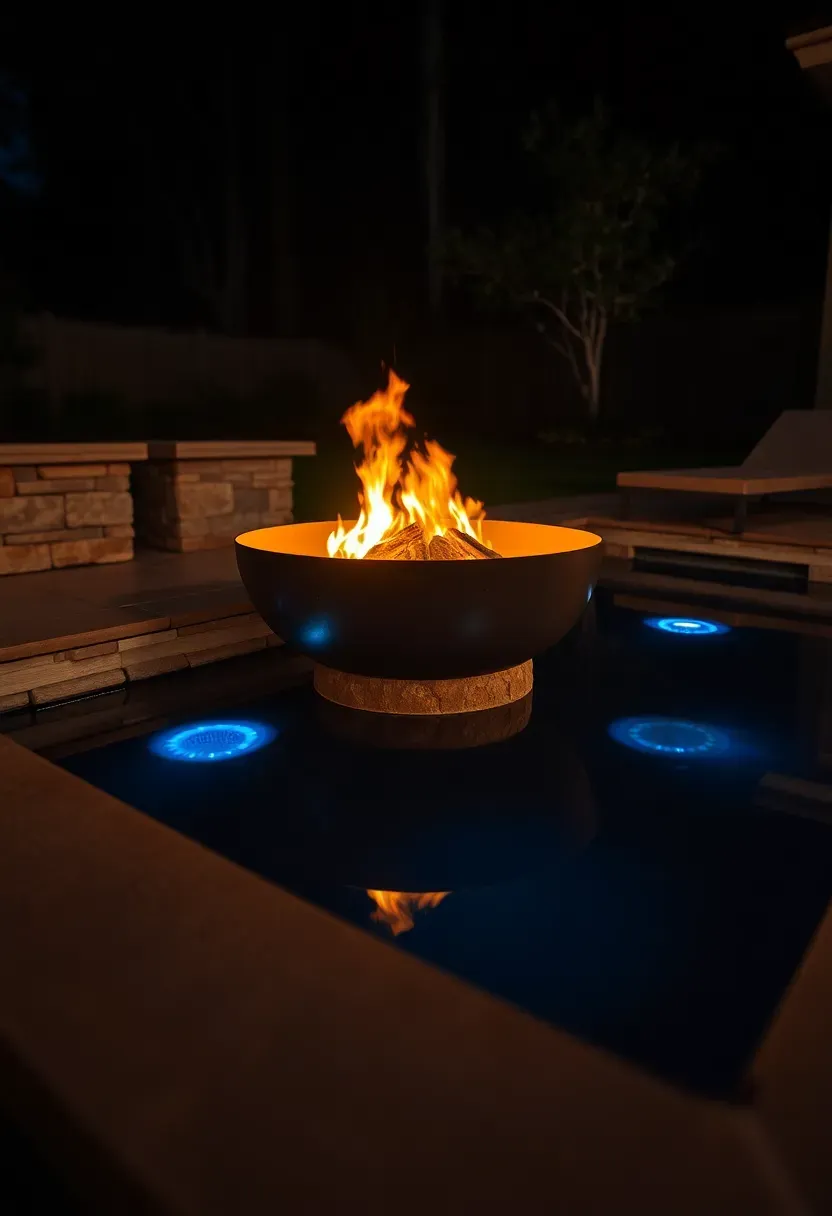
21. Nighttime Fire and Water Combo
Fire and water together create the most compelling outdoor focal point you can build. The combination works because the elements contrast each other — warm and cool, flickering and still, bright and reflective. The simplest version is a fire bowl positioned at the edge of a shallow reflecting pool so flames mirror on the water surface after dark. A gas-fed fire bowl ($300-$1,200) sits on a stone or concrete pedestal next to a lined basin 4-6 inches deep and 3-4 feet wide, filled with water treated with a small amount of mosquito dunk to prevent larvae.
Step 1: Build the Reflecting Pool
Excavate a shallow basin, line with EPDM, and edge with natural stone set flush with the surrounding grade. Fill to within 1 inch of the rim. No pump needed — still water gives the best reflections.
Step 2: Position the Fire Element
Place a gas fire bowl on a stable base 12-18 inches from the pool edge. Run a gas line from your house meter (hire a licensed plumber) or use a propane-fed unit with a hidden tank compartment.
Step 3: Light It
Add two or three underwater LED puck lights ($15-$30 each, solar or low-voltage) in the reflecting pool for a secondary glow. The combination of firelight from above and cool light from below is what makes this setup feel genuinely special.
Quick FAQ
How much does a full backyard oasis cost? It depends entirely on scope. A stock tank pool with string lights and container plants runs $1,000-$2,000. A proper in-ground pool with landscaping, pergola, and lighting can reach $60,000-$120,000. Most people land somewhere in between by choosing two or three anchor features and building around them gradually over several seasons.
Which backyard oasis features add the most home value? In-ground pools, outdoor kitchens, and permanent pergolas with electrical typically return 40-60% of their cost at resale in warm-climate markets. In northern states, pools sometimes reduce value because buyers see maintenance liability. Landscaping and lighting improvements tend to have the best return regardless of region.
Can I build a backyard oasis in a small yard? Absolutely. A 15x20-foot space fits a stock tank pool, a small seating area, and dense tropical plantings comfortably. The key in small yards is going vertical — tall plants, overhead string lights, and vertical screens make a compact space feel enclosed and lush rather than cramped.
Do backyard oasis features increase water bills significantly? A stock tank pool adds about $5-$10/month to your water bill for top-offs. An in-ground pool is closer to $20-$40/month depending on evaporation, splash-out, and backwash cycles. Drip irrigation for tropical plantings costs less than a lawn sprinkler system. The biggest ongoing cost for most backyard oasis setups is electricity for pumps, heaters, and lighting.
What is the lowest-maintenance backyard oasis setup? A gravel courtyard with a self-contained fountain, drought-tolerant plantings, string lights on a timer, and a comfortable seating area. No lawn, no pool filter, no vine pruning — just sweep the gravel occasionally, clean the fountain pump once a month, and water the plants during dry spells.
Building a backyard oasis is not a single weekend project, and it should not be. Pick one anchor feature — a pool, a fire pit, a pergola — and install it well. Live with it for a season. Notice where you sit, where you look, where the sun hits and where shade falls. Then add the next layer: plants, lighting, a water feature. The best outdoor spaces are not designed all at once on paper. They accumulate, one good decision at a time, until the yard feels like somewhere you would rather be than inside.
Pinterest cover for 21 Backyard Oasis Ideas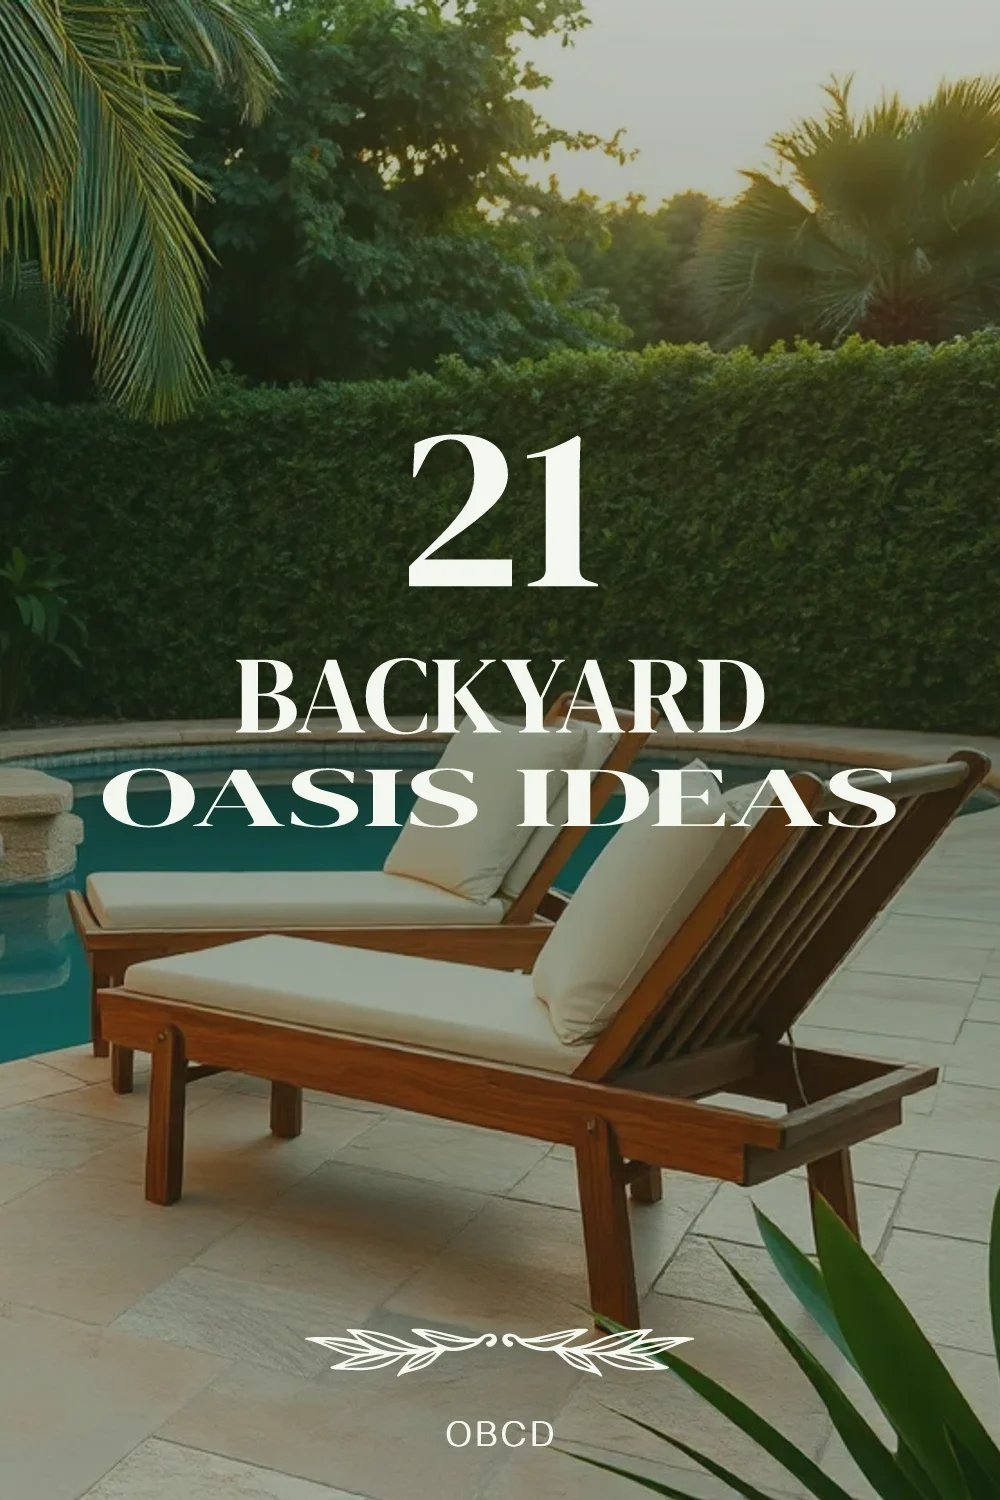
About the author
OBCD
CGI visualization and interior design content. We create detailed 3D renders and curate practical design ideas for every room in your home.