27 Backyard Layout Ideas for Every Yard Size
Most backyards get designed by accident. You buy a grill, drop it near the back door, add a patio table somewhere in the middle, and call it done. Five years later you are mowing around furniture that does not really work where it sits. A deliberate layout changes everything — it controls foot traffic, groups activities that belong together, and keeps maintenance reasonable. I have helped neighbors rethink yards from 400 square feet to half an acre, and the single biggest factor in whether people actually use their outdoor space is not the furniture or the plants. It is the plan underneath.
Here are 27 layout approaches organized from small urban lots to large rural properties, with zone-based thinking, material pairings, and real spacing guidance.
Table of Contents
- L-Shaped Patio with Side Garden
- Central Lawn with Border Beds
- Gravel Courtyard Layout
- Diagonal Pathway Design
- Sunken Seating Area
- Three-Zone Entertainer Layout
- Wraparound Deck with Ground Level Patio
- Cottage Garden Rooms
- Minimalist Concrete and Grass Grid
- Side Yard Passageway Layout
- Fire Pit Circle with Radiating Paths
- Raised Terrace Stepdown
- Pool and Pavilion Axis
- Kitchen Triangle Outdoor Layout
- Meadow Border with Central Clearing
- Japanese Stroll Garden Layout
- U-Shaped Entertaining Yard
- Narrow Lot Linear Layout
- Orchard Grid with Understory Seating
- Slope-Terraced Multi-Level Yard
- Pet-Friendly Loop Layout
- Rain Garden Integration Layout
- Pergola Room Divider Layout
- Front-to-Back Flow-Through Design
- Gravel and Steel Edging Modern Plan
- Woodland Shade Garden Layout
- Family Activity Hub Layout
1. L-Shaped Patio with Side Garden
An L-shaped patio uses the two walls formed where your house meets a side wing, garage, or bump-out to create a sheltered corner. The patio surface fills that L, and a planting bed runs along the inside edge where the angle naturally collects rainwater runoff. This layout works particularly well for lots under 2,000 square feet because it keeps the hard surface tight against the building and leaves the remaining yard open as a single unbroken green area. The sheltered corner also blocks wind from at least two directions.
Tips
- Keep the patio width at least 10 feet on each leg so furniture does not feel cramped against the walls.
- Plant the inside bed with herbs or low edibles since it gets reflected heat from two building walls.
- Use the same paver material as your front walkway to tie the property together visually.

We picked a few things that go well with this idea: Galvanized Steel Landscape Edging (6-Pack, 20ft) (★4.5), Galvanized Steel Landscape Edging (10-Pack, 33ft) (★4.5) and Worth Garden Steel Landscape Edging (10-Pack, 33ft) (★4.6). As an Amazon Associate we earn from qualifying purchases.
2. Central Lawn with Border Beds
Why This Layout Persists
The central lawn ringed by planting beds is the oldest residential garden layout in the Western tradition, and it sticks around because it works. The open center gives kids and dogs room to run, hosts lawn games, and provides a visual rest between busy flower borders. Deep border beds — at least 4 feet wide — along the fence line absorb the visual weight of the perimeter and make a standard rectangular lot feel less like a box.
Making It Feel Fresh
Swap the traditional rectangular lawn for an oval or kidney shape. The curved edge breaks up the straight fence lines and creates planting pockets at the corners where the bed widens naturally. Use a single row of low boxwood or steel edging to define the lawn boundary crisply. Without a clean edge, the bed-to-lawn transition gets ragged fast.
Choose If
- You want flexible open space in the middle of the yard
- You enjoy perennial gardening and want maximum bed footage
- Your lot is basically rectangular with 30 feet or more of width
We picked a few things that go well with this idea: BALI OUTDOORS 32-Inch Round Fire Pit (★4.5), Solo Stove Bonfire 2.0 Smokeless Fire Pit (★4.6) and Yaheetech 32-Inch Square Fire Pit Table (★4.4). As an Amazon Associate we earn from qualifying purchases.
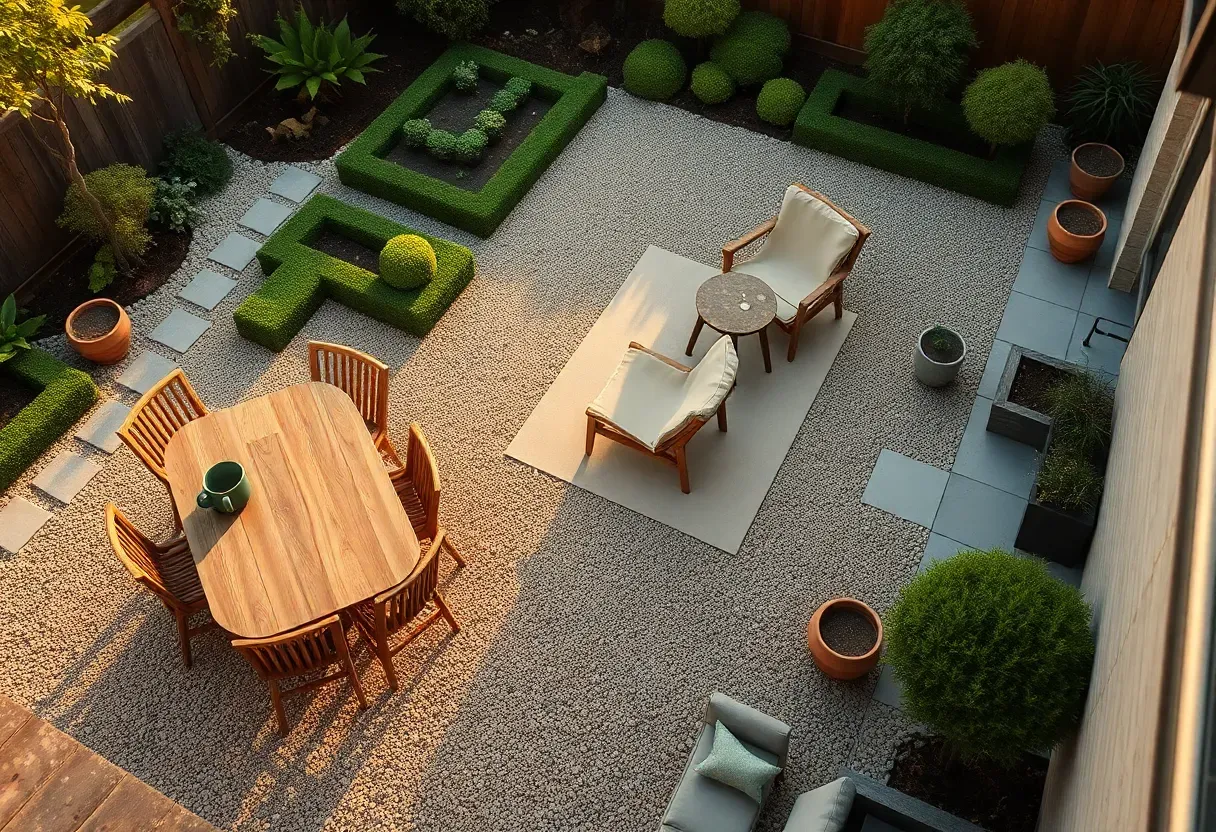
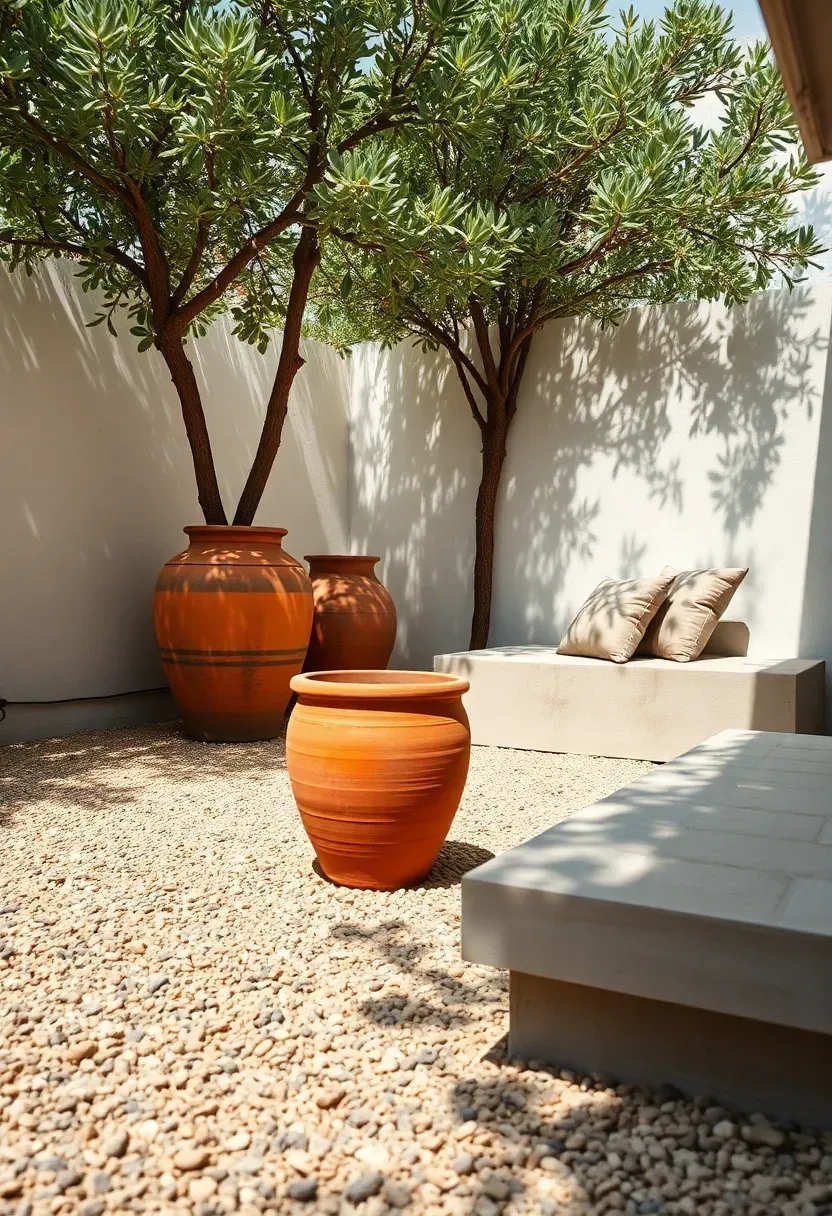
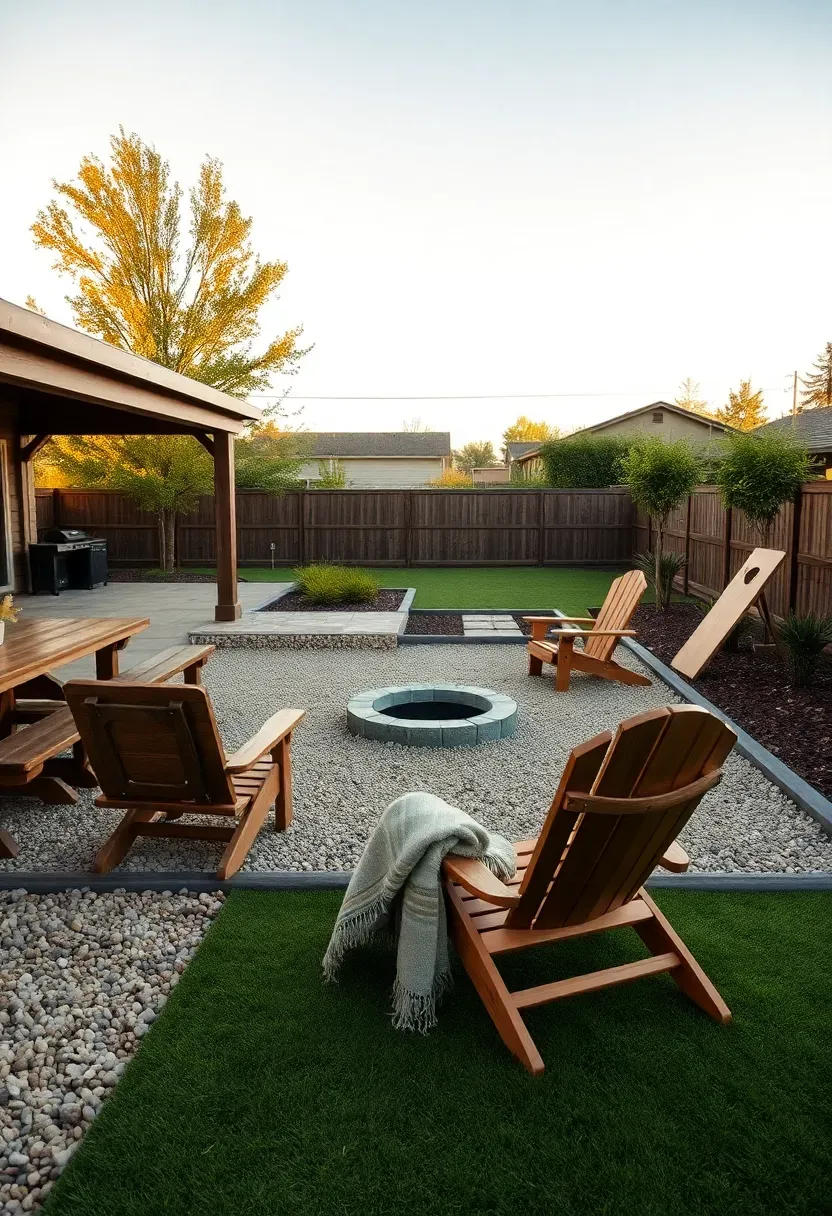
3. Gravel Courtyard Layout
Gravel as a primary ground surface eliminates mowing entirely and costs roughly a third of what poured concrete does for the same square footage. Decomposed granite or pea gravel over compacted base and landscape fabric creates a firm, draining surface that handles furniture and foot traffic. The courtyard approach works by treating the entire backyard as a single room — gravel floor, walls defined by fencing or hedges, and furniture arranged the way you would inside. Large potted plants replace in-ground beds for seasonal color.
Tips
- Compact your base layer to at least 95 percent density before spreading gravel, or furniture legs will sink.
- Edge everything with steel or aluminum landscape edging to keep gravel from migrating into adjacent beds.
- Choose angular crushed stone over round pea gravel if you want a surface that locks in place underfoot.

We picked a few things that go well with this idea: Southwest Boulder Decomposed Granite (10 lbs) (★4.3), Natural Pea Gravel River Rock (10 lbs) (★4.4) and Vigoro Bagged Pea Gravel (0.5 cu ft) (★4.2). As an Amazon Associate we earn from qualifying purchases.
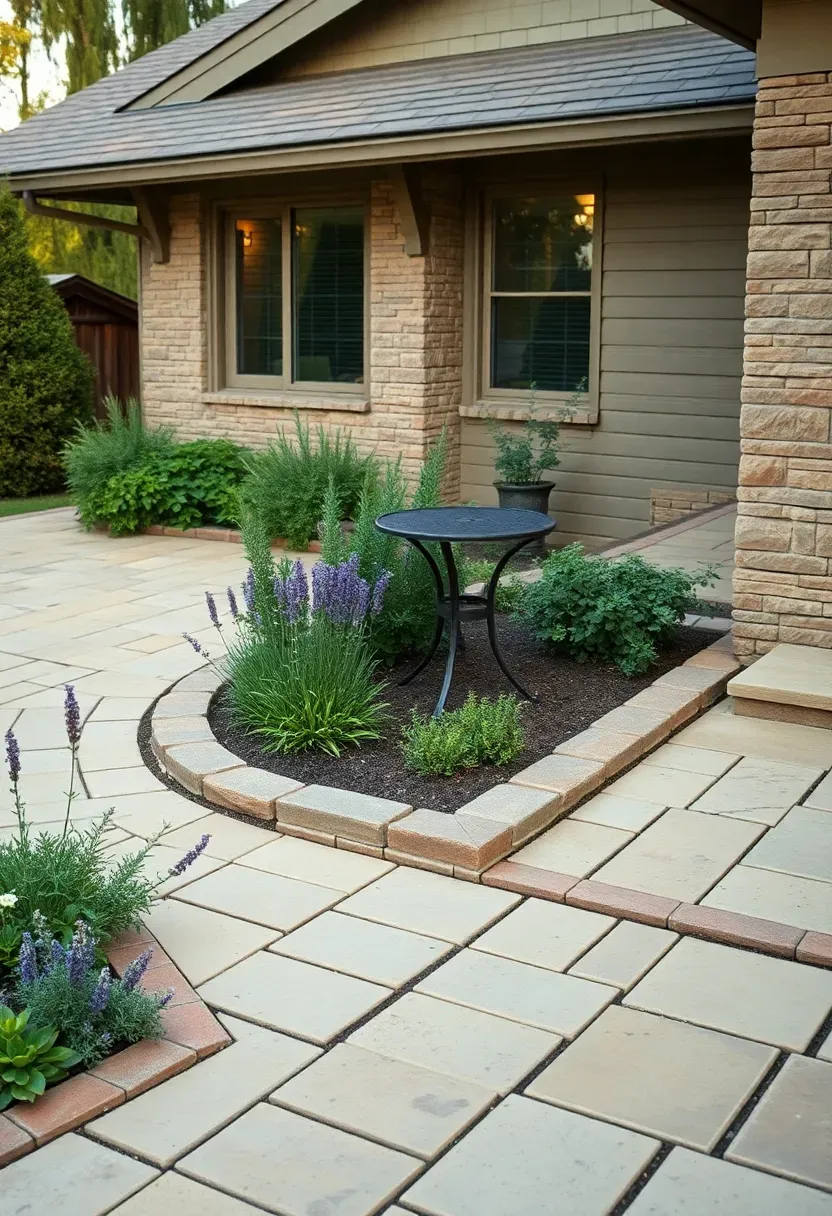
4. Diagonal Pathway Design
The Problem with Center Paths
A path running straight down the middle of a rectangular yard splits the space into two narrow strips and makes the yard feel like a hallway. It also emphasizes the shortest dimension — you walk toward the back fence and see exactly how close it is.
The Diagonal Fix
Running the main path from one corner to the opposite corner uses the longest possible line through any rectangle. A 30-by-50-foot yard has a diagonal of about 58 feet — 8 feet longer than the long side. That extra visual length makes the yard feel substantially bigger. The triangular beds on either side of the diagonal path can hold different programs: vegetable garden on one side, seating area on the other.
Watch Out
- Diagonal paths need a destination at the far end — a bench, a focal plant, or a gate. Without one, the path feels aimless.
- Keep the path width at 36 inches minimum so two people can walk side by side.
- Avoid running diagonal paths through slopes; they create awkward cross-grade issues.
Recommended
Items for this idea
5. Sunken Seating Area
Dropping a seating area 18 to 24 inches below grade creates a sense of enclosure without building any walls. The change in level separates the social zone from the rest of the yard psychologically and physically — you step down into it, which signals arrival. Built-in bench seating around the perimeter eliminates the need for movable chairs and doubles as retaining walls. A fire feature at the center gives the space a focal point and extends use into cooler months. This layout demands good drainage underneath since you are creating a bowl that collects water.
Tips
- Install a French drain beneath the gravel subbase, sloped to daylight or a dry well, before building the retaining walls.
- Keep the sunken area no deeper than 24 inches — deeper requires engineering review for the retaining structure in most jurisdictions.
- Use the same material for the bench top and the surrounding patio to visually connect the two levels.
6. Three-Zone Entertainer Layout
Step 1: Map the Zones
Divide the yard into cooking-and-dining near the house, lounge-and-fire in the middle, and activity space (lawn games, play area, garden) at the back. The cooking zone stays close to the kitchen door for obvious reasons — hauling plates and drinks across 60 feet of yard gets old fast.
Step 2: Define Boundaries
Use material changes rather than walls to separate zones. Pavers for dining, gravel for the fire lounge, and turf or decomposed granite for the activity area. Each surface shift signals a different use without blocking sightlines.
Step 3: Connect with Purpose
Link zones with a single pathway spine — not multiple branching trails. One clear route from house to back fence keeps navigation simple and prevents the yard from feeling chopped into disconnected rooms.
Watch Out
- Resist the urge to make all three zones the same size. The zone you use most should get the most space.
Recommended
Items for this idea
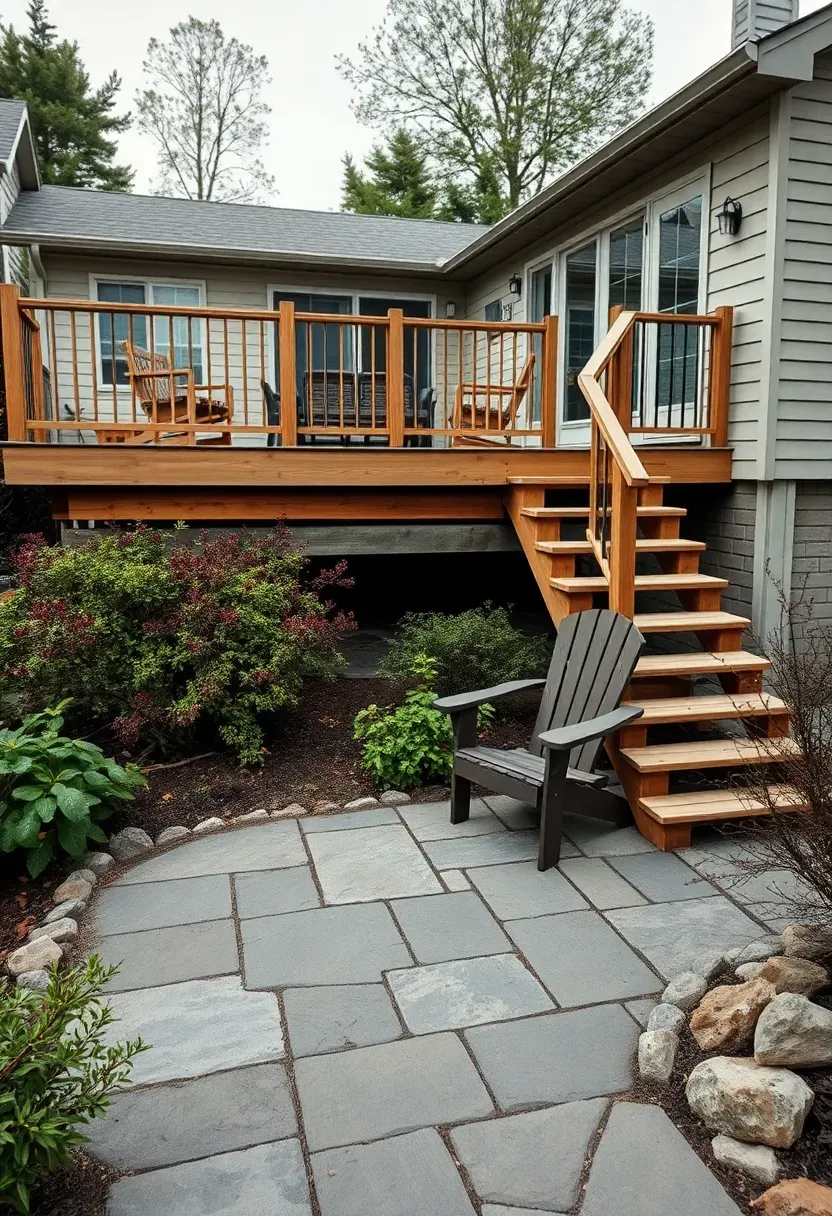
7. Wraparound Deck with Ground Level Patio
When your back door sits 2 to 4 feet above grade — common with raised foundations and walkout basements — a deck-to-patio combination makes more sense than choosing one or the other. The deck extends your indoor floor level outward for seamless access, while the patio below gives you a ground-connected space that feels more like a garden room. The deck handles dining and direct kitchen access. The patio handles lounging, fire features, and anything that benefits from being on solid ground rather than a suspended platform.
Tips
- Build deck stairs wide — at least 5 feet — so the transition between levels feels like a feature, not a bottleneck.
- Use the area underneath the deck for dry storage if you close it in with lattice and a moisture barrier.
- Match the patio stone color to the deck railing or trim for visual continuity between levels.
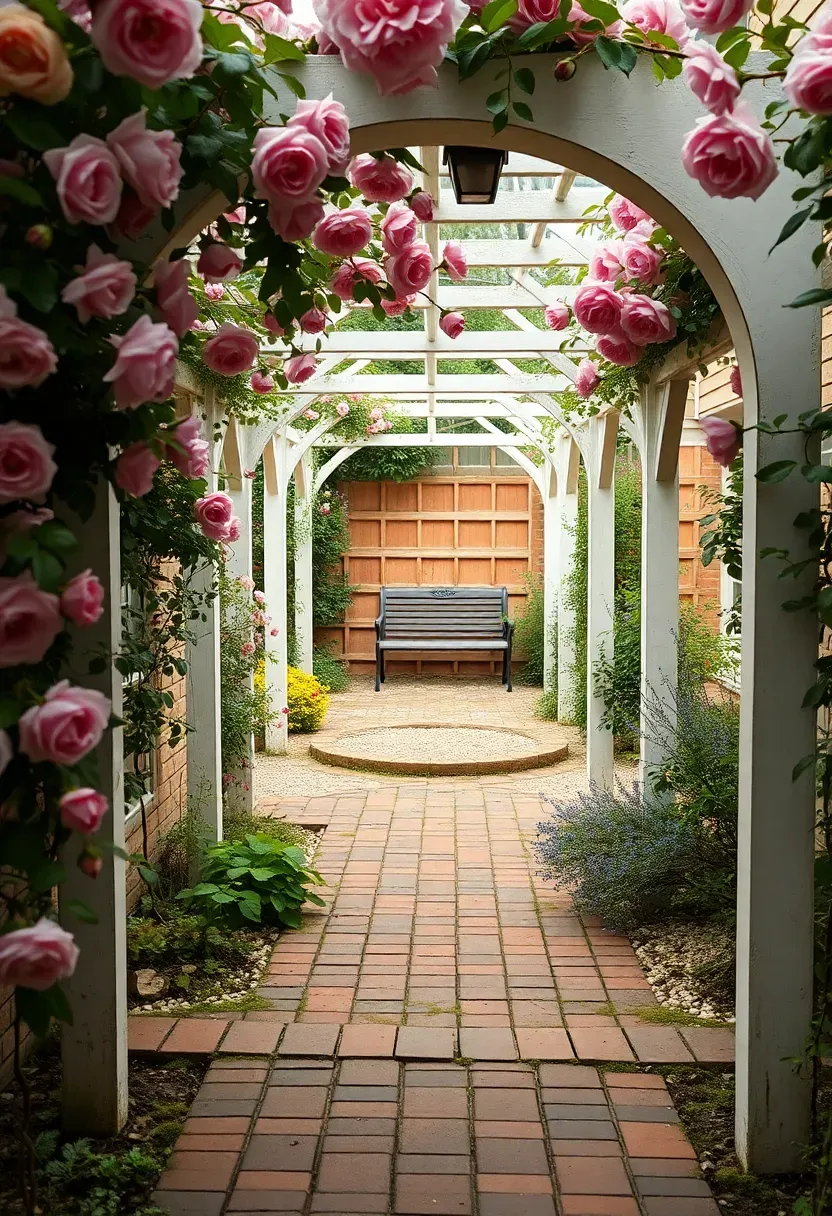
8. Cottage Garden Rooms
The garden room concept divides a single yard into several smaller enclosed spaces, each with its own character. Hedges, trellises, low walls, or even dense plantings serve as room dividers. You pass through an opening — an arch, a gap in a hedge, a gate — and enter a different mood. One room might be a sunny herb garden, the next a shaded reading nook, the third a cutting flower bed. This layout rewards slow movement and rewards curiosity over efficiency.
Tips
- Keep room dividers below 5 feet so the yard does not feel claustrophobic from inside the house.
- Give each room a different ground surface — brick in one, gravel in another, lawn in a third — to reinforce the sense of distinct spaces.
- Plant at least one fragrant species per room so each space has its own scent identity.
Recommended
Items for this idea
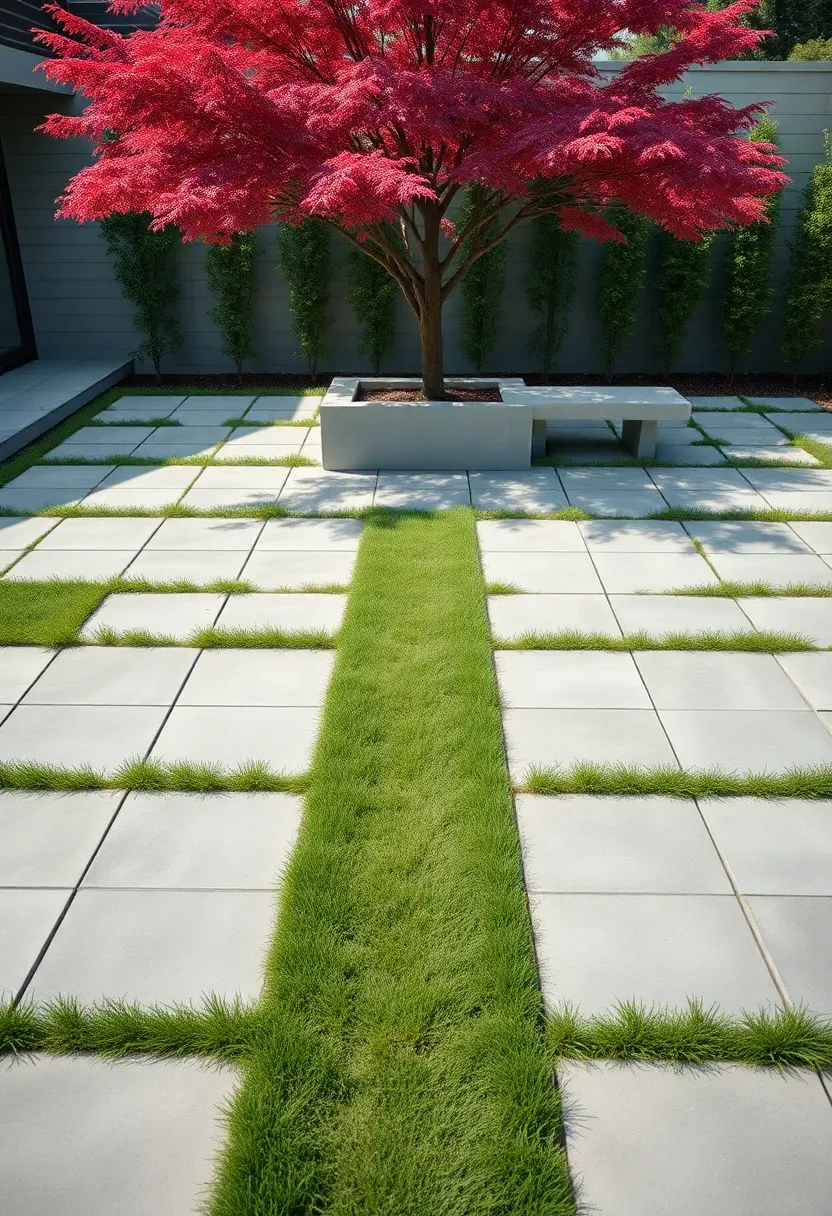
9. Minimalist Concrete and Grass Grid
A grid of square concrete pavers with grass or groundcover growing in the joints between them produces a clean, architectural look with almost no maintenance beyond mowing. The grid works because it imposes order on an outdoor space the same way tile does on a floor — repetition creates calm. Standard 24-by-24-inch pavers set on a compacted gravel base with 2 to 3 inches of soil in the joints support grass growth while staying level enough for furniture. The result is a surface that is part lawn, part patio, and entirely usable.
Tips
- Use a concrete saw to cut perimeter pavers rather than leaving partial grass strips at the edges — clean edges make or break this look.
- Plant dwarf mondo grass or creeping thyme in the joints if you want something lower-maintenance than turf grass.
- Set pavers 1/4 inch above the soil line in the joints so your mower blade clears them without scraping.
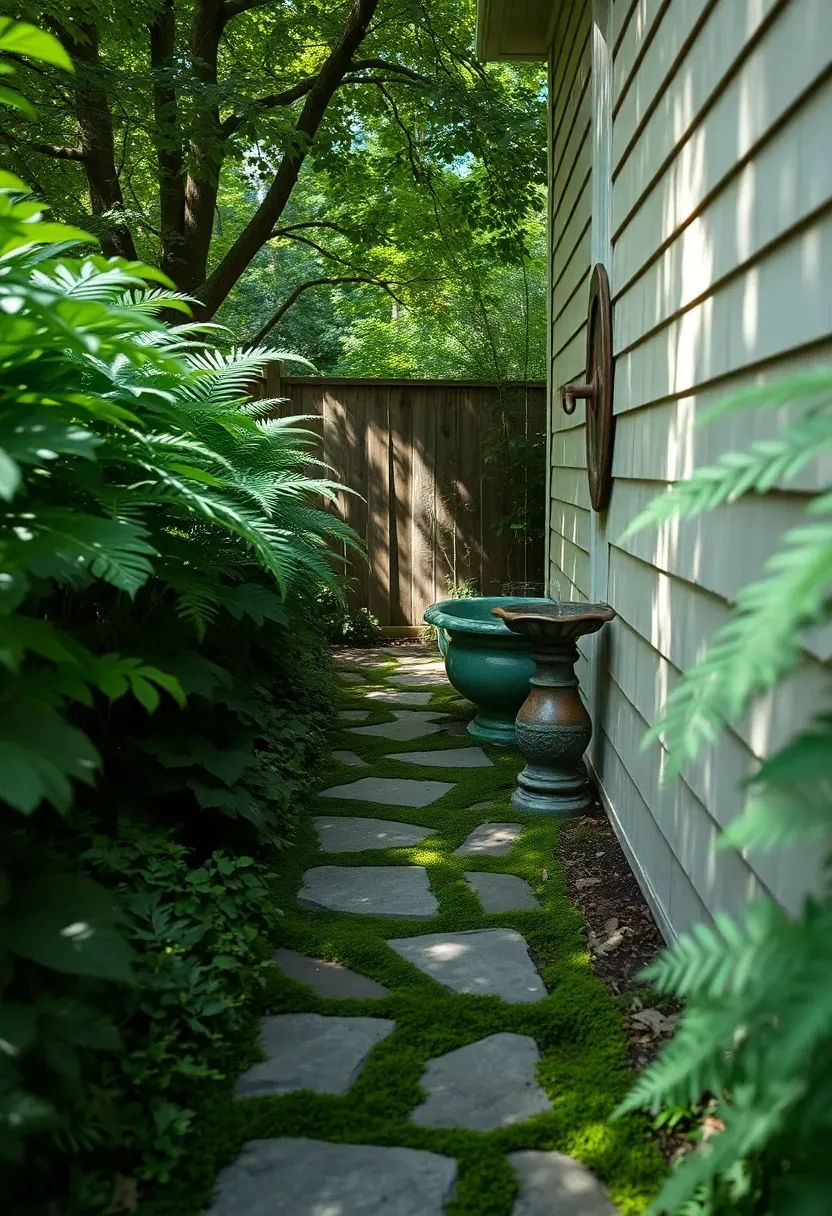
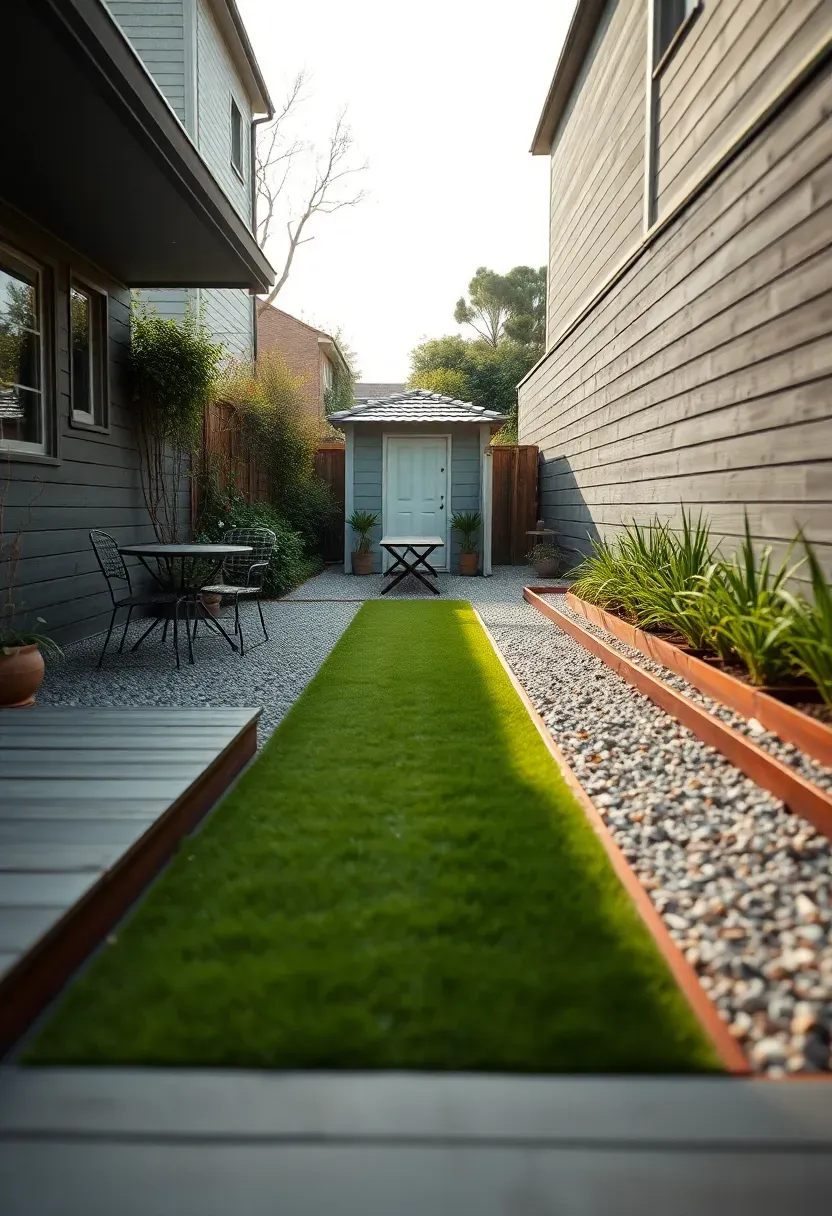
10. Side Yard Passageway Layout
The Overlooked Space
Side yards — those 5-to-10-foot-wide strips between your house and the fence — usually become storage dumps or weed corridors. But a narrow space with walls on both sides has built-in enclosure that most backyards lack. That makes it feel intimate rather than cramped if you design into it instead of ignoring it.
How to Use It
Lay a single-file stepping stone path down the center with shade-tolerant groundcover on both sides. Add a focal point at the far end: a wall-mounted fountain, a piece of sculpture, or a specimen plant in a large pot. If the space is 7 feet wide or more, you can fit a small bench at the destination point and create a genuine sitting area.
Watch Out
- Check drainage patterns before designing — side yards often carry roof runoff and need a channel drain or French drain to prevent flooding your new garden.
- Avoid tall plants close to the house wall; they trap moisture and can damage siding.
Recommended
Items for this idea
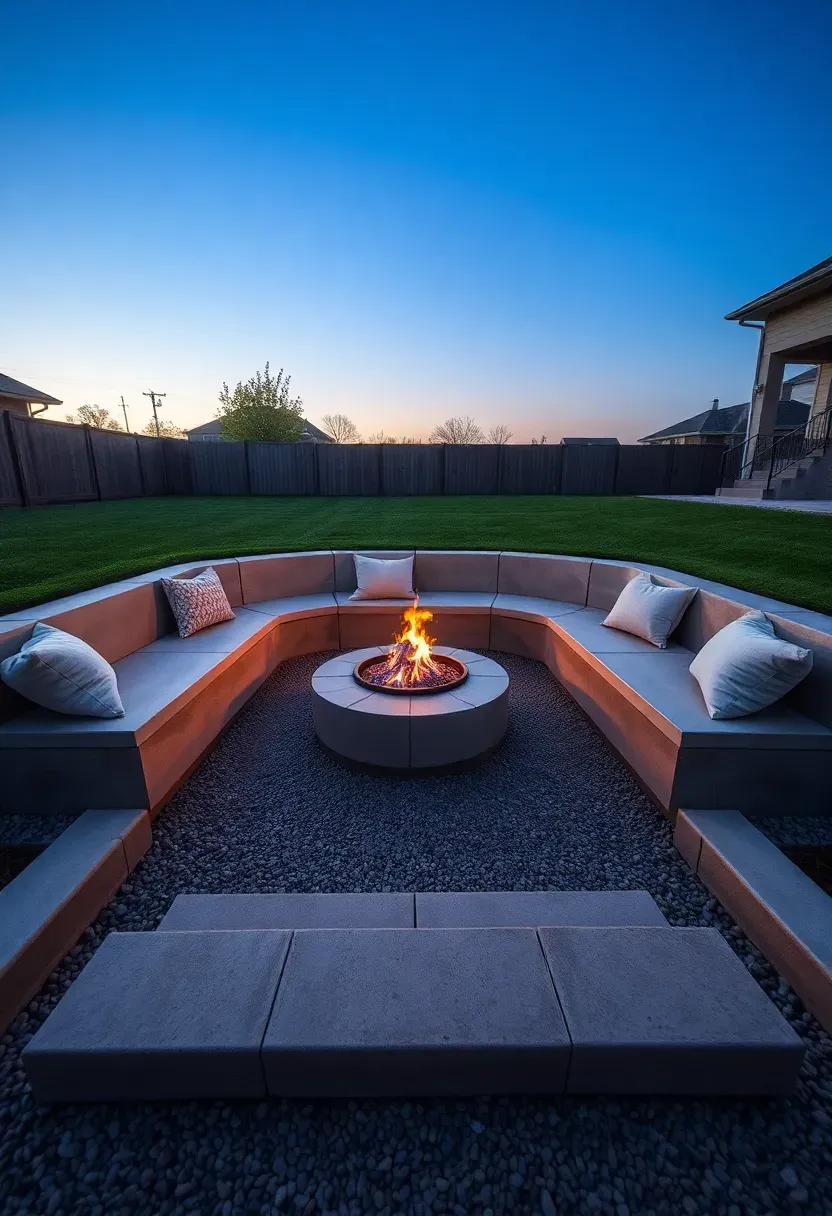
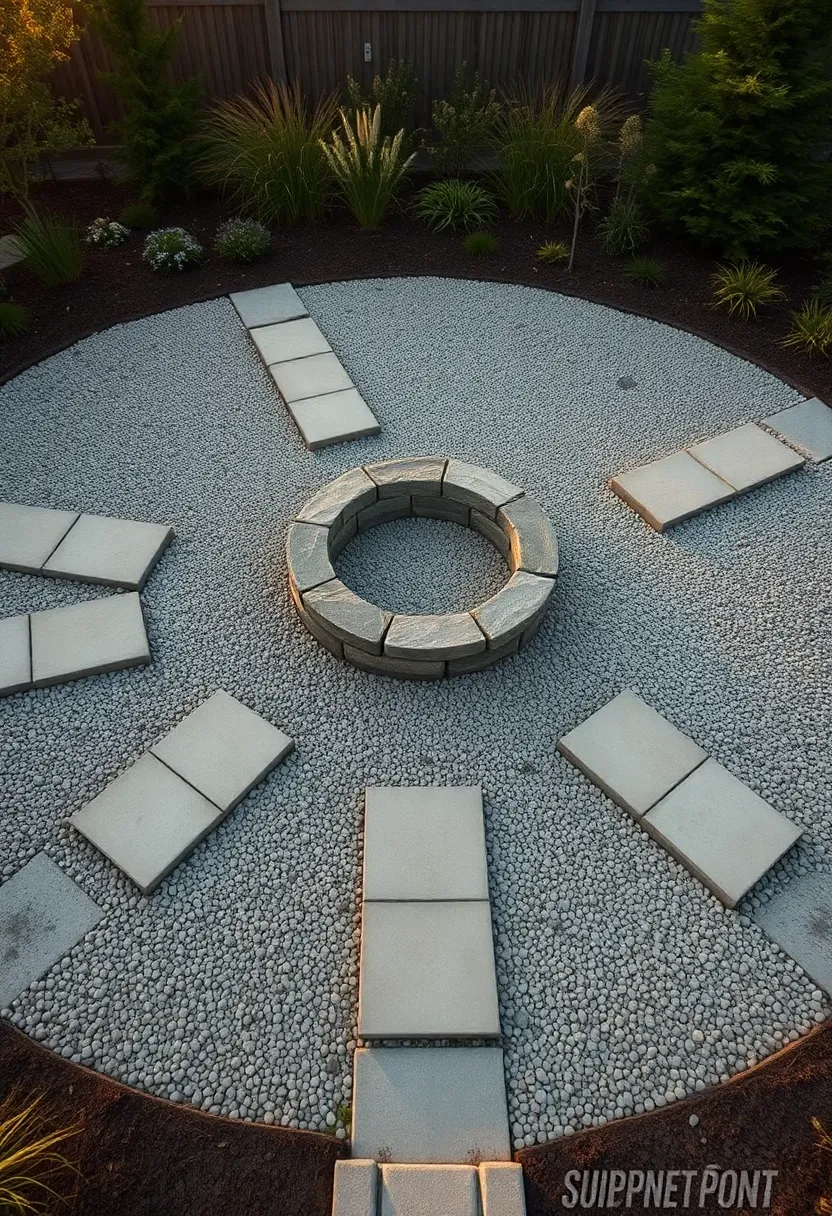
11. Fire Pit Circle with Radiating Paths
Placing a fire pit at the center of the yard and running paths outward to different zones creates a layout with a clear heart. The fire pit acts as the social anchor — the place everyone gravitates toward after dark — and the radiating paths connect it to the house, the garden, the gate, and whatever other destinations your yard includes. The circular clearing around the pit should extend at least 8 feet from the fire edge in all directions to keep seating comfortable and meet most fire code setback requirements.
Tips
- Use a different path material than the fire circle surface to make the hub-and-spoke pattern read clearly from above.
- Angle at least one path toward the prevailing downwind direction so smoke has a natural escape route away from the main seating.
- Keep paths narrow — 30 to 36 inches — so the spoke pattern does not eat up all the planting space between paths.
12. Raised Terrace Stepdown
How It Works
Instead of grading a sloped yard flat — which is expensive and destroys natural drainage — a terrace stepdown creates two or three level platforms at different heights. Each terrace becomes a usable flat surface for furniture, planting, or play. The retaining walls between terraces handle the grade change and can double as seating edges or planter walls.
Building It Right
Keep each terrace drop to 18 inches or less to avoid the need for engineered retaining walls in most jurisdictions. Walls under 4 feet generally do not require permits, but check local codes. Use wide steps — at least 48 inches — between levels so the transitions feel generous rather than cramped. The top terrace nearest the house should be the largest since it gets the most use.
Pros and Cons
Pros: Uses the natural slope instead of fighting it; creates distinct areas without fencing; retaining walls add architectural interest.
Cons: Drainage behind retaining walls needs careful planning with gravel backfill and weep holes; construction cost is higher than a flat-grade patio; each terrace needs its own level base preparation.
Recommended
Items for this idea
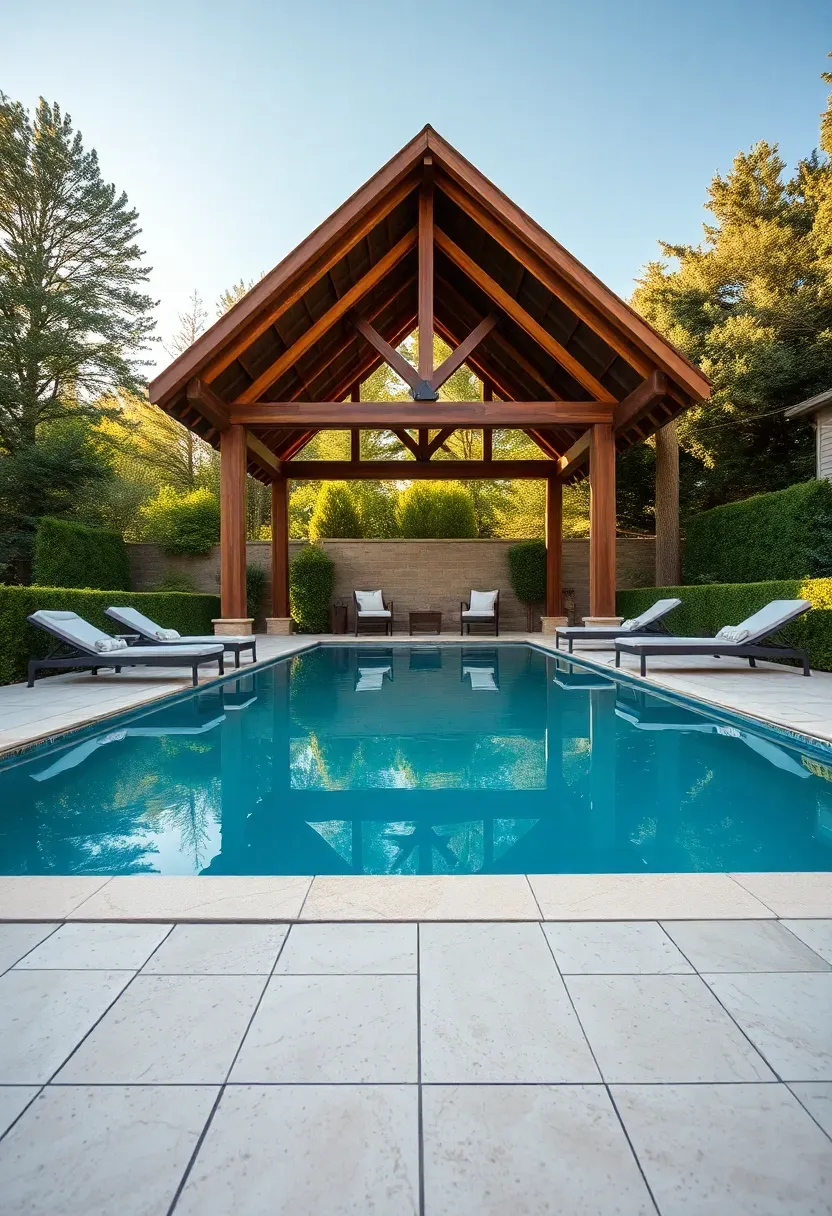
13. Pool and Pavilion Axis
A strong central axis — pool running lengthwise toward a structure at the far end — gives a backyard the kind of order usually reserved for public parks. The pavilion, pergola, or cabana at the terminus anchors the view and provides shade for anyone not in the water. Symmetrical planting or matching lounge areas on both sides of the pool reinforce the formality. This layout demands at least 40 feet of depth and 25 feet of width to avoid feeling squeezed, so it works best on lots with 5,000 or more usable square feet.
Tips
- Set the pavilion floor 6 to 12 inches above the pool deck so water does not sheet into the shaded area during rain.
- Plant tall narrow trees — Italian cypress, columnar hornbeam — along the axis to frame the view without blocking it.
- Keep pool equipment behind the pavilion where the structure hides the pad from view and muffles pump noise.
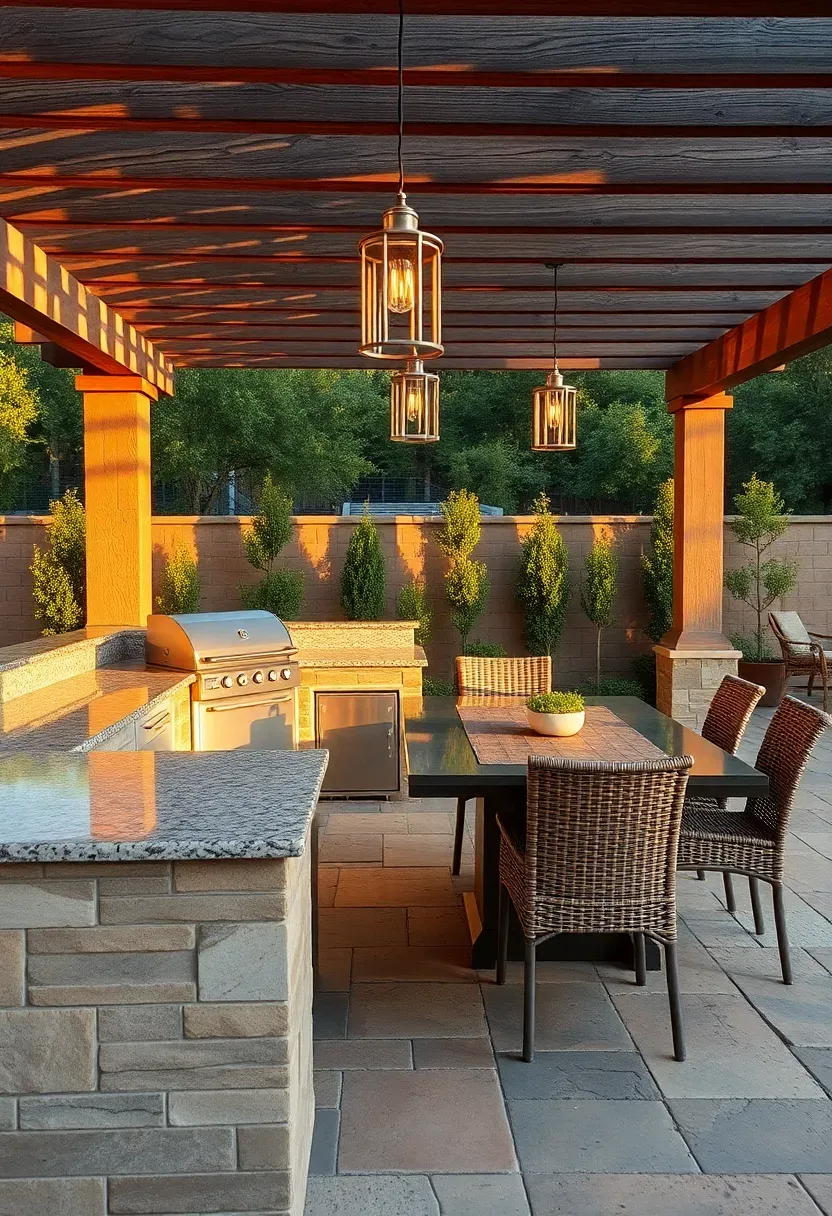
14. Kitchen Triangle Outdoor Layout
Indoor kitchen design uses the work triangle — stove, sink, fridge — to minimize steps between tasks. The same principle applies outdoors with the grill, the prep surface, and the dining table as the three points. Keeping these elements 6 to 10 feet apart means the cook can plate and serve without hiking across the yard, and guests at the table stay close enough for conversation without crowding the grill. The triangle should sit on a single contiguous hard surface so you are not stepping on and off patio edges while carrying hot food.
Tips
- Face the grill away from prevailing wind so smoke blows away from the dining area.
- Include at least 8 linear feet of counter space — running out of prep surface is the number one complaint with outdoor kitchens.
- Run a gas line from the house rather than relying on propane tanks if your yard layout allows trenching along the patio edge.
Recommended
Items for this idea
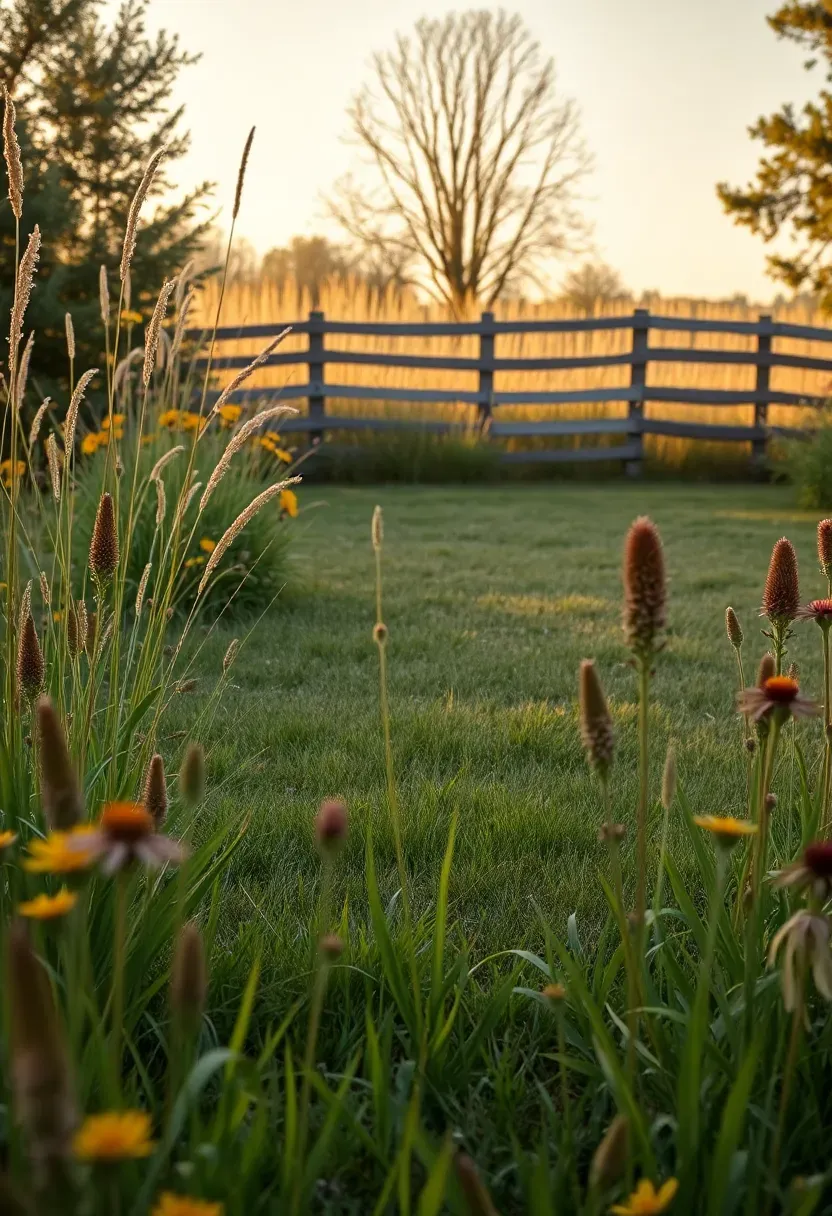
15. Meadow Border with Central Clearing
This layout flips the traditional lawn-and-border formula by making the border the star. A wide strip of native meadow grasses and wildflowers — 8 to 15 feet deep — lines the perimeter, while a modest central clearing of mowed turf provides usable open space. The meadow border attracts pollinators, requires no irrigation once established, and gets mowed just once per year in late winter. The visual effect is a clearing in a meadow rather than a lawn surrounded by fence.
Tips
- Seed the meadow with a local native mix rather than a generic wildflower blend — regional species establish faster and resist weeds better.
- Mow a clean 3-foot strip between the meadow and the lawn edge to show the contrast is intentional, not neglected.
- Allow the meadow to reach full height (3 to 5 feet) before the first annual mowing to let seeds drop and ensure reseeding.
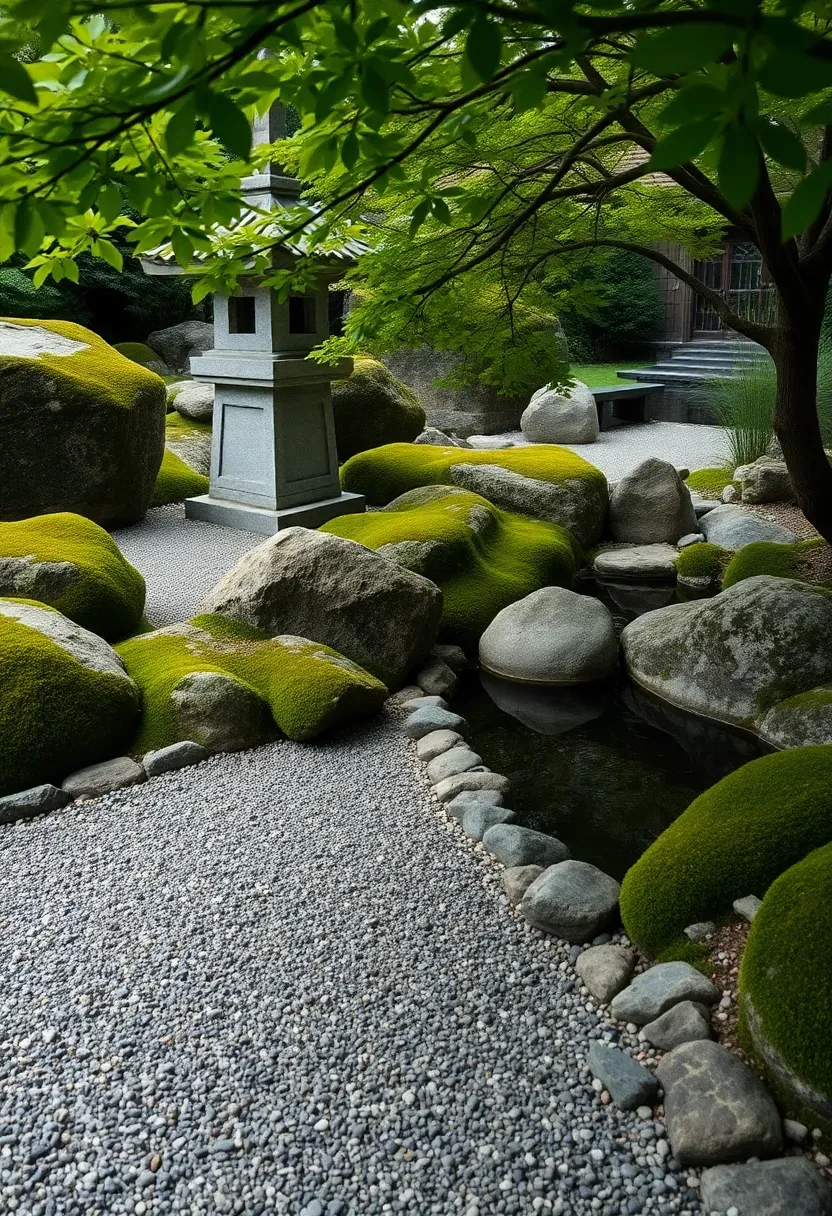
16. Japanese Stroll Garden Layout
Origins
The stroll garden — kaiyushiki in Japanese — developed in the Edo period as a way to experience a landscape by walking through it rather than viewing it from a single point. The path curves deliberately so you never see the entire garden at once. Each turn reveals a new composition: a stone lantern, a water basin, a view across a small pond.
Modern Application
In a residential backyard, the stroll garden layout works by replacing straight paths with curves and hiding parts of the yard behind planted screens or rock groupings. Even a 1,500-square-foot yard can use this approach if you break sightlines with a single large boulder or a clump of ornamental grasses at the midpoint. The goal is that the yard feels larger than it measures because you discover it in stages.
Apply at Home
- Use odd numbers when grouping rocks — threes and fives look natural while even numbers look arranged.
- Lay the path in irregularly spaced stepping stones rather than a continuous surface to slow walking speed and encourage looking.
- Keep the plant palette restrained: two or three species repeated throughout rather than a collector's mix of everything.
Recommended
Items for this idea
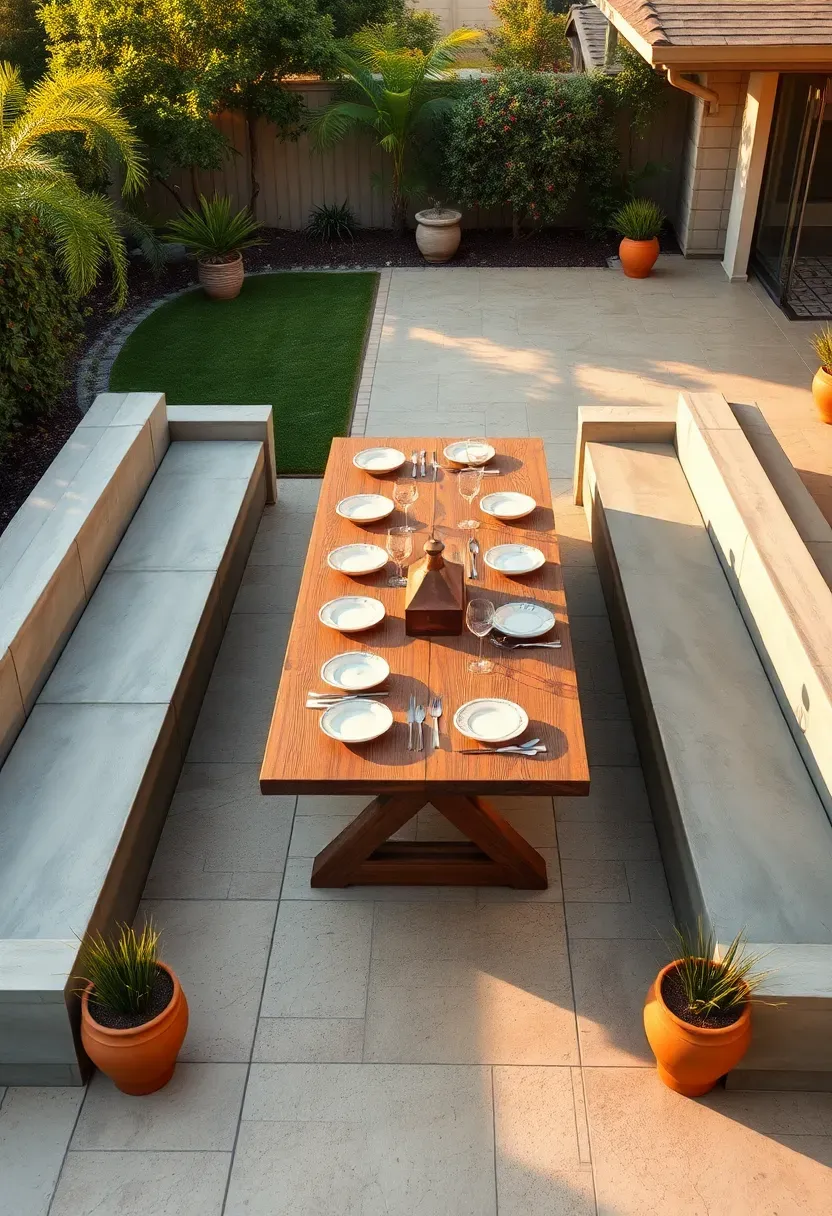
17. U-Shaped Entertaining Yard
The U-shape places seating or structure on three sides of a central space, leaving the fourth side open — usually facing the house or the best view. This creates a natural amphitheater effect where everyone faces inward. Built-in benches along the three sides minimize furniture clutter and maximize seating capacity for parties. The open fourth side keeps the space from feeling boxed in and provides an entry point that does not require stepping over or between seated guests.
Tips
- Build the bench seat height at 17 to 18 inches and the depth at 18 to 20 inches for comfortable sitting without back support.
- Add cushions and removable backs for daily use but design the structure to look complete without them.
- Position the open side away from prevailing wind so the U-shape acts as a natural windbreak for seated guests.
18. Narrow Lot Linear Layout
The Problem
Lots that are 20 to 25 feet wide and 60 or more feet deep are common in older urban neighborhoods. The default approach — a narrow lawn strip running the full length — creates a bowling alley effect where the space feels even narrower and longer than it is.
The Solution
Break the length into three or four distinct sections stacked front to back, each with a different surface and purpose. A deck or patio nearest the house for dining. A gravel or paver area in the middle for lounging. A lawn section beyond that for open space. A utility zone at the very back for shed, compost, and tool storage. Each section is as wide as the full lot, so no individual zone feels narrow.
Pros and Cons
Pros: Makes a long narrow space feel like a series of rooms; each zone can have different character; prevents the bowling alley look.
Cons: Multiple surface transitions add cost; each section needs its own edging and base preparation; the view from the house shows every zone stacked in a row.
Recommended
Items for this idea
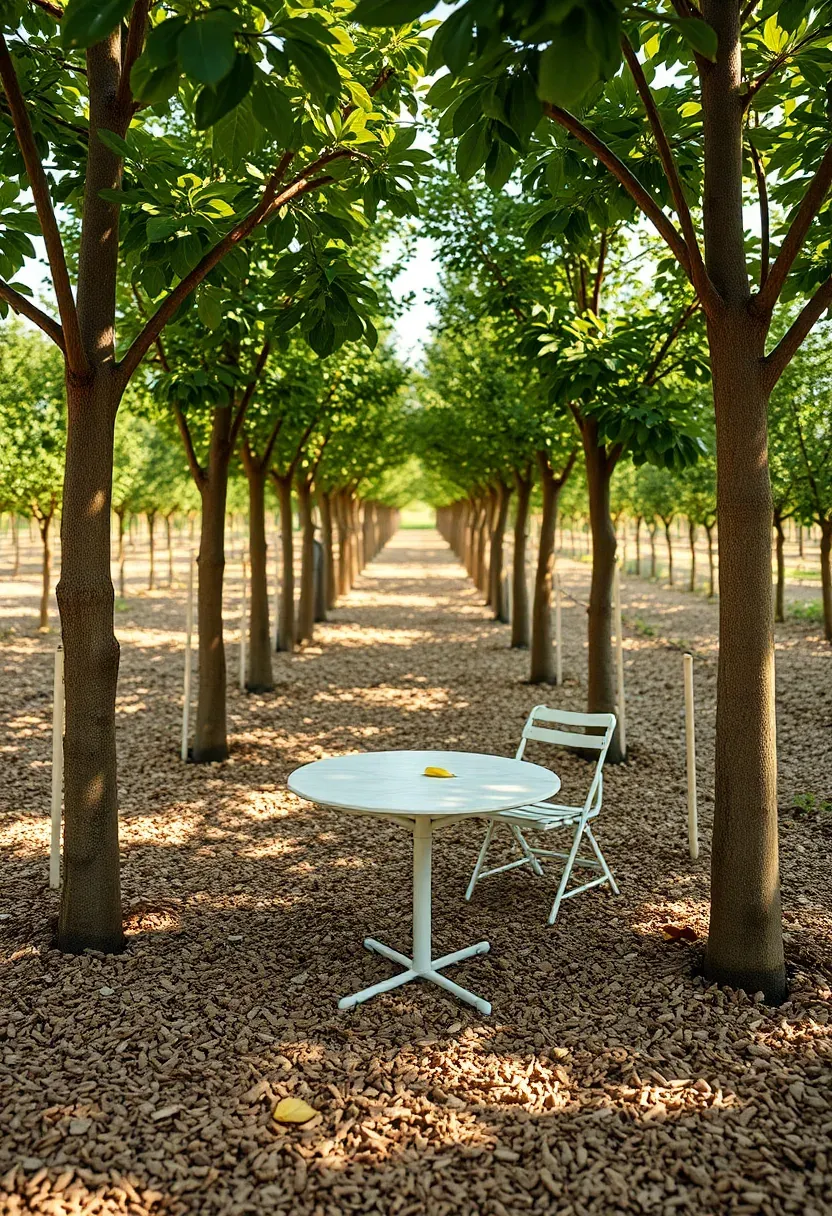
19. Orchard Grid with Understory Seating
Planting fruit trees in a grid — rows spaced 12 to 15 feet apart with trees at the same interval — creates a canopy that shades the entire yard within five to seven years. The grid pattern allows mowing or mulching between rows and provides clear sightlines through the trunks. Placing a seating area beneath the mature canopy gives you a shaded outdoor room without building a pergola or pavilion. The trees do the structural work. Apple, pear, fig, and citrus all work depending on your climate zone.
Tips
- Choose semi-dwarf rootstocks that top out at 12 to 15 feet rather than standard trees that will overshade the entire property.
- Mulch under the canopy with wood chips 4 inches deep to suppress weeds and keep the floor clean for sitting.
- Position the seating area near the center of the grid where canopy coverage is densest and wind protection is highest.

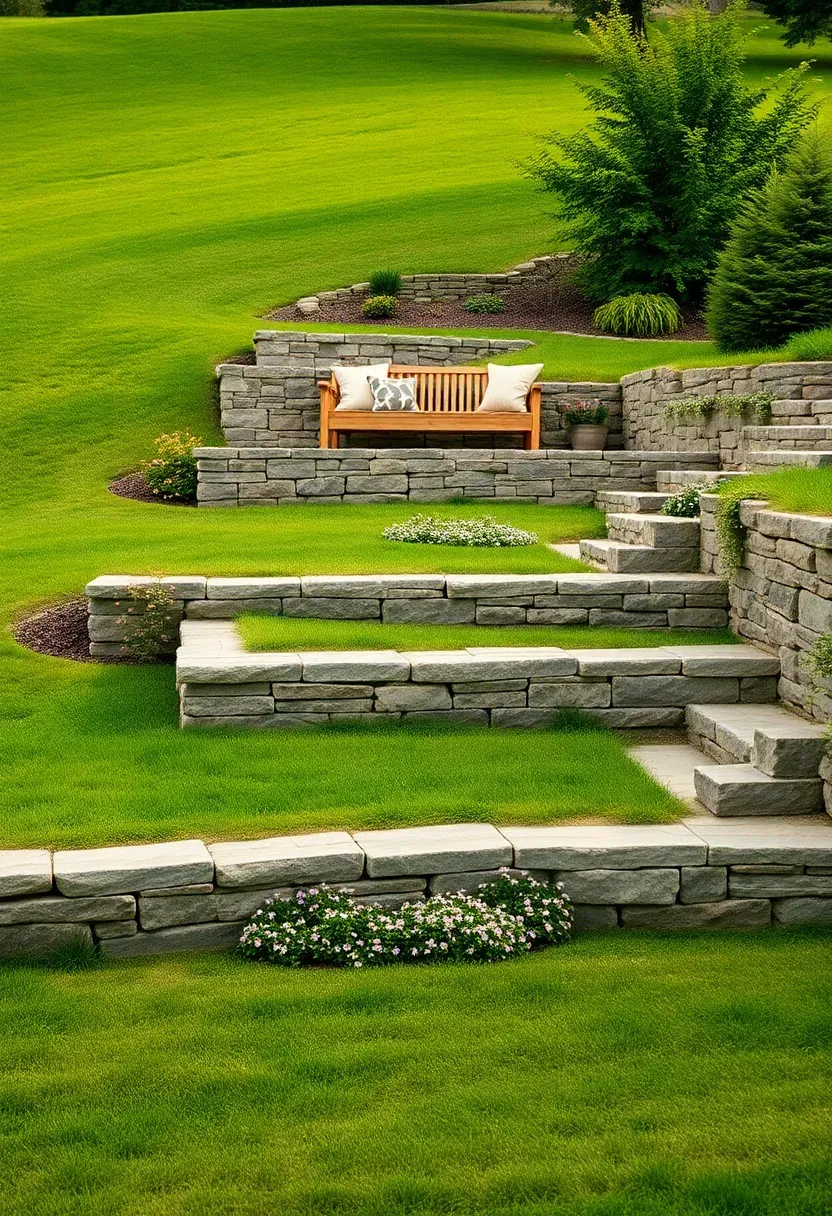
20. Slope-Terraced Multi-Level Yard
Step 1: Survey the Grade
Measure the total elevation change from the highest point to the lowest. Divide that number by the number of terraces you want, keeping each drop to 2 feet or less for residential retaining walls that avoid permit requirements in most areas. A 6-foot total slope splits neatly into three 2-foot terraces.
Step 2: Assign Uses by Level
Put the heaviest-use zone — dining or cooking — on the terrace closest to the house for easy access. Place passive zones — garden beds, meditation space, hammock area — on the lowest terrace where foot traffic is lightest. Water features and hot tubs work well at the bottom where they can collect natural runoff.
Step 3: Build the Connections
Wide stone or timber steps between levels should include a landing every 4 to 5 steps for safety and visual rhythm. Integrate landscape lighting into the step risers so level changes are visible after dark.
Watch Out
- Drainage behind every retaining wall needs a gravel backfill column and weep holes — skipping this causes wall failure within a few years.
Recommended
Items for this idea
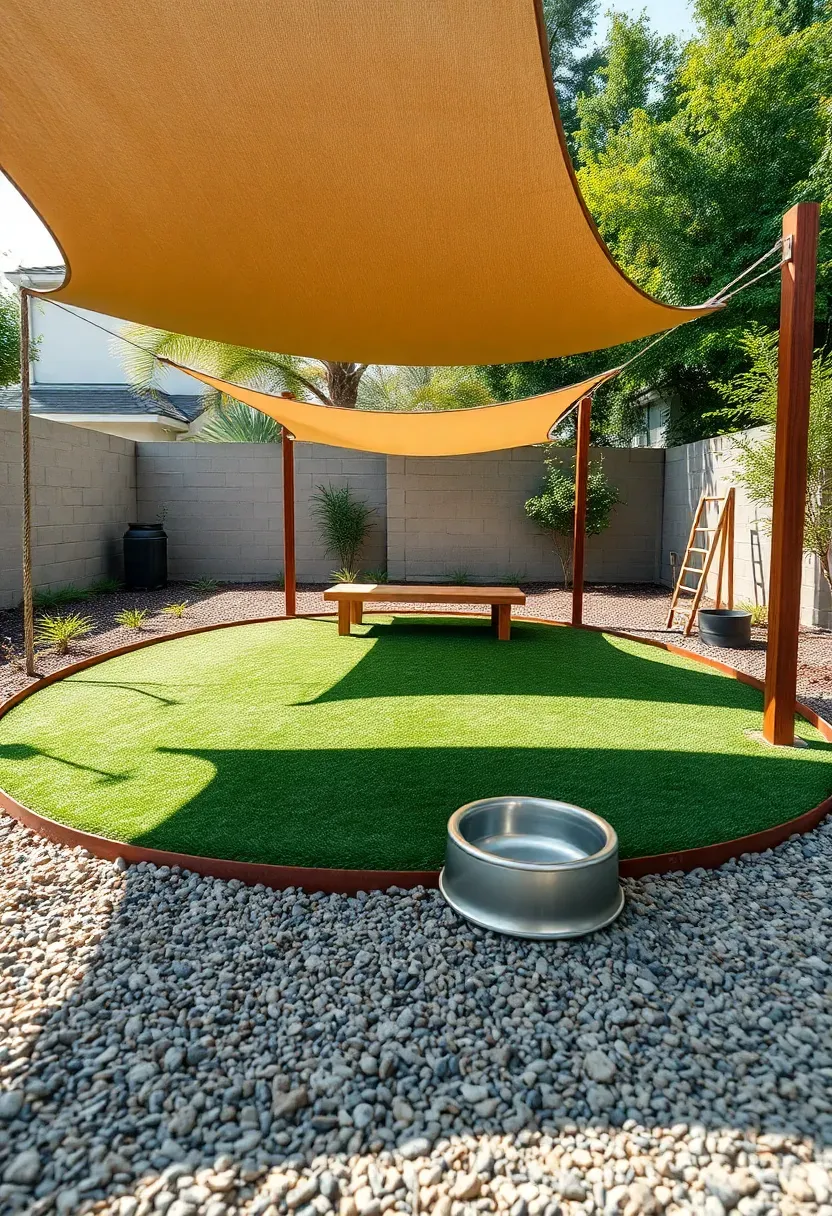
21. Pet-Friendly Loop Layout
Dogs wear paths into lawns regardless of your layout — so design the path they want instead of fighting it. A perimeter loop of compacted decomposed granite or rubber mulch gives dogs a running track that drains well and does not turn to mud. The central area stays turf or artificial grass for play and rest. A shaded station with a water bowl at one end of the loop gives them a destination. This layout also keeps dog traffic off garden beds by making the loop more appealing than cutting through plantings.
Tips
- Use 6-inch steel edging to keep the decomposed granite loop separate from the lawn — dogs scuff material over the edge with every lap.
- Avoid cocoa mulch in the loop; it contains theobromine which is toxic to dogs.
- Make the loop at least 3 feet wide so two dogs can pass each other without leaving the track.
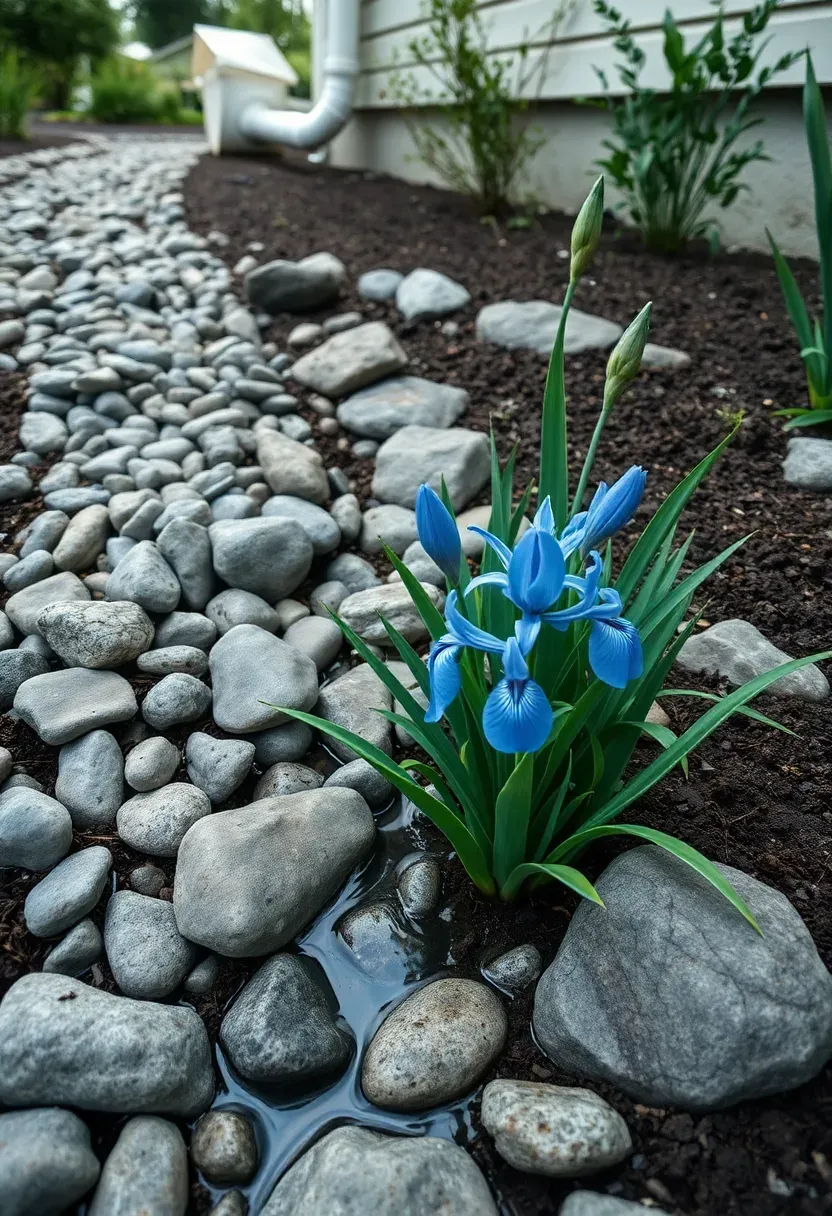
22. Rain Garden Integration Layout
Why It Matters
A typical 1,500-square-foot roof sheds about 900 gallons of water in a 1-inch rainstorm. That water either sheets across your yard, pools against the foundation, or runs off into storm drains. A rain garden captures it in a shallow planted depression where it infiltrates slowly into the soil, filtering pollutants and recharging groundwater.
How to Build the Layout Around It
Position the rain garden 10 to 15 feet from the foundation at the lowest point of your yard where water naturally collects. Direct downspout discharge to it via a dry creek bed of river rock — the creek bed becomes a design feature that gives the yard a sense of movement even when dry. Plant the basin with native sedges, iris, and switchgrass that tolerate both wet feet and dry spells.
Choose If
- You deal with standing water after storms
- Your municipality offers stormwater fee credits for rain garden installation
- You want to reduce irrigation needs by keeping rainwater on site
Recommended
Items for this idea
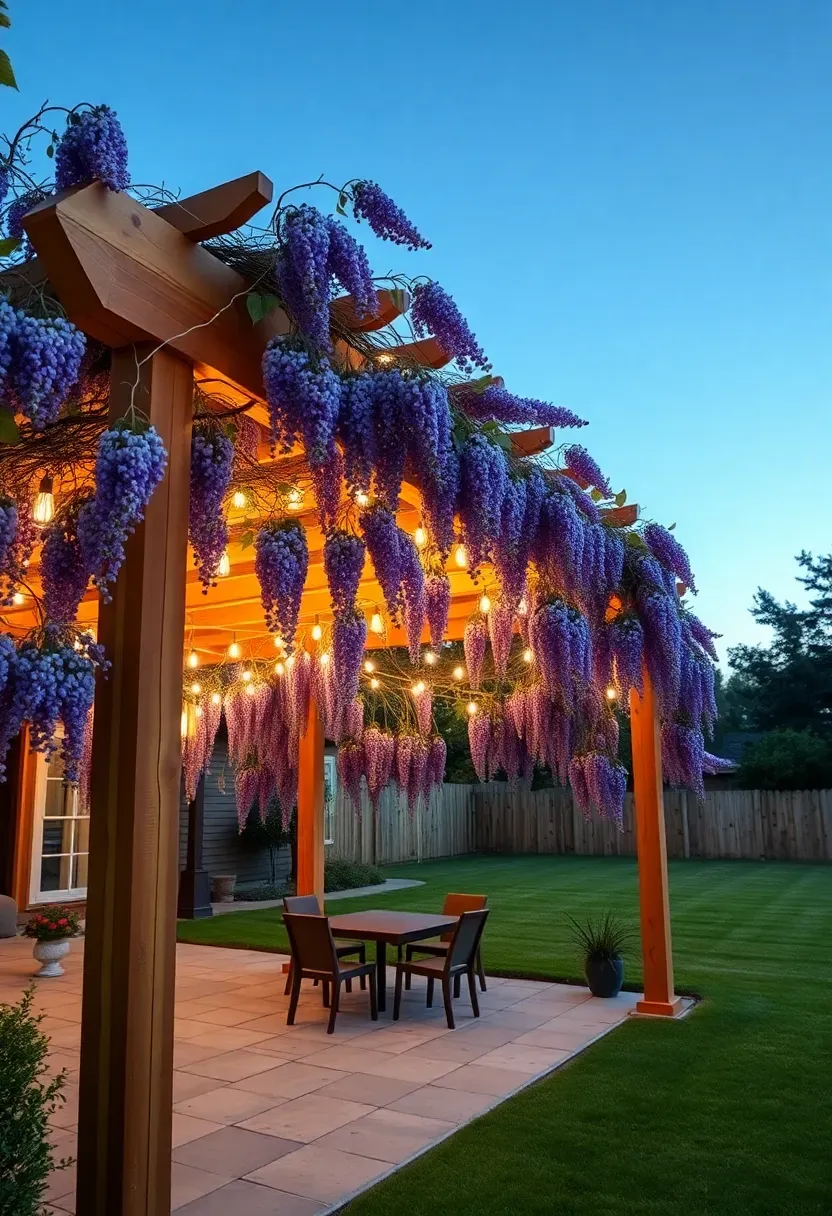
23. Pergola Room Divider Layout
A freestanding pergola running perpendicular to the fence line — rather than attached to the house — divides the yard into two rooms without solid walls. The pergola columns define a threshold you pass through, and climbing plants on the structure add seasonal screening. The near room handles dining and socializing. The far room becomes whatever you need: garden, play area, hot tub zone, or quiet retreat. This layout adds vertical structure to yards that feel flat and featureless.
Tips
- Set pergola posts in concrete footings below frost line, even if your area rarely freezes — shallow posts heave over freeze-thaw cycles.
- Choose one climbing plant species and train it consistently rather than mixing multiple vines that compete.
- Hang string lights from the pergola beams at 8 feet above ground to create a ceiling plane that makes the outdoor room feel enclosed overhead.
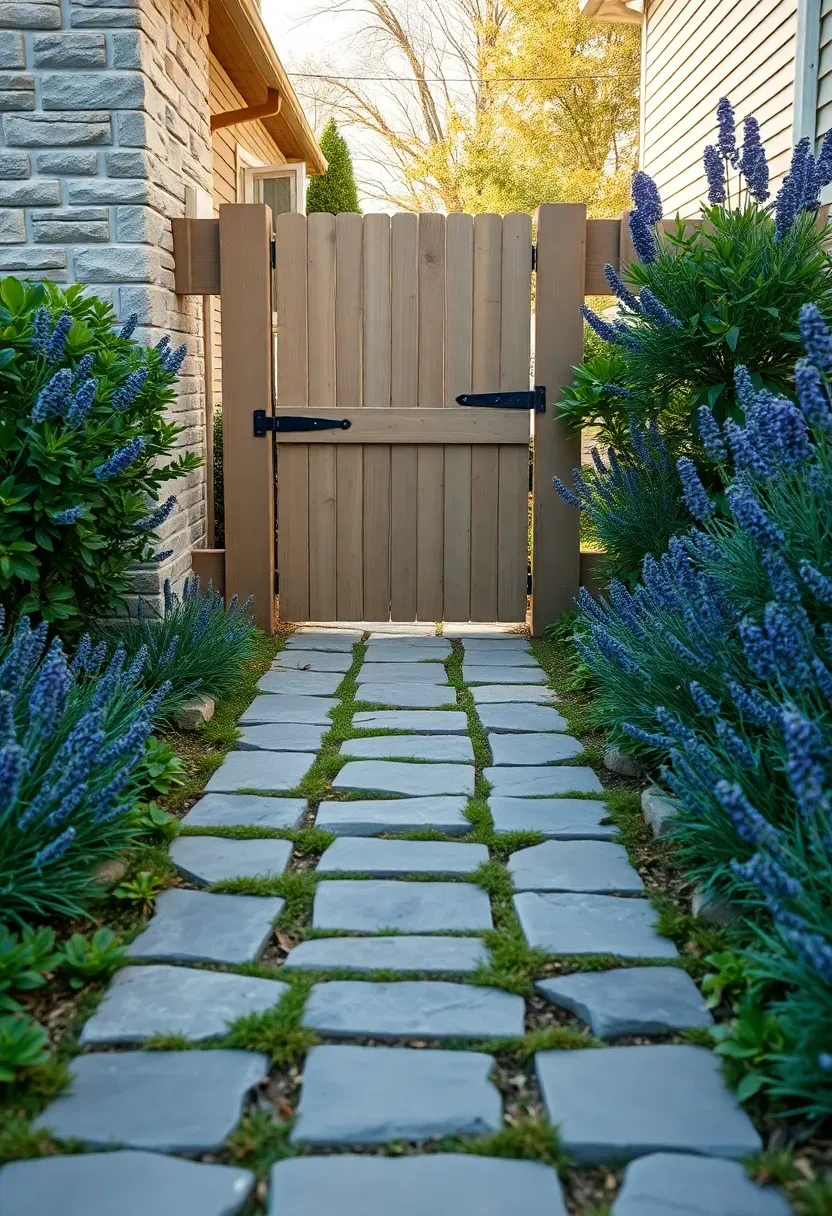
24. Front-to-Back Flow-Through Design
Most homes treat front and back yards as entirely separate spaces with different styles, different plants, and different purposes. A flow-through design connects them with a continuous path and consistent materials that run from the front garden, through a side gate, and into the backyard. This makes the entire property feel like one cohesive landscape rather than two disjointed halves. It also improves practical circulation — you can wheel a garden cart or carry groceries through without navigating disconnected paths.
Tips
- Use the same paver or stone throughout both yards so the material continuity registers immediately.
- Install a gate in the side fence that matches the fence style but opens wide enough for a wheelbarrow — 36 inches minimum.
- Repeat three key plant species from front to back to create visual rhythm across the property.
Recommended
Items for this idea
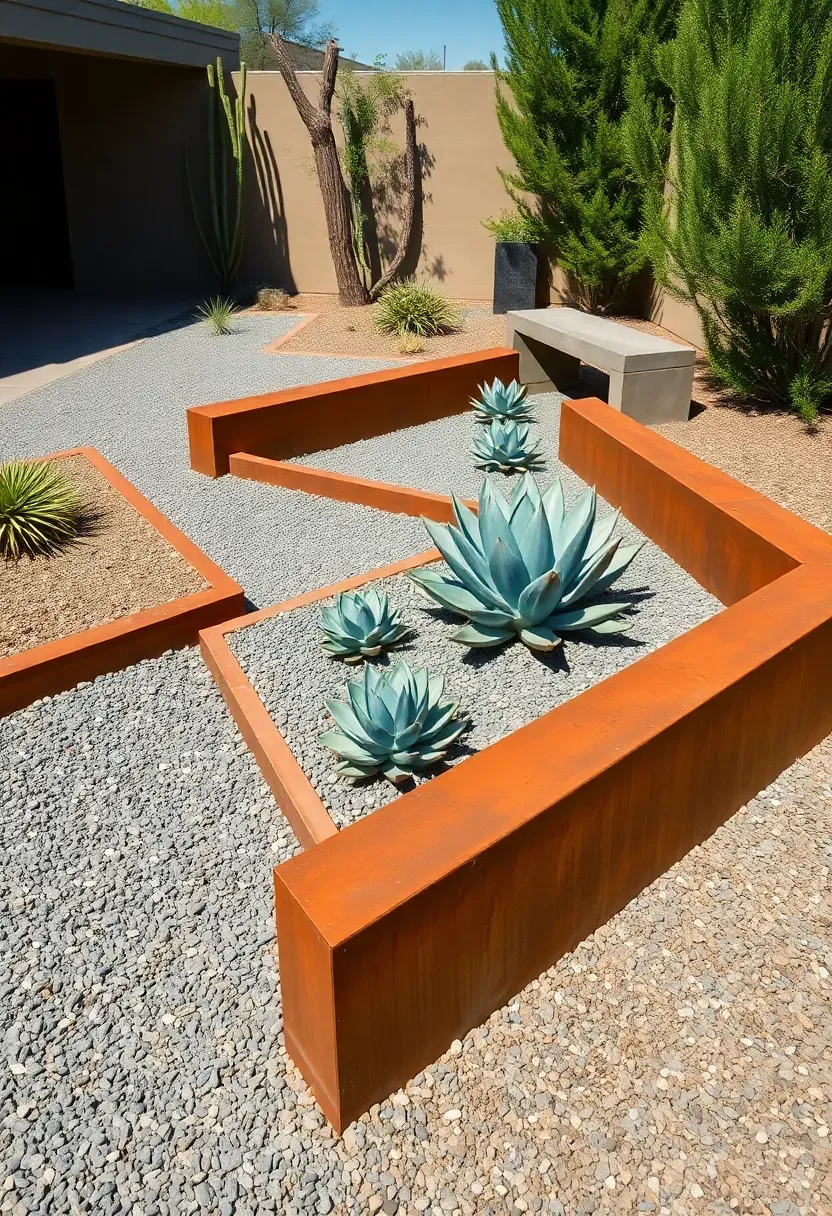
25. Gravel and Steel Edging Modern Plan
The Aesthetic
Corten steel edging strips — that weathered orange-brown patina — paired with angular gravel beds produce a look that reads as designed without trying hard. The steel holds clean geometric lines that gravel alone cannot maintain, and the rust tone warms up what would otherwise be a cold, industrial palette. Succulents, ornamental grasses, and architectural plants in geometric groupings complete the composition.
Practical Advantages
Steel edging lasts decades without replacement, gravel never needs mowing, and the plants in this style tend to be drought-tolerant species that need little supplemental water. Total irrigation can drop to near zero after the first establishment year. Maintenance consists of raking gravel flat twice a year and removing the occasional weed seedling.
Recommendation
This layout works best in dry climates or for homeowners who genuinely do not want to maintain a lawn. In wet climates, gravel beds grow moss and weeds more aggressively, and the low-water plant palette makes less sense.
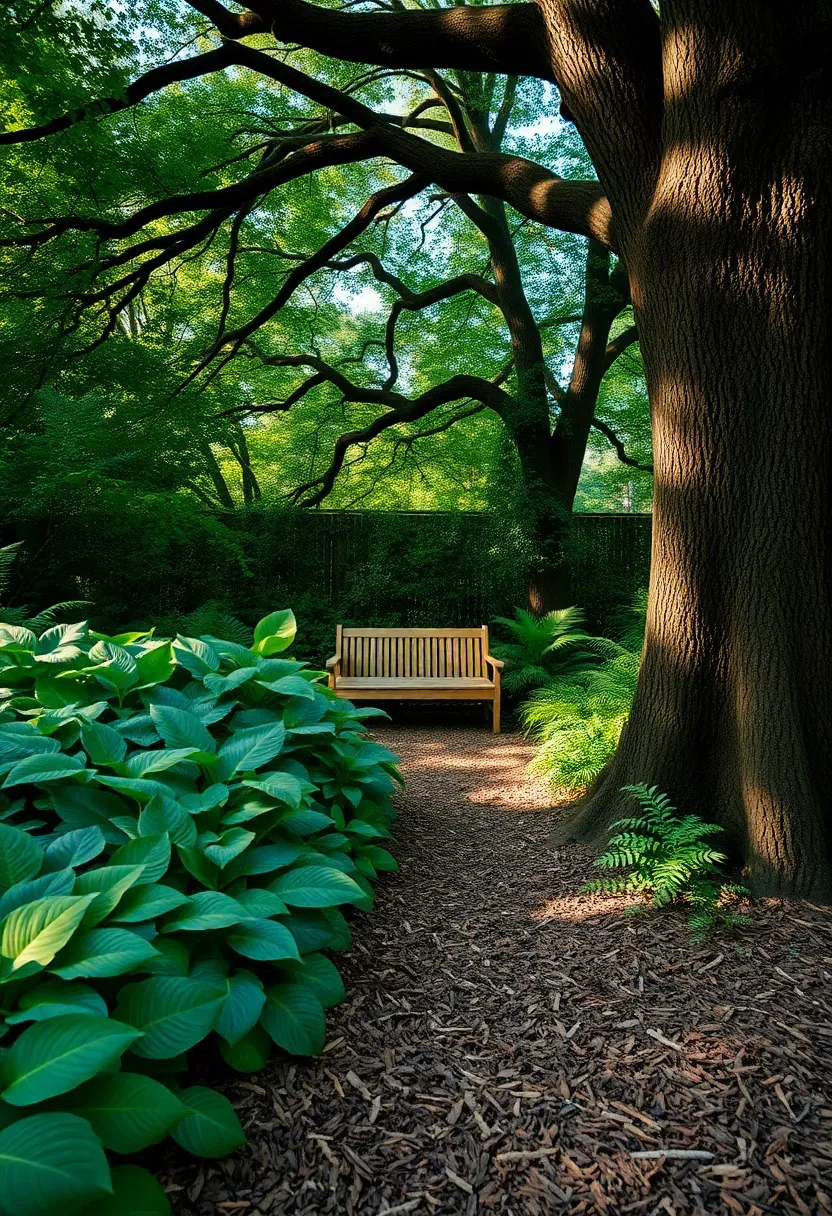
26. Woodland Shade Garden Layout
If mature trees already shade most of your yard, stop fighting for sun and design around the canopy. A woodland layout embraces shade by planting the understory with ferns, hostas, heuchera, astilbe, and native woodland wildflowers that thrive without direct sun. Bark mulch paths wind through the plantings, and seating goes wherever a natural clearing allows dappled light. The effect is a walk through a curated forest rather than a yard struggling to grow grass under trees.
Tips
- Remove lower tree limbs up to 8 feet to allow light penetration and create a sense of openness beneath the canopy — arborists call this crown raising.
- Use 3 inches of shredded bark mulch on paths rather than gravel, which looks out of place in a woodland setting.
- Group plants in drifts of a single species rather than mixing everything together — woodland floors in nature are colonies, not collages.
Recommended
Items for this idea
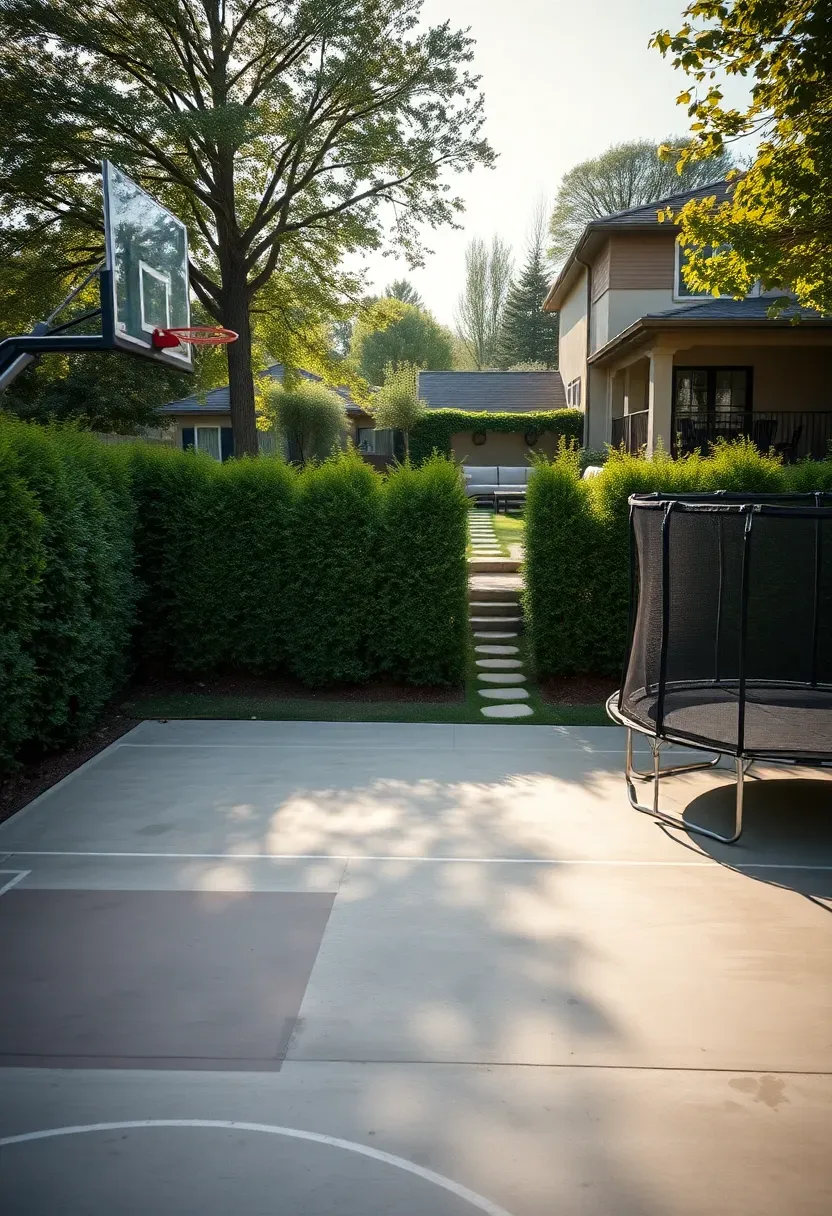
27. Family Activity Hub Layout
Step 1: List Every Activity
Write down everything your family actually does in the yard — not aspirational uses, actual ones. Basketball, trampoline, grilling, eating outside, gardening, playing in the sprinkler. Rank them by frequency.
Step 2: Assign Space by Usage
Give the most space to the activity that happens most often. A basketball half-court takes a 30-by-30-foot area; a trampoline needs 15 by 15 feet with safety clearance. Plot these onto your yard dimensions and see what fits without overlapping.
Step 3: Buffer the Noise
Separate noisy active zones from quiet seating areas with at least a hedge row or a trellis screen. Nobody wants to relax in a lounge chair next to a basketball backboard. A 5-foot-tall hedge absorbs enough visual and auditory separation to make both zones feel independent.
Watch Out
- In-ground trampolines need a retention pit with drainage — water in the pit rusts springs and breeds mosquitoes.
- Basketball courts need a level, hard surface and a 10-foot overhead clearance from any tree limbs or structures.
Quick FAQ
How do I decide which layout fits my yard? Start by measuring your lot dimensions and noting the fixed elements: house position, mature trees, slopes, utility lines, and property setbacks. The layout should work around these constraints rather than requiring you to remove or relocate them.
What is the cheapest backyard layout to build? Gravel courtyard and meadow border layouts cost the least because they skip poured concrete and reduce or eliminate sod installation. A full gravel yard over compacted base runs $3 to $6 per square foot, while a meadow border costs mainly seed and one season of patience.
Can I combine multiple layout ideas in one yard? Absolutely. Most real backyards use elements from two or three layout concepts. The key is maintaining consistent materials and a clear circulation path that connects everything without dead ends or awkward transitions.
Do I need a landscape architect for a backyard layout? For flat lots under 3,000 square feet with no major drainage issues, you can likely plan and execute a layout yourself using graph paper and stakes to mock up zones at full scale. Once slopes, retaining walls, or major grading enter the picture, a professional saves you from expensive mistakes.
Which layouts work best for small yards under 1,000 square feet? The L-shaped patio, gravel courtyard, minimalist concrete grid, and diagonal pathway designs all perform well in tight spaces because they use every square foot deliberately and avoid wasted lawn that is too small for real activity.
Your backyard layout is the foundation that everything else sits on. Get the zones right, get the circulation right, and the furniture, plants, and finishing details will fall into place with far less effort. Grab a tape measure and some stakes, mock up two or three of these ideas at full scale in your yard, and live with the layout for a weekend before committing to any hardscape. The best plan is the one that matches how you actually spend time outside — not the one that looks best in a photograph.
Pinterest cover for 27 Backyard Layout Ideas for Every Yard Size
About the author
OBCD
CGI visualization and interior design content. We create detailed 3D renders and curate practical design ideas for every room in your home.