19 Backyard Makeover Ideas
I spent three years ignoring my backyard. The grass was patchy, the concrete slab had a crack running diagonally across it, and the only seating was a folding camp chair I kept meaning to replace. Then one Saturday I ripped out the slab, laid down a 10x12 gravel pad, and dragged out two Adirondack chairs from a garage sale. That afternoon I sat outside for the first time in months. The backyard was still rough, but the shift felt immediate. Most makeovers work this way — a single weekend project breaks the inertia, and the rest follows gradually.
Here are 19 backyard makeover ideas organized from quick fixes to bigger builds, each with real costs and practical notes.
Table of Contents
- Gravel Patio Swap
- Raised Garden Bed Grid
- Stained Concrete Refresh
- Privacy Hedge Wall
- Shade Sail Installation
- Dry Creek Bed Drainage Fix
- Built-In Bench Seating
- Outdoor Rug and Furniture Zone
- Stepping Stone Pathway
- Vertical Garden Panel
- Cedar Pergola Build
- Fire Pit Gathering Area
- Sod-to-Clover Lawn Conversion
- Retaining Wall Terracing
- Outdoor Kitchen Counter
- Flagstone Patio with Creeping Thyme
- Low-Voltage Landscape Lighting
- Water Feature Focal Point
- Complete Hardscape and Softscape Overhaul
1. Gravel Patio Swap
Ripping out a cracked concrete slab and replacing it with compacted pea gravel is one of the fastest backyard makeover ideas you can execute in a single weekend. Rent a jackhammer ($60/day), break the slab into pieces small enough to haul, then excavate 4 inches down across the area. Lay landscape fabric, add a 2-inch base of crushed stone, compact it, then top with 2 inches of pea gravel. A 10x12-foot area costs roughly $250-$400 in materials. The result drains better than concrete and feels deliberately casual rather than neglected.
Tips
- Edge the gravel area with steel landscape edging to prevent migration into the lawn.
- Pea gravel shifts underfoot — use 3/8-inch angular gravel (like decomposed granite) if you want a firmer surface for dining chairs.
- Compact each layer with a plate compactor, not just a hand tamper. It makes a real difference.
We picked a few things that go well with this idea: PARTPHONER Low Voltage Path Lights (12-Pack) (★4.5), SUNVIE LED Pathway Lights 3000K (12-Pack) (★4.5) and LEONLITE Low Voltage Path Lights (12-Pack) (★4.4). As an Amazon Associate we earn from qualifying purchases.
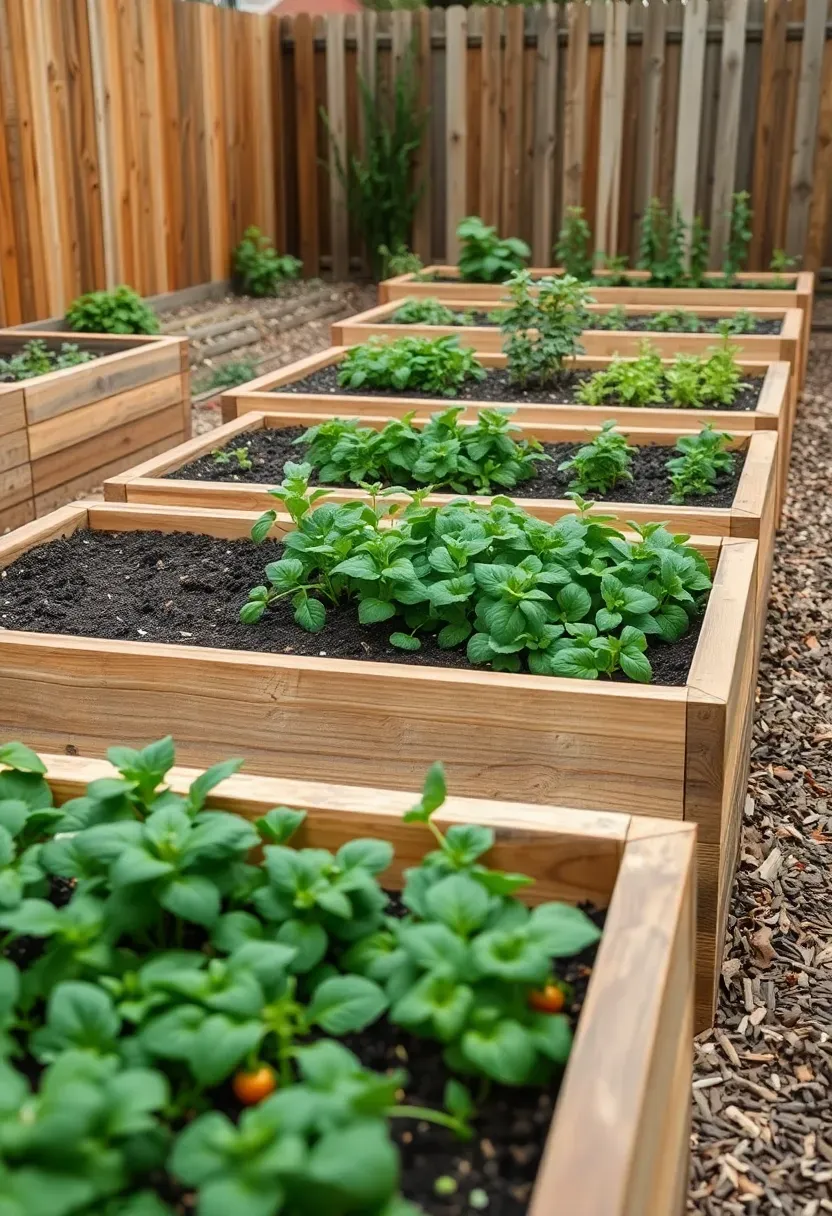
2. Raised Garden Bed Grid
The Problem
Bare or weedy patches in a backyard look neglected, and amending poor native soil across a large area gets expensive. You end up spending $300+ on topsoil and compost only to watch it wash away or compact back down within a season.
The Solution
Build a grid of raised beds instead. Four 4x4-foot beds arranged in a square with 2-foot pathways between them costs about $200-$350 in cedar lumber and screws. Fill each bed with a 60/40 mix of topsoil and compost ($80-$120 total). The beds define the space architecturally while giving you productive growing area. Line the pathways with wood chips or pea gravel so you are not walking through mud after rain.
Pros and Cons
- Pro: Immediate visual structure, even before plants mature.
- Pro: Better drainage and root health than ground-level planting in clay soils.
- Con: Cedar beds last 10-15 years but will eventually need replacement.
We picked a few things that go well with this idea: Low Voltage Landscape Spotlights 2700K (6-Pack) (★4.5), SUNVIE 6W Landscape Spotlights (4-Pack) (★4.6) and Gardencoin 12V Landscape Spotlight (2-Pack) (★4.9). As an Amazon Associate we earn from qualifying purchases.
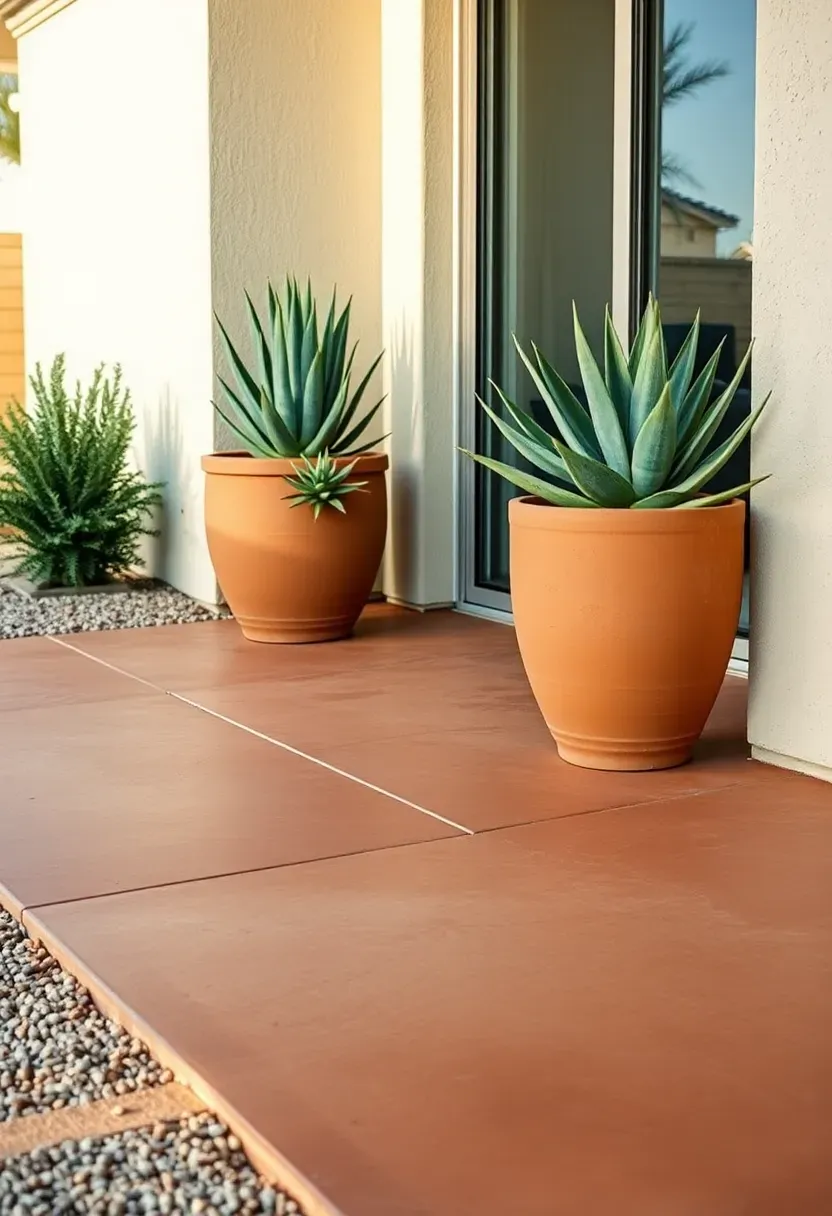
3. Stained Concrete Refresh
If your existing concrete is structurally sound but just looks ugly, acid staining or water-based concrete stain can change the color entirely for $0.30-$0.60 per square foot in materials. Clean the surface with a pressure washer first, let it dry for 48 hours, then apply the stain with a pump sprayer in two thin coats. Seal with a matte or satin concrete sealer afterward. The result mimics natural stone at a fraction of the cost. Warm terracotta and slate gray are the most forgiving colors for hiding minor surface imperfections.
Tips
- Test the stain on a hidden corner first — concrete absorbs stain unevenly depending on its age and previous treatments.
- Acid stains create chemical reactions with the concrete and produce variegated, marbled effects. Water-based stains give more uniform coverage.
- Reapply sealer every 2-3 years to maintain the color.
We picked a few things that go well with this idea: LOVE STORY Triangle Shade Sail (12ft) (★4.5), Shade&Beyond Permeable Triangle Sail (16ft) (★4.5) and SUNNY GUARD Triangle Shade Sail (16ft) (★4.6). As an Amazon Associate we earn from qualifying purchases.
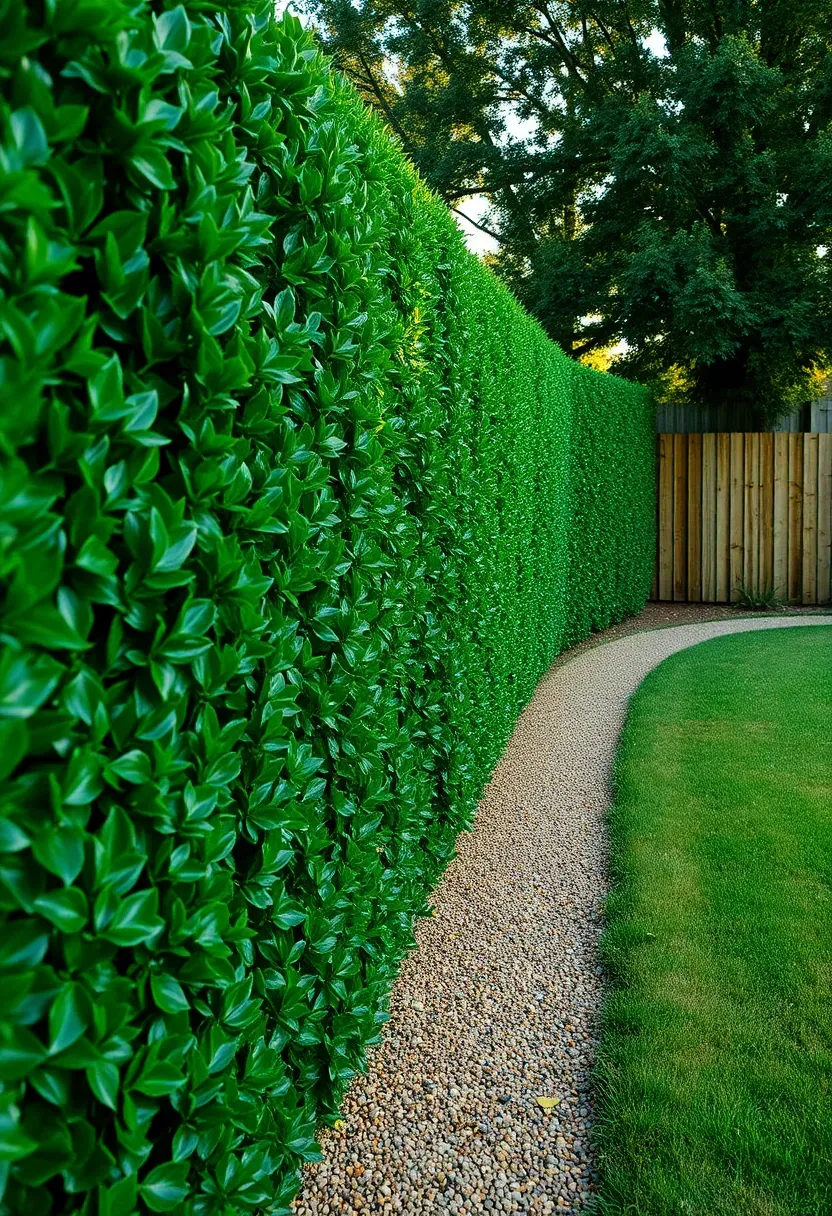
4. Privacy Hedge Wall
Privet vs. Arborvitae
Both create dense privacy screens, but they grow differently and suit different situations. Privet (Ligustrum) grows fast — 2-3 feet per year — and can be sheared into a formal wall within two seasons. It drops leaves in cold climates (USDA zones 4-6) but stays evergreen in zones 7+. Arborvitae (Thuja) grows 1-2 feet per year and stays green year-round in zones 3-7, but it has a softer, more natural silhouette that does not shear into crisp geometric shapes as well.
Choose Privet If
You want fast coverage and don't mind twice-yearly trimming. Plant 18 inches apart for a solid screen within 18 months.
Choose Arborvitae If
You need year-round green in a cold climate and prefer lower maintenance. Plant 3-4 feet apart and let them fill in naturally over 2-3 years.
Recommendation
For most backyard makeovers where speed matters, privet is the better pick. Buy 3-gallon container plants ($12-$18 each) rather than bare-root — they establish faster and give you a head start.
Recommended
Items for this idea
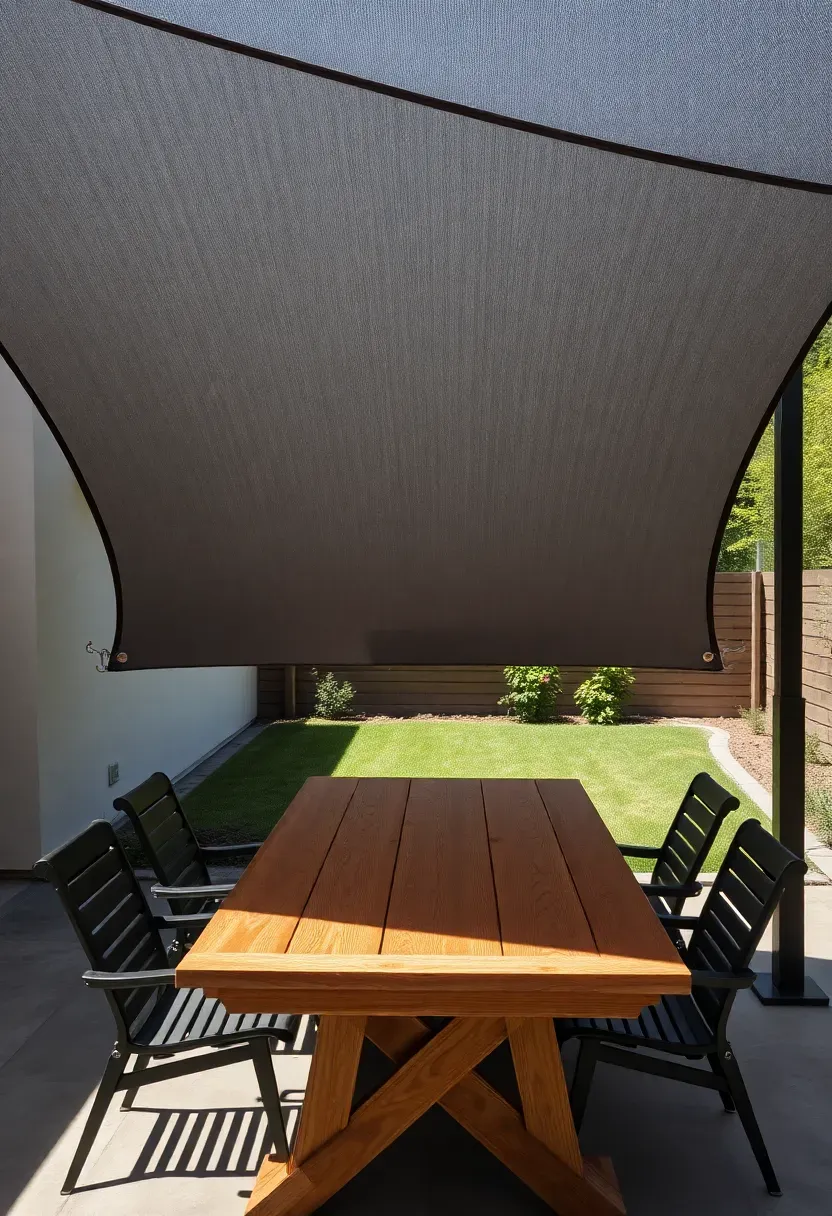
5. Shade Sail Installation
How to Install a Shade Sail
A shade sail turns an unusable sun-blasted patio into a comfortable outdoor room for $80-$250 depending on size and fabric quality.
Step 1: Pick Your Anchor Points
You need three or four fixed points — house walls, fence posts, or dedicated steel posts set in concrete. Measure the area and buy a sail 10-15% smaller than the span to ensure proper tension.
Step 2: Install Hardware
Screw stainless steel pad eyes or turnbuckles into each anchor point. For wood posts, use through-bolts rather than lag screws — they hold better under wind load. For masonry walls, use sleeve anchors rated for at least 200 pounds of pull-out force.
Step 3: Tension and Angle
Attach the sail and tighten the turnbuckles until the fabric is taut with no sagging in the center. Angle at least one corner lower than the others so rainwater runs off rather than pooling.
Watch Out
- Cheap polyester sails degrade in UV within one season. Spend the extra $30-$50 for HDPE knitted fabric — it lasts 5-8 years.
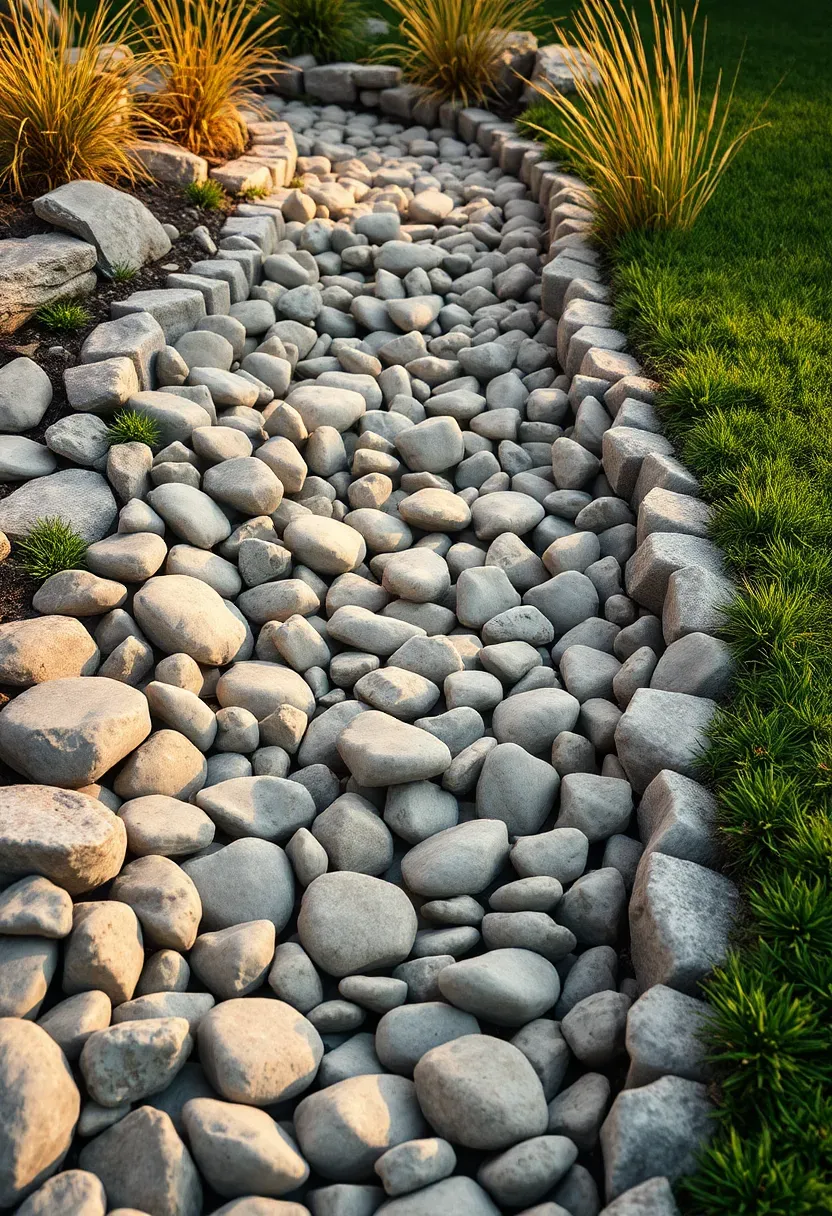
6. Dry Creek Bed Drainage Fix
Why Standing Water Ruins Backyards
Poor drainage kills grass, breeds mosquitoes, and makes entire sections of a yard unusable after rain. French drains work but require trenching and pipe — expensive and disruptive. A dry creek bed solves the same problem while adding a landscape feature that looks intentional even when it is bone dry.
How to Build It
Dig a shallow trench (6-8 inches deep, 18-24 inches wide) following the natural low point where water collects. Line with landscape fabric, then fill with a mix of river rock sizes — 3-6 inch stones along the edges, 1-2 inch gravel in the center channel. The trench should slope at least 1 inch per 10 feet toward your drainage exit point (a rain garden, storm drain, or the street).
Worth Knowing
- Plant native grasses or sedges along the banks to stabilize the edges and soften the look.
- A 30-foot dry creek bed costs about $200-$400 in materials if you do the digging yourself.
Recommended
Items for this idea
7. Built-In Bench Seating
Built-in benches do something freestanding furniture cannot: they define the edges of an outdoor room permanently. An L-shaped bench built from pressure-treated lumber or cedar costs $150-$400 in materials and seats 6-8 people without taking up the visual space that individual chairs do. Build the seat 17-18 inches high and 16-18 inches deep for comfortable sitting. If you add a hinged seat top, the interior becomes weatherproof storage for cushions, garden tools, or firewood. Anchor the bench to a patio surface or set the legs in concrete footings so it does not shift.
Tips
- Sand all surfaces to 120 grit and apply an exterior wood stain before assembly — it is much harder to reach every surface after the bench is built.
- Add 2-inch outdoor foam cushions with Sunbrella-type fabric covers to make the bench genuinely comfortable rather than just a place to perch.
- A built-in bench around a fire pit works especially well because nobody has to drag chairs.
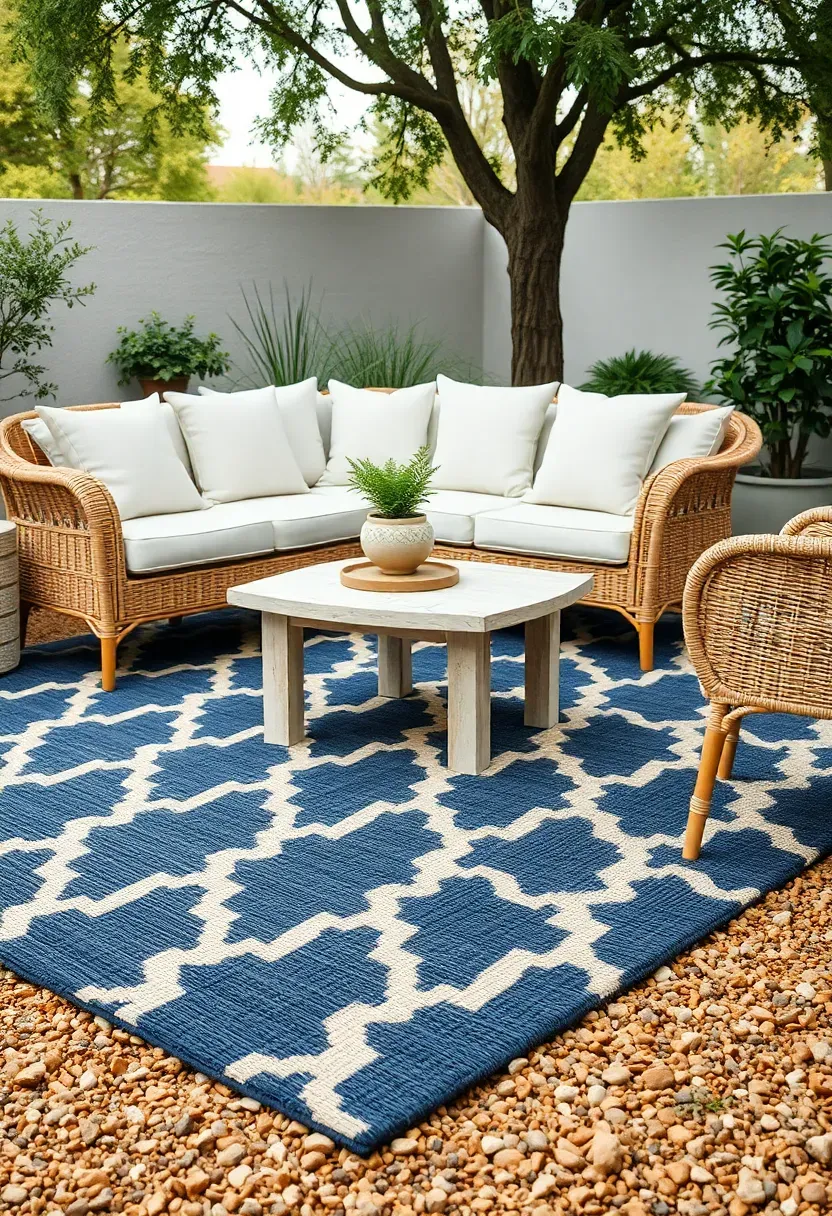
8. Outdoor Rug and Furniture Zone
This is the fastest backyard makeover idea on the list. Buy a 5x7 or 8x10 polypropylene outdoor rug ($40-$120), place it on any flat surface — concrete, gravel, even a level section of lawn — and arrange a small seating group on top. The rug visually anchors the furniture and creates a "room" where there was just empty yard. Polypropylene rugs handle rain, sun, and foot traffic. Hose them off when they get dirty. Pair the rug with a weather-resistant conversation set (two chairs plus a small table) and the space immediately reads as intentional.
Tips
- Secure the rug corners with landscape staples if it sits on grass or gravel — wind will flip it otherwise.
- Dark-colored rugs show less dirt but absorb more heat. In hot climates, go with lighter patterns.
- Replace the rug every 2-3 seasons when UV exposure fades the pattern.
Recommended
Items for this idea
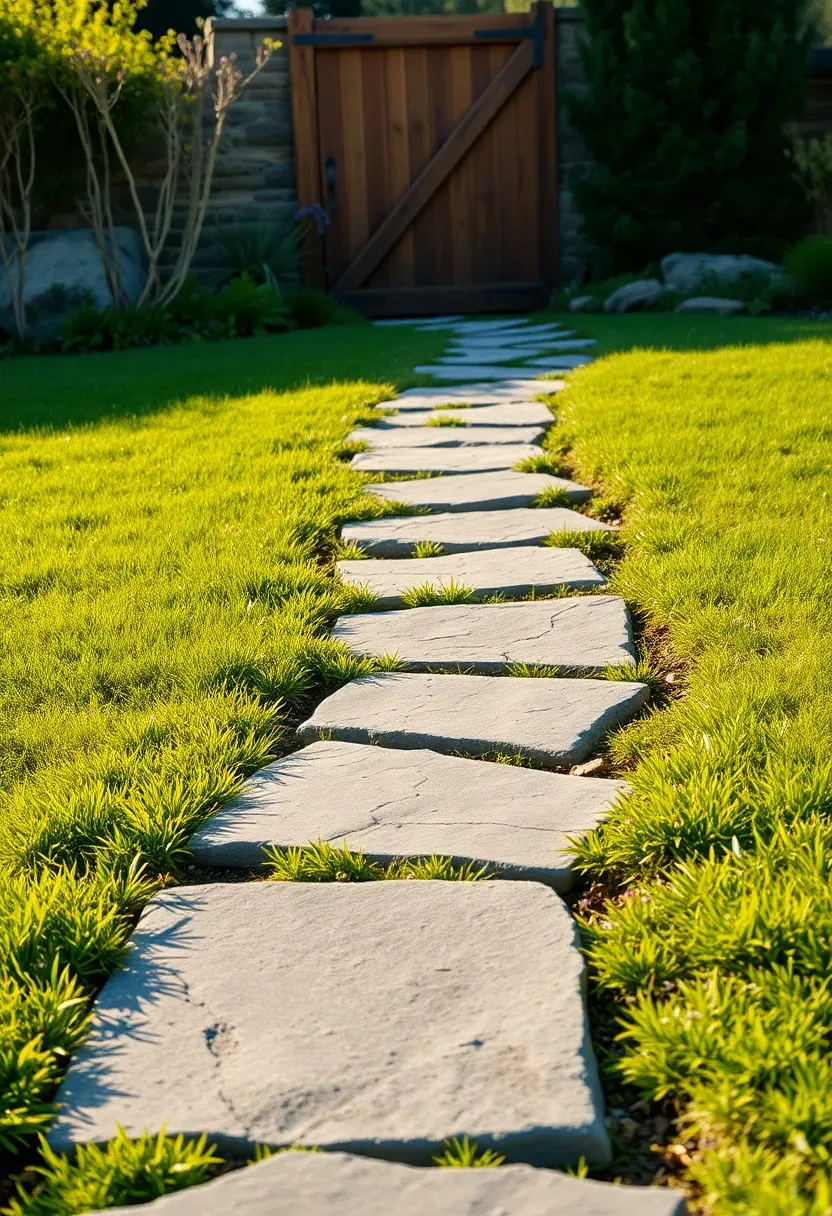
9. Stepping Stone Pathway
How to Lay a Stepping Stone Path
A pathway does two things simultaneously in a backyard makeover: it protects the lawn from foot traffic wear and it creates visual direction, pulling attention (and people) toward a destination — a garden, a seating area, a gate.
Step 1: Plan the Route
Walk your desired path naturally and mark each footfall with spray paint. Space stones 22-24 inches apart center-to-center to match a comfortable stride.
Step 2: Set the Stones
Cut around each mark with an edger or flat shovel, remove 2 inches of soil, add a 1-inch layer of coarse sand, and set the stone so its surface sits flush with or slightly above the surrounding lawn. This prevents mower blade damage.
Step 3: Fill Gaps
Pack soil around each stone and press grass seed or creeping thyme into the joints. Within 6-8 weeks, the path will look like it has been there for years.
Watch Out
- Irregular flagstone ($2-$5/piece at landscape yards) looks better than uniform concrete rounds — the natural shapes create more visual interest.
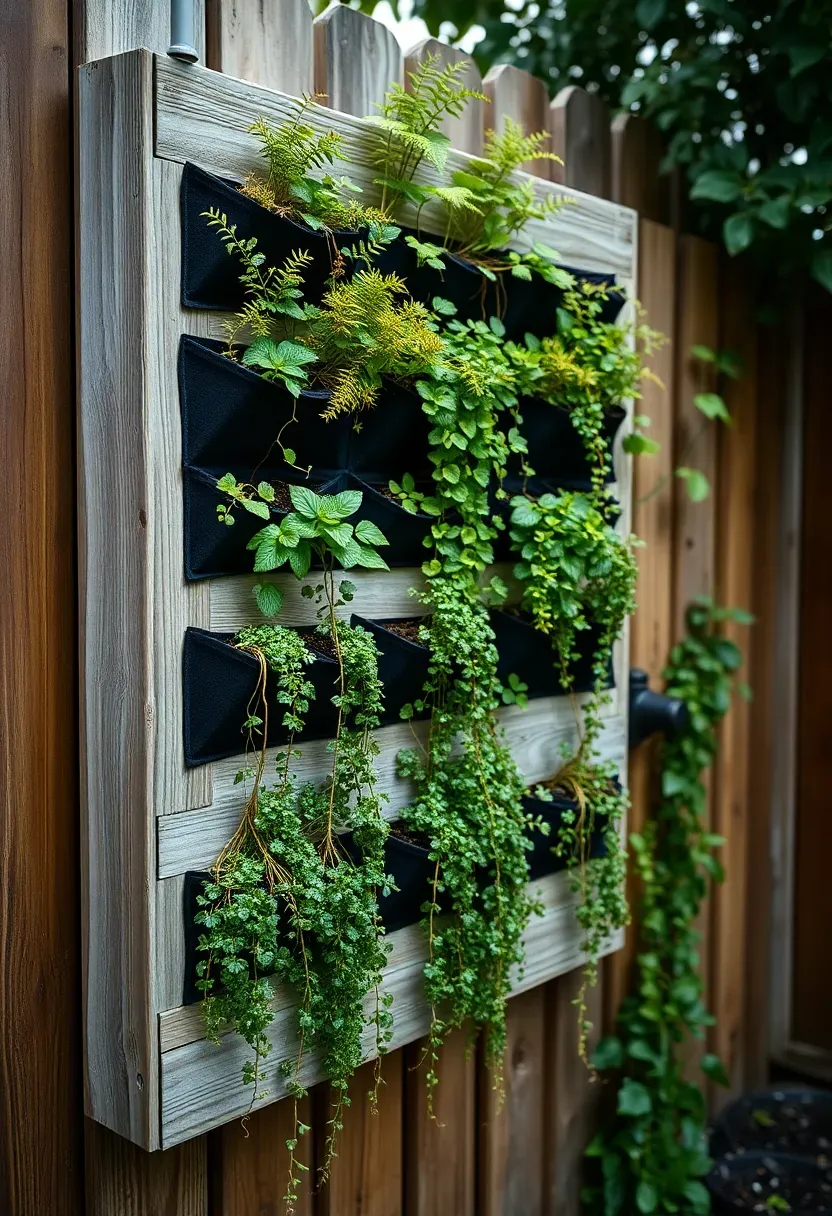
10. Vertical Garden Panel
A vertical garden panel turns a blank fence or wall into a green feature without taking up any ground space. This works especially well in small backyards where every square foot matters. Buy or build a 4x6-foot frame from cedar or reclaimed pallet wood, attach landscape fabric to the back, staple on horizontal pockets of burlap or felt planting strips, and fill with lightweight potting mix. Plant with trailing varieties — creeping jenny, string of pearls, small ferns, or herbs like thyme and oregano. Mount the panel on a fence with lag bolts. Total cost runs $50-$120 depending on materials.
Tips
- Install a drip irrigation line across the top of the panel — hand watering vertically is messy and uneven.
- Succulents do best on south-facing panels with full sun. Ferns and mosses prefer north or east-facing shade.
- The panel will weigh 40-60 pounds when saturated, so anchor it to fence posts, not just fence boards.
Recommended
Items for this idea
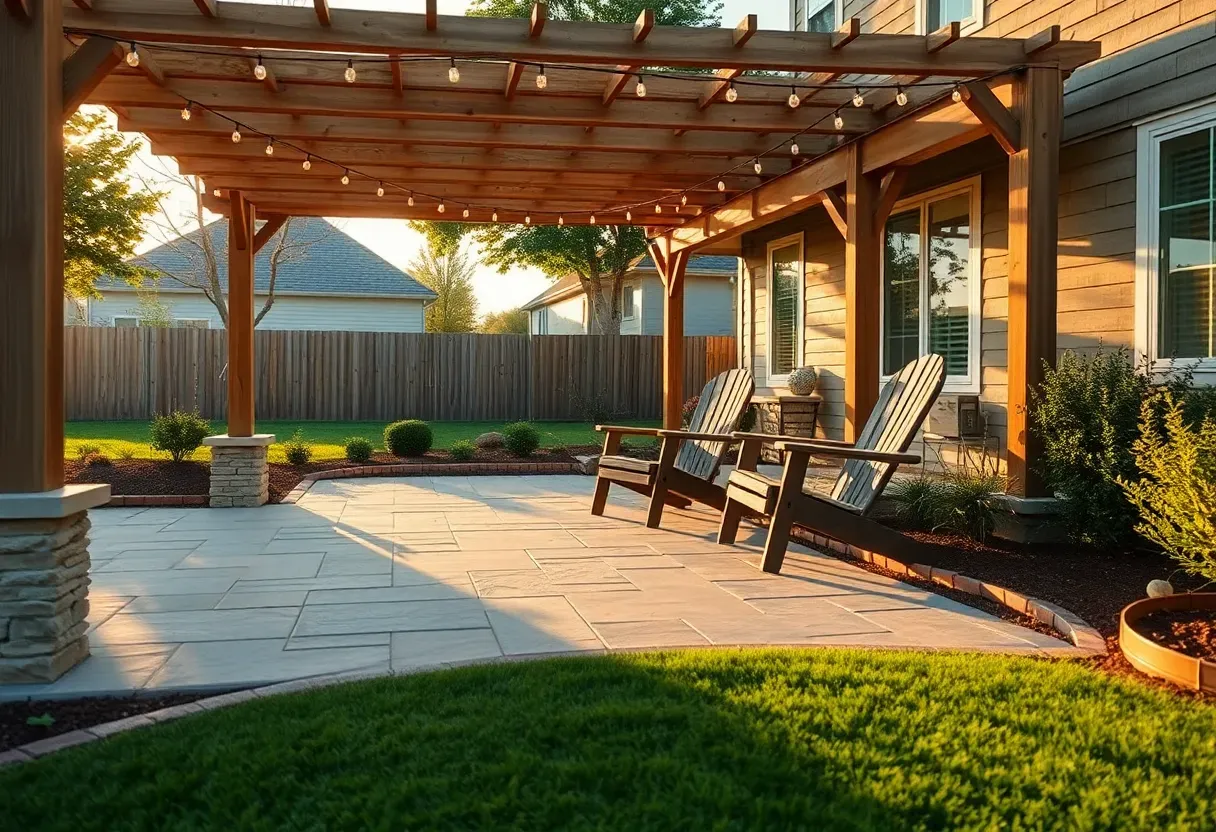
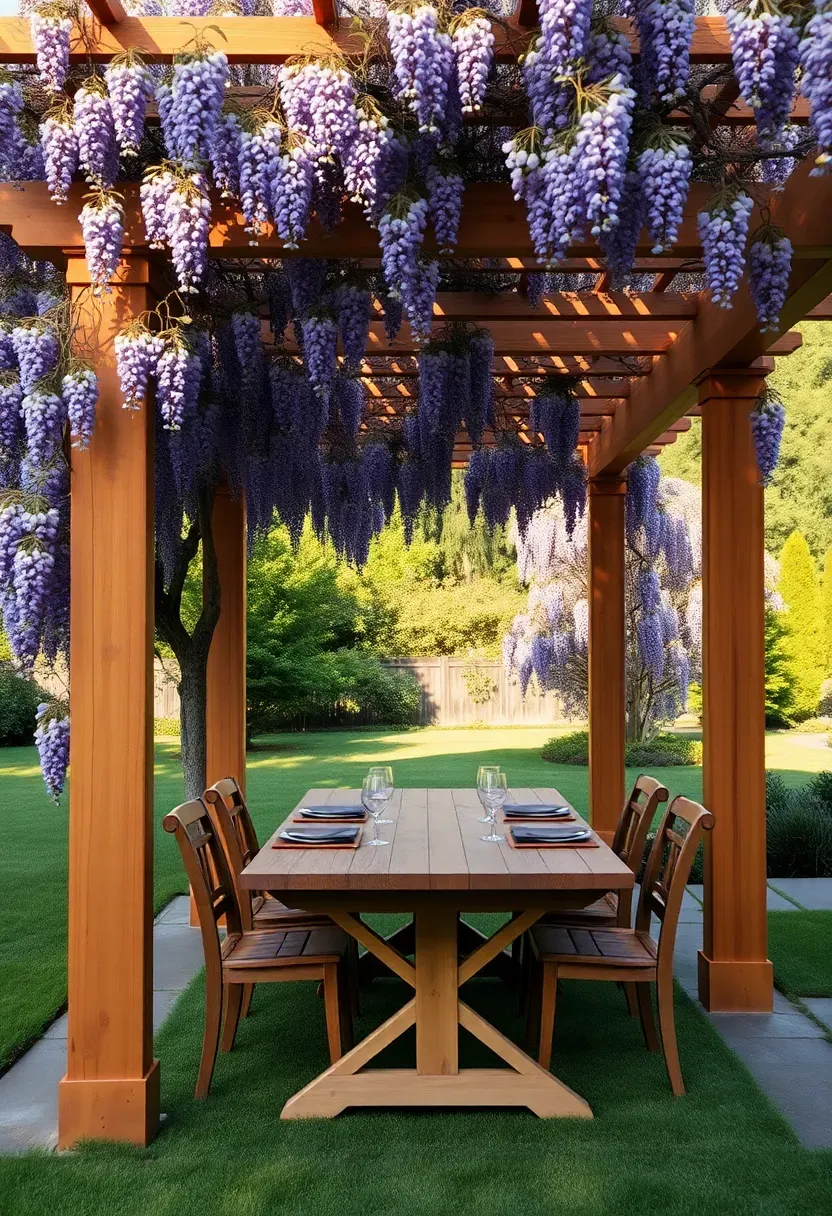
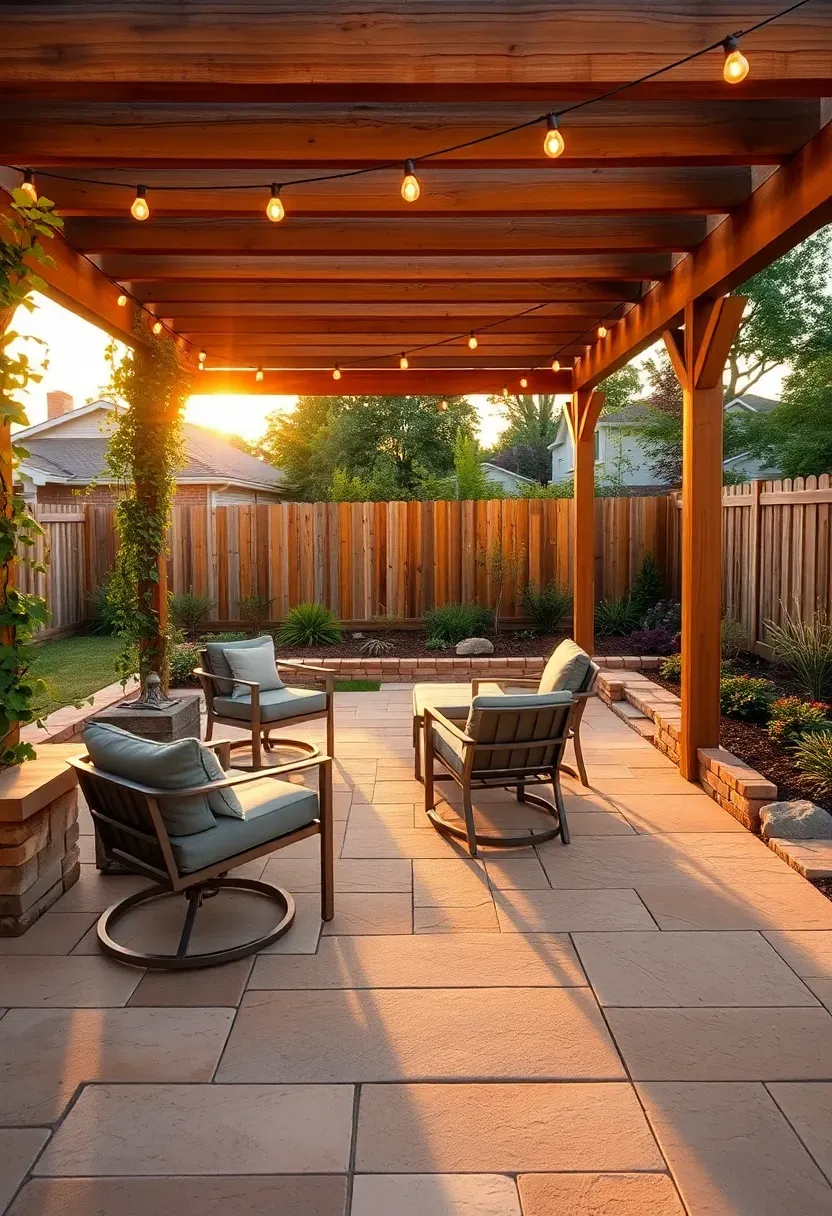
11. Cedar Pergola Build
A pergola is probably the single highest-impact addition you can make to a backyard. It defines an outdoor room with architectural weight that no amount of furniture rearranging can match. A basic 10x12-foot freestanding pergola uses four 6x6 posts, 2x8 beams, and 2x6 rafters — roughly $600-$1,200 in cedar lumber. Set the posts in concrete footings (12 inches diameter, 36 inches deep in most climates). The open-rafter design provides filtered shade and supports climbing plants like wisteria, jasmine, or grape vines that will eventually create a living canopy.
Tips
- Pre-stain all lumber before assembly. Cedar turns gray within 6 months without a UV-blocking finish.
- Notch the beams onto the posts with a half-lap joint rather than just bolting them to the sides — it looks more professional and creates a stronger connection.
- If you want full shade, add a retractable canopy or grow muscadine grapes across the rafters.
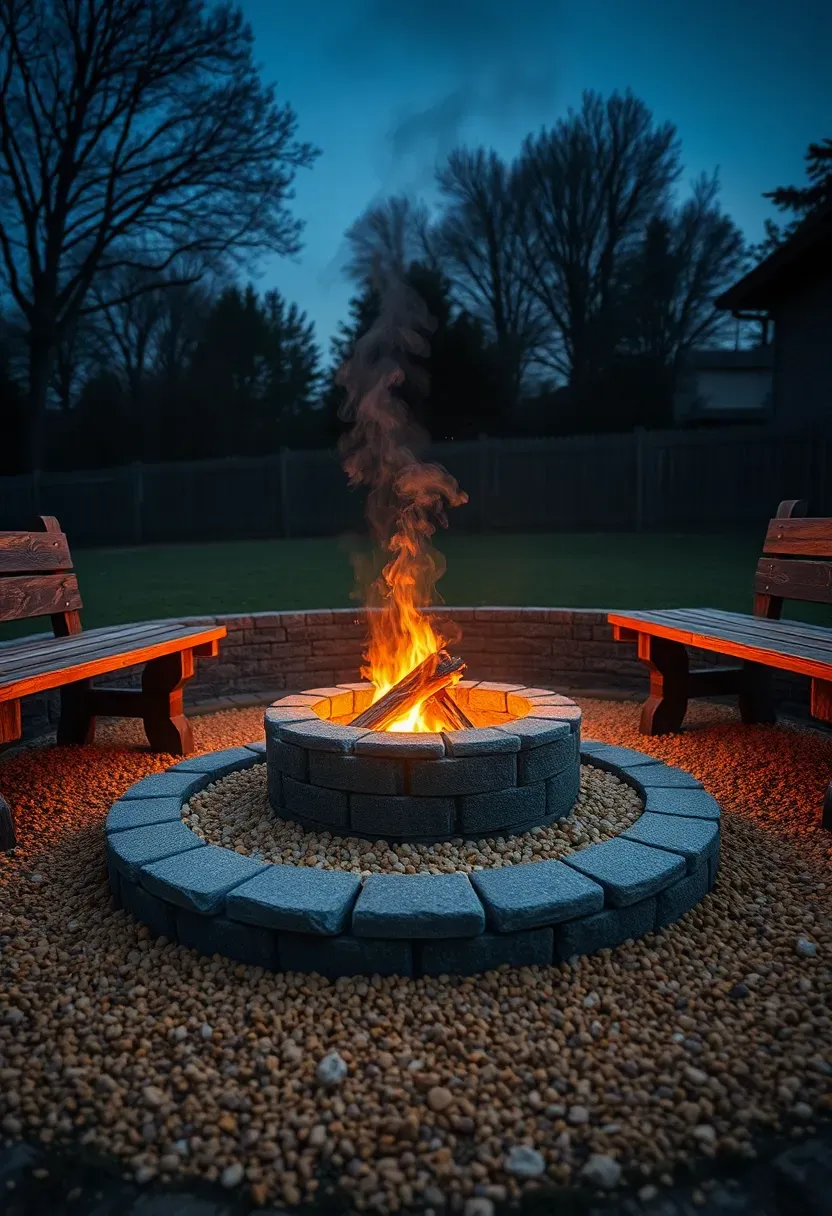
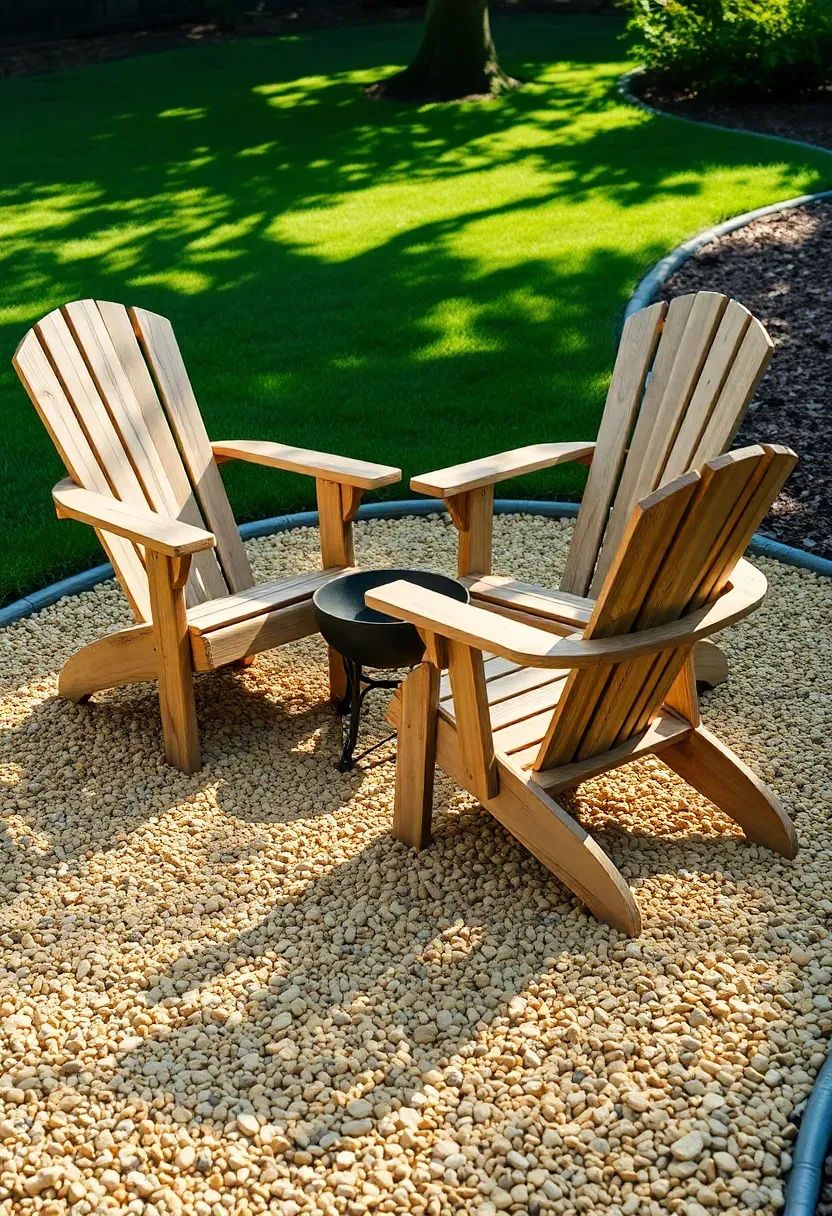
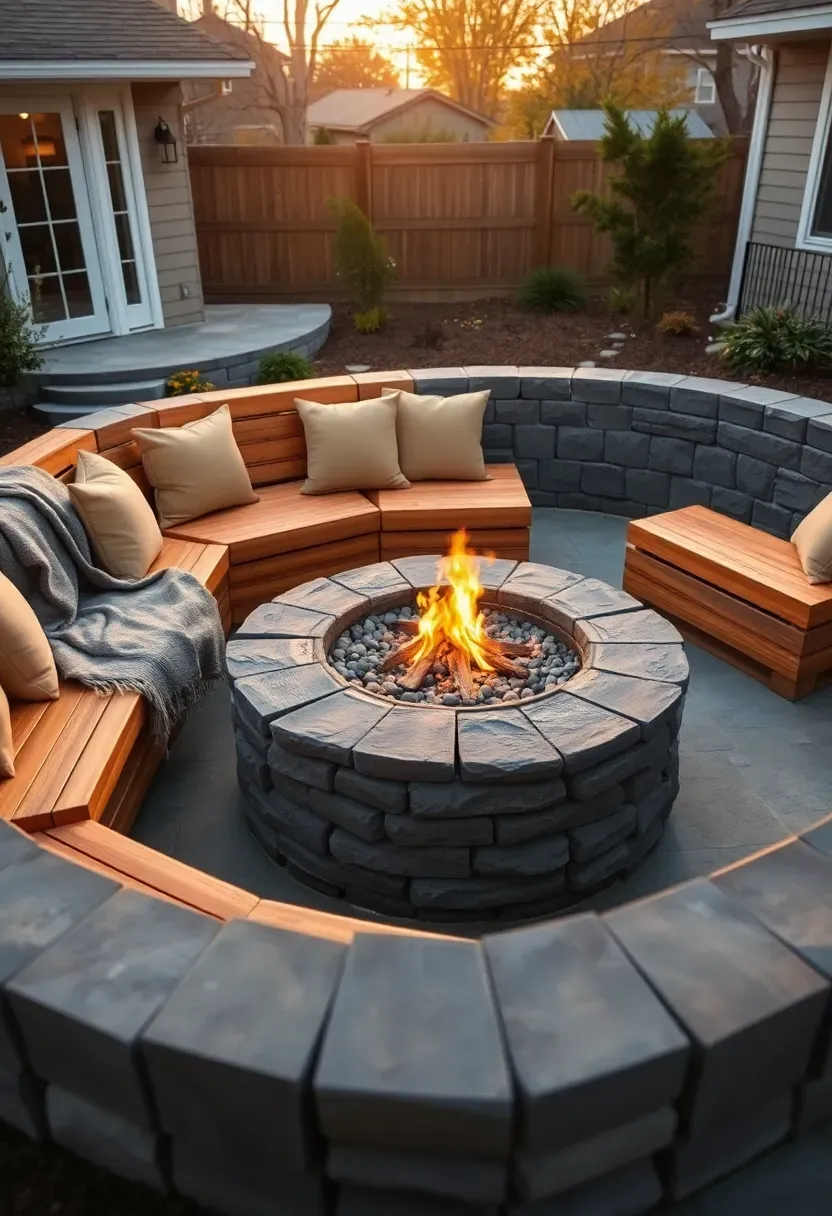
12. Fire Pit Gathering Area
The Problem
Backyards often lack a focal point — somewhere that pulls people together and gives the space a purpose after dark. Without one, the yard empties out at sunset.
The Solution
A ground-level fire pit built from dry-stacked retaining wall blocks creates that focal point for $150-$300 in materials. Dig a 42-inch diameter circle 6 inches deep, add 4 inches of pea gravel for drainage, then stack two or three courses of concrete retaining wall blocks (no mortar needed — gravity and friction hold them). Surround the pit with a 10-foot diameter ring of compacted gravel or flagstone so seating stays on solid ground rather than muddy grass.
Pros and Cons
- Pro: No permit needed in most jurisdictions for ground-level pits under 3 feet in diameter.
- Pro: Becomes the default gathering spot for every outdoor evening.
- Con: Smoke direction is unpredictable — someone always ends up in the plume. Positioning the pit where prevailing winds push smoke away from the main seating helps.
Recommended
Items for this idea
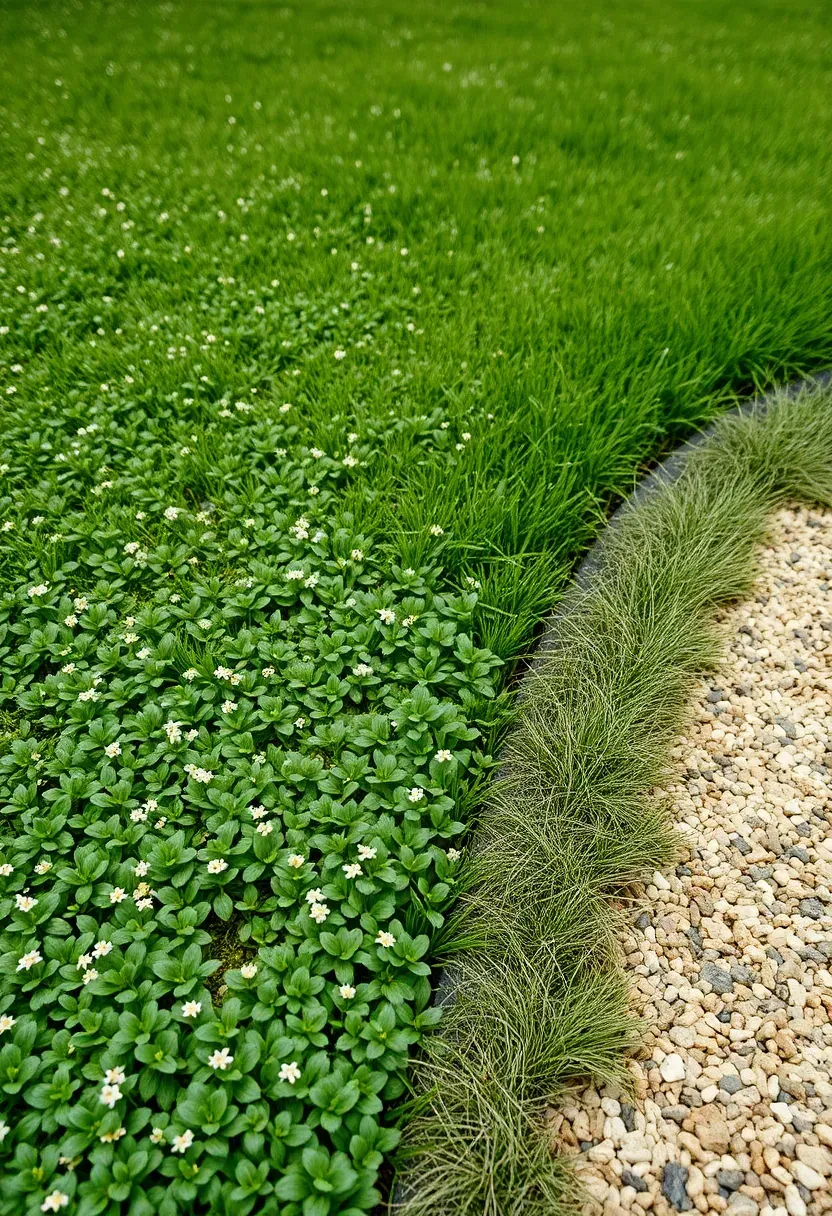
13. Sod-to-Clover Lawn Conversion
Micro-clover (Trifolium repens var. Pipolina) stays green with almost no watering, fixes its own nitrogen so you never fertilize, and grows 4-6 inches tall — which means mowing once a month instead of weekly. For a backyard makeover where you want less maintenance rather than more projects, overseeding your existing lawn with micro-clover is hard to beat. Mow existing grass short (1.5 inches), rake to expose soil, broadcast clover seed at 2 ounces per 1,000 square feet, and water lightly daily for two weeks. A 5-pound bag of micro-clover seed covers 4,000-5,000 square feet and costs $30-$50. Within two months, the clover fills in and begins crowding out weeds.
Tips
- Micro-clover does attract bees. If that is a concern, mow before it flowers (every 3-4 weeks in growing season).
- Mix clover seed with fine fescue for a more traditional lawn look that still requires less water and no fertilizer.
- Avoid applying broadleaf herbicides — they kill clover along with weeds.
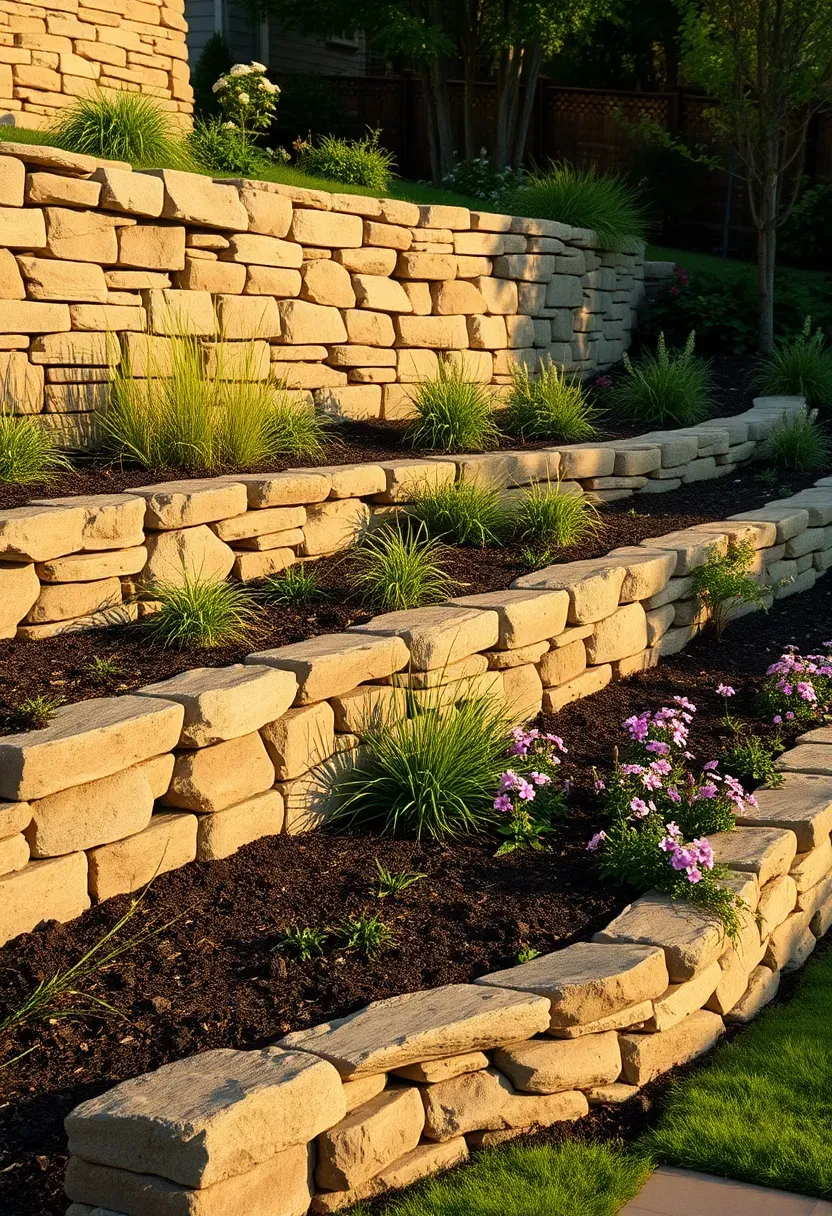
14. Retaining Wall Terracing
Origins of Terraced Landscapes
Terracing has been used for thousands of years in mountainous regions — from the rice paddies of the Philippines to the hillside vineyards of Italy's Cinque Terre. The principle is simple: turn a slope into a series of flat steps held in place by walls. Each terrace captures water and soil that would otherwise wash downhill.
Modern Backyard Application
In a residential backyard, a sloped yard that collects water at the bottom and erodes at the top can be converted into two or three level planting terraces using stackable concrete blocks or natural stone. Each wall should be no taller than 3 feet without engineering — above that, you likely need a permit and a structural plan. Budget $15-$25 per linear foot for materials on a wall 2 feet high.
How to Apply at Home
- Start from the bottom of the slope and work upward. Each terrace level should step back 6-12 inches from the wall below.
- Backfill behind each wall with gravel (not soil) for the first 12 inches to ensure drainage.
- Plant each terrace with ground covers or perennials that root deeply and hold the soil — daylilies, creeping phlox, or ornamental grasses.
Recommended
Items for this idea
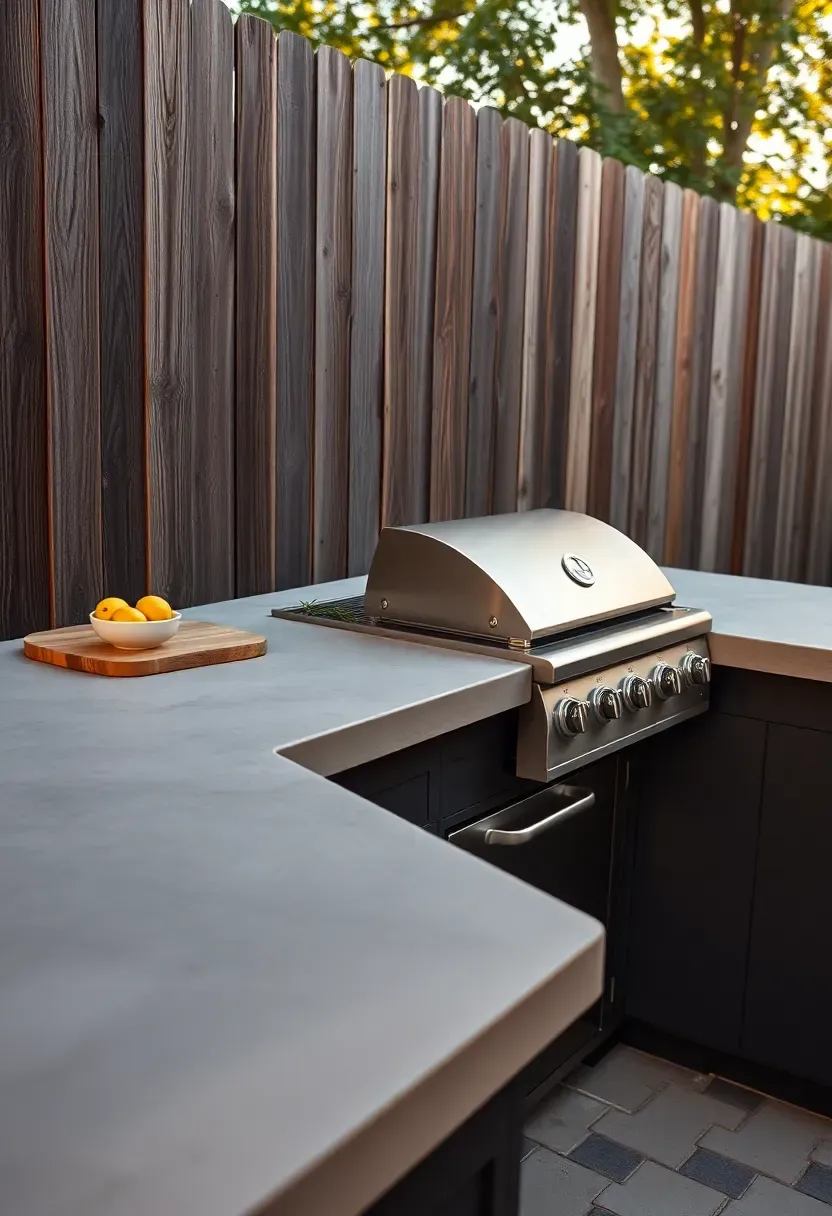
15. Outdoor Kitchen Counter
How to Build a Basic Outdoor Counter
You do not need a $15,000 custom outdoor kitchen to cook outside comfortably. A simple L-shaped counter with a built-in grill gives you prep space, cooking space, and a place for people to sit with a drink while you grill.
Step 1: Frame It
Build a frame from pressure-treated 2x4s and steel studs. The counter should be 36 inches high (standard kitchen height) and 24-26 inches deep. Sheathe the frame with cement board, not plywood — it handles moisture and heat.
Step 2: Surface It
Pour or install a concrete countertop. For DIY, build a melamine form, pour a 1.5-inch-thick countertop with fiber-reinforced concrete mix, and cure for 7 days. Or use outdoor-rated porcelain tiles on cement board. Both options handle weather and heat.
Step 3: Drop In the Grill
Most drop-in grills fit a standard cutout (28-34 inches wide). Frame the opening with steel angle iron for heat protection and set the grill on a noncombustible surface.
Watch Out
- Run a gas line professionally if you use a natural gas grill. Propane is cheaper to install but more expensive to operate long-term.
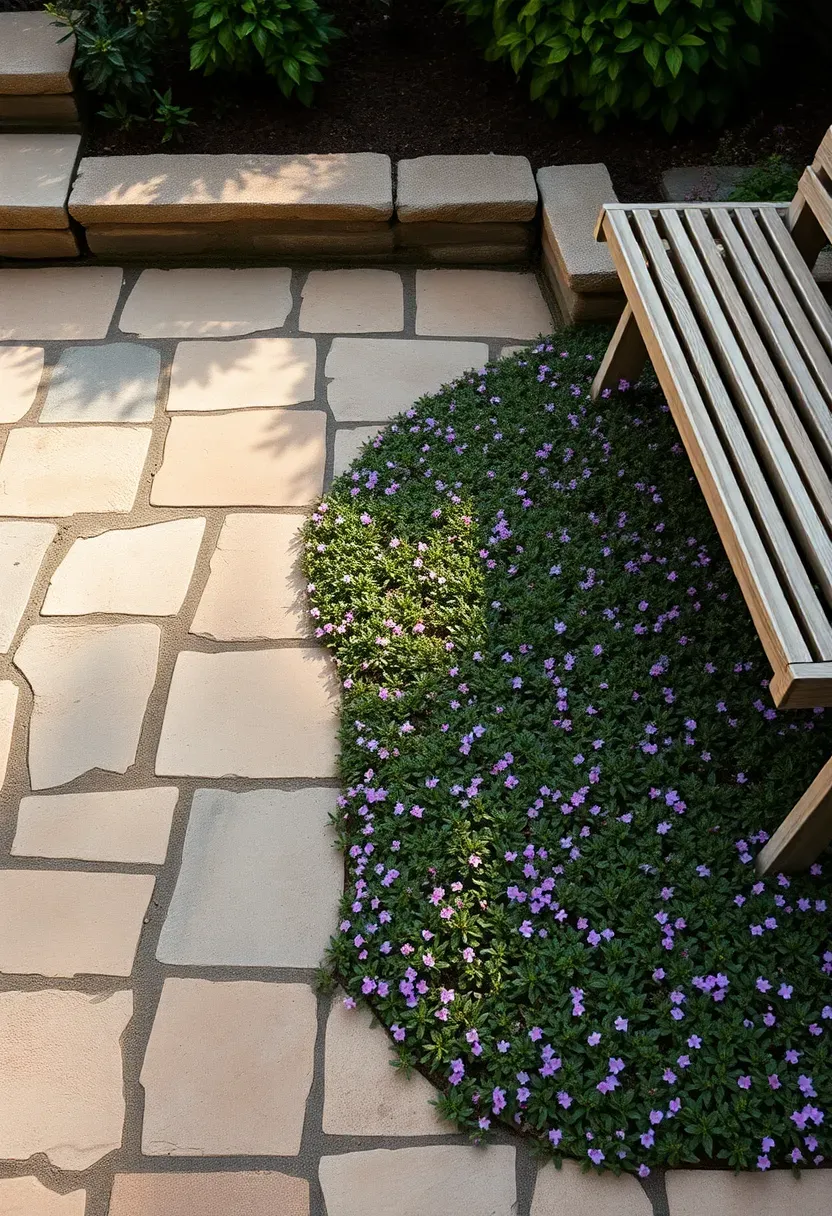
16. Flagstone Patio with Creeping Thyme
Flagstone set in a sand base with creeping thyme (Thymus serpyllum) filling the joints is one of the best-looking patio surfaces you can build, and it gets better every year as the thyme spreads and thickens. Unlike mortared stone, this dry-laid approach flexes with freeze-thaw cycles instead of cracking. Excavate 6 inches, lay 4 inches of compacted crushed stone base, add 1 inch of leveling sand, and set the flagstone pieces in a jigsaw pattern with 1-2 inch gaps between stones. Pack the joints with a 50/50 mix of sand and compost, then press thyme plugs into every joint.
Tips
- Buy flagstone by the pallet ($300-$600 per ton, covers about 80-120 square feet depending on thickness) rather than picking individual pieces — it is significantly cheaper.
- Red creeping thyme produces pink-purple flowers in summer and tolerates moderate foot traffic. Woolly thyme handles less traffic but spreads faster.
- Spray the joints with water daily for the first two weeks until the thyme roots establish.
Recommended
Items for this idea
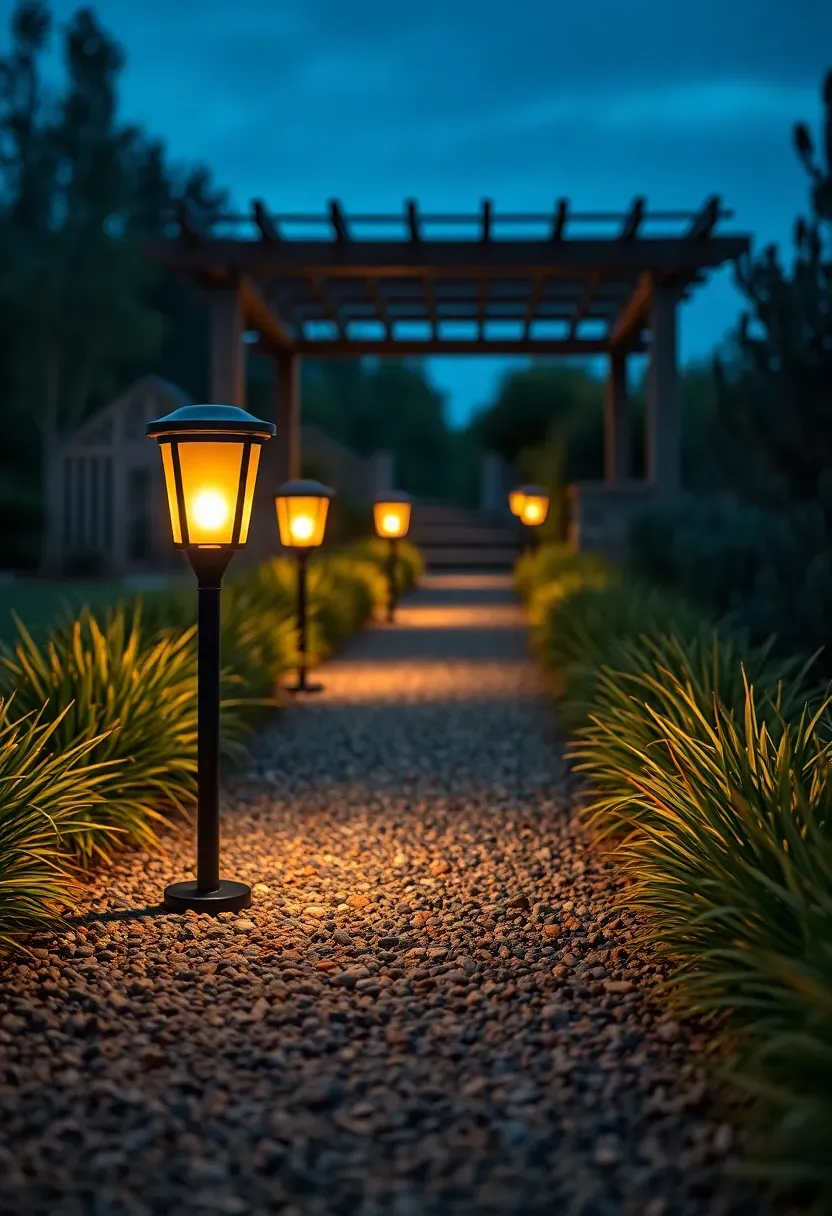
17. Low-Voltage Landscape Lighting
Low-voltage LED landscape lighting (12V systems) is safe enough to install without an electrician and draws so little power that running 10-15 fixtures costs about $2/month in electricity. A basic kit with a transformer, 100 feet of direct-burial cable, and 6-8 path lights runs $80-$150. Bury the cable 3-4 inches deep along pathways and garden edges, stake the fixtures every 6-8 feet, and plug the transformer into any outdoor GFCI outlet. The effect after dark is immediate — the yard goes from a black void to an inviting, layered space.
Tips
- Aim for warm white LEDs (2700K) — cooler temperatures look harsh and institutional in residential settings.
- Up-light one or two trees with well lights or bullet spots to add vertical dimension. A single up-lit tree changes the entire feel of the yard at night.
- Use a photocell or astronomical timer on the transformer so lights turn on at dusk automatically.
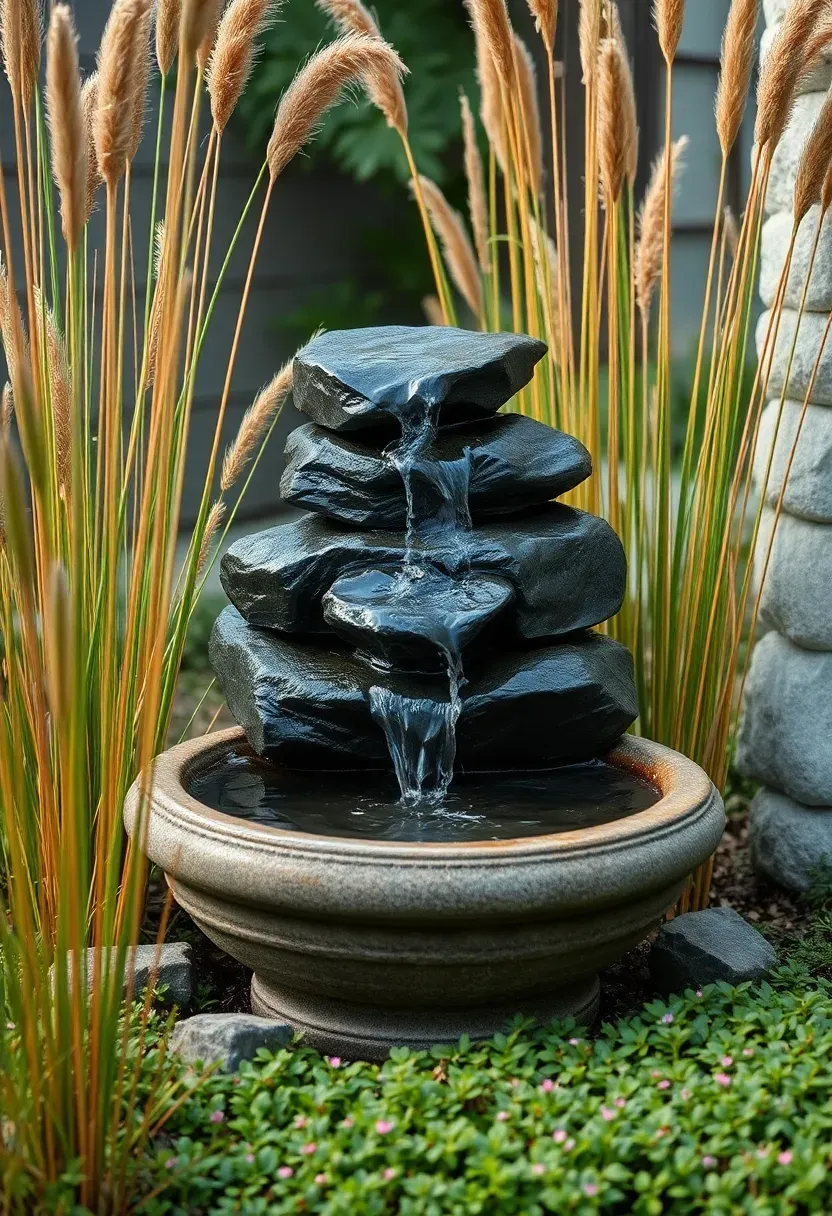
18. Water Feature Focal Point
Fountain vs. Pondless Waterfall
Both add the sound of moving water, which does something no other backyard element can — it masks traffic noise, neighbor conversations, and general urban hum. But they work differently.
Fountain
A self-contained recirculating fountain sits on a patio or in a garden bed. No plumbing connection needed — just fill the basin, plug in the pump, and the water cycles through. Costs $100-$500 for a stone or concrete model. Maintenance is minimal: top off evaporation weekly and clean the pump intake monthly.
Pondless Waterfall
A pondless waterfall recirculates water from a buried reservoir up through stacked rocks. No standing water means no mosquitoes, no algae problems, and no risk for small children. Installation is more involved — you dig a 3x3-foot basin, set a vault and pump, run tubing to the top of the rock stack, and arrange stones naturally. Materials run $300-$700 plus stone. The sound is more dramatic than a fountain because water falls a greater distance.
Choose Based On
Pick a fountain if you want something moveable and simple. Pick a pondless waterfall if you have a slope or corner that needs a permanent focal point with more presence.
Recommended
Items for this idea
19. Complete Hardscape and Softscape Overhaul
This is the whole-yard version. If you have the budget ($5,000-$25,000 depending on yard size and materials) and want to do everything at once rather than piecemeal, a full hardscape and softscape overhaul replaces patchy lawn, cracked concrete, and overgrown beds with a cohesive outdoor living space. Work in this order: demolition first (remove what you don't want), then grading and drainage, then hardscape (patios, walls, paths), then irrigation, then planting, then lighting. Doing it out of order means tearing up finished work to run pipes or fix drainage problems you should have solved earlier. Hire a landscape designer ($500-$1,500 for a plan) even if you do the labor yourself — the plan pays for itself by preventing expensive mistakes.
Tips
- Get three contractor bids if hiring out, and check that each bid covers the same scope. The cheapest bid often skips base preparation or drainage work.
- Phase the project over two or three weekends rather than trying to finish everything in one marathon push. Fatigue leads to sloppy work.
- Photograph the yard from multiple angles before you start — you will want the "before" shots later.
Quick FAQ
How much does a basic backyard makeover cost? A focused weekend project like a gravel patio swap or stepping stone pathway runs $200-$500 in materials. Mid-range projects like a pergola or fire pit area cost $500-$1,500. A full yard overhaul with professional help can reach $10,000-$25,000 depending on your region and yard size.
Which backyard makeover ideas add the most home value? Hardscaping (patios, retaining walls, outdoor kitchens) consistently returns 50-75% of its cost at resale according to multiple remodeling cost-vs-value reports. Mature landscaping and outdoor lighting also test well with buyers. Fire pits and pergolas are in the "desirable features" category on most real estate listing platforms now.
Can I do a backyard makeover in stages? Absolutely, and you probably should. Start with the infrastructure — grading, drainage, and one main hardscape surface. Add planting, lighting, and features over the following months. Piecemeal makeovers let you adjust the plan as you learn what you actually use and enjoy.
What is the fastest way to improve a backyard? An outdoor rug with a small furniture group creates a defined living space in under an hour. After that, adding landscape lighting is the next-biggest impact for the least effort — a 6-fixture path light kit installs in about two hours.
Do I need permits for backyard renovations? Generally not for ground-level projects under 30 inches high — patios, fire pits, garden beds, fences under 6 feet. Retaining walls over 3-4 feet, any structure with a roof (like a covered pavilion), electrical or gas line work, and anything affecting drainage toward neighboring properties will likely need permits. Check your local building department before starting.
A backyard makeover does not need to happen all at once. Pick the one idea from this list that would bother you most to leave undone, and start there. One finished project in the yard you actually use is worth more than a Pinterest board full of saved ideas. The best backyards I have seen were built over years — a patio one summer, a pergola the next, lighting the fall after that. Each layer made the space a little more livable until, at some point, the owners stopped going inside.
Pinterest cover for 19 Backyard Makeover Ideas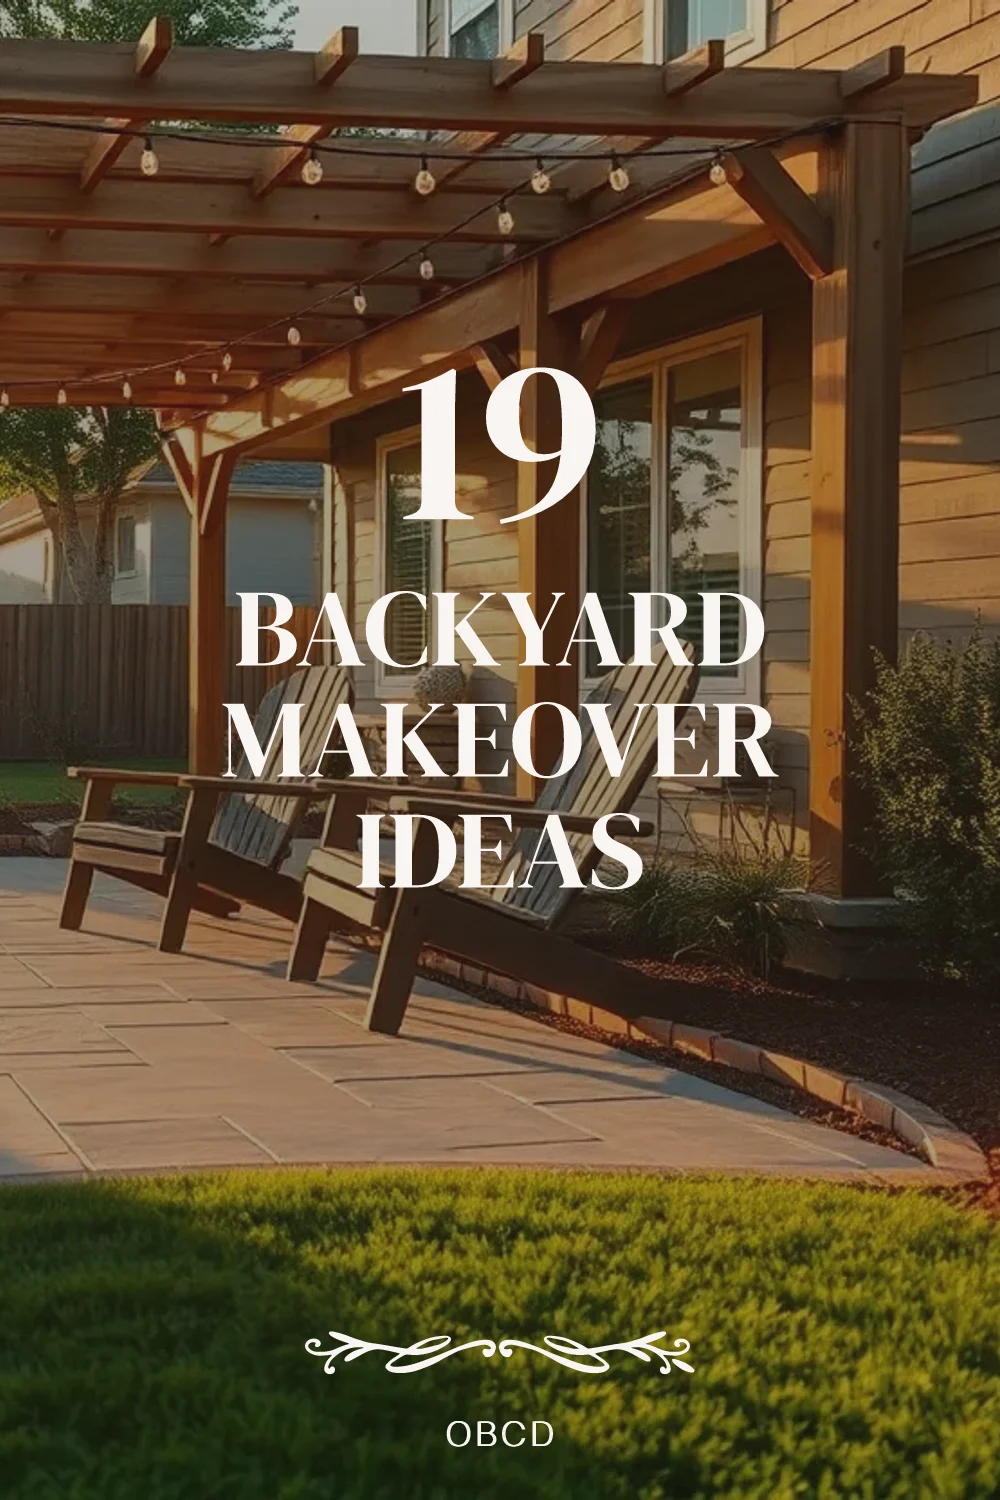
About the author
OBCD
CGI visualization and interior design content. We create detailed 3D renders and curate practical design ideas for every room in your home.