23 Backyard Lighting Ideas
My neighbor installed a single floodlight on his garage and called his backyard "done." The entire yard looked like a prison exercise area — flat white light, harsh shadows, zero atmosphere. Meanwhile, his wife sat inside because the glare made it impossible to relax outdoors. The problem is not whether you light your backyard. The problem is how. Good outdoor lighting works in layers: ambient glow for general visibility, task light where you cook or eat, and accent fixtures that pick out specific plants or architectural features. The 23 backyard lighting ideas here cover all three layers, from $12 solar stakes to $1,500 professionally installed moonlighting systems.
These ideas are organized by placement and purpose — overhead and string options, ground-level path lighting, accent and feature lighting, and technology-driven smart setups.
Table of Contents
- Draped Cafe Lights Between Trees
- Moonlighting From Canopy Height
- Low-Voltage Path Bollards
- Recessed Deck Stair Lights
- Fire Pit Perimeter Glow
- Solar-Powered Walkway Discs
- Pendant Lights Over Outdoor Dining
- Uplighting Mature Trees
- LED Strip Under Bench Seating
- Copper Lanterns on Shepherd Hooks
- Underwater Pond Lights
- Wall-Mounted Sconces on Fence Posts
- Globe String Lights on a Pergola
- Tiki Torches for Bug Control
- Ground Wash Lights Along Walls
- Solar Jar Cluster on a Table
- Smart Zoned Lighting System
- Fairy Lights in Shrubs
- Bollard Lights Flanking a Gate
- Candle Hurricanes on Stone Ledges
- Rope Lights Tracing a Garden Border
- Spotlight on a Water Feature
- Overhead Sail Light Canopy
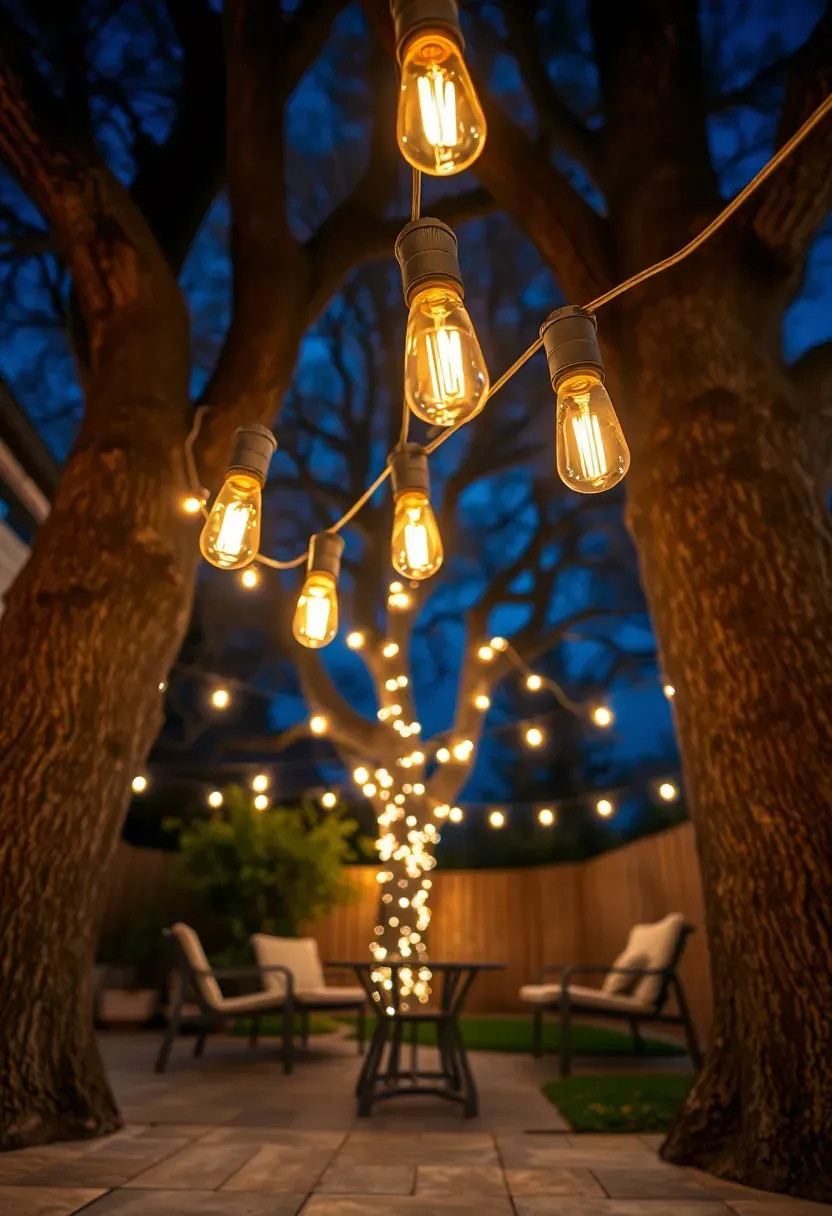
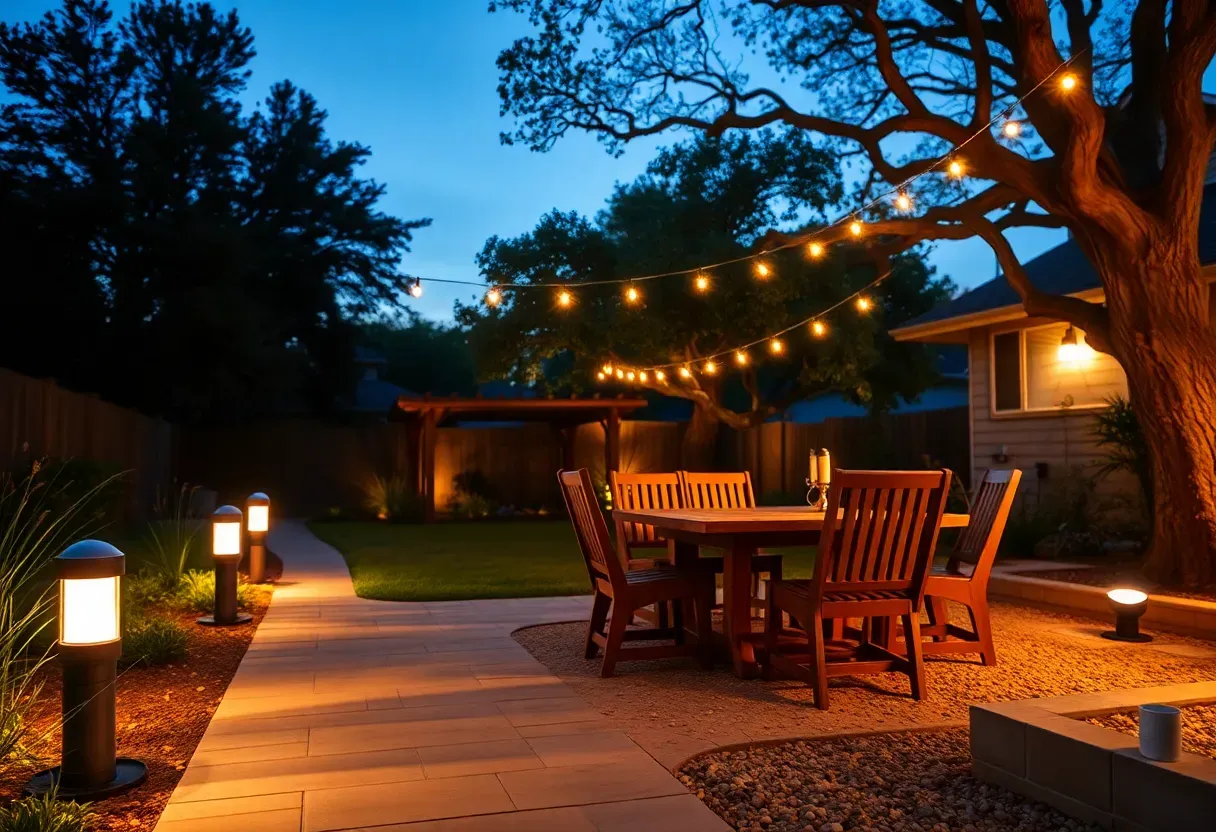
1. Draped Cafe Lights Between Trees
Cafe lights work because they sit at the intersection of decorative and functional. String them from tree trunk to tree trunk at about 10-12 feet high, with a gentle catenary sag in the middle. Use commercial-grade E26 sockets with shatterproof LED bulbs rated at 2200K — that warm amber sits close to candlelight without turning skin tones orange. The key to getting the drape right is to use aircraft cable as a support line first, then attach the light string to it with small carabiner clips every 3 feet. Without that cable, bulb weight pulls the string into a deep U-shape that looks sloppy and puts stress on the end connections. A single 100-foot run covers most suburban backyards.
Tips
- Wrap tree attachment points with rubber padding to prevent bark damage from wire tension
- Install an outdoor dimmer — full brightness works for cleanup, but 40% is better for dinner
- Shatterproof bulbs cost $2 more per bulb and save you from barefoot glass encounters
We picked a few things that go well with this idea: Svater 105FT Commercial Outdoor String Lights (★4.6), 100FT LED Patio String Lights Dimmable (★4.3) and Brightever 100FT Edison Patio Lights (52 Bulbs) (★4.6). As an Amazon Associate we earn from qualifying purchases.
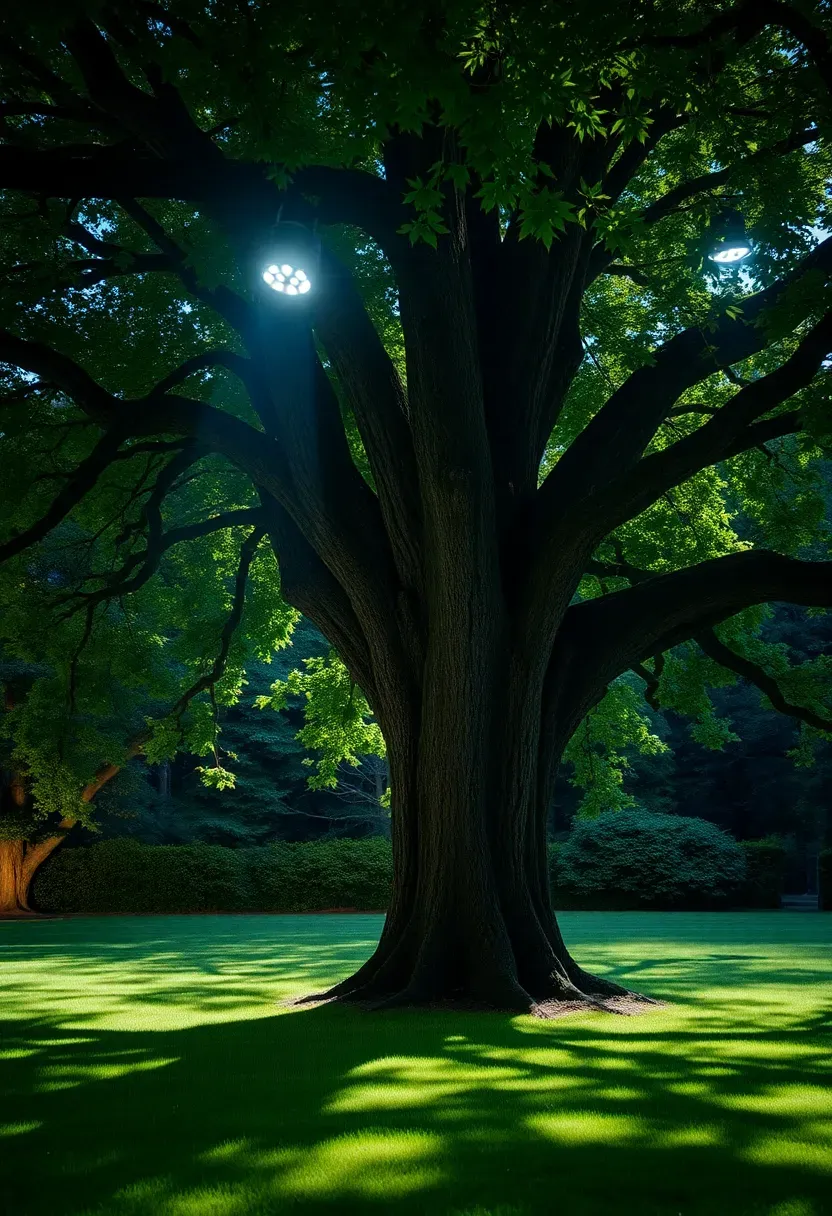
2. Moonlighting From Canopy Height
The issue
Ground-mounted uplights create drama but also produce blinding glare if you catch them at the wrong angle. Walking toward an uplight aimed at a tree means staring directly into the beam.
The fix
Moonlighting reverses the direction. Fixtures mount 20-30 feet up in the tree canopy, angled downward through branches and leaves. The result mimics actual moonlight — soft, dappled, and indirect. You get pools of light on the ground without any visible fixture from eye level. A certified arborist can install mounting brackets without harming the tree using non-invasive compression straps rather than screws into the trunk. Most setups use 3-5 fixtures per tree depending on canopy spread.
Pros and cons
- Pro: Most natural-looking outdoor lighting available — guests often cannot identify the source
- Pro: Illuminates large ground areas from a single tree, reducing total fixture count
- Con: Professional installation runs $400-$800 per tree including wiring, and fixtures need repositioning as branches grow
We picked a few things that go well with this idea: DERAYSION Solar Pathway Lights (12-Pack) (★4.4), Mancra Glass Metal Solar Path Lights (8-Pack) (★4.5) and Greluna 3000K Solar Pathway Lights (12-Pack) (★4.3). As an Amazon Associate we earn from qualifying purchases.
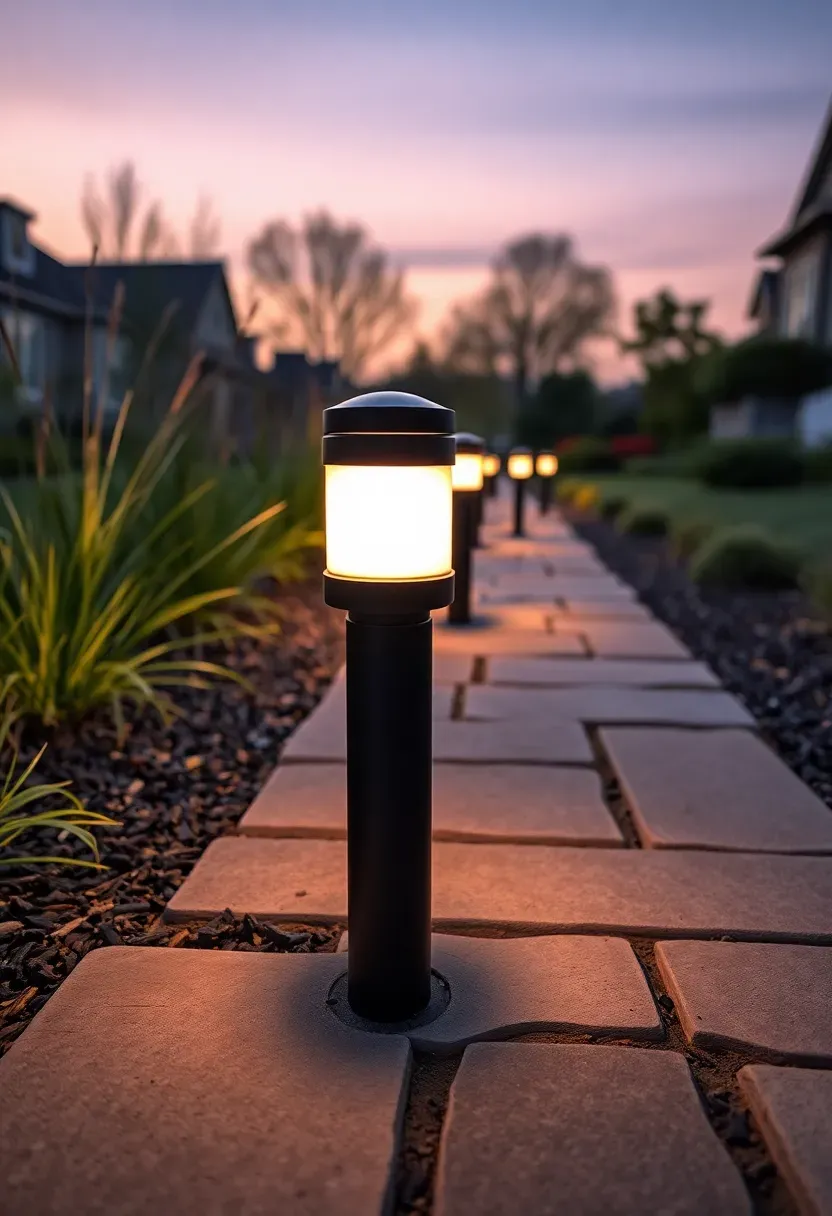
3. Low-Voltage Path Bollards
Path bollard lights stand 18-24 inches tall and cast a pool of light 4-6 feet in diameter. Unlike mushroom-cap path lights that direct all illumination downward in a tight circle, bollards with frosted lenses spread light laterally across the walking surface. Space them 8-10 feet apart on alternating sides of the path — staggered placement gives more uniform coverage than lining them up in parallel rows. Low-voltage (12V) systems use a single transformer plugged into a GFCI outlet, with direct-burial cable connecting each fixture in a daisy chain. The whole run draws less power than a single 60-watt incandescent bulb. Black or bronze finishes disappear during the day better than stainless steel, which catches sun glare.
Tips
- Bury cable 6 inches deep in a shallow trench with landscape fabric over it to prevent accidental shovel strikes
- Place the transformer near the house where you can access the timer without walking outside
- Clean frosted lenses once a season with warm soapy water — mineral deposits from irrigation cut output by 30%
We picked a few things that go well with this idea: REEGOLD 7W Low Voltage Landscape Spotlights (6-Pack) (★4.5), SUNVIE 6W Landscape Spotlights (4-Pack) (★4.6) and Gardencoin 12V Aluminum Landscape Spotlight (2-Pack) (★4.9). As an Amazon Associate we earn from qualifying purchases.
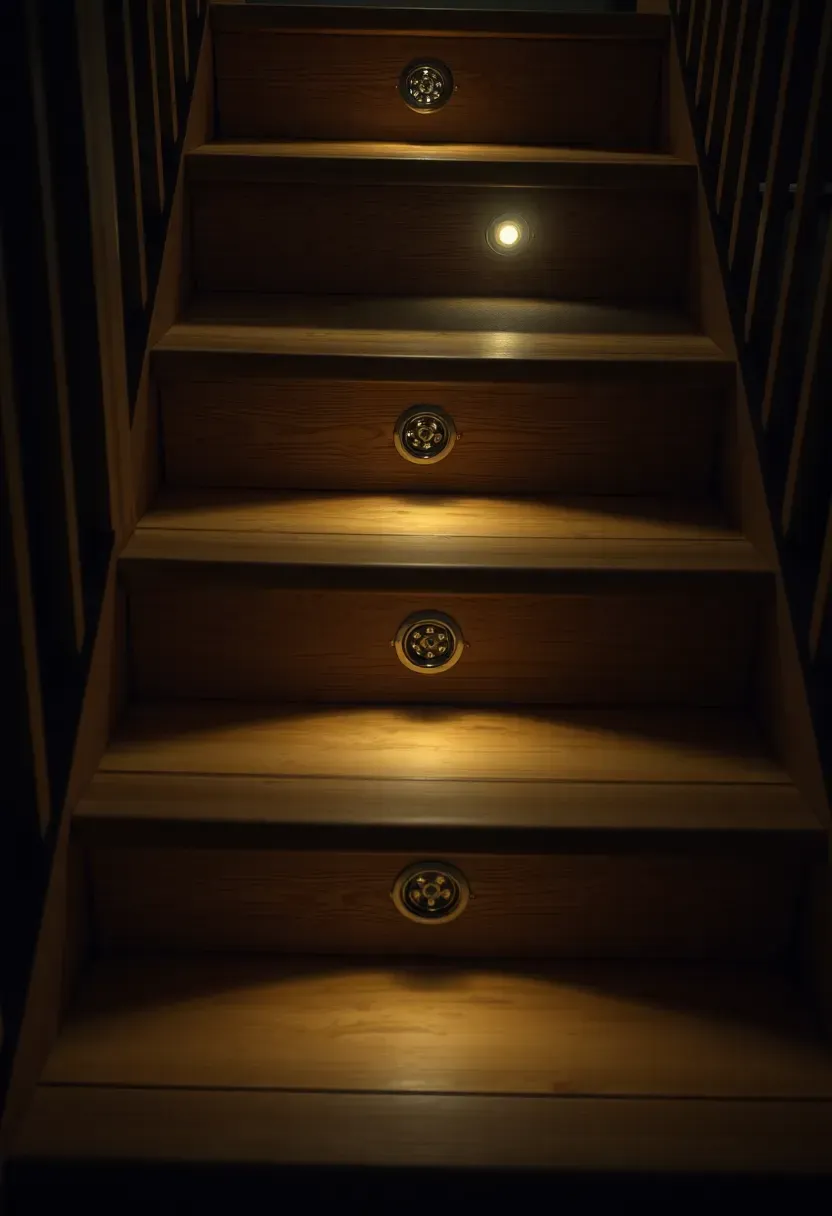
4. Recessed Deck Stair Lights
Step 1: Choose fixture size
Measure your stair riser height. Most deck stairs have 7-inch risers, which fit a standard 3-inch round recessed LED. If your risers are shorter, rectangular louvered fixtures at 1.5 inches tall work without cutting into the tread above.
Step 2: Cut and install
Drill a hole saw opening in the center of each riser board. Feed the low-voltage wire behind the riser, connect the fixture with waterproof connectors, and press-fit into the hole. Stainless steel friction clips hold the fixture in place.
Step 3: Wire to transformer
Run all connections back to a 12V magnetic transformer mounted under the deck or in a nearby weatherproof box. Add a photocell so the stair lights activate automatically at dusk.
Watch out
- Never install lights in the tread surface — foot traffic and moisture will destroy them within one season
- Use amber or warm white (2700K) to preserve your night vision on the stairs rather than bright white
Recommended
Items for this idea
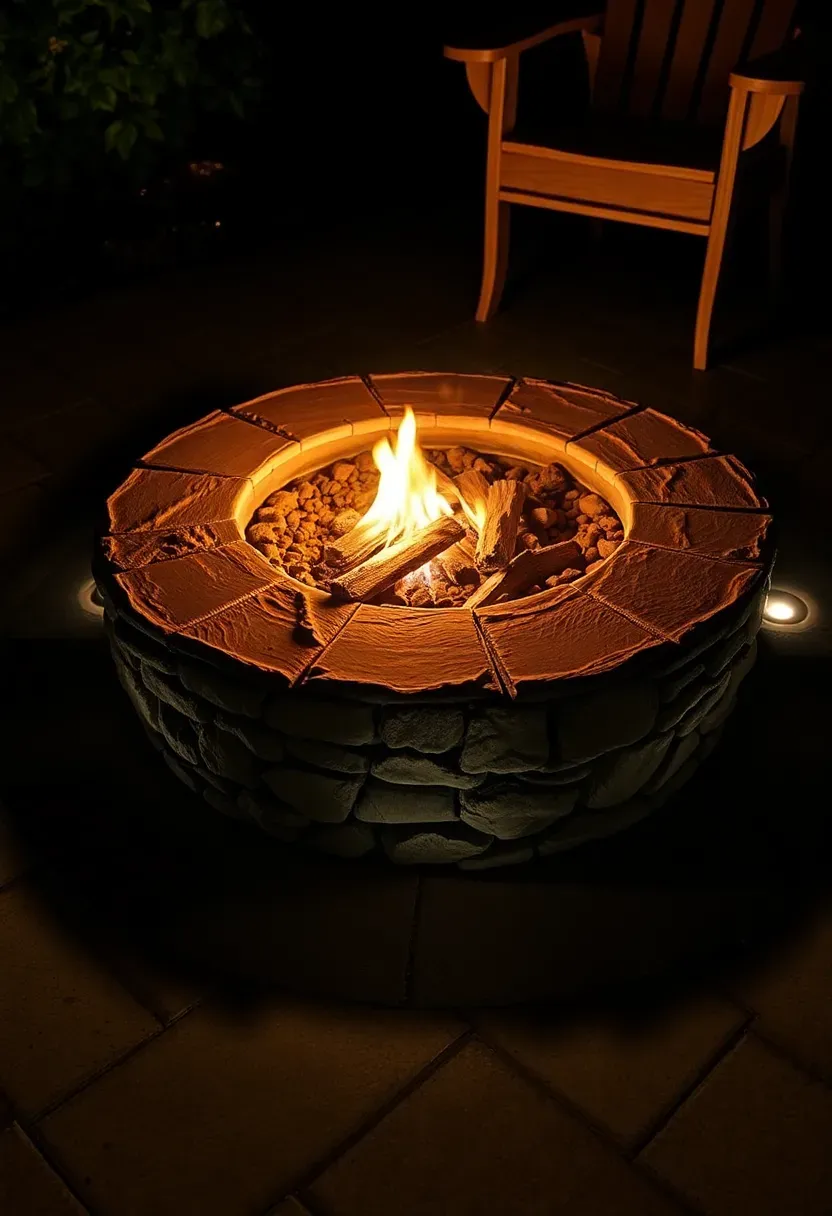
5. Fire Pit Perimeter Glow
A fire pit already provides light, but only intermittently and only when the fire is burning. Recessed in-ground LED pucks installed in a ring 18 inches outside the fire pit edge give consistent ambient light to the seating area regardless of flame height. Set them flush with the patio surface using concrete-rated housings — the same fixtures used in commercial driveways, rated for vehicle weight. Wire them on a separate circuit from other yard lights so you can run them independently. When the fire is roaring, dim them to 15% so they do not compete with the flames. On nights when you skip the fire entirely, bring them up to full brightness to define the gathering space. The warm 2700K color temperature matches firelight closely enough that the two sources blend rather than clash.
Tips
- Install at least 6 pucks in the ring for even coverage — fewer creates dark gaps between seats
- Angle each puck slightly outward to wash light across the seating surface rather than straight up
- Silicone-sealed lenses handle radiant heat from the fire pit without cracking
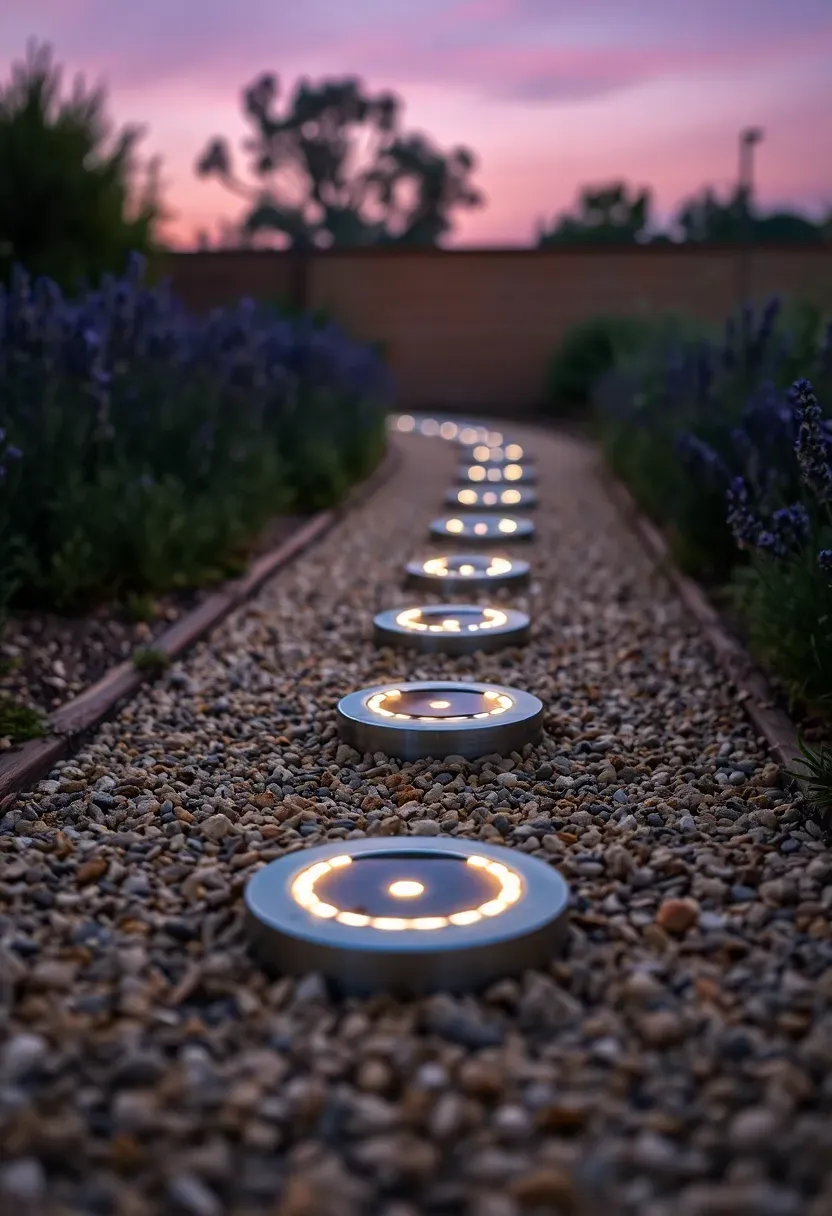
6. Solar-Powered Walkway Discs
These flat discs sit flush with the ground surface — no post, no stake, no trip hazard. Each disc contains a small solar panel on top, a lithium battery, and a ring of LEDs around the perimeter that cast light outward across the path. They work especially well in gravel or decomposed granite paths where you can nestle them into the surface material. In paved paths, some models come with adhesive backing rated for concrete. Expect 8-10 hours of runtime on a full charge in summer, dropping to 5-6 hours in winter when sun exposure is shorter. The flat profile means lawn mowers pass right over them in adjacent grass without damage, which is something that post-style solar lights cannot survive.
Tips
- Place them every 5 feet in straight sections and every 3 feet through curves where footing is less predictable
- Clean the solar panel surface monthly — a thin film of pollen or dust cuts charging efficiency in half
- Avoid placing under dense tree canopy where they receive less than 4 hours of direct sun
Recommended
Items for this idea
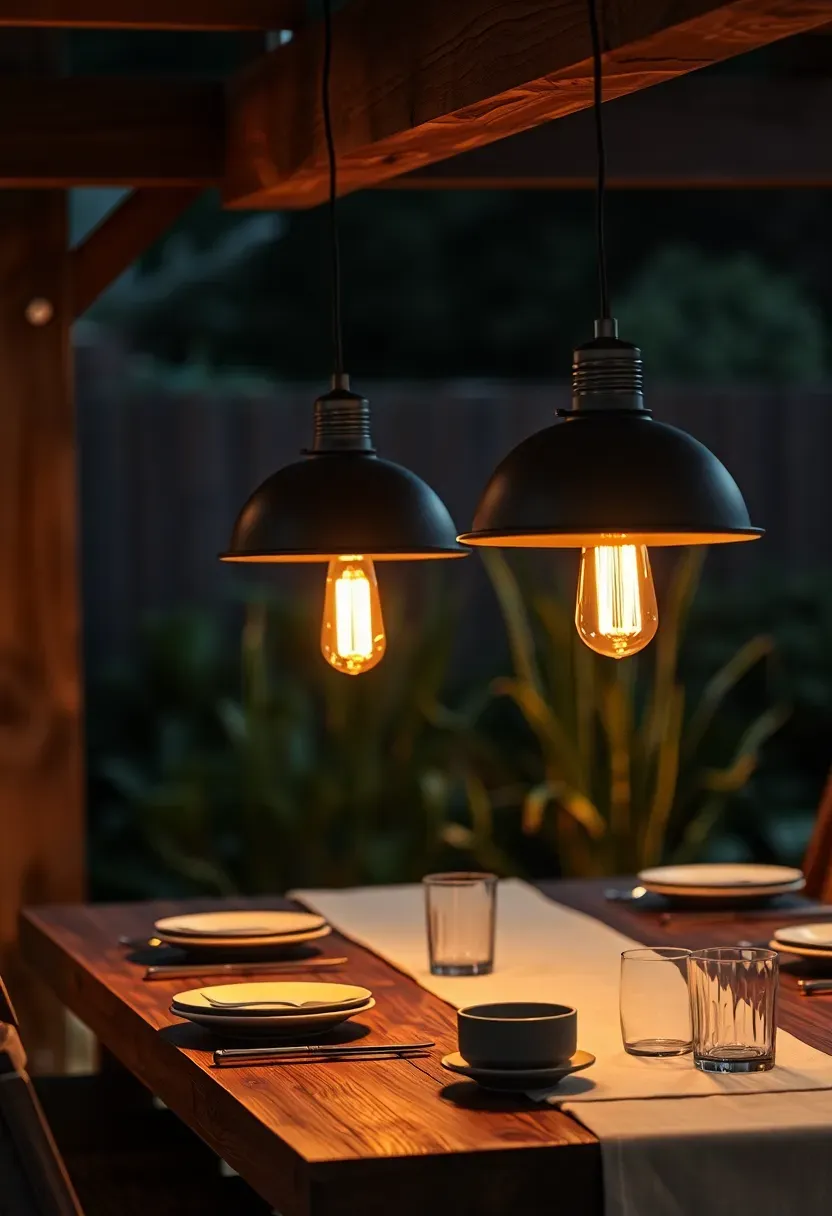
7. Pendant Lights Over Outdoor Dining
Pendant fixtures hung 30-36 inches above the table surface put light exactly where food needs to be visible without illuminating your face from below (the flashlight-under-chin effect). For outdoor use, choose fixtures with an IP44 rating minimum and metal or resin shades — fabric and paper will not last through one rainy week. Mount them from a pergola beam, a dedicated overhead cable, or a freestanding arch if you do not have permanent structure above the table. Two pendants over a 6-foot table provide better coverage than a single centered fixture. Use 2700K-3000K bulbs at 600-800 lumens each — bright enough to see your plate clearly without making the space feel like a showroom.
Tips
- Secure pendant cords with strain relief clamps at the ceiling mount to prevent wind from swinging them into the table
- Swap to vintage-style Edison LED bulbs for visible filament glow that doubles as decorative lighting
- Connect to a weatherproof dimmer so you can shift from food prep brightness to after-dinner atmosphere
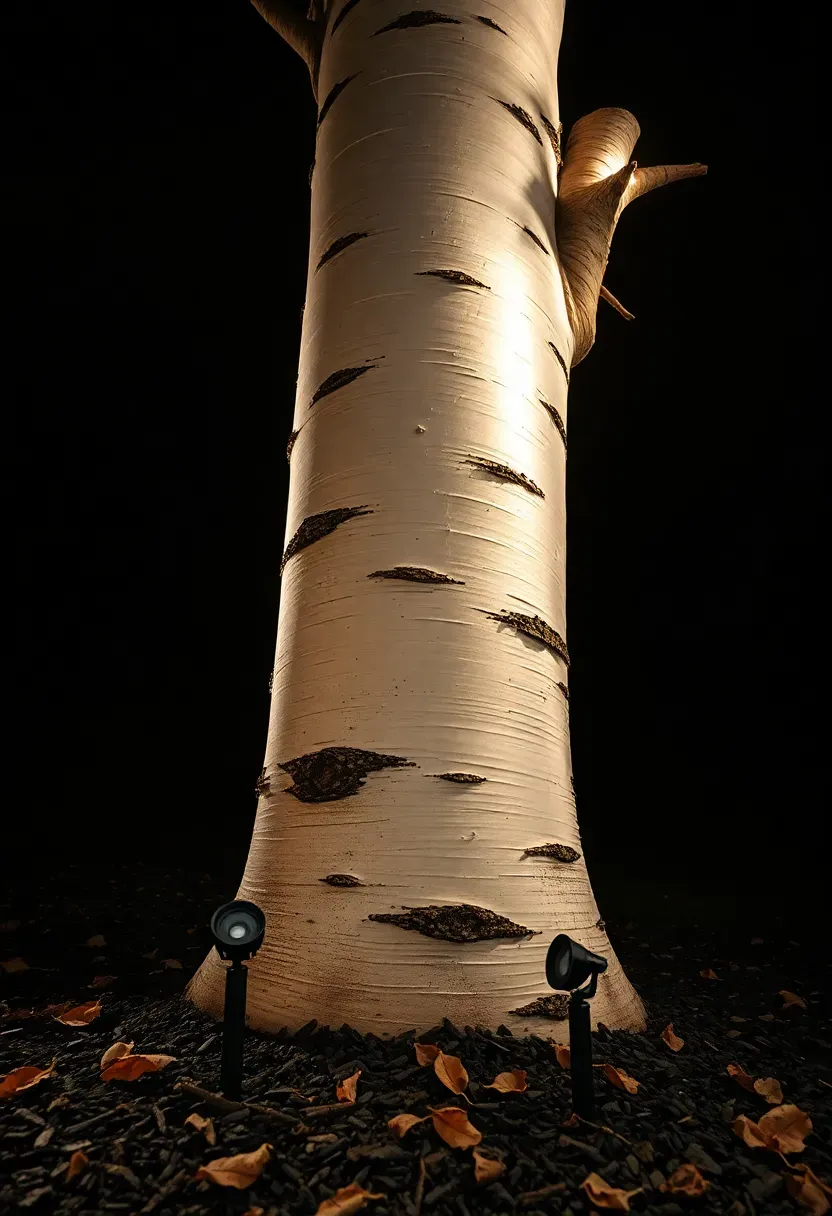
8. Uplighting Mature Trees
Uplighting a tree is the single most dramatic backyard lighting move for the money. A pair of 7-watt LED spotlights aimed upward from the base costs about $35 total and draws less electricity than a nightlight. The effect depends on tree species — white bark trees like birch or sycamore glow almost silver, while rough-barked oaks get deep texture shadows that change as wind moves the branches. Position the fixtures 12-18 inches from the trunk base, angled at about 60 degrees from horizontal. Two lights placed on opposite sides of the trunk eliminate the flat, one-dimensional look that a single fixture creates. Narrow beam angles (15-25 degrees) work better for tall trees because they throw light higher into the canopy without wasting it sideways.
Tips
- Stake fixtures into the ground rather than placing them on the surface — lawn equipment and foot traffic will knock them over
- Green-tinted lenses on the fixture housing help them vanish into mulch beds during daylight
- Avoid uplighting trees near bedroom windows — the indirect glow can disturb sleep patterns
Recommended
Items for this idea
9. LED Strip Under Bench Seating
The issue
Built-in benches along retaining walls or fence lines sit in their own shadow after dark. Overhead lights help, but the bench surface and the ground directly beneath stay dim.
The fix
Mount an IP65-rated LED strip along the underside of the bench front edge, recessed into a slim aluminum channel with a frosted diffuser. The downward-angled light washes across the patio surface beneath the bench, creating a floating effect where the bench appears to hover above a pool of warm light. This also makes it easy to spot dropped items, keeps the seating area visible for navigation, and adds depth to the overall yard lighting scheme without introducing another visible fixture. A 16-foot strip on a 12V driver draws about 15 watts total.
Pros and cons
- Pro: Completely hidden during the day — no visible fixtures, just clean bench lines
- Pro: Doubles as wayfinding light so guests can see where to walk and sit
- Con: Requires running wire from the bench to a power source, which means planning during construction is far easier than retrofitting
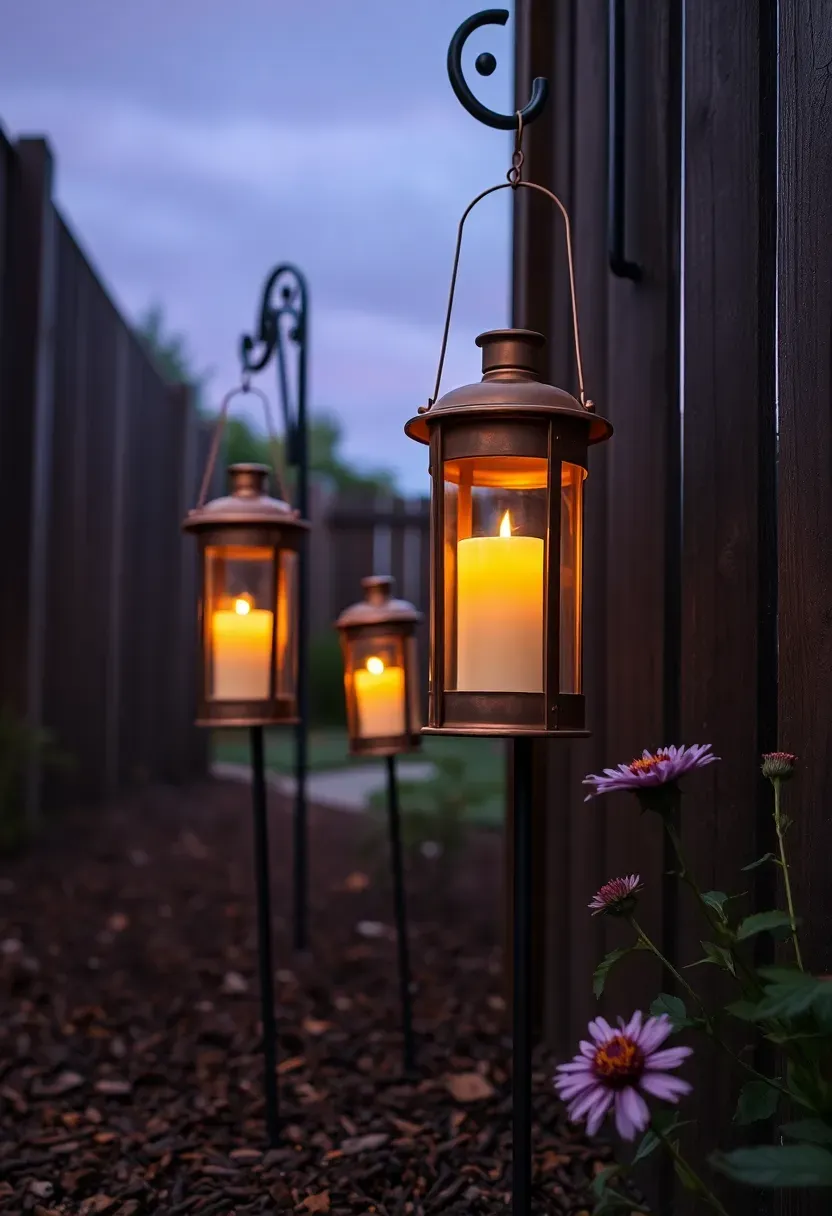
10. Copper Lanterns on Shepherd Hooks
Copper develops a green patina over 6-12 months outdoors, which means these lanterns look different every season. Push a 65-inch shepherd hook into the soil beside a flower bed, hang a copper lantern from the hook, and drop a flameless LED candle inside. The combination gives you the flicker of candlelight without the wind-extinguishing problem or the fire risk near dry mulch. Cluster three hooks at varying heights — 48, 56, and 65 inches — for layered visual interest rather than a uniform row. Copper conducts heat quickly, so if you ever want to use real candles, the lantern frame stays warm to the touch long after the flame goes out. Not a hazard, but something to know if kids are grabbing at things.
Tips
- Apply clear lacquer to the copper if you prefer the shiny penny look — once patina starts it cannot be reversed without abrasive polishing
- Anchor shepherd hooks with a concrete blob at the base in windy areas to prevent toppling
- Rechargeable flameless candles with remote controls let you turn the whole row on from the porch
Recommended
Items for this idea
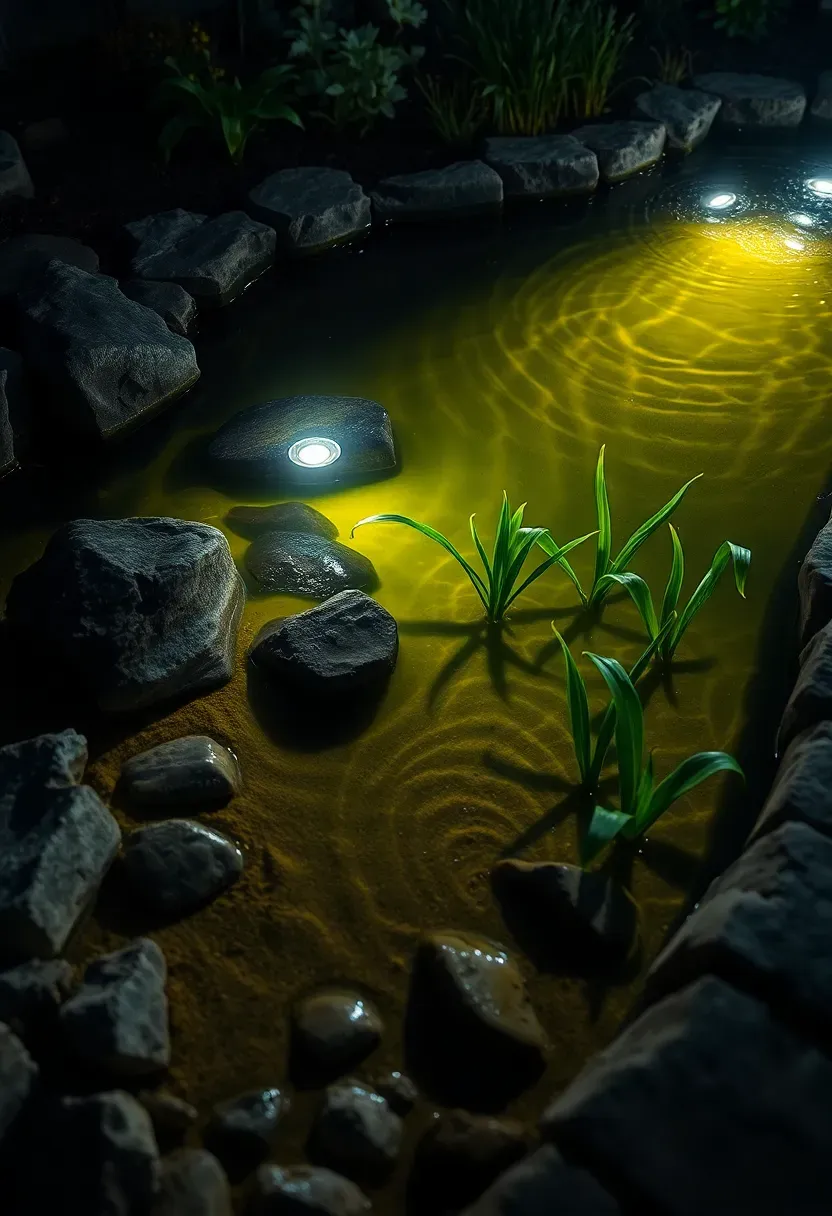
11. Underwater Pond Lights
Submersible LED pond lights rated IP68 sit on the bottom of the pond and aim upward through the water. The effect is immediate — water becomes a glowing surface that reflects off surrounding plants and stone edges. Place fixtures near interesting features: a rock ledge, a cluster of water plants, or the base of a small waterfall where the light catches moving water. Color temperature matters more underwater than anywhere else in the yard because water acts as a filter. Warm white (2700K) gives a natural golden tone. Cool white makes ponds look clinical and artificial, like a hotel lobby fountain. Most submersible fixtures come with suction cups or weighted bases that keep them stationary on the pond floor.
Tips
- Clean algae off the lens housing every two weeks during summer — green film cuts light output dramatically
- Point lights away from the primary viewing angle so you see illuminated features, not the raw LED glare
- A transformer with a built-in timer prevents accidentally running lights 24 hours and overheating the water
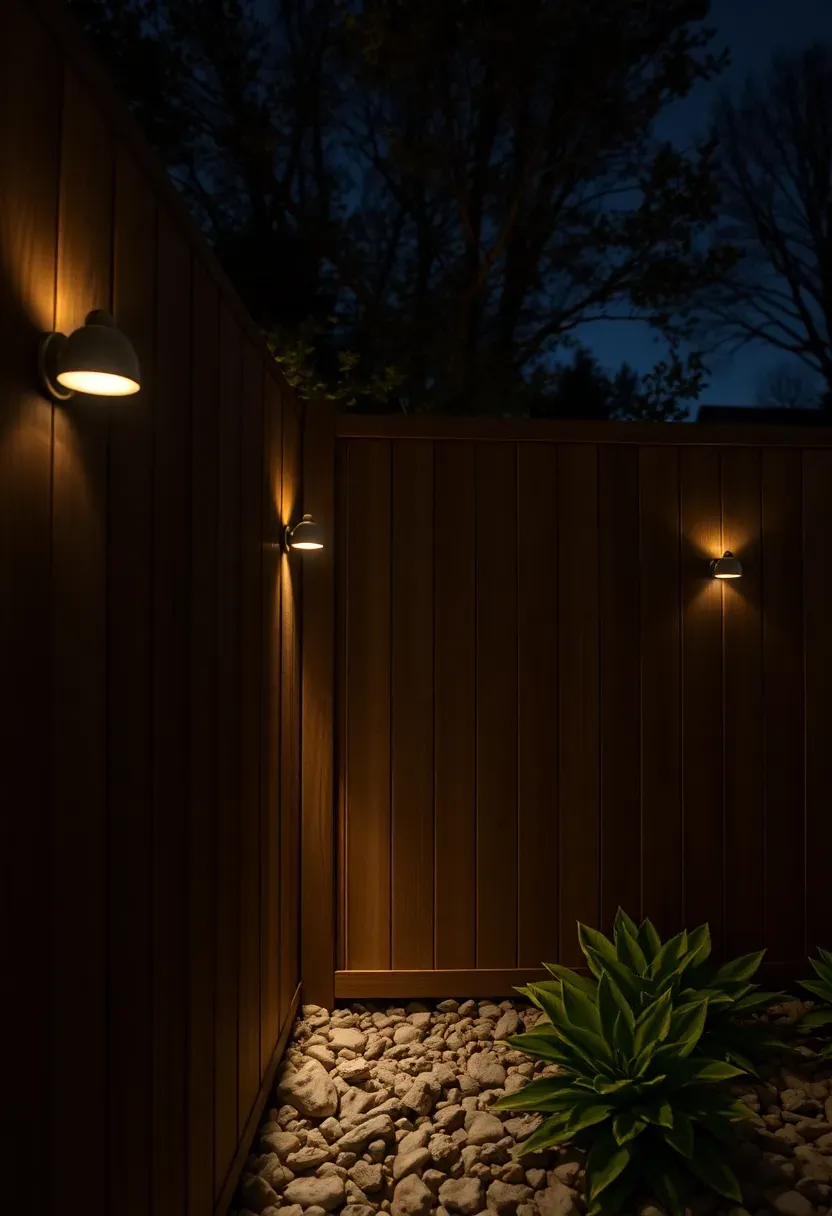
12. Wall-Mounted Sconces on Fence Posts
Fence-mounted sconces turn a blank privacy fence into a perimeter lighting system. Install fixtures on every other post, alternating sides of the fence so light washes in both directions. Down-facing sconces with a narrow aperture cast light onto the ground and the lower fence boards without throwing glare into neighboring yards — important for keeping peace with anyone on the other side. Dark sky compliant fixtures with shielded tops prevent upward light waste. Most 6x6 fence posts have enough surface area for standard exterior sconce mounting plates, though 4x4 posts may need a small backing board to provide adequate screw spacing. Low-voltage versions wire in sequence along the fence line from a single transformer.
Tips
- Check with your neighbor before installing anything on a shared fence — it is their property too in most jurisdictions
- Bronze or matte black finishes blend with stained wood fences better than brushed nickel
- Position sconces at 5-foot height to light the ground without eye-level glare for people walking the perimeter
Recommended
Items for this idea
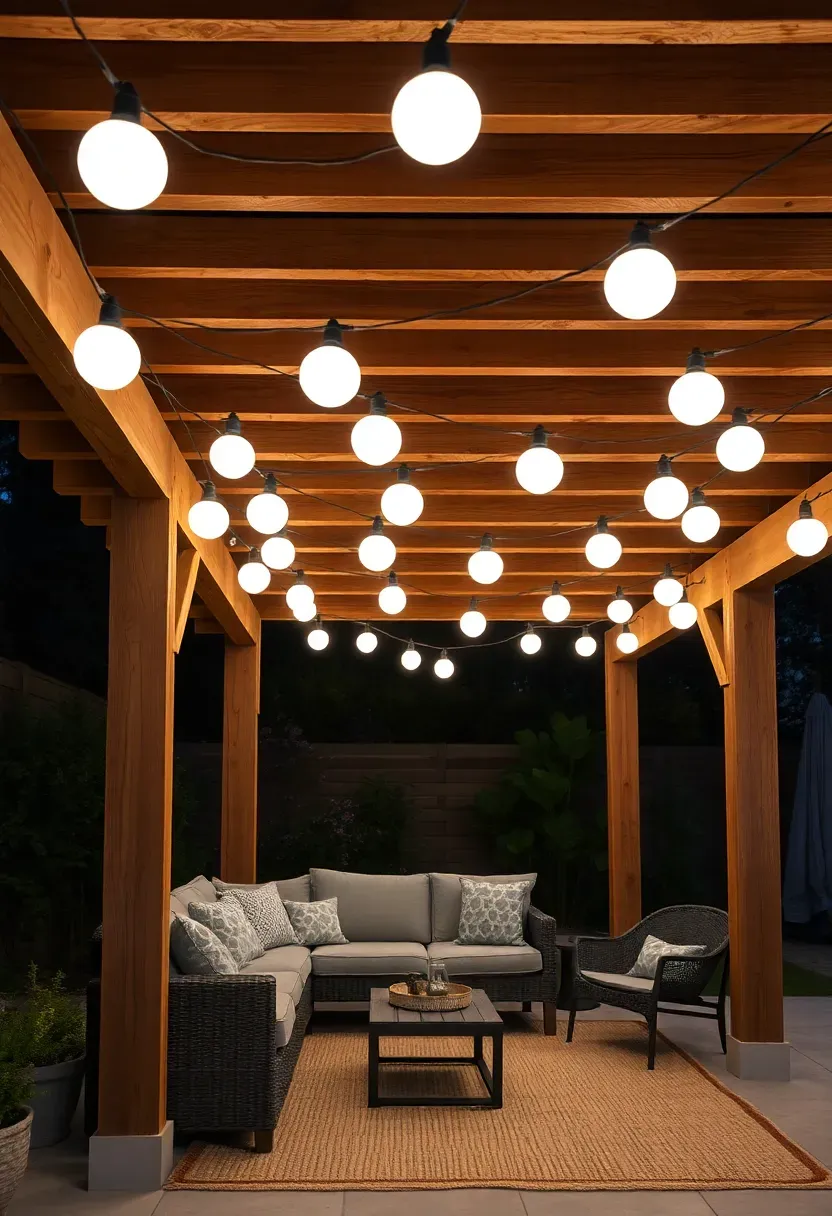
13. Globe String Lights on a Pergola
Globe lights differ from standard cafe string lights in shape and mood. The round 3-inch frosted globes scatter light in all directions rather than projecting it downward like exposed-filament bulbs. Wrap them along the perimeter beams of a pergola, then run a few strands across the open top in parallel lines spaced 18 inches apart. This creates an overhead plane of soft, even light that defines the pergola space as a distinct room within the yard. Frosted globes also hide the LED chip inside, which means no visible point source — just a smooth, uniform glow from each ball. For a 12x12 pergola, plan on about 200 feet of globe string to cover the perimeter plus three crossover runs. Commercial-grade versions with thick rubber wire last 5+ years outdoors.
Tips
- Use clear zip ties matched to the wire color to attach strings to beams — they are nearly invisible at night
- Mix globe sizes (2-inch and 3-inch) on the same structure for visual texture
- Install a smart plug so you can set schedules and control from your phone without walking outside
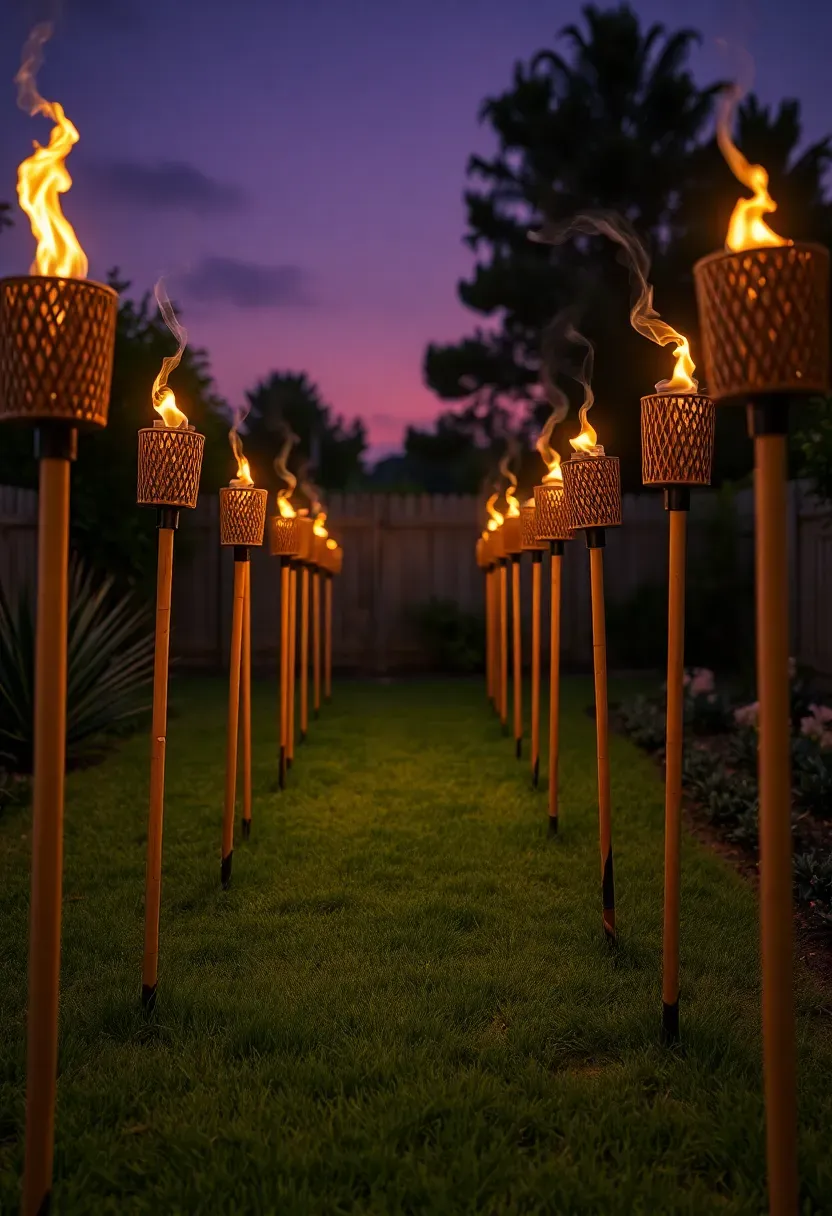
14. Tiki Torches for Bug Control
Tiki torches are not sophisticated. They are also extremely effective at two things: creating warm flickering light and deterring mosquitoes when filled with citronella fuel. Place them 6-8 feet apart along the perimeter of your entertaining area, pushed at least 18 inches into the soil so they stay upright in wind. The 65-inch standard height puts the flame above head level for most people. Use metal canisters rather than bamboo ones — bamboo canisters crack and leak fuel within two seasons, while powder-coated steel versions last indefinitely. Refill with citronella torch fuel rather than plain lamp oil if bug control is the primary goal. The citronella scent is noticeable within a 15-foot radius of each torch, creating an overlapping zone of mild repellent coverage when properly spaced.
Tips
- Snuff torches with the included cap rather than blowing them out — blowing sends hot fuel droplets sideways
- Store torches horizontally in winter to prevent water from collecting in the canister and rusting the wick holder
- Keep torches at least 10 feet from structures, overhanging branches, and fabric shade sails
Recommended
Items for this idea
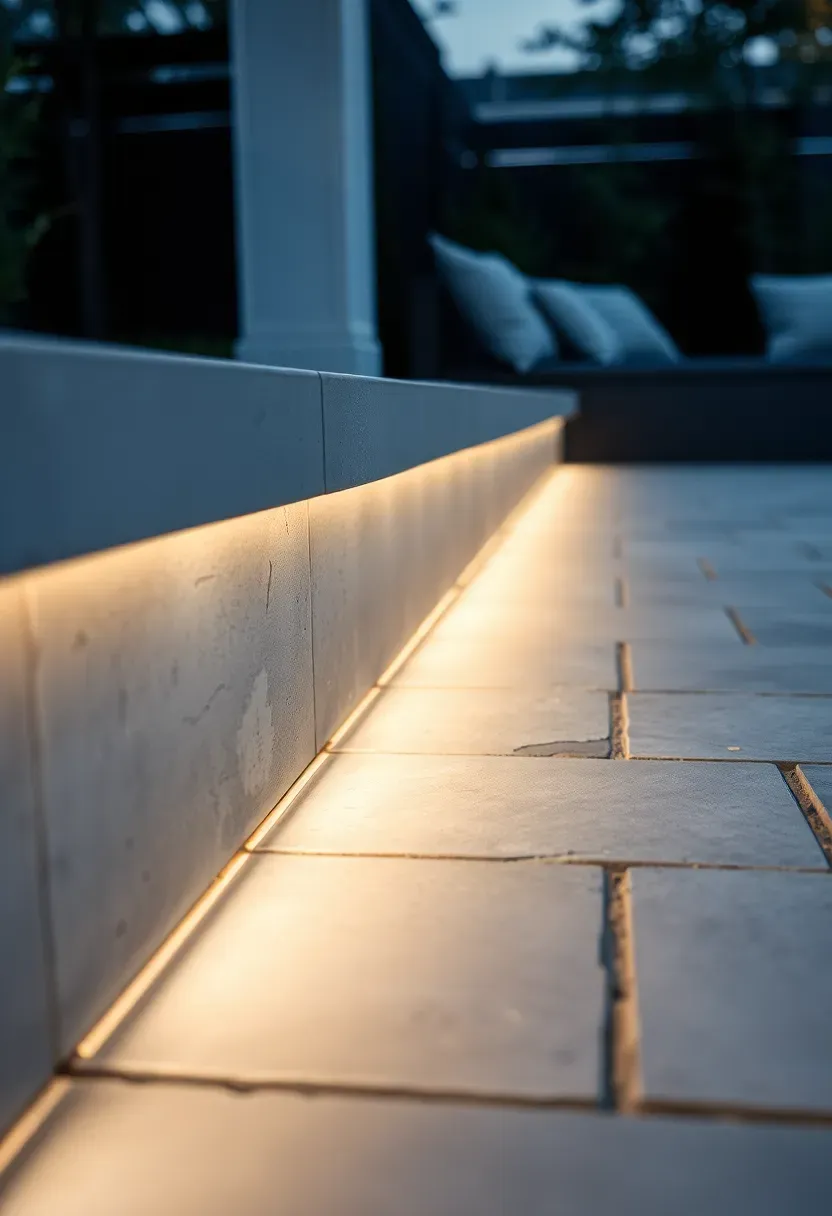
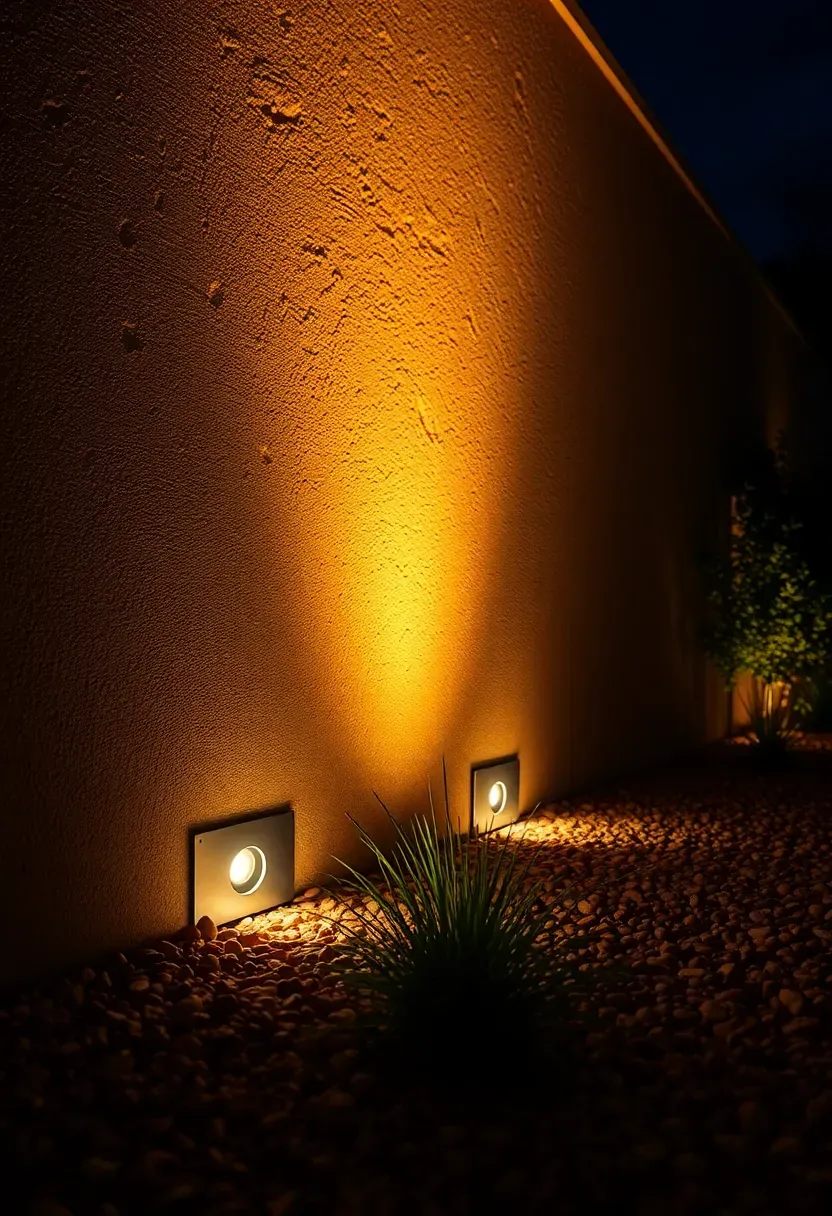
15. Ground Wash Lights Along Walls
Ground wash fixtures sit at the base of a wall and throw a fan-shaped beam of light upward across the surface. The effect highlights texture — stucco roughness, stone mortar lines, brick pattern variations — that flat daylight tends to flatten. These fixtures work on retaining walls, garden walls, the side of a raised planter, or the house foundation. The fixture body sits below ground level in a recessed housing, so only the glass lens is visible flush with the soil or paver surface. Asymmetric beam optics push 80% of the light up and forward against the wall rather than scattering it in all directions. Two fixtures spaced 6 feet apart on a 20-foot wall create overlapping wash zones with minimal dark spots between them.
Tips
- Aim for grazing angle (close to the wall, 6-8 inches out) for maximum texture emphasis on rough surfaces
- Pull the fixture 18-24 inches out from smooth walls to create a wider, softer wash without harsh bright spots
- Warm white (2700K) complements natural stone and brick; neutral white (3500K) works better on painted or rendered walls
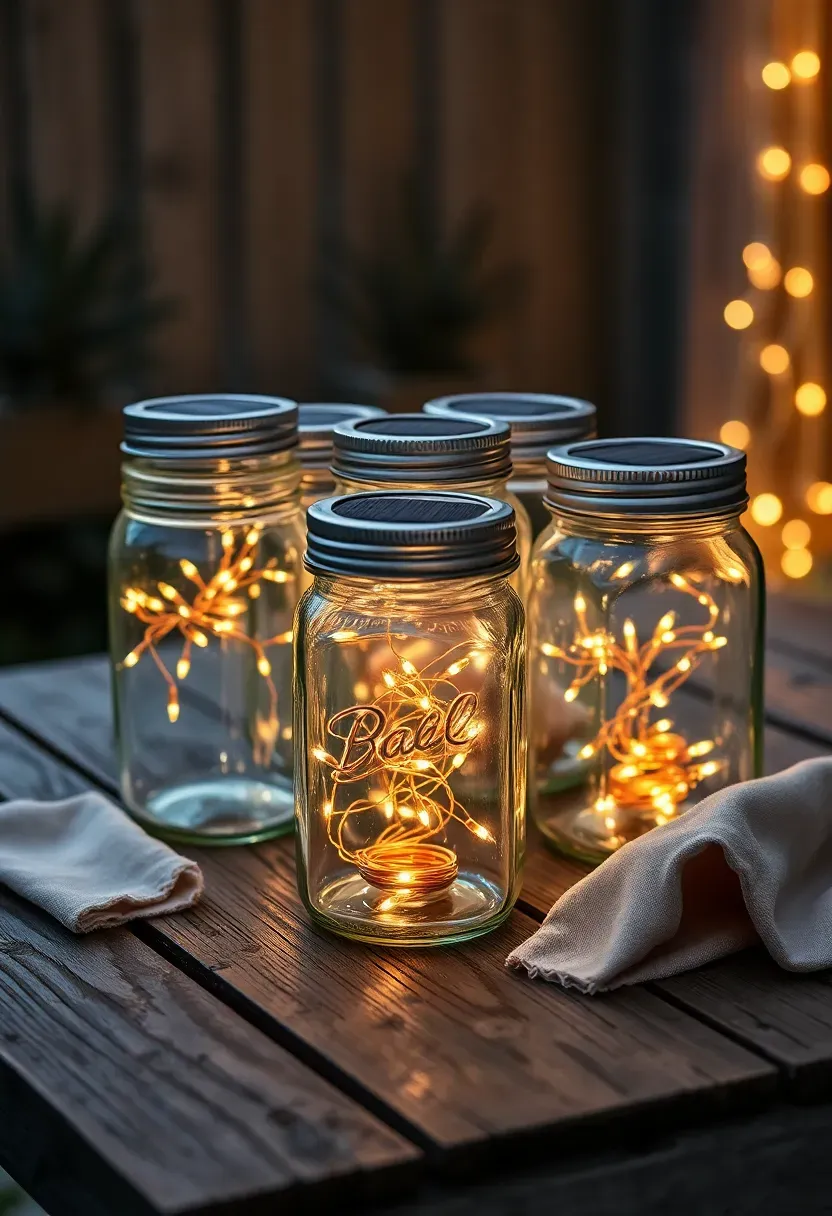
16. Solar Jar Cluster on a Table
Take five mason jars of varying sizes, drop a coiled solar fairy light string into each one, and group them in the center of your outdoor table. Each jar acts as a lantern — the glass diffuses the tiny LED points into a warm glow, and the solar panel on the lid charges during the day. No wiring, no batteries to replace, no risk of tipping a candle onto the tablecloth. The visual effect resembles a collection of fireflies caught in glass. Vary jar sizes from half-pint to quart for height differences in the cluster. Add a thin layer of sand or small pebbles in the bottom of each jar for weight so wind does not knock them over. Total cost for five jars with solar lids runs about $25-$35.
Tips
- Lids with separate small solar panels connected by thin wire charge better than integrated top-panel versions
- Tint jars with transparent spray paint in amber or blue for color variety in the cluster
- Bring jars inside during hard freezes — glass plus trapped moisture can crack in sub-zero temperatures
Recommended
Items for this idea
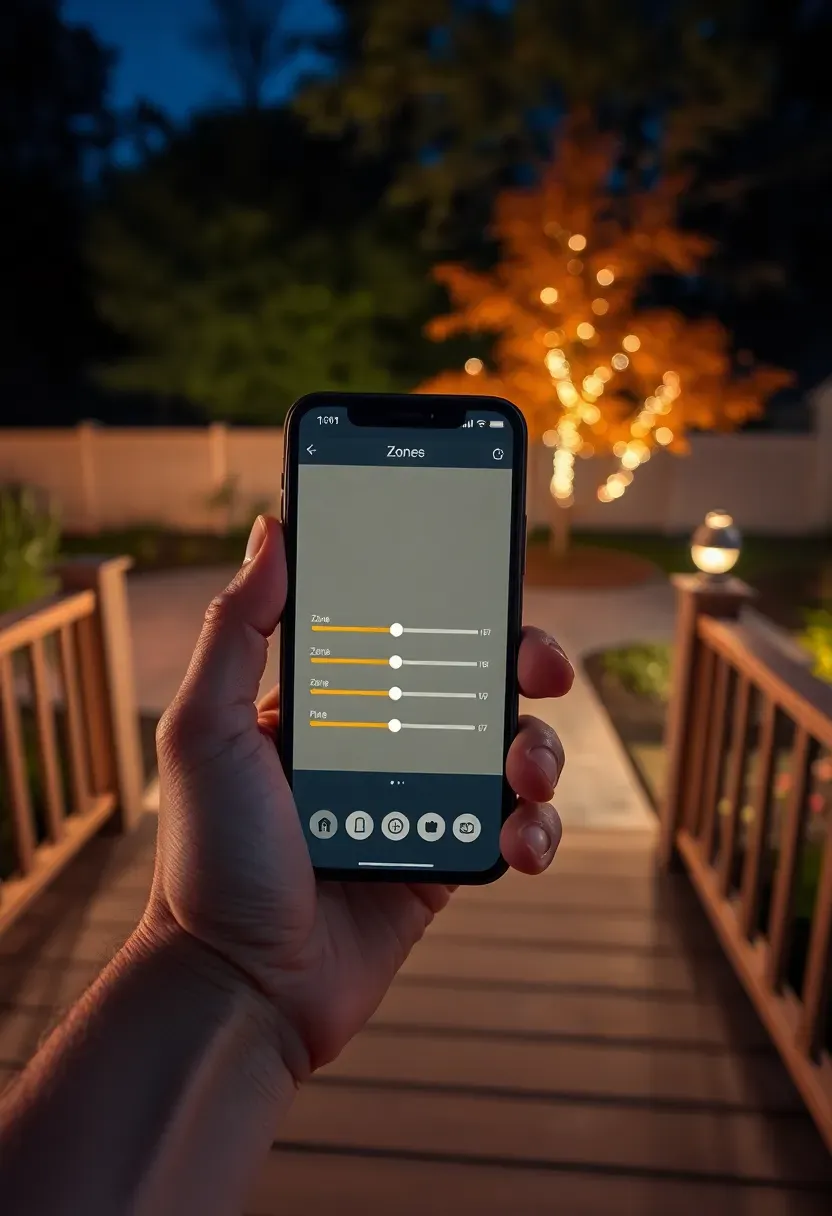
17. Smart Zoned Lighting System
Step 1: Map your zones
Walk your yard and identify 3-5 distinct areas that need independent control: dining area, path, garden beds, fire pit ring, front entry. Each zone gets its own transformer or smart relay.
Step 2: Install smart controllers
Replace standard transformers with Wi-Fi-enabled low-voltage transformers, or add smart relays to existing ones. Products from brands like Hinkley and WAC connect directly to home automation platforms. Each zone appears as a separate device in your app.
Step 3: Program scenes
Create scenes that combine zones: "Dinner" activates dining pendants and path lights at 70%, "Late Night" dims everything to 20% except the path, "Party" brings all zones to full brightness. Schedules handle daily automation; scenes handle events.
Watch out
- Wi-Fi range to outdoor transformers is often weaker than expected — a mesh network extender near the back door solves most dead spots
- Keep a manual override switch on each transformer for when the app inevitably updates and breaks something
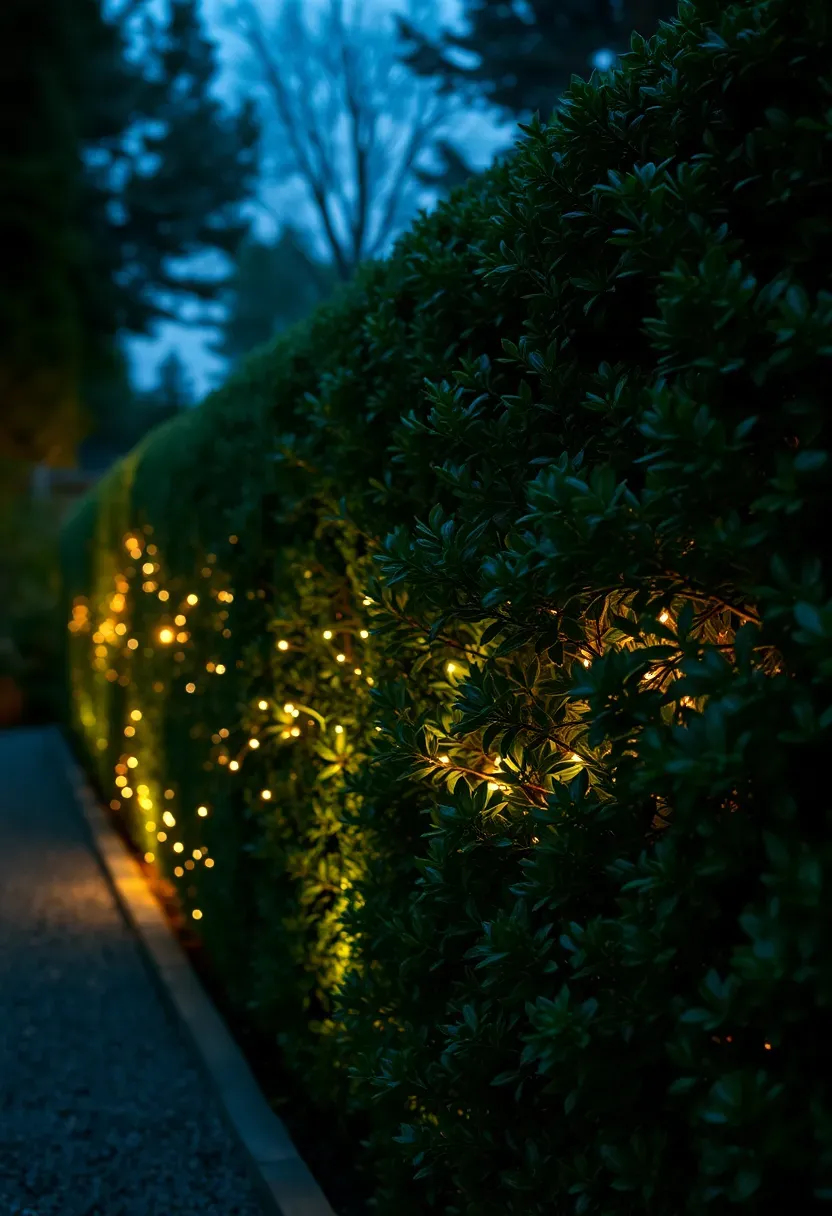
18. Fairy Lights in Shrubs
Weaving micro LED fairy lights through hedges and large shrubs gives them an interior glow that reads as magical without being childish. Use 100-count strings on ultra-thin copper wire — the wire disappears against branches, leaving only the light points visible. Push the lights toward the interior of the shrub rather than draping them on the outer surface. Light radiating outward through layers of leaves creates depth and dimension. Solar-powered fairy strings with a separate panel eliminate the need to run extension cords across the lawn. One string per 3-foot section of hedge provides good density. Dense evergreens like boxwood and yew hold fairy lights particularly well because their thick foliage structure supports the wire without sagging.
Tips
- Wrap excess wire around interior branches rather than cutting it — cutting breaks the circuit on most strings
- Replace any burned-out micro LEDs promptly, as dark gaps in an otherwise glowing hedge look like missing teeth
- Remove lights before heavy pruning to avoid cutting through wires with hedge trimmers
Recommended
Items for this idea
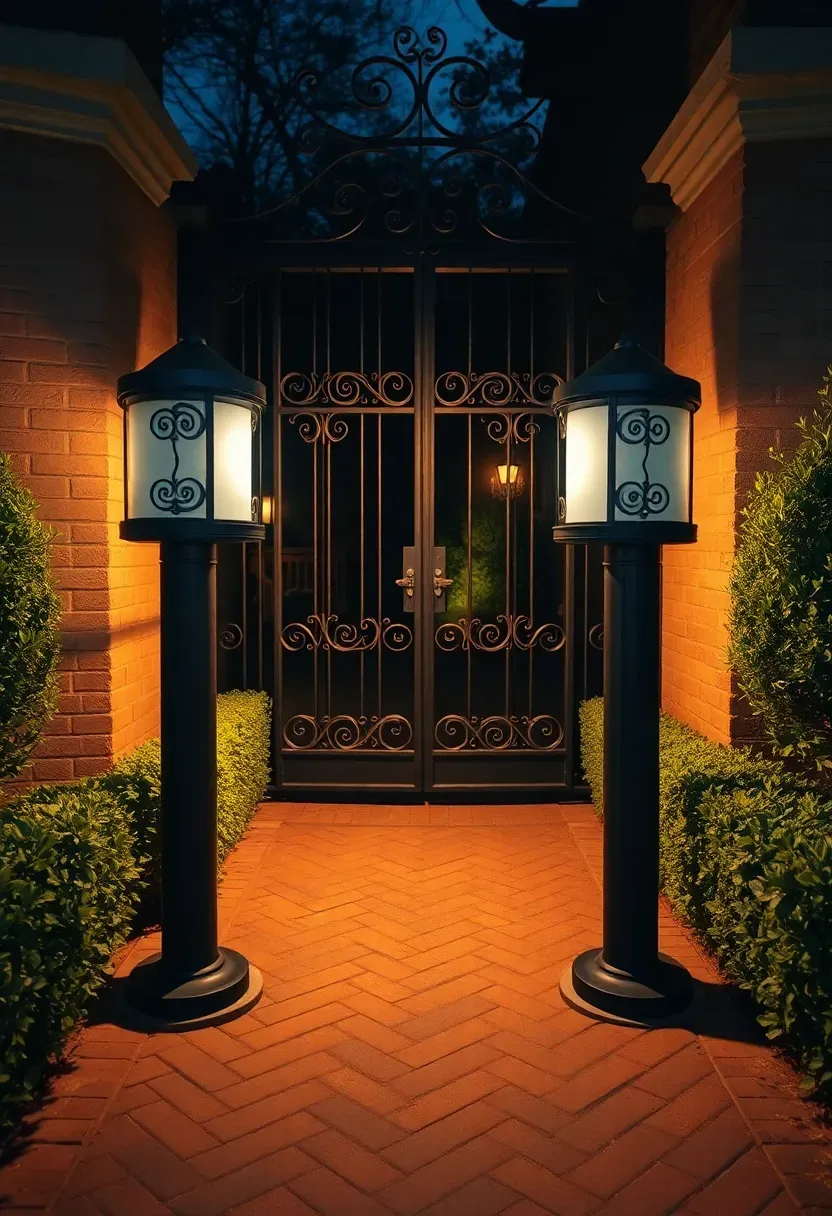
19. Bollard Lights Flanking a Gate
A pair of bollard fixtures placed on either side of a garden gate accomplishes two things: it marks the transition between zones (front yard to back, lawn to garden, patio to pool area) and it provides enough light to operate a gate latch without fumbling. Choose bollards in the 24-30 inch height range so the light falls on the path and gate hardware without shining directly into approaching faces. Match the fixture finish to the gate hardware — matte black bollards beside a wrought iron gate, brushed bronze beside oil-rubbed hardware. Wire them as the first fixtures on a path lighting circuit so they share the same transformer. The gate location usually coincides with the property's main walkway, making these bollards dual-purpose as the first path lights in the sequence.
Tips
- Set bollards 30-36 inches from the gate edge on each side so the gate can swing fully open without hitting them
- Concrete footings prevent bollards from leaning after ground frost heave cycles
- Photocell sensors on the transformer ensure these always activate at dusk regardless of season
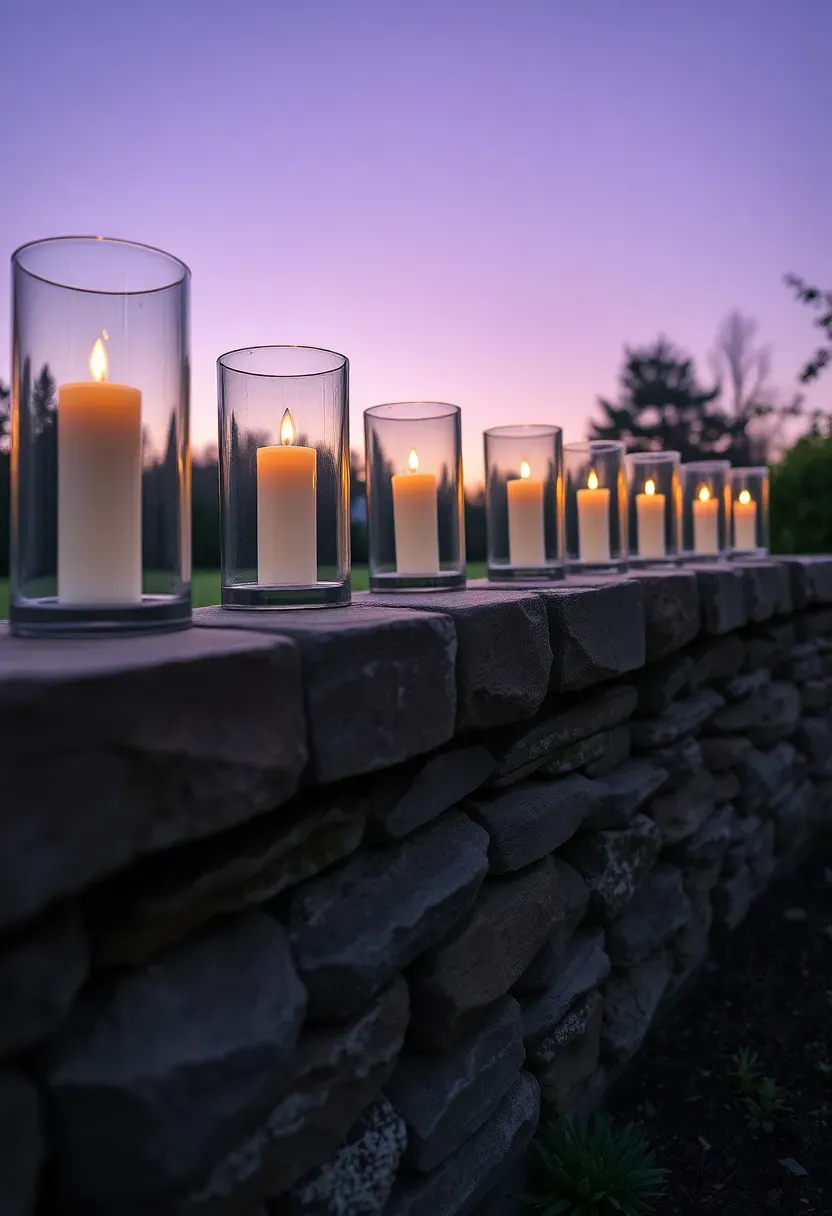
20. Candle Hurricanes on Stone Ledges
Glass hurricane lanterns on a stone wall cap or retaining wall ledge bring a warmth that electric lights do not quite match. The visible flame, the slight smoke scent, the occasional flicker when breeze hits the glass — it engages more senses than LEDs. Use 6-inch diameter hurricanes with 3-inch pillar candles inside. The glass cylinder blocks wind from extinguishing the flame while still allowing oxygen flow from the open top. Place them every 3-4 feet along the wall ledge, anchored with a ring of clear silicone on the base to prevent wind from sliding them off the edge. Beeswax pillar candles burn longer and cleaner than paraffin, with less black soot buildup on the glass interior.
Tips
- Let the hurricane cool completely before handling after the candle has been burning — glass retains heat longer than you expect
- Trim wicks to 1/4 inch before each lighting to prevent smoking and uneven flame height
- Bring hurricanes inside during rain — water pooling around the candle cracks the glass when heated next time
Recommended
Items for this idea
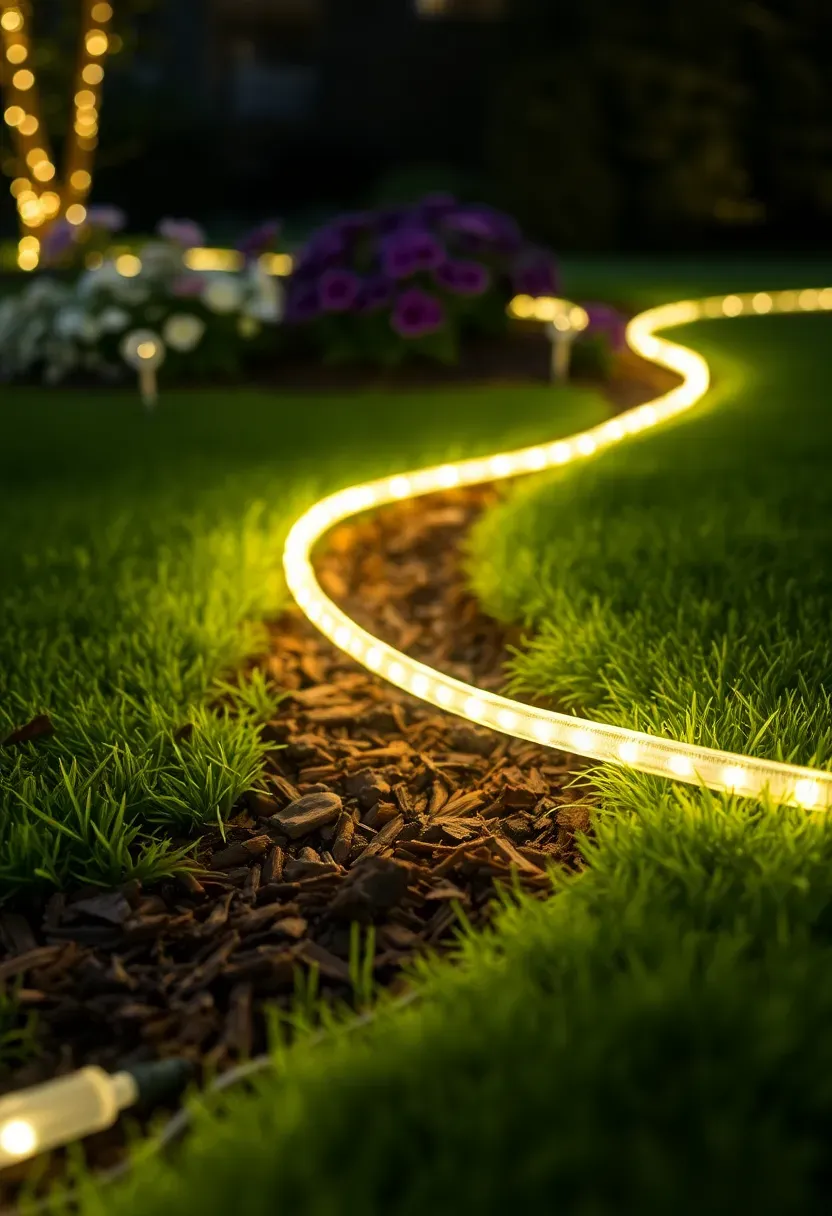
21. Rope Lights Tracing a Garden Border
LED rope lights are inexpensive, flexible, and nearly indestructible. Lay them along the border where lawn meets garden bed to define edges after dark. Pin them to the ground every 12 inches with landscape fabric staples so they follow curves without lifting. The continuous tube of light creates an unbroken line that reads as a design element rather than a functional fixture. Choose warm white rather than multicolor unless you are specifically going for a festive look. IP65-rated rope lights handle direct ground contact, irrigation overspray, and foot traffic. A 50-foot coil runs about $15-$20 and covers the border of a substantial garden bed. Connect multiple coils end-to-end for longer runs, but check the maximum daisy-chain length on the packaging — most top out at 150 feet per circuit.
Tips
- Bury rope lights under a thin layer of mulch (half an inch) so light glows through the material rather than sitting exposed on top
- Cut rope lights only at the marked intervals — cutting between marks shorts the section
- Flat rope profiles stay put better than round ones on sloped ground
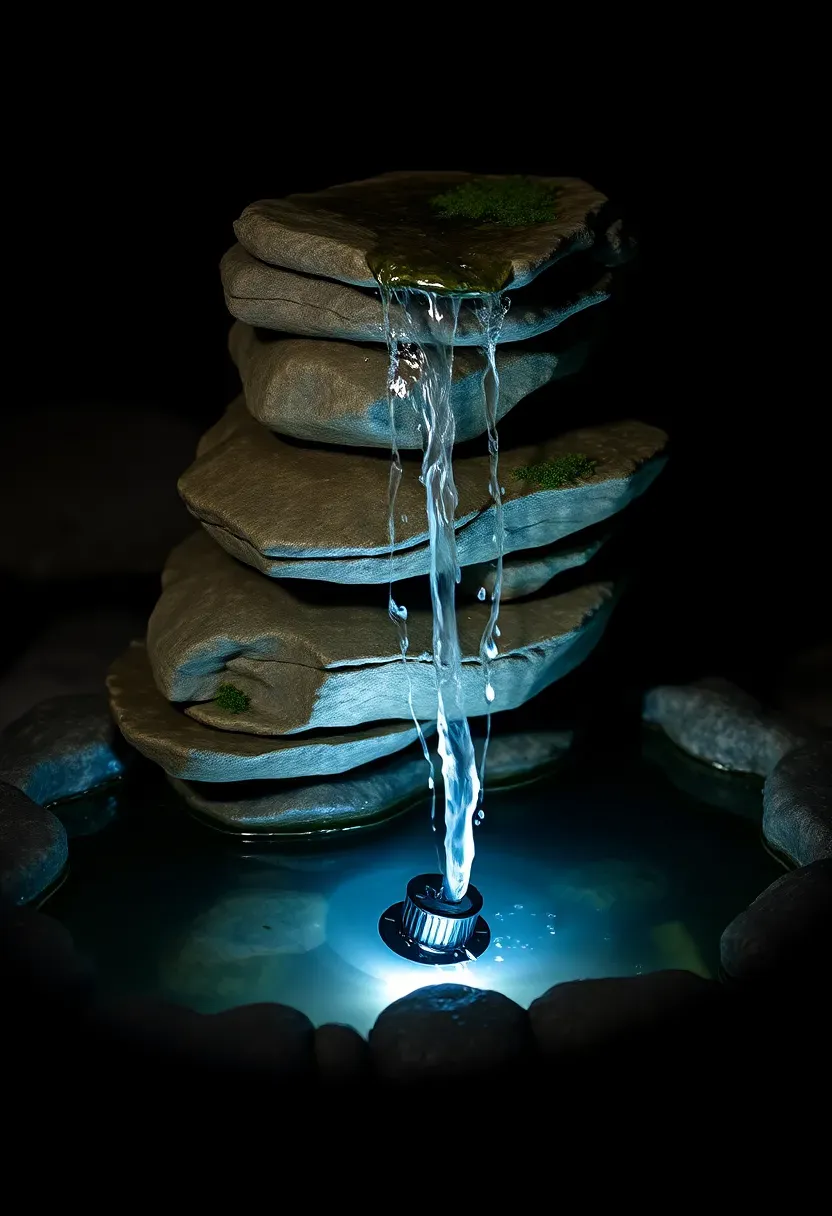
22. Spotlight on a Water Feature
Moving water and light create a visual feedback loop — the light catches every ripple, splash, and cascade, and the water reflects it back in unpredictable patterns. A single narrow-beam spotlight aimed at the point where water falls or overflows produces more visual impact than illuminating the entire fountain basin. For fountains, mount a submersible fixture in the basin pointing upward at the water column. For waterfalls, position a ground-mounted spot at the base aimed upward at the falling sheet of water. Warm white light on natural stone looks earthy and grounded. If the water feature has a copper or metal finish, neutral white (3500K) brings out the metallic character without adding amber warmth that muddies the color.
Tips
- Use a fixture with a beam angle of 15 degrees or narrower to concentrate light on the water rather than scattering across the whole area
- Adjust the aim seasonally — water flow patterns change with pump wear and debris accumulation
- A timer separate from the fountain pump lets you run lights without running the water on quiet evenings
Recommended
Items for this idea
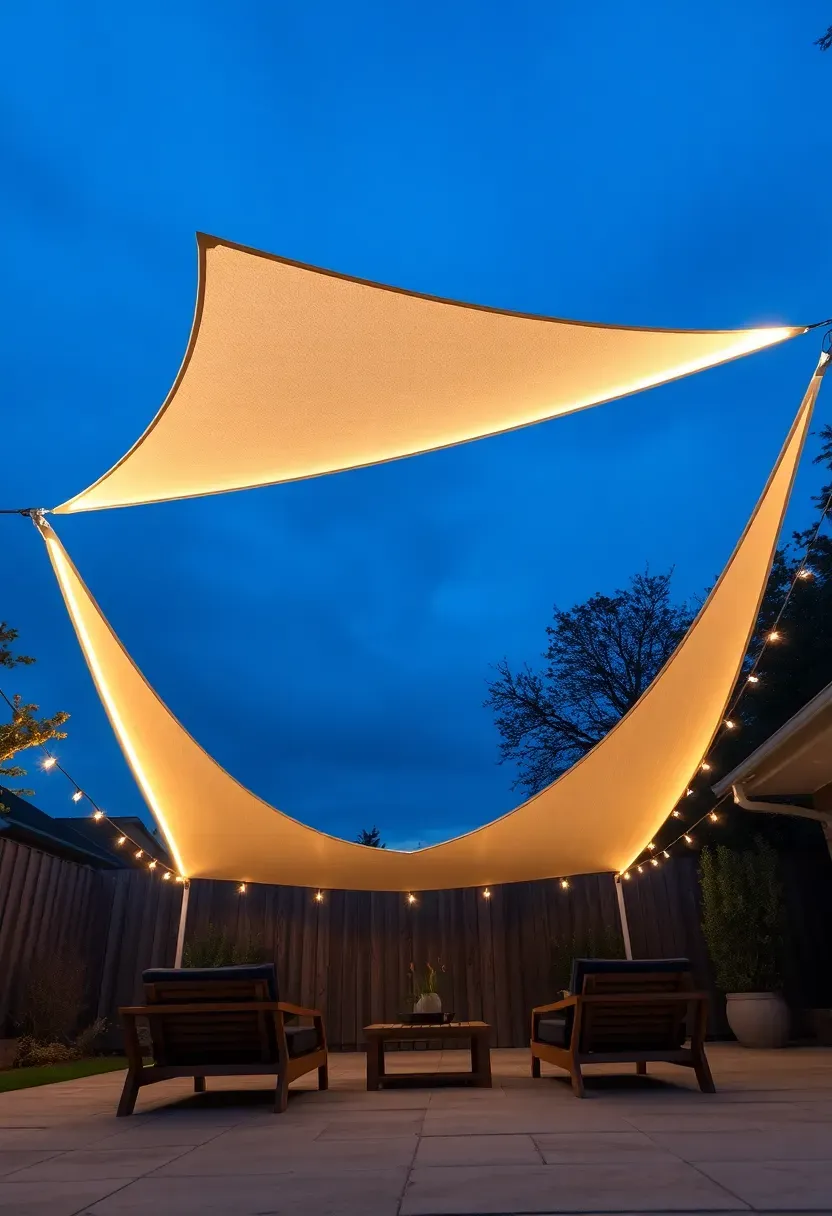
23. Overhead Sail Light Canopy
Shade sails already define outdoor ceiling planes during the day. Adding LED strip or rope lights along the sail edges extends that spatial definition into the evening. Attach IP65 LED strip inside a slim silicone channel along each edge of the sail, running wire down one of the mounting cables to a ground-level transformer. The result is a glowing geometric outline overhead that frames the space below like a room without walls. Triangular sails produce the most interesting light patterns because the three edges create directional emphasis rather than the uniform rectangle of a standard canopy. Choose warm white for seating areas and neutral white for cooking zones underneath. The sail itself provides daytime shade and nighttime ambient light from a single installation — good return on the effort involved.
Tips
- Waterproof all wire connections at the cable junction points with marine-grade shrink tubing
- Size the LED strip to run on 24V rather than 12V for longer runs without voltage drop dimming at the far end
- Detach LED strips before removing the sail for winter storage to avoid damaging the connections during folding
Quick FAQ
Does backyard lighting increase home value? Well-designed landscape lighting adds 15-20% to perceived curb appeal according to National Association of Realtors surveys. Buyers consistently rank outdoor lighting among the top five exterior features influencing purchase decisions. The key word is "well-designed" — a single floodlight does not move the needle.
Which is better for backyard lighting: solar or wired? Solar works for accent and path lighting where consistent brightness is not critical. Wired low-voltage systems deliver reliable, dimmable output for dining areas, cooking zones, and security applications. Most well-lit backyards use both — solar for remote spots and wired for primary entertaining areas.
How many lumens do I need for backyard lighting? Path lights need 100-200 lumens per fixture. Dining area pendants work at 600-800 lumens each. Accent uplights on trees perform best at 300-500 lumens with a narrow beam. The total lumen count matters less than placement — three strategically positioned low-output fixtures beat one bright floodlight for ambiance.
Can I install low-voltage landscape lighting myself? Yes. Low-voltage (12V) systems are safe for DIY installation. No electrician is needed because the transformer steps household 120V down to 12V, which cannot deliver a dangerous shock. The main skill required is digging a shallow trench for cable burial and making weatherproof wire connections using the gel-filled connectors included with most kits.
When should backyard lights turn on? Program path and safety lights to activate at dusk using a photocell sensor. Ambient and accent lighting works better on a timer set 30 minutes before you typically use the yard. Smart controllers let you set different schedules for weekdays and weekends, matching light to your actual routine.
Picking one or two ideas from this list will already change how your backyard feels after sunset. Start with the area you use most — usually the dining table or the main path from the door — and build outward from there. Layering three types of light (path, overhead, accent) across even a small yard creates the kind of depth that makes people linger outside an extra hour. Every fixture here runs on low voltage or solar, so the ongoing energy cost is negligible. The bigger investment is your time deciding where to point them.
Pinterest cover for 23 Backyard Lighting Ideas
About the author
OBCD
CGI visualization and interior design content. We create detailed 3D renders and curate practical design ideas for every room in your home.