21 Backyard Planter Ideas for Every Style
I spent two summers trying to grow tomatoes in the ground before accepting that my clay-heavy soil was not going to cooperate. Planters fixed the problem in a weekend. But the real surprise was how much they changed the look of the entire yard — suddenly there were focal points, height variations, and borders where there had been flat monotony. Whether you are dealing with poor soil, rental restrictions, or just want more control over your garden layout, the right planter can do a lot of work for you.
Below are 21 backyard planter ideas grouped by material, scale, and placement. Each one includes practical notes on drainage, weight, and what actually grows well in it.
Table of Contents
- Oversized Terracotta Pot Cluster
- Corten Steel Raised Planter
- Stacked Stone Planter Wall
- Wooden Whiskey Barrel Planter
- Concrete Trough Planter
- Hanging Macrame Planter Display
- Galvanized Metal Stock Tank
- Tiered Herb Planter Stand
- Built-In Bench Planter Combo
- Ceramic Glazed Pot Collection
- Raised Cedar Garden Bed
- Woven Rattan Basket Planter
- Vertical Wall Planter System
- Cast Iron Urn Planter
- Recycled Pallet Planter Box
- Fiberglass Lightweight Planter
- Gabion Cage Planter
- Self-Watering Rolling Planter
- Olive Jar Mediterranean Planter
- Succulent Bowl Arrangement
- Modular Planter Screen Wall
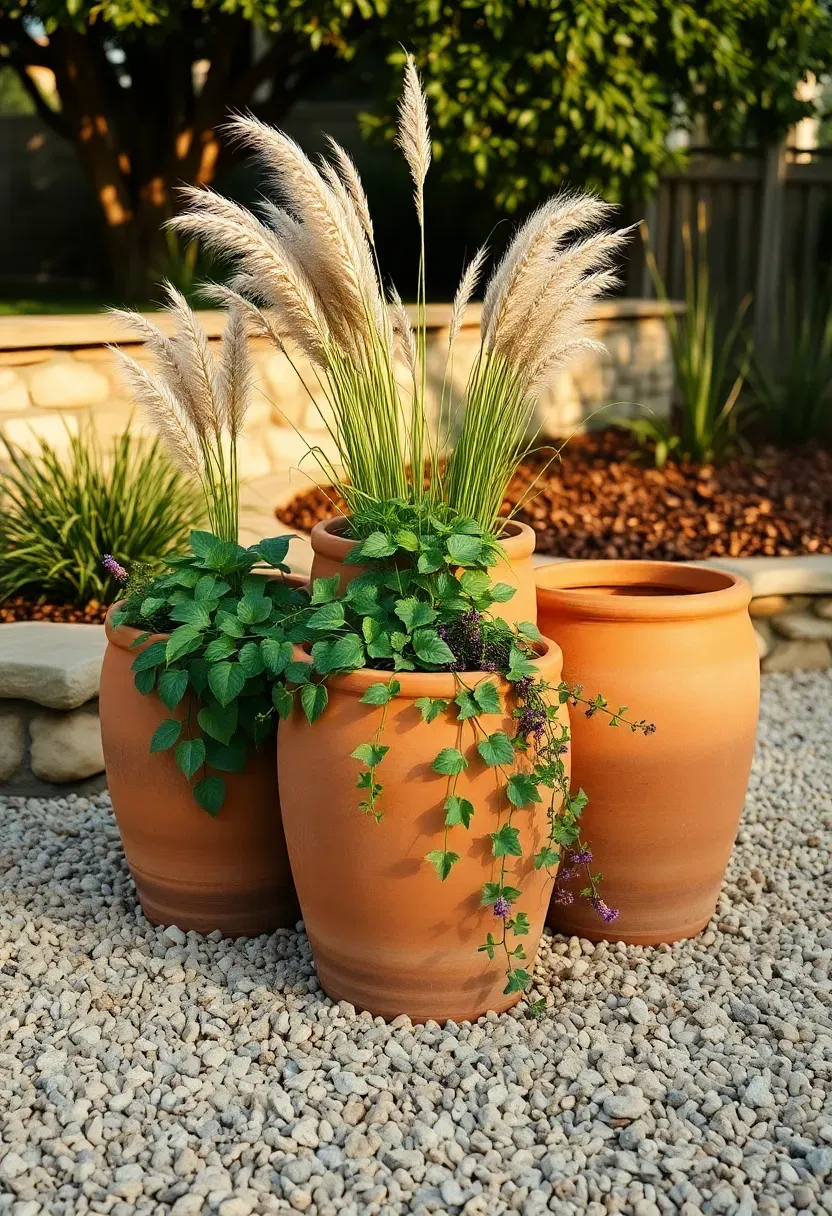
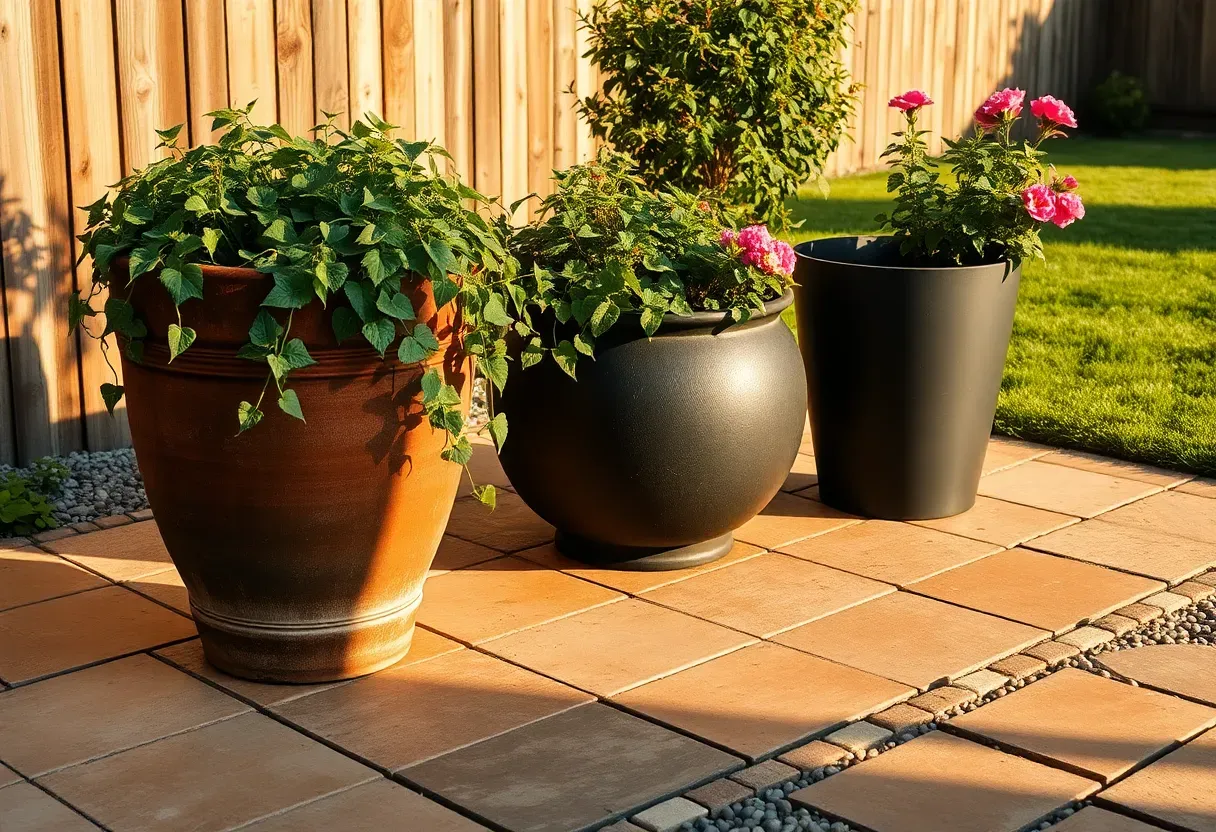
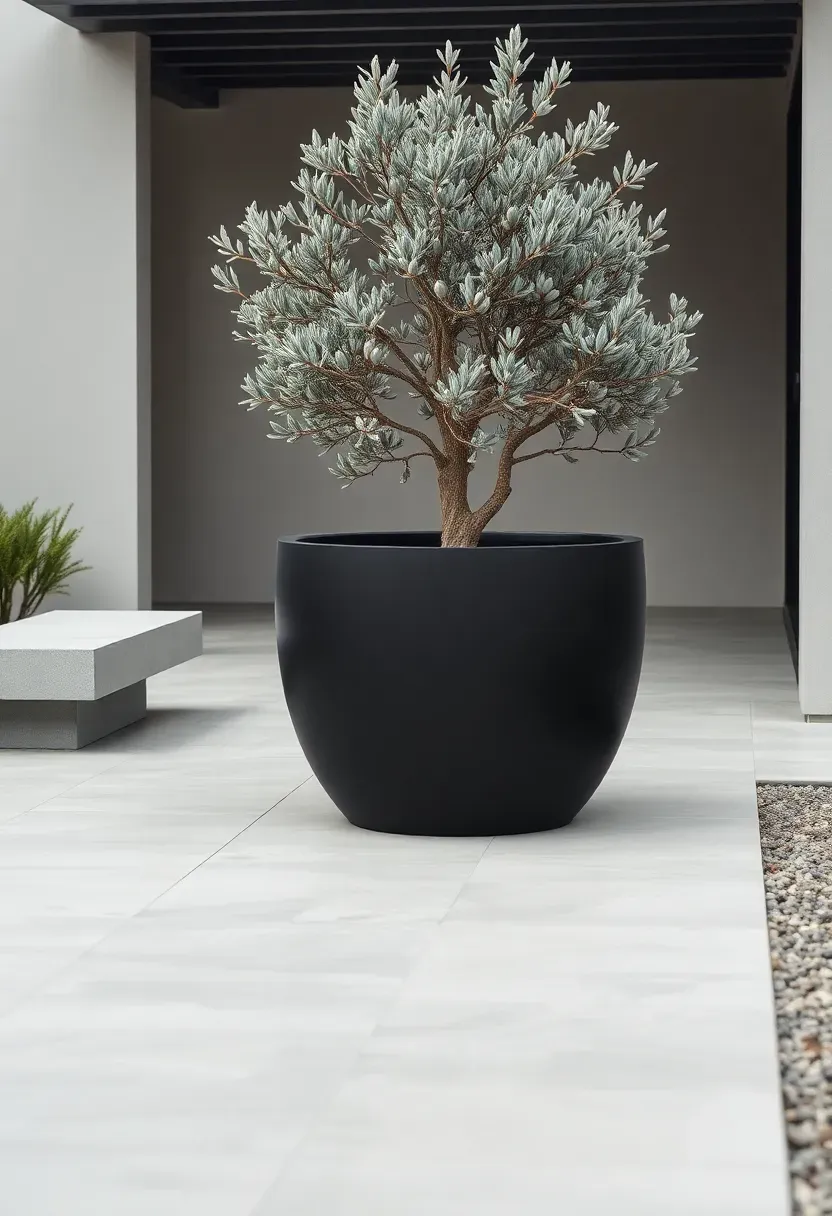
1. Oversized Terracotta Pot Cluster
Grouping three to five terracotta pots in different heights creates an instant garden vignette without any construction. The key is going bigger than you think — pots under 18 inches across look lost outdoors. Set the tallest pot slightly off-center and arrange the others in a loose crescent around it. Terracotta breathes, which keeps roots from sitting in moisture, but it also dries out faster in summer heat. Expect to water every other day in July unless you mulch the surface with bark chips.
Tips
- Drill extra drainage holes if the pot only has one — clay can be brittle, so use a masonry bit at low speed.
- Group odd numbers together. Three or five pots reads as intentional; four looks like a grid.
- Line the inside with a thin layer of landscape fabric to slow mineral leaching through the walls.
We picked a few things that go well with this idea: Worth Garden Large Urn Planter (14") (★4.5), Creative Co-Op Whitewashed Terra-Cotta Urn (★4.5) and Worth Garden Terracotta Planter Set (2-Pack) (★4.8). As an Amazon Associate we earn from qualifying purchases.
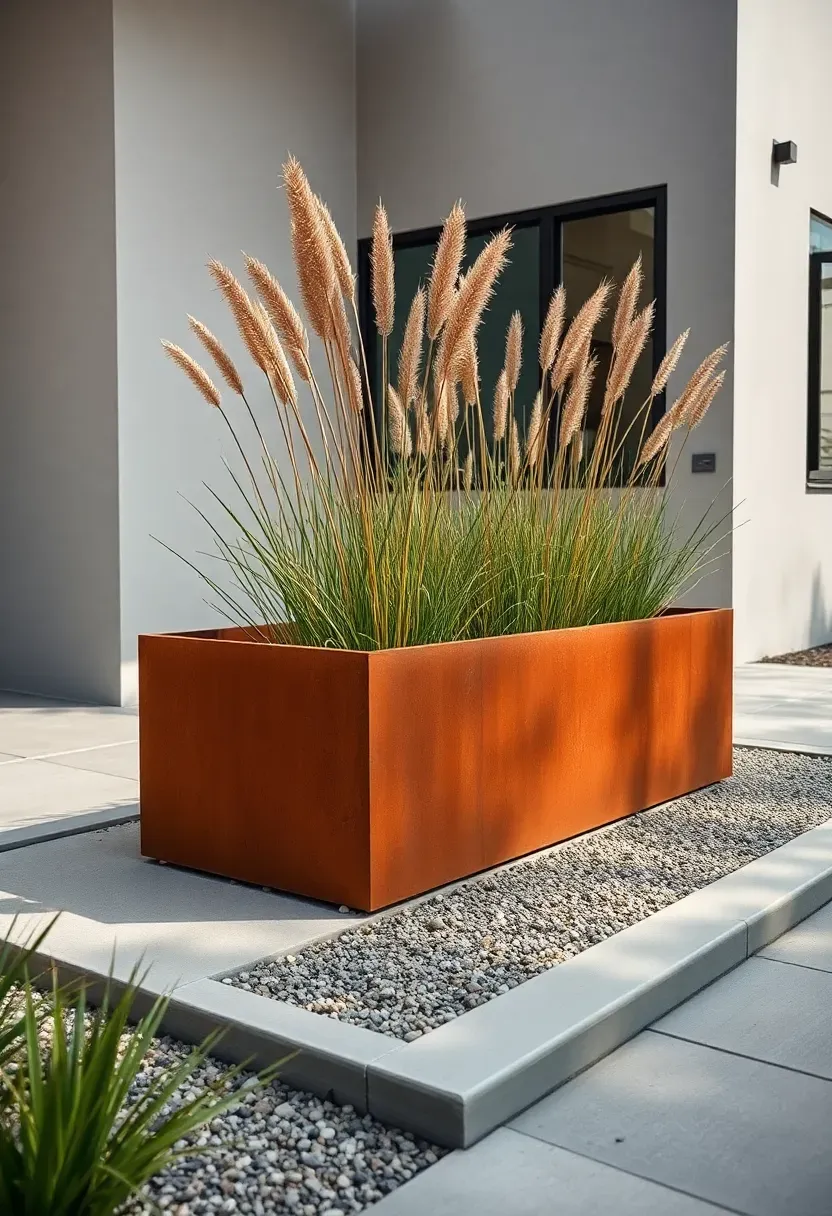
2. Corten Steel Raised Planter
Why Corten Works Outdoors
Corten steel develops a stable rust layer that actually protects the metal underneath from further corrosion. Unlike painted steel planters that chip and flake within a few seasons, corten looks better with age. The warm orange-brown patina pairs well with concrete, gravel, and dark green foliage.
What to Watch For
These planters get hot in direct sun — surface temperatures can hit 140 degrees F on a south-facing wall. That heat radiates into the soil and can stress shallow-rooted plants. Choose deep-rooted species like ornamental grasses, lavender, or rosemary that can handle warm root zones. Budget $200 to $500 for a 4-foot planter from a metal fabricator, or about half that if you weld your own from sheet stock.
Pros and Cons
- Pro: zero maintenance once the patina stabilizes (about 6 months).
- Con: rust runoff stains concrete and pavers during the first season — set it on gravel or a drip tray.
- Pro: extremely durable in freeze-thaw climates where ceramic and terracotta crack.
We picked a few things that go well with this idea: BlueWish Elevated Cedar Garden Bed (72") (★5.0), Infinite Cedar Raised Garden Bed (2x8) (★5.0) and Cedar Raised Garden Bed with Legs (48x24) (★4.5). As an Amazon Associate we earn from qualifying purchases.
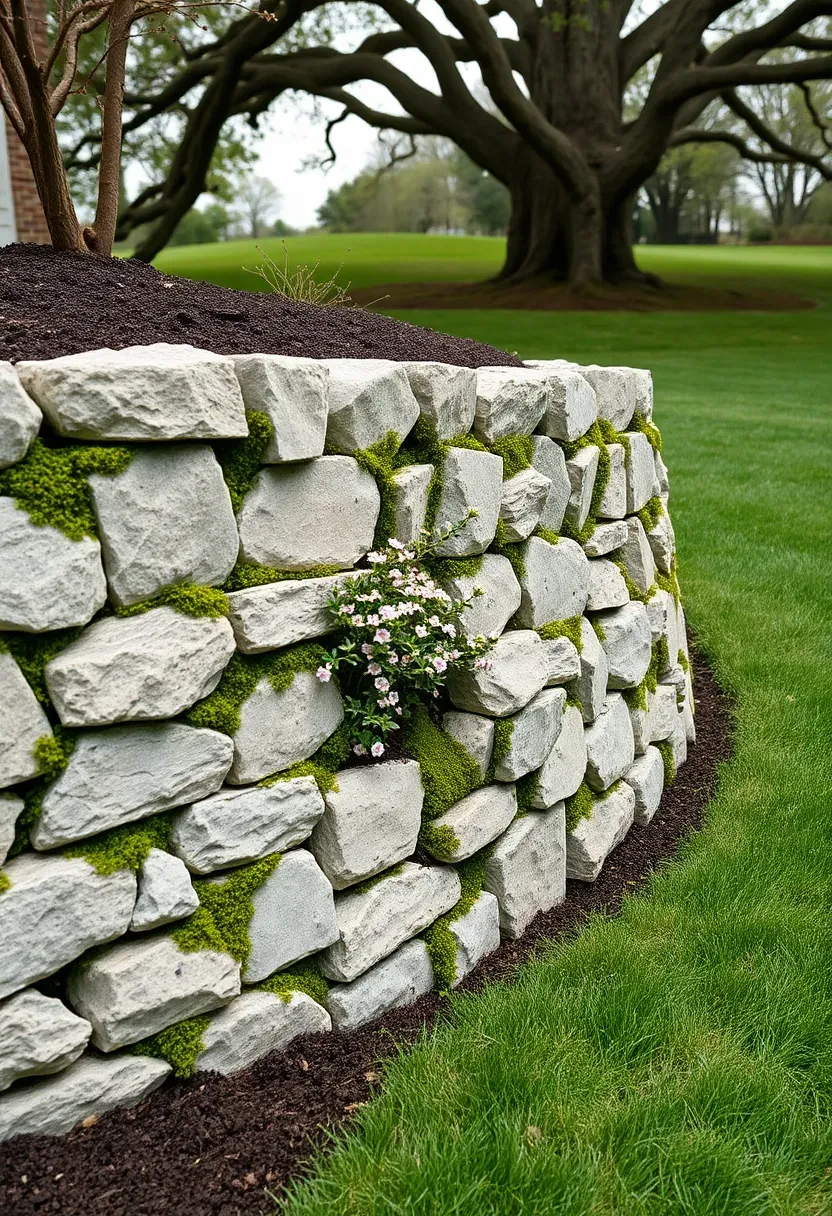
3. Stacked Stone Planter Wall
A dry-stacked stone wall doubles as a retaining structure and a planting bed, which makes it useful on any lot with even mild slope. You build it by setting flat fieldstone or tumbled limestone in courses without mortar, angling each course slightly backward so gravity holds it together. The gaps between stones become micro-habitats for creeping plants, sedums, and small ferns. Build it 18 to 24 inches tall for a casual border, or go up to 3 feet if you need actual soil retention on a grade change.
Tips
- Backfill behind the wall with gravel for the first 6 inches before adding soil — this prevents hydrostatic pressure from pushing stones out.
- Tuck rooted cuttings of creeping thyme or sedum into the joints during spring for a living wall effect.
- Source stone locally to match the regional geology and save on delivery costs.
We picked a few things that go well with this idea: Augshy Macrame Plant Hangers (2-Pack, 35") (★4.6), Mkono Macrame Plant Hanger with Wood Beads (★4.7) and Self-Watering Macrame Hanging Planters (3-Set) (★4.7). As an Amazon Associate we earn from qualifying purchases.
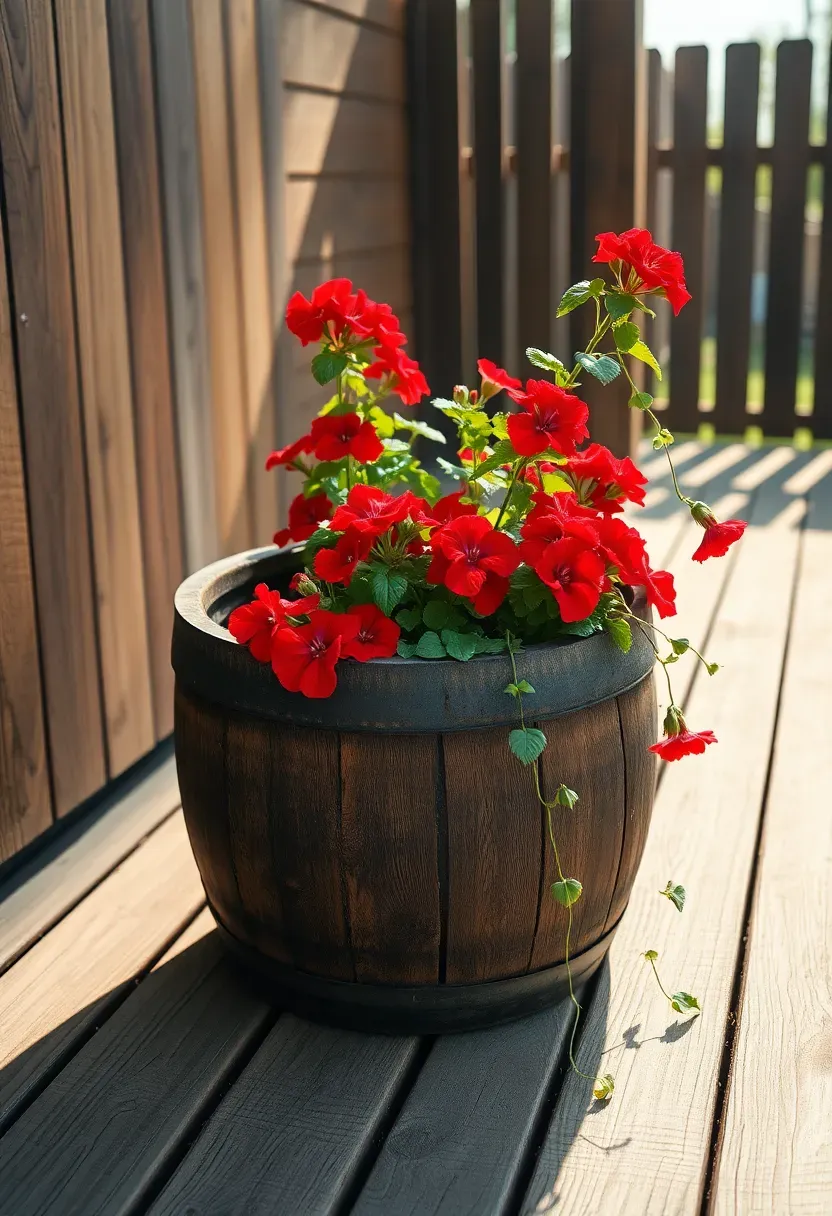
4. Wooden Whiskey Barrel Planter
How to Prep One
Actual used bourbon barrels cost $40 to $80 at farm supply stores and come pre-charred inside, which gives them some natural rot resistance. Drill five or six half-inch drainage holes through the bottom. Line the interior walls with heavy-duty plastic sheeting, stapled at the rim, to slow wood decay from constant soil moisture — but leave the bottom uncovered so water can escape.
Step 1: Inspect the Hoops
Check that the metal bands are snug. Dried-out barrels shrink, and the hoops slide down. Tighten them by tapping with a rubber mallet, or drill a small screw through each band into the stave to lock it.
Step 2: Seal the Exterior
Apply a coat of exterior wood oil (tung oil or Danish oil) to the outside. Skip polyurethane — it peels within a year outdoors.
Step 3: Plant Deep-Rooters
With 22 to 24 inches of soil depth, these barrels handle tomatoes, peppers, dwarf citrus, and even small blueberry bushes. Avoid shallow annual mixes that waste the depth.
Recommended
Items for this idea
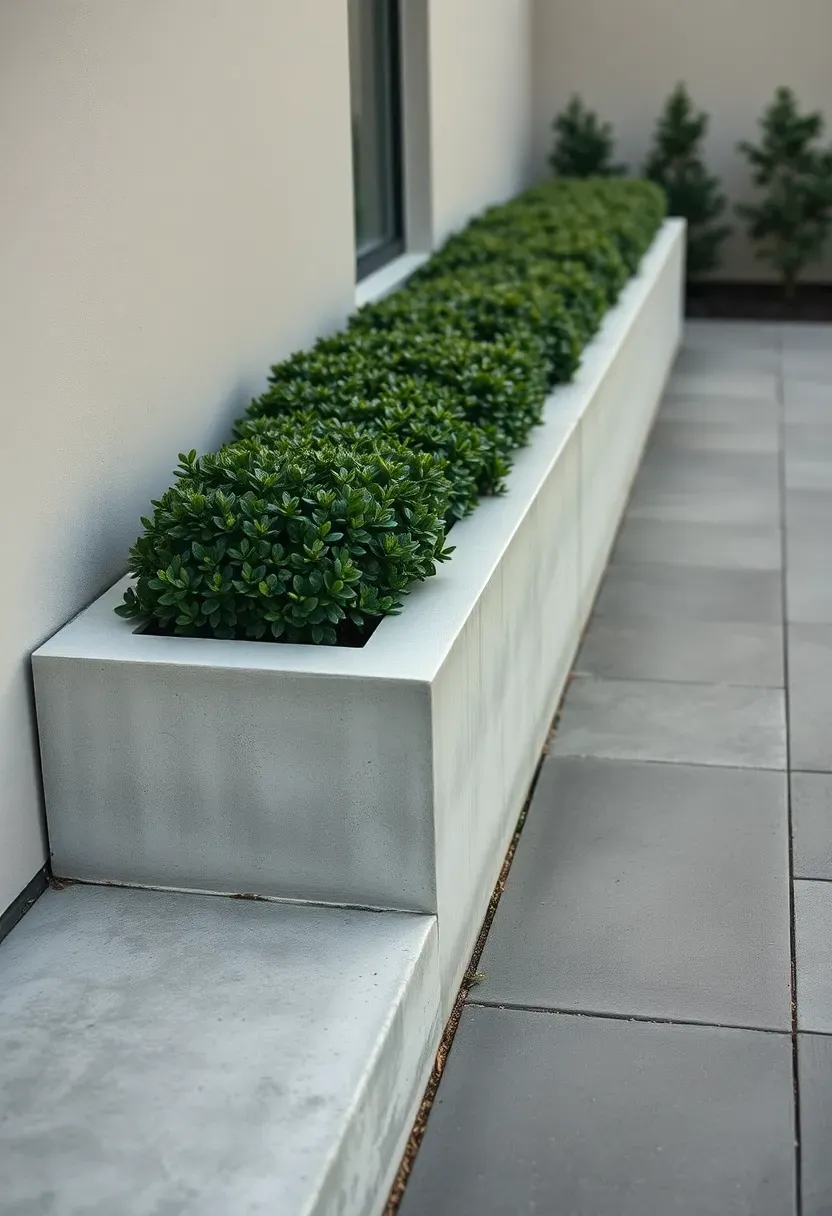
5. Concrete Trough Planter
Poured or precast concrete troughs sit heavy and permanent, which is exactly the point. A 6-foot trough weighing 300 pounds is not going anywhere in a windstorm, and it will not tip over when a dog leans against it. The industrial look softens quickly once plants fill in, and concrete naturally develops a chalky patina that pairs with almost any landscape style. For DIY, you can cast your own using two nested plastic bins as forms and a hypertufa mix — equal parts Portland cement, perlite, and peat moss.
Tips
- Cure homemade concrete planters for at least 28 days before planting; fresh cement is alkaline enough to burn roots.
- Seal the interior with a concrete waterproofing compound to prevent minerals from leaching into soil.
- Place on a bed of compacted gravel rather than directly on a wood deck — the weight and moisture will damage decking over time.
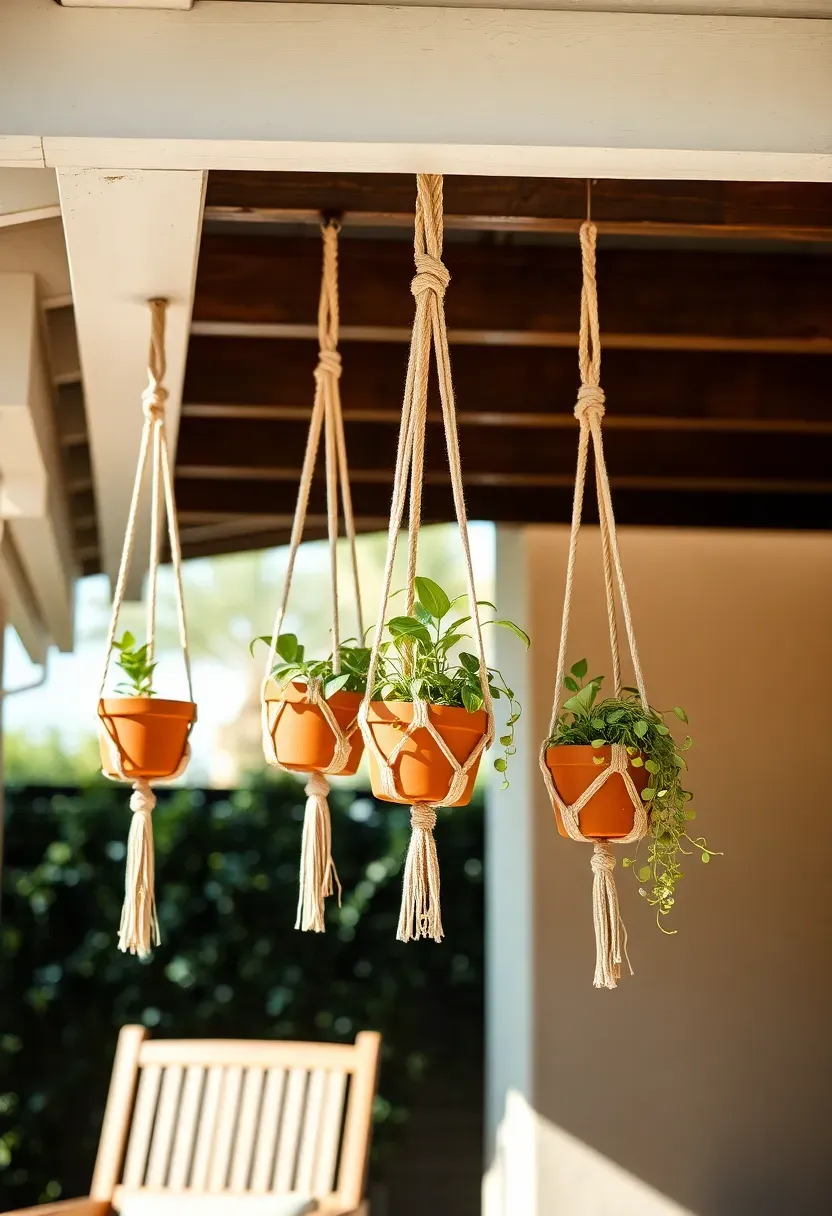
6. Hanging Macrame Planter Display
Hanging planters use vertical space that ground containers ignore entirely. Macrame holders made from natural cotton or jute cord suspend 6 to 8-inch pots from pergola beams, patio covers, or heavy-duty ceiling hooks. Stagger three at different heights — roughly 12 inches apart vertically — so the foliage creates a cascading column without tangling. Best plants for this setup: pothos, string of pearls, trailing petunia, and creeping jenny. Keep the pots lightweight (plastic or thin ceramic) since a soil-filled 10-inch pot with water weight can exceed 15 pounds.
Tips
- Use S-hooks rated for 25 pounds minimum; decorative brass hooks often max out at 10.
- Rotate pots a quarter turn weekly so growth stays even on all sides.
- Swap macrame for marine-grade rope in exposed locations — cotton rots within one wet season.
Recommended
Items for this idea
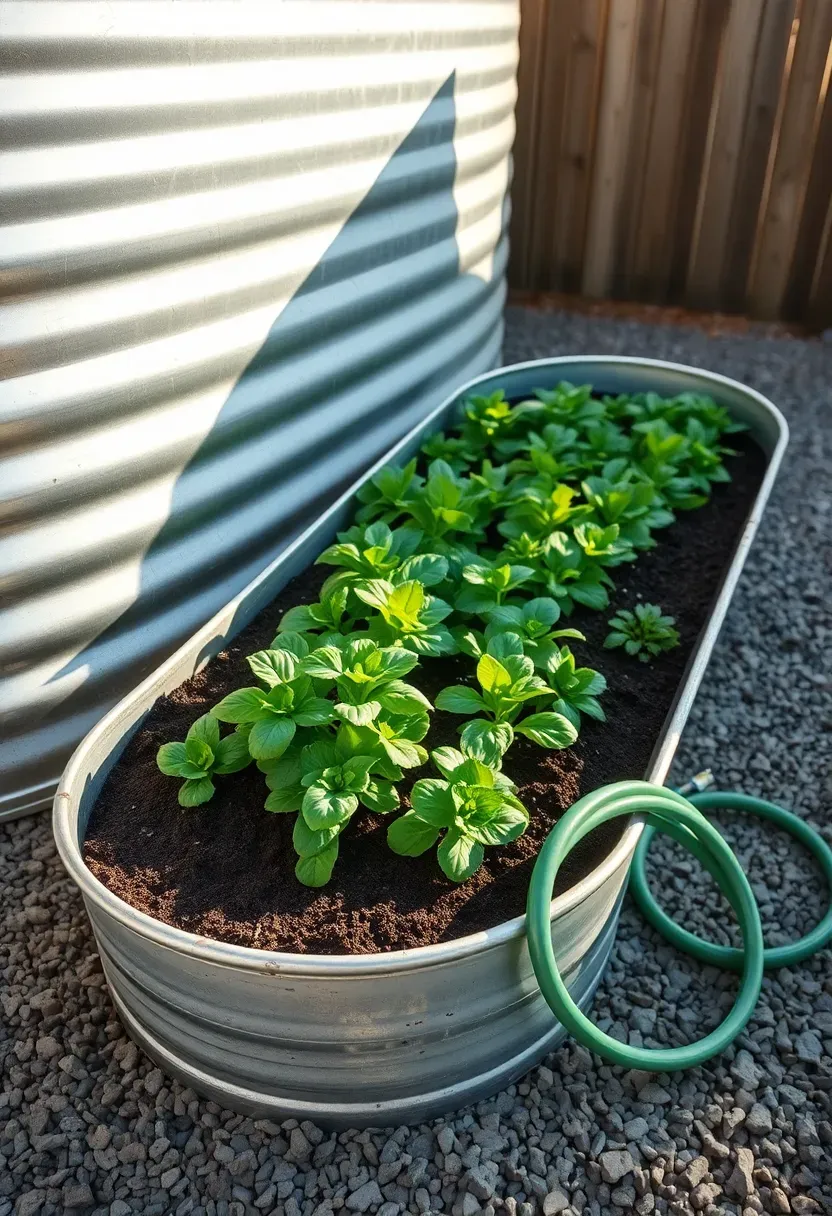
7. Galvanized Metal Stock Tank
Stock Tank vs. Purpose-Built Planter
A 2x4-foot galvanized stock tank from a feed store runs about $70 — roughly a third of what a similarly sized decorative planter costs. The oval shape fits naturally along fence lines or patio edges. Galvanized steel resists rust for 15 to 20 years, and the corrugated walls add a farmhouse texture that works in both rural and suburban settings.
Best Setup
Drill drainage holes every 8 inches across the bottom with a step bit. Fill the lower third with crushed gravel or broken terracotta shards to improve drainage and reduce the amount of soil you need. Top with a quality raised-bed mix — not bagged topsoil, which compacts too much in a container.
Choose If
- You want a quick, affordable kitchen garden bed: fill with herbs, lettuce, and compact peppers.
- You want an ornamental border: plant a single grass species like blue fescue in a repeating row of matching tanks.
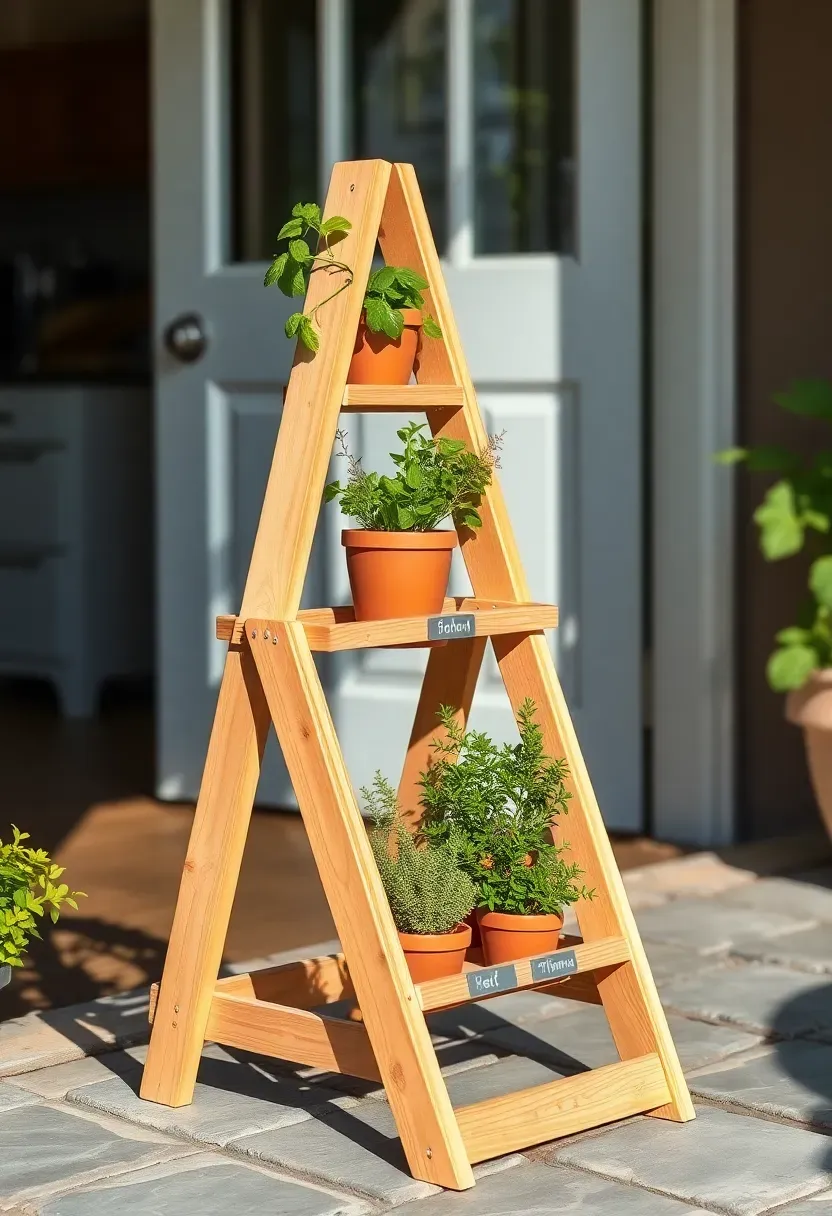
8. Tiered Herb Planter Stand
A tiered stand puts herbs at picking height and keeps them organized by water needs. Build or buy a three-level A-frame stand and assign each tier based on sun and moisture: Mediterranean herbs (rosemary, thyme, oregano) on the sunny top tier where soil dries fastest, leafy herbs (basil, cilantro, parsley) on the shaded middle tier, and mint on the bottom where it gets the most moisture and cannot spread into other plants. The whole setup takes about 2x3 feet of floor space, making it practical even on a small apartment patio.
Tips
- Line wooden shelves with zinc trays to catch drainage and protect the wood from rot.
- Label each tier with small slate tags — it helps guests pick herbs for their plates without asking.
- Harvest from the top down regularly to keep plants bushy and prevent leggy growth.
Recommended
Items for this idea
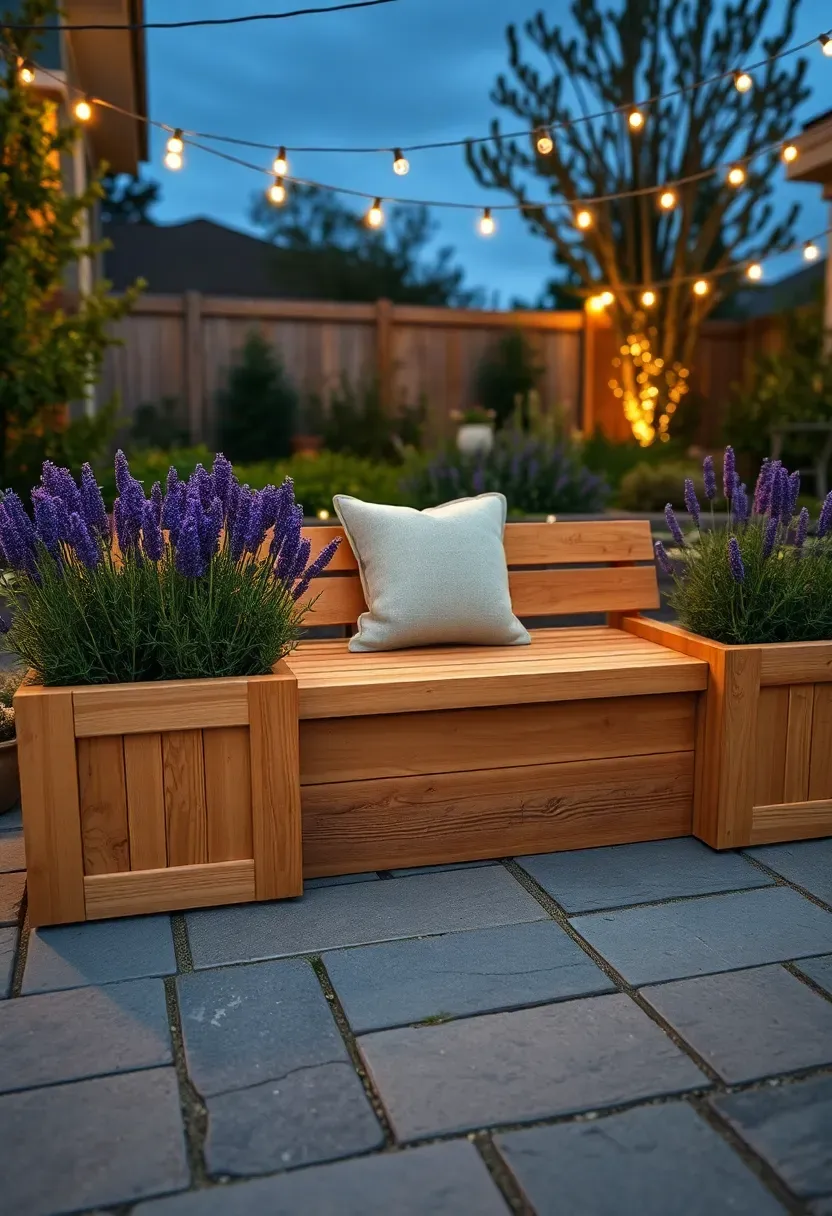
9. Built-In Bench Planter Combo
The Problem
Most patios force a choice between seating and greenery. You either have enough chairs for guests or enough pots for plants, but not both — especially on decks under 200 square feet.
The Solution
A built-in bench with planter boxes at each end solves both. The bench seat spans 6 to 8 feet between two 18-inch-square planter boxes, creating a single piece of furniture that frames a seating area with living plants. Build the boxes from pressure-treated lumber or cedar, with a removable liner inside for easy soil changes. The bench seat connects the two boxes and doubles as a structural brace that keeps the planters from tipping.
Pros and Cons
- Pro: frees up floor space that separate pots and chairs would occupy.
- Con: the planters are fixed in place — rearranging is not an option after installation.
- Pro: lavender or rosemary in the end boxes scents the seating area naturally.
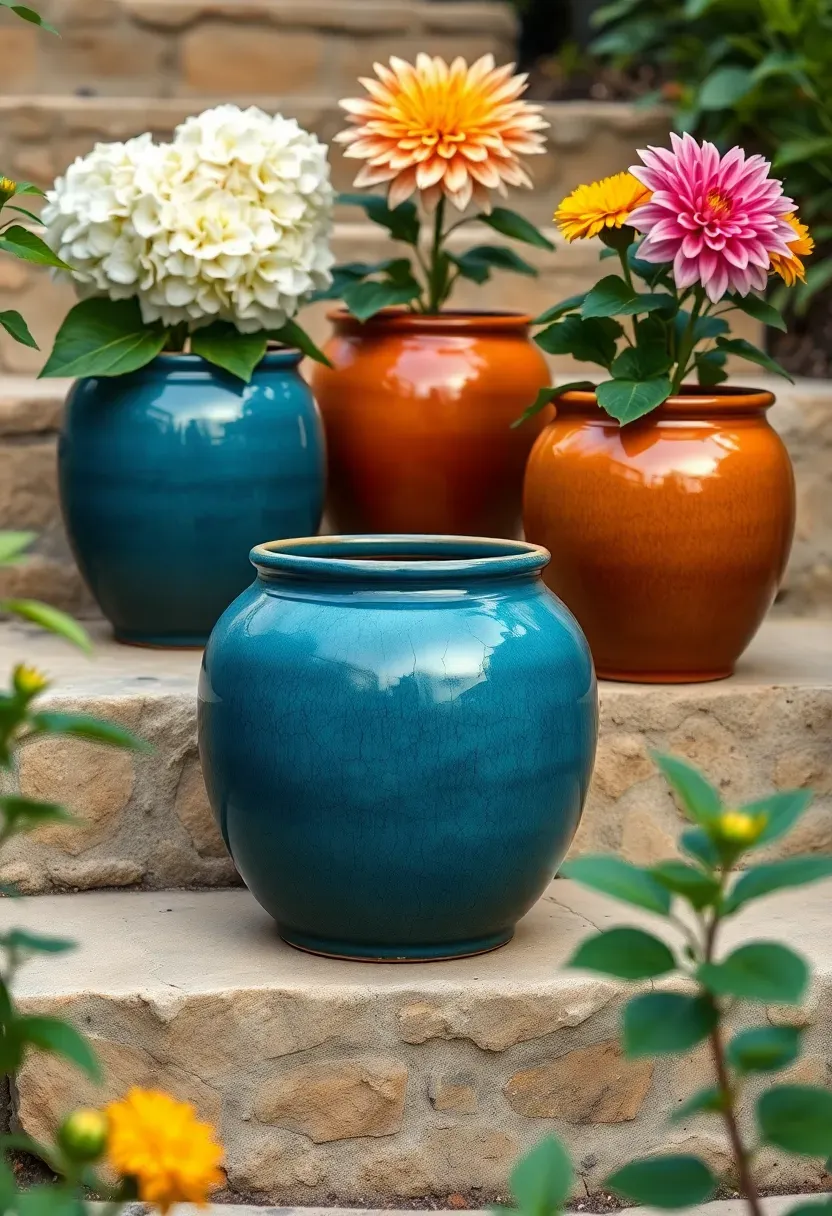
10. Ceramic Glazed Pot Collection
Glazed ceramic pots hold moisture longer than unglazed terracotta because the glass-like surface seals the clay body. That retention makes them better for thirsty plants like hydrangeas, ferns, and hostas, but worse for succulents and lavender that need fast-draining soil. The color range is the real draw — deep teal, amber, cobalt, matte black — and a curated set of three or four pots in a shared color family creates a more pulled-together look than a random assortment. Place them on stone steps, beside a garden gate, or flanking a back door.
Tips
- Check the glaze covers the interior completely; partially glazed pots still wick moisture and may crack in freezing weather.
- Elevate pots on terracotta feet or small stone pavers to prevent moisture from staining the surface beneath.
- Bring glazed pots indoors or into a garage before the first hard freeze if you live in Zone 6 or colder.
Recommended
Items for this idea
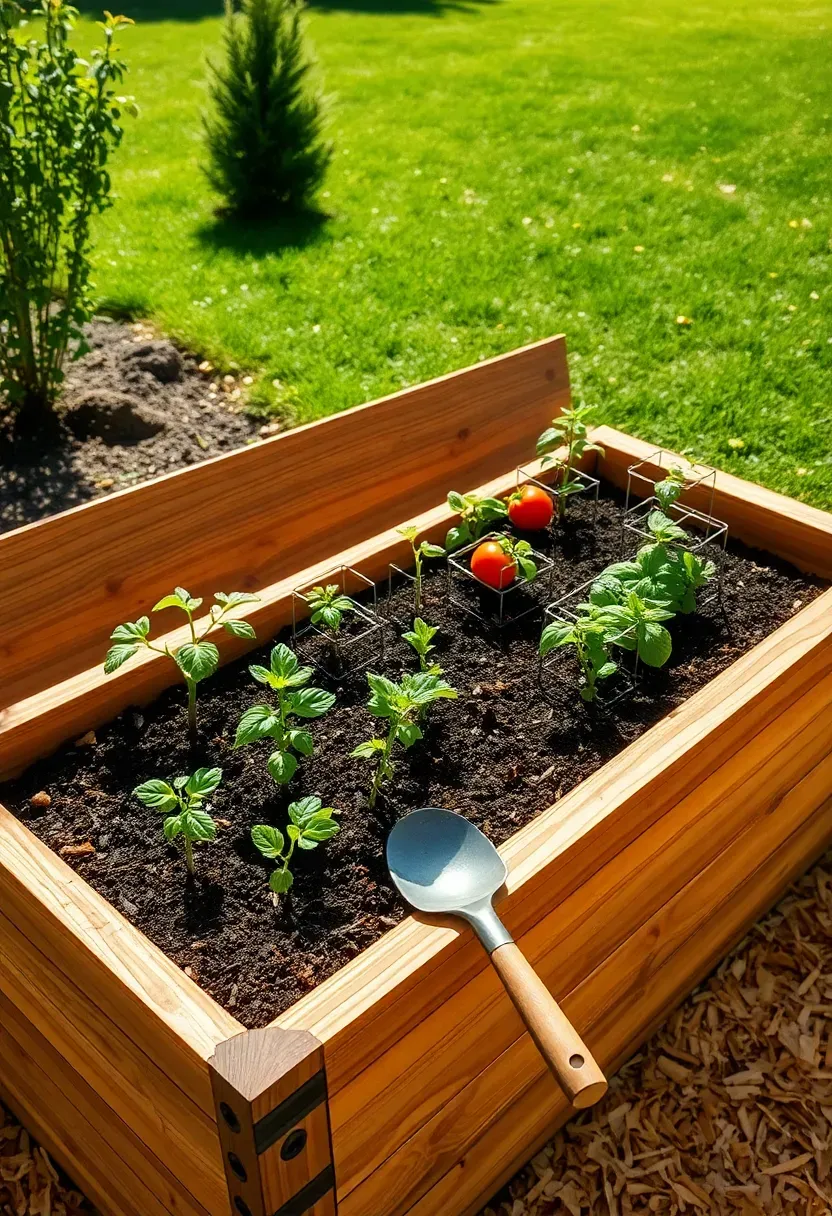
11. Raised Cedar Garden Bed
Cedar vs. Pine
Western red cedar naturally contains thujaplicins — compounds that resist fungal decay and insect damage without chemical treatment. A cedar raised bed lasts 10 to 15 years outdoors; untreated pine rots in 3 to 4. The cost difference is real ($80 versus $30 for a 4x8 bed), but replacing a rotted bed every few years costs more in the long run and disrupts established soil biology.
Modern Take
Stack two courses of 2x6 cedar boards for a 12-inch-tall bed — deep enough for most vegetables including carrots and beets. Line the bottom with hardware cloth to keep burrowing rodents out. Fill with a 60/40 mix of compost and topsoil. Skip the landscape fabric on the bottom; it impedes drainage and beneficial earthworm movement between native ground and bed soil.
Recommendation
Cedar is worth the upfront cost if you plan to grow food. For purely ornamental beds that you might relocate, cheaper pine with a food-safe wood stain is fine.
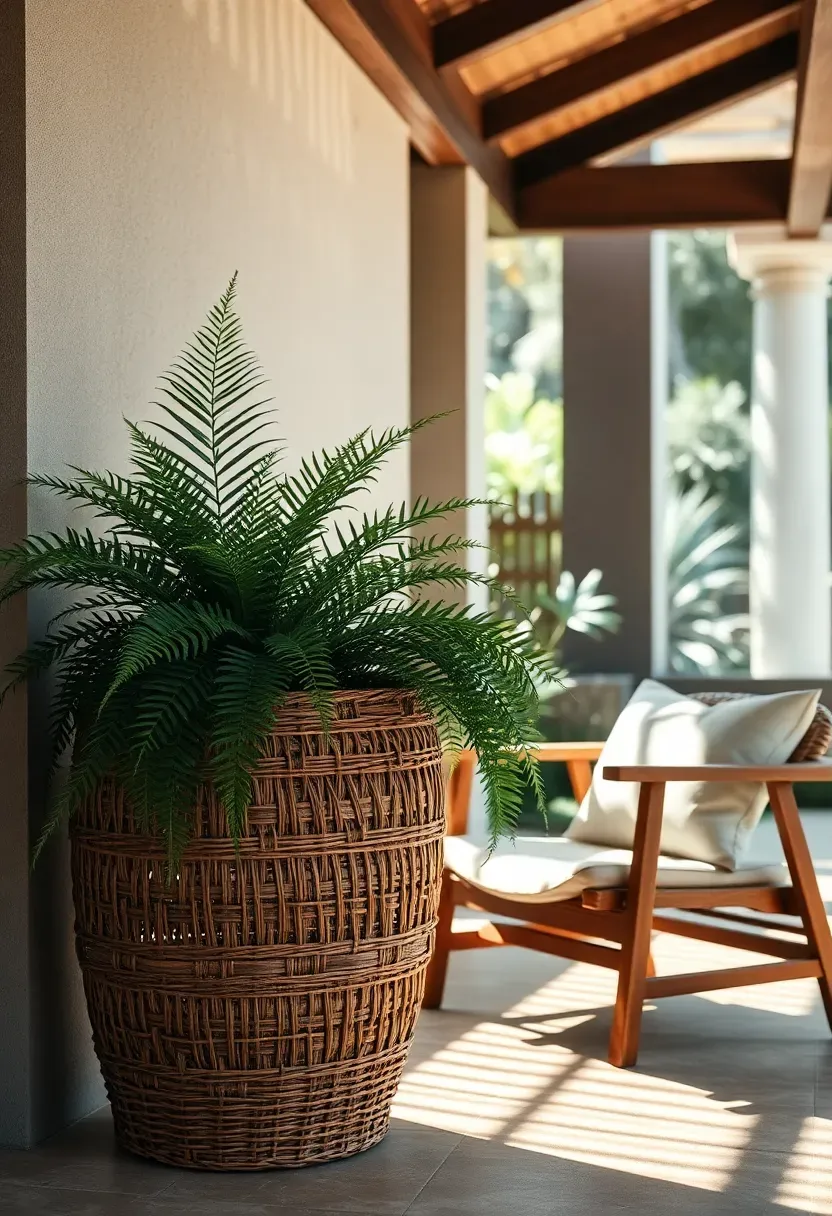
12. Woven Rattan Basket Planter
Rattan and wicker baskets bring a warm, textural element that metal and ceramic cannot match. Use them as decorative sleeves around a plain plastic nursery pot rather than planting directly into the basket — rattan rots quickly with constant soil contact. The look works best on covered patios, screened porches, and under pergolas where rain exposure is limited. A 16-inch basket holding a Boston fern or a peace lily adds a relaxed, resort quality to an otherwise hard-surface patio.
Tips
- Spray baskets with a clear outdoor sealant (matte finish, not glossy) to extend their life by two to three seasons.
- Place a plastic saucer inside the basket beneath the pot to catch drainage and protect the weave.
- Rotate between two or three baskets seasonally so each one gets time to dry out completely and avoid mold.
Recommended
Items for this idea
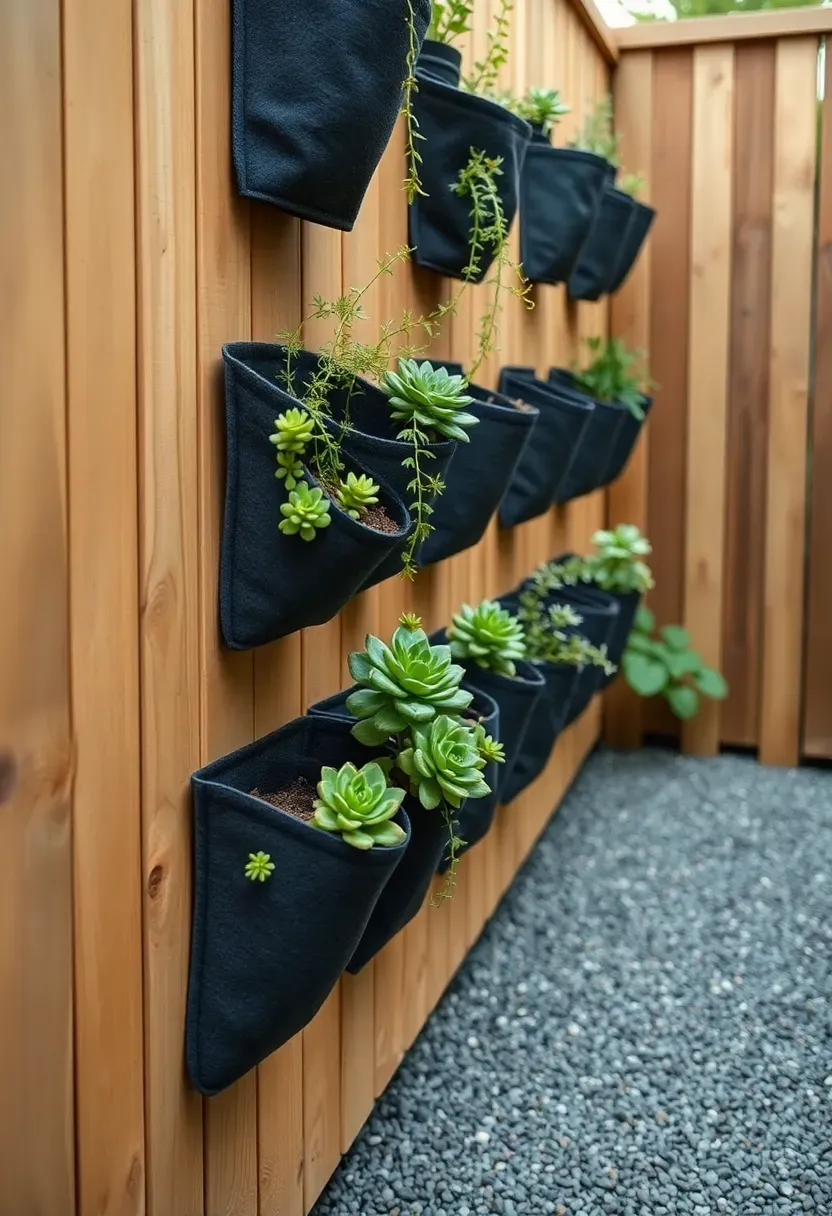
13. Vertical Wall Planter System
How It Works
Modular pocket planters bolt or hang onto any flat surface — fences, garage walls, retaining walls. Each pocket holds a 4 to 6-inch pot worth of soil. Stack them in a grid pattern, stagger them for a more organic look, or run a single column for a narrow side yard. Water drips from upper pockets to lower ones, so plant drought-tolerant species at the top and moisture-loving ones at the bottom.
Step 1: Choose Your System
Felt-pocket systems cost $20 to $40 and work well for lightweight annuals. Rigid modular trays ($50 to $100) hold more soil and support perennials and small shrubs.
Step 2: Anchor Securely
A fully planted 4x4-foot wall system can weigh over 100 pounds when wet. Use lag bolts into studs or masonry anchors — not drywall screws.
Step 3: Automate Watering
A drip line along the top row with a battery timer eliminates the single biggest failure point: forgetting to water the top pockets, which dry out first.
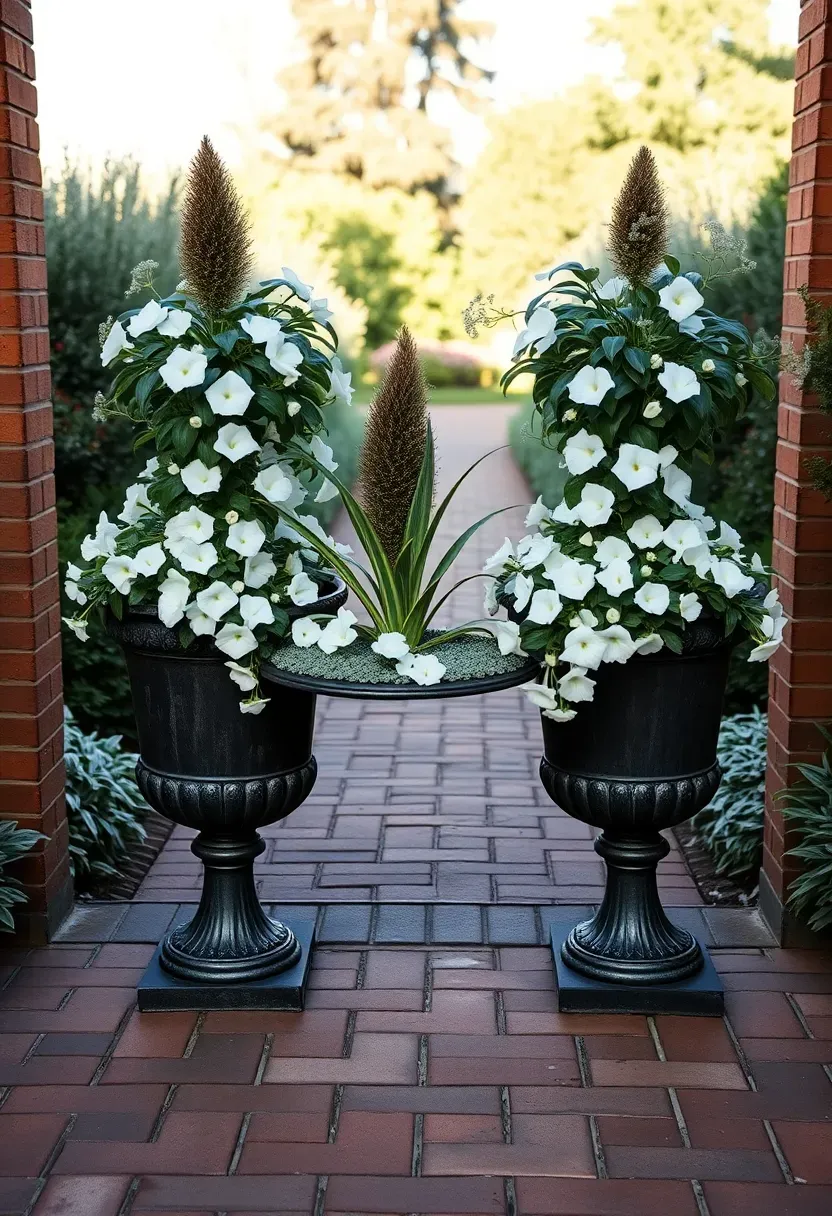
14. Cast Iron Urn Planter
Cast iron urns are the formal punctuation marks of garden design. A matched pair flanking a gate, pathway entrance, or set of stairs signals the boundary between one garden zone and another. The weight (40 to 80 pounds empty) means they double as permanent anchors that do not shift in wind. Antique urns from salvage yards run $150 to $400 each; reproduction cast aluminum versions look similar at half the weight and a third of the price. Plant with a central upright (dracaena spike, fountain grass) surrounded by trailing annuals (sweet potato vine, white petunias) for the classic urn silhouette.
Tips
- Coat the interior with rust-inhibiting spray before planting to extend the life of the casting.
- Drill a drainage hole if none exists — cast iron can be drilled with a cobalt bit at slow speed.
- Place iron urns on stone pads rather than wood surfaces, since rust stains wood permanently.
Recommended
Items for this idea
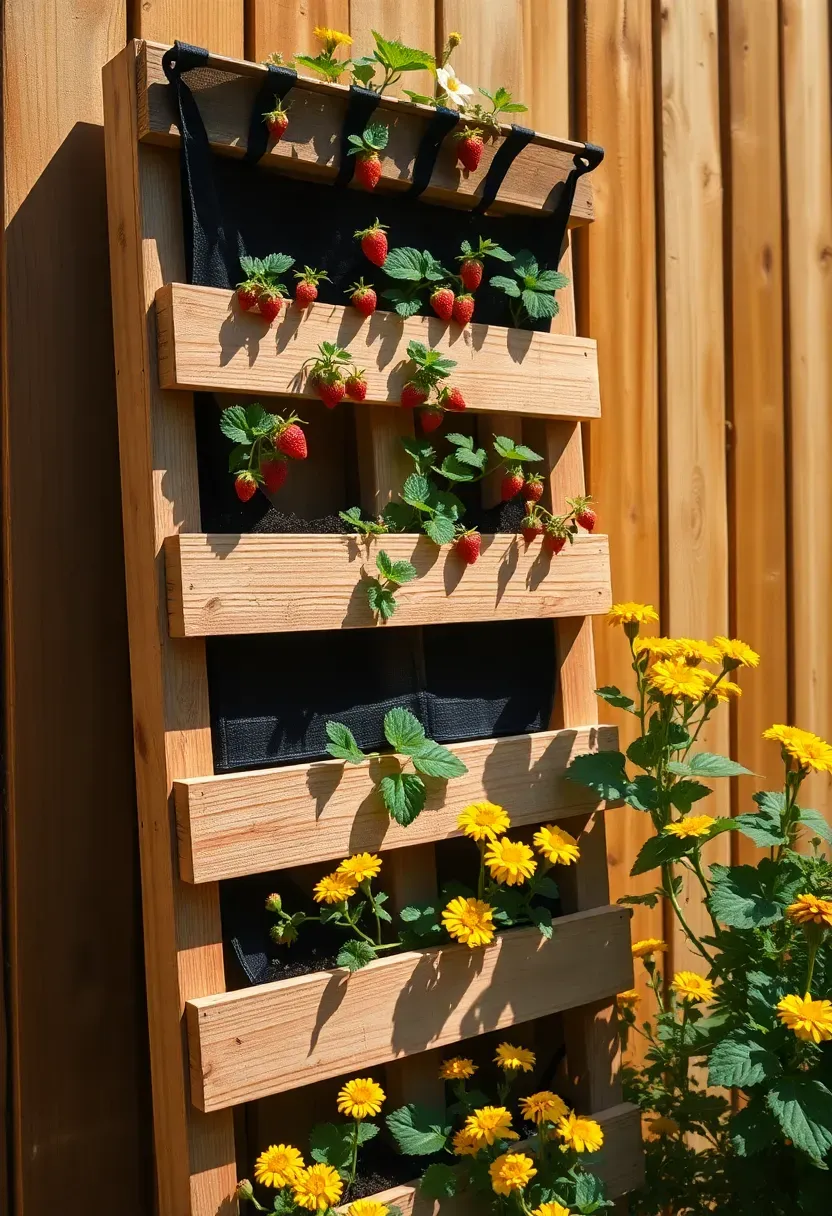
15. Recycled Pallet Planter Box
Origins
Pallet planters started as a Pinterest-driven DIY trend around 2012, but they stuck around because the raw material is genuinely free and the build takes under an hour. A single standard pallet (48x40 inches) yields either one vertical wall planter or two horizontal trough-style boxes after disassembly.
Modern Approach
Sand the wood and check the stamp: pallets marked "HT" (heat-treated) are safe for food gardening. Avoid "MB" (methyl bromide) pallets entirely. Staple landscape fabric across the back and bottom to hold soil, leaving the slat openings as planting pockets. Lean the finished piece against a fence at a 10-degree angle for stability, and secure the top with a single screw into a fence post.
Apply at Home
Strawberries, lettuce, and compact herbs grow well in the shallow pockets. Avoid heavy fruiting plants like tomatoes — the soil volume is too small to sustain them through a full season.
16. Fiberglass Lightweight Planter
Fiberglass planters weigh 70 to 80 percent less than concrete or stone equivalents of the same size, which matters enormously on rooftops, elevated decks, and balconies with weight limits. A 30-inch fiberglass cube weighs around 15 pounds empty versus 120 for concrete. Modern fiberglass finishes convincingly mimic stone, metal, and even aged terracotta from a few feet away. The material is frost-resistant, UV-stable, and will not crack in freeze-thaw cycles.
Tips
- Add a layer of gravel or a few bricks inside the base for ballast — without added weight, lightweight planters tip in strong gusts.
- Choose matte finishes over glossy ones; gloss shows scratches and fingerprints quickly.
- Inspect the interior for drainage holes before buying — some decorative models ship without them.
Recommended
Items for this idea
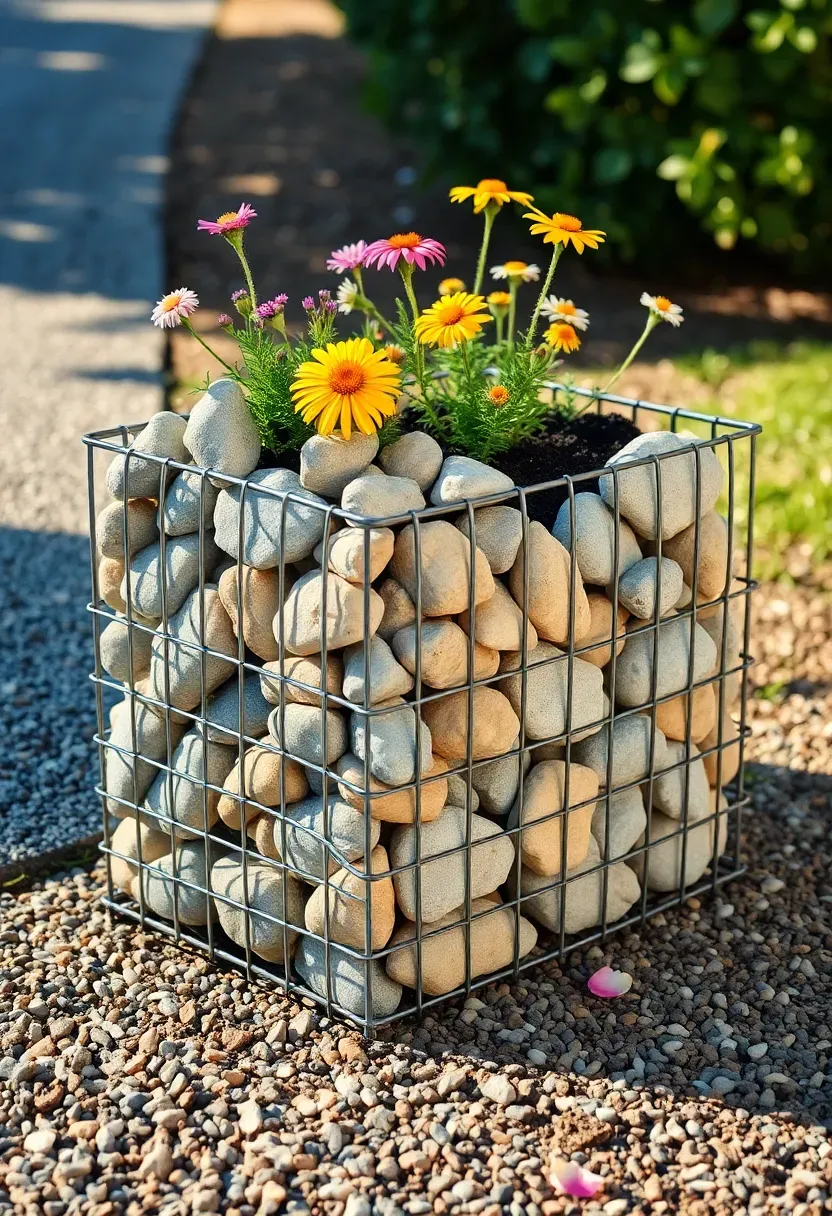
17. Gabion Cage Planter
Gabion Basics
A gabion is a wire cage filled with stones — a civil engineering staple used for retaining walls and erosion control since the 1800s. Scaled down to planter size (2x4 feet, 18 inches tall), gabions create a rugged, textural raised bed that drains exceptionally well. The stone fill acts as thermal mass, absorbing daytime heat and releasing it slowly at night, which extends the growing season by a couple of weeks in spring and fall.
Choose If
- You have leftover stone from a landscaping project and want to put it to use.
- You want a planter that doubles as a structural landscape element — retaining a small grade, edging a driveway, or defining a patio border.
Recommendation
Buy pre-formed gabion baskets from a fencing supplier ($30 to $60 each) and fill with whatever stone is cheapest locally. Line the inside with geotextile fabric before adding soil on top of the stone fill.
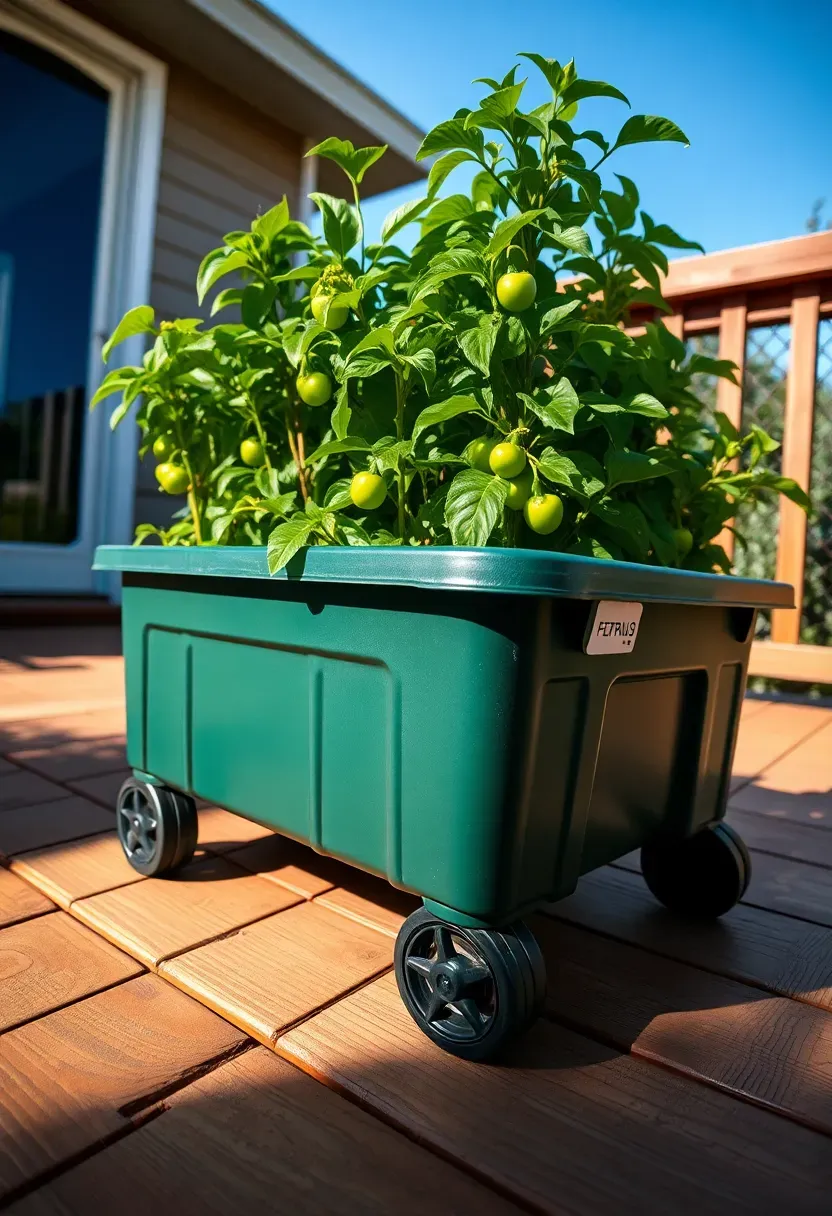
18. Self-Watering Rolling Planter
Self-watering planters use a reservoir beneath the soil that wicks moisture upward through capillary action. Add locking caster wheels and you get a planter that follows the sun across a deck or retreats under a roof overhang before a storm. The reservoir typically holds 2 to 5 gallons and sustains plants for 3 to 7 days between refills depending on heat and plant size. Commercial models cost $60 to $150; DIY versions use nested storage totes and a length of PVC pipe as a fill tube.
Tips
- Check the reservoir level weekly through the fill tube — overflow holes prevent waterlogging but cannot fix an empty reservoir.
- Lock the casters once positioned; a planter rolling off a deck edge is a real hazard on sloped surfaces.
- Clean the reservoir at the end of each season to prevent algae and mineral buildup.
Recommended
Items for this idea
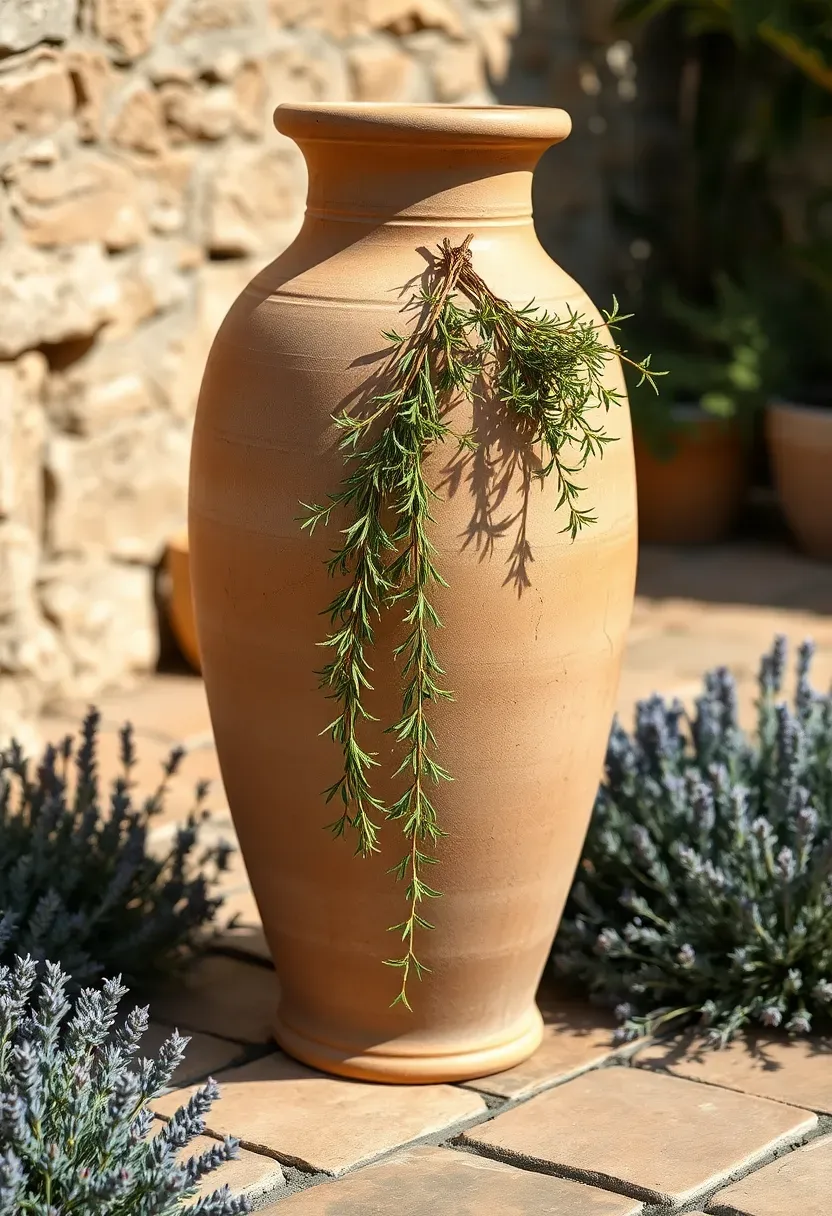
19. Olive Jar Mediterranean Planter
Historical Roots
These tapered vessels with narrow necks were originally used to store and transport olive oil across the Mediterranean basin. Antique examples from Greece, Turkey, and southern Italy date back centuries. As garden ornaments, they work as standalone sculptural pieces without any planting at all — but adding a single trailing rosemary or a spray of Russian sage from the mouth softens the look and connects the jar to the living garden around it.
Modern Use
Reproduction olive jars in frost-proof stoneware run $80 to $250 depending on size. Place one at the end of a garden path, beside a water feature, or centered in a gravel courtyard. The narrow opening limits planting to a single specimen or a small arrangement, which actually forces restraint — and restraint almost always looks better than abundance in this context.
Apply at Home
Pair with low Mediterranean plantings — lavender hedges, santolina, or creeping thyme — to create a cohesive regional theme rather than dropping the jar randomly among hostas and hydrangeas.
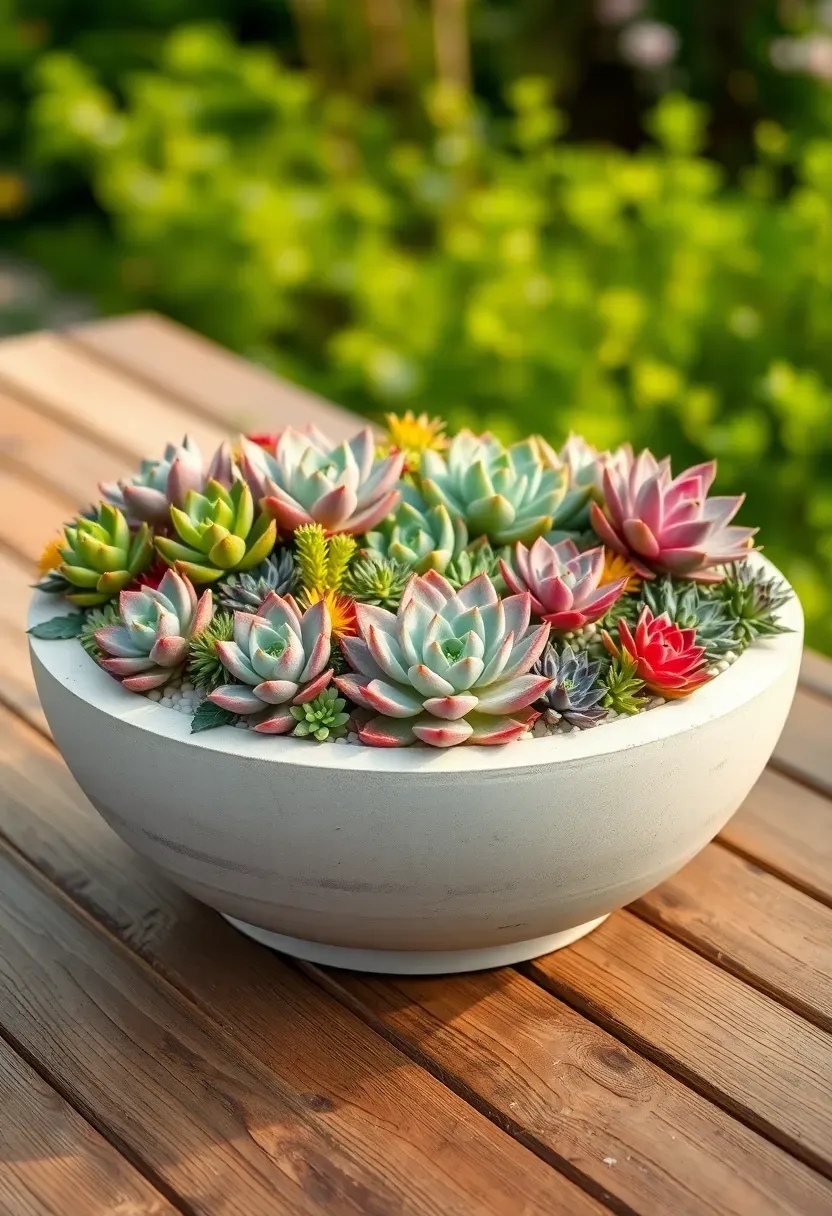
20. Succulent Bowl Arrangement
A wide, shallow bowl — concrete, ceramic, or even a repurposed birdbath basin — is the ideal vessel for succulents because it mirrors their natural growing conditions: fast drainage, limited soil depth, and full sun exposure. Pack the bowl tightly with a mix of rosette types (echeveria, sempervivum), trailing types (string of donkeys, sedum morganianum), and upright types (aloe, haworthia) for contrast in form and texture. Top-dress with fine gravel or decomposed granite to keep the crown of each plant dry and prevent rot.
Tips
- Use a cactus-specific potting mix, not regular potting soil — succulents rot in moisture-retaining mixes.
- Water once every 10 to 14 days in summer; once a month in winter if the bowl stays outdoors.
- Separate any pups or offsets in early spring and use them to start a second bowl or fill gaps.

Recommended
Items for this idea
21. Modular Planter Screen Wall
Tall, narrow planter boxes arranged in a row create a living privacy screen that blocks sight lines without the permanence or HOA complications of a fence. Each module is typically 12 to 16 inches wide, 12 inches deep, and 36 to 48 inches tall. Fill with fast-growing screening plants — clumping bamboo, Italian cypress, ornamental grasses, or tall lavender — and the green screen fills in within one growing season. The modular format means you can add or remove sections, rearrange the layout, or relocate the entire wall to a new property.
Tips
- Use fiberglass or composite boxes for rooftops and elevated decks where weight matters.
- Choose clumping bamboo varieties only — running bamboo escapes even large planters through drainage holes.
- Space boxes with no more than 2 inches between them for a continuous screen effect; wider gaps create visible breaks at eye level.
Quick FAQ
Which backyard planter material lasts longest outdoors? Corten steel and concrete both exceed 20 years with zero maintenance. Galvanized steel lasts 15 to 20 years. Cedar runs 10 to 15 years. Terracotta and ceramic can last indefinitely in mild climates but crack in freeze-thaw zones unless brought indoors for winter.
Do I need drainage holes in every planter? Yes, without exception. Planters without drainage kill more plants than drought, cold, or pests combined. If your container lacks holes, drill them before planting — one hole per 4 inches of base diameter is a reasonable minimum.
Can I leave planters outside during winter? It depends on the material. Concrete, corten steel, fiberglass, and galvanized metal handle freezing temperatures without damage. Terracotta, unglazed ceramic, and most glazed pottery should be emptied and stored or at least wrapped in burlap and elevated off the ground to reduce moisture absorption and cracking.
What soil mix works best for outdoor container gardening? A 50/50 blend of quality potting mix and compost suits most plants. Avoid straight garden soil — it compacts in containers and smothers roots. For succulents and Mediterranean herbs, add 30 percent perlite or pumice to speed drainage.
How often should I fertilize planters compared to in-ground beds? Container plants need more frequent feeding because nutrients wash out with every watering. A slow-release granular fertilizer at planting time plus a liquid feed every two to three weeks during the growing season keeps most plants healthy without overcomplicating things.
Planters are the easiest way to add structure, color, and growing space to a backyard without breaking ground. Start with one or two from this list that match your climate and aesthetic, see how they hold up through a full season, and expand from there. The beauty of containers is that nothing is permanent — if a placement or plant choice does not work, you move it and try again next spring.
Pinterest cover for 21 Backyard Planter Ideas for Every Style
About the author
OBCD
CGI visualization and interior design content. We create detailed 3D renders and curate practical design ideas for every room in your home.