23 Backyard Retaining Wall Ideas for Every Slope
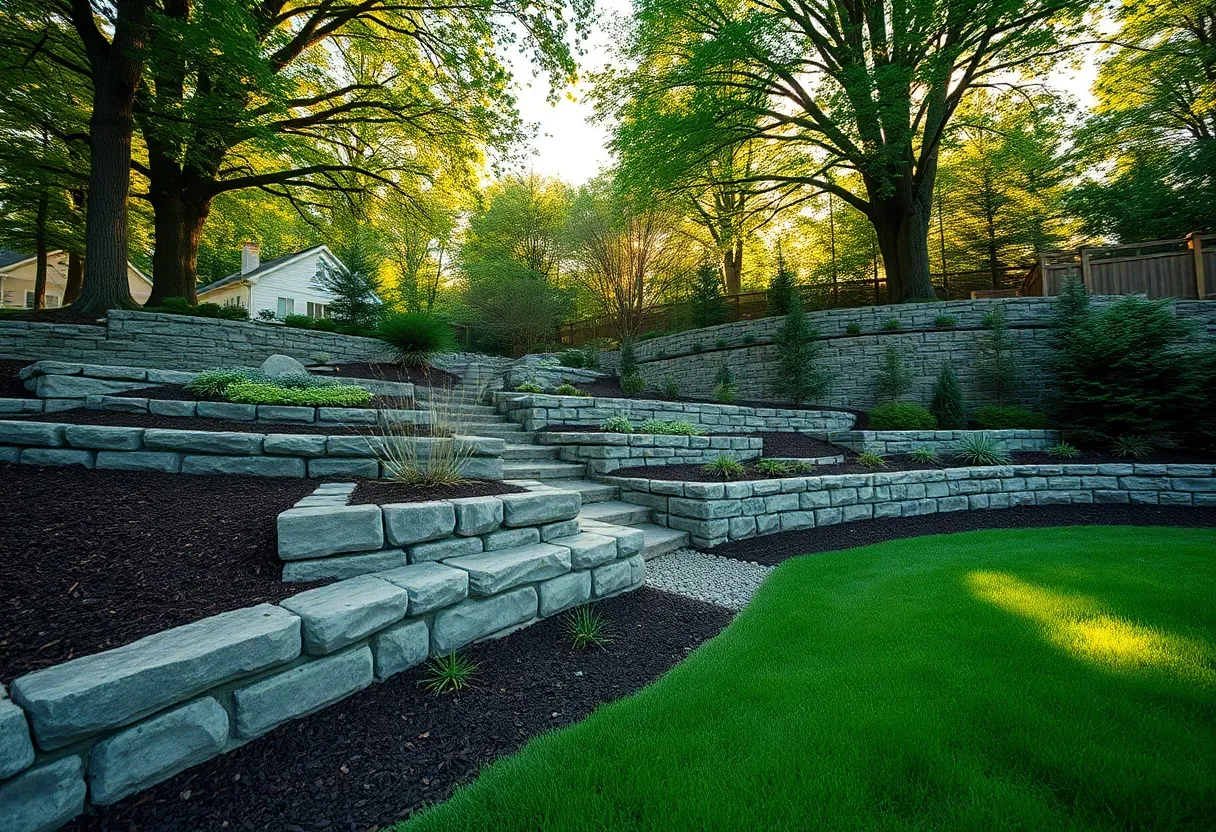
When I bought my house, the backyard dropped about six feet over forty feet of yard. Rain turned the lower half into a mud chute every spring. A retaining wall fixed the erosion problem, but the real surprise was how much usable space I gained — what used to be an unusable slope became two flat areas, one for a patio and one for raised beds. The project taught me that retaining walls are equal parts engineering and aesthetics, and getting the drainage wrong costs more than the wall itself. These 23 ideas cover materials from poured concrete to dry-stacked fieldstone, with honest notes on cost, difficulty, and where each type actually makes sense.
Here are 23 backyard retaining wall ideas organized from simple gravity walls to complex multi-tier systems, covering different materials, budgets, and slope conditions.
Table of Contents
- Stacked Natural Stone Wall
- Concrete Block Gravity Wall
- Timber Retaining Wall
- Boulder Wall with Native Plants
- Poured Concrete Modern Wall
- Gabion Basket Wall
- Dry-Stacked Fieldstone Wall
- Railroad Tie Wall
- Brick Retaining Wall
- Corten Steel Planter Wall
- Limestone Block Terraces
- Curved Retaining Wall with Bench
- Concrete Block Wall with Stone Veneer
- Living Wall with Built-In Planters
- Multi-Tier Garden Terrace
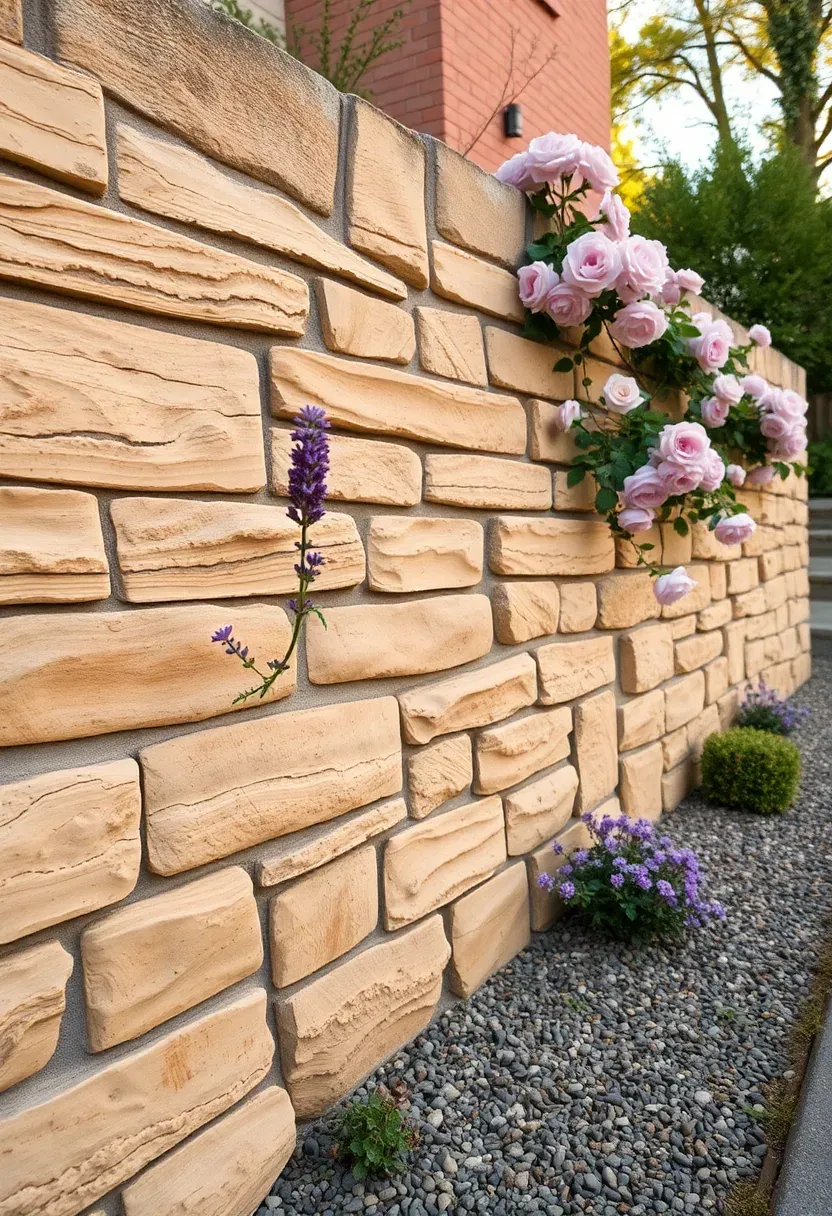
- Sandstone Retaining Wall
- Concrete and Wood Hybrid Wall
- Moss Rock Retaining Wall
- Interlocking Block Wall with Stairs
- Low Seat Wall for Patio Edge
- Retaining Wall with Water Feature
- Recycled Concrete Chunk Wall
- Cantilevered Concrete Wall with Lighting
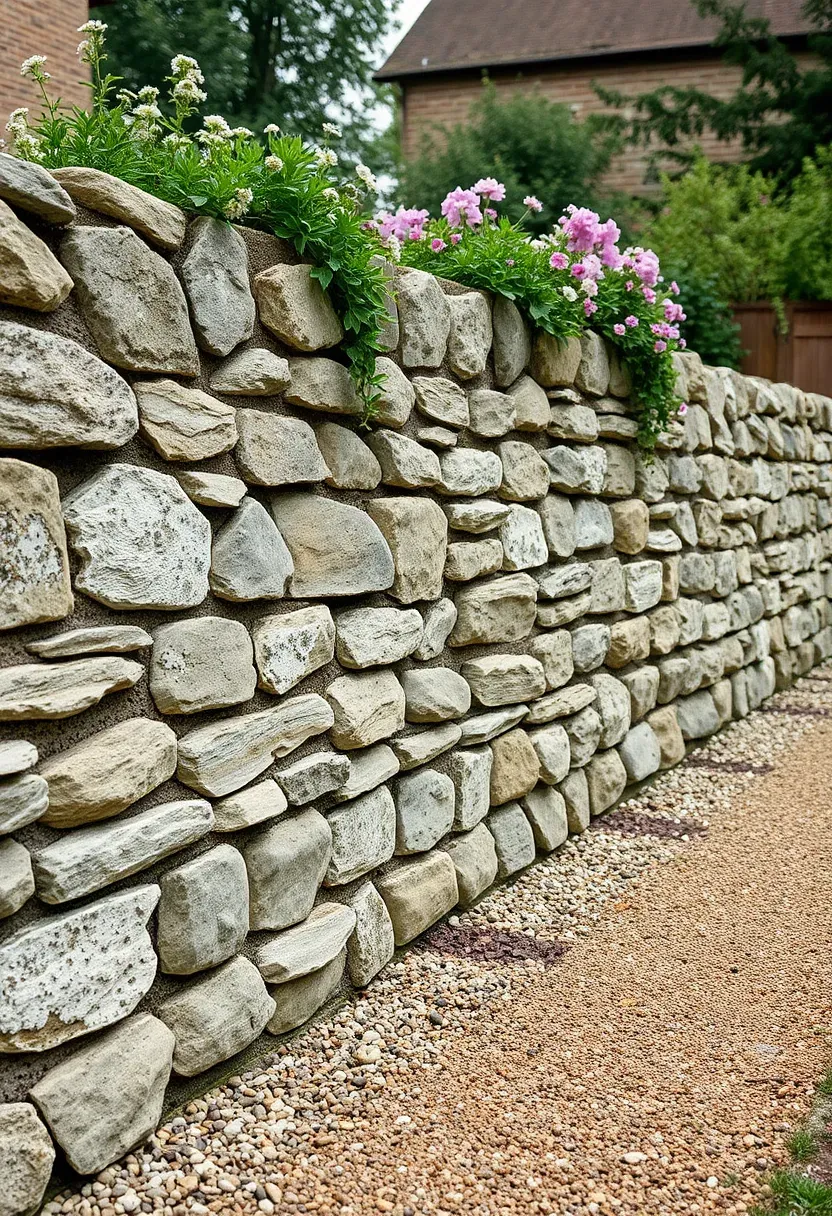
1. Stacked Natural Stone Wall
Natural stone walls use the weight and friction of irregularly shaped rocks to hold soil in place without mortar or reinforcement. Bluestone, fieldstone, and granite are the most common choices depending on your region. Material costs run $15 to $30 per square face foot, but the real expense is labor — fitting irregular stones together takes skill and patience. A well-built dry-stack stone wall can last generations because it flexes slightly with ground movement instead of cracking. The rough texture and color variation give it a look that blends into wooded or cottage-style yards better than any manufactured product.
Tips
- Source stone locally to save on delivery costs and get a material that matches your region's natural geology
- Batter the wall inward at about 1 inch per foot of height for stability
- Leave small gaps between stones to act as natural weep holes for water drainage
We picked a few things that go well with this idea: Landical Faux Stone Retaining Wall Blocks (8-Pack) (★3.6), Landical Gray Faux Stone Edging Blocks (8-Pack) (★4.5) and Landical Faux Stone Retaining Wall Blocks (4-Pack) (★3.6). As an Amazon Associate we earn from qualifying purchases.
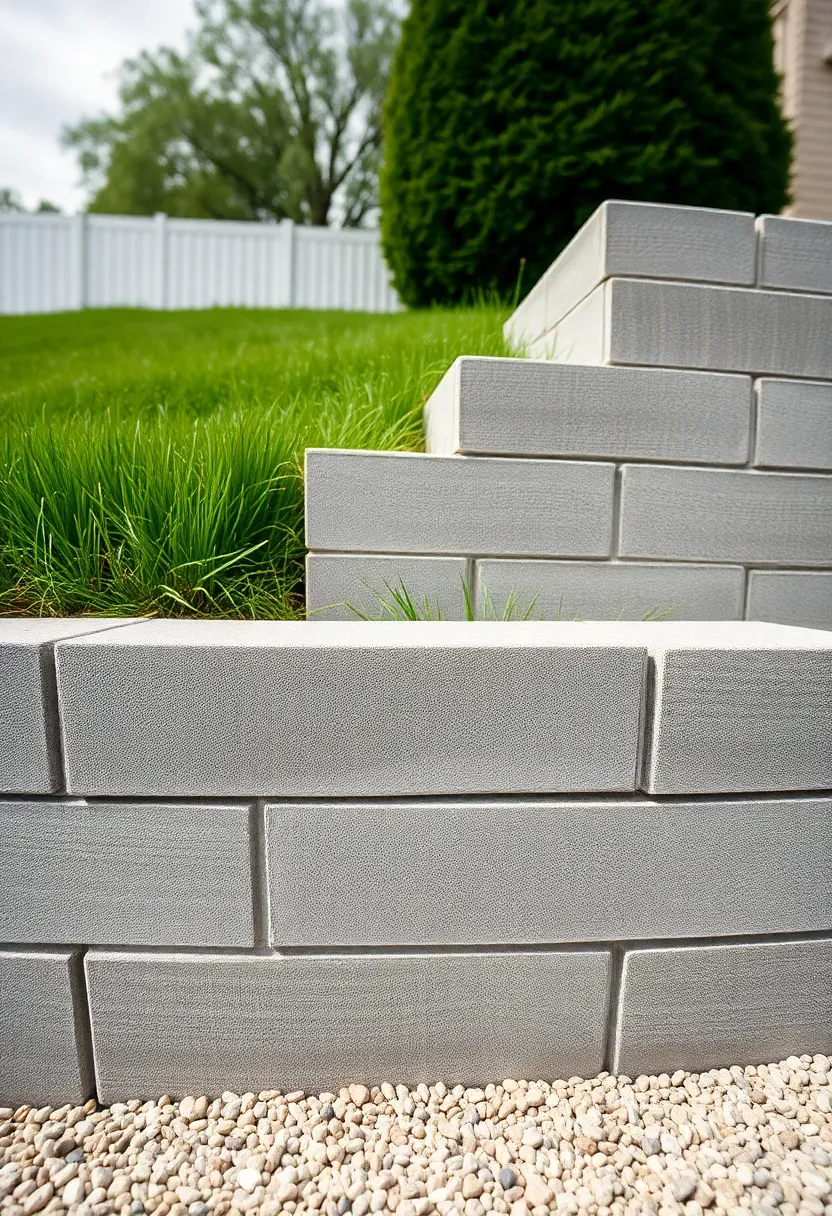
2. Concrete Block Gravity Wall
Why blocks work for most yards
Concrete retaining wall blocks are the default choice for good reason. They are uniform, stackable, and available at every big-box store for $3 to $6 per block. A standard 12-inch-deep block can support a wall up to about 3 feet tall without geogrid reinforcement. Above that height, you need engineering and reinforcement layers, which adds cost but remains cheaper than most alternatives.
The tradeoff
You get speed and predictability. A motivated DIYer can install 30 linear feet in a weekend. But the uniform texture and color can look industrial, especially in yards with a lot of natural plantings. Staining or veneering the face helps, though that erases some of the cost advantage.
Choose this if
- Your wall is under 4 feet and you want to do it yourself
- Budget matters more than a handcrafted look
- You need a straight, consistent line along a property edge
We picked a few things that go well with this idea: VEVOR Trench Drain System (6-Pack) (★4.5), Low Profile Catch Basin Drain Kit (16.4ft) (★4.3) and NAACOO Catch Basin Downspout Extender (8.2ft) (★4.3). As an Amazon Associate we earn from qualifying purchases.
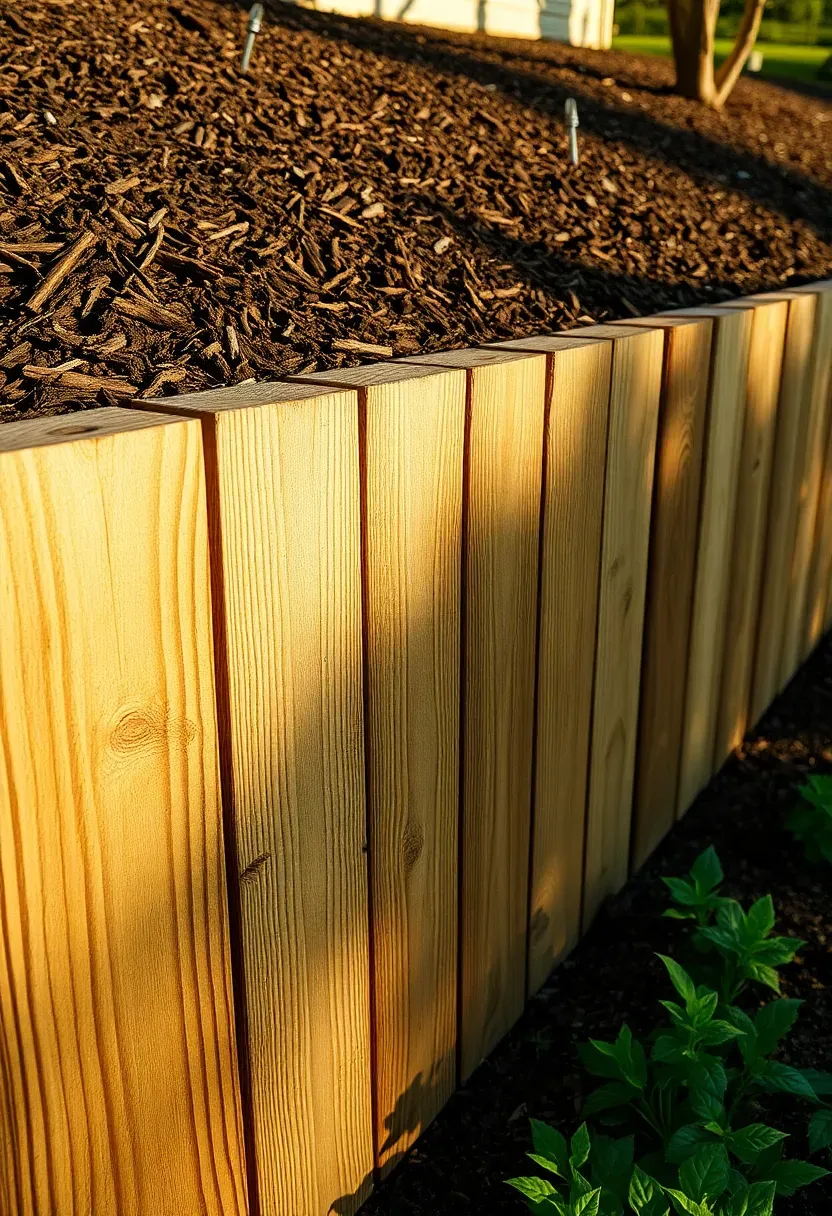
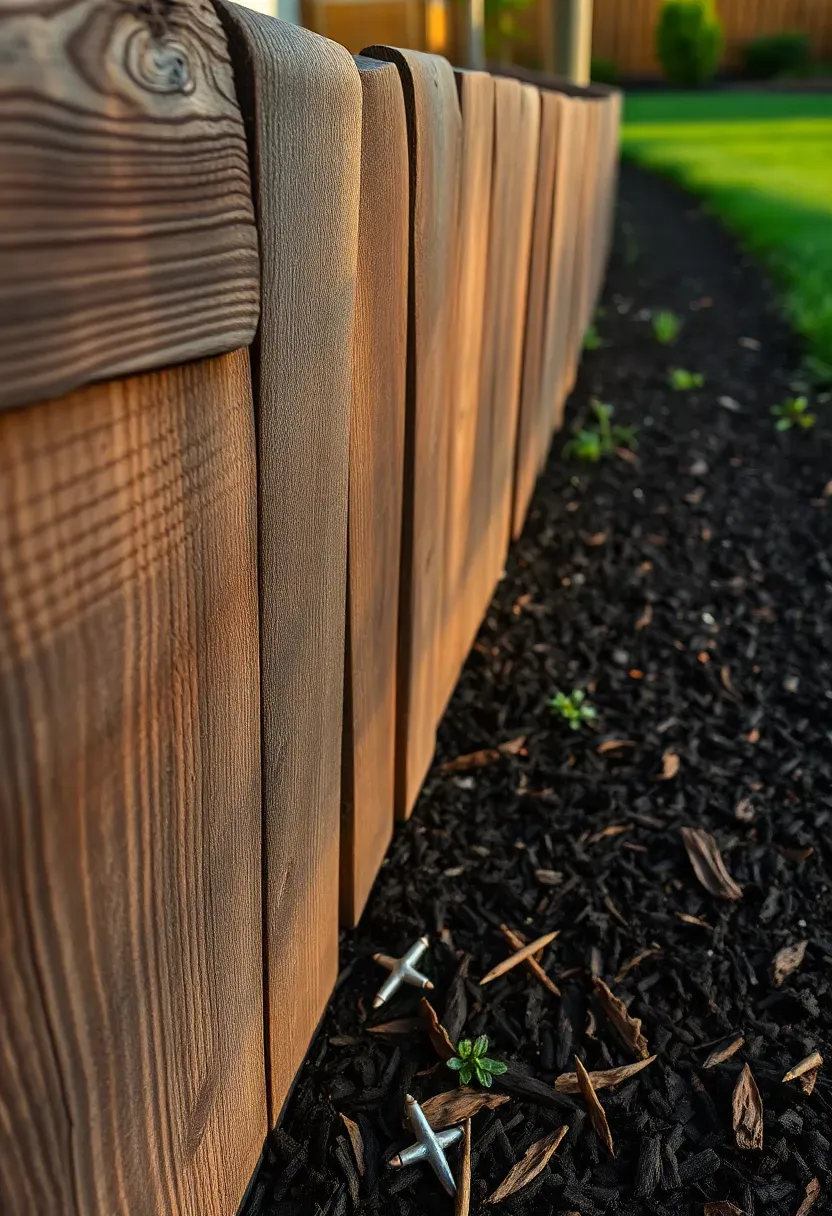
3. Timber Retaining Wall
Landscape timbers — usually 6x6 pressure-treated lumber — create a warm, horizontal-line look that works well in rustic or wooded backyards. A 4-foot wall using 8-foot timbers costs roughly $12 to $18 per linear foot in materials. You anchor them with rebar driven through drilled holes into the ground, and tie layers together with landscape spikes. The main limitation is lifespan: even pressure-treated wood in ground contact degrades in 15 to 20 years, faster in wet climates. Cedar and redwood last longer but cost two to three times as much. Timber walls suit gentle slopes where you need a 2- to 3-foot retaining height and prefer an organic feel over masonry.
Tips
- Use ground-contact rated lumber (0.60 pcf retention) — standard deck-grade PT wood rots quickly underground
- Drill rebar holes slightly oversized so you can drive the steel without splitting the wood
- Line the soil side with landscape fabric to prevent fine particles from washing through the joints
We picked a few things that go well with this idea: PARTPHONER Low Voltage Pathway Lights (12-Pack) (★4.5), SUNVIE LED 3000K Landscape Path Lights (12-Pack) (★4.4) and SUNVIE LED Bollard Path Lights (12-Pack) (★4.5). As an Amazon Associate we earn from qualifying purchases.
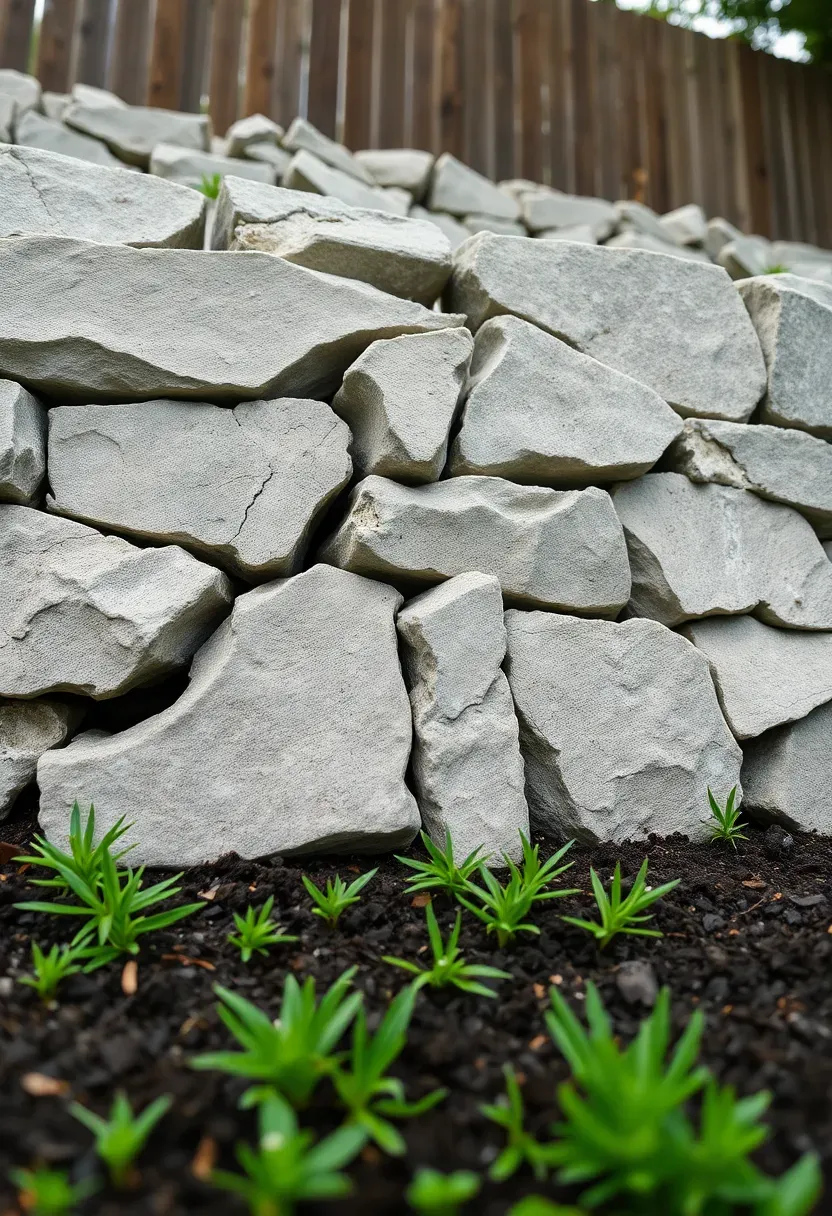
4. Boulder Wall with Native Plants
This approach skips the "wall" aesthetic entirely. You place large boulders — 500 to 2,000 pounds each — along a slope and plant native ground cover, ferns, or grasses in the gaps between them. The boulders handle the structural work while the plants soften the look and stabilize surface soil. Material cost is surprisingly low if you have a local quarry: $50 to $150 per ton delivered. Placement requires a machine operator with an excavator, which adds $300 to $600 for a half-day rental or hire. The result looks like it has been there for decades, which is the whole point. This works best on gentle to moderate slopes where you need retention but want zero visual formality.
Watch out for
- Undersized boulders shift over time — go bigger than you think you need
- Root systems from nearby trees can destabilize placement within a few years
- Drainage behind boulders matters just as much as behind a formal wall
Recommended
Items for this idea
5. Poured Concrete Modern Wall
The appeal
Poured concrete gives you complete control over shape, height, and finish. You can form it straight, curved, or stepped. The surface can be smooth, board-formed for a wood texture, or exposed aggregate. For contemporary homes, nothing matches the clean precision of a poured wall with a crisp 90-degree cap.
The reality
This is not a DIY project. You need proper forms, rebar placement per engineering specs, and a concrete pump for anything over a few yards of material. Costs range from $25 to $50 per square face foot installed, making it one of the pricier options. But a properly reinforced poured wall handles 6 to 10 feet of soil retention without blinking, and the lifespan is essentially unlimited if the footer and drainage are correct.
Pros and cons
- Pro: Strongest option per dollar at heights above 5 feet
- Pro: Unlimited finish textures and form shapes
- Con: Requires professional forming and pouring — mistakes are permanent
- Con: Cracks from poor drainage or footer failure are expensive to fix
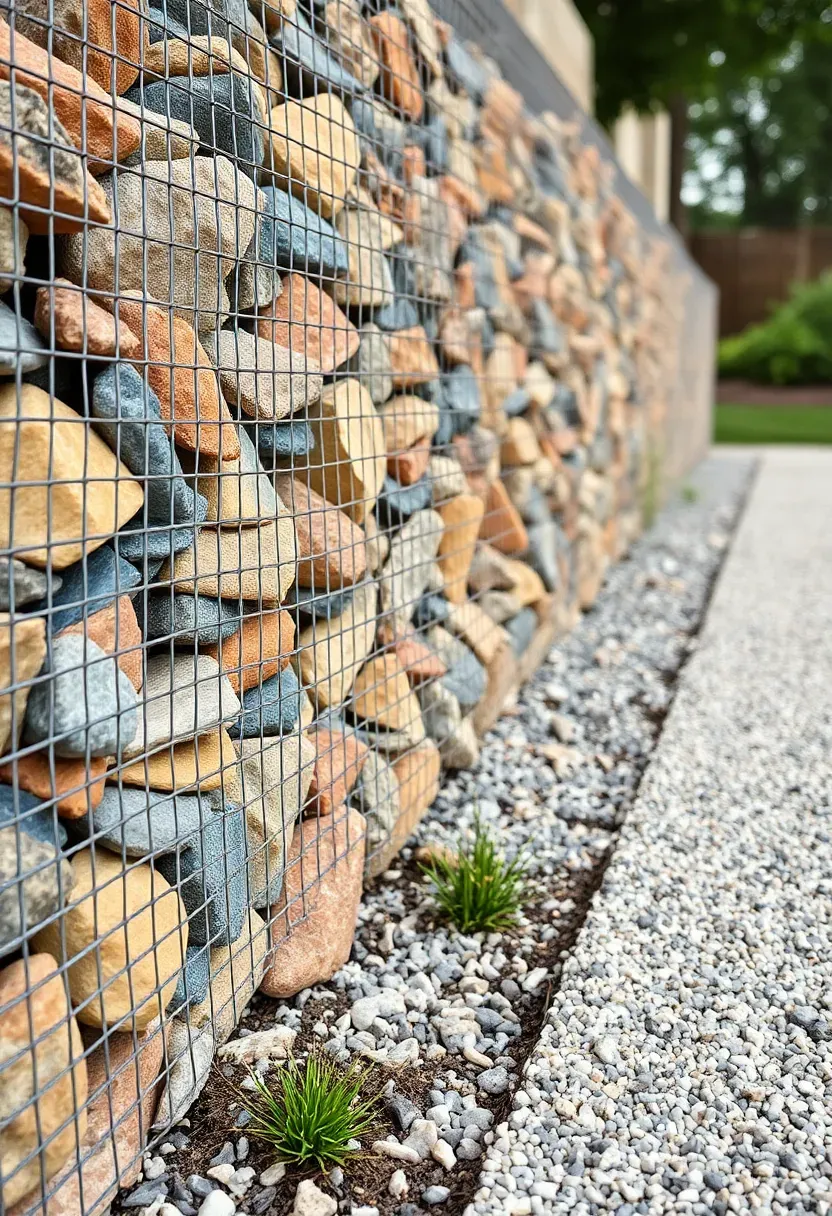
6. Gabion Basket Wall
Gabion walls are wire mesh cages filled with rock. They started as erosion control on riverbanks and highway cuts, but landscape designers adopted them for their raw industrial texture. A standard gabion cage measures 3x3x3 feet and costs $30 to $60 empty. You fill it with whatever stone is cheapest locally — river rock, crushed granite, or even recycled concrete chunks. The filled cages are heavy enough to resist soil pressure by gravity alone, and the gaps between rocks provide built-in drainage that eliminates the need for a separate French drain system behind the wall.
Tips
- Use galvanized or PVC-coated mesh for longevity — bare steel wire rusts through in 5 to 8 years
- Overfill cages slightly before closing the lid because rock settles as it compacts
- Mix stone sizes for a more interesting face texture instead of using uniform gravel
Recommended
Items for this idea
7. Dry-Stacked Fieldstone Wall
Dry stacking means no mortar, no adhesive — just stone balanced on stone. Fieldstone from your own property or a local farm supply is the cheapest material you can use, sometimes free if you are clearing land. The skill is in the fitting: each stone needs two solid contact points with the course below and one overlap across a joint. A good dry-stack wall leans back into the slope at roughly a 10-degree angle. Heights above 3 feet get risky without experience because the wall relies entirely on gravity and friction. But for garden terraces and low borders, dry-stacking is satisfying handwork that produces a wall with genuine character.
Steps to build
- Dig a trench 6 inches deep and 4 inches wider than your thickest stones, then compact the bottom with gravel.
- Lay the base course using your largest, flattest stones with the widest face down.
- Stack courses by offsetting joints (like brickwork), filling voids behind the face with smaller rubble as you go.
- Cap with flat stones that overhang the face by an inch to shed rainwater away from the wall.
8. Railroad Tie Wall
Railroad ties are heavy, creosote-treated timbers that last 30 or more years in ground contact. They measure roughly 7x9 inches by 8.5 feet, weigh about 200 pounds each, and cost $15 to $30 per tie from salvage yards. The dark, rough-sawn look suits rural and industrial aesthetics. Construction is straightforward: stack ties in a running bond pattern and secure layers with 12-inch landscape spikes or threaded rebar. The main concern is creosote, which is a coal tar preservative that leaches into surrounding soil. Most states allow railroad ties for landscape use, but avoid them near vegetable gardens or anywhere children play in the dirt.
Tips
- Pre-drill spike holes to prevent splitting — railroad ties are dense and dry
- Offset joints by at least 2 feet between courses for structural integrity
- Grade soil behind the wall toward a perforated drain pipe at the base to manage water
Recommended
Items for this idea
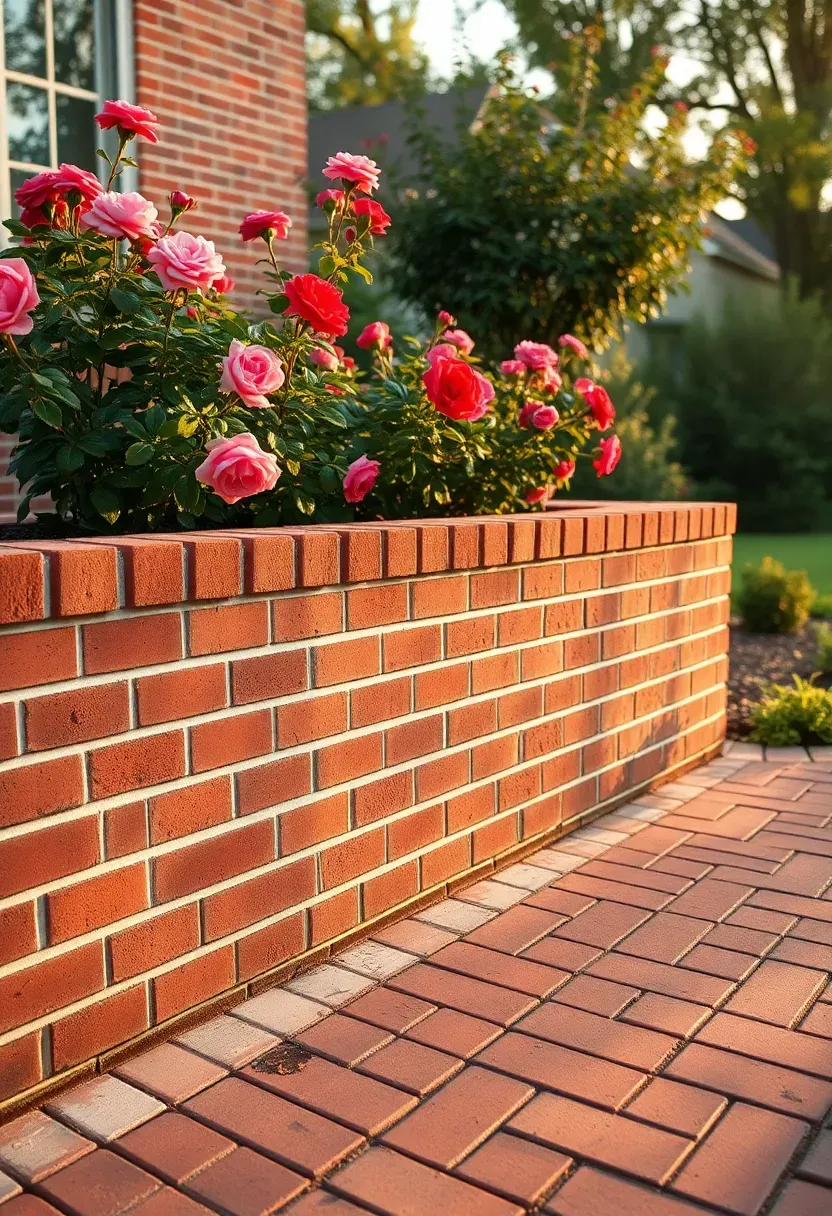
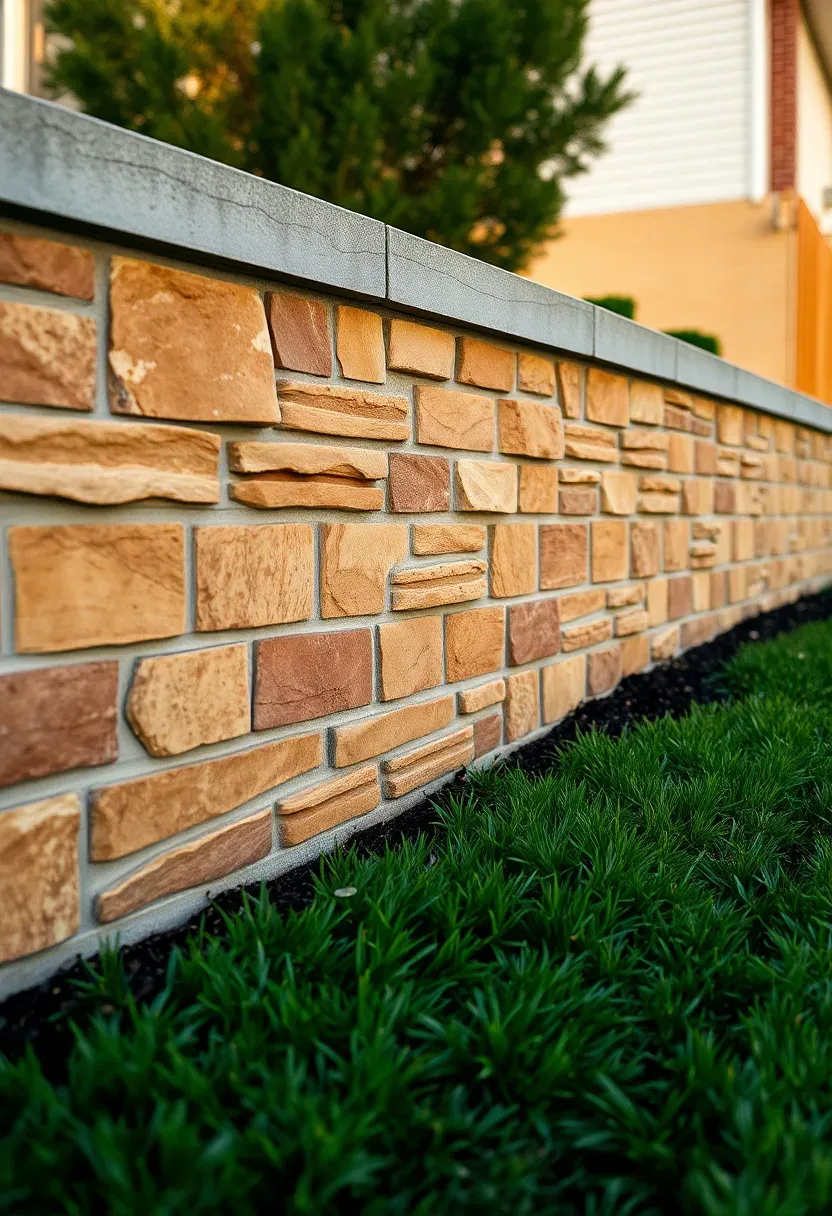
9. Brick Retaining Wall
Traditional vs. structural
A single-wythe brick wall (one brick thick) is decorative only — it cannot hold back more than a foot or two of soil. For actual retention, you need a double-wythe wall with a concrete footer and steel reinforcement, or a concrete block core with a brick veneer face. The veneer approach is more common because it gives you the warm brick appearance without the structural limitations of solid brick.
Cost and durability
Full brick construction runs $20 to $35 per square face foot installed. The color options are broad — from classic red to charcoal to cream — and brick weathers gracefully over decades. Mortar joints need repointing every 20 to 30 years in freeze-thaw climates. Brick retaining walls pair naturally with brick patios and home facades, creating a unified material language across the property.
Choose this if
- Your home already has brick elements and you want visual continuity
- You prefer a formal, traditional look over rustic or modern styles
- The wall height is under 4 feet and you want to invest in long-term aesthetics
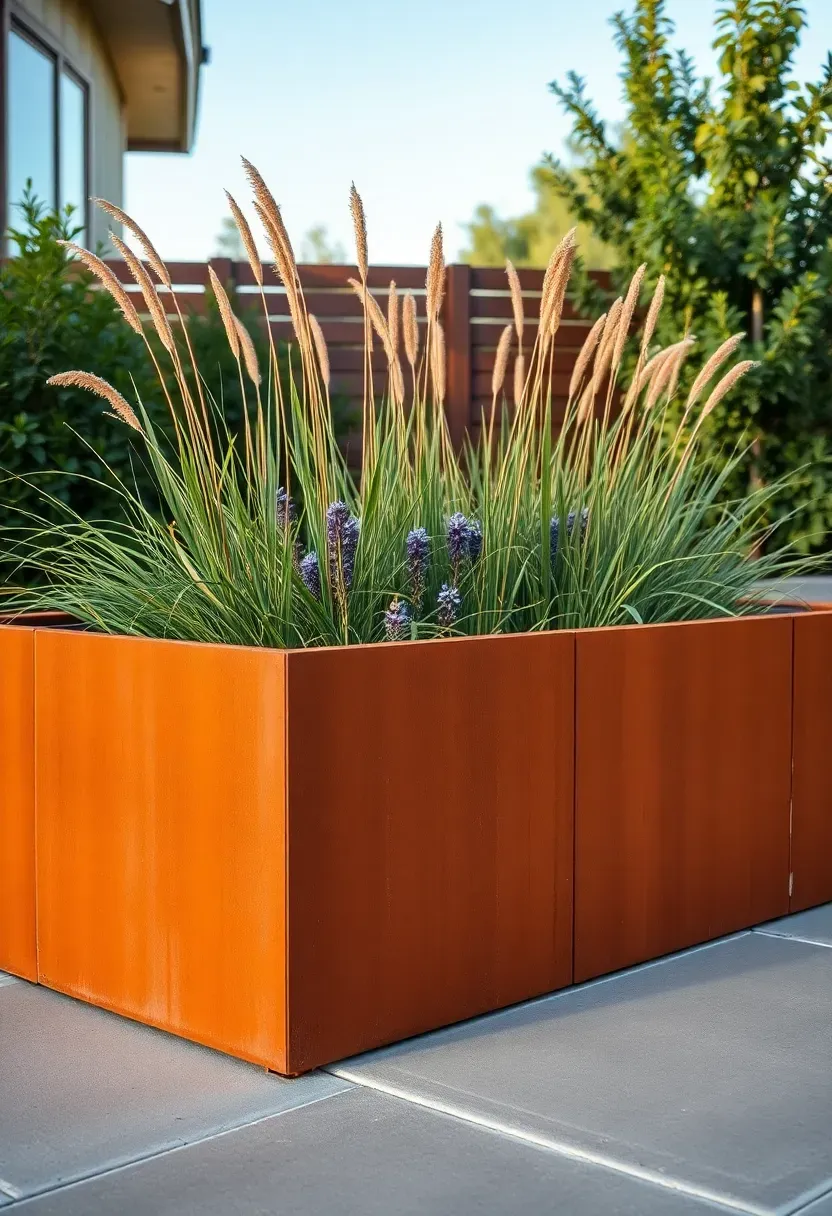
10. Corten Steel Planter Wall
Corten steel — also called weathering steel — forms a stable rust patina that protects the underlying metal from further corrosion. As a retaining wall material, it offers a look that nothing else can replicate: thin, precise edges with a warm orange-brown surface that deepens over 6 to 18 months of exposure. Steel panels come in 1/4-inch or 3/8-inch thickness and are welded or bolted to steel posts anchored in concrete footings. Material costs run $30 to $60 per linear foot for 2-foot-tall panels. The slim profile takes up almost no yard space compared to stone or block walls, which matters in narrow side yards or tight terraces.
Tips
- Expect rust staining on adjacent concrete or light-colored stone during the first year of patina development
- Seal the bottom edge with bituminous coating where steel meets soil to slow hidden corrosion
- Pair with drought-tolerant grasses or succulents for a southwest or modern industrial feel
Recommended
Items for this idea
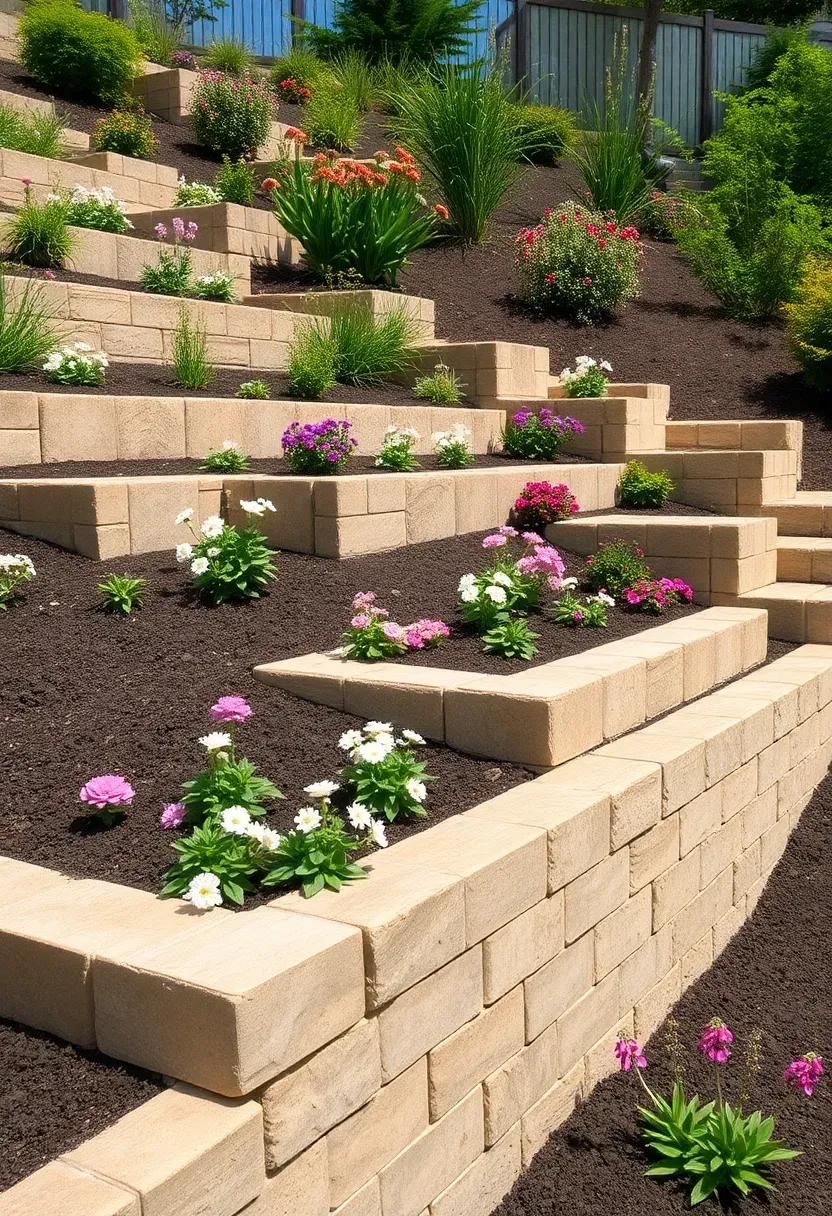
11. Limestone Block Terraces
Instead of building one tall wall, splitting the height across two or three shorter limestone walls creates terraces — flat planting beds at different levels. Each wall can be 2 to 3 feet tall, which keeps them in gravity-wall territory (no geogrid needed). Cut limestone blocks with split faces cost $8 to $15 per square face foot and stack cleanly because of their uniform dimensions. The buff and gray tones of limestone complement most home exteriors, and the material stays cooler than dark stone or concrete in direct sunlight. Terracing also slows water runoff naturally, giving each level time to absorb rainfall before it reaches the next.
Steps to build
- Start at the bottom — build the lowest wall first with a compacted gravel base and level footer course.
- Backfill with drainage gravel behind the wall, then add soil to create the first terrace level.
- Set the next wall back at least 2 feet from the face of the lower wall to distribute weight evenly.
- Plant each terrace as you complete it so root systems begin stabilizing soil immediately.
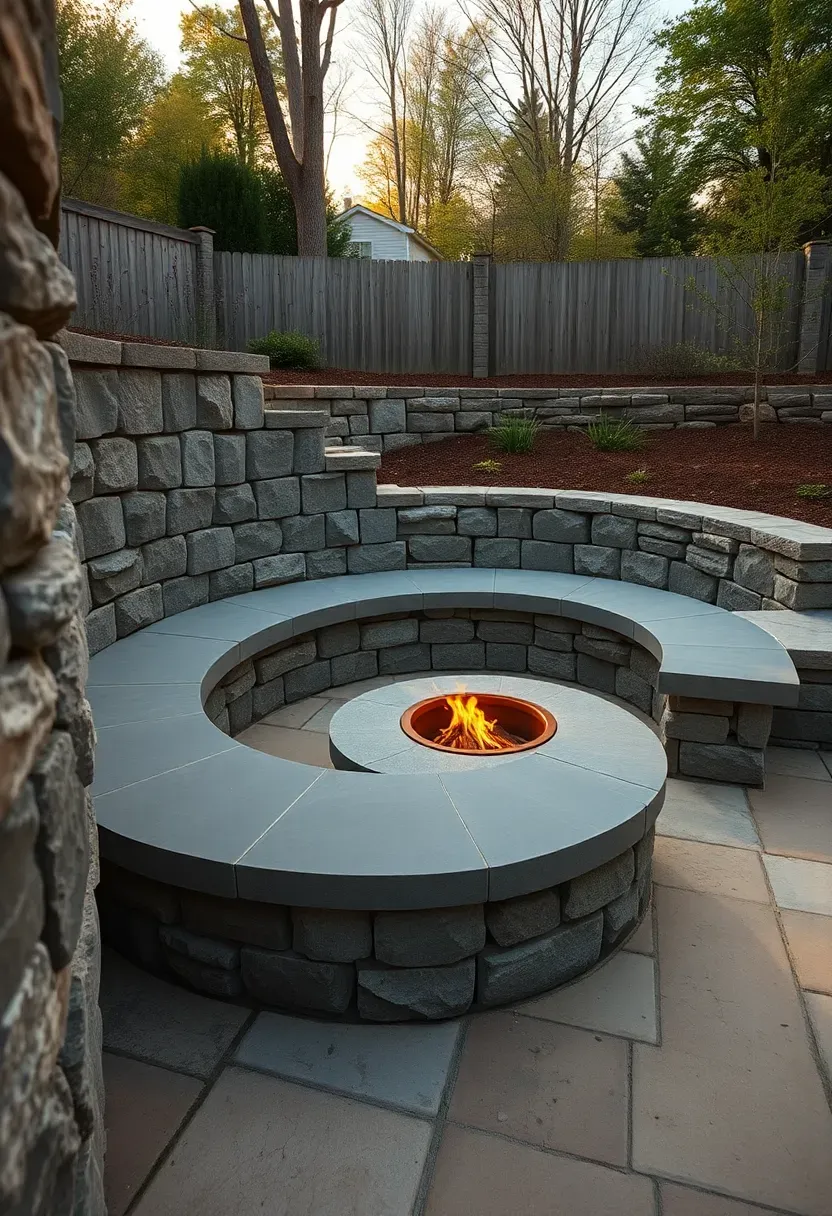
12. Curved Retaining Wall with Bench
A curved wall is structurally stronger than a straight one — the arc shape resists lateral soil pressure the way an arch resists downward load. Adding a flat capstone wide enough to sit on (16 to 18 inches) turns the wall into built-in seating. This works particularly well around sunken patios, fire pits, or conversation areas where the grade change is 2 to 4 feet. You lose some usable space behind the curve compared to a straight wall, but you gain a seating area that does not require any furniture. Natural stone with a rough split face on the front and a smooth honed cap gives the best combination of visual texture and sitting comfort.
Tips
- Use a garden hose laid on the ground to test your curve shape before committing to excavation
- Set capstones with construction adhesive to prevent shifting when people sit and stand repeatedly
- Keep the inside radius above 4 feet — tighter curves require custom-cut stone and increase labor cost significantly
Recommended
Items for this idea
13. Concrete Block Wall with Stone Veneer
The problem
You want the look of natural stone but the price and ease of concrete blocks. Solid stone walls require skilled masons and expensive material. Concrete blocks are affordable but look plain.
The solution
Build a standard concrete block retaining wall, then adhere thin-cut natural stone veneer to the exposed face. Veneer pieces are 3/4 to 1-1/2 inches thick, weigh a fraction of full stone, and attach with mortar or construction adhesive. The result is visually indistinguishable from a solid stone wall at normal viewing distance. Total cost including veneer runs $18 to $28 per square face foot — less than solid stone but more than bare block.
Pros and cons
- Pro: Looks like real stone because it is real stone — just thinner
- Pro: Block core provides consistent structural strength and faster build time
- Con: Veneer can delaminate if mortar bed preparation is poor or freeze-thaw cycles are severe
- Con: Adds a second trade (veneer installer) or a second skill set for DIY
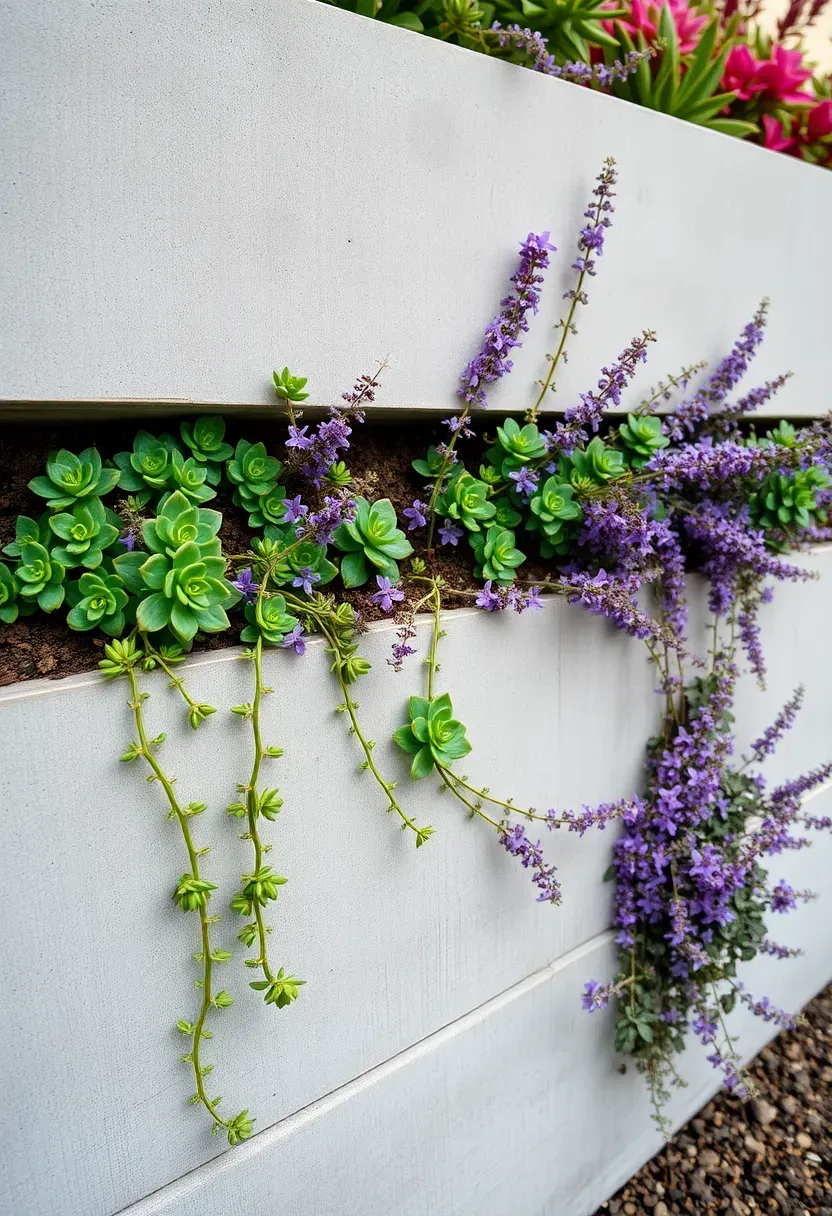
14. Living Wall with Built-In Planters
Building planter pockets directly into a retaining wall softens the hard surface and adds vertical gardening space. The approach works with concrete block, poured concrete, or stone — you simply leave open rectangular or stepped sections in the face and line them with landscape fabric. Trailing plants like creeping jenny, sedum, or trailing rosemary spill over the edges and gradually cover the wall face. The planters need their own drainage (gravel layer at the bottom of each pocket) so water does not pool and weaken the structure. This idea works well for walls that face patios or outdoor dining areas where you want greenery at eye level rather than just at ground level.
Plant suggestions
- Full sun: Sedum, lantana, trailing verbena, creeping thyme
- Part shade: Creeping jenny, ajuga, ferns, heuchera
- Dry climate: Trailing rosemary, ice plant, string of pearls, echeveria
Recommended
Items for this idea
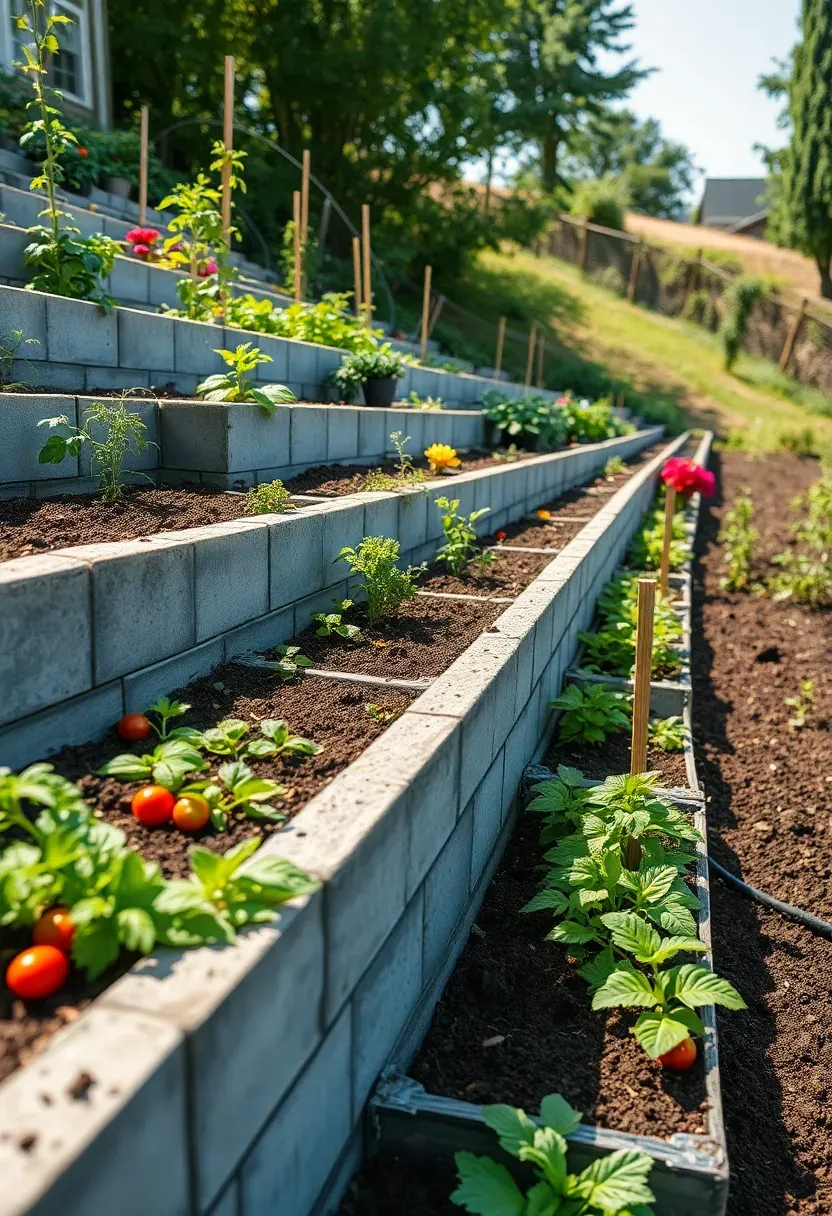
15. Multi-Tier Garden Terrace
This is terracing taken to its productive extreme. Instead of ornamental plantings, each terrace level becomes a raised bed for vegetables, herbs, or cut flowers. The retaining walls serve double duty — they hold the slope and they define garden rows at a comfortable working height. Walls at 18 to 24 inches put the soil surface at a good level for planting and weeding without constant bending. Concrete block or landscape timber both work here because aesthetics matter less when plants cover the wall face within one growing season.
Steps to build
- Map sun exposure across the slope before deciding terrace placement — south-facing terraces get the most growing hours.
- Build walls 18 to 24 inches tall with 4 to 6 feet of flat bed between each tier.
- Fill with raised bed mix (50% topsoil, 30% compost, 20% perlite or coarse sand) rather than native clay or subsoil.
- Install drip irrigation on each tier before planting — hand-watering multiple levels gets old fast.
16. Sandstone Retaining Wall
Sandstone splits along natural bedding planes into flat slabs that stack easily, making it one of the more forgiving stones for dry-stacking. The warm buff, tan, and pink tones give it a distinctly different character from gray granite or bluestone. Regional availability varies — sandstone is abundant and cheap in the central U.S. and parts of the Southwest but expensive to ship to the coasts. Expect $10 to $25 per square face foot depending on proximity to a quarry. The main drawback is softness: sandstone absorbs water more readily than granite and can flake in severe freeze-thaw climates. In moderate climates, it weathers into a beautiful patina that deepens the color over years.
Tips
- Seal sandstone in freeze-thaw zones with a breathable penetrating sealer to reduce spalling
- Lay stones with the natural bedding plane horizontal — standing them on edge causes premature splitting
- Avoid acid-based cleaners on sandstone; they etch the surface and damage the natural texture
Recommended
Items for this idea
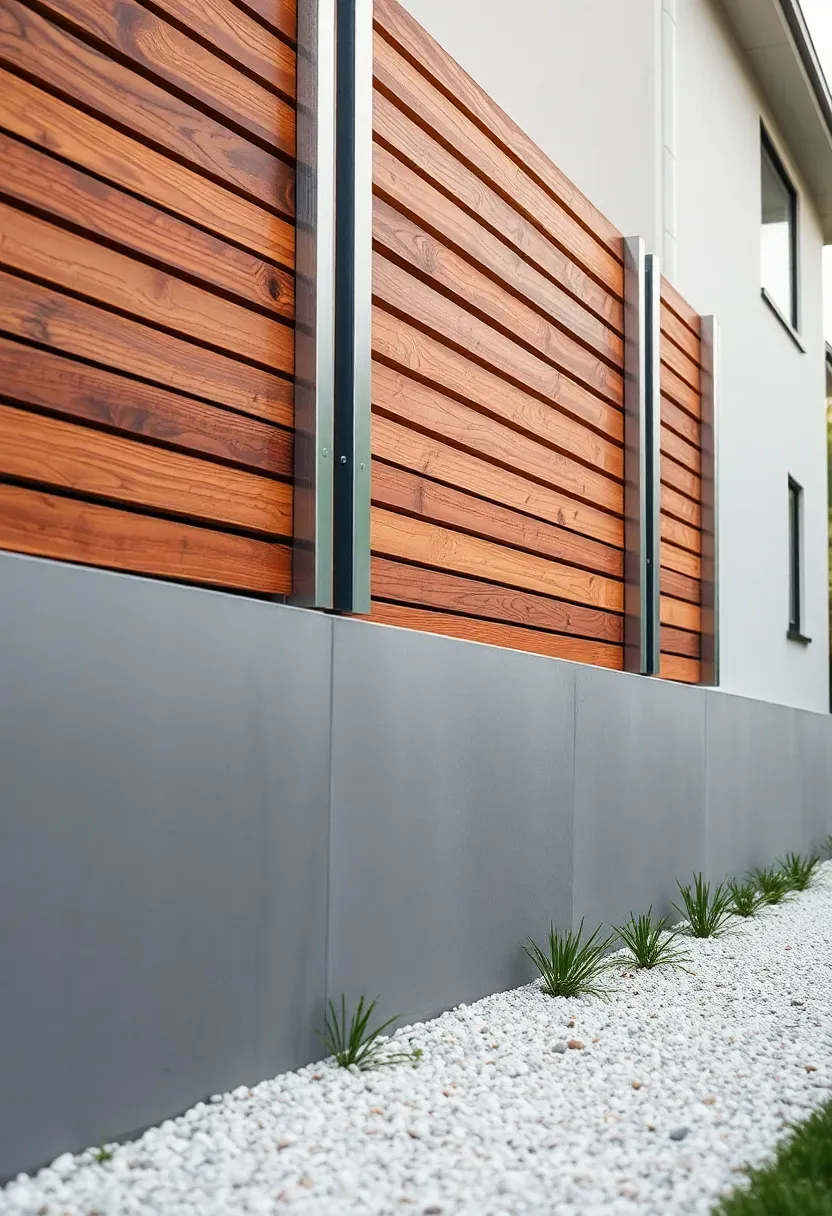
17. Concrete and Wood Hybrid Wall
Why mix materials?
A full concrete wall can feel cold and institutional. A full wood wall has lifespan issues. Combining the two gives you the structural permanence of concrete for the lower, soil-contact portion and the warm texture of wood for the visible upper section. The concrete handles the wet, heavy work below grade and at the base, while cedar, ipe, or thermally modified wood forms horizontal slats or panels above.
How it comes together
The concrete section is typically poured or built from block up to grade level or slightly above. Steel posts embedded in the concrete support the wood portion above. The wood slats can be horizontal, vertical, or even angled for a privacy screen effect. Total cost runs $30 to $55 per linear foot depending on wood species and wall height. The combination reads as modern and intentional rather than cost-cutting.
Choose this if
- You want a contemporary look without a fully industrial feel
- The upper portion of the wall is visible from a patio or living space
- You need retention below grade but a fence or screen above
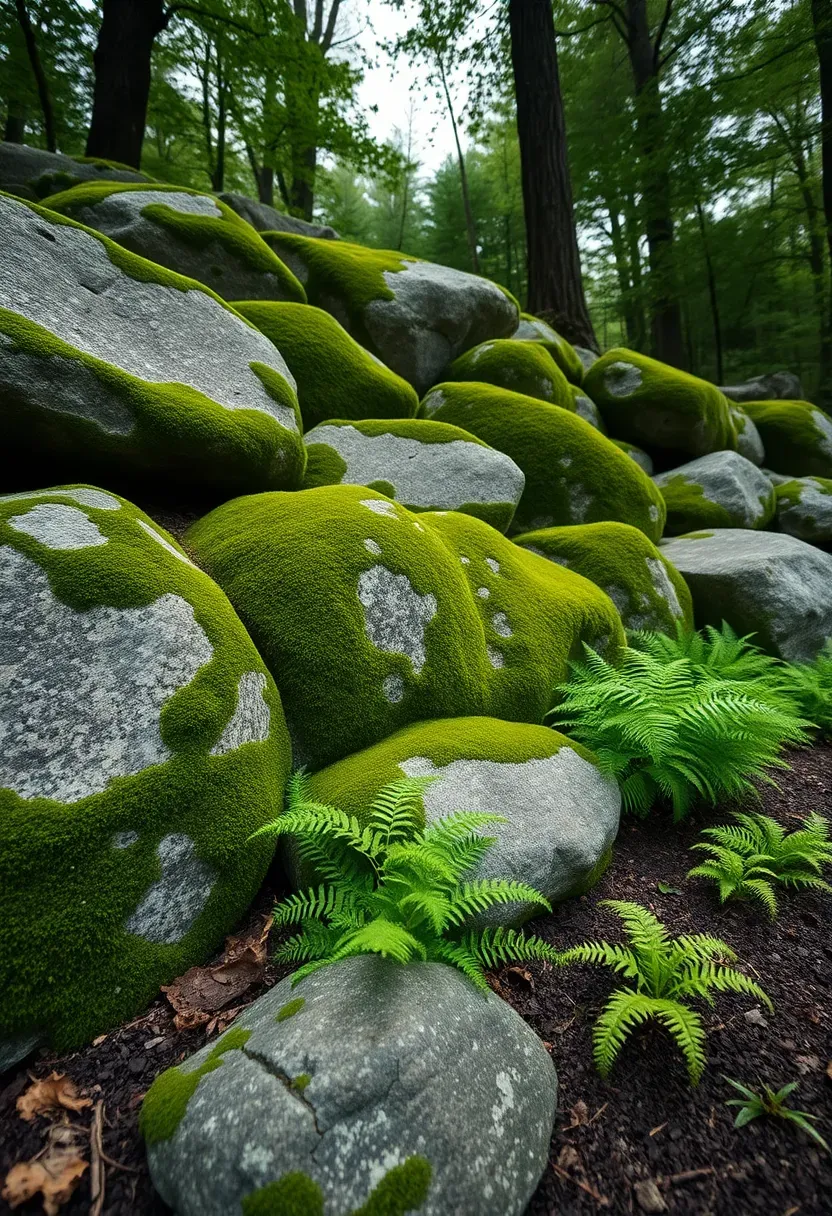
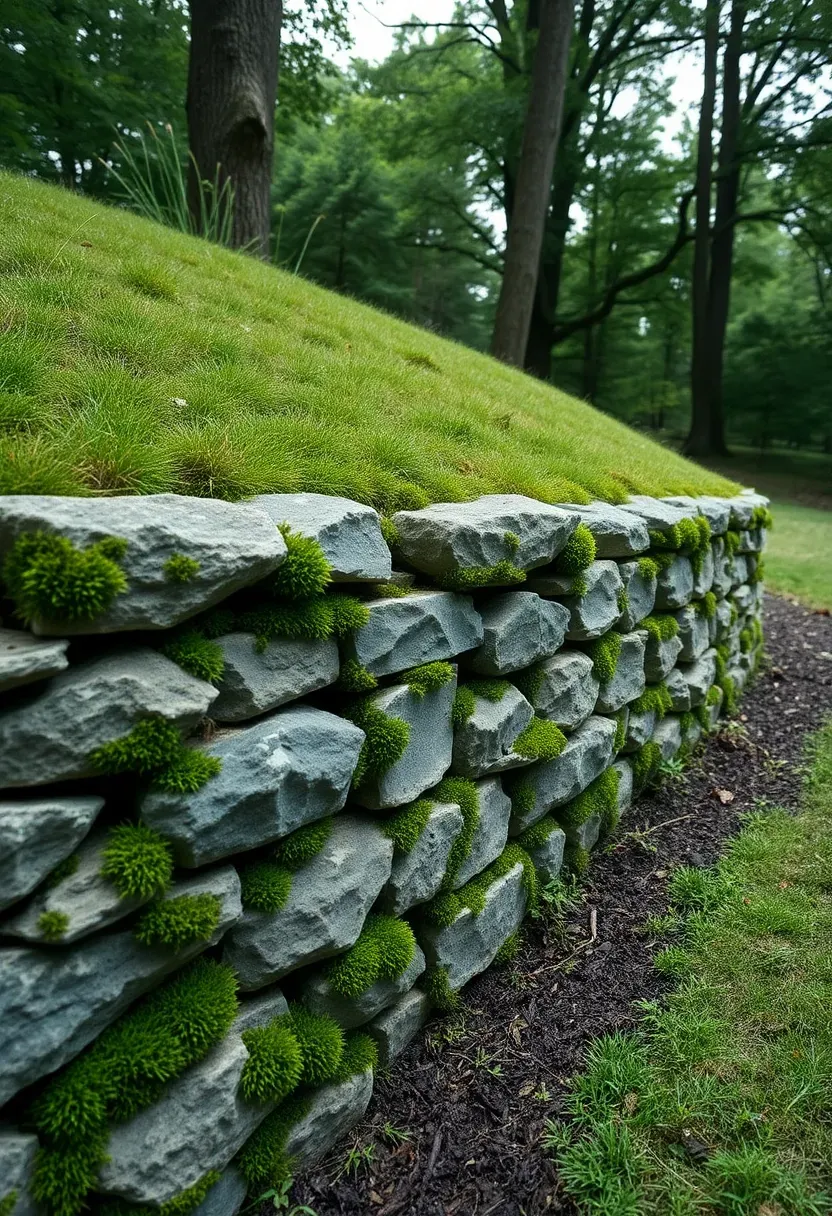
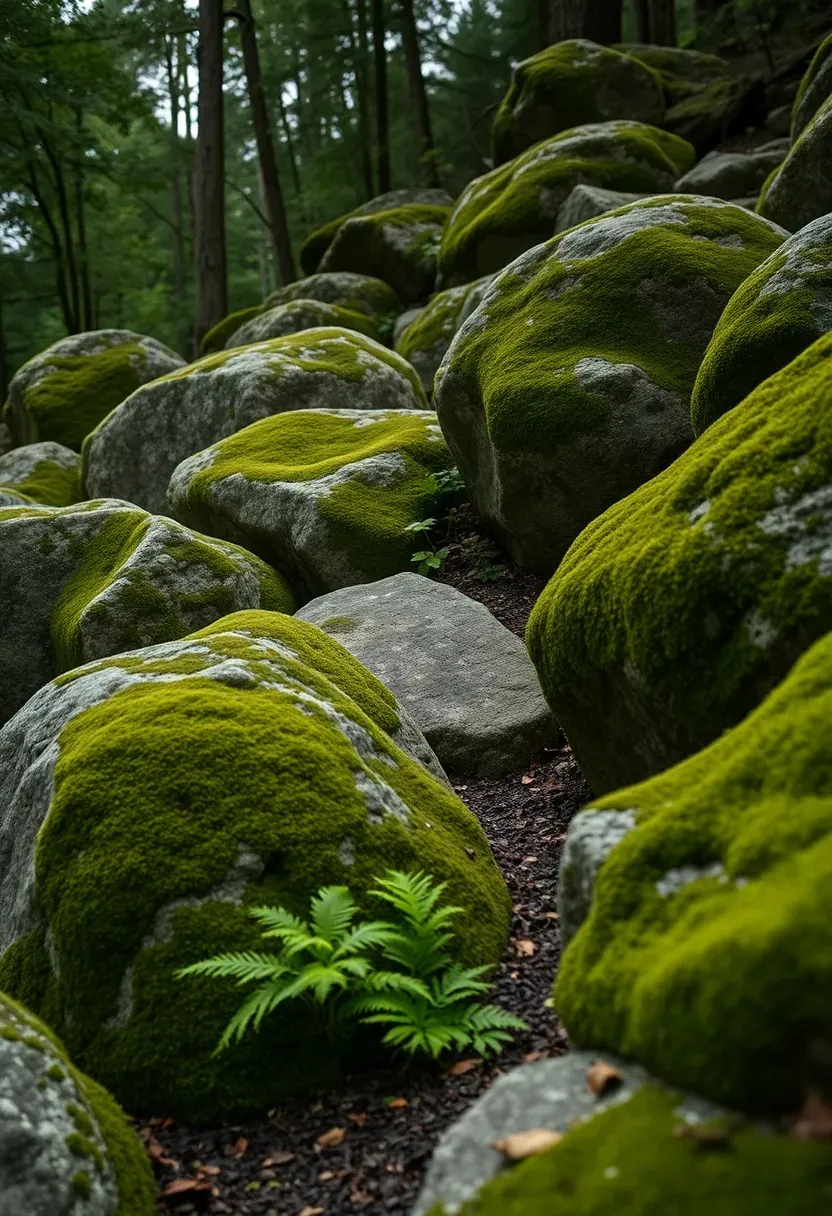
18. Moss Rock Retaining Wall
Moss rock refers to boulders and large stones that already have moss, lichen, or weathering on their surface when you buy them. Quarries and stone yards charge a premium for them — roughly $200 to $400 per ton compared to $100 to $200 for clean stone — but the aged appearance is something you cannot fake or accelerate convincingly. Placement follows the same principles as a boulder wall: large stones at the base, smaller ones above, and each piece tilted slightly back into the slope. The mossy surface encourages additional growth in shady, moist conditions, so within a year or two the wall looks like it grew out of the hillside rather than being placed by a machine.
Tips
- Keep moss-covered faces oriented north or east where they receive less direct sun, which helps moss survive
- Mist newly placed moss rock during the first dry season to encourage moss recovery after disturbance
- Avoid power washing or scrubbing — the moss and lichen are the whole point
Recommended
Items for this idea
19. Interlocking Block Wall with Stairs
When a retaining wall crosses a path or access route, you need stairs integrated into the structure. Interlocking concrete blocks make this relatively straightforward because the uniform dimensions allow you to step blocks back in a staircase pattern. Each step typically uses a single block depth (about 12 inches) as the tread, with a rise of one block height (about 6 inches). Stone or concrete slab treads placed on top of the blocks provide a more comfortable and durable walking surface than the block faces alone. This design works for grade changes of 3 to 8 feet where you need both retention and pedestrian access.
Steps to build
- Plan the stair location where foot traffic naturally moves between levels — fighting desire paths never works.
- Build the wall sections on either side of the stair opening first, leaving a gap 4 to 5 feet wide.
- Step blocks back into the hillside at the stair opening, using one block depth per tread and one block height per riser.
- Cap each step with a stone or concrete slab that overhangs the riser by 1 inch for a finished look and easier footing.

20. Low Seat Wall for Patio Edge
Not every retaining wall needs to hold back a steep hill. A seat wall only 18 to 24 inches tall can handle a gentle grade transition between a patio and a slightly higher lawn while providing permanent seating around the patio perimeter. The wall eliminates the cost and maintenance of outdoor furniture in that zone and defines the edge of the outdoor living area with a clean architectural line. Natural stone, brick, and concrete block all work at this height. The key detail is the cap: a smooth, flat surface 16 to 20 inches deep that is comfortable to sit on without a cushion. Bluestone, granite, or poured concrete caps all work well.
Tips
- Set the wall height at 18 inches from the finished patio surface — this matches standard chair seat height
- Use a full-depth cap stone rather than a thin veneer piece that can crack under weight
- Consider radiant heat: dark stone in full sun gets uncomfortable to sit on in summer, so choose lighter tones or add shade
Recommended
Items for this idea
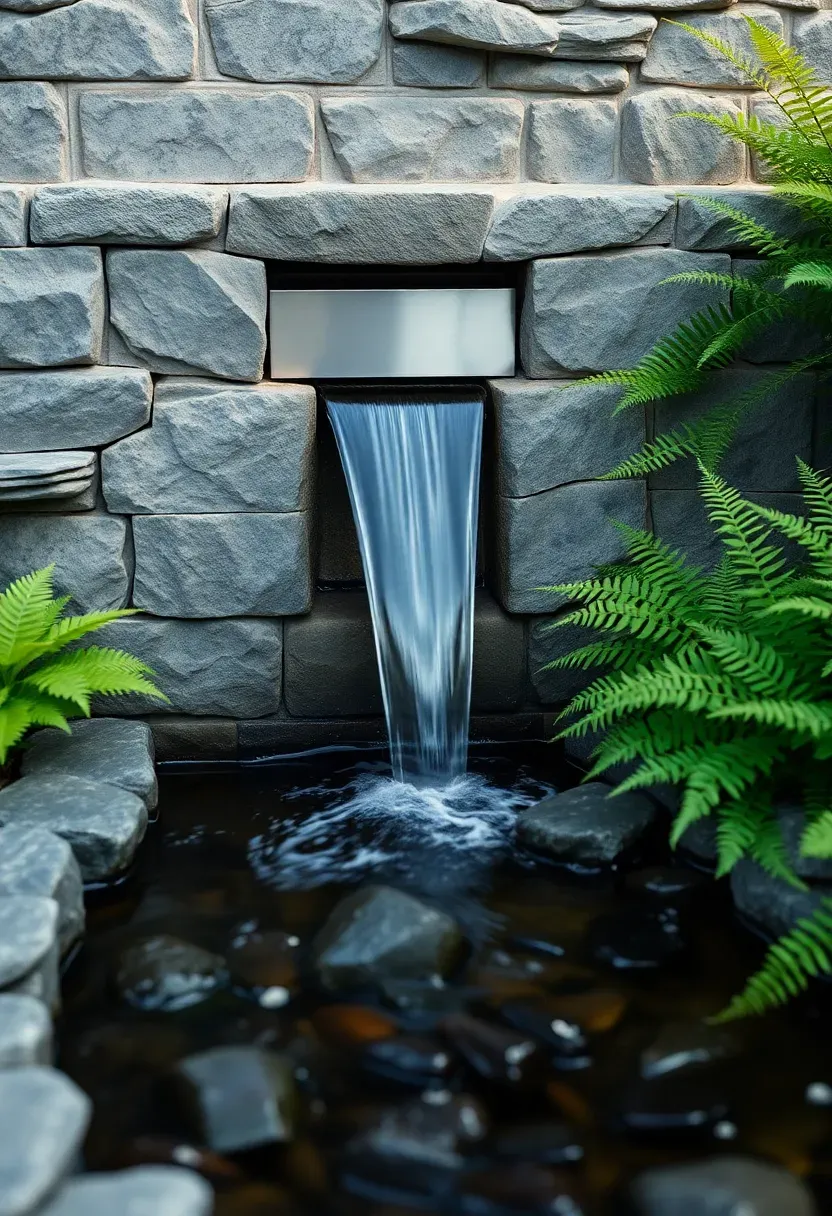
21. Retaining Wall with Water Feature
The concept
A retaining wall with a built-in spillway or waterfall turns a structural necessity into a focal point. Water exits through a slot or weir cut into the wall face and falls into a catch basin or stream bed at the base. The sound masks traffic noise and creates atmosphere that no planting alone can match.
What it takes
You need a recirculating pump in a buried basin, a supply line run behind or through the wall, and a spillway detail in the wall face. The plumbing adds $500 to $1,500 to the wall cost depending on pump size and basin complexity. The wall itself needs waterproofing on the back face where the supply line penetrates, and the catch basin needs an overflow route for heavy rain. Professional installation is recommended unless you have plumbing experience.
Pros and cons
- Pro: Turns a retaining wall from background structure into a garden centerpiece
- Pro: Moving water attracts birds and creates ambient sound
- Con: Pumps require electricity and occasional maintenance
- Con: Standing water in the basin can breed mosquitoes without proper circulation
22. Recycled Concrete Chunk Wall
Broken concrete from demolished sidewalks, driveways, and foundations — sometimes called urbanite — makes surprisingly effective retaining wall material. The pieces are free or nearly free from demolition contractors who would otherwise pay to dump them. You stack the flat broken edges outward like irregular flagstone, creating a wall with a rough, honest texture. The structural performance matches natural stone because the material is just as dense and heavy. The aesthetic is polarizing: some people see creative reuse, others see rubble. It works best in gardens, side yards, and utilitarian areas rather than formal entertaining spaces.
Tips
- Select pieces with at least one flat face for the wall surface — round or crumbly chunks do not stack well
- Break oversized pieces with a sledgehammer to get manageable sizes (50 to 100 pounds each)
- Mix in some pieces with exposed aggregate for visual interest — the stone inside cured concrete often has attractive color
Recommended
Items for this idea
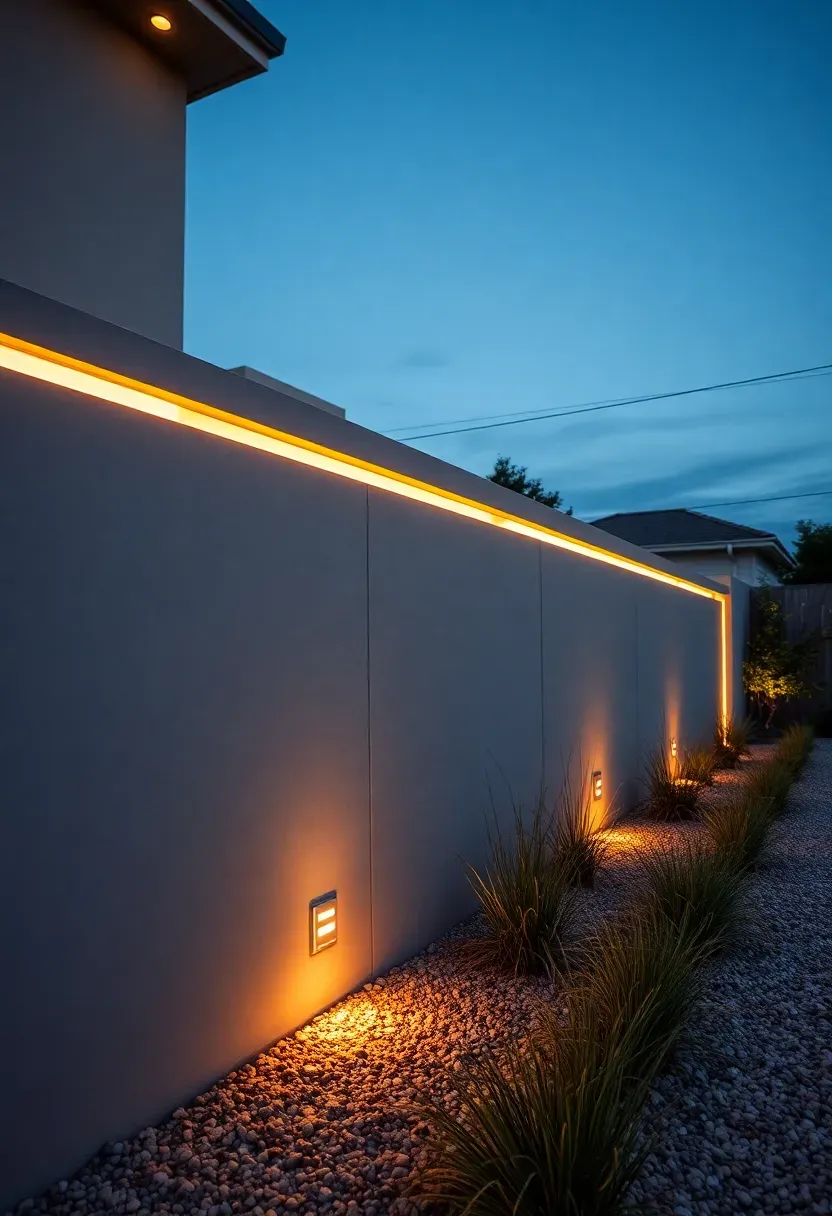
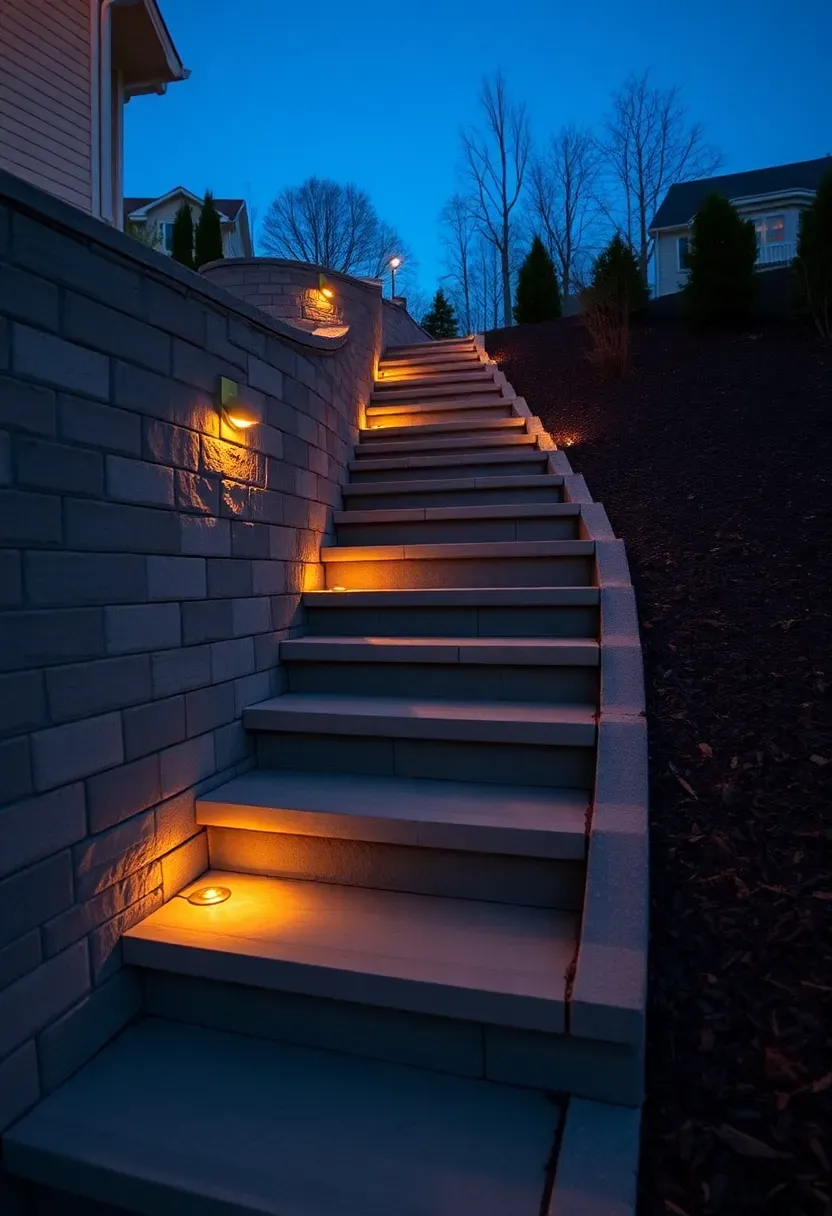
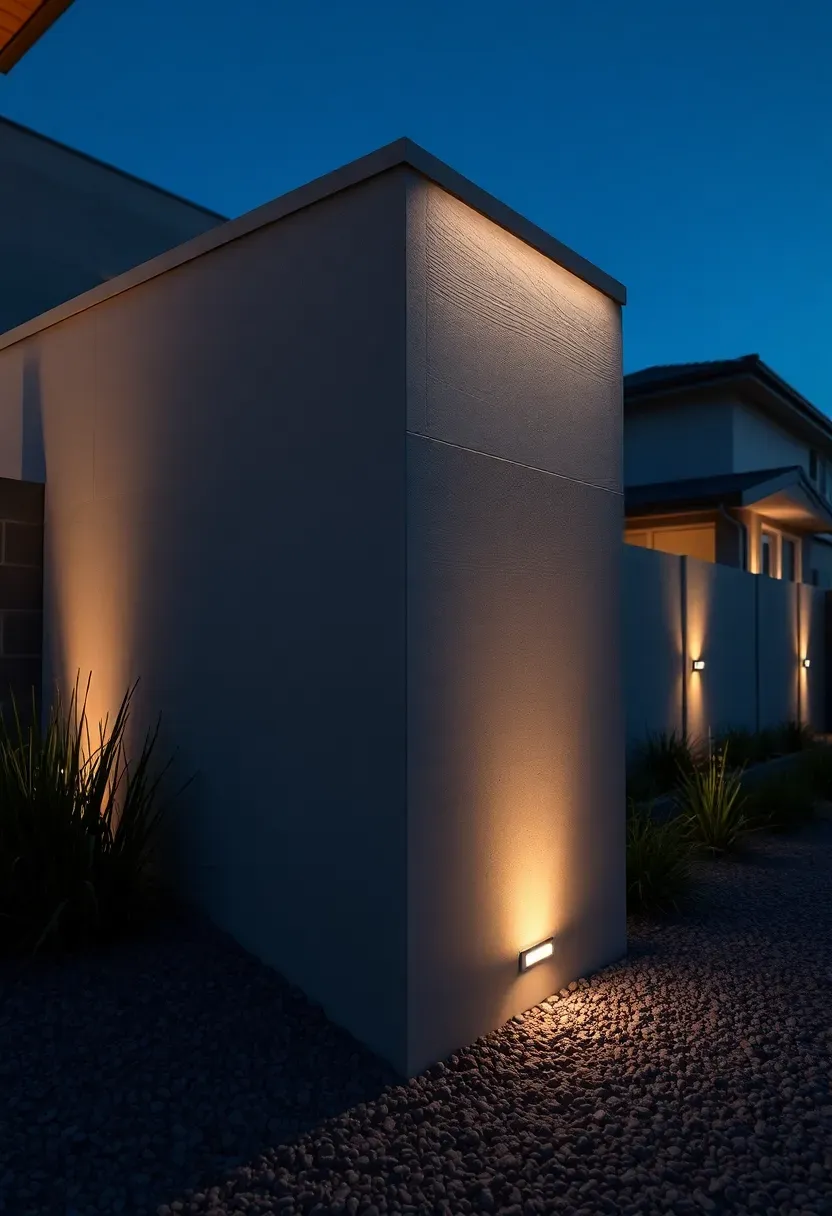
23. Cantilevered Concrete Wall with Lighting
A cantilevered retaining wall uses an L-shaped or inverted-T footer where the weight of the soil sitting on the footer base resists the overturning force. This engineering approach allows taller, thinner walls than gravity-based designs — a 6-inch-thick stem can retain 6 to 8 feet of soil when the footer is properly sized. Adding recessed LED lighting along the base or within the wall cap turns the structure into a dramatic nighttime feature. Warm white (2700K) LED strip in an aluminum channel recessed into the cap creates a soft downlight wash on the wall face. Linear fixtures at the base graze light upward across the concrete texture. This is a professional-grade project requiring structural engineering, but the result is a wall that works as hard visually as it does structurally.
Design details
- Recess LED channels into the cap rather than surface-mounting for a cleaner look and better protection from weather
- Use 2700K to 3000K color temperature — cooler whites look harsh against concrete and stone
- Wire lighting to a low-voltage transformer with a timer or photocell so you are not managing it manually every evening
Quick FAQ
How tall can a retaining wall be without a permit? Most jurisdictions allow walls up to 4 feet measured from the bottom of the footer to the top of the wall without a building permit. Above 4 feet, you typically need a permit and stamped engineering drawings. Check your local code because some areas set the threshold at 3 feet, and HOA rules may add further restrictions.
What goes behind a retaining wall for drainage? A 12-inch-wide zone of clean crushed gravel behind the wall, with a 4-inch perforated drain pipe at the base, is the standard approach. The gravel lets water move downward instead of building hydrostatic pressure against the wall. The drain pipe carries collected water to a daylight outlet or storm drain at the low end of the wall. Skipping drainage is the most common cause of retaining wall failure.
Can I build a retaining wall myself? Walls under 3 feet tall using interlocking blocks or timber are manageable DIY projects with basic tools and a free weekend. You need a plate compactor for the gravel base, a level, and the patience to get the first course perfectly straight. Anything taller, curved, or on a steep slope benefits from professional help — the weight of soil behind a 5-foot wall is enough to cause serious injury if the wall fails during construction.
How long do different retaining wall materials last? Poured concrete and natural stone walls can last 50 to 100 years or more with proper drainage. Concrete block walls typically last 30 to 50 years. Pressure-treated timber walls average 15 to 20 years. Railroad ties can last 30 years due to creosote treatment. Gabion baskets last as long as the wire mesh holds — 20 to 40 years for galvanized, longer for PVC-coated.
Do retaining walls increase property value? A well-built retaining wall that creates usable flat space on a sloped lot does increase value, especially if the alternative is an unusable hillside. Appraisers typically view functional retaining walls as permanent site improvements similar to grading or drainage systems. The aesthetic quality matters — a crumbling timber wall hurts value while a stone wall with integrated landscaping adds to curb appeal.
Retaining walls sit at the intersection of engineering and landscape design. The best material for your yard depends on your slope height, budget, and how visible the wall is from living spaces. Start by measuring the grade change and checking local permit requirements — those two numbers narrow your options faster than any Pinterest board. If you are tackling a wall over 4 feet, invest in a geotechnical consult before buying materials. The $500 you spend on engineering can save thousands in rebuilding a failed wall. For anything under 3 feet, grab some blocks or timbers and start with a test section in the least visible part of your yard to build confidence before committing to the full run.
Pinterest cover for 23 Backyard Retaining Wall Ideas for Every Slope
About the author
OBCD
CGI visualization and interior design content. We create detailed 3D renders and curate practical design ideas for every room in your home.