29 Backyard Putting Green Ideas

My neighbor installed a putting green two years ago. It was a 200-square-foot kidney shape wedged between his patio and the fence. He spent about $4,500 on synthetic turf, sand infill, and a weekend of grading work. That green gets more use than his pool. His kids practice chip shots after school, guests end up out there during every cookout, and he claims his handicap dropped three strokes — though I have only his word on that. What struck me was how many different ways people build these things. Some go full country club with bunkers and fringe cuts. Others just want a flat patch of good turf next to the deck. The 29 ideas here cover that whole range.
Below are 29 putting green setups organized from basic flat builds to elaborate multi-hole courses with sand traps, lighting, and landscaping.
Table of Contents
- Simple Flat Rectangle
- Kidney-Shaped Green with Fringe
- Multi-Hole Contoured Course
- Rooftop Putting Green
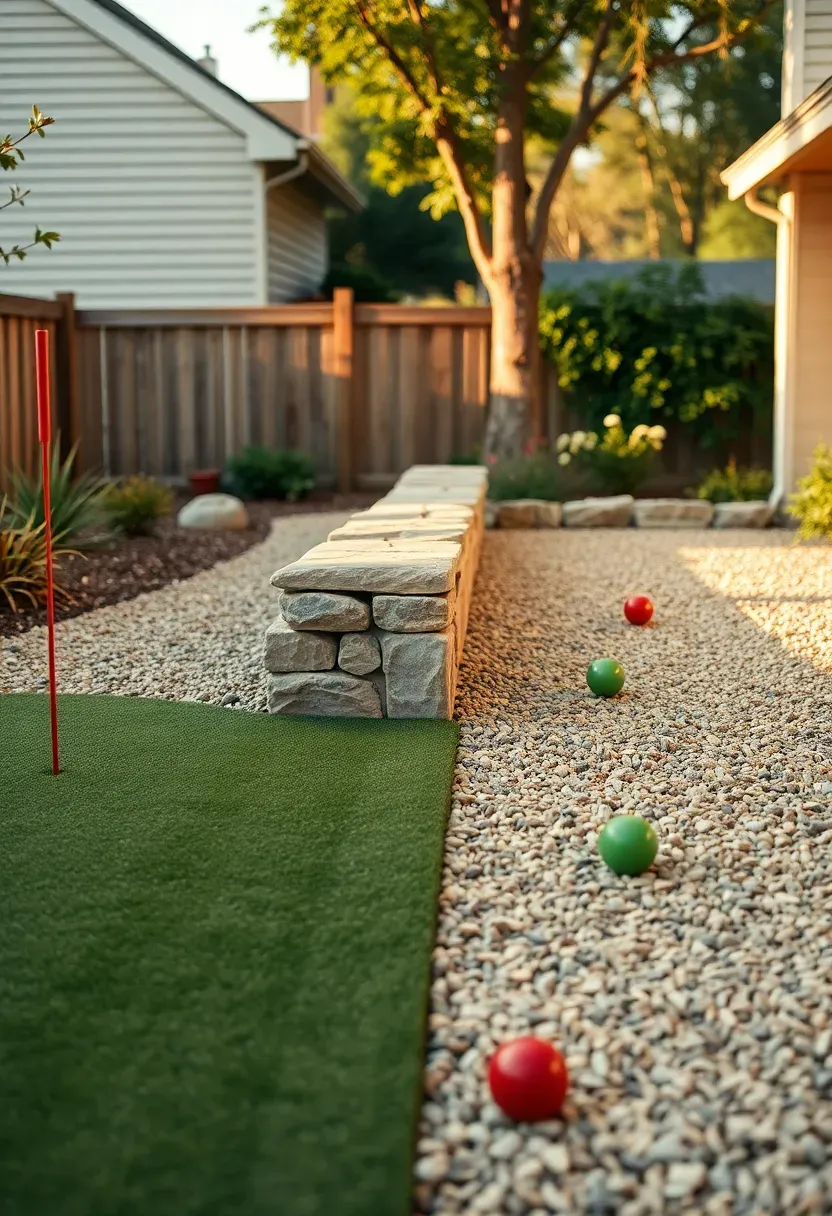
- Side Yard Narrow Green
- Sunken Green with Stone Border
- Putting Green with Chipping Area
- Island Green Surrounded by Gravel
- Slope-Built Tiered Green
- LED-Lit Night Putting Green
- Poolside Putting Green
- Circular Green with Center Pin
- Green with Practice Bunker
- Natural Grass Bentgrass Green
- Portable Roll-Out Green
- Patio-Integrated Putting Strip
- Green with Bocce Court Combo
- Japanese Garden Putting Green
- Desert Landscape Putting Green
- Green with Putting Mat Bridge
- Miniature Golf Backyard Course
- Putting Green Under Pergola
- Dog-Friendly Turf and Putting Green
- Raised Platform Green
- Putting Green with Scoreboard Wall
- Wraparound Patio Putting Green
- Wooded Clearing Green
- Green with Built-In Seating
- Full Backyard Practice Facility
1. Simple Flat Rectangle
The most straightforward build: grade a flat area, compact the base, and roll out synthetic turf rated at 12-14 feet on the stimpmeter. A 10x20-foot rectangle costs between $2,000 and $3,500 installed with proper drainage rock and silica sand infill. No fancy contouring, no fringe — just a clean practice surface. This works for anyone who wants repetition on straight putts and does not have time for a major landscaping project. Most homeowners finish the install in a long weekend.
Tips
- Use a plate compactor on the crushed rock base to prevent settling and low spots
- Choose turf with a nylon fiber face rather than polypropylene for a truer ball roll
- Install a 4-inch perforated drain pipe under the center if your yard holds water
We picked a few things that go well with this idea: Bearwill 5x10ft Professional Putting Green Mat (★4.4), Chriiena 3.3x10ft Putting Green Mat (★4.3) and Lunarthos 10ft Putting Mat with Alignment Lines (★4.5). As an Amazon Associate we earn from qualifying purchases.
2. Kidney-Shaped Green with Fringe
Why curves matter
A kidney shape does two things a rectangle cannot. It gives you different putt lengths from every angle, and it fits into irregular yard spaces without looking forced. The curved edges also let you add a fringe border — a ring of slightly taller turf (typically 1.5 inches vs. 0.5 inches on the putting surface) that catches offline shots the way a real green does.
The install
Laying out the curve takes more planning than a rectangle. Use a garden hose to test shapes before cutting turf. Budget about 15-20% more material than a rectangle of the same area because of waste from curved cuts. Expect to spend $3,500 to $6,000 for a 300-square-foot kidney green with fringe.
We picked a few things that go well with this idea: MUVPOH 10x7ft Golf Practice Net with Mat (★4.5), Heavy Duty 10x7ft Golf Hitting Net Portable (★4.4) and Amazgolf 10x10ft Golf Practice Cage Net (★4.3). As an Amazon Associate we earn from qualifying purchases.
3. Multi-Hole Contoured Course
If you have at least 600 square feet to work with, a three-hole green with built-in undulations turns your yard into a real practice course. Each hole gets a different break pattern — one left-to-right, one uphill, one with a subtle ridge running through it. The contours are built from compacted decomposed granite shaped before the turf goes down. This is not a weekend project. Professional installation runs $8,000 to $15,000 depending on complexity, but you get a surface that genuinely improves your short game because no two putts are the same.
Steps
- Hire a grading contractor to shape the sub-base contours according to a plan
- Compact the shaped base in layers — 2 inches at a time — to prevent settling
- Roll the turf over the contours and stretch it into the valleys using turf nails at 6-inch intervals along curves
- Cut holes with a standard 4.25-inch cup cutter and install flush-mount cups
We picked a few things that go well with this idea: SENSECLUB Chipping Net with Mat and Balls (★4.5), SkyLife Dual-Turf 4x5ft Golf Practice Mat (★4.4) and Fivepropy 9-Hole Backyard Golf Yard Game (★4.6). As an Amazon Associate we earn from qualifying purchases.
4. Rooftop Putting Green
Urban golfers without yards can still practice. A rooftop putting green uses lightweight foam underlayment instead of gravel base to keep the weight within structural limits — typically under 15 pounds per square foot. The key concern is wind. Balls on a rooftop green drift in gusts, so install a low perimeter lip or use heavier practice balls. A 6x12-foot rooftop green costs $1,500 to $3,000 including the foam base and edge containment. Weight capacity must be confirmed by a structural engineer before installation.
Tips
- Use closed-cell foam panels (not gravel) to keep dead load under 12 PSF
- Secure turf edges with adhesive rather than ground stakes
- Add a ball-stop net at the building edge for safety
Recommended
Items for this idea
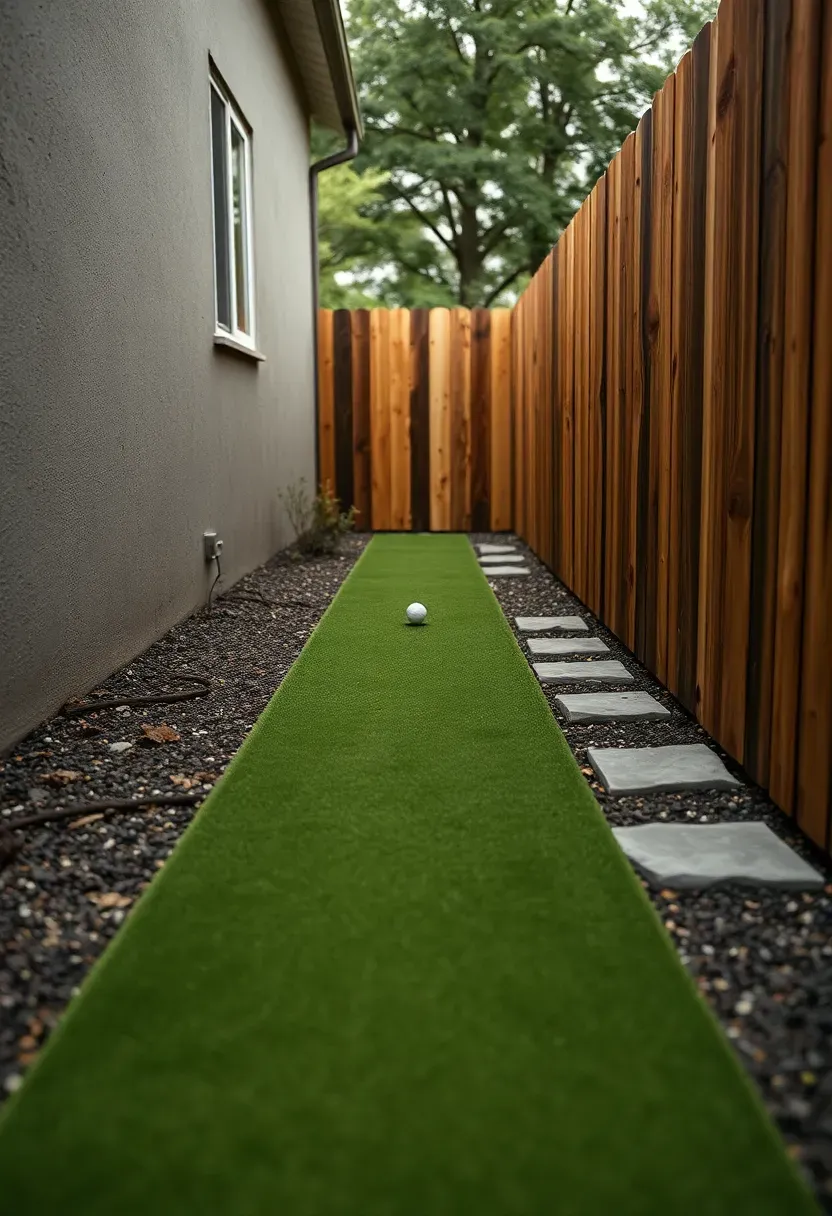
5. Side Yard Narrow Green
That 5-foot-wide strip between your house and the fence is usually wasted space. A narrow putting green turns it into a 30- to 50-foot-long practice lane for lag putting — the one skill most amateurs neglect. The narrow format forces you to control distance rather than direction, which is where most three-putts actually originate. Grade the length with a gentle 1-2% slope for drainage and to add a subtle break. Installation in a side yard is often simpler than the main yard because the space is already contained by structures on both sides.
Tips
- Keep the width at least 4 feet for comfortable stance and stroke
- Install landscape edging flush with the turf surface to prevent tripping
- Use the fence side for a ball return channel made from PVC half-pipe
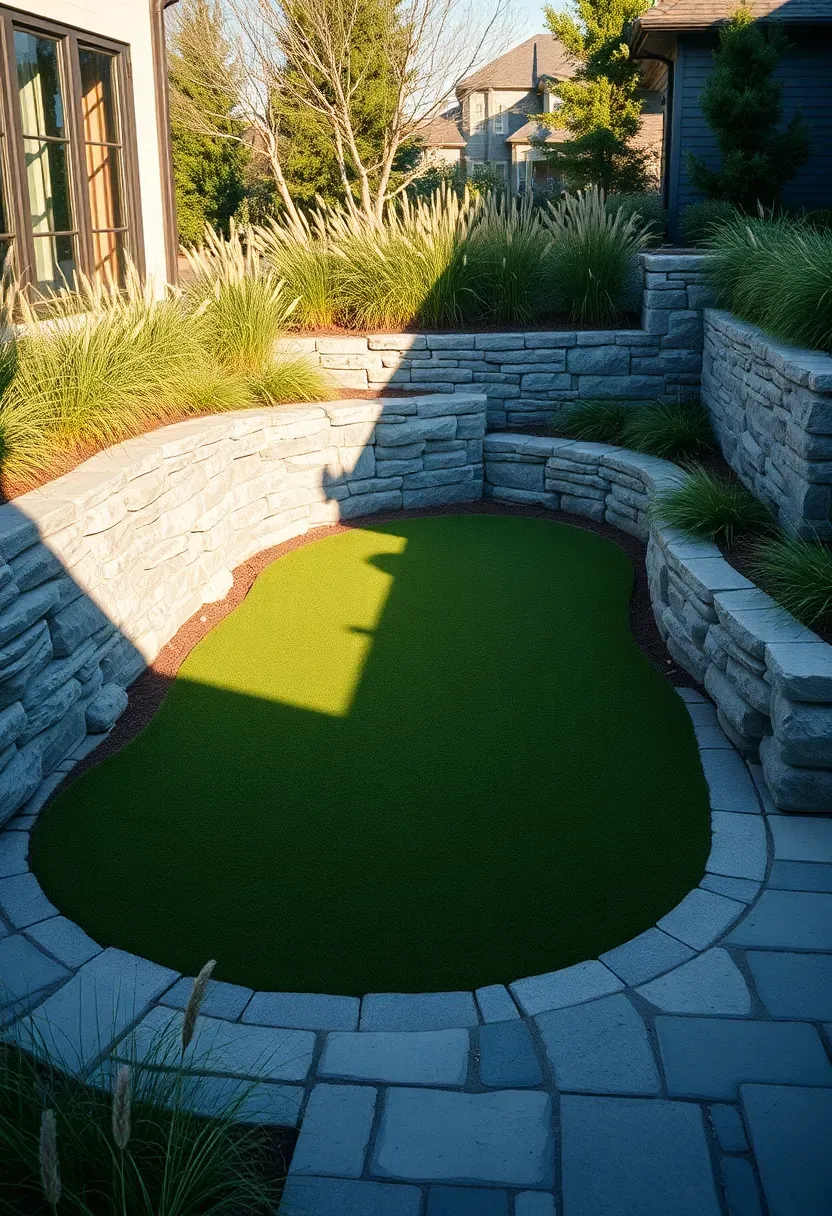
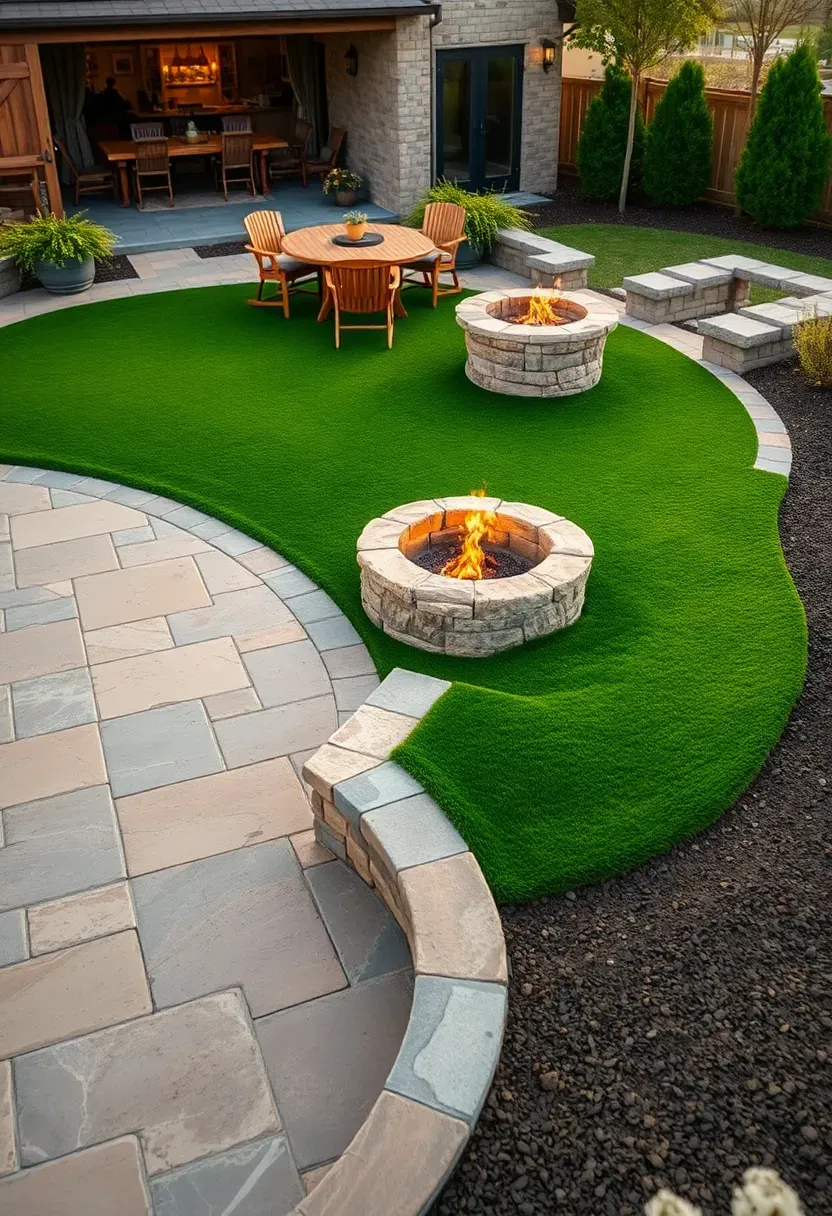
6. Sunken Green with Stone Border
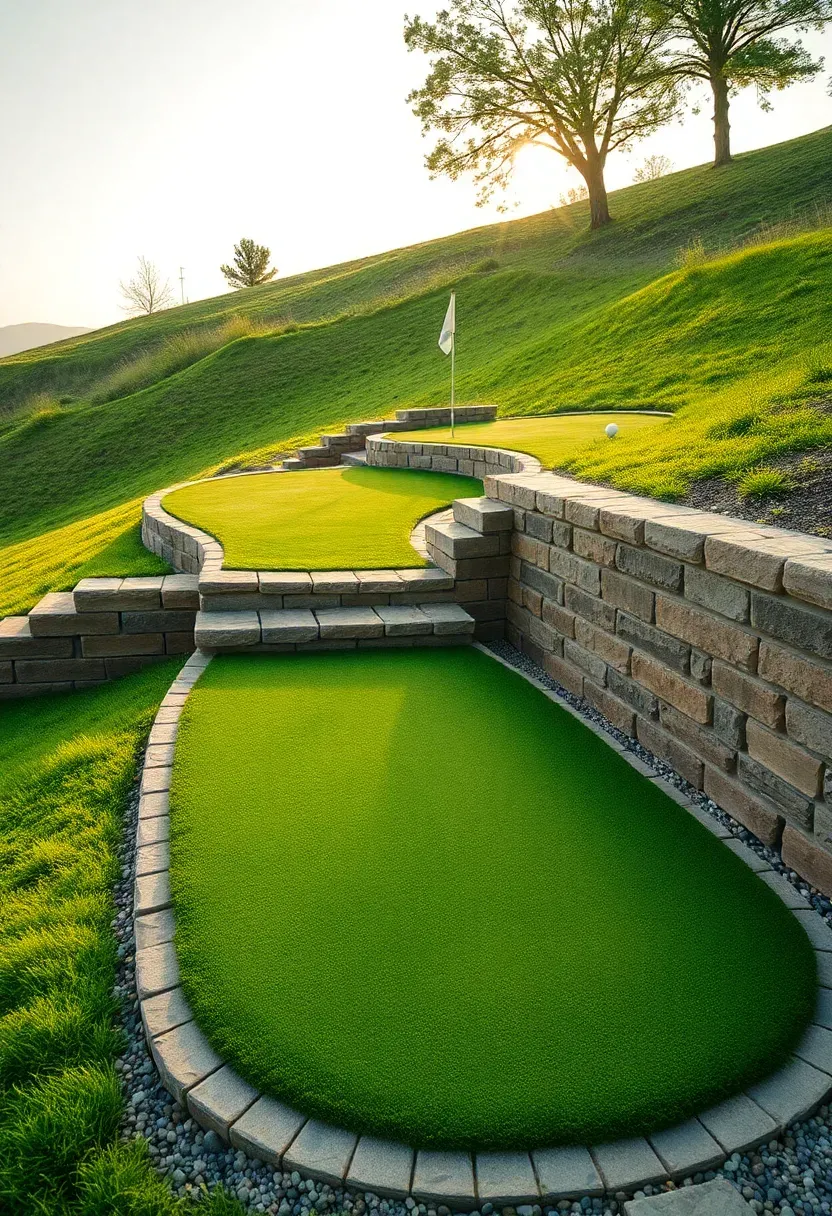
Dropping the green 8-12 inches below the surrounding grade creates a distinct room in the landscape. The stone retaining wall around it serves as both a design feature and a ball backstop. Flagstone, stacked ledgestone, or even concrete block all work for the border — the height is low enough that structural engineering is not required. The sunken design also helps with drainage because you can grade the surrounding lawn to shed water away from the green. Budget $5,000 to $9,000 for a 400-square-foot sunken green with stone walls on three sides.
Watch out
- Ensure proper drainage below the green — a sunken area without drain rock becomes a pond
- Grade the bottom with a 2% slope toward a catch basin at the lowest corner
- Keep the retaining wall height under 18 inches to avoid permit requirements in most jurisdictions
Recommended
Items for this idea
7. Putting Green with Chipping Area
A putting-only green ignores the shot that actually gets the ball there. Adding a chipping zone — a 10x15-foot area of taller turf (1.75 to 2 inches) positioned 15 to 30 feet from the green edge — lets you practice pitch shots, bump-and-runs, and flop shots. Use a different turf product for the chipping area with a higher pile height and denser backing to absorb club impact. The two zones share the same gravel drainage base but get separate turf installations. This combo adds $2,000 to $4,000 over a putting-only setup.
Tips
- Place the chipping area so shots land toward the house interior of the green, not toward neighbors
- Install a ball-stop net behind the green if the chipping distance exceeds 20 yards
- Use a rubber tee mat embedded in the chipping turf for iron shots to protect the surface
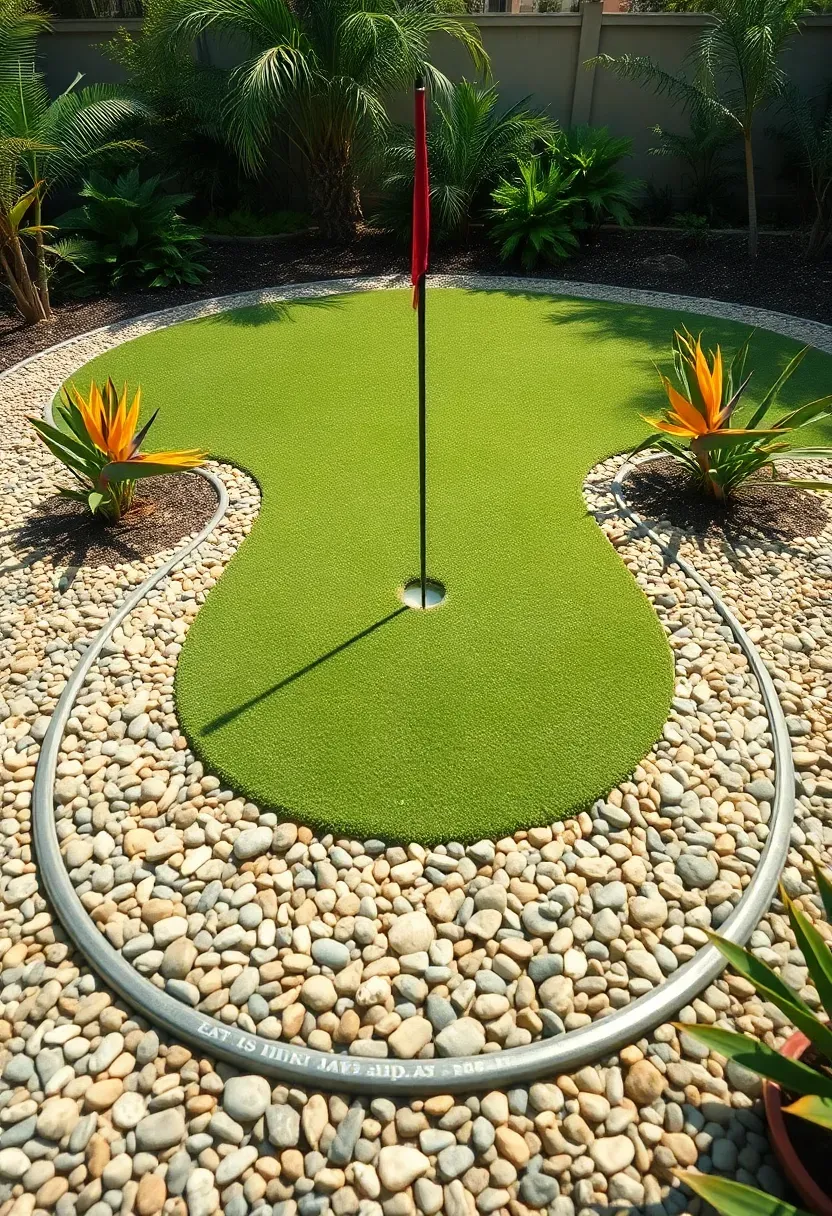
8. Island Green Surrounded by Gravel
Borrowing the concept from TPC Sawgrass, an island green sits in a sea of decorative gravel instead of water. The gravel border — typically 3-4 feet wide using Mexican beach pebble or river rock — creates a visual separation that makes the green feel like a destination. Balls that roll off the edge settle in the gravel and stay visible. This design skips the maintenance headache of turf-to-lawn transitions, since gravel meets landscape fabric on all sides. A 250-square-foot island green with gravel surround runs $3,000 to $5,500.
Layout Advice
- Set the gravel on landscape fabric over compacted soil to prevent weed growth
- Edge the gravel perimeter with steel landscape edging to keep stones from migrating into the lawn
- Choose light-colored gravel for contrast against the dark green turf
Recommended
Items for this idea
9. Slope-Built Tiered Green
A sloped yard is not an obstacle — it is an opportunity to build a green with genuine elevation change. Cut the slope into two or three terraces, each with its own putting surface and cup. Shots that start on the upper tier and need to navigate a break down to a lower hole replicate some of the most challenging putts you will face on a real course. Stone or timber retaining walls separate the levels. This build requires professional grading and costs $10,000 to $18,000, but the result is a backyard practice facility that flat-lot owners cannot replicate.
Steps
- Survey the slope to determine cut-and-fill volumes for each terrace level
- Build retaining walls from the bottom up, backfilling and compacting behind each wall
- Grade each terrace with internal drainage running to a common outlet
- Install turf on each level separately to allow proper stretching over the contours
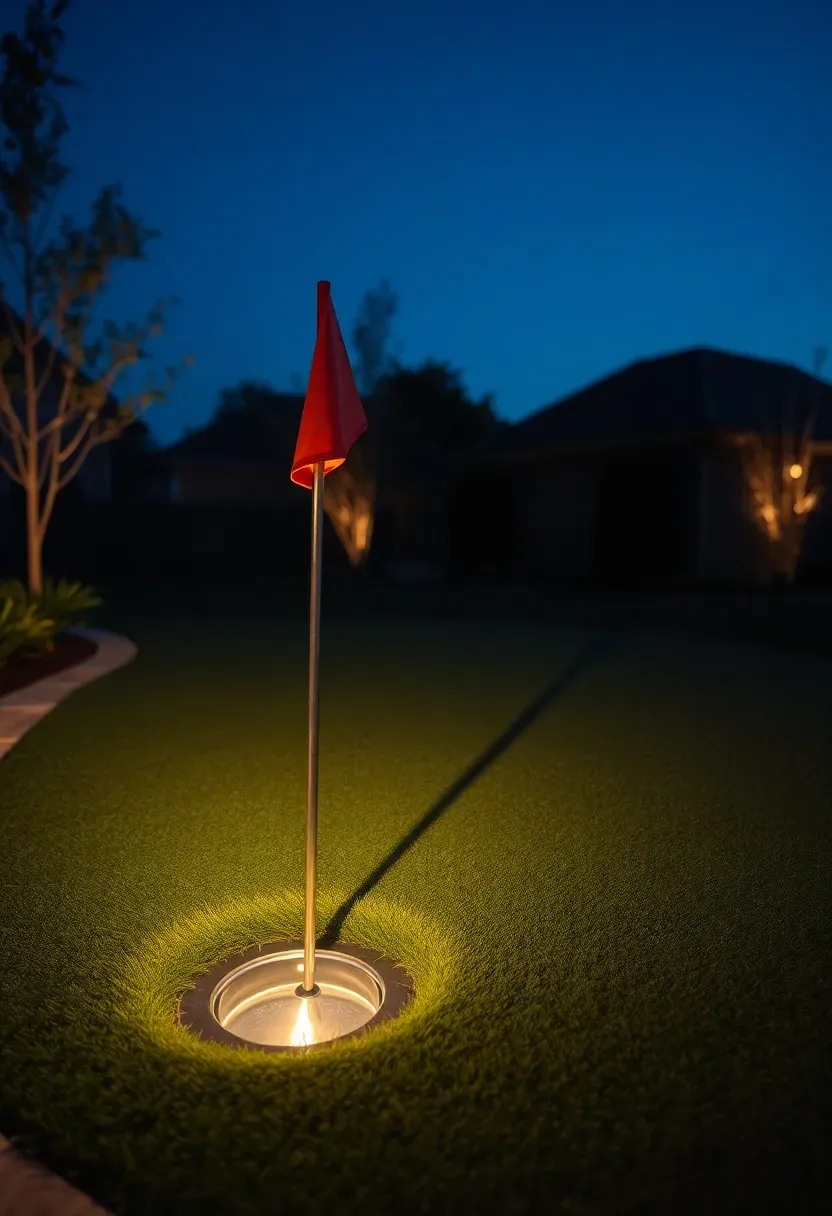
10. LED-Lit Night Putting Green
Golf does not have to end at sunset. Low-voltage LED ground lights installed around the perimeter and at each cup turn the green into a usable space until midnight. Flush-mount fixtures set into the stone or concrete border throw light across the surface without creating shadows that interfere with reading breaks. A basic lighting kit with 8 fixtures, a transformer, and wire runs $400 to $800 for materials. The mood it creates — warm light on green turf against a dark yard — also makes the space feel more like an outdoor room than a sports installation.
Planning Tips
- Use 3000K warm white LEDs to avoid the clinical look of daylight-color fixtures
- Position lights low and angled across the surface so the ball casts a readable shadow
- Install a smart timer or photocell to automate on/off at dusk and a set shutoff time
Recommended
Items for this idea
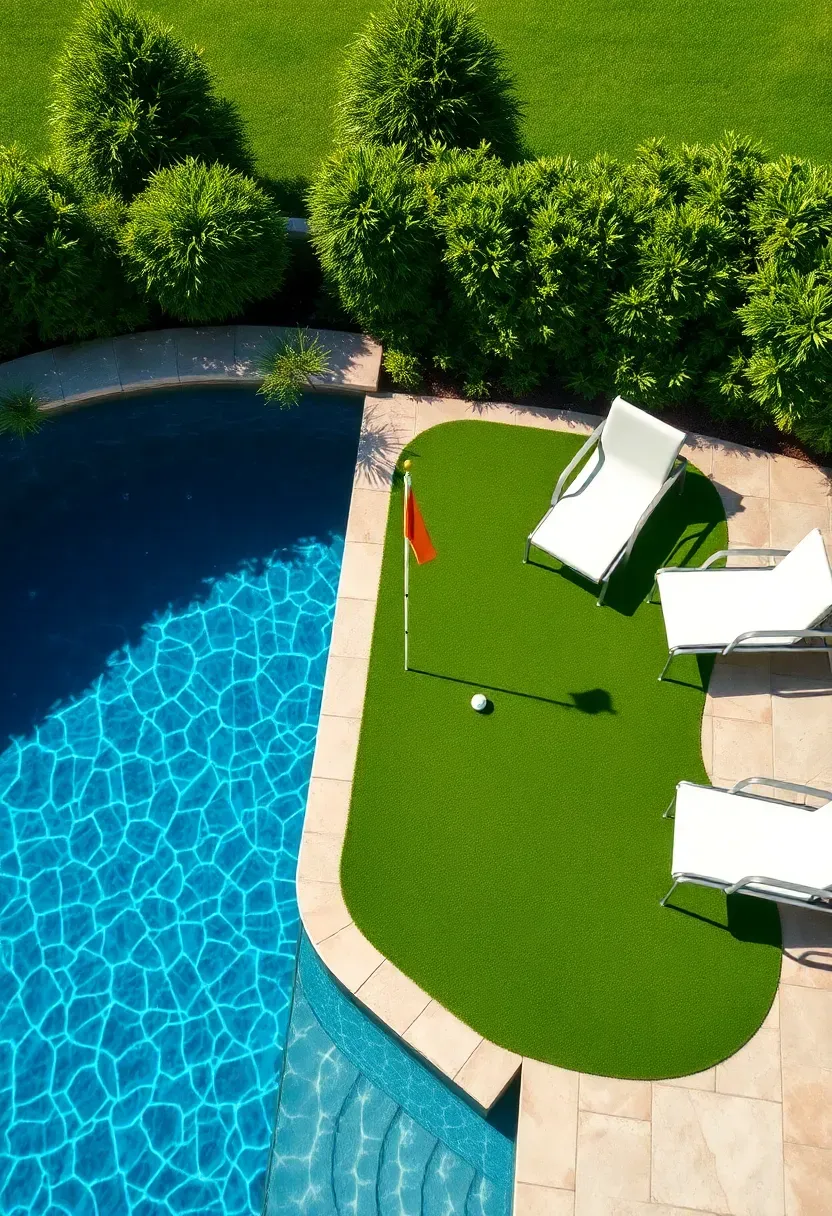
11. Poolside Putting Green
Placing the putting green next to the pool makes both amenities feel like part of the same outdoor complex. The stone or concrete pool deck extends to the green edge, and a flush transition keeps the look seamless. Chlorine splash is the main concern — rinsing the turf with fresh water after pool use prevents fiber degradation over time. Position the green on the opposite side of the pool from the splash zone if possible. A poolside green of 200-300 square feet adds $2,500 to $5,000 to a typical pool renovation.
Tips
- Use UV-stabilized turf rated for pool environments to handle reflected sunlight
- Install a small curb between the pool deck and green to redirect splash water
- Avoid placing cup holes within 5 feet of the pool edge to prevent accidental trips
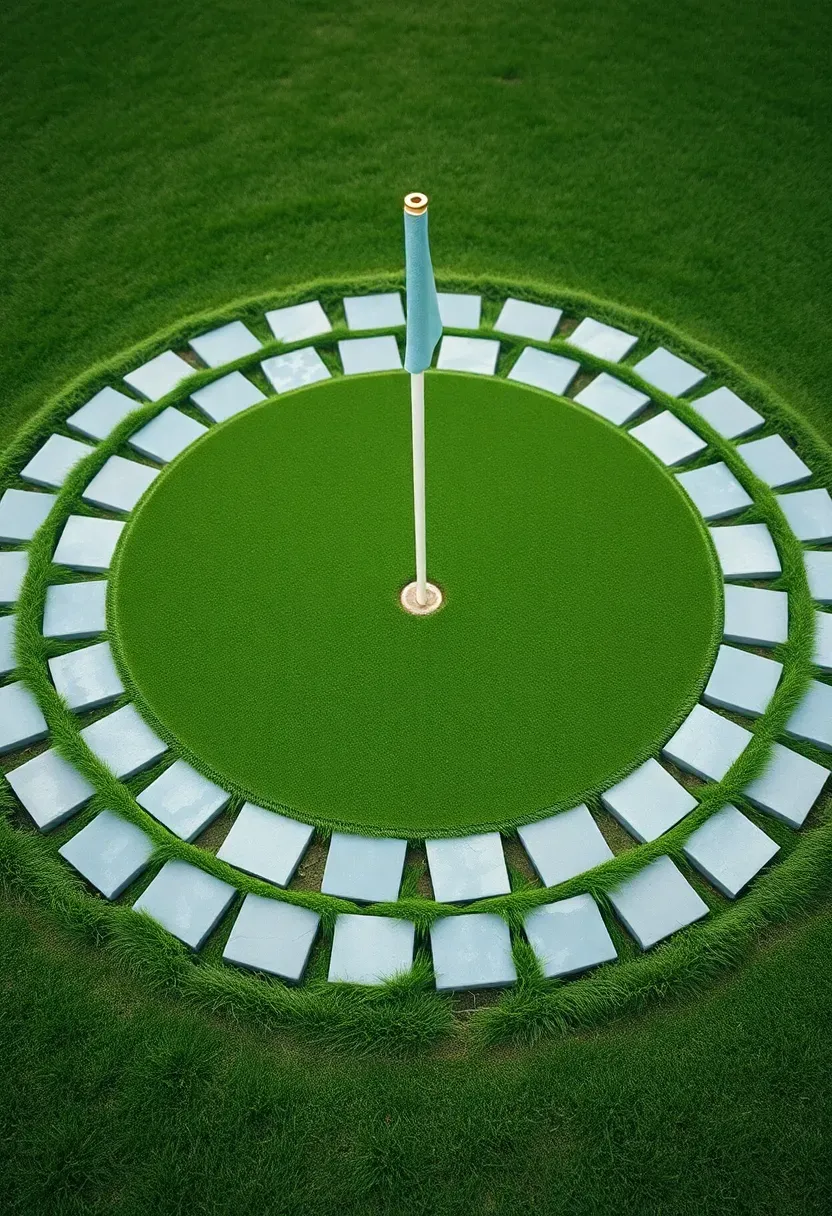
12. Circular Green with Center Pin
A circle is the simplest shape that guarantees every putt is a different length depending on where you stand. A 15-foot-diameter circle gives you putts from 3 to 14 feet — the range where scoring actually happens. The center pin placement means you practice breaking putts from 360 degrees if you build in a subtle crown or tilt. This design uses the least material per usable area and fits into tight corners of a yard. Material cost for a 15-foot circle runs $1,200 to $2,000 for turf and base.
Tips
- Build a 1-inch crown from center to edge for drainage and to create natural break
- Use a compass stake and string line to cut a perfect circle in the turf
- Ring the green with flat flagstone for a clean transition to the surrounding lawn
Recommended
Items for this idea
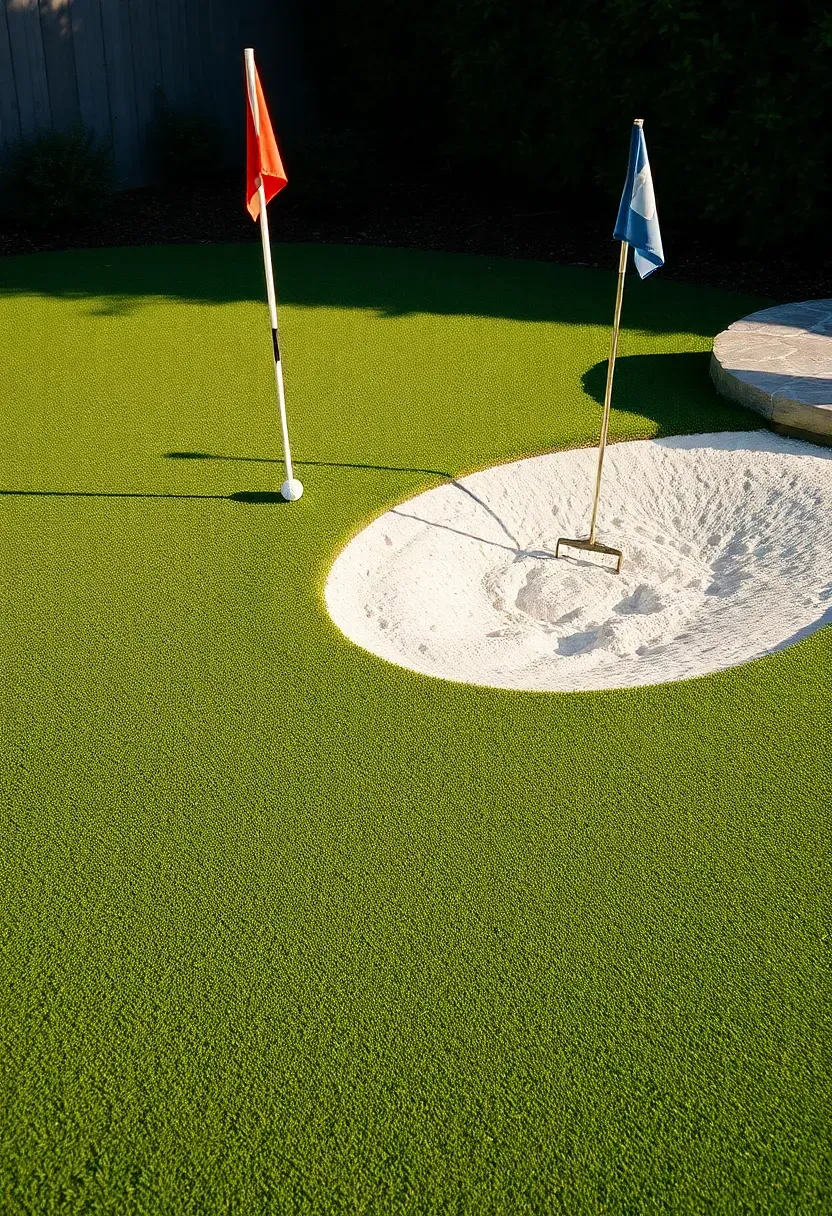
13. Green with Practice Bunker
Why add sand
If greenside bunker shots terrify you, building a practice bunker next to your putting green lets you hit 50 sand shots a day until they do not. A bunker as small as 6x8 feet with 8 inches of bunker sand gives you enough room for a full swing with a 56-degree wedge.
Building the bunker
Excavate 16 inches deep. Line the bottom and sides with landscape fabric, then add 4 inches of pea gravel for drainage before filling with washed bunker sand. The lip between bunker and green should be 4-6 inches high — enough to practice a proper explosion shot. Total cost for a small bunker: $800 to $1,500 plus the sand delivery.
14. Natural Grass Bentgrass Green
Real grass vs. synthetic
Bentgrass putting greens are what country clubs use. The feel, the speed, the way a ball checks on a pitch shot — nothing synthetic replicates it completely. But maintaining a bentgrass green at home requires mowing at 0.125 inches every other day, watering daily, fungicide applications, and aeration twice a year. It is a part-time job.
Choose if...
You genuinely enjoy turf maintenance as a hobby, you live in a cool-season climate (zones 3-6), and you want the most authentic practice surface possible. Skip it if you travel frequently, live where summer temperatures exceed 90 degrees regularly, or want a low-maintenance setup.
Recommended
Items for this idea
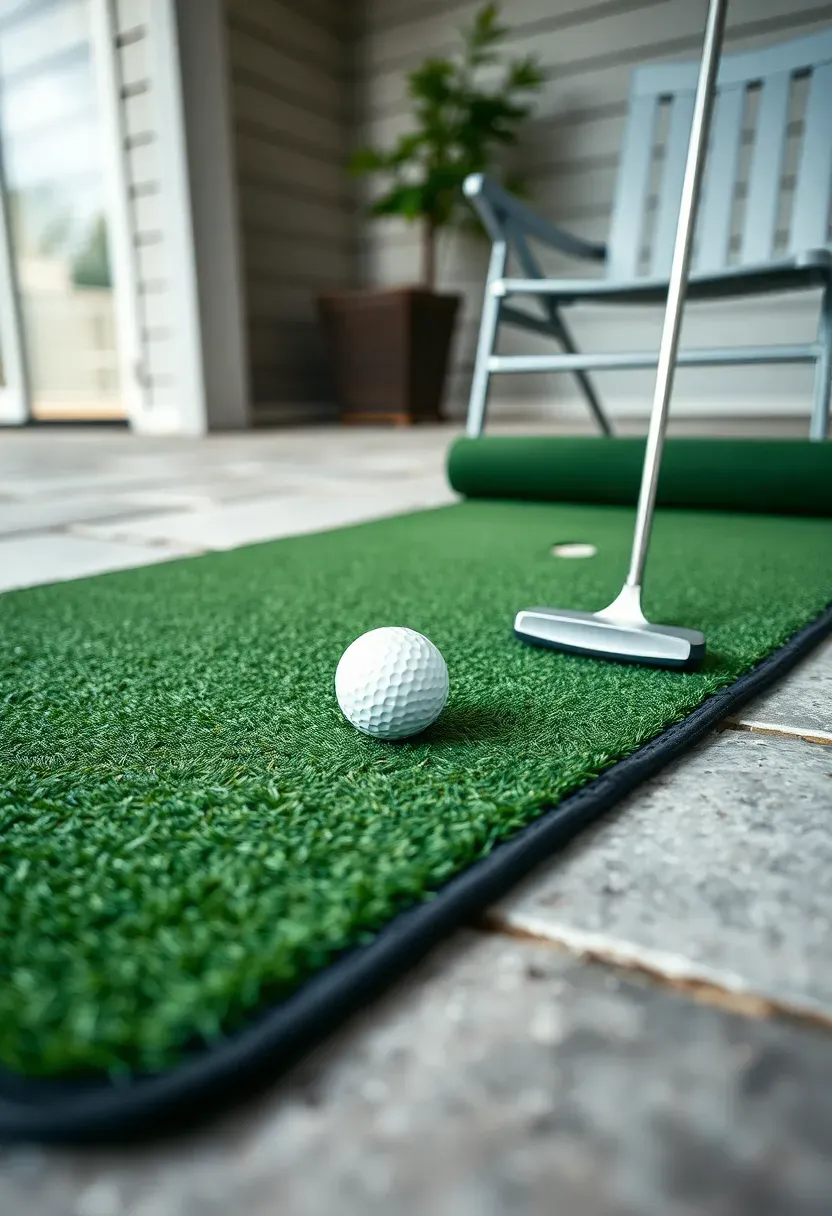
15. Portable Roll-Out Green
Not ready to commit to a permanent installation? Roll-out putting mats in the 4x12-foot range cost $200 to $600 and work on any flat surface — garage floor, patio, basement, driveway. The best ones use dual-density foam under a nylon turf face that rolls true at about 10 on the stimpmeter. They lack the contours and break of a built green, but for straight-putt mechanics practice, they are hard to beat per dollar. Roll them up and store in a closet when you need the space back.
What to look for
- Weight: heavier mats (15+ pounds) lay flatter and resist bunching during strokes
- Backing: rubber non-slip backing keeps the mat stationary on smooth surfaces
- Return: some mats include a gravity ball return channel that feeds balls back to your feet
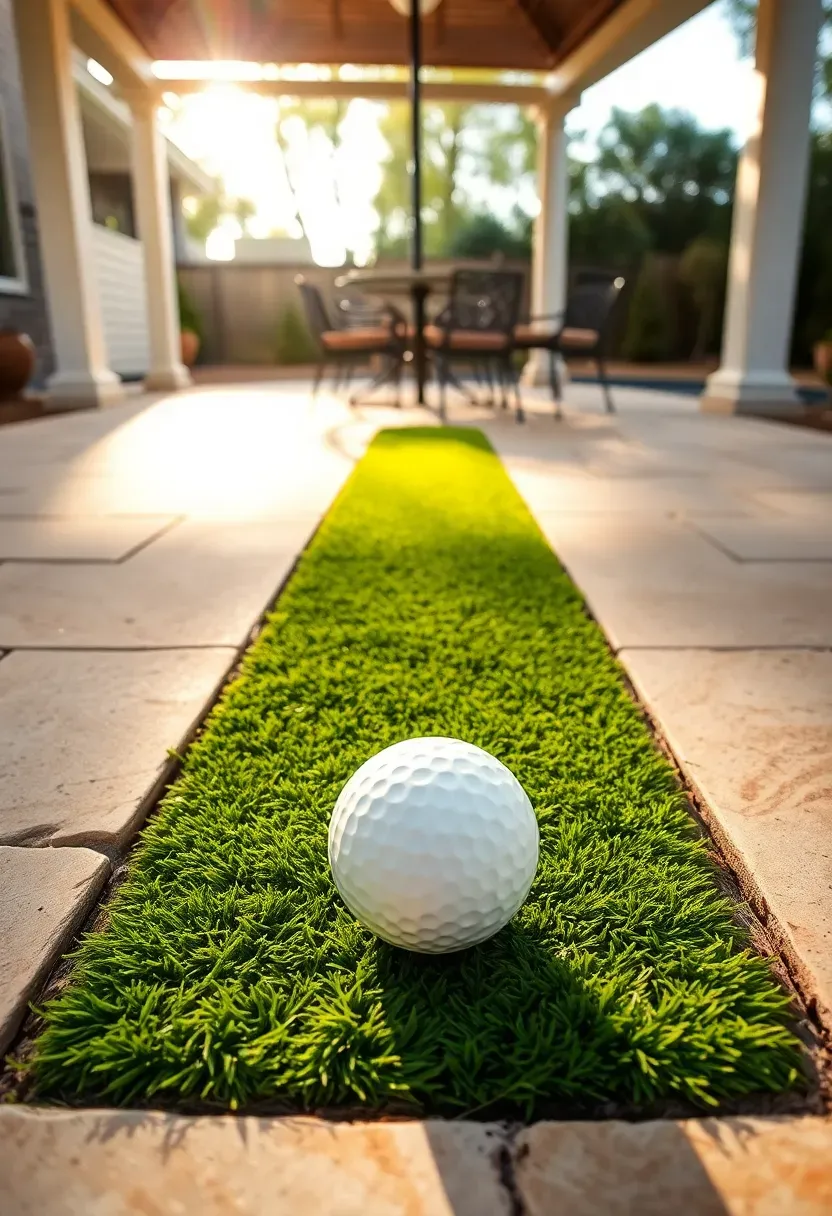
16. Patio-Integrated Putting Strip
Run a 3-foot-wide strip of putting turf directly into the patio surface, bordered by the same stone or pavers on both sides. The green becomes a design element rather than a separate sports feature — like a water channel or planting strip built into the hardscape. It works best with rectangular pavers that allow clean straight edges against the turf. Length depends on your patio footprint, but even 12 feet gives you useful practice distance. This integration approach costs less than a standalone green because it shares the patio's base preparation.
Tips
- Set the turf surface flush with the paver tops for a seamless transition
- Use a concrete edge restraint under the paver-to-turf border to prevent lateral shifting
- Slope the turf strip with the patio's existing drainage grade
Recommended
Items for this idea
17. Green with Bocce Court Combo
Pairing a putting green with a bocce court covers golfers and non-golfers alike. Both use similar base construction — compacted gravel under a smooth surface — so building them side by side shares site prep costs. The bocce court uses crushed oyster shell or decomposed granite, while the putting green gets synthetic turf. A low stone divider between the two surfaces keeps materials from mixing. Standard bocce dimensions (13x60 feet) plus a 12x25-foot putting green fit comfortably in a 30x65-foot yard area. Combined cost: $8,000 to $14,000.
Layout Advice
- Orient the bocce court lengthwise along the longest yard dimension
- Place the putting green at the near end of the bocce court for easy access from the house
- Use the same stone material for both borders to unify the look
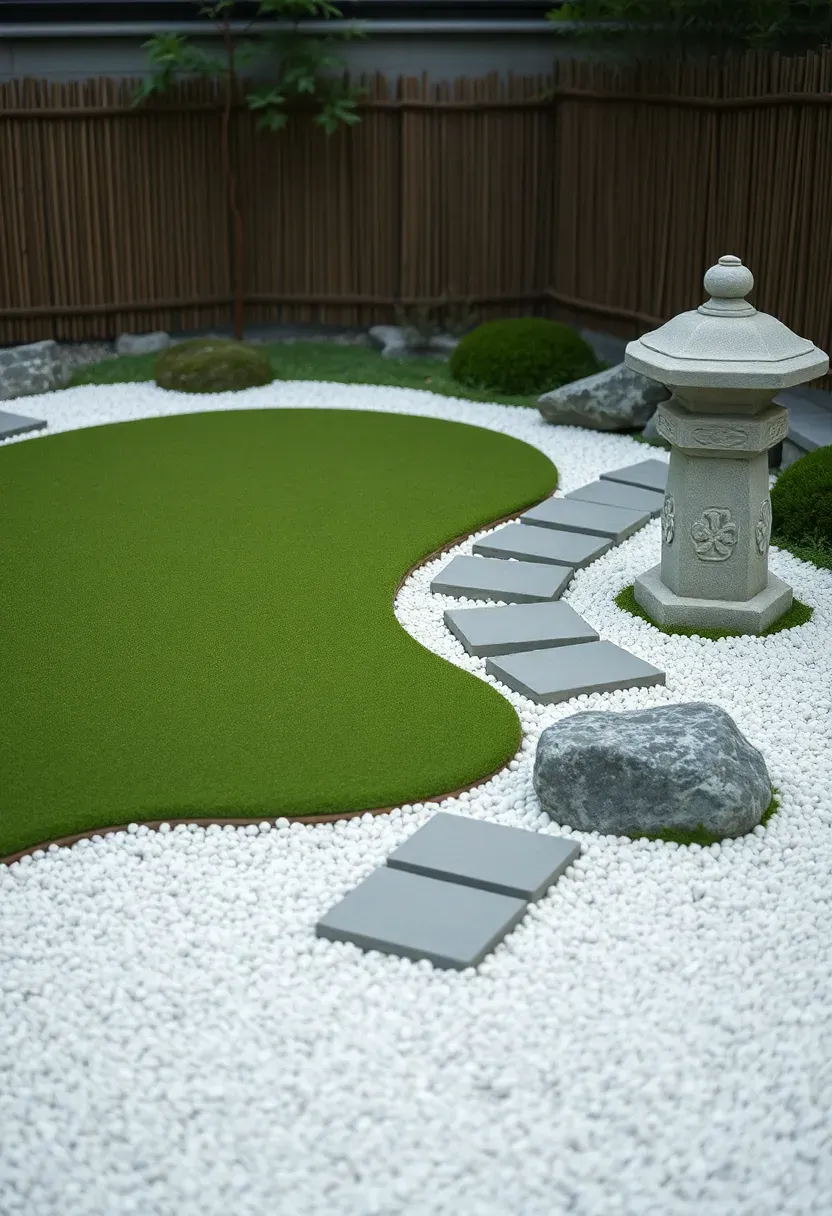
18. Japanese Garden Putting Green
A putting green shaped as an organic form within a Japanese garden layout blurs the line between sport and landscape design. Surround the green with raked gravel, moss patches, and a few placed boulders. Use mondo grass or dwarf liriope as the fringe material instead of synthetic fringe turf. A stone lantern near one corner provides both decoration and ambient light. The green itself stays synthetic for performance, but everything around it follows wabi-sabi principles — asymmetry, natural materials, and intentional simplicity.
Design Tips
- Choose dark green turf to match the muted tones of moss and stone
- Rake the surrounding gravel in curved patterns that follow the green's contour
- Limit decorative elements to odd numbers (3 boulders, 1 lantern, 5 plantings)
Recommended
Items for this idea
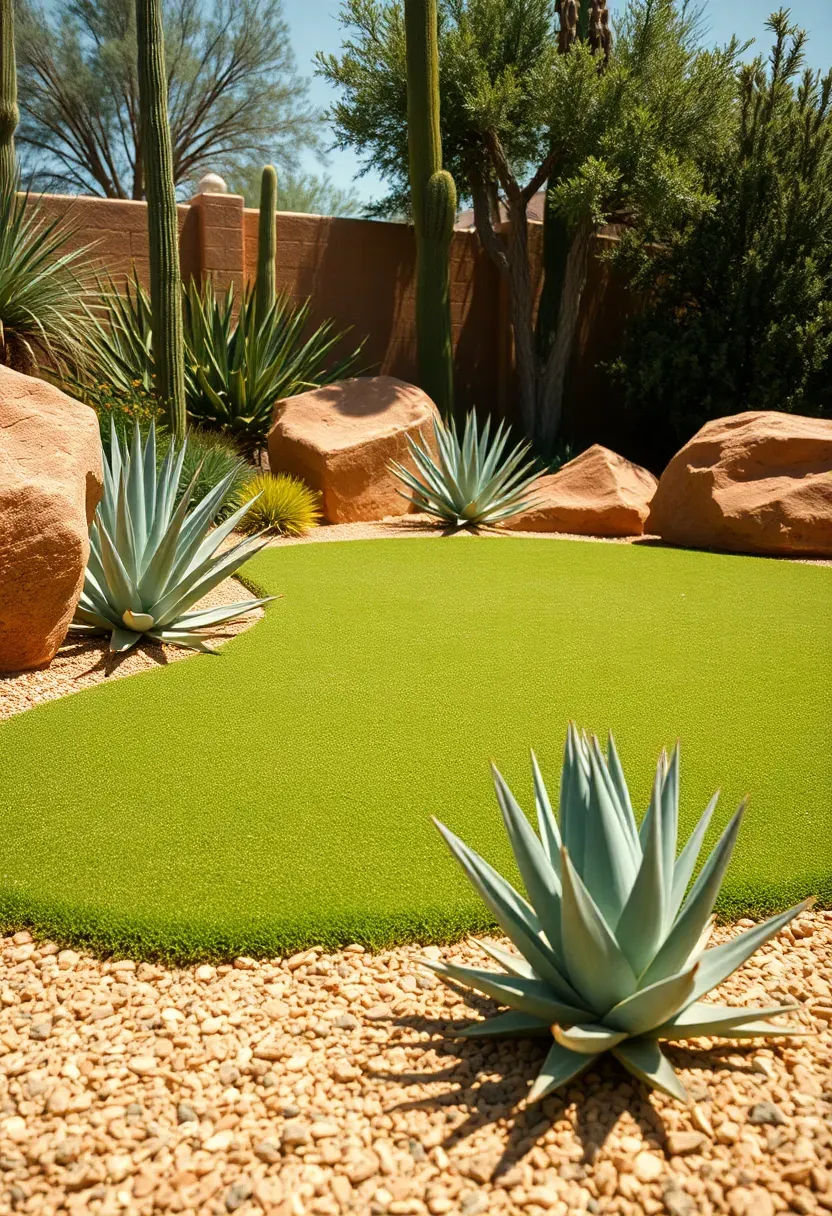
19. Desert Landscape Putting Green
In Arizona, Nevada, and Southern California, synthetic turf putting greens solve two problems at once: they give you a practice area and add green to a landscape without using irrigation water. Surround the green with decomposed granite, desert plantings like agave and ocotillo, and large boulders for a design that belongs in the climate rather than fighting it. Temperatures on synthetic turf can reach 150 degrees in direct sun, so choose a lighter-colored infill (like Zeofill) that stays cooler than standard black rubber crumb.
Tips
- Use a turf with built-in UV stabilizers rated for desert sun exposure
- Install the green in an area that gets afternoon shade from a structure or tree
- Edge with steel or aluminum edging — wood rots quickly in dry heat with irrigation splash
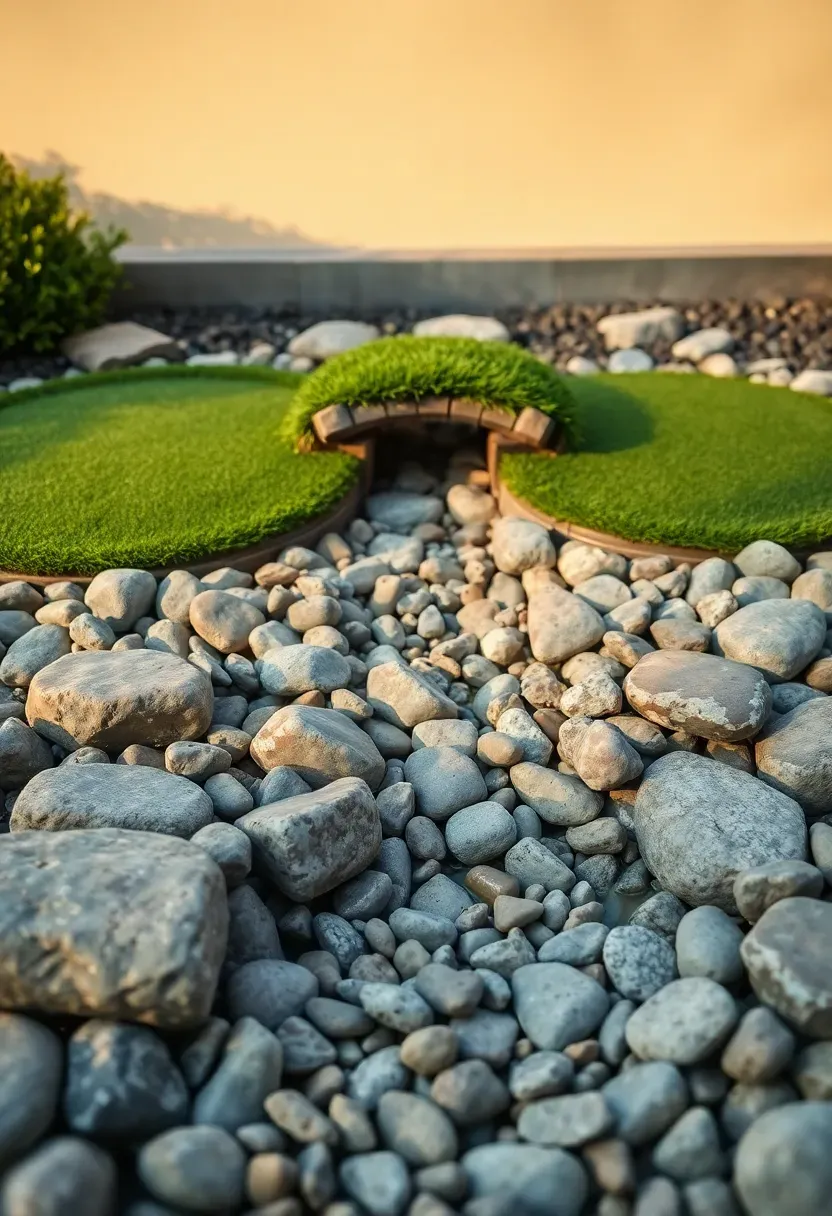
20. Green with Putting Mat Bridge
Connect two separate putting surfaces with a narrow turf bridge spanning a decorative dry creek bed or gravel channel. The bridge is 2-3 feet wide and 6-8 feet long, creating a putting challenge that requires rolling the ball across an elevation change and through a narrowing. The dry creek underneath uses river rock and a few larger stones for a natural look. This design works in yards where a single large green would dominate the space — breaking it into two connected zones makes the whole area feel more like a garden than a golf facility.
Steps
- Build the two green areas with standard base and turf on each side of the creek channel
- Form the bridge with a plywood and foam substructure arching over the creek
- Stretch turf over the bridge, fastening it on both sides to the green edges
- Fill the creek channel with graduated river rock — larger stones at the edges, smaller in the center

Recommended
Items for this idea
21. Miniature Golf Backyard Course
Forget serious practice — a backyard mini golf course is pure entertainment. Build 6 to 9 holes using synthetic turf for each green, with obstacles made from landscape materials: PVC pipe tunnels, stacked brick walls, ramp boards, and planter-box chicanes. Each hole needs a tee-off spot, one or two obstacles, and a cup. Keep the total footprint manageable by using switchback layouts that fold the course through the available space. Kids love it, party guests love it, and the whole project can be built for $3,000 to $7,000 depending on how elaborate the obstacles get.
Tips
- Design each hole on paper first with exact dimensions to avoid running out of space
- Use pressure-treated 2x6 lumber for borders that guide ball direction
- Number each hole with small painted signs for a professional mini-golf feel
22. Putting Green Under Pergola
A pergola over the putting green gives you shade, rain protection, and a visual frame that turns the green into an outdoor room. The structure does not need to cover the entire green — even partial coverage over the main putting area keeps you comfortable in summer heat. Attach string lights to the pergola beams for evening sessions. The shade also keeps turf surface temperatures 20-30 degrees cooler than uncovered areas. A 12x16-foot pergola over an existing green adds $3,000 to $6,000 depending on material — pressure-treated wood at the low end, cedar or aluminum at the high end.
Watch out
- Set pergola posts outside the putting surface footprint so they do not interfere with play
- Choose an open-beam design that lets enough light through to prevent mold on the turf
- Account for post footings (typically 12-inch diameter, 36-inch deep) in the grading plan
Recommended
Items for this idea
23. Dog-Friendly Turf and Putting Green
If you have dogs, they are going to use the putting green whether you plan for it or not. Build the putting surface from standard putting turf, but surround it with pet-turf — a product designed with antimicrobial infill, drainage perforations, and fibers that resist claw damage. The pet turf area gives the dog a comfortable spot while keeping the actual putting surface cleaner. Use a low border (2-inch aluminum edging) between the zones so the dog learns the boundary. Rinse the pet turf weekly with enzyme cleaner to prevent odor buildup.
Tips
- Choose T-shaped or W-shaped turf fibers for the pet area — they recover from foot traffic better than flat fibers
- Install a dedicated hose bib near the turf for easy cleaning
- Avoid rubber crumb infill in the pet zone — dogs sometimes ingest it; use Zeofill or silica sand instead
24. Raised Platform Green
Building the green on a raised deck platform — 18 to 24 inches above grade — solves drainage problems on flat lots where water pools. The platform uses standard deck framing (pressure-treated joists on concrete piers) with a plywood subfloor topped by foam padding and putting turf. The elevation change also creates a visual focal point and puts the putting surface at a height that is easier on your back for retrieving balls from the cup. A 10x20-foot raised green platform costs $4,000 to $7,000 including framing and turf.
Steps
- Set concrete pier footings at 4-foot intervals across the platform footprint
- Frame with 2x8 pressure-treated joists at 16-inch centers on adjustable post bases
- Deck with 3/4-inch exterior plywood, sealed on both faces
- Layer closed-cell foam padding (1/2 inch) over the plywood, then stretch and staple putting turf
Recommended
Items for this idea
25. Putting Green with Scoreboard Wall
Adding a scoreboard next to the green turns casual putting into a competitive game. A simple chalkboard or whiteboard mounted on a fence post or freestanding frame works perfectly — write names, track scores per hole, keep a running handicap. For a more permanent setup, use a painted plywood panel with a clear-coat finish and dry-erase marker surface. Position the scoreboard where it is visible from the green but does not obstruct play or foot traffic. The competitive element keeps kids and guests engaged longer than open-ended putting.
Tips
- Mount the board at 48-inch height for easy writing by both adults and older kids
- Add a small shelf underneath for chalk, markers, and a rag
- Use exterior-grade paint or marine varnish to protect the board from weather
26. Wraparound Patio Putting Green
Instead of placing the green away from the patio, wrap it around the patio edge like a border. The green follows the patio's perimeter shape — curving around corners and varying in width from 4 to 8 feet. You putt along the curve, which adds natural break to every shot. Guests sitting on the patio can watch and heckle without leaving their chairs. The integration means no separate area of the yard is consumed — the green and the entertaining space share the same footprint.
Layout Advice
- Vary the green width at different points to create natural difficulty changes
- Place cup holes at the widest sections where balls are less likely to roll off the edge
- Use the same stone border material as the patio edge for visual continuity
Recommended
Items for this idea
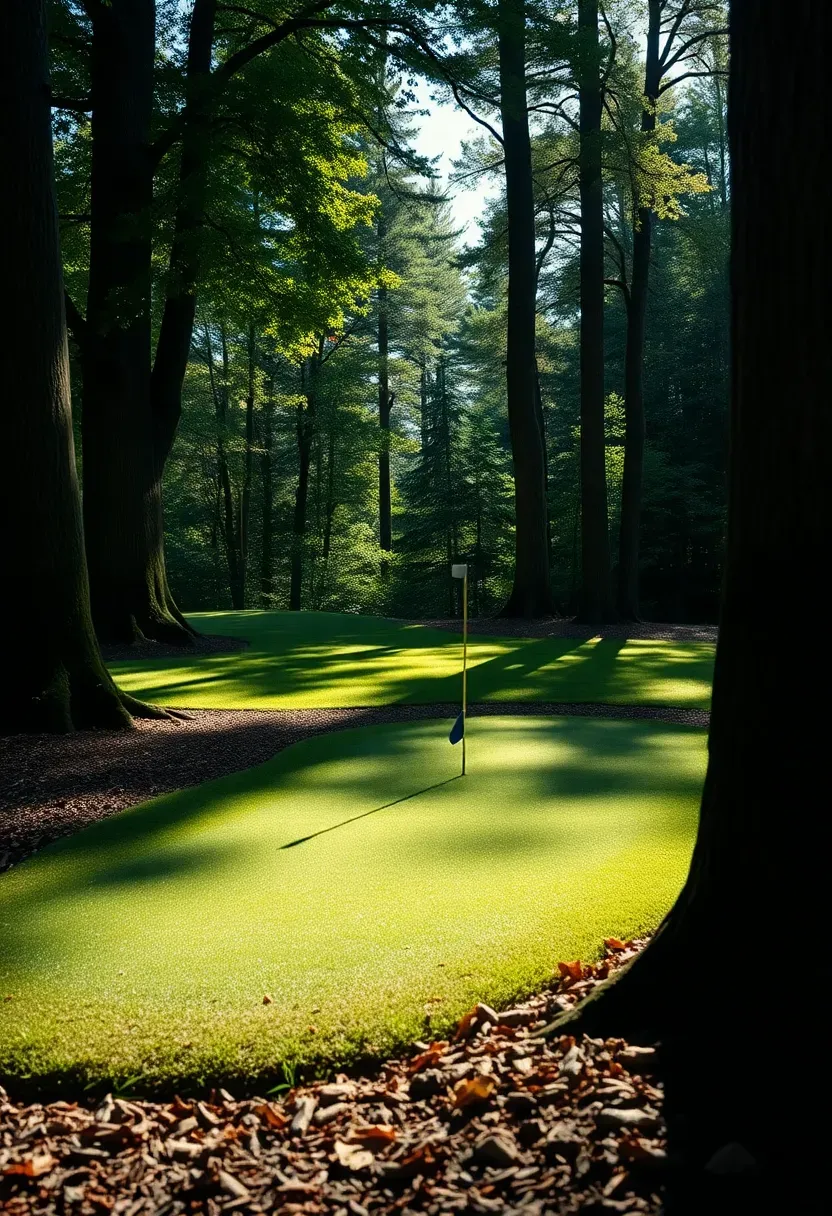
27. Wooded Clearing Green
A putting green set in a clearing among mature trees gives you shade, privacy, and a setting that feels more like a woodland course than a suburban yard. The challenge is tree roots and canopy drip. Grade the clearing carefully, working around major roots rather than cutting them. Use a deeper gravel base (6 inches instead of the standard 4) to bridge over minor root bumps. The dappled light filtering through leaves creates shifting shadows that change how you read the green throughout the day — good practice for reading real course conditions.
Watch out
- Avoid installing within 3 feet of major tree trunk bases to prevent root damage
- Plan for leaf removal — a blower or leaf vacuum becomes a weekly necessity in autumn
- Choose turf with strong drainage backing since tree canopy reduces evaporation
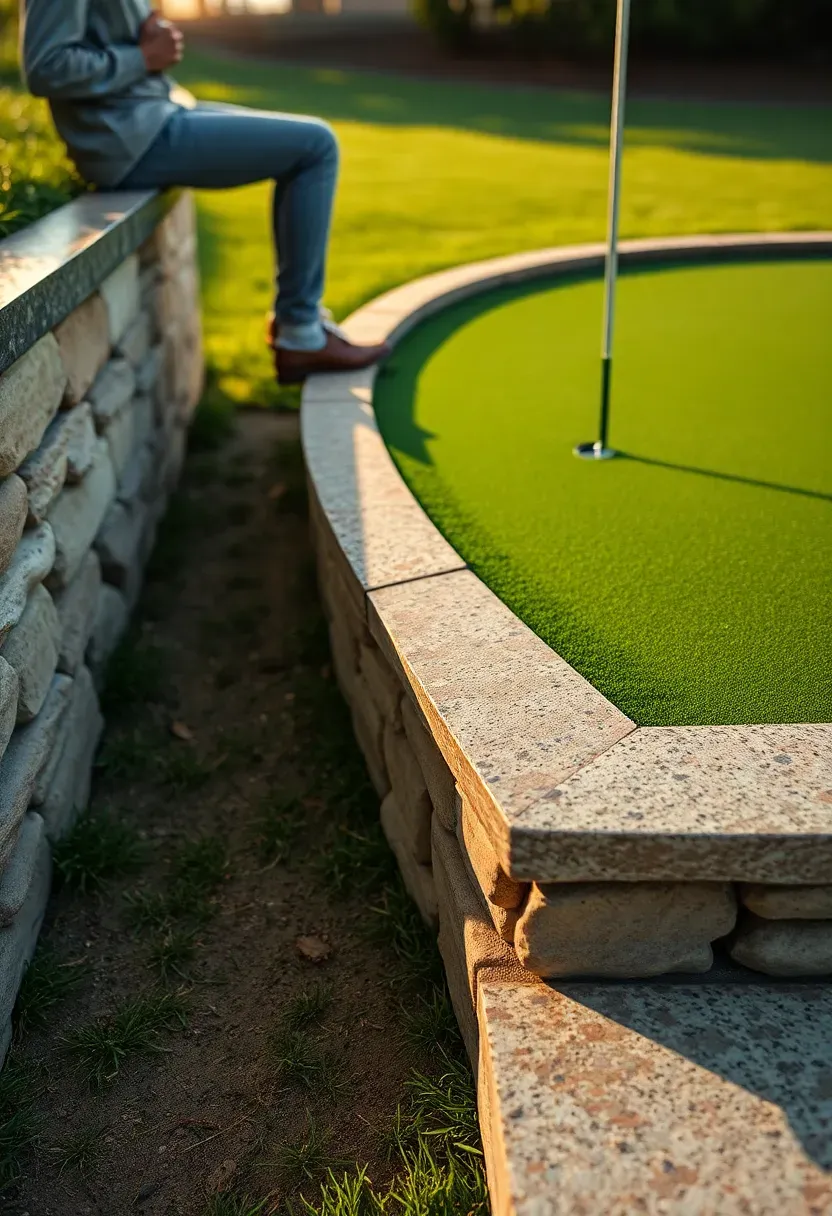
28. Green with Built-In Seating
A low stone or concrete seat wall along one side of the green gives spectators a comfortable perch and doubles as the green's border. Build the wall 16-18 inches high and 12-14 inches deep — standard bench dimensions. Cap it with a smooth stone slab for comfortable sitting. The wall side facing the green acts as a backstop for offline putts, while the seating side faces the yard or garden. This dual-purpose design reduces the number of separate landscape features you need to build.
Tips
- Slope the seat cap slightly away from the green (1/4 inch per foot) to shed rainwater
- Embed LED strip lighting under the cap overhang for nighttime visibility
- Use a frost-resistant stone or concrete mix if you are in freeze-thaw climate zones
Recommended
Items for this idea
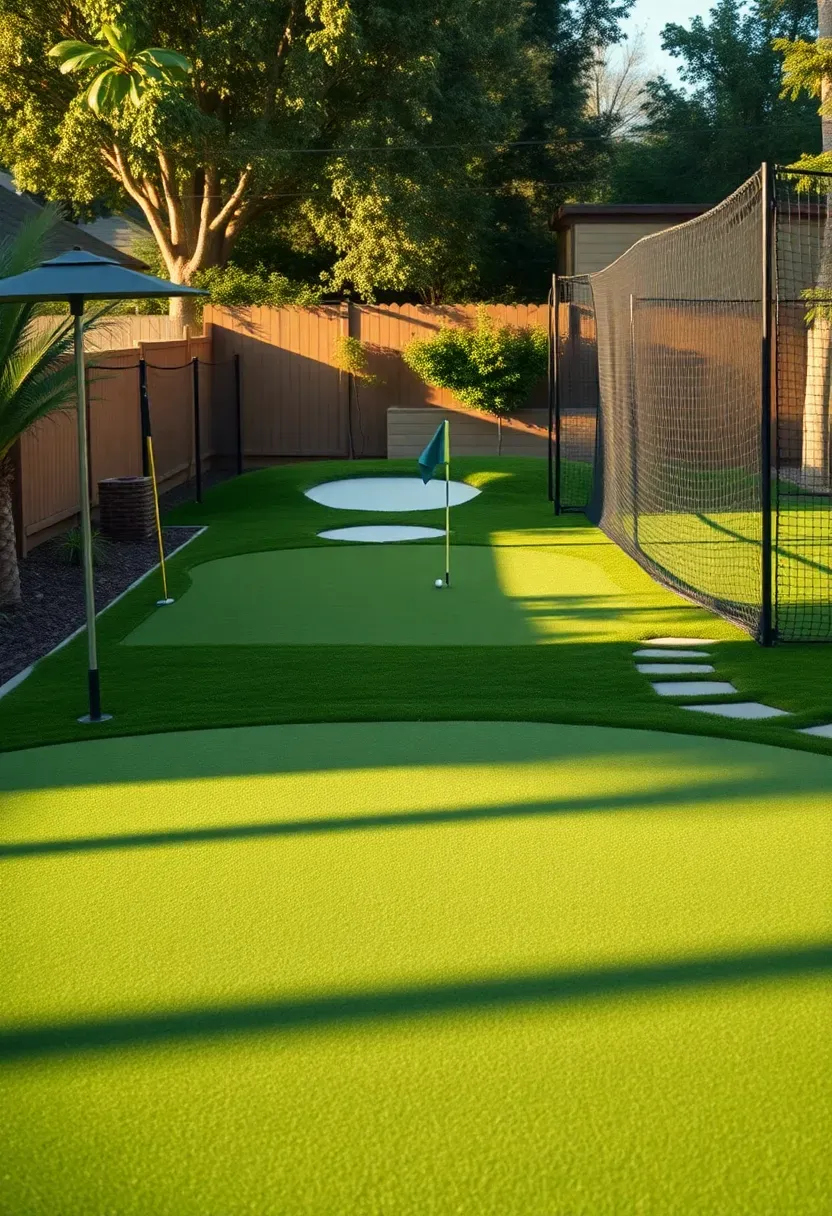
29. Full Backyard Practice Facility
This is the whole package: a multi-hole putting green, a chipping area with two distances, a practice bunker, and a hitting net for full swings — all connected by turf pathways. You need a minimum of 2,000 square feet, and the project runs $20,000 to $40,000 professionally installed. But it replaces the driving range, the short-game area at your club, and the practice green in a single space that is 30 seconds from your back door. For serious golfers who practice daily, the per-session cost drops below a range bucket within two years.
Steps
- Map the yard with zones: hitting area farthest from the house, green closest, bunker and chipping between them
- Install the hitting net first — it acts as a backstop boundary for the entire facility
- Build the bunker and chipping areas next, grading drainage toward a common collection point
- Install the putting green last so foot traffic from other construction does not damage the turf surface
Quick FAQ
How much does a backyard putting green cost? Basic rectangular greens on flat ground start at $2,000 for a 200-square-foot DIY install. Professional installations with contours, drainage, and quality turf run $15 to $25 per square foot. A typical 400-square-foot green installed by a contractor costs $6,000 to $10,000.
Is synthetic putting turf safe for kids and pets? Modern synthetic putting turf uses non-toxic polyethylene or nylon fibers with silica sand or Zeofill infill. Both materials are inert and safe for contact. Avoid older products with lead-based pigments or crumb rubber infill if children or pets will use the area regularly.
How long does synthetic putting turf last? Quality synthetic putting turf lasts 10 to 15 years with proper maintenance. UV degradation is the primary wear factor. Annual brushing, infill top-ups, and occasional rinses extend the lifespan. Budget for replacement turf at about 60% of the original install cost since the base remains.
Can I install a putting green on a slope? Yes, but slopes over 5% require terracing or significant grading work to create a usable surface. Mild slopes actually benefit putting practice by adding natural break. Steeper slopes need retaining walls and engineered drainage, which increases the project cost by 30-50%.
Do putting greens increase home value? Putting greens are not consistently valued by appraisers, but they can make a property more attractive to buyers who golf. Well-integrated greens that complement the overall landscape design are viewed more favorably than standalone installations that dominate the yard. In golf-community neighborhoods, a putting green can add perceived value of $5,000 to $15,000.
Building a backyard putting green is one of the few home projects where the cost per use actually justifies itself if you practice regularly. Start with your yard's real constraints — size, slope, sun exposure, drainage — and let those guide which of these 29 designs fits. A simple 10x20 rectangle works for most people and most budgets. If you want more, the multi-hole and practice facility setups scale up from there. Whatever you build, spend the money on quality turf and proper base preparation. The surface is the whole point, and cutting corners on either of those two things shows up in every putt you hit.
Pinterest cover for 29 Backyard Putting Green Ideas
About the author
OBCD
CGI visualization and interior design content. We create detailed 3D renders and curate practical design ideas for every room in your home.