21 Backyard Vegetable Garden Ideas
My first vegetable garden was four tomato plants shoved into a strip of clay soil along the garage. Two drowned from poor drainage, one got blight, and the survivor produced exactly six cherry tomatoes. That was twelve years ago. Since then I have built, torn out, and rebuilt gardens in three different backyards across two climate zones. What I learned is that the container matters almost as much as what you grow in it — bed height, sun orientation, soil depth, and irrigation setup determine whether your August harvest fills a colander or a wheelbarrow.
These 21 backyard vegetable garden ideas cover layouts and structures for different yard sizes, sun conditions, and budgets.
Table of Contents
- Classic Raised Bed Grid
- Tiered Hillside Beds
- Stock Tank Planter Garden
- French Potager Layout
- Vertical Pallet Wall Garden
- Keyhole Garden Bed
- Straw Bale Growing Rows
- Container Garden on a Patio
- Hugelkultur Mound Bed
- Cattle Panel Arch Trellis
- Square Foot Garden Grid
- Greenhouse Cold Frame Combo
- Spiral Herb and Veggie Tower
- Wicking Bed System
- Sunken In-Ground Beds
- Espalier Fruit and Veggie Wall
- Rain Gutter Grow System
- Three Sisters Mound Planting
- Rolling Cart Garden
- Corrugated Metal Raised Beds
- Food Forest Polyculture Patch
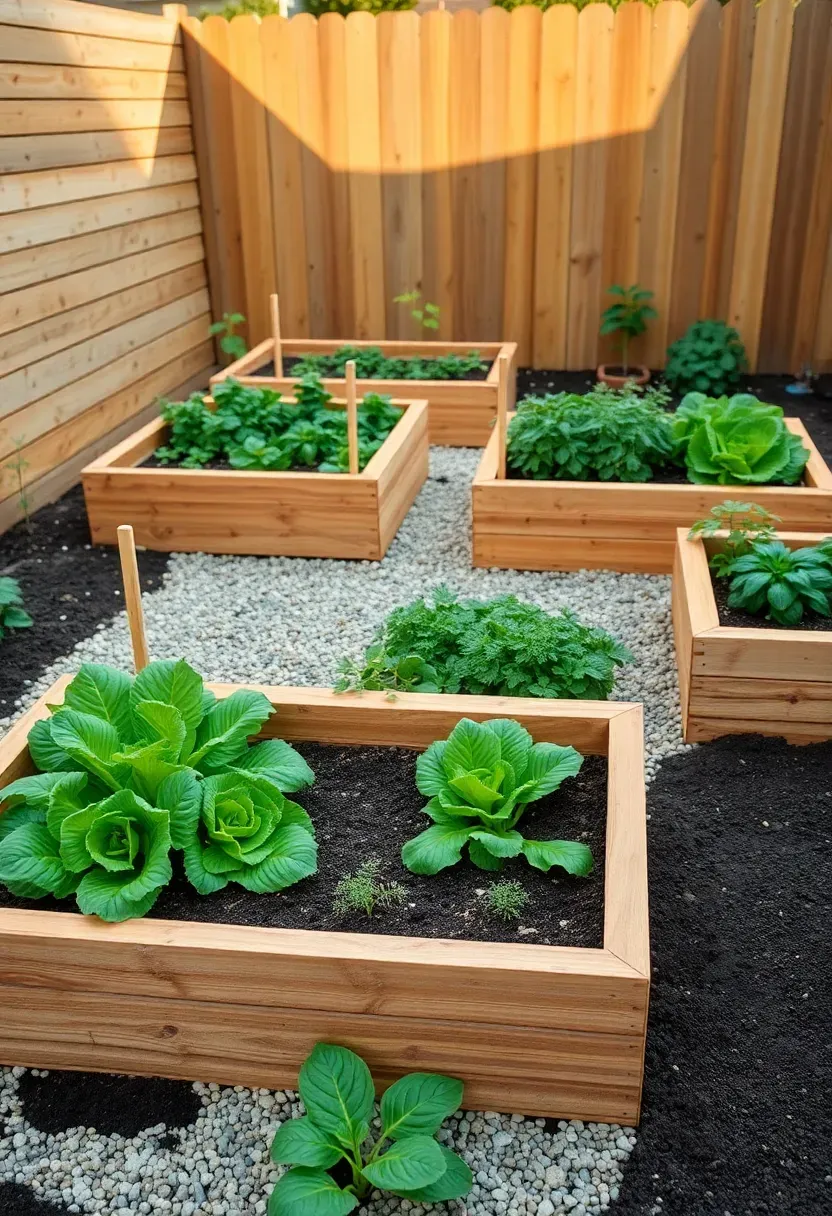
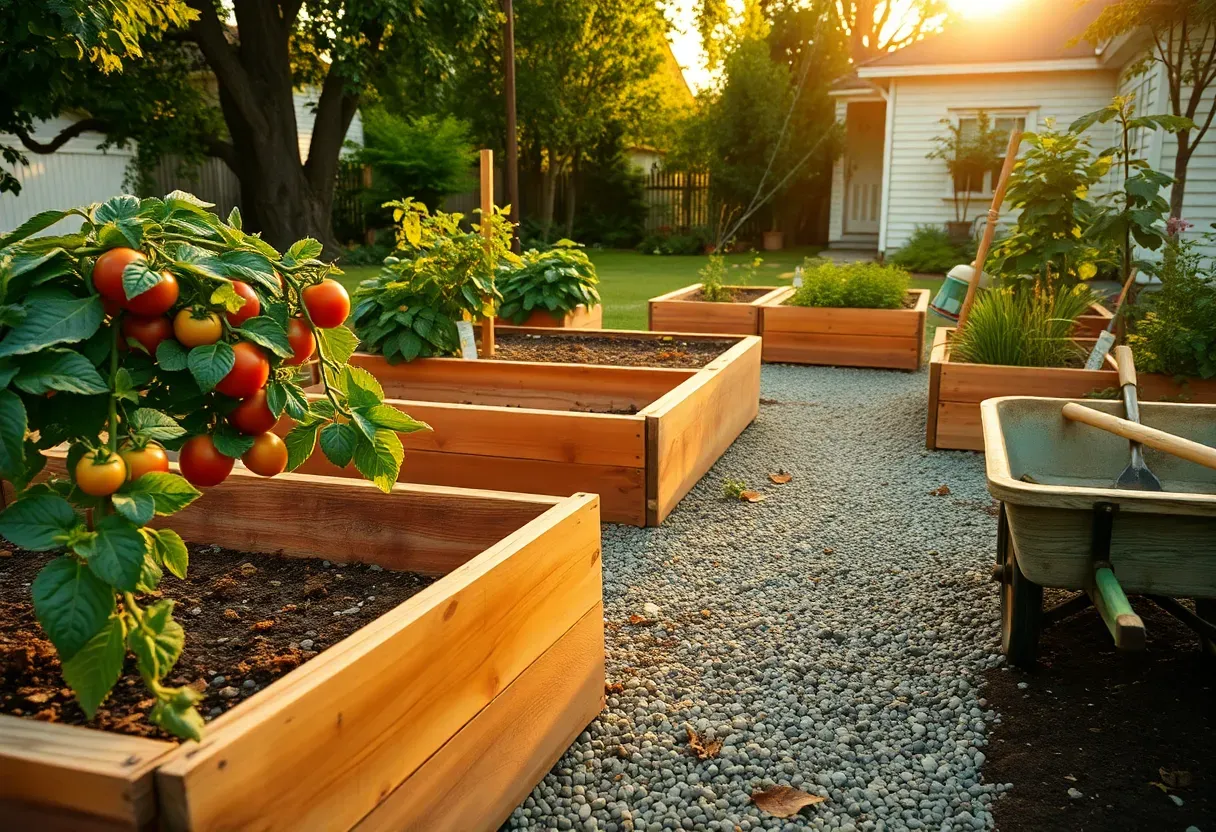
1. Classic Raised Bed Grid
Four to six rectangular beds arranged in a grid with 3-foot pathways between them remains the most reliable backyard vegetable garden layout for a reason. Standard dimensions are 4 feet wide (so you can reach the center from either side) by 8 feet long, built from untreated cedar or Douglas fir. Fill with a 60/40 mix of topsoil and compost, and you get soil that drains fast after rain but holds moisture during dry spells. Most families can grow a full season of salad greens, tomatoes, peppers, and root vegetables in a four-bed setup.
Tips
- Keep beds no wider than 4 feet to avoid stepping on and compacting the soil
- Line the bottom with hardware cloth to keep burrowing pests out
- Run a single drip irrigation line down the center of each bed for consistent watering
We picked a few things that go well with this idea: Land Guard Galvanized Raised Garden Bed (★4.5), Land Guard Galvanized Garden Bed (2-Pack) (★4.5) and Galvanized Raised Garden Bed 6x3ft (2-Pack) (★4.5). As an Amazon Associate we earn from qualifying purchases.
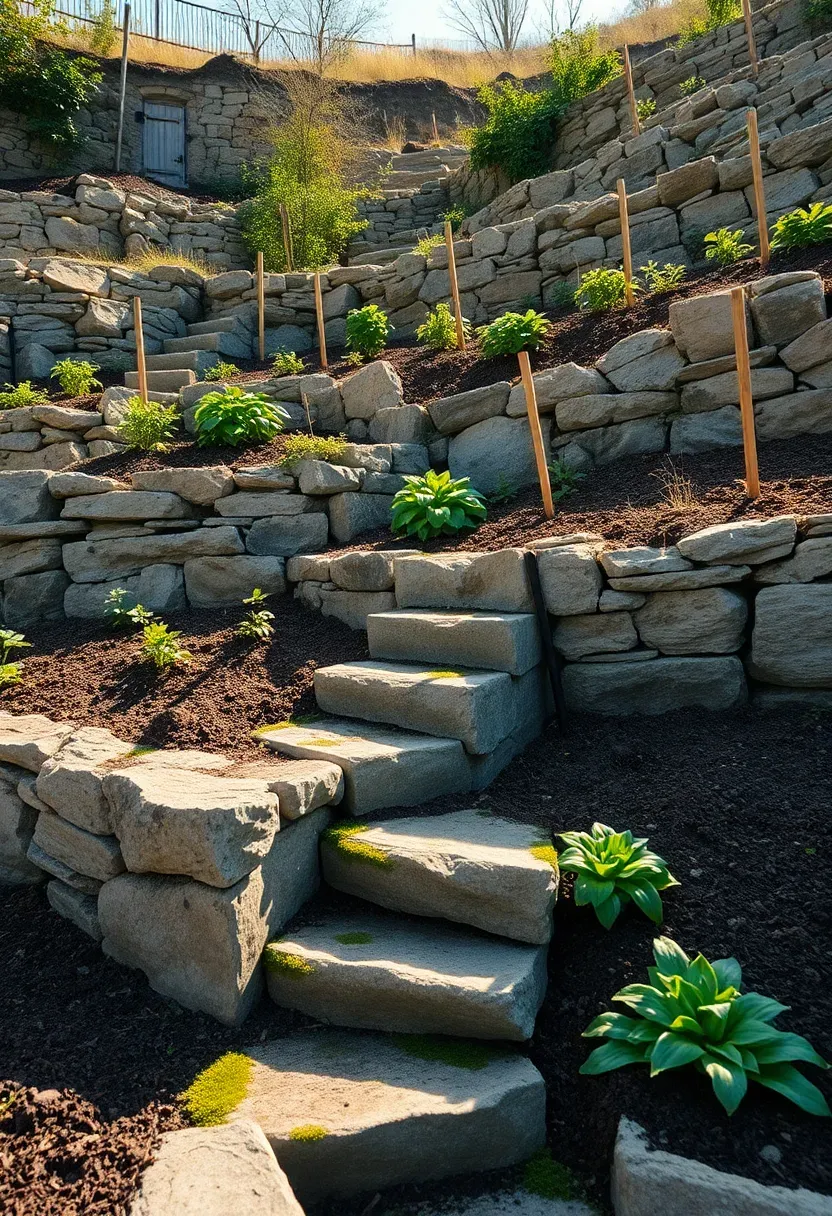
2. Tiered Hillside Beds
The problem
A sloped yard loses topsoil to erosion every time it rains, and planting directly on a grade means water rushes past roots before it can soak in. Most people look at a hill and write it off as unusable garden space.
The fix
Cut the slope into level terraces using stacked stone, landscape timbers, or concrete block retaining walls. Each terrace becomes a flat growing bed 3-4 feet deep. The stone walls absorb heat during the day and radiate it back at night, creating a warmer microclimate that extends your growing season by two to three weeks. Cost depends heavily on material — dry-stacked fieldstone is cheapest at around $5 per square foot of wall face, while mortared cut stone runs $20-$35.
Worth knowing
- Terraces on a south-facing slope get maximum sun exposure in the Northern Hemisphere
- Install a French drain behind each retaining wall to prevent hydrostatic pressure buildup
- Start building from the bottom tier and work upward
We picked a few things that go well with this idea: VIVOSUN 5-Gallon Fabric Grow Bags (5-Pack) (★4.6), Gardzen 10-Gallon Fabric Grow Bags (10-Pack) (★4.6) and Land Guard 5-Gallon Grow Bags (4-Pack) (★4.4). As an Amazon Associate we earn from qualifying purchases.
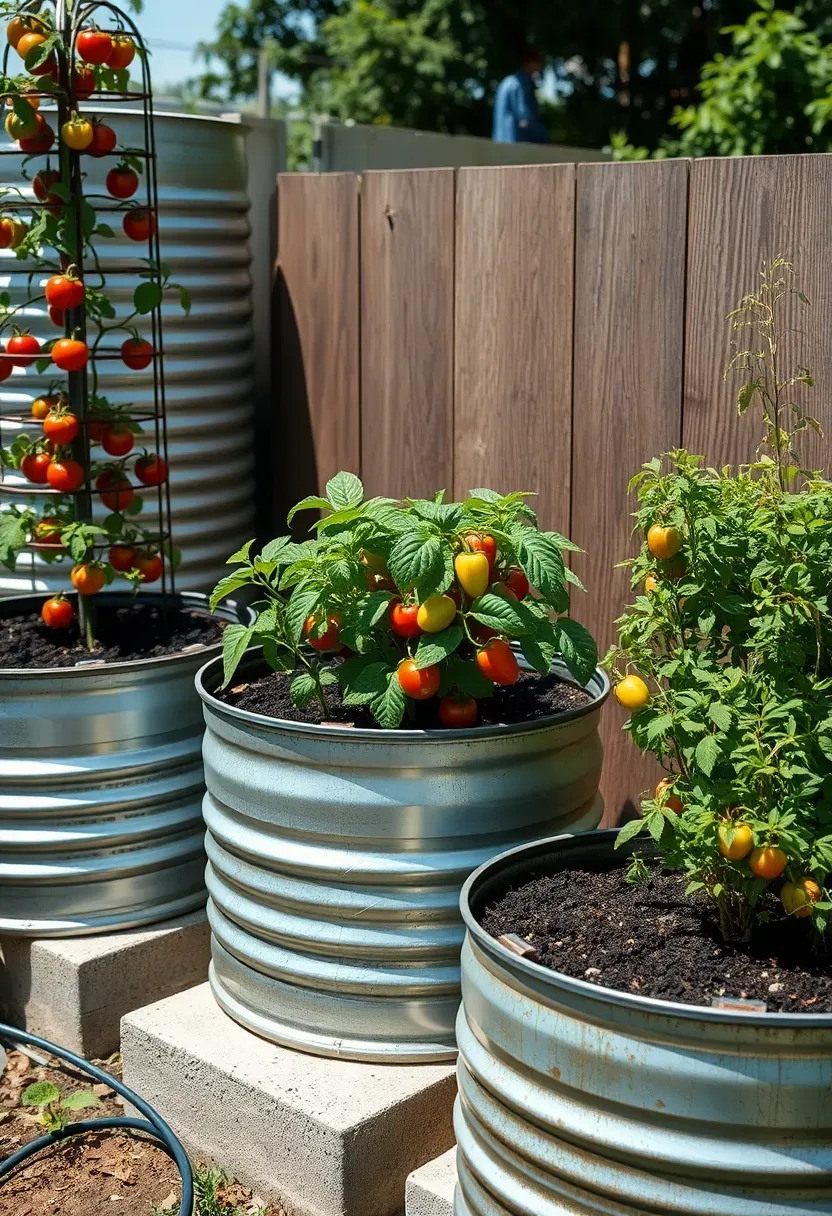
3. Stock Tank Planter Garden
Galvanized steel livestock tanks make surprisingly good vegetable planters. The oval ones (2x4 feet or 2x6 feet) are the right size for a row of tomatoes or a mixed salad bed. Drill six to eight half-inch drainage holes in the bottom, add 3 inches of gravel, then fill with garden soil mix. The metal heats up faster than wood in spring, which gives warm-season crops like peppers and eggplant a head start. A new 2x6-foot tank costs $120-$180 at farm supply stores. They last decades — I have one going on year eight with no rust-through.
Tips
- Paint the exterior a light color if you are in a hot climate to prevent root overheating
- Set tanks on concrete blocks to improve drainage airflow underneath
- Use the round 3-foot tanks for single specimen plants like zucchini or a dwarf fruit tree
We picked a few things that go well with this idea: Rain Bird Drip Irrigation Garden Kit (★4.1), MIXC 200ft Drip Irrigation System (32 Nozzles) (★4.6) and Vego Garden Drip Irrigation Kit (Large) (★4.8). As an Amazon Associate we earn from qualifying purchases.
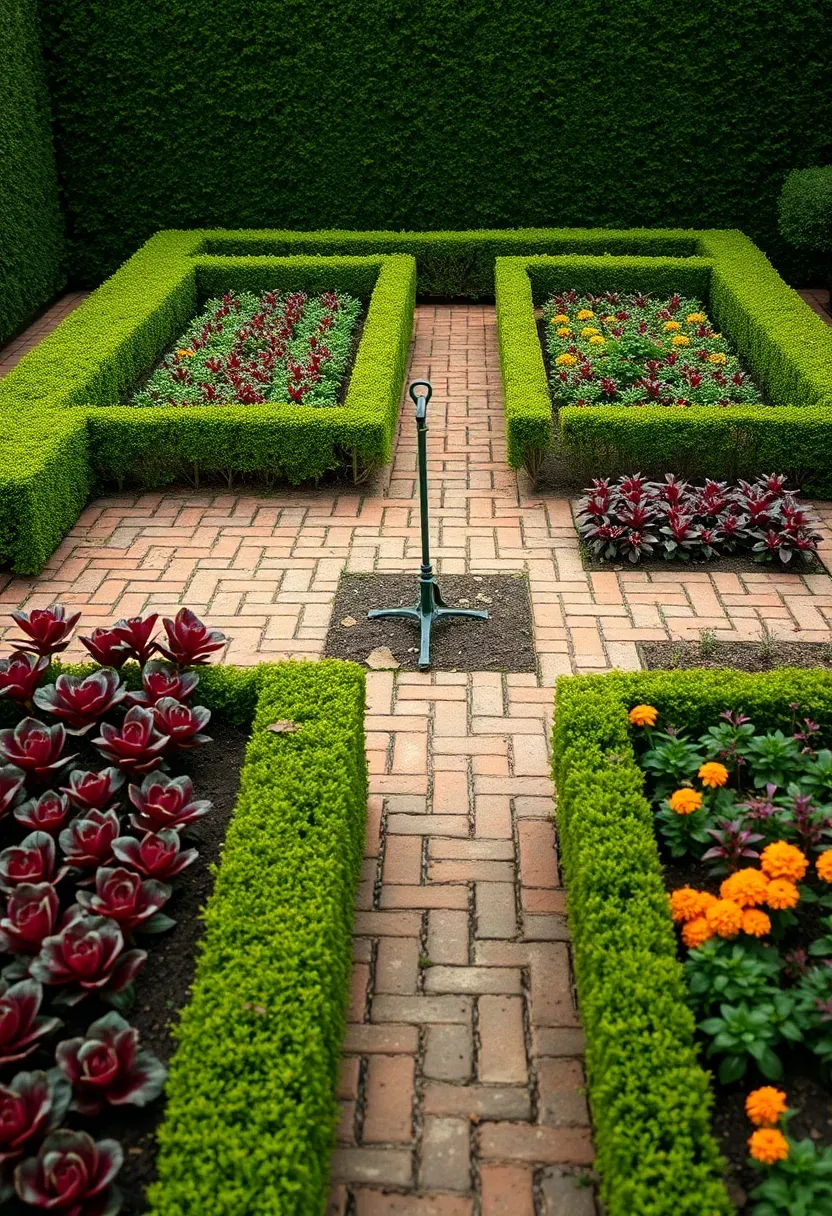
4. French Potager Layout
What makes it different
A potager mixes vegetables, herbs, and flowers in geometric beds designed to look ornamental year-round. Unlike a utilitarian row garden, the goal is a kitchen garden that doubles as a landscape feature. Traditional potagers use low boxwood or lavender hedges as bed borders, gravel or brick paths, and a central element like a tuteur or birdbath.
How to plan one
Start with a symmetrical footprint — a square divided into four or nine equal beds works well. Plant tall crops (tomatoes, pole beans) in the center beds and shorter ones (lettuce, herbs, marigolds) along the edges. Interplanting flowers like nasturtiums and calendula adds color and draws pollinators. The formal structure means it looks intentional even in late fall when production winds down.
Choose this if
- Your vegetable garden is visible from the house or patio
- You want edible landscaping that satisfies an HOA
- You enjoy the design process as much as the harvest

Recommended
Items for this idea
5. Vertical Pallet Wall Garden
A heat-treated shipping pallet mounted to a fence or wall holds six to eight planting pockets for shallow-rooted crops. Staple landscape fabric across the back and bottom, fill each slat gap with potting mix, and plant lettuce, spinach, strawberries, or herbs directly into the openings. The whole setup costs under $30 if you find a free pallet. Hang it where it gets at least six hours of sun. The biggest limitation is soil volume — each pocket holds roughly 2 quarts of mix, so stick to crops with compact root systems.
Tips
- Only use pallets stamped "HT" (heat-treated) — avoid "MB" (methyl bromide fumigated)
- Water from the top and let gravity carry moisture down through each level
- Replace the landscape fabric annually since UV breaks it down
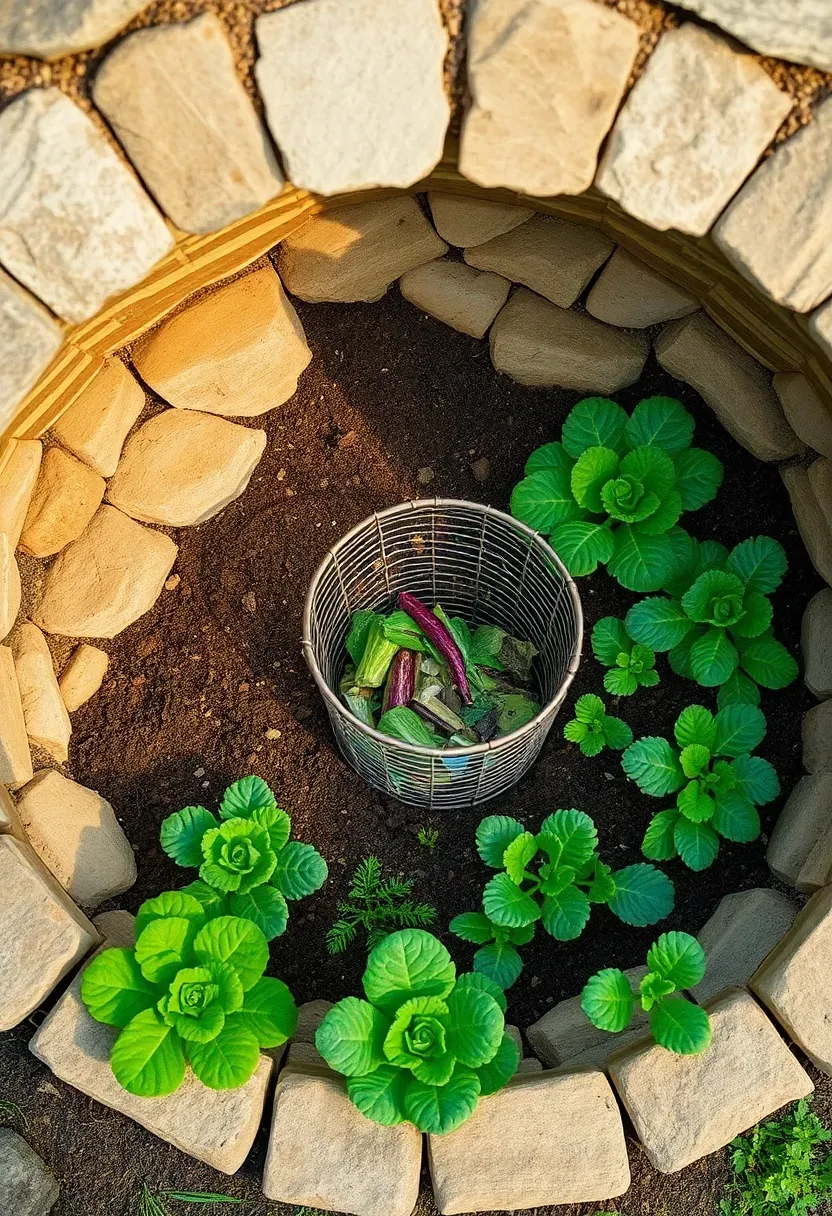
6. Keyhole Garden Bed
Origins
Developed in sub-Saharan Africa for arid conditions, the keyhole garden is a circular raised bed about 6 feet across with a wedge-shaped notch cut into one side for access. A wire mesh composting basket sits in the center. You dump kitchen scraps into the basket, pour gray water over the top, and nutrients leach outward into the surrounding soil.
Modern backyard version
Build the outer wall 3 feet high from stacked stone, cinder block, or corrugated metal. Fill the interior with layers of cardboard, sticks, compost, and topsoil — essentially a lasagna-style bed. The central compost basket continuously feeds the soil so you rarely need to add fertilizer. These beds retain moisture far better than conventional raised beds, cutting water use by roughly 40%.
Where it works best
- Dry climates where water conservation matters
- Yards with poor native soil that would need heavy amendment
- Gardeners who want to compost directly in place rather than maintaining a separate bin
Recommended
Items for this idea
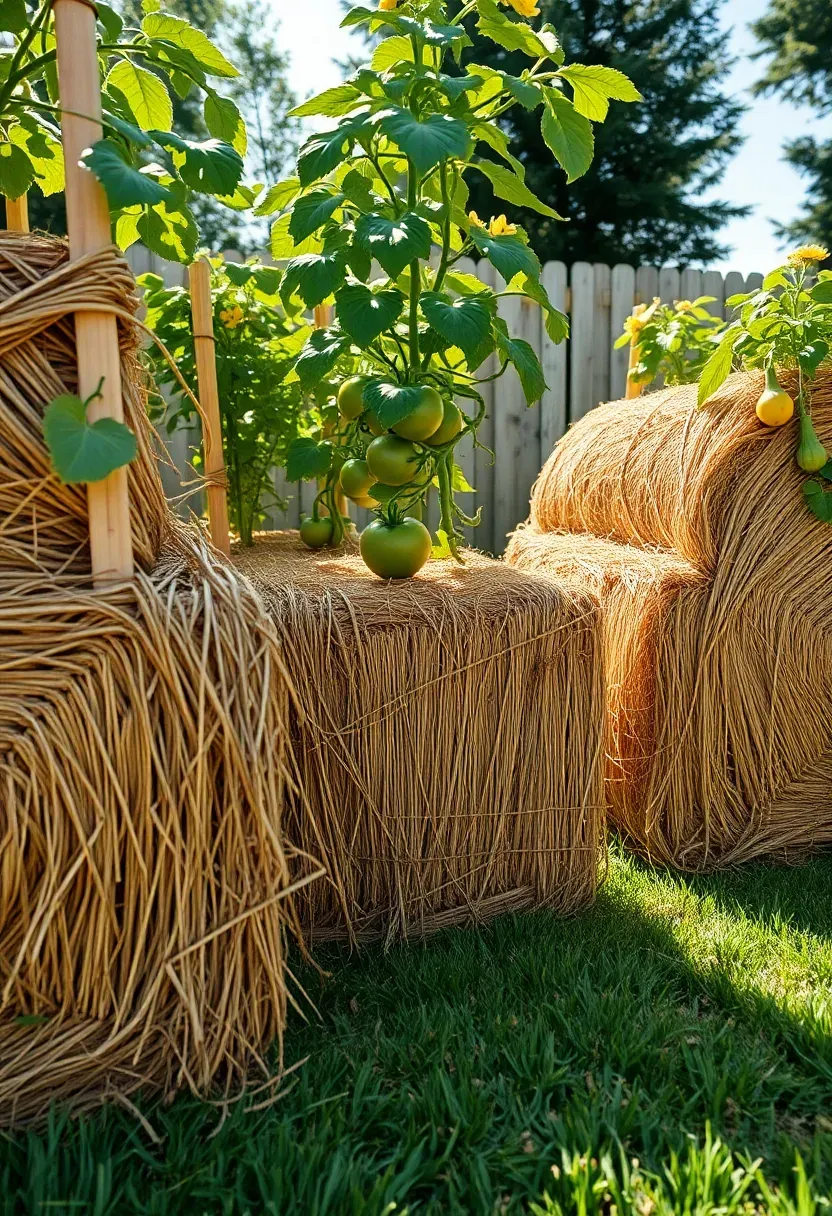
7. Straw Bale Growing Rows
No soil, no digging, no building. You set straw bales directly on the ground, condition them for two weeks with nitrogen fertilizer and water, then plant seedlings right into the decomposing straw. The interior of a conditioned bale reaches 120-140 degrees during the initial breakdown, which kills weed seeds and creates a warm root zone. A standard two-string bale costs $5-$8 and supports 2-3 tomato plants or 4-6 pepper plants. At the end of the season the spent bales become mulch or compost.
Tips
- Use straw, not hay — hay contains seeds that will sprout everywhere
- Condition bales for 10-14 days before planting by adding half a cup of ammonium sulfate per bale daily and soaking with water
- Bales dry out fast in wind, so drip irrigation or a soaker hose on top is almost mandatory
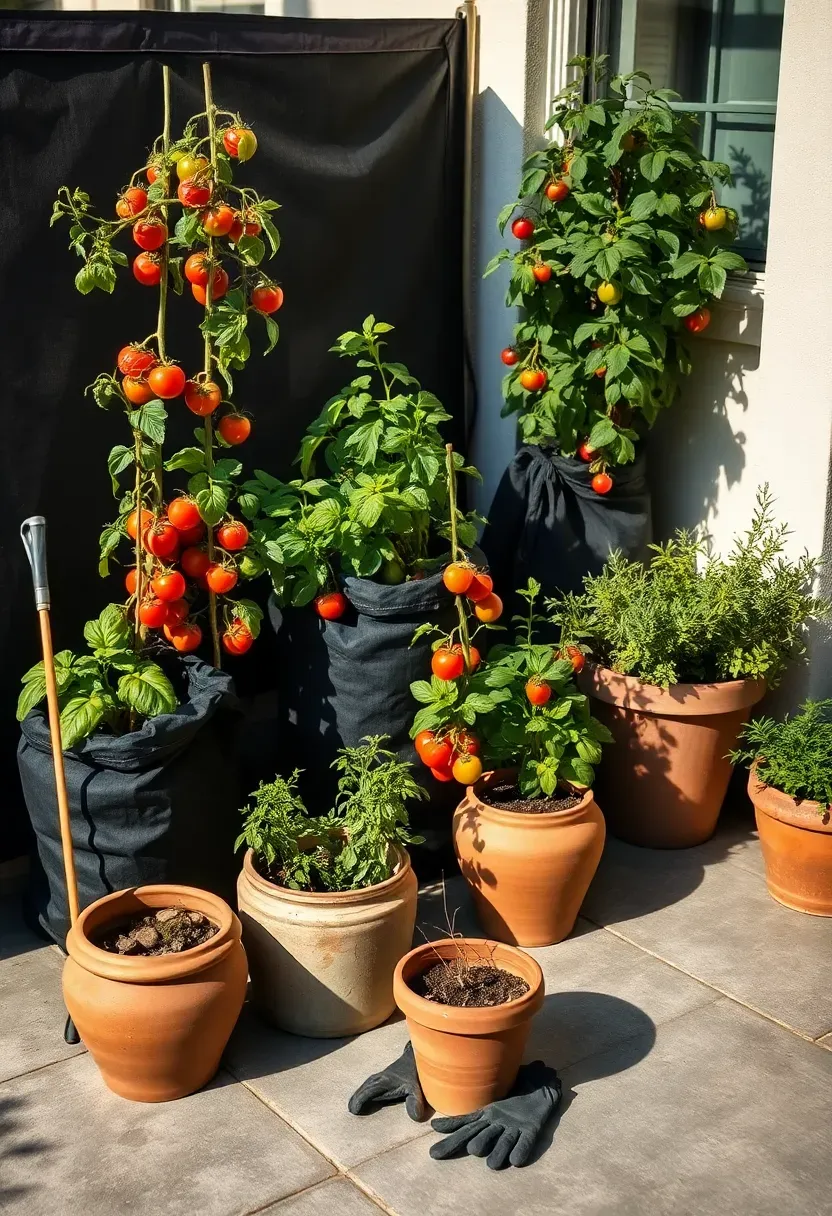
8. Container Garden on a Patio
Step 1: Pick the right containers
Fabric grow bags (5, 7, or 10 gallon) cost $2-$5 each and air-prune roots for healthier plants. Glazed ceramic pots look better but weigh a lot and crack in freezing temperatures. Plastic nursery pots are cheap and light but heat up fast in direct sun. For most vegetables, 5 gallons is the minimum — 10 gallons for tomatoes and peppers.
Step 2: Match crops to container size
A 5-gallon bag handles one pepper plant, a cluster of herbs, or a bush bean planting. Tomatoes need 10 gallons minimum. Lettuce and radishes grow in anything 6 inches deep. Cucumbers and squash need 15+ gallons and a trellis.
Step 3: Set up watering
Containers dry out twice as fast as ground beds. A timer-controlled drip system with spaghetti tubes to each pot costs about $40 and saves daily hand-watering labor.
Watch out
- Never use garden soil in containers — it compacts and drains poorly. Use a potting mix with perlite
- Saucers under pots prevent runoff stains on patios but can breed mosquitoes if water sits
Recommended
Items for this idea
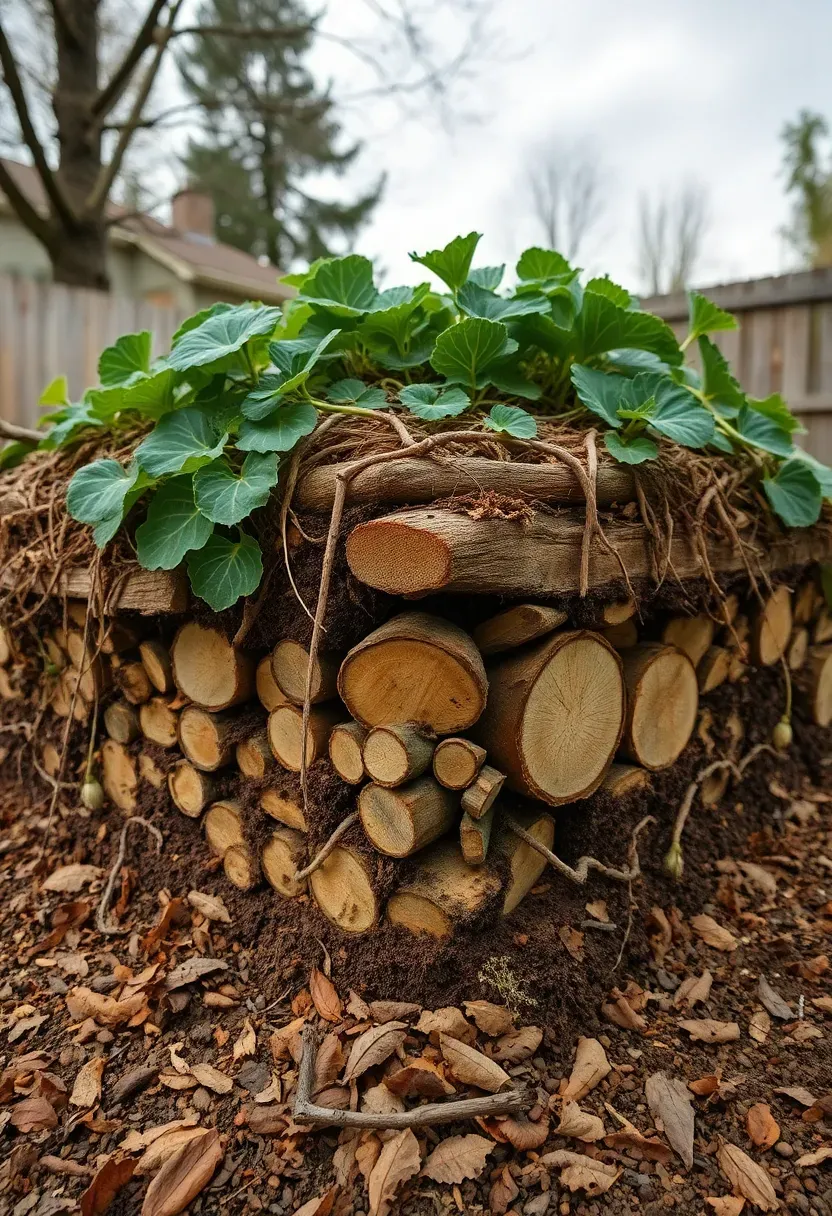
9. Hugelkultur Mound Bed
Hugelkultur (German for "mound culture") buries rotting logs and branches under a mound of soil and compost. As the wood decomposes over 3-5 years, it acts like a sponge — absorbing water during rain and releasing it slowly back to plant roots during dry periods. A new mound is typically 3-4 feet tall and sinks about 30% in the first year. Build them running north-south so both sides get sun exposure. The south-facing slope runs warmer and suits heat-loving crops, while the north side stays cooler for lettuce and greens.
Tips
- Use hardwood logs (oak, maple, ash) that decompose slowly rather than softwoods that break down too fast
- Add a layer of grass clippings or manure between the wood and topsoil to jumpstart decomposition
- Plant nitrogen fixers like beans or peas in year one since the decomposing wood temporarily ties up nitrogen in the soil

10. Cattle Panel Arch Trellis
A 16-foot cattle panel (welded wire livestock fencing) bent into an arch between two raised beds creates a walk-through trellis for climbing crops. Secure the ends to the inside walls of beds spaced 4-5 feet apart and you get an 8-foot-tall arch that supports pole beans, cucumbers, small melons, or indeterminate tomatoes. The panel costs $25-$35 and lasts 15+ years. Growing vertically on an arch keeps fruit off the ground, improves air circulation around foliage, and makes harvesting easy — beans and cucumbers hang at eye level.
Tips
- Use 16-gauge panels with 4x4-inch grid openings — lighter gauge panels sag under the weight of mature plants
- Attach panels to beds with U-bolts or zip-tied to rebar stakes driven 18 inches into the ground
- Plant shade-tolerant crops like lettuce underneath the arch to use the shaded ground space
Recommended
Items for this idea
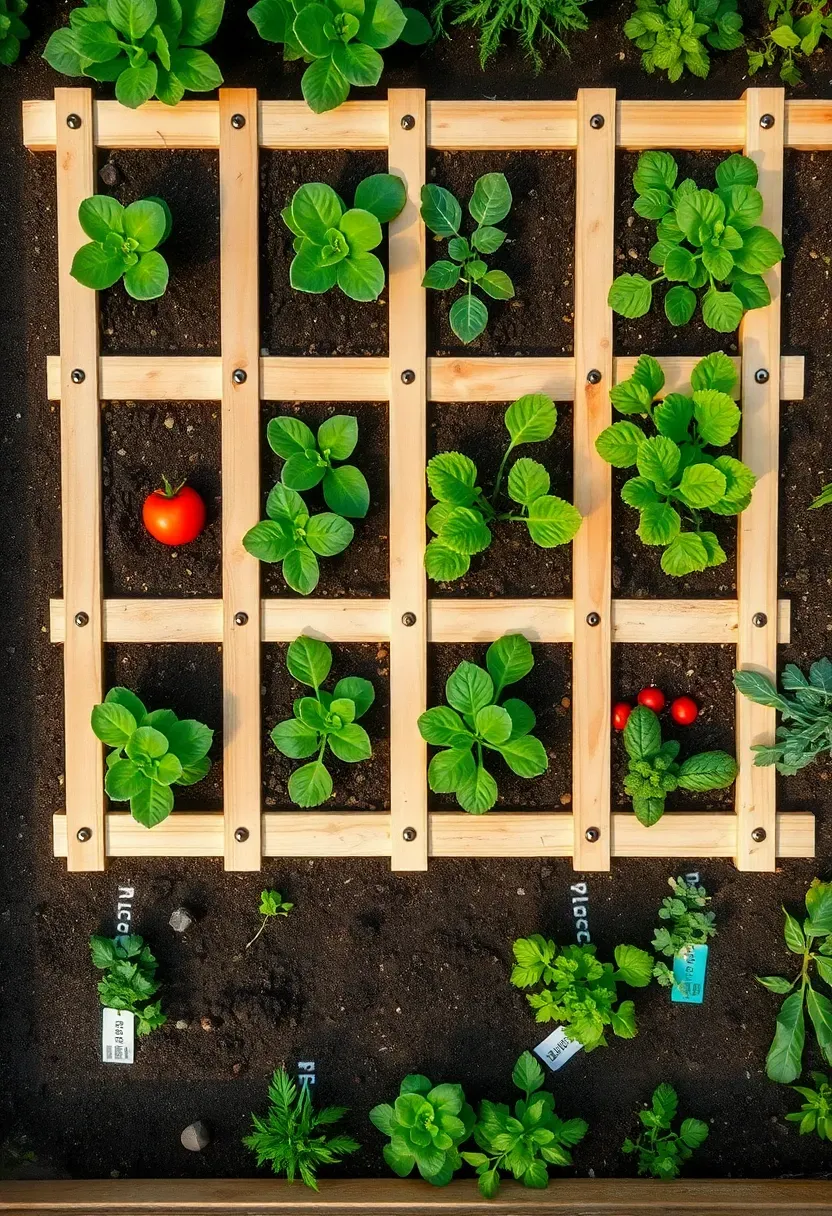
11. Square Foot Garden Grid
Mel Bartholomew's square foot gardening method divides a 4x4-foot raised bed into sixteen 1-foot squares using a visible grid made from lath strips or string. Each square gets a specific number of plants based on spacing needs: one tomato, four lettuce heads, nine spinach plants, or sixteen radishes per square. The system works well for beginners because it removes the guesswork from spacing and makes crop rotation simple — you just replant individual squares as they finish rather than redoing whole rows.
Tips
- Build the grid from thin wooden strips screwed or stapled to the bed frame so it stays visible all season
- Use Mel's Mix (equal parts compost, peat moss or coco coir, and vermiculite) for optimal drainage and nutrition
- Track what was planted in each square to rotate plant families and prevent soil disease buildup
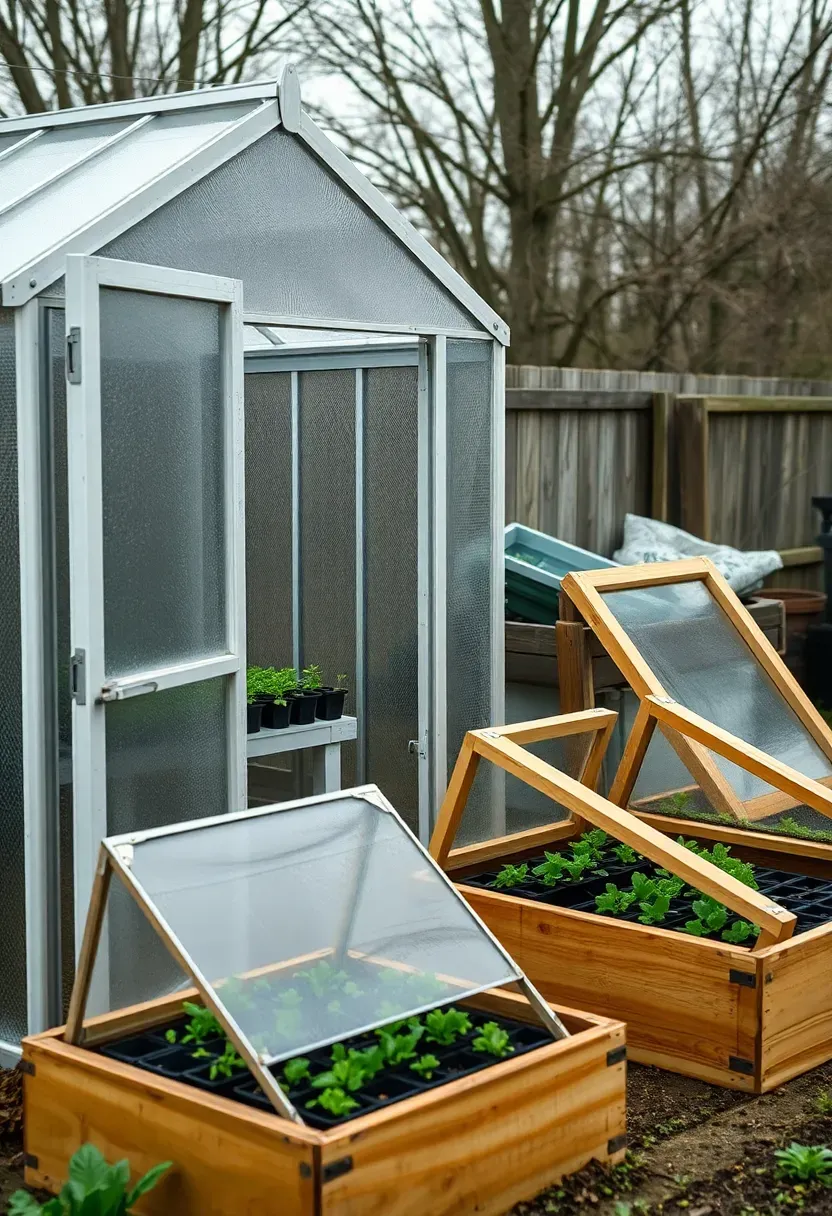
12. Greenhouse Cold Frame Combo
The structure
A compact greenhouse (6x8 or 8x10 feet) paired with one or two cold frames along its south wall extends your vegetable growing season by 6-10 weeks on each end. Start seedlings in the heated greenhouse in February, harden them off in the cold frames in March, and transplant to outdoor beds in April. Reverse the process in fall — move tender crops under cover before the first frost.
Budget breakdown
A basic polycarbonate panel greenhouse kit runs $500-$1,500. A wooden cold frame with a recycled window sash lid costs $30-$75 to build from scratch. The combination costs less than a single high-end greenhouse and provides more flexible growing options.
Best crops for this setup
- Greenhouse: tomato and pepper seedlings, winter greens, microgreens
- Cold frame: lettuce, spinach, kale, radishes, overwintered garlic
Recommended
Items for this idea
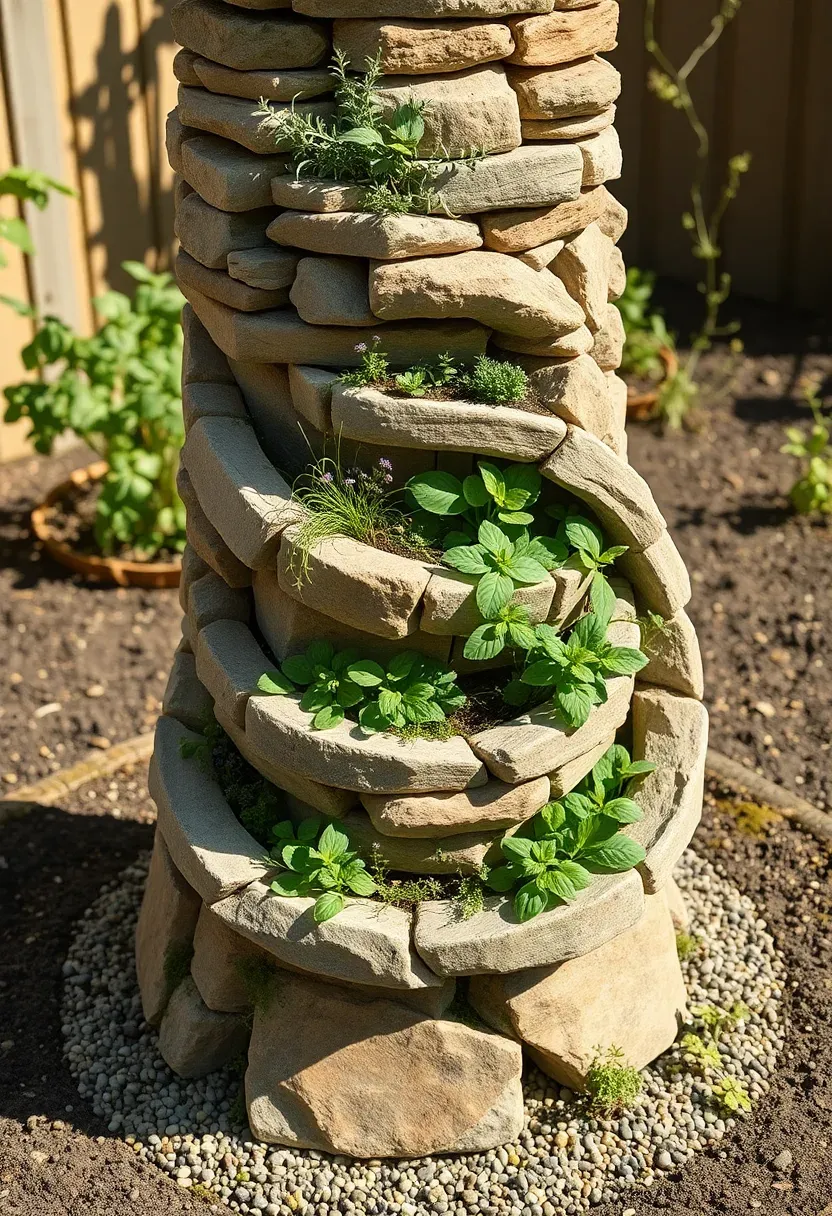
13. Spiral Herb and Veggie Tower
A garden spiral is a circular raised bed that winds upward like a snail shell, typically 5-6 feet across and 3-4 feet tall at the center. Build it from dry-stacked stone, brick, or urbanite (broken concrete chunks). The design creates multiple microclimates in a small footprint — the top is drier and warmer (good for rosemary, thyme, and peppers), the middle retains moderate moisture (basil, parsley, cherry tomatoes), and the base stays damp (mint, cilantro, lettuce). One spiral replaces 20+ individual pots worth of growing space.
Tips
- Build on a gravel base for drainage and level the first course carefully since everything above follows that line
- Fill the interior with rubble and broken pots before topping with soil to reduce the total amount of soil needed
- Plant trailing crops like strawberries or nasturtiums on the outer edges to cascade down the wall
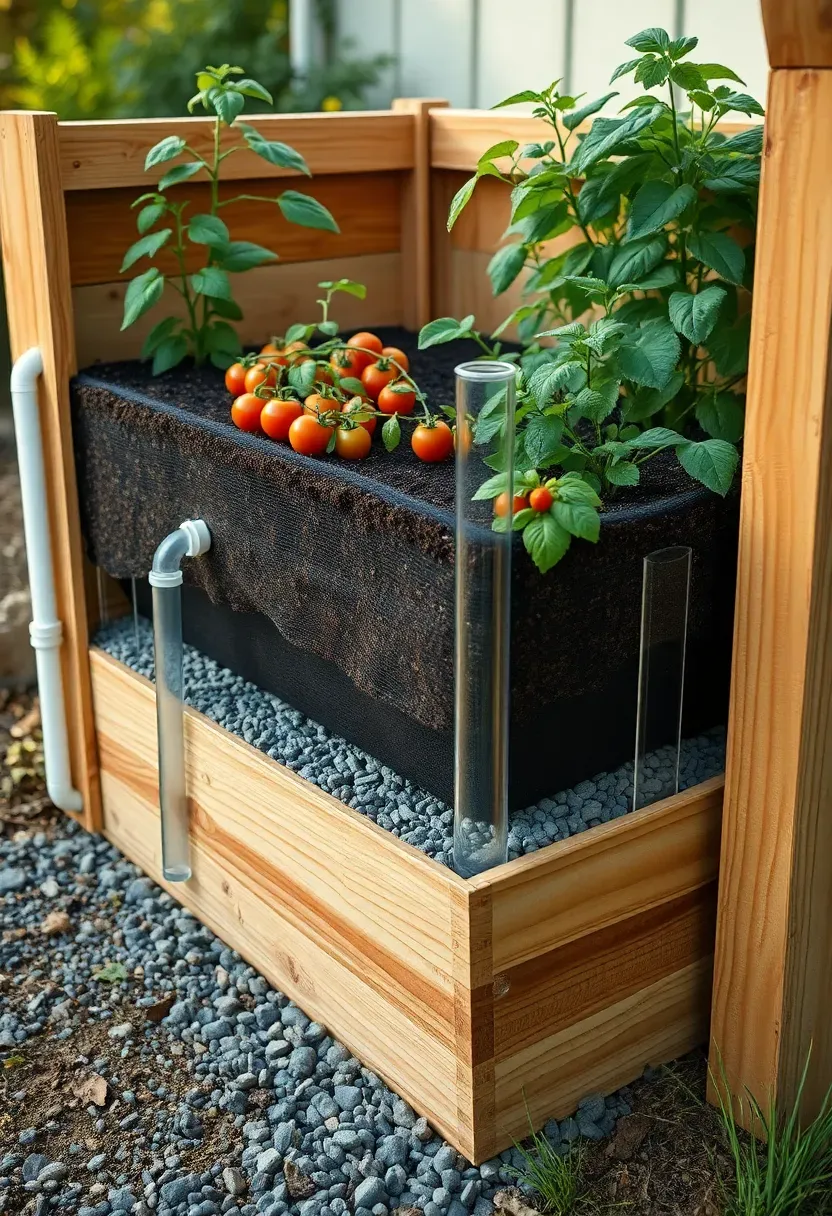
14. Wicking Bed System
A wicking bed has a sealed water reservoir in the bottom third of a raised bed. Water wicks upward through the soil via capillary action, keeping the root zone consistently moist without surface watering. Build one by lining a standard raised bed with pond liner, adding a layer of gravel with a perforated overflow pipe, covering with geotextile fabric, then filling with soil. A fill pipe lets you add water directly to the reservoir. Depending on climate and bed size, you only need to refill the reservoir once or twice a week instead of daily watering.
Tips
- Install a sight tube (clear vinyl hose attached to the overflow pipe) so you can check the water level without guessing
- Use coarse gravel (20mm) in the reservoir layer to maximize water storage volume
- The overflow pipe should exit at the top of the gravel layer so the soil zone never becomes waterlogged
Recommended
Items for this idea
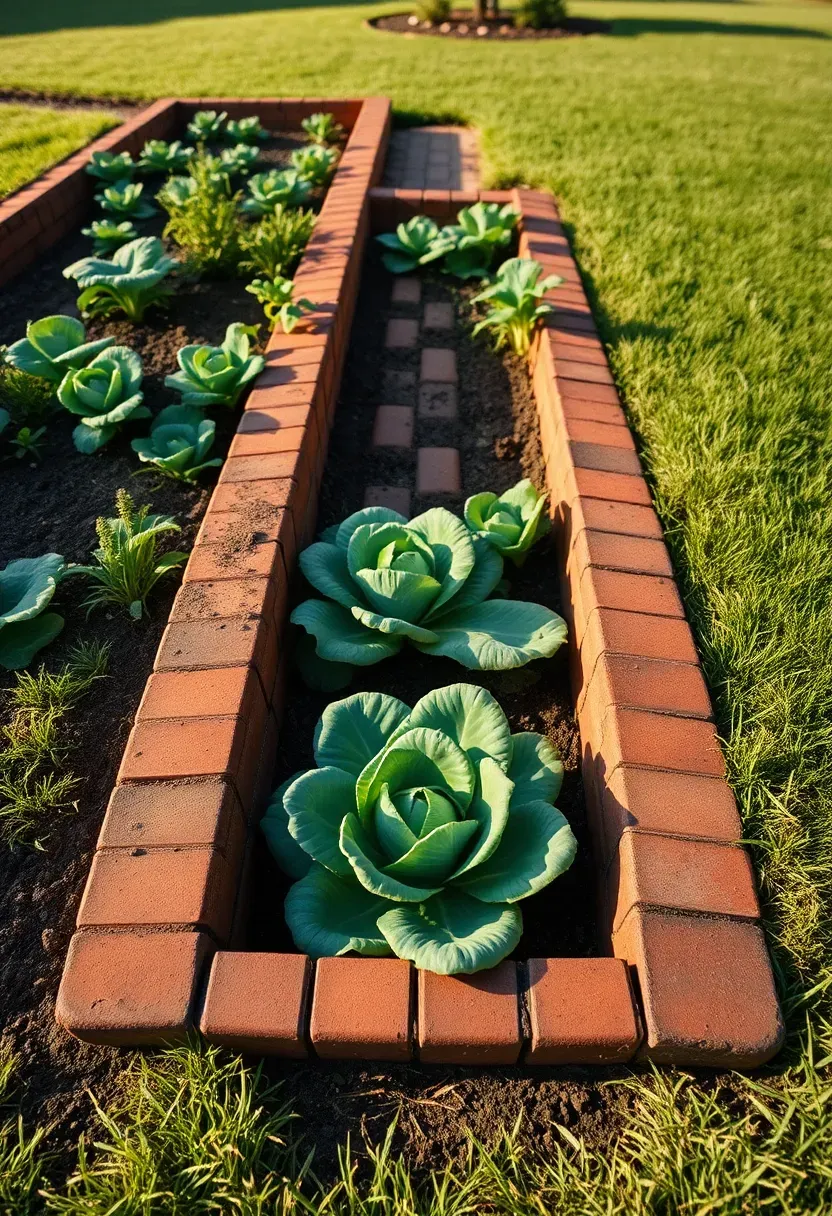
15. Sunken In-Ground Beds
Why go below grade
Digging beds 12-18 inches below the surrounding ground level keeps root zones cooler in hot climates, reduces wind exposure on seedlings, and collects rainwater that would otherwise run off flat ground. This technique has been used in desert agriculture for centuries — Zuni waffle gardens in New Mexico follow the same principle.
How to build them
Excavate a 4x8-foot rectangle, amend the native soil with compost, and edge the perimeter with brick, stone, or landscape timbers flush with ground level. The sunken profile retains moisture longer than raised beds and is less visible from a distance, which works well if you prefer a low-profile garden. Cost is minimal since you are just moving dirt rather than building structures.
Downsides to consider
- Poor drainage in clay soils can flood sunken beds during heavy rain
- Harder to access for people with mobility limitations since you bend down further
- Burrowing pests have direct access from the sides
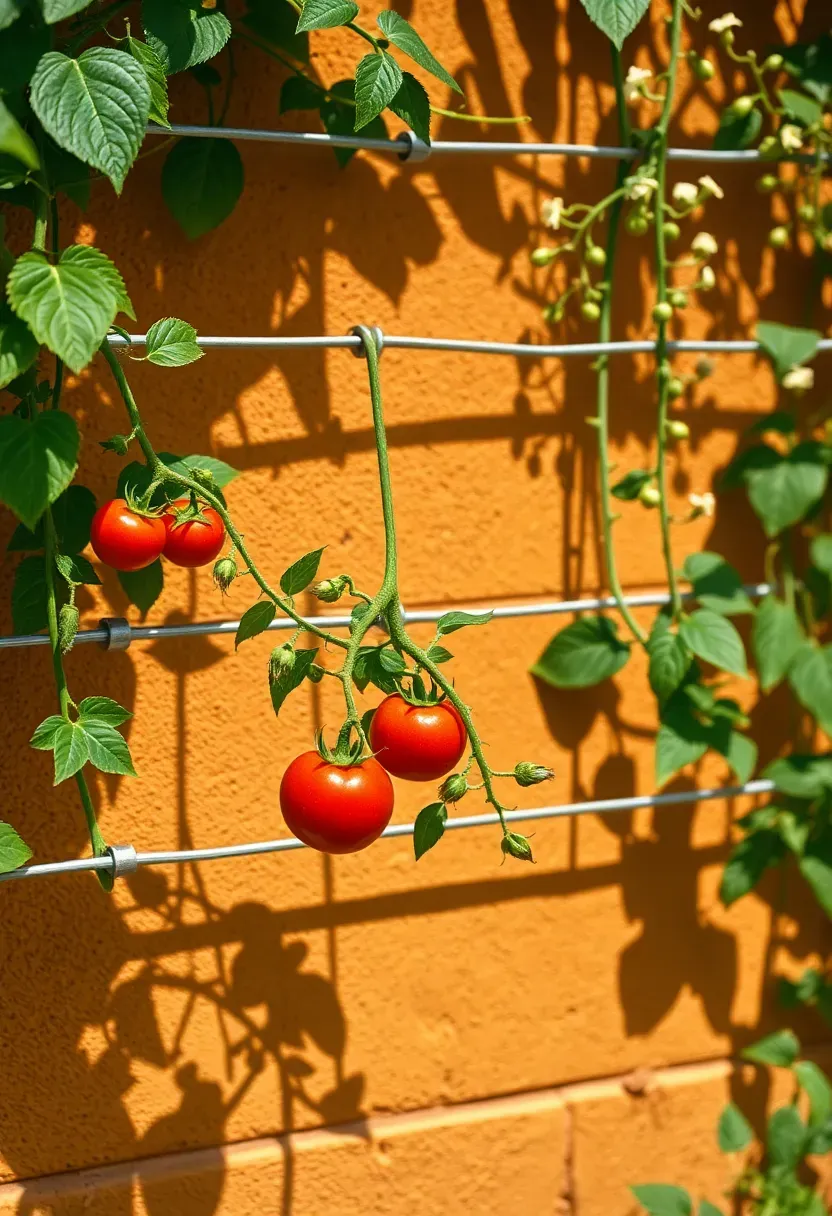
16. Espalier Fruit and Veggie Wall
Espalier trains plants to grow flat against a wall or fence on a wire support system. While traditionally used for apple and pear trees, the technique works for tomatoes, cucumbers, peas, and small fruiting plants. Mount horizontal galvanized wires at 12-18 inch intervals on a south-facing wall or fence. Tie plants to the wires as they grow, pruning lateral branches to maintain a flat profile. A single 8-foot wall section can support 3-4 espaliered tomato plants or a full row of peas and beans. This approach turns an unused fence line into productive growing space.
Tips
- Leave 6 inches between the wall surface and the first wire for air circulation behind the foliage
- South or southwest-facing walls radiate stored heat at night, protecting frost-sensitive crops
- Use soft garden twine or stretchy plant tape rather than wire ties that can cut into stems
Recommended
Items for this idea
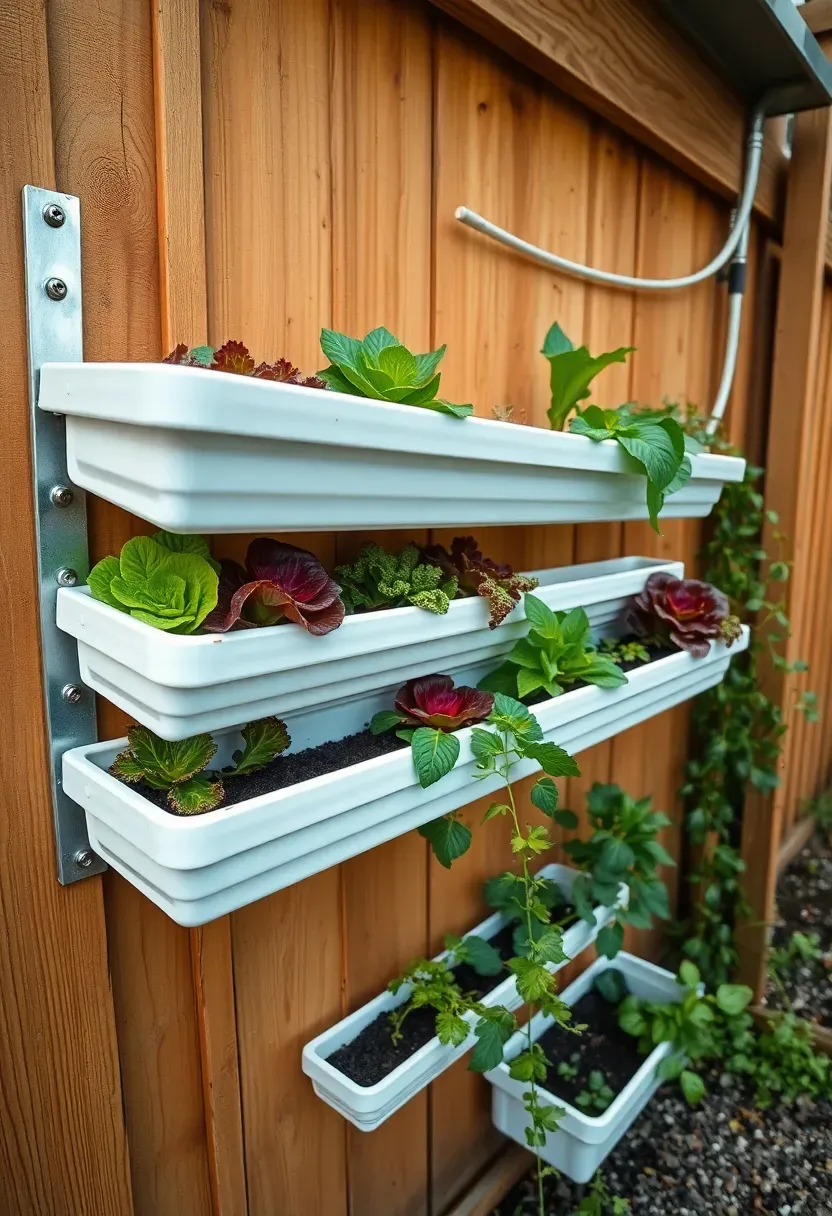
17. Rain Gutter Grow System
Standard vinyl rain gutters (10-foot sections) mounted horizontally to a fence, wall, or freestanding frame create narrow growing channels for shallow-rooted crops. Drill drainage holes every 12 inches, fill with potting mix, and plant lettuce, radishes, strawberries, or herbs. Stack three to five rows vertically and you turn 10 square feet of wall space into 30-50 square feet of growing area. Materials cost about $15 per 10-foot section including brackets. The system works particularly well for cut-and-come-again lettuce varieties where you harvest outer leaves repeatedly.
Tips
- Use 6-inch-wide gutters rather than standard 5-inch for more soil volume
- Slope gutters slightly (1/4 inch per foot) toward one end so excess water drains rather than pooling
- Paint white gutters a dark color to absorb heat in cooler climates or leave them white in hot regions to reflect it

18. Three Sisters Mound Planting
The tradition
Indigenous peoples across the Americas developed this polyculture system centuries before European contact. Corn, beans, and squash planted together in a mound create a self-supporting ecosystem. The corn provides a climbing structure for the beans. The beans fix atmospheric nitrogen into the soil, feeding the corn and squash. The broad squash leaves shade the ground, suppressing weeds and retaining moisture.
Modern application
Build a flat-topped mound about 18 inches high and 4 feet across. Plant 4-5 corn seeds in the center. When corn reaches 6 inches, plant 4 bean seeds around the stalks. A week later, plant 2-3 squash or pumpkin seeds at the mound edge. Use a pole corn variety (not sweet corn, which is too short for beans to climb effectively). Dry beans work better than green beans since they stay on the vine through corn harvest.
What to expect
- Lower individual yields per crop compared to monoculture rows, but higher total food production per square foot
- Nearly zero fertilizer or mulch inputs after the first year
- A beautiful, textured planting that generates a lot of questions from visitors
Recommended
Items for this idea
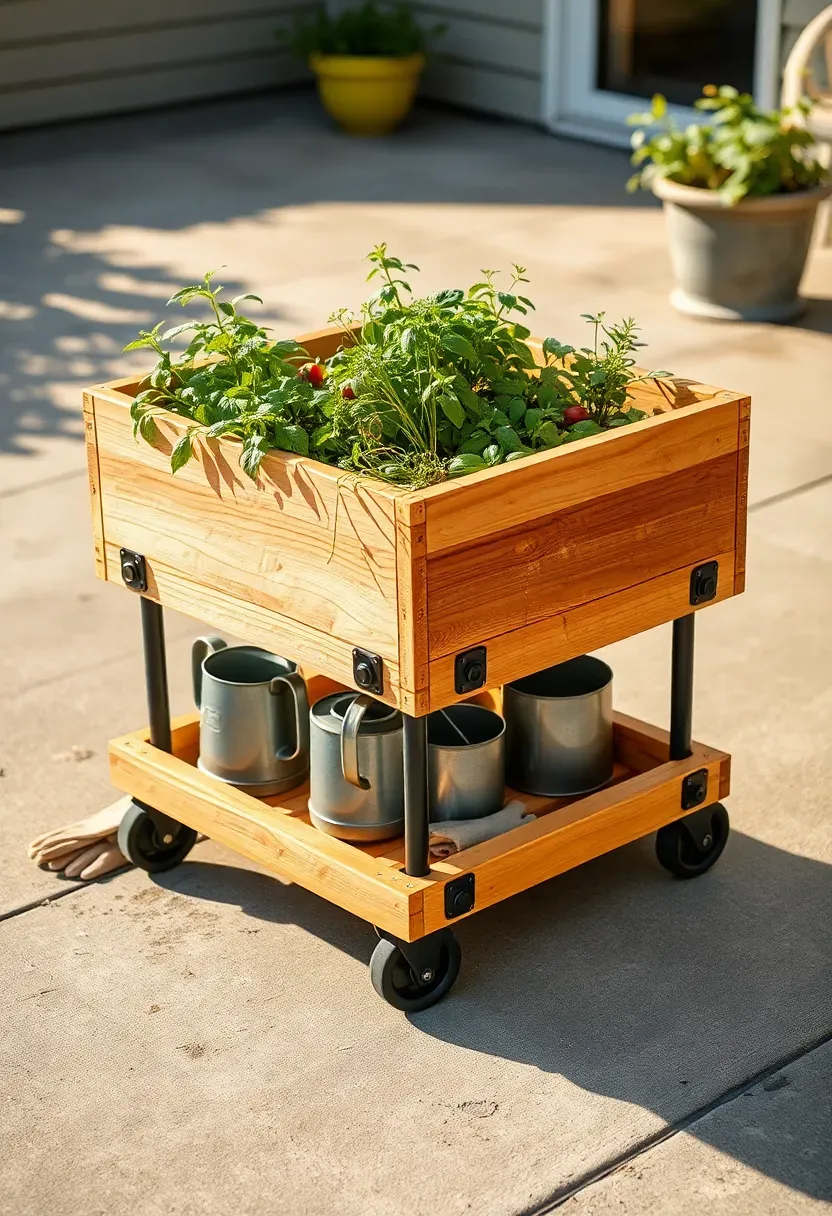
19. Rolling Cart Garden
A planter box on heavy-duty locking casters lets you follow the sun. This matters more than most gardeners realize — a spot that gets full sun in June might be shaded by tree canopy growth or a neighbor's addition by August. Build or buy a cart planter at least 10 inches deep and no wider than a doorway if you plan to roll it under cover during hailstorms or freezes. Cedar or redwood frames on 3-inch polyurethane casters handle the weight of wet soil. One cart holds enough lettuce for weekly salads or three compact pepper plants.
Tips
- Use lightweight potting mix with extra perlite to keep total weight manageable
- Lock the casters once positioned so wind does not push the cart around
- Build a bottom shelf for storing watering cans, gloves, and tools underneath
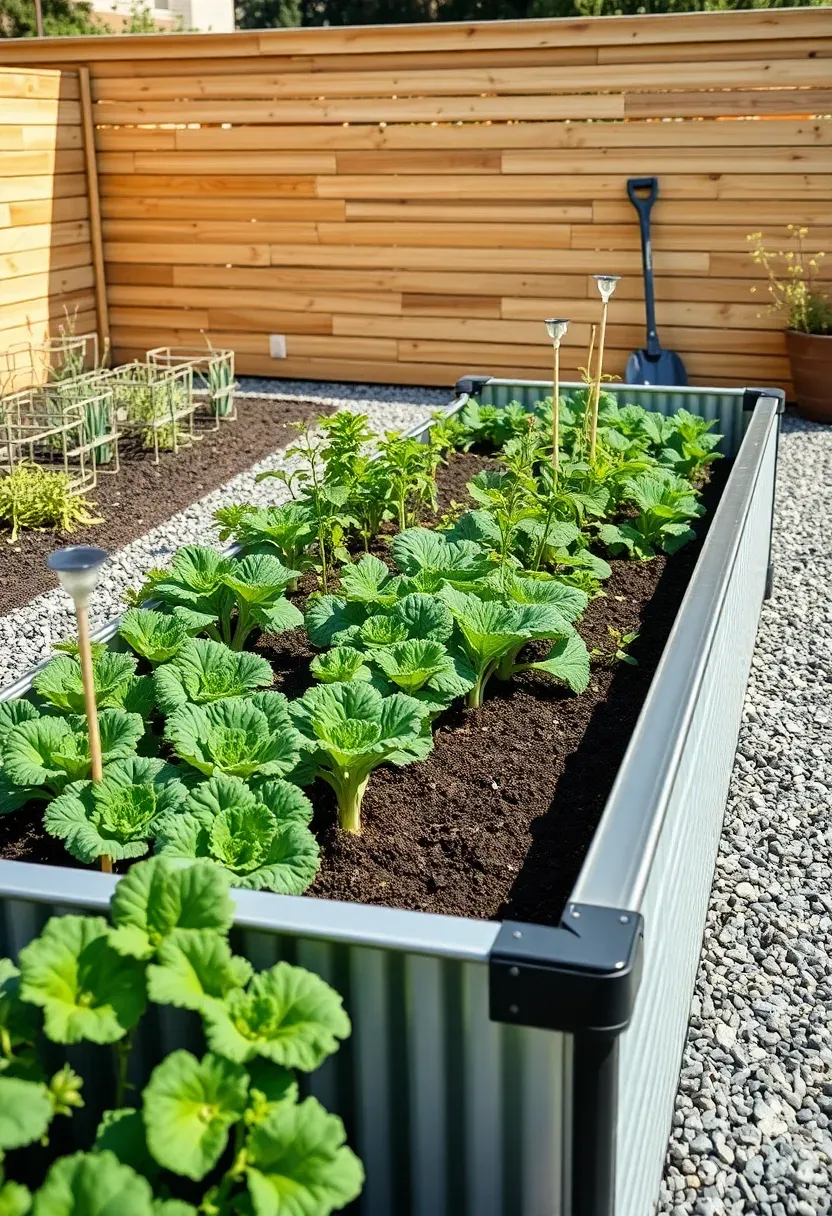
20. Corrugated Metal Raised Beds
Metal vs. wood
Corrugated galvanized steel panels bent into raised bed walls look sharp, resist rot completely, and last 20-30 years with no maintenance. They cost roughly the same as cedar ($100-$200 for a 4x8-foot bed) but do not need replacing every 8-10 years like wood does. The galvanized coating prevents rust, and despite what you may have read, zinc from galvanized steel does not leach into soil at levels that affect plants or food safety. University extension services in multiple states have tested this and confirmed it is safe for vegetable growing.
Construction notes
Use a steel frame of angle iron or 2x4 lumber at the corners and top rail to prevent the panels from bowing outward under soil pressure. Panels come in 8-foot lengths at roofing supply stores for $15-$25 each. Cut them with tin snips or a circular saw with a metal-cutting blade. Wear gloves — cut edges are razor sharp until you cap them with a folded top rail.
Recommended
Items for this idea
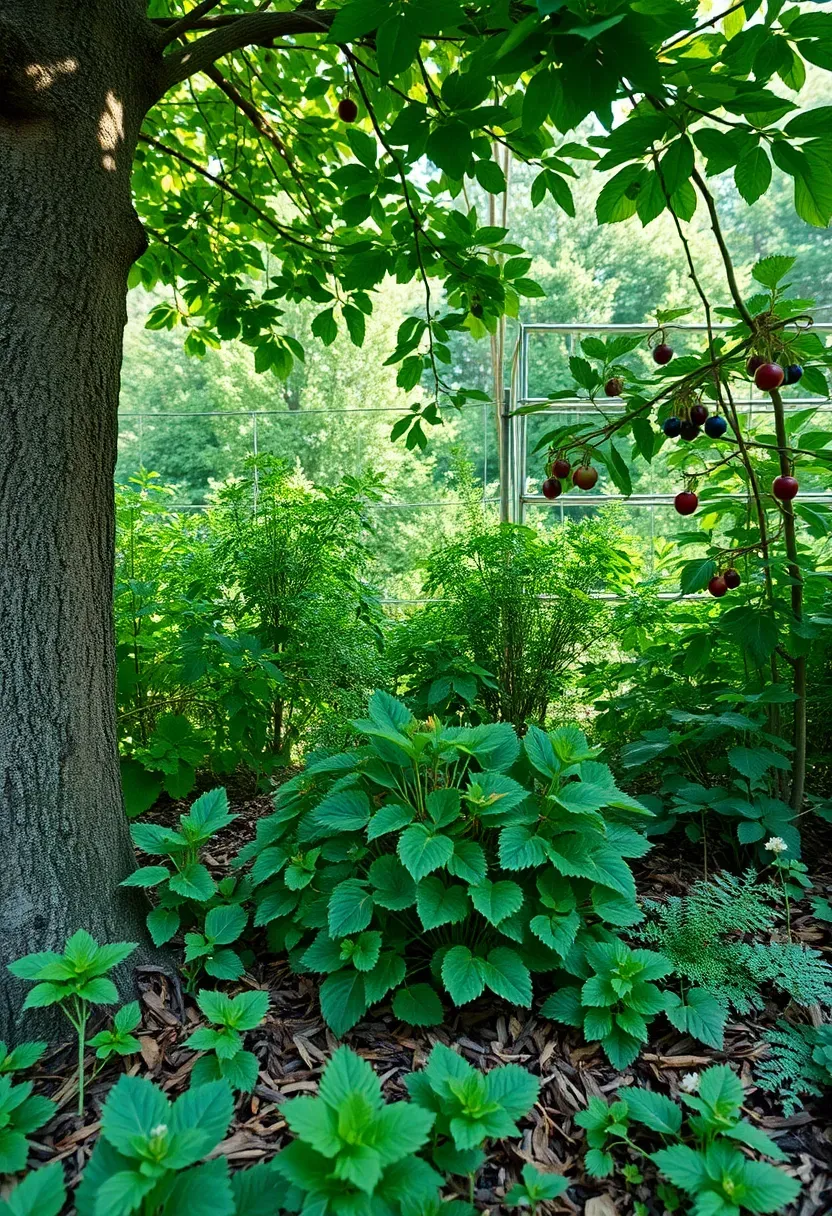
21. Food Forest Polyculture Patch
A food forest layers edible plants at different heights to mimic a natural woodland edge. The tallest layer is fruit or nut trees. Below that, dwarf fruit trees or large shrubs like blueberries. Then climbing plants (grapes, kiwi, passion fruit) on trellises. Beneath those, perennial vegetables like asparagus, rhubarb, and artichoke. Ground cover crops (strawberries, clover, creeping thyme) fill in the floor. A mature food forest patch produces food with minimal annual labor since the perennial plants come back each year without replanting.
Tips
- Start small — a 10x20-foot patch with one fruit tree, three berry bushes, and ground-level perennials is enough to learn the system
- Plant nitrogen-fixing companions (comfrey, clover, lupine) to build soil fertility without synthetic fertilizer
- Accept that a food forest looks "wild" — this is not a manicured garden and it will never look like one
Quick FAQ
Do I need full sun for a backyard vegetable garden? Most fruiting crops (tomatoes, peppers, squash) need 6-8 hours of direct sun daily. But leafy greens, herbs, root vegetables, and peas produce well with 4-5 hours. If your yard has partial shade, focus on those crops and save the sunny spots for heat-lovers.
What is the cheapest way to start a vegetable garden? Straw bale gardening or direct in-ground beds cost under $50 to set up. Buy straw bales for $5-$8 each, condition them with fertilizer, and plant directly into them. For in-ground beds, the main expense is compost amendment — roughly $30-$40 per cubic yard delivered.
How deep should raised beds be for vegetables? Most vegetables root in the top 12 inches of soil. A 12-inch-deep bed works for the vast majority of crops. Root vegetables like carrots and parsnips benefit from 18 inches. Going deeper than 18 inches adds cost without much benefit unless you are gardening over concrete or compacted hardpan.
Can I grow vegetables in containers on a rental property? Absolutely. Fabric grow bags, stock tanks, and large pots can go on any patio, balcony, or driveway. When you move, everything comes with you. Use the 5-7-10 gallon sizing guide under Idea 8 to match container size to crop type.
When should I start a backyard vegetable garden? Timing depends on your USDA hardiness zone. Cool-season crops (lettuce, peas, broccoli) go in 4-6 weeks before your last frost date. Warm-season crops (tomatoes, peppers, squash) go in 1-2 weeks after the last frost. Your local extension office publishes planting calendars specific to your county.
Growing food in your own yard connects you to something most of us have lost touch with — the actual process of turning sunlight and dirt into dinner. You do not need a large lot, expensive equipment, or years of experience. Pick one idea from this list that fits your space, build it this weekend, and plant something. The worst that happens is you learn what not to do next year, and even that has value.
Pinterest cover for 21 Backyard Vegetable Garden Ideas
About the author
OBCD
CGI visualization and interior design content. We create detailed 3D renders and curate practical design ideas for every room in your home.